#arduino pro
Explore tagged Tumblr posts
Visit Tumblr Blog
Explore Tumblr blogs with no restrictions, modern design and the best experience.
Last Seen Tumblr Blogs


Fun Fact
In Q3 of 2020, 31% of US users access the Tumblr app daily.
Text
Arduino Pro Micro gear shifter (for ETS2/ATS)
Here's the source code of a quick and dirty emulator for 16 gears shifter (originally from MAN trucks) adapted to Logitech G-27 shifter/USB.
/*-------------------------------------------------- Sample code by Matthew Heironimus https://github.com/MHeironimus/ArduinoJoystickLibrary 2016-11-24 Gear shifter for MAN lever and ETS2/ATS mod by Genxha https://wolfhowls.tumblr.com/ Wiring: Lever wire > Pro Micro Pin Upper (round) button (Emulated X button index 3 joy 4) Blue > GND Yellow > 5 Side selector (Emulated B button Index 2 joy 3) Violet > 4 Green > GND Lower selector (Emulated A button - both positions index 0, 1 joy 1, 2) White > GND Red > 3 Blue* > 2 <---- Note: solder a spare wire between center position of lower selector to pin 2 -----------------------------------------------*/ #include Joystick_ Joystick(JOYSTICK_DEFAULT_REPORT_ID, JOYSTICK_TYPE_GAMEPAD, 4, 0, // Button Count, Hat Switch Count false, false, false, // X and Y, but no Z Axis false, false, false, // No Rx, Ry, or Rz false, false, // No rudder or throttle false, false, false); // No accelerator, brake, or steering void setup() { // Initialize Button Pins for (int index = 0; index < 4; index++) { int pin = index + 2; pinMode(pin, INPUT_PULLUP); } Joystick.begin(); // Initialize for (int index = 0; index < 4; index++) { // Reset Joystick.setButton(index, !digitalRead(index + 2)); } } void loop() { int lastButtonState[4]; for (int index = 0; index < 4; index++) { // read and set initial button status lastButtonState[index] = digitalRead(index + 2); } /* Main FOR loop */ for (int index = 0; index < 4; index++) { // read button status and send joystick events int pin = index +2; int currentButtonState = !digitalRead(pin); if (currentButtonState != lastButtonState[index]) { Joystick.setButton(index, currentButtonState); lastButtonState[index] = currentButtonState; } } }
0 notes
Text
Arduino Pro Mini 328

The Arduino Pro Mini 328 3.3V/8MHz is an Arduino board with a 3.3V power supply and runs on an 8MHz bootloader. It includes connectors that allow for flexible orientation when soldering wires or connectors. For beginners, we suggest starting with the Uno R3 as your first Arduino board.
The Arduino Pro mini 328 series is a fantastic board that allows for a quick and easy setup. It caters specifically to users who are aware of the system’s voltage limitations (3.3V), lack of connectors, and off-board USB connection.
The Arduino Pro mini 328, a microcontroller board powered by the ATmega328, features 14 digital input/output pins (including 6 for PWM output), 6 analog inputs, an on-board resonator, a reset button, and pin header mounting holes.
The Arduino Pro mini 328 is designed for semi-permanent placement in items or displays. It comes equipped with headers that allow for the utilization of a range of connectors or direct wire soldering. Additionally, the six pin header can be linked with an FTDI cable to supply USB power and enable communication with the board. The pin configuration also conforms to that of the Mini Arduino.
Included in this product are a variety of notable attributes to enhance your experience.
There are a total of 8 analog input ports, specifically labeled A0 through A7.
A set of TTL level serial port transceivers are included, featuring separate RX and TX capabilities.
The following six ports operate using PWM: D3, D5, D6, D9, D10 and D11.
Utilize the Atmel Atmega328P-AU microcontroller.
Back up linear data retrieval.
-Provide assistance to 9V battery.
1 note
·
View note
Text
Ad | Some Humble Bundle Goodies
One for the audio engineers - The Audio Arcade bundle gives you a whole bunch of royalty-free music and SFX as well as plugins to insert in all the major game engines. Ambient tracks, environmental sounds, explosions, you name it.
Money raised goes towards Children's Miracle Network Hospitals.
For those who dabble in Virtual Reality, the Upload VR Showcase with Devolver Digital has a bunch of Serious Sam VR games as well as the Talos Principle, a really solid puzzle game.
Money raised goes to Special Effect which helps people with disabilities enjoy games via accessible controllers. I've seen the stuff they do and it's honestly great.
Want to get into programming but don't know where to start? The Learn to Program bundle has a tonne of resources covering everything from HTML and CSS through to Python, C# and Ruby.
Money raised goes towards Code.org which seeks to expand participation in computing science by helping women and students of colour.
The Future Tech Innovators Toolkit is a software bundle with courses on Robotics, Electronics and programming with Raspberry Pi and Arduino.
Money raised goes towards Alzheimers Research UK.
The Home How-To Guides bundle offers a complete set of books for home improvements and projects. Want to know more about plumbing, home repair, bathrooms, wiring or carpentry? This bundle has you covered.
Money raised goes to It Gets Better, a charity that supports LGBT Youth.
Want to pick up the latest Elden Ring DLC? It's also available on the Humble Store with the key being redeemable on Steam.
105 notes
·
View notes
Text
Numpad Jr
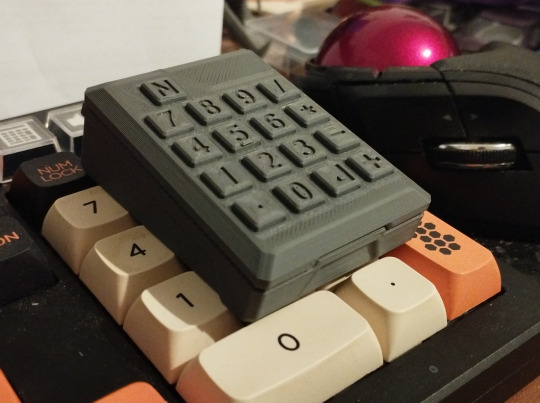
My thinkpad doesn't have a numpad and could use something more portable than the average USB ones, so… just made one! Used Kailh square mouse buttons and an Arduino Pro Micro.
Sure, tactility's compromised due to size… but look at the cute lil' thingy lol.
13 notes
·
View notes
Text
The Legendary ThinkPad T480s

I recently got myself an old Lenovo ThinkPad T480s for just $230—a real steal for this iconic machine. The model I got had the i7-8650u and 16GB RAM. Even though it’s about 7 years old, the ThinkPad T480s still holds legendary status among laptop enthusiasts. A quick search on YouTube and you will find a ton of recent videos praising its robust build, exceptional keyboard, and solid performance. There's almost a cult like following for this ThinkPad.


Right after purchasing, I opened up the laptop for some essential maintenance. I disassembled the heat sink/heat pipe/fan assembly and thoroughly cleaned the fan with a brush and compressed air duster. After cleaning off the old thermal paste from the heat sink and CPU using IPA, I reapplied some Kryonaut Thermal Grizzly paste to ensure optimal cooling performance.


Over the next two days, I set it up with Ubuntu and installed a bunch of development tools like Visual Studio Code, Python, Jupyter Notebook, and Arduino IDE. Additionally, I configured VirtualBox to run a Windows 10 Pro VM for flexibility.
To enhance seamless workflow between my ThinkPad and Mac, I configured Syncthing for effortless file synchronization and CopyQ for shared clipboard functionality. For backup, I am using Timeshift for system snapshots and Déjà Dup for user files. Installed Gnome Sushi and Imagemagick to make file preview work like on a Mac. It's also nice that the Ubuntu dock can be configured to look similar to a Mac.
On top of that, I also installed xremap to do some key remapping for things like copy, paste, quit, etc. to make Ubuntu work more like a Mac, just because the Mac is my main machine and all those key strokes are like muscle memory already. Keep having to change as I switch between using the 2 was a real pain.


That’s it, a brand new old ThinkPad. The ThinkPad T480s remains a fantastic laptop even after all these years, providing stellar performance and an exceptional Linux experience. It’s the perfect budget-friendly yet powerful laptop for developers, makers, and Linux enthusiasts alike.

Below are some videos you can check out:
youtube
youtube
2 notes
·
View notes
Text
Progress Update 11/10/2024
Haven't made a progress update in a bit, but want to keep documenting changes and interations even if they are small. So here we go.
The majority of the focus recently has been on developing the Viewfinder for the Interpreter. One of the major pieces of design I want to incorporate into this is a 3D viewing space, akin to a hologram/projection/Pepper's Ghost. My original plan for this was to modify this design. I saw this concept about a decade ago on Instructables I think and thought it was really cool.
My modifications were going to be using four separate OLED displays each running either the original or a mirrored or rotated version of the original gif/movie/image, rather than a single screen with the four images on it together. There were some pros and cons of this I had convinced myself of, but one of my barriers on progress in this method was related to having the Arduino I am working with not having enough breakout pins for the type of data pins I need for four screens. My soldering skills aren't amazing, so getting four of them hooked into one set of pins was daunting.
However, I found this video a few days ago, and was reintroduced to Retroreflectors. Video goes over the basics of the tech, and even takes it a step further by introducing ways to make it into a "touch screen". However, that's extra complexity and not what I want for this Viewfinder anyway, so it's possible I can just snag the reflector part of their build and significantly reduce the complexity in my own design.
This now leaves potential for a much larger image size, as before I was limited to 128 x 64 pixels, as I wanted to keep the footprint small, which majorly limited screen size to fit with needing to cram four into the space. So bigger canvas size is great! Fewer electrical components is also great! Now is just getting in some sample materials for testing the holographic display part itself.
Another part of the project I've been working on is the music. Less progress here, but I have started to tinker with a program to add in drums which I think will add a much-needed layer to the music I have been working on.
That's all for this one, I am hoping to have materials in a couple weeks, and I am clearing out some sidejobs that also will help fund this endeavor.
4 notes
·
View notes
Text
Techaircraft
Dive into the world of Arduino programming with Techaircraft! 🌍 Whether you're a beginner or a seasoned pro, our hands-on projects will spark your creativity and ignite your passion for tech. From building smart gadgets to automating everyday tasks, the possibilities are endless! Join our community of innovators and unleash your potential. Let’s code, create, and connect with like-minded tech enthusiasts! 💻 . 𝐖𝐞𝐛𝐬𝐢𝐭𝐞 - www.techaircraft.com
𝐓𝐞𝐜𝐡𝐚𝐢𝐫𝐜𝐫𝐚𝐟𝐭 𝐬𝐮𝐩𝐩𝐨𝐫𝐭 𝐝𝐞𝐭𝐚𝐢𝐥𝐬:
𝐌𝐨𝐛𝐢𝐥𝐞 𝐍𝐮𝐦𝐛𝐞𝐫 - 8686069898
#Arduino#Techaircraft#Innovation#CodingLife#MakerMovement#TechCommunity#DIYProjects#Electronics#STEMEducation#CreativityUnleashed

2 notes
·
View notes
Text
EXG Synapse — DIY Neuroscience Kit | HCI/BCI & Robotics for Beginners
Neuphony Synapse has comprehensive biopotential signal compatibility, covering ECG, EEG, EOG, and EMG, ensures a versatile solution for various physiological monitoring applications. It seamlessly pairs with any MCU featuring ADC, expanding compatibility across platforms like Arduino, ESP32, STM32, and more. Enjoy flexibility with an optional bypass of the bandpass filter allowing tailored signal output for diverse analysis.
Technical Specifications:
Input Voltage: 3.3V
Input Impedance: 20⁹ Ω
Compatible Hardware: Any ADC input
Biopotentials: ECG EMG, EOG, or EEG (configurable bandpass) | By default configured for a bandwidth of 1.6Hz to 47Hz and Gain 50
No. of channels: 1
Electrodes: 3
Dimensions: 30.0 x 33.0 mm
Open Source: Hardware
Very Compact and space-utilized EXG Synapse
What’s Inside the Kit?:
We offer three types of packages i.e. Explorer Edition, Innovator Bundle & Pioneer Pro Kit. Based on the package you purchase, you’ll get the following components for your DIY Neuroscience Kit.
EXG Synapse PCB
Medical EXG Sensors
Wet Wipes
Nuprep Gel
Snap Cable
Head Strap
Jumper Cable
Straight Pin Header
Angeled Pin Header
Resistors (1MR, 1.5MR, 1.8MR, 2.1MR)
Capacitors (3nF, 0.1uF, 0.2uF, 0.5uF)
ESP32 (with Micro USB cable)
Dry Sensors
more info:https://neuphony.com/product/exg-synapse/
2 notes
·
View notes
Text
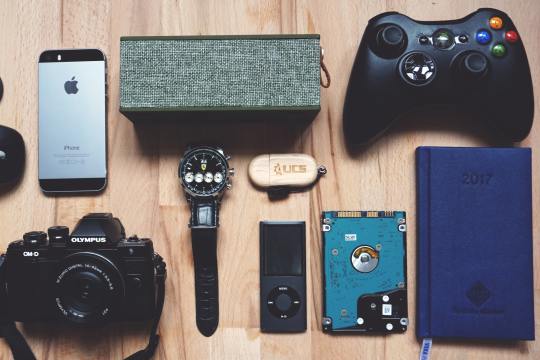
Top 10 Scale Gifts for the Gadget Enthusiast
Finding the ideal present for the gadget lover in your life may be thrilling and difficult at the same time because technology is continuously changing, and gadgets are becoming an essential part of our lives. The appropriate gadget may make their world come alive, whether it's for a birthday, an anniversary, or to express gratitude. We've put together a list of Top 10 Scale Gifts for the Gadget Enthusiast to aid you in your search for the perfect present.
High-end headphones
There's nothing quite like immersing yourself in music or podcasts with a pair of high-quality headphones. For the audiophile in your life, consider options like the Bose QuietComfort 35 II or Sony WH-1000XM4. These headphones not only offer exceptional sound quality but also come with noise-canceling features, making them perfect for music lovers on the go.
Smartwatch or Fitness Tracker
Smartwatches and fitness trackers have become more than just timekeeping devices; they're personal assistants for tracking health and staying connected. Due to their abundance of health and fitness capabilities, app compatibility, and stylish designs, the Apple Watch Series 7 and Fitbit Versa 3 are both fantastic options.
Drone
Drones have taken the world by storm, offering a unique perspective and endless possibilities for creativity. DJI's Mavic Air 2 and Skydio 2 are top-notch options, equipped with high-resolution cameras, obstacle avoidance, and impressive flight capabilities. A drone is an excellent gift for both tech enthusiasts and photography lovers.
Virtual Reality (VR) Headset
Step into another world with a VR headset. Oculus Quest 2 and Valve Index provide immersive gaming experiences and access to virtual reality applications. VR headsets are perfect for those who crave a new level of entertainment and want to explore virtual realms.
High-Performance Laptop
A powerful laptop is essential for the tech enthusiast who wants power on the run. Choose laptops are notorious for their exceptional speed, stunning defenses, and portability, similar as the MacBook Pro or Dell XPS 15. These laptops work well for a variety of operations, including videotape editing and programming.
Smart Home Devices
Transforming a house into a smart home is a trend that continues to gain momentum. Smart home devices like Amazon Echo, Google Nest, and Philips Hue lights offer convenience and automation. They allow control over lights, music, security, and more with just a voice command or a tap on your smartphone.
Streaming Device
Cutting the cord has never been more accessible with streaming devices like Roku Ultra and Apple TV 4K. These devices offer access to a vast library of streaming services, including Netflix, Disney+, and Hulu, in stunning 4K quality. Streaming devices are perfect for binge-watchers and movie buffs.
High-Resolution Camera
Capture life's moments in stunning detail with a high-resolution camera. The Sony Alpha a7R IV and Canon EOS R5 are recognized for their superb image quality and adaptability. For photographers who want to capture landscapes, portraiture, or wildlife, these cameras are perfect.
Gaming Console or Accessories
Gaming is a passion for many gadget enthusiasts. Consider the latest gaming consoles like the PlayStation 5 or Xbox Series X. Enhance the gaming experience with accessories like gaming chairs, mechanical keyboards, or gaming headsets.
Tech Toolkit or DIY Electronics Kit
For those who love to tinker and build, a tech toolkit or DIY electronics kit is the perfect gift. Arduino Starter Kits and Raspberry Pi Bundles provide endless opportunities for creating gadgets, robots, and electronic projects.
Conclusion
In conclusion, it need not be difficult to select the ideal present for a gadget fanatic. With the top 10 scale gifts we've outlined, you can surprise your loved one with a thoughtful and exciting present that aligns with their passion for technology. Remember, the best gift is one that shows you know their interests and cater to their tech-savvy side.
2 notes
·
View notes
Text
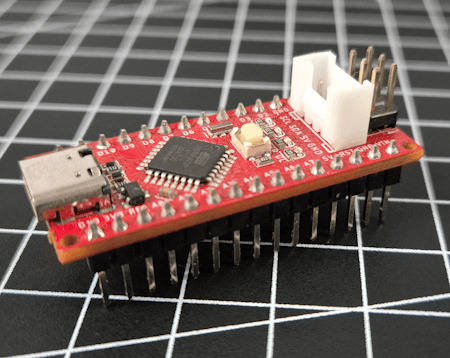
Color Nano V4.0 im Test – Günstiger Arduino Nano mit USB-C!

Beim Stöbern auf Aliexpress bin ich auf ein besonders interessantes Mikrocontroller-Board gestoßen: das Color Nano V4.0 mit USB-Typ-C-Anschluss. Es handelt sich dabei um einen günstigen Nachbau des beliebten Arduino Nano V3, der jedoch mit einem entscheidenden Unterschied daherkommt – einem modernen USB-C-Port. Damit passt das Board perfekt in mein aktuelles Setup, denn ich kann nun meine ESP32-Boards und den Arduino-kompatiblen Nano mit nur einem einzigen USB-C-Kabel direkt am Schreibtisch programmieren und mit Strom versorgen. Für mich ein echter Pluspunkt im Alltag – aber taugt das Board auch in der Praxis?

🔎 Hinweis: Das Color Nano V4.0 Board ist aktuell nur über Aliexpress erhältlich. Der Preis liegt bei rund 3,90 € inklusive Versand, was ich für absolut fair und gerechtfertigt halte – vor allem angesichts der soliden Verarbeitung und des modernen USB-C-Anschlusses.

Color Nano V4 - ohne Header - Vorderseite

Color Nano V4 - ohne Header - Rückseite
Optische Unterschiede zum klassischen Arduino Nano Klon
Da sich die technischen Daten des Color Nano V4.0 nicht vom originalen Arduino Nano V3 unterscheiden, lohnt sich zunächst ein Blick auf die optischen Merkmale. Ich selbst besitze (noch) keinen originalen Nano, da der aktuelle Preis von 27,10 € für meinen Geschmack etwas überzogen ist – besonders im Vergleich zu günstigen China-Klonen.


Im direkten Vergleich mit einem klassischen Arduino Nano Klon fallen beim Color Nano V4.0 einige Besonderheiten ins Auge: - Statt des üblichen blauen PCBs kommt dieses Board mit einer auffälligen weißen Platine daher. - Die Beschriftung ist farbig gehalten: Jede Funktionsgruppe (z. B. digitale Pins, analoge Pins, Stromversorgung) ist in einer anderen Farbe gedruckt – das wirkt nicht nur modern, sondern hilft auch bei der Orientierung. - Auffällig ist der moderne USB-Typ-C-Anschluss, der den veralteten Mini-USB oder Micro-USB-Port ablöst. Kein Herumprobieren mehr beim Einstecken und ideal für Nutzer, die auch mit ESP32-Boards arbeiten – so reicht künftig ein einziges USB-C-Kabel auf dem Schreibtisch. - Die drei Status-LEDs (TX, ON, L) sind seitlich angebracht und gut sichtbar. - Das PCB wirkt insgesamt aufgeräumt, die Lötstellen sind sauber ausgeführt.


Insgesamt macht das Board optisch einen modernen und durchdachten Eindruck, der sich deutlich von den klassischen Nano-Klonen abhebt.
Lieferumfang und Verpackung
Der Lieferumfang des Color Nano V4.0 ist schlicht, aber vollkommen ausreichend. Zum Board selbst werden zwei 1-polige 15-Pin-Stiftleisten (Rastermaß 2,54 mm) sowie eine kleine 2-polige 3-Pin-Leiste beigelegt, die für den ICSP-Sockel gedacht ist.

Lieferumfang des Color Nano V4

Verpackung des Color Nano V4 Eine Variante mit vorgelöteten Pins ist mir bislang nicht bekannt – das Board wird also immer im Bausatz geliefert. Das ist jedoch kein Problem: Das Anlöten der Stiftleisten ist schnell erledigt und erfordert keine besonderen Lötkenntnisse. Auch Einsteiger mit wenig Erfahrung kommen hier problemlos ans Ziel. Verpackt war das Ganze in einem kleinen, antistatisch wirkenden Tütchen – funktional und für den Versandweg absolut in Ordnung.
Technische Daten des Color Nano V4.0
Auch wenn das Color Nano V4.0 optisch aus der Reihe tanzt, bleibt es technisch ein vollwertiger Arduino Nano V3 Klon. Es kommt keine zusätzliche Hardware zum Einsatz, und die Programmierung funktioniert genauso wie beim Original oder bei klassischen China-Klonen – kompatibel mit der Arduino IDE und dem ATmega328P-Bootloader.

Hier die wichtigsten technischen Daten im Überblick: EigenschaftWertMicrocontrollerATmega328ArchitekturAVRBetriebsspannung5 VEingangsspannung (Vin)7–12 VTaktfrequenz16 MHzFlash-Speicher32 KB (davon 2 KB für Bootloader)SRAM2 KBEEPROM1 KBDigitale I/O Pins22 (davon 6 PWM)Analoge Eingänge8PWM-Ausgänge6Max. Strom pro I/O-Pin20 mAStromverbrauchca. 19 mAAbmessungen (PCB)18 × 45 mmGewichtca. 7 g Wichtig: Auch beim Color Nano V4.0 läuft alles über den bekannten ATmega328, was bedeutet, dass bestehende Projekte 1:1 übernommen werden können – nur mit modernerem USB-C-Komfort.
Lötarbeiten & Eindruck nach der Montage
Bevor man den Color Nano V4.0 verwenden kann, müssen zunächst die mitgelieferten Stiftleisten angelötet werden. Der Vorgang ist unkompliziert und auch für Anfänger machbar.


Allerdings offenbarte sich bei der weißen Platine ein kleiner optischer Nachteil: Beim Löten mit Lötzinn mit Flussmittelkern hinterlässt das Flussmittel auf dem hellen PCB sichtbare Rückstände. Eine einfache Reinigung mit Isopropanol reichte zunächst nicht aus – die Platine wirkte danach etwas unsauber und fleckig, was schade ist, da die farbige Beschriftung und das klare Design eigentlich sehr ansprechend sind.


Meine Lösung: Ich habe mir einen sauberen Malerpinsel genommen und die Borsten auf etwa 1,5 cm gekürzt. Dadurch wurde der vormals weiche Pinsel härter – ideal, um die Platine zusammen mit etwas Isopropanol gründlich zu reinigen. Das Ergebnis: Die Platine sieht wieder wie neu aus und glänzt richtig schön. Diese einfache Methode kann ich jedem empfehlen, der ähnliche Probleme mit Rückständen auf hellen PCBs hat.
Programmieren in der Arduino IDE
Die Programmierung des Color Nano V4.0 funktioniert wie gewohnt und ist vollständig kompatibel mit der Arduino IDE. Nach dem Anschließen über USB-C wird das Board in der IDE erkannt – du kannst den Mikrocontroller also problemlos mit deinen Sketchen bespielen. Allerdings zeigt sich – wie bei vielen China-Klonen – ein bekannter Nachteil: Die Funktion „Boardinformationen abrufen“ liefert keine Details. Das liegt daran, dass bei diesen Klonen häufig ein alternativer USB-zu-Seriell-Chip (z. B. CH340) verbaut ist, der keine erweiterten Metadaten über das Board bereitstellt. Für den praktischen Einsatz ist das kein Problem – solange der richtige COM-Port und das passende Boardprofil (Arduino Nano, ATmega328P, Old Bootloader) eingestellt sind, funktioniert alles zuverlässig.
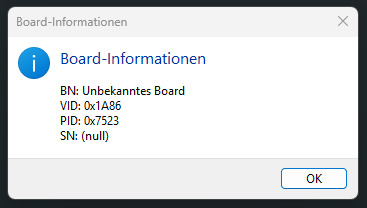
Versuch die Boardinformationen über den Color Nano V4 abzurufen ✅ Tipp: Falls das Board nicht sofort erkannt wird, kann es helfen, den passenden CH340-Treiber manuell zu installieren. Unter Windows geschieht das meist automatisch – für Linux und macOS gibt es entsprechende Treiberpakete online. Prozessorwahl & Funktionsumfang Bei der Auswahl des Boards in der Arduino IDE reicht es aus, das Profil „Arduino Nano“ mit dem Prozessor „ATmega328P“ auszuwählen. Ein Wechsel auf den „Old Bootloader“ ist nicht notwendig – auf dem Color Nano V4.0 ist bereits der neuere ATmega328P mit dem aktuellen Bootloader verbaut. ✅ Das bedeutet für dich: - Du erhältst den vollen Funktionsumfang des Mikrocontrollers - Keine Einschränkungen beim Speicher - Keine Probleme mit der Kompatibilität zu aktuellen Libraries und Sketches Gerade bei China-Klonen ist das nicht immer selbstverständlich: Dort findet man gelegentlich ältere Versionen mit eingeschränktem Speicher oder Bootloader-Problemen, was zu Verbindungsproblemen oder unerklärlichen Fehlern beim Hochladen führen kann.
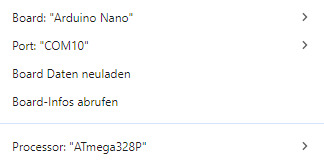
Auswahl des Arduino Nano in der Arduino IDE Beim Color Nano V4.0 war das in meinem Test nicht der Fall – alles funktionierte auf Anhieb sauber und stabil. Alternative Nano-Klone mit USB-C: Der Seeduino Nano v1.0 Der Color Nano V4.0 ist nicht der einzige Arduino Nano-Klon mit USB-C-Anschluss. Ein weiterer spannender Vertreter ist der Seeduino Nano v1.0 von Seeedstudio. Dieses Board basiert ebenfalls auf dem ATmega328P, bietet jedoch zusätzlich einige praktische Erweiterungen, die besonders im Bereich Sensorik und Rapid Prototyping interessant sind.
Seeduino Nano v1.0

Seeduino Nano v1.0

Seeduino Nano v1.0 Was den Seeduino Nano besonders macht: - ✅ USB-C Anschluss – wie beim Color Nano modern und bequem - 🔌 Grove-Schnittstelle – ermöglicht das einfache Anschließen von Sensoren und Aktoren aus dem Grove-Ökosystem - 🔄 I²C-Erweiterbarkeit – mit einem passenden Y-Adapter oder Hub können mehrere I²C-Geräte angeschlossen werden (sofern unterschiedliche I²C-Adressen verwendet werden) 💡 Das macht den Seeduino Nano ideal für schnelle Experimente und modulare Aufbauten – gerade auch im Bildungsbereich oder für Prototyping-Projekte.

zwei Mikrocontroller - Arduino Nano Klone mit USB-Typ-C Schnittstelle 🧠 Fazit: Du siehst: Es gibt eine Vielzahl spannender Arduino-kompatibler Mikrocontroller, die auf dem Open-Source-Gedanken basieren und diesen mit eigenen Ideen weiterentwickeln. Der Color Nano V4.0 ist dabei eine besonders günstige, puristische Variante mit modernem USB-C-Komfort – ohne Schnickschnack, aber mit voller Funktionalität. Read the full article
0 notes
Text
Arduino Pro Mini 5V

The Arduino Pro Mini 5V is equipped with the 16MHz bootloader. However, ATMEGA328P versions of the Arduino Pro Mini do not include connectors.
The Arduino Pro series is ideal for those who are familiar with the limitations of system voltage (5V), lack of connectors, and off-board USB, as it allows for a quick and efficient setup.
The Pro Mini ATMEGA328P features a micro-controller based on the ATmega328. It offers 14 digital input/output pins (with 6 capable of functioning as PWM outputs), 6 analog inputs, an on-board resonator, a reset button, and holes for attaching pin headers.
The Arduino Pro Mini 5V is designed for semi-permanent use in objects or exhibitions and can be powered and connected to via an FTDI cable using a six pin header. Its pin layout is also compatible with the Mini Arduino.
Features :
ATmega328 running at 16MHz with external resonator (0.5% tolerance)
0.8mm Thin PCB
USB connection off board
Supports auto-reset
5V regulator
Max 150mA output
Over-current protected
Weighs less than 2 grams!
DC input 5V up to 12V
Onboard Power and Status LEDs
Analog Pins: 8
Digital I/Os: 14
0.7×1.3″ (18x33mm)
1 note
·
View note
Text
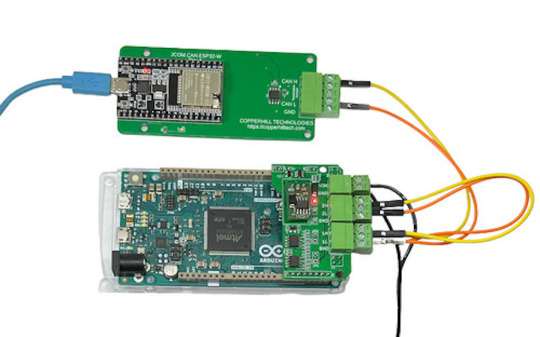
Unlocking SAE J1939 Development with the Arduino-Due-Based Programming Kit
Discover the Arduino-Due-Based SAE J1939 Programming Kit by Copperhill Technologies — a complete development platform for building, simulating, and monitoring heavy-duty vehicle networks using the J1939 protocol. Includes hardware, software, and detailed guides for ECU prototyping, diagnostics, and telematics.
#arduino due#can bus shield#sae j1939#can bus#embedded system#J1939 simulator#J1939 programming#arduino ide#J1939 protocol stack
0 notes
Text
Electrical Engineer Resume Examples That Get Hired
When it comes to landing a top-tier engineering job, your resume isn’t just a formality—it’s your first impression. In the competitive field of electrical engineering, hiring managers often sift through hundreds of applications. So how do you ensure yours stands out? Simple: by crafting a resume that showcases your technical expertise, problem-solving capabilities, and achievements in a concise, compelling format. This article will walk you through engineering resume examples that get noticed—and get hired.
Who This Guide Is For
This guide is designed for aspiring and experienced electrical engineers of all ages seeking to break into or grow within the engineering industry. Whether you're a recent graduate, a mid-level engineer making a career move, or a seasoned pro exploring leadership roles, this article is packed with value.
Ideal for:
Job seekers in the engineering industry
College graduates with degrees in Electrical Engineering
Professionals aiming to transition into higher-paying technical roles
Engineers looking for resume inspiration or formatting guidance
Why an Impressive Electrical Engineer Resume Matters
According to the U.S. Bureau of Labor Statistics, electrical engineering jobs are projected to grow by 5% from 2022 to 2032, which is about as fast as average. But that still means competition is stiff. A strategically written resume increases your chances of getting noticed by recruiters, HR software (ATS systems), and hiring managers.
Your resume should not only highlight your technical proficiency, but also emphasize:
Project achievements
Problem-solving experiences
Leadership qualities
Certifications and tools
Key Elements of a High-Converting Electrical Engineer Resume
To create a resume that checks all the boxes, follow this winning structure:
1. Professional Summary (Make a Powerful First Impression)
Your summary should be concise—3–4 sentences—and tailored to the job description. Mention your years of experience, core competencies, and a major achievement.
Example:
Results-driven Electrical Engineer with 6+ years of experience in designing, testing, and deploying electronic systems for automotive and aerospace applications. Skilled in CAD, MATLAB, and PLC programming. Successfully led a cost-reduction project that saved $500K annually.
2. Technical Skills (Show What You Know)
List tools, platforms, and programming languages you’re proficient in.
Popular skills to include:
AutoCAD
MATLAB
Simulink
PLC Programming
Circuit Design
Embedded Systems
Project Management Software
🔍 Tip: Tailor your skills to the job posting—many companies use ATS to filter resumes based on keywords.
3. Work Experience (Focus on Impact, Not Just Duties)
Use bullet points to highlight your contributions. Start with action verbs and quantify results wherever possible.
Example:
Designed and implemented PCB layouts for automotive sensors, reducing signal noise by 35%
Collaborated with cross-functional teams to complete a $2M project 2 months ahead of schedule
Conducted root cause analysis on faulty circuits, improving product reliability by 20%
4. Education (Credentials Still Count)
Mention your degrees, institutions, and graduation dates. Include GPA only if it's strong (3.5+).
Example: Bachelor of Science in Electrical Engineering Georgia Institute of Technology, 2021 GPA: 3.8/4.0
5. Certifications & Additional Training
These show your commitment to staying current in the field.
Certified Systems Engineering Professional (CSEP)
OSHA Electrical Safety Certification
IoT and Smart Grid Systems (Coursera)
Top Engineering Resume Examples That Work
Here are three high-performing engineering resume examples for different career stages:
1. Entry-Level Electrical Engineer Resume
Best for: Recent graduates and interns
Highlight: Academic projects, internships, and software skills.
Key Achievement:
Developed an Arduino-based smart lighting system as a capstone project, which reduced power usage by 40%.
2. Mid-Level Electrical Engineer Resume
Best for: Professionals with 3–7 years of experience
Highlight: Industry-specific tools and project leadership
Key Achievement:
Redesigned PCB architecture for a telecom product, increasing efficiency by 18% and reducing costs by $150K.
3. Senior Electrical Engineer / Engineering Manager Resume
Best for: Engineers with 10+ years and leadership experience
Highlight: Strategic thinking, budget management, team oversight
Key Achievement:
Led a team of 12 engineers on a multi-year defense project, managing a $5M budget and delivering on time and under cost.
Formatting Tips to Ensure Readability and Impact
Keep it to one page (two pages max for senior roles)
Use a clean, professional font like Calibri or Arial
Stick to chronological format
Bold job titles and use italics for companies
Save as PDF to preserve layout
Common Mistakes to Avoid
🚫 Using generic templates without customization 🚫 Listing job duties instead of accomplishments 🚫 Overstuffing with technical jargon 🚫 Skipping keywords relevant to the job description 🚫 Ignoring ATS optimization
Final Thoughts: Build a Resume That Opens Doors
In a fast-evolving tech world, your resume needs to reflect more than just your qualifications—it needs to tell a compelling story of value. By using the engineering resume examples outlined above, you can transform your job search and present yourself as the confident, capable engineer that employers are actively looking for.
✅ Ready to Build a Resume That Gets You Hired?
Visit our website today for more industry-approved templates, resume tips, and personalized guidance. Don’t just apply—stand out.
0 notes
Text
What Are the Must-Have Tools for a Future-Ready STEM Lab in Agartala?

Introduction: Why Every STEM Lab in Agartala Needs the Right Tools
A STEM Lab in Agartala is more than just a classroom—it’s a hands-on innovation center where students explore robotics, coding, AI, and engineering. To make learning engaging and future-ready, schools must equip their STEM Lab in Agartala with the right tools and technologies.
In this guide, we’ll explore the must-have tools that every future-ready STEM Lab in Agartala should have.
1. Robotics Kits – Powering Hands-On Learning
A top-quality STEM Lab in Agartala must include robotics kits to teach students about automation, AI, and engineering. Some of the best robotics kits include:
LEGO Mindstorms EV3 – Ideal for beginners, offering block-based coding. Arduino & Raspberry Pi Kits – Great for advanced robotics and IoT projects. VEX Robotics Kits – Used for competitions and real-world problem-solving.
These kits help students develop logical thinking and problem-solving skills while preparing them for careers in automation and robotics.
2. 3D Printers – Bringing Creativity to Life
A STEM Lab in Agartala should have 3D printers to help students design and prototype real-world objects. Some essential options include:
Creality Ender 3 – Affordable and beginner-friendly for schools. Ultimaker 2+ – High-quality prints for advanced projects. ️ Anycubic Photon – Best for precise, resin-based 3D printing.
With 3D printing, students can turn their ideas into reality, fostering creativity and innovation.
3. Coding & AI Learning Kits – Preparing for the Future
To make a STEM Lab in Agartala future-ready, it must include coding and AI tools for teaching programming skills. Some of the best choices are:
Scratch & Blockly – Block-based coding for beginners. Python & Java Programming Platforms – Industry-standard coding languages. Google AIY & NVIDIA Jetson Nano – AI and machine learning kits for advanced learning.
These tools help students learn AI, data science, and machine learning, making them ready for future tech careers.
4. Virtual Reality (VR) & Augmented Reality (AR) – Immersive Learning
A cutting-edge STEM Lab in Agartala should include VR and AR tools to create immersive educational experiences. The best options are:
VR and AR tools make learning more engaging and interactive, helping students visualize complex concepts easily.
5. IoT & Smart Sensors – Learning About the Connected World
An IoT-enabled STEM Lab in Agartala prepares students for the future of smart technology and automation. Essential IoT tools include:
Arduino IoT Cloud – Teaches real-world IoT applications. ESP8266 & ESP32 Microcontrollers – Used for smart device projects. Smart Sensors (Temperature, Humidity, Motion) – For creating real-time monitoring systems.
With IoT tools, students can build smart home projects, automated weather stations, and AI-driven devices.
6. Electronics & Circuit Design Kits – Understanding Engineering Basics
A future-ready STEM Lab in Agartala must include electronics kits for hands-on engineering projects. The best options are:
LittleBits Electronics Kit – Easy-to-use snap circuits for beginners. Snap Circuits Pro – Teaches circuit design in a fun way. Breadboards & Multimeters – Essential for real-world electronics projects.
Electronics kits enhance problem-solving skills and prepare students for engineering careers.
7. STEM Software & Simulations – Enhancing Digital Learning
A well-equipped STEM Lab in Agartala should also have digital tools and software for coding, engineering, and simulations. Some must-have software include:
Tinkercad – Online 3D design and electronics simulation. MATLAB & Simulink – Used for data analysis and AI applications. AutoCAD & SolidWorks – Industry-grade design software.
These digital tools help students practice real-world STEM applications in a virtual environment.
Conclusion: Build a Future-Ready STEM Lab in Agartala with the Right Tools
A high-quality STEM Lab in Agartala must include robotics kits, 3D printers, AI and coding tools, IoT kits, VR devices, and circuit design tools to prepare students for technology-driven careers.
By investing in these essential tools, schools in Agartala can create an engaging, innovative, and future-ready learning environment.
Want to set up a STEM Lab in Agartala? Contact us today to Upgrade the best solutions for your school!
0 notes
Text

Arduino programming opens the door to endless creativity and hands-on innovation. Whether you're building a simple LED circuit or a complex IoT device, Arduino makes electronics accessible for beginners and powerful for pros. With just a few lines of code, you can control sensors, motors, lights, and displays—bringing your ideas to life in real time. It’s not just coding; it’s problem-solving, designing, and engineering in one. From students and hobbyists to tech professionals, Arduino empowers makers everywhere to experiment, learn, and build smarter systems. Dive into the world of embedded systems, automate your surroundings, and explore the future of connected devices. Every sketch you write brings you closer to mastering both hardware and software.
#Arduino #ArduinoProgramming #EmbeddedSystems #MakerCulture #TechInnovation #STEMEducation #ElectronicsProjects #IoTDevelopment #OpenSourceHardware #Robotics #Microcontroller #DIYTech #CodeTheFuture #ArduinoUno #ProgrammingLife
0 notes
Text
How to Choose the Right Arduino Board for Your DIY Electronics

Arduino boards are at the heart of many DIY electronics projects. They are popular with hobbyists, students, and anyone who enjoys building things. If you’re new to Arduino or just unsure which board to pick for your project, this guide will help you choose the right one. With many options out there, it’s important to find the board that best fits your needs.
What is Arduino?
Before we dive into choosing a board, let’s quickly go over what an Arduino is. Arduino is an open-source platform made up of hardware and software that allows you to build electronics easily. It includes a microcontroller, which controls the board, and pins to connect sensors, motors, lights, and other parts. Many people use Arduino for prototyping, automation, and interactive projects because it’s simple to use and has a large community to help.
Things to Consider When Choosing an Arduino Board
1. How Complex is Your Project?
The complexity of your project plays a big role in choosing the best Arduino board. Some projects may need only basic functions, while others require more power or special features. Here’s a guide based on project complexity:
Simple Projects: If you’re working on basic tasks like blinking an LED, reading a temperature sensor, or turning on a light, boards like the Arduino Uno or Arduino Nano will work well. These boards are powerful enough for simple tasks.
Intermediate Projects: For projects that need to control motors, handle multiple sensors, or need more memory, you might want to choose a board like the Arduino Mega or Arduino Due. These boards have more pins and are more powerful, making them better for more complex tasks.
Advanced Projects: For projects that require lots of power, such as robotics or systems that need to process data quickly, you should look at boards like the Arduino Zero or Arduino MKR series. These boards offer more processing power and additional features for advanced projects.
2. Size and Shape of the Board
If your project has space limitations, the size of the Arduino board can be an important factor. Some projects need compact boards, while others can handle bigger ones. Here’s a look at some sizes:
Arduino Uno: It’s not the smallest, but it’s a good middle-ground between size and functionality. It’s about 68.6 x 53.4 mm.
Arduino Nano: If space is tight, the Arduino Nano is a smaller option at 45 x 18 mm. It’s great for small projects where you still need basic features.
Arduino Pro Mini: For projects that need an even smaller board, the Arduino Pro Mini is a tiny option, great for things like wearable electronics or embedded systems.
Arduino MKR Boards: The MKR series offers a good balance of size and power, especially if you need features like wireless communication for IoT projects.
3. Number of Pins and Connectivity
The number of pins on your Arduino board determines how many things you can connect to it—like sensors, motors, and other components. Simpler projects don’t need many pins, but more complicated ones will.
Arduino Uno: It has 14 digital I/O pins and 6 analog pins, which is enough for most basic projects.
Arduino Mega: If you need lots of pins, the Arduino Mega is the best choice. It offers 54 digital I/O pins, 16 analog inputs, and 4 UARTs, making it perfect for larger projects like robots or projects with multiple sensors.
Arduino Nano: The Nano has 14 digital I/O pins and 8 analog pins. It’s similar to the Uno but much smaller.
Arduino MKR Boards: These boards usually have additional connectivity options like Wi-Fi and Bluetooth, making them ideal for remote or wireless projects.
4. Power Requirements
Consider how you’ll power your project. Some boards can be powered through USB, while others may need a battery or an external power supply.
Arduino Uno: This board can be powered through USB or an external 9V battery or power supply, making it flexible for both stationary and mobile projects.
Arduino Nano: The Nano can be powered through a mini-USB connection or a 5V source. It's a great choice for small projects where power options are limited.
Arduino MKR Boards: Some MKR boards include a Li-Po battery charger, which is useful for battery-operated projects. If you want a board that can run on batteries for a long time, a MKR board might be the right choice.
5. Wireless Features
If your project needs wireless features like Wi-Fi or Bluetooth, you’ll want to choose an Arduino board that supports these functions. Many Arduino boards now come with built-in wireless capabilities, perfect for IoT (Internet of Things) projects.
Arduino MKR WiFi 1010: This board has both Wi-Fi and Bluetooth, which is great for wireless projects. It’s also compatible with the Arduino IoT Cloud, allowing you to control your devices from anywhere.
Arduino MKR GSM 1400: If you need to use mobile networks, this board has GSM/3G support, which is perfect for remote projects.
Arduino Nano 33 IoT: This board offers both Wi-Fi and Bluetooth in a small size, making it ideal for IoT projects that need compactness and wireless features.
6. Community Support
Arduino is known for its active and helpful community, which can be a big help, especially if you’re new to electronics. The most popular boards, like the Arduino Uno and Arduino Nano, have tons of tutorials, guides, and support available online. This makes it easier to get started and find solutions when you need help.
Additionally, consider looking at the availability of shields (extra boards that plug into your Arduino to add features). Popular boards often have many shields available, making it easier to expand your project without doing a lot of extra work.
7. Cost
Finally, think about your budget. While basic boards like the Arduino Uno are inexpensive, advanced boards like the Arduino Zero or MKR series can be more expensive. If you’re on a budget, you can also consider buying clone boards, which offer similar functions at a lower price.
Conclusion
Choosing the right Arduino board for your DIY electronics project depends on a few key factors, including how complex your project is, the size of the board, how many pins you need, power requirements, and whether you need wireless features. For simpler projects, the Arduino Uno or Arduino Nano should be enough. For more complex projects, consider the Arduino Mega or Arduino Due. If you need wireless communication, the Arduino MKR series is a great option.
Once you pick the right board for your needs, you’ll be ready to bring your project to life with the help of the Arduino platform. Whether you’re building a simple light control system or a robot, the right board will make your project easier and more fun to complete.
1 note
·
View note