#aws lambda function s3 trigger
Explore tagged Tumblr posts
Visit Tumblr Blog
Explore Tumblr blogs with no restrictions, modern design and the best experience.
Last Seen Tumblr Blogs


Fun Fact
Post activity is at the highest at 4:00 pm EDT; notes peak at 10:00 pm EDT.
Text
AWS Lambda Compute Service Tutorial for Amazon Cloud Developers
Full Video Link - https://youtube.com/shorts/QmQOWR_aiNI Hi, a new #video #tutorial on #aws #lambda #awslambda is published on #codeonedigest #youtube channel. @java @awscloud @AWSCloudIndia @YouTube #youtube @codeonedigest #codeonedigest #aws #amaz
AWS Lambda is a serverless compute service that runs your code in response to events and automatically manages the underlying compute resources for you. These events may include changes in state such as a user placing an item in a shopping cart on an ecommerce website. AWS Lambda automatically runs code in response to multiple events, such as HTTP requests via Amazon API Gateway, modifications…

View On WordPress
#amazon lambda java example#aws#aws cloud#aws lambda#aws lambda api gateway#aws lambda api gateway trigger#aws lambda basic#aws lambda code#aws lambda configuration#aws lambda developer#aws lambda event trigger#aws lambda eventbridge#aws lambda example#aws lambda function#aws lambda function example#aws lambda function s3 trigger#aws lambda java#aws lambda server#aws lambda service#aws lambda tutorial#aws training#aws tutorial#lambda service
0 notes
Text
Serverless Computing: The Power of Pay-Per-Use Architectures

The cloud has fundamentally changed how businesses build and deploy applications, but even traditional cloud models often require you to provision and manage servers – whether virtual machines or containers. Enter Serverless Computing, a paradigm shift that has truly captured the imagination of developers and businesses alike. As we move through 2025, serverless is no longer just a niche trend; it's a foundational architecture driving efficiency, scalability, and innovation.
Contrary to its name, "serverless" doesn't mean there are no servers. It means that you, the developer, no longer have to manage them. The underlying infrastructure – provisioning, scaling, patching, and maintenance – is entirely handled by your cloud provider. This frees up development teams to focus purely on writing code and building features, transforming the traditional operational burden into a true pay-per-use model.
How Does Serverless Work? The Event-Driven Magic
At its heart, serverless computing is an event-driven architecture. When an event occurs (like a user clicking a button, a file being uploaded, or data arriving from an IoT device), a small piece of your code – often called a "function" – is triggered and executed.
The two main components driving this are:
Function-as-a-Service (FaaS): This is the core compute service. With FaaS (e.g., AWS Lambda, Azure Functions, Google Cloud Functions), you upload your code in snippets (functions), and the cloud provider runs them on demand. The function only executes when triggered, and then the resources are spun down, meaning you're not paying for idle time.
Backend-as-a-Service (BaaS): This refers to managed services that handle common backend functionalities like databases (e.g., AWS DynamoDB, Google Cloud Firestore), authentication (e.g., AWS Cognito, Firebase Authentication), storage (e.g., AWS S3, Azure Blob Storage), and messaging. These services also follow a serverless, pay-per-use model, abstracting away server management.
The beauty is that the cloud provider dynamically allocates compute resources, scales automatically from zero to thousands of instances in seconds, and deallocates them when the function finishes, ensuring optimal resource utilization.
The Allure of Pay-Per-Use: Key Benefits
Serverless computing offers compelling advantages that are accelerating its adoption:
Significant Cost Savings: This is often the most celebrated benefit. You pay only for the exact compute time your code runs (often measured in milliseconds) and the resources consumed. There are no costs for idle servers or pre-provisioned capacity, which can lead to substantial reductions in cloud bills, especially for applications with fluctuating or unpredictable traffic.
Automatic & Seamless Scaling: Serverless platforms inherently handle scaling. Whether you have 10 users or 10 million, the system automatically scales up or down to meet demand without any manual intervention. This is a game-changer for businesses with seasonal traffic or viral events.
Reduced Operational Overhead: Developers are liberated from managing servers, operating systems, security patching, load balancing, and capacity planning. This offloads a massive burden to the cloud provider, freeing up valuable developer time.
Faster Time-to-Market: With no infrastructure to provision or manage, developers can focus purely on business logic. This accelerates development cycles, allowing teams to prototype, iterate, and deploy new features and applications much faster.
Enhanced Reliability & Fault Tolerance: Serverless platforms are designed for high availability, typically running functions across multiple data centers. If one instance fails, another can quickly take its place, offering built-in redundancy.
Real-World Applications: Where Serverless Shines
Serverless architectures are ideal for a wide range of use cases:
API Backends: Building highly scalable and cost-effective RESTful or GraphQL APIs for web and mobile applications.
Webhooks & Event Processors: Handling real-time events from third-party services (e.g., payment gateways, CRM systems) or internal systems.
Data Processing Pipelines: Transforming and moving data from various sources, such as image resizing after an upload, processing IoT sensor data, or performing real-time analytics.
Chatbots & Voice Assistants: Powering the backend logic for conversational interfaces, where each user query can trigger a serverless function.
Static Websites with Dynamic Functionality: Adding dynamic elements like form submissions, user authentication, or server-side rendering to otherwise static sites.
IoT Backends: Processing massive streams of data from connected devices with instant scalability.
Automated Tasks & Scheduled Jobs: Running daily reports, sending notifications, or performing database cleanups without needing always-on servers.
Challenges and Considerations
While powerful, serverless computing isn't a silver bullet and comes with its own set of challenges:
Cold Starts: If a function hasn't been invoked recently, the first invocation might experience a slight delay (a "cold start") as the provider spins up the execution environment. While providers are continuously optimizing this, it can impact latency-sensitive applications.
Vendor Lock-in: Relying heavily on a specific cloud provider's serverless ecosystem can make migration to another provider challenging due to platform-specific integrations and services.
Debugging & Monitoring: The distributed and ephemeral nature of serverless functions can make traditional debugging and end-to-end tracing more complex. Specialized monitoring tools are evolving to address this.
State Management: Serverless functions are inherently stateless. Managing application state across multiple function invocations requires careful design, often leveraging managed backend services like databases or object storage.
Cost Predictability: While often cheaper, highly complex or frequently invoked serverless applications can sometimes lead to unexpected costs if not carefully monitored and optimized.
The Future: More Intelligent, More Pervasive
As we look ahead, the serverless landscape in 2025 is evolving rapidly:
Stateful Serverless: Advancements are being made to support more stateful applications, blurring the lines further with traditional microservices.
Edge Integration: Serverless functions are increasingly deployed at the "edge" (closer to the users or data sources) via services like Cloudflare Workers or AWS Lambda@Edge. This significantly reduces latency for global applications and supports real-time edge AI.
AI & Machine Learning Synergy: Serverless is becoming the go-to architecture for deploying and scaling AI/ML inference models, allowing developers to build intelligent applications without managing complex GPU infrastructure.
Wider Language Support & Tooling: The ecosystem of developer tools, frameworks, and supported programming languages continues to expand, making serverless more accessible to a broader range of developers.
Hybrid & Multi-Cloud Strategies: Organizations are exploring ways to implement serverless across hybrid cloud environments or with multiple cloud providers to avoid vendor lock-in.
Serverless computing represents a powerful abstraction layer, allowing developers to focus on what they do best: creating innovative solutions. By embracing its pay-per-use model and understanding its nuances, businesses can unlock unparalleled agility, efficiency, and scalability, cementing serverless computing's role as a cornerstone of modern cloud architecture.
1 note
·
View note
Text
🔍 Deep Dive into Event-Driven Autoscaling: Smarter Scaling for Modern Applications
In the era of cloud-native computing, autoscaling is no longer a luxury—it’s a necessity. But traditional autoscaling methods based on CPU and memory usage alone often fall short in dynamic, event-heavy environments.
Enter Event-Driven Autoscaling (EDA): a smarter, more responsive approach that scales applications based on real-time events, not just system metrics.
🚀 What Is Event-Driven Autoscaling?
Event-Driven Autoscaling refers to automatically adjusting the number of application instances based on external event triggers. Instead of monitoring just the resource usage of your containers or pods, this method reacts to meaningful activity such as:
Number of messages in a Kafka topic
Length of a queue in RabbitMQ or Azure Service Bus
Rate of HTTP requests or custom events
Incoming workloads from APIs or sensors
This makes EDA a perfect fit for microservices, serverless applications, streaming systems, and any workload that has bursty or unpredictable demand.
⚙️ How Traditional Autoscaling Falls Short
Traditional tools like Horizontal Pod Autoscaler (HPA) in Kubernetes work well for CPU-bound applications. However, they struggle with:
Event-driven workloads with low CPU usage but high message traffic
Delayed scaling response times
Lack of granularity for external metrics
That’s where EDA tools step in—with precision scaling based on actual workload intensity, not just infrastructure metrics.
🧰 Tools That Enable Event-Driven Autoscaling
Several tools and platforms support EDA in modern cloud-native ecosystems:
🔹 KEDA (Kubernetes-based Event Driven Autoscaler)
Open-source, lightweight scaler for Kubernetes
Supports 50+ event sources: Kafka, Azure Queue, Prometheus, Redis, etc.
Works alongside HPA or independently
Auto-scales workloads from zero to N instances
🔹 Knative Autoscaling
Built into the Knative Serverless framework
Scales HTTP-based workloads and functions
Supports scale-to-zero for cost efficiency
Ideal for serverless APIs and short-lived services
🔹 Custom Event Triggers & Cloud Functions
Cloud platforms like AWS Lambda, Google Cloud Functions, and Azure Functions integrate autoscaling based on HTTP triggers, storage events, and more.
💡 Real-World Use Cases
Streaming Applications Scale data processing pods based on Kafka or RabbitMQ queue length.
Image Processing Pipelines Autoscale workers when files are uploaded to S3 or a blob store.
Serverless APIs Dynamically scale HTTP endpoints in Knative or AWS Lambda based on incoming traffic.
CI/CD Systems Spawn build runners only when a new job is queued.
🛠️ Key Benefits
⚡ Faster response to real demand
💰 Optimized resource usage and cost-efficiency
📊 Fine-grained control based on external events
🔄 Improved application resilience and scalability
🌐 Supports scale-to-zero for true serverless architecture
🧭 Final Thoughts
Event-Driven Autoscaling represents a shift from infrastructure-centered scaling to workload-aware automation. It allows teams to build responsive, scalable, and cost-effective systems in today’s dynamic environments.
If your application experiences spikes in demand based on events—not just resource load—it's time to explore tools like KEDA and Knative to unlock the full potential of event-driven scaling.
🔗 Ready to adopt EDA?
Evaluate your workload triggers, choose the right toolset, and integrate event-based metrics into your scaling strategy. Your infrastructure (and budget) will thank you.
For more info, Kindly follow: Hawkstack Technologies
#EventDrivenAutoscaling #KEDA #Knative #Kubernetes #Serverless #CloudNative #Autoscaling #DevOps #Microservices #PlatformEngineering
0 notes
Text
Cloud Cost Optimization Strategies to Scale Without Wasting Resources
As startups and enterprises increasingly move to the cloud, one issue continues to surface: unexpectedly high cloud bills. While cloud platforms offer incredible scalability and flexibility, without proper optimization, costs can spiral out of control—especially for fast-growing businesses.
This guide breaks down proven cloud cost optimization strategies to help your company scale sustainably while keeping expenses in check. At Salzen Cloud, we specialize in helping teams optimize cloud usage without sacrificing performance or security.
💡 Why Cloud Cost Optimization Is Crucial
When you first migrate to the cloud, costs may seem manageable. But as your application usage grows, so do compute instances, storage, and data transfer costs. Before long, you’re spending thousands on idle resources, over-provisioned servers, or unused services.
Effective cost optimization enables you to:
🚀 Scale operations without financial waste
📈 Improve ROI on cloud investments
🛡️ Maintain agility while staying within budget
🧰 Top Strategies to Optimize Cloud Costs
Here are the key techniques we use at Salzen Cloud to help clients control and reduce cloud spend:
1. 📊 Right-Size Your Resources
Start by analyzing resource usage. Are you running t3.large instances when t3.medium would do? Are dev environments left running after hours?
Use tools like:
AWS Cost Explorer
Azure Advisor
Google Cloud Recommender
These tools analyze usage patterns and recommend right-sized instances, storage classes, and networking configurations.
2. 💤 Turn Off Idle Resources
Development, testing, or staging environments often run 24/7 unnecessarily. Schedule them to shut down after work hours or when not in use.
Implement automation with:
Lambda scripts or Azure Automation
Instance Scheduler on AWS
Terraform with time-based triggers
3. 💼 Use Reserved or Spot Instances
Cloud providers offer deep discounts for reserved or spot instances. Use:
Reserved Instances for predictable workloads (up to 72% savings)
Spot Instances for fault-tolerant or batch jobs (up to 90% savings)
At Salzen Cloud, we help businesses forecast and reserve the right resources to save long-term.
4. 📦 Leverage Autoscaling and Load Balancers
Autoscaling allows your application to scale up/down based on traffic, avoiding overprovisioning.
Pair this with intelligent load balancing to distribute traffic efficiently and prevent unnecessary compute usage.
5. 🧹 Clean Up Unused Resources
It’s common to forget about:
Unattached storage volumes (EBS, persistent disks)
Idle elastic IPs
Old snapshots or backups
Unused services (e.g., unused databases or functions)
Set monthly audits to remove or archive unused resources.
6. 🔍 Monitor Usage and Set Budgets
Implement detailed billing dashboards using:
AWS Budgets and Cost Anomaly Detection
Azure Cost Management
GCP Billing Reports
Set up alerts when costs approach defined thresholds. Salzen Cloud helps configure proactive cost monitoring dashboards for clients using real-time metrics.
7. 🏷️ Implement Tagging and Resource Management
Tag all resources by:
Environment (prod, dev, staging)
Department (engineering, marketing)
Owner or team
This makes it easier to track, allocate, and reduce costs effectively.
8. 🔐 Optimize Storage Tiers
Move rarely accessed data to cheaper storage classes:
AWS S3 Glacier / Infrequent Access
Azure Cool / Archive Tier
GCP Nearline / Coldline
Always evaluate storage lifecycle policies to automate this process.
⚙️ Salzen Cloud’s Approach to Smart Scaling
At Salzen Cloud, we take a holistic view of cloud cost optimization:
Automated audits and policy enforcement using Terraform, Kubernetes, and cloud-native tools
Cost dashboards integrated into CI/CD pipelines
Real-time alerts for overprovisioning or anomalous usage
Proactive savings plan strategies based on workload trends
Our team works closely with engineering and finance teams to ensure visibility, accountability, and savings at every level.
🚀 Final Thoughts
Cloud spending doesn’t have to be unpredictable. With a strategic approach, your startup or enterprise can scale confidently, innovate quickly, and spend smartly. The key is visibility, automation, and continuous refinement.
Let Salzen Cloud help you cut cloud costs—not performance.
0 notes
Text
Integrating ROSA Applications with AWS Services (CS221)
In today's rapidly evolving cloud-native landscape, enterprises are looking for scalable, secure, and fully managed Kubernetes solutions that work seamlessly with existing cloud infrastructure. Red Hat OpenShift Service on AWS (ROSA) meets that demand by combining the power of Red Hat OpenShift with the scalability and flexibility of Amazon Web Services (AWS).
In this blog post, we’ll explore how you can integrate ROSA-based applications with key AWS services, unlocking a powerful hybrid architecture that enhances your applications' capabilities.
📌 What is ROSA?
ROSA (Red Hat OpenShift Service on AWS) is a managed OpenShift offering jointly developed and supported by Red Hat and AWS. It allows you to run containerized applications using OpenShift while taking full advantage of AWS services such as storage, databases, analytics, and identity management.
🔗 Why Integrate ROSA with AWS Services?
Integrating ROSA with native AWS services enables:
Seamless access to AWS resources (like RDS, S3, DynamoDB)
Improved scalability and availability
Cost-effective hybrid application architecture
Enhanced observability and monitoring
Secure IAM-based access control using AWS IAM Roles for Service Accounts (IRSA)
🛠️ Key Integration Scenarios
1. Storage Integration with Amazon S3 and EFS
Applications deployed on ROSA can use AWS storage services for persistent and object storage needs.
Use Case: A web app storing images to S3.
How: Use OpenShift’s CSI drivers to mount EFS or access S3 through SDKs or CLI.
yaml
Copy
Edit
apiVersion: v1
kind: PersistentVolumeClaim
metadata:
name: efs-pvc
spec:
accessModes:
- ReadWriteMany
storageClassName: efs-sc
resources:
requests:
storage: 5Gi
2. Database Integration with Amazon RDS
You can offload your relational database requirements to managed RDS instances.
Use Case: Deploying a Spring Boot app with PostgreSQL on RDS.
How: Store DB credentials in Kubernetes secrets and use RDS endpoint in your app’s config.
env
Copy
Edit
SPRING_DATASOURCE_URL=jdbc:postgresql://<rds-endpoint>:5432/mydb
3. Authentication with AWS IAM + OIDC
ROSA supports IAM Roles for Service Accounts (IRSA), enabling fine-grained permissions for workloads.
Use Case: Granting a pod access to a specific S3 bucket.
How:
Create an IAM role with S3 access
Associate it with a Kubernetes service account
Use OIDC to federate access
4. Observability with Amazon CloudWatch and Prometheus
Monitor your workloads using Amazon CloudWatch Container Insights or integrate Prometheus and Grafana on ROSA for deeper insights.
Use Case: Track application metrics and logs in a single AWS dashboard.
How: Forward logs from OpenShift to CloudWatch using Fluent Bit.
5. Serverless Integration with AWS Lambda
Bridge your ROSA applications with AWS Lambda for event-driven workloads.
Use Case: Triggering a Lambda function on file upload to S3.
How: Use EventBridge or S3 event notifications with your ROSA app triggering the workflow.
🔒 Security Best Practices
Use IAM Roles for Service Accounts (IRSA) to avoid hardcoding credentials.
Use AWS Secrets Manager or OpenShift Vault integration for managing secrets securely.
Enable VPC PrivateLink to keep traffic within AWS private network boundaries.
🚀 Getting Started
To start integrating your ROSA applications with AWS:
Deploy your ROSA cluster using the AWS Management Console or CLI
Set up AWS CLI & IAM permissions
Enable the AWS services needed (e.g., RDS, S3, Lambda)
Create Kubernetes Secrets and ConfigMaps for service integration
Use ServiceAccounts, RBAC, and IRSA for secure access
🎯 Final Thoughts
ROSA is not just about running Kubernetes on AWS—it's about unlocking the true hybrid cloud potential by integrating with a rich ecosystem of AWS services. Whether you're building microservices, data pipelines, or enterprise-grade applications, ROSA + AWS gives you the tools to scale confidently, operate securely, and innovate rapidly.
If you're interested in hands-on workshops, consulting, or ROSA enablement for your team, feel free to reach out to HawkStack Technologies – your trusted Red Hat and AWS integration partner.
💬 Let's Talk!
Have you tried ROSA yet? What AWS services are you integrating with your OpenShift workloads? Share your experience or questions in the comments!
For more details www.hawkstack.com
0 notes
Text
How AWS Lambda Really Works Behind the Scenes
AWS Lambda is a serverless computing service that runs code in response to events without provisioning servers. It automatically handles scaling, fault tolerance, and resource management. Behind the scenes, Lambda uses containers to run functions on demand. It integrates with AWS services like S3 and API Gateway, making it ideal for building scalable, event-driven applications.
0 notes
Text
Increase AWS Security with MITRE D3FEND, Engage, ATT&CK

Engage, ATT&CK, D3FEND
Connecting MITRE threat detection and mitigation frameworks to AWS security services. Amazon Web Services may benefit from MITRE ATT&CK, MITRE Engage, and MITRE D3FEND controls and processes. These organised, publicly available models explain threat actor activities to assist threat detection and response.
Combining MITRE frameworks completes security operations lifecycle strategy. MITRE ATT&CK specifies threat actor tactics, strategies, and processes, essential for threat modelling and risk assessment. Additionally, MITRE D3FEND proposes proactive security controls like system settings protection and least privilege access to align defences with known attack patterns.
With MITRE Engage, security teams can expose threat actors, cost them money by directing resources to honeypot infrastructure, or mislead them into divulging their strategies by exploiting appealing fictional targets. D3FEND turns ATT&CK insights into defensive mechanisms, unlike Engage. Integrating these frameworks informs security operations lifecycle detection, monitoring, incident response, and post-event analysis.
Depending on the services, the client handles cloud security and AWS handles cloud infrastructure security. This is crucial for AWS-using businesses. AWS cloud-scale platforms have native security capabilities like these MITRE frameworks.
Amazon Web Services follows MITRE security lifecycle frameworks:
Amazon Inspector finds threat actor-related vulnerabilities, Amazon Macie finds sensitive data exposure, and Amazon Security Lake collects logs for ATT&CK-based threat modelling and risk assessment.
AWS Web Application Firewall (WAF) provides application-layer security, while AWS Identity and Access Management (IAM) and AWS Organisations provide least privilege when implementing preventative measures. Honey tokens are digital decoys that replicate real credentials to attract danger actors and trigger alerts. They may be in AWS Secrets Manager.
Amazon AWS Security Hub centralises security alerts, GuardDuty detects unusual activity patterns, and Amazon Detective investigates irregularities. GuardDuty monitors AWS accounts and workloads to detect attacks automatically.
AWS Step Functions and Lambda automate incident response, containment, and recovery. Real-time DDoS mitigation is provided with AWS Shield and WAF. AWS Security Incident Response was introduced in 2024 to prepare, respond, and recover from security incidents. Threat actors may be rerouted to honeypots or given fake Amazon Simple Storage Service (S3) files.
Security Lake and Detective conduct post-event forensic investigations, while Security Hub and IAM policies use historical trends to improve security. Observing honeypot interactions can change MITRE Engage strategies.
GuardDuty and other AWS security services provide threat intelligence and details on detected threats to MITRE ATT&CK. GuardDuty Extended Threat Detection intelligently detects, correlates, and aligns signals with the MITRE ATT&CK lifecycle to find an attack sequence. A discovery report includes IP addresses, TTPs, AWS API queries, and a description of occurrences. The MITRE strategy and method identification of an activity is highlighted by each discovery signal.
Malicious IP lists, dubious network behaviours, and the AWS API request and user agent can be included. You can automate answers by downloading this extensive JSON data. Interestingly, AWS and MITRE have updated and developed new MITRE ATT&CK cloud matrix methodologies based on real-world threat actor behaviours that target AWS customers, such as modifying S3 bucket lifespan restrictions for data destruction.
Companies may automate detection and response, build security operations using industry-standard procedures, maintain visibility throughout their AWS environment, and improve security controls by aligning AWS security services with MITRE frameworks. Companies can better identify, stop, and fool threat actors using this relationship, boosting their security.
#MITRED3FEND#MITREATTCK#MITREframeworks#Engage#AWSsecurityservices#D3FEND#Technology#technews#technologynews#news#govindhtech
0 notes
Link
[ad_1] Welcome devs to the world of development and automation. Today, we are diving into an exciting project in which we will be creating a Serverless Image Processing Pipeline with AWS services. The project starts with creating S3 buckets for storing uploaded images and processed Thumbnails, and eventually using many services like Lambda, API Gateway (To trigger the Lambda Function), DynamoDB (storing image Metadata), and at last we will run this program in ECS cluster by creating a Docker image of the project. This project is packed with cloud services and development tech stacks like Next.js, and practicing this will further enhance your understanding of Cloud services and how they interact with each other. So with further ado, let’s get started! Note: The code and instructions in this post are for demo use and learning only. A production environment will require a tighter grip on configurations and security. Prerequisites Before we get into the project, we need to ensure that we have the following requirements met in our system: An AWS Account: Since we use AWS services for the project, we need an AWS account. A configured IAM User with required services access would be appreciated. Basic Understanding of AWS Services: Since we are dealing with many AWS services, it is better to have a decent understanding of them, such as S3, which is used for storage, API gateway to trigger Lambda function, and many more. Node Installed: Our frontend is built with Next.js, so having Node in your system is necessary. For Code reference, here is the GitHub repo. AWS Services Setup We will start the project by setting up our AWS services. First and foremost, we will create 2 S3 buckets, namely sample-image-uploads-bucket and sample-thumbnails-bucket. The reason for this long name is that the bucket name has to be unique all over the AWS Workspace. So to create the bucket, head over to the S3 dashboard and click ‘Create Bucket’, select ‘General Purpose’, and give it a name (sample-image-uploads-bucket) and leave the rest of the configuration as default. Similarly, create the other bucket named sample-thumbnails-bucket, but in this bucket, make sure you uncheck Block Public Access because we will need it for our ECS Cluster. We need to ensure that the sample-thumbnails-bucket has public read access, so that ECS Frontend can display them. For that, we will attach the following policy to that bucket: "Version": "2012-10-17", "Statement": [ "Sid": "PublicRead", "Effect": "Allow", "Principal": "*", "Action": "s3:GetObject", "Resource": "arn:aws:s3:::sample-thumbnails-bucket/*" ] After creating buckets, let’s move to our Database for storing image metadata. We will create a DynamoDb table for that. Go to your DynamoDb console, click on Create Table, give it a name (image_metadata), and in the primary key select string, name it image_id. AWS services will communicate with each other, so they need a role with proper permissions. To create a role, go to the IAM dashboard, select Role, and click on Create Role. Under trust identity type, select AWS service, and under use case, choose Lambda. Attach the following policies: AmazonS3FullAccess AmazonDynamoDBFullAccess CloudWatchLogsFullAccess Give this role a name (Lambda-Image-Processor-Role) and save it. Creating Lambda Function We have our Lambda role, buckets, and DynamoDb table ready, so now let’s create the Lambda function which will process the image and make the thumbnail out of it, since we are using the Pillow library to process the images, Lambda by default doesn’t provide that. To fix this, we will add a layer in the Lambda function. To do that, follow the following steps: Now go to your Lambda dashboard, click on Create a Function. Select Author from Scratch and choose Python 3.9 as the runtime language, give it a name: image-processor, and in the Code tab, you have the Upload from Option, select that, choose zip file, and upload your Zip file of the image-processor. Go to Configuration, and under the Permissions column, Edit the configuration by changing the existing role to the role we created Lambda-Image-Processor-Role. Now go to your S3 bucket (sample-image-uploads-bucket) and go to its Properties section and scroll down to Event Notification, here click on Create Event Notification, give it a name (trigger-image-processor) and in the event type, select PUT and select the lambda function we created (image-processor). Now, since Pillow doesn’t come built-in with the lambda library, we will do the following steps to fix that: Go to your Lambda function (image-processor) and scroll down to the Layer section, here click on Add Layer. In the Add Layer section, select Specify an ARN and provide this ARN arn:aws:lambda:us-east-1:770693421928:layer:Klayers-p39-pillow:1 . Change the region accordingly; I am using us-east-1. Add the layer. Now in the Code tab of your Lambda-Function you would be having a lambda-function.py, put the following content inside the lambda_function.py: import boto3 import uuid import os from PIL import Image from io import BytesIO import datetime s3 = boto3.client('s3') dynamodb = boto3.client('dynamodb') UPLOAD_BUCKET = '' THUMBNAIL_BUCKET = '' DDB_TABLE = 'image_metadata' def lambda_handler(event, context): record = event['Records'][0] bucket = record['s3']['bucket']['name'] key = record['s3']['object']['key'] response = s3.get_object(Bucket=bucket, Key=key) image = Image.open(BytesIO(response['Body'].read())) image.thumbnail((200, 200)) thumbnail_buffer = BytesIO() image.save(thumbnail_buffer, 'JPEG') thumbnail_buffer.seek(0) thumbnail_key = f"thumb_key" s3.put_object( Bucket=THUMBNAIL_BUCKET, Key=thumbnail_key, Body=thumbnail_buffer, ContentType='image/jpeg' ) image_id = str(uuid.uuid4()) original_url = f"https://UPLOAD_BUCKET.s3.amazonaws.com/key" thumbnail_url = f"https://THUMBNAIL_BUCKET.s3.amazonaws.com/thumbnail_key" uploaded_at = datetime.datetime.now().isoformat() dynamodb.put_item( TableName=DDB_TABLE, Item= 'image_id': 'S': image_id, 'original_url': 'S': original_url, 'thumbnail_url': 'S': thumbnail_url, 'uploaded_at': 'S': uploaded_at ) return 'statusCode': 200, 'body': f"Thumbnail created: thumbnail_url" Now, we will need another Lambda function for API Gateway because that will act as the entry point for our frontend ECS app to fetch image data from DynamoDB. To create the lambda function, go to your Lambda Dashboard, click on create function, select Author from scratch and python 3.9 as runtime, give it a name, get-image-metadata, and in the configuration, select the same role that we assigned to other Lambda functions (Lambda-Image-Processor-Role) Now, in the Code section of the function, put the following content: import boto3 import json dynamodb = boto3.client('dynamodb') TABLE_NAME = 'image_metadata' def lambda_handler(event, context): try: response = dynamodb.scan(TableName=TABLE_NAME) images = [] for item in response['Items']: images.append( 'image_id': item['image_id']['S'], 'original_url': item['original_url']['S'], 'thumbnail_url': item['thumbnail_url']['S'], 'uploaded_at': item['uploaded_at']['S'] ) return 'statusCode': 200, 'headers': "Content-Type": "application/json" , 'body': json.dumps(images) except Exception as e: return 'statusCode': 500, 'body': f"Error: str(e)" Creating the API Gateway The API Gateway will act as the entry point for your ECS Frontend application to fetch image data from DynamoDB. It will connect to the Lambda function that queries DynamoDB and returns the image metadata. The URL of the Gateway is used in our Frontend app to display images. To create the API Gateway, do the following steps: Go to the AWS Management Console → Search for API Gateway → Click Create API. Select HTTP API. Click on Build. API name: image-gallery-api Add integrations: Select Lambda and select the get_image_metadata function Select Method: Get and Path: /images Endpoint type: Regional Click on Next and create the API Gateway URL. Before creating the Frontend, let’s test the application manually. First go to your Upload S3 Bucket (sample-image-uploads-bucket) and upload a jpg/jpeg image; other image will not work as your function only processes these two types:In the Picture above, I have uploaded an image titled “ghibil-art.jpg” file, and once uploaded, it will trigger the Lambda function, that will create the thumbnail out of it named as “thumbnail-ghibil-art.jpg” and store it in sample-thumbnails-bucket and the information about the image will be stored in image-metadata table in DynamoDb. In the image above, you can see the Item inside the Explore Item section of our DynamoDb table “image-metadata.” To test the API-Gateway, we will check the Invoke URL of our image-gallery-API followed by /images. It will show the following output, with the curl command: Now our application is working fine, we can deploy a frontend to visualise the project. Creating the Frontend App For the sake of Simplicity, we will be creating a minimal, simple gallery frontend using Next.js, Dockerize it, and deploy it on ECS. To create the app, do the following steps: Initialization npx create-next-app@latest image-gallery cd image-gallery npm install npm install axios Create the Gallery Component Create a new file components/Gallery.js: 'use client'; import useState, useEffect from 'react'; import axios from 'axios'; import styles from './Gallery.module.css'; const Gallery = () => const [images, setImages] = useState([]); const [loading, setLoading] = useState(true); useEffect(() => const fetchImages = async () => try const response = await axios.get('https:///images'); setImages(response.data); setLoading(false); catch (error) console.error('Error fetching images:', error); setLoading(false); ; fetchImages(); , []); if (loading) return Loading...; return ( images.map((image) => ( new Date(image.uploaded_at).toLocaleDateString() )) ); ; export default Gallery; Make Sure to Change the Gateway-URL to your API_GATEWAY_URL Add CSS Module Create components/Gallery.module.css: .gallery display: grid; grid-template-columns: repeat(auto-fill, minmax(200px, 1fr)); gap: 20px; padding: 20px; max-width: 1200px; margin: 0 auto; .imageCard background: #fff; border-radius: 8px; box-shadow: 0 2px 5px rgba(0,0,0,0.1); overflow: hidden; transition: transform 0.2s; .imageCard:hover transform: scale(1.05); .thumbnail width: 100%; height: 150px; object-fit: cover; .date text-align: center; padding: 10px; margin: 0; font-size: 0.9em; color: #666; .loading text-align: center; padding: 50px; font-size: 1.2em; Update the Home Page Modify app/page.js: import Gallery from '../components/Gallery'; export default function Home() return ( Image Gallery ); Next.js’s built-in Image component To use Next.js’s built-in Image component for better optimization, update next.config.mjs: const nextConfig = images: domains: ['sample-thumbnails-bucket.s3.amazonaws.com'], , ; export default nextConfig; Run the Application Visit in your browser, and you will see the application running with all the thumbnails uploaded. For demonstration purposes, I have put four images (jpeg/jpg) in my sample-images-upload-bucket. Through the function, they are transformed into thumbnails and stored in the sample-thumbnail-bucket. The application looks like this: Containerising and Creating the ECS Cluster Now we are almost done with the project, so we will continue by creating a Dockerfile of the project as follows: # Use the official Node.js image as a base FROM node:18-alpine AS builder # Set working directory WORKDIR /app # Copy package files and install dependencies COPY package.json package-lock.json ./ RUN npm install # Copy the rest of the application code COPY . . # Build the Next.js app RUN npm run build # Use a lightweight Node.js image for production FROM node:18-alpine # Set working directory WORKDIR /app # Copy built files from the builder stage COPY --from=builder /app ./ # Expose port EXPOSE 3000 # Run the application CMD ["npm", "start"] Now we will build the Docker image using: docker build -t sample-nextjs-app . Now that we have our Docker image, we will push it to AWS ECR repo, for that, do the following steps: Step 1: Push the Docker Image to Amazon ECR Go to the AWS Management Console → Search for ECR (Elastic Container Registry) → Open ECR. Create a new repository: Click Create repository. Set Repository name (e.g., sample-nextjs-app). Choose Private (or Public if required). Click Create repository. Push your Docker image to ECR: In the newly created repository, click View push commands. Follow the commands to: Authenticate Docker with ECR. Build, tag, and push your image. You need to have AWS CLI configured for this step. Step 2: Create an ECS Cluster aws ecs create-cluster --cluster-name sample-ecs-cluster Step 3: Create a Task Definition In the ECS Console, go to Task Definitions. Click Create new Task Definition. Choose Fargate → Click Next step. Set task definition details: Name: sample-nextjs-task Task role: ecsTaskExecutionRole (Create one if missing). "Version": "2012-10-17", "Statement": [ "Sid": "Statement1", "Effect": "Allow", "Action": [ "ecr:GetDownloadUrlForLayer", "ecr:BatchGetImage", "ecr:GetAuthorizationToken", "ecr:BatchCheckLayerAvailability" ], "Resource": "arn:aws:ecr:us-east-1:624448302051:repository/sample-nextjs-app" ] Task memory & CPU: Choose appropriate values (e.g., 512MB & 256 CPU). Define the container: Click Add container. Container name: sample-nextjs-container. Image URL: Paste the ECR image URI from Step 1. Port mappings: Set 3000 for both container and host ports. Click Add. Click Create. Step 4: Create an ECS Service Go to “ECS” → Click Clusters → Select your cluster (sample-ecs-cluster). Click Create Service. Choose Fargate → Click Next step. Set up the service: Task definition: Select sample-nextjs-task. Cluster: sample-ecs-cluster. Service name: sample-nextjs-service. Number of tasks: 1 (Can scale later). Networking settings: Select an existing VPC. Choose Public subnets. Enable Auto-assign Public IP. Click Next step → Create service. Step 5: Access the Application Go to ECS > Clusters > sample-ecs-cluster. Click on the Tasks tab. Click on the running task. Find the Public IP under Network. Open a browser and go to:http://:3000 Your Next.js app should be live! 🚀 Conclusion This marks the end of the blog. Today, we divided into many AWS services: s3, IAM, ECR, Lambda function, ECS, Fargate, and API Gateway. We started the project by creating s3 buckets and eventually deployed our application in an ECS cluster. Throughout this guide, we covered containerizing the Next.js app, pushing it to ECR, configuring ECS task definitions, and deploying via the AWS console. This setup allows for automated scaling, easy updates, and secure API access—all key benefits of a cloud-native deployment. Potential production configurations may include changes like below: Implementing more restrictive IAM permissions, improving control over public access to S3 buckets (using CloudFront, pre-signed URLs, or a backend proxy instead of making the sample-thumbnails-bucket public) Adding error handling and pagination (especially for DynamoDB queries) Utilizing secure VPC/network configurations for ECS (like using an Application Load Balancer and private subnets instead of direct public IPs) Addressing scaling concerns by replacing the DynamoDB.scan operation within the metadata-fetching Lambda with the DynamoDB.query Using environment variables instead of a hardcoded API gateway URL in the Next.js code [ad_2] Source link
0 notes
Text
Integrating ROSA Applications With AWS Services (CS221)
As organizations increasingly adopt Kubernetes for container orchestration, Red Hat OpenShift Service on AWS (ROSA) has become a go-to managed Kubernetes solution. ROSA combines the power of Red Hat OpenShift with AWS infrastructure, offering seamless integrations, enterprise support, and scalability.
In CS221, we explore the design and implementation of intelligent systems. Integrating ROSA with AWS services enhances the capabilities of these systems, allowing real-time data ingestion, model deployment, logging, security, and scalable storage. In this blog, we’ll dive into how ROSA applications can be integrated with key AWS services to build production-ready, intelligent applications.
Why ROSA + AWS?
ROSA provides:
Managed OpenShift with built-in CI/CD, monitoring, and developer tooling.
Native integration with AWS IAM, VPCs, EBS/EFS, and security policies.
Ease of hybrid/multi-cloud deployments.
AWS provides:
A rich suite of services like S3, RDS, SageMaker, Lambda, CloudWatch, and more that extend OpenShift’s capabilities.
1. Storage Integration: Using Amazon S3 and EFS
🎯 Use Case:
Store unstructured data (e.g., ML datasets, logs, user uploads) from ROSA applications.
🔧 How to Integrate:
Use AWS Service Broker or OpenShift Operators to provision and bind S3 buckets.
Mount EFS volumes into ROSA pods for shared file systems.
2. Deploying ML Models With SageMaker
🎯 Use Case:
Train and deploy ML models using AWS SageMaker, then consume them in ROSA apps.
🔧 How to Integrate:
Build and train models in SageMaker.
Deploy as SageMaker Endpoints.
Connect from ROSA microservices using REST calls or AWS SDK.
💡 Tip:
Use Amazon EventBridge to trigger SageMaker workflows based on OpenShift events or Kafka topics.
3. Logging and Monitoring With CloudWatch
🎯 Use Case:
Centralize log and metrics collection from ROSA to AWS CloudWatch for visibility and alerting.
🔧 How to Integrate:
Use Fluent Bit/Fluentd DaemonSets in OpenShift to forward logs to CloudWatch Logs.
Leverage CloudWatch Container Insights for performance metrics.
4. Identity and Access Management With AWS IAM
🎯 Use Case:
Ensure secure, fine-grained access control for services running inside ROSA.
🔧 How to Integrate:
Use IAM Roles for Service Accounts (IRSA) via OpenShift.
Map OpenShift service accounts to IAM roles using OIDC.
Security Benefit:
Avoid hardcoding AWS credentials in containers. Use temporary credentials via role assumption.
5. Event-Driven Architectures With AWS Lambda
🎯 Use Case:
Trigger backend logic from ROSA applications (e.g., image processing, webhook handling).
🔧 How to Integrate:
Use Amazon SNS/SQS to decouple communication.
ROSA sends messages, and Lambda functions process them asynchronously.
🚀 Example Flow:
ROSA app publishes message to SNS.
Lambda listens via an SQS queue.
Lambda processes the event and stores the result in S3 or DynamoDB.
6. Databases With Amazon RDS and DynamoDB
🎯 Use Case:
Persistent storage of structured data like user profiles, system metadata.
🔧 How to Integrate:
Provision Amazon RDS databases (PostgreSQL, MySQL) and connect via VPC peering or service endpoints.
Use DynamoDB for NoSQL needs such as session storage or real-time counters.
DevOps Integration
CI/CD with OpenShift Pipelines and AWS:
Automate build/test/deploy via Tekton Pipelines in ROSA.
Store artifacts in Amazon ECR.
Use AWS CodeBuild/CodePipeline to trigger downstream services.
Best Practices
✅ Use Secrets Manager or Parameter Store for credentials management.
✅ Monitor costs using AWS Budgets when autoscaling ROSA workloads.
✅ Regularly scan container images with Amazon Inspector or Quay Security Scanner.
✅ Enable auto-scaling and HPA with AWS CloudWatch metrics.
Conclusion
ROSA allows developers to run OpenShift-native applications with the power of AWS services. Whether you're building scalable web services, training ML models, or setting up observability, integrating ROSA with AWS transforms your architecture into a modern, secure, and intelligent system.
In CS221, where systems need to learn, adapt, and scale, this integration empowers us to bring intelligent agents to life in real-world cloud environments.
For more info, Kindly follow: Hawkstack Technologies
0 notes
Text
Integrating ROSA Applications with AWS Services (CS221)
As cloud-native architectures become the backbone of modern application deployments, combining the power of Red Hat OpenShift Service on AWS (ROSA) with native AWS services unlocks immense value for developers and DevOps teams alike. In this blog post, we explore how to integrate ROSA-hosted applications with AWS services to build scalable, secure, and cloud-optimized solutions — a key skill set emphasized in the CS221 course.
🚀 What is ROSA?
Red Hat OpenShift Service on AWS (ROSA) is a managed OpenShift platform that runs natively on AWS. It allows organizations to deploy Kubernetes-based applications while leveraging the scalability and global reach of AWS, without managing the underlying infrastructure.
With ROSA, you get:
Fully managed OpenShift clusters
Integrated with AWS IAM and billing
Access to AWS services like RDS, S3, DynamoDB, Lambda, etc.
Native CI/CD, container orchestration, and operator support
🧩 Why Integrate ROSA with AWS Services?
ROSA applications often need to interact with services like:
Amazon S3 for object storage
Amazon RDS or DynamoDB for database integration
Amazon SNS/SQS for messaging and queuing
AWS Secrets Manager or SSM Parameter Store for secrets management
Amazon CloudWatch for monitoring and logging
Integration enhances your application’s:
Scalability — Offload data, caching, messaging to AWS-native services
Security — Use IAM roles and policies for fine-grained access control
Resilience — Rely on AWS SLAs for critical components
Observability — Monitor and trace hybrid workloads via CloudWatch and X-Ray
🔐 IAM and Permissions: Secure Integration First
A crucial part of ROSA-AWS integration is managing IAM roles and policies securely.
Steps:
Create IAM Roles for Service Accounts (IRSA):
ROSA supports IAM Roles for Service Accounts, allowing pods to securely access AWS services without hardcoding credentials.
Attach IAM Policy to the Role:
Example: An application that uploads files to S3 will need the following permissions:{ "Effect": "Allow", "Action": ["s3:PutObject", "s3:GetObject"], "Resource": "arn:aws:s3:::my-bucket-name/*" }
Annotate OpenShift Service Account:
Use oc annotate to associate your OpenShift service account with the IAM role.
📦 Common Integration Use Cases
1. Storing App Logs in S3
Use a Fluentd or Loki pipeline to export logs from OpenShift to Amazon S3.
2. Connecting ROSA Apps to RDS
Applications can use standard drivers (PostgreSQL, MySQL) to connect to RDS endpoints — make sure to configure VPC and security groups appropriately.
3. Triggering AWS Lambda from ROSA
Set up an API Gateway or SNS topic to allow OpenShift applications to invoke serverless functions in AWS for batch processing or asynchronous tasks.
4. Using AWS Secrets Manager
Mount secrets securely in pods using CSI drivers or inject them using operators.
🛠 Hands-On Example: Accessing S3 from ROSA Pod
Here’s a quick walkthrough:
Create an IAM Role with S3 permissions.
Associate the role with a Kubernetes service account.
Deploy your pod using that service account.
Use AWS SDK (e.g., boto3 for Python) inside your app to access S3.
oc create sa s3-access oc annotate sa s3-access eks.amazonaws.com/role-arn=arn:aws:iam::<account-id>:role/S3AccessRole
Then reference s3-access in your pod’s YAML.
📚 ROSA CS221 Course Highlights
The CS221 course from Red Hat focuses on:
Configuring service accounts and roles
Setting up secure access to AWS services
Using OpenShift tools and operators to manage external integrations
Best practices for hybrid cloud observability and logging
It’s a great choice for developers, cloud engineers, and architects aiming to harness the full potential of ROSA + AWS.
✅ Final Thoughts
Integrating ROSA with AWS services enables teams to build robust, cloud-native applications using best-in-class tools from both Red Hat and AWS. Whether it's persistent storage, messaging, serverless computing, or monitoring — AWS services complement ROSA perfectly.
Mastering these integrations through real-world use cases or formal training (like CS221) can significantly uplift your DevOps capabilities in hybrid cloud environments.
Looking to Learn or Deploy ROSA with AWS?
HawkStack Technologies offers hands-on training, consulting, and ROSA deployment support. For more details www.hawkstack.com
0 notes
Text
Build A Smarter Security Chatbot With Amazon Bedrock Agents

Use an Amazon Security Lake and Amazon Bedrock chatbot for incident investigation. This post shows how to set up a security chatbot that uses an Amazon Bedrock agent to combine pre-existing playbooks into a serverless backend and GUI to investigate or respond to security incidents. The chatbot presents uniquely created Amazon Bedrock agents to solve security vulnerabilities with natural language input. The solution uses a single graphical user interface (GUI) to directly communicate with the Amazon Bedrock agent to build and run SQL queries or advise internal incident response playbooks for security problems.
User queries are sent via React UI.
Note: This approach does not integrate authentication into React UI. Include authentication capabilities that meet your company's security standards. AWS Amplify UI and Amazon Cognito can add authentication.
Amazon API Gateway REST APIs employ Invoke Agent AWS Lambda to handle user queries.
User queries trigger Lambda function calls to Amazon Bedrock agent.
Amazon Bedrock (using Claude 3 Sonnet from Anthropic) selects between querying Security Lake using Amazon Athena or gathering playbook data after processing the inquiry.
Ask about the playbook knowledge base:
The Amazon Bedrock agent queries the playbooks knowledge base and delivers relevant results.
For Security Lake data enquiries:
The Amazon Bedrock agent takes Security Lake table schemas from the schema knowledge base to produce SQL queries.
When the Amazon Bedrock agent calls the SQL query action from the action group, the SQL query is sent.
Action groups call the Execute SQL on Athena Lambda function to conduct queries on Athena and transmit results to the Amazon Bedrock agent.
After extracting action group or knowledge base findings:
The Amazon Bedrock agent uses the collected data to create and return the final answer to the Invoke Agent Lambda function.
The Lambda function uses an API Gateway WebSocket API to return the response to the client.
API Gateway responds to React UI via WebSocket.
The chat interface displays the agent's reaction.
Requirements
Prior to executing the example solution, complete the following requirements:
Select an administrator account to manage Security Lake configuration for each member account in AWS Organisations. Configure Security Lake with necessary logs: Amazon Route53, Security Hub, CloudTrail, and VPC Flow Logs.
Connect subscriber AWS account to source Security Lake AWS account for subscriber queries.
Approve the subscriber's AWS account resource sharing request in AWS RAM.
Create a database link in AWS Lake Formation in the subscriber AWS account and grant access to the Security Lake Athena tables.
Provide access to Anthropic's Claude v3 model for Amazon Bedrock in the AWS subscriber account where you'll build the solution. Using a model before activating it in your AWS account will result in an error.
When requirements are satisfied, the sample solution design provides these resources:
Amazon S3 powers Amazon CloudFront.
Chatbot UI static website hosted on Amazon S3.
Lambda functions can be invoked using API gateways.
An Amazon Bedrock agent is invoked via a Lambda function.
A knowledge base-equipped Amazon Bedrock agent.
Amazon Bedrock agents' Athena SQL query action group.
Amazon Bedrock has example Athena table schemas for Security Lake. Sample table schemas improve SQL query generation for table fields in Security Lake, even if the Amazon Bedrock agent retrieves data from the Athena database.
A knowledge base on Amazon Bedrock to examine pre-existing incident response playbooks. The Amazon Bedrock agent might propose investigation or reaction based on playbooks allowed by your company.
Cost
Before installing the sample solution and reading this tutorial, understand the AWS service costs. The cost of Amazon Bedrock and Athena to query Security Lake depends on the amount of data.
Security Lake cost depends on AWS log and event data consumption. Security Lake charges separately for other AWS services. Amazon S3, AWS Glue, EventBridge, Lambda, SQS, and SNS include price details.
Amazon Bedrock on-demand pricing depends on input and output tokens and the large language model (LLM). A model learns to understand user input and instructions using tokens, which are a few characters. Amazon Bedrock pricing has additional details.
The SQL queries Amazon Bedrock creates are launched by Athena. Athena's cost depends on how much Security Lake data is scanned for that query. See Athena pricing for details.
Clear up
Clean up if you launched the security chatbot example solution using the Launch Stack button in the console with the CloudFormation template security_genai_chatbot_cfn:
Choose the Security GenAI Chatbot stack in CloudFormation for the account and region where the solution was installed.
Choose “Delete the stack”.
If you deployed the solution using AWS CDK, run cdk destruct –all.
Conclusion
The sample solution illustrates how task-oriented Amazon Bedrock agents and natural language input may increase security and speed up inquiry and analysis. A prototype solution using an Amazon Bedrock agent-driven user interface. This approach may be expanded to incorporate additional task-oriented agents with models, knowledge bases, and instructions. Increased use of AI-powered agents can help your AWS security team perform better across several domains.
The chatbot's backend views data normalised into the Open Cybersecurity Schema Framework (OCSF) by Security Lake.
#securitychatbot#AmazonBedrockagents#graphicaluserinterface#Bedrockagent#chatbot#chatbotsecurity#Technology#TechNews#technologynews#news#govindhtech
0 notes
Text
Cost Optimization in the Cloud: Reducing Expenses Without Sacrificing Performance
Introduction
Cloud computing offers scalability and flexibility, but without careful management, costs can spiral out of control. Businesses must find ways to optimize cloud spending while maintaining high performance. Cost optimization in the cloud is about eliminating waste, optimizing resources, and leveraging automation to reduce expenses without sacrificing efficiency or reliability.
In this blog, we’ll explore key strategies to cut cloud costs while ensuring optimal performance.
Why Cloud Cost Optimization Matters
Uncontrolled cloud spending can lead to budget overruns and wasted resources. Organizations must implement cost-saving measures to: ✅ Maximize ROI – Get the most value from cloud investments. ✅ Improve Efficiency – Eliminate unnecessary resource consumption. ✅ Enhance Scalability – Pay only for what’s needed while ensuring performance. ✅ Strengthen Governance – Maintain visibility and control over cloud expenses.
Top Cloud Cost Optimization Strategies
1. Right-Sizing Resources to Match Workloads
One of the biggest causes of cloud overspending is using over-provisioned instances. Right-sizing ensures that resources are aligned with actual workloads.
✔ Analyze CPU, memory, and storage usage to select optimal instance sizes. ✔ Use auto-scaling to adjust resources dynamically. ✔ Choose spot instances or reserved instances for predictable workloads.
Recommended Tools: AWS Compute Optimizer, Azure Advisor, Google Cloud Recommender
2. Implement Auto-Scaling to Avoid Over-Provisioning
Auto-scaling ensures that cloud resources increase or decrease based on real-time demand. This prevents paying for unused capacity while maintaining performance.
✔ Configure horizontal scaling to add or remove instances as needed. ✔ Implement vertical scaling to adjust resource allocation dynamically. ✔ Use scheduled scaling for predictable traffic fluctuations.
Recommended Tools: AWS Auto Scaling, Kubernetes Horizontal Pod Autoscaler, Azure Virtual Machine Scale Sets
3. Optimize Storage Costs with Tiered Storage and Data Lifecycle Policies
Storing inactive or infrequently accessed data in expensive storage tiers can lead to unnecessary costs.
✔ Move cold data to cost-effective storage options (e.g., AWS Glacier, Azure Blob Cool Storage). ✔ Set data lifecycle policies to archive or delete unused files automatically. ✔ Use compression and deduplication to reduce storage footprint.
Recommended Tools: AWS S3 Lifecycle Policies, Azure Storage Tiers, Google Cloud Storage Nearline
4. Use Serverless Computing to Reduce Infrastructure Costs
Serverless computing eliminates the need for provisioning and managing servers, allowing businesses to pay only for actual usage.
✔ Adopt AWS Lambda, Azure Functions, or Google Cloud Functions for event-driven workloads. ✔ Use containerization (Kubernetes, Docker) to maximize resource efficiency. ✔ Implement event-based architectures to trigger functions only when needed.
5. Monitor and Analyze Cloud Costs Regularly
Without real-time cost monitoring, organizations can quickly lose track of spending.
✔ Set up budget alerts to track cloud expenses. ✔ Analyze spending patterns using cost and usage reports. ✔ Identify underutilized resources and shut them down.
Recommended Tools: AWS Cost Explorer, Azure Cost Management, Google Cloud Billing Reports
6. Adopt a FinOps Approach for Cloud Financial Management
FinOps (Financial Operations) is a collaborative approach that helps organizations like Salzen optimize cloud spending through accountability and cost governance.
✔ Set budgets and enforce spending limits for different teams. ✔ Tag resources for better cost allocation and reporting. ✔ Encourage cross-team collaboration between finance, operations, and development teams.
Recommended Tools: CloudHealth, Apptio Cloudability, AWS Budgets
7. Leverage Discounts and Savings Plans
Cloud providers offer various discounted pricing models for committed usage.
✔ Use Reserved Instances (RIs) for long-term workloads. ✔ Take advantage of Savings Plans for flexible, discounted pricing. ✔ Utilize Spot Instances for non-critical, batch-processing tasks.
Recommended Tools: AWS Savings Plans, Azure Reserved VM Instances, Google Committed Use Discounts
Balancing Cost Optimization and Performance
While reducing costs is important, businesses must ensure performance remains uncompromised. Here’s how:
🚀 Prioritize mission-critical workloads while optimizing non-essential ones. 🚀 Use load balancing to distribute workloads efficiently. 🚀 **Continuously refine cost.
0 notes
Text
Setting Up a CI/CD Pipeline with AWS CodePipeline and CodeBuild

Setting Up a CI/CD Pipeline with AWS CodePipeline and CodeBuild
AWS CodePipeline and CodeBuild are key services for automating the build, test, and deployment phases of your software delivery process.
Together, they enable continuous integration and continuous delivery (CI/CD), streamlining the release cycle for your applications.
Here’s a quick guide:
Overview of the Services AWS CodePipeline:
Orchestrates the CI/CD process by connecting different stages, such as source, build, test, and deploy.
AWS CodeBuild:
A fully managed build service that compiles source code, runs tests, and produces deployable artifacts.
Steps to Set Up a CI/CD Pipeline Source Stage:
Integrate with a code repository like GitHub, AWS CodeCommit, or Bitbucket to detect changes automatically.
Build Stage:
Use CodeBuild to compile and test your application.
Define build specifications (buildspec.yml) to configure the build process.
Test Stage (Optional):
Include automated tests to validate code quality and functionality.
Deploy Stage:
Automate deployment to services like EC2, Elastic Beanstalk, Lambda, or S3.
Use deployment providers like AWS CodeDeploy.
Key Features of AWS CodePipeline and CodeBuild Event-Driven Workflow:
Automatically triggers the pipeline on code changes.
Customizable Stages:
Define stages and steps to fit your specific CI/CD needs.
Scalability: Handle workloads of any size without infrastructure management.
Security: Leverage IAM roles and encryption to secure your pipeline.
Benefits of Automating CI/CD with AWS Speed:
Shorten development cycles with automated and parallel processes.
Reliability:
Minimize human error and ensure consistent deployments. Cost
Effectiveness: Pay only for the resources you use.
With AWS CodePipeline and CodeBuild, you can create a robust and efficient CI/CD pipeline, accelerating your software delivery process and enhancing your DevOps practices.

0 notes
Text
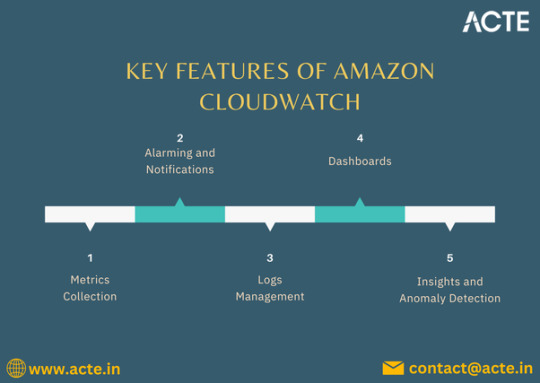
A Deep Dive into Amazon CloudWatch: Your AWS Management Ally
In the ever-evolving landscape of cloud computing, effective monitoring and management are crucial for maintaining optimal performance and reliability. Amazon CloudWatch, a core service of Amazon Web Services (AWS), serves as a powerful ally in this regard. In this blog, we will explore the features, benefits, and real-world applications of Amazon CloudWatch, helping you leverage its capabilities to enhance your AWS environment.
If you want to advance your career at the AWS Course in Pune, you need to take a systematic approach and join up for a course that best suits your interests and will greatly expand your learning path.

What is Amazon CloudWatch?
Amazon CloudWatch is a robust monitoring service designed to provide real-time insights into AWS resources and applications. By collecting and tracking metrics, logs, and events, CloudWatch enables users to monitor their cloud infrastructure and applications comprehensively.
Key Features of Amazon CloudWatch
Comprehensive Metrics Collection: CloudWatch automatically gathers metrics from various AWS services such as EC2, RDS, and S3. You can also publish custom metrics to gain deeper visibility into your specific applications.
Log Management and Analysis: With CloudWatch Logs, you can collect, monitor, and analyze log files from your AWS resources, making troubleshooting and performance analysis more efficient.
Alarms and Notifications: CloudWatch allows you to set alarms based on specific metrics, enabling proactive monitoring. For instance, you can create alarms for CPU usage, memory consumption, or error rates, triggering notifications via Amazon SNS (Simple Notification Service) when thresholds are crossed.
Custom Dashboards: CloudWatch provides customizable dashboards that allow you to visualize your metrics and logs in a consolidated view, making it easier to track performance trends.
Event Management: With CloudWatch Events, you can respond to changes in your AWS resources automatically. This capability allows for automated workflows by triggering AWS Lambda functions or other actions based on specific events.
To master the intricacies of AWS and unlock its full potential, individuals can benefit from enrolling in the AWS Online Training.
Benefits of Using Amazon CloudWatch
Enhanced Visibility: Gain real-time insights into your applications and resources, facilitating better decision-making and troubleshooting.
Cost Efficiency: Monitor resource usage to identify underutilized instances or services. This insight helps optimize costs and allocate resources more effectively.
Improved Application Reliability: Proactive monitoring and alerting allow you to address issues before they impact users, ensuring a more reliable application experience.
Simplified Troubleshooting: Integration of logs with metrics streamlines the process of identifying and resolving issues, reducing downtime.
Real-World Use Cases
Application Performance Monitoring: Use CloudWatch to track the performance of your applications in real time, ensuring they run smoothly and efficiently.
Infrastructure Health Checks: Monitor the health and performance of your AWS infrastructure, including servers, databases, and network components, to maintain optimal operation.
Security and Compliance Monitoring: Leverage CloudWatch to monitor for suspicious activities in your AWS environment, enhancing your security posture.
Cost Management: Analyze usage patterns to identify areas for cost savings, helping you optimize your cloud expenditure.
Conclusion
Amazon CloudWatch is an indispensable tool for organizations utilizing AWS services. Its comprehensive monitoring, logging, and alerting features empower businesses to maintain high performance, reliability, and cost-efficiency. By leveraging CloudWatch effectively, you can ensure your applications and resources are always performing at their best, making it a valuable ally in your cloud management strategy.
0 notes
Text
Using AWS Lambda for Serverless Computing: A Real-World Example

In recent years, serverless computing has become one of the most transformative trends in cloud computing. AWS Lambda, Amazon Web Services’ serverless compute service, has emerged as one of the key tools for building scalable, event-driven applications without the need to manage servers. In this post, we’ll walk through a real-world example of using AWS Lambda for serverless computing, highlighting the key benefits and how you can use Lambda to simplify your infrastructure.
What is AWS Lambda?
AWS Lambda is a compute service that allows you to run code without provisioning or managing servers. You upload your code (usually as a function), set the trigger, and Lambda takes care of everything else—auto-scaling, high availability, and even fault tolerance. This makes it an ideal solution for building microservices, processing data streams, automating tasks, and more.
Real-World Example: Building an Image Resizing Service
Let’s dive into a practical example of how AWS Lambda can be used to build a serverless image resizing service. Suppose you run a website where users upload images, and you want to automatically resize these images for different use cases—like thumbnails, profile pictures, and full-size versions.
Step 1: Create an S3 Bucket for Image Storage
The first step is to create an Amazon S3 bucket, where users will upload their images. S3 is an object storage service that is highly scalable and integrates seamlessly with AWS Lambda.
Step 2: Create the Lambda Function
Next, you’ll create a Lambda function that performs the image resizing. The code for this function is typically written in Python, Node.js, or another supported runtime. Here's an example Python function that resizes an image using the Pillow library:
import boto3
from PIL import Image
import io
s3 = boto3.client('s3')
def lambda_handler(event, context):
# Get the S3 bucket and object key from the event
bucket_name = event['Records'][0]['s3']['bucket']['name']
object_key = event['Records'][0]['s3']['object']['key']
# Download the image file from S3
img_obj = s3.get_object(Bucket=bucket_name, Key=object_key)
img_data = img_obj['Body'].read()
img = Image.open(io.BytesIO(img_data))
# Resize the image
img_resized = img.resize((128, 128)) # Resize to 128x128 pixels
# Save the resized image back to S3
out_key = f"resized/{object_key}"
out_buffer = io.BytesIO()
img_resized.save(out_buffer, 'JPEG')
out_buffer.seek(0)
s3.put_object(Bucket=bucket_name, Key=out_key, Body=out_buffer)
return {'statusCode': 200, 'body': 'Image resized successfully'}
This function does the following:
Downloads the uploaded image from the S3 bucket.
Resizes the image to 128x128 pixels.
Uploads the resized image back to the S3 bucket under a new path (e.g., resized/{object_key}).
Step 3: Set Up an S3 Event Trigger
AWS Lambda works seamlessly with other AWS services, like S3. To automate the image resizing process, you can set up an S3 event notification that triggers your Lambda function every time a new image is uploaded to the bucket. This is configured within the S3 console by adding an event notification that calls your Lambda function when an object is created.
Step 4: Testing the Lambda Function
Now that the Lambda function is set up and triggered by S3 events, you can test it by uploading an image to the S3 bucket. Once the image is uploaded, Lambda will automatically process the image, resize it, and store it in the designated S3 path.
Step 5: Monitor and Scale Automatically
One of the biggest advantages of using AWS Lambda is that you don’t have to worry about scaling. Lambda automatically scales to handle the volume of events, and you only pay for the compute time you use (in terms of requests and execution duration). AWS also provides monitoring and logging via Amazon CloudWatch, so you can easily track the performance of your Lambda function and troubleshoot if needed.
Key Benefits of Using AWS Lambda for Serverless Computing
Cost Efficiency: With AWS Lambda, you only pay for the execution time, meaning you don’t incur costs for idle resources. This is ideal for applications with variable or unpredictable workloads.
Auto-Scaling: Lambda automatically scales to handle an increasing number of events, without needing you to manually adjust infrastructure. This makes it well-suited for burst workloads, like processing thousands of images uploaded in a short period.
No Server Management: You don’t need to manage the underlying infrastructure. AWS handles provisioning, patching, and scaling of the servers, allowing you to focus on your code and business logic.
Event-Driven: Lambda integrates with many AWS services like S3, DynamoDB, SNS, and API Gateway, enabling you to build event-driven architectures without complex setups.
Quick Deployment: With Lambda, you can deploy your application faster, as there’s no need to worry about provisioning servers, load balancing, or scaling. Upload your code, set the trigger, and it’s ready to go.
Conclusion
AWS Lambda simplifies serverless application development by removing the need to manage infrastructure and enabling automatic scaling based on demand. In our image resizing example, Lambda not only reduces the complexity of managing servers but also makes the application more cost-effective and scalable. Whether you’re building a microservice, automating tasks, or handling real-time data streams, AWS Lambda is a powerful tool that can help you develop modern, cloud-native applications with ease.
By embracing serverless computing with AWS Lambda, you can build highly scalable, efficient, and cost-effective applications that are ideal for today's fast-paced, cloud-driven world.
To know more about AWS Lambda Enroll Now:
AWS Training In Chennai
AWS Course In Chennai
AWS Certification Training In Chennai
0 notes
Text
Secure AWS S3 Buckets with Custom Signed URLs and Lambda Triggers Best Practices
Introduction Securing AWS S3 Buckets with Custom Signed URLs and Lambda Triggers: A Comprehensive Guide In this tutorial, you’ll learn how to secure your AWS S3 buckets with custom signed URLs and Lambda triggers. This will involve implementing an AWS Lambda function that generates temporary, RESTful URLs for file downloads from your S3 buckets. Securing your S3 buckets with custom signed URLs…
0 notes