#bootable usb windows 10
Explore tagged Tumblr posts
Visit Tumblr Blog
Explore Tumblr blogs with no restrictions, modern design and the best experience.
Last Seen Tumblr Blogs


Fun Fact
12.7% of mobile users access Tumblr.
Text
Create Multiboot OS ISO files on a single bootable USB Disk
Learn how to use WinSetupFromUSB to create multiboot OS ISO files
Create Multiboot OS ISO files on a single bootable USB Disk If you’re tired of juggling multiple USBs for different operating systems, WinSetupFromUSB might be exactly what you need. With it, you can create a USB stick loaded with several ISO bootable images—Windows, Linux, or even utilities—all on a single drive. This guide covers how to set it up, comparisons to other similar tools, and tips…
#Bootable USB drive#Create Bootable USB#Microsoft Windows#USB#USB Disk#USB Drive#Windows#Windows 10#Windows 11#Windows Server
0 notes
Text
Create a Bootable USB Drive for Windows with DiskPeak
Need to install or repair your Windows OS? A bootable USB drive is the perfect solution! Here’s a quick guide:
Download Windows ISO Files:
Windows 11: Install Windows 11 from USB
Windows 10: Buy Windows 10 USB
Windows 7: Bootable USB Drive Windows 7
Use Rufus: Download Rufus, select your USB drive and the ISO file, then click "Start."
For a smooth and reliable experience, choose DiskPeak bootable USB drives. They ensure seamless installations and are compatible with various Windows versions.
👉 Get yours now: Buy Windows 10 USB
#DiskPeak #BootableUSB #Windows10 #Windows11 #Windows7 #TechSolutions #PCUpgrade
0 notes
Note
Please, please explain how to install and use linux like I'm 5 years old. I'm so sick of windows adding AI and other bullshit to my already struggling elderly laptop but I'm really not good with computers at all so I have no idea where to start with Linux.
Okay, so, I'm going to break this down into steps I would give the average tumblr user first, and then if any of them are confusing or use words you don't understand, ask me and I'll explain that step in greater detail.
Step 0) BACK. UP. YOUR. SHIT.
NEVER EVER EVER CHANGE YOUR OPERATING SYSTEM WITHOUT A COMPLETE BACKUP OF ALL YOUR FILES.
Step 1) Learn your machine. You need to know:
How much RAM you have
If your processor is 32 or 64 bit
How big your hard drive is
On windows, you can find out all of this by going to the start menu, typing "about" and opening the first result on your system instead of the internet.
For additional instructions, visit this page.
Step 2) Pick your Linux.
There's like 10,000 kinds of Linux, each tailored to particular functions that the end-user (that is you!) might want to have. The sheer amount is very daunting, so first I'm going to give my suggestions, then I'll explain how to pick for yourself.
For Mac users, I suggest Kubuntu. For windows users, I suggest Mint Cinnamon. If your laptop is really REALLY old, I recommend Sparky Stable, which is the lightest weight Linux I would ever suggest for a new user. In every case, download the version suited to your processor (32 bit can be labelled "x86" or "32 bit"; 64 bit is always labelled "64 bit").
If you want to try a different type of linux, you'll need to make sure your laptop meets the "minimum specs" or "system requirements." These numbers tell you how much RAM, processor and hard drive space the linux will use. (That's why you needed those numbers at the beginning.)
Step 3) Collect your supplies. You're going to need:
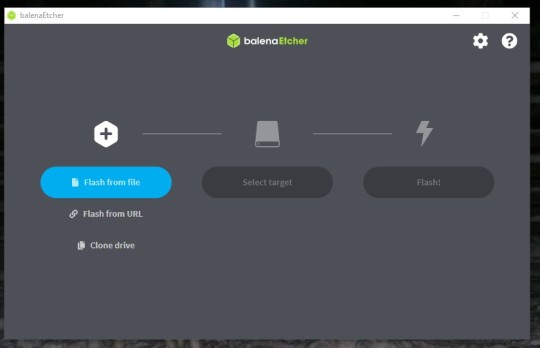
An ISO burning program compatible with your current system, like Balena Etcher.
A copy of the ISO file for the Linux you want to use.
Your laptop.
An 8gb or larger USB flash drive.
Step 3) Make a bootable USB drive
Install Balena Etcher, hitting "okay" and "next" when prompted. Last I checked, Etcher doesn't have adware attached, so you can just hit next every time.
Plug your USB drive into the laptop.
Open Etcher.
Click "flash from file" and open the ISO file with your Linux on it.
Click "Select target" and open the USB drive location. Hit the "flash" button. This will start writing all the linux installer data to your flash drive. Depending on the speed of your machine, this could take as long as 10 minutes, but shouldn't be much longer.
Step 4) Boot to the USB drive
This is, in my opinion, the trickiest step for a lot of people who don't do "computer stuff." Fortunately, in a rare act of good will, Windows 10 made this process a lot easier.
All you'll need to do is go to settings, then recovery, then advanced startup and pick the button labelled "use a device."
This tutorial has images showing where each of those is located. It's considered an "advanced setting" so you may get a spooky popup warning you that you could "harm your system by making changes" but we're not doing anything potentially harmful so you can ignore that if you get it.
Step 5) Try out linux on the flash drive first.
Linux installs using a cool little test version of itself that you can play around in. You won't be able to make changes or save settings, but you can explore a bit and see if the interface is to your liking. If it's hideous or hard to navigate, simply pick a new linux version to download, and repeat the "make a bootable USB" step for it.
Step 6) Actually install that sucker
This step varies from version to version, but the first part should be the same across the board: on the desktop, there should be a shortcut that says something like "install now." Double click it.
Follow the instructions your specific linux version gives you. When in doubt, pick the default, with one exception:
If it asks you to encrypt your drive say no. That's a more advanced feature that can really fuck your shit up down the road if you don't know how to handle it.
At some point you're going to get a scary looking warning that says 1 of 2 things. Either:
Install Linux alongside Windows, or
Format harddrive to delete all data
That first option will let you do what is called "dual booting." From then on, your computer will ask every time you turn it on whether you want Windows or Linux.
The second option will nuke Windows from orbit, leaving only linux behind.
The install process is slower the larger your chosen version is, but I've never seen it take more than half an hour. During that time, most linux versions will have a little slideshow of the features and layout of common settings that you can read or ignore as you prefer.
Step 7) Boot to your sexy new Linux device.
If you're dual booting, use the arrow keys and enter key to select your linux version from the new boot menu, called GRUB.
If you've only got linux, turn the computer on as normal and linux will boot up immediately.
Bonus Step: Copy Pasting some code
In your new start menu, look for an application called "terminal" or "terminal emulator." Open that up, and you will be presented with an intense looking (but actually very harmless) text command area.
Now, open up your web browser (firefox comes pre-installed on most!), and search the phrase "what to do after installing [linux version you picked]"
You're looking for a website called "It's FOSS." Here's a link to their page on Mint. This site has lots and lots of snippets of little text commands you can experiment with to learn how that functionality works!
Or, if you don't want to fuck with the terminal at all (fair enough!) then instead of "terminal" look for something called "software manager."
This is sort of like an app store for linux; you can install all kinds of programs directly from there without needing to go to the website of the program itself!
297 notes
·
View notes
Text
If you don’t like Windows 10, Windows 11, or other mainstream desktop operating systems for whatever reason, consider using linux. It isn’t as hard as you think.
I switched from Windows 10 to Linux Mint a few months ago, and it went pretty smoothly for me.
Linux has a reputation for being difficult to use, and while it is somewhat deserved, it is quite overblown.
For myself, I think the hardest part of switching was installing Linux on my device. It required me to learn some new software and took about 3 hours on my first try. After setting up my laptop, it was pretty easy. The user interface took a few days to adjust to, and I fiddled around with some settings to my preference, but it was not difficult to adjust from Windows 10 to Linux Mint.
And if you can get someone else to install linux for you, all you need to do it get used to some user interface changes!
INSTALLING LINUX ON YOUR COMPUTER
Here’s an installation guide for Linux Mint if you want more detail than what I give. Link: https://linuxmint-installation-guide.readthedocs.io/en/latest/
You will need: a laptop or desktop, a USB stick, and USB writing software.
Download a linux ISO file. An ISO file is all the data used to install an operating system onto a computer.
Then you will need to download a USB writing program. Then you can use USB writing software to put the ISO file onto a USB drive. This will create the “bootable media” which will be used to install linux onto your computer. For installing Linux Mint on my device, I used Balena Etcher to write the ISO file.

64 notes
·
View notes
Text
feels like I've been on my feet since monday even though I nap whenever I can. It's just been a lot.
Today I installed windows 10 (use the windows media creation tool to download the iso then use Rufus because the tool will waste your time downloading then not saving that bootable usb) on mum's computer as hers had inexplicably reverted to german and was demanding a password we never set. I really dislike 11 so 10 is much easier for me anyway.
In some (not so) downtime -which ended up being three ten-minute sessions-, I redid a batch of doll earrings and made necklaces for the Rainbow High gals with 70mm eye pins.


and here are my two Zooeys: aliexpress heads on Maleficent playline and Zooey stock. The pale eyeshadow variant never showed up so I gradually acetoned off makeup elements until the character seemed ready. Short Zooey may get green blushed lips, for now i'm really enjoying the serene expression built into the sculpt and the gorgeous mint skin. I'm over the moon with my varied height, varied body, factory/stock heads, swapped eyes crew of Rainbow Highs. 100% worth it.

7 notes
·
View notes
Text
I switched to Linux
Eight days ago I finally switched to Linux full time.
I've been a dabbler with Linux for near on 25 years, about as long as I've had access to a home computer. My first experiences of Linux came from Linux ISO's bundled on Computer Shopper magazine (and other similar styled magazines) demo discs; and about 5 years ago I started running Linux as a desktop on at least one computer fairly regularly. But I always used Windows on my main system.
As of eight days ago now, that is no longer the case. The only trace of Windows I will have now is if I ever have to run a virtual machine.
The reasons for the switch are many, but they boil down to three main reasons: 1. Issues with Windows itself; 2. Being tired of Microsoft's bullshit; and 3. No longer trusting Microsoft given the current political climate.
1. Issues with Windows. Windows is slow. I have a pretty powerful computer, it has a fast processor (a Ryzen 6800h), 32Gb of RAM, and two NVME SSDs. It therefore shouldn't take 30 seconds for an explorer window to open, just because I have the audacity to have an optical drive (at least I think that's the reason for the delay); it shouldn't take dozens of seconds for a folder of a hundred images to respond to me creating a new folder and then another dozen seconds after dragging some images into it; I shouldn't need to keep on disabling shit I don't want every time Windows wants to do an update, nor should I have shit installed on my system that I don't even know about until I visit my start menu. In short a lot of issues I have are, for the most part, pretty well known, and I'm tired of it.
2. Microsoft's Bullshit. You know what people really love. Being tracked. People really love AI being shoehorned into their computers. They also love their perfectly functional machines becoming unsupported in October this year (yeah just to remind you, Windows 10 support is ending October 2025). There are ways of mitigating a lot of this stuff. It's possible to disable the tracking and AI, and it's possible to build a Windows 11 bootable USB without the restrictions (and also with out the tracking and AI too). But I shouldn't have to do that. And honestly even doing that, there was always the nag in the back of my mind asking if I actually had closed all the doors.
Points 1 and 2 on their own, while compelling reasons for me to make the switch, were never quite enough for me to take that final step. The effort in actually committing was just a fraction more than staying. But point 3 pushed me over
3. Lack of Trust in Microsoft. The current political climate (aka President Elon and King Trumps new and hopefully (literally) short lived dynasty) is, uh, not ideal let's just say. Big companies are already folding on various inclusivity policies; even though the current Executive Orders are essentially just suggestions. They are for all intents, covering their arses in an effort to protect themselves from their new dictators. But that also means that any big company in America simply can't be trusted any more. Would Microsoft say no if they are ordered to give Elon and his goons a back door into anyone's computer?
I don't think, in reality Microsoft would actually do that, and I doubt they'd even be asked, as that'd be an own goal for Elon and Trump that I'd hope a lot of republicans would be upset by. But the possibility remains. I don't know, I realise this sounds a bit conspiracy theory; and it sort of is. But the simple fact is that with rising Fascism in the US among politics and business bowing to it, I can't ignore that possibility.
So, finally I switched.
I'm currently running Linux Mint 22.1, and honestly it's been a pretty painless experience. I knew already that basic stuff like web browsing is already a solved problem in Linux, so I knew I'd have no issues with that, but I've also got nearly all the software I used on Windows running too (I even compiled my first piece of software, MakeMKV, and it works). The only exception is Affinity Photo, but I can spin up a Windows VM for that until I can figure out how to run it in Bottles.
Would I recommend everyone switch to Linux. No I don't. As mentioned, I've been a dabbler in Linux for over 25 years, so I've long gotten used to it. I've also had a long time to prepare for it. For example with exception to Affinity and MakeMKV all the software I routinely use is Free and/or Open Source and thus already has native Linux versions. I also don't make money from working on my computer and I mostly play indie games that tend to have good Linux support too. In addition, I enjoy actively working to get my computer to do stuff; it actually feels a bit nostalgic for me to a time when I had a 486 computer with a stack of demo discs and playing the first few levels of Quake 2 at like 7 frames a second, and thinking it was awesome. Linux is by far not nearly that bad, but I feel like I'm actually using my computer, and not merely a device that lets me go on the internet and play games.
If you're all those things, then a switch to Linux might be something you should consider, and either way I'll probably be writing updates on a fairly frequent basis (I plan monthly), at least as long as I have something interesting to report.
2 notes
·
View notes
Text
Okay so update on trying to install windows to the ssd:
I’ve given up trying to install it from the hard drive onto the ssd, so I’m trying to get a bootable usb and install it from there.
I borrowed a usb from a friend, downloaded windows 10, but it… didn’t work?? Like when I tried to boot from it it just did nothing, and when I plugged it into my hdd windows it said that it had to be reformatted? Which is weird because I’m pretty sure you’re meant to be able to read it, so maybe it somehow got corrupted or something.
Anyway I’m doing another download to try again, this time checking it’s bootable before trying to boot from it. Here’s hoping it works at some point lmao
#text post#randyposting#I’m tired but I will do this#just popped a Pepsi max#I’ll do this all night if I have to#computers
12 notes
·
View notes
Video
youtube
Free Windows 10/ Windows 11 USB Bootable Media Creation Step By Step | W...
0 notes
Text
Overcoming Common PC Performance Challenges
Navigating PC Access Issues
In today’s digital age, where personal computers are central to work, gaming, and communication, losing access due to a forgotten password can be a frustrating roadblock. The issue of How To Fix Forgot Windows Password & Can't Sign In is a common challenge for users across the globe. This problem often arises when a user forgets their login credentials or inherits a device with an unknown password. Fortunately, several methods can restore access without compromising data. One effective approach involves using a password reset disk, created prior to the issue, which allows users to reset their credentials via the login screen’s recovery option.
Alternatively, booting into Safe Mode with Command Prompt can enable users to reset the password by accessing the administrator account and entering commands like “net user [username] [newpassword].” For those without recovery tools, creating a bootable USB with a third-party utility can bypass the login, though caution is needed to avoid data loss or security risks. These solutions empower users to regain control, ensuring their PC remains a reliable tool for daily tasks.
Maintaining Optimal PC Performance
Beyond access issues, maintaining a PC’s performance is critical to its longevity and efficiency. The challenge of Check for Overheating & Improve Cooling in PC is vital, as excessive heat can throttle performance, cause crashes, or damage components like the CPU or GPU. Overheating often stems from dust buildup, inadequate airflow, or outdated cooling systems. Users can start by monitoring temperatures using software that tracks CPU and GPU heat levels, with safe thresholds typically below 85°C under load. If temperatures exceed this, physical
inspection is necessary. Opening the PC case to clean dust from fans and heat sinks with compressed air can significantly improve airflow. Ensuring proper fan placement—intake fans at the front and exhaust fans at the rear—creates a balanced cooling system. Upgrading to high-performance case fans or liquid cooling solutions can further reduce temperatures, especially for gaming rigs or workstations running intensive tasks. These steps prevent thermal throttling, maintaining smooth operation and extending hardware life.
Diagnosing and Resolving Access Problems
When addressing How To Fix Forgot Windows Password & Can't Sign In, preparation and caution are key. For users with a Microsoft account, resetting the password online via another device is straightforward, requiring only an email or phone verification. Local accounts, however, demand more technical steps, such as accessing the Recovery Environment by restarting the PC and pressing F11 or Shift+F8 during boot. From there, users can navigate to advanced options to reset credentials or restore the system to a previous point. If these methods fail, reinstalling the operating system is a last resort, though it risks data loss unless files are backed up. Consulting online forums or professional technicians can provide additional guidance, especially for complex setups involving encrypted drives. These approaches ensure users regain access without compromising security, keeping their digital lives on track.
Enhancing Cooling for Long-Term Reliability
To effectively Check for Overheating & Improve Cooling in PC, proactive maintenance is essential. Dust accumulation, a common culprit, can be mitigated by cleaning the PC every three to six months, focusing on areas like the power supply and GPU fans. Reapplying thermal paste on the CPU every two years, costing around $10, improves heat transfer to the heat sink. For users in warmer climates or with high-performance systems, investing in aftermarket coolers, priced between $50 and $150, can lower temperatures by 10-20°C. Ensuring proper case ventilation, with at least two intake and one exhaust fan, maintains consistent airflow. Monitoring software can also alert users to spikes in temperature, allowing timely intervention. These measures protect components, preventing costly repairs and ensuring PCs handle demanding tasks like video editing or gaming without lag.
The Impact on User Experience
Addressing these PC challenges transforms user experience, fostering confidence and productivity. A user who resolved a forgotten password issue shared how regaining access to their work files prevented a missed deadline, highlighting the relief of quick solutions. Similarly, a gamer noted that improving cooling eliminated stuttering during intense sessions, enhancing enjoyment. By tackling How To Fix Forgot Windows Password & Can't Sign In and Check for Overheating & Improve Cooling in PC, users avoid frustration and maintain reliable systems. These fixes empower individuals, from students to professionals, to rely on their PCs for critical tasks, reinforcing the importance of proactive maintenance.
Practical Steps for Implementation
For password issues, users should prepare recovery options in advance, such as setting up security questions or linking a Microsoft account. When addressing How To Fix Forgot Windows Password & Can't Sign In, backing up data before attempting resets is crucial, using external drives or cloud storage. For cooling, regular checks using free monitoring tools can catch issues early. Cleaning requires minimal tools—compressed air cans cost $5-$10—and takes under an hour. For Check for Overheating & Improve Cooling in PC, investing in a cooling pad for laptops, priced at $20-$40, is a simple upgrade.
0 notes
Text
How to Get Windows 10 with License Key for Your PC

Windows 10 continues to be one of the most trusted and widely used operating systems in the world. Whether you're a student, a business owner, or a home user, having a secure and reliable system is essential. To enjoy all the features and security benefits, you need Windows 10 with license key.
This guide will help you understand why a licensed version is important, how to buy the right key, and what benefits come with using Windows 10 Professional Pro Key.
What Is Windows 10 Professional Pro Key?
A Windows 10 Professional Pro Key is a unique product key that unlocks the full features of the Professional version of Windows 10. With it, users gain access to tools like Remote Desktop, Group Policy Editor, BitLocker encryption, and Hyper-V virtualization.
The Pro version is ideal for professionals who need more control, security, and flexibility. Unlike the Home version, Windows 10 Pro allows you to join domains, manage policies, and protect data with advanced encryption.
Why Choose Windows 10 with License Key?
Choosing Windows 10 with license key ensures you're getting a genuine product. It also means your system will receive regular updates from Microsoft. This keeps your system secure and bug-free.
Unlicensed versions may appear to work but often have limited functionality. You'll miss out on updates, face security risks, and even run into performance issues. With a licensed key, your system runs smoothly and stays protected.
Key Features of Windows 10 Pro
Windows 10 Pro offers many features that go beyond the Home edition. Here are a few that stand out:
BitLocker Drive Encryption: Secure your files from unauthorized access.
Remote Desktop Access: Control your PC from anywhere using another device.
Hyper-V Virtualization: Run multiple operating systems on the same hardware.
Group Policy Editor: Manage user permissions and system configurations with precision.
Azure Active Directory: Useful for enterprise users who need domain join capabilities.
These tools are especially helpful for IT professionals, small business owners, and developers who need more than just basic functionality.
How to Purchase a Windows 10 Professional Pro Key
Buying a genuine Windows 10 Professional Pro Key is quick and easy. Here are the steps to follow:
Visit a trusted online seller offering verified Microsoft product keys.
Choose the Windows 10 Professional version.
Complete the payment and receive your key through email.
Use the key to activate your Windows 10 system.
Make sure to only purchase from authorized sellers to avoid counterfeit or non-working keys.
Installing Windows 10 with License Key
If you're installing a fresh copy of Windows or upgrading, you can use your Windows 10 with license key to activate the software. Follow these steps:
Download the official Windows 10 installation tool from Microsoft's website.
Create a bootable USB or DVD.
Install the OS and enter your license key when prompted.
Once installed, go to Settings > Update & Security > Activation to confirm your license status.
This ensures your Windows is fully activated and functioning properly.
Is Windows 10 Professional Worth the Upgrade?
Absolutely. The upgrade to Windows 10 Pro is worthwhile, especially if you need more control over your system. The added security tools, remote features, and administrative control make it ideal for business and tech-savvy users.
Even casual users benefit from a system that’s secure, fast, and customizable. If you use your PC for work or personal projects, investing in a Pro key is a smart move.
Where to Buy Reliable Windows 10 Pro Keys
Finding a reliable seller for your Windows 10 Professional Pro Key is critical. Some tips to ensure you’re buying a valid key:
Check customer reviews and ratings.
Ensure the website is SSL-secured.
Look for money-back guarantees or refund policies.
Confirm they provide after-sales support.
These signs indicate a trusted source. Avoid suspicious deals that seem too good to be true.
Common Issues and Troubleshooting
If your key doesn’t work right away, don’t panic. Sometimes, minor errors during installation can cause problems. Here’s what to check:
Ensure you entered the key correctly.
Make sure your internet connection is stable.
Restart your PC and try again.
Contact the seller if the key still fails.
Most issues can be fixed in minutes with proper support.
Final Thoughts
Getting Windows 10 with license key is the best way to enjoy a stable, secure, and full-featured Windows experience. With a Windows 10 Professional Pro Key, you're not only upgrading your OS—you’re unlocking advanced tools that boost productivity and safety.
If you're ready to upgrade or activate your system, choose a trusted source and make the move to Windows 10 Pro today.
0 notes
Text
Pourquoi vous devriez installer Windows 11 proprement lors d'une mise à niveau depuis Windows 10
Si vous avez décidé de passer de Windows 10 à Windows 11, bravo ! C’est un excellent choix pour profiter d’un système plus moderne, plus rapide, et surtout, plus sécurisé. Mais attention : si vous voulez tirer pleinement parti de toutes les nouveautés, en particulier des fonctions de sécurité avancées, il ne suffit pas de cliquer sur "Mettre à niveau" dans les paramètres. La meilleure méthode ? Une installation propre. Pourquoi ? Parce qu’une mise à niveau classique (dite "sur place") peut conserver vos fichiers, mais aussi des restes de votre ancien système... et cela peut vous empêcher d’activer certaines protections clés de Windows 11, comme le contrôle intelligent des applications. C’est LA fonctionnalité que vous allez vouloir, et on vous explique pourquoi. Contrôle intelligent des applications : votre nouveau garde du corps numérique Le contrôle intelligent des applications c’est un peu comme un videur ultra-strict à l’entrée de votre ordinateur : il ne laisse passer que les applications sûres, connues et vérifiées. Ce système bloque proactivement les programmes suspects avant même qu’ils aient une chance de s’exécuter. En effet, il est bien plus rapide qu’un antivirus classique. Il s’appuie sur l’IA et le cloud de Microsoft pour analyser la fiabilité des applications. Si un programme est signé numériquement par un éditeur de confiance, il passe. S’il ne l’est pas ? le contrôle intelligent des applications décide, grâce à des données télémétriques, s’il est sain… ou à bloquer. Important : une fois activé, vous ne pouvez pas débloquer une appli refusée. Il faut soit désactiver totalement la fonctionnalité (et perdre cette protection), soit réinstaller Windows pour tout réinitialiser. C’est radical, mais c’est aussi ce qui rend ce système très puissant. Mais alors, pourquoi ne pas l’activer après coup ? Parce que vous ne pouvez pas. Pour activer le contrôle intelligent des applications, Windows exige une installation propre. Il n’existe aucun moyen officiel de l’activer après une mise à niveau normale. Les solutions de contournement ne tiennent jamais longtemps : à chaque redémarrage ou mise à jour, tout se réinitialise. En clair : si vous voulez cette sécurité renforcée, il faut repartir de zéro. Comment faire une installation propre de Windows 11 (sans tout perdre) Pas de panique : tout effacer ne veut pas dire tout perdre. Voici un petit guide pour vous aider à tout préparer sereinement avant de cliquer sur “Formater” : 1. Sauvegardez tout ce qui compte Utilisez un disque dur externe ou votre service cloud préféré pour copier vos fichiers importants. On ne le répètera jamais assez ! 2. Synchronisez avec votre compte Microsoft Connectez-vous et vérifiez que vos paramètres, mots de passe, thèmes et préférences d'applications sont bien sauvegardés. Pour cela, ouvrez l’application Sauvegarde Windows. 3. Récupérez vos clés de licence Certains logiciels que vous avez achetés (Microsoft Office, Adobe, etc.) nécessitent une clé. Conservez-les précieusement avant de tout effacer. Pour cela, utiliser le logiciel gratuit ProduKey (de NirSoft) 4. Activez TPM et le démarrage sécurisé Accédez à l’UEFI (anciennement BIOS) et activez le TPM 2.0 et le Secure Boot. Ces deux éléments sont obligatoires pour installer Windows 11. L’installation propre, étape par étape Tout d’abord, téléchargez l’outil de création de support de Windows 11 depuis le site officiel de Microsoft. Ensuite, utilisez cet outil pour créer une clé USB bootable. Puis, redémarrez votre PC et démarrez à partir de la clé USB. Une fois arrivé au menu d’installation, choisissez l’option "Installation personnalisée" et supprimez la partition système existante. Enfin, laissez l’installation se dérouler jusqu’au bout, puis configurez votre PC comme s’il était neuf. Astuce : lors de la configuration, activez l’option "Envoyer des données de diagnostic facultatives". Elle est indispensable pour que le contrôle intelligent des applications fonctionne.
Que se passe-t-il après l’installation ? Une fois Windows 11 installé proprement : Ouvrez le menu démarrer et recherchez Contrôle intelligent des applications. L’outil démarre automatiquement en mode Évaluation. Si vous utilisez uniquement des applications sûres pendant quelque temps, il s’activera définitivement. Si vous installez trop de logiciels douteux, il se désactivera… et vous devrez recommencer. Conclusion Oui, une installation propre demande un peu plus de préparation. Mais en échange, vous obtenez : Un système plus rapide et fluide Moins de bugs hérités de Windows 10 Et surtout : une sécurité renforcée grâce au Contrôle intelligent des applications Alors, prêt à faire le grand saut vers un Windows 11 propre, sécurisé et performant ? Prenez un peu de temps aujourd’hui, et votre PC vous dira merci pendant des années.
0 notes
Text
Make bootable pendrive
To make a bootable USB drive (pendrive) on Windows 10, you can use the built-in Command Prompt method or use a tool like Rufus, which is easier and recommended. Here’s both methods: Method 1: Using Rufus (Recommended) Download Rufus from the official site: https://rufus.ie Insert your USB drive (at least 8GB recommended). Open Rufus (no installation needed). Under “Device”, select your USB…
0 notes
Text
How to Create a Bootable USB Stick for Windows

AUS, Wholesale/Bulk/Lot 10Pcs USB Flash Drives Thumb Data Storage Pen U Disk Memory Stick (10PCS - 4GB)
Product Information
Interface: USB 2.0
Size: picture shows
Capacity: 8MB/16MB/64MB/128MB/512MB/1GB/2GB/4GB/8GB/16GB/32GB/64GB
Color: Multicolor
Fast data transfer rate--Read
Features:
Easy to carry
Hot plug & play
Compatible with USB 1.1/2.0
Compatible with PC, Notebook, MAC
Store your pictures, videos, and songs and any kind of data.
Support Windows 7/8/10,Windows Vista,Windows 98/2000/XP,Mac OS X, Linux.
Easy to read and read in high speed ,No need drive/power supply only plug in Small style and fashionable products, as an impressive gift for your beloved, friends or even customers. Thumb Drive
Package Included:
10x Flash Memory Stick
(Pack the USB flash drive reasonably)
Note:8MB,16MB Suitable for storing small data such as bytes, it is not suitable for storing large capacity, otherwise they may be damaged,Please determine if it is right for you ! Thank
Ability to work:
USB 1.0/1.1 LOW SPEED
8MB approximately 6-7MB.
16MB approximately 13-14MB.
About capacity:
64MB = approximately 58MB-60MB
128MB = approximately 100MB-120MB
256MB = approximately 220MB-240MB
512MB = approximately 480MB-500MB
1GB = approximately 960MB-980MB
2GB = approximately 1.6GB-1.8GB
4GB = approximately 3.6GB-3.8GB
8GB = approximately 7GB-7.5GB
16GB = approximately 14GB-15GB
32GB = approximately 28GB-30GB
64GB = approximately 58GB-60GB (EXFAT format)
This is calculation difference between manufacturer and our PC,just for you reference.
0 notes
Text
Beginner’s Guide to Ethical Hacking Tools 🔐
Ethical hacking is more than a buzzword—it’s a critical skillset in 2025’s cybersecurity landscape. If you’ve ever wondered how hackers think and how companies stay one step ahead of cybercriminals, you need to know the essential tools of the trade. Here’s your beginner’s toolkit:
1. Kali Linux – The Hacker’s Operating System
A Linux distribution packed with security and penetration-testing tools.
Why use it? Pre-installed tools, live-boot capability, regular updates.
Get started: Download the ISO, create a bootable USB, and explore tools like Nmap and Metasploit.
2. Nmap – Network Mapper
Scans networks to discover hosts, services, and vulnerabilities.
bash
CopyEdit
nmap -sS -sV -O target_ip
-sS for stealth scan
-sV to detect service versions
-O for OS detection
3. Metasploit Framework – Exploitation Powerhouse
Automates exploiting known vulnerabilities.
Use case: After identifying an open port with Nmap, launch an exploit module in Metasploit to test the weakness.
Basic commands: bashCopyEditmsfconsole use exploit/windows/smb/ms17_010_eternalblue set RHOST target_ip run
4. Wireshark – Packet Analyzer
Captures and analyzes network traffic in real time.
Why it matters: See exactly what data is flowing across the network—useful for finding unencrypted credentials.
Tip: Apply display filters like http or ftp to focus on specific protocols.
5. Burp Suite – Web Application Scanner
Interacts with web applications to find vulnerabilities (SQLi, XSS, CSRF).
Features: Proxy traffic, automated scanner, intruder for fuzzing.
Getting started: Configure your browser to use Burp’s proxy, then browse the target site to capture requests.
6. John the Ripper – Password Cracker
Tests password strength by performing dictionary and brute-force attacks.
bash
CopyEdit
john --wordlist=/usr/share/wordlists/rockyou.txt hashfile.txt
Tip: Always test on hashes you have permission to crack.
7. Nikto – Web Server Scanner
Checks web servers for dangerous files, outdated software, and misconfigurations.
bash
CopyEdit
nikto -h http://target_website
Quick win: Identify default files and known vulnerabilities in seconds.
8. Aircrack-ng – Wireless Network Auditor
Assesses Wi-Fi network security by capturing and cracking WEP/WPA-PSK keys.
Workflow:
airodump-ng to capture packets
airmon-ng to enable monitor mode
aircrack-ng to crack the handshake
9. OWASP ZAP – Web Vulnerability Scanner
An open-source alternative to Burp Suite with active community support.
Use case: Automated scans plus manual testing of web applications.
Bonus: Integrated API for custom scripting.
10. Hydra – Fast Login Cracker
Performs rapid brute-force attacks on network and web services.
bash
CopyEdit
hydra -l admin -P passwords.txt ssh://target_ip
Warning: Use only in lab environments or with explicit permission.
Putting It into Practice
Set up a lab with virtual machines (Kali Linux + victim OS).
Scan the network with Nmap.
Analyze traffic in Wireshark.
Exploit a vulnerability with Metasploit.
Validate web app security using Burp Suite and OWASP ZAP.
Crack test passwords with John the Ripper and Hydra.
Ready to Dive Deeper?
If you’re serious about ethical hacking, check out our Ethical Hacking Course in Jodhpur at TechFly (no link here per your request). You’ll get hands-on labs, expert mentorship, and real-world attack/defense scenarios.
1 note
·
View note
Text
I cannot recommend Ventoy enough. I've switched the moment I've discovered it, and I've never looked back. It's so easy an convenient. No need to have 10 USB sticks for different isos, no need to reformat the USB stick when you want to put a different iso on it. You just set the USB stick with Ventoy once, and then you just drag and drop whatever isos you want as many times as you want to. And it also works both on Linux and Windows! Please give it a try, it's so much better than all the other ways to make a bootable USB.
hey, privacy concerned folks,
DON'T USE BALENA ETCHER TO USB YOUR ISOs
As @tailsos-official stated in their blog post, it displays ads which is weird for a simple disk imaging tool and more important:
It shares your IP address, the file name of the image the model of the USB stick and a bunch of other things with the Balena company and third parties.
On Windows, use Rufus instead. It's pretty neat.
On Mac, use the Raspberry Pi Imager. It does its job. Or if you don't mind the terminal, use dd. It's built-in.
On Linux you can use dd, or whatever comes with your DE. Or whatever else you prefer. We got options.
You can also use Ventoy and just chuck all your ISOs on it. No need to reformat your usb drives again just for a new boot stick. One USB to rule them all.
sources under the cut
youtube
467 notes
·
View notes
Text
0 notes