#bootstrap 4 portfolio template
Explore tagged Tumblr posts
Visit Tumblr Blog
Explore Tumblr blogs with no restrictions, modern design and the best experience.
Last Seen Tumblr Blogs


Fun Fact
When “GIF” was named word of the year in 2012, Oxford Dictionaries U.S.A. credited Tumblr for pushing the word.
Text
Transform Your Online Presence with Stylish Portfolio – A Free One Page Bootstrap Template That Wows
Why Stylish Portfolio is a Must-Have for Creative Professionals In today’s fast-paced digital world, first impressions happen online. Whether you’re a freelancer, designer, developer, or photographer, having a professional online portfolio is essential. The Stylish Portfolio template answers a common struggle — how to create a visually striking, functional website without spending a dime or…
#Bootstrap 4 Personal Template#bootstrap 4 portfolio template#bootstrap portfolio#Call to action button#creative portfolio#free creative website template#free HTML template#Free HTML5 Portfolio Template#free one page website#Freelance Developer Template#Full Width#Hero Header#On hover effect#One Page Portfolio Template#one-page personal site#Responsive Portfolio Template#Smooth scroll#Social Media Icons#Stylish Portfolio Bootstrap Template
0 notes
Text
SaaS Financial Model Template: A Complete Guide for Founders and CFOs
If you're running or launching a SaaS (Software as a Service) business, having a solid SaaS financial model template is essential for fundraising, strategic planning, and long-term growth. This guide explains what a SaaS financial model template is, why it matters, and how to choose or build one that fits your startup’s unique needs.
What Is a SaaS Financial Model Template?
A SaaS financial model template is a pre-built spreadsheet (usually in Excel or Google Sheets) that helps you forecast your company’s revenue, expenses, and cash flow. Unlike traditional business models, SaaS businesses rely on recurring revenue, which requires a specialized structure for tracking:
Monthly Recurring Revenue (MRR)
Churn and retention
Customer Acquisition Cost (CAC)
Lifetime Value (LTV)
Customer cohorts and usage trends
Annual Recurring Revenue (ARR)
A great template allows you to input key metrics and assumptions, then automatically generates financial projections over months or years.
Why You Need a SaaS Financial Model Template
Whether you’re bootstrapping or pitching to investors, a financial model helps you:
Understand your unit economics
Know whether your customer acquisition strategy is profitable over time.
Plan for runway and hiring
Forecast how much cash you’ll need and when to hire new team members.
Raise capital more effectively
VCs and angel investors expect detailed financial projections that align with industry norms.
Stress test growth strategies
See how scaling marketing, changing pricing, or improving retention impacts your bottom line.
Key Components of a SaaS Financial Model
When evaluating or using a SaaS financial model template, make sure it includes the following components:
1. Revenue Model
Breaks down different streams of revenue — subscriptions, upsells, renewals, etc. Should support monthly and annual plans.
2. Customer Metrics
Includes MRR, ARR, churn rate, LTV, CAC, and payback period. Often these are linked to marketing and sales assumptions.
3. Expense Forecast
Fixed and variable costs, including salaries, software tools, office costs, marketing, and customer support.
4. Headcount Plan
Helps forecast when to hire and the cost impact of building your team across departments.
5. Cash Flow & Runway
Tracks how much cash is left each month and when you’ll need more funding.
6. Cap Table & Funding Plan
Outlines equity ownership, fundraising rounds, and investor stakes.
Who Should Use a SaaS Financial Model Template?
Startup founders looking to fundraise or understand their runway
CFOs and financial analysts managing growth-stage SaaS companies
Accelerators and advisors helping portfolio companies prepare forecasts
Freelancers and consultants working with SaaS clients
Free vs. Paid SaaS Financial Model Templates
There are plenty of free templates available online, but they often lack detail or flexibility. Paid templates — especially those built by SaaS experts — offer:
More advanced formulas and visualizations
Scenario modeling (best case, base case, worst case)
Pre-built dashboards for investors
Easy customization by business size and pricing model
Recommended SaaS Financial Model Templates
If you're looking for a reliable starting point, here are a few trusted options:
Foresight.io SaaS Template – Clean, customizable, and designed for early-stage startups
Baremetrics Free Model – Great for bootstrappers or simple forecasts
Ascent by T2D3 – Built for VC-backed startups targeting hypergrowth
Tip: Make sure your template is easy to update monthly or quarterly as your actuals come in.
Final Thoughts
A SaaS financial model template isn't just a spreadsheet — it’s your financial roadmap. The right model can help you make smarter decisions, impress investors, and prepare for sustainable growth. Whether you use a free version or invest in a professional template, ensure it aligns with your business model and stage of growth.
Need help customizing your SaaS financial model?
Let me know and I can help build a tailored version based on your pricing tiers, growth targets, and product metrics.
0 notes
Text
Resume WordPress theme is an easily customizable responsive CV/resume/v-card/portfolio WordPress theme made with bootstrap 4. Its unique and modern design, easy navigation, one-page layout helps you effortlessly organize and beautifully illustrate your skills, experience, and portfolio https://visualmodo.com/theme/resume-wordpress-theme/ 📝📋🖋️👔👩💼
Resume #WordPress #Theme #Template #Plugins #Portfolio #PageBuilder #WebDesign #WebDevelopment #Website #CV #Skills
0 notes
Text
10 Reasons GetDigi360 Stands Out as the Best SEO Company in Ahmedabad

In a city as competitive as Ahmedabad, being online isn’t enough—visibility is what drives real business growth. That’s where strategic SEO comes in. For brands aiming to rank higher and reach more customers, choosing the right SEO partner is essential.
GetDigi360 has earned a reputation as a reliable, performance-driven SEO company in Ahmedabad. But what sets us apart? Let’s explore ten strong reasons why we’re a favorite among local businesses.
1. Ahmedabad-Focused Digital Strategy
Local businesses need local strategies. Our SEO campaigns are designed specifically for Ahmedabad’s consumer landscape—targeting regional search behavior, cultural nuances, and local keywords that truly convert.
2. Built from the Ground Up—No Templates
We don’t recycle strategies or apply cookie-cutter formulas. Every campaign we create is built from scratch based on your industry, competition, and goals. That’s how we deliver results tailored to your business—not someone else's.
3. Total Transparency—No Guesswork
You’ll never be left wondering what we’re doing. From keyword selection to ranking reports, our communication is straightforward and jargon-free. You’ll always know where you stand���and where we’re taking you next.
4. A Portfolio Backed by Results
Talk is cheap—results matter. Over the years, we’ve helped clinics, retailers, service providers, and startups climb to the top of search rankings. Our work has generated leads, phone calls, and real ROI for clients across Ahmedabad.
5. A Skilled, In-House Team
At GetDigi360, every project is handled by professionals under one roof. Whether it’s technical SEO, on-page optimization, or crafting content that ranks, our team handles it all with precision.
6. Holistic Approach to Digital Growth
We don’t just look at keywords—we examine the full picture. SEO works best when integrated with clean web design, mobile optimization, quality content, and even paid ads. Our multi-service capability ensures everything works in sync.
7. Clean, Ethical SEO That Lasts
We only use search engine–approved techniques. No shady backlinks, no keyword stuffing, and no tricks that get your site penalized. Our SEO gives you sustainable, long-term visibility—without risking your brand.
8. Clarity in Reporting and Metrics
Our clients appreciate how easy it is to understand their monthly progress. We offer visual, insightful reports showing traffic growth, keyword performance, and the real impact on your business—not just empty charts.
9. Packages That Make Business Sense
Whether you're a bootstrapped startup or an established local brand, our pricing adapts to your growth stage. We don’t lock you into unnecessary plans. Instead, we offer flexible packages that grow with your goals.
10. We Think Like Business Owners—Not Just Marketers
What makes us different? We care about your outcomes. We don’t chase vanity metrics—we focus on what truly matters: traffic that converts, inquiries that lead to sales, and long-term success that drives revenue.
Final Words: Make the Right SEO Choice for Your Business
Working with a local, experienced, and trustworthy SEO company in Ahmedabad can make all the difference. With GetDigi360, you're not hiring a vendor—you’re gaining a digital growth partner who understands your market, respects your goals, and delivers what actually matters.
If you're ready to stop guessing and start growing, it's time to connect with GetDigi360.
#SEOServicesAhmedabad#DigitalMarketingExperts#AhmedabadMarketingAgency#GetDigi360#GrowWithSEO#LocalBusinessMarketing
0 notes
Text
Why You Need a Graphic Design Virtual Assistant Today

Introduction
In today's digital-first world, visual content is king. Whether it's for websites, social media, or marketing materials, design plays a critical role in brand success. However, hiring full-time graphic designers isn't always cost-effective, especially for small businesses. That's where a graphic design virtual assistant can transform your workflow. These professionals offer flexibility, creativity, and expertise without the overhead. In this blog, we’ll explore why hiring a design VA is a smart move and how they can help you grow faster.
1. What is a Graphic Design Virtual Assistant?
A graphic design virtual assistant is a remote professional skilled in creating visual content. They handle tasks such as social media graphics, logos, brochures, and website design elements. Unlike traditional in-house designers, VAs work on-demand, making them highly efficient for specific projects. They often work with multiple clients, bringing diverse experience and fresh ideas. You can hire them part-time, hourly, or on a project basis. This flexibility makes them ideal for startups and entrepreneurs. They are also great for scaling visual output without blowing your budget.
2. The Cost-Saving Advantage
Hiring an in-house designer involves salary, benefits, and workspace expenses. A graphic design virtual assistant removes these overhead costs completely. You only pay for the work you need, which optimizes your budget. VAs are usually based in different regions, offering competitive rates for high-quality work. Their freelance model gives you access to professional services at a fraction of the cost. This makes them a smart solution for bootstrapped businesses. You can allocate saved funds to marketing or product development instead. Cost efficiency is one of the biggest benefits of using a design VA.
3. Boost Your Brand Identity
Consistent, eye-catching branding is key to standing out in any market. A graphic design virtual assistant can help ensure that all your visuals—from logos to posts—align with your brand. They use tools like Adobe Illustrator, Canva, and Photoshop to deliver high-quality work. By maintaining a consistent look, they increase brand recognition and trust. Your audience begins to associate your unique style with your message. This professional appearance can set you apart from competitors. Great design enhances user experience and encourages engagement. A design VA helps polish your brand image across all channels.
4. Increase Productivity and Focus
Delegating design work to a professional allows you to focus on your core business. Instead of struggling with DIY tools, let a graphic design virtual assistant take over creative tasks. They can handle quick turnaround jobs like flyers, social media banners, and email templates. This saves time and ensures consistent quality in every design piece. With design off your plate, you can invest your time in strategy and operations. Business owners and teams can avoid burnout and improve workflow. Outsourcing design increases overall productivity while maintaining a professional output. It's a win-win solution for growing businesses.
5. Access to Diverse Skills and Styles
A graphic design virtual assistant often comes with a wide range of design expertise. From minimalist to bold and vibrant styles, they adapt based on project needs. Many have backgrounds in branding, UI/UX, and motion graphics. This versatility ensures your visual content remains fresh and creative. You’re not limited to one designer’s style, especially if you rotate VAs based on projects. They stay updated on design trends, ensuring your content looks modern and relevant. With a broad portfolio, VAs can offer suggestions you might not have considered. Their creativity adds valuable depth to your brand presence.
6. Flexible Working Hours
Design VAs operate across global time zones, making them a 24/7 resource for your business. Need last-minute edits for a launch? A graphic design virtual assistant can get it done while you sleep. Their flexible schedule means faster turnaround for urgent requests. You can assign tasks at any time and expect delivery within agreed deadlines. This is especially helpful for companies with tight content calendars. Weekend work or off-hour tasks are often easier to schedule with VAs. It’s like having a full-time designer without the 9-to-5 restrictions. This flexibility supports your business rhythm and growth pace.
7. Ideal for Startups and Small Businesses
Startups need strong visuals but often lack the budget for full-time staff. A graphic design virtual assistant offers a perfect solution—professional results without the overhead. They support everything from pitch decks to app mockups. Their input can help a startup appear more polished and investor-ready. Even small local businesses benefit from marketing materials like flyers, posters, and menus. VAs help establish a visual identity that communicates professionalism. As your company grows, you can scale up their involvement. Hiring a design VA is a budget-friendly way to level the playing field.
8. How to Hire the Right Design VA
Finding the right graphic design virtual assistant requires clarity on your goals. Start by outlining the design tasks you need help with regularly. Then explore platforms like Upwork, Fiverr, or VA agencies specializing in creatives. Check their portfolios and reviews to gauge their design style and experience. Conduct a trial project to assess compatibility and communication. Choose someone who understands your brand voice and vision. Make sure they’re familiar with the design tools your team uses. A smooth onboarding process sets the stage for long-term collaboration. Take your time—it’s worth finding the perfect match.
Conclusion
Hiring a graphic design virtual assistant is no longer a luxury—it’s a smart, strategic move. Whether you're scaling your brand, launching a startup, or simply want to improve your visual content, a design VA offers the expertise and flexibility you need. They save time, reduce costs, and elevate your brand identity. With global talent at your fingertips, you can access world-class design support tailored to your business. Start small or scale big—either way, bringing a design VA on board could be your best decision this year.
FAQs
What is a graphic design virtual assistant? A remote professional who provides design services such as logos, graphics, and templates for your business.
How much does a graphic design VA cost? Rates vary, but many VAs offer affordable hourly or project-based pricing compared to in-house designers.
What tools do design VAs use? Most use Adobe Suite, Canva, Figma, and other industry-standard tools based on your project needs.
Can a VA design my website or app? Yes, many VAs have UI/UX experience and can create mockups or work alongside developers.
Where can I find a good design virtual assistant? Try platforms like Upwork, Fiverr, OnlineJobs.ph, or dedicated VA agencies.
How do I know if a VA is skilled enough? Review their portfolio, client testimonials, and ask for a sample task to evaluate their abilities.
Is it better to hire a full-time designer or a VA? If you have limited design needs or budget, a VA is more flexible and cost-effective.
What’s the best way to manage a remote design VA? Use tools like Trello, Slack, or Asana to assign tasks, give feedback, and track deadlines efficiently.
0 notes
Text
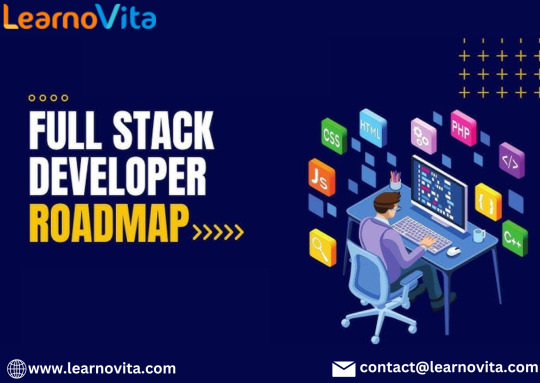
The Definitive Blueprint for Aspiring Full Stack Web Developers
Embarking on a career as a full stack web developer is an exciting journey filled with endless possibilities. Full stack developers are equipped to handle both the frontend and backend aspects of web applications, making them invaluable in the tech industry. This blog serves as your definitive blueprint, guiding you through the essential skills and steps needed to achieve success in this field.
For those looking to enhance their skills, Full Stack Developer Course Online programs offer comprehensive education and job placement assistance, making it easier to master this tool and advance your career.
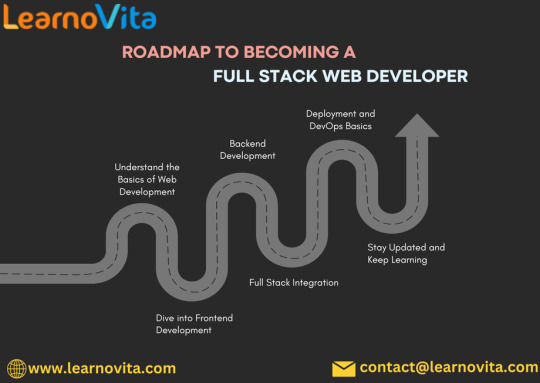
Step 1: Lay the Groundwork
Master HTML & CSS
Start by learning the foundational technologies of the web:
HTML (HyperText Markup Language): Understand how to structure web content using various elements and tags. Familiarize yourself with semantic HTML to improve accessibility and SEO.
CSS (Cascading Style Sheets): Learn to style your web pages effectively. Focus on layout techniques, color schemes, typography, and responsive design principles.
Get Comfortable with JavaScript
JavaScript: This powerful scripting language is essential for adding interactivity to your web applications. Concentrate on:
Variables, data types, and operators
Control structures (if statements, loops)
Functions, scope, and DOM manipulation for dynamic content
Step 2: Strengthen Your Frontend Skills
Deepen Your JavaScript Knowledge
ES6 and Modern Features: Become proficient in newer JavaScript features such as arrow functions, destructuring, template literals, and modules.
Explore Frontend Frameworks
React: Dive into this popular library for building user interfaces. Understand components, state management, and hooks.
Alternative Frameworks: Consider learning Vue.js or Angular to broaden your perspective on frontend development.
Responsive Design Practices
Learn how to create mobile-friendly applications using responsive design techniques. Frameworks like Bootstrap or Tailwind CSS can expedite your design process.
Version Control with Git
Git: Familiarize yourself with version control systems. Learn to track changes in your code and collaborate using platforms like GitHub.
Step 3: Transition to Backend Development
Learn Server-Side Technologies
Node.js: Get to know this JavaScript runtime for server-side programming. Understand its architecture and how to build scalable applications.
Express.js: Learn this framework for Node.js that simplifies the creation of robust APIs and web applications.
Database Management
SQL Databases: Start with relational databases like PostgreSQL or MySQL. Learn how to write queries and manage data effectively.
NoSQL Databases: Explore MongoDB for handling unstructured data, and understand when to use NoSQL versus SQL.
API Development
Master the principles of RESTful API design. Learn to create and consume APIs using HTTP methods and status codes.
With the aid of Best Online Training & Placement programs, which offer comprehensive training and job placement support to anyone looking to develop their talents, it’s easier to learn this tool and advance your career.
Step 4: Full Stack Integration
Build Complete Applications
Combine your frontend and backend skills to create full stack projects. Ideas include:
A personal blog or portfolio site
A task management application
An e-commerce store
Implement User Authentication
Learn to secure your applications by implementing user authentication and authorization. Explore techniques such as JWT (JSON Web Tokens) and OAuth.
With the aid of Best Online Training & Placement programs, which offer comprehensive training and job placement support to anyone looking to develop their talents, it’s easier to learn this tool and advance your career.
Step 5: Deployment and DevOps Fundamentals
Deploy Your Applications
Understand the deployment process using platforms like Heroku, Vercel, or AWS. Learn how to configure your applications for production environments.
Basic DevOps Knowledge
Familiarize yourself with key DevOps practices, including Continuous Integration/Continuous Deployment (CI/CD) and containerization with Docker.
Step 6: Engage with the Community and Continuous Learning
Join Online Developer Communities
Connect with fellow developers through forums such as Stack Overflow, Reddit, or Discord. Engaging with a community can provide support, resources, and networking opportunities.
Stay Current
Follow blogs, podcasts, and YouTube channels dedicated to web development. Continuous learning is vital in this fast-paced industry.
Create a Professional Portfolio
Build a portfolio showcasing your projects, skills, and experiences. Highlight your best work to attract potential employers and clients.
Conclusion
The path to becoming a full stack web developer is filled with challenges and opportunities for growth. By following this definitive blueprint, you can equip yourself with the skills and knowledge needed to thrive in this dynamic field. Embrace the learning journey, stay curious, and enjoy the process of becoming a skilled developer
0 notes
Text
The Ultimate Guide to Building a Website: From Planning to Launch

Building a website is an exciting yet complex process that requires careful planning, execution, and maintenance. Whether you're creating a personal blog, an e-commerce store, or a corporate website, this guide will walk you through every step—from planning to launch—to ensure your website is functional, user-friendly, and optimized for success.
1. Planning Your Website
Before diving into design or development, it’s crucial to lay a solid foundation for your website. Here’s how to get started:
Define Your Goals and Target Audience
Identify the purpose of your website (e.g., selling products, sharing information, building a community).
Understand your target audience’s needs, preferences, and behaviors.
Choose a Domain Name and Hosting Provider
Select a domain name that is short, memorable, and relevant to your brand.
Choose a reliable hosting provider that offers good speed, uptime, and customer support.
Create a Sitemap and Wireframe
A sitemap outlines the structure of your website, including all pages and their hierarchy.
A wireframe is a visual blueprint of your website’s layout, helping you plan the placement of elements like headers, images, and buttons.
2. Choosing the Right Platform
The platform you choose will determine how your website is built and managed. Here are some popular options:
Content Management Systems (CMS)
WordPress: Highly customizable and beginner-friendly, ideal for blogs, portfolios, and business websites.
Wix: Drag-and-drop builder, perfect for small businesses and personal websites.
Squarespace: Known for its stunning templates, great for creatives and small businesses.
Shopify: Designed for e-commerce, offering robust features for online stores.
Custom Development
If you need a highly unique or complex website, consider hiring a web development company in Kochi to build a custom solution tailored to your needs.
3. Designing Your Website
Design plays a critical role in user experience (UX) and engagement. Follow these tips to create a visually appealing and functional design:
Responsive Design
Ensure your website looks great on all devices (desktop, tablet, mobile).
Use a mobile-first approach to prioritize mobile users.
User Interface (UI) and User Experience (UX)
Keep the design clean and intuitive, with easy navigation.
Use consistent fonts, colors, and styles to maintain brand identity.
Visual Elements
Use high-quality images and videos to enhance your content.
Optimize visuals for fast loading times.
4. Development Process
Once the design is finalized, it’s time to bring your website to life. Here’s what the development process involves:
Front-End Development
Focuses on the visual and interactive aspects of your website.
Uses languages like HTML, CSS, and JavaScript.
Back-End Development
Handles the server-side functionality, such as databases and user authentication.
Uses languages like PHP, Python, or Ruby.
Frameworks and Libraries
Use frameworks like Bootstrap (for front-end) or Laravel (for back-end) to streamline development.
Leverage libraries like React or Angular for dynamic, interactive features.
5. Adding Functionality
Your website needs more than just a pretty design—it needs functionality to meet user needs. Here’s how to enhance your site:
Plugins and Widgets
Add features like contact forms, social media integration, and SEO tools using plugins.
Use widgets to display dynamic content, such as recent posts or testimonials.
E-Commerce Features
If you’re building an online store, integrate payment gateways, product catalogs, and shopping carts.
Platforms like WooCommerce (for WordPress) or Shopify make this process easier.
SEO Best Practices
Optimize your website for search engines by using proper meta tags, alt text, and structured data.
Ensure your site is fast, mobile-friendly, and secure (HTTPS).
6. Testing and Debugging
Before launching, thoroughly test your website to ensure it works flawlessly:
Cross-Browser and Cross-Device Testing
Check how your website performs on different browsers (Chrome, Safari, Firefox) and devices (desktop, tablet, mobile).
Performance Optimization
Use tools like Google PageSpeed Insights or GTmetrix to identify and fix performance issues.
Compress images, minify CSS/JavaScript, and enable caching.
Debugging
Fix any bugs or errors that could affect user experience.
Test forms, links, and interactive elements to ensure they work as intended.
7. Launching Your Website
Once your website is ready, it’s time to go live. Follow these steps for a smooth launch:
Final Checks
Review all content for accuracy and consistency.
Test all functionalities, including forms, buttons, and navigation.
Set Up Analytics
Install tools like Google Analytics and Google Search Console to track traffic, user behavior, and performance.
Submit to Search Engines
Submit your sitemap to Google and Bing to ensure your site is indexed quickly.
8. Post-Launch Maintenance
Your work doesn’t end after the launch. Regular maintenance is essential to keep your website running smoothly:
Content Updates
Regularly publish new content or update existing pages to keep your site fresh and relevant.
Security
Use security plugins or services to protect your site from threats.
Regularly update your CMS, plugins, and themes to patch vulnerabilities.
Backups
Schedule regular backups to prevent data loss in case of technical issues.
Why Choose Professional Web Development Services?
While DIY website builders are great for beginners, professional services offer unparalleled expertise and customization. If you’re looking for web development in Kochi, consider partnering with a trusted agency like SvaHub Media. Their team of experts can help you design, develop, and launch a website that meets your unique needs.
For businesses in Kochi, web development services in Kochi provide end-to-end solutions, from planning and design to post-launch support. Whether you need a simple blog or a complex e-commerce platform, professional developers can deliver a high-quality website that drives results.
Final Thoughts
Building a website is a multi-step process that requires careful planning, execution, and ongoing maintenance. By following this guide, you can create a website that not only looks great but also performs well and meets your goals. Whether you choose to build your site yourself or hire a professional team, the key to success lies in understanding your audience, optimizing for usability, and staying committed to continuous improvement.
If you’re ready to take your online presence to the next level, consider partnering with a web development company in Kochi to bring your vision to life. With the right strategy and expertise, your website can become a powerful tool for growth and success.
0 notes
Text
Retirement Planning Specialist in Springboro

Independent professional financial planning and investment management advisory firm serving Centerville, Lebanon, Springboro, Dayton and Cincinnati, Ohio. Founded by David Frazier, an Investment Advisor and Certified Financial Planner™ professional, Financial Plan Advisors has offered investments and advisory services for over twenty years. The predominant services provided to clients revolve around retirement planning, fee-only fiduciary portfolio management, and retirement income generation. Visit -
0 notes
Text
Build Portfolio Website in Laravel 11: Your Comprehensive Guide
Building a portfolio website is an essential step for showcasing your skills, projects, and achievements in today's competitive world. Laravel 11, the latest version of the robust PHP framework, offers unparalleled tools and features to create a stunning and functional portfolio website. In this guide, we’ll walk you through the process of building a portfolio website in Laravel 11, ensuring you have a step-by-step roadmap to success.
Why Choose Laravel 11 for Your Portfolio Website?
1. Modern Features
Laravel 11 introduces enhanced routing, improved performance, and advanced tooling that make it the go-to choice for web development.
2. Scalability
Whether you're a freelancer or a business owner, Laravel 11's scalability ensures your website can grow as your portfolio expands.
3. Security
With built-in authentication and security features, Laravel 11 protects your data and provides peace of mind.
4. Community Support
Laravel’s vast community ensures you’ll find solutions to problems, tutorials, and plugins to enhance your website.
Key Features of a Portfolio Website
To build a portfolio website in Laravel 11, ensure it includes:
Homepage: A welcoming introduction.
About Section: Your background and expertise.
Projects: A gallery showcasing your work.
Contact Form: Easy communication.
Blog Section: Share insights and updates.
Responsive Design: Optimized for all devices.
Getting Started with Laravel 11
Step 1: Install Laravel 11
Start by setting up Laravel 11 on your local environment.
composer create-project --prefer-dist laravel/laravel portfolio-website
Step 2: Configure Your Environment
Update your .env file to set up the database and other environment variables.
DB_CONNECTION=mysql
DB_HOST=127.0.0.1
DB_PORT=3306
DB_DATABASE=portfolio
DB_USERNAME=root
DB_PASSWORD=yourpassword
Step 3: Set Up Authentication
Laravel 11 offers seamless authentication features.
php artisan make:auth
This command generates routes, controllers, and views for user authentication.
Step 4: Design Your Database
Create tables for your portfolio items, such as projects, blogs, and user profiles. Use migrations to structure your database.
php artisan make:migration create_projects_table
In the migration file:
Schema::create('projects', function (Blueprint $table) {
$table->id();
$table->string('title');
$table->text('description');
$table->string('image')->nullable();
$table->timestamps();
});
Run the migration:
php artisan migrate
Building the Frontend
Step 1: Choose a CSS Framework
Laravel integrates well with frameworks like Tailwind CSS and Bootstrap. Install Tailwind CSS for modern and responsive designs:
npm install -D tailwindcss
npx tailwindcss init
Configure your Tailwind file and integrate it into your project.
Step 2: Create Blade Templates
Laravel’s Blade templating engine simplifies building dynamic pages. Create a layout file in resources/views/layouts/app.blade.php:
<!DOCTYPE html>
<html>
<head>
<title>@yield('title')</title>
<link rel="stylesheet" href="{{ asset('css/app.css') }}">
</head>
<body>
<div class="container">
@yield('content')
</div>
</body>
</html>
Use this layout in other views:
@extends('layouts.app')
@section('title', 'Home')
@section('content')
<h1>Welcome to My Portfolio</h1>
@endsection
Step 3: Dynamic Content
Fetch portfolio items from the database and display them dynamically using controllers.
public function index() {
$projects = Project::all();
return view('home', compact('projects'));
}
In your Blade template:
@foreach ($projects as $project)
<div class="project">
<h2>{{ $project->title }}</h2>
<p>{{ $project->description }}</p>
<img src="{{ $project->image }}" alt="{{ $project->title }}">
</div>
@endforeach
Advanced Features
1. Search Functionality
Add search to help visitors find specific projects or blogs.
public function search(Request $request) {
$query = $request->input('query');
$projects = Project::where('title', 'LIKE', "%{$query}%")->get();
return view('search-results', compact('projects'));
}
2. File Uploads
Enable uploading images for projects.
public function store(Request $request) {
$request->validate([
'title' => 'required',
'description' => 'required',
'image' => 'nullable|image',
]);
$imagePath = $request->file('image')->store('projects', 'public');
Project::create([
'title' => $request->title,
'description' => $request->description,
'image' => $imagePath,
]);
}
3. Integrate Analytics
Use Google Analytics or similar tools to track visitor behavior.
4. Deploying Your Website
Deploy your Laravel website using platforms like Laravel Forge, AWS, or Heroku. Ensure to optimize the performance with caching and minification.
Optimizing Your Portfolio Website for SEO
Keyword Integration: Use keywords like “Build Portfolio Website in Laravel 11” strategically in titles, meta descriptions, and content.
Fast Loading Times: Optimize images and use caching.
Responsive Design: Ensure compatibility with mobile devices.
Content Strategy: Regularly update your blog to attract organic traffic.
Conclusion
Building a portfolio website in Laravel 11 is an enriching experience that showcases your skills and work to the world. By leveraging the framework’s capabilities and integrating advanced features, you can create a website that stands out in the digital landscape. Start your journey today and make your mark with a professional portfolio website
0 notes
Text
Web Development Made Easy: Your Path to Creating Stunning Websites!
Web development might seem intimidating at first, but with the right approach, anyone can create stunning websites. Here’s a straightforward guide to get you started!

1. Understand the Basics
Before diving into coding, familiarize yourself with the fundamental concepts:
HTML (HyperText Markup Language): The backbone of any website. It structures your content.
CSS (Cascading Style Sheets): This styles your website, allowing for customization of fonts, colors, and layouts.
JavaScript: Adds interactivity to your site, making it dynamic.
2. Choose the Right Tools
You don’t need to be a coding expert to create beautiful websites. Here are some tools that simplify the process:
Website Builders: Platforms like Wix, Squarespace, and WordPress offer templates and drag-and-drop functionality, making it easy to get started without coding.
Code Editors: If you prefer coding, tools like Visual Studio Code or Sublime Text can help streamline your development process.
3. Responsive Design
Make sure your website looks great on all devices. Use responsive design principles:
Flexbox and Grid in CSS help create flexible layouts.
Test your website on various devices to ensure usability.
4. Utilize Frameworks and Libraries
Speed up development with frameworks:
Bootstrap for CSS: Quickly style your website with pre-defined classes.
jQuery for JavaScript: Simplifies HTML document traversing and event handling.
5. Focus on User Experience (UX)
A great website is user-friendly. Keep these tips in mind:
Navigation: Ensure your site is easy to navigate.
Loading Speed: Optimize images and scripts to enhance performance.
Accessibility: Make your website usable for everyone, including those with disabilities.
6. Learn from Resources
Take advantage of online resources:
Free Courses: Platforms like Codecademy, freeCodeCamp, and Udemy offer excellent tutorials.
Documentation: Refer to MDN Web Docs for in-depth explanations of web technologies.
7. Practice, Practice, Practice
The best way to learn is by doing. Start with small projects:
Create a personal blog or portfolio.
Build a simple landing page for a fictional product.
8. Stay Updated
Web development is constantly evolving. Follow industry news, blogs, and forums to stay informed about the latest trends and technologies.
By breaking down the process into manageable steps, you can demystify web development and create stunning websites. Remember, practice is key, and with time, you’ll gain the skills needed to bring your vision to life!
#WebDevelopment #HTML #CSS #JavaScript #ResponsiveDesign #UserExperience #WebDesign #Coding #WebsiteBuilder #LearningToCode
0 notes
Text
Jimmy – Stunning Free Bootstrap Portfolio Template to Showcase Your Personal Brand
Why Jimmy is a Must-Have for Your Personal Brand In the world of digital-first impressions, a clean and striking portfolio site can make or break your professional image. Whether you’re a designer, developer, freelancer, or fresh graduate, the way you present your work online matters more than ever. The problem? Not everyone has the time or resources to build a polished site from scratch. That’s…
#barbershop HTML5 template#bootstrap 4 portfolio template#Bootstrap 4 portfolio theme#bootstrap portfolio#Call to action button#Carousel#Clean#Free Bootstrap Portfolio Template#free creative portfolio#free html5 personal template#free one page website#Hero Header#On hover effect#one page portfolio theme#one-page personal site#personal branding website#Personal Portfolio Template#responsive html template#responsive portfolio website#Sticky Navigation Bar
0 notes
Text
A Guide to the Best CSS Frameworks for Web Developers
CSS frameworks are an essential tool for modern web development, enabling developers to create responsive, mobile-friendly websites with less effort. They come with pre-built grids, styles, and UI components, saving developers time and allowing them to focus on functionality and user experience. In this article, we’ll explore some of the top CSS frameworks that are widely used in the industry today.
1. Bootstrap
Overview:
Bootstrap is the most well-known CSS framework and has been a popular choice among developers for many years. It provides a rich set of UI components, a responsive grid system, and a consistent design language, making it an ideal choice for rapid development.
Key Features:
Responsive Grid System: Bootstrap's 12-column grid is flexible and adapts to different screen sizes, making it easy to create responsive layouts.
Pre-designed UI Components: Includes buttons, forms, carousels, and navigation bars that are ready to use.
Extensive Documentation: One of the reasons for Bootstrap's popularity is its comprehensive documentation, making it easy for developers to get started.
Customizable via Sass: Developers can easily customize the framework using Sass variables.
Use Case:
Bootstrap is a go-to choice for building responsive websites quickly, making it suitable for beginners and experienced developers alike. It is commonly used for creating corporate websites, landing pages, and admin dashboards.
2. Foundation
Overview:
Foundation by Zurb is a robust CSS framework designed for professional developers who need flexibility and control over their projects. It’s built with a mobile-first philosophy, ensuring that designs are fully responsive right out of the box.
Key Features:
Advanced Grid System: Foundation’s grid system is highly customizable, giving developers more control over layouts.
Mobile-first Design: Every element is optimized for smaller screens and can easily scale up for larger devices.
Comprehensive UI Components: Offers pre-built components like dropdown menus, buttons, forms, and more.
Foundation for Emails: In addition to web development, Foundation also has a version tailored for creating responsive email templates.
Use Case:
Foundation is ideal for larger projects where flexibility is important. It’s widely used for enterprise-level websites, web applications, and complex projects that require a mobile-first approach.
3. Tailwind CSS
Overview:
Tailwind CSS is a utility-first framework that provides developers with low-level CSS classes, offering maximum flexibility to design their projects without predefined styles or components. Unlike traditional frameworks, Tailwind allows developers to apply styles directly in their HTML, giving them full control over the look and feel of their sites.
Key Features:
Utility-first Classes: Tailwind’s utility classes allow developers to style elements quickly without writing custom CSS.
Highly Customizable: Developers can override default settings to create their own themes and styles.
Responsive Design Utilities: Tailwind makes it easy to apply different styles based on screen size using responsive utility classes.
Minimal Overhead: Tailwind doesn’t come with pre-built UI components, keeping the framework lightweight.
Use Case:
Tailwind is perfect for developers who want to create unique designs without relying on predefined components. It’s ideal for projects that require a lot of customization and creativity, such as web apps and portfolio sites.
4. Bulma
Overview:
Bulma is a lightweight, modern CSS framework that is built on Flexbox. It’s known for its simplicity and ease of use, making it a great option for developers who want a minimalistic approach to web design.
Key Features:
Flexbox-based Grid: Bulma uses Flexbox for its grid system, which makes creating responsive layouts a breeze.
Clean Syntax: Bulma offers a clean and readable CSS structure, making it easy for developers to work with.
Pre-styled Components: Provides simple UI components such as buttons, cards, and navigation menus.
No JavaScript Dependencies: Bulma focuses purely on CSS, making it compatible with any JavaScript framework or library.
Use Case:
Bulma is an excellent choice for developers who want a minimalist, clean design with modern UI components. It’s well-suited for smaller projects, landing pages, and personal websites.
5. Materialize CSS
Overview:
Materialize is a CSS framework based on Google’s Material Design principles. It provides developers with ready-made components that follow Material Design guidelines, allowing them to create clean and intuitive user interfaces.
Key Features:
Material Design Components: Includes all the standard Material Design components such as cards, buttons, and navigation bars.
Responsive Grid: Like Bootstrap, Materialize uses a 12-column grid that helps in creating fluid, responsive layouts.
Interactive Elements: Comes with built-in JavaScript components like sliders, modals, and parallax effects.
Sass Support: Materialize is built using Sass, making it highly customizable.
Use Case:
Materialize is perfect for developers looking to implement Google’s Material Design system in their projects. It’s commonly used for web apps, portfolios, and other projects where a clean, modern design is essential.
Conclusion
Each CSS framework offers its own set of features and benefits, so the right one for you depends on the specific requirements of your project. Bootstrap is a versatile and popular choice for most websites, while Foundation is great for more advanced, flexible designs. Tailwind CSS gives developers the freedom to create custom designs, while Bulma offers a lightweight, minimalist option. Lastly, Materialize is perfect for those who prefer Google’s Material Design aesthetic.
1 note
·
View note
Text
Resume WordPress theme is an easily customizable responsive CV/resume/v-card/portfolio WordPress theme made with bootstrap 4. Its unique and modern design, easy navigation, one-page layout helps you effortlessly organize and beautifully illustrate your skills, experience, and portfolio https://visualmodo.com/theme/resume-wordpress-theme/ 📝📋🖋️👔👩💼
Resume #WordPress #Theme #Template #Plugins #Portfolio #PageBuilder #WebDesign #WebDevelopment #Website #CV #Skills
0 notes
Text
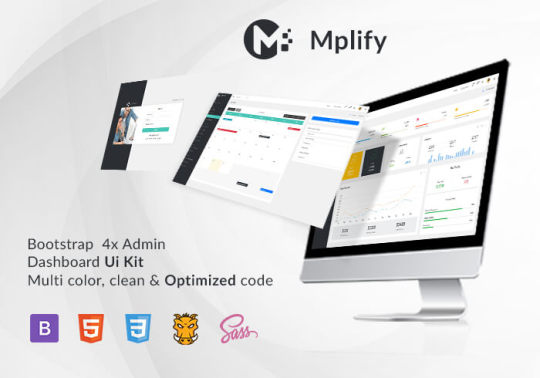
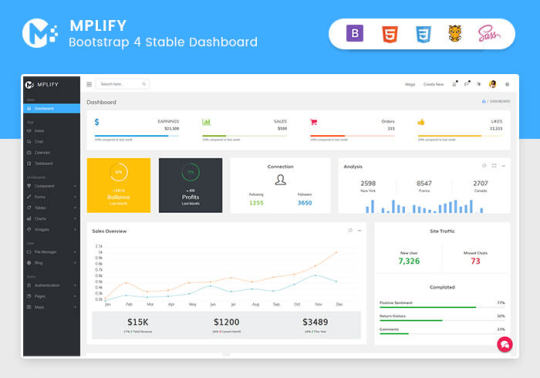
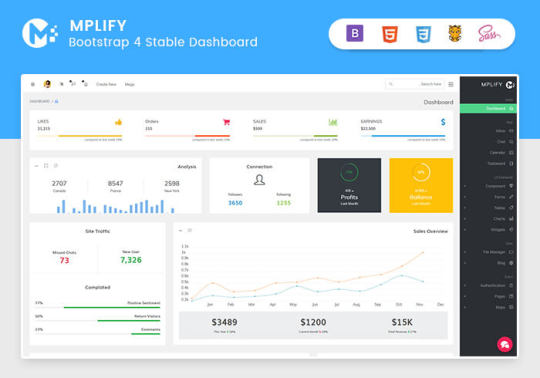
Mplify - Versatile Bootstrap 4 Admin Template by Thememakker
Mplify Admin makes the development process easy and fast for you and aims to help you implement your idea in real time.
Product Highlights
Mplify is a fully professional, responsive, modern, multi-purpose, and feature-rich admin template. It can be used to create various websites, admin templates, admin dashboards, backend websites, CMS, CRM, blogs, business websites, timelines, and portfolios. This versatility makes it an ideal choice for developers looking to build functional and aesthetically pleasing web applications efficiently.
Key Features
Bootstrap 4.3.1: Ensures compatibility and modern design standards.
jQuery 3.3.1: Offers extensive plugins and support.
Built-in SCSS: Provides more flexibility and control over styles.
Light & Dark Full Support: Allows users to switch between light and dark themes.
RTL Full Support: Right-to-left language support for global accessibility.
W3C Validate Code: Ensures high coding standards and practices.
Mobile and Tablet Friendly: Responsive design for all devices.
Treeview: For hierarchical data display.
Drag & Drop Upload: Simplifies file uploading processes.
Image Cropping: Integrated tools for editing images.
Summernote: Rich text editor integration.
Markdown: Support for markdown formatting.
Beautiful Inbox Interface: User-friendly email management.
User-Friendly Chat App: Built-in chat application.
Scrum & Kanban Taskboard: Task management tools.
Add Events to Your Calendar: Event management capabilities.
File Manager: Efficient file organization and management.
Blogging: Tools to manage and create blog posts.
Testimonials: Features to showcase user testimonials.
Maintenance: Tools to manage and schedule maintenance.
Team Board: Collaboration tools for team management.
Search Result: Enhanced search functionalities.
Beautiful Pricing: Elegant pricing tables and plans.
Contact List & Grid: Efficient contact management.
User Profile: Customizable user profiles.
Extended Forms: Advanced form functionalities.
Clean Widgets: A variety of clean, modern widgets.
Technical Specifications
Bootstrap 4.3.1
Bootstrap 4.3.1 is a powerful front-end framework for faster and easier web development. It includes HTML and CSS-based design templates for typography, forms, buttons, tables, navigation, modals, image carousels, and many other interface components, as well as optional JavaScript plugins. Mplify leverages Bootstrap 4.3.1 to ensure a consistent and responsive design across all devices.
jQuery 3.3.1
jQuery is a fast, small, and feature-rich JavaScript library. It makes things like HTML document traversal and manipulation, event handling, and animation much simpler with an easy-to-use custom API integration that works across a multitude of browsers. Mplify includes jQuery 3.3.1 to provide enhanced functionality and interactivity to your applications.
Built-in SCSS
SCSS is a preprocessor scripting language that is interpreted or compiled into CSS. It allows you to use variables, nested rules, mixins, inline imports, and more, all with a fully CSS-compatible syntax. With SCSS, Mplify offers a more powerful and flexible way to manage styles.
Light & Dark Full Support
Mplify comes with built-in support for light and dark themes, allowing users to switch between these modes based on their preferences. This feature enhances user experience and accessibility, especially in different lighting conditions.
RTL Full Support
For developers targeting global audiences, Mplify provides full right-to-left (RTL) language support. This feature ensures that languages like Arabic, Hebrew, and Persian are properly displayed, making the template versatile and inclusive.
W3C Validate Code
The World Wide Web Consortium (W3C) sets the standards for web development. Mplify adheres to W3C's coding standards, ensuring that the template is built with clean, valid code, which improves browser compatibility, SEO, and overall performance.
Mobile and Tablet Friendly
In today's mobile-first world, having a responsive design is crucial. Mplify is designed to be fully responsive, ensuring that your mobile application looks great and functions seamlessly on all devices, including desktops, tablets, and smartphones.
Applications
Mplify’s versatile design and feature set make it suitable for a wide range of applications across various industries. Here are some key applications:
Admin Dashboards
Mplify provides a robust framework for building admin dashboards. With its extensive set of UI components, charts, forms, and tables, you can create comprehensive dashboards that provide valuable insights and data visualization.
CMS (Content Management Systems)
With features like blogging, file management, and user profile management, Mplify can be used to build powerful CMS platforms. Its clean widgets and beautiful interface ensure that the content management experience is both efficient and enjoyable.
CRM (Customer Relationship Management)
Mplify’s built-in tools for managing contacts, scheduling events, and maintaining communication through a chat app make it an excellent choice for developing CRM systems. These features help businesses manage customer interactions and data effectively.
Business Websites
The multi-purpose nature of Mplify allows it to be used for various business websites. Whether you need a portfolio, a blog, or a corporate website, Mplify provides the necessary tools and components to create a professional online presence.
Blogging Platforms
With integrated tools like Summernote for rich text editing and Markdown support, Mplify is ideal for creating blogging platforms. The beautiful inbox interface and testimonial features enhance the blogging experience, making it easy to manage and publish content.
Benefits
Easy and Fast Development
Mplify is designed to streamline the development process. With its pre-built components and templates, you can quickly assemble functional and aesthetically pleasing applications. This reduces development time and costs, allowing you to focus on implementing your ideas in real time.
Professional and Modern Design
Mplify offers a clean, modern design that is both professional and user-friendly. The template includes a variety of customizable widgets and components that adhere to the latest design standards, ensuring your application looks polished and up-to-date.
Comprehensive Feature Set
From task management tools like Scrum and Kanban boards to extensive form functionalities, Mplify provides a wide range of features that cater to various needs. This comprehensive feature set makes it a versatile solution for different types of projects.
Responsive and Mobile-Friendly
With Mplify, you can ensure that your application is accessible on all devices. Its responsive design adapts to different screen sizes, providing a seamless user experience on desktops, tablets, and smartphones.
Global Accessibility
Mplify’s RTL support and multi-language capabilities make it suitable for global applications. This feature ensures that your application can cater to users from different regions, enhancing its reach and usability.
Regular Updates and Support
When you purchase a license for Mplify, you receive all future updates for free. This ensures that your application remains up-to-date with the latest features and improvements. Additionally, Mplify provides excellent customer support to assist with any issues or queries.
Challenges and Limitations
Learning Curve
While Mplify is designed to be user-friendly, there may be a learning curve for beginners who are not familiar with Bootstrap or jQuery. However, comprehensive documentation and community support can help mitigate this challenge.
Customization
Although Mplify offers a wide range of customization options, extensive customization may require advanced knowledge of SCSS and JavaScript. This could be a limitation for developers who are not well-versed in these technologies.
Performance
As with any feature-rich template, there is a potential for performance issues if too many components and plugins are used simultaneously. It is important to optimize the application and selectively use features to maintain optimal performance.
Latest Innovations
Enhanced UI Components
Mplify continues to evolve with regular updates that introduce new and improved UI components. These enhancements ensure that your application remains modern and functional.
Advanced-Data Visualization
Recent updates have focused on improving data visualization capabilities. With enhanced charting tools and interactive elements, Mplify allows for more dynamic and engaging data presentation.
Integration with New Technologies
Mplify is continuously updated to integrate with the latest web technologies. This ensures compatibility with new frameworks and libraries, providing developers with more tools to build advanced applications.
Future Prospects
AI and Machine Learning Integration
The future of Mplify may include integration with AI and machine learning tools. This would enable developers to build more intelligent and automated applications, enhancing user experience and functionality.
Expanded Plugin Support
As the web development landscape evolves, Mplify is likely to expand its plugin support. This will provide developers with more options for extending the functionality of their applications.
Improved Accessibility Features
Mplify is expected to continue enhancing its accessibility features. This includes better support for assistive technologies and compliance with accessibility standards, ensuring that applications built with Mplify are inclusive for all users.
Comparative Analysis
Versus Other Bootstrap Templates
When compared to other Bootstrap templates, Mplify stands out due to its comprehensive feature set, modern design, and extensive customization options. While other templates may offer similar components, Mplify's unique features like RTL support and advanced task management tools give it an edge.
Versus Custom Development
Opting for a pre-built template like Mplify can significantly reduce development time and costs compared to custom web development. While custom development offers more flexibility, Mplify provides a robust foundation that can be easily customized to meet specific needs.
User Guides and Tutorials
Getting Started with Mplify
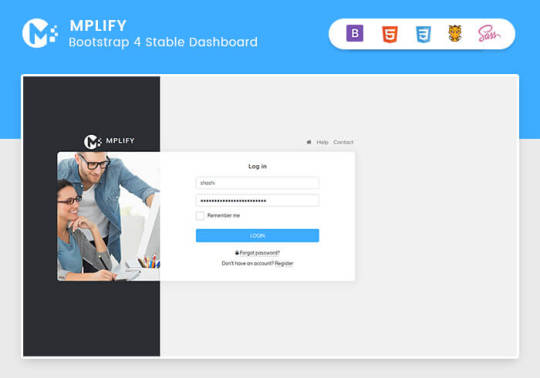
Installation: Download and install Mplify from the official website or marketplace.
Configuration: Configure the template settings according to your project requirements.
Customization: Use the built-in SCSS files to customize the styles and appearance.
Integration: Integrate Mplify with your backend systems and databases.
Deployment: Deploy your application on your preferred hosting platform.
Advanced Customization Techniques
SCSS Variables: Use SCSS variables to easily change colors, fonts, and other styles.
JavaScript Customization: Extend the functionality by adding custom JavaScript code.
Component Modification: Modify existing components or create new ones to meet specific needs.
Performance Optimization: Optimize the performance by minifying CSS and JavaScript files, and selectively loading components.
Conclusion
Mplify is a powerful, versatile, and user-friendly Bootstrap 4 admin dashboard template. It offers a wide range of features and customization options, making it suitable for various applications, from admin dashboards to business websites. With its modern design, responsive layout, and extensive documentation, Mplify simplifies the development process, allowing developers to implement their ideas in real time efficiently.
Whether you are building a CMS, CRM, or a personal blog, Mplify provides the tools and flexibility needed to create a professional and functional web application. Its ongoing updates and support ensure that your projects remain current and compatible with the latest web technologies.
#Mplify Admin#Bootstrap 4.3.1#jQuery 3.3.1#SCSS#Light & Dark Theme#RTL Support#W3C Validation#Responsive Design#Admin Template#Admin Dashboard#CMS#CRM#Blogging#Business Websites#Web Development#UI Components#Data Visualization#AI Integration#Machine Learning#Accessibility Features#Task Management#File Management#Rich Text Editor#Markdown Support#User Profiles#Performance Optimization#Web Technologies#Custom Development#Web Application Development#Front-end Framework
0 notes
Text
Web Designing Course in Delhi.
https://picklesanimation.in/best-web-designing-institute-in-delhi/
Certainly! Here's a sample course outline for a web design course at Pickles Animation:
Course Title: Web Design Essentials
Week 1: Introduction to Web Design
Overview of web design principles
Evolution of the internet and web design
Understanding the role of a web designer
Introduction to HTML, CSS, and JavaScript
Overview of popular web design tools and software
Week 2: HTML Fundamentals
Introduction to HTML5
Understanding the structure of HTML documents
Working with tags, attributes, and elements
Creating links, images, and basic forms
Semantic HTML and best practices
Week 3: CSS Fundamentals
Introduction to CSS3
Basic CSS syntax and selectors
Working with color, typography, and backgrounds
Box model and layout techniques
Responsive design principles
Week 4: Advanced CSS
CSS positioning and layout techniques
Flexbox and CSS Grid
CSS transitions and animations
Introduction to CSS preprocessors (e.g., SASS)
Cross-browser compatibility and vendor prefixes
Week 5: Introduction to JavaScript
Basics of JavaScript programming
Working with variables, data types, and operators
Control flow and conditional statements
Functions and scope
Introduction to DOM manipulation
Week 6: Responsive Web Design
Principles of responsive design
Media queries and breakpoints
Creating fluid layouts
Adaptive vs. responsive design strategies
Testing and debugging for different devices
Week 7: Web Typography
Typography principles for the web
Choosing and pairing web fonts
Implementing custom fonts
Enhancing readability and accessibility
Typography trends in modern web design
Week 8: User Experience (UX) Design
Understanding user experience design principles
Conducting user research and analysis
Creating user personas and user journeys
Wireframing and prototyping tools and techniques
Usability testing and iteration
Week 9: Introduction to Web Design Frameworks and Libraries
Overview of popular CSS frameworks (e.g., Bootstrap, Foundation)
Introduction to front-end JavaScript frameworks (e.g., React, Vue.js)
Using pre-built components and templates
Pros and cons of using frameworks and libraries
Week 10: Web Design Portfolio Development
Crafting a web design portfolio
Showcasing projects and case studies
Building an online portfolio website
Resume and cover letter writing tips for web designers
Strategies for networking and finding job opportunities in web design
Final Project: Students will work on a final web design project that incorporates concepts learned throughout the course. This project will be presented to the class and will contribute to their portfolio.

Throughout the course, students will engage in hands-on projects, exercises, and critiques to reinforce their understanding of web design principles and techniques. Additionally, guest speakers from the industry may be invited to provide insights into real-world applications of web design.
0 notes