#but it would involve setting up a texture file from scratch to get everything in there
Explore tagged Tumblr posts
Visit Tumblr Blog
Explore Tumblr blogs with no restrictions, modern design and the best experience.
Last Seen Tumblr Blogs


Fun Fact
In 2020, Tumblr had 29.4 million users in the US.
Text

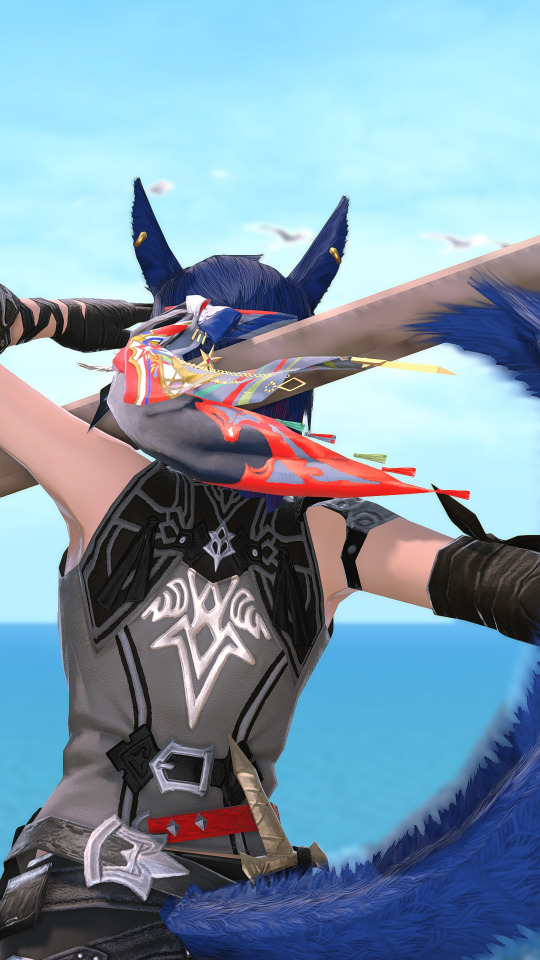
MiqoMarch Day 28 - Adventure
O, what great adventure awaits beyond that horizon?
#miqomarch#miqomarch 2024#ffxiv#miqo'te#ffxiv gpose#arsay's dawntrail fit UvU#its still slightly a work in progress#I want to add the wayfarers necklace to it so arsay can have a tripled necklace look#but it would involve setting up a texture file from scratch to get everything in there#so im waiting until 7.0 to launch to see if the pagos and uraeus stuff gets a texture update right away#kinda hoping the base shirt gets an update on launch so the metal details match the shorts#but its not the end of the world if it doesnt#Arsay is very excited to see tural!!#definitely sad that g'raha isnt coming with and she was a bit of a baby about that at first#but they chatted and everything is fine#just praying shtola and graha show up together since they'd be leaving from the same place :)#idk what will happen character arc wise but i think arsay is focusing more taking in every bit of the journey she can#even the not so fun stuff!!#of course she will still gladly be the hero if people need her to be but im hoping she plays more of a support role to some extent#WOL posting#Arsay Nun
54 notes
·
View notes
Note
any tips for fingering yourself (vagina) for the 1st time? i masturbate mostly through clitoral stimulation and it’s great, but i’ve tried it before but didn’t really feel anything. also felt like i didn’t know where to aim if that makes sense? i know you’ve done a squirting 101 before, i hope you don’t mind this question! love your fics btw <3
iiii am so sorry i forgot to answer this, i was on vacation for a week and hardly checking my inbox or DMs!
as always i just want to firstly assure you that if you're not getting anything from doing that, there's nothing at all wrong with you—just in case that's a fear or concern you're having. fingering is... it may take some time and practice to get comfortable doing it.
(it's honestly still not my personal favorite thing to do just because i've got some weird fears over hygiene, plus having longer nails (my fault for not filing them down more when i do a fresh set rip) makes me paranoid of accidentally scratching, so unless i jump straight to toys, i typically use protection over my fingers.)
but! i hope regardless i can still offer some guidance or advice!
what i'd advice first and foremost is when you're getting down to it, to start off how you usually do. i've found it's much easier to move onto any form of penetration once already warmed up, whether that's watching or reading something, using imagination, getting right into clitoral stimulation—whatever gets you going.
from there, i'd recommend maybe waiting until you start to get wet, whether you do or don't have additional lubrication to use. even if you find yourself 'adequately covered', there's nothing wrong with a little extra help!
(and saliva can be just fine starting out but remember that it does evaporate quickly, so if you're in for the long haul, don't find yourself wet easily, want to do some more stretching you haven't yet tried, what have you—particularly if it's still new to you—i'd recommend getting something all natural and water based to start.)
from there, i'd start with a tease of fingertips around the vaginal opening and dipping slowly inside to get used to the sensation of both being fingered as well as what it feels like inside of your body. some people start with the index and some the middle finger, so i'd experiment to see what's more comfortable to you. still work slow, both in terms of going inwards and adding fingers, as you don't want to surprise yourself.
btw, if you're typically used to clitoral stimulation, i'd keep that involved all the while.
once you're comfortable with the sensation of using your fingers, then i would try looking for some hot spots. there's so many nerve endings running through that part of the body, and a lot of them run through the same network so clit stimulation can help enhance everything.
the g-spot itself is located on the northern wall of the vaginal canal, roughly 1.5-2 inches inside—it depends on your body! it can also appear larger, smaller, slightly further or shallower in the body, as well as slightly to the right or left, but regardless, it's often easier to find once you're already turned on though, as it swells with arousal and the shape and texture of it becomes more apparent. the feeling of it may also be firm, or it may be sort of squishy.
the easiest way i'd say to reach it with fingers is with your palm facing upwards, towards your belly, and with the finger(s) inserted close to or to the base of the hand. most relate finding it with the sudden urge to pee, and while i find that true, i'd also relate it to the feeling you may get when you've found the perfect angle and pressure on your clit, and the feeling sort of reverberates from the inside out, deeper in than just your outside bits.
if you find it difficult or uncomfortable to reach it with your fingers, try using different fingers, or even situating yourself differently so the hot spots are easier to reach. if that doesn't seem to do much, i'd even suggest trying a toy to better stimulate things. no harm in experimenting! there's tons of toys out there made of different materials and shapes, with or without the sole purpose of g-spot stimulation.
i'd always suggest starting kind of 'basic' when it comes to internally-based toys, or even starting with ones focused on external stimulation so you may not be so focused on coordinating both hands at once. when it does come to the insertable toys, though, there's nothing wrong with a simple angled dildo or vibrator. i'd also stay away from things like rabbits to start as they're typically not fixed to everyone's personal dimensions, as well as anything too big, super firm, etc. you can work up to those things once you've got some more experience / know a bit more about what you like or need.
more than anything else, take your time with it! don't rush or put pressure on yourself if things aren't working out right away. there's nothing wrong with experimenting to find what works best for you, and if you find out in the end that hey, fingering just isn't for me, or i think i'd prefer using toys instead or i'd prefer someone else doing this particular thing to me, whatever, that's totally fine too! just as long as you're listening to your body, going at your pace, taking the time to learn what's best for you, you can't go wrong.
personally, it took me a long time to even get comfortable with putting one finger in, despite how badly i wanted to try it out. now i know i'm not typically into fingering myself, but i do know what to do to feel good when i choose to do so, and i wouldn't have figured that out if i hadn't given myself the time to experiment and learn.
remember—there's no one way to do things so take the time to curate your own best experience! good luck and thank you for reading my fics <3 if you have any other questions please feel free send them my way!
6 notes
·
View notes
Text
DFX452 | Blog Post 2.5 | 3/5/25
Bringing My Goblins to Life in Unreal Engine
Importing and Organizing Assets
Jumping into Unreal Engine, I started fresh with a new file using the VFX template. Organization was key, so I set up a dedicated folder for textures and began importing my Substance Painter exports. Keeping everything neat from the start saves a ton of headaches later.
I had to make a pit stop back in Maya to re-export my goblins and treasure chest in separate pieces. The reason? Unreal has a pesky habit of resetting pivot points to (0,0), no matter where I set them in Maya. Adjusting pivots in Unreal isn’t the easiest process either, so the cleanest solution was to separate each part—ensuring the arms, heads, and other movable parts would pivot correctly when animated.


Assembling the Goblins and Chest
Once everything was imported (with smoothing groups, tangent space normals, and nanite enabled to optimize performance), it was time to reassemble.


I created mesh blueprints—essentially a blank canvas where I could build a hierarchy for my models. I used these blueprints to reassemble the goblins and treasure chest, ensuring each part was correctly grouped. The arms were attached to the body, the weapons connected to the arms, and everything was structured properly for animation.


After that, I created materials for each texture set, plugging in the necessary textures and tweaking them with “multiply” nodes when needed to get the right look. It’s a simple but crucial step in making the assets look polished.

Animating the Treasure Chest and Goblins
With my goblins ready for action, I created a sequence, the cinematic in which I'll use a multi-track tool to edit key frames and animate. I decided to start with first scene in the commercial—the most important and complex part of the project.

I started with the chest animation, initially having it drop into view, shake, and burst open. But something felt off—it lacked personality. So, I pushed it further, giving the chest a bouncy movement as it hopped toward the camera before dramatically springing open. This exaggerated motion made the chest feel more alive.

Next came the camera animation, tracking forward as the chest moved toward it. I knew this would need tweaking later, but getting the basic motion in place was my main goal.

Then came the goblins. I quickly realized animating them separately from the chest would be a nightmare—they’d move at different paces and look unnatural. Since Unreal doesn’t allow stacking blueprints inside each other, I grouped the goblins manually, positioning them inside the chest and syncing their movements with the bouncing motion. Maybe not the most traditional method, but it worked!

Adding Visual Flair with VFX
To amp up the magic, I added a glowing light inside the chest to highlight the gold. Then came my biggest challenge—creating a magical VFX effect using Niagara. Since I was still new to the system, this took a while. My first attempt involved building a flowing energy effect in Maya, using a height map with transparency in Unreal. I even made a custom mask in Photoshop to blend the edges better.


While the effect was cool, I realized it didn’t fit the animation and scrapped it for now. Instead, I created a simple yet effective translucent ray effect and a dust poof for when the chest hits the ground. I used the starter content smoke material for the dust but built the Niagara effect from scratch. Simple but effective!


Lighting the Scene for Maximum Impact
With animations and effects in place, it was time to light the scene. I added a directional light to simulate a global light source, a skylight to soften shadows, and a post-processing volume to tweak exposure, bloom, vignette, and global illumination. Lighting is one of those things that require constant tweaking, but it’s what makes everything feel cinematic.

I experimented with a three-point lighting setup, using rectangular lights to sculpt the scene’s depth. However, I ran into a ton of lighting artifacts—flickering, static shadows, and weird shadow pop-ins. Fixing this involved tweaking Unreal’s settings, switching from Lumen to Screen Space for global illumination, enabling distance field shadows, increasing sample rates, and adjusting post-processing settings. A lot of trial and error, but totally worth it.


The Mysterious Disappearing Shadows
One of the strangest issues I faced was shadows suddenly appearing as the camera got closer to the goblins. Even weirder, they weren’t appearing all at once—first the head, then the body, then the arms. At first, I thought it was a culling issue (where Unreal stops rendering objects outside the camera view), but it turned out to be a simple fix. The goblins’ bounding boxes were too small, so Unreal wasn’t registering their shadows properly. Increasing the bounds scale solved it instantly. A small but crucial fix!

Here's a WIP sneak peak:
Wrapping Up
The next step? Rendering everything out in multiple passes for compositing. This process has been a rollercoaster of problem-solving, but every challenge taught me something new about Unreal Engine. Can’t wait to see it all come together in the final render!
0 notes
Photo
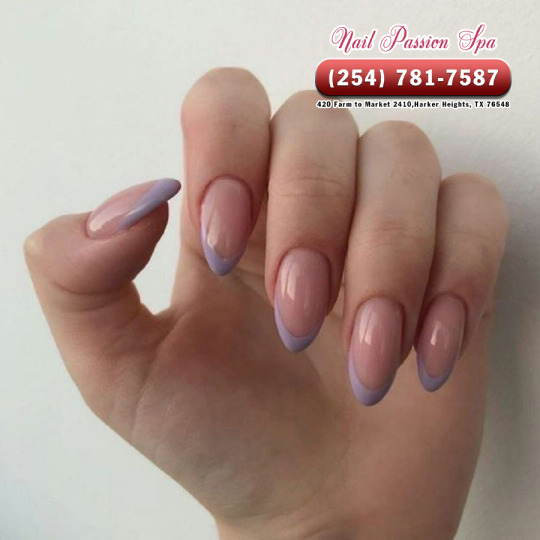


SNS nails aren’t new, but they haven’t been hugely popular until recent years. If you’re looking to switch your fingernail game up a bit, find out everything you need to know about SNS—a new, natural option for nail enhancements.
1. What Is SNS?
SNS stands for Signature Nail Systems. It is a branded powder-dipping system, accompanied by a brush-on, gel-based polish. SNS comes in an array of colors and shades and consists of benzoyl peroxide, titanium dioxide, acrylic ester polymer, vitamin E and calcium.
2. How Is SNS Applied To Your Nails?
SNS nails rely on powder rather than layers of gel. The process of applying SNS nails is fairly simple. Let’s break it down:
Your nails are filed and shaped then cleansed with a primer.
The nail technician applies a coat of resin on the nail plate.
Dips each nail into the coloured powder, and secures the colour with a bonding liquid.
The process is repeated a number of times to create the required strength and structure.
Finally there’s the glossy top coat to give the look its luster and shine.
It will take about 45 minutes to 1 hour for the SNS application. SNS nails cannot be infilled, so when you have regrowth you will have to do a full removal and re-application.
3. How To Remove SNS Nails?
The process of removing powder manicures is quite easy. Begin by removing the top layer of gel polish, and then soak your nails in acetone, generally no filing or buffing required. While acetone is the most effective method, it can irritate and dry your skin. You can use acetone-free nail polish remover if you prefer. A clever option is to stop in your local nail salon and have your SNS nails removed professionally. Never try to peel off your SNS nails, as this can remove the top layer of your natural nails, causing them to become brittle and break.
4. What Are The Benefits Of SNS Nails?
SNS nails are incredibly easy to apply.
There is no curing or setting under a LED or UV light.
SNS provides a lightweight feel (thinner on the nail than acrylic). It’s a great way of getting a bit of extra strength in your nails, whilst maintaining a more natural-looking finish.
SNS has nutrients inside the powder that help strengthen the bed of your nails rather than wear them down.
Gives off fewer fumes. Less harsh on your natural nails.
More resistant to chips and can last up to 3 weeks.
SNS nails don’t just come in one style. Like any other polish, you can create beautiful designs that are totally worth showing off. There is an almost endless amount of colors and textures to choose from. With this nail technique, you can let your imagination go wild.
5. Should We Try SNS Nails?
SNS manicure is especially for anyone who is:
Unhappy with the strong, acrylic smell that’s become synonymous with nail polish.
Sensitive to chemical odors or have skin allergies.
Nervous about the potentially harmful effects that the UV lights used to dry other types of polish can have.
6. How Much Does SNS Nails Cost?
Depending on where you plan to get your nails done, and how elaborate you would prefer the design, you can expect SNS manicure to range from $35 to $75 for a full set.
7. What Should You Be Aware Of SNS Nails?
You may have to go in for a touch-up around 2-3 weeks. Otherwise, you will have to get the colour removed and start from scratch.
Even though no UV or LED light and less filing of the natural nail is involved, SNS nails still require a gel base and top coat, which can be damaging to nails.
Be sure that you go to a licensed nail technician or a professional nail salon to ensure minimal risk of infection and other skin issues.
And if you need any more help, please contact our nail salon 76548, we are always ready to help you look better - that's our mission
0 notes
Text
Ben Chisholm, Chelsea Wolfe’s Secret Weapon // Decibel Magazine
Ben Chisholm has played on critically acclaimed albums, toured the world and played Roadburn festival. He’s visible in a music video which was uploaded to YouTube over a month ago and has been viewed almost two hundred thousand times. Still, many fans of his work don’t really know him.
The multi-instrumentalist has been playing with Chelsea Wolfe since 2010. His instrumental contributions and sound collages count as indispensable parts of the band’s macabre atmosphere live and in studio.
Read the full article HERE.
youtube
Chisholm’s fourth album with Chelsea Wolfe, Hiss Spun, will be released this Friday, September 22 on Sargent House Records. Together with Chisholm, we unravel his history with the band, his contributions to Hiss Spun, and recount how he and Wolfe came to join Converge for their ‘Blood Moon’ shows in 2016.
What’s the story of your pre-Wolfe work?
Growing up, I played in various punk, grindcore and noise bands around Northern California. Then I started focusing on solo recording projects. There isn’t a lot of past music available. My project White Horse had a boxset released by Weyrd Son in Europe, and another solo project called Revelator has a split 7” released with Wear Your Wounds which is Jacob [Bannon]from Converge’s project. Other than that, my early output is buried on scratched CD-Rs.
And how did you and Chelsea meet and begin collaborating?
I was playing guitar in a different band which happened to play some shows around Los Angeles with Chelsea Wolfe and her band in 2009. I was really into what they were doing and happened to be hanging around the Sacramento area often, so I started playing and recording with them.
To start, I think we ought to get some background details. You’ve been playing with Chelsea Wolfe for a good deal of time—the official Hiss Spun info sheet calls you a “longtime collaborator.” When exactly did your collaboration with Chelsea begin?
I played piano on a song from The Grime and the Glow, but didn’t join the band until early 2010. Shortly after that, we began recording the songs that would become Ἀποκάλυψις. That was my first real collaboration with the band.
In your own words, what exactly is your role in the band, as a composer but also in live performance?
I try to remain fluid as a collaborator. I help flesh out Chelsea’s demos and contribute extra progressions and sketches here and there. We send song files back and forth, and chip away at them like that. While we’re in the studio, I play a little bit of whatever instrument is needed. For the live show, I usually play bass and keys, and manage any tape tracks or interludes that are being run. For this upcoming tour, I’ll be filling in on guitar for the first time in the band, as our guitarist Bryan takes paternity leave, and I played a lot of guitar on the new album as well.
In Wolfe you perform synthesizers and bass, but you also used sound collages on this album and others. Do you think more in terms of theory and notes, or do you approach music from another angle?
Most of my ideas come in bursts, usually while playing piano or acoustic guitar, and usually in a kind of stoned nighttime “flow state.” I process those ideas later and find the tones and textures that feel right for them. The sound collages and ‘cut-up’ production techniques all happen in that space too. Chelsea is a great editor, she’ll hear one small section, or one element of something I’m working on and find the perfect place for it in a larger piece. Theory kind of comes in after that, adding melody lines or modulating entire sections to fit in different songs. I have a basic education in music theory, but I don’t usually think in those terms while composing.
What’s your approach for collecting sound samples?
I always carry a handheld field recorder with me. I’ve recently started using a smaller version that just plugs right into my phone, and sometimes even a regular phone mic voice memo will do the trick. Chelsea also collects sound samples from out in the world and sends them to me. It’s similar to taking a picture, the quality isn’t always as important as the content.
I know that you recorded a coyote howl in California and put that somewhere on the record.
The coyote’s howl, and a passing motorcycle, is heard during the heavy synth and bass breakdown in “The Culling.” I captured that on my field recorder and ran it through various guitar pedals and cut up the pieces from there.
What was the story behind working with Troy Van Leeuwen in the studio? I’m a big fan of his work in Queens of the Stone Age and Failure, and he did a very good job of integrating his own style into the Chelsea Wolfe sound.
The songs with Troy were originally meant for a side project we were working on. Chelsea sent him demos of “Vex” and “Spun” in early 2015. He tracked his parts at his home studio, some of which ended up on the final mixes. The other parts he played were written and recorded on the spot over a weekend at GodCity Studio towards the end of the sessions. I learned a lot from just watching him play. He’s a cool motherfucker.
You also helped on the Converge ‘Blood Moon’ shows. What was the story behind that collaboration, and what was the biggest challenge in making those album-only tracks come to life?
I’ve been a Converge fan for almost two decades. I had released that split with Jacob a few years prior, and had introduced myself to the band over the years whenever our paths crossed. We hung out with Kurt around Boston and Salem on the first Abysstour and a couple of weeks later, he called to ask if I’d be interested in playing keyboard with them at Roadburn Festival the following spring. I jumped at the chance, and eventually the project grew to involve Chelsea on guitar and vocals as well. Building out that set was a pretty big undertaking. Kurt sent me some of the original stems from certain tracks so I could recreate those sounds, and organize the backing tracks for what couldn’t be played live. There are lots of hidden gems buried in the songs they chose. Those four shows were very special. Hopefully we’ll get a chance to bring ‘Blood Moon’ together again in the future.
Hiss Spun is the most overtly hard rocking record in the Chelsea Wolfe discography. Most bands get more accessible as they age but your work seems to get angrier and more abrasive. How do you think the album compares with your previous work?
Hiss Spun is heavier as a result of a couple things. One being that we worked on the songs as a band a lot with drummer Jess Gowrie, Chelsea and myself in a room together, playing way too loud. On prior albums, there was a lot more isolation involved in the creative process. The second reason this album is louder is, as I already brought up, some of these songs were intended for a side project, which was going in a pretty heavy direction. The songs from that project felt right in the context of the band, so we harvested a few.
Is there a particular song on Hiss Spun that you’re proud of or feel is a great example of your work?
I’m very pleased with Hiss Spun, I’ve never been as happy with one of our albums right out the gate. It was quite a task to get everything to sit together properly, especially when we came into the studio with upwards of 30 tracks of pre-production stems for some songs, but Kurt did a great job. The way he recorded the drums and guitars is pretty much exactly how I’d hoped he would.
If I had to pick a favorite song from the album right now, it would be “Scrape.” This was the first song we collaborated on with Jess, and it’s built primarily from a sample of a tractor bucket scraping on a concrete floor. My friend Travis actually recorded the original sample on his phone, and sent it to me. I manipulated it from there and built chords, which sound like a fucked up brass section to me. All of this combined with Chelsea’s intense, frenetic vocal performance makes this song feel like a very different approach for us.
12 notes
·
View notes
Text
Ben Chisholm, Chelsea Wolfe’s Secret Weapon // Decibel Mag
Ben Chisholm has played on critically acclaimed albums, toured the world and played Roadburn festival. He’s visible in a music video which was uploaded to YouTube over a month ago and has been viewed almost two hundred thousand times. Still, many fans of his work don’t really know him.
The multi-instrumentalist has been playing with Chelsea Wolfe since 2010. His instrumental contributions and sound collages count as indispensable parts of the band’s macabre atmosphere live and in studio.
Read the full article HERE.
youtube
Chisholm’s fourth album with Chelsea Wolfe, Hiss Spun, will be released this Friday, September 22 on Sargent House Records. Together with Chisholm, we unravel his history with the band, his contributions to Hiss Spun, and recount how he and Wolfe came to join Converge for their ‘Blood Moon’ shows in 2016.
What’s the story of your pre-Wolfe work?
Growing up, I played in various punk, grindcore and noise bands around Northern California. Then I started focusing on solo recording projects. There isn’t a lot of past music available. My project White Horse had a boxset released by Weyrd Son in Europe, and another solo project called Revelator has a split 7” released with Wear Your Wounds which is Jacob [Bannon]from Converge’s project. Other than that, my early output is buried on scratched CD-Rs.
And how did you and Chelsea meet and begin collaborating?
I was playing guitar in a different band which happened to play some shows around Los Angeles with Chelsea Wolfe and her band in 2009. I was really into what they were doing and happened to be hanging around the Sacramento area often, so I started playing and recording with them.
To start, I think we ought to get some background details. You’ve been playing with Chelsea Wolfe for a good deal of time—the official Hiss Spun info sheet calls you a “longtime collaborator.” When exactly did your collaboration with Chelsea begin?
I played piano on a song from The Grime and the Glow, but didn’t join the band until early 2010. Shortly after that, we began recording the songs that would become Ἀποκάλυψις. That was my first real collaboration with the band.
In your own words, what exactly is your role in the band, as a composer but also in live performance?
I try to remain fluid as a collaborator. I help flesh out Chelsea’s demos and contribute extra progressions and sketches here and there. We send song files back and forth, and chip away at them like that. While we’re in the studio, I play a little bit of whatever instrument is needed. For the live show, I usually play bass and keys, and manage any tape tracks or interludes that are being run. For this upcoming tour, I’ll be filling in on guitar for the first time in the band, as our guitarist Bryan takes paternity leave, and I played a lot of guitar on the new album as well.
In Wolfe you perform synthesizers and bass, but you also used sound collages on this album and others. Do you think more in terms of theory and notes, or do you approach music from another angle?
Most of my ideas come in bursts, usually while playing piano or acoustic guitar, and usually in a kind of stoned nighttime “flow state.” I process those ideas later and find the tones and textures that feel right for them. The sound collages and ‘cut-up’ production techniques all happen in that space too. Chelsea is a great editor, she’ll hear one small section, or one element of something I’m working on and find the perfect place for it in a larger piece. Theory kind of comes in after that, adding melody lines or modulating entire sections to fit in different songs. I have a basic education in music theory, but I don’t usually think in those terms while composing.
What’s your approach for collecting sound samples?
I always carry a handheld field recorder with me. I’ve recently started using a smaller version that just plugs right into my phone, and sometimes even a regular phone mic voice memo will do the trick. Chelsea also collects sound samples from out in the world and sends them to me. It’s similar to taking a picture, the quality isn’t always as important as the content.
I know that you recorded a coyote howl in California and put that somewhere on the record.
The coyote’s howl, and a passing motorcycle, is heard during the heavy synth and bass breakdown in “The Culling.” I captured that on my field recorder and ran it through various guitar pedals and cut up the pieces from there.
What was the story behind working with Troy Van Leeuwen in the studio? I’m a big fan of his work in Queens of the Stone Age and Failure, and he did a very good job of integrating his own style into the Chelsea Wolfe sound.
The songs with Troy were originally meant for a side project we were working on. Chelsea sent him demos of “Vex” and “Spun” in early 2015. He tracked his parts at his home studio, some of which ended up on the final mixes. The other parts he played were written and recorded on the spot over a weekend at GodCity Studio towards the end of the sessions. I learned a lot from just watching him play. He’s a cool motherfucker.
You also helped on the Converge ‘Blood Moon’ shows. What was the story behind that collaboration, and what was the biggest challenge in making those album-only tracks come to life?
I’ve been a Converge fan for almost two decades. I had released that split with Jacob a few years prior, and had introduced myself to the band over the years whenever our paths crossed. We hung out with Kurt around Boston and Salem on the first Abysstour and a couple of weeks later, he called to ask if I’d be interested in playing keyboard with them at Roadburn Festival the following spring. I jumped at the chance, and eventually the project grew to involve Chelsea on guitar and vocals as well. Building out that set was a pretty big undertaking. Kurt sent me some of the original stems from certain tracks so I could recreate those sounds, and organize the backing tracks for what couldn’t be played live. There are lots of hidden gems buried in the songs they chose. Those four shows were very special. Hopefully we’ll get a chance to bring ‘Blood Moon’ together again in the future.
Hiss Spun is the most overtly hard rocking record in the Chelsea Wolfe discography. Most bands get more accessible as they age but your work seems to get angrier and more abrasive. How do you think the album compares with your previous work?
Hiss Spun is heavier as a result of a couple things. One being that we worked on the songs as a band a lot with drummer Jess Gowrie, Chelsea and myself in a room together, playing way too loud. On prior albums, there was a lot more isolation involved in the creative process. The second reason this album is louder is, as I already brought up, some of these songs were intended for a side project, which was going in a pretty heavy direction. The songs from that project felt right in the context of the band, so we harvested a few.
Is there a particular song on Hiss Spun that you’re proud of or feel is a great example of your work?
I’m very pleased with Hiss Spun, I’ve never been as happy with one of our albums right out the gate. It was quite a task to get everything to sit together properly, especially when we came into the studio with upwards of 30 tracks of pre-production stems for some songs, but Kurt did a great job. The way he recorded the drums and guitars is pretty much exactly how I’d hoped he would.
If I had to pick a favorite song from the album right now, it would be “Scrape.” This was the first song we collaborated on with Jess, and it’s built primarily from a sample of a tractor bucket scraping on a concrete floor. My friend Travis actually recorded the original sample on his phone, and sent it to me. I manipulated it from there and built chords, which sound like a fucked up brass section to me. All of this combined with Chelsea’s intense, frenetic vocal performance makes this song feel like a very different approach for us.
4 notes
·
View notes
Text
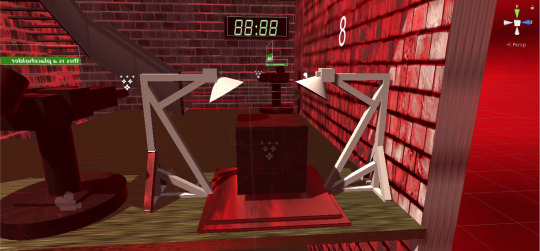
Progression of Video Game Design - Final Major Project Development (Year 1 - Weeks 21-32)
This is it. The final frontier. The last post of the year. The last 12 weeks of the project, which is how long I have spent on it.
Prior to this project, I have been preparing by practicing game design with both Unity and Game Maker Studio (see my Games Engines post to learn more about them), which mainly required me to improve my coding skills if I was going to make a game for my final major project, even though it was a 12-week process that could mean I barely make progress. But did I succeed in the end?
I don’t have videos of these games I made in my own time, but I do have pictures.
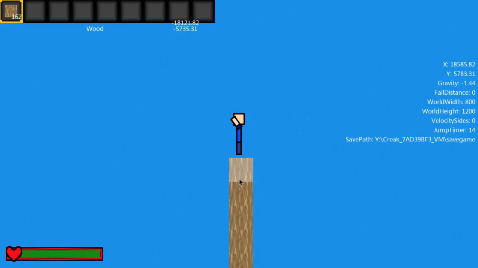
This is a home project I’m doing called Creak, which is a test to see how well I can create something like Minecraft/Terraria (games I really enjoy playing). I have learned a lot over this time, like how to use certain functions and storage mechanics.
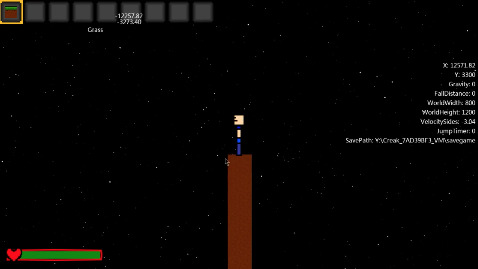
This is another screenshot, which takes place in Creak’s space. There isn’t really anything interesting I can tell you about it as this part of the game has nothing exciting.
Anyway, onto my final major project progression and what happened during this time. I chose to do game design because that was my strongest suit this year, and I wanted to expand upon it.
Now, I don’t have many screenshots of what it is in this video, but I DO have video proof of me doing this project. Because all of the footage stuck together would be over 10 hours long, I decided to speed it up so it would be at least 10 minutes.
youtube
You will need to constantly refer back to this when I say “see the video”, since a lot of what I screenshot will mainly come from this video. And yes, this is my video.
The Beginning - Weeks 21-23
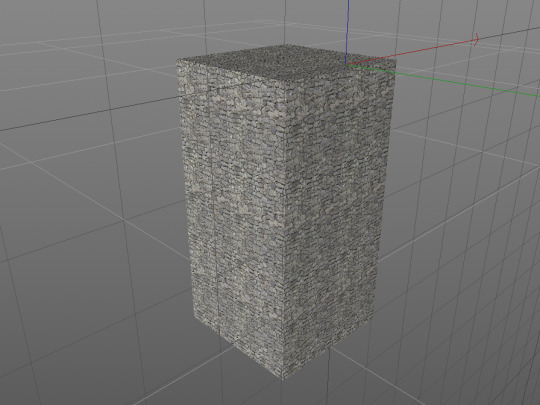
The beginning of the project involved me having to make assets, as I needed a lot of them at the time, because I couldn’t make a game without any base assets (there are default shapes in Unity, but those aren’t good since they lack textures). Because my game takes place in a city, I had to make many houses and other tall structures. This is the earliest screenshot I have of one of them. You can check my earliest post to know more about these buildings, as I have already discussed them in that post.
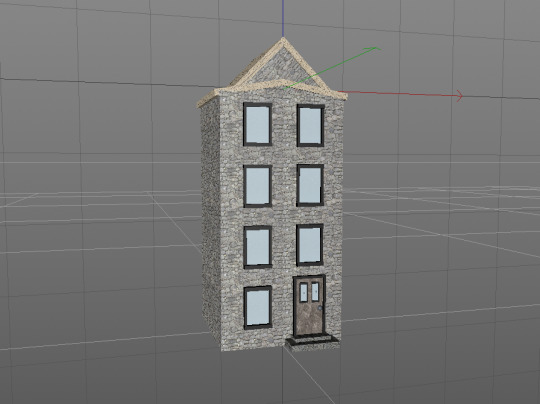
This is the end result. The detail didn’t really matter as it was going to be filtered red in the game, but was still needed just in case I couldn’t get it working.
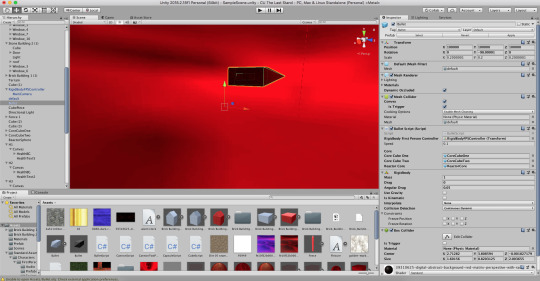
I then created a scene with these buildings and added more elements (see the video), after which I decided to start on the final outcome itself, by creating a skybox and added lighting (see the video).
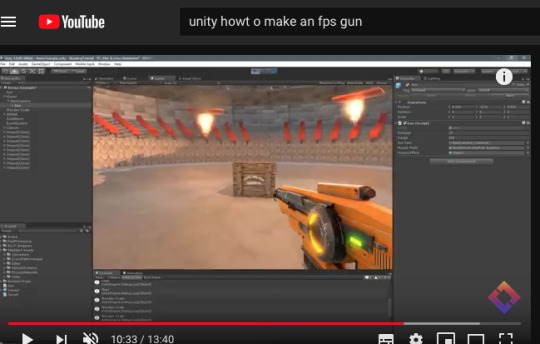
I decided to then start working on homing bullets, as those were going to be important in later additions. I created cubes that could be damaged and destroyed (no video or screenshot), and made a test level to test the behaviours of these objects. Unfortunately, I scrapped the homing bullet concept as the bullet never faced the right direction, even when told to via code (see Programming Languages post for more details about them). I deleted the test level shortly afterwards and got to work on guns (see the video at around 1:30 in).
Map Design and Testing - Weeks 24 - 27
This was the trickiest part of all, as that involved adding more objects and making sure everything worked properly. In this picture, you can see me watching a tutorial on YouTube, which I had to do multiple times to learn certain mechanics.
Overtime, I made more assets and practiced more at home with Unity. Eventually I got problems fixed and was free to move on with no interferences. However, upon adding this sniper rifle, disaster struck.
I stated in another post:
In the game, there is an option where you can choose the gun you want to use. Making this actually work correctly was a NIGHTMARE. I have added in the gun to layer on top of what was the placeholder gun (which has been kept for selection purposes and good use), and then I went into the script that handles the guns.
Following that, I have written code into the script that allowed the player to switch weapons. When I went to test it, the code did work, but not in the way I intended. What happened was that after I pressed the hotkey that makes it happen, the gun just disappeared and could never be seen again. The other gun didn’t even show up.
I went back to the script and wrote another method that involves the usage of other assets and scripts, but this time, BOTH guns could be seen and not switched. At this point, I’m pulling my hair out a little, and it has been one hour.
For 50 minutes after that, I was trying to get some help via the Internet and tutors, but nothing was successful, even the expert tutorials.
But then, I have realised. What the script does is that when the gun disappears, the other one doesn’t appear since the object isn’t active for long enough to tell it to be visible, hence the endless onslaught of headbanging fury.
So I took to a different asset that was visible all the time and ran some tests with the same script methods. After over two hours and losing count of the amount of times I wanted to cease the project entirely, it FINALLY worked. The guns were swapping perfectly. I followed my victory by loudly shouting “YES!” and having some time out to calm myself down. All I’m doing now is praying that I NEVER have to deal with a problem like that ever again.
I had spent 4 weeks on the project at the time, and this was the point where I almost gave up entirely. But after a calm break, I took back to work.
There were more assets that I made for the game which were originally going to be added, but they were scrapped due to time constraints and the problems which I had just solved at the time. One of the scrapped assets is actually one I have tried to implement, but failed:
This is the Spike Plate, a planned trap for certain areas. What it would have done was move back and forth, instantly kill the player upon contact and move when the player moves in front of it, like a sensor trap. I scrapped this idea as the instant kill technicalities didn’t work, and all it did upon collision was throw the player through the floor, rendering the game unplayable. This is no longer in the game’s files, but is still a Cinema 4D asset I have in storage.
During this time, I was also hunting for sound effects for my game, since I have no knowledge in designing sound effects from scratch. This will explain why some of the sound effects will seem familiar, since they came from Freesound and YouTube, and I tried to find similar sounds on Freesound than I did on YouTube, but they were worse than what I currently had, so I decided to keep them instead, such as this one:
youtube

I made the majority of the map over Easter break (see the video at about 3 minutes in). The minority was just missing textures, which I’m applying in these screenshots. In the second screenshot, you can see the first part of the last area. The very top (the fourth floor) is missing due to loading technicalities which I had to add, otherwise the game would likely crash due to memory overload.
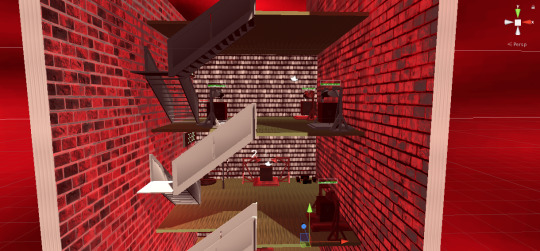
Before, the reactors and cubes were just white with no textures. Here, they are the proper textures, which is a rough red with some noise. The stairs however, remain un-textured due to time constraints and the fact that I’m not really wanting to spend hours just texturing every single one of the steps (there are 10 sets of these, for the record).
After the testing and map design was done, I had to make the menus which appeared at the start and end of the game. This proved to be difficult to perfect as... firstly, this was my first time using an interactive button in Unity, and secondly, the text turned out very blurry (when opposed to the logo) upon compiling the game. To get around the second issue, I had to cheat a little bit. What you see in the picture below is the text on multiple UI (user-interface, learn more about that in my User Interface post) layers, but distanced in such a way that it would look perfectly clear (see the picture below the one below this text).
In short, making the menu was tricky and... would I do it again? Probably, since I know how to make one now.
Final Testing and Assembly - Weeks 28-32
After the menus were complete, I got a few of my classmates to try out the game for themselves and give opinions. The reception on this game was positive, however there were collision errors and ways around obstacles I didn’t know about, which were quickly fixed shortly afterwards.


After that, I had to build the game. This was done in the Build Settings in Unity, which required me to change up a few things for good performance.

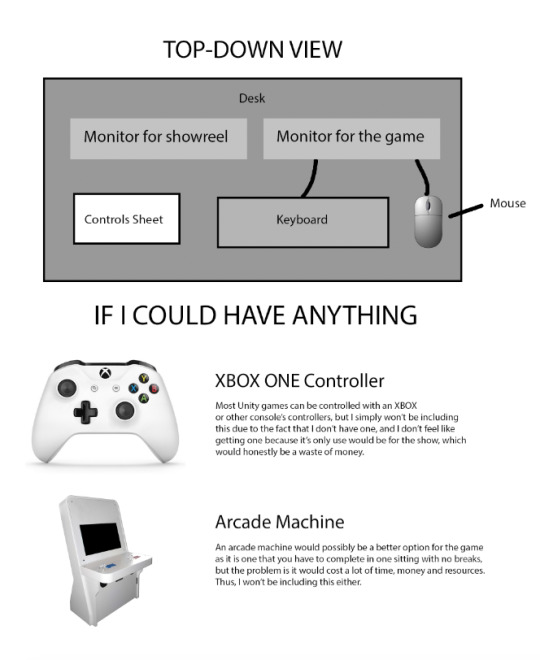
There was a lot going through my head when I did this, but mostly I was just shaking my fist in victory for completing this project... well, not quite. There was still a few more things to do. Like, the controls sheet for when it is on public display, and a concept to what the game would look like if it was released on Steam, which is the world’s most popular online video game distributor.
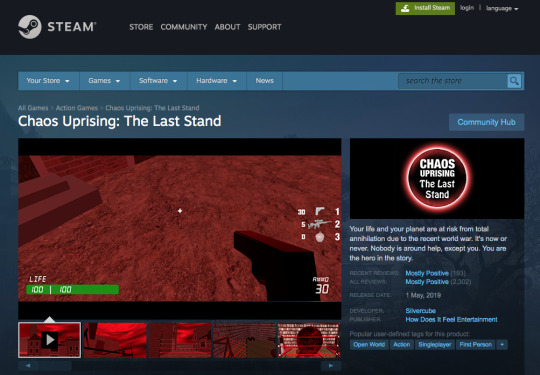
I made this concept with both Photoshop and Google Chrome’s Inspect feature to edit text and certain parts, like the videos tab and the banner above the description. If you’re curious, here is the original image with only a changed title, release date and publishers:
Would I ever release the game on Steam? Well, putting a game on Steam is very expensive, so no. In fact, I probably wouldn’t even put it anywhere online.
After that was done, I had to do the Controls sheet.

Here is my first draft. You can see the game’s logo, the description and objective of the game and the main controls of the game. As you can also see, it is an A3 sheet when it should be A4, which I finished up with more changes, like making the “w a s d” controls all capitals, and changing the weird arrow text to drawn arrows.

So that is it. The entire process of making a game from start to finish in just 10 weeks, which is now described to you as incredibly hard work. Before this project, I was preparing for it. And it was worth the struggle, if I’m completely honest.
Now for the plan for the end of year show where all work goes up on display.
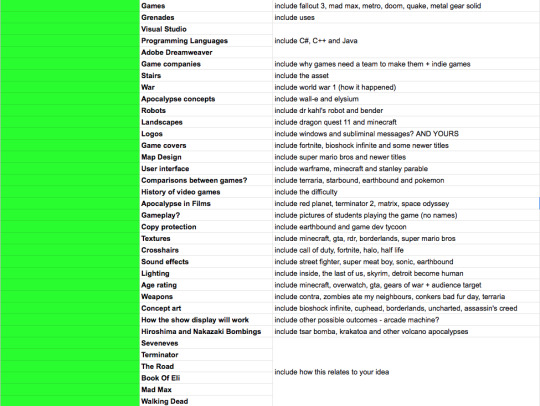
Throughout the entirety of this project, I’ve kept a spreadsheet of research I had to do, which helped me greatly:
And that’s the end. 12 weeks of working finally got me to this point. I honestly didn’t think I was ever going to finish this after all of the problems that I had with it, but then I’ve come to the conclusion that my game is more than just a game - it’s a reminder to never give up. Would I do this again? Maybe with something a little bit simpler and original, as this was very complicated and a little bit unoriginal (Only using a cube for a target? Walking around with guns and shooting everything down?).
Next time around I plan to put a lot less food on my plate so I can stop worrying night upon night of work, about error upon error needing a fix, drifting from tab to tab on the Internet filled with information that I need... it’s not as easy as you think, as you can see in the video.
0 notes
Text
6 Components That Shape a Complete Visual System for Digital Products

Photo by Balázs Kétyi on Unsplash
A Visual System conveys the look of a brand and represents how a product feels inside and out. It is very important for any product designers to understand the details of a visual system thus utilize it to help shape a better product. Here let’s go through 6 major elements to consider in a brand visual system.
1. Logo System
Designing a logo for a brand is the first step to establish a brand look and feel. There are many ways to brainstorm a logo and create either a word mark or pictograph. I will write another article specifically focused on logo design. Here let’s summarize some basic good logo rules:
Simple
Original
Balanced
Timeless
Memorable
Versatile and Scalable
Look Good in Black & White
Appropriate
Once a logo idea is set and completed, the rest is to expand that logo into a variety of use cases and formats. A logo should be a unique vector design that only the logo designer has to touch. Once a logo is completed, it should be applied and used in different scenarios and at least lasts for a long period of time. I used to work with a manager (engineering background) who wanted me to come up with a guide of how the logo was designed in case all the original files were lost. That shouldn’t ever be the case. Even with that guide of “how a logo was made”, no one besides the designer can make it. That’s why just simply keeping the original file in multiple secure places; and having a variety of exports that fits every possible need is necessary.
Primary Logo: This is how the logo appears most of the time.
Horizontal & Vertical: This gives the options to choose between two orientations in case the space is restricted.
Logo Mark: This allows a brand to appear in even constrained space, yet still represents the brand and company. The logo mark should be memorable enough for people to know what brand it represents.
Logo with Brand Color: This allows the logo to be applied to a variety of brand colors, which add visual interests in marketing design.
Clearance: This tells marketing designers leaving enough space around the logo so it doesn’t overlap with other elements.
Logo Don’ts: This tells other designers or people who intend to use the logo not to mess up with the original logo. Distortion of logos harms the brand personality and visual experience.
Logo Sizes: A good logo shouldn’t be constrained by its size because it’s vector based and can be expanded or reduced to any size. A standard logo size could be set around 4 inches long; minimum logo size could be set to 1 inch or ¾ inch. Of course, if any websites or social media requires a standard size, the logo should be able to be adjusted to that exact size.
Exports: I usually export all logos (Horizontal, vertical, color, black & white) in ESP, SVG, PNG and PDF format. Not many places needs JEPG and TIFF anymore.
2. Colors
Color is another thing in a brand that evokes emotional and visual connection between customers and the experience. When considering the color system for a brand, always consider a primary and secondary color. Unless the brand is definitely setting up two colors equally, always suggest one primary color that connects the brand image with it.
Primary Color: It’s important to understand what feelings the brand wants to convey through its primary colors. There are many references online talking about how colors represent different meanings. Just to name a few in the following:
Red: Passion, Love, Anger. Orange: Energy, Happiness, Vitality. Yellow: Happiness, Hope, Deceit. Green: New Beginnings, Abundance, Nature. Blue: Calm, Responsible, Sadness. Purple: Creativity, Royalty, Wealth.
Secondary Color: Secondary color could be one or a set of colors. My preference is to always consider complimentary colors of primary ones to create visual contrast for future usages. Unless harmony or unity is a fairly important message in the brand, otherwise, I would l always prefer complimentary colors over analogous colors.
Color System: Besides the primary and secondary color, it’s important to set up several other colors in the system that covers the rainbow colors. Due to the value, tone and hue of primary or secondary colors, the color system can either enhance the similar tone or complement to add another level of value depending on the need.
Gradient: For many modern digital products, it’s quite important to establish a set of gradients with the brand colors. Different from the considerations on secondary colors which focus on contrast, gradients should create smooth and harmonious transition between colors. That’s why bright and analogous colors (green + blue, or pink + orange) can avoid dirty middle muddy colors.
Grayscale Colors: This is absolutely one of the most important elements in colors designers shouldn’t ignore. Even for typeface alone, different grey levels in font can tell completely different stories in the product and marketing design. Depending on the primary color, the grey tone could be relatively warm or cool.
Transparent Colors: If the system designers want to define the colors to a next level, having the transparent colors and its value would help tremendously in communicating with engineers and other marketing fellows. This may not be that useful in common cases, but if a design piece involves different layers, gradients can be so useful to make everything clear.
Drop Shadow: You will be surprised by how many designs use drop shadows to create depth and dimensions on a 2D surface. Having used drop shadow in a variety of places, remembering its value could be a painful experience for designers. Thus, defining a drop shadow system that can be applied to any elements while designing would help designers tremendously.
3. Topography
Typography is one of the most important subjects in graphic design and its history. A font designer could focus his whole life and career on just these 26 letters. I personally loved learning, researching and teaching typography in my past experiences. Simply black and white letters alone have so much power to tell everything they want in any media.
Many junior product designers probably won’t consider typography an important thing in a product since it’s such a small piece. However, we have to admit that always every page/flow we design involves text (typography). That’s why it’s important to set a good text display system and make it convenient for any designers to apply and use.
What to consider when setting up a text/typography system?
Contrast: There are so many contrasts worth talking about in typography (Size, weight, form, direction, structure, color and texture etc). Here I mainly meant contrast between forms. It’s important to set a primary font for the brand or product. But there is so much more to play around if there’s a good contrast between displayed font and content font. As a designer for the text system, considering a serif and san serif font. Each set has many sizes and weights, the combination of each one of them can generate ample visual interests.
Sizes: Understanding sizes in font is paramount in print design, I even remember the default text size and minimum sizes I usually apply in graphic design pieces. But for the web, it’s a little different. Not only are the sizes much bigger, since we are working with engineers, we have to build a system that helps them to implement the product too. For sizes, consider: Title and body content sizes. The smallest size on the web I would go is 12pt, then multiple by 4 or 8 and increase all the way up to 48pt or 64pt if necessary.
Weight: The general rule is the bigger the font gets, the more weight it can gain. For body fonts, it’s important to provide a variety of weights: Black, Bold, Medium and Regular. Sometimes for tiny fonts, allowing All Cap letters in some cases can help set a complete font system that’s both visually appealing and flexible.
Leading: Many product designers who do not have the training in typography may not be aware of this concept. There are default settings from the design software or system, but it’s still up to the designer to figure out the exact space between text lines. The rule of thumb is: the bigger the font size, the smaller the leading space can be; and don’t let the leading (white space) jump over the content - meaning always keep the leading space smaller than the font sizes unless there’s special consideration.
Platforms: designing for the web is different than designing on the mobile apps. Believe it or not, fonts on the phone should be set bigger than on the web. Different from how we usually think, since we hold the phone closer, shouldn’t the font size be smaller than on the web? No, since a mobile phone usually moves and its screen size is limited, the regular content size for best readability is around 16-18. At the same time, I wouldn’t go too large on the title font too, anything beyond 32pt can be considered too big for a phone size.
4. Brand Visual Elements
Many products’ branding was done by design agencies, thus many in-house product designers may not realize that visual elements can be generated or used in product or marketing design. I think a good brand system should always consider visual elements that fit the brand personality because it really helps to convey the brand and build beautiful visual connections with customers.
So, how to generate or design visual elements for a brand/product?
Start from the Logo: Many visual elements look consistent or somewhat connected with the brand because it’s originated from the logo elements. Either the logo pieces itself, or the negative space/pieces from the logo. Both could be a good starting point to generate visual elements for the brand.
Start from Scratch: Consider dots, lines, shapes, color and texture; or a combination of them as the basic visual elements. Make some interesting designs to begin with, and start to consider how to apply a system that organizes all elements.
Build Sets: After exploring several designs, define some sets of combinations. These combinations give variety in the design while providing a consistent look and feel from the same elements. It’s always good to have more options when designing.
Create Rules: Similar to considering how a system can be applied to the elements, consider a grid or some sort of rules that pull everything together. The reason why these rules are important is that such systems can be used and applied in other designers’ work across products or departments. That way, the brand and visual elements can stay consistent while creating interesting designs across.
5. Illustrations
As someone who loves illustrations and illustrated my own children’s book, I believe illustrations give personality and emotion to a brand. Many illustrators have a certain style that can provide tremendous visual value to customers. However, as a product designer, we have to consider illustrations from both the brand/ product perspective and stockholders’ perspective. That means we have to figure out the right style that fits the brand/product and is loved by the leadership levels to set examples for future usages.
So, what should we consider when setting up illustration styles?
Line or Shape: This can easily be decided depending on the look of the logo and visual elements. Either to follow the same style, or use a completely different style to contrast the look of the brand. Personally, I like shape based illustrations because it has more details and can contain more colors that also tells part of the story. But for some brand/product that really values simplicity or craft look, line based illustration could be a total great fit.
Mono Color or Multiple Color: This is dependent on the brand personality again. If the brand and product is singular focused and wants to convey a mature, focus and trustworthy meaning, having a mono colored illustration style won’t be a bad idea. But if the brand is very fun, versatile or even energetic, using a variety of color can help reinforce that feeling.
Simple or Sophisticated: Illustrations can be as simple as several lines or gets completed as a whole gigantic system. There are many levels of complexity the illustration can get to. If we can break down the levels and allow our customers or leadership to choose, we can make a good decision that we are also confident about.
Regular or Exaggerated: If the illustration involves a figure for example, one style is to keep it as common as possible, the other style is to exaggerate its size or proportion. I am sure you have seen some of Facebook’s illustrations having a lady with super long arms or feet...That’s what I meant about exaggeration. Depending on the brand personality, exaggerated style can help convey a fun, open minded and futuristic look and feeling.
Smooth or Texture: While a smooth style usually gives people the feeling of professional, digital, trendy or futuristic; a texture based illustration can convey the idea about handson, personalized, crafty and artistic. Depending how the brand can relate to the two different sides, designers or illustrators can help bring textures into the product and make beautiful designs.
6. Photography
After talking about the 5 pieces above, the last piece of photography gets easy. In a brand guide, there is usually a section about image usage and how that reflects the brand personality. In product however, user experience designers have to constantly look for online images in their mocks or design. It’s important to build an image or photo library that conveys the brand and also ease the process of product design.
Avatars: Create a library of 50+ avatars that fits the brand personality; name each one of the avatars with the first and last name in case the mock needs that, organize them into gender, age and personality. Such systems can dramatically help product designers speed up their design process and reduce the stress of looking on the internet.
Default Images: Create a set of default images that can go anywhere as a placeholder. This can simply be a placeholder system for designers, or it can become the default images for real product use cases.
Special images: Buy stock images that fit the brand images, have a variety of them ready to be pulled and used in any design files. Again, this helps the designers and also create a system that circles everything back to the brand from inside the organization to outside.
That’s it! Six components that help shape a complete visual system for any digital products. This is a summary of a visual system on what I learned in 8 years combined experience in both visual design and product design. I hope it’s helpful for other designers who will be helping their companies to build their own visual system.
0 notes
Text
See how to Generate a Bibliography in MLA Andamp; APA Pattern
See how to Generate a Bibliography in MLA Andamp; APA Pattern
Right before we start to go over these types of page like a bibliography, you need to explain its this means.http://ift.tt/2iq7Mql Compared with a regular essay or researching old fashioned paper, a bibliography consists of merely the number of solutions that scholar designed to research project a specific area of interest. It could be specified case study helpers as the isolated project or as an element of the investigation document.
For it to be more clear, it’s much like a more in depth referrals (is effective reported) website page. The bibliography also should go after your cardstock. It handles the past a single or number of sites. Listed below are some tips you need to understand to post an extensive pieces of paper with this form:
It is easier to prep the complete bibliography if you ever jot down each and case studies paper every headline, brand, newsletter particular date, and source when applying any steer or indirect estimates. Once you surface texture the essay, you online case study won’t be then looking out for origins you have utilized as a way to search for these kinds of aspects.
Spirit these issues you have to use in all section:
Author’s identify
The name of your handbook, report, and many more.
Year or so of newsletter
Sites (if any straight insurance quote was implemented)
The reality is, these factors depend upon the specified formulating layout. Although you don’t be required to jot down whole source brand in APA, for you to do it in MLA set up. Formatting has become the fundamentals. That’s why is any scholastic report be noticeable.
Adhere to the order case studies selected formatting. It is really very unlikely to offer the primary aspect of the papers in Chi town, along with the subsequent aspect (bibliography) in APA.
After you have the opportunity to select the papers file format, we advise opting for MLA. This is basically the most effective set up which necessitates nominal attempts.
It’s to have some place for those bibliography illustration:
Alison Anderson case study research, Fireplace Wrecks Namatjira Ghost Gum line (Namatjira, MLA, 3 Jan 2013), 1-2.
Judith White colored, Albert Namatjira: Wanderer Get Rid buy case studies Of (Aussie Method Collector, Problem 13, July- Sept . 2000), 111-113.
Nationwide Art gallery of Modern australia, Catalogue shows: Nationwide Collection of Modern australia (Nationwide Collection of Melbourne, Canberra, 2014).
THE Job OF Personal references
Perhaps you may want to know why you will need to comprise of work references and report options the right way. Creators are posting their supplies to remain identified, and nobody wants his ways to be lost. The bibliography is the right way to treat artistic individuals for his or her extraordinary foreign language, busting press, challenging days they experienced, even more.
The call to report all solutions (even electronic digital) is outlined by cerebral asset. Based on any foreign mental premises regulation, citing one’s thought processes is obligatory.
You need to consideration the do my case studies cabability to obtain any providers that you would like.
Any breakdown to place filled citations is usually perceived as plagiarism. You will probably find more info . on this website write my case study.
One more purpose is so it will be potential to obtain the exact same methods readily if perhaps anyone has an interest ample to view the history/manual/guide to your last part.
Last of all, it’s with your attention to report your website or some other foundation so that they can help case sudy analisys support visit discussion with worthwhile research. Of course, when you gotten it mistaken, you might consider continually convince your educator that this approach was extracted from an additional writer. It may possibly keep your bibliography.
Phase-BY-Move Operating instructions
Carry out a study
As with all other scholastic newspaper, bibliography calls for qualitative and quantitative homework. You might want to visit your favorite search results (Yahoo, and many more.) and get all solutions that connect with custom case studies your subject areas.
Use equally major Andamp; supplementary origins
Initial check out all likely most important methods. They feature:
E-book
Clinical periodicals
School magazines
Books
Review guidelines
Genuine accounts
Govt reports
Additional options involve:
Job interviews case study helper
Polls
Internet surveys
Questionnaires
Spirit that extra solutions are certainly not involved in the bibliography.
Look at right after sound level
The bibliography is typically tied to specific amount of phrases. The whole essay may just be 1000 written text. Therefore, your functions reported ought not to be more than 100-150 key phrases. Most suitable, it requires at most ten percent in the complete newspaper. Once a bibliography is specified independently, you would like to concentrate on the amount of asked for phrases. Of course, your mentor guidelines this celebration.
Jot down your information
Cultivate operates mentioned write the place where case studies writing service you get downward all noticed, suitable, and updated providers. Be sure to do not forget that providers over the age of five years will not operate. Encompass even the ones suppliers that you just typically are not absolutely sure about. Subsequently, you could possibly speak to your coach to uncover which places you could use.
Set up a preliminary
To paraphrase, get started with your bibliography write. When you finally select the best option methods, compose the options one after the other thoroughly. You might actually case studies writer usean on-line demonstration of bibliography earned from the net to acquire some assistance.
Everything matters
Don’t forget anything as the time of distribution or quantity if your origin has an individual. Commonly, magazines and mags acquire more knowledge than publications.
Go along with trial notice greeting cards
Work references could possibly be made depending on so-labeled example message credit card case study writer. As soon as you’re carried out with your project, choose the data upon your message notes to change the cardstock by yourself.
Revision
When you will decide to proofread and redo a final bibliography, observe irrespective of whether case study papers all the resources are enclosed, placed into the alphabetical buy, and they are no more than five-years. With regards to individuals resources which do not comprise of experts identities (e.g., encyclopedias, movies), they must be alphabetized by subject. Eventually, inspect the formatting with the MLA Publishing Guideline.
This is a further type of bibliography, developed best case studies in APA fashion this period:
Bibliography
Berg, J.H., Andamp; Archer, R.L. (1982). Replies to personal-disclosure and interplay dreams. Log of Experimental Social networking Mindset, 18, 501-512.
Huang, Li-Ning. (1999). Family unit Communicating Patters and Persona Attributes. Communications Every quarter, 47, 230-243.
LePoire, B.A., Haynes, J., Driscoll, J., Operater, B.N., Wheelis, T.F., Hyde, M.K., Prochaska, M., Andamp; Ramos, L. (1997). Bond as a good purpose of parent and mate solution-avoidance inclinations. Our Correspondence Investigation, 23, 413-441.
Wingfield, M.C. (2000). Adjustments to Family members Dynamics: The Influence over Younger People as well as Human relationships. The Angora?, 31-44.
We wish to point out to you about a chance to obtain an entire bibliography constructed completely from scratch by appointing an experienced copy writer at this case studies help particular system.
Look at the pro over the internet Html code editor
The post See how to Generate a Bibliography in MLA Andamp; APA Pattern appeared first on Guest Blogging Platform for Jewelry & Fashion.
from Blog – Guest Blogging Platform for Jewelry & Fashion http://ift.tt/2kbyNy3 via IFTTT from Untitled http://ift.tt/2ix4Xn8 via IFTTT from Ladiesfashion25 http://ift.tt/2iuGgIm via IFTTT
0 notes
Text
See how to Generate a Bibliography in MLA Andamp; APA Pattern
See how to Generate a Bibliography in MLA Andamp; APA Pattern
Right before we start to go over these types of page like a bibliography, you need to explain its this means.http://ift.tt/2iq7Mql Compared with a regular essay or researching old fashioned paper, a bibliography consists of merely the number of solutions that scholar designed to research project a specific area of interest. It could be specified case study helpers as the isolated project or as an element of the investigation document.
For it to be more clear, it’s much like a more in depth referrals (is effective reported) website page. The bibliography also should go after your cardstock. It handles the past a single or number of sites. Listed below are some tips you need to understand to post an extensive pieces of paper with this form:
It is easier to prep the complete bibliography if you ever jot down each and case studies paper every headline, brand, newsletter particular date, and source when applying any steer or indirect estimates. Once you surface texture the essay, you online case study won’t be then looking out for origins you have utilized as a way to search for these kinds of aspects.
Spirit these issues you have to use in all section:
Author’s identify
The name of your handbook, report, and many more.
Year or so of newsletter
Sites (if any straight insurance quote was implemented)
The reality is, these factors depend upon the specified formulating layout. Although you don’t be required to jot down whole source brand in APA, for you to do it in MLA set up. Formatting has become the fundamentals. That’s why is any scholastic report be noticeable.
Adhere to the order case studies selected formatting. It is really very unlikely to offer the primary aspect of the papers in Chi town, along with the subsequent aspect (bibliography) in APA.
After you have the opportunity to select the papers file format, we advise opting for MLA. This is basically the most effective set up which necessitates nominal attempts.
It’s to have some place for those bibliography illustration:
Alison Anderson case study research, Fireplace Wrecks Namatjira Ghost Gum line (Namatjira, MLA, 3 Jan 2013), 1-2.
Judith White colored, Albert Namatjira: Wanderer Get Rid buy case studies Of (Aussie Method Collector, Problem 13, July- Sept . 2000), 111-113.
Nationwide Art gallery of Modern australia, Catalogue shows: Nationwide Collection of Modern australia (Nationwide Collection of Melbourne, Canberra, 2014).
THE Job OF Personal references
Perhaps you may want to know why you will need to comprise of work references and report options the right way. Creators are posting their supplies to remain identified, and nobody wants his ways to be lost. The bibliography is the right way to treat artistic individuals for his or her extraordinary foreign language, busting press, challenging days they experienced, even more.
The call to report all solutions (even electronic digital) is outlined by cerebral asset. Based on any foreign mental premises regulation, citing one’s thought processes is obligatory.
You need to consideration the do my case studies cabability to obtain any providers that you would like.
Any breakdown to place filled citations is usually perceived as plagiarism. You will probably find more info . on this website write my case study.
One more purpose is so it will be potential to obtain the exact same methods readily if perhaps anyone has an interest ample to view the history/manual/guide to your last part.
Last of all, it’s with your attention to report your website or some other foundation so that they can help case sudy analisys support visit discussion with worthwhile research. Of course, when you gotten it mistaken, you might consider continually convince your educator that this approach was extracted from an additional writer. It may possibly keep your bibliography.
Phase-BY-Move Operating instructions
Carry out a study
As with all other scholastic newspaper, bibliography calls for qualitative and quantitative homework. You might want to visit your favorite search results (Yahoo, and many more.) and get all solutions that connect with custom case studies your subject areas.
Use equally major Andamp; supplementary origins
Initial check out all likely most important methods. They feature:
E-book
Clinical periodicals
School magazines
Books
Review guidelines
Genuine accounts
Govt reports
Additional options involve:
Job interviews case study helper
Polls
Internet surveys
Questionnaires
Spirit that extra solutions are certainly not involved in the bibliography.
Look at right after sound level
The bibliography is typically tied to specific amount of phrases. The whole essay may just be 1000 written text. Therefore, your functions reported ought not to be more than 100-150 key phrases. Most suitable, it requires at most ten percent in the complete newspaper. Once a bibliography is specified independently, you would like to concentrate on the amount of asked for phrases. Of course, your mentor guidelines this celebration.
Jot down your information
Cultivate operates mentioned write the place where case studies writing service you get downward all noticed, suitable, and updated providers. Be sure to do not forget that providers over the age of five years will not operate. Encompass even the ones suppliers that you just typically are not absolutely sure about. Subsequently, you could possibly speak to your coach to uncover which places you could use.
Set up a preliminary
To paraphrase, get started with your bibliography write. When you finally select the best option methods, compose the options one after the other thoroughly. You might actually case studies writer usean on-line demonstration of bibliography earned from the net to acquire some assistance.
Everything matters
Don’t forget anything as the time of distribution or quantity if your origin has an individual. Commonly, magazines and mags acquire more knowledge than publications.
Go along with trial notice greeting cards
Work references could possibly be made depending on so-labeled example message credit card case study writer. As soon as you’re carried out with your project, choose the data upon your message notes to change the cardstock by yourself.
Revision
When you will decide to proofread and redo a final bibliography, observe irrespective of whether case study papers all the resources are enclosed, placed into the alphabetical buy, and they are no more than five-years. With regards to individuals resources which do not comprise of experts identities (e.g., encyclopedias, movies), they must be alphabetized by subject. Eventually, inspect the formatting with the MLA Publishing Guideline.
This is a further type of bibliography, developed best case studies in APA fashion this period:
Bibliography
Berg, J.H., Andamp; Archer, R.L. (1982). Replies to personal-disclosure and interplay dreams. Log of Experimental Social networking Mindset, 18, 501-512.
Huang, Li-Ning. (1999). Family unit Communicating Patters and Persona Attributes. Communications Every quarter, 47, 230-243.
LePoire, B.A., Haynes, J., Driscoll, J., Operater, B.N., Wheelis, T.F., Hyde, M.K., Prochaska, M., Andamp; Ramos, L. (1997). Bond as a good purpose of parent and mate solution-avoidance inclinations. Our Correspondence Investigation, 23, 413-441.
Wingfield, M.C. (2000). Adjustments to Family members Dynamics: The Influence over Younger People as well as Human relationships. The Angora?, 31-44.
We wish to point out to you about a chance to obtain an entire bibliography constructed completely from scratch by appointing an experienced copy writer at this case studies help particular system.
Look at the pro over the internet Html code editor
The post See how to Generate a Bibliography in MLA Andamp; APA Pattern appeared first on Guest Blogging Platform for Jewelry & Fashion.
from Blog – Guest Blogging Platform for Jewelry & Fashion http://ift.tt/2kbyNy3 via IFTTT from Untitled http://ift.tt/2ix4Xn8 via IFTTT from Ladies Fashion http://ift.tt/2BoSDsU via IFTTT
0 notes
Text
See how to Generate a Bibliography in MLA Andamp; APA Pattern
See how to Generate a Bibliography in MLA Andamp; APA Pattern
Right before we start to go over these types of page like a bibliography, you need to explain its this means.http://ift.tt/2iq7Mql Compared with a regular essay or researching old fashioned paper, a bibliography consists of merely the number of solutions that scholar designed to research project a specific area of interest. It could be specified case study helpers as the isolated project or as an element of the investigation document.
For it to be more clear, it’s much like a more in depth referrals (is effective reported) website page. The bibliography also should go after your cardstock. It handles the past a single or number of sites. Listed below are some tips you need to understand to post an extensive pieces of paper with this form:
It is easier to prep the complete bibliography if you ever jot down each and case studies paper every headline, brand, newsletter particular date, and source when applying any steer or indirect estimates. Once you surface texture the essay, you online case study won’t be then looking out for origins you have utilized as a way to search for these kinds of aspects.
Spirit these issues you have to use in all section:
Author’s identify
The name of your handbook, report, and many more.
Year or so of newsletter
Sites (if any straight insurance quote was implemented)
The reality is, these factors depend upon the specified formulating layout. Although you don’t be required to jot down whole source brand in APA, for you to do it in MLA set up. Formatting has become the fundamentals. That’s why is any scholastic report be noticeable.
Adhere to the order case studies selected formatting. It is really very unlikely to offer the primary aspect of the papers in Chi town, along with the subsequent aspect (bibliography) in APA.
After you have the opportunity to select the papers file format, we advise opting for MLA. This is basically the most effective set up which necessitates nominal attempts.
It’s to have some place for those bibliography illustration:
Alison Anderson case study research, Fireplace Wrecks Namatjira Ghost Gum line (Namatjira, MLA, 3 Jan 2013), 1-2.
Judith White colored, Albert Namatjira: Wanderer Get Rid buy case studies Of (Aussie Method Collector, Problem 13, July- Sept . 2000), 111-113.
Nationwide Art gallery of Modern australia, Catalogue shows: Nationwide Collection of Modern australia (Nationwide Collection of Melbourne, Canberra, 2014).
THE Job OF Personal references
Perhaps you may want to know why you will need to comprise of work references and report options the right way. Creators are posting their supplies to remain identified, and nobody wants his ways to be lost. The bibliography is the right way to treat artistic individuals for his or her extraordinary foreign language, busting press, challenging days they experienced, even more.
The call to report all solutions (even electronic digital) is outlined by cerebral asset. Based on any foreign mental premises regulation, citing one’s thought processes is obligatory.
You need to consideration the do my case studies cabability to obtain any providers that you would like.
Any breakdown to place filled citations is usually perceived as plagiarism. You will probably find more info . on this website write my case study.
One more purpose is so it will be potential to obtain the exact same methods readily if perhaps anyone has an interest ample to view the history/manual/guide to your last part.
Last of all, it’s with your attention to report your website or some other foundation so that they can help case sudy analisys support visit discussion with worthwhile research. Of course, when you gotten it mistaken, you might consider continually convince your educator that this approach was extracted from an additional writer. It may possibly keep your bibliography.
Phase-BY-Move Operating instructions
Carry out a study
As with all other scholastic newspaper, bibliography calls for qualitative and quantitative homework. You might want to visit your favorite search results (Yahoo, and many more.) and get all solutions that connect with custom case studies your subject areas.
Use equally major Andamp; supplementary origins
Initial check out all likely most important methods. They feature:
E-book
Clinical periodicals
School magazines
Books
Review guidelines
Genuine accounts
Govt reports
Additional options involve:
Job interviews case study helper
Polls
Internet surveys
Questionnaires
Spirit that extra solutions are certainly not involved in the bibliography.
Look at right after sound level
The bibliography is typically tied to specific amount of phrases. The whole essay may just be 1000 written text. Therefore, your functions reported ought not to be more than 100-150 key phrases. Most suitable, it requires at most ten percent in the complete newspaper. Once a bibliography is specified independently, you would like to concentrate on the amount of asked for phrases. Of course, your mentor guidelines this celebration.
Jot down your information
Cultivate operates mentioned write the place where case studies writing service you get downward all noticed, suitable, and updated providers. Be sure to do not forget that providers over the age of five years will not operate. Encompass even the ones suppliers that you just typically are not absolutely sure about. Subsequently, you could possibly speak to your coach to uncover which places you could use.
Set up a preliminary
To paraphrase, get started with your bibliography write. When you finally select the best option methods, compose the options one after the other thoroughly. You might actually case studies writer usean on-line demonstration of bibliography earned from the net to acquire some assistance.
Everything matters
Don’t forget anything as the time of distribution or quantity if your origin has an individual. Commonly, magazines and mags acquire more knowledge than publications.
Go along with trial notice greeting cards
Work references could possibly be made depending on so-labeled example message credit card case study writer. As soon as you’re carried out with your project, choose the data upon your message notes to change the cardstock by yourself.
Revision
When you will decide to proofread and redo a final bibliography, observe irrespective of whether case study papers all the resources are enclosed, placed into the alphabetical buy, and they are no more than five-years. With regards to individuals resources which do not comprise of experts identities (e.g., encyclopedias, movies), they must be alphabetized by subject. Eventually, inspect the formatting with the MLA Publishing Guideline.
This is a further type of bibliography, developed best case studies in APA fashion this period:
Bibliography
Berg, J.H., Andamp; Archer, R.L. (1982). Replies to personal-disclosure and interplay dreams. Log of Experimental Social networking Mindset, 18, 501-512.
Huang, Li-Ning. (1999). Family unit Communicating Patters and Persona Attributes. Communications Every quarter, 47, 230-243.
LePoire, B.A., Haynes, J., Driscoll, J., Operater, B.N., Wheelis, T.F., Hyde, M.K., Prochaska, M., Andamp; Ramos, L. (1997). Bond as a good purpose of parent and mate solution-avoidance inclinations. Our Correspondence Investigation, 23, 413-441.
Wingfield, M.C. (2000). Adjustments to Family members Dynamics: The Influence over Younger People as well as Human relationships. The Angora?, 31-44.
We wish to point out to you about a chance to obtain an entire bibliography constructed completely from scratch by appointing an experienced copy writer at this case studies help particular system.
Look at the pro over the internet Html code editor
The post See how to Generate a Bibliography in MLA Andamp; APA Pattern appeared first on Guest Blogging Platform for Jewelry & Fashion.
from Blog – Guest Blogging Platform for Jewelry & Fashion http://ift.tt/2kbyNy3 via IFTTT from Untitled http://ift.tt/2ix4Xn8 via IFTTT
0 notes
Photo

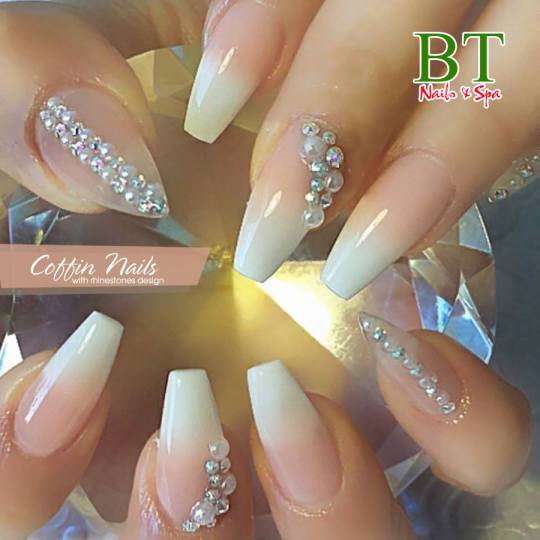
SNS nails aren’t new, but they haven’t been hugely popular until recent years. If you’re looking to switch your fingernail game up a bit, find out everything you need to know about SNS—a new, natural option for nail enhancements.
1. What Is SNS?
SNS stands for Signature Nail Systems. It is a branded powder-dipping system, accompanied by a brush-on, gel-based polish. SNS comes in an array of colors and shades and consists of benzoyl peroxide, titanium dioxide, acrylic ester polymer, vitamin E and calcium.
2. How Is SNS Applied To Your Nails?
SNS nails rely on powder rather than layers of gel. The process of applying SNS nails is fairly simple. Let’s break it down:
Your nails are filed and shaped then cleansed with a primer.
The nail technician applies a coat of resin on the nail plate.
Dips each nail into the coloured powder, and secures the colour with a bonding liquid.
The process is repeated a number of times to create the required strength and structure.
Finally there’s the glossy top coat to give the look its luster and shine.
It will take about 45 minutes to 1 hour for the SNS application. SNS nails cannot be infilled, so when you have regrowth you will have to do a full removal and re-application.
3. How To Remove SNS Nails?
The process of removing powder manicures is quite easy. Begin by removing the top layer of gel polish, and then soak your nails in acetone, generally no filing or buffing required. While acetone is the most effective method, it can irritate and dry your skin. You can use acetone-free nail polish remover if you prefer. A clever option is to stop in your local nail salon and have your SNS nails removed professionally. Never try to peel off your SNS nails, as this can remove the top layer of your natural nails, causing them to become brittle and break.
4. What Are The Benefits Of SNS Nails?
SNS nails are incredibly easy to apply.
There is no curing or setting under a LED or UV light.
SNS provides a lightweight feel (thinner on the nail than acrylic). It’s a great way of getting a bit of extra strength in your nails, whilst maintaining a more natural-looking finish.
SNS has nutrients inside the powder that help strengthen the bed of your nails rather than wear them down.
Gives off fewer fumes. Less harsh on your natural nails.
More resistant to chips and can last up to 3 weeks.
SNS nails don’t just come in one style. Like any other polish, you can create beautiful designs that are totally worth showing off. There is an almost endless amount of colors and textures to choose from. With this nail technique, you can let your imagination go wild.
5. Should We Try SNS Nails?
SNS manicure is especially for anyone who is:
Unhappy with the strong, acrylic smell that’s become synonymous with nail polish.
Sensitive to chemical odors or have skin allergies.
Nervous about the potentially harmful effects that the UV lights used to dry other types of polish can have.
6. How Much Does SNS Nails Cost?
Depending on where you plan to get your nails done, and how elaborate you would prefer the design, you can expect SNS manicure to range from $35 to $75 for a full set.
7. What Should You Be Aware Of SNS Nails?
You may have to go in for a touch-up around 2-3 weeks. Otherwise, you will have to get the colour removed and start from scratch.
Even though no UV or LED light and less filing of the natural nail is involved, SNS nails still require a gel base and top coat, which can be damaging to nails.
Be sure that you go to a licensed nail technician or a professional nail salon to ensure minimal risk of infection and other skin issues.
And if you need any more help, please contact our nail salon 60544, we are always ready to help you look better – that’s our mission
BT Nails Spa
Address : 15420 S Rt 59Plainfield, IL 60544
Tel : 815-733-6285
0 notes