#copying files with Ansible
Explore tagged Tumblr posts
Visit Tumblr Blog
Explore Tumblr blogs with no restrictions, modern design and the best experience.
Last Seen Tumblr Blogs


Fun Fact
69% of Tumblr users are millennials.
Text
Ansible Copy: Automated file copy module
Ansible Copy: Automated file copy module #homelab #ansible #automation #copyfiles #managepermissions #synchronizedata #localhosts #remotehosts #configurationmanagement #filemanagement #ansiblecopymodule
There is no doubt that Ansible is an excellent tool in the home lab, production, and any other environment you want to automate. It provides configuration management capabilities, and the learning curve isn’t too steep. There is a module, in particular, we want to look at, the Ansible copy module, and see how we can use it to copy files between a local machine and a remote server. Table of…

View On WordPress
#Ansible automation tool#Ansible file permissions management#Ansible playbook for file management#copy module in Ansible#copying files with Ansible#fetch module in Ansible#local to remote file transfer#managing remote servers#recursive directory copy#synchronization between remote hosts
0 notes
Text
Future-Ready HR: How Zero-Downtime SAP S/4HANA Upgrades Slash Admin Effort and Boost Employee Experience
Reading time: ~9 minutes • Author: SAPSOL Technologies Inc.
Executive Summary (Why stay for the next nine minutes?)
HR has become the cockpit for culture, compliance, and analytics-driven talent decisions. Yet most teams still run the digital equivalent of a flip phone: ECC 6.0 or an early S/4 release installed when TikTok didn’t exist. Staying on “version lock” quietly drains budgets—payroll defects, clunky self-service, manual audits—until a single statutory patch or ransomware scare forces a panic upgrade.

It doesn’t have to be that way. A zero-downtime SAP S/4HANA migration, delivered with modern DevOps, automated regression testing, and business-led governance, lets you transform the HR core without stopping payroll or blowing up IT change windows. In this deep dive you’ll learn:
The five hidden HR costs of running yesterday’s ERP
A phase-by-phase playbook for near-invisible cutover—validated at mid-market firms across North America
Real KPIs in 60 days: fewer payroll recalculations, faster onboarding, and a 31 % jump in self-service adoption
Action kit: register for our 26 June micro-webinar (1 CE credit) and grab the 15-point checklist to start tomorrow
1. The Hidden Tax of Running on Yesterday’s ERP
Every HR pro has lived at least one of these nightmares—often shrugging them off as “just how the system works.” Multiply them across years and thousands of employees, and the cost rivals an enterprise-wide wage hike.
Patch ParalysisScenario: Ottawa releases a mid-year CPP rate change. Payroll must implement it in two weeks, but finance is in year-end freeze. Manual notes, off-cycle transports, weekend overtime—then a retro run reveals under-withholding on 800 staff.Tax in hours: 120 developer + analyst hours per patch.Tax in trust: Employee confidence tanks when paycheques bounce.
Security DebtRole concepts written for 2008 processes force endless SoD spreadsheets. Auditors demand screenshots for every change. Each year the HRIS lead burns a full month compiling user-access evidence.
UX FatigueESS/MSS screens render like Windows XP. Employees open tickets rather than self-serve address changes, spiking help-desk volume by 15–20 %. New grads—used to consumer-grade apps—question your brand.
Analytics BlackoutsReal-time dashboards stall because legacy cluster tables can’t feed BW/4HANA live connections. HR must export CSVs, re-import to Power BI, reconcile totals, and hope no one notices daily-refresh gaps.
Cloud-Talent SprawlRecruiting, learning, and well-being live in separate SaaS tools. Nightly interfaces fail, HRIS babysits IDocs at midnight, and CFO wonders why subscription spend keeps climbing.
Bottom line: Those “little pains” cost six or seven figures annually. Modernizing the digital core erases the tax—but only if you keep payroll humming, time clocks online, and compliance filings on schedule. Welcome to zero-downtime migration.
2. Anatomy of a Zero-Downtime SAP S/4HANA Upgrade
Phase 1 – Dual-Track Sandboxing (Days 0–10)
Objective: Give HR super-users a playground that mirrors live payroll while production stays untouched.
How: SAPSOL deploys automated clone scripts—powered by SAP Landscape Transformation (SLT) and Infrastructure-as-Code templates (Terraform, Ansible). Within 48 hours a greenfield S/4HANA sandbox holds PA/OM/PT/PY data scrubbed of PII.
Why it matters: Business owners prove statutory, union, and time rules in isolation. The tech team tweaks roles, Fiori catalogs, and CDS views without delaying month-end.
Pro tip: Schedule “sandbox showcase” lunches—15-minute demos that excite HR stakeholders and surface nuance early (“Our northern sites calculate dual overtime thresholds!”).
Phase 2 – Data Minimization & Clone Masking (Days 11–25)
Data hoarding dooms many upgrades. Terabytes of inactive personnel files balloon copy cycles and expose PII.
Rule-based archiving: Retain only active employees + two full fiscal years.
GDPR masking: Hash SIN/SSN, bank data, and health codes for non-production copies.
Result: 47 % smaller footprint → copy/refresh windows collapse from 20 hours to 8.
Phase 3 – Sprint-Style Regression Harness (Days 26–60)
Introduce HR-Bot, SAPSOL’s regression engine:
600+ automated scripts cover payroll clusters, Time Evaluation, Benefits, and Global Employment.
Execution pace: Two hours for end-to-end vs. 10 days of manual step-lists.
Tolerance: Variance > 0.03 % triggers red flag. Human testers focus on exceptions, not keystrokes.
Regression becomes a nightly safety net, freeing analysts for business process innovation.
Phase 4 – Shadow Cutover (Weekend T-0)
Friday 18:00 – ECC payroll finishes week. SLT delta replication streams last-minute master-data edits to S/4.
Friday 21:00 – Finance, HR, and IT sign off on penny-perfect rehearsal payroll inside S/4.
Friday 22:00 – DNS switch: ESS/MSS URLs now point to the S/4 tenant; API integrations flip automatically via SAP API Management.
Monday 07:00 – Employees log in, see Fiori launchpad mobile tiles. No tickets, no confetti cannons—just business as usual.
Phase 5 – Continuous Innovation Loop (Post Go-Live)
Traditional upgrades dump you at go-live then vanish for 18 months. Zero-downtime culture embeds DevOps:
Feature Pack Stack drip-feeding—small transports weekly, not mega-projects yearly.
Blue-green pipelines—automated unit + regression tests gate every transport.
Feedback loops—daily stand-up with HR ops, weekly KPI review. Change windows are now measured in coffee breaks.
3. Change Management: Winning Hearts Before You Move Code
A seamless cutover still fails if the workforce rejects new workflows. SAPSOL’s “People, Process, Platform” model runs parallel to tech tracks:
Personas & journeys – Map recruiter, manager, hourly associate pain points.
Hyper-care squads – Power users sit with help-desk during first two payroll cycles.
Micro-learning bursts – 3-minute “how-to” videos embedded in Fiori. Uptake beats hour-long webinars.
Result? User adoption spikes quickly often visible in ESS log-ins by week 2.
4. Compliance & Audit Readiness Baked In
Zero-downtime doesn’t just protect operations; it boosts compliance posture:
SoD automation – SAP Cloud Identity Access Governance compares old vs. new roles nightly.
e-Document Framework – Tax-authority e-filings (Canada, US, EU) validated pre-cutover.
Lineage reporting – Every payroll cluster mutation logged in HANA native storage, simplifying CRA or IRS queries.
Auditors now receive screenshots and drill-downs at click speed, not quarter-end heroics.
5. Performance Gains You Can Take to the Bank
Within the first two payroll cycles post-go-live, SAPSOL clients typically see:
60 DAY RESULT
Payroll recalculations 92/year –38 %
Onboarding cycle (offer → badge) 11 days –22 %
ESS/MSS log-ins 5 500/month +31 %
Unplanned downtime 2.5 hrs/yr 0 hrs
One $750 M discrete-manufacturer counts 3 498 staff hours returned annually—funding three new talent-analytics analysts without head-count increase.
6. Case Study
Profile – 1 900 employees, unionized production, dual-country payroll (CA/US), ECC 6 for 14 years.
Challenge – Legacy payroll schema required 43 custom Operation Rules; security roles triggered 600+ SoD conflicts each audit.
SAPSOL Solution
Dual-track sandbox; 37 payroll variants tested in 10 days
GDPR masking reduced non-prod clone from 3.2 TB → 1.4 TB
Near-Zero-Downtime (NZDT) services + blue/green pipeline executed cutover in 49 minutes
Hyper-care “Ask Me Anything” Teams channel moderated by HR-Bot
Outcome – Zero payroll disruption, –41 % payroll support tickets, +3 % Glassdoor rating in six months.
Read our case study on Assessment of Complete Upgrade and Integration Functionality of ERP (COTS) with BIBO/COGNOS and External Systems
7. Top Questions from HR Leaders—Answered in Plain Speak
Q1. Will moving to S/4 break our union overtime rules?No. SAP Time Sheet (CATS/SuccessFactors Time Tracking) inherits your custom schemas. We import PCRs, run dual-payroll reconciliation, and give union reps a sandbox login to verify every scenario before go-live.
Q2. Our headquarters is in Canada, but 40 % of the workforce is in the US. Can we run parallel payroll?Absolutely. SAPSOL’s harness executes CA and US payroll in a single simulation batch. Variance reports highlight penny differences line-by-line so Finance signs off with confidence.
Q3. How do we show ROI to the CFO beyond “it’s newer”?We deliver a quantified value storyboard: reduced ticket labour, compliance fines avoided, attrition savings from better UX, and working-capital release from faster hiring time. Most clients see payback in 12–16 months.
Q4. Our IT team fears “another massive SAP project.” What’s different?Zero-downtime scope fits in 14-week sprints, not two-year marathons. Automated regression and blue-green transport pipelines mean fewer late nights and predictable release cadence.
Q5. Do we need to rip-and-replace HR add-ons (payroll tax engines, time clocks)?No. Certified interfaces (HR FIORI OData, CPI iFlows) keep existing peripherals alive. In pilots we reused 92 % of third-party integrations unchanged.
8. Technical Underpinnings (Geek Corner)
Downtime-Optimized DMO – Combines SUM + NZDT add-on so business operations continue while database tables convert in shadow schema.
HANA native storage extension – Offloads cold personnel data to cheaper disk tiers but keeps hot clusters in-memory, balancing cost and speed.
CDS-based HR analytics – Replaces cluster decoding with virtual data model views, feeding SAP Analytics Cloud dashboards in real time.
CI/CD Toolchain – GitLab, abapGit, and gCTS orchestrate transports; Selenium/RPA automate UI smoke tests.
These pieces work behind the curtain so HR never sees a hiccup.
9. Next Steps—Your 3-Step Action Kit
Reserve your seat at our Zero-Downtime HR Upgrade micro-webinar on 26 June—capped at 200 live seats. Attendees earn 1 SHRM/HRCI credit and receive the complete 15-Point HR Upgrade Checklist.
Download the checklist and benchmark your current payroll and self-service pain points. It’s a one-page scorecard you can share with IT and Finance.
Book a free discovery call at https://www.sapsol.com/free-sap-poc/ to scope timelines, quick wins, and budget guardrails. (We’ll show you live KPI dashboards from real clients—no slideware.)
Upgrade your core. Elevate your people. SAPSOL has your back.
Final Thought
Zero-downtime migration isn’t a Silicon-Valley fantasy. It’s a proven, repeatable path to unlock modern HR capabilities—without risking the payroll run or employee trust. The sooner your digital core evolves, the faster HR can pivot from data janitor to strategic powerhouse.
See you on 26 June—let’s build an HR ecosystem ready for anything.Sam Mall — Founder, SAPSOL Technologies Inc.Website: https://www.sapsol.comCall us at: +1 3438000733
0 notes
Text
Terraform with Ansible: A Powerful Duo for Infrastructure Management

Managing infrastructure has evolved into a seamless, automated process with tools like Terraform and Ansible. These two technologies are often paired together, allowing developers, DevOps teams, and system administrators to tackle complex cloud infrastructure challenges efficiently. But why use Terraform with Ansible, and how do they complement each other?
Let's dive into what makes these tools so powerful when combined, covering the best practices, Terraform setup steps, Ansible configurations, and real-world use cases.
What is Terraform?
Terraform is a popular infrastructure-as-code (IaC) tool developed by HashiCorp. It allows users to define infrastructure in a declarative manner, which means specifying the desired state rather than writing scripts to achieve it. By creating Terraform configurations, teams can automate the provisioning and management of cloud resources across multiple providers like AWS, Azure, and Google Cloud.
Terraform is especially valuable because:
It provides a single configuration language that can be used across different cloud providers.
It manages resources using a state file to keep track of current infrastructure and applies only necessary changes.
It’s ideal for infrastructure that requires scaling and flexibility.
What is Ansible?
Ansible is an open-source automation tool that excels in configuration management, application deployment, and task automation. Developed by Red Hat, Ansible works by using playbooks written in YAML to define a series of tasks that need to be performed on servers or other resources.
With Ansible, you can:
Automate repetitive tasks (like software installation or server configurations).
Control complex deployments with a simple, human-readable language.
Avoid the need for agents or additional software on servers, as it operates over SSH.
Why Combine Terraform with Ansible?
While Terraform and Ansible are powerful tools individually, using Terraform with Ansible creates a more holistic solution for infrastructure and configuration management.
Here’s how they work together:
Terraform provisions the infrastructure, creating cloud resources like virtual machines, networks, or databases.
Ansible then configures those resources by installing necessary software, setting configurations, and managing deployments.
By using Terraform with Ansible, DevOps teams can automate end-to-end workflows, from setting up servers to configuring applications. This combination is also beneficial for ensuring consistency and repeatability in deployments.
Setting Up Terraform with Ansible: Step-by-Step Guide
Here’s a simplified approach to setting up Terraform with Ansible for an automated infrastructure.
1. Define Your Infrastructure with Terraform
Start by creating a Terraform configuration file where you define the resources needed. For example, let’s say you’re deploying a web application on AWS. You could use Terraform to create:
An EC2 instance for the application server.
A VPC (Virtual Private Cloud) to isolate resources.
Security groups for controlling access.
Here’s an example of a Terraform configuration for creating an EC2 instance on AWS:
hcl
Copy code
provider "aws" {
region = "us-west-2"
}
resource "aws_instance" "app_server" {
ami = "ami-0c55b159cbfafe1f0"
instance_type = "t2.micro"
tags = {
Name = "Terraform-Ansible-Server"
}
}
After defining the configuration, initialize and apply it with:
bash
Copy code
terraform init
terraform apply
2. Generate an Inventory File for Ansible
Terraform can output details about the resources it creates, such as the public IP addresses of EC2 instances. This information is essential for Ansible to know where to connect and perform tasks. You can use Terraform's output variables to create a dynamic inventory file for Ansible.
Add an output block in your Terraform configuration:
hcl
Copy code
output "instance_ip" {
value = aws_instance.app_server.public_ip
}
To use this information in Ansible, run terraform output and direct it to a file that Ansible can read.
3. Write Ansible Playbooks
Now, create a playbook that will handle the configurations on the EC2 instance. For instance, you might want to:
Install web servers like Apache or NGINX.
Set up firewall rules.
Deploy application code.
Here’s a sample Ansible playbook that installs NGINX on the server:
yaml
Copy code
---
- name: Configure Web Server
hosts: all
become: yes
tasks:
- name: Update apt packages
apt:
update_cache: yes
- name: Install NGINX
apt:
name: nginx
state: present
- name: Start NGINX
service:
name: nginx
state: started
4. Run Ansible to Configure the Server
With your inventory file and playbook ready, run the following command to configure the server:
bash
Copy code
ansible-playbook -i inventory_file playbook.yml
This command instructs Ansible to read the inventory file and execute the playbook tasks on each server listed.
Best Practices When Using Terraform with Ansible
Combining Terraform with Ansible requires a few best practices to ensure smooth, scalable, and reliable automation.
Separate Infrastructure and Configuration Logic
Use Terraform strictly for creating and managing infrastructure, while Ansible should handle software configurations and tasks. This clear separation of concerns minimizes errors and makes debugging easier.
Maintain Version Control
Store both Terraform configuration files and Ansible playbooks in a version-controlled repository. This allows teams to roll back to previous configurations if issues arise and track changes over time.
Use Terraform Modules and Ansible Roles
Modules and roles are reusable pieces of code that can make your configurations more modular. Terraform modules allow you to encapsulate resources and reuse them across multiple environments, while Ansible roles organize playbooks into reusable components.
Manage State Carefully
With Terraform’s state file, ensure it’s securely stored, ideally in a remote backend like AWS S3 or Google Cloud Storage. This practice prevents conflicts in multi-user environments and keeps the state consistent.
Plan and Test Changes
Terraform and Ansible changes can sometimes have far-reaching effects. Always use terraform plan before applying changes to preview what will be modified, and test Ansible playbooks in a development environment.
Real-World Applications of Terraform with Ansible
The Terraform-Ansible combo is used by organizations worldwide to manage cloud infrastructure efficiently.
Multi-Cloud Deployments: Terraform’s support for various cloud providers enables teams to deploy across AWS, Azure, and GCP, while Ansible ensures that configurations remain consistent.
Continuous Integration and Deployment (CI/CD): Terraform and Ansible are often integrated into CI/CD pipelines to automate everything from resource provisioning to application deployment. Tools like Jenkins, GitLab CI, or CircleCI can trigger Terraform and Ansible scripts for seamless updates.
Scaling Applications: By using Terraform with Ansible, teams can scale infrastructure dynamically. Terraform provisions additional instances when needed, and Ansible applies the latest configurations.
Dev and Test Environments: Development and testing teams use Terraform and Ansible to create isolated environments that mirror production. This process allows teams to test configurations and deployments safely.
Top Benefits of Terraform with Ansible
Consistency Across Environments: Terraform ensures infrastructure is defined consistently, while Ansible guarantees configurations remain uniform across instances.
Reduced Manual Effort: Automate repetitive tasks, leading to time savings and fewer errors.
Scalability: Easily adapt and expand your infrastructure based on demand.
Flexibility with Multi-Cloud: Terraform’s multi-cloud support means you’re not locked into one provider.
Improved Reliability: Automation reduces human error, making deployments and configurations more reliable.
Final Thoughts
Using Terraform with Ansible creates a synergy that takes your automation and cloud infrastructure management to new heights. Whether you’re setting up environments for development, managing complex multi-cloud setups, or automating application deployments, this combination streamlines operations and reduces the risk of errors.
By integrating these two tools, you’re setting the stage for scalable, reliable, and efficient infrastructure that’s well-suited for today’s dynamic cloud environments. For any team looking to improve their infrastructure management practices, Terraform with Ansible is a match made in automation heaven.
0 notes
Text
Master Ansible: Automation & DevOps with Real Projects
1. Introduction
Ansible is a powerful open-source tool used for IT automation, configuration management, and application deployment. In the realm of DevOps, automation is crucial for streamlining operations, reducing errors, and speeding up processes. This article delves into the world of Ansible, exploring its capabilities and demonstrating how it can transform your DevOps practices through real-world projects.
2. Getting Started with Ansible
Ansible Installation To get started with Ansible, you first need to install it. Ansible is available for various operating systems, including Linux, macOS, and Windows. Installation is straightforward, typically involving a simple command like pip install ansible for Python environments. Once installed, you can verify the installation with ansible --version.
Basic Commands and Concepts Ansible uses simple, human-readable YAML files for automation, making it accessible even to those new to coding. The primary components include inventory files, playbooks, modules, and plugins. An inventory file lists all the hosts you want to manage, while playbooks define the tasks to execute on those hosts.
3. Core Components of Ansible
Inventory Files Inventory files are a cornerstone of Ansible’s architecture. They define the hosts and groups of hosts on which Ansible commands, modules, and playbooks operate. These files can be static or dynamic, allowing for flexible management of environments.
Playbooks Playbooks are YAML files that contain a series of tasks to be executed on managed nodes. They are the heart of Ansible’s configuration management, enabling users to describe the desired state of their systems.
Modules and Plugins Modules are reusable, standalone scripts that perform specific tasks such as installing packages or managing services. Plugins extend Ansible’s functionality, providing additional capabilities like logging, caching, and connection management.
4. Ansible Configuration Management
Managing Files and Directories Ansible makes it easy to manage files and directories across multiple systems. You can use the copy module to transfer files, the template module to manage configuration files, and the file module to manage permissions and ownership.
Automating User Management User management is a common task in system administration. With Ansible, you can automate the creation, deletion, and modification of user accounts and groups, ensuring consistent user management across your infrastructure.
5. Ansible for Application Deployment
Deploying Web Applications Ansible excels at deploying web applications. You can automate the deployment of entire web stacks, including web servers, application servers, and databases. Playbooks can handle everything from installing necessary packages to configuring services and deploying code.
Managing Dependencies Managing dependencies is crucial for successful application deployment. Ansible can automate the installation of dependencies, ensuring that all required packages and libraries are available on the target systems.
6. Network Automation with Ansible
Configuring Network Devices Ansible’s network automation capabilities allow you to configure routers, switches, firewalls, and other network devices. Using modules designed for network management, you can automate tasks like interface configuration, VLAN management, and firmware updates.
Automating Network Security Security is a top priority in network management. Ansible can automate the configuration of security policies, firewalls, and intrusion detection systems, helping to protect your network from threats.
7. Ansible Roles and Galaxy
Creating and Using Roles Roles are a powerful way to organize and reuse Ansible code. By structuring your playbooks into roles, you can simplify your automation tasks and make your code more modular and maintainable.
Sharing Roles with Ansible Galaxy Ansible Galaxy is a community hub for sharing Ansible roles. It allows you to find and reuse roles created by others, accelerating your automation projects and promoting best practices.
8. Advanced Ansible Techniques
Ansible Vault for Secrets Ansible Vault is a feature that allows you to securely store and manage sensitive data, such as passwords and API keys. By encrypting this information, Ansible Vault helps protect your sensitive data from unauthorized access.
Using Conditionals and Loops Conditionals and loops in Ansible playbooks enable more dynamic and flexible automation. You can use conditionals to execute tasks based on certain conditions and loops to perform repetitive tasks efficiently.
9. Real-World Ansible Projects
Automating CI/CD Pipelines Continuous Integration and Continuous Deployment (CI/CD) are key components of modern DevOps practices. Ansible can automate the entire CI/CD pipeline, from code integration and testing to deployment and monitoring, ensuring fast and reliable software delivery.
Infrastructure as Code with Ansible Infrastructure as Code (IaC) is a methodology for managing and provisioning computing infrastructure through machine-readable scripts. Ansible supports IaC by enabling the automation of infrastructure setup, configuration, and management.
10. Integrating Ansible with Other Tools
Ansible and Jenkins Jenkins is a popular open-source automation server used for building, testing, and deploying software. Ansible can be integrated with Jenkins to automate post-build deployment tasks, making it a powerful addition to the CI/CD workflow.
Ansible and Kubernetes Kubernetes is a container orchestration platform that automates the deployment, scaling, and management of containerized applications. Ansible can be used to manage Kubernetes clusters, automate application deployment, and handle configuration management.
11. Troubleshooting Ansible
Common Errors and Solutions Even with its simplicity, Ansible can encounter errors during playbook execution. Common issues include syntax errors in YAML files, missing modules, and incorrect inventory configurations. Knowing how to troubleshoot these errors is essential for smooth automation.
Debugging Playbooks Ansible provides several debugging tools and strategies, such as the -v flag for verbose output and the debug module for printing variables and task outputs. These tools help identify and resolve issues in your playbooks.
12. Security and Compliance with Ansible
Automating Security Patches Keeping systems up to date with the latest security patches is crucial for maintaining security. Ansible can automate the patch management process, ensuring that all systems are consistently updated and secure.
Compliance Checks Compliance with industry standards and regulations is a vital aspect of IT management. Ansible can automate compliance checks, providing reports and remediations to ensure your systems meet required standards.
13. Ansible Best Practices
Writing Readable Playbooks Readable playbooks are easier to maintain and troubleshoot. Using descriptive names for tasks, organizing your playbooks into roles, and including comments can make your Ansible code more understandable and maintainable.
Version Control and Collaboration Version control systems like Git are essential for managing changes to your Ansible codebase. They facilitate collaboration among team members, allow for version tracking, and help avoid conflicts.
14. Future of Ansible in DevOps
Emerging Trends As DevOps practices evolve, Ansible continues to adapt and grow. Emerging trends include increased focus on security automation, integration with AI and machine learning for smarter automation, and expanded support for hybrid and multi-cloud environments.
0 notes
Text
hi
Jenkins openshiftplugin service id
need bc.yml
need xlrpipeline true
need xlr onboarding fr the application
RELEASEconfig.son(parameters for deployment) is in oc deploy serviced to connect to openshift for ausonia templates created on tower
need towermachinecredential
bitbucket repo
create a project in template tower in project u will specific playbook to use
need to credentialsto server and vault credentials(encrypt/decrypt) on template to tell on which server to run
e03d51dadc4
dc.yml ( copy same)
no need values
need vars … use vars.yml connection string to mongodb
vars need to be encrypted ( we encrypt in ansible)
properties file( if app needs properties)
ginger template ( for mongo) -- for encrypt secrets.j2 / group vars
ansible will decrypt using ansible credential
secrets on fly ( using ginger template)
secrets.j2 ( in this format) vault and in openshift
at runtime openshift will pull secrets from vault
or encrypt secrets and push into bitbucket repo and call it as a variable
from bitbucket pull we use scmsecret this secret is defined directly in openshift namespace
this secret is used in template /project
0 notes
Text
5 Everyday Sysadmin Tasks to Automate with Ansible
As a sysadmin, your day is often filled with repetitive tasks that can be both time-consuming and prone to human error. By automating these tasks with Ansible, you can not only save time but also ensure consistency and reliability across your systems. Here are five everyday sysadmin tasks that you can automate with Ansible:
1. User Management
Managing user accounts is a fundamental task for any sysadmin. Whether it's adding new users, updating existing ones, or removing those who no longer need access, these actions can be automated with Ansible.
Playbook Example:
- name: Manage user accounts
hosts: all
become: yes
tasks:
- name: Add a new user
user:
name: johndoe
state: present
groups: "wheel"
- name: Set authorized key for user
authorized_key:
user: johndoe
state: present
key: "{{ lookup('file', '/path/to/public_key.pub') }}"
2. Software Installation and Updates
Keeping software up-to-date is crucial for security and functionality. Ansible can help you automate the installation and updating of software packages across all your servers.
Playbook Example:
- name: Ensure software is installed and up-to-date
hosts: all
become: yes
tasks:
- name: Install necessary packages
package:
name:
- vim
- git
- htop
state: latest
3. Service Management
Starting, stopping, and restarting services are common tasks for sysadmins. With Ansible, you can manage these services across multiple servers with a single command.
Playbook Example:
- name: Manage services
hosts: all
become: yes
tasks:
- name: Ensure nginx is running
service:
name: nginx
state: started
- name: Restart apache2 service
service:
name: apache2
state: restarted
4. Configuration Management
Maintaining consistent configuration files across your servers is essential. Ansible can help you manage and deploy configuration files to ensure that all servers have the same settings.
Playbook Example:
- name: Deploy configuration files
hosts: all
become: yes
tasks:
- name: Copy nginx configuration file
copy:
src: /path/to/nginx.conf
dest: /etc/nginx/nginx.conf
owner: root
group: root
mode: '0644'
- name: Reload nginx to apply changes
service:
name: nginx
state: reloaded
5. System Monitoring and Alerts
Monitoring system performance and setting up alerts for critical issues can be streamlined with Ansible. This ensures that you're always aware of the health of your servers.
Playbook Example:
- name: Set up system monitoring
hosts: all
become: yes
tasks:
- name: Install monitoring tools
package:
name: monitoring-tool
state: present
- name: Deploy monitoring configuration
copy:
src: /path/to/monitoring.conf
dest: /etc/monitoring-tool/monitoring.conf
owner: root
group: root
mode: '0644'
- name: Start monitoring service
service:
name: monitoring-tool
state: started
Conclusion
Automating these everyday tasks with Ansible not only frees up your time but also enhances the reliability and consistency of your IT environment. By leveraging the power of Ansible, you can focus more on strategic initiatives and less on repetitive tasks.
For more details click www.hawktack.com
#redhatcourses#docker#linux#container#containerorchestration#information technology#kubernetes#containersecurity#dockerswarm#aws
1 note
·
View note
Text
APACHE WEBSERVER CONFIGURATION IN DOCKER USING ANSIBLE ⚜
Now the question is what is docker and what is ansible ???

Docker is an open platform for developing, shipping, and running applications. Docker enables you to separate your applications from your infrastructure so you can deliver software quickly. With Docker, you can manage your infrastructure in the same ways you manage your applications.

Ansible is a radically simple IT automation engine that automates cloud provisioning, configuration management, application deployment, intra-service orchestration, and many other IT needs.
SO basically our task is :
🔰Write an Ansible PlayBook that does the following operations in the managed nodes: 🔹 Configure Docker 🔹 Start and enable Docker services 🔹 Pull the httpd server image from the Docker Hub 🔹 Run the docker container and expose it to the public 🔹 Copy the html code in /var/www/html directory and start the web server
Lets do it :))))
So lets know some of the concept of ansible first :
Ansible Playbooks :
Ordered lists of tasks, saved so you can run those tasks in that order repeatedly. Playbooks can include variables as well as tasks. Playbooks are written in YAML and are easy to read, write, share and understand.
♦️ Inventory :
A list of managed nodes. An inventory file is also sometimes called a “hostfile”. Your inventory can specify information like IP address for each managed node. An inventory can also organize managed nodes.
♦️ Control Node:
Any machine with Ansible installed is known as controller node. You can run Ansible commands and playbooks by invoking the ansible or ansible-playbook command from any control node. You can use any computer that has a Python installation as a control node - laptops, shared desktops, and servers can all run Ansible. However, you cannot use a Windows machine as a control node. You can have multiple control nodes.
If you want to install ansible use below commands :
pip3 install ansible
yum install sshpass
ansible --version >> TO check version
Lets do the project ::
So this is my managed nodes where we will use ansible book to automate docker using ansible :
so In this picture you can clearly see we dont have docker , HTTPD and hostname is Managed_node so Lets automate :
IP : 192.168.147.139

And this is my controller nodes from where we will automate the managed Node :
IP : 192.168.147.138
So Let do ::
If this shows its means you are ready to go :

Lets create yaml file and automate the managed Node :

Finally created the yml file :)
And now if we are trying to go to this url we will reach to our destination :) : http://192.168.147.139:32771/Search/index.html

So we come to the end of our task :
Thanku || hope you all enjoy my task |
Github link for this project : https://github.com/ROHITkumaw/Search_Capital
linkedln : https://www.linkedin.com/in/rohit-kumar-4b5183181/
1 note
·
View note
Text
How to Install and Use Docker on CentOS

Docker is a containerization technology that allows you to quickly build, test and deploy applications as portable, self-sufficient containers that can run virtually anywhere.
The container is a way to package software along with binaries and settings required to make the software that runs isolated within an operating system.
In this tutorial, we will install Docker CE on CentOS 7 and explore the basic Docker commands and concepts. Let’s GO !
Prerequisites
Before proceeding with this tutorial, make sure that you have installed a CentOS 7 server (You may want to see our tutorial : How to install a CentOS 7 image )
Install Docker on CentOS
Although the Docker package is available in the official CentOS 7 repository, it may not always be the latest version. The recommended approach is to install Docker from the Docker’s repositories.
To install Docker on your CentOS 7 server follow the steps below:
1. Start by updating your system packages and install the required dependencies:
sudo yum update
sudo yum install yum-utils device-mapper-persistent-data lvm2
2. Next, run the following command which will add the Docker stable repository to your system:
sudo yum-config-manager --add-repo https://download.docker.com/linux/centos/docker-ce.repo
3. Now that the Docker repository is enabled, install the latest version of Docker CE (Community Edition) using yum by typing:
sudo yum install docker-ce
4. Once the Docker package is installed, start the Docker daemon and enable it to automatically start at boot time:
sudo systemctl start dockersudo systemctl enable docker
5. To verify that the Docker service is running type:
sudo systemctl status docker
6. The output should look something like this:
● docker.service - Docker Application Container Engine Loaded: loaded (/usr/lib/systemd/system/docker.service; enabled; vendor preset: disabled) Active: active (running) since Wed 2018-10-31 08:51:20 UTC; 7s ago Docs: https://docs.docker.com Main PID: 2492 (dockerd) CGroup: /system.slice/docker.service ├─2492 /usr/bin/dockerd └─2498 docker-containerd --config /var/run/docker/containerd/containerd.toml
At the time of writing, the current stable version of Docker is, 18.06.1, to print the Docker version type:
docker -v
Docker version 18.06.1-ce, build e68fc7a
Executing the Docker Command Without Sudo
By default managing, Docker requires administrator privileges. If you want to run Docker commands as a non-root user without prepending sudo you need to add your user to the docker group which is created during the installation of the Docker CE package. You can do that by typing:
sudo usermod -aG docker $USER
$USER is an environnement variable that holds your username.
Log out and log back in so that the group membership is refreshed.
To verify Docker is installed successfully and that you can run docker commands without sudo, issue the following command which will download a test image, run it in a container, print a “Hello from Docker” message and exit:
docker container run hello-world
The output should look like the following:
Unable to find image 'hello-world:latest' locally latest: Pulling from library/hello-world 9bb5a5d4561a: Pull complete Digest: sha256:f5233545e43561214ca4891fd1157e1c3c563316ed8e237750d59bde73361e77 Status: Downloaded newer image for hello-world:latest Hello from Docker! This message shows that your installation appears to be working correctly.
Docker command line interface
Now that we have a working Docker installation, let’s go over the basic syntax of the docker CLI.
The docker command line take the following form:
docker [option] [subcommand] [arguments]
You can list all available commands by typing docker with no parameters:
docker
If you need more help on any [subcommand], just type:
docker [subcommand] --help
Docker Images
A Docker image is made up of a series of layers representing instructions in the image’s Dockerfile that make up an executable software application. An image is an immutable binary file including the application and all other dependencies such as binaries, libraries, and instructions necessary for running the application. In short, a Docker image is essentially a snapshot of a Docker container.
The Docker Hub is cloud-based registry service which among other functionalities is used for keeping the Docker images either in a public or private repository.
To search the Docker Hub repository for an image just use the search subcommand. For example, to search for the CentOS image, run:
docker search centos
The output should look like the following:
NAME DESCRIPTION STARS OFFICIAL AUTOMATED centos The official build of CentOS. 4257 [OK] ansible/centos7-ansible Ansible on Centos7 109 [OK] jdeathe/centos-ssh CentOS-6 6.9 x86_64 / CentOS-7 7.4.1708 x86_… 94 [OK] consol/centos-xfce-vnc Centos container with "headless" VNC session… 52 [OK] imagine10255/centos6-lnmp-php56 centos6-lnmp-php56 40 [OK] tutum/centos Simple CentOS docker image with SSH access 39
As you can see the search results prints a table with five columns, NAME, DESCRIPTION, STARS, OFFICIAL and AUTOMATED. The official image is an image that Docker develops in conjunction with upstream partners.
If we want to download the official build of CentOS 7, we can do that by using the image pull subcommand:
docker image pull centos
Using default tag: latest latest: Pulling from library/centos 469cfcc7a4b3: Pull complete Digest: sha256:989b936d56b1ace20ddf855a301741e52abca38286382cba7f44443210e96d16 Status: Downloaded newer image for centos:latest
Depending on your Internet speed, the download may take a few seconds or a few minutes. Once the image is downloaded we can list the images with:
docker image ls
The output should look something like the following:
REPOSITORY TAG IMAGE ID CREATED SIZE hello-world latest e38bc07ac18e 3 weeks ago 1.85kB centos latest e934aafc2206 4 weeks ago 199MB
If for some reason you want to delete an image you can do that with the image rm [image_name] subcommand:
docker image rm centos
Untagged: centos:latest Untagged: centos@sha256:989b936d56b1ace20ddf855a301741e52abca38286382cba7f44443210e96d16 Deleted: sha256:e934aafc22064b7322c0250f1e32e5ce93b2d19b356f4537f5864bd102e8531f Deleted: sha256:43e653f84b79ba52711b0f726ff5a7fd1162ae9df4be76ca1de8370b8bbf9bb0
Docker Containers
An instance of an image is called a container. A container represents a runtime for a single application, process, or service.
It may not be the most appropriate comparison but if you are a programmer you can think of a Docker image as class and Docker container as an instance of a class.
We can start, stop, remove and manage a container with the docker container subcommand.
The following command will start a Docker container based on the CentoOS image. If you don’t have the image locally, it will download it first:
docker container run centos
At first sight, it may seem to you that nothing happened at all. Well, that is not true. The CentOS container stops immediately after booting up because it does not have a long-running process and we didn’t provide any command, so the container booted up, ran an empty command and then exited.
The switch -it allows us to interact with the container via the command line. To start an interactive container type:
docker container run -it centos /bin/bash
As you can see from the output once the container is started the command prompt is changed which means that you’re now working from inside the container:
[root@719ef9304412 /]#
To list running containers: , type:
docker container ls
CONTAINER ID IMAGE COMMAND CREATED STATUS PORTS NAMES 79ab8e16d567 centos "/bin/bash" 22 minutes ago Up 22 minutes ecstatic_ardinghelli
If you don’t have any running containers the output will be empty.
To view both running and stopped containers, pass it the -a switch:
docker container ls -a
CONTAINER ID IMAGE COMMAND CREATED STATUS PORTS NAMES 79ab8e16d567 centos "/bin/bash" 22 minutes ago Up 22 minutes ecstatic_ardinghelli c55680af670c centos "/bin/bash" 30 minutes ago Exited (0) 30 minutes ago modest_hawking c6a147d1bc8a hello-world "/hello" 20 hours ago Exited (0) 20 hours ago sleepy_shannon
To delete one or more containers just copy the container ID (or IDs) from above and paste them after the container rm subcommand:
docker container rm c55680af670c
Conclusion
You have learned how to install Docker on your CentOS 7 machine and how to download Docker images and manage Docker containers.
This tutorial barely scratches the surface of the Docker ecosystem. In some of our next articles, we will continue to dive into other aspects of Docker. To learn more about Docker check out the official Docker documentation.
If you have any questions or remark, please leave a comment .
2 notes
·
View notes
Text
Managing VMware vSphere Virtual Machines with Ansible
I was tasked with extraordinary daunting task of provisioning a test environment on vSphere. I knew that the install was going to fail on me multiple times and I was in dire need of a few things:
Start over from inception - basically a blank sheet of paper
Create checkpoints and be able to revert to those checkpoints fairly easily
Do a ton of customization in the guest OS
The Anti-Pattern
I’ve been enslaved with vSphere in previous jobs. It’s a handy platform for various things. I was probably the first customer to run ESX on NetApp NFS fifteen years ago. I can vividly remember that already back then I was incredibly tired of “right clicking” in vCenter and I wrote extensive automation with the Perl bindings and SDKs that were available at the time. I get a rash if I have to do something manually in vCenter and I see it as nothing but an API endpoint. Manual work in vCenter is the worst TOIL and the anti-pattern of modern infrastructure management.

Hello Ansible
I manage my own environment, which is KVM based, entirely with Ansible. Sure, it’s statically assigned virtual machines but surprisingly, it works just great as I’m just deploying clusters where HA is dealt with elsewhere. When this project that I’m working on came up, I frantically started to map out everything I needed to do in the Ansible docs. Not too surprisingly, Ansible makes everything a breeze. You’ll find the VMware vSphere integration in the “Cloud Modules” section.
Inception
I needed to start with something. That includes some right-clicking in vCenter. I uploaded this vmdk file into one the datastores and manually configured a Virtual Machine template with the uploaded vmdk file. This is I could bear with as I only had to do it once. Surprisingly, I could not find a CentOS 7 OVA/OVF file that could deploy from (CentOS was requirement for the project, I’m an Ubuntu-first type of guy and they have plenty of images readily available).
Once you have that Virtual Machine template baked. Step away from vCenter, logout, close tab. Don’t look back (remember the name of the template!)
I’ve stashed the directory tree on GitHub. The Ansible pattern I prefer is that you use a ansible.cfg local to what you’re doing, playbooks to carry out your tasks and apply roles as necessary. I’m not going through the minutia of getting Ansible installed and all that jazz. The VMware modules have numerous Python dependences and they will tell you what is missing, simply pip install <whatever is complaining> to get rolling.
Going forward, let's assume:
git clone https://github.com/NimbleStorage/automation-examples cd cloud/vmware-vcenter
There are some variables that needs to be customized and tailored to any specific environment. The file that needs editing is host_vars/localhost that needs to be copied from host_vars/localhost-dist. Mine looks similar to this:
--- vcenter_hostname: 192.168.1.1 vcenter_username: [email protected] vcenter_password: "HPE Cyber Security Will See This" vcenter_datastore: MY-DSX vcenter_folder: / vcenter_template: CentOS7 vcenter_datacenter: MY-DC vcenter_resource_pool: MY-RP # Misc config machine_group: machines machine_initial_user: root machine_initial_password: osboxes.org # Machine config machine_memory_mb: 2048 machine_num_cpus: 2 machine_num_cpu_cores_per_socket: 1 machine_networks: - name: VM Network - name: Island Network machine_disks: - size_gb: 500 type: thinProvisioned datastore: "{{ vcenter_datastore }}"
I also have a fairly basic inventory that I’m working with (in hosts):
[machines] tme-foo-m1 tme-foo-m2 tme-foo-m3 tme-foo-m4 tme-foo-m5 tme-foo-m6
Tailor your config and let’s move on.
Note: The network I’m sitting on is providing DHCP services with permanent leases and automatic DNS registration, I don’t have to deal with IP addressing. If static IP addressing is required, feel free to modify to your liking but I wouldn’t even know where to begin as the vmdk image I’m using as a starter is non-customizable.
Deploy Virtual Machines
First things first, provision the virtual machines. I intentionally didn’t want to screw around with VM snapshots to clone from. Full copies of each VM is being performed. I’m running this on the most efficient VMware storage array in the biz so I don’t really have to care that much about space.
Let’s deploy!
$ ansible-playbook deploy.yaml PLAY [localhost] **************************************************** TASK [Gathering Facts] ********************************************************************* Monday 04 November 2019 04:12:51 +0000 (0:00:00.096) 0:00:00.096 ******* ok: [localhost] TASK [deploy : Create a virtual machine from a template] ************************************************************** Monday 04 November 2019 04:12:52 +0000 (0:00:00.916) 0:00:01.012 ******* changed: [localhost -> localhost] => (item=tme-foo-m1) changed: [localhost -> localhost] => (item=tme-foo-m2) changed: [localhost -> localhost] => (item=tme-foo-m3) changed: [localhost -> localhost] => (item=tme-foo-m4) changed: [localhost -> localhost] => (item=tme-foo-m5) changed: [localhost -> localhost] => (item=tme-foo-m6) PLAY RECAP ********************************************************** localhost : ok=2 changed=1 unreachable=0 failed=0 skipped=0 rescued=0 ignored=0 Monday 04 November 2019 04:31:37 +0000 (0:18:45.897) 0:18:46.910 ******* ===================================================================== deploy : Create a virtual machine from a template ---------- 1125.90s Gathering Facts ----------------------------------------------- 0.92s Playbook run took 0 days, 0 hours, 18 minutes, 46 seconds
In this phase we have machines deployed. They’re not very useful yet as I want to add my current SSH key from the machine I’m managing the environment from. Copy roles/prepare/files/authorized_keys-dist to roles/prepare/files/authorized_keys:
cp roles/prepare/files/authorized_keys-dist roles/prepare/files/authorized_keys
Add your public key to roles/prepare/files/authorized_keys. Also configure machine_user to match the username your managing your machines from.
Now, let’s prep the machines:
$ ansible-playbook prepare.yaml PLAY [localhost] **************************************************** TASK [Gathering Facts] ********************************************************************* Monday 04 November 2019 04:50:36 +0000 (0:00:00.102) 0:00:00.102 ******* ok: [localhost] TASK [prepare : Gather info about VM] ********************************************************************* Monday 04 November 2019 04:50:37 +0000 (0:00:00.889) 0:00:00.991 ******* ok: [localhost -> localhost] => (item=tme-foo-m1) ok: [localhost -> localhost] => (item=tme-foo-m2) ok: [localhost -> localhost] => (item=tme-foo-m3) ok: [localhost -> localhost] => (item=tme-foo-m4) ok: [localhost -> localhost] => (item=tme-foo-m5) ok: [localhost -> localhost] => (item=tme-foo-m6) TASK [prepare : Register IP in inventory] ********************************************************************* Monday 04 November 2019 04:50:41 +0000 (0:00:04.191) 0:00:05.183 ******* <very large blurb redacted> TASK [prepare : Test VM] ********************************************************************* Monday 04 November 2019 04:50:41 +0000 (0:00:00.157) 0:00:05.341 ******* ok: [localhost -> None] => (item=tme-foo-m1) ok: [localhost -> None] => (item=tme-foo-m2) ok: [localhost -> None] => (item=tme-foo-m3) ok: [localhost -> None] => (item=tme-foo-m4) ok: [localhost -> None] => (item=tme-foo-m5) ok: [localhost -> None] => (item=tme-foo-m6) TASK [prepare : Create ansible user] ********************************************************************* Monday 04 November 2019 04:50:46 +0000 (0:00:04.572) 0:00:09.914 ******* changed: [localhost -> None] => (item=tme-foo-m1) changed: [localhost -> None] => (item=tme-foo-m2) changed: [localhost -> None] => (item=tme-foo-m3) changed: [localhost -> None] => (item=tme-foo-m4) changed: [localhost -> None] => (item=tme-foo-m5) changed: [localhost -> None] => (item=tme-foo-m6) TASK [prepare : Upload new sudoers] ********************************************************************* Monday 04 November 2019 04:50:49 +0000 (0:00:03.283) 0:00:13.198 ******* changed: [localhost -> None] => (item=tme-foo-m1) changed: [localhost -> None] => (item=tme-foo-m2) changed: [localhost -> None] => (item=tme-foo-m3) changed: [localhost -> None] => (item=tme-foo-m4) changed: [localhost -> None] => (item=tme-foo-m5) changed: [localhost -> None] => (item=tme-foo-m6) TASK [prepare : Upload authorized_keys] ********************************************************************* Monday 04 November 2019 04:50:53 +0000 (0:00:04.124) 0:00:17.323 ******* changed: [localhost -> None] => (item=tme-foo-m1) changed: [localhost -> None] => (item=tme-foo-m2) changed: [localhost -> None] => (item=tme-foo-m3) changed: [localhost -> None] => (item=tme-foo-m4) changed: [localhost -> None] => (item=tme-foo-m5) changed: [localhost -> None] => (item=tme-foo-m6) PLAY RECAP ********************************************************** localhost : ok=9 changed=6 unreachable=0 failed=0 skipped=0 rescued=0 ignored=0 Monday 04 November 2019 04:51:01 +0000 (0:00:01.980) 0:00:24.903 ******* ===================================================================== prepare : Test VM --------------------------------------------- 4.57s prepare : Gather info about VM -------------------------------- 4.19s prepare : Upload new sudoers ---------------------------------- 4.12s prepare : Upload authorized_keys ------------------------------ 3.59s prepare : Create ansible user --------------------------------- 3.28s Gathering Facts ----------------------------------------------- 0.89s prepare : Register IP in inventory ---------------------------- 0.16s Playbook run took 0 days, 0 hours, 0 minutes, 20 seconds
At this stage, things should be in a pristine state. Let’s move on.
Managing Virtual Machines
The bleak inventory file what we have created should now be usable. Let’s ping our machine farm:
$ ansible -m ping machines tme-foo-m5 | SUCCESS => { "ansible_facts": { "discovered_interpreter_python": "/usr/bin/python" }, "changed": false, "ping": "pong" } tme-foo-m4 | SUCCESS => { "ansible_facts": { "discovered_interpreter_python": "/usr/bin/python" }, "changed": false, "ping": "pong" } tme-foo-m3 | SUCCESS => { "ansible_facts": { "discovered_interpreter_python": "/usr/bin/python" }, "changed": false, "ping": "pong" } tme-foo-m2 | SUCCESS => { "ansible_facts": { "discovered_interpreter_python": "/usr/bin/python" }, "changed": false, "ping": "pong" } tme-foo-m1 | SUCCESS => { "ansible_facts": { "discovered_interpreter_python": "/usr/bin/python" }, "changed": false, "ping": "pong" } tme-foo-m6 | SUCCESS => { "ansible_facts": { "discovered_interpreter_python": "/usr/bin/python" }, "changed": false, "ping": "pong" }
As a good Linux citizen you always want to update to all the latest packages. I provided a crude package_update.yaml file for your convenience. It will also reboot the VMs once completed.
Important: The default password for the root user is still what that template shipped with. If you intend to use this for anything but a sandbox exercise, consider changing that root password.
Snapshot and Restore Virtual Machines
Now to the fun part. I’ve redacted a lot of the content I created for this project for many reasons, but it involved making customizations and installing proprietary software. In the various stages I wanted to create snapshots as some of these steps were not only lengthy, they were one-way streets. Creating a snapshot of the environment was indeed very handy.
To create a VM snapshot for the machines group:
$ ansible-playbook snapshot.yaml -e snapshot=goldenboy PLAY [localhost] **************************************************** TASK [Gathering Facts] ********************************************************************* Monday 04 November 2019 05:09:25 +0000 (0:00:00.096) 0:00:00.096 ******* ok: [localhost] TASK [snapshot : Create a VM snapshot] ********************************************************************* Monday 04 November 2019 05:09:27 +0000 (0:00:01.893) 0:00:01.989 ******* changed: [localhost -> localhost] => (item=tme-foo-m1) changed: [localhost -> localhost] => (item=tme-foo-m2) changed: [localhost -> localhost] => (item=tme-foo-m3) changed: [localhost -> localhost] => (item=tme-foo-m4) changed: [localhost -> localhost] => (item=tme-foo-m5) changed: [localhost -> localhost] => (item=tme-foo-m6) PLAY RECAP ********************************************************** localhost : ok=2 changed=1 unreachable=0 failed=0 skipped=0 rescued=0 ignored=0 Monday 04 November 2019 05:09:35 +0000 (0:00:08.452) 0:00:10.442 ******* ===================================================================== snapshot : Create a VM snapshot ------------------------------- 8.45s Gathering Facts ----------------------------------------------- 1.89s Playbook run took 0 days, 0 hours, 0 minutes, 10 seconds
It’s now possible to trash the VM. If you ever want to go back:
$ ansible-playbook restore.yaml -e snapshot=goldenboy PLAY [localhost] **************************************************** TASK [Gathering Facts] ********************************************************************* Monday 04 November 2019 05:11:38 +0000 (0:00:00.104) 0:00:00.104 ******* ok: [localhost] TASK [restore : Revert a VM to a snapshot] ********************************************************************* Monday 04 November 2019 05:11:38 +0000 (0:00:00.860) 0:00:00.964 ******* changed: [localhost -> localhost] => (item=tme-foo-m1) changed: [localhost -> localhost] => (item=tme-foo-m2) changed: [localhost -> localhost] => (item=tme-foo-m3) changed: [localhost -> localhost] => (item=tme-foo-m4) changed: [localhost -> localhost] => (item=tme-foo-m5) changed: [localhost -> localhost] => (item=tme-foo-m6) TASK [restore : Power On VM] ********************************************************************* Monday 04 November 2019 05:11:47 +0000 (0:00:08.466) 0:00:09.431 ******* changed: [localhost -> localhost] => (item=tme-foo-m1) changed: [localhost -> localhost] => (item=tme-foo-m2) changed: [localhost -> localhost] => (item=tme-foo-m3) changed: [localhost -> localhost] => (item=tme-foo-m4) changed: [localhost -> localhost] => (item=tme-foo-m5) changed: [localhost -> localhost] => (item=tme-foo-m6) PLAY RECAP ********************************************************** localhost : ok=3 changed=2 unreachable=0 failed=0 skipped=0 rescued=0 ignored=0 Monday 04 November 2019 05:12:02 +0000 (0:00:15.232) 0:00:24.663 ******* ===================================================================== restore : Power On VM ---------------------------------------- 15.23s restore : Revert a VM to a snapshot --------------------------- 8.47s Gathering Facts ----------------------------------------------- 0.86s Playbook run took 0 days, 0 hours, 0 minutes, 24 seconds
Destroy Virtual Machines
I like things neat and tidy. This is how you would clean up after yourself:
$ ansible-playbook destroy.yaml PLAY [localhost] **************************************************** TASK [Gathering Facts] ********************************************************************* Monday 04 November 2019 05:13:12 +0000 (0:00:00.099) 0:00:00.099 ******* ok: [localhost] TASK [destroy : Destroy a virtual machine] ********************************************************************* Monday 04 November 2019 05:13:13 +0000 (0:00:00.870) 0:00:00.969 ******* changed: [localhost -> localhost] => (item=tme-foo-m1) changed: [localhost -> localhost] => (item=tme-foo-m2) changed: [localhost -> localhost] => (item=tme-foo-m3) changed: [localhost -> localhost] => (item=tme-foo-m4) changed: [localhost -> localhost] => (item=tme-foo-m5) changed: [localhost -> localhost] => (item=tme-foo-m6) PLAY RECAP ********************************************************** localhost : ok=2 changed=1 unreachable=0 failed=0 skipped=0 rescued=0 ignored=0 Monday 04 November 2019 05:13:37 +0000 (0:00:24.141) 0:00:25.111 ******* ===================================================================== destroy : Destroy a virtual machine -------------------------- 24.14s Gathering Facts ----------------------------------------------- 0.87s Playbook run took 0 days, 0 hours, 0 minutes, 25 seconds
Summary
I probably dissed VMware more than necessary in this post. It’s a great infrastructure platform that is being deployed by 99% of the IT shops out there (don’t quote me on that). I hope you enjoyed this tutorial on how to make vSphere useful with Ansible.
Trivia: This tutorial brought you by one of the first few HPE Nimble Storage dHCI systems ever brought up!
1 note
·
View note
Text
I’ve been thinking more about the distributed system idea. The hardest problem is how to containerise applications so each program sees the same operating system regardless of the computer.
Kubernetes fixes the problem by using literal containers which bring the whole filesystem along.
Slurm doesn’t. It assumes shared network storage.
Ansible copies the basic set of dependencies around.
Here I’ll introduce a variation of Slurm with an interesting use case. Bank Python (as it’s named) is the usage of Python by large investment banks to manage risk. I don’t know a huge amount about the financial side but what’s interesting is how it handles distributed computing.
Bank Python treats everything like a database and stores all the code in a database as well. Not ideal from my perspective since it needs a new set of development tools. This approach has some advantages though.
For one since everything is stored centrally the scripts don’t assume any access to host resources. The database also makes it easy to deploy new versions or new scripts.
I like the container conceptually but it lacks a certain flexibility. I’m currently leaning towards a mesh networking system where each host publishes a set of directories which can be accessed like a network file system. Although applications don’t see a network filesystem but rather files are explicitly copied to a working directory.
0 notes
Text
In this guide, we will install Semaphore Ansible Web UI on CentOS 7|CentOS 8. Semaphore is an open source web-based solution that makes Ansible easy to use for IT teams of all kinds. It gives you a Web interface from where you can launch and manage Ansible Tasks. Install Semaphore Ansible Web UI on CentOS 7|CentOS 8 Semaphore depends on the following tools: MySQL >= 5.6.4/MariaDB >= 5.3 ansible git >= 2.x We will start the installation by ensuring these dependencies are installed on your CentOS 7|CentOS 8 server. So follow steps in the next sections to ensure all is set. Before any installation we recommend you perform an update on the OS layer: sudo yum -y update A reboot is also essential once the upgrade is made: sudo reboot -f Step 1: Install MariaDB Database Server We have a comprehensive guide on installation of MariaDB on CentOS 7|CentOS 8. Run the commands below to install the latest stable release of MariaDB database server. curl -LsS -O https://downloads.mariadb.com/MariaDB/mariadb_repo_setup sudo bash mariadb_repo_setup sudo yum install MariaDB-server MariaDB-client MariaDB-backup Start and enable mariadb database service: sudo systemctl enable --now mariadb Secure database server after installation: $ sudo mariadb-secure-installation Switch to unix_socket authentication [Y/n] n Change the root password? [Y/n] y Remove anonymous users? [Y/n] y Disallow root login remotely? [Y/n] y Remove test database and access to it? [Y/n] y Reload privilege tables now? [Y/n] y Step 2: Install git 2.x on CentOS 7|CentOS 8 Install git 2.x on your CentOS 7 server using our guide below. Install latest version of Git ( Git 2.x ) on CentOS 7 Confirm git version. $ git --version git version 2.34.1 Step 3: Install Ansible on CentOS 7|CentOS 8 Install Ansible on your CentOS 7 server. sudo yum -y install epel-release sudo yum -y install ansible Test if ansible command is available. $ ansible --version ansible 2.9.27 config file = /etc/ansible/ansible.cfg configured module search path = [u'/root/.ansible/plugins/modules', u'/usr/share/ansible/plugins/modules'] ansible python module location = /usr/lib/python2.7/site-packages/ansible executable location = /usr/bin/ansible python version = 2.7.5 (default, Nov 16 2020, 22:23:17) [GCC 4.8.5 20150623 (Red Hat 4.8.5-44)] Step 4: Download Semaphore Visit the Semaphore Releases page and copy the download link for your OS. sudo yum -y install wget curl VER=$(curl -s https://api.github.com/repos/ansible-semaphore/semaphore/releases/latest|grep tag_name | cut -d '"' -f 4|sed 's/v//g') wget https://github.com/ansible-semaphore/semaphore/releases/download/v$VER/semaphore_$VER_linux_amd64.rpm Install Semaphore package: $ sudo rpm -Uvh semaphore_$VER_linux_amd64.rpm Preparing… ################################# [100%] Updating / installing… 1:semaphore-0:2.8.53-1 ################################# [100%] Check if you have semaphore binary in your $PATH. $ which semaphore /usr/bin/semaphore $ semaphore version v2.8.53 Usage help document: $ semaphore --help Ansible Semaphore is a beautiful web UI for Ansible. Source code is available at https://github.com/ansible-semaphore/semaphore. Complete documentation is available at https://ansible-semaphore.com. Usage: semaphore [flags] semaphore [command] Available Commands: completion generate the autocompletion script for the specified shell help Help about any command migrate Execute migrations server Run in server mode setup Perform interactive setup upgrade Upgrade to latest stable version user Manage users version Print the version of Semaphore Flags: --config string Configuration file path -h, --help help for semaphore Use "semaphore [command] --help" for more information about a command. Step 5: Setup Semaphore Run the following command to start Semaphore setup in your system.
$ sudo semaphore setup Hello! You will now be guided through a setup to: 1. Set up configuration for a MySQL/MariaDB database 2. Set up a path for your playbooks (auto-created) 3. Run database Migrations 4. Set up initial semaphore user & password What database to use: 1 - MySQL 2 - BoltDB 3 - PostgreSQL (default 1): 1 DB Hostname (default 127.0.0.1:3306): DB User (default root): root DB Password: DB Name (default semaphore): semaphore Playbook path (default /tmp/semaphore): /opt/semaphore Web root URL (optional, example http://localhost:8010/): http://localhost:8010/ Enable email alerts (y/n, default n): n Enable telegram alerts (y/n, default n): n Enable LDAP authentication (y/n, default n): n Confirm these values are correct to initiate setup. Is this correct? (yes/no): yes Config output directory (default /root): WARN[0037] An input error occured:unexpected newline Running: mkdir -p /root.. Configuration written to /root/config.json.. Pinging db.. Running DB Migrations.. Checking DB migrations Creating migrations table ...... Migrations Finished Set username Username: admin Email: [email protected] WARN[0268] sql: no rows in result set level=Warn Your name: Admin User Password: StrongUserPassword You are all setup Admin User! Re-launch this program pointing to the configuration file ./semaphore -config /root/config.json To run as daemon: nohup ./semaphore -config /root/config.json & You can login with [email protected] or computingpost. You can set other configuration values on the file /root/config.json. Step 6: Configure systemd unit for Semaphore Let’s now configure Semaphore Ansible UI to be managed by systemd. Create systemd service unit file. sudo vi /etc/systemd/system/semaphore.service The add: [Unit] Description=Semaphore Ansible UI Documentation=https://github.com/ansible-semaphore/semaphore Wants=network-online.target After=network-online.target [Service] Type=simple ExecReload=/bin/kill -HUP $MAINPID ExecStart=/usr/bin/semaphore server --config /etc/semaphore/config.json SyslogIdentifier=semaphore Restart=always [Install] WantedBy=multi-user.target Create Semaphore configurations directory: sudo mkdir /etc/semaphore Copy your configuration file to created directory: sudo ln -s /root/config.json /etc/semaphore/config.json Stop running instances of Semaphore. sudo pkill semaphore Confirm: ps aux | grep semaphore Reload systemd and start semaphore service. sudo systemctl daemon-reload sudo systemctl restart semaphore Check status to see if running: $ systemctl status semaphore ● semaphore.service - Semaphore Ansible UI Loaded: loaded (/etc/systemd/system/semaphore.service; disabled; vendor preset: disabled) Active: active (running) since Tue 2022-04-19 13:29:42 UTC; 3s ago Docs: https://github.com/ansible-semaphore/semaphore Main PID: 8636 (semaphore) CGroup: /system.slice/semaphore.service └─8636 /usr/bin/semaphore server --config /etc/semaphore/config.json Apr 19 13:29:42 centos.example.com systemd[1]: Started Semaphore Ansible UI. Apr 19 13:29:42 centos.example.com semaphore[8636]: MySQL [email protected]:3306 semaphore Apr 19 13:29:42 centos.example.com semaphore[8636]: Tmp Path (projects home) /tmp/semaphore Apr 19 13:29:42 centos.example.com semaphore[8636]: Semaphore v2.8.53 Apr 19 13:29:42 centos.example.com semaphore[8636]: Interface Apr 19 13:29:42 centos.example.com semaphore[8636]: Port :3000 Apr 19 13:29:42 centos.example.com semaphore[8636]: Server is running Set Service to start at boot. $ sudo systemctl enable semaphore Created symlink /etc/systemd/system/multi-user.target.wants/semaphore.service → /etc/systemd/system/semaphore.service. Port 3000 should now be Open $ sudo ss -tunelp | grep 3000 tcp LISTEN 0 128 [::]:3000 [::]:* users:(("semaphore",pid=8636,fd=8)) ino:36321 sk:ffff8ae3b4e59080 v6only:0
Step 7: Setup Nginx Proxy (Optional) To be able to access Semaphore Web interface with a domain name, use the guide below to setup. Configure Nginx Proxy for Semaphore Ansible Web UI Step 8: Access Semaphore Web interface On your web browser, open semaphore Server IP on port 3000 or server name. Use the username/email created earlier during installation to Sign in. Web console for semaphore should be shown after authentication. You’re ready to manage your servers with Ansible and powerful Web UI. The initial steps required are: Add SSH keys / API keys used by Ansible – Under Key Store > create key Create Inventory file with servers to manage – Under Inventory > create inventory Create users and add to Team(s) Create Environments Add Playbook repositories Create Task Templates and execute Also check a detailed guide on semaphore Web UI. For Ubuntu / Debian installation, check: Setup Semaphore Ansible Web UI on Ubuntu / Debian
0 notes
Text
Ansible: Automation & DevOps – The Key to Efficient IT Management

In today’s fast-paced world of IT operations, managing infrastructure manually is like using a typewriter in the age of smartphones. The demand for rapid deployments, streamlined operations, and seamless scaling is at an all-time high. That’s where Ansible: Automation & DevOps comes into play.
Ansible is one of the most powerful tools in the DevOps ecosystem, allowing IT professionals to automate their day-to-day tasks efficiently. Whether you’re a system administrator, a DevOps engineer, or someone keen on improving your operational workflows, understanding and mastering Ansible will empower you to streamline operations, reduce errors, and improve overall system reliability.
What is Ansible?
Simply put, Ansible is an open-source IT automation tool. It allows users to automate tasks like configuring systems, managing servers, deploying applications, and orchestrating workflows. It’s popular because it’s simple, agentless, and powerful enough to automate complex multi-tier applications.
The best part? Ansible doesn’t require a lot of coding. This makes it user-friendly for IT professionals who may not be comfortable with scripting but still want to introduce automation into their workflows.
Why is Ansible Important in DevOps?
In DevOps, the goal is to bridge the gap between software development and IT operations. This means faster releases, fewer bugs, and more efficient use of resources. Automation is the backbone of this process, and Ansible is one of the most efficient ways to introduce automation into your environment.
With Ansible: Automation & DevOps, you can:
Automate repetitive tasks, freeing up time for more strategic work.
Deploy applications faster and more consistently.
Ensure that your infrastructure is always in the desired state.
Minimize human errors, which are often the cause of outages and downtime.
For organizations, this translates into cost savings, improved productivity, and better reliability.
How Ansible Works
Unlike some other automation tools, Ansible is agentless. This means that you don’t have to install any additional software on the systems you’re managing. Instead, Ansible communicates with systems over SSH (Linux/Unix) or WinRM (Windows).
Ansible uses playbooks, which are simple YAML files where you describe your automation jobs. These playbooks are human-readable, meaning that even people who aren’t familiar with coding can understand them.
Here’s a simple example of what an Ansible playbook might look like:
yaml
Copy code
- name: Install Apache on web servers
hosts: webservers
tasks:
- name: Install Apache
apt:
name: apache2
state: present
In this example, you’re instructing Ansible to install the Apache web server on all the hosts defined as "webservers."
Key Benefits of Using Ansible in DevOps
1. Simplicity and Ease of Use
The learning curve for Ansible is relatively shallow. Its simple, human-readable syntax (YAML) ensures that even non-programmers can create automation scripts quickly. This makes it accessible to more teams and allows for collaboration between developers and operations teams without needing to dive into complex coding.
2. Agentless Architecture
Unlike other automation tools that require agents to be installed on remote nodes, Ansible is agentless. This not only reduces the overhead but also simplifies the security model since there are fewer moving parts to manage.
3. Scalability
One of the most significant advantages of Ansible is its scalability. Whether you’re managing ten servers or ten thousand, Ansible scales seamlessly. It’s designed to handle large environments and can manage multiple infrastructures simultaneously.
4. Consistency Across Environments
Ensuring that applications and systems are consistent across different environments is a significant challenge for many organizations. Ansible solves this by allowing users to automate everything from development to production in the same way. This reduces the chances of discrepancies between environments and ensures that applications run smoothly, no matter where they’re deployed.
5. Flexibility in Managing Multi-Tier Applications
Ansible excels in managing multi-tier applications. Whether you’re dealing with a simple web server or a complex application with multiple components and dependencies, Ansible can manage it all with ease.
Ansible vs. Other Automation Tools
While Ansible is not the only automation tool out there, it stands out due to its simplicity, agentless nature, and flexibility. Let's compare it with some other popular tools in the DevOps ecosystem:
Chef and Puppet: Both Chef and Puppet require agents on the nodes they manage, which adds complexity. They also have steeper learning curves due to their more complex syntaxes.
SaltStack: SaltStack is also agentless but is often seen as more complex than Ansible in terms of configuration and maintenance.
Terraform: Terraform is primarily used for infrastructure as code (IaC), while Ansible shines in automating configuration management and application deployment.
Integrating Ansible with Other DevOps Tools
In the world of DevOps, no tool exists in isolation. One of the key reasons Ansible is so popular is its ability to integrate seamlessly with other DevOps tools. Whether you’re using Jenkins for continuous integration, Docker for containerization, or Kubernetes for orchestration, Ansible can be the glue that ties everything together.
For example, you can use Ansible to automate the deployment of Docker containers across your infrastructure or manage Kubernetes clusters. This type of integration helps create a fully automated DevOps pipeline, reducing the need for manual intervention and making your processes more efficient.
Use Cases for Ansible in DevOps
1. Continuous Integration and Continuous Deployment (CI/CD)
In modern software development, the goal is to release code as quickly and reliably as possible. By integrating Ansible with CI/CD tools like Jenkins, you can automate the entire deployment process, ensuring that new code is deployed to production environments smoothly and without errors.
2. Infrastructure as Code (IaC)
With Ansible, you can manage infrastructure the same way you manage application code. This is known as Infrastructure as Code (IaC). It allows you to define your infrastructure in code form, ensuring that your environments are reproducible, scalable, and consistent.
3. Cloud Provisioning
Many organizations are moving their infrastructure to the cloud. Ansible supports major cloud providers like AWS, Google Cloud, and Azure, making it easy to provision and manage cloud resources through automation. Whether you're deploying VMs, configuring cloud storage, or managing networks, Ansible can handle it.
4. Security and Compliance Automation
Ensuring that your systems are secure and compliant with industry standards can be a daunting task. Ansible can automate security checks and enforce compliance policies across your infrastructure. Whether you need to apply security patches, manage firewall rules, or ensure that certain services are running, Ansible can do it for you.
The Future of Ansible and DevOps
The future of Ansible: Automation & DevOps looks incredibly promising. As more organizations adopt DevOps practices, the need for automation will only increase. With Ansible, you can ensure that your operations are efficient, scalable, and ready for the future.
Whether you’re just starting out or you’re looking to take your DevOps game to the next level, Ansible is a tool that should be in your arsenal.
Conclusion: Start Your Ansible Journey Today
Mastering Ansible: Automation & DevOps is not just a smart career move; it's essential in today's IT landscape. Whether you're looking to improve operational efficiency, scale your infrastructure, or simply reduce human error, Ansible is your go-to solution.
The best part? You don’t need to be a seasoned developer to start using Ansible. With its simple syntax and powerful capabilities, even beginners can start automating tasks right away. So why wait? Dive into the world of Ansible today, and see how it can revolutionize your DevOps practices.
0 notes
Text
Introduction to Ansible and Its Importance in DevOps
Automation has become the backbone of modern IT operations, and tools like Ansible are at the forefront of this revolution. But what exactly is Ansible, and why should you consider using it in your DevOps practices?
What is Ansible? Ansible is an open-source automation tool that simplifies the process of configuring and managing computers. It allows users to automate repetitive tasks, deploy applications, and manage complex IT environments without the need for complex scripts or programming. With Ansible, tasks that would normally take hours or even days can be completed in minutes, all while maintaining a high level of consistency and reliability.
Why Use Ansible in DevOps? In the world of DevOps, speed, efficiency, and consistency are key. Ansible meets these needs by offering a simple, agentless architecture that can automate the deployment and management of applications across multiple servers.
Simplifying Automation with Ansible Ansible makes automation easy with its simple, human-readable language, YAML (Yet Another Markup Language). This means you don't need to be a coding expert to write Ansible playbooks. The tool also eliminates the need for agents on remote systems, reducing overhead and making it easier to manage large environments.
Enhancing Efficiency and Consistency By automating repetitive tasks, Ansible helps teams save time and reduce the risk of human error. With Ansible, you can ensure that your systems are configured exactly as you want them, every time. This consistency is crucial in maintaining reliable and secure IT operations.
Getting Started with Ansible
Ready to dive in? Here’s how you can get started with Ansible.
Installing Ansible Before you can start using Ansible, you need to install it. The process is straightforward, but there are a few requirements and dependencies you'll need to meet.
Requirements and Dependencies Ansible requires Python (version 3.5 or later) to run. You’ll also need a system with a Unix-like OS (Linux, macOS, or Windows with WSL) to install it.
Step-by-Step Installation Guide
Install Python: Most systems come with Python pre-installed. You can check by running python --version or python3 --version.
Install Ansible: Once Python is installed, you can use pip to install Ansible. Run the command pip install ansible to get started.
Verify Installation: To verify that Ansible is installed correctly, run ansible --version.
Ansible Architecture Overview
Understanding Ansible’s architecture is key to mastering its use.
Core Components: Inventory, Modules, and Playbooks
Inventory: This is a list of hosts (computers) that Ansible manages.
Modules: These are the units of code Ansible uses to perform tasks.
Playbooks: These are files that define the tasks Ansible will execute on your hosts.
Ansible Configuration File and Its Significance The Ansible configuration file (ansible.cfg) is crucial as it allows you to define settings and behaviors for Ansible, such as default module paths, remote user information, and more.
Core Concepts in Ansible
Ansible’s power lies in its simplicity and flexibility. Here are some core concepts to understand:
Understanding Playbooks and Their Role Playbooks are the heart of Ansible. They define the tasks you want to perform on your managed hosts.
Structure of a Playbook A playbook is written in YAML format and typically consists of one or more "plays." Each play defines a set of tasks executed on a specified group of hosts.
Modules and How They Work Modules are the building blocks of Ansible. They are used to perform actions on your managed hosts.
Commonly Used Ansible Modules Some commonly used modules include:
apt/yum: For package management
service: For managing services
copy/template: For managing files
Creating Custom Modules If Ansible doesn’t have a module that meets your needs, you can create your own. Custom modules can be written in any language that returns JSON, making them highly flexible.
Advanced Ansible Techniques
As you become more familiar with Ansible, you’ll want to explore more advanced techniques.
Using Roles for Better Playbook Organization Roles are a way to organize playbooks and manage complex configurations more easily.
Best Practices for Role Management Keep your roles simple and focused. Each role should perform one specific function. This makes it easier to maintain and reuse roles across different projects.
Ansible Galaxy: The Hub of Community Content Ansible Galaxy is a community hub where you can find roles created by other Ansible users.
Finding and Using Roles from Ansible Galaxy To use a role from Ansible Galaxy, you can simply run ansible-galaxy install <role_name>. This will download the role to your system, and you can use it in your playbooks just like any other role.
Contributing to Ansible Galaxy If you create a role that you think others might find useful, you can share it on Ansible Galaxy. This is a great way to contribute to the community and get feedback on your work.
Ansible in Real-World Projects
Now that you understand the basics, let's look at how you can use Ansible in real-world projects.
Automating Server Provisioning Ansible is perfect for automating server provisioning. You can create playbooks to set up servers with all the necessary software and configurations in minutes.
Setting Up a Web Server with Ansible To set up a web server, you can write a playbook that installs the web server software, configures it, and starts the service. This entire process can be automated with Ansible, saving you time and reducing the risk of errors.
Automating Database Deployment Just like with web servers, you can use Ansible to automate the deployment of databases. This includes installing the database software, creating databases, and configuring access permissions.
Continuous Integration and Deployment (CI/CD) with Ansible Ansible can also be used in CI/CD pipelines to automate the deployment of applications.
Integrating Ansible with Jenkins By integrating Ansible with Jenkins, you can automate the deployment process whenever there’s a change in your codebase. This ensures that your applications are always up-to-date and running smoothly.
Deploying Applications with Zero Downtime Ansible can help you achieve zero-downtime deployments by automating the process of updating your servers without taking them offline. This is crucial for maintaining service availability and minimizing disruptions.
Troubleshooting and Debugging in Ansible
Even with automation, things can go wrong. Here’s how to troubleshoot and debug Ansible.
Common Errors and How to Fix Them Some common errors in Ansible include syntax errors in playbooks, missing or incorrect modules, and connectivity issues with managed hosts. Ansible provides clear error messages to help you identify and fix these issues.
Debugging Tips and Tools Ansible provides several tools for debugging, such as the --check option to simulate a playbook run, the -v option for verbose output, and the debug module for printing variable values during execution.
Best Practices for Using Ansible in Production
When using Ansible in production, it's important to follow best practices to ensure security, performance, and reliability.
Security Considerations Always use secure methods for storing sensitive information, such as Ansible Vault or environment variables. Avoid hardcoding passwords or other sensitive data in your playbooks.
Performance Optimization Techniques To optimize performance, use strategies like parallelism to execute tasks on multiple hosts simultaneously. Also, minimize the number of tasks in each playbook to reduce execution time.
Conclusion
Ansible is a powerful tool for automating tasks and managing IT environments. Mastering Ansible can streamline your DevOps processes, improve efficiency, and ensure consistency across your infrastructure. Whether you’re just getting started or looking to deepen your knowledge, Ansible offers endless opportunities for growth and innovation.
0 notes
Text
Global Software Configuration Management Tools Market Is Projected To Witness A High CAGR During 2022-2028 | Kamatera, CFEngine, Puppet
The recent research report on the Global Software Configuration Management Tools Market 2022-2028 explains current market trends, possible growth rate, differentiable industry strategies, future prospects, significant players and their profiles, regional analysis, and industry shares as well as forecast details. The detail study offers a wide range of considerable information that also highlights the importance of the foremost parameters of the world Software Configuration Management Tools market.
Market Is Expected to Reach Rise At A CAGR Of 16% During The Forecast Period
(Exclusive Offer: Flat 30% discount on this report)
Click Here to Get Free Sample PDF Copy of Latest Research on Software Configuration Management Tools Market 2022 Before Purchase:
https://www.theresearchinsights.com/request_sample.php?id=489528&mode=V004
Top Key Players are covered in this report:
Kamatera, CFEngine, Puppet, AccuRev (Micro Focus), IBM, Microsoft, Chef, Ansible, SaltStack, Canonical, Rudder, Atlassian, TeamCity, Octopus Deploy, SaltStack Platform
On the Basis of Product, the Software Configuration Management Tools Market Is Primarily Split Into
· Cloud Based
· On-Premise
On the Basis of End Users/Application, This Report Covers
· Large Enterprises
· SMEs
·
The regions are further sub-divided into:
-North America (NA) – US, Canada, and Mexico
-Europe (EU) – UK, Germany, France, Italy, Russia, Spain & Rest of Europe
-Asia-Pacific (APAC) – China, India, Japan, South Korea, Australia & Rest of APAC
-Latin America (LA) – Brazil, Argentina, Peru, Chile & Rest of Latin America
-The Middle East and Africa (MEA) – Saudi Arabia, UAE, Israel, South Africa
Major Highlights of the Software Configuration Management Tools Market report study:
· A detailed look at the global Software Configuration Management Tools Industry
· The report analyzes the global Software Configuration Management Tools market and provides its stakeholders with significant actionable insights
· The report has considered all the major developments in the recent past, helping the users of the report with recent industry updates
· The report study is expected to help the key decision-makers in the industry to assist them in the decision-making process
· The study includes data on Software Configuration Management Tools market intelligence, changing market dynamics, current and expected market trends, etc.
· The report comprises an in-depth analysis of macroeconomic and microeconomic factors affecting the global Software Configuration Management Tools market
· Market Ecosystem and adoption across market regions
· Major trends shaping the global Software Configuration Management Tools market
· Historical and forecast size of the Software Configuration Management Tools market in terms of Revenue (USD Million)
SPECIAL OFFER: AVAIL UP TO 30% DISCOUNT ON THIS REPORT:
https://www.theresearchinsights.com/ask_for_discount.php?id=489528&mode=V004
Market Segment Analysis:
The Software Configuration Management Tools Report provides a primary review of the industry along with definitions, classifications, and enterprise chain shape. Market analysis is furnished for the worldwide markets which include improvement tendencies, hostile view evaluation, and key regions development. Development policies and plans are discussed in addition to manufacturing strategies and fee systems are also analyzed. This file additionally states import/export consumption, supply and demand, charge, sales and gross margins.
Browse Full Report at:
https://www.theresearchinsights.com/reports/global-software-configuration-management-tools-market-growth-2022-2028-489528?mode=V004
The Research covers the following objectives:
– To study and analyze the Global Software Configuration Management Tools consumption by key regions/countries, product type and application, history data from 2016 to 2022, and forecast to 2026.
– To understand the structure of Software Configuration Management Tools by identifying its various sub-segments.
– Focuses on the key global Software Configuration Management Tools manufacturers, to define, describe and analyze the sales volume, value, market share, market competition landscape, Porter’s five forces analysis, SWOT analysis and development plans in the next few years.
– To analyze the Software Configuration Management Tools with respect to individual growth trends, future prospects, and their contribution to the total market.
– To share detailed information about the key factors influencing the growth of the market (growth potential, opportunities, drivers, industry-specific challenges and risks).
– To project the consumption of Software Configuration Management Tools submarkets, with respect to key regions (along with their respective key countries).
Report Customization:
Software Configuration Management Tools, the report can be customized according to your business requirements as we recognize what our clients want, we have extended 25% customization at no additional cost to all our clients for any of our syndicated reports.
In addition to customization of our reports, we also offer fully tailored research solutions to our clients in all industries we track.
Our research and insights help our clients in identifying compatible business partners.
Note: All of the reports that we list have been tracking the impact of COVID-19 on the market. In doing this, both the upstream and downstream flow of the entire supply chain has been taken into account. In addition, where possible we will provide an additional COVID-19 update report/supplement to the report in Q3, please check with the sales team.
About us:
The Research Insights – A world leader in analysis, research and consulting that can help you renew your business and change your approach. With us you will learn to make decisions with fearlessness. We make sense of inconveniences, opportunities, circumstances, estimates and information using our experienced skills and verified methodologies. Our research reports will provide you with an exceptional experience of innovative solutions and results. We have effectively led companies around the world with our market research reports and are in an excellent position to lead digital transformations. Therefore, we create greater value for clients by presenting advanced opportunities in the global market.
Contact Us:
Robin
Sales Manager
Contact number: + 91-996-067-0000
https://www.theresearchinsights.com
0 notes
Text
Automating RHEL Administration with Ansible
Introduction
Red Hat Enterprise Linux (RHEL) is a popular choice for enterprise environments due to its stability, security, and robust support. Managing RHEL systems can be complex, especially when dealing with large-scale deployments. Ansible, an open-source automation tool, can simplify this process by allowing administrators to automate repetitive tasks, ensure consistency, and improve efficiency.
Benefits of Using Ansible for RHEL System Administration
Consistency: Ansible ensures that configurations are applied uniformly across all systems.
Efficiency: Automating tasks reduces manual effort and minimizes the risk of human error.
Scalability: Ansible can manage hundreds or thousands of systems from a single control node.
Idempotency: Ansible playbooks ensure that the desired state is achieved without unintended side effects.
Writing Playbooks for Common RHEL Configurations
Ansible playbooks are YAML files that define a series of tasks to be executed on remote systems. Here are some common RHEL configurations that can be automated using Ansible:
1. Installing and Configuring NTP
---
- name: Ensure NTP is installed and configured
hosts: rhel_servers
become: yes
tasks:
- name: Install NTP package
yum:
name: ntp
state: present
- name: Configure NTP
copy:
src: /path/to/ntp.conf
dest: /etc/ntp.conf
owner: root
group: root
mode: 0644
- name: Start and enable NTP service
systemd:
name: ntpd
state: started
enabled: yes
2. Managing Users and Groups
---
- name: Manage users and groups
hosts: rhel_servers
become: yes
tasks:
- name: Create a group
group:
name: developers
state: present
- name: Create a user and add to group
user:
name: john
state: present
groups: developers
shell: /bin/bash
3. Configuring Firewall Rules
---
- name: Configure firewall rules
hosts: rhel_servers
become: yes
tasks:
- name: Ensure firewalld is installed
yum:
name: firewalld
state: present
- name: Start and enable firewalld
systemd:
name: firewalld
state: started
enabled: yes
- name: Allow HTTP service
firewalld:
service: http
permanent: yes
state: enabled
immediate: yes
- name: Reload firewalld
command: firewall-cmd --reload
Examples of Automating Server Provisioning and Management
Provisioning a New RHEL Server
---
- name: Provision a new RHEL server
hosts: new_rhel_server
become: yes
tasks:
- name: Update all packages
yum:
name: '*'
state: latest
- name: Install essential packages
yum:
name:
- vim
- git
- wget
state: present
- name: Create application directory
file:
path: /opt/myapp
state: directory
owner: appuser
group: appgroup
mode: 0755
- name: Deploy application
copy:
src: /path/to/application
dest: /opt/myapp/
owner: appuser
group: appgroup
mode: 0755
- name: Start application service
systemd:
name: myapp
state: started
enabled: yes
Managing Package Updates
---
- name: Manage package updates
hosts: rhel_servers
become: yes
tasks:
- name: Update all packages
yum:
name: '*'
state: latest
- name: Remove unnecessary packages
yum:
name: oldpackage
state: absent
Conclusion
Ansible provides a powerful and flexible way to automate RHEL system administration tasks. By writing playbooks for common configurations and management tasks, administrators can save time, reduce errors, and ensure consistency across their environments. As a result, they can focus more on strategic initiatives rather than routine maintenance.
By leveraging Ansible for RHEL, organizations can achieve more efficient and reliable operations, ultimately enhancing their overall IT infrastructure.
for more details click www.qcsdclabs.com
#redhatcourses#information technology#container#containerorchestration#linux#docker#aws#containersecurity#kubernetes#dockerswarm
0 notes
Text
Ceph Client

Ceph.client.admin.keyring ceph.bootstrap-mgr.keyring ceph.bootstrap-osd.keyring ceph.bootstrap-mds.keyring ceph.bootstrap-rgw.keyring ceph.bootstrap-rbd.keyring Use ceph-deploy to copy the configuration file and admin key to your admin node and your Ceph Nodes so that you can use the ceph CLI without having to specify the monitor address.
Generate a minimal ceph.conf file, make a local copy, and transfer it to the client: juju ssh ceph-mon/0 sudo ceph config generate-minimal-conf tee ceph.conf juju scp ceph.conf ceph-client/0: Connect to the client: juju ssh ceph-client/0 On the client host, Install the required software, put the ceph.conf file in place, and set up the correct.
1.10 Installing a Ceph Client. To install a Ceph Client: Perform the following steps on the system that will act as a Ceph Client: If SELinux is enabled, disable it and then reboot the system. Stop and disable the firewall service. For Oracle Linux 6 or Oracle Linux 7 (where iptables is used instead of firewalld ), enter: For Oracle Linux 7, enter.
Ceph kernel client (kernel modules). Contribute to ceph/ceph-client development by creating an account on GitHub. Get rid of the releases annotation by breaking it up into two functions: prepcap which is done under the spinlock and sendcap that is done outside it.
Ceph Client List
Ceph Client Log
Ceph Client Windows
A python client for ceph-rest-api After learning there was an API for Ceph, it was clear to me that I was going to write a client to wrap around it and use it for various purposes. January 1, 2014.
Ceph is a massively scalable, open source, distributed storage system.
These links provide details on how to use Ceph with OpenStack:
Ceph - The De Facto Storage Backend for OpenStack(Hong Kong Summittalk)
Note
Configuring Ceph storage servers is outside the scope of this documentation.
Authentication
We recommend the cephx authentication method in the Cephconfig reference. OpenStack-Ansible enables cephx by default forthe Ceph client. You can choose to override this setting by using thecephx Ansible variable:
Deploy Ceph on a trusted network if disabling cephx.
Configuration file overrides
OpenStack-Ansible provides the ceph_conf_file variable. This allowsyou to specify configuration file options to override the defaultCeph configuration:
The use of the ceph_conf_file variable is optional. By default,OpenStack-Ansible obtains a copy of ceph.conf from one of your Cephmonitors. This transfer of ceph.conf requires the OpenStack-Ansibledeployment host public key to be deployed to all of the Ceph monitors. Moredetails are available here: Deploying SSH Keys.
The following minimal example configuration sets nova and glanceto use ceph pools: ephemeral-vms and images respectively.The example uses cephx authentication, and requires existing glance andcinder accounts for images and ephemeral-vms pools.
For a complete example how to provide the necessary configuration for a Cephbackend without necessary access to Ceph monitors via SSH please seeCeph keyring from file example.
Extra client configuration files
Deployers can specify extra Ceph configuration files to supportmultiple Ceph cluster backends via the ceph_extra_confs variable.

Ceph Client List
These config file sources must be present on the deployment host.
Ceph Client Log
Alternatively, deployers can specify more options in ceph_extra_confsto deploy keyrings, ceph.conf files, and configure libvirt secrets.
The primary aim of this feature is to deploy multiple ceph clusters ascinder backends and enable nova/libvirt to mount block volumes from thosebackends. These settings do not override the normal deployment ofceph client and associated setup tasks.
Deploying multiple ceph clusters as cinder backends requires the followingadjustments to each backend in cinder_backends Onyx sierra.
The dictionary keys rbd_ceph_conf, rbd_user, and rbd_secret_uuidmust be unique for each ceph cluster to used as a cinder_backend.
Monitors
The Ceph Monitor maintains a master copy of the cluster map.OpenStack-Ansible provides the ceph_mons variable and expects a list ofIP addresses for the Ceph Monitor servers in the deployment:
Configure os_gnocchi with ceph_client
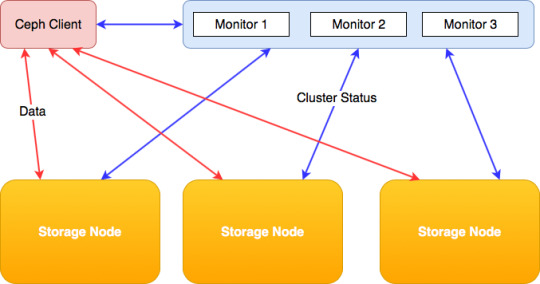
Ceph Client Windows

If the os_gnocchi role is going to utilize the ceph_client role, the followingconfigurations need to be added to the user variable file:
0 notes