#cosplay guide
Explore tagged Tumblr posts
Visit Tumblr Blog
Explore Tumblr blogs with no restrictions, modern design and the best experience.
Last Seen Tumblr Blogs


Fun Fact
Tumblr has been banned in Indonesia for providing people with access to pornographic content.
Text


I finished my analysis of Silco’s Act 1 outfit (which is actually me just bullying him for several pages) and I figured somebody else besides me might find this interesting, so here you go :)
#arcane#silco#cosplay#cosplay guide#outfit analysis#character design analysis#sort of#fashion#clothing
1K notes
·
View notes
Text


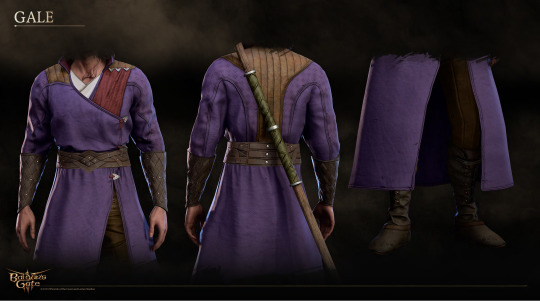


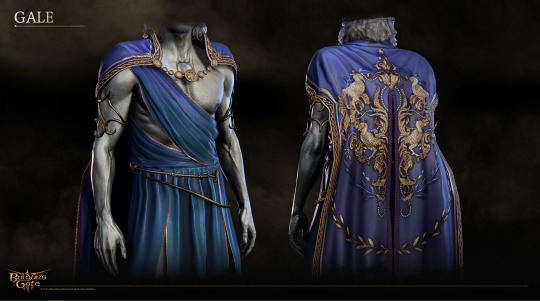

gale dekarios + cosplay guide
(click on the images for a bigger version)
#gale dekarios#gale of waterdeep#baldur's gate 3#bg3#baldurs gate 3#cosplay reference#cosplay guide#ch: gale dekarios#vg: baldur's gate 3#series: baldur's gate#misc: reference#misc: resources#i found this completely by accident and it's such a wonderful resource whether you're an artist writer or cosplayer tbh
732 notes
·
View notes
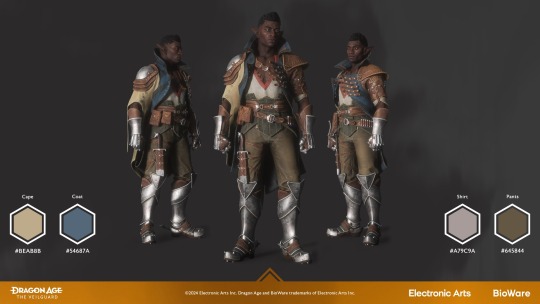
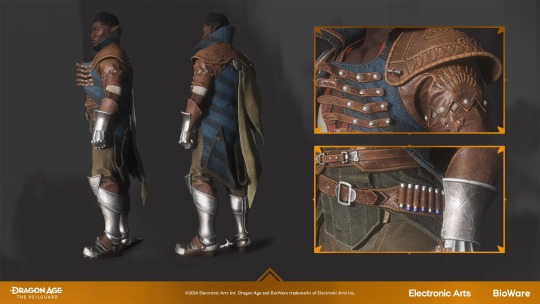
Text
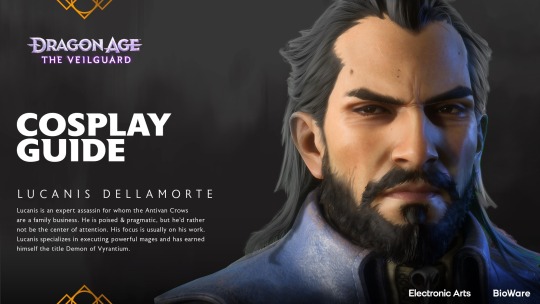
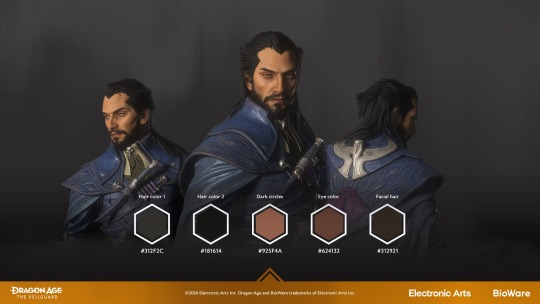

Lucanis Cosplay Guide
#lucanis dellamorte#dragon age lucanis#video games#dragon age the veilguard#veilguard#datv#dragon age#dragon age: the veilguard#cosplay guide
331 notes
·
View notes
Text

Got that punk attitude and like to play Solo? Jump into the clothes of Rogue Amendiares! 🤘
If you're ready for a challenge, even Arasaka Tower will crumple before you 🔥 Our new cosplay guide is now available 👉 https://www.cyberpunk.net/cosplay-guides
#cyberpunk#cyberpunk 2077#gaming#video games#cd projekt red#cyberpunk2077#cyberpunk cosplay#cosplay guide#cosplay
177 notes
·
View notes
Text
Cosplay Guide 2.0 - Release V1.0
Hello everyone!
With MWIII around the corner and me only about 10% through the MWII multiplayer operators, I realise that I am NOT going to finish the complete guide in time for release, not with the time I have available.
SO, I am going to release the guide in stages, first with all the 'story' characters added (that I could get assets for) and then later with Multiplayer operators, and then with additional faction AI/NPCs after that.
In parallel, I will also work on MWIII loadouts as a separate project as assets for that become available too. Honestly cannot give an ETA for when to start expecting those, but they will be coming at some point.
Now, without further ado, I preset to you:

THE [UN]OFFICIAL MODERN WARFARE COSPLAY GUIDE
Clicking to the above will take you to a Google Drive download link, where the PDF will be hosted. As versions are posted, I will announce this via posts like this and provide new links, and delete the old version too.
V1.0 is story characters only, and total size is 525MB. Pages are 5100x3300px size, so quality should be fairly high with minimal compression artifacing.
This has been the culmination of literal months of work on my part, and if you would like to show your appreciation, I have enabled tipping on this post (and will on future posts for version updates). I have zero intentions on pay-walling content, as I believe knowledge and information like this should be shared freely. But my research and ASD-borne levels of focus are driven by copius amounts of tea and sugary foods, so if you want to 'fuel' me and keep this going, I won't say no!
A huge thanks to everyone that has reached out to provide their own insight on gear and equipment, either via notes and reblogs on the different guide posts I've made, or via my ask box, or through my DMs. You've helped fill my blind spots and further enhance the accuracy of my research. Many thanks to those, you all know who you are!
Thank you for your support! Seeing the daily batch of likes and reblog notifications for these guides, even after all this time, serves to motivate me and keep this project going!
#call of duty#call of duty modern warfare#cod#cod mw#call of duty modern warfare 2022#cod mw22#modern warfare ii#mwii#cosplay guide#cosplay reference
541 notes
·
View notes
Text

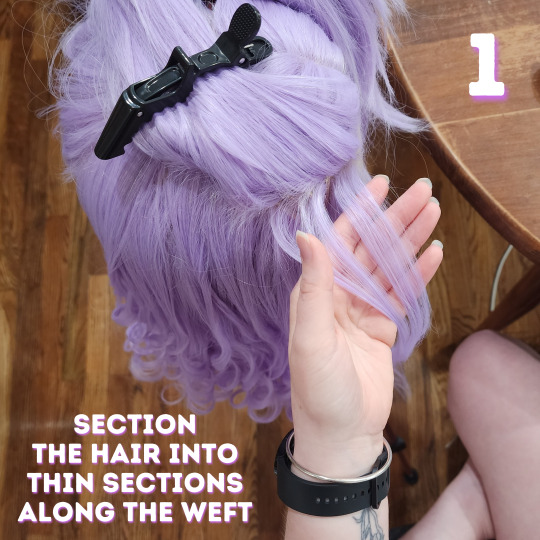


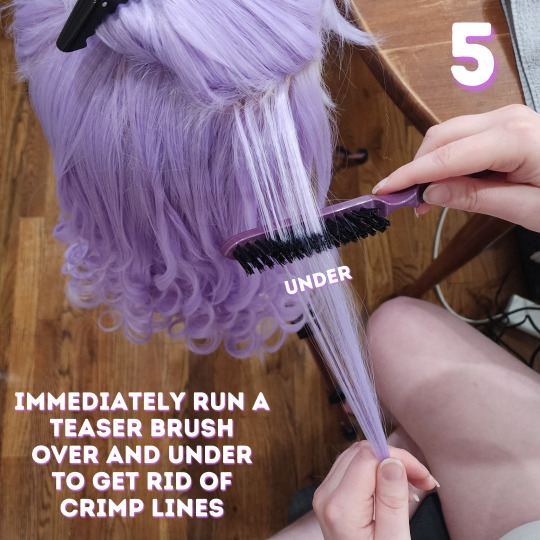


Here is our complete guide to curling a heat safe wig!
We specifically figured out this method worked best when styling this wig for my level 3 Imogen Temult cosplay. She's from campaign 3 of Critical Role. There are many other methods to curl wigs, but this is the one that got the best hold and our desired look on this particular wig! Of course, then I decided to cosplay Imogen at level 13 first and her hair is totally different so this wig is going in storage but at least we got to make a useful tutorial first.
We already have a video version of this tutorial up on our Tiktok and Youtube that we will move over to Tumblr, but honestly I struggle The Most with learning from video tutorials. I prefer things written out so we wanted to make this sort of tutorial as well for accessibility!
Additional tips & all of the products we use are under the cut. Feel free to shoot us a message if you have any questions or want more tutorials on wigs!
What We Use:
Wig: Pastel Purple Wavy Lace Front Synthetic Wig LF5110 from Wig Is Fashion. It technically comes with a curl but we straightened and recurled it differently. Whatever wig you get, just make sure you check that it's heat safe before attempting this!
Silicone Spray: Mane 'n Tail Detangler. Yes, this is technically for horses, but listen, it works SO WELL on synthetic wigs. It keeps it from getting all static-y and tangled. We've only ever used this brand but it works really well so we're def sticking with it.
Setting Spray: Schwarzkopf Got2b Glued Blasting Freeze Spray. This makes sure the curls you spent hours making actually hold!
Crimper: SixRiver Ceramic Waver Hair Tool with 4-in-1 Flat Crimping Iron Plates. This comes with four ceramic crimping plates and Nic uses the one with the "most wiggles" on the lowest setting (320). You can probably use any crimper that goes low enough. Crimp it fast, you aren't holding it like with curls.
Curling Iron: Conair 1 Inch Curling Iron. We use this on "19", whatever that means because it doesn't actually have temperatures. Any curling iron with low enough heat settings will do, you might need to play with settings to make sure you don't melt the hair. Test it on the bottom of the lowest layer of hair where you could cut it off if you melt it. As with curls on human hair, different barrel widths will give you wildly different curl looks.
Teaser Brush & Large Tooth Comb: Honestly these probably came with one of our first hair cutting or wig styling kits so ¯\_(ツ)_/¯ Apparently the teaser brush is Revlon branded.
We aren't sponsored by anyone, this is just what we use! Feel free to substitute in anything that you have / know works well with wigs. We hope this helps! Please let us know what other cosplay or crafting tutorials you'd like to see <3
#wigs#wig styling#cosplay#cosplay wigs#critical role#imogen temult#imogen temult cosplay#bells hells#cr3#imogen temult cosplay level 3#nic crafts#work in progress#crafting#craftblr#cosplay wip#buy list#crafting guide#tutorial#how to#cosplay guide#cosplayer#wig#polycraftory
77 notes
·
View notes
Text


YOU EVER SEEN SOMEONE SO BEAUTIFUL YOU CRIED
#gODDD LOOK AT THEM#aaaaHHHHHHH#dragon age#dragon age veilguard#taash#dragon age taash#datv#cosplay guide
56 notes
·
View notes
Text
🟨 Cosplay Guide: Kerry Eurodyne


#cyberpunk 2077#kerry eurodyne#references#cosplay guide#pssspspssp come get your grandpa here#it has a tons of cool references :O great for art too
25 notes
·
View notes
Text
mgs tumblr do y’all have any good cosplay guides for solid snake? I can’t really seem to find anything that closely matches his sneaking suit
16 notes
·
View notes
Text
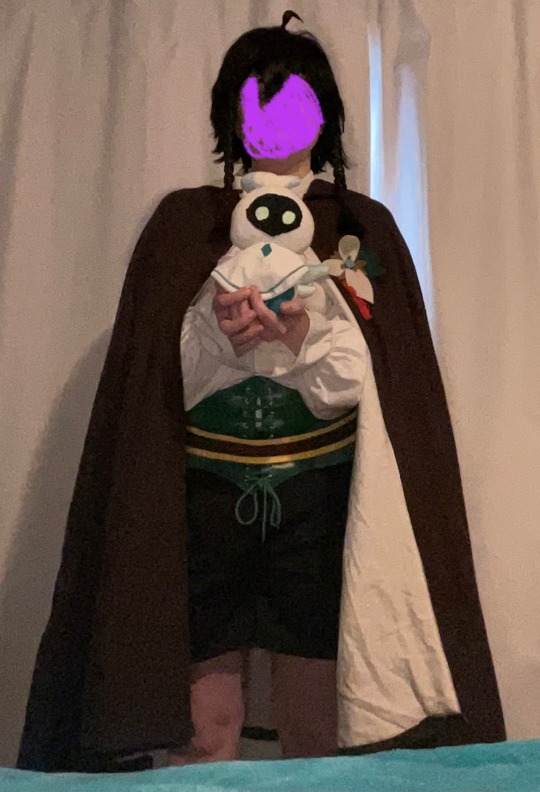
Nameless Bard Cosplay Breakdown
Why? Why not (I want to share my creation especially with seeing so many tiktok cosplays of them, but never any guides/posts about how people. did stuff for them /lh)
I..don't know how well screen-readers will handle such a long post. I hope it works out okay.
Note: final image does not have alt image text at the time of posting, but I intend to add it later on
add alt text to images (all minus final since that would be a picture from the morning of)
Cloak
This thing is LONG. I'm about 5'1/155 cm, and this thing goes down to my KNEES (& big hood too!)
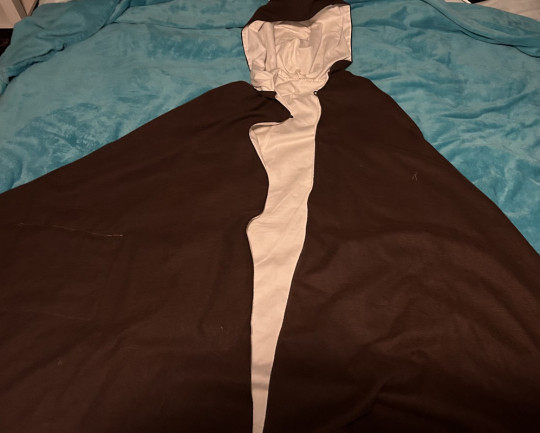
The inside fabric is from old off-white/beige bedsheets, and the outside fabric was from joann's (link).
I used a pattern from Aliceincosplayland on Etsy (link) (note: you don't need to buy a pattern to make a cloak- I bought it because of the different options between the lengths & hood sizes) ; for mine, I used the knee-length pattern & the larger hood size.
The large covered hook & eye also from joann's (link).
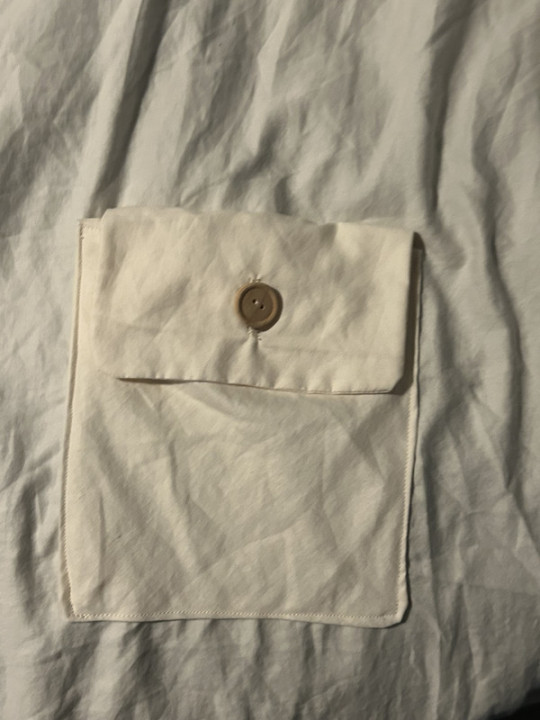
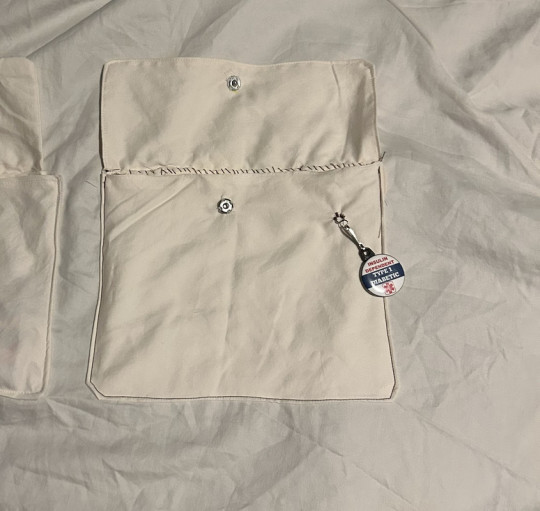
POCKETS! There's 2 small pockets close to the edges, & a bigger one I added this year to fit things like my PDM, testing kit, battery pack, etc. The smaller pockets have wooden buttons & button holes, the bigger one has a snap w/ a wooden button hot-glued on top because I didn't wanna tinker with the button hole foot.
Windblume Flower
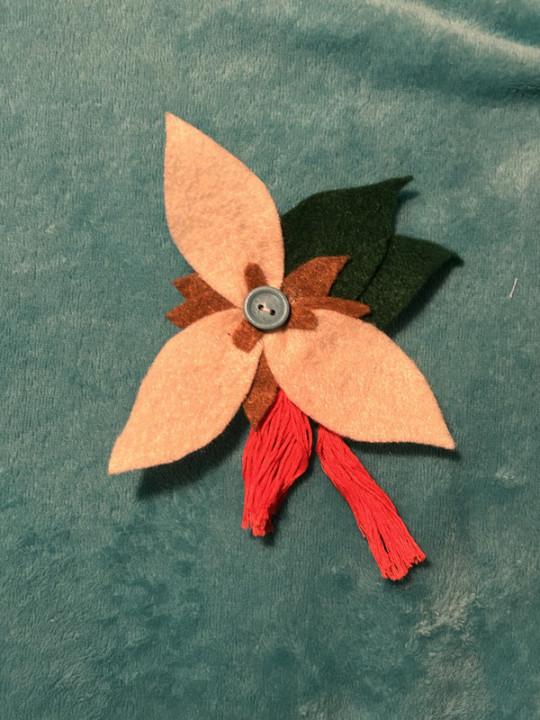
I forgot what I traced but I made patterns for the leaves and petals & used a tutorial to make the tassels with red embroidery thread.
It's made of felt, hot glue, and I hand-sewed some bits like the button in the middle. It's also removable & fastens via safety pin sewed into the back.
Shirt
I gotta be honest, I forgot to work on it and tried to finish it about a week before the con. It looked like it was going well, but little errors made it look not up to the standard I was holding myself to and I hated it. I didn't even add the finishing touches with the shirt's collar's closure, or the ruffles on the cuffs of the sleeves. Instead, I'm using the original shirt I got off amazon last year (link), which I'm glad I kept intact when trying t make the second version's pattern.
I wanted to make another variation that was closer to his canonical outfit and was not made out of that plasticky fabric material (not that it was uncomfy, I just thought it'd be better for a convention center with a lotta people). The arm holes were a bit too big, the neck hole was a bit snug, and I botched the collar almost entirely. Lesson learned, make mockups and do not procrastinate on your projects until the week before the event.
I have the picture of it in this post.
If it counts, last year I made a slight alteration to the original shirt in which I sewed part of the slit in the top so it didn't go as deep. That's about it, honestly.
Shorts
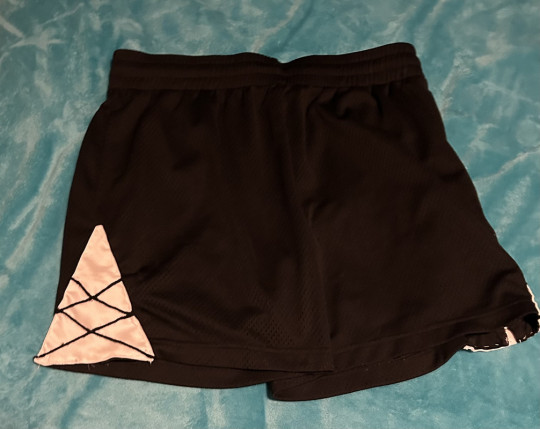
Honestly, these weren't too bad overall. I cut the triangle panels out of white fabric, used embroidery thread for the criss-cross bits, and hand-sewed said panels onto the shorts.
It's great 'cus it has pockets and it's adjustable with the drawstring on the inside.
Wig
This fucker (part 2)
I combined a wig off Amazon (link) with wefts from hair extensions (link; though it comes with two I used just under one weft for both briads) to get the general shape
I went into detail on how I redid it here (also where the pictures are) but to sum it up: washed out hairspray/gel from last year, trimmed & rebraided the longer strands, used hairspray to do the bangs & gel to fix the ends.
Belt
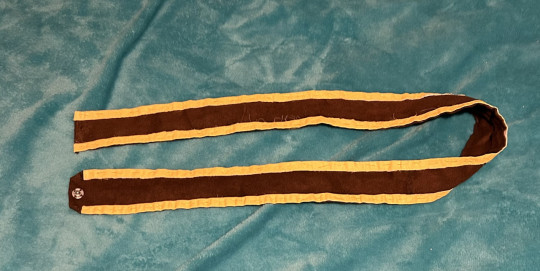
I had this old brown fabric from an old sewing class project that I used. I measured the length by putting the rest of the costume on and using a measuring tape, overlapping a little so there was room to add the snaps for a closure. I think I used the trim from an old bedsheet and put it on either of the longer ends, then painted it yellow to match the bard's. Semi-reliable snap closure sewn in later, then boom, belt!
Lyre Prop
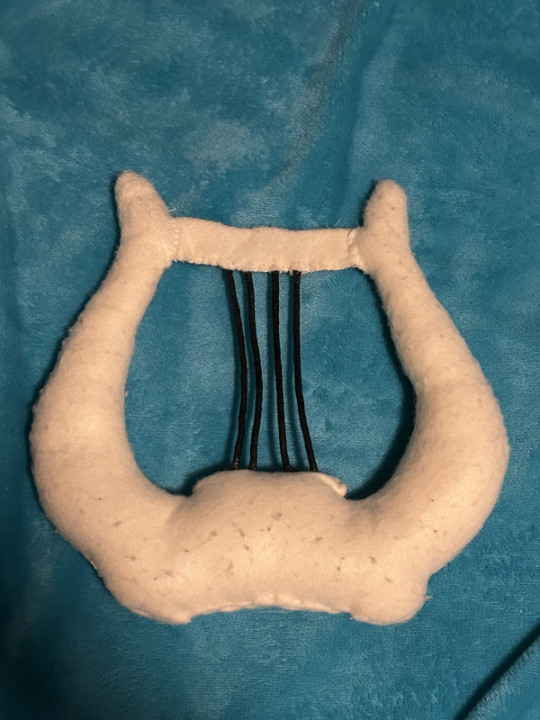
I forgot what I traced to make this pattern too, but I made it out of felt, essentially a stuffed toy. The little bar bit at the top is a separate pattern piece, as I tried making it all into one and was unable to turn it inside out. I forgot what kind of cord/string I used for the lyre strings, I just remember using mod podge to stiffen it as a finishing touch.
I used it last year as a prop, but I ended up just carrying it around so it might be best to leave home unless you plan to take a lotta pictures.
Miscellaneous Parts
Corset Belt: bought off amazon (link) ; It's comfy for the most part. liked the idea of a faux corset as opposed to the vest
Boots: last year I used a different set of boots that I've had for years, this year I'm using slightly newer boots that I got off my brother since they're small on him. They're timberlands I think? A li'l bit of height, lace-up, slight heel, feels 3% more badass /j
Makeup: I... know very little about makeup. I highly doubt the bard used makeup back then (/j). With that in mind, I really just use black eyeshadow & an eyebrow brush to fill my brows in and that's it. I use an old eyeshadow palette, but I also have an eyeshadow stick from the dollar store that works if you wet it slightly (mostly because it's a year old and is dried out by now..probably).
Wisp Prop: Touched on in this post, I like to take along one of my wisp dolls- the second one I've ever made, specifically. Made with my own personal pattern, he's easy to tuck away into a smaller pocket with just his head sticking out. I'll never forget the excitement of the Bennett and Fischl cosplayers I ran into last year when I took the wisp out to show them. 100/10, easily my favorite prop. The only real change made to him is that he has glow in the dark paint on his eyes, which probably won't do much in a convention setting but I still think it's cool.
Sword Prop: Very unnecessary & impromptu, but also very fun. At last year's con there was a vendor selling foam game/anime weapons and I got a foam Freedom Sworn. At the time of writing this out, I'm unsure if I will be taking it with me this year or not, since I can't exactly store it under my cloak when I'm not holding it.
Final Reveal!
(like I said at the top, this image is the only one w/out alt image text; I'll add it later)
(face scribbled over for comfort reasons)
#genshin impact#cosplay#genshin#nameless bard#old mondstadt#genshin cosplay#nameless bard cosplay#🎭 | og posts#cosplay genshin impact#long post#sewing#cosplay guide#today's the day of the con & I'm fuckin' pumped >:33
14 notes
·
View notes
Text
youtube
Do you have WHAT IT TAKES TO WIN a Cosplay Craftsmanship Contest??
I can’t describe in detail the exact terms of every cosplay contest in the world… but I can overanalyze the flip outta contests, their categories, and their judging criteria in a general sense — and I got the research to back it all up! So on those terms, let's dive in, and find out if you have what it takes to win!
#cosplay#cosplay contest#cosplay competition#craftsmanship contest#cosplay craftsmanship contest#cosplayer#cosplay crafter#cosplay craftsmanship#cosplay video#cosplay youtube#cosplay tutorial#cosplay guide#cosplay help#cosplay youtuber#telekineticmaniac#Youtube
5 notes
·
View notes
Text
Snow White Cosplay Costume Guide
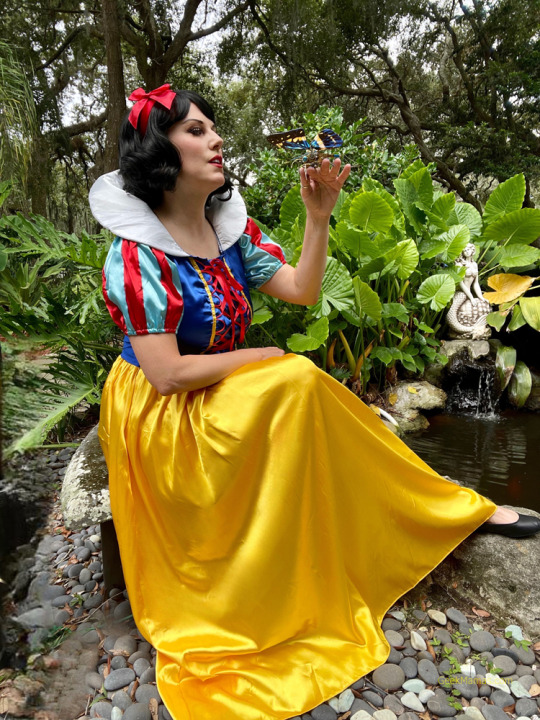
View On WordPress
#Cosplay#cosplay guide#costumes#disney#disney costume#disney princess#halloween inspo#snow white#snow white and seven dwarfs#snow white costume
3 notes
·
View notes
Text


Hello, I recently made a Crowley wig and decided to write a guide on the process. Here is a link to a google doc if this form of writing is more comfortable to read for you: here
Since I’m showcasing my wig and the job I’ve done on it, I wanted to write a small guide/explanation of how I worked on it, how long it took me to make it, materials, costs, resources, etc.
This has been a very interesting learning experience since it’s my first time working with a wig. I am by no means a very experienced cosplayer and I am writing a general guide for other beginners. Feel free to make suggestions and correct the information on this post.
What is the base wig? I worked with a wig from Amazon. - 16$
I simply searched “Red Wavy Wig” and this was one of the initial results that I liked. I thought that the base wig would be enough to look close to canon. When it arrived, I immediately realized that it had too much volume and I needed to do something about the fact that it didn’t have a prominent hairline (Pic 1). It had so much hair that it was impossible to brush it out to at the very least straighten it or make it less voluminous. Not saying that Crowley’s hair can’t be that, it’s just that it was so awkward I couldn’t stand it. This wig is advertised to be a Black Widow wig, and her hair is longer in the front than in the back, which is just not the case for Crowley. In addition, this wig was just.. Cheap. I get it - I wanted to save some money and got the quality I paid for, but I would DEFINITELY recommend buying a better wig if you don’t have the time/money/resources to clean the hair that would shed from it. Otherwise, the advantage of this wig is that I didn’t need to buy a second one for wefts - I straight up took the wefts off of it and then reattached them on the hairline. This is not a common practice and a lot of cosplayers recommend buying two wigs for this reason, but I risked it and the end result still came out fine. If you are not sure in your de-wefting skills, buy a second one, but prepare to deal with double the shedding.

How did you fix it?
1. Creating a fake hairline.
In fact, this post is what inspired me to work on my wig. I was very impressed with OP’s wig, specifically its hairline and sideburns. The hair looks thick and very sturdy. Their explanation of the work is very good, but I am very hands-on and a visual learner, so this video was very helpful to figure out what materials I needed and the steps on making the hairline. For my wig, I bought the following materials:
Glue gun from Michaels - 2.99
Glue sticks from Michaels - 3.99
Red Felt by Loops and Threads from Michaels - 8$ (you get a heap of felt that you honestly don’t need, unless you’re attempting to cut the hairline out of it multiple times).
Cleargel Tacky Glue from Michaels - 2.79$
Hairclips from Dollar General - 2$
TreSemme Hairspray (here) - 3.39$
Hair Gel (mine, but you can use any - this one is for my personal use) - 4.7$
Hairdresser’s scissors (optional, but I REALLY recommend using them instead of using office scissors to cut hair. ..mine) - 8.99$
Quilting Pins from Michaels (or any pins, I just took the cheapest ones) - 3.99$
Mannequin Head from Michaels, mine - 5.99$
Note: Unfortunately, the one I linked is tilted slightly to the side, which prevented me from making the hairline perfectly straight and symmetrical, so I recommend buying a mannequin head that is straight. Michael’s sells one for 8.99$.
Seamripper from Michaels - 6$, but you can and should order a cheaper one on Amazon for 2.99$.
Hair rollers (mine) - 11.99$.
Note: This cost is going to be excluded from the final cost because I am 100% sure it is possible to find cheaper hair rollers that look like the ones I linked. I personally found similar tube-shaped rollers at a Dollar Tree for about 2$, but I can’t link it or provide a correct cost, so I do not want to mislead or provide inaccurate information.
Wig stand from Amazon (mine) - 9.99$
Note: You will need a stand that is sturdy and will not move at all while you are working. You’re going to lose your mind if you try working with something that is constantly moving away from your hands. I link mine because unlike some other wig stands, this one clamps on the side of the table and will not move at all while you are working.
Follow the attached guide on how to make the hairline. Here are some tips on working with glue and hair that I learned along the process:
1. Do not under any circumstance start working without figuring out how to dispose of the hair that is going to inevitably fall off the wig.
2. Put on some clothes that you don’t care about and leave them in the place where you work, if you can, because hair is going to stick to your clothes and you absolutely do not want to carry synthetic hair around your house.
3. You can put a plastic bag or a trash bag under the working space or under the wig as you work with the hair. If you are using a mannequin head stand with clamps, simply clamp it on top of the bag on the table - this way, the hair will not fall on the floor.
4. The video guide mentions using a hairdryer to dry the glue faster. Utilize it, because it does help with the process tremendously, but the quickly dried glue may create more residue on the hair than it would if it would dry naturally over time. In my opinion, it was very much worth it and saved a lot of time.
5. As you are working through the gluing process, you may notice that there is some glue residue on top of the hair pieces. Personally, not a huge fan, because it makes the hairline look unnatural and ugly. To fix this, take a q-tip or a piece of paper towel, wet it with water and carefully swab the glued down pieces, then dry them with a paper towel, then wet them again, and so on and so forth. Some strands of hair might stick out - that is okay, just be careful and stop when you feel like it might mess with the glue too much.

2. Cutting the hair
Use a reference picture of Crowley to know the pattern of his hair. Generally speaking, his hair is shorter at the front and longer in the back. It is slicked back and has medium volume to it.
Use references and guide on how to cut hair (here, here).
General tip for cutting is never attempt to blunt cut (cutting hair horizontally) unless you know what you’re doing and it is the finish you’re going for. Work slow and remove smaller pieces of hair before removing bigger ones. You will gradually build up confidence about removing

3. Styling the hair
After I cut the hair, I was still kind of unsatisfied with how it looked. I decided to use hair gel to brush the hair back on the sides and on the top. After that, I used some hairspray to make it stick, and kind of just pat the hair down on the top, pressing it to the foam head. That helped to reduce the volume on the top.

4. Curling the hair
After cutting the hair, I decided it would be a good idea to re-curl it, since it lost some of its pattern.
You shouldn’t attempt curling synthetic hair with an electric hair curler, because it is a fire hazard and can also ruin the hair. Use bobby pins, bigoudi, or hair rollers. I curled the hair on this wig by using hair rollers. First, I sprayed the hair with water, then I put the hair on the rollers, and then I used the hair dryer to kind of make the hair stay in this shape and I left it overnight. This video shows how to use a steamer and bobby pins to curl the hair in a similar fashion.

After all of these steps, you should be done with the main process! You are welcome to do any other adjustments, the floor is yours. I chose to stop here because at this point I have been working on this wig for a long time and I was in a time crunch. If I had more time, I would modify the hairline more and probably define the curls, but I was fine with the look of my end result because I was going for a early 2000s Crowley.
Total cost: 75.84$ (without the hair rollers), assuming that you didn’t have any of the materials above.
How do I wear it?
I recommend using hair gel to put your own hair in your wig cap, as it is going to secure everything in place. In the 2000s Crowley look, Crowley sort of has his ears visible, so I would say try to put the hair of the wig back behind your ears. Be careful not to show too much of your hairline though.
Additionally, since my end result hairline came out looking a bit harsh, I like to use some orange eyeshadow around the hairline. Just take a q-tip or a brush and gently dab it near the hairline after putting on the wig, and hopefully it will make it seem more natural.
How long does this take?
I worked on the hairline for about 4-5 hours for 4 days straight. I worked slow because I wasn’t sure and I had to reattach the hair multiple times, so I would say it took me 16-20 hours total. Add about an hour for cutting and additional one for styling, and you’d get 18-22 hours total.
Is it worth it?
Honestly? It is all up to you.
If you are satisfied with your wig as it came, you are very welcome to use it for cosplay, but I strived to achieve some accuracy and dedicated myself to this little project.
The best part?
…The wig is not for me! :D In fact, I am going to be cosplaying Aziraphale. This wig is actually for my girlfriend who cosplays Crowley with me. We will probably post our couple cosplays together in the future. Like I said, I was in a time crunch, because we’re actually college students. I believe that when you make something for a person you love, it turns out the best.
I hope this guide has been useful! Again, feel free to ask me any questions and add on. Happy cosplaying!!!
#good omens#good omens cosplay#crowley cosplay#cosplay guide#cosplay wig#im really hoping this will help someone achieve their perfect crowley hair!!!
2 notes
·
View notes
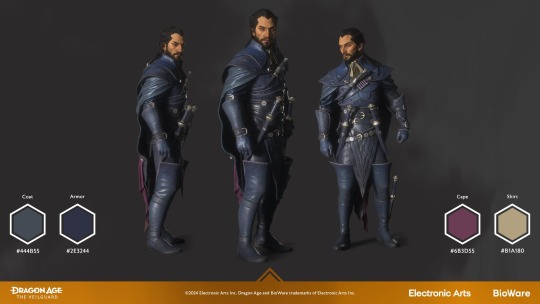
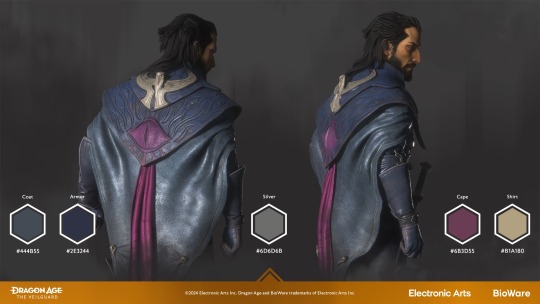
Text
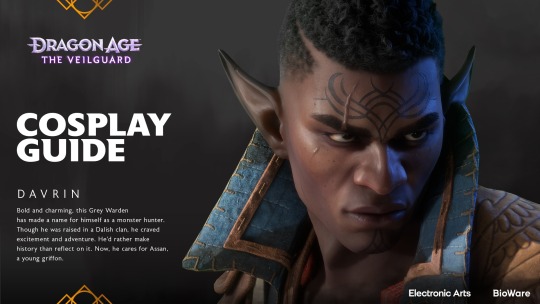
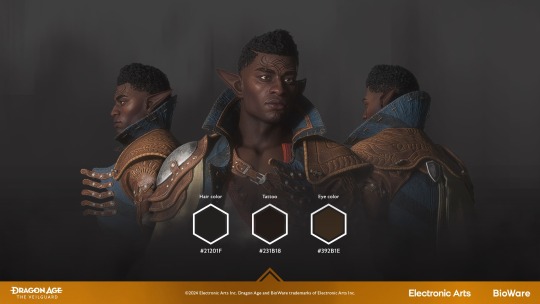
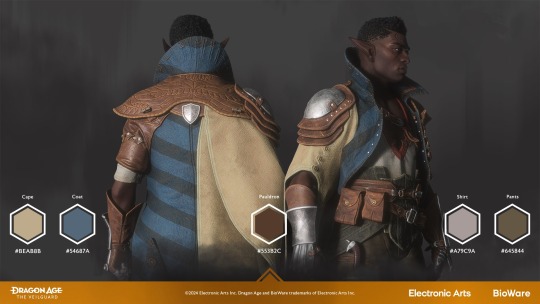
Davrin Cosplay Guide
#warden davrin#davrin dragon age#davrin#dragon age davrin#dragon age#datv#dragon age: the veilguard#dragon age the veilguard#veilguard#cosplay guide
198 notes
·
View notes
Text

Put on Aurore's luxury clothes and become the better half of the Cassel Twins netrunner duo if you dare! ❤️🔥
Check out our brand-new cosplay guide!
156 notes
·
View notes
Note
Where can you get all of the items for Lt Simon "Ghost" Riley 'Nightware' ?
I’m sure if you input the item’s name (from my 2.0 cosplay guide, not the original one I posted that is not nearly as comprehensive) into Google, you’ll find no shortage of retailers offering that product or comparable products to suit your needs.
Just be mindful that some items that he has are modified after the fact, are fictionalised variations in colours not commercially available, are items not available for public purchase due to various kinds of restrictions and regulations, or may just be cost prehibative due to there not being any clones made by overseas suppliers (looking at you, FirstSpear).
Good luck and happy hunting!
#call of duty#call of duty modern warfare#cod#cod mw#call of duty modern warfare 2022#cod mw22#simon ghost riley#modern warfare ii#mwii#cosplay guide#cosplay resources
18 notes
·
View notes