#cricut com setup
Explore tagged Tumblr posts
Visit Tumblr Blog
Explore Tumblr blogs with no restrictions, modern design and the best experience.
Last Seen Tumblr Blogs


Fun Fact
Tumblr Inc. is using 66 technologies for its website.
Text
How to Connect Cricut to Laptop With USB and Bluetooth?
Do you want to connect your Cricut to your laptop? If so, this blog is perfect for you. As a craft expert, I’ll tell you how to connect Cricut to laptop and use it for your creative work. I know it’s a little technical, but trust me, it’s very simple. You’ll learn it quickly.
Everybody starts from scratch, and maybe this is your first time setting up your machine on a laptop. Basically, I’ll share the two best methods here: via USB and Bluetooth. So, without wasting a minute, let’s dig into it.
What Do You Need to Get Started?
Well, when you’re connecting your machine to a laptop, you should take care of a few things. Check out the list below:
Considering all of these factors, you can start connecting your crafting machine to your laptop.
How to Connect Cricut to Laptop: 2 Different Methods
You’re finally ready with your devices to set up your machine. I’m sharing two of the best methods to connect your machine to your laptop. So, follow all the steps carefully to set up your machine and start your DIY journey.
Method 1: With the Help of a USB Cable
This is the most preferred method. Since it’s a wired method, you don’t need to setup any complex settings to connect your devices with it. Check out the steps below to connect it.
This is how to connect Cricut to laptop via USB. It’s a beginner-friendly method, and anyone can use it to setup their machine with a laptop.
However, you must ensure that your laptop has the necessary USB drivers installed. If not, install them immediately to avoid any obstacles during the setup.
Method 2: Using a Bluetooth Connection
This is another way to connect your machine to a laptop. Check all the steps to connect your devices together via a Bluetooth connection. Learn the procedure below.
You know how to connect your crafting machine to your laptop or computer using a Bluetooth connection. As a wireless connection, it’s highly recommended for a hectic working environment. You can use this connection for your devices.
Conclusion
Finally, you know how to connect Cricut to laptop. Both USB and Bluetooth are good for connecting your machine to a laptop. You can choose anyone. Two things that I want you to know are that you should make sure your laptop supports Bluetooth if you’re choosing a wireless network. And, if you’re choosing a wired connection, ensure that your laptop has USB drivers installed. Besides, everything is simple.
FAQs
How to Connect Cricut to Laptop Without USB?
If you want a wireless connection to connect your machine to your laptop, Bluetooth is the only option. As Cricut machines don’t support a Wi-Fi connection, Bluetooth is a reliable method for connecting your devices and starting work on your projects.
How to Install USB Drivers on Laptop?
If your laptop doesn’t have USB drivers installed, it may create problems with your USB connection. Check how to get them.
How Do I Get My Cricut Software on My Laptop?
Downloading and installing the software on your laptop is pretty simple. All you need to do is to follow the steps below:
Visit: cricut.com/setup cricut design space
Source: https://cdesignspace.wordpress.com/2025/01/15/how-to-connect-cricut-to-laptop-with-usb-and-bluetooth/
#cricut design space#cricut design space setup#cricut setup#cricut com setup#www.cricut.com/setup login#www.cricut.com setup login#cricut explore air 2 setup#cricut explore air 2#cricut project ideas#cricut#cutfiles#cricutprojects#svgtrending#cutfilesforcricut
0 notes
Text
Discover 6 Best Cricut Christmas Gift Ideas: Check Them Out!
Are you excited about Christmas? I feel the same way! I am a great lover of the Christmas season and a professional DIY crafter. I have helped many users through my blogs and social media posts. For some time now, I have been getting many messages about the best Cricut Christmas gift ideas. I understand how eager my readers are to create something special this year. As a full-time crafter, I aim to make crafting simple by sharing the easiest ideas to help you get started.
I completely understand how challenging this occasion can be. I wonder when it comes to sending Christmas gifts to someone. But you’ll not feel challenged after reading this blog. Let me tell you some of my personal favorite Christmas gift ideas to try in 2024.
1. Christmas Decoratives
Who doesn’t like personalized gifts? If you want to prepare a gift to send this Christmas, try out personalizing Christmas decorations. I like decorating Christmas bulbs and hanging them on the Christmas tree. I have decorated many bulbs and blanks to give as gifts to friends or guests. If you’re running out of good ideas, try this one, which is easy and affordable. As you already know how simple it is to work with vinyl, you can create the best designs to give Christmas vibes to your personalized decoratives. Let’s check out more Cricut Christmas gift ideas that I’ve listed for you.
2. Sippers
Although this idea is basic, it’s simple and quick to create. If you have a good hand on Cricut, you can quickly design and decorate your sippers with the best Cricut vinyl. Working with vinyl is my best part of crafting. I love trying different types of vinyl to create something unique. You can also try out something unique and place it on your sipper bottle. You can give it to someone you know very well, like your friends and any kid in your family. Well, everybody loves sippers, and people will love your gift.
3. Keychains
It is also an interesting and easy way to create a gift for someone. For this, you need to buy some blanks from online stores such as Dollar Tree or any other store that you prefer. It’s one of my favorite Cricut Christmas gift ideas. When I decided to give keychains to my loved ones, I felt uncertain at first, but when I got their response, it made my day. You can create many beautiful keychains using your versatile Cricut machines. I would say it’s the best gift if you can design it creatively.
4. Tote Bags
When it’s about Christmas, you can’t miss a well-designed tote bag. You know tote bags are trendy throughout the year. This makes them a perfect gift for Christmas. All you need is a Cricut cutting machine, a heat press, iron-on vinyl, and an online design that you can get from Design Space. You can easily get blank tote bags from any online or offline store that you can personalize with creative Christmas fonts, designs, and embellishments. Therefore, I recommend it to you to send it as a gift.
5. Food Packagings
If you’re a good baker and make brownies, cookies, and other things at home, you can even personalize your food packs. It is all about the magic of high-quality vinyl and a Cricut machine that will create the best sticker to paste on your food packet. If you have food to give to someone, create and personalize your own food packaging. You can even personalize glass jars and put your cookies, brownies, cupcakes, or anything else you have made by yourself.
6. Door Wreath
If you are a creative person, try making a door wreath. Although it is a little complex, it makes a wonderful gift for neighbors and friends. You can decorate your wreath with colorful papers, some decorative items, stars, and even a welcome message. I like decorating wreaths for my home every Christmas. I believe it’s one of the graceful Cricut Christmas gift ideas to try.
Conclusion
You’ve seen Cricut ideas for Christmas gifts. Now it’s your turn to try them out for your Christmas Eve. As a Cricut user, you might have already tried different gift ideas and shared them with others. If you like my ideas, give these projects a try and surprise your friends and family with custom gifts. The best thing about personalized gifts is that you put your emotions and efforts into them, which makes each gift precious and lovable. So, I hope that you’ll create something special this Christmas that will bring a smile to the faces of your loved ones.
FAQs
How Can I Earn With Cricut Machines on Christmas?
If you want to earn profits by creating Christmas crafts, you can do it easily. All you need is a Cricut machine and the necessary accessories to get started. You can create unique DIY projects for Christmas and sell them online. If you’re a DIY enthusiast, there are some items you can earn the most profit with, such as wooden ornaments, DIY wreaths, and customized items.
What Supplies Do I Need to Make Cricut Christmas Cards?
If you want to design Christmas cards for your friends and loved ones, you need a precise machine such as Explore or Maker. You also need design software which is built into all Cricut cutting machines: Design Space. Besides, you will need some materials like insert cards, pens and markers, and any other decorations you would like to add.
Is Cricut Design Space Good for Creating Christmas Cards?
Yes, Design Space has a full library of the best designs. If you want to create greeting cards, you’ll get some of the best designs and templates in the Design Space library. Once you find the best design, you can easily create the best cards for Christmas.
Visit: cricut.com/setup www.cricut.com/setup login
Source: https://cricricutdesigncut.wordpress.com/2024/12/23/discover-6-best-cricut-christmas-gift-ideas-check-them-out/
#cricut.com/setup#www.cricut.com/setup login#www.cricut.com/setup#cricut design space setup#cricut design space#cricut.com setup#cricut com setup#cricut explore air 2#cricut.com setup mac#cricut setup for pc#digital design#design space setup#cricut#cutfilesforcricut#cutfiles#cricutprojects#cricuttutorials
0 notes
Text

www.cricut.com setup login
Cricut machines are well-equipped with smart features for your everyday DIYing regime. It also has an easy-to-use application known as Cricut Design Space, a smart software invented to produce the best designs. You can select any Cricut machines from its vast lineup, including the Cricut Explore series, Cricut Maker series, Cricut Joy series, and Cricut heat presses. Each and every machine will help you create something best. Thus, get started with your Cricut via www.cricut.com setup login.
#install cricut design space app#www.cricut.com setup login#www.cricut.com/setup login#www.cricut.com#www.cricut.com/setup#cricut.com/setup#cricut com setup#cricut setup#cricut setup download#cricut setup for pc#cricut setup on computer#cricut setup explore air 2 setup#cricut design space setup#cricut design space app#cricut design space download#cricut design space software#cricut design space login
0 notes
Text
How to Make Labels With Cricut Explore?
Hi! Lovely crafters. I have been waiting to write this blog for many days after designing a custom label for my daughter’s school assignment. It was fun making it. And most importantly, my daughter loved it. So, I thought, why not share my way of creating labels with a Cricut Explore machine?
www.cricut.com setup login
0 notes
Text
How to Connect Cricut to Bluetooth: Full Guide for Beginners
Hey, do you want to learn how to connect Cricut to Bluetooth? Don’t worry—I’ve got your back! When I was 14 years old, I used to make many paper crafts using tools like scissors, blades, and other stationery items. Using these tools was often dangerous, as they could cut my fingers, and there was always a potential risk.
But as I grew up and started living on my own, the first thing I bought was a Cricut machine. Yes, I have spent years trying different tools and machines to craft things that I always wanted to make. As a crafting expert, I have now started uploading videos to YouTube. There, I teach my audience about Cricut, like how to use it, the connection and setup process, and get started with DIY projects.
In this blog, I will show you how to connect Cricut to a computer and mobile via Bluetooth. So, are you ready to learn? If so, let’s get started!
Why Do You Need to Connect My Cricut Machine?
When I first got my Cricut, I was in a dilemma about how to connect Cricut to Bluetooth. But there was also another option, like connecting it to a Mac via USB cable. This is why I was in a dilemma. So, I decided to choose an easy method, such as a USB cable, and then, after some days, I moved to a Bluetooth connection.
So, now, why do we need to connect it to any device? We need to connect Cricut to our computer or phone because we have to control our Cricut using any device.
Also, we need to create an intricate design on Cricut software and send it to a Cricut machine. Hence, all these tasks cannot be performed without connecting the Cricut to the device.
How to Connect Cricut to Bluetooth on Mac?
When I begin connecting my Cricut to Bluetooth, I always start by placing it on a flat surface. The flat surface is needed because when you cut the material or load it into it, you will need to load it straight into it. Hence, I chose the flat surface. Besides, I kept my Cricut within 10-15 feet of my Mac. Ensure you are placing your Cricut or device within a reasonable distance of each other. Otherwise, it will cause trouble during the connection.
Here’s how to connect Cricut to Mac via Bluetooth:
How to Connect Cricut to Bluetooth on iOS?
I also have an iOS device, which I use when I have to work on a small design. It is portable enough to carry and control the Cricut remotely and hassle-free. So, if you are looking for the steps to connect your Cricut to your iOS device, follow the steps below.
Here’s how to connect Cricut to an iOS device via Bluetooth:
By the end, you might have understood how to connect Cricut to Bluetooth on devices like Mac or iOS. The stepwise instructions given will surely help you connect your Cricut to your device in no time.
FAQs
Question 1: Which macOS can I connect to my Cricut?
Answer: According to Cricut’s official website, users with macOS 11 or higher. Besides, there are hardware requirements that you should check before connecting Cricut to your Mac. Below are the requirements you need to ensure on your Mac for your Cricut:
Question 2: What do I need to connect Cricut to Bluetooth?
Answer: To connect your Cricut to Bluetooth, you will need a Cricut machine and a computer with Bluetooth features. However, if you want to connect it via a USB cord, you need a USB cable. Make sure your Cricut has a USB port. You can also connect your Cricut to your phone. For this, Bluetooth and a Cricut machine are needed, and that’s it!
Question 3: how to connect my Cricut to Android?
Answer: Follow the steps given below to connect your Cricut to an Android phone:
Visit: install cricut design space app www.cricut.com setup login cricut create connect to computer cricut.com/setup
Source: https://desincricut.wordpress.com/2024/05/07/how-to-connect-cricut-to-bluetooth-full-guide-for-beginners/
#cricut.com/setup#www.cricut.com setup login#install cricut design space app#cricut create connect to computer#cricut new product setup#cricut setup#cricut com setup#cricut explore 3#cricut explore air 2#cricut design space#cricut new machine setup#cricut setup on computer
0 notes
Text
Top 3 Cricut 4th of July Ideas: Inspiring Festive DIY Crafts
If you are looking to get creative to show your patriotism for your Nation as it celebrates its Independence Day. Or If you are having people over to your house and you want them to notice how innovatively you are celebrating this year’s Independence Day, then you are a person who is looking for ideas to help you with being a crafter. Especially if you already own a Cricut cutting machine, we are sure you can’t wait to craft projects for the 4th of July. So, this blog will provide you with easy Cricut 4th of July ideas to help you celebrate Independence Day by being creative.
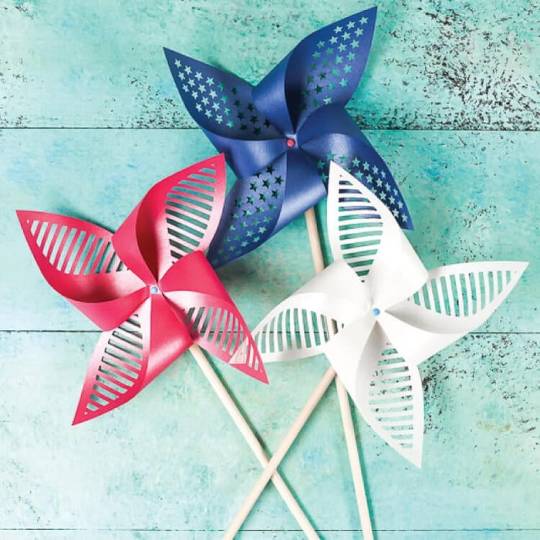
1. Patriotic Pinwheels
The Patriotic Pinwheels are cute decorative pieces coming in red, white, and blue colors. While the Red and White pinwheels have stripes, the Blue one has stars. When they are put together, they become a patriotic centerpiece. The following steps will help you to make a pinwheel:
Importantly, you need Red, White, and Blue papers (It is preferred to have thick sheets), Small Brands, Wooden Dowels, A hot glue gun, and, most importantly, a Cricut cutting machine.
First, you need to upload the pinwheel design on the Design Space. Once the pinwheel images are uploaded, you must cut out each pinwheel — red, white, and blue. The unassembled paper will look like this:

Next, you have to bring the holes together along the outside edge towards the center of the hole.
Then, you need to thread a brad through all five holes and open it so the entire pinwheel holds together.
Get the glue and stick the wooden dowel on the back to complete the pinwheel. Continue the same steps for other pinwheel cuts.
2. Statue of Liberty Crown
Are you excited to take on the next project, and do you need more of Cricut’s 4th of July ideas? Making a Statue of Liberty Crown for this year’s Independence Day is easy. Let us see how to do it:
First, upload a sketch of the Statue of Liberty to your Design Space. Or you can find a relevant design from the Design Space access. The design should have one portion for the Crown and another for two headbands.
Next, the Cricut machine should be set to the Cardstock settings. Now, place your paper on top of the cutting mat. Then, follow the prompts in the software to load the paper and give instructions to cut.
Once the machine cuts the paper, you need to take the paper off the mat. It is good to use tweezers to remove the cut portion.

After removing the cut pieces, you must attach the Crown and the headbands together.

Hola! You have your own Statue of Liberty Crown for your child to wear during the Independence Day celebration.
3. America Rainbow T-Shirt
Customizing your t-shirt by using a Cricut machine is always fun. So, why not customize your t-shirt that show your patriotism?
You need a Blank t-shirt, America Cut file, Cricut machine, Iron-On Vinyl, Easy Press 2, Easy Press Mat, Iron-On Protective Sheet, and Weeding Tools.
First, you need to upload an American Cut Rainbow design, or you can search for the same on Design Space images. And mirror the image before you give instructions to cut. There will be an option Mirror, that reverses the image.

Next, you need to place the Vinyl face-down on the mat before loading it into the machine.
Now, change the material settings to Vinyl and click go. Let the Cricut cut the Vinyl.
After the cutting, you need to remove the excess Vinyl and keep just the image.
The next step is to plug the Easy Press 2 into the power. Be sure that the settings on the press machine are in the recommended settings of the Vinyl. After the Easy Press is heated up, place your shirt on the EasyPress Mat and, for 5–10s, preheat the area.
Then press it on top of the Vinyl and press the Cricut button, i.e., C. You need to hold it firmly without moving as the countdown begins. Next, turn the shirt over and press it again using Easy Press again for 15.
After pressing the design on the t-shirt, you must remove the carrier sheet before the Vinyl cools down.
Now, let it cool down, and you will have the America Rainbow printed on your t-shirt.

Conclusion
As Independence Day 23 is getting close, the entire country is ready to celebrate it. As a crafter, you are looking for ideas to celebrate uniquely. So, here are the Cricut 4th of July ideas for you to make creative designs to show your patriotism. These designs, Pinwheels, the Statue of Liberty Crown, and the America Rainbow will provide you with enough energy to make more crafts for your Independence Day.
Source: Cricut 4th of July ideas
#Cricut 4th of July ideas#CRICUT COM SETUP#CRICUT DESIGN SPACE LOGIN#SETUP CRICUT DESIGN SPACE SETUP
0 notes
Text
https://www.scoop.it/topic/cricut-com-setup-mac-by-install-cricut-design-space-app
0 notes
Text
cricut setup for windows and mac
Crafting is one of those hobbies that people of every age follow. To provide flawless results and an enjoyable experience in crafting, Cricut offers various impressive heat pres and cutting devices. Some of the popular cutting machines it offers are the Cricut Maker 3, Cricut Explore 3, Cricut EasyPress 3, Cricut Autopress, and more. With the help of these machines, anyone can create stunning DIY projects without any professional help. Also, for new users, the app offers various written content and video tutorials. Visit the cricut.com/setup website now to get more information.
cricut com setup explore air 2
design.cricut.com/setup
cricut setup for windows and mac
0 notes
Text
How to Connect a Cricut to Computer and Mobile: Easy Guide
Hello everyone, I have good news for you: I finally bought the latest model of the Cricut machine. I was talking about adding this crafting tool to my add-on room, and I finally completed my wish. With the Cricut machine, I can create unlimited DIY projects as I want. Before getting started with anything, I need to learn how to connect a Cricut to your computer and phone and then proceed with the cutting process.
You are aware that Cricut has been ruling the crafting world with its models and has impressed many crafters worldwide. All their series are known to produce tons of DIY projects for business and personal use. In addition, they are compatible with Windows, Mac, iOS, and Android devices. In this guide, you will learn the process that you should consider to connect the Cricut machine and create your best projects.
How to Connect a Cricut to a Computer?
As said in the above lines of the blog, the typical way that will assist you in connecting the Cricut machine to a desktop is by enabling the device Bluetooth. If you aren’t aware of the process, then take a look at the forthcoming details:
For Windows
This section will offer the A-Z details based on connecting the craft plotter to the Windows system. Also, you are advised not to skip any step while performing how to connect the Cricut machine to a system:
Commence this connection method by turning on your Cricut product.
After that, put it on a flat table 10-15 ft from your desktop.
Now, select Devices by opening the Start menu > Settings option.
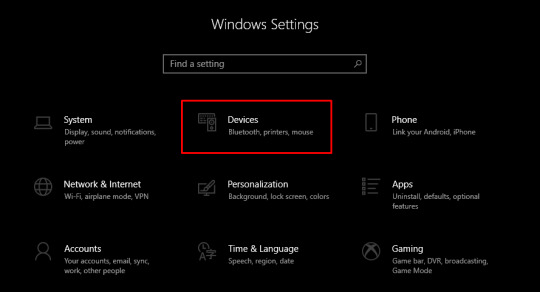
Next, enable your computer’s Bluetooth and tap the Add Bluetooth or other devices option.
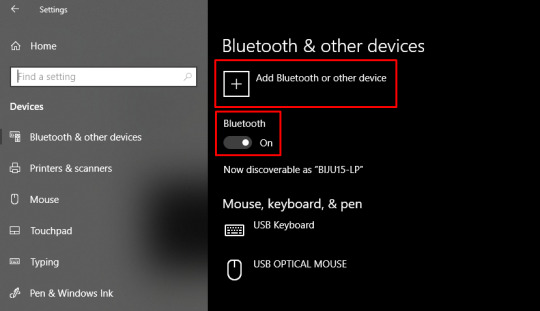
Further, the Add a Device screen will appear on your screen, and tick the Bluetooth option.

Then, you must hold on for a few minutes until your Windows computer detects the nearby machine.
At this point of the connection process, tap on your Cricut model, and your device will be shown as connected during the setup process.
For Mac
Under this part, the details below will teach you how to connect a Cricut to the Mac operating system. To make the perfect connection, pay special attention to the coming explained steps:
Kickstart the method by repeating steps 1 & 2 while connecting Windows to the machine.
Further, click the Apple icon, and a dropbox will open in front of you.
Now, tap System Preferences given inside the dropbox, and a new window will open.
Following this, look for Bluetooth > click it, and the Bluetooth will open.
Next, turn on your Mac Bluetooth by clicking the Turn Bluetooth On and wait for a few seconds.
After the time is over, start searching for your machine name inside the Devices column.
If you are lucky enough to find the name, click on it, and the connection process will instantly start.
To finish the method, go back to the New Product Setup, where the devices are already connected.
Once you have completed the process mentioned above, it’s time to climb the stairs and learn how to connect Cricut to smartphones.
How to Connect Cricut to Phone?
It isn’t a big concern whether you own an Android or iOS device; you can easily connect your craft plotter to your phone. However, to properly execute the process, you must pay attention to the upcoming information.
For Android
Keep going with how to connect a Cricut to an Android phone by scanning the steps shared below:
Commence the method by unpacking your craft plotter and placing it on your table.
After that, you need to check that your Cricut is on and within the range of 10-15 ft apart.
Now, switch on your Android device > open the Settings tab, and then click the Bluetooth option.

At this time, verify that your device’s Bluetooth is on and that the Available Devices section will be visible.
Following this, look for your Cricut model > select it, and close the tab.
Return to the New Product Setup page to conclude the process. There, you will find the devices connected to each other.
For iOS
With the help of the coming steps, you can effortlessly connect both devices without making any serious mistakes:
Perform steps 1 to 3 that you did while connecting Cricut to your Android device.

After that, enable the Bluetooth and wait till the scanning process is in progress.
Now, pick up your craft plotter from the Devices column visible on your screen.
In the end, your wireless connection process will finally come to an end.
Wasn’t this guide helpful for learning how to connect your Cricut machine to PCs and smartphones? Following the earlier methods will make it easy for you to finish this process with a snap of your fingers.
Frequently Asked Questions
Question: Why My Device Isn’t Able to Connect My Cricut Machine?
Answer: It isn’t a big task to connect the machine to any device for crafting purposes. However, due to some factors, you might have difficulty connecting the devices. The list of the factors is as follows:
Your device is not enabled.
Using an outdated driver or an earlier version of the Cricut app.
Inserting a USB cable into the wrong port.
Question: How Do I Set up My Cricut to Computer?
Answer: To set up your machine on your computer, follow the steps given below:
Commence the process by plugging in your machine & powering it on.
Now, start pairing your devices via a wired or wireless connection method.
Next, download & install Cricut Design Space and create your account.
Complete the remaining process by following the guidelines given on your screen.
Question: Can I Connect My Cricut Using a USB Cord?
Answer: Yes, you can absolutely connect your Cricut machine with a USB cord. To make a successful connection between devices, you need to put one side of the cable into a device’s USB port and the other end into your machine port. Go to the Cricut New Product Setup page and check that the connection has been built successfully.
Read more: install cricut design space app
cricut.com/setup
cricut.com/setup mac
Source: how to connect a cricut
#how to connect a cricut#cricut.com/setup mac#cricut explore 3#cricut explore air 2#cricut.com/setup#install cricut design space app
0 notes
Text

Unleashing Creativity: Transforming Projects with the Cricut Explore Air 2
From intricate to precise cutting, Cricut has several exciting features to offer. Robust machines such as Cricut Maker 3 or Explore 3 are superb collections in Cricut's lineup. They easily cut hundreds of materials in less time. Besides, they work with its companion, Cricut Design Space. This app is used to create an intricate or desirable design. Initially, it connects the cricut com setup to computers or mobile devices. To connect your Cricut to devices, you will need to navigate to Cricut Explore Air 2.
Visit here for more Information:- https://cricutmakerdesign.space/
0 notes
Text
How to Connect Cricut to Computer via Bluetooth or USB?
I still remember the day I bought my first Cricut Maker and Explore machine. You won’t believe me, but I was unsure of the proper machine setup. I didn’t want to make any mistakes that would lead to an error. Anyway, I learned how to connect Cricut to computer from the guidebook that comes with Cricut.
Although every user can use this easy guide to connect their machine, there are people who need an in-depth tutorial on Cricut setup. However, it’s been more than 3 years since I have been using these cutting machines for creating DIY projects. The best part about this machine is that it can connect via both Bluetooth and a USB cable.
By the end of this blog, you will learn how to set up your Cricut Maker or Explore machine using a USB or Bluetooth connection. So, are you ready to complete your Cricut setup? Let’s delve into it!
How to Setup Cricut Machine With Design Space?
Before learning how to connect Cricut to computer, the complete Cricut machine setup is essential.With this setup, you will connect your Cricut cutting machine to the Design Space that helps you create design, and it works as a medium to transfer your design to the cutting machine that cuts your final projects. Here’s how to set up your Cricut Maker or Explore on a Windows computer:
First, you need to power on the machine and computer.
Next, you have to connect the machine to your computer using a USB cable or pair it via Bluetooth. (I have explained how to connect Cricut to computer via USB or Bluetooth in the next section).
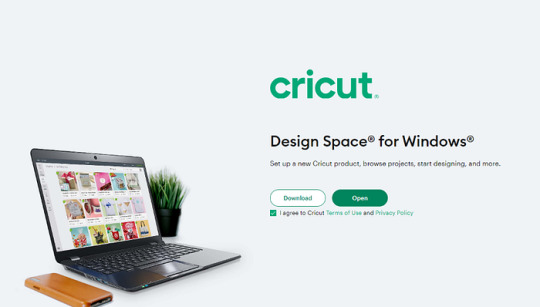
Then, download and install the Design Space app by simply visiting cricut.com/setup.
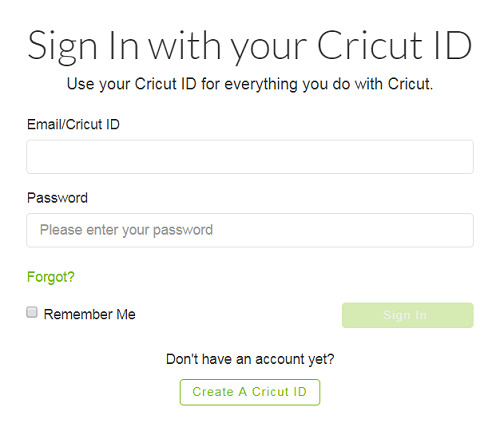
Afterward, you have to follow the on-screen instructions to sign in or create a Cricut ID and Password.
Finally, your Cricut setup is done; now you can move to the next section, where I have explained the way of connecting your Cricut to your computer.
How to Connect Cricut to Computer via Bluetooth?
So, are you ready to connect your Cricut to your computer wirelessly? The process is simple, and this is only for Windows users.
First of all, you have to maintain at least 10 to 15 feet of distance between your computer and the machine. For Cricut Explore or Explore One, you need to insert the Wireless Bluetooth Adapter.
Now, you have to go to the Start menu and choose the Settings.
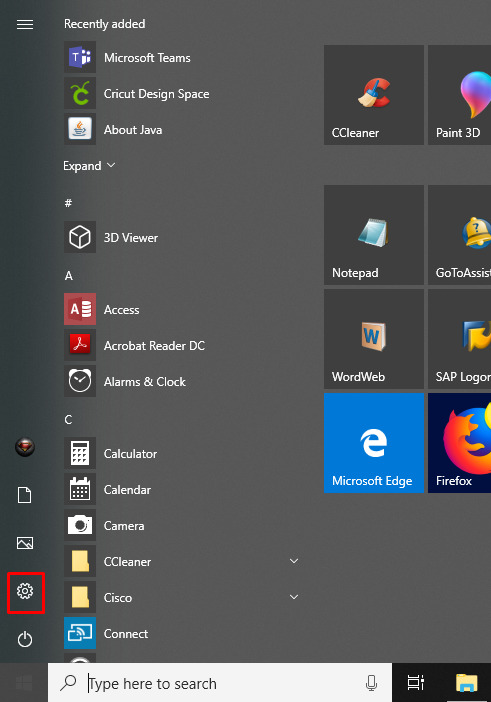
On Windows Settings, you have to select Devices.
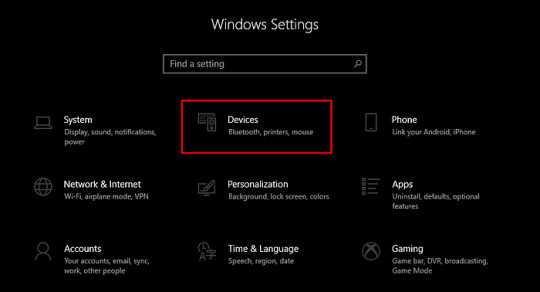
Next, turn on the Bluetooth and hit the Add Bluetooth or other device option.

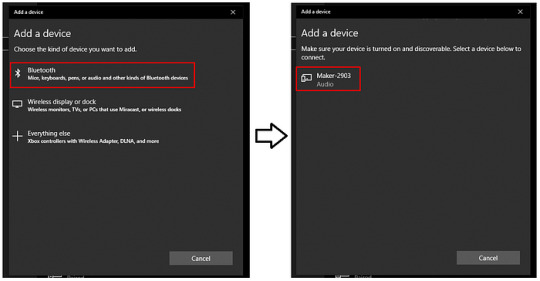
After that, you have to select Bluetooth and then wait for a while until it detects your cutting machine. Once detected, you can select it to proceed ahead.
When prompted, you should enter four digits of PIN: 0000.
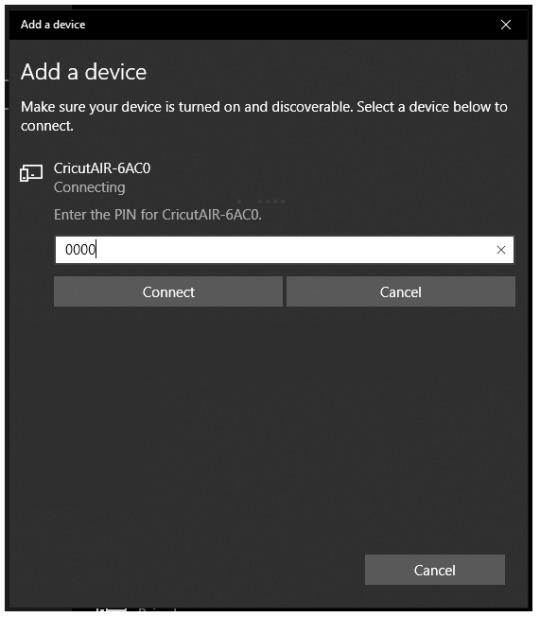
Finally, you have paired your Cricut Maker or Explore with your Windows computer.
That is it! This is the complete process of connecting your Cricut machine to a computer with the help of wireless Bluetooth. If you want to connect the machine using USB, then proceed with the following step.
How to Connect Cricut to Computer Using a USB Cable?
Another way to connect your Cricut to a computer is a USB cable. Below, I have given step-by-step instructions to establish the connection between the computer and Cricut:
Take a USB cable and connect it to the back of the Cricut machine.
Next, use the other end of the USB cable to connect it to a computer.
Then, you have to follow the instructions on your computer screen to install the USB driver.
If you find it difficult to connect it via USB, then you should check whether your computer meets the minimum system requirements for Design Space.
FAQs
Question 1: Why is the Cricut machine not connecting to a computer?
Answer: Below are 2 fixes that you can try if your Cricut machine isn’t connecting to your computer:
Inspect the Cricut: here, you need to check whether your machine is turned on and kept within a distance of 10–15 feet from the computer. For Explore or Explore One, make sure you have inserted the Wireless Bluetooth Adapter.
Check the computer: your computer must meet the minimum system requirements so that it can connect to Bluetooth. If everything seems okay, then try restarting the computer and machine.
Question 2: What is the PIN for connecting my Cricut to my Bluetooth?
Answer: It is 0000. This code is entered when you are prompted while pairing up your Cricut machine with your computer. The steps go as follows:
Open the Bluetooth on your computer.
Then, turn on the Bluetooth.
Go to the Add Bluetooth or other device option.
Next, you need to select the Bluetooth option, and it will start looking for your machine.
When it finds the machine, you need to click on it and then enter the code 0000.
Then, hit the Connect tab to connect the devices.
Question 3: Why can’t I connect my Cricut via USB?
Answer: Many people face a similar issue while connecting their Cricut via a USB cable. There are various reasons that stop you from connecting it via cable. To fix this problem, you need to check whether the cable is inserted properly into its port or not. If everything seems perfect, then you should try to replace the USB or try a different port on your computer. There are chances that these fixes will help you reconnect your cutting machine to your compatible device.
Conclusion
In this blog, I have explained two methods to connect your Cricut to a computer. This guide will be useful for connecting your Cricut Maker or Explore series machines to your Windows computer. Before talking about the connection between the computer and the machine, I have started with the Cricut setup, which is a must before connecting it to the cable or wirelessly. Both methods are suitable and depend on your choice of what suits you best.
Read more: install cricut design space app
cricut.com/setup
cricut.com/setup mac
Cricut machine setup
Source: how to connect Cricut to computer
#how to connect Cricut to computer#Cricut machine setup#cricut.com/setup mac#cricut.com/setup#cricut design space#cricut.com sign in#cricut setup#cricut new machine setup#cricut.com/create#install cricut design space app#Cricut machine not connecting
0 notes
Text
How to Make Cricut Wedding Card: 4 Easy Steps
Are you getting married but can’t decide which Cricut wedding card will be best? I was hoping you wouldn’t stress as I will help you by teaching you how to make them out of the Cricut machine. Weddings are all about reuniting with close ones, singing their favorite songs and dancing.
I have been in the crafting business for the past two and a half years and have done tons of DIY projects for various events. But this is the first time I am going into custom-made wedding invitations. Thanks to Cricut machines, invitations will be a lot easier and a memorable craft for me.
Every crafter will agree that to make any craft out of a Cricut machine; they must have a specific set of tools to help them give the project the perfect shape. Follow the blog to learn in-depth about making personalized invitations.
Step 1: Creating a Cricut Wedding Card
To create your favorite invitation design, switch on your device and open the Design Space app. After that, tick New Project, press the Projects tool, and type Invitations into the search box. Now, select the design, read the details about the design, and then click the Customize option.
Following this, select the Cricut Foil section by going to the Operation section and selecting the Pen option. After making the changes, select the text and change its font, style, size, and color. Following this, press Weld, which is visible under the top right side of the canvas.
Once you are done after making all the changes on your Cricut wedding card, click the Make It option. Next, you need to check that the designs are placed properly in their respective places. After checking all the designs, hit the Continue option.
Step 2: Cutting Your Design
Following this, unbox your Cricut cutting mat and place your Cricut material on top of it with the help of the brayer tool. Then, check that you use the correct material and tools before cutting. After that, connect your devices, load the mat into the machine, insert the tools inside the Clamp, and turn on your cut-die machine. Now, you need to wait till the cutting process is going on. Once it is finished, start unloading your mat from the Cricut machine.
Step 3: Assemble Your Materials
Now, peel off the Cricut material from the mat and use a sharp item to remove tiny pieces of material from your Cricut wedding card design. Following this, take your Cricut scoring tool and start folding your envelope. After folding the envelope equally from all sides, stick the sides using strong adhesive glue. You can also use a Cricut glue gun to spread the glue equally. Also, repeat the same steps by folding and sticking the invitation pieces together. Keep the card and envelope aside for a few minutes until the glue ultimately gets dried up.
Step 4: Share Your Final Wedding Invitation
Last but not least, cut the extra sides of your Cricut wedding card and insert them inside the respective envelopes. Now, deliver them to your loved one’s address along with a box of sweets. Alternatively, you can personally visit and invite them to attend your wedding and give you blessings.
Conclusion
See how easy it was to make a Cricut wedding card with the help of Cricut machines. Apart from this DIY craft, you can also do other projects for your D-day with this cut-die machine within a few minutes. Projects that it can make are wine glasses, welcome signs, coasters, table runners, ring boxes, and so much more. You must be patient and focused while working on these projects using the Cricut craft machine.
Frequently Asked Questions
Question: Is Cricut Worth Making Wedding Crafts?
Answer: Absolutely; Cricut is the ultimate cutting machine you can prefer while making any craft for your wedding ceremony. This craft product can cut any material, tissue, or leather within a few seconds. Besides that, Cricut comes with designing software that helps make the design easier.
Question: What Cricut Accessories Do I Need to Make My Invitation Card?
Answer: The total number of Cricut accessories that will help you in making invitation cards more easily are as follows:
Question: Can I Make Money By Selling Cricut Wedding Invitations?
Answer: You can make money by making and selling DIY wedding invitations to your customers. To start your own business, you need to learn every detail about Cricut supplies and how they can be used to make cards. Moreover, you need to be very careful while making crafts and be aware of the customer’s expectations.
Visit: cricut.com/setup
install cricut design space app
www.cricut.com setup login
cricut.com setup mac
Source: https://cutting-setup.com/how-to-make-cricut-wedding-card-4-easy-steps/
#cricut.com setup download#cricut.com/setup#cricut.com sign in#cricut.com design space#cricut.com/create#cricut.com/register#cricut accessories#cricut design space#cricut design space download#design.cricut.com/setup#install cricut explore air 2#install cricut design space app#cricut setup#cricut explore air 2 setup#cricut explore air 2#cricut project ideas#cricut design space app#cricut com setup#cricut design space login
0 notes
Text
Cricut Design Space Download for Windows 10: Ultimate Guide
Cricut Design Space download for Windows 10 is a piece of cake. Sounds strange to you, right? It might sound so if you are a beginner and have just got your new Cricut machine for setup. I remember the day I first bought a cutting machine to start my crafting venture. It was like a dream come true. I wanted to make every sort of project that I had ever imagined. Since then, it has been only my crafting tool, and it helped me so much throughout my journey.
Now, as a craft expert, I teach aspiring crafters about the usage of a cutting machine. But how do you get started with this machine? Do we need software? Yes, you will need to download the Design Space app. Let’s get into this blog to learn about the system requirements for this software and the steps to download and install it on a Windows PC.
Minimum System Requirements for Cricut Design Space
Before I walk you through the detailed steps for the Cricut Design Space download for Windows 10, you must know the system specs first. In other words, you need to check your Windows PC to confirm whether your PC is compatible enough to run the software without any trouble. Below, I have mentioned the system specs.
Check the following specs right away before downloading the software:
Despite all this, this software supports the offline feature, meaning you can use it without being connected to the internet on your PC. That’s all in system specs. Now, you can proceed ahead to download your app.
Cricut Design Space Download for Windows 10 Computers
To download the software, first go to the link to reach Cricut’s download page. From there, you will download the app. Now, let’s dive into the following steps:
Here’s how to download the application on Windows 10:
Cricut Design Space Install for Windows 10 Computers
In the previous section (above), you saw the steps forthe Cricut Design Space download for Windows 10 in a stepwise manner. Now, I’ll show you the detailed steps for installing the same software on your PC or Windows 10 device.
Here’s how to install the application on Windows 10:
Once the installation is complete, you are ready to use the software. All you need to do is create an account and start using it.
Conclusion
Finally, you have learned the steps for downloading the Design Space app for Windows 10. In this blog, I discussed the system specs before downloading the app on a Windows 10 PC. After that, I explained the detailed steps for downloading and installing the software. Following these easy steps will help you download and install the app quickly on the right device.
FAQs
Question 1: Do I need the internet to use Cricut Design Space?
Answer: Well, not necessarily. This software is advanced and can be used offline, too. But the question is—is this offline feature available for all compatible devices? The simple answer is no. You can use the offline feature with devices such as Windows PCs, macOS, and iOS. The offline option is not available for an Android device.
Question 2: Can I use Cricut Design Space on multiple devices?
Answer: Absolutely, yes! Since this software is cloud-based, you can use it anywhere without any hassle. You can start your project on an iOS or Android device from the sofa and finish it on your computer in your craft room. In short, it is possible to use the software on multiple devices without any trouble.
Question 3: How to disable grid in Cricut Design Space?
Answer: It is simple to disable if you do not want any gridlines on your software. To do this, follow the steps below:
Visit: cricut.com/setup www.cicut.com/setup login
Source: https://cricricutdesigncut.wordpress.com/2024/09/24/cricut-design-space-download-for-windows-10-ultimate-guide/
#design space setup#cricut design space setup#cricut setup#cricut.com setup mac#cricut.com/setup#cricut com setup#cricut design space#cricut.com sign in#cricut.com/register#cricut.com design space#cricut.com/create#digital design#cricut explore#cricut crafts#cricutprojects#cutfilesforcricut
0 notes
Text
How to Connect Laptop to Cricut: A Beginners Setup Guide
Have you been planning to purchase a Cricut machine? If yes, you need to know a few things. These include connecting your device to your crafting machine. To connect, you can use a computer or a phone. To learn about the connection process of your device to a machine, you should follow this blog. As a long-time Cricut user, I can guide you through how to connect laptop to Cricut.
When it comes to connecting a laptop to your machine, you can use either a Windows or Mac laptop. Both laptops are capable of working with Design space. But before you use your laptop with your machine, you need to make sure it meets the system requirements for Design Space. In the blog, you will also learn about the features your computer requires. So, let’s dive into it.
Minimum System Requirements to Use Cricut on Your Laptop
In order to learn how to connect laptop to Cricut, you should first check whether your laptop is compatible with the Design Space software or not. If your computer/laptop lacks some features, you may have difficulty downloading the app, and when you use it, you will have to face some problems. To avoid these issues, you must make sure that your computer has these specs.
How to Connect Laptop to Cricut (Windows)?
If you want to connect your laptop to your machine, you can pick one of the Windows or Mac laptops. We will first talk about Windows and then about the Mac. Before connecting it to your machine, you must check your laptop’s compatibility with Cricut. This is the process for the connection.
How to Connect Laptop to Cricut (Mac)?
A Mac is an advanced computer, so if you want to use your Mac laptop for a machine, you can use it perfectly. The laptop will work fine with any machine. Before you use the machine, you should first check the features of the computer and make sure that it is capable of being used with your machine. This is how you will connect a machine to your laptop.
Conclusion
In short, you read how to connect laptop to Cricut. I believe you can now easily connect your Windows or Mac laptop to your machine. You have two connection options for connecting Cricut to your laptop. The first option is Bluetooth, which is a wireless option, and the other is the wired USB cable. Here, we discussed Bluetooth connection in detail as it is more flexible and is preferred by users. Now that you have learned your connection process, you can easily do that and start working on your project.
FAQs
Is a Laptop Necessary for a Cricut Connection?
Not really! A laptop is not at all necessary to work on any project or to connect your machine to it. To start, you need a device. For a device, you can use a phone or a computer. So, if you have a computer, you can use it to connect to your machine as well. A laptop is not necessary to connect your machine. You can use an Android or iPhone smartphone to connect. However, in case you already have a laptop, you can use it.
How Do I Find Out if My Laptop Is Compatible With Cricut or Not?
If you want to know whether your laptop is compatible with your machine or not, you should check a few things on your laptop. You must check your device specifications and make sure that it has all the features that Cricut requires. To be able to use your machine, your laptop needs 4 GB RAM, 2GB free disk space, USB or Bluetooth connection, 1024 x 768 pixels screen resolution, and 2-3 Mbps internet speed.
Can I Connect Cricut to My Android Phone?
Yes, you can! Cricut works with multiple devices, and an Android phone is one of them. If you want to use it on your machine, connect it to your machine. You can connect them using Bluetooth. To do this, you have to turn on your machine and go to Bluetooth settings on the phone. You will have to search for the machine model and select it. Your mobile device will be paired to your machine.
Visit: install cricut design space app
Source: https://connectingcricutmakertocomputer.blogspot.com/2024/08/how-to-connect-laptop-to-cricut.html
#How to Connect Laptop to Cricut#cricut.com/setup#cricut.com/setup app#cricut setup#www.cricut.com/setup#www.cricut.com/setup login#cricut.com/setup login#cricut.com/setup mac#cricut.com/setup windows#cricut.com setup mac#cricut com setup#cricut design space app login#install cricut design space app#www.cricut.com setup login
0 notes
Text
How to Use the Cricut Explore Air 2: Ultimate Guide
You all are here to learn how to use the Cricut Explore Air 2. I have been using this machine for a long time, and it has been my all-time favorite crafting tool. You all must be wondering about its setup and usage, so I want to tell you that it’s very simple, and you will be amazed by its excellent features and performance.
In this blog, I will tell you all the basics about the latest Explore Air 2. Although Cricut has made various tools, some machines, like Explore Air 2, are best sellers. To learn more about the machine and its uses, read this blog till the end and learn everything here. With the help of this blog, I will teach you how to use Cricut Explore Air 2 for beginners.
What Is a Cricut Explore Air 2?
Cricut Explore Air 2 is the latest machine from Cricut that is so brilliant that it can cut over 100 materials and can make 3000+ ready-to-make projects in the Design Space software. If you are a Cricut user, you already know the Cricut Explore Air 2 setup that includes Cricut Design Space.
You can either make designs in the Design Space or upload an external file into it. Also, you can use other programs to make designs, including Adobe Illustrator and Canva. Plus, you can upload your own fonts, too.
If your requirement is to do some bigger projects for personal or professional use, an Explore Air 2 would be an ideal option. Now, let’s move on to the following process to learn how to use the Cricut Explore Air 2.
What Can I Cut With Cricut Explore Air 2?
Since I have been using the Explore Air 2 for so long, I have tried different materials with it. Basically, it can cut light to hard materials like paper, vinyl, cardstock, etc. So, this machine is no more than a powerhouse that can cut a range of materials easily. However, you will need some special type of blades, such as deep blades, to cut those materials.
How to Use the Cricut Explore Air 2 to Make a Paper Flower?
When you know about the Explore Air 2 machine, it’s time to create a project out of it. So, here I am going to tell you how to make large paper flowers with your Cricut.
If you are ready, arrange a large paper of about 12” x 12” to make bigger flowers, and you can also adjust the size as per your choice. If you are confused about where to buy the cardstock, don’t worry; you can get them from a local craft store easily.
Step 1: Supplies and Tools You Need to Get Started
When you have decided to make a large paper flower with your cardstock, you’ll need to arrange a few items, as I have listed below.
When you all are ready with these items, let’s continue with my guide on how to use Cricut Explore Air 2.
Step 2: Download a Paper Flower Template From Design Space
You need to get the template for this design under the Design Space Library. Use it to get a perfect design template for you. Once you find the design, you should cut it with your Cricut Explore Air 2 machine. Once you are done, see how to use the Cricut Explore Air 2 to make a large flower design.
Step 3: Cut Your Flower Design
When you are ready with the design, you need to cut it. To do it, load the cutting mat with cardstock into the Explore Air 2 and allow it to cut your design. Once the final design comes out, you can continue with the further steps.
Step 4: Assemble All the Pieces
When you get the final cut, it’s time to assemble them. Collect similar petals together. Once you assemble them together, you are good to go to learn how to use your Cricut Explore Air 2 to make a flower project.
Step 5: Overlap the Petals
In this step, you need to use craft glue to overlap the petals from the bottom to create a petal-like dimension. Apply the glue at the bottom of your petals. To make the petals glued correctly, you can use wonder clips to hold them. So, I am using a bunch of wonder clips here to hold my petals.
When the glue is dried up, you will see a small line at the bottom of your petal due to overlapping, but it will be covered with another layer of petals, so don’t worry about it.
Step 6: Align Petals in the Form of a Ring
When the glue is dried up fully, you need to arrange the petals in the form of a ring around a circle to check how many petals it’ll take to make a flower. Then, glue all of those petals together to make a flower layer. On this layer, you can add more petal layers.
Step 7: Add More Petal Layers in the Center
After creating one layer, you can add more layers in its center to create a bulky flower design. Add different colored petals to make a complete flower. At the end, I am adding a yellow flower. It was a beautiful project that you can make with your Cricut Explore Air 2 machine.
Conclusion
Finally, you have learned how to use the Cricut Explore Air 2 to create a beautiful project. I know it’s something new to make but trust me, it’ll look best at your home. It’s one of the graceful decorative items you can create with your Cricut machine. Well, there are many options to try with your Explore Air 2, and you will get more such projects in my further blogs.
Visit: cricut.com/setup
design.cricut.com/setup
cricut.com setup mac
install cricut design space app
www.cricut.com/setup login
Source: https://cricutspaces.wordpress.com/2024/02/21/how-to-use-the-cricut-explore-air-2-ultimate-guide/
#cricut.com/setup#cricut design space download#cricut explore air 2#cricut software app#cricut new machine setup#cricut project ideas#install cricut design space app#www.cricut.com/setup#www.cricut.com/setup login#cricut setup#cricut crafts#cricut com setup#design.cricut.com#design.cricut.com/setup#cricut.com/create#cricut.com/register#cricut.com
1 note
·
View note
Text
How to Connect Cricut Bluetooth to Computer: Full Guide
Hey, Cricut folks, I’m going to show you the easiest way to connect Cricut Bluetooth. I know how hard it can be when we get a new Cricut machine. From setup up to performing a test cut, it seems like climbing a mountain. But wait, this is not as difficult as you think!
I recently finished setting up a friend’s machine, in which I briefly taught him how to connect Cricut to computer. Honestly speaking, I didn’t even touch a thing; I was just instructing him to do this and that. Following my instructions, he completed his setup in a matter of minutes. Do you also want me to instruct you on how to set up your Cricut machine? If so, join me on a board to connect your Cricut to your computer using Bluetooth. Let’s start!
Step 1: Unpacking the Cricut Product
In the first step, you must open your new Cricut machine. Be careful while unboxing the box because many accessories are included. You have to ensure that nothing breaks while taking things out. As you can see below, I have unboxed my Cricut Maker 3 machine, and the items inside the box are as follows:
Similarly, when you unbox other Cricut models, such as Cricut Explore or Joy, you will get a few similar items. Now that we have done the unboxing let's proceed with the second step, which is to connect Cricut Bluetooth.
Step 2: Place Your Cricut Machine
Now, you have to find a place where you can locate your machine properly. Ensure the surface is completely flat so that it will be easier to work for you in the future. If you have a table, you can keep it. Otherwise, the floor is also a good idea if you have none.
Now you have chosen the right place, let’s move on to plug the machine. To do this, you have to find a nearby power socket and connect your machine to it.
Once connected, you have to turn on the machine by pressing its power button.
Step 3: Connect Cricut Bluetooth to Your Device
Finally, we are heading to learn how to connect Cricut to a computer via Bluetooth. But here, one question that might arise in your mind is what computer will we connect to? Is this a Mac or Windows or others?
Don’t worry! I have got your back for both the computers. I will show you how to individually connect your Cricut machine via Bluetooth on a Mac or Windows computer. Let’s start with Windows first:
For Windows
For Mac
FAQs
Question 1: Can I connect my Cricut to my laptop?
Answer: As mentioned on its official site, Cricut works with iOS, Windows, Mac, and Android. However, it is not compatible with Chromebook or Unix/Linux. Hence, if you use the operating system mentioned above, you can use any brand’s laptop, such as HP, Acer, Dell, Asus, Lenovo, MSI, and Apple.
Question 2: Is the Internet compulsory for using Cricut Design Space?
Answer: No, it is not necessary to connect the Cricut software to the internet all the time. The internet is only needed when you want to access a certain feature in the app. Otherwise, there is no need to connect it to the internet. The offline option is available for the Cricut app on all devices except Android devices.
Question 3: Can I connect my Cricut machine without Bluetooth?
Answer: Absolutely, yes! You can also connect your Cricut machine and computer via a USB cable. To do this, insert one cable end into the machine’s USB port and the other end into the computer’s USB port. Once connected, you are ready to use the machine for cutting, scoring, and other operations.
Final Words
In conclusion, I discussed how you can connect Cricut Bluetooth to Mac and Windows computers. I explained everything stepwise so that every beginner Cricut user can connect their Cricut wirelessly and hassle-free. The connection is important if you want to set up your Cricut. Hence, connect it and set it up to get started with your Cricut cutting machine. Start setting up your Cricut machine in one go with this simple guide.
Source: https://desincricut.wordpress.com/2024/04/23/how-to-connect-cricut-bluetooth-to-computer-full-guide/
#cricut setup#install cricut design space app#install cricut printer#install cricut explore air 2#www.cricut.com setup login#cricut.com/setup#cricut.com setup download#cricut.com setup#cricut.com setup windows#cricut.com setup mac#cricut.com/create#cricut.com sign in#cricut.com/register#cricut.com design space#cricut#cricut com setup#cricut new#cricut new product device#cricut new machine setup#cricut new product setup#cricut create#cricut create connect to computer
0 notes