#design space setup
Explore tagged Tumblr posts
Visit Tumblr Blog
Explore Tumblr blogs with no restrictions, modern design and the best experience.
Last Seen Tumblr Blogs


Fun Fact
Kazakhstan’s Minister of Communications and Informatics has blocked the Tumblr site because it contained 60 sites of terrorism, extremism, and pornography in 2015.
Text
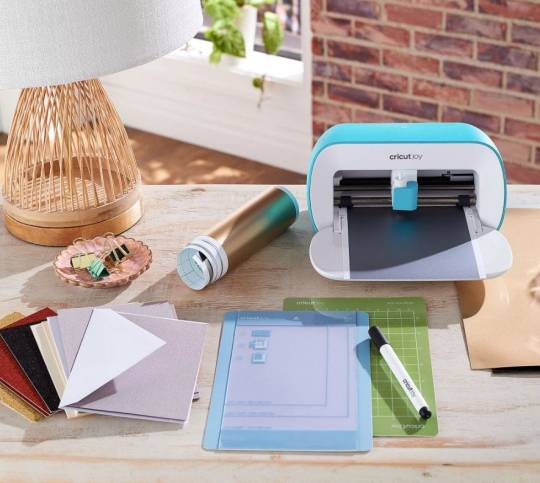
How Do I Set Up My Cricut Maker? [Ultimate Guide]
Buying a new Cricut Maker can be overwhelming for all of us. Initially, setup can be daunting, but once you do it, you will love the overall process. However, you can easily set up any Cricut machine without needing much assistance.
The post is all about how do I set up my Cricut Maker. Through this write-up, we will see the items while unboxing the new Cricut Maker. Further, you will explore the Cricut Maker and its types. Afterward, we will explain the complete process of setting up your Cricut Maker machine.
What Do You Get in the Cricut Maker Box?
Unboxing a new product is always an exciting task. While unboxing the Cricut Maker machine, we got several items that we will be discussing here. However, you always have the option to select the bundles when you buy the machine from Cricut's official website.
Following are the items that you get in the box of the new Cricut Maker:
Apart from these, you will get the following:
The best thing is that we get the blades and tools along with the new Cricut machine. These blades allow us to try various products before buying more blades.
How Do I Set Up My Cricut Maker on a Computer?
When we talk about setting up Cricut Maker machine, it means we want to connect it to our devices like computers or mobile phones. However, there are certain ways to connect these machines to our devices. For example, we can connect our Cricut Maker to our computer or phone via Bluetooth or USB cable. So, it is the users’ choice to choose which way is the most suitable for them.
Below, we explain how to set up Cricut Maker. This method is only applicable for Windows or Mac users only:
How Do I Set Up My Cricut Maker on a Mobile?
Here's how to set up your Cricut Maker on Mobile devices with iOS or Android operating systems:
Cricut Maker is the most advanced and versatile in Cricut's lineup. However, the box contains various items that you can use to make several projects uninterruptedly. In this write-up, we explained the Maker and its features in detail. It helps the users to get an overview of machines so that they can use them without any hassle. After exploring the Maker cutting machine, the blog found out how do I set up my Cricut Maker.
FAQs
Question 1: Can I set up the Cricut Maker easily?
Answer: People think the setup is daunting, but this is not the case. Cricut machines are just like printers. The only difference is that Cricut has blades to cut. However, when you go through the notice period, you will find the setup is too easy and complete in less time. While setting up, you will need to download and install the Design Space app. This app will guide you through the further setup process, making it easy for beginners to set up the machine in one go.
Question 2: How do I connect my mobile phone to my Cricut?
Answer: Here, we are going to show you the method to connect your mobile device to the Cricut machine. Here, we are using iPhone or iOS devices. So, ensure you have an iOS device.
Question 3: Can I use the Cricut without its software?
Answer: No, you must use the Cricut Design Space app to send your design to your Cricut device. The machine is the companion for your Cricut cutting machine. Without this machine, you can't cut anything. However, the Design Space is essential for creating intricate designs and then sending them to the machine. Also, the app is the only way to maintain communication between your computer and Cricut.
Visit: cricut.com/setup
cricut.com/setup
Source: https://cricutmakersetup.wordpress.com/2023/10/21/how-do-i-set-up-my-cricut-maker-ultimate-guide/
#cricut explore air 2#design space setup#cricut maker#cricut.com/setup#cricut.com design space#cricut.com/create#cricut.com sign in#design cricut.com download#digital design
2 notes
·
View notes
Text


Some pictures of my bedroom after I’ve done some tidying! Slightly outdated though as my closet was recently updated and I’m currently updating my school desk :3
This decor is a result of a lot of hard work over 5+ years, and about 85% of it is thrifted or secondhand!!
#vaporwave#retro aesthetic#lighting#room decor#bedroom#clean bedroom#aesthetic#aesthetic room#vulture culture#dead things#gaming#cool room#room update#room tour#gaming setup#art setup#artist#fyp#comfort#comfy#cozy vibes#good vibes#my safe place#safe space#home decor#decoration#interior design#interior decorating#thrifted decor#thrifted
19 notes
·
View notes
Text
How to Calibrate Cricut Explore Air 2? (Full Guide!)
Cricut Explore Air 2 is a worthwhile machine for crafters who want to make pro-level crafting projects. The machine offers precise cuts for more than 100 different types of materials, including Cricut Smart Material, leather, wood, glass, metal, etc. With its easy-to-use interface, the machine allows users to work on DIY projects even if they are novices. Moreover, sometimes crafters may need to perform Cricut Explore Air 2 calibration before a cut.
Calibration is a process that helps set the machine’s blade to cut the design accurately without any flaws. Many users don’t know the procedure and struggle to get the perfect cut. If you have the same problem, then the follow-up blog will provide you with all the information about calibrating your machine.
Cricut Explore Air 2 Calibration on Windows/Mac
If you are using your Cricut Explore Air 2 machine on a computer, then the following is the extensive guide that will help you perform the calibration process.
Step 1: Selecting the Printer
Open the ‘Cricut Design Space app‘, sign in to your account, and then click on the Settings option.
Then, follow the path Machines > Machine Calibration, and select Cricut Explore Air 2.
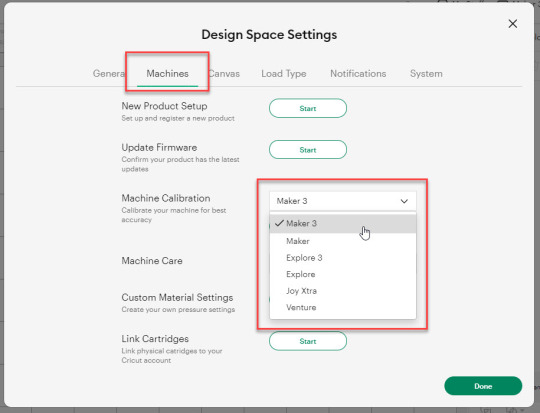
After selecting your crafting machine, click on the Start option.
Depending on the machine you choose, you will be asked to complete the calibration; select the Print Then Cut option.
In the next step, choose what you like to use with your printer machine for the process.
After that, click on the Continue option.
Step 2: Starting the Calibration Cut
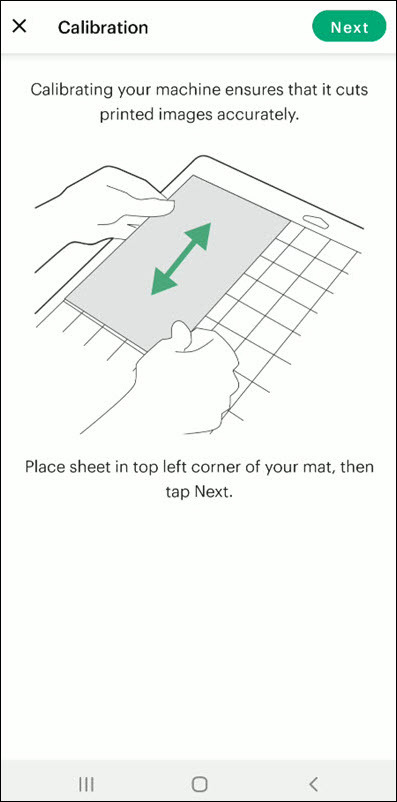
Now, you should place the printed calibration sheet on the mat, position it perfectly, and select the Continue option.
For the next step, ensure that your machine is ON and connected to your computer using USB or Bluetooth. Select the machine from the drop-down menu, insert the cutting mat into your crafting machine, and click Go.
Furthermore, the device will start scanning the markings for the calibration.
After the cutting is complete, check if the cut-makings are touched without unloading the mat from the machine. (If the markings are touched, then choose the Yes option in the app and select Continue to move to the next step.)
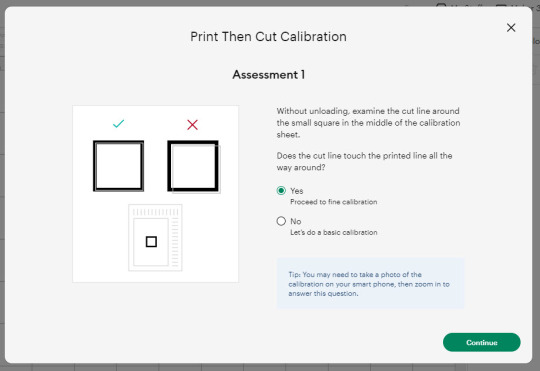
Note: If you choose the No option, then the machine will perform a cut for the next time for the accurate cut.
Also, the machine will start the calibration cut at the top and side of the page.
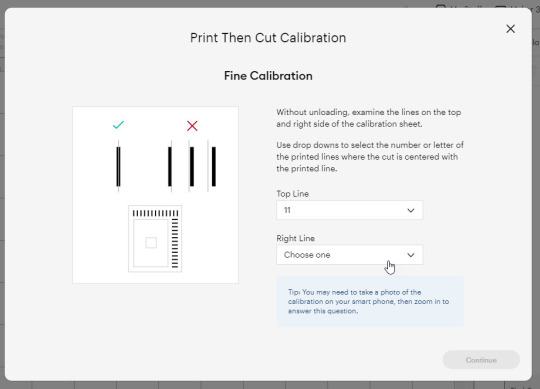
Now, check if the markings are correct without unloading the mat from the device. (The cut should be on or before line 1 and on or before line 21.)
If your cut meets all the conditions, choose the line closest to the center of the printed lines, the same as the following image; when you are done, select the Continue option.
In the next step, the Cricut Explore Air 2 machine will perform a confirmation cut around the large sheet. When this step is complete, unload the mat from the machine and remove the calibration sheet; now, you need to answer the final question on the app.
You need to choose Yes, cut is close enough to the center if you are happy with the cut. (Select no and follow the further process if you are not happy with the cut.)
Cricut Explore Air 2 Calibration On iOS/Android
The follow-up method will allow you to Calibrate your Explore Air 2 machine without any hassle. So, let’s begin the process.
Step 1: Connecting the Printer to Your Machine
Start by signing into your Cricut account on the app and selecting the menu option from the upper right corner.
After that, tap on Settings and then select Print Then Cut Settings.
Also, tap on the Calibration.
Next, you have to choose the Send to Printer, or I have a calibration sheet option.
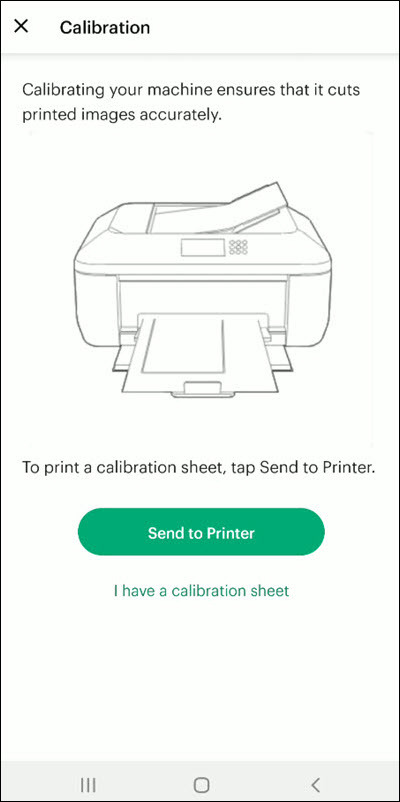
Now, the preview of the calibration sheet will appear on the screen (it can be a little different depending on the device you are using.)
Afterward, tap “Select a printer” and select the printer device you are using. Then, choose Next.
Step 2: Perform Sheet Calibration Process
After that, take the printed calibration sheet, place it onto the machine mat perfectly, and select Next.
Specify the appropriate material setting for your machine.
Then, after loading the mat into the machine, press the Go button on it.
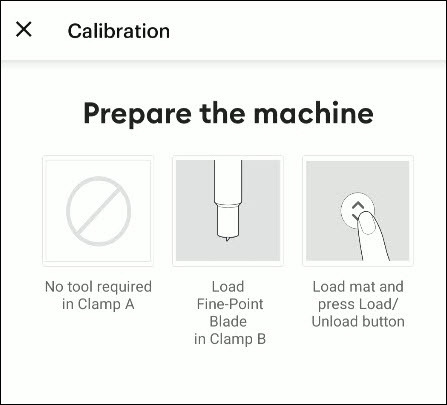
Also, the machine will look for the marking for the calibration and then start the cutting process near the small square.
Afterward, without unloading the mat from the machine, check for the cut to ensure the cut touches the marked lines all the way around. (If the lines touch the cut, then tap Yes in the app, then select Next to proceed with the next step.)
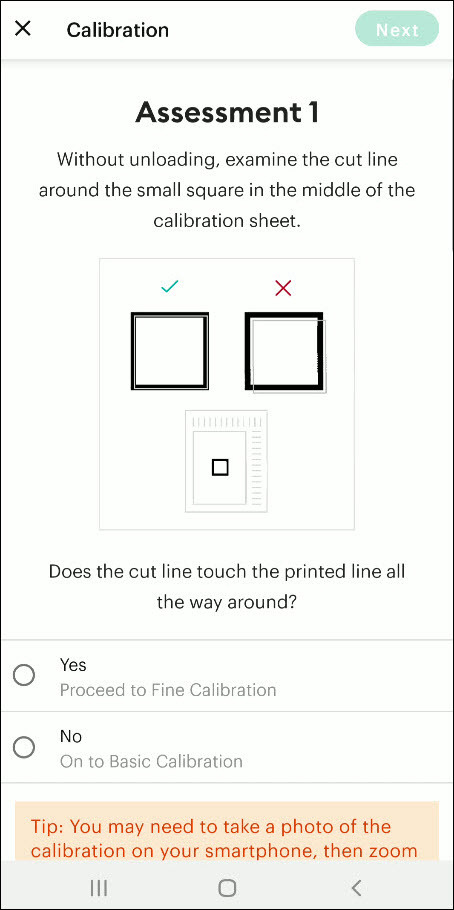
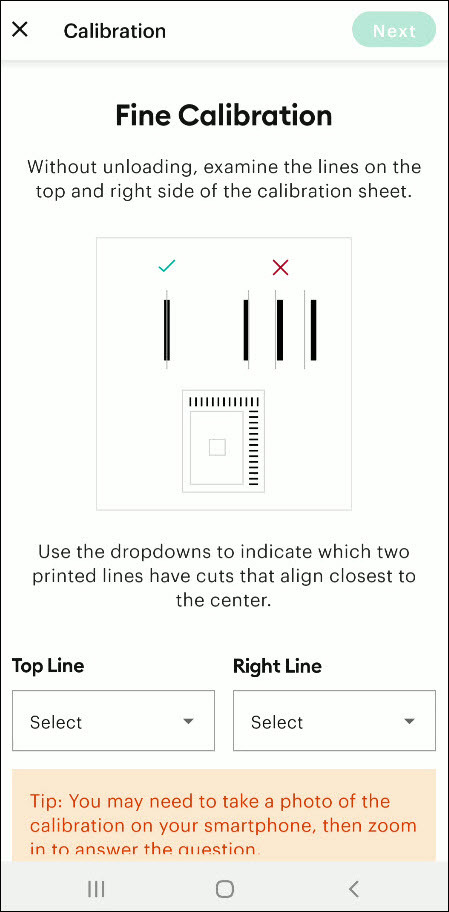
However, if you select the No option, then the machine will try to cut close to the top and sides of the page. (Once done, look closely without unloading the mat; there should be a cut before line 1 and on or after line 21.)
If the cut meets these lines, you need to specify which cut is closest to the center of the printed lines and the right side of the calibration sheet.
Once you are done, select Next to move forward.
After that, keep following the instructions on the screen to complete the procedure.
Once the process is complete, you can start cutting materials on your machine.
Final Words
Cricut Explore Air 2 calibration is the best way to get the pin-point cuts. These methods will help you to perform the calibration process on computer and smartphone devices. With these methods, you cannot only calibrate your Explore Air 2 but also any other cutting machine of the brand. Furthermore, if you have any doubts regarding the procedure or have any issues, then it would be good to ask for more assistance and guidance.
Frequently Asked Questions
Why Is My Cricut Explore 2 Not Cutting Properly?
Cricut Explore machines are known for their flawless and fast-cutting results. Sometimes, it is due to the material you are trying to cut on your device. Also, in some cases, the machine faces technical issues. To get your machine out of this problem and start cutting properly, you can use the calibration procedure. The process to calibrate your machine is simple.
Why Should I Calibrate My Cricut Machine?
However, the cuts can sometimes be misaligned due to various reasons. Crafters can calibrate their devices to get the blades and cuts aligned to their initial position. After the calibration, the machine starts to provide flawless cuts once again. However, the calibration process is a little complex and differs from device to device. So, you must know the whole process before performing it.
What Is the Thickest Setting on Cricut Explore Air 2?
We all know that Cricut cutting machines are known for their fast and flawless cuts, even for intricate designs. Thus, the Cricut Explore machine can cut a wide range of materials of a certain thickness. If you want to cut the wood, metal, leather, etc., then your machine can cut up to 2mm. However, different materials need to use specific blades to get the desired results.
Source: How to Calibrate Cricut Explore Air 2
#how to calibrate cricut explore air 2#cricut design space app#cricut design space download#cricut design space software#cricut machine setup#cricut explore air 2 setup
2 notes
·
View notes
Text
How to Connect Cricut Joy to Computer? (Full Guide)
Wants to Learn ‘how to connect Cricut machine and you want to connect it to a computer‘? You can do it effortlessly with the help of this article. This machine is more compact than other Cricut cutting machines. With a sleek appearance and amazing results, Cricut Joy is the choice for many crafters. As a Cricut user and a professional crafter, I’m here to guide you with it. Let’s learn how to connect Cricut Joy to computer.
When it comes to connecting Cricut Joy to a computer, this machine doesn’t support a USB connection. Therefore, you have only one option for connection – Bluetooth. So, I’ll tell you about the Bluetooth connection on your Windows and Mac computers. Let’s get ready with the process.
Minimum System Requirements for Cricut Joy
Before you connect a machine to your computer, check whether your computer and machine are compatible. Why does this matter? You might know that Cricut runs a software called Design Space. This software has some minimum system requirements for a device that is added to it. So, let’s check out those requirements.
For Windows
For a Windows system, Design Space needs Windows 10 or 11 or the latest versions with an AMD processor or an equivalent one. It should also have a minimum of 2GB RAM, good free storage, and compatibility with Firefox, Microsoft Edge, and Google Chrome.
For Mac
For a Mac computer, Cricut Design Space needs a 14.x or newer operating system. Also, an Intel or equivalent processor. It should also have 2GB RAM and 300 MB storage. When you know the most important requirements, let’s dive into the steps involved in connecting your machine to a computer.
How to Connect Cricut Joy to Computer (Windows and Mac)
To connect your machine to your computer, you need to follow the steps given below. Here, you’ll see the steps for Windows and Mac computers.
For Windows
To connect your machine to a Windows computer, check out the given steps. As you already know, Cricut Joy doesn’t support USB, so we’ll stick to the Bluetooth connection.
To start, unpack your machine and collect all the accessories from the machine’s box.
Then, install your machine at least 10-15 feet away from the computer.
Now, connect the machine to a power source and turn it on.
After that, go to the Start menu and hit the Settings option.
Next, you should click on the Devices option.
In the next step, ensure that Bluetooth is ON.
Moving forward, hit the “Add Bluetooth or other device” option.
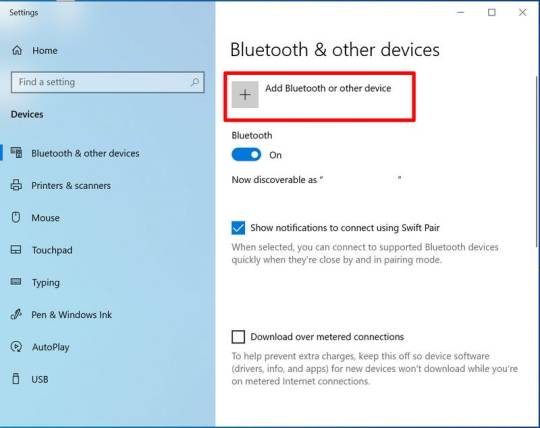
Also, tap on the Bluetooth and let the computer search for your machine model.
When the machine appears on the screen, select it and let it connect.
Lastly, your devices are paired with Bluetooth connection.
That’s how to connect Cricut Joy to computer. When you know everything, it’s time to try the connection for your devices.
For Mac
If you’re a Mactonish, below are the steps for connecting your crafting machine to your Mac.
To get started, connect your Mac to a power cord.
Then, install your machine on a flat surface and keep it at least 10-15 feet away from your Mac.
Now, go to your Apple menu and select System Preferences.
After that, locate the Bluetooth option on the Mac.
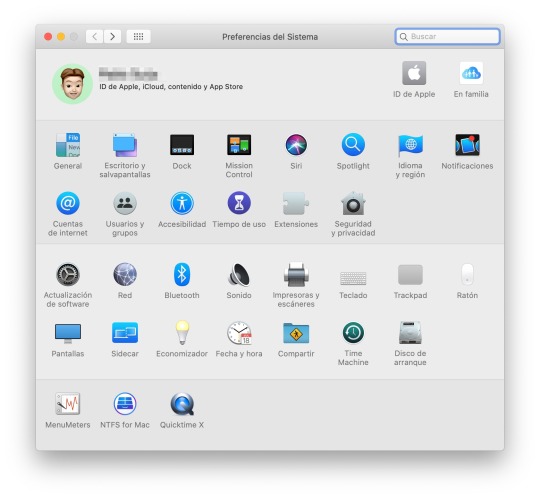
Also, check whether Bluetooth is ON.
In the next step, choose your machine from the list of available devices.
Finally, your machine is paired with your Mac.
That’s how to connect your machine to a Mac computer. Finally, you can start creating projects with your brand-new machine. Now, let’s take a look at the steps for a Mac computer.
Conclusion
Finally, you know how to connect Cricut Joy to computer. Start creating your DIY projects quickly. This machine is excellent for beginners and for DIY pros. The only thing you need to care about is the minimum system requirements for the Design Space software. Besides that, this tiny tool is travel-friendly and works well for you. The crafting machine can become your companion when you need it.
FAQs
How to Download Cricut Design Space on Computer?
To get the Design Space software on a computer, follow these steps:
To start, launch a browser and navigate to https://cricut.com/setup.
Then, accept the Terms of Use and its Privacy Policy.
Now, hit the Download button on the screen.
After that, let the file download under the Downloads folder.
Next, visit the Downloads folder and find the app file.
Double-click on the folder to open it.
In the next step, run the installation and continue with the on-screen directions.
Finally, sign in to your account.
Can I Connect My Cricut Joy to Computer via USB?
No, you can’t use a USB to connect your machine to your computer. It doesn’t support USB. However, you can use a Bluetooth connection to set up a connection between your machine and your computer.
How to Connect Cricut Joy to Windows 11?
You can connect a machine to Windows 11 via a Bluetooth connection. Go to your laptop and search for Bluetooth and other devices. Then, turn on the Bluetooth option. Now, let your laptop locate your machine. Then, choose your machine’s name from the list of devices and let the pairing happen.
Source: How to Connect Cricut Joy to Computer
#how to connect Cricut Joy to computer#cricut design space download#cricut design space app#cricut design space software#cricut joy setup
2 notes
·
View notes
Text
I put on the Miku expo on YouTube bc I like putting on the vocaloid/Hololive/etc concerts in the background while I draw and stuff and WOW they were not lying, even filmed from an optimal viewing angle this looks embarrassing and there’s not even an attempt to use the lighting to help make the illusion as a matter of fact every time the lights go up it looks way worse. It’s only like a quarter of the stage too.
Hatsune Miku looked better live a decade ago :|
if I paid hundreds of bucks to see real life Miku and I got what’s effectively a high production movie showing I’d be soo pissed
#miku expo 2024#yiiiikes man#and like I’m no lighting designer but I can think of several things that would make this setup look way more acceptable#namely DONT PUT LIGHTS /BEHIND/ THE STUPID TV SCREEN MAKING IT SUPER OBVIOUS THAT ITS A TV SCREEN??#WHY aren’t those laser lights on the stage also on the screen? that would at least make it stick out less from an ideal angle#it’s literally just. a black rectangle in the middle of the stage. it looks so tiny from far away#it’s probably only 20-30 ft#they can barely travel on the stage!!!#if you’re a performer you’ll know it’s super important for solos/small groups on a big stage to move around and fill the space or its weird#embarrassing. smh.
8 notes
·
View notes
Text
Cricut Not Connecting to Bluetooth: 5 Effective Solutions

All Cricut machines have Bluetooth connectivity to connect to all types of computers and smartphones. Sometimes, you may face the error message “Cricut not connecting to Bluetooth. “There can be various reasons for this issue, such as compatibility, restrictions, distance between your devices, configuration, and more.
Many factors can cause connectivity problems. To know all the solutions, explore this write-up and find the best method to eliminate this wireless connection error.
Solution 1: Unpair and Restart Your Device
You may face this issue if your machine is far from your device. In this case, you’re going to follow the steps to resolve your connectivity issue:
Firstly, unpair the machine from all devices.
Then, unplug the machine from the main power.
After that, restart your computer or mobile phone.
Next, plug in back your machine and power it on.
Ensure your machine is within 15 feet of your device for Bluetooth connectivity.
Also, confirm that Wi-Fi and Bluetooth are enabled on your device.
Make sure your device has the latest version of the Design Space app.
Click on the Add Bluetooth or other device option.
Now, select the Bluetooth option and wait for the computer to scan your machine.
You click on your machine from the result and pair your machine.
Solution 2: Check for a Firewall or Antivirus Software
The Windows Firewall on your system or antivirus on your phone can stop the machine. Follow the steps below to solve the Cricut not connecting to Bluetooth issue:
To begin, go to the search bar and type Windows Firewall on the search field.
After that, you must agree to give permission to the app through the Windows firewall.
Then, go to the Windows Firewall settings and select the option to Change Settings.
Next, you have to move to the list and click the Design Space software checkbox.
After that, select both the private and public options.
If the option for the app registered does not show, choose to Allow another app option.
Hence, move to the installation folder of your Cricut software.
Solution 3: Remove the Other Device
If your device is already connected with the other device, it can face issues while connecting. Therefore, you need to remove the other device by following the below steps:
Start by pressing the Start menu and choose the Settings option.
Next, open the Devices window by selecting its option.
After that, choose the device you want to remove from your computer and hit the Remove Device option.
Then, confirm the action by choosing the right option.
Finally, you can pair your machine to see if the issue of Cricut not connecting to Bluetooth has been resolved.
Solution 4: Update the Software
The issue can arise even when the machine’s software is outdated. Here are the steps to update your machine’s software:
Start by pressing the Windows and X buttons together on the keyboard.
When a list of options appears on your screen, click the Device Manager option.
In the device manager screen, select the option of the machine and right-click on it.
After that, choose the Update Driver Software option.
Once your driver is updated, try to complete the Bluetooth pairing process.
Solution 5: Check for Device Compatibility
Check the system requirements on the Cricut official website (Cricut.com/setup) to verify your device’s compatibility.
Android: The app is compatible with Android 10.0 or the latest version but only on mobile devices and tablets. It is not supported on Chromebooks. Some qualified devices include Samsung Galaxy, Google Pixel, LG, G, K or V series, Motorola Droid, and One Plus.
iOS: The app is compatible with iOS or later on iPhones, iPads, and iPods.
Windows or Mac: The software can be used on Windows or Mac computers.
First, click the Design Space icon on your desktop.
Then, go to the Start menu, open the file location, and right-click.
Now, open the “Properties” section. In the Properties window, select the Compatibility tab.
Final Thoughts
In conclusion, this issue of Cricut not connecting to Bluetooth can be fixed with this troubleshooting guide. There can be various reasons, such as if your machine has connection issues, is far away, or has outdated software.
Remember to stay patient while resolving these issues. With persistence, you can overcome these problems, enjoy wireless connectivity, and work seamlessly with your machine.
FAQs
How do I connect Cricut machine to my Mac?
To connect a machine to a Mac, you can use Bluetooth or a USB cable; here, if you want to connect with Bluetooth, then follow the steps:
Turn on the machine and make sure it is within the range of 10-15 feet of the computer.
After that, go to System Preferences and choose the Bluetooth option.
Now, check if the Bluetooth is on and choose your machine from the list.
Next, follow the prompt to complete the pairing process.
Why is my Cricut machine not connecting to Bluetooth?
If your crafting machine is not connecting to Bluetooth, there are many reasons like:
Make sure your machine is within 15 feet of your device.
Check the power and whether it is turned on or not.
And check if the Bluetooth device is turned on.
Make sure your device’s Wi-Fi is turned on.
Update your Design Space to the latest version.
Make sure your system has all the minimum system requirements for running the Design Space app.
Unpair your machine from all devices, restart your device, plug it back into the machine, and then re-pair it.
How do I reset my Cricut machine using Bluetooth?
The steps to reset the machine using Bluetooth are as follows:
First, unpair the machine from all devices.
Then, unplug the machine from the power.
Now, restart your computer or mobile device.
Next, plug the machine back in and turn it on.
After that, move the machine within 15 feet of your computer or mobile device.
Make sure your computer or mobile device’s Wi-Fi and Bluetooth are on.
Lastly, update the Design Space app to the latest version.
For more information visit: how to setup cricut maker cricut new machine setup
Source: Cricut Not Connecting to Bluetooth
#cricut not connecting to bluetooth#Cricut Design Space app#Cricut Design Space software#cricut new machine setup#cricut.com/setup
2 notes
·
View notes
Text
How to Use Cricut Infusible Ink for Smooth & Vibrant Projects

Do you love crafting shirts and other fabric materials? Then, you can learn how to use Cricut infusible ink. Cricut has released a new material called infusible ink that bonds with fabric, unlike iron-on vinyl that sits on top.
Infusible ink is a transfer process where the colors from a transfer sheet are directly applied to the blank surface. Unlike heat-transfer vinyl, the ink does not sit on top of the surface. It is directly applied to and absorbed by the fibers. Read the blog to explore everything about infusible ink.
What Is Cricut Infusible Ink?
Infusible ink is a special kind of material that is super easy to use. However, the important thing you need to remember is the supplies needed to make these projects. You can make t-shirts and tote bags that are safe for machine washing, drying, ironing, and steaming. Wash them with mild detergent and cold water to preserve the design.
How to Use Cricut Infusible Ink: 5 Easy Steps
Here are the steps to begin your project. First, let’s list the materials you will need.
Step 1: Supplies and Tools Needed
Before you learn how to use Cricut infusible ink, you will need some art supplies and materials to start your project. Check the list of materials below and gather them.
You can choose a Cricut Maker, Explore Air 2, Explore 3, and Joy.
Cricut EasyPress 2
EasyPress mat
Infusible ink transfer
Lint roller
Butcher paper
Cardstock
SVG text
Design Space
After gathering all the materials, you need to start creating your project. Let’s get started with the step-by-step instructions:
Step 1: Create a Design for Your Project
First, open the Design Space and click on New Project. Once the file is open, upload the SVG text file, select all the letters, hit the Weld option, and weld them together. Then, size it and place it on the background design. Select both layers, slice them, and delete the unneeded pieces. Make sure to mirror your design. You are ready to send it to your machine for cutting.
Important Note: You need to mirror your design before you send it to the cutting machine.
Step 2: Load the Sheet on Mat
Place the infusible ink transfer sheet on the StandardGrip mat with the liner side down. Under the materials section, go to Browse All Materials and search for the infusible ink transfer sheet from the list of materials. To cut with the machine, you need to load the mat and blade into a machine and hit the Go button.
Step 3: Weed Out the Design
After cutting the design, flip the mat over and remove the extra part with the weeding tool. To separate the cutout design, roll it, use your fingers or tweezers to remove the negative pieces around it, and leave the design. Cut the clear liner so it does not extend beyond the edge of your heat press heat plate.
Step 4: Prep the Tote Bag
Once you place a blank on top of the EasyPress mat, position the sheet of cardstock inside the blank to protect your mat and project. Before applying your design to the tote bag, use a lint roller to remove lint and debris from the entire surface. Cover the blank with butcher paper, which must be larger than the heat plate. Preheat the tote bag to remove any moisture and wrinkles that cause unwanted effects.
Step 5: Apply the Infusible Ink
Place the cut design on the material and use the heat press to transfer it. Then, put the design on a tote bag and apply pressure with the machine to transfer it to the material. Finally, allow the tote bag to cool completely before removing the transfer paper.
Tips to Know Before Starting Your Project
Now, you know the process of using infusible ink, but there are some tips you should remember while working with infusible ink.
When you handle an infusible ink material, make sure that your hands are dry and free of oil; otherwise, it will stick to the sheet.
If you are preparing your base material for the design application, it is recommended that you set up your press machine with the right temperature and pressure.
Do not reuse butcher paper for multiple projects. This is because it protects your design from transferring to another blank material.
Summary
This blog covers everything you need to know about infusible ink and how to use Cricut infusible ink. This material allows you to easily create a permanent and seamless design that becomes part of the fabric, and you can craft many projects with it.
You can use ink on various materials, including apparel, bags, pillows, covers, hats, and ceramics. Follow the above guide, and you can simply start crafting with Infusible ink.
FAQs
Which Is Better Infusible Ink or Iron-on Vinyl?
Infusible ink is often preferred over iron-on vinyl for its seamless, permanent designs. It can create a more permanent and vibrant result, especially light-colored materials. Iron-on material is better suited for dark fabrics or when you need more texture and layers for different materials stacked on top of each other.
How Long Does Cricut Ink Sheet Last?
The infusible ink is supposed to last a lifetime. The heat press machine permanently transfers the ink to the blank material and does not flake, peel off, or wrinkle. However, the ink has a shelf life, so using it within the time limit is important. If you want it to last a lifetime, you can protect it from moisture by using the carrier sheet and washing the material with a mild detergent.
Can I Use Infusible Ink Sheets on Regular Paper?
No, you should not use Infusible Ink sheets on regular paper. If you want to use paper with Infusibe ink, you need to use laser copy paper, which is designed to withstand high heat and has a special coating to prevent it from transferring to another part of the project. The ink is designed in such a way that it can absorb the heat, and the design will get transferred to the material.
Visit: Cricut.com/setup Cricut setup www.cricut/setup
Source: how to use cricut infusible ink
#how to use cricut infusible ink#cricut design space download#cricut design space app#cricut design space software#Cricut setup
1 note
·
View note
Text
emilie is sooo flower based omg. she was made for me
#personal stuff#delete later#she is going to be vital to my teyvat flora document i can tell < remembering tighnari literally tells us nothing abt plants#a little sad no mondstadt characters in the new event but it's whatever. other characters need their time in the spotlight i GUESS#i actually do love nilou's new outfit. she looks so cute. love her wreath.#and KIRARA!!!!! SHE LOOKS ADORABLE. I LOVE HER HAT#also the train in this event..... this is setup for natlan natlan is going to have to do with space and going to other worlds TRUST#the little paper creatures... also the witch statue. we ARE getting more hexenzirkel lore!!#i love emilie actually she's so cute.#helps that the natlan characters kinda look like ass.#OOH. THE NEW COSMETICS THING IN THE IMAGINARIUM THEATER.... HELLOOO#no spices from the west :((#okay natlan teaser. the designs are. hm.#they're about what i expected. i wasn't really expecting hyv to make any really Good designs for natlan like. we all saw sumeru#they do look like pokemon trainers. tbh.#the blue girlie even has the same ''white person who has gone outside'' skin tone they gave to that one lady#a little upset because i KNOW after we get that blue themed girl we're not going to get a furina surfing outfit <///3#also hyv adding australia into the mix of cultural inspiration uugh. can they shut the fuck up oh my god#like yeah sure fine just use the entire fucking southern hemisphere who cares. i guess. no one will be able to tell the difference
4 notes
·
View notes
Text
i think i am starting to feel a little better for some very specific reasons that don't actually have a lot to do with setting up my craft room, but setting up my craft room is super exciting, because i am going to finally get to start binding fanfiction, and i've wanted to do that for the entire year.
#musings#i have not had the time or space to craft and i think having a Designated Space#with Designated Projects#would do a lot for my brain :)#esp since the setup i have now is this tiny little desk that is fun to write on but NOT to draw on...
9 notes
·
View notes
Text
I could spend a couple hundred bucks on a fancy grow light setup or I could spend about $30 for a basic stand and lamp from the pet store
#is it the same?#not exactly#but I can choose whichever cheap bulb I want and adapt my setup as needed#the plants get light#what more do they need?#(warmth obviously but in the reptile room with the space heater running a couple of hours a day they're golden)#it's not like I plan to have more than two seed trays#and THEN I'll get one of those continuous mist bottles that's designed for haircare#and use that to mist the plants a couple of times a day to supplement watering#(the actual issue is me remembering to water them)#(that's my downfall)#I have my seed shopping list finalized and ready to go#I already have trays#at most the only other thing I may need is a little bit of soil to start them in#why am I thinking about this instead of--I dunno--how to get through a winter with forecasted heavy snow?#your guess is as a good as mine#if I'm successful this year with starting strong seedlings I will pass out the extras#but I haven't been successful thusfar#mine#gardening
7 notes
·
View notes
Text
Cricut Design Space Download for Windows, Mac, Android, & iOS
Cricut Design Space is a companion app that is necessary for Cricut crafters. It allows crafters to set up their crafting machine, operate it, and make beautiful designs. The app provides a wide library of free resources to create beautiful designs from scratch. The app works on various OS devices and is easy to download. If you want to get started with Cricut crafting and want to download the app, then read the comprehensive guide to complete the download on Windows, Mac, iOS, and Android devices.
Cricut Design Space Download on a Computer
You can download the Cricut app on your Windows or Mac device and start using it right away. These are the well-tailored methods to download the app easily.
Windows
Mac
Cricut Design Space Download on a Smartphone
If you use an Android or Apple device, then you can follow the methods below to install the app and get started with your crafting work.
iOS
Android
Frequently Asked Questions
Why can't I complete Cricut Design Space download?
Check the Cricut app system requirements before you proceed with the download. If your PC or smartphone does not fulfill the requirements, then you can face issues with the download. You also need to check your device's internet connection to confirm everything is working properly. If nothing helps, then it would be wise to get additional help from customer service.
What are the system requirements for downloading Cricut app?
To download the app, your device must meet the following criteria:
How to download Cricut Design Space on a computer?
These are the steps you can follow to install the software on your device.
Visit: cricut.com/setup
Source: https://cricricutdesigncut.wordpress.com/2025/05/28/cricut-design-space-download-for-windows-mac-android-ios-2/
#design space setup#digital design#cricutcomsetup#cricutdesignspace#wwwcricutcomsetuplogin#cricutexploreair2setup#designcricutcomsetup#installcricutexploreair2#cricutsetup#cricutsetupforpc#cricutdesignspacesetup#designcricutcomdownload#cricutdesignspacedownload#cricutdesignspaceonline#cricutdesignspaceapp#cricutdesignspacedesktop#cricutaccountsubscription#cricutaccess#Cricutexploreair2setuppdf#cricutexploreair2download#howtousecricutexploreair2withphone#howtosetupcricutexploreair2oniphone#cricutexploreair2bluetooth#cricutcomsetupmac#cricutcomsetupforwindow#supportcricutcom#cricutnewmachinesetup#cricutaccountlogin#cricutdesignspacelogin#cricutsoftwareapp
0 notes
Text

The vibes are good here
#hitsupod#setup#art studio#interior design#wfh#remote work#plants#pokémon#gaming setup#gaming#streaming#design space
5 notes
·
View notes
Text
Cricut Iron On Vinyl Instructions: Quick & Easy Guide
If you’re new to the world of Cricut and want to upgrade your crafting with iron-on vinyl, then this quick and easy tutorial is for you. Cricut iron on vinyl is a thin, flexible pre-cut sheet or roll of vinyl with an adhesive backing that is activated after heat and pressure. You can create beautiful personalized T-shirts, makeup bags, pillowcases, wine bags, and more from iron-on vinyl.
In this guide, I am going to show you detailed Cricut iron-on vinyl instructions to help you explore other possibilities for the Cricut machine. Don’t worry; I have written this tutorial for beginners in mind — I will walk you through the entire process in depth from start to finish. Plus, I will discuss the essential supplies, how to make a design, how to cut iron on vinyl, and so much more. So, let’s get started.
Essential Tools and Materials for Designing a T-shirt
Gathering enough supplies is the most important instruction for making any Cricut iron-on vinyl project.
A Cricut cutting machine
Weeding tool
Cricut Easy Press
Everyday iron-on vinyl
Base material (T-shirt, tote bag, etc)
Cricut cutting mat
Heat Press mat
Cricut Design Space
Cricut Guide
Butcher paper
Step 1: Create or Upload a Design in the Cricut App
The first thing you need to keep in mind for any Cricut iron-on project is a digital design that allows you to cut iron on vinyl. You use the design and apply it to the desired surface.
First, download a design in SVG format from the internet and make sure it is compatible with Cricut Design Space.
Unzip the SVG file, open the Cricut app, and click on New Project.
Also, hit the Upload button on the left sidebar and upload the file to the canvas.
Next, drag and resize the design to fit the surface. I chose a shirt as the surface to demonstrate the Cricut iron on vinyl instructions.
When the design is ready for iron on vinyl, click the Make It option.
Step 2: Select Your Materials
Now is the right moment to choose the materials and configure the settings one by one in the Design Space.
On the prepare screen, toggle the “Mirror” option and press the Continue button.
Click Browse All Material on the next make-screen and search for iron on vinyl. Note: If you have Cricut Explore Air 2, turn the wheel to custom.
Step 3: Cut & Weed Out Iron On Vinyl
As soon as you select iron as the material, it’s time to cut out the design.
First, place the vinyl on the Cricut cutting mat and insert the mat into the machine.
You have to press the flashing Go button to start cutting your design on the vinyl.
Once the machine stops cutting, remove the mat and the negative parts from the design using the weeding tool.
Step 4: Preparation for Applying Heat
Once your design is ready, it is time to learn Cricut iron-on vinyl instructions and prepare everything to apply the heat.
Initially, visit the Cricut Heat Guide and get accurate timing & temperature info.
Set up the workspace, place the Easy Press mat on a clean surface, and preheat it.
Now, lay down the shirt on the heat press mat and preheat it for 5 seconds to remove the wrinkles.
Step 5: Place the Vinyl on Your Shirt
These are the final Cricut iron on vinyl instructions that need to be followed to complete the process.
First, center the vinyl design on the shirt you just cut out, and be sure to place the shiny vinyl side up.
Now, place butcher paper over the design and apply heat to the vinyl following the Cricut heat transfer guide. I use light pressure at 315F for 30 seconds.
Finally, leave the surface (shirt) until it cools, then peel off the plastic transfer sheet.
Frequently Asked Questions
Question 1: How do I use a Cricut iron on vinyl?
The following are brief step-by-step instructions for using the Cricut vinyl.
Create or upload a design in Cricut Design Space.
Select vinyl as the material and other cut settings.
Cut and weed out the design.
Place the heat press on your design.
Question 2: How long should you leave the Cricut iron on vinyl?
Once you apply heat to the Cricut iron on vinyl, it penetrates the surface, and the time and temperature depend entirely on the Cricut Heat Guide instructions. For better results, apply moderate pressure with the iron for 25 to 30 seconds. As for how long to leave the iron on vinyl, the answer is simple: until the surface has cooled.
Question 3: What materials should you avoid while using Cricut iron on vinyl?
Before deciding how to use Cricut iron on vinyl, it is important to know its compatibility with various materials. Iron on vinyl is suitable for use on cotton, polyester, blends, and burlap canvas. But, it is not compatible with fabrics like nylon and spandex. Therefore, refrain from using iron on vinyl on such fabric surfaces.
Final Words
Crafting with a Cricut machine is both adventurous and challenging, offering many opportunities. One such difficult task is cutting and applying heat iron on vinyl with Cricut to create popular DIY projects like T-shirts, tote bags, cards, banners, keychains, and makeup bags. If you are here, you’ve already navigated through the step-by-step Cricut iron-on vinyl instructions necessary to achieve the desired output.
Source: Cricut iron on vinyl
Cricut iron on vinyl instructions
Visit here for more Information: Cricut.com/setup
Cricut explore 3
#Cricut iron on vinyl#Cricut iron on vinyl instructions#cricut.com/setup#cricut explore 3#design space cricut#cricut maker 3 vs explore 3#2024
2 notes
·
View notes
Text
Why Is My Cricut Not Connecting? (Quick Fixes)
Cricut machines are one of the most useful tools for crafters, which makes it easy for them to create complex designs and projects. However, users may become extremely frustrated as a result of connectivity problems. It is important to comprehend the causes of these issues. This will enable you to troubleshoot them more successfully. This blog will look into the query, “Why is my Cricut not connecting?” alongside the typical causes of connectivity problems for your machine.
Method 1: Check the Connection of Devices
Cricut machines can connect either via a��USB cable or with the help of Bluetooth. Knowing how each connection type works is essential for troubleshooting connectivity issues.
USB Connection

The USB that you are using must be in good condition; otherwise, you will have trouble connecting it to your machine. Plus, you must ensure the wire is correctly plugged into your computer and the machine. A malfunctioning cable or port could be the cause of the connection loss. An alternative USB cable or port might help fix the problem.
Bluetooth Connection
With the Bluetooth option, you can have a wireless connection to your machine. Just ensure that you turn on Bluetooth on your device. If your machine’s name does not appear in the list of available devices, then you should try the following steps:
Restart your devices: Sometimes, a simple restart of your device can resolve the issue. So, start with that.
Forget the device: If that does not work, you can try forgetting the device. To do this on your computer or mobile device, go to Bluetooth settings, find your machine model, and select “Forget.” After that, try to reconnect again.
These steps often answer the question, Why is my Cricut not connecting?
Method 2: Update Design Space or Operating System
Another main factor in connectivity issues is software compatibility. You need to make sure that both the app and the device’s operating system are up to date. Older software often leads to connectivity problems.
Updating Design Space
To check whether the app is updated or not, follow the below steps:
On Windows
You need to open the app and then need to click on the three horizontal lines in the top left corner. Once there, go on to select “Check for updates” and click OK. Your app will be updated if you have some older versions.
On Mac
If you have a Mac, open the app and click on “Design Space” from the menu bar. Afterward, select the “Check for updates” option. If updates are available, go ahead and install them. Once installed, you must restart the application. This way, you can resolve the issue related to why is my Cricut not connecting.
Method 3: Diagnosing the Network Settings
Network settings can mainly impact wireless connectivity. You must ensure that your antivirus software does not block the firewall settings for the Cricut Design Space app. If found positive, you might need to adjust your firewall settings so that the app can communicate through the network.
Method 4: Check the Firewall Settings
Sometimes, you need to configure the firewall settings properly so that the machine can connect properly. In order to do that, follow the below steps for Windows and Mac.
Windows
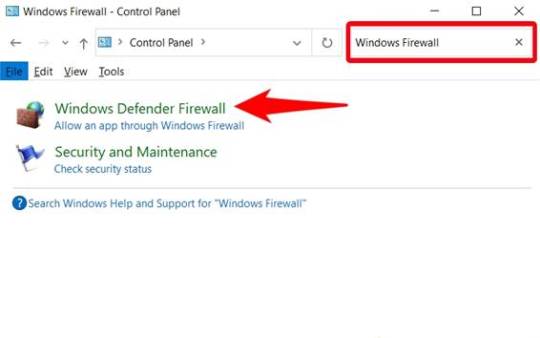
First, you need to go to the Control Panel, then to System and Security, and from there you must open Windows Defender Firewall. Once you reach there, check for the option “Allow an app through Windows Defender Firewall.” Click on it and ensure the app is allowed.
Mac
On Mac, go to System Preferences, then Security & Privacy, and then Firewall. Once there, select the Firewall option and ensure that the Design Space software is allowed. Adjusting these settings can help answer why is my Cricut not connecting.
Method 5: Ensure Your Device Is Compatible
You will have to make sure that your computer or mobile device meets these minimum system requirements for using Design Space. If your operating system has insufficient RAM or processing power, you might have difficulty connecting or might not connect altogether.
Method 6: Checking System Requirements
The minimum system specs for the application include:
Windows: Windows 10 or later, and at least 4 GB RAM or more.
Mac: macOS 10.12 or later, and at least 4 GB RAM or more.
Mobile: iOS 12 or later or Android 5.0 or later.
If your device does not fulfill these requirements, you should consider upgrading your hardware or changing the device that connects your machine.
Troubleshooting Steps
If you still face trouble with the connectivity, then follow these quick and simple steps:
Restart your machine: Turn off your machine and wait a few seconds. Then, turn it on again. This will surely solve the issue.
Reset Bluetooth settings: If you are using Bluetooth, reset your device’s Bluetooth settings and try to reconnect. It should fix the problem.
Reinstall Design Space: Uninstall the app and reinstall it. Reinstalling will ensure a fresh start, and hopefully, you will be able to reconnect again.
Conclusion
In short, connectivity issues with your Cricut machine can arise from various factors, including connection type, software compatibility, network settings, and device compatibility. Following the tips and suggestions mentioned above, one can address the question, “Why is my Cricut not connecting?”
Just remember to check your connections, and ensure that the software is updated, also make sure your device meets the necessary requirements. With these methods, one can enjoy a seamless crafting experience with their machine.
FAQs
1. What should I do if my Cricut machine doesn’t turn on?
Ensure that your power cord is securely connected to both the machine and the electric outlet. If using a power strip, try plugging directly into a wall outlet. You should also check the power cord for any visible damage.
2. How can I improve Bluetooth connectivity with my Cricut?
Make sure that your machine is within range of your device and that Bluetooth is enabled. Restart both devices and try forgetting the machine in the Bluetooth settings before reconnecting.
3. What are the minimum system requirements for Cricut Design Space?
For Windows, you need Windows 10 or later with at least 4 GB RAM. For Mac, macOS 10.12 or later with 4 GB RAM is required. Mobile devices should run iOS 12 or Android 5.0 or later.
4. How do I check for updates in Cricut Design Space?
On Windows, open the app and click the three horizontal lines in the top left corner to select “Check for Updates.” On Mac, click “Design Space” in the menu bar and select “Check for Updates.“
5. What should I do if my Cricut App is crashing?
Try reinstalling the app to ensure a fresh start. Also, check for software updates and clear your device’s cache to improve performance.
Source: Why Is My Cricut Not Connecting
#why is my cricut not connecting#cricut design space#cricut design space app#cricut design space software#cricut design space download#cricut machine setup
4 notes
·
View notes
Text
#Adjustable Height Desks#Collaborative Desk Options#Compact Office Setup#Contemporary Office Desks#Corporate Desk Standards#Creative Office Desk#Desk Organization Systems#Desk Privacy Solutions#Desk Space Optimization#Eco-Friendly Desk Setup#Ergonomic Workstation Design#Health-Focused Desk Setup#Home Office Solutions#Individual Workstation Ideas
1 note
·
View note
Text
Do you take your crafts seriously? Cricut is a perfect machine that allows you to craft with your heart. So, use the machine and employ all your crafting skills to end up with a wide range of personalized and professional handmade items. Also, download and install the Design Space software to add more creativity to your project. Go to cricut.com/setup and get the software right away. Once you make a unique and attractive project, give it a professional touch and take your crafting skills to a commercial level. Cricut Design Space Login You can utilize online platforms to sell them and make some extra bucks while staying in the comfort of your home.
#Cricut Design Space#cricut design space login#cricut design space download#cricut design space for mac#cricut design space app#cricut design space setup#cricut software#cricut.com setup windows#cricut.com/setup windows#cricut.com/setup#cricut.com sign in#cricut.com/create#cricut.com design space#design cricut.com download
2 notes
·
View notes