#dangoproject
Explore tagged Tumblr posts
Visit Tumblr Blog
Explore Tumblr blogs with no restrictions, modern design and the best experience.
Last Seen Tumblr Blogs


Fun Fact
1,644 Tumblr posts in 1 second.
Text

Dango Project: COMPLETE
This journey was absolutely phenomenal. Building a fursuit from start to finish is something that an artist should definitely experience at least once in their lives. To build this beautiful thing you poured your soul into and strut around where people can see your hard work.
Dango debuted at Confuzzled 2024, and it was an absolute blast!


Thank you to all my amazing friends who cheered me on during the ups and downs of making this big ole lad, and the people who were with me to give me the confidence to have some fun during the event.
You're all wonderful.


Suits in the pictures:
Bagworm (fish) : @eelcakes
Nira (dragon) : @boesesglurak
Ray (cat) : @blossom-beast
Red (hyena) : @bloodiehyena
#dangoproject#fursuit#fursuit maker#pangolin furry#furry#myart#confuzzled#cfz#confuzzled 2024#max friend#blossom-beast#eelfriend#bloodiehyena#fursuiting
34 notes
·
View notes
Text

Building Dango: Part 14
At last!!
Sewed the green-blue fur blend onto the neck, and put the liner in as well and ooooh goodness it looks so dang good pinned together. Wowowowow. Incredible.
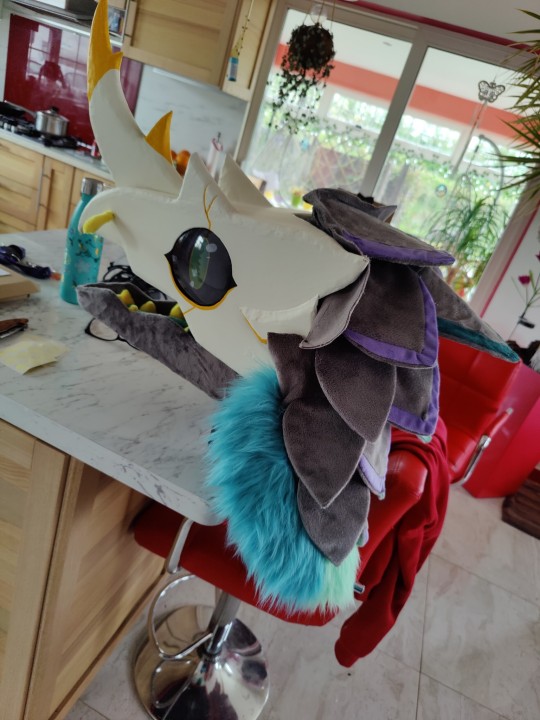

For the neck lining i. Well i ran out of the liner fabric lol. So I got this new liner that is 4 way stretch purple glitter lycra that Im also going to use for the lining of paws. Its so nice to the touch...

Next up, the paws!!
I got this 2 way stretch red vinyl. And Ive had it for quite a bit since I ordered it a couple months early in case it took a really long time to ship from Poland. And it was shoved in my fabric box for a couple weeks, constantly skrunked and unskruned until the skrunk was too much and there were CREASES.
Since this is vinyl/pvc that also stretches, I was EXTREMELY hesitant to iron it in case it melts. Even if the back is woven, its still a gamble. So after reading for advice online I came to the age ole trick: have a hot fucking shower and let the steam uncrease it.
So off it went into the bathroom with me- I needed a scrub anyway LOL
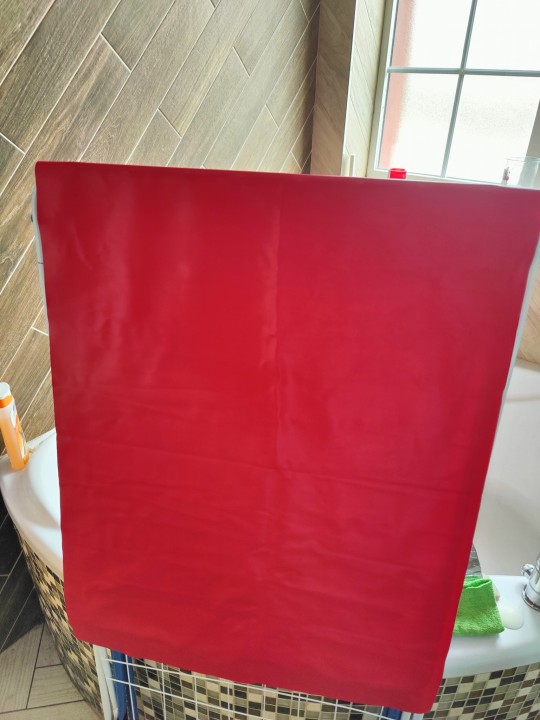
And honestly!! It did work! I left it hanging for a good few hours and it became mostly crease free where I needed it to be :)
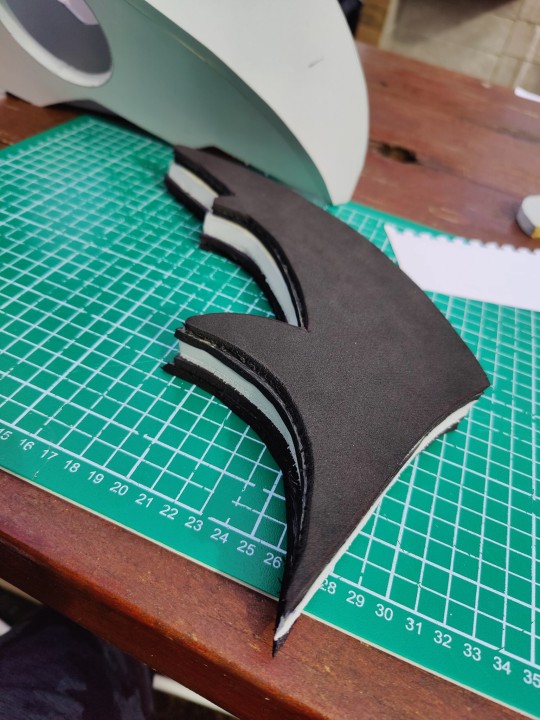
This fabric is going to be our claws. Machine sewed. After making so many beetle plushies this was child's play at this point.
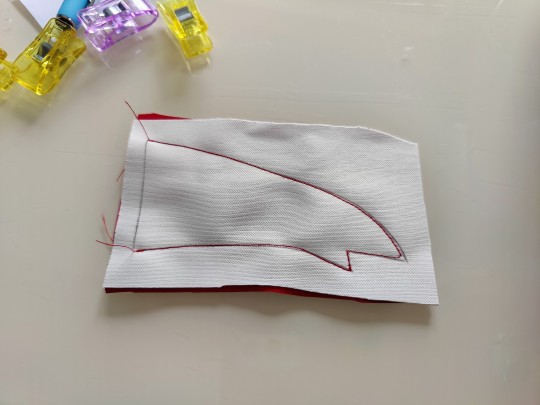
The overall jist of the paws is to make the underside fluffy as well as the knuckles, to hide where the vinyl meets with the real fabric because I know that wasnt going to be super neat with the way theyre made.
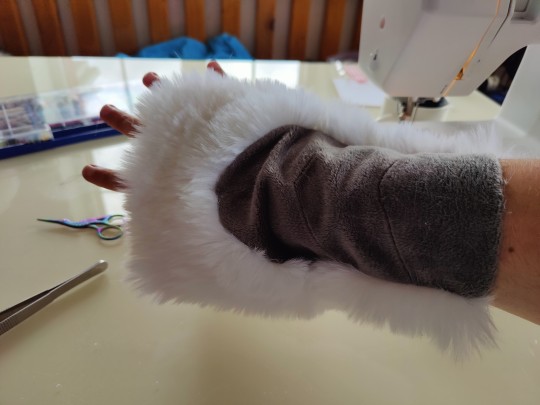
The first part is easily machine sewed! All the claws, and the palms. But actually sewing the fingers together? Boy thats a challenge for hand sewing only.
Blanket stitched together. And homestly??? Honestly??? Im fucking in love. And they FIT

Still not done though! Continuing paws soon...
15 notes
·
View notes
Text

Building Dango: Part 2
I actually finished this step a couple weeks ago but was too busy to post with con prep, so here it is now!
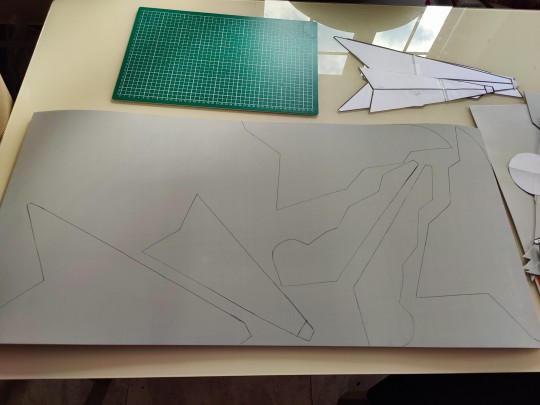
In this edition were getting the EVA foam together. I got a big ole cutting board before starting for about 7 quid so its easier to cut out the large shapes.
But first! Tracing.
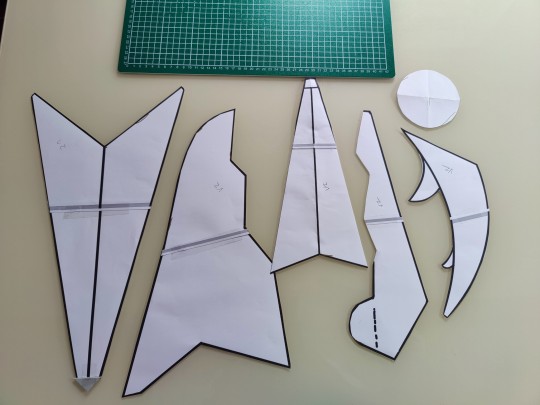
We got ourselves the paper pattern to trace and slightly edit. Drop that sucker on the foam. And start cutting.

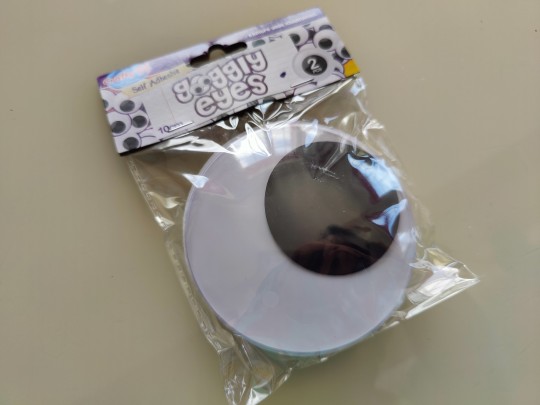
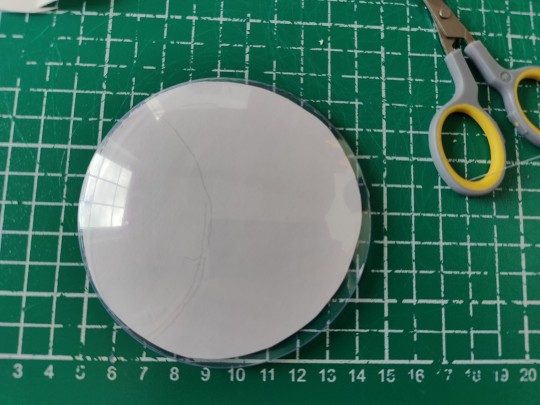
For the eyes I am planning to have them domed. Which means I got these googly eyes im going to deface to steal the plastic dome from.
Cutting the circle was honestly the most nerve-wracking part of this, and I did it in 4 segments just to be as careful as possible.
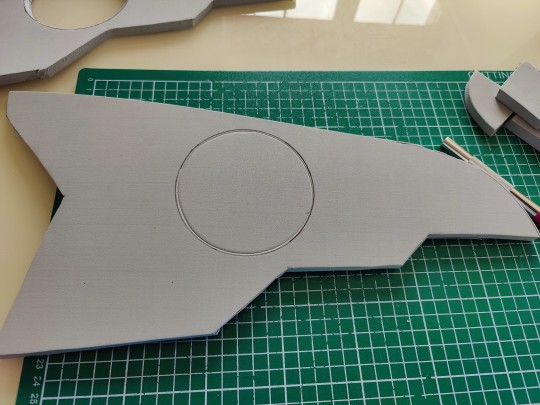

I wouldng exactly call cutting the EVA foam easy tbh. I was using mainly 10mm super high density foam as the base structure. That is to make sure that the base head is strong and isnt going to warp during movement. My exacto knife wasnt entirely... long enough to cut through it in one go, and I wouldnt say I was strong enough to do that even if it could lol. My arm and hand hurt afterwards, and theres some parts that came out a little crooked.
A lot of EVA sculptors cut their edges at an angle, and honestly, i was too scared to do that and mess up the angle with how *rough* cutting this already was. So I opted for just simple straight edges. I probably shouldve added some extra space here or there and thought about the fact this foam is 10mm thick. But oh well.
Whats important is its cut and we can move onto gluing.
Now we could use hot glue, or super glue. But the recommendation from Pros is Contact Cement. So thats what were gonna use.
Honestly this was pretty easy. You mark one side and swipe it down evenly with a scrap piece, you leave it to dry for like a minute or two, do the second piece where the first is gonna connect. Let that dry. Then put the two pieces together. Revolutionary shit im telling you. The bond is so damn strong too im shook.

Theres several parts I wasnt too happy about though. The top and longest piece wasnt long enough and ill need to compensate for it later. And some cuttings werent identical like I wanted. The biggest issue was the fact I didnt take into account the thickness of the foam overlapping at the jaw. So its. Well it doesnt exactly fit right now. But that will be fixed with sanding. A lot of sanding.
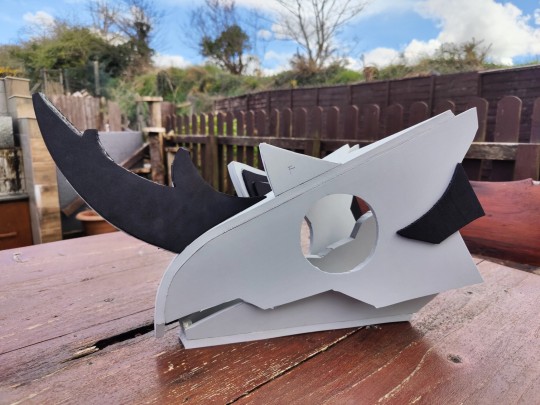
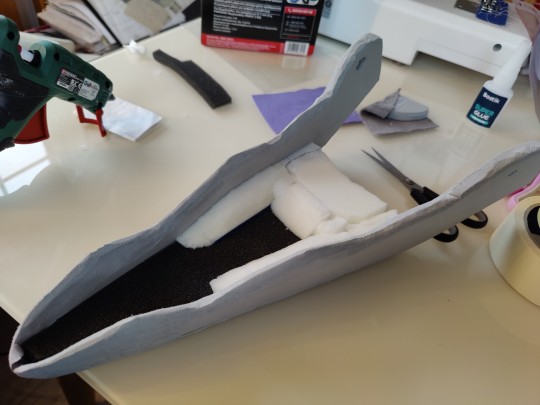
Youre probably looking and pointing at the black pieces of foam too. Thats 4mm low density foam. I wanted it for building details.
For the horn I ran into the problem of it possibly being heavy. And with its placement, it needs to be *light*. Initially I was going to use three pieces of 10mm high density foam. But that sucker weighed about 70 grams together. Thats. A lot. To be put on the tip of the mask.
You may be quick to suggest to carve out two pieces of low density foam as the horn, bend it, and make it hollow. And to that I say: im not experienced enough with eva foam to do that and also i dont want it to get crushed inside a luggage into a deflated Thing.
So i tried to weigh up the difference between the low and high density. And it turns out i can just use 2 pieces of low density foam that equal the size of the high density one, but it weights *half as much*. So instead i used high density as the core of the horn, surrounded by 4 pieces of low density. Which reduced the horn to about 40 grams! Yippe!!
And with it all put together... it is super blocky. And i am dreading figuring out how to sand it, and actually make it wearable.
17 notes
·
View notes
Text

Well it's that time again where Jay attempts to make another fursuit but this time from scratch and of a creature that has Zero Tutorials documented on because I hate my life apparently
DANGO TIME!

This guy is a fantasy hybrid based on a pangolin. That's all we really need to know because the prominant feature is his pangolin scales, and the rest is made up.
BASE MATERIALS WE'RE GONNA USE:
EVA foam- high density 1cm
EVA foam- low density 5mm
Normal foam 1in thick for neck
Normal foam 1cm thick for scales
Craft foam as a tester
Fabrics
Eye mesh
Googly eyes
Magnets
The core features of this head I want to incorporate are:
Moving jaw
Detatchable magnetic ears and antennae
Whiskers on springs
Removable neck on a zipper
Removable tongue
Parts I'd like to make:
Head
Paws
Wings (tryhard)
Tail (tryhard x2)
Feet (what is wrong with you)
This is no easy project and I only have about a month to tackle this so lets get to it!
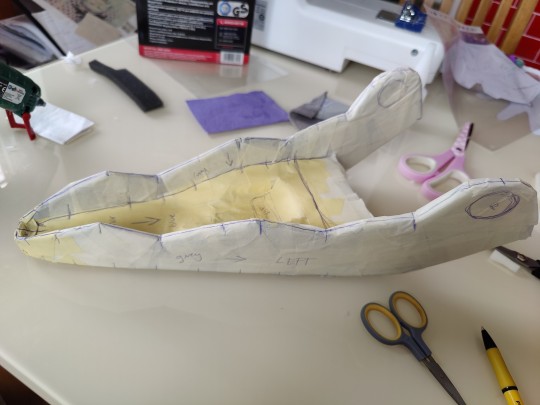
Starting with a simple little model from sculpey, I taped it with masking tape, marked the pattern down, cut it up, traced on paper, then went to scaling it up on my computer which was no easy feat. But in the end we have ended up with a more or less correctly size pattern.


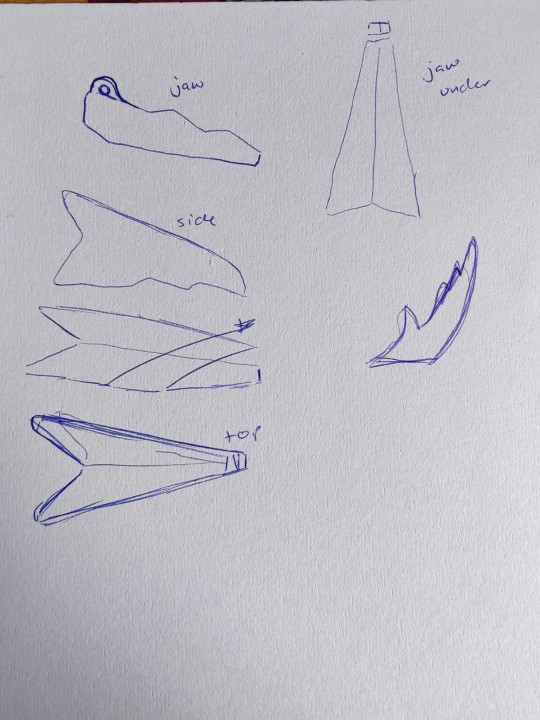
For the test of seeing if its fits and is sized correctly I used flimsy craft foam to put it together and immediately found it Too Large. But otherwise I liked the shape!
Back to the digital drawing board, rescaling, crushing the snoot in from being too long aaaaaand I was out of craft foam so I used a cardboard box instead (it worked better than the craft foam honeslty.)
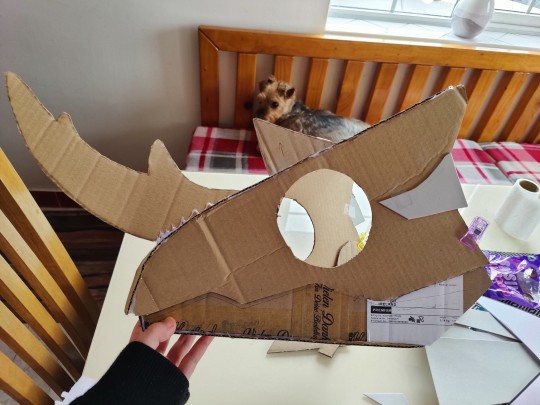

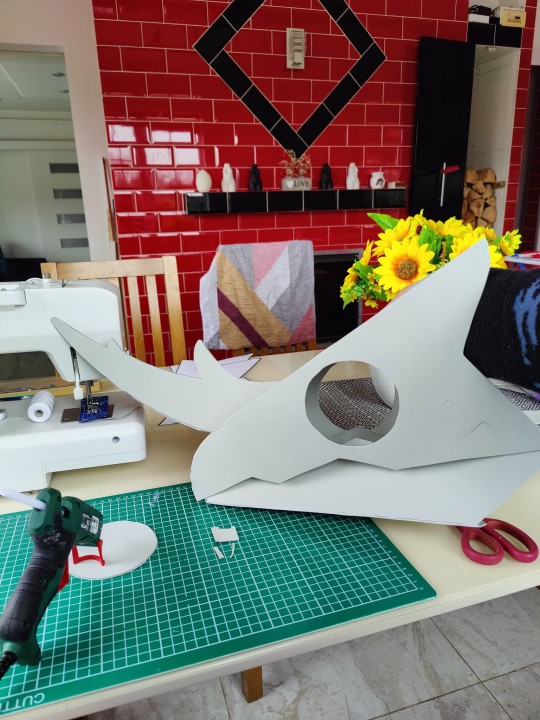
And it looks pretty good! The size is nice and its pretty sturdy. Only adjustements that were needed was scrunching up the jaw a little and lifting the cheakbone some. I added the brow spines and secondary cheek and we got ourselves a good base!
It's still a large-ish head, but I cannot go smaller due to how big the eyes gotta be, but it's okay.
Thankfully the head is pretty blocky on this guy, so I don't exactly have to worry too much about organic shapes (for once)
The sight on this guy is going to be great too. The eyes are going to be domes using large googly eyes which are 10cm in diameter. That gives a GREAT peripheral vision to the sides, but not much in the front which is fairly normal for fursuit. Thankfully though the jaw will move, so Ill have extra sight through the jaws.
Day 1 complete! Next day: Using EVA foam for the proper base.
16 notes
·
View notes
Text

First up finishing the jaw.
I love doing this sepcific ass style of cutting out symmetrical small parts of fabric. Essentially you dont even cut out the piece separately, just draw em on a slab, cut out two sides, line em up, wnd rhen sew the shapes on- and THEN cut them
Now we have several doritoes.
Just sewed these onto the fabric itself, and for the top jaw i sewed them onto little pieces of black eva foam and glued em onto the top skull.


Then glued the whole jaw fabric on... sewed the seams.. and voila!!

I also did the whiskers, which are on springs that i gutted two pens for. Theyre silley but I cant add videos to a post so Ill share those later.


Next up, sewing the neck piece, which is the easier part.

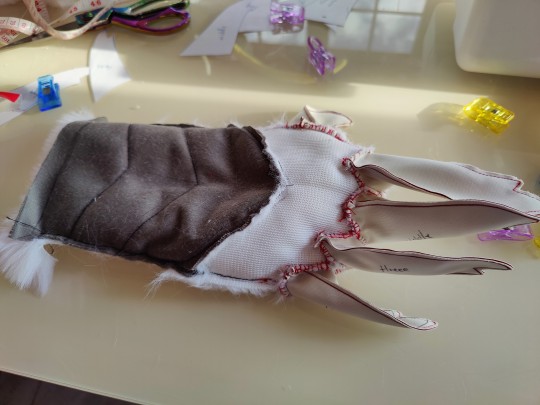
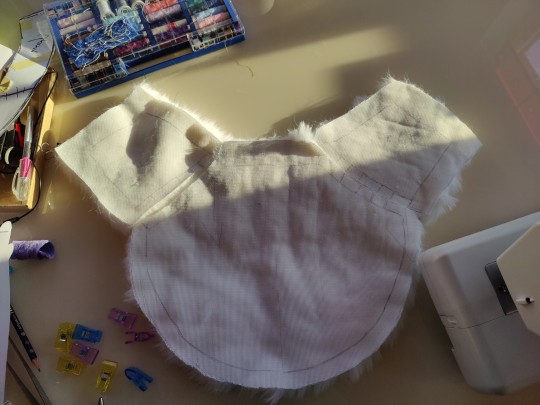
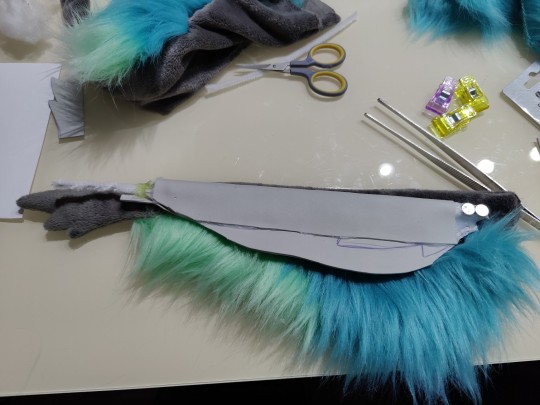
The harder part is the actual scales. This whole fabric is literally just the crest and one side of the scales. Hell. Im fearing 2 meters of fabric may not be enough but im holding my breath.

Some of the scales have accents, so I had to go through the gruelling process of sewing all of that up together. I fucked up one of them by cutting past the seam allowance and into the actual fabric part so :") had to redo that scale. Thankfully i could reuse the grey for another piece though so not all was lost.

And here they are!! One side of the scales!!

Making Dango: Part 11
The part where he is starting to look like an actual Thing
Its just pinned for now while I get the rest of the scales made :)
15 notes
·
View notes
Text

Building Dango: Part 17
We are... so close to the finish line now. Just a little more.
Let's finish off the tail.

To make an invisible belt loop I'll be using this tutorial.
Essentially it is cutting two pieces of EVA foam in the shape you need, one with a slip in part cutaway, a tube of fabric that goes through the holes between the eva foam, and then your top part pattern.

I'm opting for a raw meat pattern that I always thought looked super super cool!
The meaty bits are sewn onto the dark teal using applique, as well as the bone part. The underneath teal is then cut away, as well as slits in the blue where the hidden belt loop is.

Then you just cut off the excess from applique and you have yourself a pattern!

You then hot glue the pieces together (space left over for the belt strip to wiggle in, carefully ladder stitch the edges of the belt strip into your appliqued fabric slits, and then sew the tail shut into the edges of your seam allowance of the tail itself.
Now for the pincers and feet, it was pretty straight forward, the same as with the hand claws. The pincers have upholstery foam in them, and the feet are just stuffed. I then ladder stitched them on once it was all together.

And MAN am I HAPPY with the tail. A thicker belt loop keeps the tail nice and snug eveb though its got a little bit of weight to it.


I definitely want to make a bigger version of this year, but Ill have to figure out a way to store it easily. Perhaps have it be inflatable :)
And weRE ALMOST DONE NOW!!!!
Now just to fix the ears and then I can get some nice photos..... aughhhhhh
12 notes
·
View notes
Text

Dango Project: Part 15
Continuing the paws!
Like mentioned in the previous update, I got a 4 way stretch purple lycra for the inner lining of the paws simply because the 2 way stretch fabric test didnt work earlier.


Pin that sucker up, carefully machine saw it, and there it is.
The pattern has been adjust further. Honestly I made 1 more prototype before this. A certain interesting quality to this fabric.. one of the ways is stretchier than the other, so the first one I made of this fabric was made on the less stretchy side. And it felt tight.
So I adjusted the pattern just a little bit more in size for the fingers, and the wrist/cuff that I extended to match the width of the actual minky and fur. And also switched to the stretchier side.
Once thats sewed and perfected I could sew it onto one side of the paw. Only at the wrist, the end, and between the fingers. Originally I wasn't going to do the finger tips, however after a test I decided to do it because it was really hard to slip in and out of them when the fingers kept inverting inside the paw when I took em out.
But the claws are sewn vertically, not horizontally. So I had to do this very awkward quick sew through the center of the fabric to the seam allowance of the claw.

But it worked!!
I couldve honestly made the claws juuuust a teeny tiny bit thicker to account for the seam allowance, but its fine :)
Dont forget about stuffing the claw tips so its not just empty air! Theres about a centimeter of empty space between the end of my finger and the tip of the claw. So that needed stuffed lightly!
Last part is the bias tape. Ive never used bias tape. So this was another learning experience.

On the first paw I cut it off like 3mm too short to fully cover the stitching, and also placed the meetpoint of it like at the top of the paw? In view?
Things you dont think about prior.
However the second paw came out stellar.
I ALSO had to shave the knuckle fur down. Because it was comically long and dwarfed the minky scales LOL.
However none of the clippers in the house would buzz this god forsaken rabbit fur. So I had to do it with scissors because I am Not Willing to drop €80 on clippers. Its not perfect by any means. Theres some balder spots if you look closely. But its good enough for my first time shaving fur! And with SCISSORS.
Here they are! :]


12 notes
·
View notes
Text

Building Dango: Part 6
Were inching ever closer to the deadline. And this is the point where I'm starting to doubt if I'll even get to finish him at all.
The ever looming threat of fitting him on my head is like a knife hanging above my head.
Lets get painting.
There's honestly not many pictures of the painting process itself. All you need to know is that I used Montana Black acrylic paint spray (if you yell at me for this choice id love to hear it, unironically) because its the only spray paint available in this god damn country and can get it semi locally.
Got really lucky with the weather window too. I cant spray paint inside again or Ill get beheaded, so thank god for there actually being sun for once.
I sprayed the inside black first. Which honestly was a redundant choice because once I sprayed the outside white the black was like. Missing. From how big the holes are and also the wind which was very unkind.
The black painting however... of course another tragedy struck.
The nozzle was leaking.
And it leaked all over the outside.

It was a quick decision to quickly smear the thick globs of paint flat against the foam before it dried into visibly raised splotches. But god damn was I pissed off.
Thankfully I bought an extra can of white a day earlier, and switched out the nozzles which helped. But jesus christ man
That wasn't the end of bad nozzles though.
The nozzle on my first white can was fucked too. At least not dripping. But it bubbled and then clogged.
THANKFULLY- (im started to become a seer here) i have ordered MORE CANS with EXTRA NOZZLES that came literally the same day I was doing the first white coat. Literally forsaw this tragedy. Jesus christ.
The reason I ordered stuff online is because the only varnish I had on hand was gloss, and I wouldve much preferred matt on this mask. And our local shop only had gloss. So i had to bite the shipping cost (also got some other items i needed for my other art supplies)
Either way. Three coats of hard white. Thick coats. I was slathering that shit on there. Thank god I bought extra white because the first half used can ran out.

While you can layer this spray paint on after 20-30 minutes, it still needs 24 hours to dry fully. So This was a 4 day ordeal between the black, white, and then varnish.
Ive never done matt varnish before either. And boy that matt can texture. I love it.
The only downside is that I never could quite smooth out the brush strokes of the primer or gap filler sculpting foam. If i had more time maybe i'd do it differently. But for now ill just have to take what i have.

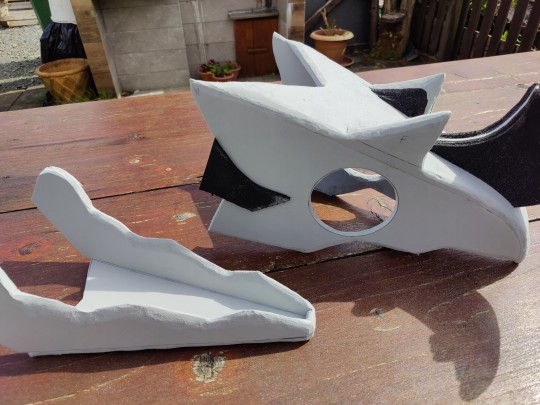
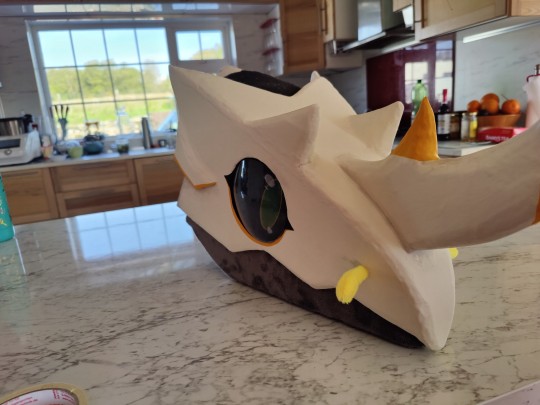
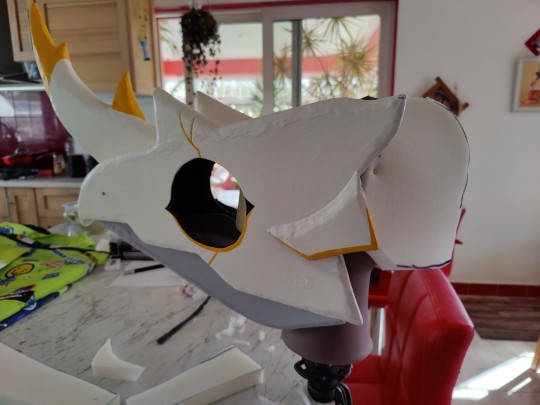
The last bits is cleanup, reapplying the black with just normal acrylic paint, painting the inner eye holes, and then all the gold markings.


And wow!!! He actually. Looks like something now holy shit.
8 notes
·
View notes
Text

Building Dango: Part 4
We're so far in and still have so fucking much to do. I am fearing I may not have this guy made in time. Which I'll have to stomach through clenched teeth.
We're moving on to priming. And I'll be using Flexbond for this. I previously used a spray version, which fucking stinks. (If any of you guys remember the making of my kenku fursuit then you remember the horrors of gassing my family.)
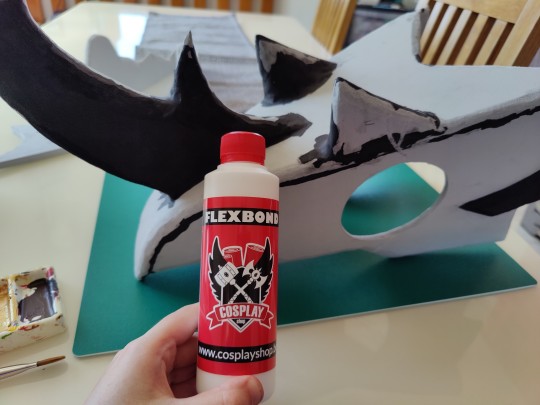
This is odourless and I can slap quite thick bits of it on there.
It's water based and kinda smells like PVA glue (suspicious...) but honestly it worked wonders. I was hoping it would cover up the majority of roughness and imperfections, and with three coats, it did mostly that! Kudos to my friend for pointing me in the direction of this substance.
It took about 3-4 hours to dry on each coat, and I could safely do it inside. Unfortunately there are paintbrush streaks. But I can stomach that.

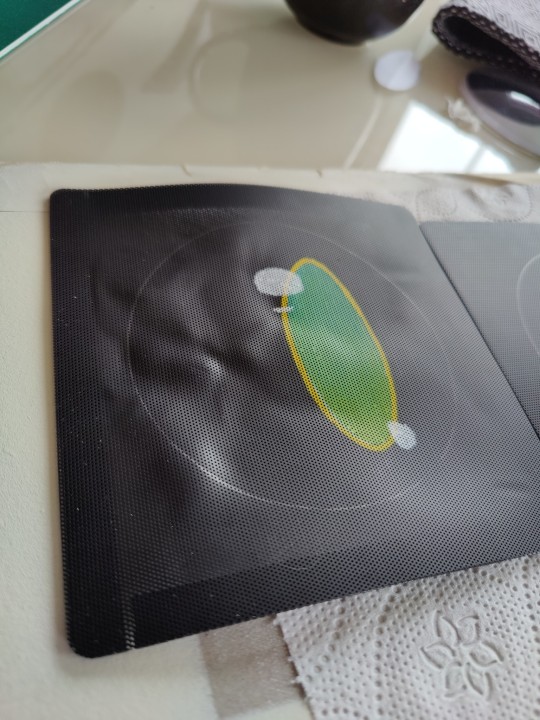
In between waiting for the coats to dry, I got to work on the eyes. I'm using this mesh as the base. It's nice and thick, does have a bend to it, and has fantastic view through the many holes in it. And since it's already black, I only need to paint the pupil. Though I have also painted a set of eyes for a friend that were fully painted and they looked fine too. Poking any clogged up holes IS a chore though, so to make sure there's as little of that as possible, you gotta water down your acrylic paint and slowly work your way up with coats. I haven't tried dried brushing it, mainly because that method is quite messy, and watered down colour worked better for me.

However, this didn't go without a tragedy. While trying to get the paint to dry faster, I often use a hairbrush. But. Well I was holding the mesh up in the air and drying it. And I guess I held the hairbrush too close and it bent the metal just enough to make dents from where my fingers held it. And. Unfortunately. Begudgingly. I could not restore the mesh back. So I had to paint the second eye all over again. So if you're drying with a hairbrush- do so on a flat surface.

For the JAW.
And here's where I start to realise I'm doing this backwards.
For the Jaw I will be using chicago screws. Originally I was going to use this hinge I got off etsy from a polish maker:

But Dango's head is already quite. Tight. And these would add another centimeter on each side of the head and there's just not enough space for that- nor do I think they would fit actually....
SO HERE WE ARE: CHICAGO SCREWS.

Chicago screws are originally used for leather work, and come in various sizes. The main body of the screw is sleek, so the jaw can freely move around on the middle part, while the actual tube is hollow with end being the 'screw' part. This screw part will be inside the jaw so I can freely unscrew it if I ever need to. While two pieces of my high density foam are about 2cm in thickness when smooshed together, I opted for 17mm thick screws instead. Which meant I head to drill holes, then indents into those holes, to make sure the screws fit in.
I did this because A: the flat part of the screw is going to poke through to the outer layer of the skull that will not have fabric covering it. It needs to be flush with the skull so that its not as easily seen. I made it sink into the foam by another 1-2mm so I could then cover it in sculpting foam and then.... prime it again. Like an egit. Anyway. And B: I didn't want the screws to poke me into my cheeks. Even though they're flat, Id rather drill into the foam and have it flush against it then poke out and be texture hell yanno?
Always test the drill bits on scraps though before you commit to the real deal! It took me a while to get the hang of the actual drill bit of my rotary carver, but in the end I was confident in actually drilling the mask.

ISN'T THIS CLEAN. God I'm so proud of it.

So I was drilling again after priming shit. I should've done this before the priming stage. But tbf they only arrived in the mail after I primed so. Whatever. (spoiler: this isnt the last time I pull out the fucking carver)
THE JAW IS HINGED.

And we continue working....
12 notes
·
View notes
Text

Building Dango: Part 3
In starting this step, Ive been officially finished with my real job, therefore its speedrun time from now.
With the mask now glued together we begin the process of ✨sanding✨
Essentially carving from this block of legos we got going on.
I got this rotary carver from my father like 10 years ago that was like maybe 10 quid in Lidl. Its finally going to meet its use (hoarding runs in the family.)
I only had 1 type of sandibg grit with this carver... so it had to do. The other bits are stone, abd while they are thinner, i didnt really see that much of a difference in texture after it was carved.
Honestly this was super anxiety inducing. This was truly my first time using this carver, and it was a feat of patience and trying to go slow enough not to fuck up this foam.
Now be aware, EVA is toxic, and theres SO much fucking dust when carving. I was wearing a mask and sunglasses while working on this, as well as doing it outside.
But I was chipping away at it regardless. The jaw looked good as I tackled it first and gained some confidence. It would receive several more touchups over the course of two days, but essentially it was done!
I didnt mind having it super rough, because the jaw will actually be covered by fabric, so its fine. The real test was the top part of the mask which is pseudo-skull.
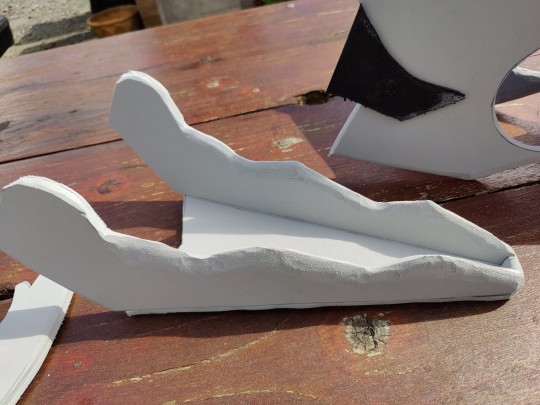
It does technically have a rough-ish texture, but I was still trying to get it as smooth as possible.
The horn- gid i was dreading it. But honestly I am so fucking proud of myself for doing it so clean. Its just. Chef kiss. So nice and pointy im in love.
Then came the gap filling- which I use EVA sculpting foam for. I swear ill have this tub forever theres so much.

I will say, i dont think i let the sculpting clay dry long enough, because i was having a really rough time sanding it again. It didnt turn out super smooth against the edges of the mask, so Im hoping i can fix that with a primer.... please god fix it


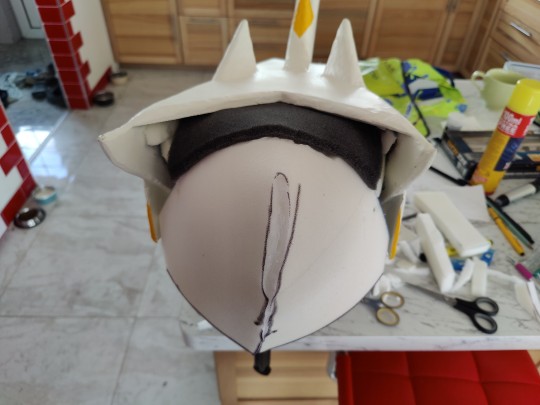
And lastly I added the scar Dango has on one side of the mask :'D
Sanding overall took about 6 hours total. And i came out of the sanding process like a white dog emerging from a pit of mud. Immediately had to take a shower and dump my clothes into the washing machine lmfao
10 notes
·
View notes
Text

Building Dango: Part 16
Lets get to building the tail!!!
No we already made a prototype earlier from foam, we have a perfectly ready pattern to do this in about 2 days.

The colourway is purple > blue > teal > green with a golden accent. We will also use the red leather for pincers and 'legs'.
I will be using craft foam as the sturdy base for the shell parts, and we already have the pincers carved out of 1in foam. So this is gonna be smooth sailing.
You've seen me cut fabric before so I won't bore you with it again. Everything's sewed up on the machine now! How nice and easy and straightforward.


Now we shove the craft foam into the shells, and blanket stitch them shut so that the foam is in there securely. At first I thought id have to hot glue the fabric down to the foam but honestly Im fine with not doing that at all.

Nice and sturdy!

Now to sew the fluffy underside. Which. Well it was a challenge now that the foam was in. I couldn't exactly invert the fabric now and put it under the machine. Looking back I probably should've put the foam in last LOL. So I did the portion I could on it and the rest I blanket stitched together- remember blanket stitches dont need a massive seam allowance, they're actually stronger with less of it! I usually go for 5mm.
I always have some error to my sewing though, especially as the dart came out a little wonky on the fluffy bit with the way it slips around, So i had to sew an extra bit on to completely close up the sides. I got plenty of scraps though so they come in handy. And its long fur so its not gonna be seen.


And now we just have a triangular hole left.
Check it out stuffed!
Next update because I only have a 10 image limit: making the tail have an invisible buckle strap.
15 notes
·
View notes
Text
Making Dango: Part 13
Were getting into the nitty gritty now.
We gonna start with the antennae. I was brainstorming how to do these for quite a while.
My friend suggested using something as an anchor for the antennae, so they dont just sag, and that was a brilliant idea. I got plenty of chichago screws in my order, so lets use those.
Stuff three pipe cleaners in there and braid them. Stick magnets on the underside, stick magnets to the head, and theyll easily stick on now.
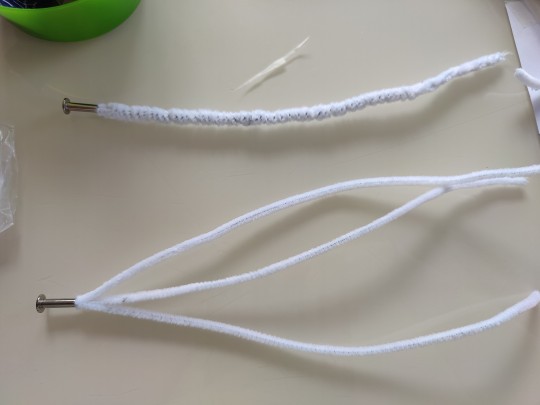

Originally I was going to have 2 pairs, but the placement of the first was impossible the way I did the first scale... I should've lowered the placement of the first crest scale, because I wasnt able to fit the magnets before it. So I settled for one pair of antennae, right after the first scale. This shouldnt be plenty. Theyre technically posable too.
Sew the fabric on them in one big tube with a stuffed end, and DAMN

Next step, the eyes.
Stupid as I am, I only measured one side of the cut foam to fit the eye, and just assumed the other side would do. As you can see thats not the case.
I had to heavily cut the eye dome to fit it inz and even then there were spaces i just had to fill with hot glue.
I just about managed to have enough 'clear' glue stick, because our store ran out of clear ones and from then on I had to use glitter ones.
The inside has black foam covers, and also painted with black acrylic paint to conceal the glue.
And here they are!!
Though... the vision is not great.
The way you do dome eyes is you have to stick clear plastic onto the back of the mesh so that no condensation gets inside the dome and fogs up your eye sight. I used lamination sheets for that. And that was not the best choice. My vision went from great to quite bad real quick. There's glare inside as well, but thats unavoidable with the eyes being placed the way they are. Light peeks into one eye and glares onto the other fron the inside.
I later went back and tore off the lamination plastic, then glued on a different kind of plastic sheet. And the vision got at least 30% better. The googly eye dome itself is just not the best plastic itself, but it is what it is.
The eyes are done now, and they look quite good from the outside :)
Next, sewed up the neck, yippee
And last foe todays update, one ear.
I sewed it up through pain and tears and glued it onto the foam. The foam that I cut to size to only stick onto the grey part while the long fur has jiggle physics. Put some pipe cleaners on the end too to keep the fluffy bit upright. And i...
I dont like it


Like at all.
Look at how it bundles up on the back... how crinkly it is on the front... it definitely needs a small trim but i... i still don't know how to fix this
Im gonna put this off until I can get a second opinion from a friend
Also happy to hear suggestions on this
9 notes
·
View notes
Text

I have so much respect for yall but also kinda scared of your power to work with fur tbh
19 notes
·
View notes
Text

Building Dango: Part 10
Time to prep the neck.
I'm using mainly paper to decide on the length of the neck. I initially was going to have the entire neck piece in foam, however I am not so sure anymore. So first were going to construct it out of fabric and if it needs foam later well then that will be a problem for later me. I was also gonna have this part be attachable with a zipper.... but that idea has turned into a logistical nightmare, so I think ill just leave it for now and make it all one piece.
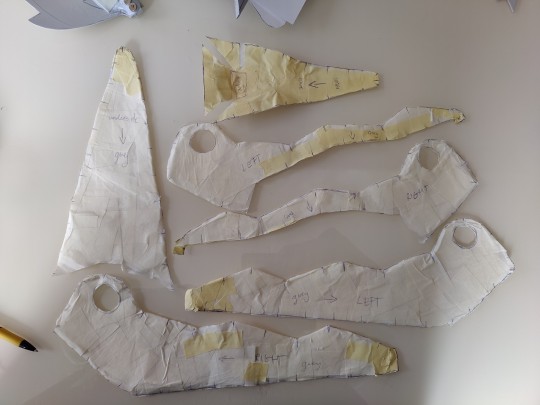
Paper guides are great but a hassle to put on.


The main crest is in the center of the 'hood', so these need to be placed pretty correctly.
The rest if the scales have 2 different sizes. The closer to the throat the smaller they are. The main crest and the secondary scales will have coloured accents on them. So thats going to be fun while sewing.

I think it looks preeetty dang good though! Now all thats left is to tape up the foam part and connect it to paper, and mark out exactly where the scales will be placed. This neck is symmetrical so I can pattern only 1 half of it.


Now that we got the pattern, we can get to sewing.

And to ease myself into it I started with the jaw! Which was honestly fairly straight forward. The one feature i wanted on it too is a detachable tongue. So thats there on velcro now too. Only wish that i maybe lightly stuffed the tongue some, but oh well.


Originally I was going to use black for the inside of the mouth, but I think this super dark teal actually does the job too :)
9 notes
·
View notes
Text

Building Dango: Part 9
It's time to prepare the jaw.
While the head was made to fit my face, I think I ended up with some discrepencies for the jaw size. I probably shouldve added a lot more foam to the top of the head, because instead I ended up with almost 2 inches of extra foam in the jaw so I can move it properly. Oh well.
It is a little too deep too, something I coulve and probably shouldve fixed in the cardboard stage. Why didnt I do that? A mystery of fuck around and find out.
EITHER WAY!
The base has thin 1cm thick foam inserted to elevate the teeth that are going to be in it. But then I realise the jaw angles upwards, so I had to add artificial gums as well for the rest of the teeth.
I knew going in the jaw wasnt super symmetrical, so I did end up taping up the whole entire thing to make sure it will all fit and get the pattern that way. Cutting it off the jaw was a greulling process and I also sliced my finger open which was fun to hear my friends yell at me.
After that I finally bit my fucking tongue and actually fitted the head properly. With elastic. One horizontally, and one vertically to create a faux dome. Of course I had to cut through the black foam on the top of the mask to fit the elastic through.
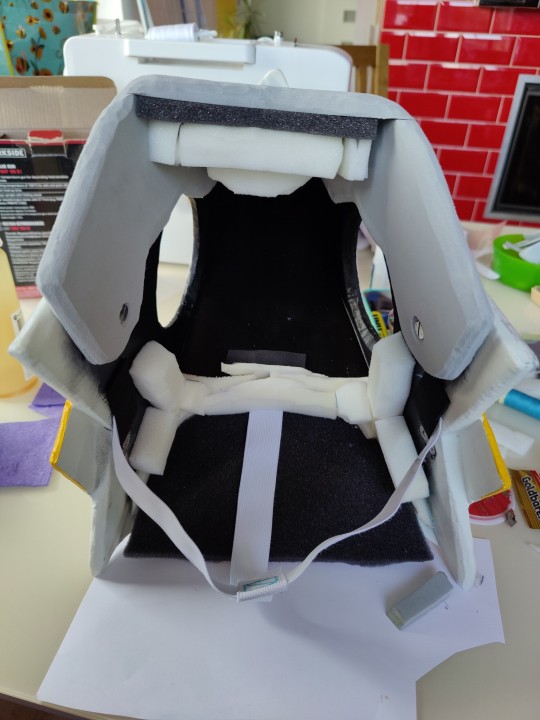
But Jay- how do you attach this elastic?? Are you sewing it through the foam?
NO!!!
We are back to using the strongest bonding agent we own- contact cement. With a piece of 2mm low density eva foam on *top* of it to keep the elastic stable and the bond stronger. I will say. That if i really were to pull at it, it would rip off. Because its not actually stuck to the foam... its stuck to the paint and varnish. So lets avoid that scenario shall we.

After that I started fitting on more foam to the top corner, and then using 1in upholstery foam I built the back of the head. The dummy head I bought just for this is finally being utalised. I was quite stressed about this part because I did not have a lot of upholstery foam but it was all okay in the end! And it came out pretty nice and snug :)
Next step: The neck scales.
8 notes
·
View notes