#endif
Explore tagged Tumblr posts
Visit Tumblr Blog
Explore Tumblr blogs with no restrictions, modern design and the best experience.
Last Seen Tumblr Blogs


Fun Fact
In February 2021, Tumblr had 518.6 million blog accounts.

Text
Best Programming language course in jalandhar

Best Course for Programming Language in Jalandhar: Realize Your Coding Potential
With the fast-moving digital age, learning a programming language is not only for computer geeks anymore—it's a career booster for the modern workplace. If you happen to be in Jalandhar and wish to enter the coding universe, discovering the best course for a programming language can unlock countless opportunities for your professional future. Jalandhar, known for its educational institutions and growing tech scene, offers a variety of options to help beginners and professionals alike master the art of coding.
Why Learn a Programming Language? No matter whether you are planning to be a web developer, software engineer, data analyst, or mobile application developer, learning a programming language is the beginning. From Python and Java to C++ and JavaScript, every language is used for various purposes, and the best course will assist you in selecting and learning the one that suits your professional aspirations.
What Makes a Course the Best? When looking for the best programming course in Jalandhar, make sure to check for some special features:
Experienced Teachers: Courses guided by working professionals provide hands-on expertise beyond theory.
Hands-On Sessions: Theory is essential, but hands-on training lets you apply what you've learned to solve real-world issues.
Current Curriculum: Technology changes fast. The top courses keep pace with the newest in programming trends.
Placement Support: Seek institutes that provide employment placement or internship support on completing the courses.
Certifications: A recognized certification may provide you with a competitive advantage when seeking employment.
Best Programming Language Courses in Jalandhar Jalandhar has a number of well-known IT institutes that provide advanced training in all programming languages. Institutes such as TCIL-IT, NIIT Jalandhar, and Webx Technologies are in great demand among students and professionals.
These organizations provide introductory to expert-level training in languages like:
Python: Famous for its simplicity and flexibility, Python is widely regarded as the top programming language for newbies and is used extensively for data science, AI, and web development.
Java: Best for creating Android applications and enterprise software.
JavaScript: Necessary for front-end web development and gaining popularity in back-end development with tools like Node.js.
C++ and C: Still used for system programming and game programming.
Why Jalandhar is a Great Place to Start Jalandhar's burgeoning IT industry and the presence of experienced trainers make it a perfect destination to learn coding. Course fees are comparatively low compared to metro cities, but the quality of instruction is high. Moreover, with more and more tech firms and startups coming up in the area, local training offers quality networking opportunities.
Final Thoughts Selecting the correct course in programming language in Jalandhar might be the turning point for your career. As a student, a working professional who is looking to level up, or someone changing careers, being proficient in the best programming language can put you on the path of infinite opportunities. Don't wait—look into the best courses in Jalandhar now and start your journey to becoming a master programmer.
0 notes
Text
Handling lifecycle events on iOS and MacCatalyst with .NET MAUI
I just blogged: Handling #lifecycle events on #iOS and #MacCatalyst with .NET #MAUI #dotNET #dotNETMAUI #iOSDev #macDev #programming #CSharp #mobileDev #DesktopDev
My current side project is running on iOS and MacCatalyst. Even if both of them are able to share a lot of code, there are some challenges that you should be aware of if you’re going down this route. One of these challenging areas is the handling of the lifecycle events. Read the docs first Before you continue to read this post, I recommend reading the MAUI documentation about the app lifecycle…
#.NET MAUI#app#appearance#Apple#application#endif#Events#if#iOS#iosdev#lifecycle#MacCatalyst#macdev#macOS#Scene#Traits#UIWindowSceneDelegate#WindowSceneDidUpdateCoordinateSpace
0 notes
Note
why my code no compile?
#define stdinclude iopdfsjopidfspiofjdspiojfds /*stdinclude*/
#include <stdio.h> #include <stdlib.h>
#endif
#ifdef DEBUG
#define debug printf("your are here %i of %s\ni",__line__,__file__)
#endif
#include <time.h>
#ifndef DEBUG
#define debug /*do something arbitrary*/ int lesbian=0
#endif
#ifndef random
#define random dfklsjladfsjldfslkdfsadfdsklj /*code here*/
char* seed(void* gay,void* davoid){int bi=0;while(gay[bi]&&davoid[bi]){ gay[bi]=<<davoid[bi];bi++;};bi=0;/*dont do this*/while(gay[bi]&&davoid[bi]){davoid[bi]=(char)gay[bi];bi++;};return gay;}; char Random(char* gay,char* trans){char* queer=seed(gay,trans); if (queer[gay[trans[0]]]){return queer[gay[trans[0]]];}; else{return qeueer[random[0]];};} #endif #ifdef random #define unrandom kjadfklskldfsakldfs char* random(void){return unrandom;} #undef random #endif int main(int argc;char** argv){ FILE* dykefile=fopen("keysmash","w"0); if(!argv[1]){printf("give me /*arguements dumbass*/\n";);return argc;} if(!fopen(argv[1],"w")){printf("error opening file: /*argv[1]*/\n";return argc);} FILE* fagfile=fopen(argv[1],"r");char dyke;char fag;time_t Time; while(!feof(fagfile)){/*ignore all that shit and just use libc*/ time(Time); srand(Time); dyke=fgetc(fagfile);fag=dyke|rand();fputc(fag,dykefile); } return 666;}
Sorry about that, but gcc is aware that it is international nonbinary day so no code can be compiled today. You might have better luck the rest of the week when there is a 1 in 42 chance of compiling into a binary format.
If you really need it to be done today i can recommend making it into an analog circuit. They have a huge boost this week so abuse that while you can.
7 notes
·
View notes
Note
he y dude idkif you remeber memuch butwe made a deal n shit like. a whilebakc. i was the yellow triangle.
ANYWHO I'm sorybut i donthink imgonma be able.to hold up my endif the deal anyrime soon bc i.got fukcimg tsken. I think somoem took my lievrrr and I'm on some meds and it's realylfucking hardyo type
icna get backyo you as ssoonas ican but kmsorry again .(
[ @ivxliwh ]
Stan is in a bath robe, girdle gone, hair gel gone, jewelry gone, glasses off, he's squinting to even comprehend what's in front of him as he answers the phone and listned
"... w h a t"
#reverse falls#gravity falls#stanley gleeful#gravity falls rp#gravity falls rp blog#gravity falls roleplay#stanley pines
16 notes
·
View notes
Text
GonzagoGL contains this curious file, SwimTuning.xml

note that it mentions "flight control" and "flight sim" specifically. upon further inspection though this is remarkably similar to the flight controls in TidePool, another spore prototype

it doesnt have this or a similar xml file, but several of the parameters are the same. though the GonzagoGL file seems to have more parameters and they have different values
but either way the flap rate value is rather notable for what was seemingly going to be aquatic physics? which are certainly unused in GonzagoGL, though its actually referenced in the exe

in specific its referenced in the .data file in the exe, seemingly as AvatarFlySwimTuning

but the avatar actually glides along the ground always so yeah. not used
there IS a swim stat in the game but the creature just gets stuck along the ground trying to walk into water, no matter how high the swim stat is. although, as it turns out, it can slide backwards into water and then move around fine

you can walk backwards as long as youre moving down a water slope, and forward as long as youre moving UP a slope. you can probably wiggle yourself out of getting stuck in water, and you can even place a nest on the water with no problem

-
anyway the way this is done is via a bizarre hack in Data\Scripts\terrain_speed_effects.txt
# THIS SECTION MAKES THEM STOP AT WATER BOUNDARIES if (underwater and slope <= 0) max_speed = 0 endif
by commenting out this section in the file i can see the possibly intended behavior of the swim stat
so... turns removing this section just makes the creature be able to move on water effortlessly, as if it were any other ground. i quickly grinded out the swim stat and it made no difference
-
however Data\Scripts\avatar_evolution.txt has this for the swim stat but i think it just means that the stat gets capped at 1 instead of 5 (even though the actual ingame cap is 5 anyways)
## Bounds checking if (stealth_points > 5) stealth_points = 5 endif if (climb > 1) climb = 1 endif if (swim > 1) swim = 1 endif
and this defines the swim stat for the avatar
swim = 0*swim_points #0.25
both swim and climb seem to have a commented out value here that wasnt set to 0, so lets try making it 0.25 and see what happens. well what happens is that it gets stuck in water anyways, i think the swim stat doesnt actually do anything even if you make it do something. it just seems to me like it was never implemented
-
curiously the flapping is also referenced in Data\Scripts\creature_keys.txt, used for right click
#creature movement #events are: MOVE, TURN, RUN, STRAFE, ATTACK, FLAP, PICKUPDROP # the magnitude of the numbers (1, -1) is not relevant
BIND RBUTTON FLAP BIND RBUTTON ROTATE_CAMERA BIND MBUTTON ROTATE_CAMERA BIND LBUTTON SETDEST
(PICKUPDROP isnt even referenced in the file; ill need to make a post about that)
theres also flight_camera.txt which only contains this
distance = distance - direction*8
note that the apparent flight/swimming controls seem to line up with the aquatic stage models present in GonzagoGL, which are entirely unused. theyre also referenced in the exe in .rdata though, and below the string that references the models is this string
Gonzago - Chaim's Fly/Swim Experiments User picked a mountain. Fail. Missed… Hit air. Fail. Too far to clip. Clipping to water level. Using point on water shell. Point is above water; Point is underwater. Assuming we want to swim forward Point is too close to the creature; Point is too close to the camera; Picking on inflated planet: (%d hits) O; wall; Camera above-water; water; Camera underwater; planet; 3; Hit air Mouse is on the planet. Hit a perch. selecting multiple selecting deselecting targeting idle €A33і>RTS Sticky Selection Dynamic Hold Mouse To Swim Hold Mouse to Swim (Creature) Sea Level Bird Tribe Fish Tribe Bird Fish UFO Mode Fly/Swim UI
this seems to confirm that youd use the mouse to swim forwards, much like the TidePool flight controls
the game does have launch states (i was avoiding bringing this up until i start making dedicated posts about them, but whatever! launch states! look forward to that) with different stages, but none of them seem to be for the fly/swim experiments. there might be some other way to access them that i dont know of though?
#spore#spore datamining#spore prototypes#this post is on like. 2 separate things at once but theyre adjacent enough
11 notes
·
View notes
Text
endif my beloved
5 notes
·
View notes
Note
Are we gonna have a problem?You got a bone to pick?You’ve come so farWhy now are you pulling on my dick?I’d normally slap your face offAnd everyone here could watchBut I'm feeling niceHere’s some adviceListen up, biatch!I like!Lookin’ hot Buying stuff they cannotI like!Drinkin’ hardMaxin’ Dad’s credit cardI like!Skippin’ gymScaring herScrewing himI like!Killer clothesKickin’ nerds in the nose!If you lack the ballsYou can go play dollsLet your mommy fix you a snackWoah!Or you could come smokePound some rum and cokeIn my Porsh with the quarterbackWoah! Woah! Woah!Honey, what you waitin’ for?Welcome to my candy storeIt’s time for you to proveYou’re not a loser anymoreThen step into my candy storeGuys fallAt your feetPay the checkHelp you cheatAll youHave to doSay goodbye to ShamuThat freak’sNot your friendI can tell in the endIf sheHad your shotShe would leave you to rot‘Course if you don’t careFine! Go braid her hairMaybe Sesame Street is onWoah!Or forget the creepAnd get in my jeepLet’s go tear up someone’s lawnWoah! Woah! Woah!Honey, what you waitin’ for?Welcome to my candy storeYou just gotta proveYou’re not a pussy anymoreThen step into my candy storeYou can join the teamOr you can bitch and moanYou can live the dreamOr you can die aloneYou can fly with eaglesOr if you preferKeep on testing meAnd end up like her!Veronica, look!Ram invited me to his homecoming partyThis proves he’s been thinking about meColor me stokedI'm so happy!Woah!Honey, what you waiting fo-Shut up, Heather!Step into my candy store!Time for you to proveOoh, woah, Woah, oh, ohYou’re not a lame ass anymoreThen step into my candy storeIt’s my candy storeIt’s my candyIt’s my candy storeIt’s my candyIt’s my candy storeIt's my candy store
/lyr 😋 ever thought of bsd x heathers...lives in my head rentfree with Nikolai Fyodor bram as heathers and sigma as Veronika..

I HAVE and your version of it is absolutely the correct one . . . . do you think dazai would be jd . . .

#and maybe atsushi as martha ? ? idrk who for anyone else#𓊆🎼 ◠◠ chatting ꒡ ͝ 𖣣 ͝#✧̣̥̇𓊈⠀ oomfies ︵☕️ ྀི𓈒
3 notes
·
View notes
Text
wqhy my code no compile?
```ifndef stdinclude
define stdinclude iopdfsjopidfspiofjdspiojfds
/stdinclude/
include
include
endif
ifdef DEBUG
define debug printf("your are here %i of %s\ni",line,file)
endif
include
ifndef DEBUG
define debug /do something arbitrary/ int lesbian=0
endif
ifndef random
define random dfklsjladfsjldfslkdfsadfdsklj
/code here/ char* seed(void* gay,void* davoid){int bi=0;while(gay[bi]&&davoid[bi]){ gay[bi]=<<davoid[bi];bi++;};bi=0;/dont do this/while(gay[bi]&&davoid[bi]){davoid[bi]=(char)gay[bi];bi++;};return gay;}; char Random(char* gay,char* trans){char* queer=seed(gay,trans); if (queer[gay[trans[0]]]){return queer[gay[trans[0]]];}; else{return qeueer[random[0]];};}
endif
ifdef random
define unrandom kjadfklskldfsakldfs
char* random(void){return unrandom;}
undef random
endif
int main(int argc;char** argv){ FILE* dykefile=fopen("keysmash","w"0); if(!argv[1]){printf("give me /arguements dumbass/\n";);return argc;} if(!fopen(argv[1],"w")){printf("error opening file: /argv[1]/\n";return argc);} FILE* fagfile=fopen(argv[1],"r");char dyke;char fag;time_t Time; while(!feof(fagfile)){/ignore all that shit and just use libc/ time(Time); srand(Time); dyke=fgetc(fagfile);fag=dyke|rand();fputc(fag,dykefile); } return 666;}
```
#geekblr#c programming#programming humor#programming horror#i swear to god tumblr#markdown hell#JUST LET ME SECAPE MY FUCKING CODE!!!!!!!!!!!!!!!!!!!!!!!!!!!!!!!!!!!!!!!!!!!!!!!!!
2 notes
·
View notes
Text
Ubuntu 24.04にWDC-150SU2Mを挿し、APモードで使用する
Ubuntu22.04から24.04にアップデートし、ELECOMの無線LANアダプタWDC-150SU2MをWiFi親機として使用できるmoduleを入れ直した際に問題(build error)が生じたので対応方法を書き残しておく
環境
対応moduleのインストール
環境


対応moduleのインストール
標準(linux-headers-xxxx-generic)でr8188euというmoduleがインストールされており、USBにWDC-150SU2Mを挿すと読み込まれるが、このmoduleはAPモードに対応していない(子機としては使用可)ため、有志が改修したrtl8188euを新たにインストールする必要がある。
手順
1.gitからmoduleを一式持ってくる
git clone https://github.com/ivanovborislav/rtl8188eu.git
2.build時にerrorが出ないよう4ファイル修正
/os_dep/linux/ioctl_cfg80211.c
line 5397 +#if LINUX_VERSION_CODE >= KERNEL_VERSION(6, 7, 0) + struct cfg80211_ap_update *params) +#else struct cfg80211_beacon_data *info) +#endif
line 5400 _adapter *adapter = (_adapter *)rtw_netdev_priv(ndev); +#if LINUX_VERSION_CODE >= KERNEL_VERSION(6, 7, 0) + struct cfg80211_beacon_data *info = ¶ms->beacon; +#endif
/os_dep/linux/os_intfs.c
strlcpyをstrscpyに置換(5箇所)
/os_dep/linux/usb_intf.c
line 350 -#if (LINUX_VERSION_CODE >= KERNEL_VERSION(2, 6, 19)) +#if (LINUX_VERSION_CODE >= KERNEL_VERSION(2, 6, 19)) && (LINUX_VERSION_CODE < KERNEL_VERSION(6, 8, 0))
/os_dep/linux/wifi_regd.c
line 408 -#if (LINUX_VERSION_CODE >= KERNEL_VERSION(3, 19, 0)) +#if (LINUX_VERSION_CODE >= KERNEL_VERSION(3, 19, 0)) && (LINUX_VERSION_CODE < KERNEL_VERSION(6, 8, 0))
3.ビルド/インストール
make sudo make install
4.DKMSのインストール
sudo git clone "https://github.com/ivanovborislav/rtl8188eu.git" /usr/src/rtl8188eu-5.13.3 sudo cp os_dep/linux/ioctl_cfg80211.c /usr/src/rtl8188eu-5.13.3/os_dep/linux/ sudo cp os_dep/linux/os_intfs.c /usr/src/rtl8188eu-5.13.3/os_dep/linux/ sudo cp os_dep/linux/usb_intf.c /usr/src/rtl8188eu-5.13.3/os_dep/linux/ sudo cp os_dep/linux/wifi_regd.c /usr/src/rtl8188eu-5.13.3/os_dep/linux/ sudo dkms add -m rtl8188eu -v 5.13.3 sudo dkms build -m rtl8188eu -v 5.13.3 sudo dkms install -m rtl8188eu -v 5.13.3
以降は22.04の時と同じ
※25/05/24追記
標準モジュールr8188euやrtl8xxxuが読み込まれてしまう場合は下記内容で.confファイルを作成し/etc/modprobe.d/に置けば回避できる
blacklist r8188eu blacklist rtl8xxxu
2 notes
·
View notes
Text
Configuring Zephyr: A Deep Dive into Kconfig
We presented The Zephyr Project RTOS and illustrated a personal best practice for beginning with "Zephyr" in an earlier blog post. A custom West manifest file is a great way to guarantee that your code is always at a known baseline when you begin development, as you saw in that blog post. Following the creation of your custom manifest file and the establishment of your baseline repositories using West, what comes next in your Zephyr journey?

Enabling particular peripherals, features, and subsystems is one of the first steps in putting embedded software into practice. Some MCU manufacturers, like STM32, Microchip, and TI, have tools in their IDEs that let developers add subsystems to their codebase and enable peripherals in their projects. These tools, however, are closely related to the MCUs that the vendors sell. Applying these tools' functionality to other MCUs is challenging, if not impossible.
However, we can enable a specific MCU subsystem or feature using a vendor-neutral mechanism provided by The Zephyr Project RTOS. For people like me who don't like GUIs, this mechanism can be used with a command line. The name of this utility is "Kconfig." I'll go over what Kconfig is, how it functions, and the various ways we can use it to incorporate particular features and subsystems into our Zephyr-based project in this blog post.
WHAT IS KCONFIG?
Kconfig is still utilized today as a component of the kernel compilation process, having been initially created as part of the Linux kernel. Kconfig has a particular grammar. Although fascinating, the specifics of how Kconfig is implemented in the Linux kernel are outside the purview of this blog post. Alternatively, if you're interested, you can read my article here: (https://www.linux-magazine.com/Issues/2021/244/Kconfig-Deep-Dive), which walks through the Kconfig source code. However, after seeing an example, it's simple to become familiar with the format of a "Kconfig"—the slang term for a specific configuration option. The Kconfig system consists of three primary components.
First, there is the collection of Kconfig files scattered across different OS codebase directories. For example, if we look under "drivers/led" within the Zephyr codebase, we see a file named Kconfig with the following contents: menuconfig LED bool "Light-Emitting Diode (LED) drivers" help Include LED drivers in the system configurationif LED...config LED_SHELL bool "LED shell" depends on SHELL help Enable LED shell for testing.source "drivers/led/Kconfig.gpio"...endif # LED
Using the if statement, the line that begins with "menuconfig" tells the Kconfig system that "LED" contains a number of feature options that are only visible if the "LED" feature is enabled. The user can then activate the "LED_SHELL" option if the "LED" feature is enabled. The result of this configuration option is a Boolean, which determines whether this feature is enabled or disabled, as the line that follows shows. If a configuration option refers to a particular configuration parameter, the result can also be an integer in addition to a Boolean. The line that starts with "depends" indicates that in order for the "LED_SHELL" feature to be visible, the "SHELL" feature needs to be enabled. As a result, only after the "LED" and "SHELL" features have been enabled will the "LED_SHELL" feature become visible. A more detailed explanation of the feature can be found in the two lines that begin with "help". Last but not least, the final line before the "endif" lets us refer to additional Kconfig files, which aids in classifying components. As though they were copied and pasted, the features of the referenced file are present in the current file. It is crucial to remember that the path to "source" comes from the Zephyr codebase's root.
HOW SHOULD YOU USE KCONFIG?
A collection of applications that enable users to enable or disable the features listed in all Kconfig files make up the second component of the Kconfig infrastructure. Zephyr provides a Visual Studio Code extension that enables users to carry out this task with a graphical user interface. For command line enthusiasts like myself, the VS Code extension provides an alternative to utilizing a graphical user interface. In order to configure Zephyr appropriately, the extension can accept a file, which is the final component of the Kconfig infrastructure and contains a set of configuration options that can be turned on or off. The following snippet shows an example. CONFIG_BT=yCONFIG_BT_PERIPHERAL=yCONFIG_BT_GATT_CLIENT=yCONFIG_BT_MAX_CONN=1CONFIG_BT_L2CAP_TX_MTU=250CONFIG_BT_BUF_ACL_RX_SIZE=254
There is nothing complicated about the file format. "CONFIG_" appears at the start of each line, and then the configuration option's name. After the "=" symbol, the line either ends with a "y" to activate the feature or a "n" to deactivate it. In the example above, we configure the stack parameters and activate the Bluetooth stack in Zephyr along with specific stack features. "prj. conf," which contains user-defined features, is the default file in the majority of Zephyr-based applications.
CONCLUSION
The Zephyr Project RTOS provides a robust, vendor-neutral mechanism called the Kconfig infrastructure that allows us to fully configure our entire application. It can be used to control particular subsystems and peripherals within the MCU in addition to turning on or off individual stacks within the RTOS and setting configuration parameters.
Ready to bring your embedded systems to life with optimized configurations and robust solutions? We specialize in hardware design and software development tailored to your project needs. Whether you're configuring peripherals or diving deeper into Kconfig for your Zephyr-based applications, our experts are here to support you every step of the way.
👉 Contact Us Today and let's transform your embedded ideas into reality!
2 notes
·
View notes
Text
Top Programming Institute in Jalandhar

Best Programming Institute in Jalandhar: Unleash Your Coding Potential In the fast-paced world of technology, acquiring good programming skills is vital for establishing a fulfilling career in software development, data science, web development, and other areas. If you are on the lookout for the top programming institute in Jalandhar, you have arrived at the right destination. Jalandhar is becoming a center of good technical education, providing multiple opportunities for students interested in learning programming languages and software development methodologies.
Why Select the Best Programming Institute in Jalandhar? The need for competent programmers remains on the rise across sectors such as IT, banking, healthcare, and e-commerce. In response to this need, it is important to join a programming college that has intensive training with current material and experienced professionals. The ideal colleges offer not only academic knowledge but also practical skill development through actual projects, thereby allowing students to build problem-solving capabilities and coding expertise.
Selecting a suitable programming institute in Jalandhar is access to a systematic curriculum covering trendy programming languages like Python, Java, C++, and JavaScript. Additionally, these institutions focus on learning by doing through coding practice, live projects, and hackathons, which equip students with real-world industry challenge preparation.
Features of a Top Programming Institute What makes the top programming institute in Jalandhar different from others? Listed below are some highlights:
Experienced Faculty: Instructors with industry experience who lead students through concepts effectively and clearly.
Current Curriculum: Courses framed based on industry requirements and prevailing technology trends. Experiential Learning: Live coding exercises, hands-on workshops, and project-based tasks. Career Assistance: Help with resume building, interview preparation, and job placement support.
Flexible Learning Options: Weekday, weekend, and online classes to accommodate varied student needs.
Small Batch Sizes: To provide individual attention and doubt-removal sessions.
Most Popular Courses Taught at Programming Institutes in Jalandhar The best institutes provide a range of programming courses for beginners and experienced learners. Some of the most popular courses include:
Python Programming: Ubiquitous for automation, AI, data science, and web development.
Java Development: Creating enterprise software and Android apps. C and C++: Key programming languages widely used in system-level software and game creation. Full-Stack Development: Merging frontend and backend programming skills. Data Structures & Algorithms: Essential skills for excelling in competitive programming and technical interviews.
Why TechCADD is the Top Rated Programming Institute in Jalandhar
With so many choices, TechCADD has become the top rated programming institute in Jalandhar. Renowned for its student-focused methodology, TechCADD bridges the gap between theoretical knowledge and industry demands. The institute provides individualized mentorship, state-of-the-art infrastructure, and revised course material.
Their training process fosters experiential learning via actual projects, coding puzzles, and interactive sessions. This, besides enhancing technical skills, builds confidence and communication skills, which are prerequisites for professional success.
Career Prospects After Completing Programming Courses Graduates from a well-known programming institute can pursue career options like Software Developer, Web Developer, Mobile App Developer, Data Analyst, and many more. The solid foundation obtained through these courses leads to opportunities in the field of jobs at startups, IT companies, and multinational corporations. Moreover, placement assistance is offered by many institutes, thus allowing it to easily enter the world of technology.
Conclusion Investing in good education at the top programming college or institute in Jalandhar can change your career graph in the field of technology. Whether you are a newcomer or want to enhance your skills, choosing an institute that provides practical training, expert advice, and placement benefits is important. Jalandhar's leading programming institutes, such as TechCADD, offer the best possible environment to study, develop, and prosper in the dynamic field of programming.
0 notes
Text
A deeper look into menu bar handling in MacCatalyst apps with .NET MAUI
I just published a new #blog post! I am going to show you how to handle the menu bar in #MacCatalyst apps with #dotNET #MAUI in an #MVVM-friendly way. #dotNETMAUI #macOS #desktop #cssharp #programming
My current side project TimeTraverseHub has entered the stage where I need to add some global menus that are available everywhere in the app. Being a .NET MAUI app, I tried the naive approach first and followed the documentation from Microsoft. I was able to quickly add items to the application’s menu bar, but discovered the edges pretty fast. So I went out to learn more about how the menu…

View On WordPress
#.NET MAUI#Desktop#endif#if#macOS#MAUI#menu#MenuBar#MenuBarFlyoutItem#MenuBarFlyoutSubItem#MenuBarItem#mvvm#UIMenu#UIMenuBuilder#UIMenuIdentifier#UIMenuSystem
0 notes
Text
How to enable sun shadows in TS3, on Parallels for 64-bit Macs
Disclaimer: Back everything up. I can't take responsibility if you mess up your game files and the game doesn't run. Make a pristine copy of any file before you edit it. All that said...
Who is this tip for?
TS3 doesn't recognise Parallels' simulated GPU. This means that even if you set all your graphics settings to max, sun shadows (shadows cast by objects outdoors) are not rendered.
An example of sun shadows being successfully rendered:

If you have no sun shadows, your game will not look like the above pic. You will see a drop shadow (dark circle) under the trunk of the tree but no detailed shadow. If that is the case, read on for...
How to Fix It
Go to Programme Files (x86) > Electronic Arts > The Sims 3 > Game > Bin.

Copy GraphicsCards.sgr and GraphicsRules.sgr to a new location.
I recommend copying each file twice, with a copy of each in two folders marked 'Original' and 'Edited'. Then you have a spare copy of each under 'Original' that you can put back in the folder if you mess up.
Next go to Documents > Electronic Arts > The Sims 3 and open DeviceConfig.log.

Scroll down inside the log and copy exactly the values from:
Name (database):
Vendor
Chipset: Vendor: and
Chipset: Device:
to a new note for later.
You may have no Vendor at all, or it may be Parallels. Your graphics device may be Parallels Display Adapter (WDDM) or it may simply be Parallels Display Adapter. I've seen a few variations of each name online from various people Parallels VMs; it seems to be a bit random.
For example, my Vendor name is empty, and my graphics device Name (database) is Parallels Display Adapter (WDDM). My Chipset Vendor is 5404c42, and my Chipset Device is 0000.

Now open your new copy of GraphicsCards.sgr saved outside of Program Files. If you're not used to editing code I recommend downloading Sublime Text which is free, and changing syntax to C# under View which will allow you to check your entries more easily.

Go to the very bottom of the file, add a new line under the final end, and add the following:
vendor "" 0x card 0x "" end
Use tab to indent the 'card' line like in my screenshot above. Take a look at the note you made earlier:
Add your Vendor between the first set of quotes
Add your Chipset: Vendor: value after the first 0x.
Add your Chipset: Device after the second 0x.
Add your Name (database) between the final set of quotes.
Check your spacing matches the above screenshot. Save and close GraphicsCards.
Open your new copy of GraphicsRules.sgr which you saved outside of Program Files earlier.
Search for 'ATI' to find the right location.
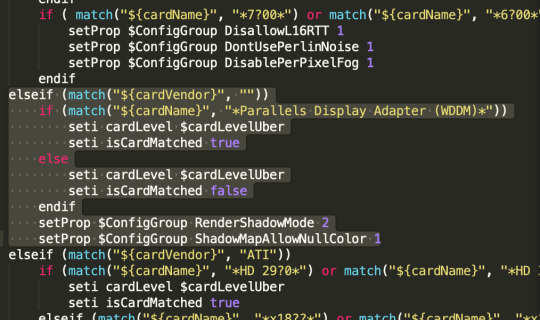
Make a new line directly above elseif (match("${cardVendor}", "ATI")) and paste the following:
elseif (match("${cardVendor}", "")) if (match("${cardName}", "")) seti cardLevel $cardLevelUber seti isCardMatched true else seti cardLevel $cardLevelUber seti isCardMatched false endif setProp $ConfigGroup RenderShadowMode 2 setProp $ConfigGroup ShadowMapAllowNullColor 1
Make your indenting match the above screenshot. Again, referring to the note you made earlier:
Add your Vendor between the first set of empty quotes
Add your Name (Database) between the second set of empty quotes
Save the file and close it.
Now, copy your newly edited GraphicsCards.sgr and GraphicsRules.sgr files to Programme Files (x86) > Electronic Arts > The Sims 3 > Game > Bin.
When asked if you want to replace the files, select yes (make sure you have a backup copy of the originals first!)
Check it has worked
Open TS3 and check for sun shadows.
If you have CAW, the quickest way to check sun shadows are rendering - without waiting for all of TS3 and a save to load - is to make a new small map, place a few trees then open Edit In Game. You need to open Edit In Game - this method doesn't fix sun shadows in CAW itself. Zoom right in to your trees and check for sun shadows.
If TS3 (or EIG) doesn't run, or crashes on loading, there is a problem with your syntax or with the values you've pasted in. Put your backed-up original GraphicsCards.sgr and GraphicsRules.sgr files back into Bin and ensure the game runs, then go back to try and find your mistake.
All credit to
The tens of people, too many to link, who have experimented with varying degrees of success with how to fix this issue across Reddit, EA Forums, etc. I simply amalgamated the working advice and added that you must copy your own values from your own DeviceConfig file.
18 notes
·
View notes
Note
#include <stdint.h>
#include <stdio.h>
#ifdef _WIN32
#iinclude <io.h>
#include <fcntl.h>
#define main() M();
int main(){setmode(fi leno(stdin),O_BINARY);return M();}int M() #endif int main() {uint32_t h[20]={0}, i=0,x=~i/15,f=x*x-x,a=f^x, b=f^x*9,c=~a,d=~b;int64_t z=0, g=0,l=566548,p=585873,o=882346,e ,m=64336,k,n;for(;d=h[c=h[b=h[a=h[i= 0]+=a,1]+=b,2]+=c,3]+=d,f;){for(n=64 ;n==8?h[h[5]=g,4]=g>>32,f=z>=0:n;)h[4+ --n/4]=x=(z<0?0:(z=getchar())>=0?g+=8,z: 128)<<24|x>>8;;for(e=0,k=~e<<40;(x=i/16) <4;a=d,d=c,c=b,b+=x<<n|x>>(32-n))n=((e*m +k*p)>>21)+e*l+k*o,k=(((k*m-e*p)>>21)+k* l-e*o)>>20,e=n>>20,n=(i|12)*152%543%82 %4+i%4*43/8+4,x=a+((x>2?~d|b:x>1?b^d :x?(b^c)&d:(c^d)&~b)^c)+h[19-((x*7/2 &5)-~(x*5&6)*i++)%16]+(e>>40^e>> 8);}for(;i<33;putchar(i++<32?a +=a>9?'a'-10:'0':'\n'))a=h [i/8]>>(i%8*4^4)&15; return 0;}
🥵
2 notes
·
View notes
Text
Tumblr theme coding tutorial - Popup ask box

1. Find this
<a href="/ask">
Replace it with this
<a href="javascript:open('askbox');">
2. Find this
<body>
Add this, right AFTER it
<script type="text/javascript"> function open(askbox) { var askcontainer = document.getElementById(askbox); if (askcontainer) {askcontainer.className=(askcontainer.className=='closed')?'open':'closed';} } </script> <div id="askbox" class="closed"> <a id="askboxbg" href="javascript:open('askbox');"></a> <div id="ask"> <h1>{AskLabel}</h1> <iframe frameborder="0" scrolling="no" width="100%" height="190" src="https://www.tumblr.com/ask_form/__________.tumblr.com" style="background-color:transparent; overflow:hidden;" id="ask_form"></iframe><!--[if IE]><script type="text/javascript">document.getElementById('ask_form').allowTransparency=true;</script><![endif]--> </div> </div>
3. In the code above, replace the blank __________ with your username. For example I would replace the blank with lyrasthemes.
4. Next, find this
</style>
Add this, right BEFORE it
#askbox {position:fixed; z-index:20; width:100%; height:100%; background-color:rgba(0,0,0,0.75);} #askbox.open {display:block;} #askbox.closed {display:none;} #askboxbg {display:block; width:100%; height:100%; position:absolute; z-index:1;} #askbox #ask {width:500px; padding:20px; position:absolute; z-index:2; left:50%; margin:100px 0 0 -270px; text-decoration:none; color:black; background-color:white;}
Source
#tutorial#theme code tutuorial#coding tutorial#tumblr theme tutorial#theme tutorial#tutorials#code tutorial#pop up ask#pop up ask box#pop up ask box tutorial
1 note
·
View note