#eye tutorial
Explore tagged Tumblr posts
Visit Tumblr Blog
Explore Tumblr blogs with no restrictions, modern design and the best experience.
Last Seen Tumblr Blogs


Fun Fact
Tumblr was named as a finalist in Lead411’s New York City Hot 125 in Aug 2010.
Note
how do u draw eyelashes like that??
I dont actively think about my process BUT since you asked I figured out a tiny tutorial just for you Anon! <3

72 notes
·
View notes
Text

2025 Eye Drawing Tutorial
I have made an updated eye drawing tutorial!
This is how I personally draw my eyes!
Feel free to use if you'd like! No credit needed if you use this, but it's always appreciated! 💜💙
#art#digital art#artwork#drawing#artist#artists on tumblr#art tumblr#art tips#art tutorial#drawing tips#drawing tutorial#art guide#drawing guide#tutorial#how to draw#eye tutorial#eyes tutorial#digital artist#ipad artist#digitalart#digital drawing#illustration#creator#clip studio paint#procreate#medibang#paint tool sai#photoshop#firealpaca#tips and tricks
25 notes
·
View notes
Note
how do you draw eyelashes and closed eyes so beautifully???

Well you're my first ever ask! Thank you so much <3 I usually experiment with my lashes but i've done a basic tutorial for you, hope it helps! Brushes: https://assets.clip-studio.com/en-us/detail?id=2068131 https://assets.clip-studio.com/en-us/detail?id=1719521
73 notes
·
View notes
Text
eye tutorial!!!
ignore the fact that my user got cut off at the end and i didn’t figure out the right lighting until the end
(this is my first time rec a tutorial lol)
@bookwormgirl123
#eye tutorial#cartoony realism#<- or smg#sophia doodles#drawing#artists on tumblr#my art#doodle#sketch#sketches#drawing eyes#tutorial#art tutorial#beginner artist#i’ve only been drawing for like two months#so if it’s bad don’t bully me too much 🫶
18 notes
·
View notes
Text
I'm doing faces this week, but I'm planning to put down some extra work on them and do real drawings, not just sketches, with shading, highlights and lineweight. Today I show how I'm supposed to draw a pair of eyes on a front face, even if I'm very seldom finish them like this when sketching. Tomorrow I'm planning on watching some videos on drawing hair and making something similar to this of what a deduced. The rest of the week I think I'll have time for 2-3 real facedrawings. But you know what they say happens when plans meet reality.
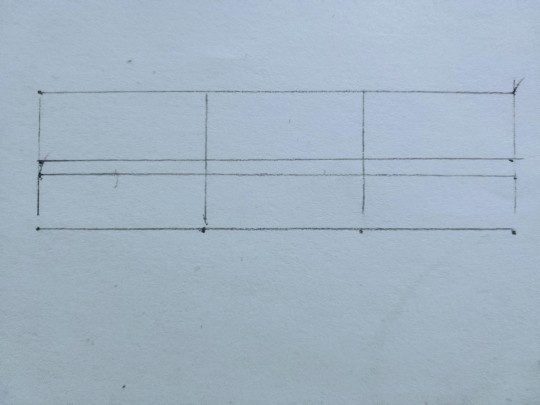
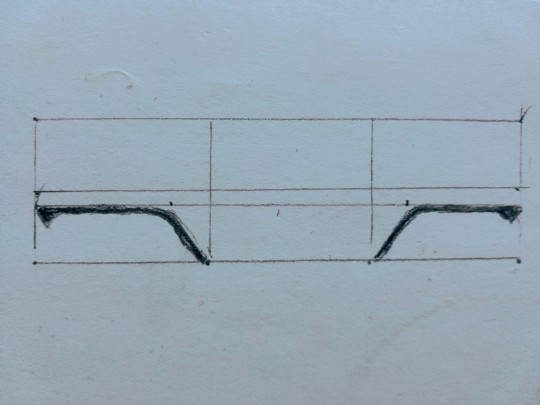
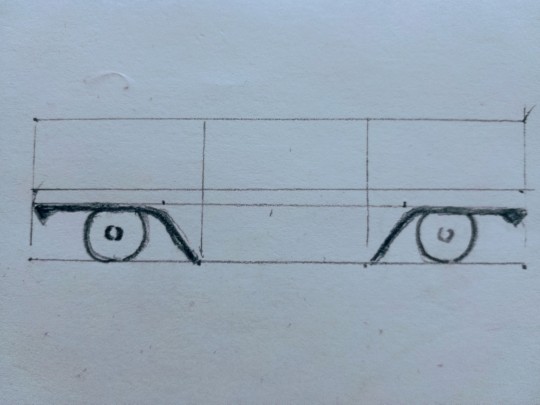
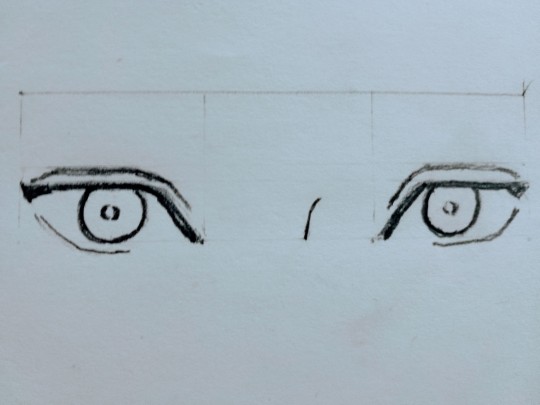
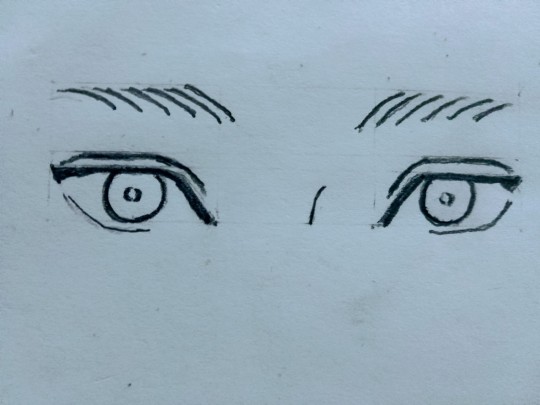
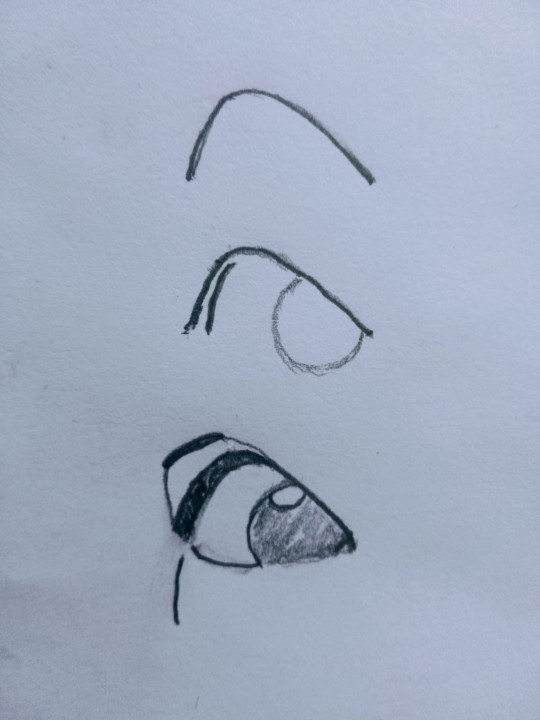
I also did a 3 step drawing on a right eye from ¾-view in comic style. But this is a direct redraw from Chommang. The front eyes is my own step by step instruction. Chommangs 3 step instruction below:
#pencil and paper#daily practice#pencil drawing#black and white#eye practice#eye tutorial#tutorial#traditional art#my art
14 notes
·
View notes
Note
Unrelated, but can you do a tutorial for eyes?
Sure! Here's a lil something I put together, hope it helps!


And if it's difficult to read I'll go ahead and put my steps here in text: Step 1 -
Basically to start- We'll be using 3 main colors. You'll be only using these 3 colors throughout the whole process unless you wanna add on some extras for flair or preference. Step 2 -
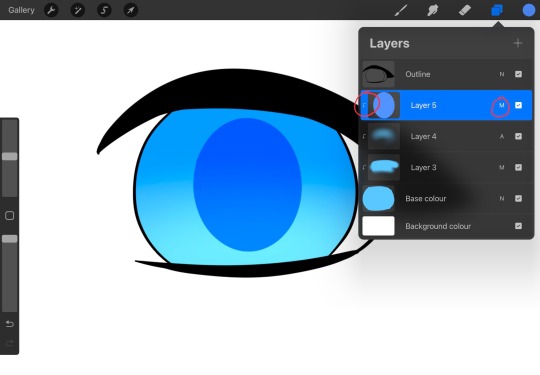
Using these colors, I outline a set of irises along with the pupils. Then I fill in the eyes with what will be considered the character's main eye color.
Note: When the sclera is darker than the character's eye color I tend to use a color darker than it for the pupils and irises. Step 3 -
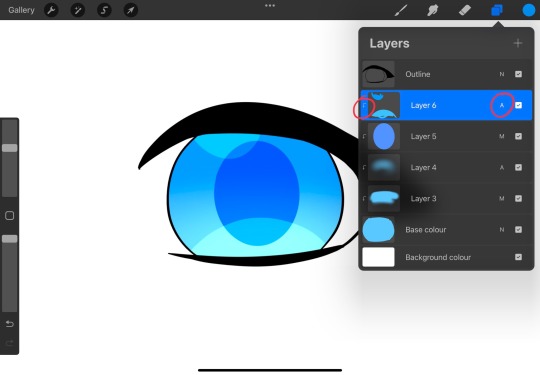
Using the darkest color, and on it's own layer, you color 1/3 of the eye on the top. You'll then set this layer to "Multiply". Using the same color of the irises, also on it's own layer, you'll color over the bottom of the irises and pupil. This layer will be set to "Add/Glow". Step 4 -
Set both layers to 30% opacity, and blur until you're content with the results. I also recommend changing layer opacity of either if you think it fits the eye colors better.
Note: Sometimes I'll add an extra "Add/Glow" layer if I really want to make the eyes stand out or glow.
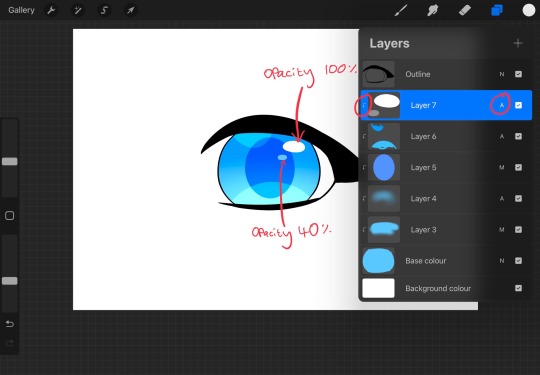
Step 5 -
Then on a new layer I'll add some shapes and lines in the eyes to give a little shine. This layer will be another "Add/Glow" layer. Then it's set to 20-30% opacity.
I'll sometimes use other shapes other than this in the eyes to show off different emotions. Though, this is the one I conistantly use.
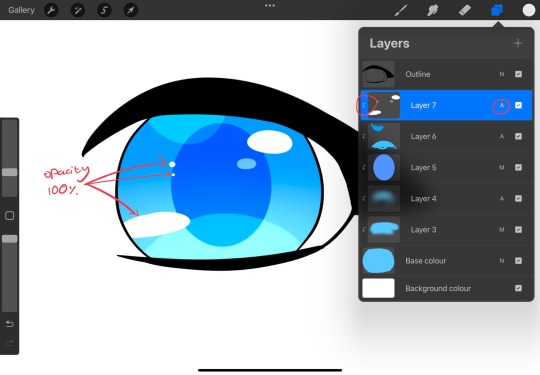
Note: I didn't mention this in the post because I forgot to do so- but you use the same color you used for the irises for this step! Step 6 -
Then finallly I add some light reflection, sometimes adding in an extra glow to them if I feel like going the extra mile to do so.
Anyway, that's basically my current process!
--- I've never gotten asked on something like this before so if it looks wonky it's very much because I'm not used to doing this lmao Now I'm gonna go skitter off to cause more chaos.
#my art#eye tutorial#eyes#monkey sona#how does one tag something like this whoops#tutortial#Free to use
52 notes
·
View notes
Note
Hey, I gotta ask…
HOW do you draw your eyes? They’re the cutest anime eyes I’ve ever seen and I love them!
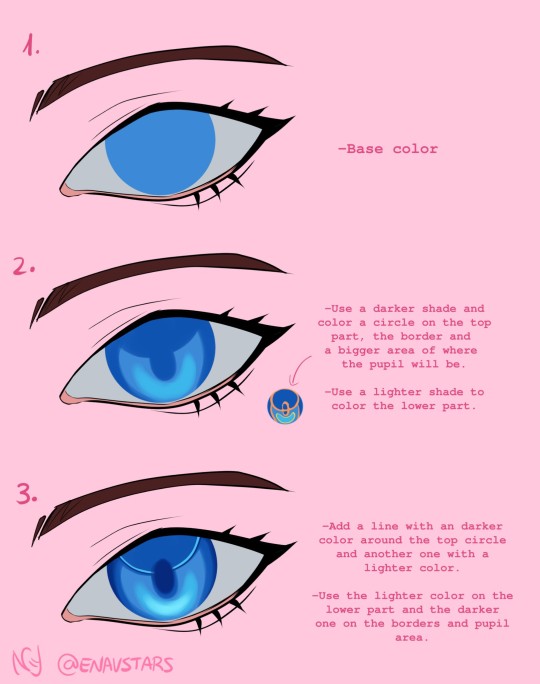
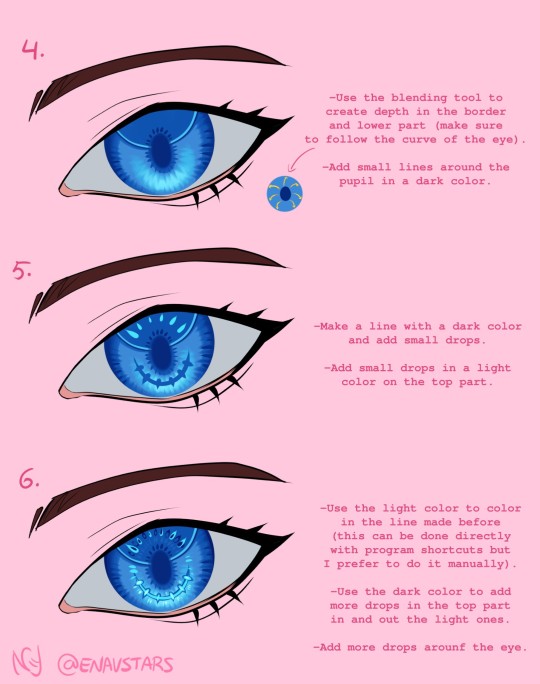
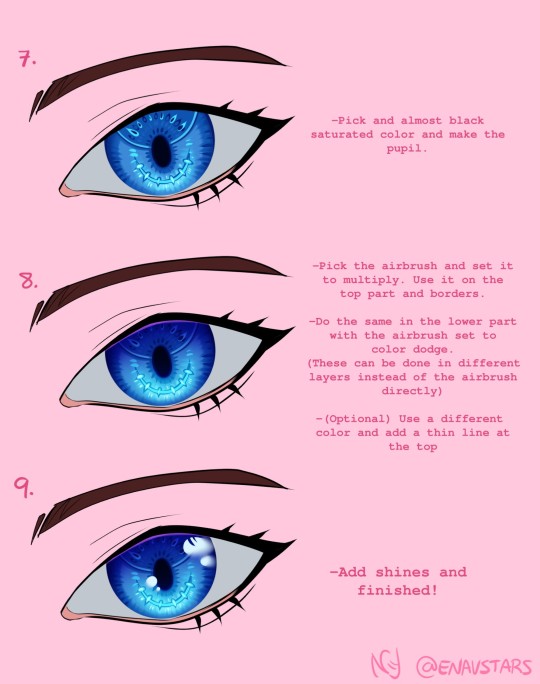
Here's a tutorial on how I color eyes :)
This is my first time doing a tutorial, I hope is easy to understand.
Eyes are my favourite part of a drawing so I always put a lot of effort in them, I'm happy people like them <3
203 notes
·
View notes
Text

Hey here’s another mini tutorial on how I draw and shade eyes
#art ref#art reference#art tutorial#eye tutorial#shading tutorial#drawing tutorial#drawing#anime#anime art#smkittykat art tips and tricks
273 notes
·
View notes
Text

Very excited to share my first Ko-Fi tutorial!
This time, we'll be studying EYES 👀
▶️ https://ko-fi.com/i/IC0C619H1A0 ◀️
16 notes
·
View notes
Note
DROP EYE TUTORIAL!??!?!?
(Plz)


Ofc!
Also,

#my art#asks#eye tutorial#art tutorial#art#hermitcraft#hermitcraft fanart#gtws#mumbo jumbo#grian#zedaph#zedaph fanart#gtws fanart#goodtimeswithscar#goodtimeswithscar fanart#grian fanart#mumbo jumbo fanart#art advice#requests#art requests#?#grem :D#I think#sounds like you..#also this ask is MONTHS old so so sorry-
152 notes
·
View notes
Text
Here’s a simple tutorial on how i shade eyes! I hope it’s helpful 🤗🌻
115 notes
·
View notes
Text
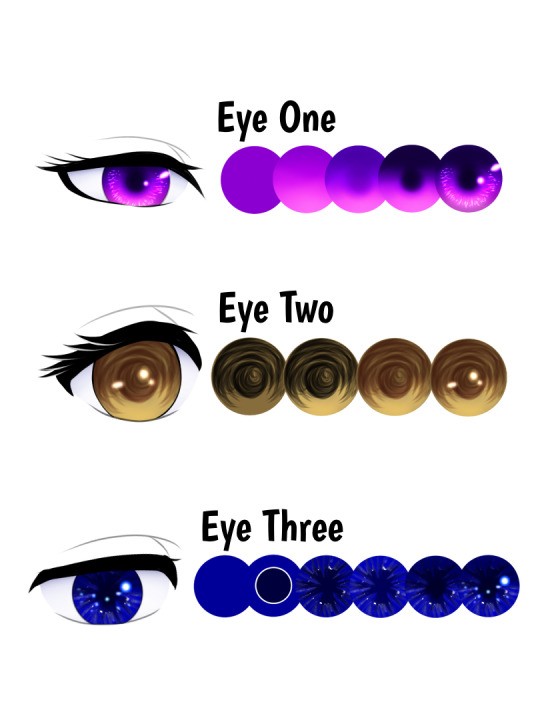
My 3 Ways of Coloring Eyes
I got bored so here’s some quick tutorials on the three ways I color my eyes in IbisPaint.
Eye one is the method I use the most since it fits my art style. Eye three is a method I use when I’m working on more detailed art works. Eye two is a method I recently started using. It’s quick and simple and works pretty well when I’m feeling a little lazy to do completely detailed art works.
Eye One
Step One: Base Color - Color in the eye with the character's eye color.
Step Two: Screen Effect - Add a new layer and clip it to the base color layer. Set this layer to the Screen effect. The colors you’ll need is the base color, and one or two lighter tints from the base color. If you want to add a fourth color you can. Using the airbrush (trapezoid 60%), color the circle from the middle downwards starting with the base color. With each tint/light color, you’ll want to color closer to the bottom part of the circle to create a gradient.
Step Three: Hard-light Effect - Once step two is complete you can merge the layer with the base one. Create a new layer and clip it then set it to Hard light. Repeat the process of Step two but upwards. Using the base color first color the top half of the circle and the center to create the pupil. Then use one or two more colors darker than the base color and repeat the process.
Step Four: Multiply Effect - After merging the layer for step 3 create a new layer and set it to the multiply effect. Remember to clip it to the base layer. Use the darkest color from step three and/or it’s optional an even darker color. Color in the pupil and the very top part of the eye. You can slowly blend in the darker color by coloring along the edge of the circle or use the blur tool (not the blur effect). Make sure to avoid the pupil if you’re using the blur tool. As seen in Step 5, I also colored around the bottom half of the circle to make the lighter colors appear more on the inner part of the eye.
Step Five: Highlights - After merging the layer from step 4, you can create the final layer and set it to Add. Brushes I used was Dip Pen for the small highlights surrounding the iris and Neon 2 - Add for the bigger highlights. Use two or three colors lighter than the base. The highlights can be any length or size so feel free to experiment as much as you want with the highlights! I mostly drew small and short lines and dots for my highlights. Once you’re satisfied with the highlights you can merge the layer!

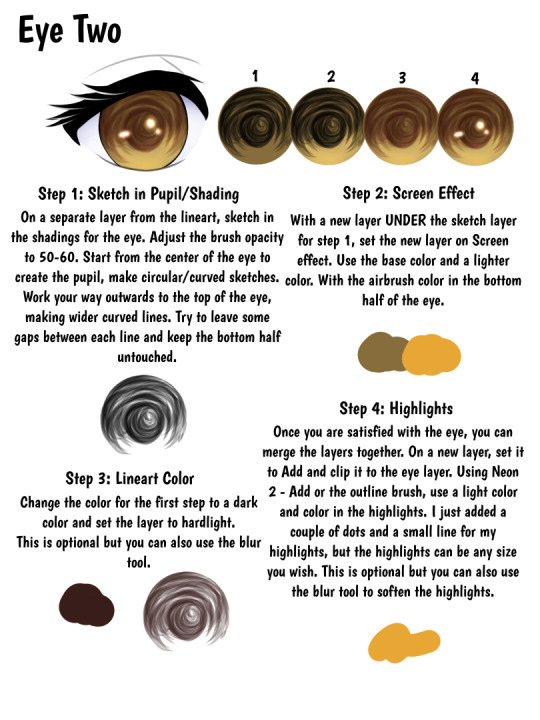
Eye Two
Step One: Sketch in the Pupil - Depending on how you draw your lineart, the sketch for the pupil and shadow will be on a separate layer underneath the lineart layer. Adjust your brush's opacity to 50-60 or however low or high you’d like. Start from the pupil on the center of the eye and create circular or curved sketched lines. Work your way outwards and to the top half of the eye, making wider curved lines. Try to leave some gaps between the lines and keep the bottom half untouched. And don’t focus too much on this half, just make quick sketches it doesn’t have to be perfect!
Step Two: Screen Effect - With a new layer UNDER the sketch layer for step one, set this layer to Screen. Use the airbrush to color the bottom half of the eye. I used the base color and a lighter shade for this step.
Step Three: Sketch Color - Going back to the pupil layer from step one, you’re going to change the color of the sketch to a dark color of the base color. Once you picked out the color set it to hard light. This is optional but you can also use the blur effect. Also optional, you can do mixed colors or another effect besides the hard light one as well for this method. Try experimenting with it!
Step Four: Highlights - After merging the previous layers together you can add a new layer and set it to Add. Use either the Neon 2 - Add or an outline brushes for this step. Use the light color from step 2 or other lighter colors to create the highlights. I just added a couple of dots and a small line for my highlights but the highlights can be any size you like. This is optional but you can also use the blur effect to soften the highlights.
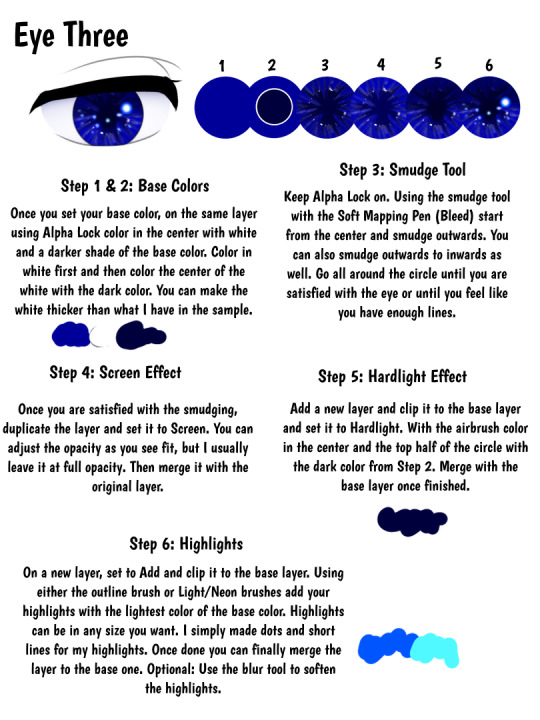
Eye Three
Step One & Two: Base Colors - After picking out your base color, turn on alpha lock and color in the center of the circle with white and a darker shade of the base color. You can do this two ways, color in white first and then the darker color. Or you can color in the darker shade first and then color in white alongside the dark color. You can make the white thicker than what I have shown in the sample. White should be one of the main colors used in this but if you wish to use the lightest tint of the base color in place of white you can do that too!
Step Three: Smudge Tool - Make sure alpha lock is still enabled and using the smudge tool with the Soft Mapping Pen (Bleed) start smudging lines from the center outwards. You can also smudge outwards to inwards as well. Go all around the circle until you are satisfied with the eye or until you feel like you have enough lines. Make sure to adjust the size of the brush to make the lines thin or thick.
Step Four: Screen Effect - Once you’re satisfied with the smudges, duplicate the layer and set it to screen. You can adjust the opacity as you see fit but I usually just leave it at full opacity. Then merge it with the base layer.
Step Five: Hard Light Effect - On a new layer, clipped to the base one set it to hard light effect. With the airbrush color I’m the center of the eye to create the pupil and the top half of the circle. Use the dark color from step 2. If you wish to make the pupil more visible you can color it in more or use a darker color. Once finished, merge the layer to the base.
Step Six: Highlights - On a new layer, set to Add and clipped to the base layer we can add the highlights! Use either the Neon/Light brushes and the Outline brushes to draw the highlights with the lightest tint of the base color. The highlights can be any shape or size you wish. I mostly made dots and short lines for my highlights. This is optional but you can also use the blur effect to soften the highlights.
#ariparri#art tutorial#coloring tutorial#eye tutorial#ibispaint#ibispaint tutorial#eye reference#art tip#art reference#ibispaint tips
19 notes
·
View notes
Note
Hey! I love your art! Do you think you could do an eye tutorial? I’ve seen your head, arm and nose tutorials and I love the way you draw eyes!
i also posted it on tiktok, i hope this is okay!!
50 notes
·
View notes
Text
@just-a-douglas-simp-existing wanted a tutorial on how I shade eyes so here ya go 👇✨

1) Once you have your eye shape, make another layer underneath your lineart and add your base colour
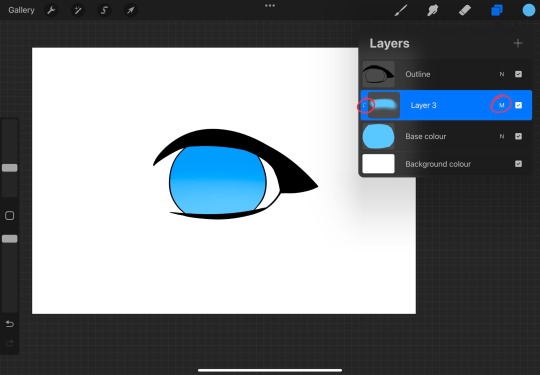
2) Then add another layer above the base colour, hit clipping mask, and set the blending mode to Multiply. With the same colour and with Soft Brush, draw a lil arch shape at the top of the iris, and change the opacity to how much you want it to be
3) Another layer, Clipping Mask, this time the blending mode is Add. Do the same thing as step 2 only this time, on the bottom of the iris
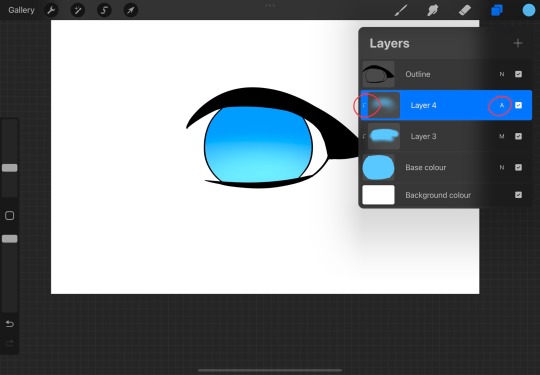
4) Another layer, Clipping Mask, Multiply, change the brush to any inking brush (I used Studio Pen but you can use any one you want) and choose a slightly darker shade of the base colour for the pupil
5) Another layer, Clipping Mask, Add, this is for the highlights. Choose a lighter shade of the base colour and make an arch at the bottom, then choose a darker shade and make a smaller blob shape at the top. (Adjust the opacity if you want)
6) Another layer, Clipping Mask, Add, now these are on only one layer (mostly to save time lol). Change the colour to white and make these little blobs like so. The pen opacities are shown in the picture
7) Continue to make tiny dots and blobs like so, until you're happy with the highlights

8) Optional bonus highlight: I like to add a little heart in the highlights layer, just use the base colour to draw a tiny heart like this. But you can skip this step if you want ofc
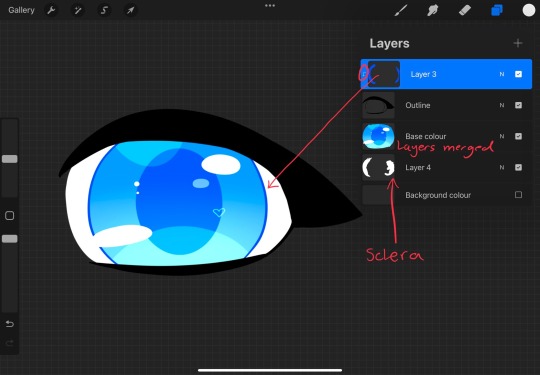
9) Now this and the next step are both completely optional, after you're happy with the iris, merge all the layers into one. And add another layer above the lineart and chose a slightly darker shade of the pupil colour to colour the outline of the iris
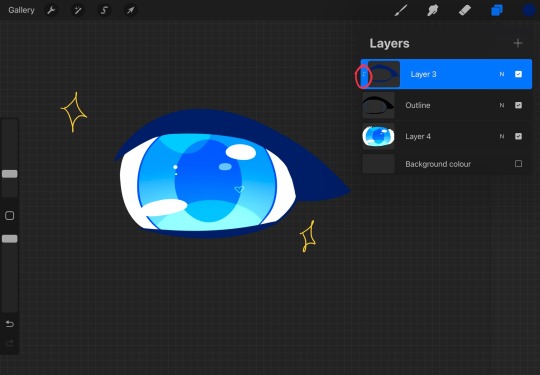
10) Similar process to step 9, except make the colour a lot darker to colour the outline of the eye. And donee✨
Hopefully this was easy to understand and lemme know if you want anymore tutorials ✨✨✨
24 notes
·
View notes
Text

someone on discord asked me for an eye tut so uhh. yeah ive peaked as an artist
4 notes
·
View notes
Text
you never know how bad your explaining skills are until you try to make a tutorial
#crochet#amigurumi#plushies#etsy#sanrio#kuromi#kuromicore#sanriocore#crochet kuromi#kuromi amigurumi#kuromi plush#crochet sanrio#sanrio amigurumi#sanrio plush#fluffy#crochet yarn#crochet tutorial#eye tutorial#tutorial#amigurumi tutorial
8 notes
·
View notes