#ffmpeg audacity
Explore tagged Tumblr posts
Visit Tumblr Blog
Explore Tumblr blogs with no restrictions, modern design and the best experience.
Last Seen Tumblr Blogs


Fun Fact
Tumblr has 4 main sources of revenue.
Text
instalar corretamente o FFmpeg
Para utilizar o Audacity , é crucial instalar corretamente o FFmpeg. A instalação do #ffmpeg no #audacity é um processo fundamental para assegurar a compatibilidade e funcionalidade adequada. Para orientações detalhadas sobre como instalar o FFmpeg no Audacity em 2024, recomenda-se seguir cuidadosamente as instruções fornecidas pelo software. Essas etapas, quando seguidas corretamente, garantem a integração bem-sucedida do FFmpeg no Audacity, proporcionando uma variedade de recursos e melhorando a qualidade geral da experiência de edição de áudio. Para obter informações específicas sobre como instalar a biblioteca FFmpeg no Audacity, é aconselhável consultar as fontes oficiais de suporte ou documentação do Audacity.
youtube
instalar ffmpeg audacity_ instalar ffmpeg audacity 2024, instalar ffmpeg audacity, instalar ffmpeg audacity 2024, como instalar ffmpeg audacity_, comoinstalar ffmpeg audacity 2024, como instalar ffmpeg audacity_, como instalar ffmpeg audacity, ffmpeg,audacity,ffmpeg audacity, instalar ffmpeg audacity, como instalar libreria ffmpeg en audacity, como baixar e instalar ffmpeg para audacity 2022, instalar ffmpeg audacity, Installing FFmpeg for Audacity,
#instalar ffmpeg audacity_ instalar ffmpeg audacity 2024#instalar ffmpeg audacity#instalar ffmpeg audacity 2024#como instalar ffmpeg audacity_#comoinstalar ffmpeg audacity 2024#como instalar ffmpeg audacity#ffmpeg#audacity#ffmpeg audacity#como instalar libreria ffmpeg en audacity#como baixar e instalar ffmpeg para audacity 2022#Installing FFmpeg for Audacity#Youtube
2 notes
·
View notes
Text
Successfully cut the album I recorded from YT into tracks yippee, now to convert the WAVs into OGGs so it doesn't take up a gig of disk space.
#audacity and ffmpeg my beloved#I have a few more to do before I record more I don't want gig wav files littering my disk
0 notes
Video
youtube
Installation de FFmpeg pour Audacity [Tutoriel]
0 notes
Note
Beepity boopity :3
#something something “doing this to you” something something#I didn't really have any reason to do this other than figuring out if I could make similar things#It didn't fare well against mp3 compression but it's still receivable. mostly.#I definitely did it differently than prev#I know there are online generators/receivers but I decided it'd be fun to mess around with actual desktop software#so I made this with QSSTV#which sucked because it doesn't have audio file IO#I had to use a pipewire graph editor to manually pipe audio from a media player in#and to save the output file I had to let QSSTV output to the speakers and I had to set ffmpeg to capture the ALSA output monitor#then I just trimmed the audio with audacity and made it an mp3 with ffmpeg#definitely a more roundabout way of doing things#but the most important thing is the friends we made along the way#officially friends with thasune now#sorry thanook. this robot is WAY cooler than you. /j
17 notes
·
View notes
Text
FFmpeg could only have come from the open source process/ethos
For most open source projects -- Linux, Audacity, Mastodon -- open source is a cost we pay to be free of corporate influence. It's worth paying that cost, but the resulting software is worse than the equivalent proprietary software in most respects. Not so for FFmpeg, the poster child for what open source is good at.
We should be campaigning for it to be a UNESCO world heritage site, alongside the demo scene and German techno.
11 notes
·
View notes
Text
"I have seen three pictures of the man".
Picture_01
The boy stood still, staring at the camera, his gaze fixed, unyielding. A absent smirk, just the stark, unadorned plane of his face. It was a face that already knew the weight of scrutiny, the silent judgment that settled like dust. No empathy, but a rigid mask, the skin stretched taut over the bones, revealing nothing.
"What a dreadful child!", a silent testament to the cruelty of first impressions. "What a hideous little boy! A monkey! That's why he looks so miserable and nobody wishes to play with him.". Parents would quietly whisper to each other upon seeing him arriving at the playground, shamelessly blessing God for having not so ugly sons.
Even in childhood, the contours of our features are being etched into a narrative not of our making. A single, unyielding look, and the world begins to define us: dreadful, wizened, hideous. Labels whispered and solidified, a prison built of glances. How swiftly the gaze of society could strip innocence, how easily a child could become a stigma, a grotesque caricature, simply for the way he appears, and becomes no longer human.
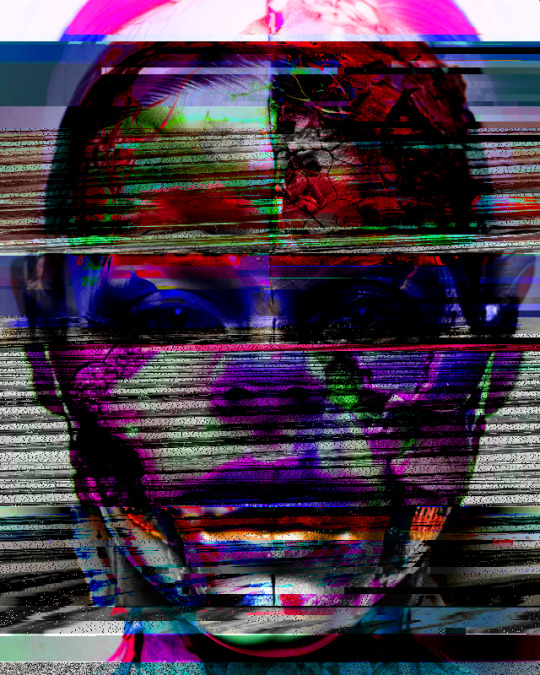
#GlitchArt + #AIportrait + Text inspired by a paragraph from No Longer Human by #OsamuDazai.

Childhood and Body Shaming.
Society's judgmental and pitiful gaze.
Physical appearance and discrimination.
Art inspiration and creative process.
Experimental Art and New Media.
Body Horror and Body Positivity.
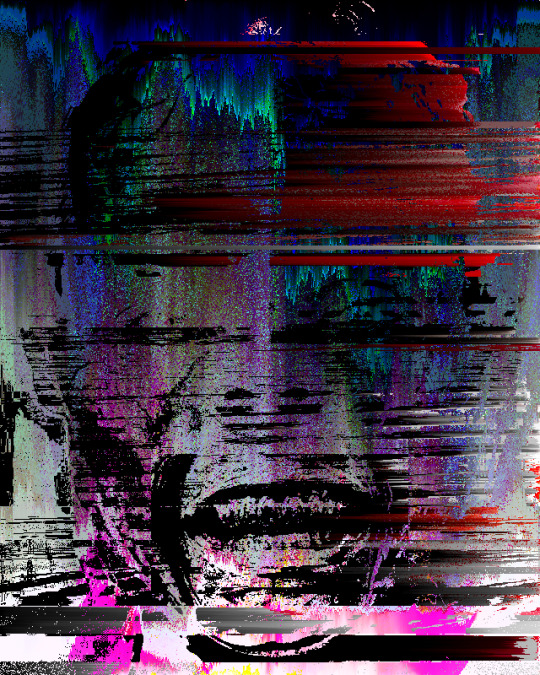
How was the video made?
Initial AI Image Generation and Glitching:
Eight AI-generated portraits were compiled into a PDF (JPG compression).
The PDF's raw data was manipulated using a text editor (Notepad++) by replacing hexadecimal characters, creating initial glitches.
The glitched PDF was viewed in SumatraPDF.
Each glitched image was copied and pasted into a single Photoshop file as separate layers (PSD).
The PSD file's raw data was again manipulated in Notepad++, further glitching the image layers.
The glitched layers were then adjusted in Photoshop using Hue and Saturation adjustments.
All layers were blended into a final PNG image.
Image Sorting and Animation:
The PNG image was processed using the "UltimateSort" script by GenerateMe, creating a series of sorted frames.
A selection of these frames was exported.
The frames were compiled into an animated GIF.
The GIF was encoded into an MP4 video.
The GIF's raw data was databended in Note++
The glitched GIF was played in IrfanView and screen recorded via ShareX.
The two MP4 video files that were made from the GIF were edited together in Adobe Premiere.
Video Glitching and Audio Integration:
The edited video track was exported as an MP4.
The MP4 was converted to an AVI file using the ASV1 codec.
The AVI video's raw data was imported into Audacity as a RAW file, glitched, and saved.
The glitched AVI was converted back into an MP4 video using FFmpeg.
The glitched video was imported into Adobe Premiere.
Audio was added: a Mubert-generated musical track and a voiceover.
The voiceover was created using TTSMaker, based on text generated by Gemini 2.0, which drew inspiration from a paragraph in No Longer Human.
#digital art#new media art#artificial intelligence#glitch art#glitch#art#artists on tumblr#databending#dark art#macabre#dark aesthetic#dark artwork#glitchart#glitch aesthetic#glitchartistscollective#glitch artists collective
15 notes
·
View notes
Text
HEY EVERYBODY!
MAKE THIS POST EXPLODE!!!
This is infinity-times better than what my post is and it's WAY more comprehensive and detailed and user-friendly! IT DESERVES ALL OF MY NOTES AND MORE! SO GO GIVE EM TO OP!!!!
YouTube Downloads through VLC: Step by Step
So this guide to easily downloading off YouTube is super helpful, but there's enough important information hidden in the reblogs that (with the permission of OP @queriesntheories ) I'm doing a more step-by-step version.
Please note: these downloads will be in YouTube quality. My test video download is coming through at 360p, even though the video I'm starting from is set to 720p. They're legible, but they won't look great on a TV. For high visual quality, you'll want to seek out other methods.
This guide is written for Windows 10, since that's what I can test on. It's been tested on Firefox, Chrome, and Edge (which is a Chromium browser, so the method should work in other Chromium browsers too). So far, I haven't tracked down a way to use this download method on mobile.
BASIC KNOWLEDGE:
I'll try to make this pretty beginner-friendly, but I am going to assume that you know how to right-click, double-click, navigate right-click menus, click-and-drag, use keyboard shortcuts that are given to you (for example, how to use Ctrl+A), and get the URL for any YouTube video you want to download.
You'll also need to download and install one or more programs off the internet using .exe files, if you don't have these programs already. Please make sure you know how to use your firewall and antivirus to keep your computer safe, and google any names you don't recognize before allowing permission for each file. You can also hover your mouse over each link in this post to make sure it goes where I'm saying it will go.
YOU WILL NEED:
A computer where you have admin permissions. This is usually a computer you own or have the main login on. Sadly, a shared computer like the ones at universities and libraries will not work for this.
Enough space on your computer to install the programs listed below, if you don't have them already, and some space to save your downloaded files to. The files are pretty small because of the low video quality.
A simple text editing program. Notepad is the one that usually comes with Windows. If it lets you change fonts, it's too fancy. A notepad designed specifically to edit program code without messing it up is Notepad++, which you can download here.
A web browser. I use Firefox, which you can get here. Chrome or other Chrome-based browsers should also work. I haven't tested in Safari.
An Internet connection fast enough to load YouTube. A little buffering is fine. The downloads will happen much faster than streaming the entire video, unless your internet is very slow.
VLC Media Player, which you can get here. It's a free player for music and videos, available on Windows, Android, and iOS, and it can play almost any format of video or audio file that exists. We'll be using it for one of the central steps in this process.
If you want just the audio from a YouTube video, you'll need to download the video and then use a different program to copy the audio into its own file. At the end of this post, I'll have instructions for that, using a free sound editor called Audacity.
SETUP TO DOWNLOAD:
The first time you do this, you'll need to set VLC up so it can do what you want. This is where we need Notepad and admin permissions. You shouldn't need to repeat this process unless you're reinstalling VLC.
If VLC is open, close it.
In your computer's file system (File Explorer on Windows), go to C:\Program Files\VideoLAN\VLC\lua\playlist
If you're not familiar with File Explorer, you'll start by clicking where the left side shows (C:). Then in the big main window, you'll double-click each folder that you see in the file path, in order - so in this case, when you're in C: you need to look for Program Files. (There will be two of them. You want the one without the x86 at the end.) Then inside Program Files you're looking for VideoLAN, and so forth through the whole path.
Once you're inside the "playlist" folder, you'll see a lot of files ending in .luac - they're in alphabetical order. The one you want to edit is youtube.luac which is probably at the bottom.
You can't edit youtube.luac while it's in this folder. Click and drag it out of the playlist folder to somewhere else you can find it - your desktop, for instance. Your computer will ask for admin permission to move the file. Click the "Continue" button with the blue and yellow shield.
Now that the file is moved, double-click on it. The Microsoft Store will want you to search for a program to open the .luac file type with. Don't go to the Microsoft Store, just click on the blue "More apps" below that option, and you'll get a list that should include your notepad program. Click on it and click OK.
The file that opens up will be absolutely full of gibberish-looking code. That's fine. Use Ctrl+A to select everything inside the file, then Backspace or Delete to delete it. Don't close the file yet.
In your web browser, go to https://github.com/videolan/vlc/blob/master/share/lua/playlist/youtube.lua
Click in the part of the Github page that has a bunch of mostly blue code in it. Use Ctrl+A to select all of that code, then come back into your empty youtube.luac file and use Ctrl+P to paste the whole chunk of code into the file.
Save the youtube.luac file (Ctrl+S or File > Save in the upper left corner of the notepad program), then close the notepad program.
Drag youtube.luac back into the folder it came from. The computer will ask for admin permission again. Give it permission.
Now you can close Github and Notepad. You're ready to start downloading!
HOW TO DOWNLOAD:
First, get your YouTube link. It should look something like this: https://www.youtube.com/watch?v=abc123DEF45 If it's longer, you can delete any extra stuff after that first set of letters and numbers, but you don't have to.
Now open VLC. Go to Media > Open Network Stream and paste your YouTube link into the box that comes up. Click Play. Wait until the video starts to play, then you can pause it if you want so it's not distracting you during the next part.
(If nothing happens, you probably forgot to put youtube.luac back. coughs)
In VLC, go to Tools > Codec Information. At the bottom of the pop-up box you'll see a long string of gibberish in a box labeled Location. Click in the Location box. It won't look like it clicked properly, but when you press Ctrl+A, it should select all. Use Ctrl+C to copy it.
In your web browser, paste the entire string of gibberish and hit Enter. Your same YouTube video should come up, but without any of the YouTube interface around it. This is where the video actually lives on YouTube's servers. YouTube really, really doesn't like to show this address to humans, which is why we needed VLC to be like "hi I'm just a little video player" and get it for us.
Because, if you're looking at the place where the video actually lives, you can just right-click-download it, and YouTube can't stop you.
Right-click on your video. Choose "Save Video As". Choose where to save it to - I use my computer's built-in Music or Videos folders.
Give it a name other than "videoplayback" so you can tell it apart from your other downloads.
The "Save As Type" dropdown under the Name field will probably default to MP4. This is a good versatile video format that most video players can read. If you need a different format, you can convert the download later. (That's a whole other post topic.)
Click Save, and your video will start downloading! It may take a few minutes to fully download, depending on your video length and internet speed. Once the download finishes, congratulations! You have successfully downloaded a YouTube video!
If you'd like to convert your video into a (usually smaller) audio file, so you can put it on a music player, it's time to install and set up Audacity.
INSTALLING AUDACITY (first time setup for audio file conversion):
You can get Audacity here. If you're following along on Windows 10, choose the "64-bit installer (recommended)". Run the installer, but don't open Audacity at the end, or if it does open, close it again.
On that same Audacity download page, scroll down past the installers to the "Additional resources". You'll see a box with a "Link to FFmpeg library". This is where you'll get the add-on program that will let Audacity open your downloaded YouTube video, so you can tell it to make an audio-only file. The link will take you to this page on the Audacity support wiki, which will always have the most up-to-date information on how to install the file you need here.
From that wiki page, follow the link to the actual FFmpeg library. If you're not using an adblocker, be careful not to click on any of the ads showing you download buttons. The link you want is bold blue text under "FFmpeg Installer for Audacity 3.2 and later", and looks something like this: "FFmpeg_5.0.0_for_Audacity_on_Windows_x86.exe". Download and install it. Without this, Audacity won't be able to open MP4 files downloaded from YouTube.
CONVERTING TO AUDIO:
Make sure you know where to find your downloaded MP4 video file. This file won't go away when you "convert" it - you'll just be copying the audio into a different file.
Open up Audacity.
Go to File > Open and choose your video file.
You'll get one of those soundwave file displays you see in recording booths and so forth. Audacity is a good solid choice if you want to teach yourself to edit soundwave files, but that's not what we're here for right now.
Go to File > Export Audio. The File Name will populate to match the video's filename, but you can edit it if you want.
Click the Browse button next to the Folder box, and choose where to save your new audio file to. I use my computer's Music folder.
You can click on the Format dropdown and choose an audio file type. If you're not sure which one you want, MP3 is the most common and versatile.
If you'd like your music player to know the artist, album, and so forth for your audio track, you can edit that later in File Manager, or you can put the information in with the Edit Metadata button here. You can leave any of the slots blank, for instance if you don't have a track number because it's a YouTube video.
Once everything is set up, click Export, and your new audio file will be created. Go forth and listen!
#vlc media player#youtube#q's internet trinkets#media preservation#piracy#video downloader#audacity#songs#mp3#ffmpeg#notepad++#internet tools#internet archive
240 notes
·
View notes
Note
what’s your preferred way of storing / having access to all of your favorite music nowadays? streaming is getting really bad these days, wondering what your personal opinion is
i don't use streaming services like spotify and try not to meddle in that sphere because i find it venomous and hedonistic, if anything for the extreme consumption of resources necessary to sustain it, but that applies to the internet at large. there's no reason for me to use it when i have better means at my disposal and it fails to host most of my favorite music, the energy is just not there/in any inculcated dependency on corporate entities. is it getting bad by its distribution of royalties, management of intellectual property legalities, or some other domain? personally i store the digital copies of music i value on external hard drives, and to that i would recommend toshiba products. i find youtube to be useful for fetching audio through the python fork of youtube downloader and converting formats with ffmpeg, it's best if the videos allow for timestamped track splitting so you don't have to manually do this in audacity. unfortunately it's impossible to bypass the sacrifice of audio quality required to upload anything to youtube. if you record transfers of your own physical media, it might help to share your files with friends to decrease the chances they might be lost in the case that any of your drives die.
24 notes
·
View notes
Text
I’ve been in the habit of burning mix CDs using downloaded audio for a while now and one thing I never understand is why YouTube puts their stuff in 48kHz sampling rate instead of 44.1.
Furthermore this causes me issues because CD players Don’t Like That and when burning one it’ll either a) be forcefully downsampled to 44.1 and have a ton of aliasing or b) burn at 48 and sound like you’re playing a record too slowly.
The only application I’ve found that doesn’t do this is Windows Media Player. It can burn CDs with 48kHz source MP3s just fine.
For those who know more about this than I do, why is WMP literally the only utility I’ve found that can do this? I’ve tried ffmpeg, audacity, and other CD burning applications and nothing else downsamples well (if it downsamples at all).
6 notes
·
View notes
Text
youtube
FLASHING WARNING - Le Hz - Living Safely for us all ( Kaspar tomato edition ) - Various techniques - 29/03/2024
background_cubemap_512_002_traumabasedminedCtrl
visual techniques https://github.com/itsKaspar/tomato chromakeying, converting video into vertical lines of singlepixels, ffmpeg -i in -vf fps=25000/1001,drawbox=t=fill:c=black:enable='mod(n,2)' -c:a copy out...ffmpeg -flags2 +export_mvs -i in -vf "split[original],codecview=mv=pf+bf+bb[vectors],[vectors][original]blend=all_mode=difference128,eq=contrast=7:brightness=-1:gamma=1.5" out...ffmpeg -y -i in -vf "rgbashift=rh=-40" out... https://www.youtube.com/watch?v=BhbUZcxTxMg
aural techniques - opening bin files in audacity, zoom h4n mic, reason4, a sample from solaris1972
Source: Youtube @https://www.youtube.com/@FactoryFarmedCorpPolicyRobots Post shared Via Glitch artists collective - Facebook ( Tumblr didnt like the video size thus the link)
5 notes
·
View notes
Note
hey can I download yt videos as .mp3 with yt-dlp?
Technically yes, but MP3s are really outdated and won't sound as good and will generate much larger files than a more modern format. I recommend using the best command which will get you the best audio quality available, which on YouTube usually means .opus. that's a very modern file format but because it's open source it's supported by just about everything I've ever tried including all modern web browsers, VLC, foobar2000, WinAmp (even the antique versions have a plug-in for it), audacity, Android, mpv, etc
Unless you're like my girlfriend and insist on using a copy of Windows Media player from 2005 you should be good with the better audio quality.
For this I use the command: yt-dlp -x --audio-format best --audio-quality 0 --sponsorblock-remove all <url>
If you were going to use MP3 you would just change it from 'best' to 'mp3'
The -x means eXtract audio
You will need the customized versions of ffmpeg and ffprobe linked on the yt-dlp page installed for this to work, you can just dump them in the same folder as yt-dlp and it will find them.
Let me know if you have any other questions or if I made a typo in this
I also have a bunch of commands related to adding metadata to the download in the command I use, but I find those are pretty unreliable and you're better off just rewriting everything with musicbrain picard anyway
6 notes
·
View notes
Text
is it just me or does anyone else see FFmpeg and go huh.... mpreg... hehehe. i do it every time i load smth into audacity im going mental
1 note
·
View note
Text
طريقة سهلة لدمج ملفات الصوت على نظام Windows 11 باستخدام أدوات مجانية
دمج ملفات الصوت أصبح أسهل من أي وقت مضى مع الأدوات المتاحة على نظام Windows 11. سواء كنت تعمل على مشروع صوتي، تنظيم ملفات الموسيقى، أو إنشاء محتوى صوتي، فإن دمج الملفات الصوتية يمكن أن يكون عملية سريعة وفعالة. في هذا المقال، سنستعرض أفضل الطرق لدمج ملفات الصوت على Windows 11 باستخدام أدوات مجانية ومدمجة في النظام، مع خطوات سهلة يمكن لأي شخص اتباعها.
هل لديك ملفات صوتية متعددة تريد دمجها في ملف واحد؟ إذا كان الأمر كذلك، فلديك طرق متعددة للقيام بذلك على جهاز الكمبيوت�� الذي يعمل بنظام Windows 11. سأوضح لك كيفية القيام بذلك باستخدام كل من الطرق الرسومية وسطر الأوامر.
دمج مسارات صوتية متعددة بيانياً باستخدام Audacity
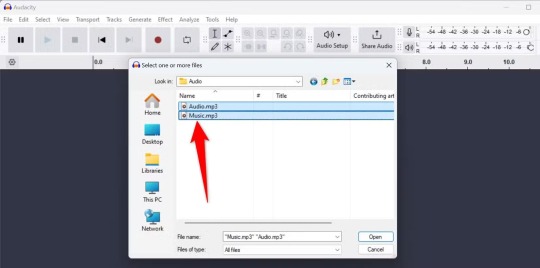
أسهل طريقة رسومية لدمج ملفات الصوت على Windows 11 هي استخدام تطبيق Audacity المجاني والمفتوح المصدر. يمكنك استخدام هذا التطبيق لتحرير مسارات الموسيقى الخاصة بك بعدة طرق، بما في ذلك دمج ملفاتك. لاستخدامه، قم بزيارة موقع Audacity وقم بتنزيل التطبيق وتثبيته على جهاز الكمبيوتر الخاص بك. قم بتشغيل التطبيق. من شريط القائمة، حدد ملف > استيراد > صوت (أو اضغط على Ctrl+Shift+i).

في نافذة تحديد ملف واحد أو أكثر، افتح المجلد الذي يحتوي على ملفات الصوت. حدد جميع الملفات التي تريد دمجها وحدد "فتح". إذا كانت ملفاتك موجودة في مجلدات مختلفة، فحدد "ملف" > "استيراد" > "صوت" مرة أخرى واختر تلك الملفات الإضافية.
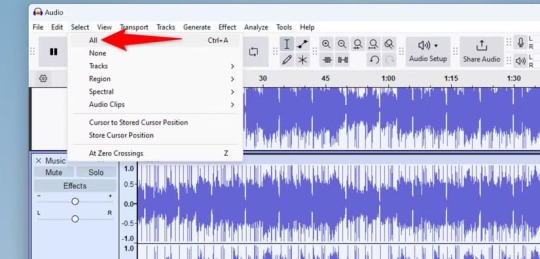
ستظهر ملفاتك في Audacity. الآن عليك وضع هذه الملفات واحدة تلو الأخرى ثم دمجها. للقيام بذلك، حدد جميع الملفات عن طريق اختيار Select > All من شريط القائمة أو الضغط على Ctrl+A.
أنت جاهز لمحاذاة ملفاتك. للقيام بذلك، من شريط قائمة التطبيق، حدد المسارات > محاذاة المسارات > محاذاة النهاية إلى النهاية.
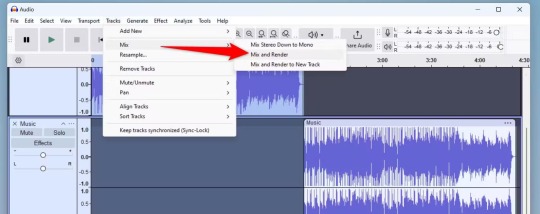
أصبحت ملفاتك الآن واحدة تلو الأخرى. لدمج هذه الملفات في مسار واحد، من شريط قائمة Audacity، اختر المسارات > المزج > المزج والتقديم.
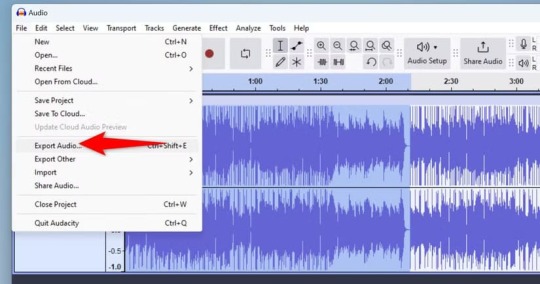
تم دمج ملفاتك الآن في مسار واحد. يمكنك تشغيل هذا المسار بالنقر فوق زر التشغيل في شريط الأدوات. لإخراج هذا المسار خارج Audacity كملف موسيقى، من شريط قائمة التطبيق، حدد ملف > تصدير الصوت (أو اضغط على Ctrl+Shift+E). في نافذة كيف تريد التصدير، اختر "تصدير إلى الكمبيوتر" لأنك تريد حفظ الملف الناتج على جهاز الكمبيوتر الخاص بك.
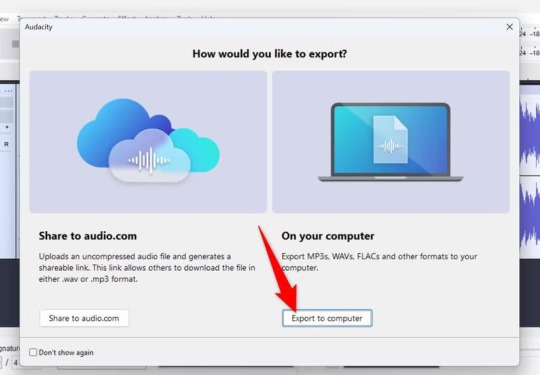
سيتم تشغيل نافذة تصدير الصوت. انقر فوق حقل "اسم الملف" واكتب اسمًا للملف الناتج. حدد "استعراض" بجوار "المجلد" واختر المجلد الذي تريد حفظ الملف فيه. انقر فوق "تنسيق" وحدد تنسيقًا صوتيًا لملفك (اختر "ملفات MP3" إذا لم تكن متأكدًا، حيث يتم تشغيل هذا التنسيق على جميع الأجهزة تقريبًا). اختياريًا، قم بتكوين خيارات أخرى. ثم انقر فوق "تصدير".
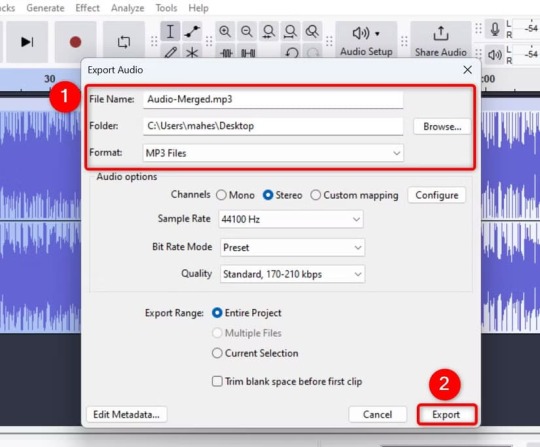
انتظر حتى ينتهي برنامج Audacity من دمج ملفاتك. قد يستغرق هذا من بضع ثوانٍ إلى عدة دقائق، اعتمادًا على عدد الملفات التي اخترتها ومدة تشغيل ملفاتك. عندما يتم دمج جميع الملفات، سترى الملف الناتج في المجلد الذي اخترته.
دمج ملفات صوتية متعددة من موجه الأوامر باستخدام FFmpeg
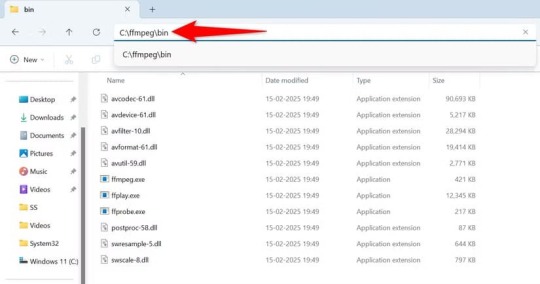
إذا كنت تبحث عن طريقة سطر أوامر لدمج العديد من ملفات الصوت، فإن FFmpeg هي أفضل طريقة للقيام بذلك. تتيح لك هذه الأداة المجانية والمفتوحة المصدر تحرير ملفات الوسائط الخاصة بك باستخدام العديد من الطرق، بما في ذلك دمجها. للقيام بذلك، قم بتشغيل موقع FFmpeg وتنزيل أرشيف التطبيق على جهاز الكمبيوتر الخاص بك. استخرج الأرشيف وانسخ جميع المجلدات المستخرجة. قم بالوصول إلى مجلد جذر محرك الأقراص C، وقم بإنشاء مجلد جديد يسمى ffmpeg هنا، والصق المجلدات المنسوخة في هذا المجلد الجديد. افتح مجلد "bin"، وحدد شريط العناوين، وانسخ المسار الكامل للمجلد ��لى الحافظة الخاصة بك.
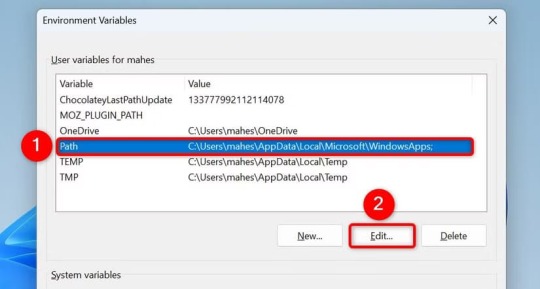
قم بتشغيل بحث Windows (اضغط على Windows+S)، واكتب Edit Environment Variables for Your Account (تحرير متغيرات البيئة لحسابك)، ثم حدد العنصر الذي يحمل هذا الاسم. في النافذة المفتوحة، في قسم User Variables for ، اختر "Path" (المسار) وانقر فوق "Edit (تحرير)".
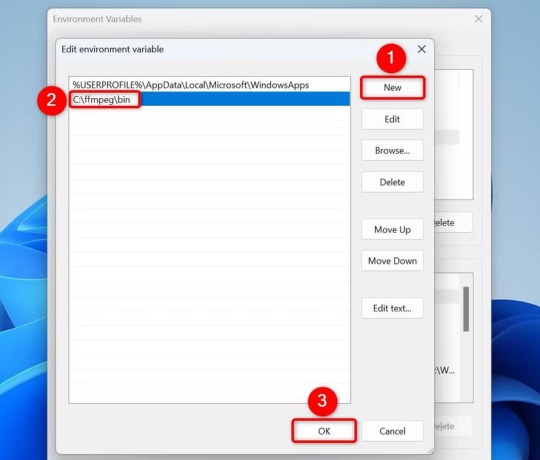
في الشريط الجانبي الأيمن لبيئة تحرير المتغير، انقر فوق "جديد". الصق المسار الذي قمت بنسخه من قبل واختر "موافق" في الأسفل.
أغلق جميع النوافذ المفتوحة. قم بتشغيل مستكشف الملفات (اضغط على Windows+E) وابحث عن المجلد الذي يحتوي على ملفات الصوت. انقر فوق شريط العناوين وانسخ المسار الكامل للمجلد. بعد ذلك، قم بالوصول إلى بحث Windows (اضغط على Windows+S)، واكتب موجه الأوامر، وحدد "تشغيل كمسؤول". اختر "نعم" في موجه التحكم في حساب المستخدم. في نافذة موجه الأوامر، اكتب الأمر التالي مع استبدال "PATH" بالمسار الذي قمت بنسخه، واضغط على Enter. cd “PATH” بعد ذلك، اكتب الأمر التالي واضغط على Enter. يقوم هذا الأمر بإنشاء قائمة بجميع ملفات MP3 الموجودة في المجلد الحالي وحفظ هذه القائمة في ملف filelist.txt. ثم يقوم بتشغيل FFmpeg لدمج جميع الملفات المدرجة في قائمة الملفات في ملف واحد يسمى merged_audio.mp3. (for %i in (*.mp3) do @echo file '%i') > filelist.txt && ffmpeg -f concat -safe 0 -i filelist.txt -c copy merged_audio.mp3
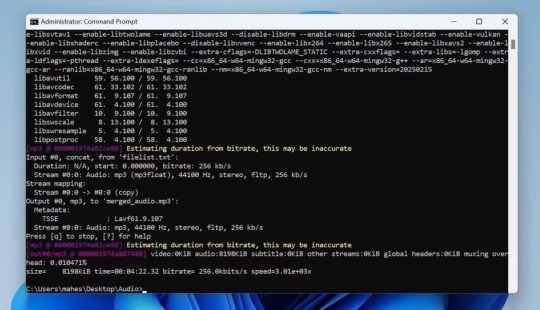
عندما يقوم موجه الأوامر (عبر FFmpeg) بدمج ملفاتك، ستجد الملف الناتج في نفس المجلد الذي يحتوي على الملفات الأصلية.
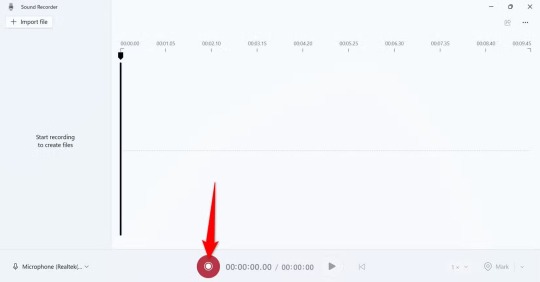
استخدم مسجل الصوت لتسجيل ملفات الصوت يدويًا
إذا كنت تبحث عن طريقة أساسية لدمج ملفين صوتيين أو أكثر، ويفضل أن تكون ملفات قصيرة، فيمكنك استخدام تطبيق مسجل الصوت المدمج في Windows 11. باستخدام هذا التطبيق، يمكنك تسجيل ملفات الصوت المتعددة، وإنشاء ملف إخراج واحد. لاحظ أن هذه الطريقة قد تضيف بعض الضوضاء من محيطك أيضًا، حيث يسجل التطبيق الصوت من ميكروفون الكمبيوتر الشخصي. لاستخدام هذه الطريقة، قم بتشغيل Windows Search (اضغط على Windows+S)، واكتب Sound Recorder، وافتح التطبيق. ثم افتح File Explorer (اضغط على Windows+E)، وابحث عن ملف الصوت الأول، وقم بتشغيله باستخدام مشغل الوسائط المفضل لديك. بمجرد بدء تشغيل الملف، في مسجل الصوت، انقر فوق "بدء التسجيل" (الزر الأحمر) أو اضغط على Ctrl+R.
عند انتهاء تشغيل الملف الأول، قم بتشغيل الملف التالي الذي تريد دمجه. بهذه الطريقة، عندما تسجل كل ملفات الصوت، انقر فوق "إيقاف التسجيل" (الزر الأسود) أو اضغط على Esc.
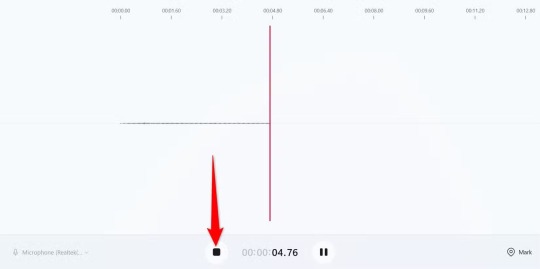
في الشريط الجانبي الأيسر لمسجل الصوت، سترى الملف الناتج. يحتوي هذا الملف على ملفات صوتية متعددة. لتشغيله، انقر فوق الملف واختر زر التشغيل. لعرض الملف في مستكشف الملفات، انقر بزر الماوس الأيمن فوق الملف واختر "إظهار في المجلد".

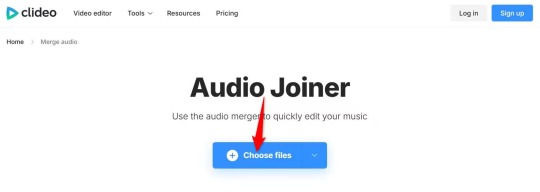
استخدم أداة تعتمد على الويب لدمج ملفات الصوت
إذا كنت لا تريد تثبيت واستخدام تطبيق سطح المكتب لدمج ملفات الصوت، فاستخدم إحدى الأدوات العديدة التي تعتمد على الويب. تعمل هذه الأدوات من متصفح الويب الخاص بك وتتيح لك دمج ملفات صوتية متعددة في ملف واحد. يمكنك استخدام اثنتين من هذه الأدوات وهما Clideo وAudio Joiner. لاستخدام Clideo، على سبيل المثال، قم بتشغيل موقعه. انقر فوق "اختيار الملفات" وحدد الملفات التي تريد دمجها. يمكنك أيضًا سحب ملفاتك وإفلاتها على الموقع لتحميلها. لإضافة ملفات من Google Drive أو Google Photos أو Dropbox، انقر فوق رمز السهم لأسفل بجوار اختيار الملفات وحدد الخيار المناسب.
انتظر حتى يتم تحميل الملفات. عند الانتهاء من ذلك، اسحب المقاطع الصوتية على الجدول الزمني وقم بترتيبها بالطريقة التي تريدها في الملف الناتج. لإضافة المزيد من الملفات، انقر فوق "إضافة المزيد من الملفات الصوتية" واختر ملفاتك. عندما تكون راضيًا عن الاختيار، انقر فوق "تصدير" في الزاوية اليمنى السفلية للموقع.
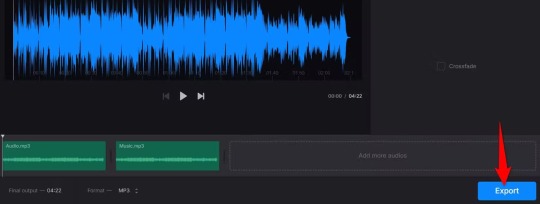
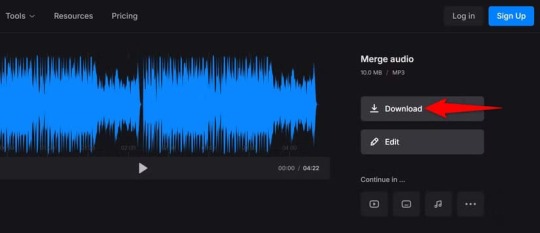
سيبدأ الموقع في دمج ملفاتك. عند الانتهاء من ذلك، انقر على "تنزيل" على الجانب الأيمن لحفظ الملف الناتج على جهاز الكمبيوتر الخاص بك. إذا كنت تريد إجراء أي تغييرات، فانقر على "تحرير". لتحميل الملف مباشرة إلى Google Drive أو Dropbox، بجوار "تنزيل"، انقر على رمز السهم لأسفل واختر الخيار المناسب.
وهذه هي الطريقة التي يمكنك بها إنشاء ملف واحد من ملفات صوتية متعددة على جهاز الكمبيوتر الذي يعمل بنظام Windows 11. وبهذه الطريقة، يمكنك أيضًا تحويل ملفات الوسائط من تنسيق إلى آخر. دمج ملفات الصوت على Windows 11 لم يعد يتطلب برامج معقدة أو مكلفة. باتباع الخطوات المذكورة في هذا المقال، يمكنك تحقيق نتائج احترافية باستخدام أدوات مجانية ومتاحة للجميع. جرب هذه الطرق وشاركنا تجربتك في التعليقات: ما هي المشاريع الصوتية التي تعمل عليها؟ ولمزيد من النصائح حول أدوات Windows، تابع مقالاتنا القادمة. Read the full article
0 notes
Text
I've been asked for a list of software that I want installed on my students' virtual machines next semester. So I'm basically making a list of all of the programs I think everyone should have installed on a Windows machine in order to make it usable. Soliciting suggestions for anything I may have forgotten; here is my list so far: Firefox Thunderbird Google Drive LibreOffice GNU Image Manipulation Program Rawtherapee Transmission Audacity Blender ffmpeg yt-dlp 7-Zip Logseq VLC Media Player https://ift.tt/UlfgYSn January 17, 2025 at 02:51PM
0 notes
Text
教你安裝 FFmpeg 5.0.0 for Audacity,用來對 AAC 做編碼及解碼 https://zfly9.blogspot.com/2023/01/18dx3ra.html
1 note
·
View note
Text
please pray for me, I misplaced my FFmpeg libraries again. Audacity is threatening to break my fucking legs
0 notes