#figured out the lasso tool and used it correctly for the first time...
Explore tagged Tumblr posts
Visit Tumblr Blog
Explore Tumblr blogs with no restrictions, modern design and the best experience.
Last Seen Tumblr Blogs


Fun Fact
In February 2021, Tumblr had 518.6 million blog accounts.
Text

#Hangster#top gun maverick fanart#2025#clip studio paint pro#figured out the lasso tool and used it correctly for the first time...
32 notes
·
View notes
Note
ok so you have a comic and its real good yeah? how'd you figure out how to do the thing where you can draw an entire page, like the same people over and over again, and then do that multiple times without like... dying? cause every time i try to Comic, even in a simplified style, i almost always cant do more than one page ever
Okay, this is a real good question, so here goes a bit of a quick comic lesson?? Maybe some of you find it useful. Hopefully
I’ve been trying to draw comics my whole life, like it’s what a I wanted to do all along, and every time I tried I ended up not finding the best style for it, working too much on a panel and ending up exhausted, or not getting enough inspiration for it…
So what happened when I went to college is that I met some teachers that had been or were comic artists, and I told them what could I do to draw comics properly, what advice would they give me.
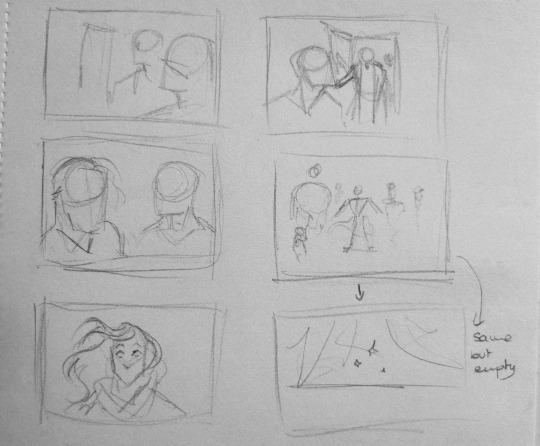
First of all they taught me about something called thumbnails which are a very sketchy lil’ drawings of every panel on a page. These are very very quick to draw and you can easily draw 20 pages in a row with only these sketches. Like this:
After that, I learned (by myself) that sketching on paper the expressions for every character before bringing it to digital was quite usefull. Also acting the scenes out as the characters (as I mentioned some days ago) helped me a lot to find a facial and body expressions I wanted to draw afterwards on paper. These are some tests I did for page 40:
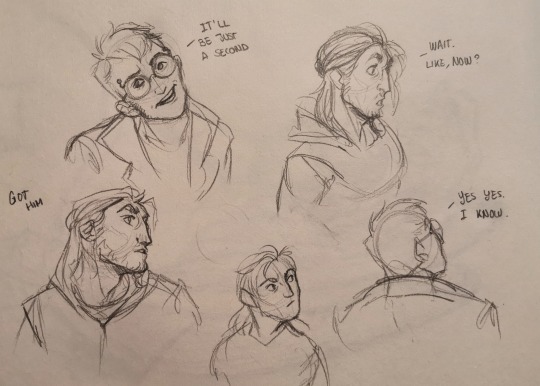
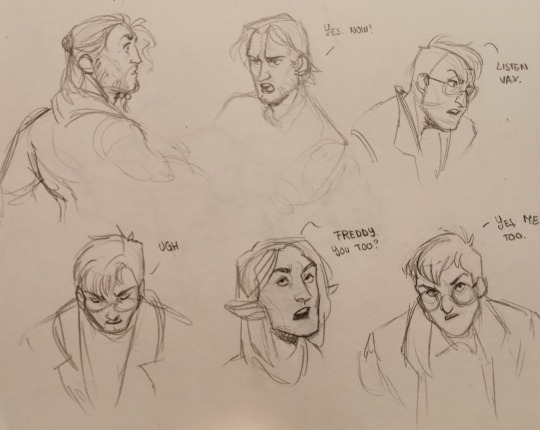
Drawing hours and hours in front of a computer screen is exhausting, so for me, figuring out the expressions of the characters before drawing digitally is very helpful and saves time and energy.
You always end up changing some things, I use to change the dialogue a lot.
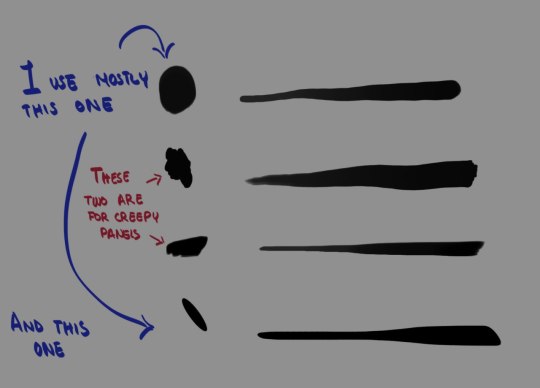
And then, I work on the line with the brushes I find more comfy for me. Hard brushes usually work for me but I use various kinds:
Line art takes a bit of time, so be patient and make sure you like the line art before starting with colour. Also, things closer to the foreground or in the foreground tend to have thicker line!
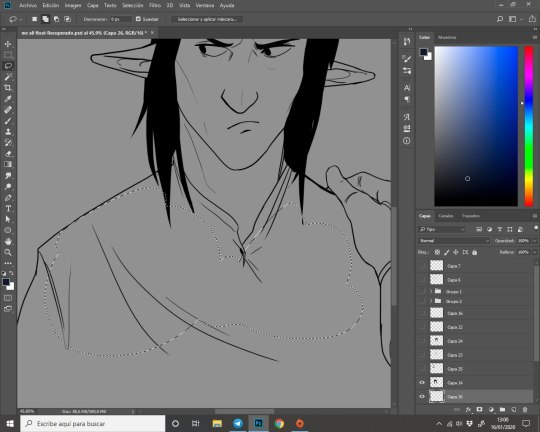
Then, colouring is easier because (at least in photoshop) there’s a tool called lasso that helps you to select the areas you want to fill with any color and the lineart helps a lot here. Take your time with this tool, it’s a bit hard at first. I recommend to select areas by lil “bites” and then work on the areas close to the lines. Then press Alt + Backspace Key to fill the area with any colour, like this:
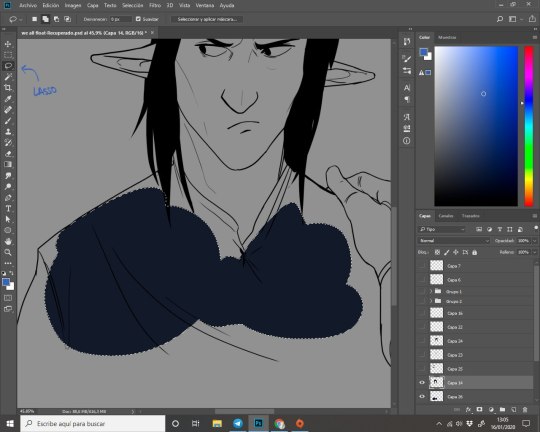
And so, you work on your comic colouring, you can add lights (don’t recommend use white a lot, I learned that thanks to this comic) and shadows, using the lasso again and the grade tool (very easy to use).
Then add dialogue bubbles, and it will take time to learn how to place them correctly (I’m still learning too).
Also, recycle drawings! It’ll help a lot when you’re the only person working on a whole comic! It’s not cheating at all, you’re being practical.
And this is my whole process, it’s a bit hard and it takes time, but it’s definitely worthy. I don’t say this is what you must do, I’m just saying that this is what works for me.
Sometimes you need a process to work properly and finding it can be tedious, so I hope you find this helpful for maybe future comic projects!
#comic artist#comic#critical role art#critical role fan art#critical role#percival de rolo#vax'ildan#shawn gilmore#matthew mercer#sketches#thumbnail
185 notes
·
View notes
Text
MANIP TUTORIAL
this is a picture based, 8-step tutorial, showing you how to achieve something like this:
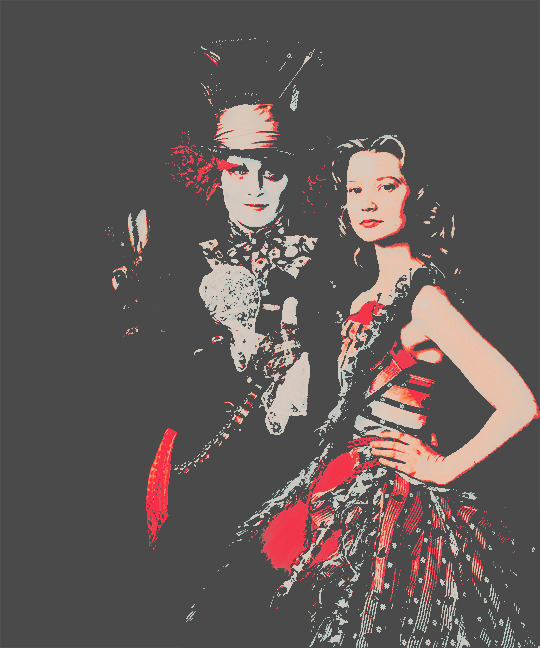
these edits can be accomplished with all sorts of free editing softwares, but today I will be using Photoshop ! (which you can also find download links for online if ur sneakyyy ;)
TUTORIAL BELOW THE CUT:
pre-tutorial notes: just as an FYI, there are several different ways you can crop people out of pictures in PS; you can use the lasso tool freehand, the polygon lasso tool with individual lines, the magic wand tool to select and delete certain sections of a photo, or even the quick selection tool. Today, I will be using the Lasso tool to crop out the general shape of Alice, and then i will go back in with the eraser to get out any extra edges, or soften up parts like her hair, to make her look more realistic. Let’s get started !
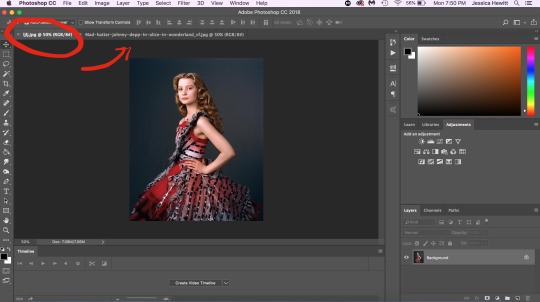
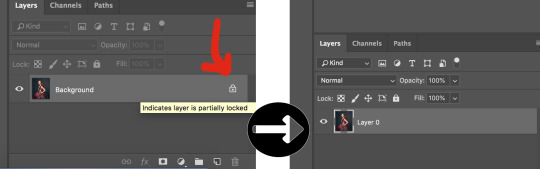
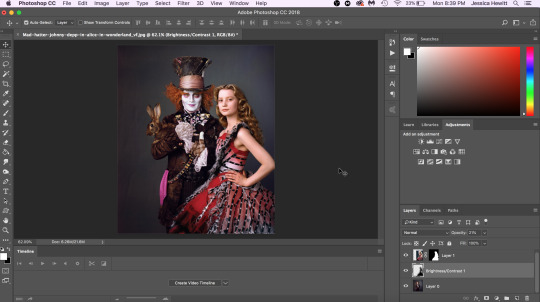
Step 1: first, open up both of the images you are working with, of your two characters. In this case, I have an image of Tarrant Hightopp, as well as a separate picture of Alice Kingsleigh. They are each in their own document tab as you can see in the image below(circled):
Step 2: Since I will be cropping Alice out of her picture, and putting her onto the picture of Tarrant - we only will need to crop her out; and not edit the picture of him. But - before we do any cropping out, make sure your layers aren’t locked! Sometimes when you open an image, the layer will be locked, preventing you from doing certain things to it. All you have to do to change this is to click the little lock icon, and it should go away. Look at my screen below:
Step 3: Now it’s time to crop! Again, as I said above, I’ll be using the lasso tool to crop Alice out of her picture. Basically, you just click+drag with the lasso tool, around the person’s whole shape, and then let go; and you’ve got a selection of them. (Make sure you don’t let go too soon ! You’ll end up cutting the person essentially in half !) If it’s easier for you - you can also select bits of the background around your person, and delete those as you go, to crop the figure out. Here’s my screen, as i select Alice:

Step 4: Now, once you’ve got your selection - there are a couple of things you can do. You can either mask your image with that selection; OR you can delete the background around the person. Masking is a bit more safe - because if you make a mistake, you can always remove, or add more of the original photo back in - however sometimes it doesn’t matter, and i just like to delete the background. The first gif below shows you how I delete the background (by right-clicking & inverting the selection, and hitting the delete key); whereas the second gif shows you how I mask my image selection(hitting the icon at the bottom panel, underneath the layers). Whichever method you choose is up to you!

Step 5: At this point, you’ve got your character cropped. There may be some harsh edges still, but don’t worry about that yet - we’ll clean that up soon enough. What I tend to do now, is move my character into the other picture; and get them positioned correctly before fixing the edges. To do this, I select the picture of Tarrant, and then drag the document tab of Alice’s Picture, over the picture im on. Then I click-drag the picture of Alice into the picture of Tarrant. I know it’s confusing, but try using this gif as a reference:
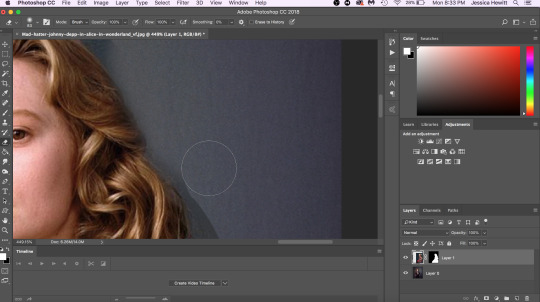
Step 6: So now we’ve finally got both images in the same document ! Here, i usually adjust the sizing of each character to make sure they look the same height, as well as their positions, etc. When that’s all settled, it’s time to fix the edges ! You can use the lasso tool again to take out bits of the edges, or you can do what I like - which is using the eraser tool! I like the eraser because you can change how soft or hard the eraser is, as well as the opacity. It’s nice for making softer edges around the hair, and harsher ones around fabrics, or body angles. The below image is just an upclose shot of me erasing the edge around Alice’s hair:
Step 7: After all the edges are properly erased, zoom out, and look at your full picture. Does it look perfect? Is anything odd, or out of place? For me, when I zoomed out, I felt that Alice needed a shadow behind her. This is obviously optional, and you can do this several ways - but I added some slight shading behind her and here was the result:
Step 8: Now you have a complete manip! If you are me, usually im making manips for edits and what not - so I’d go in here and add a psd or filter over the image - but that’s really all there is to it! I hope this helped you guys out, and if you have any questions, feel free to send them to me IM, or in my ask box ! ♥︎ - Jess
PS: this tutorial was made by request of @thedarknessxwithin :)
#TUTORIAL#:: my tutorials.#manip tutorial#graphic tutorial#PS tutorials#ps tut#tutorials#edit tutorial#ps resources#rph#rp resources#rp tutorial#ps help#photoshop tutorials#photoshop edit
393 notes
·
View notes
Text
Content Aware Tool GIF

I created a short 10 frame GIF using a series of altered images that were made using the 'content aware fill tool' in Photoshop.
We also focused on doing things wrong. The goal was to use it wrong instead of following the rules of during it correctly. This would help to experiment and discover new ways or techniques of creating new work. It can help you create something weird, cool, unintentional and unexpected. Doing something the correct way all the time is boring and creates predictable work that has already been done countless of times. It does not let you discover your own ways and may lead you to end up falling into copying everything and every norm. You can create things that are more exciting and original when you go along a new path, which is about not following the rules of doing it correctly.
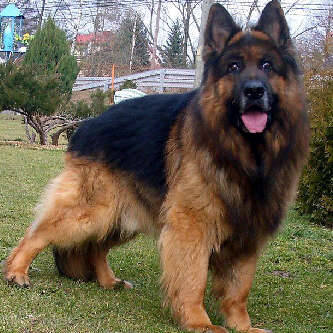
Firstly, I went ahead with picking a photo for use. The reason I chose this picture in specific was because it already looked eerie and creepy. This would provide the perfect bases for creating more weirdly altered versions of this image. I just selected what I wanted changed, right click with lasso tool and content aware fill it. Then I just mess around with selecting what I want.
It was honestly pretty confusing at first for me because I didn't know what each action was actually doing. I just saw things changing but didn't know what was really happening and why it was changing to that specific thing. But then after a while of playing around I figured out was was happening and how the sections of the image were replacing themselves with other parts of the image. I was able to create things like writing and extra arms, or replace the shadow figure. It was mostly just a bunch of experimenting to see what variations I could make. It was cool.
And then I dragged all the images into one photoshop file, seperated into their individual layer for each image. To create the gif, I went into 'Window', 'Create Timeline' and chose the frame option instead of video. Then for each frame I only let one image be visible, and kept changing it till they all had their turn. The gif was too slow at first, but I solved this problem by chanigng the speed to 0.2.
Some people may say that this isn't ethical. Their reasoning behind this could be that I am stealing an image from someone else and manipulating it to look different from the original and how I want it to look. Some may argue that you can use this method to not just manipulate, but ruin, mock or poke fun at someone else's work. This would apply to mine since it doesn't look like a realistic manipulation. However, to someone else's who does look realistic, you could argue that this method could potentially trick people into thinking it is the real, original image or that you are the owner of it. This could be said to be dangerous if used to trick others. However, in my case, I only used it personally as work, learning and experimenting without the intent of sharing. It is also not made to look realistic or believable. It also does not breach any copyright laws.
When it comes to using this in my own work, there are oppurtunities that I can use it, for example when it comes to animation and video creating. However, my work isn't weird or abstract enough to use this method in it. I think there are oppurtunities to use this tool in a more normal manner, but for now I don't think I will use it in my work because I need it to be more structured.
0 notes
Text
Collar And Chains.
. There are plenty of reasons you must consider buying a Cat Damaging blog post that the moment you learn what they are you are not mosting likely to think that you have actually not made such an assets faster. If you do not want to tally up all the words on your website and then to accomplish the math to figure out your key phrase quality, there are actually a selection from tools on call that mia-sportblog.info are going to perform this for you. The first service for your diabetic pet is to feed her or him a diet regimen from homemade foods so you can track of precisely how much carbohydrates and glucose they are acquiring. If our team possessed yet another canine ever once again at that point that would rely on its character for what title this would have! Before the canine is launched for adopting, he is actually be fully around time on his gos and also worming. I merely performed a short article on my developer kind pet which is a mix between the Shih tzu as well as the Bichon. The indoor canine needs to be offered a bedroom in the section from an area, out of radiators as well as fractures under doors or home windows. Hostility in pets is a principal factor proprietors seek instruction - and also if you do not possess efficient adventure in taking care of canine aggressiveness, you will definitely put your own self, the pet and also others at risk.
Your dog may additionally begin asking for a great deal of water, as well as might not possess a really good hunger for food. The receiver will present the last recognized area from the collar should your pet dog project past its own variation. If you are attempting to educate your pet as well as your dogs seems to not be intrigued, this question is actually important. With a little bit of preparation, this could bring about a great deal of fun for canine and proprietor identical. Some dog breeders even will go to court to get the pet back after that because of breach of contract. The Iditarod, without a doubt the most widely known canine dogsled nationality on the planet, is an entertainment of the historical shipping of the diphtheria product back in 1925. Some pet dogs, also when correctly taught, can be a trouble when on a leash and also these dog collars are a device to keep the pet as well as its own manager risk-free. Canine care maintenance entails details instructions that could be sensibly related to brush your household pet dog. The most effective collars possess adjustable amounts, as well as merely the most affordable level that the canine reacts to need to be made use of. One more concern along with some of these lassos that fasten under the canine's face is actually that if the pet operates as well as strikes completion from the lead, it might snap his director around and also cause injury. Pet dogs, when certainly not contending, are generally delegated rest in workout pens, pet crates, or dog camping tents closed as well as familiar environments where they can kick back and recuperate in between operates. A Pomchi is what our team call a developer pet dog or a cross species, which simply suggests it is actually a mix of pair of existing types from pet. Among the most effective factors you can do to stop pet dog aggression, particularly to other canines, is actually to mingle puppy dogs. Pet dog outfits can easily produce her warm and also therefore maintain her constant as well as behaved if your little bit of pet is actually hyper-active. Though if a simpler pet dog (read: foolish) begins to obtain frustrated, that is actually well to put an end to that brain activity and also provide a prize for their initiative. Whether an individual buys this pet vest style as well as makes ADOPT ME vests to offer or even to contribute, eventually this will be actually the pets who help. Sneezing, sniffing, dripping nose, and also watered-down eyes can easily resist productivity for those with canine allergies. Some people regard them as one from the dangerous dog breeds since their tough impulse from chasing and also appropriating prey can easily rely on be actually disastrous triggering trauma to individuals, various other dogs, and also felines.
0 notes
Text
Week E3: “Tris and Fails”
This week involved a lot of experimenting, learning, and a whole lot of modelling.
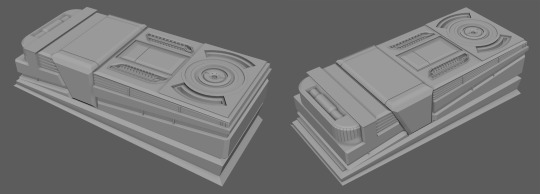
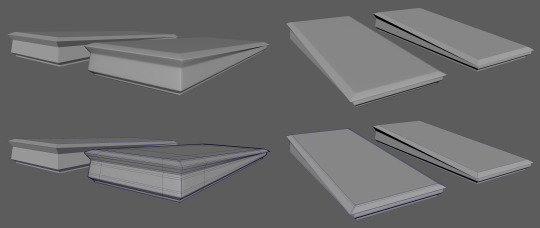
I began by taking the model of the cold coffin and scaling it correctly with the hatch.
I noticed a disparity in detail with the two models and began to define the cold coffin a little more.
I made a rather detailed set of panels and shapes ino the base of the coffin. The theory would be that these things, much like a usb, would be “plugged” into the rest of the device. Here the memories would be extracted from the host and uploaded to the memory disks attached to the whole device.
The modelling for this took a while and I unfortunately suffered a few hiccups along the way.
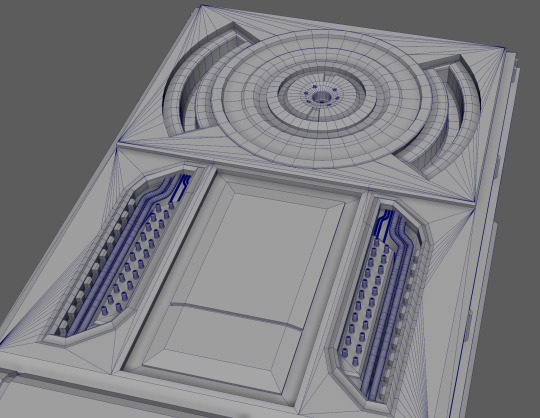
After losing 2 hours work i managed to familiarise myself better with the “boolean” tool which had previously destroyed the mesh of some of my model due to not freezing the transformations and deleting history after.
However now able to use them properly I started to explore other ways to improve my modelling and the outcomes.
I looked into smoothing meshes and noticed the difference it makes when adding edge loops in the appropriate places to get a much nicer looking model upon smoothing.
I realised this technique does requires a very clean and grid like geometry to be done efficiently. I was concerned that keeping a clean topology could be time consuming especially for a concept artist that would rather concern themselves with designing quickly and not getting bogged down in the technicalities.
I am however using this time to learn and try out different techniques as well as improving my modelling skills rather than be quick.
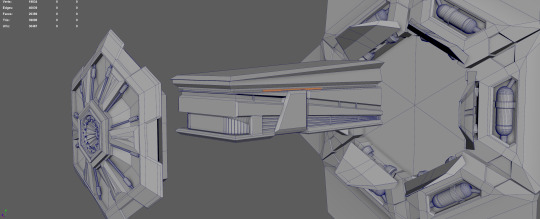
The next think I moved onto was the port itself. Essentially a negative of the underside of the coffin.
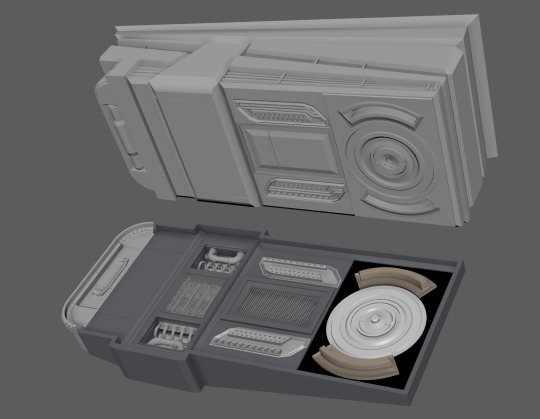
This took a surprising amount of time to model I found but I guess the majority of the time was taken learning and trying to create shapes I had not attempted before. Though I did a simple yet slightly detailed block out earlier in BA3b for the asteroid facility I found that this was something different. Perhaps because i was delving into the territory of high poly modelling now.
The majority of the time was spent on the smaller more intricate components such as the pipe work and tubes going through the interior of the dock.
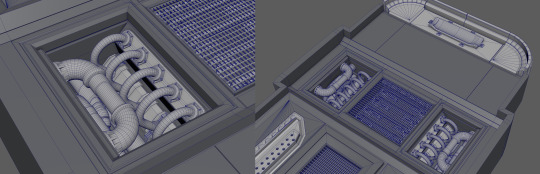
I found that the reason the modelling was taking a very long time too was that I was essentially juggling all the design work at the same time. It in fact reminded me how important concepting before hand is. In the future I believe I would try to do a rough but informative sketch to get some of the shapes mapped out first.

The other major difficulty, I was finding out as I progressed, was actually making this device feel “constructed” or “built”. Fortunately sci-fi grants a little leeway in terms of design but to actually make an asset look manufactured was something I had not done before and was proving difficult and very time consuming.

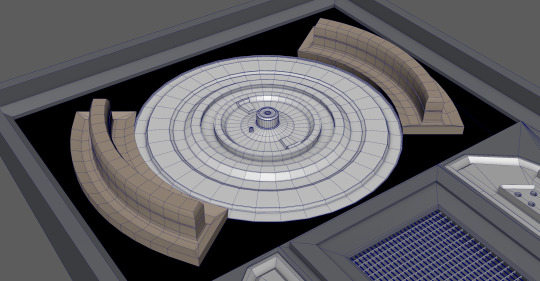
Towards the end I did find I was making more and more small components and actually ended up using a few in a modular way.
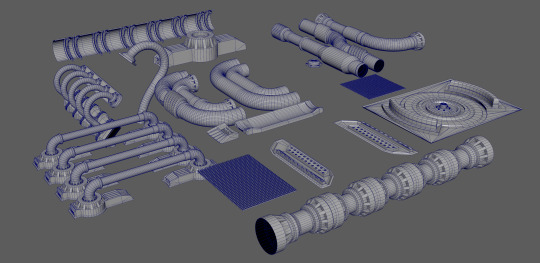
The majority of these pieces ended up being really helpful exercises in trying to model certain shapes as well as to generate greebles efficiently. As I am still learning to model and would not class myself as a 3D artist I understood that this was taking time to do due to the learning and inexperience yet I was speeding up a lot as things went on.
Though the model was not complete I wanted to have a small play around in Keyshot to assess the lighting and renders as well as the default materials.
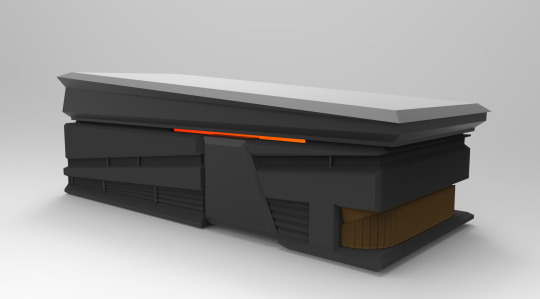
I found it made the models look very appealing and the simple to use, drag and drop materials that could be applied onto separate meshes was very helpful.
I will likely not venture too much into the texturing and materials yet but it was interesting to have a play around.
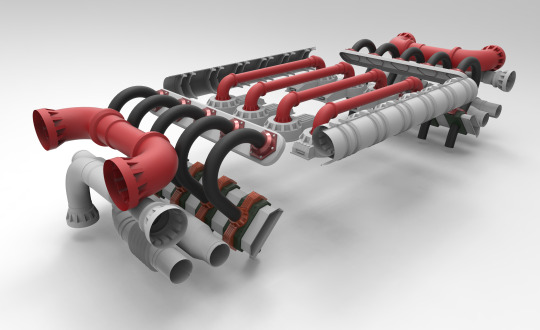
I also took a lot of the pipework and more intricate models in to test and was very pleased with the renders I could get.
Schedule Change:
I decided to put the modelling on hold for now. I had been doing it for nearly 2 weeks now and felt i was getting close to getting into a rut. I also realised that I had been working on this cryo pod/memory disk idea for nearly 4 weeks now!
Though this is a long time for a single asset I must admit that A LOT of thought and iteration has been put into this design as well as testing new techniques and ways to present, create, and develop concepts. The tie has certainly not been wasted but I’m afraid that my old schedule mocked up has become somewhat undermined now. As are my deliverables.
I had originally outlined that I would do several environments, a couple vehicles, some assets designs and even a character but am almost certain that this will not be achievable with the time left. I am okay cutting areas as a fair bit of work has been produced so far and I do not want to rush certain designs simply to have a larger body of final pieces at the end.
I have come to understand that I’m at university not just to produce artwork for tasks and briefs but to do as much learning and experimenting in the time here.
As a result I intend to shift my original focus of using this project as a portfolio generating plan and instead ensure that it is a chance for me to learn and continue experiment with my skills as a concept artist.
I may need to draft up a new plan for my deliverables due to this focus shift and figure out what designs I want to continue working on during the time left. One thing that certainly won’t change is the focus on “The Mind” itself as well as the intention to do a couple key-frame images of an event in this fictional world as my final piece.
Moving on from this area of thought and taking a break from 3D I decided to attempt a sort of spit paint for “The Body”.
I have very rarely taken the action of trying to paint an concept or idea from scratch straight away but after talking to a colleague on his workflows I decided it would be an interesting and helpful exercise.
Very often I find myself sticking to a more rigid workflow of thumbnail > develop > iterate > finalise. But attempting to simply design by pulling shapes from the canvas will be a new one for me.
Nearly 5 hours of painting after whilst tuning into a few robotpencil.com Q&A’s I came out with this.
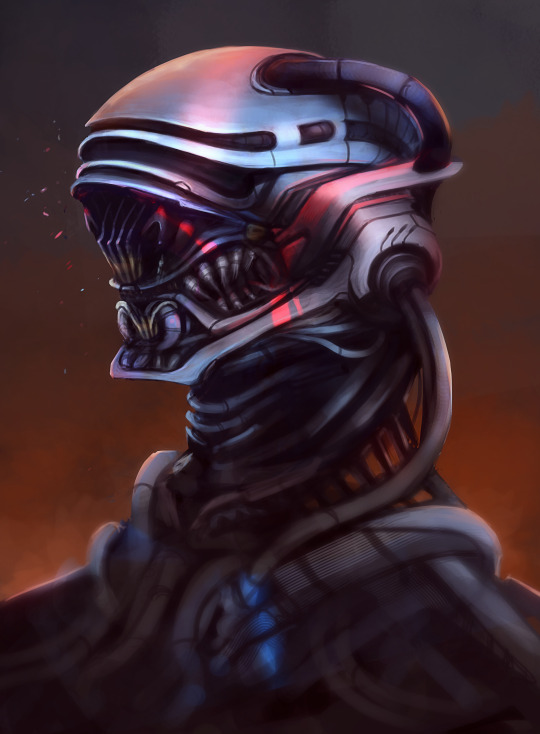
I’ll honestly say I was very happy with how this turned out and though it doesn’t hit some of the design choices I want for the character of “The Body” it certainly acted as great exercise and a change from all the 3D recently.
I began the process simply by using the lasso toll to generate some light and dark shapes.
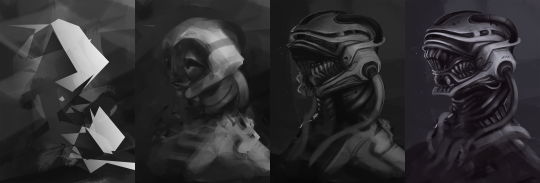
From there I pulled more and more shaped out until I have rough concept for a head neck and upper torso.
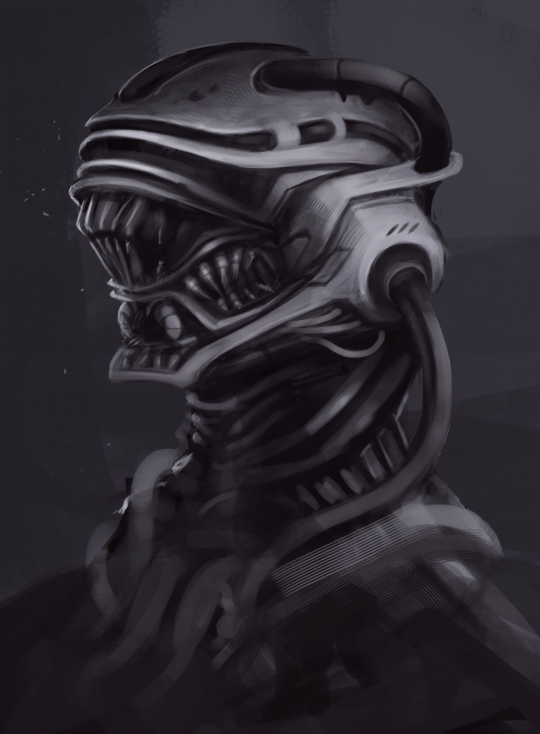
I could have probably left the concept at this stage as a lot of the information had been provided at this point however I wanted to spend time trying to convert the grey scale image into a colour version as well as try to define the forms and materials a little bit.
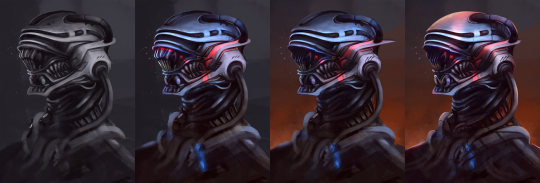
After some more time I had finally come a point where I was happy with the piece.

Though there is certainly more that could be done to neaten up the piece and make it more portfolio standard as a rough, early concept I think it works to show the idea and acted as a good exercise in attempting a more final like image to what I usually create.
It must be stated that this isn’t quite the design language I want for “The Body” as this design comes off rather evil and menacing.
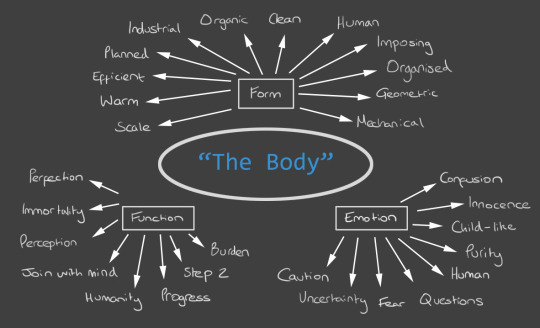
If I refer back to my old key words and feelings outlined for this character I find that very little is being reflected through this design. I will certainly spend time in the weeks to come using my usual thumbnailing formula to come up with some designs that might be more appropriate to what I was initially looking for with the themes I planned.
0 notes