#getcourse
Explore tagged Tumblr posts
Visit Tumblr Blog
Explore Tumblr blogs with no restrictions, modern design and the best experience.
Last Seen Tumblr Blogs


Fun Fact
The KCSC sent more than 20K requests to delete posts related to prostitution and porn to Tumblr from January to June 2017.
Text
актуальный промокод для подключения платежного модуля Геткурс 274283109. Подключившись у Getcourse pay по промокоду вы получите бонусом в подарок бесплатную базовую настройку аккаунта
0 notes
Text
Как ИИ в продажах меняет мышление предпринимателей
Что общего у малого бизнеса в Москве, маркетплейсов и B2B-компаний? Все они ищут способы продавать быстрее, дешевле и эффективнее. И сегодня у них появляется серьёзный помощник — ИИ в продажах. Уже не фантастика, а вполне рабочий инструмент: ИИ-продавец, нейропродавец, AI-менеджер по продажам, ИИ-ассисте��т для продаж — как бы его ни называли, он становится частью команды.
Почему бизнес доверяет ИИ-продажнику
Когда клиенту отвечают мгновенно, предлагают подходящий продукт, делают допродажу и напоминают спустя сутки — это не магия, а результат внедрения ИИ-агента для продажи. Такой ИИ-менеджер по продажам работает по заданным сценариям, анализирует ответы, прогнозирует интерес и помогает закрыть сделку.
Компании всё чаще внедряют ИИ в продажи, потому что:
ИИ для отдела продаж не болеет и не устаёт
Продажи с AI масштабируются без увеличения штата
ИИ для скрипта продаж адаптируется под клиента
ИИ-бот продажник в мессенджере обрабатывает лидов в 10 раз больше обычного менеджера
Автоматизация продаж ИИ снижает стоимость лида на 30–50%
Где уже используют ИИ в продажах
На маркетплейсах — от Озона до Etsy: ИИ для продажи товаров ускоряет ответы, допродаёт, возвращает ушедших клиентов.
В недвижимости — ИИ для продажи недвижимости помогает сегментировать заявки и вести диалоги без пропусков.
На Авито — ИИ-продавец Авито ведёт переписки как живой человек, обрабатывая даже голосовые.
В отделах продаж Москвы — ИИ-отдел продаж Москва тестирует связку CRM + нейросеть для входящего потока.
В онлайн-образовании — ИИ-продавцы GetCourse заменяют консультантов и показывают рост выручки на 42%.
ИИ в продажах: примеры из практики
Нейропродавец на Авито продал 47 товаров за месяц без участия человека.
AI-продажник для онлайн-школы обработал 1000 диалогов и вернул 17% клиентов фоллоуапом.
ИИ для увеличения продаж товаров на Озон применяет сценарии до- и после-продажи, поднимая рейтинг продавца.
В одном из кейсов, упомянутых на платформе Eureka, ИИ-решения для продаж заменили 4-х операторов и окупились за 10 дней.
Как использовать ИИ для продаж в своём бизнесе
Вот с чего начать:
Настройте ИИ для воронки продаж — он б��дет вести клиента по этапам, дожимая до результата.
Протестируйте ИИ для анализа продаж — найдите, где теряются деньги.
Интегрируйте AI для отдела продаж — даже если у вас всего 1 менеджер.
Создайте промт для ИИ-агента продавца (пример) на базе своей базы знаний.
Запустите ИИ-бота для продаж в Telegram, WhatsApp или на сайте.
Используйте ИИ для скриптов продаж создания — адаптируйте фразы под ЦА.
Задействуйте ИИ для маркетинга и продаж — связав его с рекламными источниками.
Часто задаваемые вопросы
Как создать нейропродавца? Сформулируйте задачи, подготовьте FAQ, выберите платформу (n8n, Savvy, Wappi), и соберите первый MVP. Как создать ИИ-продавца — это уже не задача на месяцы, а работа на выходные.
Как можно использовать ИИ в продажах, если нет команды? Запускайте поэтапно: сначала как помощника менеджера, потом как самостоятельного агента.
Контроль отдела продаж ИИ — это реально? Да. Вся переписка, конверсии, статусы и ошибки фиксируются, а сам ИИ обучается на результатах.
Менеджеров по продажам заменит ИИ? В простых задачах — уже заменяет. В сложных — усиливает. Но факт: ИИ в работе менеджера по продажам делает команду эффективнее.
Как увеличить продажи с помощью ИИ? Запустить авто воронку продаж ИИ, использовать персональные триггеры, тестировать разные скрипты и проводить ИИ-аналитику продаж.
Вывод
ИИ в сфере продаж — это не просто модный инструмент, а необходимость в условиях высокой конкуренции. Он помогает оптимизировать процессы, сократить затраты, обрабатывать больше заявок и продавать через ИИ круглосуточно.
Если вы хотите купить ИИ-продавца, протестировать AI-ассистента для продаж или внедрить ИИ в продажах B2B, сейчас — идеальный момент.
1 note
·
View note
Photo

Хотим поделиться с вами нашей радостью! Поздравьте нас! Сегодня наша школа получила знак качества от учебной платформы Геткурс и вошла в сотню школ из 18 000, которые соответствуют критериям Знака качества GetCourse! Это означает, что наш проект теперь включен в Реестр проверенных и надежных школ на платформе Геткурс. Мы были отмечены за нашу открытость и высокое качество взаимодействия с учениками! Теперь значок красуется на нашем сайте: https://amalgama660.ru/index. А весь реестр можно посмотреть здесь: https://getcourse.ru/qualityreestr.
0 notes
Photo

#thebrandshub_ #getcourses #freedomtolearn #learningathome #online Get A Course And Became An Expert 😎 (at Mumbai, Maharashtra) https://www.instagram.com/p/CDvtENYhIUx/?igshid=hhn5hsfjigty
0 notes
Photo

[КАК ЗАПУСТИТЬ ОНЛАЙН-ШКОЛУ И НЕ ПРОГОРЕТЬ] Обратился эксперт, о себе рассказал следующее: давно работаю в оффлайне — провожу обучающие программы и курсы, бьюти-сфера. Хочу выйти в онлайн, два года пробовала — не взлетело, хотя вроде бы все делали по инструкциям из акселератора. Видно по отзывам, что эксперт толковый, реально кайфует от своего дела (любит объяснять сложное простым языком) и искренне радуется ��езультатам учеников. Договорились и составили план запуска онлайн-школы за 12 недель: 0. Название проекта. Выбрали красивое название проекта. 1. Платформа для запуска. Настроили Геткурс. Зарегистрировали ИП, открыли расчетный счет и настроили прием платежей 2. Позиционирование. Прописали 3 основных сегмента ЦА, прописали их аватары. Провели конкурентный анализ, сформировали политику цен. 3. Линейка продуктов. Составили очередность и план запуска продуктов. Разработали структуру и формат продуктов: 2 вебинара, 4 интенсива, 2 курса. 4. Структура и содержание. Проработали единый стиль оформления всех материалов и лендингов. Качественно проработали каждую презентацию. 5. Соцсетей. Основным каналом эксперта был и есть Instagram. Увеличили количество подписчиков на 10к 6. Сайт. Основным конструктор страниц выбрали встроенный GetCourse. Это решение себя полностью оправдало. 7. Отзывы. Собрали более 200 отзывов по всем проведенным онлайн-мероприятиям. Итак, за 3 месяца работы мы получили результат: Суммарно провели 26 эфиров, 2 трансляции в Инстаграм и 2 мастер-класса. Создали портфель качественных продуктов и инструкций (презентации, чек-листы, видео) Заработали более 700 000 руб. прибыли от продаж участия в курсе и доступов к записям вебинаров, Собрали базу 3000 клиентов с email и телефон, просегментировали ее по доходу и статусу через анкетирование, Собрали большое количество отзывов по всем проведенным программам, Запустили рентабельный онлайн бизнес В дальнейшем наши взгляды на развитие проекта разошлись. Эксперт выбрал для себя новый путь развития с опорой на созданную мной рабочую систему онлайн школы. #lastormo #СергейБолдырев #Продюсирование #платформа #онлайншкола (at Метрополис Metropolis) https://www.instagram.com/p/B5cTXASjQED/?igshid=1jq2gaez4uiyl
2 notes
·
View notes
Text
Council Post: Five Lessons Learned On Entering The Indian Market
Julia Ponomareva is the Head of International Business Development Projects at GetCourse. getty Over the past few years, India has become a mecca of online education. As of June 2022, there were seven unicorns in India (i.e., startups that have grown to a $1 billion evaluation) in the online education space, according to an India Briefing report. India follows only the U.S. and China in terms…

View On WordPress
0 notes
Text
Пожалуй, самая худшая онлайн-школа по уровню сервиса

По крайней мере из тех, что я видел. О чем речь?
По весне встречались на детском мероприятии в небольшом кругу знакомых. И там пара человек поделилась своим опытом прохождения курса на тему воспитания в одной онлайн-школе.
Их отзывы были хорошие. И я тогда подписался на рассылку этой школы.
Так несколько месяцев фоном ее почитывал, эфиры какие-то смотрел, как это часто бывает.
Школа оказалась очень плодовитой на рассылки и мероприятия. Причем, постепенно я оказался подписан на 3 рассылки с разных доменов. Все как бы под крылом одной школы, но от разных экспертов.
И вот в конце июля решил подробнее узнать про один из продуктов, который был для меня тогда актуален.
Оформил заявку, и…
Ничего не произошло.
Как обычно мы настраиваем с клиентами рассылки в таких случаях?
Как минимум автоматическое письмо, что заявка создана. Еще одно через некоторое время с напоминанием об оплате. Потом еще. Где-то между первым и вторым звонок менеджера. Если не дозвонился — ещё письмо.
Как более продвинутый вариант — все эти письма в случае не читаемости дублируется сообщениями в ВК, WhatsApp и далее по списку.
Короче, в любой крупной школе клиенту не дают забыть, что он проявил интерес к тому или иному продукту и оформил заказ.
В случае с этой школой?
Всё было ровно наоборот. И дело тут было вовсе не в применении концепции «огненных колец» в ее гиперболизированном виде. А в обычной раздолбайской организации работы школы.
Прошло пару дней, со мной никто не вышел на связь. Но при этом школа постоянно продолжала рассылать рекламные предложения — акции, вебинары и прочее.
Я написал им ответ на одно из писем с вопросом в духе «Тут кто-нибудь есть?»
Молчание.
Я продублировал свое сообщение еще парой писем. А также написал им в ВК, в Telegram…
Молчание.
Я подождал еще немного и снова повторил вопросы, задав их также в адрес той части школы, на которую изначально подписывался (они выступают под общим брендом, но там другой эксперт со своим доменом и отдельным аккаунтом на GetCourse).
Там ответили быстро. И отказались помогать — отправили меня в адрес поддержки другого эксперта, сказав, что они за него не отвечают. Класс!
Через некоторое время там, на «том самом» домене, всё же какая-то женщина написала мне три !!! и короткое сообщение, никак не проясняющее мой вопрос. В духе: ожидайте, мы скоро проведем еще один вебинар на эту тему, вам придет приглашение, бла-бла.
Написала так, словно проходила мимо ноутбука впервые за месяц и выборочно решила ответить на случайные сообщения в системе. Одно из них оказалось моим. Без каких-либо планов на продолжение беседы. И так сойдет.
Ммм, ну ладно, жду приглашения на новый вебинар, может хоть на там поговорим.
Но приглашение не пришло.
Короче, спустя 3 недели я нашел маленький личный telegram-канал, который ведет эксперт, автор курса. И его же в ВК.
Только благодаря ему я смог связаться в telegram с кураторами этой школы в личке и получить всю необходимую информацию.
Почему они не отвечают на вопросы пользователей на платформе?
Не знаю. Такая вот онлайн-школа!
При таком подходе этой школе и ей подобным усиление маркетинга скорее всего только навредит. Сервис сейчас не сам по себе, он часть продукта.
Просто представьте, что таких недовольных как я, которым никто не отвечает неделями, становится кратно больше. А это больше негатива, «чёрный сарафан» и море отрицательных отзывов.
Если у вас в проекте похожий подход и есть подобное «узкое горлышко» в сервисе — примите меры, прежде чем заливать больше трафика и совершенствовать воронки продаж.
А если ваш продукт хорош и готов к развитию и масштабированию, но вы затрудняетесь с инструментами…
Подпишитесь на эту рассылку — в ней я регулярно рассказываю о них и о моем опыте их применения.
0 notes
Text
Услуги
Создание и модерация чатов.
Общение с учениками, их поддержка и мотивация.
Помощь с техническими моментами.
Создание и настройка тренинга на платформе GetCourse.
Организация и модерация вебинаров.
Организация встреч, конференций и созвонов.
0 notes
Video
youtube
Геткурс. Ограничения в аккаунте на бесплатном периоде. Getcourse настройки
0 notes
Text
Going Jamstack with React, Serverless, and Airtable
The best way to learn is to build. Let’s learn about this hot new buzzword, Jamstack, by building a site with React, Netlify (Serverless) Functions, and Airtable. One of the ingredients of Jamstack is static hosting, but that doesn’t mean everything on the site has to be static. In fact, we’re going to build an app with full-on CRUD capability, just like a tutorial for any web technology with more traditional server-side access might.
youtube
Why these technologies, you ask?
You might already know this, but the “JAM” in Jamstack stands for JavaScript, APIs, and Markup. These technologies individually are not new, so the Jamstack is really just a new and creative way to combine them. You can read more about it over at the Jamstack site.
One of the most important benefits of Jamstack is ease of deployment and hosting, which heavily influence the technologies we are using. By incorporating Netlify Functions (for backend CRUD operations with Airtable), we will be able to deploy our full-stack application to Netlify. The simplicity of this process is the beauty of the Jamstack.
As far as the database, I chose Airtable because I wanted something that was easy to get started with. I also didn’t want to get bogged down in technical database details, so Airtable fits perfectly. Here’s a few of the benefits of Airtable:
You don’t have to deploy or host a database yourself
It comes with an Excel-like GUI for viewing and editing data
There’s a nice JavaScript SDK
What we’re building
For context going forward, we are going to build an app where you can use to track online courses that you want to take. Personally, I take lots of online courses, and sometimes it’s hard to keep up with the ones in my backlog. This app will let track those courses, similar to a Netflix queue.

Source Code
One of the reasons I take lots of online courses is because I make courses. In fact, I have a new one available where you can learn how to build secure and production-ready Jamstack applications using React and Netlify (Serverless) Functions. We’ll cover authentication, data storage in Airtable, Styled Components, Continuous Integration with Netlify, and more! Check it out →
Airtable setup
Let me start by clarifying that Airtable calls their databases “bases.” So, to get started with Airtable, we’ll need to do a couple of things.
Sign up for a free account
Create a new “base”
Define a new table for storing courses
Next, let’s create a new database. We’ll log into Airtable, click on “Add a Base” and choose the “Start From Scratch” option. I named my new base “JAMstack Demos” so that I can use it for different projects in the future.

Next, let’s click on the base to open it.

You’ll notice that this looks very similar to an Excel or Google Sheets document. This is really nice for being able tower with data right inside of the dashboard. There are few columns already created, but we add our own. Here are the columns we need and their types:
name (single line text)
link (single line text)
tags (multiple select)
purchased (checkbox)
We should add a few tags to the tags column while we’re at it. I added “node,” “react,” “jamstack,” and “javascript” as a start. Feel free to add any tags that make sense for the types of classes you might be interested in.
I also added a few rows of data in the name column based on my favorite online courses:
Build 20 React Apps
Advanced React Security Patterns
React and Serverless
The last thing to do is rename the table itself. It’s called “Table 1” by default. I renamed it to “courses” instead.
Locating Airtable credentials
Before we get into writing code, there are a couple of pieces of information we need to get from Airtable. The first is your API Key. The easiest way to get this is to go your account page and look in the “Overview” section.
Next, we need the ID of the base we just created. I would recommend heading to the Airtable API page because you’ll see a list of your bases. Click on the base you just created, and you should see the base ID listed. The documentation for the Airtable API is really handy and has more detailed instructions for find the ID of a base.
Lastly, we need the table’s name. Again, I named mine “courses” but use whatever you named yours if it’s different.
Project setup
To help speed things along, I’ve created a starter project for us in the main repository. You’ll need to do a few things to follow along from here:
Fork the repository by clicking the fork button
Clone the new repository locally
Check out the starter branch with git checkout starter
There are lots of files already there. The majority of the files come from a standard create-react-app application with a few exceptions. There is also a functions directory which will host all of our serverless functions. Lastly, there’s a netlify.toml configuration file that tells Netlify where our serverless functions live. Also in this config is a redirect that simplifies the path we use to call our functions. More on this soon.
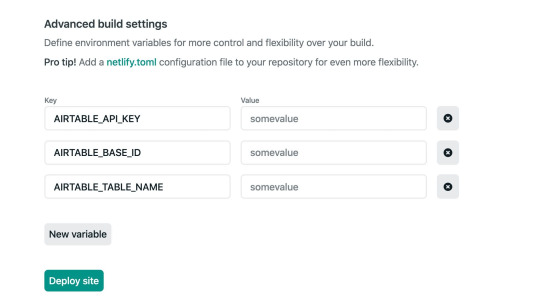
The last piece of the setup is to incorporate environment variables that we can use in our serverless functions. To do this install the dotenv package.
npm install dotenv
Then, create a .env file in the root of the repository with the following. Make sure to use your own API key, base ID, and table name that you found earlier.
AIRTABLE_API_KEY=<YOUR_API_KEY> AIRTABLE_BASE_ID=<YOUR_BASE_ID> AIRTABLE_TABLE_NAME=<YOUR_TABLE_NAME>
Now let’s write some code!
Setting up serverless functions
To create serverless functions with Netlify, we need to create a JavaScript file inside of our /functions directory. There are already some files included in this starter directory. Let’s look in the courses.js file first.
const formattedReturn = require('./formattedReturn'); const getCourses = require('./getCourses'); const createCourse = require('./createCourse'); const deleteCourse = require('./deleteCourse'); const updateCourse = require('./updateCourse'); exports.handler = async (event) => { return formattedReturn(200, 'Hello World'); };
The core part of a serverless function is the exports.handler function. This is where we handle the incoming request and respond to it. In this case, we are accepting an event parameter which we will use in just a moment.
We are returning a call inside the handler to the formattedReturn function, which makes it a bit simpler to return a status and body data. Here’s what that function looks like for reference.
module.exports = (statusCode, body) => { return { statusCode, body: JSON.stringify(body), }; };
Notice also that we are importing several helper functions to handle the interaction with Airtable. We can decide which one of these to call based on the HTTP method of the incoming request.
HTTP GET → getCourses
HTTP POST → createCourse
HTTP PUT → updateCourse
HTTP DELETE → deleteCourse
Let’s update this function to call the appropriate helper function based on the HTTP method in the event parameter. If the request doesn’t match one of the methods we are expecting, we can return a 405 status code (method not allowed).
exports.handler = async (event) => { if (event.httpMethod === 'GET') { return await getCourses(event); } else if (event.httpMethod === 'POST') { return await createCourse(event); } else if (event.httpMethod === 'PUT') { return await updateCourse(event); } else if (event.httpMethod === 'DELETE') { return await deleteCourse(event); } else { return formattedReturn(405, {}); } };
Updating the Airtable configuration file
Since we are going to be interacting with Airtable in each of the different helper files, let’s configure it once and reuse it. Open the airtable.js file.
In this file, we want to get a reference to the courses table we created earlier. To do that, we create a reference to our Airtable base using the API key and the base ID. Then, we use the base to get a reference to the table and export it.
require('dotenv').config(); var Airtable = require('airtable'); var base = new Airtable({ apiKey: process.env.AIRTABLE_API_KEY }).base( process.env.AIRTABLE_BASE_ID ); const table = base(process.env.AIRTABLE_TABLE_NAME); module.exports = { table };
Getting courses
With the Airtable config in place, we can now open up the getCourses.js file and retrieve courses from our table by calling table.select().firstPage(). The Airtable API uses pagination so, in this case, we are specifying that we want the first page of records (which is 20 records by default).
const courses = await table.select().firstPage(); return formattedReturn(200, courses);
Just like with any async/await call, we need to handle errors. Let’s surround this snippet with a try/catch.
try { const courses = await table.select().firstPage(); return formattedReturn(200, courses); } catch (err) { console.error(err); return formattedReturn(500, {}); }
Airtable returns back a lot of extra information in its records. I prefer to simplify these records with only the record ID and the values for each of the table columns we created above. These values are found in the fields property. To do this, I used the an Array map to format the data the way I want.
const { table } = require('./airtable'); const formattedReturn = require('./formattedReturn'); module.exports = async (event) => { try { const courses = await table.select().firstPage(); const formattedCourses = courses.map((course) => ({ id: course.id, ...course.fields, })); return formattedReturn(200, formattedCourses); } catch (err) { console.error(err); return formattedReturn(500, {}); } };
How do we test this out? Well, the netlify-cli provides us a netlify dev command to run our serverless functions (and our front-end) locally. First, install the CLI:
npm install -g netlify-cli
Then, run the netlify dev command inside of the directory.
This beautiful command does a few things for us:
Runs the serverless functions
Runs a web server for your site
Creates a proxy for front end and serverless functions to talk to each other on Port 8888.
Let’s open up the following URL to see if this works:
We are able to use /api/* for our API because of the redirect configuration in the netlify.toml file.
If successful, we should see our data displayed in the browser.

Creating courses
Let’s add the functionality to create a course by opening up the createCourse.js file. We need to grab the properties from the incoming POST body and use them to create a new record by calling table.create().
The incoming event.body comes in a regular string which means we need to parse it to get a JavaScript object.
const fields = JSON.parse(event.body);
Then, we use those fields to create a new course. Notice that the create() function accepts an array which allows us to create multiple records at once.
const createdCourse = await table.create([{ fields }]);
Then, we can return the createdCourse:
return formattedReturn(200, createdCourse);
And, of course, we should wrap things with a try/catch:
const { table } = require('./airtable'); const formattedReturn = require('./formattedReturn'); module.exports = async (event) => { const fields = JSON.parse(event.body); try { const createdCourse = await table.create([{ fields }]); return formattedReturn(200, createdCourse); } catch (err) { console.error(err); return formattedReturn(500, {}); } };
Since we can’t perform a POST, PUT, or DELETE directly in the browser web address (like we did for the GET), we need to use a separate tool for testing our endpoints from now on. I prefer Postman, but I’ve heard good things about Insomnia as well.
Inside of Postman, I need the following configuration.
url: localhost:8888/api/courses
method: POST
body: JSON object with name, link, and tags
After running the request, we should see the new course record is returned.

We can also check the Airtable GUI to see the new record.

Tip: Copy and paste the ID from the new record to use in the next two functions.
Updating courses
Now, let’s turn to updating an existing course. From the incoming request body, we need the id of the record as well as the other field values.
We can specifically grab the id value using object destructuring, like so:
const {id} = JSON.parse(event.body);
Then, we can use the spread operator to grab the rest of the values and assign it to a variable called fields:
const {id, ...fields} = JSON.parse(event.body);
From there, we call the update() function which takes an array of objects (each with an id and fields property) to be updated:
const updatedCourse = await table.update([{id, fields}]);
Here’s the full file with all that together:
const { table } = require('./airtable'); const formattedReturn = require('./formattedReturn'); module.exports = async (event) => { const { id, ...fields } = JSON.parse(event.body); try { const updatedCourse = await table.update([{ id, fields }]); return formattedReturn(200, updatedCourse); } catch (err) { console.error(err); return formattedReturn(500, {}); } };
To test this out, we’ll turn back to Postman for the PUT request:
url: localhost:8888/api/courses
method: PUT
body: JSON object with id (the id from the course we just created) and the fields we want to update (name, link, and tags)
I decided to append “Updated!!!” to the name of a course once it’s been updated.

We can also see the change in the Airtable GUI.
Deleting courses
Lastly, we need to add delete functionality. Open the deleteCourse.js file. We will need to get the id from the request body and use it to call the destroy() function.
const { id } = JSON.parse(event.body); const deletedCourse = await table.destroy(id);
The final file looks like this:
const { table } = require('./airtable'); const formattedReturn = require('./formattedReturn'); module.exports = async (event) => { const { id } = JSON.parse(event.body); try { const deletedCourse = await table.destroy(id); return formattedReturn(200, deletedCourse); } catch (err) { console.error(err); return formattedReturn(500, {}); } };
Here’s the configuration for the Delete request in Postman.
url: localhost:8888/api/courses
method: PUT
body: JSON object with an id (the same id from the course we just updated)

And, of course, we can double-check that the record was removed by looking at the Airtable GUI.
Displaying a list of courses in React
Whew, we have built our entire back end! Now, let’s move on to the front end. The majority of the code is already written. We just need to write the parts that interact with our serverless functions. Let’s start by displaying a list of courses.
Open the App.js file and find the loadCourses function. Inside, we need to make a call to our serverless function to retrieve the list of courses. For this app, we are going to make an HTTP request using fetch, which is built right in.
Thanks to the netlify dev command, we can make our request using a relative path to the endpoint. The beautiful thing is that this means we don’t need to make any changes after deploying our application!
const res = await fetch('/api/courses'); const courses = await res.json();
Then, store the list of courses in the courses state variable.
setCourses(courses)
Put it all together and wrap it with a try/catch:
const loadCourses = async () => { try { const res = await fetch('/api/courses'); const courses = await res.json(); setCourses(courses); } catch (error) { console.error(error); } };
Open up localhost:8888 in the browser and we should our list of courses.

Adding courses in React
Now that we have the ability to view our courses, we need the functionality to create new courses. Open up the CourseForm.js file and look for the submitCourse function. Here, we’ll need to make a POST request to the API and send the inputs from the form in the body.
The JavaScript Fetch API makes GET requests by default, so to send a POST, we need to pass a configuration object with the request. This options object will have these two properties.
method → POST
body → a stringified version of the input data
await fetch('/api/courses', { method: 'POST', body: JSON.stringify({ name, link, tags, }), });
Then, surround the call with try/catch and the entire function looks like this:
const submitCourse = async (e) => { e.preventDefault(); try { await fetch('/api/courses', { method: 'POST', body: JSON.stringify({ name, link, tags, }), }); resetForm(); courseAdded(); } catch (err) { console.error(err); } };
Test this out in the browser. Fill in the form and submit it.

After submitting the form, the form should be reset, and the list of courses should update with the newly added course.
Updating purchased courses in React
The list of courses is split into two different sections: one with courses that have been purchased and one with courses that haven’t been purchased. We can add the functionality to mark a course “purchased” so it appears in the right section. To do this, we’ll send a PUT request to the API.
Open the Course.js file and look for the markCoursePurchased function. In here, we’ll make the PUT request and include both the id of the course as well as the properties of the course with the purchased property set to true. We can do this by passing in all of the properties of the course with the spread operator and then overriding the purchased property to be true.
const markCoursePurchased = async () => { try { await fetch('/api/courses', { method: 'PUT', body: JSON.stringify({ ...course, purchased: true }), }); refreshCourses(); } catch (err) { console.error(err); } };
To test this out, click the button to mark one of the courses as purchased and the list of courses should update to display the course in the purchased section.

Deleting courses in React
And, following with our CRUD model, we will add the ability to delete courses. To do this, locate the deleteCourse function in the Course.js file we just edited. We will need to make a DELETE request to the API and pass along the id of the course we want to delete.
const deleteCourse = async () => { try { await fetch('/api/courses', { method: 'DELETE', body: JSON.stringify({ id: course.id }), }); refreshCourses(); } catch (err) { console.error(err); } };
To test this out, click the “Delete” button next to the course and the course should disappear from the list. We can also verify it is gone completely by checking the Airtable dashboard.
Deploying to Netlify
Now, that we have all of the CRUD functionality we need on the front and back end, it’s time to deploy this thing to Netlify. Hopefully, you’re as excited as I am about now easy this is. Just make sure everything is pushed up to GitHub before we move into deployment.
If you don’t have a Netlify, account, you’ll need to create one (like Airtable, it’s free). Then, in the dashboard, click the “New site from Git” option. Select GitHub, authenticate it, then select the project repo.

Next, we need to tell Netlify which branch to deploy from. We have two options here.
Use the starter branch that we’ve been working in
Choose the master branch with the final version of the code
For now, I would choose the starter branch to ensure that the code works. Then, we need to choose a command that builds the app and the publish directory that serves it.
Build command: npm run build
Publish directory: build
Netlify recently shipped an update that treats React warnings as errors during the build proces. which may cause the build to fail. I have updated the build command to CI = npm run build to account for this.

Lastly, click on the “Show Advanced” button, and add the environment variables. These should be exactly as they were in the local .env that we created.
The site should automatically start building.

We can click on the “Deploys” tab in Netlify tab and track the build progress, although it does go pretty fast. When it is complete, our shiny new app is deployed for the world can see!

Welcome to the Jamstack!
The Jamstack is a fun new place to be. I love it because it makes building and hosting fully-functional, full-stack applications like this pretty trivial. I love that Jamstack makes us mighty, all-powerful front-end developers!
I hope you see the same power and ease with the combination of technology we used here. Again, Jamstack doesn’t require that we use Airtable, React or Netlify, but we can, and they’re all freely available and easy to set up. Check out Chris’ serverless site for a whole slew of other services, resources, and ideas for working in the Jamstack. And feel free to drop questions and feedback in the comments here!
The post Going Jamstack with React, Serverless, and Airtable appeared first on CSS-Tricks.
You can support CSS-Tricks by being an MVP Supporter.
Going Jamstack with React, Serverless, and Airtable published first on https://deskbysnafu.tumblr.com/
0 notes
Text
Как коронавирус стимулирует экономику Big Data: факты и ожидания
Жесткий режим карантина и самоизо��яции из-за нового коронавируса кардинально изменил мировую экономику, сократив доходы большинства работающего населения. Однако, в некоторых отраслях наблюдается беспрецедентный рост продаж. Сегодня мы расскажем, какие компании продолжают успешно развиваться, несмотря на COVID-19 и вызванные им ограничительные меры. Спойлер: все они связаны с большими данными (Big Data) и цифровизацией.
Все онлайн: коронавирус как драйвер Big Data бизнесов
Сегодня, когда мы все по-настоящему ушли в онлайн, наибольшим спросом пользуются веб-сервисы следующих категорий: · развлекательные ресурсы, от радио и кинотеатров до электронных книг и игр; · образовательные платформы, специально ориентированные на интерактивное обучение (Coursera, Stepik, GetCourse и пр.), а также сайты с тематическими статьями, например, блог нашей Школы Больших Данных; · интернет-магазины, включая агрегаторы доставки еды из ресторанов и продуктов с оффлайн-складов; · коммуникационные инструменты – мессенджеры, платформы онлайн-звонков и видеоконференций (Zoom, Skype). При всем многообразии предлагаемых продуктов, все эти веб-сервисы объединяет их принадлежность к миру Big Data, где требуется собирать и обрабатывать огромные объемы информации. Именно здесь особенно востребованы аналитика больших данных и машинное обучение для прогнозирования пользовательского поведения и стимулирования потребителей к новым покупкам. Сегодня, когда из-за COVID-19 люди сидят по домам, количество активных пользователей и продуцирумых ими данных становится еще больше. И, хотя многие сервисы стали бесплатными на период карантина [1], выручка крупных ИТ-компаний продолжает расти. Например, Ozon.ru, гигант отечественный онлайн-торговли сообщает, что в России только за март 2020 года продажи товаров для ремонта выросли на 296%, настольных игр — на 150%, товаров для домашних занятий спортом, хобби и творчества — на 120%, книг — на 110%. В 4 раза увеличились продажи подписок на онлайн-кинотеатры и игровые сервисы [2]. В Китае, где на сегодня эпидемия почти закончилась, платформы электронной коммерции отметили 215% рост спроса на продукты питания. В частности, розничные сети КНР сообщили, что поставки овощей выросли в 6 раз во время Китайского нового года, когда в стране наблюдался пик заболевания [3].
Дистанционное обучение: за и против
Значительный рост продаж (от 20 до 250%) наблюдаются и в сегменте онлайн-образования. В условиях неопределенного будущего и избытка свободного времени люди, запертые в 4-х стенах, стремятся получить новые знания и навыки. Дополнительным фактором спроса на онлайн-курсы стала отмена привычных занятий в школах и ВУЗах [4]. Область Big Data – не исключение, сегодня в сети можно без труда найти обучающие материалы по машинному обучению и другим методам Data Science, а также курсы по Apache Spark, Hadoop, Kafka и прочим технологиям больших данных. Подобные открытые уроки – отличный способ узнать о новом инструменте. Но говорить о том, что они позволят в совершенстве овладеть им, пока преждевременно. При множестве положительных аспектов дистанционного обучения (свобода выбора тем, удобный график индивидуальных занятий) , отметим некоторые недостатки этого формата: · недостаточная обратная связь от студента к преподавателю и наоборот. Например, при взаимодействии лицом к лицу опытный учитель быстро заметит реакцию аудитории и оперативно скорректирует материал в сторону усложнения или упрощения. В онлайн-формате это сделать сложнее, т.к. даже в условиях «прямого эфира» взаимодействие происходит опосредовано. · чрезмерный фокус на заранее объявленной теме без незапланированных сопутствующих дополнений, например, комментарии и мнения, что имеет место в офлайн-беседах. Такой обмен профессиональным опытом существенно обогащает образовательную среду, расширяя кругозор участников и приводя к так называемым инсайтам (insights). Например, курсы по Apache Spark могут привести к разговору о других смежных технологиях Big Data: Hadoop, Kafka и т.д., что более вероятно в face-2-face взаимодействии, чем через веб-конференцию. · пониженная степень погружения в изучаемый предмет по сравнению с офлайн-классом из-за возможности отвлечься на другие задачи параллельно с аудио/видео-трансляцией теоретического материала. Разумеется, это вопрос дисциплины и заинтересованности студента в изучаемой теме, однако в случае личного присутствия в офлайн-классе студенты больше сконцентрированы на обучении, а не на посторонних вещах. Поэтому при всех достоинствах онлайн-курсов, для корпоративного обучения прикладным тенологиям, в частности, Big Data, офлайн пока остается более эффективным форматом. Почему курсы по Hadoop, Kafka, Spark и другим технологиям больших данных сплотят ваших сотрудников лучше любого тимбилдинга, мы рассказывали здесь.
Цифровизация и COVID-19: комбо, а не противостояние
Тем не менее, пандемия коронавируса показала, что многие бизнес-процессы действительно можно перевести в онлайн без потери эффективности. В частности, многие ИТ-специалисты и до карантина работали в удаленном режиме, администрируя сервера и разрабатывая ПО, техническую документацию или дизайн-проекты. Карантин не слишком повлиял на ежедневные задачи этой части населения. Более того, ограничительные меры сдерживания социальной активности даже выступили драйвером роста многих ИТ-решений. К примеру, система слежения за людьми в рамках программы «Умный город», реализуемой в Москве с 2012 года. Этот проект с бюджетом 500 миллиардов рублей включает в т.ч. биометрическую систему уличного видеонаблюдения с распознаванием лиц. В целях борьбы с коронавирусом эта система будет отслеживать заболевших и потенциальных носителей, нарушивших карантин [5]. Оставив за рамками этические вопросы такого использования Big Data технологий, отметим, что с этой системой уже связано несколько инцидентов информационной безопасности. В частности, записи с уличных камер городского видеонаблюдения оказались в продаже на черном рынке, а доступ к следящим устройствам не слишком защищен с технической точки зрения [6]. Почему это опасно и о других проблемах cybersecurity в биометрии мы рассказывали здесь. Впрочем, коронавирус активизирует не только государственные сервисы контроля за населением, но и затрагивает прочие проекты отечественной цифровизации, таких как беспилотные летательные аппараты (БПЛА, дроны). Например, 11 апреля 2020 года на территории аэропорта «Орловка» в Тверской области и над Погорельским сельским поселением прошла официальная демонстрация использования беспилотников для оповещения населения, предупреждения и борьбы с ЧС. В мероприятии приняли участие 10 компаний – лидеров отечественного производства БПЛА, а также представители силовых структур (МВД, МЧС и ФСБ) [7]. Успех события позволяет надеяться на устранение хотя бы части организационных проблем, которые сдерживают развитие рынка дронов в России. Подводя пока не слишком радующие итоги текущей ситуации с коронавирусом, хочется верить, что она окажет на отечественную экономику не только отрицательное воздействие, но и простимулирует развитие. Например, сегодня мы все поняли, насколько велика ценность согласованной и корректной информации, а также почему управленческие решения должны приниматься на основе реальных данных. А пока мир продолжает сидеть на карантине, мы работаем для вас – даже в период пандемии COVID-19, наш лицензированный учебный центр «Школа Больших Данных» функционирует в штатном режиме. Образоват��льные курсы обучения и повышения квалификации руководителей и ИТ-специалистов (менеджеров, архитекторов, инженеров, администраторов, Data Scientist’ов и аналитиков Big Data) в Москве ведутся согласно утвержденному расписанию. Для компаний, ограничивающих передвижения своих сотрудников, предлагается дистанционный формат обучения в режиме удаленного взаимодействия.

Смотреть расписание занятий

Зарегистрироваться на курс Источники 1. https://informburo.kz/stati/polzuysya-besplatno-servisy-kotorye-stali-dostupny-dlya-vseh-na-karantine.html 2. https://www.gazeta.ru/business/news/2020/03/22/n_14191513.shtml 3. https://nv.ua/biz/markets/pandemiya-koronavirusa-chto-izmenilos-dlya-biznesa-i-potrebiteley-novosti-mira-50077243.html 4. https://www.vedomosti.ru/management/articles/2020/04/08/827543-onlainovie-kursi 5. https://www.the-village.ru/village/city/news-city/379093-slezhka 6. https://roskomsvoboda.org/54969/ 7. http://www.robogeek.ru/letayuschie-roboty/pervye-v-rossii-ispytaniya-dronov-dlya-borby-s-posledstviyam-epidemii-koronavirusa Read the full article
0 notes
Photo

Немного организационной информации. А то уже вопросов в Директ много пришло))) ⠀ «Школа Стройности» будет проходить на сайте «Getcourse» ⠀ Почему это удобно? ⠀ ✔️сайт специализирован для онлайн обучения ✔️ле��кий и понятный для работы ✔️личный кабинет, где вы видите все задания в одном месте ✔️есть приложение ✔️можно заниматься с компьютера и с телефона ⠀ Стартуем мы 1 марта 🌸 Подробности напишем немного позже ⠀ (at Зебра Алтуфьево) https://www.instagram.com/p/B81YnxnHysu/?igshid=1n7oxi91npvhz
0 notes
Photo

Пришла пора провести вебинар. А как это сделать? Что необходимо? Как организовать? 🤔 . Самый простой вариант — прямая трансляция на YouTube. 😊 Просто и бесплатно. Но из возможностей — сам эфир, чат с участниками и запись трансляции. А вот привлечение на вебинар, посадочная страница, регистрация, вопросы оплаты и так далее — это всё необходимо организовать отдельно. 🤨 . Условно специальные сервисы для проведения вебинаров можно разделить на три группы: ❇ Имеющие встроенные программы для проведения трансляции ❇ Использующие для трансляции сторонние площадки (например YouTube) ❇ Комбинированные — внутренние или внешние возможности трансляции . В первом случае есть вероятность того, что вебинар не будет работать на iPhone, iPad, Mac - продукция Aplle не поддерживает ряд технологий по трансляции видео. Выход — провести тестовый вебинар, проверить его работоспособность на всех устройствах и при необходимости указать требования и рекомендации для зрителей. ‼ Во втором — необходимо настроить, подключить сторонний сервис и вести трансляцию через него. В 90% случаях используется YouTube. Но стоит учесть, что канал, через который ведется трансляция, должен иметь разрешение на встраивание трансляций на другие сайты. Для получения разрешения необходимо подключится к сервису AdSense. ‼ . Рекомендую по второму варианту — Бизон 365, третьему — GetCourse (о нем в следующих постах). Бизон 365: ✅ Все функции вебинарной комнаты ✅ Защита от скачивания и перехода во время трансляции на YouTube ✅ Продажи во время вебинара ✅ Автовебинары ✅ Страницы регистрации ✅ Встраиваемые формы регистрации (можно вставить на любой сайт) ✅ Личный кабинет участника ✅ Касса и прием оплаты ✅ Курсы для учеников 🌀 и еще много олезных возможностей! . 💠 И еще один приятный бонус — 30 дней бесплатный период (до 20 участников суммарно). Можно попробовать и протестировать работу. . Есть желание провести вебинар, но что-то вот как-то оно малость непонятно? - Пишите, поможем! Нет вопросов, на которые невозможно получить ответ! 💪😊 . #ВебинарЮтуб #Автовебинар #Вебинар #Бизон365 #СергейИстомин (at Voronezh) https://www.instagram.com/p/B4SeGNNBHRn/?igshid=1dpjmcssfhs88
0 notes
Text
Building Blocks of Angular Application
New Post has been published on https://is.gd/QI1yUp
Building Blocks of Angular Application

Building Block Of Angular Application By Sagar Jaybhay
Component
It is heart of angular app. In our real world application we 10 to 100 components. Component can encapsulate data, Html markup and View.

The use of component is that we can reuse this in multiple places. In angular is component based architecture and it is for easy to manage large application. Every application have app-component or root-component. There are 3 step process to use component.
Create component
Register your component in module
Add selector tag in respective html
To create component follow the below process.
Create class and export it.
Import Component from angular/core
Then mark class with component decorator.
import Component from '@angular/core' @Component( selector:'course' ) export class CourseComponent
In this selector course we have <course></course> tag present in index html or respective html file.Custom UI component selection way.
Selector By Class Name
@Component( selector:'.css_class_name' )
Selector By ID
@Component( selector:'#divID' )
Template in component
It is for adding the template or html markup to your ui component or htmlpage.
@Component( selector:'#divID', template:'<h2>Courses</h2>' )
Registering Component
To register the component in module you need to add in root module which is generally app.module.ts and in that declarations array you need to add this.
@NgModule({ import BrowserModule from '@angular/platform-browser'; import NgModule from '@angular/core'; import AppRoutingModule from './app-routing.module'; import AppComponent from './app.component'; import CourseComponent from './courses.component'; @NgModule( declarations: [ AppComponent, CourseComponent ], imports: [ BrowserModule, AppRoutingModule ], providers: [], bootstrap: [AppComponent] ) export class AppModule
This is default module and component when we generate our application. To add custom component you need to include this declarations array.


Module
Every angular application have 1 or more module and it is a container of 1 or more related component. Every application have at least 1 module is 1 app – module. If your application is smaller then 1 module is ok but as your application grows you need to create different module with each one have separate functionality.
Service
when you want some code which is reuse again and again then write that code in service and where you use that service you need to inject that service reference in constructor.
import Component from '@angular/core' import coursesService from './courses.service'; @Component( selector:'course', template:`<h2>Courses By getTitle()</h2> <ul> <li *ngFor="let cc of courses"> cc </li> </ul> ` ) export class CourseComponent pageTitle="Sagar Jaybhay"; courses; constructor(service:coursesService) this.courses=service.getCourse(); console.log("i am in constructor"+this.courses) getTitle() return this.pageTitle;
Then this service need to register in module so in module file you need to add this service inside the providers array.
import BrowserModule from '@angular/platform-browser'; import NgModule from '@angular/core'; import AppRoutingModule from './app-routing.module'; import AppComponent from './app.component'; import CourseComponent from './courses.component'; import coursesService from './courses.service'; @NgModule( declarations: [ AppComponent, CourseComponent ], imports: [ BrowserModule, AppRoutingModule ], providers: [coursesService], bootstrap: [AppComponent] ) export class AppModule
Below is the service code
export class coursesService getCourse() return ['C#','Angular','Java'];
Injectable
when our service have some dependencies in their constructor we need to add this injectable import statement in service. It follows a singleton pattern. Means single instance is created through the application. Also before the component called service should initialized and angular itself take cares of it.

0 notes
Photo

Совладелец ГетКурса рассказал нам цифры по своему сервису. ИНТЕРЕСНЫЕ ЦИФРЫ 👍 Я их вам не имею право раскрывать, но скажу что инфобизнесом стоит заниматься 🔥 Если... А кто знает, что такое GetCourse? Пишите в комментариях 🖊 С уважением #вячеславтомин #возможностиютуботтомина https://www.instagram.com/p/BxeJusFiB8g/?utm_source=ig_tumblr_share&igshid=1hxy09ovc96wx
0 notes
Video
Чем отличается GetCourse от WordPress. Часть 2. from Anfisa Breus on Vimeo.
wpwebinar.ru
0 notes