#gridsketching
Explore tagged Tumblr posts
Visit Tumblr Blog
Explore Tumblr blogs with no restrictions, modern design and the best experience.
Last Seen Tumblr Blogs


Fun Fact
Tumblr was acquired by Yahoo for $1.1B in 2013.
Text

Sketch Your Photos with Ease Using GridSketcher
GridSketcher can help you elevate your photo game! This application transforms any photo into a gorgeous doodle in seconds. Whether you enjoy art or simply want to add a creative touch to your photos, makes drawing easy and enjoyable.
Want to learn more about how GridSketcher may help your creative projects? Dive into the blog for useful tips and ideas: https://cloudknots.in/gridsketcher/blog/gridsketcher-photo-to-sketch/
#photo sketch#photo to sketch#grid drawing#grid sketching#drawing tool#drawing tools#drawing tips#drawing techniques#gridsketcher
3 notes
·
View notes
Text
Art Progress: 29 April 2020
Drawing: 30 Minutes
Number of Sketches: 1
Good Points: More accuracy with shapes and shading.
To improve: cleaner lines, drawing leaves
Here’s the drawing of houses outside my window from 26/04/2020:
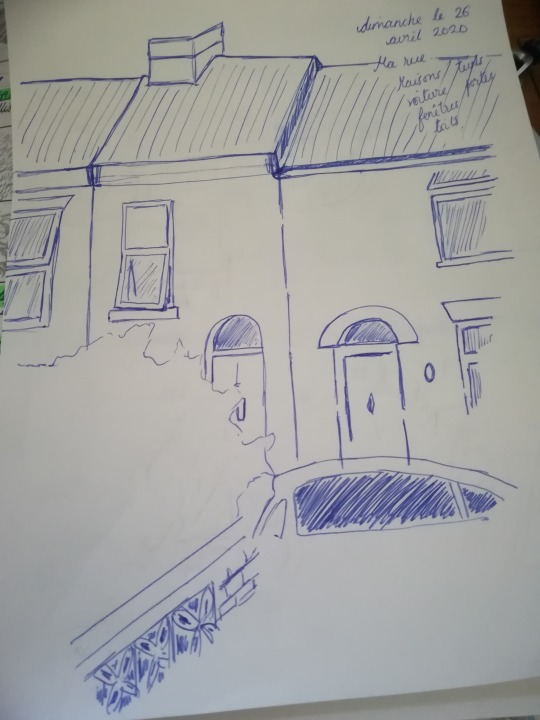
And here’s the same drawing again that I made today (partially out of a lack of any other things to draw):

I think that my observation has improved in the latter picture, as well as the shading. I still have problems with maintaining a steady hand and I wonder whether I should use a harder pencil.
Right now, this was drawn using an increasingly blunt HB pencil. I might get cleaner lines from a different pencil. At the same time, I also need to loosen my grip on the pencil. I am still too reliant on the scribes grip, which I use for writing. All of this is also linked with developing a better posture at my desk, which allows for more free lines.
I must say, however, that part of this difference has come from using a grid, as well as using dots to outline the semicircles here.
I have just reblogged a picture called Chipovnick by Mstislav Dobuzhinsky, which contains the same semicircles and columns which I intend to practice. Yesterday’s Art Progress entry included my practicing of shapes and tone using a grid. Already, I had made a quick outline of what I would copy. We shall see whether this will come to fruition.
#art#drawing#sketching#dailysketches#artprogress#progressupdate#sketch#pencil#HBpencil#grid#griddrawing#gridsketching#shapes#semicircles#rectangles#trapezium#tone#texture#shading#squaredpaper#sketchoftheday#stilllife#drawings
3 notes
·
View notes
Text
Digital Art Demystified: The Artist's Process, Step-by-Step!
Ever wondered how digital artists bring their visions to life? Dive into the fascinating process behind the art! This piece explores creative techniques, perhaps even featuring tools like a grid drawing app or explaining how to transform a photo to line drawing with precision. Discover how artists leverage modern apps, like possibly GridSketcher, to refine their craft and achieve stunning results. Get an exclusive look at the digital workflow that shapes incredible artwork.
Read more here: https://dribbble.com/shots/26158435-Behind-the-Art-Discovering-the-Process-of-a-Digital-Artist
0 notes
Text
Unlock Your Inner Artist: Why Grid Sketching Transforms Your Art!
Ready to boost your drawing accuracy and master proportions? Discover why every artist, from beginner to pro, should try grid-based sketching! This timeless technique breaks down complex images, making it easier to perfect details, especially for portrait drawing or turning a photo to line drawing. Learn how a grid drawing app or even a simple physical grid can enhance your skills, build patience, and improve your eye for detail. Whether you use a dedicated tool like GridSketcher or just practice the method, this guide shows how grid drawing can refine your artistry and lead to remarkable precision in your work.
0 notes
Text
Mastering Line Art in Digital Drawing: Essential Tips and Smart Tricks

Line art is the soul of many digital illustrations. It gives your artwork structure, personality, and flow. But mastering clean, expressive lines isn’t just about drawing random strokes. It takes practice, planning, and the right tools. Many digital artists, especially beginners, struggle with shaky lines or overly complex outlines. This blog walks through practical tips and smart tricks to sharpen your line art game.
Whether you're sketching characters, tracing over a photo to line drawing, or starting from scratch, clean line work makes a big difference. With a few changes in technique and approach, any digital artist can improve line control. The journey from rough shapes to polished lines gets easier when you have the right process in place. So, let’s dive into the strategies that can help elevate your digital line art.
Start With Simple Sketch Foundations
Before jumping into final lines, always begin with a base sketch. This rough layout guides your drawing and helps maintain proportion.
Use light and loose strokes to map the figure or object.
Focus on gesture and structure rather than perfect outlines.
Reduce opacity of your sketch layer before inking for better visibility.
Keep anatomy or object dimensions consistent using a light guide.
Sketch multiple versions if necessary. It’s easier to refine with options.
Use Consistent Brush Settings
Every artist has a favorite brush, but consistency matters more than style when doing line work.
Choose a brush with pressure sensitivity for varied stroke thickness.
Avoid constantly switching brushes during one drawing.
Stabilization settings help control jittery lines.
Match brush size to the size of your canvas for better scaling.
Keep spacing low for smooth, clean curves.
Follow the Flow of the Form
Line art should suggest movement, weight, and shape. Don't just trace - express.
Lines should follow the natural curve of the form.
Add variation in thickness where the object turns or overlaps.
Use long, confident strokes instead of short, broken lines.
Avoid over-detailing in areas that don’t need it.
Let thicker lines guide the viewer’s eye to key parts.
Refine Using Layers
Working digitally gives you the advantage of layers. Use them wisely during your line art phase.
Keep your sketch on a separate layer from the final lines.
Create multiple line layers if needed: base lines, accents, and shadows.
Use clipping masks for clean edges when shading or coloring.
Duplicate your line layer before experimenting - always save progress.
Adjust line opacity if the final image looks too harsh.
Use Grids for Better Structure
When working on a complex portrait drawing, a grid helps keep everything aligned.
Break your canvas into equal parts with a grid overlay.
Use each square to focus on one small area at a time.
This technique is especially useful for proportion-based work.
Grid-based drawing improves symmetry and balance.
Many artists rely on grid drawing for photo-based artwork.
Zoom In and Out Frequently
It’s tempting to stay zoomed in, but line quality can suffer if you lose sight of the big picture.
Zoom in for detailing but zoom out to check overall flow.
Tiny details may look fine up close but messy when viewed full scale.
Stepping back helps spot awkward curves or inconsistent stroke weight.
Make corrections after reviewing your work from a distance.
Use Reference Images for Practice
If you're learning, reference is your best friend. Tracing photos is okay when you're building skills.
Choose a clear image and lower its opacity.
Trace lightly over the structure, then draw your version.
Convert a photo to sketch conversion to practice contour lines.
This builds muscle memory for stroke direction and form.
Don’t rely on references forever - use them to build confidence.
Control Line Weight Intentionally
Line weight adds depth and focus to an illustration. Knowing when and where to change stroke thickness is important.
Thicker lines can show shadows, pressure, or proximity.
Thinner lines work better for subtle details or background shapes.
Don’t make every line the same width - it flattens the image.
Add weight at curve turns or where two objects intersect.
Keep line consistency across similar elements for a unified look.
Keep Your Workspace Clean and Simple
A cluttered digital setup can make line work harder than it needs to be.
Use neutral background colors to see lines better.
Reduce layer count by merging only when necessary.
Hide distraction layers like background colors while drawing lines.
Label your layers clearly - no more “Layer 7 copy” confusion.
Shortcuts help: know your app’s key commands to speed things up.
Practice With Intent
Line art improves over time - but random doodling isn’t enough. Practice with a goal in mind.
Try timed sketches to boost confidence and speed.
Choose a daily prompt that pushes you to draw different things.
Copy line art from pros to understand their style and pressure usage.
Test new tools inside your drawing app, like stabilizers or rulers.
Revisit old artwork and redraw the lines to see your progress.
Explore the Magic of Simplicity
Sometimes less is more. Clean and minimal line work often has the biggest impact.
Don’t overcrowd your image with excessive lines.
Learn when to stop - not every area needs texture or depth.
Let the white space work in your favor.
Bold outlines with minimal details can feel modern and striking.
Viewers often connect more with simple, confident lines.
Digital line art isn’t just about having a stylus and app. It’s about control, flow, and mindful technique. Over time, what starts as trial and error becomes a personal rhythm. From stylizing characters to turning a photo to sketch conversion, a confident line brings the art to life.
For those looking to improve their sketching control, try using grid techniques or work with guided references. Apps like GridSketcher make it easier to experiment with photo to line drawing and develop a more structured approach to digital sketching. Whether you're learning structure, detail control, or just experimenting - the right tools make a huge difference.
#photo to line drawing#gridsketcher#grid drawing#portrait drawing app#drawing app#photo to sketch conversion
0 notes
Text
How to Add a Hand-Drawn Touch to Your Digital Imagery
In an increasingly digital world, images often feel polished and precise, sometimes lacking the unique charm of a hand-drawn creation. Many people yearn for that organic, artistic feel in their visuals without necessarily possessing traditional drawing skills. Thankfully, advancements in digital tools now make it possible to infuse your photographs with a beautiful, hand-drawn aesthetic, opening up new avenues for creative expression. This process allows individuals to transform ordinary digital snaps into captivating artworks that stand out in a visually saturated landscape.
Adding a hand-drawn touch can give your digital imagery a distinctive personality, making it more engaging and memorable. It bridges the gap between photography and illustration, offering a fresh perspective on your visual content. Whether for personal projects, social media, or professional presentations, mastering these techniques can significantly elevate your visual storytelling. Furthermore, embracing this creative approach can unlock hidden artistic potential, transforming how one perceives and interacts with their own digital creations.
The Magic of Digital Sketch Transformation
The concept of transforming a photograph into a sketch has fascinated artists and enthusiasts for years. Traditionally, this involved meticulous tracing or complex artistic interpretation. However, modern digital tools have revolutionized this process, making photo to sketch conversion remarkably accessible. These technologies use sophisticated algorithms to detect lines, contours, and shading within an image, then render them in various artistic styles. The result is an image that retains the essence of the original photograph but takes on the unique characteristics of a pencil, charcoal, or ink drawing.
This digital magic allows users to experiment with diverse artistic finishes, from detailed cross-hatching to soft, ethereal pencil strokes. Consequently, it removes the barrier of requiring extensive traditional art training. One can simply upload a picture and apply a sketch effect, instantly creating a piece of art that looks like it was meticulously drawn by hand. This accessibility fuels creativity, encouraging more individuals to explore their artistic inclinations without intimidation. Therefore, it has become a popular method for giving digital content a truly personalized and artistic flair.
Techniques for Achieving a Hand-Drawn Look
Achieving an authentic hand-drawn look from your digital photos involves more than just applying a single filter. Several techniques and considerations can help enhance the desired effect. Understanding these can lead to more refined and impactful results, truly transforming your digital imagery into captivating artworks.
Simplification and Abstraction: The essence of a sketch lies in its ability to convey information with minimal lines. When transforming an image, tools often allow for varying levels of detail extraction. Opting for less detail can create a more abstract, artistic interpretation, emphasizing form over minute texture.
Line Weight and Texture: Authentic hand-drawn art features varied line weights and textures. Some digital tools can simulate this by recognizing areas of contrast or depth, rendering thicker lines for prominent features and thinner lines for subtle details. Experimenting with different "pencil" or "charcoal" textures can also add realism.
Shading Techniques: Beyond just outlines, digital tools can mimic various shading techniques. This includes cross-hatching for darker areas, stippling for textural effects, or soft, smudged shading to create depth and volume. Exploring these options can significantly impact the mood and style of the final sketch.
Color Integration: While sketches are often monochromatic, some tools allow for the integration of subtle color. This can range from a faint tint that mimics colored pencils to preserving a muted version of the original photo's colors, adding another layer of artistic expression. Choosing the right balance is key to maintaining the hand-drawn feel.
Furthermore, some digital artists even use techniques inspired by traditional methods like grid drawing. Although not always a direct feature of automated tools, the concept of breaking down an image into smaller, manageable sections can be applied mentally to analyze how a digital sketch tool renders different parts of your photo. This understanding can help in selecting the best images for conversion or in fine-tuning settings for optimal results. Consequently, a deeper appreciation for the artistic process emerges even when using digital means.
Choosing the Right Digital Tool
The market offers a wide array of tools that facilitate the transformation of digital imagery into hand-drawn art. These range from sophisticated desktop software to user-friendly mobile applications. Selecting the appropriate drawing app depends largely on your specific needs, desired level of control, and technical comfort. Many applications prioritize ease of use, allowing beginners to achieve impressive results with minimal effort.
When choosing a tool, consider features such as:
Variety of Sketch Styles: Does it offer options for pencil, charcoal, ink, or even painterly effects?
Customization Options: Can you adjust line thickness, contrast, shading intensity, or paper texture?
Output Quality: Does the final image retain good resolution and clarity, suitable for its intended use?
Ease of Use: Is the interface intuitive and straightforward for quick transformations?
A good drawing application should provide a balance of powerful features and user-friendliness. For example, some apps are designed with an intuitive interface, making the drawing tips for achieving different effects built directly into the user experience. This helps newcomers create stunning results without a steep learning curve. Therefore, exploring different options is crucial to finding the perfect fit for your creative journey.
Unleashing Your Creative Potential
Adding a hand-drawn touch to your digital imagery is a fantastic way to unleash your creative potential and give your visuals a unique, personal signature. It moves beyond the static nature of a photograph, injecting it with artistry and emotion. Whether you are an aspiring artist, a seasoned photographer, or simply someone looking to add flair to their social media posts, these digital transformation tools provide an accessible gateway to a new realm of visual expression. The possibilities are truly endless when you start to view your camera roll as a collection of canvases waiting to be sketched.
This artistic endeavor not only enhances your images but also allows for a deeper connection with the content itself. By transforming a digital photo into a sketch, you are reinterpreting it, giving it a new narrative and aesthetic. It's a journey of discovery for anyone keen on exploring the intersection of technology and art. For those interested in an intuitive platform for this kind of creative exploration, one might consider solutions like GridSketcher, which offers an effortless way to achieve stunning sketch effects and evolve photos into artistic masterpieces.
0 notes
Text
Struggling to get both eyes to look the same in your portraits? This step-by-step guide shows you how to draw a pair of realistic eyes with ease using grid drawing techniques. Whether you're a beginner or brushing up on your skills, this tutorial walks you through each stage—from sketching shapes to shading and adding detail. Discover how GridSketcher can help align proportions, enhance symmetry, and boost your realistic drawing confidence. It’s the perfect tool to make complex features easier to tackle. Start drawing better eyes today with the help of grids and smart structure!
#grid drawing ios app#gridsketcher#how to draw eye#photo to line drawing#drawing tips#drawing tutorial
0 notes
Text
Why Turning Photos into Sketches Is the Ultimate Art Hack for Beginners

Starting your art journey can feel overwhelming, especially when it comes to proportions and realistic drawing. Many beginners give up too soon just because their first few attempts didn’t look right. But what if there was a simpler way to practice? Turning photos into sketches gives beginners an easy shortcut. It makes learning art feel achievable, not frustrating.
By using digital tools, even a complete beginner can sketch something impressive. The best part? These tools don’t replace creativity – they support it. They help beginners focus more on technique without stressing about details. With the right approach, anyone can start building their art skills today.
Why Sketching from Photos Makes Learning Easier
When beginners try to draw from imagination, it often leads to guesswork. But sketching from photos offers structure and clarity. It reduces confusion and builds confidence step by step.
Photos already contain accurate shapes and lighting, making the sketching process more focused.
It saves time. No need to think “What do I draw?” – the subject is already chosen.
Practicing with familiar images keeps learners engaged and motivated.
It helps train the eye to observe finer details in a subject.
A photo sketch offers a clear path forward. Artists can focus on drawing lines and improving their hand movement. There's less pressure and more learning.
Discovering Proportions with the Grid Drawing Method
Many artists, including professionals, use the grid drawing technique to improve proportions. For beginners, it's like having a guide that breaks complex images into simple blocks.
It splits a photo into smaller parts, making it easier to focus on one section at a time.
The technique helps avoid common mistakes like uneven eyes or stretched heads.
It encourages better observation skills and slows down the drawing process, which is good for learning.
Grid drawing boosts accuracy and leads to cleaner sketches, especially during early practice.
With patience and consistency, beginners can see real progress using this technique. It's a trusted method used by artists for centuries.
How Photo Sketch Conversion Supports Artistic Growth
Converting photos into sketches sounds high-tech, but it's actually very beginner-friendly. Tools that offer photo sketch conversion simplify the hardest part – starting.
They provide a base outline to trace, which helps with steady hands and clean lines.
These conversions highlight shapes and shadows in a way that's easy to understand.
Beginners can focus on practice rather than worrying about making mistakes.
It’s perfect for learning contour drawing and visual structure without confusion.
This approach doesn't take away from creativity. Instead, it removes fear and helps users stay motivated as they learn.
Why Photo to Line Drawing Tools Are a Game-Changer
Clean outlines are the foundation of any great drawing. Using photo to line drawing tools helps beginners learn how to create strong sketch bases.
These tools simplify a photo into clear outlines, showing only the essential shapes.
It helps beginners understand the importance of edges, form, and direction.
With line drawings, students can practice tracing, shading, or adding their own style later.
It’s a safe way to practice before attempting full freehand sketches.
Over time, using these tools helps train the brain to visualize outlines naturally. It's a powerful learning shortcut.
Explore More with Beginner-Friendly Drawing Apps
A simple drawing app can make a huge difference, especially when it’s designed for learning and improvement.
These apps allow users to upload their own photos and turn them into sketch-ready formats.
They often come with grids, layers, or other tools that help guide beginners.
Easy undo options mean learners aren’t afraid to experiment.
Some apps offer step-by-step breakdowns, helping users learn better techniques.
Best of all, drawing apps bring flexibility. Students can sketch during breaks, while traveling, or anywhere inspiration strikes.
Why This Art Hack Is a Smart Start
Many people think they need talent to start drawing, but what they really need is guidance and practice. These tools offer just that. They turn a complicated skill into something manageable, especially for those starting out.
Makes learning enjoyable and less stressful
Builds confidence through visible progress
Offers a structured way to practice lines and shapes
Reduces the fear of making mistakes
Encourages regular sketching habits
When beginners use tech to their advantage, they grow faster and feel more creative. It's a smart step into the art world.
A Great Companion for New Artists: GridSketcher
For anyone looking to turn their photos into impressive sketches, GridSketcher is worth a try. It’s simple, flexible, and ideal for beginners. The app supports guided practice through features like grids, photo conversion, and sketch overlays. Artists can upload photos, break them into parts, and create neat outlines to trace. It helps new users focus on technique, not stress. With GridSketcher, drawing becomes more fun and far less intimidating.
This tool offers the perfect blend of creativity and control. It’s more than an app – it’s a confidence booster for beginners who want to improve their art skills with ease.
0 notes
Text
Mastering Digital Portrait Drawing: Expressive Faces in 2025
Discover how to create stunning digital portraits with our latest blog! Learn essential techniques like grid drawing for precise proportions, photo to line drawing for easy sketching, and tips for capturing expressive faces using a drawing app. From mastering facial anatomy to adding vibrant lighting, this guide is perfect for beginners and pros alike. Plus, explore photo sketch conversion to streamline your process. Ready to elevate your art? Check out the blog and try GridSketcher for effortless sketching. Share your creations with #DigitalPortrait2025 and inspire others! Read now for actionable tips to bring your portraits to life.
0 notes
Text
Sketch Like a Pro Using Just Your Phone with GridSketcher
Discover how to turn everyday moments into art with just your phone! This blog explores easy, beginner-friendly tips for digital sketching. Learn how tools like photo sketch conversion, grid drawing, and photo to line drawing features make sketching simpler and more fun. Whether you're improving your skills or just relaxing with doodles, the right drawing app can change your creative process.
Plus, we highlight how GridSketcher helps you practice, outline, and sketch with ease. No studio or supplies needed-just your phone and a few taps. Read the full blog to learn how to sketch like a pro from anywhere!
#drawing app#gridsketcher#photo sketch conversion#photo to line drawing#grid drawing#digital drawing#drawing tips
0 notes
Text
How Sketching Boosts Mental Health?
Sketching is more than just putting pencil to paper; it’s a powerful tool for mental well-being. For many, drawing offers a quiet escape from daily stress, allowing the mind to relax and recharge. It’s an activity that anyone can try, regardless of skill level, and the benefits are immediate. Let's see how sketching can reduce stress and spark creativity, with practical tips to get started.
0 notes
Text
Color Theory for Artists
Color can transform a simple drawing into a vibrant, eye-catching masterpiece. For artists, understanding color theory is like learning a new language that brings their work to life. Whether someone is sketching with pencils or using a drawing app, color choices can set the mood and grab attention. Let's see how artists can use color theory to enhance their drawings. It breaks down the basics and offers practical tips for beginners and pros alike. Read more here:
https://dribbble.com/shots/26022715-Color-Theory-for-Artists-Elevating-Drawings-with-Color
0 notes
Text
Portrait Drawing 101: Easy Steps for Beginners

Discovering the Art of Portrait Drawing
Portrait drawing may seem intimidating at first, especially when it comes to capturing faces with accuracy. Many beginners worry about proportions, shading, and where to even begin. However, like any art form, it becomes easier with patience, practice, and the right approach. The goal isn’t perfection-it’s progress. For beginners, learning to observe and sketch simple facial features is the first step toward creating expressive portraits.
With a few structured techniques and helpful tools, anyone can start this artistic journey. From basic outlines to refined details, drawing faces can be both fun and relaxing. Understanding the fundamentals early on builds confidence and sets the tone for future growth. As you read further, you’ll find simple steps and useful tips to make portrait drawing less overwhelming and more rewarding.
Start with Light Sketches and Simple Shapes
Every great portrait starts with a basic framework. Before adding details, beginners should learn to map the face using light lines and simple shapes. Circles can represent the skull and jaw, while vertical and horizontal lines help place the eyes, nose, and mouth correctly. This stage is not about precision but structure.
Think of it as planning before building. These guidelines make it easier to maintain proportion and symmetry, especially for facial features. It’s also helpful to use erasable pencils so adjustments can be made without stress. This relaxed approach keeps the creative flow going.
Use the Power of Grid Drawing
Once the structure is in place, many artists recommend a technique called grid drawing. This method divides your reference photo and paper into equal squares, making it easier to copy each section accurately. It works especially well for beginners who struggle with proportions or symmetry.
Instead of drawing the entire face at once, grid drawing lets you focus on one small area at a time. This reduces errors and builds confidence as you go. Over time, it also trains your eyes to observe and replicate shapes more effectively.
Learn from Photos Through Line Work
A great way to practice is by turning images into outlines, which helps you understand contours without the distraction of color or shading. Beginners often start by transforming a favorite image into a photo to line drawing, either manually or using digital tools.
These line drawings allow you to trace or mimic the essential structure of a face. It’s a smart technique for learning how to simplify complex details into basic lines. With consistent practice, this method boosts hand control and sharpens observation skills.
Break Down Features Step by Step
Instead of trying to draw the whole face at once, focus on one facial feature at a time. Start with the eyes-they’re expressive and often the highlight of a portrait. Then move on to the nose, mouth, and finally the shape of the face.
Breaking down each part gives you a chance to study how light and shadow affect different areas. It’s also less frustrating for beginners who might find full portraits too challenging at first. Slowly combining these features creates a well-balanced portrait.
Make the Most of a Drawing App
Technology can be a helpful guide when you're learning. Using a drawing app allows you to zoom in, trace, or experiment digitally before you put pencil to paper. Many beginners use apps to try out different techniques without the fear of ruining a sketch.
Drawing apps also come with practice features, grids, and layers that help develop confidence. While traditional methods are valuable, digital support adds flexibility to your learning process. It's like having an art coach in your pocket.
Turn Real Photos into Sketches
Another motivating practice is using a tool that enables photo sketch conversion. This means transforming real photos into sketch-style images, either for reference or practice. These sketches give a simplified view of a face, ideal for tracing or mimicking to improve hand coordination.
It helps artists learn to break down visual information into lines and shadows. While it’s not a substitute for freehand drawing, this method is great for gaining control and understanding structure. Over time, beginners find their lines becoming more confident and fluid.
Draw with Patience and Purpose
The journey of learning portrait drawing is not about speed-it's about steady improvement. Everyone progresses at a different pace, so there’s no need to compare. Try to draw regularly, even if it’s just for a few minutes a day. These small sessions create long-term growth.
Don’t rush the process. Celebrate small wins like getting the shape of an eye right or finally drawing a straight nose. Drawing should feel enjoyable, not stressful. With a curious mind and consistent practice, progress will naturally follow.
A Great Companion for Your Creative Path
For those looking to simplify the drawing process, especially when learning portraits, tools like GridSketcher can make a big difference. It helps beginners convert images into structured sketches using grids-making it easier to focus, learn, and grow. Whether you're trying to understand proportions or just want a clear starting point, this tool can support your artistic goals in a practical, beginner-friendly way.
So, pick up that pencil, open a photo, and begin. The world of portrait drawing is waiting for you to explore it-one confident line at a time.
0 notes
Text
Difference Between Sketching and Drawing Explained Simply

In the world of art, sketching and drawing are often used interchangeably. But if one looks a little closer, there's a subtle difference. Understanding that difference can help beginners choose the right approach and improve faster. After all, the goal isn’t just to create art-it’s to enjoy the process and express ideas clearly.
This blog breaks it down in a way that’s simple and easy to follow. Whether someone is just starting out or brushing up old skills, this comparison will help make things clearer and more enjoyable.
The Purpose Behind Each Stroke
Before comparing sketching and drawing, it's important to understand the intent behind them. Sketching is often fast and spontaneous. Artists sketch when they want to explore ideas quickly or test a layout. There’s freedom in sketching-lines can be messy, incomplete, and full of movement.
On the other hand, drawing is more detailed. It’s the refined version of that first idea. When an artist sits down to draw, they usually have a goal-to finish a clean, polished piece. The lines are clearer, the shapes more accurate, and the time spent is longer.
So while sketching is more like thinking out loud, drawing is the final sentence you write carefully.
Tools and Techniques Used
While the same pencils or pens can be used for both, the technique often changes. Sketching might start with light strokes, done quickly. Artists may use softer pencils or pens that allow smooth, flowing lines. In fact, many beginners use grid drawing to start sketching accurately.
Drawing, though, involves more attention. Harder pencils or fine liners are often preferred for detailed areas. It includes shading, outlining, and refining the work into a complete composition. So, even though the tools may be the same, how they’re used is what sets them apart.
Time and Patience Matter
Another big difference lies in the time taken. Sketches are done quickly, often in minutes. They’re practice, warm-ups, or ways to capture an idea before it fades. There’s no pressure in sketching-it’s playful, and mistakes are part of the charm.
Drawings take time and patience. Artists might spend hours on a single piece. Every part is planned, erased, and reworked until it looks just right. Especially for detailed pieces like a photo to line drawing, focus and steady hand movements matter more than speed.
This difference in timing makes each method valuable in its own way.
When to Sketch, When to Draw
Artists usually sketch when they want to explore something new. It’s perfect for learning anatomy, testing poses, or just warming up before a serious piece. Sketchbooks are often filled with quick scenes, facial expressions, or abstract ideas.
Drawing, however, is chosen when the goal is to create something presentable. It could be a portrait, a landscape, or a finished still life. People who love sharing their work online or selling prints tend to focus more on drawing. But both methods are essential—they balance each other out.
Learning Through Practice and Play
For beginners, understanding the difference can help set the right expectations. It’s okay to start with sketching, build confidence, and then move on to clean drawings. Even experienced artists sketch before starting major pieces. Sketching is not less important—it’s the foundation.
Some artists use a drawing app to try both sketching and drawing digitally. These tools help users understand strokes, layers, and brushes. The best part? They allow room to experiment without wasting paper.
So whether on paper or screen, every line helps build the bigger picture.
Choosing What Works for You
Every artist is different. Some love the speed and freedom of sketching. Others enjoy the detail and patience drawing requires. There’s no rule that says one is better. It’s more about what fits the moment or the goal.
Sometimes, both are part of the same process. A sketch begins the idea. A drawing finishes it. As skills grow, switching between the two becomes natural.
Knowing the purpose of each helps artists make smarter choices, whether they're just doodling or working on a masterpiece.
Want to Try Both the Fun Way?
Finding the right tools can make a huge difference. If someone wants to improve both sketching and drawing, a little guidance can go a long way. That’s where GridSketcher comes in-it’s a handy digital platform that helps turn photos into sketches and practice grids. It’s easy, useful, and ideal for anyone trying to get better at both forms of art.
Ready to give it a try? You might be surprised how much fun drawing can be when you start the right way.
0 notes
Text
How to Build a Drawing Habit (Even If You're Super Busy)
Drawing sounds fun until life gets in the way. You’ve got work, deadlines, laundry, and maybe a pet stealing your pen. But here’s the thing: you don’t need hours to build a habit. Even ten minutes a day can change how you feel about art. The trick is making drawing easy, fun, and stress-free—so you’ll actually look forward to it.
Whether you're a beginner or someone who hasn’t touched a pencil since school, there’s room for creativity in your routine. Let’s break it down into bite-sized steps that’ll turn doodles into daily habits.
Start Small and Keep It Simple
Big plans often lead to big pressure. You don’t need a full sketchbook page every time you draw. Start with tiny sketches-maybe just a coffee cup, your keys, or your pet’s nose. These small wins add up. They build your confidence and keep the habit alive without feeling like a chore. Over time, you’ll draw more because you want to-not because you “should.”
Use Prompts to Avoid the Blank Page Panic
Sometimes, the hardest part of drawing is deciding what to draw. This is where prompts can be a lifesaver. Make a quick list of 30 things-objects around you, parts of your day, even random emojis. Check one off every day. This removes the mental block and keeps things interesting. Eventually, you’ll start seeing the world as a sketchbook.
Leverage Tools That Make It Easier
Technology isn’t the enemy of art-it’s actually your sidekick. Apps today can spark your creativity instead of killing it. Try using a photo drawing app to turn your favorite selfies or travel shots into outlines. Then, all you have to do is trace, shade, and relax. It’s not cheating. It’s making life easier, and that’s smart.
Add Structure With Grid Magic
Ever feel like your proportions are off? Like the eyes float too far from the face? That’s where grid drawing comes in. It breaks your image into manageable chunks, so you focus one square at a time. This method improves your accuracy and makes tough drawings feel less scary. Plus, it feels super satisfying to see your progress square by square.
Find Time You Already Have
Think you have no time to draw? Think again. Look at the 5 minutes before a meeting starts or while your coffee brews. Instead of scrolling social media, open your sketchpad. These tiny pockets of time are golden. You don’t need an hour-just consistency. Keep a pencil handy, or use your phone if you're on the go.
Make It Personal and Fun
Drawing doesn’t need to be perfect. It should be personal. Whether you're sketching your breakfast or trying a photo to sketch conversion, do what feels fun. Try different styles-realistic, cartoonish, abstract. There’s no rulebook. As long as you enjoy it, you’re doing it right. The more joy you find in drawing, the more you’ll want to do it again.
Track Progress to Stay Motivated
You may not notice how far you’ve come unless you look back. Take weekly photos of your work or store it in a folder. Seeing your improvement, even in small ways, gives you a boost. This is a gentle reminder that habits don’t build in one day-but over many tiny efforts.
Why the Right Tools Matter
When the tools are easy to use, you’ll use them more. That’s where a good drawing app can help. It removes the setup stress. You can sketch from your couch, commute, or even in bed. Features like grid overlays or sketch templates can save time and guide your hand. Less hassle means more habit.
If you're looking for a gentle nudge toward daily art, Gridsketcher is worth a try. It’s designed to help beginners and casual doodlers alike. With features like grids and easy photo to sketch options, it takes the pressure off and brings the fun back. No stress, just sketches. Give it a try-and see where your pencil takes you.
0 notes
Text
Mastering the Grid Technique: A Timeless Trick for Accurate Sketching

Art has always been about precision, creativity, and expression. However, achieving perfect proportions in a drawing can be challenging, even for experienced artists. The grid technique is a classic yet powerful method that helps artists create accurate and detailed sketches. By breaking an image into smaller sections, it becomes easier to focus on one part at a time, leading to a more precise drawing.
This method has been used for centuries by famous artists to maintain correct proportions in their work. Today, modern tools like a grid drawing app make it even more accessible. Whether someone is a beginner or an advanced artist, mastering this technique can significantly improve their sketching skills.
Why the Grid Technique is a Game Changer
Many artists struggle with getting proportions right, which can lead to distorted drawings. The grid technique offers a simple yet effective solution by dividing an image into equal sections. Instead of focusing on the entire subject, artists work on one small part at a time, making the process less overwhelming.
This method is especially helpful when drawing complex subjects like portraits, animals, or landscapes. It improves accuracy by helping artists compare different sections of the image more easily. With consistent practice, this approach enhances an artist’s ability to observe details, improving their overall skill over time.
How to Use the Grid Method for Sketching
Learning the grid method is simple, but applying it correctly makes all the difference. The first step is choosing a reference image and drawing a grid over it. Artists then create a similar grid on their drawing surface, ensuring both grids have the same number of sections.
Next, they focus on sketching each section one at a time, carefully replicating what appears in each small square. This technique removes the pressure of drawing the entire image at once, allowing artists to concentrate on details. Over time, it also trains the brain to recognize shapes and proportions better, making freehand drawing easier.
The Role of Modern Tools in Grid Drawing
While traditional grids drawn with pencils and rulers work well, modern technology has made the process even more convenient. A photo drawing app allows artists to overlay grids on images digitally, eliminating the need for manual measurements. These apps provide adjustable grids, making it easier to control the number of sections based on an artist’s preference.
Using a digital tool for grid drawing also saves time and allows for easy modifications. Artists can zoom in on details, change grid sizes, and even experiment with different references before starting a sketch. This makes the learning process smoother and more efficient for both beginners and professionals.
Improving Sketching Skills with Photo Sketch Conversion
Artists often use reference images to guide their sketches. A photo sketch conversion tool helps simplify complex images by turning them into outlined versions. This allows artists to focus on the most important details without distractions from colors or shading.
This method is especially useful when learning to sketch portraits or intricate objects. By removing unnecessary details, artists can better understand the structure of the subject. Combining this approach with the grid method further enhances accuracy, making it easier to recreate images with precision.
Unlocking Artistic Potential with the Right Tools
Mastering the grid technique takes patience and practice, but the results are worth it. With the help of modern tools, artists can improve their accuracy and confidence in sketching. A grid drawing app simplifies the process, allowing users to focus on their creativity without struggling with proportions.
For those looking for an easy and effective way to enhance their drawing skills, GridSketcher is a great choice. It provides essential features for precise sketching, making the grid method accessible to artists of all levels.
0 notes