#how to bashrc
Explore tagged Tumblr posts
Visit Tumblr Blog
Explore Tumblr blogs with no restrictions, modern design and the best experience.
Last Seen Tumblr Blogs


Fun Fact
Women make up for the other 50% of Tumblr’s audience.
Text
pro tip for programmers - how to alias
hey, so you know that annoying thing that happens when you're coding, and you need to run/test the same program 100 times in a row, so you end up typing "python3 testScriptWithASuperLongName.py" into the terminal about 80,000 times?
well, there's a better way! it's called aliasing :D
in your bash shell (or zsh, or whatever shell you use, but bash is the default on VSCode and most people on tumblr use VSCode, so I'm using bash as the default to explain this concept) you can set an alias, essentially a shortcut command, that runs longer commands.
(yes you can just use the up arrow key to re-run the same command, but sometimes you're typing other things into the terminal too and you don't feel like hitting the up arrow key four times in a row, and also this is just a cool and useful tip to get comfortable with aliasing so shhhh)
so, in your terminal shell, just type this:
alias run="python3 testScriptWithASuperLongName.py"
now, you can run that entire super long command, just by typing the word "run" into your terminal. Here's a screenshot of an example on my computer to make it make more sense:

in this example, i just created a simple python file that contains one line of code: print("it works!")
then, as you can see, by setting the alias to run, i can now run that file, runningatestscript.py, simply with the command 'run'.
the best part is, this alias is temporary - it only lasts as long as your shell session is open. so once you close the terminal, the run alias is cleared and you can set it again next time to any file or task you're currently working on, to save yourself a lot of typing, typos, and time.
so if you want to, you can get in the habit of always setting a run alias in the VSCode terminal for whichever file you're working with as soon as you get everything open. that way, when you need to run the same file 50 million times, you have a super easy way of doing it! you can even set it to a single letter if you want to go for maximum speed, but i prefer to use whole short words, because they're easy for me to remember.
note: if you do want to set an alias to work for all sessions, you can simply add it to your ./bashrc file. this is a common way to automate repeatable tasks, and simply to set easier-to-remember commands for terminal commands that are really complicated/confusing/hard to remember.
for example, i saved the alias checkboot="[ -d /sys/firmware/efi ] && echo 'UEFI mode' || 'BIOS mode'" into my zshrc file (zsh equivalent of bashrc file). this way, no matter how many times i rebooted my machine, i would always be able to quickly check which boot mode was running by simply typing 'checkboot'.
yesterday i was updating my boot mode from BIOS to UEFI on my very old machine that is technically compatible with UEFI, but not configured for it by default. So it was extremely helpful and saved me the time and headache of having to remember and type that long-ass command a thousand times in between many different reboots and new shells.
if you have any tasks like that, or terminal commands that you know would be useful to you, but you can never remember them when you need them, i highly recommend getting comfortable with aliasing! it can be super useful to simply set custom aliases for all the commands you don't want to remember, so that you can automate things away and not have to worry about so much linux syntax all the time when you're tring to focus on programming.
i know this may seem like a simple tip to some, but i only learned about it recently and it's been extremely helpful to integrate into my workflow and customize my OS with! so i thought it might be worthwhile to some people if i share :) hope it helps!
#codeblr#linux#hacker#compsci#hack the planet#hacking#studyblr#coding#progblr#programmer#programming#women in tech#women in stem#women in computing#women in cs#comp sci#coding tips#programming tips#software development#software developers#vscode
115 notes
·
View notes
Text
Setting Up the Java Environment: A Complete Guide for Beginners
Java is a powerful, widely-used programming language known for its platform independence, object-oriented principles, and robustness. One of the key reasons for its popularity is the fact that it can run on any machine equipped with a Java Virtual Machine (JVM), making it truly “write once, run anywhere.” However, before you can start writing and executing Java code, you need to properly set up the Java development environment on your system.
This guide will walk you through the entire process of setting up the Java environment, including downloading and installing the necessary tools, configuring environment variables, and writing your first Java program. By the end of this tutorial, you’ll be ready to start coding in Java.
Step 1: Understanding the Components of the Java Environment
Before diving into the installation process, it’s essential to understand the core components involved in the Java ecosystem. These include:
1. JDK (Java Development Kit): This is the complete suite needed to develop and run Java applications. It includes the Java compiler (javac), standard libraries, and other tools required to build and execute Java programs.
2. JRE (Java Runtime Environment): The JRE provides the libraries and the JVM necessary to run Java applications. It’s a part of the JDK but can also be installed separately if you’re only running (not developing) Java programs.
3. JVM (Java Virtual Machine): This is the heart of Java’s platform independence. It interprets the compiled Java bytecode and allows it to run on any operating system that has a compatible JVM.
For development, you’ll primarily need the JDK, which includes the JRE and JVM.
Step 2: Downloading and Installing the Java Development Kit (JDK)
To begin coding in Java, you need to download the JDK. Here’s how to do it:
1. Go to the Official Oracle Website:
Visit the official Oracle Java SE Downloads page.
You’ll see multiple versions of Java. For most use cases, it’s best to download the latest Long-Term Support (LTS) version, which is currently Java SE 17.
2. Choose the Right Version for Your Operating System:
Select the appropriate version based on your operating system (Windows, macOS, or Linux).
Download the installer (.exe for Windows, .dmg for macOS, or a compressed package for Linux).
3. Run the Installer:
For Windows:
Double-click the .exe file and follow the installation prompts. The default installation directory is usually C:\Program Files\Java\jdk-<version>.
For macOS:
Open the .dmg file, and drag the JDK into your Applications folder.
For Linux:
Extract the downloaded .tar.gz file into a directory, and follow the system-specific instructions for installation.
Step 3: Configuring Environment Variables
Once the JDK is installed, you need to configure the PATH and JAVA_HOME environment variables on your system. This allows your terminal or command prompt to access Java’s tools from any directory.
Windows
1. Open Environment Variables:
Right-click on This PC or My Computer and choose Properties.
Click on Advanced System Settings, then click Environment Variables.
2. Set JAVA_HOME:
In the System Variables section, click New.
Set the variable name as JAVA_HOME and the variable value as the path to your JDK installation (e.g., C:\Program Files\Java\jdk-17).
3. Update PATH Variable:
In the System Variables section, find the Path variable, select it, and click Edit.
Click New and add %JAVA_HOME%\bin.
Click OK to close all dialogs.
macOS
1. Open the Terminal and edit your shell profile (e.g., .bash_profile or .zshrc for Zsh) by typing:
nano ~/.bash_profile
2. Set JAVA_HOME and Update PATH: Add the following lines:
export JAVA_HOME=$(/usr/libexec/java_home) export PATH=$JAVA_HOME/bin:$PATH
3. Save and Exit:
Press Ctrl+X to exit, then Y to save changes.
Apply the changes with:
source ~/.bash_profile
Linux
1. Open Terminal and edit your shell profile (e.g., .bashrc or .zshrc) by typing:
nano ~/.bashrc
2. Set JAVA_HOME and Update PATH: Add the following lines:
export JAVA_HOME=/usr/lib/jvm/jdk-17 export PATH=$JAVA_HOME/bin:$PATH
3. Save and Exit:
Press Ctrl+X to exit, then Y to save.
Apply the changes:
source ~/.bashrc
Step 4: Verifying the Installation
Once you’ve installed the JDK and configured the environment variables, verify that everything is set up correctly.
1. Open a Terminal or Command Prompt:
On Windows, press Windows + R, type cmd, and press Enter.
On macOS and Linux, open the Terminal from your applications or press Ctrl+Alt+T (for Linux).
2. Check the Java Version: Type the following command:
java -version
You should see output similar to:
java version “17.0.2” 2022-01-18 LTS Java(TM) SE Runtime Environment (build 17.0.2+8-86) Java HotSpot(TM) 64-Bit Server VM (build 17.0.2+8-86, mixed mode)
3. Check the Java Compiler: Similarly, check if the Java compiler (javac) is working by typing:
javac -version
The output should be something like:
javac 17.0.2
Step 5: Writing and Running Your First Java Program
With the Java environment properly set up, it’s time to write your first Java program. Follow these steps:
1. Open a Text Editor: You can use any text editor like Notepad (Windows), TextEdit (macOS), or Vim/Nano (Linux). Alternatively, you can use an Integrated Development Environment (IDE) like Eclipse, IntelliJ IDEA, or NetBeans for a more user-friendly experience.
2. Write the Program: Here’s a simple “Hello, World!” program:
public class HelloWorld { public static void main(String[] args) { System.out.println(“Hello, World!”); } }
3. Save the File: Save the file as HelloWorld.java in a directory of your choice.
4. Compile the Program: Open the terminal or command prompt and navigate to the directory where you saved the file. Use the following command to compile the program:
javac HelloWorld.java
If there are no errors, this will generate a file called HelloWorld.class.
5. Run the Program: Now, run the compiled program by typing:
java HelloWorld
You should see the following output:
Hello, World!
Step 6: Installing an IDE (Optional)
While it’s possible to write and run Java programs using just a text editor and the terminal, using an Integrated Development Environment (IDE) can make the process much easier, especially as your programs become more complex.
Some popular IDEs for Java development are:
Eclipse: A widely-used IDE with many plugins to enhance functionality.
IntelliJ IDEA: A powerful IDE with smart coding assistance, refactoring tools, and an intuitive interface.
NetBeans: A free and open-source IDE with support for various programming languages, including Java.
You can download these IDEs from their official websites and install them by following the provided instructions.
Conclusion
Setting up the Java environment may seem complicated at first, but once you’ve gone through these steps, you’ll be ready to dive into Java development. From here, you can start writing basic programs, experimenting with object-oriented concepts, and eventually tackling larger projects. Whether you’re developing desktop applications, web services, or Android apps, learning Java will give you a solid foundation in programming.
1 note
·
View note
Text
Prerender.io with Redis for SEO: Boosting Visibility for JavaScript Websites

In today's fiercely competitive digital landscape, ensuring your website ranks well on search engines is non-negotiable. However, for websites primarily constructed using JavaScript frameworks such as React or Angular, achieving optimal search engine visibility can be challenging. This is because search engine crawlers often struggle to interpret and index dynamic content generated by JavaScript. Enter Prerender.io, with Redis for SEO, offering a robust solution to this dilemma. This guide will walk you through the process of installing Prerender.io, configuring it with Redis cache for improved performance, and seamlessly managing it with PM2 for efficient operation.
Prerequisites:
- Node.js and npm: These are essential for running JavaScript applications like Prerender.io. Install them using your system's package manager. - Redis: As a widely used in-memory data store, Redis serves as the caching layer for Prerender.io, significantly enhancing performance. Refer to the official Redis website for installation instructions. - Google Chrome: Prerender.io utilizes a headless Chrome instance for rendering web pages. Depending on your Linux distribution: - For Ubuntu/Debian-based systems, Chrome may be available in the repositories. However, for more control, consider installing the latest stable version directly from Google. - For other Linux distributions, you might need to manually download and install Chrome from the official Google website.
Installation of Node.js and npm (using nvm):
Node Version Manager (nvm) allows you to manage multiple Node.js versions on your system. Here's how to install and use it: Install nvm: curl -o- https://raw.githubusercontent.com/nvm-sh/nvm/v0.39.3/install.sh | bash This command downloads and executes the nvm installation script. Follow the on-screen instructions to complete the setup. Verify nvm installation: source ~/.bashrc nvm -v The first command ensures your shell recognizes nvm commands. The second command checks if nvm is installed correctly. If successful, it should output the nvm version. Install a specific Node.js version: nvm install v20.12.0; This command installs the specified Node.js version and sets it as the active version. Verify Node.js and npm installation: node -v npm -v These commands should display the installed Node.js and npm versions.
Installation of Redis server
Use the APT package manager to install Redis from the official Ubuntu repositories: sudo apt install redis-server
Installation of Google Chrome:
- Download the Chrome DEB package from the Google website using the following command: wget https://dl.google.com/linux/direct/google-chrome-stable_current_amd64.deb - Install the downloaded package: sudo dpkg -i google-chrome-stable_current_amd64.deb If installation errors occur due to missing dependencies, resolve them using: - sudo apt-get install -f Then, retry the installation command. - sudo dpkg -i google-chrome-stable_current_amd64.deb
Installation of Prerender.io:
To globally install Prerender.io, execute the following command: sudo npm install -g prerender
Configuration:
Create a config.json file with the following content: { "prerender": { "chromeLocation": "/usr/bin/google-chrome", "forwardHeaders": false, "whitelist": , "blacklist": , "removeScriptTags": true, "redisUrl": "redis://localhost:6379" } } Adjust the settings as necessary, such as specifying the path to your Google Chrome installation, defining whitelists and blacklists for URLs, removing script tags from pre-rendered HTML, and providing the connection details for your Redis server.
Starting the Server:
Initiate the Prerender.io server using the command: node server.js --config /path/to/config.json Replace /path/to/config.json with the actual location of your configuration file. The server.js File: Here's an example of how your server.js file might look: const prerender = require('prerender'); const server = prerender(); server.start(); This code initializes the Prerender.io server using the prerender package and starts it. Make sure to customize it according to your specific requirements and configurations.
Configuring PM2:
Create an ecosystem file (ecosystem.config.js) in your project directory with the following content: module.exports = { apps: };
Managing Prerender.io with PM2:
If PM2 is not installed globally, do so by running: sudo npm install -g pm2 Then, start Prerender.io using PM2: pm2 start ecosystem.config.js
Monitoring and Maintenance (Optional):
For monitoring Prerender.io logs, use: pm2 logs Prerender-server To manage Prerender.io instances, execute: pm2 restart Prerender-server By following these steps, you'll effectively optimize your website for search engines using Prerender.io and Redis cache, ensuring improved visibility and performance in the digital realm. Read the full article
0 notes
Text
Screw it, I'm on a linux kick, I'll answer all of these:
I started with Manjaro, but then I hopped over to endeavourOS shortly after cause I found it to be better
I remember editing a config file (I think it was .bashrc? Something similar) and not being able to login as my user. I had to log in as root to fix it
Lol no
I technically have my old PC which runs windows 10, but I'm planning on just using a VM if I absolutely need windows for something
I switched out bash for zsh on my laptop, though I'm not entirely sure why. On my PC, I'm fine sticking with good ol' bash
No. Perforce, however, has hurt me. Never again. Hopefully.
My MSi ge75 Raider laptop I got from my university. It made me realize that laptops, even "gaming" laptops, aren't really the best for gaming...
See #3
Firefox. The internet would not be tolerable without it.
I struggle to find anything I really dislike about linux, but how about this: as much as modularity can be fun, it can make the system feel like it's held together by duct tape & bubblegum as well as lead to inconsistencies in stuff like UI design, like when you use a GTK application on a Qt desktop environment.
The elitism & the racism. Everyone else has already talked about the elitism ad nauseum, but something I really hate is that the community has tons of obnoxious alt-right douchebags that fearmonger about China
Gentoo seems pretty neat so far! I second the notion that gentoo isn't much harder or even different than arch, but I've noticed I've been getting much more familiar with the inner system & editing config files & such. I have tinkered with config files on my eOS laptop, but it always felt awkward. Here on gentoo, not so much! Also, I'm sure my bleeding-edge PC doesn't benefit anywhere near as much from the "optimized code" side of gentoo as much as, say, an old thinkpad, but hey, at least I get faster emerge times lmao
I like Tux more, personally, but I'm glad all the trans linux users out there are having fun with Xenia.
Unity & Unreal Engine. I'll stick with Godot (or even try coding the engine myself with openGL for smaller projects. My college education will not go to waste, I swear!)
Yak shaving. It's almost an addiction, and with gentoo, my cup runneth over
See #8
Linux ask game
1 - what was your first distro? 2 - what was your biggest linux fuckup? 3 - have you ever run rm / on real hardware? 4 - do you dual boot or have a secondary machine with windows? 5 - did you change your default shell? 6 - are you afraid of git? 7 - what was the first machine you installed linux on? 8 - do you know your way around vim keybinds? 9 - what is your favourite non-os software? 10- biggest linux pet peeve? 11- biggest annoyance with the community? 12- do you like your current distro? 13- Xenia or Tux? 14- what software are you never using again? 15- stock distro or hours of yak shaving? 16- have you compiled the kernel?
152 notes
·
View notes
Text
Installing .NET SDK 7 on Ubuntu 22.04: A Step-by-Step Guide
Introduction
The .NET SDK is a set of libraries and tools that allow developers to create .NET applications and libraries. With the release of .NET SDK 7, developers have access to a range of new features and improvements. In this blog post, we'll walk you through the process of installing .NET SDK 7 on Ubuntu 22.04 using a custom Bash script.
Why Ubuntu?
Ubuntu is one of the most popular Linux distributions, known for its ease of use and community support. It's a great choice for developers, and installing the .NET SDK on Ubuntu is straightforward.
Pre-requisites
Before you proceed with the installation, make sure you have:
A machine running Ubuntu 22.04
Curl installed (You can install it using sudo apt install curl if it's not already installed)
Basic knowledge of the terminal
The Bash Script Approach
We'll use a Bash script to automate the installation process. The script will:
Download the .NET SDK 7 tarball.
Create a directory in the user's home folder for the SDK.
Extract the SDK to this directory.
Set up the necessary environment variables.
Optionally, make these environment variables persistent across sessions.
The Script
Here's the Bash script that accomplishes these tasks:
#!/bin/bash # Check if running as root if [ "$EUID" -eq 0 ]; then echo "Please do not run as root, this script installs .NET SDK in the user's home directory." exit 1 fi # Download .NET SDK 7 echo "Downloading .NET SDK 7..." curl -O https://download.visualstudio.microsoft.com/download/pr/dbfe6cc7-dd82-4cec-b267-31ed988b1652/c60ab4793c3714be878abcb9aa834b63/dotnet-sdk-7.0.400-linux-x64.tar.gz # Create directory for .NET SDK echo "Creating directory for .NET SDK..." mkdir -p $HOME/dotnet # Extract .NET SDK echo "Extracting .NET SDK..." tar zxf dotnet-sdk-7.0.400-linux-x64.tar.gz -C $HOME/dotnet # Set up environment variables echo "Setting up environment variables..." export DOTNET_ROOT=$HOME/dotnet export PATH=$PATH:$HOME/dotnet # Make environment variables persistent read -p "Do you want to make these environment variables persistent? (y/n): " choice if [ "$choice" == "y" ] || [ "$choice" == "Y" ]; then echo "export DOTNET_ROOT=$HOME/dotnet" >> $HOME/.bashrc echo "export PATH=\$PATH:\$HOME/dotnet" >> $HOME/.bashrc echo "Environment variables have been added to $HOME/.bashrc" fi # Cleanup echo "Cleaning up downloaded files..." rm dotnet-sdk-7.0.400-linux-x64.tar.gz # Installation complete echo ".NET SDK 7 installation is complete!" # Verify the installation dotnet --version
How to Use the Script
Save the script into a file, for example, install_dotnet_sdk_7.sh.
Open a terminal and navigate to the directory where you saved the script.
Run chmod +x install_dotnet_sdk_7.sh to make the script executable.
Run ./install_dotnet_sdk_7.sh to execute the script.
Conclusion
Installing .NET SDK 7 on Ubuntu 22.04 is a straightforward process, especially when automated with a Bash script. This approach not only simplifies the installation but also ensures that you don't miss any steps. Happy coding!
0 notes
Text
website is timing out when it shouldn't be. let me run it locally to figure out why. the production webserver is gunicorn which doesn't work on windows. okay, let's put it on wsl. crlf line endings break on wsl so we need to reinstall the whole codebase and ofc python to run it. can't directly install the specific python version i need. okay installing pyenv so i can do that. can't find pyenv. okay i need to put some code into the .bashrc. missing gcc. okay installing gcc. 404. is it a firewall issue? still 404. oh wait never mind i need to update every single package on the system because it's out of date and looking at the wrong links. okay we have gcc. installing python 3.7. can't find zlib. but zlib is installed. find documentation, turns out it has some dependencies i was missing. install them. now 3.7.15 is installed! but it warns about several other missing libs which the documentation doesn't mention as a common problem. at least it's not an error! try running without them - nope things break. look up how to install them, reinstall python, and try again. more requirements that weren't documented. look them up and install them, reinstall python, and try again. one of the first warned set of requirements is missing. apparently when people said to install lzma-dev they meant to install liblzma-dev. install that, reinstall python, try again. it finally works and now i just have to deal with the fact that the behavior i'm getting makes no fucking sense
10 notes
·
View notes
Text
You can also add entries to the start to override later directories. If you have a program installed system-wide in /usr/bin but want to install a newer version for just your user, you can install it to ~/.local/bin then in ~/.bashrc (which is run whenever you open a shell of any kind, including for regular programs) you can add
export PATH=~/.local/bin:$PATH
Then it will find the user specific version first, so you can have the new version without messing with the system version.
These specific commands and behaviors are how PATH is handled in POSIX (so Linux, BSD, MacOS, etc. although the name .bashrc might be different). On other systems like Windows it's weird because of course it is.
~ is also just generally shorthand for "the home directory for the current user account," like echo ~ prints out /home/stkptr if your username is stkptr and are a regular user account. ~ is usually /root for the root user. On Windows it's called %USERPROFILE% instead of ~
Everything's Eldritch Arcanum
...until it isn't.
Today I learned about the $PATH
This is honestly a little embarrassing, because I've used this command a BUNCH before. My mentor helped me set up a GitHub repo, for instance, which I've been updating faithfully since last July.
What PATH means, in the context of a terminal, is a list of known addresses inside your computer to check for when you list an application. When you say "Go help" if you don't have the application named Go installed in the current file you're sitting inside of when you say that, the computer will tell you it doesn't know what the hell you're talking about.
But with the list of addresses in PATH you can functionally pretend to be in all of those locations in your computer. If one of the addresses you've exported has whatever application you're trying to use inside it, you're fine.
On Mac at least, the command you put into your terminal is
export PATH=$PATH:Put in your file path here. It usually saves time to start with ~/ because that "resets" you to the base path for the local user. For instance to go into my documents folder I could type my_mac/users/jeremyanderson/documents or I could type ~/documents and it will do exactly the same thing So if I wanted access to my brand new app I'd made myself I might go
export PATH=$PATH:~/documents/myapp/bin
And from then on I could call the app from anywhere with the terminal.
3 notes
·
View notes
Video
tumblr
How to drive someone completely nuts at Linux shell prompt (add to their ~/.bashrc):
alias ls='ls -l | lolcat -a' ls
60 notes
·
View notes
Text
Last login: Tue Feb 4 17:03:41 on ttys002 The default interactive shell is now zsh. To update your account to use zsh, please run `chsh -s /bin/zsh`. For more details, please visit https://support.apple.com/kb/HT208050. ~$ echo 'export BASH_SILENCE_DEPRECATION_WARNING=1' >> .bashrc ~$ ls -bash: /usr/local/bin/ls: Bad CPU type in executable ~$
How long will you abuse our patience, Catalina!
9 notes
·
View notes
Text
Passion
It’s attractive to encounter a job candidate who’s passionate about his/her craft. There’s some debate between a lot of people in tech about whether or not personal projects matter, but I think we’re just tapping into the same underlying characteristic: Caring. We want to work with people who care. If a person can articulate the value of a project, then that demonstrates a level of passion and enthusiasm that could easily be transferable to other projects.
If passion is attractive, then what is the unattractive antonym for passion? Is it apathy? Jadedness? Hatred? We all deal with some degree of weariness in our respective careers, but passion is like the light in the dark.
And I do think I’ve felt it from time to time, and I do think I know it. I have enjoyed this field more than, to put it bluntly, I thought I would. The idea of working in an actual, real system that no one has ever made before is interesting; so is the idea of solving problems that no one has ever solved before. Coding is, by its very nature, something worth writing about. It’s explicit. It follows logic. It is, the computer world, what formal proofs are to math. Until we have sentient machines, the work of coding will always be necessary. We have to be very specific, and we have to be very logical, and if at any point this logic or specificity is violated then the wheels don’t turn.
Surely I understand the significance, but sometimes I derive so much more enjoyment from learning about how things ought to work than by actually making them work. I learned about this open source library, for example, and how the person making it believed that open source was the silver bullet to the great problems of our time. He wrote at length about how this could free us from the chokehold of corporations, how we could use his system to build a new Internet, how we could finally do away with the old business models and usher in a new age of free information for all.
The next thing I knew, it was 10PM on a Friday night and I was on my fifth cup of coffee, struggling to figure out why the hell this guy’s error logging wasn’t telling me a more explicit data reading error.
*****
It’s just...a lot. There’s a lot in this field that we can do.
I’d like to try something else. I don’t like being so distant from the end user. I don’t know if I like the specifics of this language or if I’m just running on inertia; I don’t know how much I’d enjoy or dislike the other things out there, but I’d like to see.
You start by taking a new student. That student is a blank slate.
Maybe you explain to this student how you can go about SSHing into a collection of physical computers, how a .bashrc works, and how to configure an environment. Maybe you take a less practical approach. You go at length about the philosophy of this, about how in our world the act of creating is simply the act of naming, how we’ve rendered this other, virtualized world and given it form employing the same paradigms that we use to design physical objects in our world. We model items, entities, interactions, actions. And by doing so, we partake in today’s modern equivalent of crafting, but on a much grander scale than the carpenters and the plumbers and the electricians. We partake in the act of building a massive network, of distributing knowledge where knowledge is needed the most.
But...then...at what point does the passion go?
We need to keep the fire burning. There’s new technologies constantly emerging, new people with new ideas. And one day we might bury all of it. We might take a torch to it, break it, shoot it, burn it to the ground in anger and fury. And from the ashes will rise a new technology, or a new paradigm, some game-changing technology that fundamentally changes the way we interact with and design our software.
Until then, though, there’s still a lot of debugging to do.
2 notes
·
View notes
Text
Configuring the Command Prompt in Mac OS X

In an earlier post, I dealt with a glitch that displayed the command prompt in the terminal as “unknown_followed_by_several_numbers.” It now shows up as the default command prompt for Mac OS X, which does the job, but one of the nice things about the Bourne Again Shell, the bit of software underlying Terminal that actually makes it do stuff, is that it’s highly customizable.
My goal here is pretty simple. I just want to modify the command prompt - that bit of text, numbers and symbols the terminal puts out to show its waiting for the user to type something.
The settings for bash are stored in a configuration file which can be edited in any text editor. Since Mac OS X is a multiuser system, this configuration file would be stored in the user’s home directory. Most UNIX systems, this file would be called .basrc. This will work in Mac OS X as well - until you log out or reboot the computer. The next time you log in or restart the system, your bash settings will be reloaded from the global configuration file, “/etc/bashrc”, completely ignoring your customized file. The only way I’ve found to make a local configuration stick under OS X is to put the setiings into ~/.bash_profile, with “~/” representing your user home directory.

So, fire up the terminal app or navigate to your home directory if Terminal is already running. Execute “nano .bash_profile” to start the nano text editor and edit the configuration file (or create it if it doesn’t exist already.)
OK, so text for our custom command prompt is stored is a setting named “PS1”, and the way to set this up in the configuration file is “PS1=”Our Custom Command Prompt.” In fact...

...you could actually just do that. Enter some plain text and go with that. But, bash also recognizes some codes for presets to include things such as date and time, user, the working directory , and for this example, I’m going to go with something more along those lines.
These codes are in the format of “\” followed by the single letter code. The slash is an escape character which tells to treat the following single character as one of its coded presets. Any text without this escape character before it is treated as plain text and will simply be added to the command prompt, as is.
I’m going to just go ahead and build my custom command prompt, then go over how it was built.
So, using nano to edit “.bash_profile”, I’m going to enter the single line:
PS1="[\d \@] \u@\h : \w $ "
Exit nano, being sure to save the file. At the command prompt, execute “source ~/.bash_profile”. After executing this command, the command prompt on my system changed to:

And, just in case that’s hard to read in the screenshot:
[Tue Oct 22 06:17 AM] oldmacnewlife@OldMacNewLifes-Power-Mac-G5 : ~ $
Let’s take another look at that setting in the bash profile.
PS1="[\d \@] \u@\h : \w $ "
Now for the blow by blow replay. That bracket at the opening of the setting string is not preceded by an escape slash, so it’s treated as plain text and added to the command prompt, as is.
The letter ‘d’ IS preceded by a slash, and it happens to be the to insert the date into the command prompt, in day, month date format.
For the sake of readability, I added a space, then a slash followed by the ampersand sign, which is the code for time, in 12 hour format followed by AM or PM as appropriate. I then added a closing bracket followed by a space to separate the date and time from the rest of the command prompt.
The “\u” is the code for the current user. And ampersand without a slash is just an ampersand. “\h” adds the hostname.
I added a colon bracketed by spaces to split off the user and hostname, then “\w”, which is the code to display the current working directory. One more space, then the dollar sign for the traditional Unix prompt.
So, I’m calling this done. You can find the complete list of command prompt options, along with the full bash manual at:
https://www.gnu.org/software/bash/manual/html_node/Controlling-the-Prompt.html#Controlling-the-Prompt
1 note
·
View note
Text
Bandit
Level 13 → Level 14
The password for the next level is stored in /etc/bandit_pass/bandit14 and can only be read by user bandit14. For this level, you don’t get the next password, but you get a private SSH key that can be used to log into the next level. Note:localhost is a hostname that refers to the machine you are working on

connect the ssh server using sshkey will lead me to next level
Level 14 → Level 15
The password for the next level can be retrieved by submitting the password of the current level to port 30000 on localhost.

Telnet can help you to establish TCP/IP connection between you and the server
Level 15 → Level 16
The password for the next level can be retrieved by submitting the password of the current level to port 30001 on localhost using SSL encryption.
Helpful note: Getting “HEARTBEATING” and “Read R BLOCK”? Use -ign_eof and read the “CONNECTED COMMANDS” section in the manpage. Next to ‘R’ and ‘Q’, the ‘B’ command also works in this version of that command…
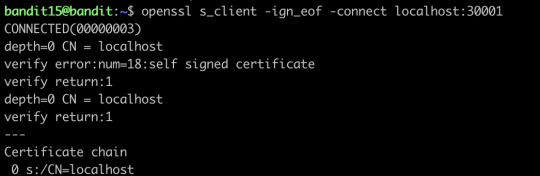
openssl will help you connect the server using SSL protocol
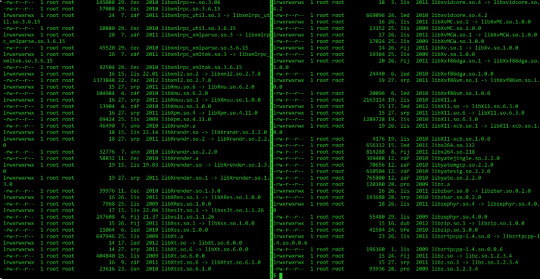
Level 16 → Level 17
The credentials for the next level can be retrieved by submitting the password of the current level to a port on localhost in the range 31000 to 32000. First find out which of these ports have a server listening on them. Then find out which of those speak SSL and which don’t. There is only 1 server that will give the next credentials, the others will simply send back to you whatever you send to it.
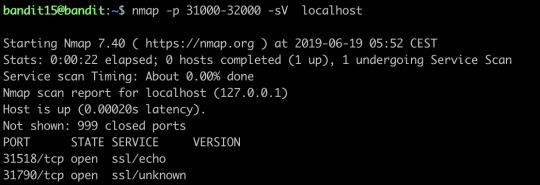
nmap can help you find out the open ports and their services on the internet, we can see we have found two open ports, and let’s try to connect the first one:


It only offers echo service, let’s try the second port:

This time it gives out the ssh key, we save it and then go to the next level
Level 17 → Level 18
There are 2 files in the homedirectory: passwords.old and passwords.new. The password for the next level is in passwords.new and is the only line that has been changed between passwords.old and passwords.newNOTE: if you have solved this level and see ‘Byebye!’ when trying to log into bandit18, this is related to the next level, bandit19

diff can show the differences between the textfiles
Level 18→ Level 19
The password for the next level is stored in a file readme in the homedirectory. Unfortunately, someone has modified .bashrc to log you out when you log in with SSH.

Though I can’t log in properly, I still can visit the file directly and get the password for the next level
Level 19 → Level 20
To gain access to the next level, you should use the setuid binary in the homedirectory. Execute it without arguments to find out how to use it. The password for this level can be found in the usual place (/etc/bandit_pass), after you have used the setuid binary.
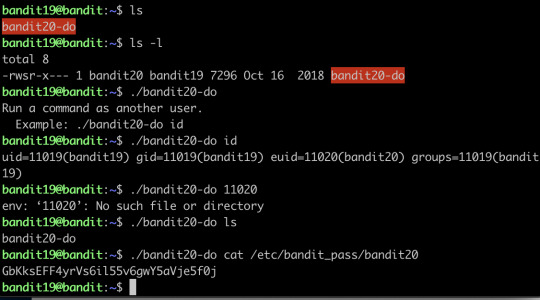
This program basically fakes you like another user, and you just use it to cat the password to the terminal directly
Level 20 → Level 21
There is a setuid binary in the homedirectory that does the following: it makes a connection to localhost on the port you specify as a commandline argument. It then reads a line of text from the connection and compares it to the password in the previous level (bandit20). If the password is correct, it will transmit the password for the next level (bandit21).
NOTE: Try connecting to your own network daemon to see if it works as you think

What you need to do is basically setting up a client and server, where nc here is actually a client sending the message, and the binary setuid here act as a server to listen to a specific code and return the password.
Level 21 → Level 22
A program is running automatically at regular intervals from cron, the time-based job scheduler. Look in /etc/cron.d/ for the configuration and see what command is being executed.

What you need to do is actually investigating what do the shells do, then you find that the shells are exporting the password to a file somewhere.
Level 22 → Level 23
A program is running automatically at regular intervals from cron, the time-based job scheduler. Look in /etc/cron.d/ for the configuration and see what command is being executed.
NOTE: Looking at shell scripts written by other people is a very useful skill. The script for this level is intentionally made easy to read. If you are having problems understanding what it does, try executing it to see the debug information it prints.
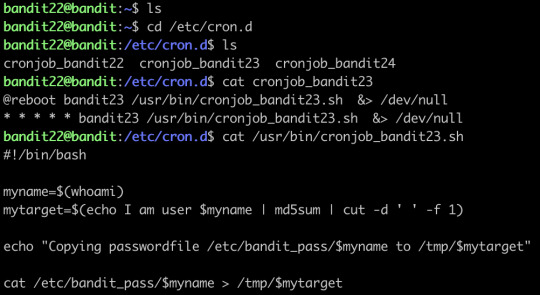
Find the shell first, an then just run it:

After running it, the password is generated.
Level 23 → Level 24
A program is running automatically at regular intervals from cron, the time-based job scheduler. Look in /etc/cron.d/ for the configuration and see what command is being executed.
NOTE: This level requires you to create your own first shell-script. This is a very big step and you should be proud of yourself when you beat this level!
NOTE 2: Keep in mind that your shell script is removed once executed, so you may want to keep a copy around…
The cron does not seem to run the sh automatically... I’ve waited for a long time and nothing happened, so I skipped this level
Level 24 → Level 25
A daemon is listening on port 30002 and will give you the password for bandit25 if given the password for bandit24 and a secret numeric 4-digit pincode. There is no way to retrieve the pincode except by going through all of the 10000 combinations, called brute-forcing.

Let’s make a new directory, and create a shell script
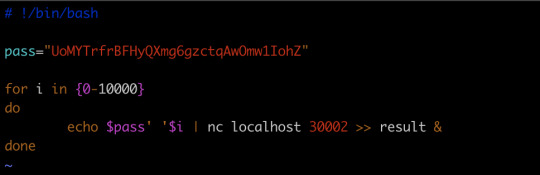
and run the script, we will get the key
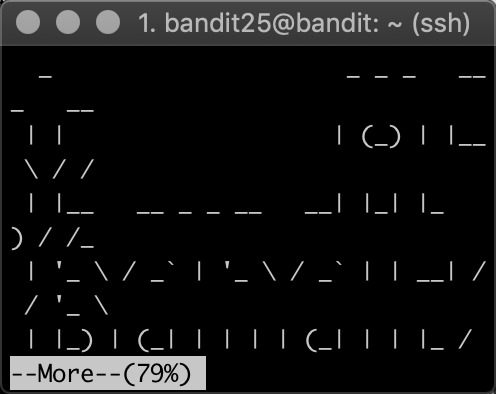
Level 25 → Level 26→Level 27(actually)
Logging in to bandit26 from bandit25 should be fairly easy… The shell for user bandit26 is not /bin/bash, but something else. Find out what it is, how it works and how to break out of it.
Honestly, this one I did not find out the solution myself, I stuck at this level for a long time, and finally, I went to google for the solution, the solution is AMAZING! The solution is so creative that I actually shocked, I will go through the solution for you:

When you tried to login, you find the connection is closed immediately. Then I tried to find some information about the shell it this level uses, then I found this:

So basically, the shell will close immediately after it showed all the text...how the hell can you connect to the level 26 and get the password of level 27???
And this is also where I stuck...
And the solution is....
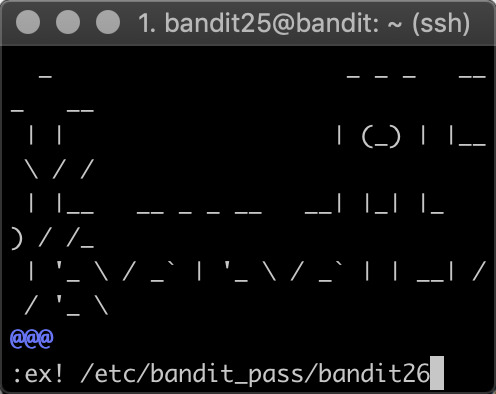
The shell does close immediately after showing all the text, but... what if you can find a way to slow down the procedure of showing all the text?? And yeah!
with “more”, you can actually realize this by simply resizing your terminal to a very small size, and now you can let the text show page by page...and as long as your text has not been fully shown on the screen, you still have the connection, and you could enter the edit mode, which is vim, and in the vim, you know you can open other files, and boom, you have the password!
2 notes
·
View notes
Text
Something Awesome Project Milestone 2 - Week 6
My other subjects and their mid-semester assessments have taken their toll on me, and I haven’t quite reached the milestone i expected to reach after week 6. I severely overestimated my coding skills
Level 11:
cat data.txt to find a string that was clearly “the password is #########” shifted 13 letters over
used tr ‘A-Za-z’ ’N-ZA-Mn-za-m’ to use rot13
then i pasted the cat data.txt to find the key
key: 5Te8Y4drgCRfCx8ugdwuEX8KFC6k2EUu
Level 12:
I go pretty stuck with this one, i tried cat data.txt and got an unreadable string, then i tried xxd -r to reverse it, but i still got something strange. At this stage I was pretty stuck for an hour or so with no progress so I had to look up the answers, and i found that if i used file on my target file, it would tell me how it was last compressed, and sure enough, i found it was compressed by gzip. Now i knew that i had to decompress it that way so i used zcat and file again, now it was telling me it was compressed by bzip, so now I need to use bacat, and it turns out it was gzip-ed again. lastly, i found out it was a tar archive so I had to use tar -xo to print to stdout. i repeated this process until i ended up with
zcat lol.bin | bzcat | zcat | tar xO | tar xO | bzcat | tar xO | zcat to get the key.
key: 8ZjyCRiBWFYkneahHwxCv3wb2a1ORpYL
Level 13:
learning how to use ssh with rsa keys
I looked through man ssh and found ssh -i which means lets you select anprivate key for the public authentication to read. I copied the key to my computer and then tried using this method. but i ran into a message that read
@@@@@@@@@@@@@@@@@@@@@@@@@@@@@@@@@@@@@@@@@@@@@@@@@@@@@@@@@@@
@ WARNING: UNPROTECTED PRIVATE KEY FILE! @
@@@@@@@@@@@@@@@@@@@@@@@@@@@@@@@@@@@@@@@@@@@@@@@@@@@@@@@@@@@
Permissions 0644 for ‘sshkey.private.rtf’ are too open.
It is required that your private key files are NOT accessible by others.
This private key will be ignored.
So I tried using chmod to change the permissions of the file. (chmod 600) to make the key not open to anyone using it except me and it worked
ssh key: MIIEpAIBAAKCAQEAxkkOE83W2cOT7IWhFc9aPaaQmQDdgzuXCv+ppZHa++buSkN+
gg0tcr7Fw8NLGa5+Uzec2rEg0WmeevB13AIoYp0MZyETq46t+jk9puNwZwIt9XgB
ZufGtZEwWbFWw/vVLNwOXBe4UWStGRWzgPpEeSv5Tb1VjLZIBdGphTIK22Amz6Zb
ThMsiMnyJafEwJ/T8PQO3myS91vUHEuoOMAzoUID4kN0MEZ3+XahyK0HJVq68KsV
ObefXG1vvA3GAJ29kxJaqvRfgYnqZryWN7w3CHjNU4c/2Jkp+n8L0SnxaNA+WYA7
jiPyTF0is8uzMlYQ4l1Lzh/8/MpvhCQF8r22dwIDAQABAoIBAQC6dWBjhyEOzjeA
J3j/RWmap9M5zfJ/wb2bfidNpwbB8rsJ4sZIDZQ7XuIh4LfygoAQSS+bBw3RXvzE
pvJt3SmU8hIDuLsCjL1VnBY5pY7Bju8g8aR/3FyjyNAqx/TLfzlLYfOu7i9Jet67
xAh0tONG/u8FB5I3LAI2Vp6OviwvdWeC4nOxCthldpuPKNLA8rmMMVRTKQ+7T2VS
nXmwYckKUcUgzoVSpiNZaS0zUDypdpy2+tRH3MQa5kqN1YKjvF8RC47woOYCktsD
o3FFpGNFec9Taa3Msy+DfQQhHKZFKIL3bJDONtmrVvtYK40/yeU4aZ/HA2DQzwhe
ol1AfiEhAoGBAOnVjosBkm7sblK+n4IEwPxs8sOmhPnTDUy5WGrpSCrXOmsVIBUf
laL3ZGLx3xCIwtCnEucB9DvN2HZkupc/h6hTKUYLqXuyLD8njTrbRhLgbC9QrKrS
M1F2fSTxVqPtZDlDMwjNR04xHA/fKh8bXXyTMqOHNJTHHNhbh3McdURjAoGBANkU
1hqfnw7+aXncJ9bjysr1ZWbqOE5Nd8AFgfwaKuGTTVX2NsUQnCMWdOp+wFak40JH
PKWkJNdBG+ex0H9JNQsTK3X5PBMAS8AfX0GrKeuwKWA6erytVTqjOfLYcdp5+z9s
8DtVCxDuVsM+i4X8UqIGOlvGbtKEVokHPFXP1q/dAoGAcHg5YX7WEehCgCYTzpO+
xysX8ScM2qS6xuZ3MqUWAxUWkh7NGZvhe0sGy9iOdANzwKw7mUUFViaCMR/t54W1
GC83sOs3D7n5Mj8x3NdO8xFit7dT9a245TvaoYQ7KgmqpSg/ScKCw4c3eiLava+J
3btnJeSIU+8ZXq9XjPRpKwUCgYA7z6LiOQKxNeXH3qHXcnHok855maUj5fJNpPbY
iDkyZ8ySF8GlcFsky8Yw6fWCqfG3zDrohJ5l9JmEsBh7SadkwsZhvecQcS9t4vby
9/8X4jS0P8ibfcKS4nBP+dT81kkkg5Z5MohXBORA7VWx+ACohcDEkprsQ+w32xeD
qT1EvQKBgQDKm8ws2ByvSUVs9GjTilCajFqLJ0eVYzRPaY6f++Gv/UVfAPV4c+S0
kAWpXbv5tbkkzbS0eaLPTKgLzavXtQoTtKwrjpolHKIHUz6Wu+n4abfAIRFubOdN
/+aLoRQ0yBDRbdXMsZN/jvY44eM+xRLdRVyMmdPtP8belRi2E2aEzA==
Level 14:
so for this level, i am meant to be able to get the password for the next level if i submit the password for the current level in port 30000 in localhost, but unfortunately, i logged into this level with an ssh key so i don’t actually know the password. Fortunately, in level 0 they told us that you can always access the password for the current level in the /etc/bandit_pass folder, and therefore I found the key for level 14:
4wcYUJFw0k0XLShlDzztnTBHiqxU3b3e
now all i have to do is submit using one of the functions they’ve given me, telnet or nc, i tried nc which allows you to create a connection to a target host at a specific host.
nc localhost -p 30000, then i typed in the level 14 key to find the level 15 key
key: BfMYroe26WYalil77FoDi9qh59eK5xNr
Level 15:
for this level i need to submit the password in localhost through port 30001 using ssl encryption, i tried doing the same thing as last level and nothing happened.
i looked up the manual for openssl, which was listed as a function that could be helpful and scrolled through the commands until i found s_client which was also on the list. s_client implements a generic SSL client which can establish a connection to a remote server, so Instead of nc I tried openssl s_client. it didn’t do anything so I added the -help tag and found i needed to use more options for the s_client and found the first two options, -host and -port told me to use -connect which was the third option. I tried that, and it gave me an input from stdin so I pasted the key and got the key for the next level!
key: cluFn7wTiGryunymYOu4RcffSxQluehd
Level 16:
This time it is similar to last level, except I’m meant to find the localhost server in-between 31000 and 32000. The final helpful command in the spec is nmap, so I used the manual for to find out what it does, and apparently it is a tool that scans ports on a network.
“ In addition to all of the scan methods discussed previously, Nmap offers options for
specifying which ports are scanned and whether the scan order is randomised or sequential. By
default, Nmap scans the most common 1,000 ports for each protocol.” I used the -p option to specify which range of ports I’m searching and then specified the network I’m scanning with ���nmap -p 31000-32000 localhost”
I found two open ports and checked them: 31518 and 31790
31518 only echoed whatever i typed in, but from 31790 i got the credentials:
RSA key:
—–BEGIN RSA PRIVATE KEY—–
MIIEogIBAAKCAQEAvmOkuifmMg6HL2YPIOjon6iWfbp7c3jx34YkYWqUH57SUdyJ
imZzeyGC0gtZPGujUSxiJSWI/oTqexh+cAMTSMlOJf7+BrJObArnxd9Y7YT2bRPQ
Ja6Lzb558YW3FZl87ORiO+rW4LCDCNd2lUvLE/GL2GWyuKN0K5iCd5TbtJzEkQTu
DSt2mcNn4rhAL+JFr56o4T6z8WWAW18BR6yGrMq7Q/kALHYW3OekePQAzL0VUYbW
JGTi65CxbCnzc/w4+mqQyvmzpWtMAzJTzAzQxNbkR2MBGySxDLrjg0LWN6sK7wNX
x0YVztz/zbIkPjfkU1jHS+9EbVNj+D1XFOJuaQIDAQABAoIBABagpxpM1aoLWfvD
KHcj10nqcoBc4oE11aFYQwik7xfW+24pRNuDE6SFthOar69jp5RlLwD1NhPx3iBl
J9nOM8OJ0VToum43UOS8YxF8WwhXriYGnc1sskbwpXOUDc9uX4+UESzH22P29ovd
d8WErY0gPxun8pbJLmxkAtWNhpMvfe0050vk9TL5wqbu9AlbssgTcCXkMQnPw9nC
YNN6DDP2lbcBrvgT9YCNL6C+ZKufD52yOQ9qOkwFTEQpjtF4uNtJom+asvlpmS8A
vLY9r60wYSvmZhNqBUrj7lyCtXMIu1kkd4w7F77k+DjHoAXyxcUp1DGL51sOmama
+TOWWgECgYEA8JtPxP0GRJ+IQkX262jM3dEIkza8ky5moIwUqYdsx0NxHgRRhORT
8c8hAuRBb2G82so8vUHk/fur85OEfc9TncnCY2crpoqsghifKLxrLgtT+qDpfZnx
SatLdt8GfQ85yA7hnWWJ2MxF3NaeSDm75Lsm+tBbAiyc9P2jGRNtMSkCgYEAypHd
HCctNi/FwjulhttFx/rHYKhLidZDFYeiE/v45bN4yFm8x7R/b0iE7KaszX+Exdvt
SghaTdcG0Knyw1bpJVyusavPzpaJMjdJ6tcFhVAbAjm7enCIvGCSx+X3l5SiWg0A
R57hJglezIiVjv3aGwHwvlZvtszK6zV6oXFAu0ECgYAbjo46T4hyP5tJi93V5HDi
Ttiek7xRVxUl+iU7rWkGAXFpMLFteQEsRr7PJ/lemmEY5eTDAFMLy9FL2m9oQWCg
R8VdwSk8r9FGLS+9aKcV5PI/WEKlwgXinB3OhYimtiG2Cg5JCqIZFHxD6MjEGOiu
L8ktHMPvodBwNsSBULpG0QKBgBAplTfC1HOnWiMGOU3KPwYWt0O6CdTkmJOmL8Ni
blh9elyZ9FsGxsgtRBXRsqXuz7wtsQAgLHxbdLq/ZJQ7YfzOKU4ZxEnabvXnvWkU
YOdjHdSOoKvDQNWu6ucyLRAWFuISeXw9a/9p7ftpxm0TSgyvmfLF2MIAEwyzRqaM
77pBAoGAMmjmIJdjp+Ez8duyn3ieo36yrttF5NSsJLAbxFpdlc1gvtGCWW+9Cq0b
dxviW8+TFVEBl1O4f7HVm6EpTscdDxU+bCXWkfjuRb7Dy9GOtt9JPsX8MBTakzh3
vBgsyi/sN3RqRBcGU40fOoZyfAMT8s1m/uYv52O6IgeuZ/ujbjY=
—–END RSA PRIVATE KEY—–
Level 17:
Since I didn’t have a password I had to connect using the same method as level 13, with the -i option. First I found the current password by using cat /etc/bandit_pass/bandit17,
current key: xLYVMN9WE5zQ5vHacb0sZEVqbrp7nBTn
next I used diff to find the difference between the two files, two keys came up, but I was looking for the one in .new and not .old so I copied the 2nd key after using diff passwords.old passwords.new
key: kfBf3eYk5BPBRzwjqutbbfE887SVc5Yd
Level 18:
So I tried using the key to log into bandit18, however straight away I was greeted with a message saying “bye-bye !” and i was forcefully logged out… hmmm…
The useful commands include ssh, ls, and cat, and I’m pretty sure cat and ls won’t have anything else to do with not getting logged out in ssh, so i pulled up the manual again for ssh. I command+F-ed to find something with the word ‘force’ to maybe force log in, options -4 and -6 changed the usage of IP addresses, but i found -t which said it could force open a pseudo terminal, so I tried that. Still got the same result however, and I realised that it was because (as the specs mentioned) .bashrc was modified. in order to bypass this, I needed to create open a new shell before bashrc gets called.
So I added on at the end: ssh -t username@hostname /bin/sh
key: IueksS7Ubh8G3DCwVzrTd8rAVOwq3M5x
Level 19:
Upon logging in, and a cheeky ls, the only file in the directory is an executable called bandit20-do and under permissions, anyone can’t read or write, but anyone can execute. After a bit of reading, I found out that running this program lets u run other commands with under the permissions of another user, because out is a
key: GbKksEFF4yrVs6il55v6gwY5aVje5f0j
Level 20:
Spec: There is a setuid binary in the homedirectory that does the following: it makes a connection to localhost on the port you specify as a commandline argument. It then reads a line of text from the connection and compares it to the password in the previous level (bandit20). If the password is correct, it will transmit the password for the next level (bandit21).
So form what i gather, I need to set up some kind of listener in a port on the localhost so that I can send the setups binary the password, and receive the next key in turn. To do this I’m probably going to need two terminal windows, one to set up the port, and the other to run the binary, for the listener, I looked up on stack exchange how to set one up and you use the -l option with the nc command, if i use the -p option to specify port then I’ll have set up my listener. I then ran suconnect with the same port and the typed in the previous password into the listener and got a neat message from suconnect saying that the passwords match, and got the next key from stdout of the listener.
key: gE269g2h3mw3pwgrj0Ha9Uoqen1c9DGr
1 note
·
View note
Video
youtube
Viral - Linux Interview Questions and Answers | Tech Arkit
* Command to check Disk usage ? * Difference between ps -aux & top command ? * What are the ways to check CPU usage ? * How to check CPU details ? * Explain the steps to create a partition & how to format with file system ? * Explain the steps to create LV ? * Explain steps to reduce XFS & EXT files systems ? * Significance of .bashrc file ? * How you check the kernel version ? * How you check the Red hat release version ? * Significance of resolv.conf file ? * What is DNS ? How you resolve DNS ? Types of DNS records ? * Difference between Nginx & HTTP Server ? * Port no of HTTP, FTP, SSH, HTTPS ? * What is SSH ? How you generate SSH-keys ? * What is Private & public key ? How they authenticate ? * What is the default configuration file of SSH ? * What is the default configuration file of HTTP ? * What is Virtual Hosting ? How you configure virtual hosting ? * Explain ifconfig command ? * Difference between IPv4 & IPv6 ? * What is MAC address ? can we change the physical address ? * How to check system uptime ? * How to check memory information ? * What is SWAP ? * What is the exact memory free in your system ? * What is cache memory ? * What if you can do rm -rvf / ? * Kinds of permission in Linux ? * What is vim & vi ? * What is pipe | ? * What is grep command ? * What Find command does ? * How to redirect commands output ? * What is systemd in Linux ? * What does systemctl do ? * If you run a command like nautilus in terminal, whether it will block your terminal or not ? * What is rsyslog ?
0 notes
Photo

How to Exit the Vi or Vim Editor The vi editor is confusing if you’re not used to it. It takes a secret handshake to escape this application if you’ve stumbled into it. Here’s how to quit vi or vim on Linux, macOS, or any other Unix-like system. The Quick Answer If you’re in vi or vim and need to get out—with or without saving your changes—here’s how: First, press the Esc key a few times. This will ensure vi is out of Insert mode and in Command mode. Second, type :q! and press Enter. This tells vi to quit without saving any changes. (If you do want to save your changes, type :wq instead.) If you want to learn the Linux command line, you’ll need to know a lot more than that. Read on and we’ll show you just how vi works and why the instructions for quitting are so unusual. vi is an important, powerful tool and the learning curve is worth it. vi, The Ubiquitous Editor Because vi is everywhere the chances are you’re going to run up against it. You can even find yourself inside vi by accident. Perhaps someone asks you to look at their Linux computer for them. You issue a command like crontab -e , and vi pops up. Surprise, someone has configured the default editor for crontab to be vi. Perhaps you’re administering a system where vi is the only editor, or the only one that will work through a remote SSH session, and you need to edit a user’s .bashrc file. The command to start vi and open a file is straight forward. Type vi , a space, and then the filename. Press Enter. The program that is launched might be vi or it might be vim , an ‘improved vi‘. It depends on your Linux distribution—for example, Ubuntu uses vim . All of the instructions in this article apply equally to vim. vi .bashrc The immediately noticeable difference between vi and other editors is that when vi launches you can’t just start typing text. That’s because vi is a modal editor. Editing is performed in one mode, the Insert mode, and issuing commands is performed in the Command mode. vi launches into Command mode. Read the remaining 25 paragraphs https://buff.ly/2InrWMZ
1 note
·
View note