#how to find wordpress username and password
Explore tagged Tumblr posts
Visit Tumblr Blog
Explore Tumblr blogs with no restrictions, modern design and the best experience.
Last Seen Tumblr Blogs


Fun Fact
Women make up for the other 50% of Tumblr’s audience.
Text
Find the step-by-step guide to easily find your WordPress admin username and password from cPanel. Let’s get started & retrieve it!
#how to find wordpress username and password in cpanel#how to get wordpress username and password from cpanel#how to check wordpress username and password from cpanel#how to change wordpress username and password from cpanel
0 notes
Text
Navigating the WordPress Admin Dashboard: A User-Friendly Guide

The WordPress Admin Dashboard is the central hub for managing your website’s content, settings, and appearance. It offers a streamlined interface where you can control everything from posts to plugins. One particularly useful feature is the ability to Master Admin Search in WordPress Dashboard, allowing you to efficiently find the content and settings you need as your site grows.
To access the dashboard, simply add “/wp-admin” to your site’s URL (e.g., www.yoursite.com/wp-admin) and log in using your credentials. Once inside, you’ll have full control over your website’s backend.
How Do You Access The WordPress Admin Dashboard?
Gaining access to the WordPress Admin Dashboard is straightforward. You just need to visit your website’s URL and add “/wp-admin” at the end (e.g., yoursite.com/wp-admin). After entering your username and password, you’ll be directed to the dashboard where you can start managing your site.
How to Search in WordPress Dashboard?
The WordPress Admin Dashboard features a built-in search bar located in the upper-right corner. This function allows you to search for posts, pages, or settings within the dashboard quickly. If you're working with a larger site, using advanced search tools might be beneficial to narrow down results more effectively.
How Do I Find My WordPress Admin Dashboard?
To find your WordPress Admin Dashboard, just type “/wp-admin” after your website’s domain. For instance, if your website is “example.com,” simply type “example.com/wp-admin” into your browser’s address bar. This will take you to the login page, where you can enter your credentials to access the dashboard.
How Do I Do an Advanced Search in WordPress?
If you require more robust search capabilities within the WordPress Admin Dashboard, there are several plugins available that offer advanced search options. Plugins like "Relevanssi" or "Admin Search" allow you to filter results more precisely. For further details on enhancing your search functionality, refer to Mastering Admin Search in WordPress Dashboard.
Conclusion
The WordPress Admin Dashboard is a powerful tool for managing all aspects of your website. Whether you're editing posts, adjusting settings, or searching for specific content, knowing your way around the dashboard is essential. If you need more advanced search functionality, plugins can help make site management more efficient, especially as your website grows in complexity.
#wordpress#wordpress theme#wordpress plugin#wordpress development#wordpress developers#developer#plugin#Admin Search in WordPress
2 notes
·
View notes
Text
Hot Tubbing
The low this morning was 38 degrees, and the high today reached 53. The rain did not begin until 5 p.m., although there were sprinkles throughout the day.
My blood sugar was back up to 171. Oh well! Once we had our coffee and played the brain games, we had oatmeal for breakfast.
Nancy and I had a brief discussion about something to get out and do today, but we wound up passing on everything except the idea to go to the hot tub later in the day. We will save our adventures in Salem for another time.
Nancy checked in with Robin and Joan and found out about Patty’s surgery yesterday. She did spend the night at the hospital after the procedure, then Jay took her home this morning.
For lunch, we had tomato soup, grilled cheese sandwiches and chips, then the last chocolate truffle for dessert.
We made an appointment for the Onsen Hot Tubs at 3:15 p.m. and spent an hour luxuriating in the hot water under the open sky of the room we were in. We were fortunate it did not rain during our visit. Not long after we got back home the rain started coming down for a while.
I finally got a response from the Senior Warden at St. Matthew in Tucson, requesting that I pass on the access information to him. I started putting together all the links and usernames and passwords, and I will text those to him in the next day or two, along with more information about handling the WordPress account.
I heard from the recovery friend who was going to take me with him to the men’s retreat for a visit on Friday. His work schedule means he has to cancel plans. But Art, another recovery friend, said he would try and find someone else who wants to go out there for the day.
Art also invited me to participate in a recovery meeting on Zoom with parolees on April 1. I will be one of two people who share their experience, strength and hope. I’m sure it will be an interesting time.
Nancy made the decision to fix dinner using the leftover chicken fettuccine and roasted veggies. A bit later we enjoyed the two little key lime pies that Kathleen had left us from her visit.
We began our streaming with the newest episode of “Will Trent,” followed by the latest episode of “Death in Paradise.” The Commissioner’s departure appears to be getting closer. We ended the evening with the final episode of series three of “Resident Alien.” There’s no information about how soon series four might appear, but there is a cliffhanger in place to keep us wondering what is coming next.
Looks like more rain is expected during the night and through most of the day tomorrow. The low might only get to 40 degrees, and tomorrow’s high could get to 46. More rain is coming through the weekend, and next Monday and Tuesday are showing sunshine with highs in the 70s. There’s little doubt that will change before those days arrive.
0 notes
Text
Step-by-Step Guide to Creating a Website Using WordPress
Welcome to Biz Odisha’s easy guide to creating your own website using WordPress! Whether you want to start a blog, business website, or online store, this guide will walk you through the process in simple steps. Let’s get started!
Step 1: Choose a Domain Name & Hosting
Your domain name is your website’s address (e.g., www.yousitename.com), and hosting is where your website files are stored. Think of it as your website’s home on the internet.

How to Choose a Domain Name:
Keep it short and easy to remember.
Avoid numbers and hyphens.
Use a “.com” extension if possible.
Choose a Hosting Provider: Some good hosting options are:
Bluehost (Great for beginners)
SiteGround
Hostinger
GoDaddy
Once you purchase a domain and hosting, you’ll receive login details for your hosting dashboard.
Step 2: Install WordPress
Most hosting providers offer one-click WordPress installation. Here’s how you can do it:
Log in to your hosting account.
Find the WordPress Installer (usually in the control panel or dashboard).
Click “Install” and choose your domain.
Set a Username and Password for your WordPress site.
Click “Finish Installation.”
Now, your WordPress website is ready! You can log in at yourdomain.com/wp-admin.

Step 3: Choose a WordPress Theme
A theme controls how your website looks. WordPress offers many free and paid themes.
How to Install a Theme:
Go to Appearance > Themes in your WordPress dashboard.
Click “Add New” and search for a theme.
Click “Install” and then “Activate”.
If you want a professional look, consider premium themes from ThemeForest, Astra,

Step 4: Customize Your Website
Once your theme is activated, it’s time to make it your own:
Go to Appearance > Customize to change colors, fonts, and layouts.
Upload your logo and set your site title.
Edit the header, footer, and homepage.
Step 5: Install Essential Plugins
Plugins add extra features to your website, like contact forms, SEO tools, and security.
Must-Have Plugins:
Yoast SEO – Helps improve Google rankings.
Elementor – Easy drag-and-drop website builder.
WPForms – To create contact forms.
WooCommerce – If you want to sell products online.
UpdraftPlus – To back up your site.
Step 6: Create Essential Pages
Every website needs some important pages:
Home Page – The first page visitors see.
About Page – Tell your story or describe your business.
Services/Products Page – Showcase what you offer.
Contact Page – Include a form, email, and location.
Step 7: Promote Your Website
Now that your website is live, it’s time to get visitors!
Share on Social Media – Facebook, Instagram, LinkedIn.
Start a Blog – Write useful articles related to your business.
Run Ads – Google Ads or Facebook Ads can bring traffic.
Engage in SEO – Keep optimizing for search rankings.
WordPress makes website creation easy, even for beginners. Follow these steps, and you’ll have a professional-looking website quickly.
1 note
·
View note
Text
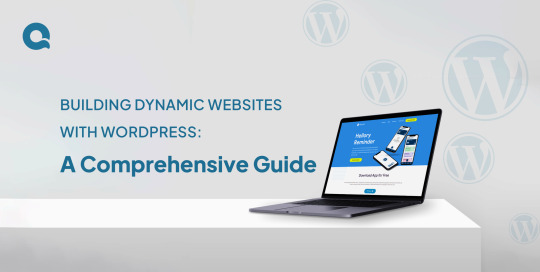
Building Dynamic Websites with WordPress: A Comprehensive Guide
Introduction:
Thanks to its flexibility, user-friendliness, and powerful features, WordPress has become one of the most popular platforms for building dynamic websites. Whether you’re a beginner or an experienced developer, WordPress offers everything you need to create a fully functional, professional-looking website. In this guide, we’ll walk you through the essential steps to building dynamic websites with WordPress, covering everything from installation to customization.
1. Understanding WordPress
Before getting into the technical aspects, let’s first understand WordPress and why it’s so widely used.
A. What is WordPress?
WordPress is a free, open-source Content Management System (CMS) that makes creating and managing websites simple. Originally designed as a platform for blogging, it has grown into a powerful tool that can be used to build all kinds of websites—from personal blogs to full-fledged e-commerce stores.
B. Why Choose WordPress?
WordPress is known for its ease of use and flexibility. Whether you’re a beginner or an expert, you can build and customize your site with ease. It’s supported by a vast community of developers, meaning you can access thousands of themes and plugins. These tools allow you to add features and design your site exactly the way you want, without needing to write any code.
2. Getting Started with WordPress
Setting up a WordPress site is simple, even if you’re new to web development. Here’s how to get started:
A. Choosing a Hosting Provider
The first step is to choose a hosting provider. Your hosting provider is where your website will live, so it’s important to pick one that offers easy WordPress installation, reliable uptime, and strong customer support. Some popular options include:
Bluehost: Known for its beginner-friendly features and seamless WordPress integration.
SiteGround: Offers excellent performance and top-notch customer service.
WP Engine: A premium option with a focus on speed and security for WordPress sites.
B. Installing WordPress
Once you’ve chosen your hosting provider, the next step is to install WordPress. Most hosts make this very easy with a one-click installation process. Here’s how it typically works:
Log in to Your Hosting Account: Access your hosting control panel or dashboard.
Find the WordPress Installation Option: Look for a section like “Website” or “Apps” where you’ll find the WordPress logo.
Follow the Prompts: Click on the WordPress icon, and the installation process will guide you through the setup. You may need to choose your website’s name, admin username, and password.
In just a few minutes, your WordPress site will be up and running, ready for you to start building and customizing.
3. Selecting and Customizing a WordPress Theme
Your website’s design is largely defined by the theme you choose. WordPress themes dictate how your site looks and feels, and with thousands of free and premium themes available, you can easily find one that suits your needs.
A. Choosing the Right Theme
When selecting a theme, think about the purpose of your website:
Business Websites: For a professional look, choose a theme with a clean, modern design. It should highlight important information like your services, contact details, and client testimonials.
Blogs: If you’re building a blog, opt for a theme that puts your content front and center. Look for layouts that emphasize readability and support multimedia content like images and videos.
B. Customizing Your Theme
After choosing your theme, you’ll want to tailor it to fit your brand. WordPress makes this easy with its built-in Customizer:
Change Colors and Fonts: Adjust the colors and fonts to align with your brand’s identity. For instance, use your brand’s color palette and select fonts that match the tone of your content.
Adjust Layouts: The layout controls how different elements are arranged on your site. You can modify the layout to make sure your content is displayed in a way that best serves your audience.
Advanced Customization: If you need more specific changes, many themes allow you to add custom CSS. This lets you fine-tune aspects of your site’s design beyond the basic options.
Example: Imagine you’ve chosen a theme for a travel blog. You can customize the colors to mirror the natural beauty of your destinations, perhaps using earthy tones or vibrant hues. Adjust the layout to prominently feature your latest blog posts, making them the first thing visitors see. Additionally, you can use widgets to display your social media links and a feed of your recent Instagram photos, helping to keep your readers engaged and connected across platforms.
4. Adding Content to Your WordPress Website
With your theme set up, the next step is to fill your website with content. WordPress makes it simple to create and organize your pages, blog posts, and menus.
A. Creating Pages and Posts
Pages and posts are the building blocks of your WordPress site, but they serve different purposes:
Pages are for static content that doesn’t change often, like your “About Us,” “Contact,” or “Services” pages.
Posts are for dynamic content that gets updated regularly, such as blog entries, news updates, or articles.
B. How to Create a Page or Post:
Go to Your Dashboard: Log in to your WordPress dashboard.
Add New Content: To create a new page, click on “Pages” > “Add New.” For a post, click on “Posts” > “Add New.”
Use the Editor: WordPress’s built-in editor lets you easily add text, images, and other media. You can also format your content with headings, lists, and links to make it more readable.
Example: Imagine you’re building a website for a restaurant. You could create individual pages for the menu, location, and reservation details. For posts, you might regularly update your blog with news about new dishes, upcoming events, or interviews with the chef.
C . Organizing Your Content
To help visitors find what they’re looking for, WordPress allows you to organize your posts using categories and tags:
Categories: These are broad groups that organize your posts by topic. For example, a food blog might have categories like “Recipes,” “Restaurant Reviews,” and “Cooking Tips.”
Tags: These are more specific labels that describe the content of your posts. For instance, a post in the “Recipes” category could have tags like “vegetarian,” “quick meals,” or “desserts.”
D. Tips for Effective Organization:
Plan Your Categories: Choose clear, broad categories that align with your content strategy. This makes it easier for visitors to navigate your site.
Use Tags Wisely: Tags should be specific and relevant to the post’s content. Avoid using too many tags; focus on a few key descriptors.
5. Extending Functionality with Plugins
One of the standout features of WordPress is its extensive library of plugins, which allow you to easily add a wide range of functionalities to your website. With thousands of plugins available, you can customize your site to meet your specific needs without writing any code.
A. Installing Plugins
Installing a plugin in WordPress is a simple process. Here’s how to do it:
Access the Plugins Section: Log in to your WordPress dashboard and navigate to the “Plugins” section on the left sidebar.
Add a New Plugin: Click on “Add New” at the top of the page.
Search for a Plugin: Use the search bar to find the specific plugin you need.
B. Some popular plugins include:
Yoast SEO: Helps optimize your site for search engines.
WooCommerce: Turns your website into a fully functional online store.
Elementor: Provides drag-and-drop page building for easy design.
Example: If you’re setting up an online store, installing WooCommerce is a great choice. This powerful plugin allows you to manage products, handle payments, and set up shipping options—all with just a few clicks. Once activated, WooCommerce transforms your WordPress site into a complete e-commerce platform, making it easy to sell products online.
C. Managing Plugins
While plugins add valuable features, it’s important to manage them carefully:
Limit Your Plugins: Installing too many plugins can slow down your website’s performance. Only use plugins that you truly need for your site’s functionality.
Regular Updates: Keep your plugins updated to ensure they work smoothly with the latest version of WordPress. Regular updates also enhance your site’s security by patching any vulnerabilities.
6. Optimizing for SEO
Search Engine Optimization (SEO) is essential for attracting visitors to your website. With the right SEO practices, you can improve your website’s visibility on search engines like Google, driving more organic traffic. Fortunately, WordPress offers a variety of tools to help you optimize your site effectively.
A. Using SEO Plugins
One of the best ways to optimize your content is by using SEO plugins. Yoast SEO is among the most popular choices for WordPress users. This powerful plugin simplifies the optimization process by providing features such as:
Meta Descriptions: Yoast allows you to easily add meta descriptions to your posts and pages, helping search engines understand the content of your site.
Focus Keywords: You can set focus keywords for each piece of content, guiding the plugin to analyze how well you’re using those keywords throughout your text.
Readability Analysis: Yoast evaluates the readability of your content, offering suggestions to improve sentence structure, paragraph length, and overall flow.
Using Yoast SEO, you can ensure that your content is both user-friendly and optimized for search engines.
B. Creating SEO-Friendly Content
Crafting content that is optimized for search engines involves several key practices:
Use Clear and Concise Headings: Headings (H1, H2, H3) help structure your content and make it easier for readers to navigate. They also signal to search engines what your content is about.
Incorporate Keywords Naturally: Identify relevant keywords related to your topic and include them naturally in your text. Avoid keyword stuffing; instead, focus on writing content that flows well and engages your readers.
Descriptive Alt Text for Images: Every image you upload should have descriptive alt text. This helps search engines understand what the image is about and improves accessibility for users with visual impairments.
Short and Relevant URLs: Create clean, concise URLs that accurately reflect the content of your page. A well-structured URL helps search engines and users understand the topic quickly.
Example
Suppose you run a blog focused on fitness. Your content might revolve around keywords like “workout routines,” “healthy eating,” and “fitness tips.”
When using Yoast SEO, you can input these keywords as your focus terms. The plugin will then analyze your content, providing suggestions for optimizing your posts. For instance, it might recommend adding your focus keywords to your headings, ensuring they appear in the first paragraph, and including them in the alt text of images related to your blog post.
By following these practices, you can enhance your chances of ranking higher in search engine results, ultimately leading to increased traffic and engagement on your website.
7. Ensuring Website Security
Website security is a top priority for every website owner. With the increasing number of cyber threats, it’s essential to protect your WordPress site from potential attacks. Fortunately, WordPress provides various tools and strategies to enhance your site’s security.
A. Implementing Security Plugins
Using security plugins is one of the most effective ways to safeguard your WordPress site. Two of the most popular options are Wordfence and Sucuri. Here’s how they can help:
Wordfence: This plugin offers comprehensive security features, including malware scanning, real-time traffic monitoring, and a firewall to block malicious activity. It notifies you of any suspicious activity and helps you take action to protect your site.
Sucuri: Sucuri provides similar features, focusing on website integrity monitoring and malware removal. It also offers a web application firewall to block harmful traffic before it reaches your site.
By installing and configuring these plugins, you can significantly reduce the risk of attacks and keep your site secure.
B. Regular Backups
Regular backups are crucial for ensuring that your website can be restored quickly in case of a security breach or other issues. If something goes wrong, you want to be able to revert to a previous version of your site without losing valuable data.
Using Backup Plugins: Consider using plugins like UpdraftPlus to manage your backups. UpdraftPlus allows you to schedule automatic backups, ensuring that your site is backed up regularly without manual effort.
Safe Storage: Make sure to store your backups in a secure location, such as Google Drive, Dropbox, or another cloud storage service. This way, even if your website is compromised, you’ll have a safe copy of your data.
By implementing robust security measures and maintaining regular backups, you can protect your WordPress site from threats and ensure that it remains safe and operational.
8. Monitoring and Analyzing Website Performance
Once your website is live, it’s crucial to monitor its performance continuously and make necessary improvements. This ensures that your visitors have a smooth experience and that your site meets its goals.
A. Using Analytics Tools
Google Analytics is an essential tool for tracking various aspects of your website, including traffic, user behavior, and conversion rates. By analyzing this data, you can gain insights into how visitors interact with your site.
Setting Up Google Analytics To start, install the Google Analytics plugin on your WordPress site. This will allow you to easily connect your site to Google Analytics and begin collecting valuable data.
Example of Insights Suppose you notice from your analytics data that many visitors leave your site after viewing just one page. This could indicate that your site’s navigation needs improvement or that your content isn’t engaging enough. By identifying these issues, you can take action to enhance user experience and encourage visitors to explore more of your site.
Improving Site Speed
A slow website can drive visitors away and negatively impact your search engine rankings. Therefore, optimizing your site’s speed is essential.
Analyzing Site Speed Use tools like GTmetrix or Google PageSpeed Insights to test your website’s speed. These tools provide detailed reports and suggestions for improving performance.
Recommendations for Improvement Common suggestions may include:
Optimizing Images: Compress images to reduce their file size without sacrificing quality.
Enabling Caching: Implement caching to store static versions of your pages, allowing them to load faster for repeat visitors.
Minifying CSS and JavaScript: Remove unnecessary characters and spaces in your code to reduce file sizes and improve loading times.
Conclusion
Building a dynamic website with WordPress is an achievable goal for anyone, regardless of technical expertise. By following the steps outlined in this guide—from setting up your site and customizing it with themes and plugins to optimizing it for SEO and securing it against threats—you can create a professional, user-friendly website that meets your needs.
WordPress’s versatility and extensive community support make it an excellent choice for building websites of all types. Whether you’re creating a personal blog, a business site, or an online store, WordPress offers the tools and flexibility to bring your vision to life.
#web development#ui ux design#web design#e commerce#businessgrowth#digita marketing#laravel#phpdevelopment#seo services#software development#wordpress development#wordpress#website
0 notes
Text
Your Comprehensive Guide to Accessing the WordPress Dashboard

Are you ready to dive into the world of WordPress and take control of your website? You've made a wise choice! WordPress is one of the most popular and powerful content management systems out there, and mastering its dashboard is the first step towards unleashing its full potential.
But how do you access the WordPress dashboard?
In this guide, we'll walk you through the process step by step, so you can easily navigate your way to the dashboard and start managing your site like a pro.
Understanding the WordPress Dashboard
Before we jump into the nitty-gritty of accessing the dashboard, let's take a moment to understand what exactly the WordPress dashboard is and why it's so important.
The dashboard is the central hub of your WordPress site. It's where you'll spend the majority of your time managing your content, customizing your site, and keeping everything running smoothly. From here, you can create new posts and pages, upload media, install plugins and themes, and much more.
Accessing the WordPress Dashboard
Now that you know why the dashboard is essential let's talk about how to access it. Fortunately, it's a straightforward process.
Log in to Your WordPress Site: The first step is to log in to your WordPress site. Simply navigate to your site's login page (typically located at yourdomain.com/wp-login.php) and enter your username and password.
Navigate to the Dashboard: Once you're logged in, you'll be taken to the WordPress admin area. This is where all the magic happens! From here, you can access the dashboard by clicking on the "Dashboard" link in the top left corner of the screen.
Explore and Customize: Congratulations, you've made it to the WordPress dashboard! Take some time to explore its various sections and familiarize yourself with its layout. You'll find everything you need to manage your site efficiently right at your fingertips.
Wrapping Up
And there you have it – a simple guide to accessing the WordPress dashboard. With just a few clicks, you'll be well on your way to harnessing the power of WordPress and taking your website to new heights.
So what are you waiting for? Log in to your WordPress site, access the dashboard, and start building something amazing today!
0 notes
Video
youtube
How To Find WordPress Username and Password in cPanel 🔥 - Reset or Chang...
1 note
·
View note
Text
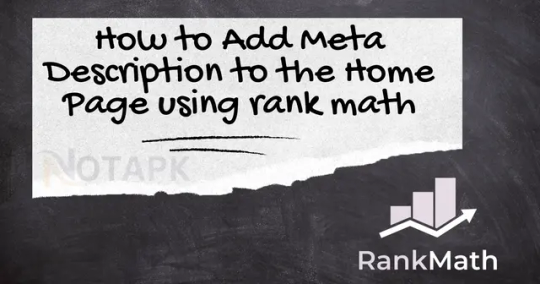
How to Add Meta Description to the Home Page Using Rank Math
In order to improve your website's SEO (search engine optimization), it is essential to add a meta description to your homepage. It aids search engines in understanding your website's content and gives users a preview of what they can expect to discover there. A well-written meta description can increase your website's click-through rate by making it more appealing to users. What is a Meta Description? Why Does Your Home Page Need a Meta Description? Accessing Your WordPress Dashboard How to Add Meta Description to the Home Page Using Rank Math Crafting an Effective Meta Description The Role of Google Robots How a Meta Description Impacts SEO Common Mistakes to Avoid Conclusion Frequently Asked Questions (FAQs)Why is a meta description important for SEO? Can I use the same meta description for all pages on my website? How can I find the right keywords for my meta description? What happens if I don't add a meta description to my home page? Should I hire an SEO expert to optimize my meta descriptions?
What is a Meta Description?
A meta description is a summary of your web page's content. It's the snippet of text that appears below your website's Title in search engine results pages (SERPs). Think of it as a mini-advertisement for your site, enticing users to click through to your page.

The meta description tag is inserted within the HTML document's element. Your title
Why Does Your Home Page Need a Meta Description?
Your home page serves as the virtual front door to your website. Adding a meta description helps visitors understand what your site is about and why they should explore further. It's your opportunity to make a compelling first impression.
Accessing Your WordPress Dashboard
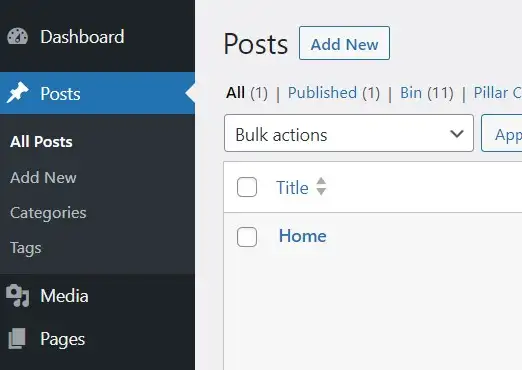
Log in to your WordPress dashboard. If you're unsure how to do this, follow these steps: - Open your web browser. - Type in your website's URL. - Add "/wp-admin" at the end (e.g., www.yourwebsite.com/wp-admin). - Enter your username and password. - Navigating to Your Home Page Once you're in the dashboard, locate the "Pages" option on the left-hand menu. Click on it to view your list of pages. Look for the "Home" page and click "Edit."
How to Add Meta Description to the Home Page Using Rank Math
There are numerous excellent SEO plugins that can help you better your SEO, such as Rank Math .You can locate Rank Math in the page editor and then click on it. If you haven't already installed the SEO plugin, we highly recommend doing so to simplify SEO duties on WordPress. Find the "edit snippet" link and select it.


After that, this window will appear
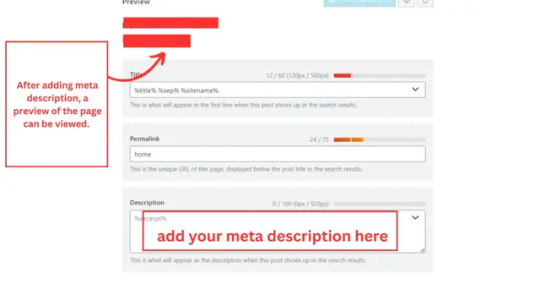
Crafting an Effective Meta Description
Now, you'll see fields for the meta title and meta description. This is where you can make your home page shine in search results. - Meta Title (up to 60 characters): Craft a concise, attention-grabbing title that includes relevant keywords like "meta description" and "home page." - Meta Description (up to 160 characters): Write a compelling description that not only contains your keywords but also entices users to click on your site. Consider it your elevator pitch to potential visitors.
The Role of Google Robots
Google robots, also known as Google's web crawlers, are responsible for indexing and ranking websites in search results. When you provide a well-crafted meta description, you're helping these robots understand your content better.
How a Meta Description Impacts SEO
A well-optimized meta description can positively affect your SEO efforts in several ways: - Improved Click-Through Rate (CTR): A compelling description encourages users to click on your link, increasing your CTR. - Relevance: Including keywords like "meta description," "home page," and "WordPress dashboard" makes your page more relevant to specific search queries. - Reduced Bounce Rate: When visitors find what they expect on your page, they're more likely to stay and explore, reducing your bounce rate.
Common Mistakes to Avoid
While adding a meta description is essential, there are some common mistakes to avoid: - Keyword Stuffing: Don't overuse keywords; it can make your meta description sound unnatural. - Duplicate Descriptions: Each page should have a unique meta description; duplicates confuse search engines. - Ignoring Length Limits: Stick to the character limits to ensure your meta description displays correctly in SERPs. - Not Updating: Regularly update your meta descriptions to keep them relevant to your page's content.
Conclusion
Adding a meta description to the home page of your WordPress site is a basic yet effective SEO technique. It aids Google's algorithms in comprehending your content, boosts click-through rates, and improves the user experience. Remember to create compelling and unique meta descriptions for each page, and you'll be well on your way to increasing the visibility of your website.
Frequently Asked Questions (FAQs)
Why is a meta description important for SEO?A meta description is essential for SEO because it helps search engines understand the content of your page and encourages users to click on your link in search results, thereby increasing your site's visibility and click-through rate.Can I use the same meta description for all pages on my website?The meta description of each page should be written specifically for that page and accurately describe its content. It's not good for visitors or search engines if you utilize the same description for many pages.How can I find the right keywords for my meta description?Conduct keyword research to identify relevant keywords related to your content. Google's Keyword Planner is a great Free tool for finding relevant and popular search terms.What happens if I don't add a meta description to my home page?If you don't provide a meta description for your website, search engines will likely construct one for you, and it may not do a good job of conveying what the page is about. By writing your meta description, you can influence how your site is presented in SERPs.Should I hire an SEO expert to optimize my meta descriptions?While hiring an SEO expert can be beneficial for overall SEO strategy, adding meta descriptions is a task you can easily handle yourself, especially with user-friendly tools like the Yoast SEO plugin for WordPress. Read the full article
0 notes
Video
youtube
How To Find Wp Password & Username From Cpanel | Reset or Change WordPress Password https://www.youtube.com/watch?v=YS1ykWaSEUE #wppassword #cpanel #wordpress #learnwordpress #howto1minute #cpaneltutorial
0 notes
Text
A Beginner's Guide: How to Create a Website on WordPress

Learn how to create a website on WordPress - the versatile and user-friendly platform for creating stunning online sites. Here Are the Following on how to create a website on WordPress: Step 1: Define Your Website's Purpose and GoalsBefore diving in, it's crucial to understand why you're creating a website. Is it a personal blog, an online portfolio, an e-commerce store, or something else? Clearly define your website's purpose and set achievable goals. Step 2: Choose a Domain Name and Hosting Your domain name is your website's address (e.g., www.yourwebsite.com). Select a domain name that reflects your brand or website's topic. Then, choose a reliable web hosting provider. Popular options include Bluehost, SiteGround, and HostGator. Many of them offer easy WordPress installation. Step 3: Install WordPress Most hosting providers offer a one-click WordPress installation. Log in to your hosting account, find the WordPress installer, and follow the on-screen instructions. You'll set up your admin username and password during this process. Step 4: Select a WordPress Theme WordPress offers a wide range of free and premium themes. Choose a theme that suits your website's style and objectives. You can customize it later to align with your branding. Step 5: Configure Essential Settings After installing WordPress, head to the dashboard. Here, you can configure important settings like site title, tagline, time zone, and permalink structure (URL format). Step 6: Install Essential Plugins Plugins enhance your website's functionality. Start with essential plugins like: - Yoast SEO: Helps with search engine optimization (SEO). - Akismet Anti-Spam: Protects your site from spam comments. - W3 Total Cache: Improves site speed and performance. - UpdraftPlus: Backs up your website regularly. Step 7: Create Key Pages Begin with fundamental pages: - Homepage: The front page of your website. - About Us: Tell visitors about your brand or yourself. - Contact Us: Provide contact information. - Blog: If you plan to blog, create this page. Step 8: Add Content Start adding content to your pages and blog posts. Use the WordPress editor, which is similar to a word processor, to format text, add images, and embed media. Step 9: Customize Your Website Use the WordPress Customizer to personalize your site's appearance. You can change colors, fonts, and other design elements. If your theme supports it, create a custom logo. Step 10: Optimize for SEO Optimize your content for search engines using the Yoast SEO plugin. Focus on keyword research, meta descriptions, and internal linking. Step 11: Set Up Analytics and Monitoring Connect your website to Google Analytics to track visitor data. Consider installing a security plugin like Wordfence to protect against threats. Step 12: Regularly Update and Back Up Your Website Keep your WordPress core, themes, and plugins up to date to ensure security and functionality. Regularly back up your website to prevent data loss. Step 13: Launch Your Website Once you're satisfied with your website's content and design, it's time to go live! Inform your audience through social media, email, or other communication channels. Step 14: Promote Your Website After launching, promote your website to attract visitors. Share your content on social media, engage with your audience, and consider other marketing strategies like email marketing and SEO. Creating a website on WordPress may seem daunting at first, but with these steps, you can build a professional and engaging online presence. Remember that practice makes perfect, and as you become more familiar with WordPress, you can explore advanced features to further enhance your site. Good luck on your web development journey! Read the full article
0 notes
Text
Find the step-by-step guide to easily find your WordPress admin username and password from cPanel. Let’s get started & retrieve it!
#how to find wordpress username and password in cpanel#how to check wordpress username and password from cpanel#how to find wordpress admin username and password from cpanel#how to get wordpress username and password from cpanel#how to find database username and password in phpmyadmin cpanel
0 notes
Text
How to Permanently Delete Your WordPress Account: A Complete Guide

If you're thinking about permanently deleting your WordPress account, you're in the right place. Whether it's for privacy reasons or because you're moving to a new platform, we'll guide you through the steps. To get a quick overview, check out how to delete your WordPress account in 5 minutes. Now, let's explore the detailed process to ensure your account is thoroughly removed.
Why Consider Deleting Your WordPress Account?
Before proceeding, it's essential to understand the reasons why you might want to delete your WordPress account:
Switching to another platform: Sometimes a different platform offers features that better meet your needs.
Privacy concerns: Deleting your account can help secure your personal information.
Streamlining your digital presence: Reducing the number of online accounts can simplify your online life.
Preparing for Account Deletion
Before you delete your WordPress account, make sure you:
Backup Your Data: Export your posts, pages, and media to avoid losing valuable content.
Inform Your Followers: Let your readers know about your plans to delete the account.
Cancel Any Subscriptions: Ensure any recurring payments linked to your account are stopped.
Steps to Permanently Delete Your WordPress Account
1. Log In to Your WordPress Account
Begin by logging into your WordPress account with your username and password.
2. Export Your Content
Go to the Tools section in the dashboard and click on "Export." Choose the option to download all content, which will create an XML file with your posts, pages, and media.
3. Delete Your Site
Navigate to My Site: Click on "My Site" in your dashboard.
Go to Settings: Scroll down and find the Settings menu.
Select Delete Your Site Permanently: At the bottom of the Settings page, find and click on the option to delete your site permanently.
4. Confirm Deletion
You will be prompted to enter your site name for confirmation. Once confirmed, your site will be permanently deleted.
For a quicker guide, refer to our article on how to delete your WordPress account in 5 minutes. It provides a concise and straightforward process to follow.
Important Considerations
Permanent Action: Once you delete your WordPress account, it cannot be undone.
Content Loss: Ensure all important content is backed up, as it will be lost permanently.
Third-Party Services: Check for any third-party services linked to your account and update or remove them as necessary.
Conclusion
Deleting your WordPress account can be a big step, but following these instructions can make it a smooth process. Always backup your data and communicate with your audience before finalizing your decision. For more details, be sure to read our guide on how to delete your WordPress account in 5 minutes. This ensures you have all the necessary information for a swift and efficient deletion process.
0 notes
Text
youtube
Welcome to our channel! In this video, we will show you how to upload a WordPress theme from cPanel. So, let's get started!
Step 1: Log in to your cPanel account. You can do this by going to your website's URL followed by "/cPanel". Enter your username and password, then click on the "Log In" button.
Step 2: Once you're logged in, scroll down to the "Files" section and click on the "File Manager" option. Make sure you select the "Web Root " option and click on "Go".
Step 3: Now, locate your WordPress installation folder. It is usually inside the "public_html" or "www" directory. Open that folder.
Step 4: Within the WordPress folder, locate the "wp-content" folder and open it. Inside, you will find a folder named "themes". Open it.
Step 5: Now, it's time to upload your theme. Click on the "Upload" button in the top menu.
Step 6: Choose your theme file from your computer and click on the "Open" button to start the upload. Once the upload is complete, you will see the theme file in your "themes" folder.
Step 7: Congratulations! You have successfully uploaded your WordPress theme from cPanel. Now, you can go to your WordPress dashboard and activate the theme.
Remember, if you encounter any issues during the upload process, feel free to reach out to your hosting provider for assistance. Thank you for watching this tutorial, and don't forget to subscribe to our channel for more helpful tips and tricks!
#Wordpress#cPanel#Tutorial#StepByStepGuide#WebDevelopment#WordpressTheme#WebsiteBuilding#WordpressTutorial#WebsiteCreation#WebDesign#WebHosting#WordpressThemes#CPanelTutorial#WordpressPlugins#Coding#WebsiteManagement#WebsiteDesign#Bloggers#ContentCreators#DigitalMarketing#Youtube
1 note
·
View note
Text
Use Laravel’s Illuminate Database Query Builder With WordPress
I’ve been working on Smolblog, a social web blogging app. To help me get to a minimally viable product sooner, I’ve been building it on top of WordPress. However, WordPress is built exclusively for the MySQL database, and I eventually want Smolblog to work with many different databases, especially SQLite. This means, for my own code, I need to abstract the database away.
The first pass I had at this was to simply have Query objects and services to handle those. This would effectively abstract away the entire data layer, making it completely system-agnostic. It wouldn’t even need to be a traditional database. But as I built this system out, I was making more and more assumptions about what the database and data code would look like. And while the database code was all abstracted away, I still had to write it. A lot of it. And every line I wrote using $wpdb was another line I’d have to rewrite someday.
I’ve been looking at other frameworks to use, and Laravel is by far the strongest contender. Their approach to dependency injection and services seems to line up well with how I’ve organically built Smolblog to this point. So when I found out that their database abstraction layer also included a way to use the library without taking on the entire Laravel framework, I decided to make “someday” today.
Prerequisites
Composer: While you can use this library without using Composer, it’s very much not recommended. That being said, if you’re using this in a plugin for general use or otherwise don’t have control over your entire WordPress environment, be sure to use Mozart or some other tool to isolate the namespaces of your dependencies.
Populated database constants: Some of the more modern WordPress setups use a connection string or other way to connect to MySQL. I didn’t find a way to get that information out of the $wpdb constant, so this code relies on having DB_HOST and other constants from wp-config.php defined.
PDO::MySQL: Illuminate DB uses PDO to handle databases, so you’ll need to make sure your PHP server has the PDO::MySQL extension installed. I’m using the official PHP image, so I needed to add these two lines to my Dockerfile:
RUN docker-php-ext-install pdo_mysql RUN docker-php-ext-enable pdo_mysql
Step 1: Dependency Injection
We’re going to use dependency injection to separate creating the database connection from using the database connection. This way the database connection can change without as much code changing.
The documentation for Laravel’s query builder involves calling their DB facade, a global class that calls a singleton instance. Digging through the documentation and code, it looks like the underlying class conforms to the Illuminate\Database\ConnectionInterface interface. So that’s what we’ll use in our service’s constructor:
use Illuminate\Database\ConnectionInterface; class ContentEventStream implements Listener { public function __construct( private ConnectionInterface $db, ) { } }
Inside the service, we’ll follow the documentation, replacing any use of the DB facade with our $db object:
$this->db->table('content_events')->insert(['column' => 'value']);
Step 2: Connection Factory
Now that we know what we need, we need to create it.
The README for the Illuminate Database package has good starting instructions. We’ll combine those with data from wp-config.php and $wpdb:
use Illuminate\Database\Capsule\Manager; use Illuminate\Database\ConnectionInterface; function getLaravelConnection(): ConnectionInterface { global $wpdb; $capsule = new Manager(); $capsule->addConnection( [ 'driver' => 'mysql', 'host' => DB_HOST, 'database' => DB_NAME, 'username' => DB_USER, 'password' => DB_PASSWORD, 'charset' => DB_CHARSET, 'prefix' => $wpdb->prefix, ] ); return $capsule->getConnection(); }
(As mentioned, we’re pulling the connection information straight from configuration. If you know how to get it from $wpdb, let me know!)
The prefix property on the connection works much the same way as WordPress' table prefix. Since we’re using the connection object to also build our queries, it will add the prefix to our queries automatically. Using this property will also use the correct tables for blogs in multisite, so data from one blog doesn’t leak into another.
For Smolblog, I only want one set of tables regardless of multisite. I also want to prefix the Smolblog-specific tables, mostly so they’re all in one place when I’m scrolling. So my prefix property looks like this:
$capsule->addConnection( [ // ... 'prefix' => $wpdb->base_prefix . 'sb_', ] );
Because I don’t want a global object or the Eloquent ORM, I can ignore the rest of the setup from the project README.
Finally, we’ll want to store this created object somewhere central. Smolblog uses a simple dependency injection container, so we’ll store it there. The first time a service that needs a database connection is created, the container will run this function and provide the object.
(Honestly, the container probably deserves a blog post of its own; you can look at the source code in the meantime.)
Step 3: Update the Schema
We have our code to build queries. We have our connection to the database. The only thing we need now is the actual tables for the database.
Here is where we can use WordPress to its full extent. We will be using the dbDelta function in particular. This will tie into WordPress' existing system for updating the database structure alongside WordPress itself.
Some plugins tie this migration code to an activation hook, but we want to be able to modify the tables even after the plugin is activated. So our process will look like this:
Loop through the different tables we will need.
Check the blog options for a schema version.
If the version matches what we have in code, we’re up-to-date. Skip to the next table.
Pass the new table schema to dbDelta and let it do its thing.
Save the schema version to blog options.
Rinse and repeat for each table.
At this point, I should bring up some of the caveats with the dbDelta function. The comments on the WordPress documentation are invaluable here, especially as they point out a few things that need to be consistent with our schemas.
Because there’s so many things that need to be consistent, we’ll isolate the unique parts of our table schemas to two things:
A name. Because every table needs one. We will declare it without the prefix.
The fields excluding the primary key. We can have UNIQUE indexes on other fields for a similar effect, but every table will have an auto-incrementing id field.
A series of values keyed to short strings? That sounds like an array! Here’s part of what Smolblog’s schema array looks like:
class DatabaseHelper { public const SCHEMA = [ 'content_events' => <<<EOF event_uuid varchar(40) NOT NULL UNIQUE, event_time varchar(30) NOT NULL, content_uuid varchar(40) NOT NULL, site_uuid varchar(40) NOT NULL, user_uuid varchar(40) NOT NULL, event_type varchar(255) NOT NULL, payload text, EOF, 'notes' => <<<EOF content_uuid varchar(40) NOT NULL UNIQUE, markdown text NOT NULL, html text, EOF, ]; public static function update_schema(): void { foreach ( self::SCHEMA as $table => $fields ) { self::table_delta( $table, $fields ); } } //... }
A brief aside: Smolblog uses UUIDs for its unique identifiers, and they’re stored here as full strings in fields ending with _uuid. I ran into trouble storing them as bytes, and something in WordPress would frequently mess with my queries when I had fields named things like user_id and site_id. I’m noting this here in case you run into the same things I did.
When WordPress loads the plugin, it will call the update_schema function declared here. That function loops through the array, extracts the table name and fields, and passes them to this function:
public static function table_delta( string $table, string $fields ): void { global $wpdb; $table_name = $wpdb->base_prefix . 'sb_' . $table; $charset_collate = $wpdb->get_charset_collate(); $sql = "CREATE TABLE $table_name ( id bigint(20) NOT NULL AUTO_INCREMENT, $fields PRIMARY KEY (id) ) $charset_collate;"; if ( md5( $sql ) === get_option( $table . '_schemaver', '' ) ) { return; } require_once ABSPATH . 'wp-admin/includes/upgrade.php'; dbDelta( $sql ); update_option( $table . '_schemaver', md5( $sql ) ); }
This function takes care of the boilerplate we talked about earlier and runs the steps:
It creates the table name using the same pattern as before: the base prefix plus sb_.
It creates a CREATE TABLE SQL statement using the table name and fields. (It’s okay to build a SQL query this way because all of the data is coming from constants inside the PHP file; none of it is coming from form data or other untrusted sources.)
It takes the MD5 hash of the SQL statement and compares that to the saved option for this table. The hash will change when the code changes, so this is a quick way to keep our code and database in-sync.
If the database needs to be updated, it requires the correct file from WordPress Core and runs the dbDelta function.
Finally, it saves the MD5 hash to the blog options so we know what version the database is on.
By calculating the version using the hash of the actual SQL, we don’t have to worry about whether some other version number has been updated. This may or may not be the approach you want to take in a production application, but it has proven very useful in development. This is the same idea as using the filemtime function as the “version number” of static CSS and JavaScript in your theme.
So there we have it. We’ve used the connection information in WordPress to hook up a Laravel database connection. And at some point in the future, it’ll be that much easier to let Smolblog work with SQLite which will in turn let Smolblog work on even more web hosts. And you can use this to do whatever you want! Maybe you just wanted to transfer some skills from Laravel to WordPress. Maybe you’re just in it for the academic challenge.
One thing you can do with this is unit-test your services using an in-memory SQLite database… and I’ll leave you with that.
final class DatabaseServiceUnitTest extends \PHPUnit\Framework\TestCase { private \Illuminate\Database\Connection $db; private DatabaseService $subject; protected function setUp(): void { $manager = new \Illuminate\Database\Capsule\Manager(); $manager->addConnection([ 'driver' => 'sqlite', 'database' => ':memory:', 'prefix' => '', ]); $manager->getConnection()->getSchemaBuilder()->create( 'content_events', function(\Illuminate\Database\Schema\Blueprint $table) { $table->uuid('event_uuid')->primary(); $table->dateTimeTz('event_time'); $table->text('payload'); } ); $this->db = $manager->getConnection(); $this->subject = new DatabaseService(db: $this->db); } public function testItPersistsAContentEvent() { $event = new class() extends ContentEvent { public function __construct() { parent::__construct( id: Identifier::fromString('8289a96d-e8c7-4c6a-8d6e-143436c59ec2'), timestamp: new \DateTimeImmutable('2022-02-22 02:02:02+00:00'), ); } public function getPayload(): array { return ['one' => 'two', 'three' => 'four']; } }; $this->subject->onContentEvent($event); $expected = [ 'event_uuid' => '8289a96d-e8c7-4c6a-8d6e-143436c59ec2', 'event_time' => '2022-02-22T02:02:02.000+00:00', 'payload' => '{"one":"two","three":"four"}', ]; $this->assertEquals((object)$expected, $table->first()); $this->assertEquals(1, $table->count()); } }
1 note
·
View note
Text
How to Add Admin User to the WordPress Database with phpMyadmin
Adding an Admin User to the WordPress Database With phpMyAdmin becomes necessary when a hacker has locked your website, you have lost access to the WordPress admin panel, or you have forgotten credentials. Here we use the HostBet Shared Hosting cPanel account screenshot.
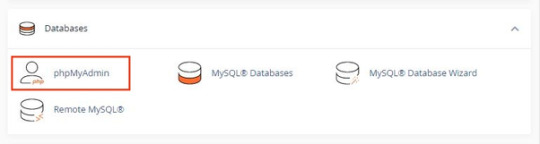
Step 1: Open the cPanel account Dashboard
Step 2: Navigate to phpMyAdmin in the Databases section.
Step 3: Click on phpMyAdmin.
Step 4: Once you’re on the phpMyAdmin dashboard, you need to select your WordPress database.
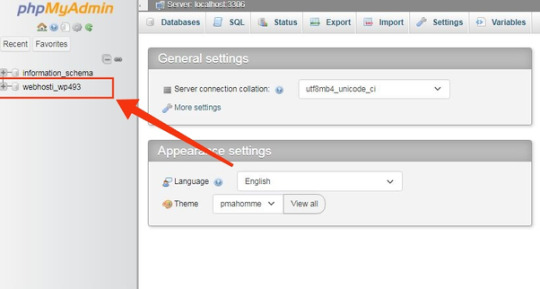
This will open the WordPress database. You will be making changes to the wp_users and wp_usermeta tables.

First, add a user to the wp_users table.
Step 5: First, you need to navigate the wp_users table and click on it. This will open the users currently listed in the table.

Please note that there is one user ID in our demo website table 1. You need to add a new user using a new unique ID, so we’ll use the 2 numbers.

Step 6: To create a new user, you need to click on the “Insert” tab.

Step 7: Add the following information to the fields on the Insert form:

ID: pick a unique number (in our example, we’ll use 2)
user_login: the username that will be used for login
user_pass: add a strong password, and make sure to select MD5 in the function from the drop-down menu (see the screenshot below)
user_nicename: the user’s full name or nickname ( you can write according to yourself)
user_email: the user’s email address
user_url: your website address
user_registered: select the date and time the user was registered using the calendar
user_activation_key: leave blank
user_status: set this to 0
display_name: the user’s full name or display name
Step 8: Once you have finished, click on the ‘Go’ button to add the new user.
Next adding a user to the wp_usermeta table.
Step 1: To add a new user, you need to navigate to wp_usermeta, click on it, and then click on the “insert” tab (same as the previous steps).
Step 2: Next, you need to add the following information to the Insert form:

unmeta_id: leave this blank
user_id: the user ID you used in the previous step
meta_key: this should be wp_capabilities
meta_value: insert this: a:1:{s:13:”administrator”;s:1:”1″;}
Step 3: After that, you need to find fields for the second row.

unmeta_id: leave this blank
user_id: the user ID you used in the previous steps
meta_key: you need to enter wp_user_level
meta_value: 10
Step 4: Once you finished typing the information into the fields, click the ‘Go’ button. that’s it. You Have successfully added new users.
0 notes
Text
How to host the Website in Amazon Cloud
Amazon Cloud Services
Few years ago, it was very crucial to invest upon maintenance and upgrade of the hardware resources for a technology-dependent growing organization. However, this no more happens now; all thanks to the advancements in cloud computing platforms and services. These days, almost all types of organizations, in one way or another, rely on Amazon Web Services Cloud Computing Solutions in order to enhance their efficiency and profitability.
Why AWS web hosting Services?
Amazon Web Hosting Services cater to wide-ranging operating needs including data storage, networking, administration and security, computing, analytics, application services, deployment, management, and more. Whether you are a hot startup or an established enterprise, you can take advantage of Amazon Cloud Services to ensure an efficient, cost-effective, and scalable solution for your IT needs.
Amazon Web Services – Where does it stand today?
Since its inception, Amazon Web Services have managed to successfully render the sustainable solutions for millions of customers across the globe. The increasing demand for AWS in 190 countries makes it needless to elaborate the value promised to the customers. Started with its own certification program in 2013, AWS was also presented with an Agency Authority to Operate (ATO) from the U.S. Department of Health and Human Services the same year. Today, it proudly boasts the name of its customers – NASA, Obama Campaign, Kempinski Hotels, Netflix, Infor, CIA, and more.
Benefits of Amazon cloud computing services
What is web hosting?
Hosting your business website on an internal server can be n an internal server can be time-consuming and expensive. Web hosting providers offer the following benefits.
Performance
A web hosting company that manages hardware resources for multiple websites has greater purchasing power. It invests in cutting-edge technology so that you get high-performing web servers with processing power, internal memory, and other computing resources. This improves website performance, and your visitors can load pages quickly.
How to host the Website in Amazon Cloud
Hosting a website on AWS is very easy. I hope you want to host a simple website. If you want to host a complex site then the process will be entirely different. Follow the steps to host your website.
Step 1: Create an AWS account if you don’t have one.
Step 2: Log in to your AWS Console, and search for Lightsail.
Step 3: Choose the config according to your need. (Ram, CPU, Storage)
Step 4: Select WordPress as your CMS.
Step 5: Follow the instructions and launch your instance.
Note: Wait for 5 minutes, it takes time to allocate resources and install CMS)
Step 6: Once your instance is ready, go to static IP, create one and connect it to your WordPress instance.
Step 7: Now you have static IP, you can enter your IP address in the browser and add /wp-admin. (For example; 89.986.34.3/wp-admin)
Step 8: This will redirect you to your WordPress login page. Now you will need to enter your username and password. The username is by default user and we need to find out the password.
Step 9: Open SSH, copy and paste this command carefully.
cat bitnami_application_password
Step 10: Now the password is revealed, copy the password and paste it into a notepad and save it.
Step 11: Close the SSH Client window, go back to your WordPress login page, and enter
username: user and paste the password.
0 notes