#how to find wordpress username and password in cpanel
Explore tagged Tumblr posts
Visit Tumblr Blog
Explore Tumblr blogs with no restrictions, modern design and the best experience.
Last Seen Tumblr Blogs


Fun Fact
Women make up for the other 50% of Tumblr’s audience.
Text
Find the step-by-step guide to easily find your WordPress admin username and password from cPanel. Let’s get started & retrieve it!
#how to find wordpress username and password in cpanel#how to get wordpress username and password from cpanel#how to check wordpress username and password from cpanel#how to change wordpress username and password from cpanel
0 notes
Video
youtube
How To Find WordPress Username and Password in cPanel 🔥 - Reset or Chang...
1 note
·
View note
Video
youtube
How To Find Wp Password & Username From Cpanel | Reset or Change WordPress Password https://www.youtube.com/watch?v=YS1ykWaSEUE #wppassword #cpanel #wordpress #learnwordpress #howto1minute #cpaneltutorial
0 notes
Text
youtube
Welcome to our channel! In this video, we will show you how to upload a WordPress theme from cPanel. So, let's get started!
Step 1: Log in to your cPanel account. You can do this by going to your website's URL followed by "/cPanel". Enter your username and password, then click on the "Log In" button.
Step 2: Once you're logged in, scroll down to the "Files" section and click on the "File Manager" option. Make sure you select the "Web Root " option and click on "Go".
Step 3: Now, locate your WordPress installation folder. It is usually inside the "public_html" or "www" directory. Open that folder.
Step 4: Within the WordPress folder, locate the "wp-content" folder and open it. Inside, you will find a folder named "themes". Open it.
Step 5: Now, it's time to upload your theme. Click on the "Upload" button in the top menu.
Step 6: Choose your theme file from your computer and click on the "Open" button to start the upload. Once the upload is complete, you will see the theme file in your "themes" folder.
Step 7: Congratulations! You have successfully uploaded your WordPress theme from cPanel. Now, you can go to your WordPress dashboard and activate the theme.
Remember, if you encounter any issues during the upload process, feel free to reach out to your hosting provider for assistance. Thank you for watching this tutorial, and don't forget to subscribe to our channel for more helpful tips and tricks!
#Wordpress#cPanel#Tutorial#StepByStepGuide#WebDevelopment#WordpressTheme#WebsiteBuilding#WordpressTutorial#WebsiteCreation#WebDesign#WebHosting#WordpressThemes#CPanelTutorial#WordpressPlugins#Coding#WebsiteManagement#WebsiteDesign#Bloggers#ContentCreators#DigitalMarketing#Youtube
1 note
·
View note
Text
How to Add Admin User to the WordPress Database with phpMyadmin
Adding an Admin User to the WordPress Database With phpMyAdmin becomes necessary when a hacker has locked your website, you have lost access to the WordPress admin panel, or you have forgotten credentials. Here we use the HostBet Shared Hosting cPanel account screenshot.
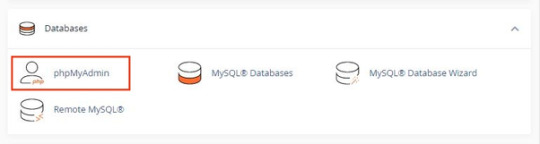
Step 1: Open the cPanel account Dashboard
Step 2: Navigate to phpMyAdmin in the Databases section.
Step 3: Click on phpMyAdmin.
Step 4: Once you’re on the phpMyAdmin dashboard, you need to select your WordPress database.
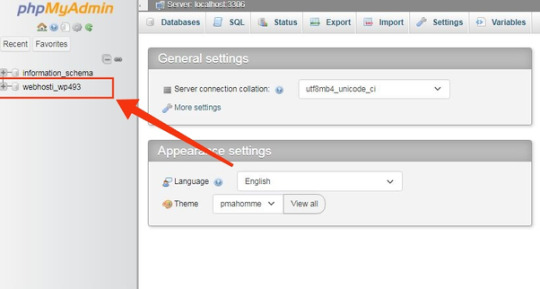
This will open the WordPress database. You will be making changes to the wp_users and wp_usermeta tables.

First, add a user to the wp_users table.
Step 5: First, you need to navigate the wp_users table and click on it. This will open the users currently listed in the table.

Please note that there is one user ID in our demo website table 1. You need to add a new user using a new unique ID, so we’ll use the 2 numbers.

Step 6: To create a new user, you need to click on the “Insert” tab.

Step 7: Add the following information to the fields on the Insert form:

ID: pick a unique number (in our example, we’ll use 2)
user_login: the username that will be used for login
user_pass: add a strong password, and make sure to select MD5 in the function from the drop-down menu (see the screenshot below)
user_nicename: the user’s full name or nickname ( you can write according to yourself)
user_email: the user’s email address
user_url: your website address
user_registered: select the date and time the user was registered using the calendar
user_activation_key: leave blank
user_status: set this to 0
display_name: the user’s full name or display name
Step 8: Once you have finished, click on the ‘Go’ button to add the new user.
Next adding a user to the wp_usermeta table.
Step 1: To add a new user, you need to navigate to wp_usermeta, click on it, and then click on the “insert” tab (same as the previous steps).
Step 2: Next, you need to add the following information to the Insert form:

unmeta_id: leave this blank
user_id: the user ID you used in the previous step
meta_key: this should be wp_capabilities
meta_value: insert this: a:1:{s:13:”administrator”;s:1:”1″;}
Step 3: After that, you need to find fields for the second row.

unmeta_id: leave this blank
user_id: the user ID you used in the previous steps
meta_key: you need to enter wp_user_level
meta_value: 10
Step 4: Once you finished typing the information into the fields, click the ‘Go’ button. that’s it. You Have successfully added new users.
0 notes
Text
How to Change Your WordPress Password [ A Guide ]
How to Change Your WordPress Password [ A Guide ]
It is very much common for WordPress users to ask how to change their password. If for any reason you are one of these WordPress users, you are very much welcome. In this article, you’ll get a complete and comprehensive guide on How to Change Your WordPress Password. However, before going further, it is important to highlight some important points just so you can understand this guide. First, you…

View On WordPress
#how to change local wordpress password#how to change wordpress admin password#how to change wordpress password in cpanel#how to find wordpress username and password#how to get wordpress username and password from database#wordpress reset admin password#wordpress reset password function
0 notes
Text
How to install wordpress – Complete wordpress tutorial

2 Things You Need Before Installing WordPress Before you installing WordPress, first you will need a domain name and second a good web hosting company. Most web hosting company provides shared space on a web server for less than $8-$10/monthly. Also many hosting company will install and maintain wordpress for you. Today, we highly recommend that you use BlueHost. Because they will give you a free domain as you like. And their hosting plan price start only $3.95/monthly. You will be happy and feel secure to hear that BlueHost is also an official recommended hosting company of wordress.

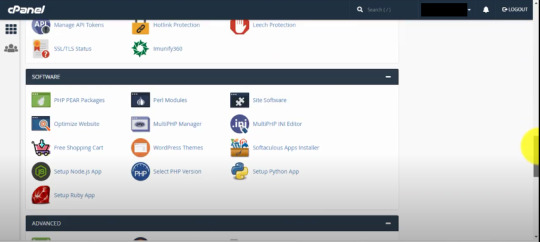
How to Install WordPress using Softaculous Softaculous is a most popular auto-installer script. Just a few clicks, you can easily install wordpress. The most popular BlueHost company use Softaculous in their control panel. Now just login to control panel account and look for WordPress icon (see below the image). You will get them under Softaculous apps installer section.

After clicking on wordpress icon you will see an overview of wordpress as like below the image. Now you need to click on the Install tab to continue the install process.

As protocol, you need to choose http:// or http://www. And if your site has SSL and HTTPS, then as protocol you have to select https:// or https://www. After that, you need to choose the domain name where you want to install WordPress. Most users want to install WordPress in their domain’s root directory, like example.com. In that case, you need to make sure that the ‘In Directory’ field is blank. (You will see ‘wp’ in directory filed as default)

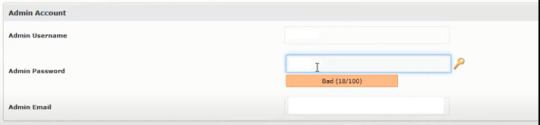
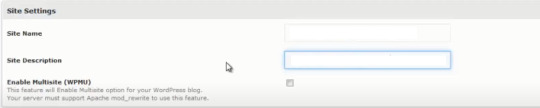
Then down a little, you will see the site settings section. Under this section, first you need to fill a title and description of your site. If you don’t want yet, don’t worry you can easily change them from your wordpress admin area after installation. Next, you need to choose an admin username, strong password, and email address. Softaculous will automatically fill in the username and password fields for you. It will use a non-dictionary word for username and a strong password.

You can change them if you want so that they are easy to remember for you. However, we strongly suggest you to always use a strong password. Always you will use correct email address in the admin email field. Because wordpress will send notifications and password reset link if you ever forgot your password. Rest of the options are optional. So you can now click on the install button to run the installer.

Softaculous will run the installer using the settings you provided. You will see a progress bar with installation status. It will take a couple of minutes, do not close the window until the progress bar reaches 100% otherwise this may affect your wordpress installation. You will see a success message after the installation is finished. It will also show you a link to your website and another link to your wordpress admin area.

How to Install WordPress using FTP Just the five steps to install wordpress. Download the latest version of WordPress.Upload those files to your web server, using FTP or cpanel file manager.Create a MySQL database and user for WordPress.Configure WordPress to connect to the database that you created for you wp site.Complete the installation and setup your website! First thing you need to do is download the latest version of WordPress. Unzip the file, and use FTP to upload WordPress files into your web host directory of your choice.

If you want to install WordPress on your root domain name (like example.com), then you need to upload WordPress files to your website’s root directory. Usually this directory is called /public_html/. On the other hand, If you want to install WordPress in a subfolder (like example.com/myblog), then upload it in a folder /public_html/myblog/. Once you are done uploading WordPress, go to your hosting control panel to create a database. We are using cPanel web hosting, so you will find icon as like below screenshot.

You will see a field to create a new database. Enter your database name, and click “Create Database”.

Now that you have created your database, MySQL still needs a username MySQL Databases page in your cPanel account, down a little MySQL Users section. Simply provide a username and password for your new user and click on the ‘Create user’ button.

This new user still does not have access to the database you created earlier. For that you will need to add the user to the database and give them permissions to perform all actions. On the same MySQL Databases page in your cPanel account, down a little ‘Add User to a Database’ section. Select the database user you created from the dropdown menu next to user, then select database, and click on the add button.

You will be now asked for the privileges you want to allow this user. Select all privileges and click on the Make changes button.

Your MySQL database and user are now ready, and it is time to run the install. Now go to to the URL where you uploaded WordPress. If it is in the main domain, then enter your domain name in the browser window, like example.com or www. example.com. You will see the language selection page. You can choose a language and click on the continue button to procced.

You will now see some installation instructions. Wordpress will need database name, password, and mysql host information. Click on the ‘Let’s go’ button to continue.

Now wordpress will show you a database connection form. You need to enter the database name, user name, password and database host.

Then click on submit button.

Next you will see ‘Run the install’ page. So you have to click on ‘Run the Install’ button to continue. Now wordpress will create tables in your database and then send you to the next step of the installation. Then you need to fill some information for wordpress to setup your site. This includes site title, username, password, and admin email address. If you do not want your website to be visible to search engines, then you can check the box next to search engine visibility

Click on the Install wordpress button to continue. Wordpress will setup your website and finish the installation. You will see a success message showing your username. You can now click on the Log in button to sign in to your wordpress site.

Read the full article
1 note
·
View note
Text
How to Download WordPress Website From cPanel
How to Download WordPress Website From cPanel The process of downloading a WordPress website can be difficult, but it's not impossible. If you're using a hosting account, you can do it through your cPanel. First, you must create a database for WordPress. This is where WordPress will store its content and settings. cPanel If you use a cPanel hosting account, you'll be able to download WordPress files from your account by using the cPanel file manager. First, you'll need to create a database for your WordPress website. This is where WordPress stores its data. To create a backup, sign in to your cPanel account and navigate to the File Manager. Choose the directory in which you wish to download your website files. In most cases, this will be the public_html directory of your site. Double-click this directory and you'll be able to find the files you need. QuickInstall To install WordPress, cPanel users need to sign into their cPanel accounts. From there, they need to click on QuickInstall. The QuickInstall application is a custom script manager that is available for many other software packages as well, including WordPress. Once you have installed QuickInstall, you can manage your installation using the Manage Installations feature. You can also delete the installation by clicking on the "Remove" link. To install WordPress using the QuickInstall tool, you must be able to access your web host's FTP account and have shell access. Next, you must move the directory containing WordPress to the desired location in the root directory. Once you have done this, launch your web browser and begin the installation process. Softaculous Once you have your hosting account, you can download a WordPress website using Softaculous. This software will create a subdirectory in your document root for the installation of WordPress. It will prompt you to enter a username and password, and will also provide the URLs to the domain and the login page. Once the installation is complete, you can log in to your website to view it and post new blog posts. To download a WordPress website from Softaculous, go to cPanel and select Softaculous. The auto installer will search the Softaculous database for WordPress platforms. You can find WordPress under the Blogs category, as well as in the popular applications slider. Once you find WordPress, click Install Now to get started. Exporting WordPress site content There are several ways to export your WordPress site content from your cPanel account. First, you can choose to export all the content or selected areas. The process can take a few minutes, depending on how large your website is. Once the export is finished, you can download the exported files directly from the server. You can also export just the posts and pages on your site. The files you export can be large so take your time and be patient. After choosing the posts and pages you want to export, you can choose the format and export them. Using phpMyAdmin First of all, you should be able to find phpMyAdmin in your cPanel account. You can use this application to export your website's database. You can export the whole database, or just specific tables, if you want. The export process will take a few minutes, depending on the size of your website. Once the export is complete, you can download the files directly by clicking on them. To begin the download, you must first log into your cPanel account. Once you have done that, navigate to the File Manager and select the Public_HTML directory. Double-click on the folder to locate the files of your website. Installing WordPress on a local computer If you want to build a site, you might want to learn how to install WordPress on a local computer. This popular content management system lets you create a website quickly and easily. Once it is installed, you can customize its appearance, add content, and more. To install WordPress on a local computer, go to your webhost's cPanel. Look for the WordPress icon under Sites. Choose Install Now and provide a domain name. The installation page should look similar, regardless of which auto-installer you use. Just make sure to change the default protocol from http to https. How to Download WordPress Website From cPanel Read the full article
0 notes
Text
Find the step-by-step guide to easily find your WordPress admin username and password from cPanel. Let’s get started & retrieve it!
#how to find wordpress username and password in cpanel#how to check wordpress username and password from cpanel#how to find wordpress admin username and password from cpanel#how to get wordpress username and password from cpanel#how to find database username and password in phpmyadmin cpanel
0 notes
Text
Website Maintenance: Mistakes Every Website Owner Should Avoid
Stay Away From These Common Website Maintenance Mistakes
Website maintenance is an essential step in the upkeep of any website. Without proper maintenance, websites can become susceptible to many issues that will cost you time and money to repair. That’s why many website owners choose to have a regular website maintenance service to help keep them on top of the latest website problems with their web design tools.
It's essential for SEO purposes and general functionality to ensure your website runs correctly on all web browsers, platforms, and devices. Several things should be checked regularly to ensure your website is always running smoothly.
Below are some of the most common mistakes website owners make when it comes to their website maintenance.
Running Unnecessary Plugins
Plugins are beautiful tools that extend the functionality of a website by giving you easy access to advanced features. But too many plugins can lead to performance issues, conflicts, and loading times. It's crucial to not only know what each plugin does but also what its purpose is.
No matter how helpful a plugin may seem, if it's running on every page, you're going to experience some severe performance issues. Ensure that the plugins installed on your site are necessary and remove any that aren't being used or whose functionality can be replaced by another plugin.
Running Outdated Themes
Outdated themes are another critical issue that needs to be addressed for website maintenance. Just like any program, themes continue to evolve and become more efficient as time goes on. When you're using an outdated theme, your site will run slower than it should, which can cause all kinds of issues for your visitors, including high bounce rates.
Using The Wrong Web Hosting Provider
Your host provider is an essential piece to website maintenance because it's where your site gets its bandwidth and connectivity to the internet. With so many web hosting providers out there, it can be hard to determine which one is right for you, but it's essential to consider that each offers different features.
As you're looking for the best hosting provider, look at things like server speed, uptime, control panel support, available space and bandwidth, cPanel or other control panel availability, etc., so you can make sure you've found the right one. Also, note how easy it is to set up your website so you can get it running as soon as possible.
Not Having A Backup Strategy
It would be best if you had a backup strategy if something were to happen with your site. Imagine how hard it would be to recover from a hacked site or losing your entire database of users. You should always have backup copies of your database and website files stored on an external device if anything were to happen.
You should also test your backup files to ensure they work properly.
Not Understanding Basic SEO Practices
SEO is important to website maintenance because it makes sure your site gets the right kind of attention from search engines and users alike. It would be best to take basic steps every week to make sure that your site keeps its place among the top ranks in search engines.
For example, you should be using "keywords" on your site for SEO purposes, ensuring users can find your website when using specific keywords. You should also ensure that all the links throughout your site work properly and emphasize essential pages, not internal links like navigation menus.
Not Using A CMS
A Content Management System (CMS) can be a huge advantage in website maintenance because it allows you to update and edit content, images, etc., on your site efficiently, so you don't have to do everything manually.
It's important to note that WordPress is one of the most widely used CMS's out there, and it's easy to install on your website.
Ignoring Important Security Protocols
It would help if you were taking the necessary precautions when it comes to your website's security. One of the simplest things you can do is install a plugin that prevents brute force attacks on your site so malicious users can't get in and damage it.
As far as other protocols go, you should have an SSL certificate for your site that encrypts all user information and passwords when they're being submitted. It's also important that you verify your website in Google Webmaster Tools to make sure there aren't any issues or errors that could be causing problems for your site.
When securing your site, always use different usernames and passwords for each account you have access to because if one gets hacked, everything else is safe.
Conclusion
Website maintenance can be a daunting task, but it doesn't have to be if you follow these simple guidelines. Make sure you're using the right theme for your site's needs, you back up everything regularly in case anything were to happen, and focus on SEO and security protocols, so your users and search engines keep coming back for more!
Website Maintenance: Mistakes Every Website Owner Should Avoid was first published on
Sharp Tack Media 9009 SE Adams St #1911 Clackamas, OR 97015 (503) 451-6675 https://goo.gl/maps/hkv1FcwAw4U2
0 notes
Link
Accessing the Marketplace Installer and Installing an Application
Logging into the newly installed Application
Troubleshooting Errors
500 Error on Installation
Database Creation Issues
Accessing the Marketplace Installer and Installing an Application
Bluerock
1. Log in to your Bluehost control panel.
2. Click the Marketplace tab from the side navigation menu to the left.

3. Choose Add Website from the drop-down menu.

4. You will be prompted to create a new WordPress site; enter a Site Name and Tagline.

If you click the Advanced button, this will give you an option to add your Email Address, WordPress Admin Username, and Password.
5. Then click the Next button.
6. Choose the domain you would like WordPress installed to in the Domain drop-down.

7. If you would like your WordPress installation to exist in a subdirectory (i.e., example.com/blog), enter your preferred folder in the Directory field.
8.Toggle suggested plugins on/off, then click the Next button. Once the installation is done, you can jump through to Logging into the newly installed Application walkthrough.
Legacy
1. Log in to your Bluehost control panel.
2. Click the addons tab from the navigation menu that stretches across the top of your screen.

3. Click the Marketplace from the sub-menu.

4. Click One-Click Installs from the navigation menu at the top of your screen.

5. Select the application you would like to install. 6. Select Get Started. 7. From the drop-down menu, choose the Domain Name you would like to use for this application. Anything entered in the field following the domain name will be a part of the URL. 8. If desired, enter a Directory. 9. Click on Next. 10. Enter Admin Information
Site Name: This will be the name displayed on your site. This is not the URL but simply the name used on your site.
Admin Email Address: This will be where your login information will be sent.
Admin Username: The desired login name for your application
Admin Password: The desired password for this application
Logging into the newly installed Application
The Marketplace installer will take a couple of minutes to install your application. Once done:
Bluerock
1. Once the installation is done from Marketplace, you have an option to Click Go back to My Sites or Click Login to WordPress to sign in right away to your new WordPress site.

2. If you select Go back to my sites, please check Log in to WordPress through My Sites to learn more.
Legacy
1. Select My Installs from the Website section. 2. Find the domain install and click Login.
Troubleshooting Errors
500 Error on Installation
This usually is a result of something incorrect with the .htaccess file or the PHP Configuration being used.
Rename the .htaccess file. The system will create a blank one for you.
Change the PHP version that is set in the PHP Config on the cPanel. For more information on how-to do that, go to PHP Version Selection.
Database Creation Issues
If you experience issues with the database not being created for a WordPress installation, please see WordPress Installation Without Automatic Database Creation.
GET STARTED
Total Design Freedom
WordPress-based Builder Available
Free Domain Name for 1st Year
Expert 24/7 support
0 notes
Text
How to Create a Blog on WordPress in 10 Minutes? Free Full Guide
In today's time, everyone wants to earn money sitting at home from the Internet. Thousands of people are earning very well from the internet by working at home today. There are many ways to earn money from the internet, the most popular of which is blogging.

How to Create a Blog on WordPress? In today's time, a lot of people are earning very well at home, so to do blogging, we have to create a website or say blog, now to create a professional blog, without coding (Coding) For this, you have to use WordPress, so in today's article, I will tell you How to Create a Blog on WordPress step by step? (How to make Professional WordPress Blog step by step guide) How to Create a Blog on WordPress?. WordPress is a very popular name for creating websites and blogs, without coding, if you do not know the code at all, then you can take support of WordPress, this is software that helps you create a better website. Or you can make money from the internet by becoming a professional blog, so to create a WordPress site, you need to have knowledge of some things like what is a domain name, web hosting ) What happens, etc. So let's know what is needed to build a website and How to Create a Blog on WordPress?? (How to Create a Blog on WordPress or a website).
How to Create a Blog on WordPress? Complete information on creating a website on WordPress
1. Purchase a domain name for your website blog To create a professional WordPress blog or website, first of all, you have to have a name which we also call a domain name. The domain name is the name of the website or blog. For example, our website name is CatchHow.com. So Similarly, for your blog, a single name will be required, so you can buy this name from godaddy.com, this website is quite popular in Indian to buy a domain name, so you can go here according to your name and according to your name If you want to keep the website, you can keep it, then you will have to buy it, buy your domain name for a year or two and after that, you can increase the debt by giving money again.

Domain Search 2. Web Hosting to Buy for Blog or Website The next important thing that comes after purchasing the domain name is Web Hosting. Web Hosting is a place on the Internet where we will store our files documents that will be needed to create a website or blog, then we will store it in Web Hosting. To buy hosting, you will find many websites on the internet, some of which are popular websites, Bluehost, Hostgator, Godaddy, from here you can buy web hosting. Web hosting is a bit expensive and different. so buy whatever hosting you need according to your needs. Read this:- Which 1 is best between SiteGround vs Bluehost? Some Website for Web Hosting - Bluehost - Hostinger - A2 Hosting - DreamHost - SiteGround - GoDaddy Hosting - GreenGeeks - InMotion Hosting - IONOS (1&1) Hosting - HostPapa 3. Connect the domain name to the DNS server After buying the domain name and web hosting, now you have to connect these two so that whatever you want to create your website or blog goes online, here you have to connect your domain name to the DNS server, so for this, you will have to You have to go to domain management and change the DNS of the domain and enter the DNS of your web hosting.
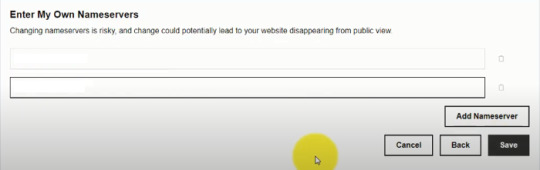
Nameserver 4. Now open the Control Panel and install WordPress Now after connecting DNS, now you have to install WordPress to create your website or WordPress blog, so for this, when you buy web hosting, then you are given a control panel on their behalf from where you can use your website. If you can control this, then you can get the link of this control panel through email or you can open the control panel by going to the account of the web hosting where you have purchased it, then you can see it in the following screenshot here. How the control panel appears.
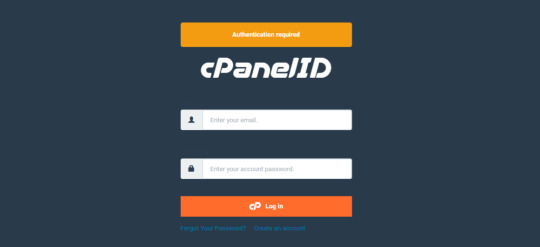
Cpanel login So here you have to enter your username and password, whichever has been given to you, be careful not to share the username and password of this control panel with anyone, then now you have to install WordPress to create a WordPress blog. To do this, you have to click on the softaculous option in the control panel and install WordPress. How to install WordPress?
softaculous apps installer - click on softaculous apps installer - Now click on WordPress - Click install - Now enter the domain name in the URL - After this, enter the login user name on the Admin user name so that when you log in on the WordPress blog, this is the user name you will need. - Enter admin password, within this option you have to enter the password which you will have to enter when logging into the WordPress blog - Now click on save installation details and save the details. - WordPress user name and password

WordPress Step-up
WordPress Step-up 5. Now open WordPress blog Now you have all already become a Ready Now you admin URL (Admin URL) from where the opening your WordPress blog ( WordPress Blog did) on the log must then URL where you will pay you to save installation details on click On top of that you will get the Admin URL, then click on the URL.
WordPress Step-up So the login page of the WordPress website will open, then here you have to enter admin user and password, whatever you entered in the details above, only then you will be able to log in to the WordPress blog.

WordPress Login So here you do not have to share this username and password with anyone, other than that you have to remember the admin URL so that whenever you have to open a WordPress blog or a website, you will need this admin URL Will to be required 6. Now install the theme for your blog or website Now you have to design your WordPress blog, then for this, you will get many free themes or if you want, you can also buy some better WordPress themes, then after logging in here you have to click on the appearance And then you have to click on the themes and according to your theme, install any theme that you like and activate it, after that your website or blog will be created. Read this for theme choosing:- Top 10 Best Free WordPress Themes (Hand-Picked for 2021)
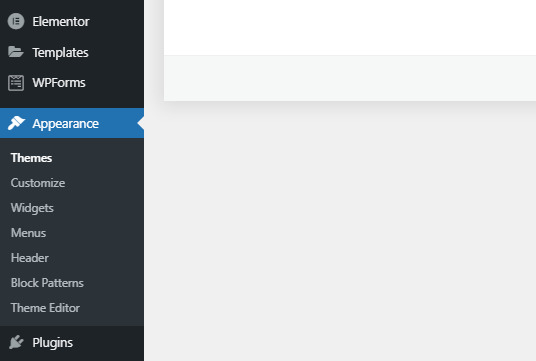
WordPress Theme So after all these things, now you can write and publish your post by clicking on the post option, but before that, if you have to design your WordPress blog, then use widgets here can you that good, that according to the plugin installed can and can design your blog is such a professional WordPress blog ( WordPress Blog can make) or website. Read this:- How to Create Backlinks Free | Dofollow or Nofollow (step by step) Continue this course:- WordPress Course Read the full article
#CreateaBlogonWordPress#HowtoCreateaBlog#HowtoCreateaBlogonWordPress#HowtoCreateaBlogonWordPressin10Minutes#howtomakeablogonwordpress#howtomakeawordpresswebsite
0 notes
Text
Find out how to Construct a WordPress Website in 24 Hours
New Post has been published on https://tiptopreview.com/how-to-build-a-wordpress-site-in-24-hours/
Find out how to Construct a WordPress Website in 24 Hours

WordPress is a incredible platform for constructing web sites on the fly with little to no growth time required to stand up and operating.
As well as, WordPress has incredible customizability starting from having the ability to absolutely customise your theme, to discovering plug-ins which have the performance to do absolutely anything you need.
The checklist of what you are able to do to customise WordPress is limitless and is mostly restricted solely to your creativeness.
You’ll be able to set up a publication plug-in to handle your publication subscriptions. You’ll be able to set up analytics plug-ins that seamlessly combine with WordPress and Google Analytics.
Different WordPress plugins will let you customise your search engine optimization similar to your title tags, meta descriptions, and meta key phrases.
Nonetheless, some plug-ins can even allow you to add noodp and noydir tags, and dive deep sufficient into their performance to permit for full management over noindex/nofollow on particular person pages.
1. Select a Good Area Identify

This could go with out saying, however choosing a good domain name is half the battle towards creating a superb web site.
Commercial
Proceed Studying Under
A great area title ought to typically be:
Quick.
Catchy.
Describe your enterprise.
Key phrase-related.
Related to your model.
Quick domains are typically outlined as domains which are three phrases or much less. Ideally two phrases or much less.
These phrases ought to talk and embody three areas: your model, your business, your key phrases.
Now, in the event you’re simply creating an organization website, your domain name ought to be a branded area title for posterity causes.
You wouldn’t simply be capable to promote your website in the event you created the area title to be “JohnsWebsitesRUS.com.” So, that consideration ought to come into play as nicely.
Now, it’s essential to say this: the precise match area title replace does are inclined to work towards domains with exact-match phrases.
Watch out about utilizing precise match key phrase phrases because the area title. Chances are you’ll get away with it for just a few months, however the selection will finally come again to hang-out you.
Commercial
Proceed Studying Under
2. Select a Good Host

Selecting a superb internet host for WordPress presents a number of challenges. An online host ought to be a optimistic addition to your web site’s arsenal.
Issues like extra web sites, bandwidth, or issues like no WHM management panel could be (and ought to be) dealbreakers. Discover a host that can fit your wants and allow you to improve your month-to-month bandwidth as essential.
As you drive extra site visitors to your website, you need to be sure that your host has a way so that you can improve that bandwidth.
Virtually nothing is worse than acquiring hundreds of tourists a month solely to search out that your web site is immediately down attributable to a scarcity of bandwidth.
Guarantee that your host provides you with the safety you want, as nicely. This may provide help to relaxation simple, realizing that you’ll not be hacked at a second’s discover.
Be taught extra about WordPress safety: 10 Tips For Keeping Your WordPress Site Secure.
For this tutorial, we’re assuming that you’ve got chosen a Linux internet host with CPANEL + WHM mixture as your internet hosting stack.
There are different implementations and kinds of hosts however for the needs of this text, that is what we’re utilizing.
Three. Stock Your Current Web site

Right here, you’ll be able to work out whether or not or not you need to begin over. In case your present web site is so horrible you need to begin over, I completely get it. I’d not need to add that website to my portfolio both!
Commercial
Proceed Studying Under
Check out your present web site and work out what you need to preserve and what you need to throw away.
Relying on what you uncover on this step, it is going to be essential to carry out a full web site migration, which is able to take longer than 24 hours and is past the scope of this text.
four. Obtain WordPress
Go to WordPress.org and obtain the set up information for WordPress. After downloading, you’ll be able to unzip the information.
Then, go browsing to your internet host. Add the information. You’ll be able to add the information wherever you need on the web site.
If you wish to add them to the foundation folder and have your whole website based mostly on WordPress, that may be accomplished.
If you happen to’d relatively only a part of your website hosted off a subdomain be the WordPress model, then that’s potential as nicely.
5. Create a MySQL Database

Earlier than continuing with the WordPress set up, it is going to be essential to create a MySQL database in Cpanel. With out a MySQL database, your WordPress set up will all be for naught.
Commercial
Proceed Studying Under
Follow the documentation here (or comply with your hosts’ assist information if they’ve them) so as to create a brand new database with the MySQL Database Wizard.
Make sure to take down your username and password for the SQL database. We might be utilizing them within the subsequent steps.
Want-to-know: When creating your username and password the MySQL database wizard often creates a username with the database title + consumer like so: user_databasename.
So, username_db1 can be the total username you utilize when modifying wp_config.php. Don’t fear – we’re attending to that in just a bit bit.
6. Set up WordPress in 15 Minutes
There are some modifications it is advisable make to the WordPress set up information earlier than you progress ahead with putting in WordPress.
To begin with, it’s essential to make modifications to wp_config.php so as to be certain that your set up will work. With out these modifications, your set up may have issues.
Please be aware as nicely that the gadgets within the wp-config.php file are all in a selected order. This order does matter and in the event you make modifications and also you don’t know what you’re doing, you’ll be able to introduce issues into your set up.
Commercial
Proceed Studying Under
Utilizing your FTP answer, let’s navigate to wp-config-sample.php. We have now to re-name this file to wp-config.php for the file to work.
Subsequent, we’re going to make modifications to some gadgets within the file: the database title, the database username, database password, and database host.
Do not forget that need-to-know merchandise we mentioned within the final step? That applies right here.
So your database title would be the full title of the database you created.
The Database Username might be “username_db1”. Enter your password.
Now, the Database Host is about by your internet hosting supplier. It will likely be essential to contact their assist and procure this data for that wp-config.php merchandise.
For additional particulars, here is the official documentation for modifying wp-config-sample.php.
Now that we have now renamed wp-config-sample.php, and we have now entered in our database’s data, it’s time to go to the primary set up URL and proceed with the set up.
In just a few seconds, you must have a welcome display that reveals, “Congratulations! WordPress is now installed.”
Commercial
Proceed Studying Under
This complete course of ought to take round 5-10 minutes whole.
Some upkeep suggestions: It would be best to change your admin listing in your website, so as to forestall hackers from hacking into your again finish. As well as, utilizing robust passwords like “7$192^98asv097!@#E41” is advisable only for the safety alone.
Please, don’t use the phrase “password” or different identifiable easy-to-guess data as your WordPress password. It’s higher to be thorough and just a little cautious on the outset than be sorry later.
7. Discover a Good Theme

Now that WordPress is put in, you will need to discover a good theme for our undertaking.
Commercial
Proceed Studying Under
Discovering a superb theme implies that:
It would meet our wants.
It’s typically light-weight and hundreds quick.
It has legitimate HTML together with legitimate CSS.
It consists of compatibility with not solely probably the most popular plug-ins, but additionally most plug-ins that you simply plan on utilizing.
It consists of high-quality assist together with thorough documentation.
Whenever you do discover a theme you want, you must take a look at issues like its customizability, your necessities, whether or not or not you’ll outgrow the theme, in addition to integration along with your model’s colours.
Now, nearly each theme provides you with the chance to vary colours after set up, so I wouldn’t fear an excessive amount of about this half at first.
Whereas discovering a theme keep in mind to be looking out for the theme’s customizability and compatibility with plug-ins.
eight. Set up the Theme
Whenever you do discover your theme, it’s typically a easy matter of downloading the information, extracting the information, and importing them to your server.
You’ll be able to then go into WordPress themes and alter the theme over to the brand new one so you’ll be able to check it out.
Commercial
Proceed Studying Under
9. Customise Your Theme
Taking a look at customizations of your theme, it’s important that you would be able to customise the whole lot. There are completely different ranges of customization out there that may make or break your web site efforts.
When you have a theme that doesn’t allow you to customise your content material with your individual coding, or you need to code in such a means that mimics the coding getting used on the theme, then the theme is just not coded nicely.
You can run into points with this later with cross-platform and cross-display compatibility.
A theme shouldn’t restrict what you are able to do along with your website. As a substitute, it ought to assist improve your web site efforts and make issues simpler.
If, for no matter motive, you discover that your theme doesn’t will let you accomplish what you need, it could be time to search out one other theme. Revisit step 7 and ensure your theme suits the targets of your undertaking earlier than you progress ahead.
If you happen to discover that out there themes don’t do what you need your web site to do, it could be essential to maneuver on to customized theme growth, which might take greater than 24 hours.
Commercial
Proceed Studying Under
Here are some good tutorials on how you can create customized WordPress themes.
10. Discover & Set up Good Plug-Ins
Discovering good plug-ins is critical to just remember to not solely have the performance that you simply want, however that enhanced performance runs easily.
From search engine optimization plug-ins to publication and analytics plug-ins, be certain your theme is suitable.
A few of my favourite plugins to make use of embody:
Redirection (for implementing 301 redirects the straightforward means).
Yoast’s search engine optimization Plugin (for implementing all the search engine optimization fundamentals simply).
Tribulant Newsletters (simple creation and administration of newsletters together with publication subscriptions).
Google XML Sitemaps (for straightforward implementation of XML Sitemaps on WordPress websites).
W3 Complete Cache (for minification, pace optimization).
Disqus Remark System (a widely-used remark system throughout the net).
Social media sharing plug-ins (if they aren’t already a part of your theme).
Social media analytics plug-ins (for social analytics).
11. Configuring the search engine optimization Fundamentals
Permalink construction
In an effort to implement effective SEO, the very first thing that ought to be modified is the construction of your permalinks. Yow will discover these settings underneath Settings > Permalinks.
I want utilizing the next permalink construction: domainname.com/class/postname/ the place class consists of the weblog submit’s class (keyword-optimized for the topical focus of your weblog), after which a keyword-rich postname.
If you happen to want to embody the class like advisable above, choose Customized Construction and use the next: /%class%/%postname%/.
Commercial
Proceed Studying Under
When you have had your website for some time, it’s possible that you’ve got hyperlinks in place. Don’t panic!
WordPress will robotically implement the redirects for you so that you don’t need to set them up manually.

Altering From WWW To Non-WWW
You’ll discover this selection underneath Settings > Basic.
It will likely be essential to take a little bit of time and take into consideration what you need your website to point out up as: WWW or non-WWW.
Commercial
Proceed Studying Under
In case you are migrating an present website over to WordPress, I like to recommend that you simply use the prevailing website URL. Altering from WWW from non-WWW in that occasion will solely trigger extra hurt than good, and you may introduce severe search engine optimization efficiency points because of this.

Make Positive You Enable Search Engines to Index Your Website
It is a biggie and might result in search engine optimization efficiency points in the event you don’t configure this. Yow will discover this setting in Settings > Studying > Search Engine Visibility.
Commercial
Proceed Studying Under
Usually, this field is checked. In an effort to enable full crawling of your site, at all times be sure that this field is unchecked.

Website Velocity
Velocity is king and might make or break your web site efficiency, particularly the place conversions are involved.
Look into how one can pace up your theme. It’s preferable to get rid of as many calls to the server as potential.
When you have 15 CSS information in your theme, contemplate condensing them all the way down to 1-Three CSS information. The identical factor holds true with JS information.
Commercial
Proceed Studying Under
When you have 15 JS information as a part of your theme, both search for one other well-optimized theme or manually condense them down into 1-Three information most.
As well as, putting in the WP Complete Cache plug-in might help make your website quicker with its choices of web page caching, database caching, providing minify choices, and integration with a spread of CDNs (content material supply networks), additional rising your alternative for pace.
Be Positive to Noindex, Comply with Archive Pages and Disable Archives You Don’t Want
Archive pages are the king of duplicate content material in WordPress. They will make or break a website, particularly when the positioning reaches tons of of pages.
You don’t need to tackle that headache sooner or later.
Setting this search engine optimization fundamental now will assist make your optimization efforts simpler. Yow will discover this setting in Yoast’s SEO plug-in underneath: Yoast > Titles & Metas > Different. Choose the setting that claims “Noindex subpages of archives.”
As well as, I like to recommend including the NOODP and NOYDIR meta robots tags sitewide. These tags will forestall Google and different search engines from robotically utilizing the DMOZ and Yahoo Listing descriptions.
Commercial
Proceed Studying Under
For individuals who proceed the combination of meta key phrases, I counsel checking “use meta keywords tag” right here as nicely.

Constructing a WordPress website is straightforward. It will possibly take lower than 24 hours to construct a reliable website that appears like a model you need to do enterprise with.
It would take for much longer, nonetheless, to construct a fantastic online presence that drives site visitors on a constant foundation.
Commercial
Proceed Studying Under
So mess around with it. Improve your creativity. See what you’ll be able to provide you with.
It’s by experimentation and testing that we really discover the suitable path by means of the SERPs.
Further Sources:

Picture Credit: Paulo Bobita
if( !ss_u )
!function(f,b,e,v,n,t,s) if(f.fbq)return;n=f.fbq=function()n.callMethod? n.callMethod.apply(n,arguments):n.queue.push(arguments); if(!f._fbq)f._fbq=n;n.push=n;n.loaded=!0;n.version='2.0'; n.queue=[];t=b.createElement(e);t.async=!0; t.src=v;s=b.getElementsByTagName(e)[0]; s.parentNode.insertBefore(t,s)(window,document,'script', 'https://connect.facebook.net/en_US/fbevents.js');
if( typeof sopp !== "undefined" && sopp === 'yes' ) fbq('dataProcessingOptions', ['LDU'], 1, 1000); else fbq('dataProcessingOptions', []);
fbq('init', '1321385257908563');
fbq('track', 'PageView');
fbq('trackSingle', '1321385257908563', 'ViewContent', content_name: 'how-to-build-wordpress-site', content_category: 'seo wp ' );
// end of scroll user Source link
0 notes
Text
Find the step-by-step guide to easily find your WordPress admin username and password from cPanel. Let’s get started & retrieve it!
#406 not acceptable error solution#http 406 not acceptable how to fix#what does 406 not acceptable mean#406 not acceptable meaning
0 notes
Photo

https://www.wpplatformhelp.com/wordpress-tutorials-by-wp-learning-lab/how-to-fix-error-establishing-a-database-connection-wp-learning-lab/
How to fix "Error establishing a database connection" | WP Learning Lab
youtube
Grab Your Free 17-Point WordPress Pre-Launch PDF Checklist: https://wplearninglab.com/17-point-wp-pre-launch-checklist-optin-yt/?utm_source=YouTube_Video&utm_medium=Description_Link&utm_term=Description_Link&utm_campaign=YouTube
Grab your free 10-Point WP Security Checklist: http://bit.ly/10point-wordpress-hardening-checklist
Error establishing database connection is a very common error that I bet every WordPress user has encountered at some point. Luckily the fix is very easy and there are two ways to fix it.
Nearly every time this error is caused by incorrect or incomplete database information in your wp-config.php file or no linking the database user to the database.
Let’s tackle the first one first.
Incorrect or incomplete database information in your wp-config.php
All you have to do here is double check your MySQL database name, database username and the database user password. Make sure the credentials you have in the wp-config.php match exactly to the ones you created.
If you’re not sure where to find the ones you created, log into your cPanel account.
Then click on MySQL databases. That will show you all the database in your hosting account. Find the correct on for the wp-config.php file you’re working on. Make sure the db name matches what’s in the file.
Then find the db username you have linked to that database and what’s in the wp-config.php file matches exactly what’s associated with your database.
If you don’t remember the password, or have it noted somewhere, you can generated a new password for the user and put that into the wp-config.php.
While you’re here, you can make sure that the second possible reason for the error is taken care of.
At the bottom of the MySQL database page you will be able to link the database user to the database. Make sure they are linked and the correct privileges are set. If you’re unsure of the proper privileges, choose them all.
Now save the db user to database association. Save the wp-config.php file you were updating.
Then go to the page that was generating the error establishing database connection error and reload that page. Everything should be working normally now.
I hope this information helps you! If you have any questions leave a comment below or ping me @WPLearningLab on Twitter.
————–
If you want more excellent WordPress information check out our website where we post WordPress tutorials daily.
https://wplearninglab.com/
Connect with us:
WP Learning Lab Channel: http://www.youtube.com/subscription_center?add_user=wplearninglab
Facebook: https://www.facebook.com/wplearninglab
Twitter: https://twitter.com/WPLearningLab
Google Plus: http://google.com/+Wplearninglab
Pinterest: http://www.pinterest.com/wplearninglab/ source
0 notes
Text
WordPress Hosting Australia
Conclusion:Within a few minutes, WordPress is a mind-blowing way to set up your website. It will hardly take 10 minutes to take the listed measure. For the design interface, for a better experience, you can use custom WordPress creation. Make sure you build a page about us on your website. On search engine sites, apply your website. Now, the ball is on your court to make sure it's used in the best way possible.IT Company Australia's mission is to provide high-quality IT services and solutions to our customers, and our services include IT solution consulting, web hosting services, website design, app development for all devices, including Windows, IOS, and Android, and SMS gateway services offerings for IaaS, PaaS and SaaS.
WordPress is the awesome one-stop place where you can build your website as it can use CMS platforms to manage 59 percent of all websites. The only explanation for this is that it is an easy guide and support for plug-in use is also expanded. In addition, by using premium or free themes, you can also go to WordPress creation services to ensure your website looks presentable in all aspects.
WordPress is a platform that uses web-designed themes to design your website. Web creation for WordPress lets you add widgets on your website by simply using drag and drop options. In addition, using customization codes, you can improve functionality according to your needs and specifications. In this blog, we will provide you with a simple guide on how to manually install WordPress on any web hosting using offerings from the WordPress Production Business. This tutorial is broadly divided into six steps:
There are many ways to install WordPress CMS on your server if you want to. In addition, instead of ideally going for one-click installation, it is guided to manually install it. There are some instructions you must consider before hopping directly to moves.
How to install WordPress manually:
Downloading the WordPress kit is the first step.
Shape a web server database and a MySQL user with access to change it.
Now, this is the time to upload your file to the place you want.
Get started with the WordPress installation script by activating your browser's URL. The URL should be where you're uploading your WordPress file.
Detailed Instruction-
There are several custom WordPress creation services available for the convenience of installation. Nonetheless, it's really easy to install and it takes less than five minutes, not that awesome. However, to manually install WordPress, here's a simple idea.
DOWNLOAD THE WORDPRESS' Kit:
If you want to install WordPress CMS, download the WordPress package as the first step in this process. Now, this brings me to the next stage in this process.
Go to the hosting account to upload your package.
If you want to upload your kit, the WordPress Production Company has systematically developed this procedure. The kit can be uploaded in three ways:
Uploading the package through the protocol for file transfer.
Stable Socket Shell uploading.
Uploading via File Manager.
MYSQL DATABASE Type:
To start with this move, you need access to your account from cPanel. Web creation for WordPress helps to create your website with relevant content and to keep all the garbage aside. The database is a storage house where the material can be accessed on a website by a tourist. Mods, text files, and WordPress themes are included.
You will need a database to store the data, which you can form by using the method below:
Logging in to the cPanel is the first step.
You will find a MySQL database wizard in the database section. Only press it.
Enter a name for it after building a database.
Shape the database users and enter your name and password as the next step. Now, go to User Build.
The user can be linked to your account now. Now you have to go for a variety of rights, select the choices according to your needs. In addition, if you create an employee account, you can also limit the account to fewer privileges.
Keep all your data in a protected folder now. Username, password, and database name are included in the information.
WORDPRESS FILL ALL THE DETAILS:
You have to fill in the WordPress information to link WordPress to your database. You can go for custom WordPress creation services for the company website or the personal portfolio, as it will better satisfy the business needs. Let us see how phase 3 can be completed:
When you open WordPress, you will be asked to fill out all the information to link to the database. To start, you need to add the name of the database that you generated earlier.
When you open WordPress, you will be asked to fill out all the information to link to the database. To start, you need to add the name of the database that you generated earlier.
Now, enter your database username.
The next step is for the password to be entered. Be sure to use your database's complicated and tricky password. A password generator that blends various characters and numbers in order to provide a strong password can also be used.
Pick your host database. All of this data can be found on a web host.
You should keep the prefix of your table different from the default 'wp.' You can keep it safe by using a different prefix, and any unauthorized individual can not guess it.
0 notes