#how to install packages void linux
Explore tagged Tumblr posts
Visit Tumblr Blog
Explore Tumblr blogs with no restrictions, modern design and the best experience.
Last Seen Tumblr Blogs


Fun Fact
Tumblr has 16.74 million mobile monthly users in the US.
Text
Dev Log Feb 7 2025 - The Stack
Ahoy. This is JFrame of 16Naughts in the first of what I hope will turn out to be a weekly series of developer logs surrounding some of our activities here in the office. Not quite so focused on individual games most of the time, but more on some of the more interesting parts of development as a whole. Or really, just an excuse for me to geek out a little into the void. With introductions out of the way, the first public version of our game Crescent Roll (https://store.steampowered.com/app/3325680/Crescent_Roll juuuust as a quick plug) is due out here at the end of the month, and has a very interesting/unorthodox tech stack that might be of interest to certain devs wanting to cut down on their application install size. The game itself is actually written in Javascript - you know, the scripting language used by your web browser for the interactive stuff everywhere, including here. If you've been on Newgrounds or any other site, they might call games that use it "HTML5" games like they used to call "Flash" games (RIP in peace). Unfortunately, Javascript still has a bit of a sour reputation in most developer circles, and "web game" doesn't really instill much confidence in the gamer either. However, it's turning more and more into the de-facto standard for like, everything. And I do mean everything. 99% of applications on your phone are just websites wrapped in the system view (including, if you're currently using it, the Tumblr app), and it's bleeding more and more into the desktop and other device spaces. Both Android and iOS have calls available to utilize their native web browsers in applications. Windows and Mac support the same thing with WebView2 and WebKit respectively. Heck, even Xbox and Nintendo have a web framework available too (even goes back as far as Flash support for the Wii). So, if you're not using an existing game engine like we aren't and you want to go multi-platform, your choices are either A) Do it in something C/C++ -ish, or now B) Write it in JS. So great - JS runs everywhere. Except, it's not exactly a first-class citizen in any of these scenarios. Every platform has a different SDK for a different low-level language, and none of them have a one-click "bundle this website into an exe" option. So there is some additional work that needs to be done to get it into that nice little executable package.
Enter C#. Everyone calls it Microsoft Java, but their support for it has been absolutely spectacular that it has surpassed Java in pretty much every single possible way. And that includes the number and types of machines that it runs on. The DotNet Core initiative has Mac, Windows, and Linux covered (plus Xbox), Xamarin has Android, and the new stuff for Maui brought iOS into the fold. Write once, run everywhere. Very nice. Except those itty bitty little application lifetime quirks completely change how you do the initialization on each platform, and the system calls are different for getting the different web views set up, and Microsoft is pushing Maui so hard that actually finding the calls and libraries to do the stuff instead of using their own (very strange) UI toolkit is a jungle, but I mean, I only had to write our stream decompression stuff once and everything works with the same compilation options. So yeah - good enough. And fortunately, only getting better. Just recently, they added Web Views directly into Maui itself so we can now skip a lot of the bootstrapping we had to do (I'm not re-writing it until we have to, but you know- it's there for everyone else). So, there you have it. Crescent Roll is a Javascript HTML5 Web Game that uses the platform native Web View through C#. It's a super tiny 50-100MB (depending on the platform) from not having to bundle the JS engine with it, compiles in seconds, and is fast and lean when running and only getting faster and leaner as it benefits from any performance improvements made anywhere in any of those pipeline. And that's it for today's log. Once this thing is actually, you know, released, I can hopefully start doing some more recent forward-looking progress things rather than a kind of vague abstract retrospective ramblings. Maybe some shader stuff next week, who knows.
Lemme know if you have any questions on anything. I know it's kind of dry, but I can grab some links for stuff to get started with, or point to some additional reading if you want it.
3 notes
·
View notes
Note
sans a few gpu/cpu config fixes a fresh install + all my packages of void linux is identical to a fully updated old one. Like maybe if you fucked up building something that doesnt have an uninstall script and don't know how to find all the files manually? I just see 0 purpose, is it different for other distros
For the most part, not really. There are some Linux users on this website who have royally fucked their systems beyond comprehension, and it would be easier and faster to just reinstall the OS than to actually fix anything going on there, and yet just continue to live every day like this. It's their computers, they can do what they want, but this is the level of "Not willing to reinstall the OS" I had in mind.
I am an opposite extreme, I have fun messing around with wiping and reinstalling my crap. It may have been a little unclear but I don't think this is necessarily ideal use, it's just not particularly painful or obtrusive cuz reinstalls (or wiping and putting a slightly different flavor) don't take all that much time and getting everything back in order, at least for me and with how I partition things, does not take very long.
Honestly though this time I'm just thinking of wiping Mint and going back to Debian for a few reasons, which technically isn't "reinstalling" but it reminded me of those horrifying setups that real Linux users out there willingly use every day.
ETA: I mean in general I don't relate to not wanting to futz around with the OS install but I am. an extreme case, basically.
2 notes
·
View notes
Text
Debian 12 xfce ~~~~ let's go~~~~~
I complained about debian not having wifi drivers upon live cd boot, apparently that was by design for the older versions as (i think?) device drivers like that might be proprietary and non-free. and debian ships usually free and open source packages....
so that was by design~~ they changed it I think in debian 12, which I'm late to finding lol.
I missed the transparency thing xfce does sometimes~~~ I like xfce's compositor~~ and for some reason I don't like KDE when I tried it before and hadn't tried it since~~
could've tried it but just jumped on xfce desktop with debian 12, especially cause I've come to like thunar file manager over dolphin (? was that kde's?)
just got it up and running~~ tho I forget (or don't know) how to update the system yet.... mint has an update manager, or it's a cinnamon desktop thing..... idk.... tho I'm guessing "sudo apt-get update"
I like the splash screen and grub menu~~~ and (not that linux mint debian was unstable cause it wasn't~~) I hope debian is really stable~~ ot that's what I read anyway~~
and my function keys still work, lol. unlike upon fresh windows install~~
and I can still access the other hard drive~~ but for some reason upon unmounting it it says that there's still something going on or data is being written to it, but then it seems to unmount fine anyway~~ so I hope nothing is going wrong already~~ lol
continually talking about linux cause I got nowhere else to~~ lol sorry for cluttering up the tags if they aren't correct at all~~
now to install vlc and stuff lol~~ and hopefully find more xfce-4 themes so I can get it looking like windows 95 lol
or what's a better desktop environment than xfce? I tried lxde and it's supposedly not getting updated anymore so better to try lxqt in that case? it's newer.... Cinnamon is nice but got bored of it w mint, kde I didn't like back when I tried it a decade ago and hadn't touched it since.... hadn't messed w GNOME either in a long while either tho, I miss the sidebar and quick access to workspaces but didn't like it for other reasons too... or maybe it wasn't as customizeable..... or I didn't know how.....
currently rocking debian 12 as the title suggests w xfce desktop environment~~~ but could maybe switch to lxqt ~~~ but idk how to wipe all components from xfce and install lxqt...
and I don't like having more than one desktop environment installed cause that leads to duplicate apps
*side glances at how many terminal emulators are here anyway*
which do I choose? there are so many~~~ but lately I like xfce~~~ and might give lxqt a shot~~~ idk.....
there are so many and I already have a hard time choosing anyway lol
also just realized that the installer didn't ask for a root password so i have to "sudo" every single time cause I can't run as root directly.
and for some reason my username didn't capitalize so I tried to log into the system and it said the password was incorrect, I knew the password was correct, I made the first letter of my username small and i was in~~~
wtf~~~ did it lowercase it in the installer and I didn't realize it? is this what happened before when I tried to install debian years ago? I just reinstalled mint like an idiot instead of trying things T_T;;
tho I still consider myself a newbie cause arch, opensuse, slackware and others like that scare me ~~~ but they'd get me to learn~~ I just don't know enough to use them yet.
which begs the question, should I be running debian anyway? or should I just go back to mint?p
second guessing myself after a SUCCESSFUL INSTALL~~~~~ rip. but I like what I got going..... and cinnamon was getting boring lol
tldr: I'm taking tumblr on the linux journey with me~~~ :) hopefully typing about it into the void will help me be less anxious about trying stuff and potentially breaking my system~~ lol cause ya can always install a system that you know works~~ if something breaks.
happy to be running the grandpa of a whole bunch of linux distributions :)
hopefully I'm smarter than I think and this'll be fine~~~ worry I'll break stuff constantly~~~~ and I really don't like not knowing what I'm doing cause I feel stupid but that's how you learn to begin with, isn't it?
#personal#thoughts#thinking#os#operating system#operating systems#linux#debian#debian 12#debian linux#linux debian#let's go~~~~#desktop#desktop environment#desktop environments#xfce#xfce-4#i think anyway#xfce desktop#xfce-4 desktop#there are so many tho#which to choose#lxde is defunct at this point#lxqt#is it any good?#is it like xfce?#sorry for cluttering up the tags#esp if it doesn't belong here
0 notes
Text
Starting out with void linux
Hey hey! welcome back. This is my first post that's not an introduction.
So i've been into linux for almost a year, and since then i've learned a lot. But i haven't limited my options to linux only, but also to other unix systems like bsd. When i was browsing r/unix, i saw someone commenting that one should try void linux, because its similar to bsd in a way: its minimalistic, transparent and easy to understand. its very good for those who are willing to start out with linux by learning how it works.
Its main features are the xbps package manager (you cant install programs via source code compiling like in gentoo) and the fact it uses runit as the init system, which (i think) is supposed to be some weird hybrid between systemd and sysvinit.
So yesterday i decided to give a try and made a bootable usb stick. its relatively easy to install. the hardest thing would be you having to know how to partition your system in a way that actually fits your needs, but even that is explained in the official documentation. Wi-fi support works surprisingly good by default, even better than debian.
I started out from nothing and decided to install i3wm in it, but since i had no prior knowledge in twms, i went to the arch wiki (void's official site said you can consult things there) to see how to install and configure it, and i also looked up yt videos. its nice that you can work on a pc with just a keyboard, not needing to use a mouse. reminds me a lot of those old keyboard-only portable computers. they're kinda cute.
As for the programs...i installed xfce's thunar file browser but it was a bit faulty. i couldn't access the trash bin to recover/delete files. i think i should install mate's caja or something? maybe.
Firefox works nice ig, but if you want really basic web browsing, like browsing sites that dont include js, you should try midori or lynx with framebuffer enabled (havent tried this one. only plain lynx on debian's cli). if i want to listen to a song or something i can use smtube and it doesnt consume much resources. a basic libreoffice install works wonderfully!! my 1.3 ghz cpu could handle calc (linux excel) better and without lagging than let's say debian...
So that was all guys. Can't see what the future awaits for me. maybe i should try openbsd/netbsd sometime soon. they interest me a lot. I hope you all enjoyed reading this. stay safe and see you soon!
1 note
·
View note
Note
What distro of Linux do you use, and what would you recommend to someone who has been using Ubuntu for a decade because ae's scared to move away from aer familiar package manager? You know. Hypothetically.
i use Void, bc Arch was too mainstream slkdfjsdlk (okay no fr i use Void bc i kept seeing it on r/unixporn and i wanted a distro that had the "go nuts show nuts" curate-your-own-experience style Arch has but without systemd - no judgement if you like it, but it's not my vibe).
i used to use Mint and have done on-and-off since version 4 Daryna - Crunchbang was discontinued around that time and i wanted another Ubuntu-based distro to switch to.
so, if someone were looking to try something new (hypothetically, of course d: ) i would recommend considering the following first:
what's aer typical workload (and therefore what would be suitable) ?
how far would ae be willing to explore beyond aer comfort zone ?
how much time would ae have to learn new things ?
trying one or two distros out in a VM might be a good way for aem to familiarise aemself w/ any immediate quirks and pick a distro to install on bare metal (perhaps alongside aer existing distro ?)
for something more familiar i might recommend Debian Testing or LMDE (the version of Mint based directly on Debian) as they share much of the same internal architecture. i believe Debian offers a netinstall that's barebones like Arch/Void/Gentoo if trying new software (perhaps including a new DE/WM/Wayland compositor) without losing all familiarity would be of interest to this person.
for something more adventurous i would suggest Arch and perhaps picking a full DE to start with, then maybe trying an install that's more uh selective. personally, Void is no harder than Arch but the community is smaller and a person who hypothetically chose this as their new distro would not only have the barebones nature of that class of distro + an unfamiliar package manager to contend with, but additionally an unfamiliar init system (though runit is terrifyingly simple, i must say). there's also Artix, which is Arch but w/out systemd (i think they offer runit or openrc).
there are plenty of wacky distros (Bedrock, Fedora Silverblue, NixOS, Qubes, Gentoo) that would be fun to experiment with on a non-critical system/VM but they're very far removed from a decade of Ubuntu.
i appreciate this is a long answer, but you asked a lovely question and it's fun to indulge in uh um what's definitely totally a hypothetical d: if someone were to change distro i hope ae know ae can reach out to ask further questions :3
thanks for your ask ! <3 ^w^
42 notes
·
View notes
Text
What is Wayland and what different with X11?
Hi! It's my first blog here, so let's start with the history of Wayland and its main topic.
Short description
Well generally Wayland is a new protocol for display managers for Linux and UNIX-like OSes. The developing process is started by Krisitian Hosberg as an free and open-source modern implemetation of X11. The main communication protocol is written in C as an shared library. The protocl has two main components:
Server side(libwayland-server).
Client side(libwayland-client).
How it works and what difference betwen Wayland and X11?
Let's start from the working process of Wayland.
So the core for Wayland server and client is an UNIX file sockets. And using the sockets the client and the server can share the information betwen each other.
Now about the server: Generally the Wayland server is called "Wayland compositor" because it's main purpose it's to create, manage, and composite the window buffers into one single, then post the buffer to the framebuffer via the GPU backend. The server and client can communicate betwen each other using the message or other type of IPC(Inter-Process communication).
So the short process of working the server is:
So when the Wayland display got an event, like the screen refresh or the mouse pointetr movement, the Wayland display start the searching of the event handler, if the handled didn't found it's ignored. Then if the event handler is found, it called with to main parameters:
struct wl_listener *listener - an body of the event, generally used by wl_container_of(an method to extract the structure that have the event from the listener structure)
void *data - Generally passed for an event that have an second inforamtion parameter. Like the mouse pointer movement, that have the X and Y coordinatates.
Then if the type is must return the any kind of return value, like for example the surface, then the server must map the specifed region of memory and using shared-memory IPC return it to the client, so the client can show the information on it. And when the surface is updated, generally by the client signal about the surface compositor, the server must render it or can ignore it, for example if the view didn't visible for user.
The user side is very simple it's just connected to the server socket and starts the communication process betwen server.
So what the main differences betwen Wayland and X11? So most visible and big difference betwen Wayland and X11 is the communication process betwen the display manager and the window manager. In X11 the window manager communicated betwen the X11 server itself to receive the external devices events and send info to the client, in Wayland the compositor is an display manager and the window manager in one. The client and the events directly sended to the compositor to process it.
Okay, okay you may have some questions about it all, but for more information, you can read the Wikipedia or other wiki.
How i can test the Wayland and what problems can be given?
Acording to the official Wayland page, the main and the etalony Wayland compositor is Weston. Just install it in our system and run just like any other package. The compositor can be started from any enviroment: X11, other Wayland compositor, or even the shell. The problems that can be given, generally caused by the video drivers, and the Nvidia design of DRM subsystem driver.
Or the sway is an i3-compatible compositor, we have very big list of the compositors, so i can't say what compositor is the best, just select your liked.
Thanks for reading!
1 note
·
View note
Text
How to Install Flutter Software Development Kit in Linux Systems?

Many app developers wish to use flutter as an excellent platform for mobile and web application interfaces. A flutter is a fast-rising tool among many developers. If you run an organization and need an app, you can hire flutter developer and pick up service.
It is famous for a single codebase and works well on the existing code. App Developers and organizations use such a thing because of free and open source. You have a remarkable ability to create cross-platform applications for Android, Windows, iOS, Linux, and others.
Set up a flutter quickly:
It is necessary to focus on the hardware and software requirement before installing flutter on Linux.
Disk space – 600MB plus space for dependent software tools and IDE
Operating system – Linux 64 bit
Software tools – unzip, bash, mkdir, git, curl, and others
There are different ways you install a cross-platform on Linux. People can install a flutter manually or snap. It would help if you switched to the snap package and set up and set up an android studio. It is the best way to save time and effort.
Install flutter:
First, go to the terminal and install the snap package for the flutter by following the excellent command.
sudo snap install flutter --classic
After that, it asks you to search for passwords and enter them, and is ready to move.
People use a software center to install a platform and search flutter quickly.
Complete installation and run a command to make sure that packages install correctly.
Whether you get welcome to flutter, your package is ready and moves to a different process.
Install and organize android studio:
Once flutter SDK installation is over, you can get ready to use the Android SDK.
You need to install the android studio and begin work.
Install android studio by going to the terminal and running the relevant command.
It asks you to search for a password and enter them correctly.
You can utilize the software center to install the android studio, look for the latest version of Android SDK, and click on install.
After you set up an android studio, you can start using them.
sudo snap install android-studio --classic
You must confirm some critical things in the setting and go with the default. Then, you can follow details until android studio begins to install SDK and other elements.
Arrange a flutter and agree to the android license:
If you finish step 2, you can organize flutter in a device and accept the android license. Developers carefully follow simple instructions to set up cross-platform. It is essential to focus on reputation to hire senior Flutter engineer. They provide complete details about everything to you.
You can move to the required place and run a command after finishing the android studio installation.
It is easy to configure the android studio directory to package that you download android studio.
Then, run the command and open the android license.
You should accept the license as much as possible when you ask for input.
When you finish accepting the android license, you can complete the SDK set up in the device.
Validate a flutter set up:
You must set up the flutter properly in the device and verify them carefully. Verification is an important step to check anything missing in the setup. It is the best way to prevent significant problems when running.
Users should run the command to find something that is left. Whether everything is fine, you will acquire the exact output. Users can gain a tick on VS code and chrome once the package installs correctly.
Run the code:
Users keep fluttering perfectly in a device and run code. You can test sample code and understand how it works. Organizations hire flutter developer to learn how code runs and delivers accurate output.
import 'package:flutter/material.dart'; void main() { runApp(const MyApp()); } class MyApp extends StatelessWidget { const MyApp({Key? key}) : super(key: key); @override Widget build(BuildContext context) { return MaterialApp( title: 'Flutter Demo', theme: ThemeData( primarySwatch: Colors.blue, ), home: const MyHomePage(title: 'Flutter Demo Home Page'), ); } } class MyHomePage extends StatefulWidget { const MyHomePage({Key? key, required this.title}) : super(key: key); final String title; @override State createState() => _MyHomePageState(); } class _MyHomePageState extends State { int _counter = 0; void _incrementCounter() { setState(() { _counter++; }); } @override Widget build(BuildContext context) { return Scaffold( appBar: AppBar( title: Text(widget.title), ), body: Center( child: Column( mainAxisAlignment: MainAxisAlignment.center, children: [ const Text( 'You have pushed the button this many times:', ), Text( '$_counter', style: Theme.of(context).textTheme.headline4, ), ], ), ), floatingActionButton: FloatingActionButton( onPressed: _incrementCounter, tooltip: 'Increment', child: const Icon(Icons.add), ), ); } }
Easy to understand and learn:
Flutter is a contemporary framework and helps developers and organizations in different forms. It is the most straightforward platform to develop apps. App developers learn the platform quickly and work with various projects without hassle.
To hire flutter developer, you can quickly access the app and implement the right strategy for the organization process.
It is an excellent solution to build apps without any code.
Platform influences client optimized programming language like a dart.
Dart is highly popular because it is productive, easy to comprehend, fast, and scalable.
You may also use an online resource to gain better training. Training documentation is helpful to boost flutter skills and knowledge. The framework performs well on the low-end devices.
Develop versatile applications:
Flutter comes up with many exciting features that allow developers to build an app. You can come across built-in widgets and develop a customized application.
Widgets are a unique element for creating eye-catching user interfaces and delivering a perfect experience to users. Depending on your wish, you have a great chance to make your widget.
A newly built mobile app will appear on the existing version of the system. It is better to construct high-performance apps in diverse domains like education, utility, entertainment, fitness, ecommerce, and more.
App development becomes simple and easy and reduces the third-party integration when using flutter.
It is easy to share the app with potential customers.
Developers assist you in creating an app with the number one development tool.
So, you can access the proper assistance today and gain the ideal support and service to build an app with the necessary features. The platform allows you to make a modification in the app.
Conclusion:
Organizations and developers dive into cross-platform development space confidently. The above details help you understand more about installation and setting up flutter on Linux. flutteragency.com allows you to configure flutter SDK and android studio with flutter and dart and take app development to the next level.
0 notes
Text
Managing a .NET Service with Blazor
In this post I will show you how creating a cross-platform and managing a .NET Service with Blazor that can be installed on Windows (Service) and Linux (systemd).
There is a lot of information on how to run a .NET project as a service, on Windows and on Linux (Mac is not supported yet). I will provide a sample project on GitHub and will only show some of the basics here.
The most interesting part for me is hosting a Blazor Server application with Kestrel as a service on both Windows and Linux. This gives endless possibilities in managing the service, not even from the system itself but also remotely.
Managing service with Blazor
First we create a normal Blazor Server project. I keep the project as-is and just add a few classes to demonstrate the use of Blazor in the service.
Adding the background service
Create a class called CustomBackgroundService. I use the BackgroundService as a base class but I could also implement IHostedService. More information about the different types can be found here.
This service is just logging and then waiting for 5 seconds to simulate a process that runs for a while:
public class CustomBackgroundService : BackgroundService { public bool IsRunning { get; set; } private readonly ILogger<CustomBackgroundService> _logger; public CustomBackgroundService(ILogger<CustomBackgroundService> logger) => _logger = logger; protected override async Task ExecuteAsync(CancellationToken stoppingToken) { try { _logger.LogInformation($"{nameof(CustomBackgroundService)} starting {nameof(ExecuteAsync)}"); IsRunning = true; while (!stoppingToken.IsCancellationRequested) { _logger.LogInformation($"{nameof(CustomBackgroundService)} running {nameof(ExecuteAsync)}"); await Task.Delay(5000); } IsRunning = false; _logger.LogInformation($"{nameof(CustomBackgroundService)} ending {nameof(ExecuteAsync)}"); } catch (Exception exception) { _logger.LogError(exception.Message, exception); } finally { IsRunning = false; } } }
Registering and adding the hosted service:
services .AddLogging(logging => logging.AddConsole()) .AddSingleton<WeatherForecastService>() .AddSingleton<CustomBackgroundService>() .AddHostedService(serviceCollection => serviceCollection.GetRequiredService<CustomBackgroundService>());
I added a new Razor page and added it to the menu (Pages/Service.razor):
@page "/Service" @inject CustomBackgroundService _customBackgroundService <h3>Service</h3> <p><div hidden="@HideIsRunning">Running</div></p> <button name="startButton" class="btn btn-primary" @onclick="Start">Start</button> <button class="btn btn-primary" @onclick="Stop">Stop</button> @code { private bool _isRunning { get; set; } public bool HideIsRunning => !_isRunning; protected override void OnInitialized() { _isRunning = _customBackgroundService.IsRunning; base.OnInitialized(); } private async Task Start() { if(!_customBackgroundService.IsRunning) await _customBackgroundService.StartAsync(new System.Threading.CancellationToken()); _isRunning = _customBackgroundService.IsRunning; } private async Task Stop() { if(_customBackgroundService.IsRunning) await _customBackgroundService.StopAsync(new System.Threading.CancellationToken()); _isRunning = _customBackgroundService.IsRunning; } }
Adding a new menu item to the default Blazor application by changing `Shared/NavMenu.razor’:
<div class="nav-item px-3"> <NavLink class="nav-link" href="Service"> <span class="oi oi-pulse" aria-hidden="true"></span> Service </NavLink> </div>
When debugging the project this should be visible:

Blazor with running service
you can start and stop the service and check the console of your IDE to see the output:

Output from the service
Running and installing the service
To run the application as a Service the following code has to be added to the Program.cs:
public static void Main(string[] args) { var isService = !(Debugger.IsAttached || args.Contains("--console")); if (isService) Directory.SetCurrentDirectory(Environment.ProcessPath!); var builder = CreateHostBuilder(args.Where(arg => arg != "--console").ToArray()); if (isService) { if (OperatingSystem.IsWindows()) builder.UseWindowsService(); else if (OperatingSystem.IsLinux()) builder.UseSystemd(); else throw new InvalidOperationException( $"Can not run this application as a service on this Operating System"); } builder.Build().Run(); }
Next, install the following Nuget packages:
Windows: Microsoft.Extensions.Hosting.WindowsServices
Linux: Microsoft.Extensions.Hosting.Systemd
.NET Service on Windows
First, publish the application to a folder. Make sure to create the correct publish profile for Windows. Also, consider if you need to publish it Framework-Dependent (the .NET framework has to be installed on the host machine) or Self-Contained (everything needed is included, how cool is that!):

.NET Launch Settings Profile
After publishing, open a Powershell command line, go to the directory conaining the newly published service and execute the following commands:
New-Service -Name “Blazor Background Service” -BinaryPath .\BlazorBackgroundservice.BlazorUI.exe

PowerShell registers the Blazor service
Start-Service -Name “BlazorBackgroundService”

PowerShell starts the new service
I could write logs to the Event Logger but I decided to write simple logs to a text file. When you look into the directory of the service you should see a logfile log****.txt. Look into the logfile to see if the service is running. When going to the url’s provided in the logfile be aware that the https port might not work because there are no valid SSL certificates installed.

Logging on Windows
.NET Service on Linux
Same as for Windows: publish the application to a folder, using the correct publish configuration. I can test the application by adding --console to the command line:

Running on Arch Linux
To install it as a service I created the file in/etc/systemd/system/blazorbackgroundservice.service:
[Unit] Description=Blazor Background Service [Service] Type=Notify ExecStart=/home/jacob/blazorbackgroundservice/linux/BlazorBackgroundService.BlazorUI [Install] WantedBy=multi-user.target
Run the following commands:
sudo systemctl daemon-reload sudo systemctl status blazorbackgroundservice

Stopped service
sudo systemctl start blazorbackgroundservice sudo systemctl status blazorbackgroundservice

It works! Check the status output for the url of the Blazor website and browse to the site to check if it works.
You can even auto-start the service by running the following command:
sudo systemctl enable blazorbackgroundservice
Next time you reboot, the service will automatically start.
Resources
Microsoft.Extensions.Hosting.WindowsServices
Microsoft.Extensions.Hosting.Systemd
Background tasks with hosted services in ASP.NET Core
The post Managing a .NET Service with Blazor appeared first on PureSourceCode.
from WordPress https://www.puresourcecode.com/dotnet/blazor/managing-a-net-service-with-blazor/
0 notes
Text
Slack Web

Download Slack
Slack Webinar
Slack Web App
Slack Webex
The @slack/web-api package contains a simple, convenient, and configurable HTTP client for making requests to Slack’sWeb API. Use it in your app to call any of the over 130methods, and let it handle formatting, queuing, retrying, pagination, and more.
Installation
Initialize the client
You’re invited to join the discussion about all things related to Amazon Web Services on Slack. Click here to get started. You will be asked for your email address and will be sent an invite. Once there, choose your channel. Our #general channel is for anyone keen to discuss AWS related topics. The Slack Web API is an interface for querying information from and enacting change in a Slack workspace. Use it on the fly for ad-hoc queries, or as part of a more complex tapestry of platform features in a Slack app. What can you do with the Web API? Web Client The Slack Web API allows you to build applications that interact with Slack in more complex ways than the integrations we provide out of the box. Access Slack’s API methods requires an OAuth token – see the Tokens & Authentication section for more on how Slack uses OAuth tokens as well as best practices. Slack provides mobile apps for iOS and Android in addition to their Web browser client and desktop clients for macOS, Windows (with versions available from the company's website and through the Windows Store), and Linux (beta). Slack is also available for the Apple Watch, allowing users to send direct messages, see mentions, and make simple replies.
The package exports a WebClient class. All you need to do is instantiate it, and you’re ready to go. You’ll typicallyinitialize it with a token, so that you don’t have to provide the token each time you call a method. A token usuallybegins with xoxb or xoxp. You get them from each workspace an app is installed onto. The app configuration pageshelp you get your first token for your development workspace.
Initializing without a token
Alternatively, you can create a client without an token, and use it with multiple workspaces as long as you supply atoken when you call a method.
Call a method
The client instance has a named method for each of the public methods in the Web API. The most popular one iscalled chat.postMessage, and its used to send a message to a conversation. For every method, you pass arguments asproperties of an options object. This helps with the readablility of your code since every argument has a name. Allnamed methods return a Promise which resolves with the response data, or rejects with an error.
Hint: If you’re using an editor that supports TypeScript, even if you’re not using TypeScript to write your code,you’ll get hints for all the arguments each method supports. This helps you save time by reducing the number oftimes you need to pop out to a webpage to check the reference. There’s more information about usingTypeScript with this package in the documentation website.
Note: Use the Block Kit Builder for a playgroundwhere you can prototype your message’s look and feel.
Using a dynamic method name
If you want to provide the method name as a string, so that you can decide which method to call dynamically, or to calla method that might not be available in your version of the client, use the WebClient.apiCall(methodName, (options))method. The API method call above can also be written as follows:
Handle errors
Errors can happen for many reasons: maybe the token doesn’t have the proper scopes tocall a method, maybe its been revoked by a user, or maybe you just used a bad argument. In these cases, the returnedPromise will reject with an Error. You should catch the error and use the information it contains to decide how yourapp can proceed.
Each error contains a code property, which you can check against the ErrorCode export to understand the kind oferror you’re dealing with. For example, when Slack responds to your app with an error, that is anErrorCode.PlatformError. These types of errors provide Slack’s response body as the data property.
More error types
There are a few more types of errors that you might encounter, each with one of these codes:
ErrorCode.RequestError: A request could not be sent. A common reason for this is that your network connection isnot available, or api.slack.com could not be reached. This error has an original property with more details.
ErrorCode.RateLimitedError: The Web API cannot fulfill the API method call because your app has made too manyrequests too quickly. This error has a retryAfter property with the number of seconds you should wait before tryingagain. See the documentation on rate limit handling tounderstand how the client will automatically deal with these problems for you.
ErrorCode.HTTPError: The HTTP response contained an unfamiliar status code. The Web API only responds with 200(yes, even for errors) or 429 (rate limiting). If you receive this error, its likely due to a problem with a proxy,a custom TLS configuration, or a custom API URL. This error has the statusCode, statusMessage, headers, andbody properties containing more details.
Pagination
Many of the Web API’s methods returnlists of objects, and are known to be cursor-paginated. The result of calling these methods will contain a part ofthe list, or a page, and also provide you with information on how to continue to the next page on a subsequent API call.Instead of calling many times manually, the WebClient can manage getting each page, allowing you to determine when tostop, and help you process the results.
The process of retrieving multiple pages from Slack’s API can be described as asynchronous iteration, which meansyou’re processing items in a collection, but getting each item is an asynchronous operation. Fortunately, JavaScripthas this concept built in, and in newer versions of the language there’s syntax to make it even simpler:for await..of.
The for await..of syntax is available in Node v10.0.0 and above. If you’re using an older version of Node, seefunctional iteration below.
Using functional iteration
The .paginate() method can accept up to two additional parameters. The third parameter, stopFn, is a function thatis called once for each page of the result, and should return true when the app no longer needs to get another page.The fourth parameter is reducerFn, which is a function that gets called once for each page of the result, but canbe used to aggregate a result. The value it returns is used to call it the next time as the accumulator. The firsttime it gets called, the accumulator is undefined.
The returned value is a Promise, but what it resolves to depends on whether or not you include the fourth (optional)parameter. If you don’t include it, the resolved value is always undefined. In this case, its used for control flowpurposes (resuming the rest of your program), and the function in the third parameter is used to capture a result. Ifyou do include the fourth parameter, then the resolved value is the value of the accumulator. This is a familiarpattern for people that use functional programming.
Opening modals
Modals can be created by calling the views.open method. The method requires you to pass a valid view payload in addition to a trigger_id, which can be obtained when a user invokes your app using a slash command, clicking a button, or using another interactive action.
Dynamically updating a modal
After the modal is opened, you can update it dynamically by calling views.update with the view ID returned in the views.open result.
Logging
The WebClient will log interesting information to the console by default. You can use the logLevel to decide howmuch information, or how interesting the information needs to be, in order for it to be output. Mac lip pencil in soar. There are a few possiblelog levels, which you can find in the LogLevel export. By default, the value is set to LogLevel.INFO. While you’rein development, its sometimes helpful to set this to the most verbose: LogLevel.DEBUG.
All the log levels, in order of most to least information are: DEBUG, INFO, WARN, and ERROR.
Sending log output somewhere besides the console
You can also choose to have logs sent to a custom logger using the logger option. A custom logger needs to implementspecific methods (known as the Logger interface):
MethodParametersReturn typesetLevel()level: LogLevelvoidsetName()name: stringvoiddebug()..msgs: any()voidinfo()..msgs: any()voidwarn()..msgs: any()voiderror()..msgs: any()void
A very simple custom logger might ignore the name and level, and write all messages to a file.
Automatic retries
In production systems, you want your app to be resilient to short hiccups and temporary outages. Solving for thisproblem usually involves building a queuing system that handles retrying failed tasks. The WebClient comes with thisqueuing system out of the box, and its on by default! The client will retry a failed API method call up to 10 times,spaced out over about 30 minutes. If the request doesn’t succeed in that time, then the returned Promise will reject.You can observe each of the retries in your logs by setting the log level to DEBUG. Try running thefollowing code with your network disconnected, and then re-connect after you see a couple of log messages:
Shortly after re-connecting your network, you should see the Done! message. Did you notice the program doesn’t use avalid token? The client is doing something clever and helpful here. It knows the difference between an error such as notbeing able to reach api.slack.com and an error in the response from Slack about an invalid token. The former issomething that can be resolved with a retry, so it was retried. The invalid token error means that the call isn’t goingto succeed until your app does something differently, so it stops attempting retries.
You might not think 10 reties in 30 minutes is a good policy for your app. No problem, you can set the retryConfig toone that works better for you. The retryPolicies export contains a few well known options, and you can always writeyour own.
Here are some other values that you might want to use for retryConfig:
retryConfigDescriptionretryPolicies.tenRetriesInAboutThirtyMinutes(default)retryPolicies.fiveRetriesInFiveMinutesFive attempts in five minutesretryPolicies.rapidRetryPolicyUsed to keep tests running fast( retries: 0 )No retries (other options)
Note: If an API call results in a rate limit being exceeded, you might still notice the client automaticallyretrying the API call. If you’d like to opt out of that behavior, set the rejectRateLimitedCalls option to true.
Upload a file
A couple methods, files.upload and users.setPhoto, allow you to upload a file over the API. In Node, there are a fewways you might be dealing with files, or more generally, binary data. When you have the whole file in memory (like whenyou’ve just generated or processed an image), then in Node you’d have a Buffer that contains that binary data. Or,when you are reading the file from disk or a network (like when you have a path to file name), then you’d typically havea ReadableStream. The client can handle both of these binary data types for you, and it looks like any other API call.
The following example shows how you can use files.upload to upload afile that is read from disk (as a ReadableStream).
In the example above, you could also use a Buffer object as the value for the file property of the options object.
Proxy requests with a custom agent
The client allows you to customize the HTTPAgent used to create the connection to Slack.Using this option is the best way to make all requests from your app through a proxy, which is a common requirement inmany corporate settings.

In order to create an Agent from some proxy information (such as a host, port, username, and password), you can useone of many npm packages. We recommend https-proxy-agent. Startby installing this package and saving it to your package.json.
Import the HttpsProxyAgent class, and create an instance that can be used as the agent option of the WebClient.
Rate limits
When your app calls API methods too frequently, Slack will politely ask (by returning an error) the app to slow down,and also let your app know how many seconds later it should try again. This is called rate limiting and theWebClient handles it for your app with grace. The client will understand these rate limiting errors, wait theappropriate amount of time, and then retry the request without any changes in your code. The Promise returned onlyresolves when Slack has given your app a real response.
It’s a good idea to know when you’re bumping up against these limits, so thatyou might be able to change the behavior of your app to hit them less often. Your users would surely appreciate gettingthings done without the delay. Each time a rate limit related error occurs, the WebClient instance emits an event:WebClientEvent.RATE_LIMITED. We recommend that you use the event to inform users when something might take longer thanexpected, or just log it for later.
Download Slack
You might not want to the WebClient to handle rate limits in this way. Perhaps the operation was time sensitive, andit won’t be useful by the time Slack is ready for another request. Or, you have a more sophisticated approach. In thesecases, you can set the rejectRateLimitedCalls option on the client to true. Once you set this option, method callscan fail with rate limiting related errors. These errors have a code property set to ErrorCode.RateLimitedError. Seeerror handling for more details.
Request concurrency
Each of the API method calls the client starts are happening concurrently, or at the same time. If your app triesto perform a lot of method calls, let’s say 100 of them, at the same time, each one of them would be competing for thesame network resources (such as bandwidth). By competing, they might negatively affect the performance of all the rest,and therefore negatively affect the performance of your app. This is one of the reasons why the WebClient limits theconcurrency of requests by default to ten, which means it keeps track of how many requests are waiting, and onlystarts an eleventh request when one of them completes. The exact number of requests the client allows at the same timecan be set using the maxRequestConcurrency option.
The lower you set the maxRequestConcurrency, the less parallelism you’ll have in your app. Imagine setting theconcurrency to 1. Each of the method calls would have to wait for the previous method call to complete before it caneven be started. This could slow down your app significantly. So its best not to set this number too low.
Another reason, besides competing for resources, that you might limit the request concurrency is to minimize theamount of state in your app. Each request that hasn’t completed is in some ways a piece of state that hasn’t yet beenstored anywhere except the memory of your program. In the scenario where you had 100 method calls waiting, and yourprogram unexpectedly crashes, you’ve lost information about 100 different things going on in the app. But by limitingthe concurrency to a smaller number, you can minimize this risk. So its best not to set this number too high.
Custom TLS configuration
Each connection to Slack starts with a handshake that allows your app to trust that it is actually Slack you areconnecting to. The system for establishing this trust is called TLS. In order for TLS to work, the host running your appkeeps a list of trusted certificate authorities, that it can use to verify a signature Slack produces. You don’tusually see this list, its usually a part of the operating system you’re running on. In very special cases, like certaintesting techniques, you might want to send a request to another party that doesn’t have a valid TLS signature that yourcertificate authority would verify. In these cases, you can provide alternative TLS settings, in order to change how theoperating system might determine whether the signature is valid. You can use the tls option to describe the settingsyou want (these settings are the most common and useful from the standard NodeAPI).
tls propertyDescriptioncaOptionally override the trusted CA certificates. Any string or Buffer can contain multiple PEM CAs concatenated together.keyPrivate keys in PEM format. PEM allows the option of private keys being encrypted. Encrypted keys will be decrypted with passphrase.certCert chains in PEM format. One cert chain should be provided per private key.pfxPFX or PKCS12 encoded private key and certificate chain. pfx is an alternative to providing key and cert individually. PFX is usually encrypted, if it is, passphrase will be used to decrypt it.passphraseShared passphrase used for a single private key and/or a PFX.
Slack Webinar
Custom API URL
The URLs for method calls to Slack’s Web API always begin with https://slack.com/api/. In very special cases, such ascertain testing techniques, you might want to send these requests to a different URL. The slackApiUrl option allowsyou to replace this prefix with another.
Exchange an OAuth grant for a token
There’s one method in the Slack Web API that doesn’t requires a token, because its the method that gets a token! Thismethod is called oauth.v2.access. It’s used as part of the OAuth2.0 process that users initiate when installing your app into a workspace. In thelast step of this process, your app has received an authorization grant called code which it needs to exchange foran access token (token). You can use an instance of the WebClient that has no token to easily complete thisexchange.
Note: If you’re looking for a more complete solution that handles more of the OAuth process for your app, take alook at the @aoberoi/passport-slack Passport Strategy.
The Slack platform offers several APIs to build apps. Each Slack API delivers part of the capabilities from theplatform, so that you can pick just those that fit for your needs. This SDK offers a corresponding package for each ofSlack’s APIs. They are small and powerful when used independently, and work seamlessly when used together, too.
Just starting out? The Getting Started tutorial willwalk you through building your first Slack app using Node.js.
Slack APIWhat its forNPM PackageWeb APISend data to or query data from Slack using any of over 130 methods.@slack/web-apiEvents APIListen for incoming messages and many other events happening in Slack, using a URL.@slack/events-apiInteractive MessagesRespond to button clicks, dialogs, and other interactions with messages.@slack/interactive-messagesOAuthSetup the authentication flow using V2 OAuth for Slack apps as well as V1 OAuth for classic Slack apps.@slack/oauthRTM APIListen for incoming messages and a limited set of events happening in Slack, using websockets.@slack/rtm-apiIncoming WebhooksSend notifications to a single channel which the user picks on installation.@slack/webhook
Not sure about which APIs are right for your app? Read our blogpost that explains the options.If you’re still not sure, reach out for help and our community can guide you.
If you’re looking for an all-in-one solution that hides the underlying Slack APIs, but simplifies building a bot-styleapp inside Slack, try the Hubot Slack adapter. Hubot is a popular frameworkfor internal apps that automate workflows, perform ChatOps, or just generate silly memes.
Installation
Question symbol copy. Use your favorite package manager to install any of the packages and save to your package.json:
Requirements
This package supports Node v8 LTS and higher. It’s highly recommended to use the latest LTS version ofnode, and the documentation is written using syntax and featuresfrom that version.
Slack Web App
Getting Help
If you get stuck, we’re here to help. The following are the best ways to get assistance working through your issue:
Slack Webex
Issue Tracker for questions, featurerequests, bug reports and general discussion related to this package.
Email us in Slack developer support: [email protected]
Bot Developers Hangout: a Slack community for developersbuilding all types of bots. You can find the maintainers and users of this package in #sdk-node-slack-sdk.
0 notes
Text
This is really interesting, and - maybe, in a sense - kind of a subtle step in a very appealing direction...
> ### Repology, the packaging hub > #### https://repology.org/ > > Repology monitors a huge number of package repositories and other sources comparing packages versions across them and gathering other information. Repology shows you in which repositories a given project is packaged, which version is the latest and which needs updating, who maintains the package, and other related information. Repology might be useful: > > For package/port maintainers: > - Discover new releases of software you maintain packages for > - Find new projects to package > - Get in touch with fellow maintainers to improve packages together > - Keep package naming and versioning schemes in sync to other repos for your and your user's convenience > - Fix problems detected by repology, such as broken links > > For software authors: > - Keep track of where and how well your project is packaged > - Keep in touch with your product package maintainers > > For users: > - Discover new releases of software you use > - Pick distribution most suitable for you, in terms of package quantity, freshness or stability > - Keep in touch with maintainers of software you use > > #### Supported repositories > > Linux repositories: Adélie, Alpine, ALT, Amazon Linux, antiX, AOSC, Arch and AUR, Ataraxia, BlackArch, Calculate, Carbs, CentOS, Chakra, CRUX, Debian, Deepin, Devuan, Distri, ELRepo, Entware-ng, EPEL, Exherbo, Fedora, Funtoo, Gentoo, Guix, GoboLinux, Hyperbola, KaOS, KISS, Kwort, LiGurOS, Linuxbrew, Maemo, Mageia, Manjaro, Mer Project, Mint, MX Linux, Nix, openEuler, OpenMandriva, openSUSE, OpenWrt, Parabola, Pardus, Parrot, PCLinuxOS, Pisi, PLD Linux, PureOS, Raspbian, RebornOS, Rosa, Sabayon, Salix, Siduction, SlackBuilds, Slackware, SliTaz, Solus, SparkyLinux, T2 SDE, Tails, Trisquel, Ubuntu, Void > *BSD repositories: DragonFly DPorts, FreeBSD ports, MidnightBSD Mports, OpenBSD packages, pkgsrc, Ravenports > Third party repositories: Deb Multimedia, Gentoo overlays, KDE neon, OpenPKG, openSUSE additional repositories, PackMan, UnitedRPMs, RPM Fusion, RPM Sphere > Other *nix repositories: AIX Open Source Packages, HaikuPorts, Homebrew, HP-UX, IBM i, OpenIndiana, MacPorts > And non-*nix repositories: Chocolatey, ConanCenter, Cygwin, F-Droid, just-install, MSYS2 (msys2, mingw), Npackd, OS4Depot, ReactOS rapps, Scoop, Termux, Vcpkg, winget, YACP > Upstream module collections or programming language specific package managers: Buckaroo, CPAN, CRAN, crates.io, GNU ELPA, Hackage, LuaRocks, MELPA, PyPi, RubyGems, Stackage > F/OSS news sites: DistroWatch, freshcode.club, libregamewiki > Other sources: Wikidata
#repology #distros #floss #freesoftware #freesw #libresoftware #debian #arch #trisquel #ubuntu #hyperbola #f-droid #fdroid #code #source #software #apps #packages #development #hub #community #resources #tools #bsd #gnu #linux
original post
0 notes
Text
Flutter Crash Course for JavaScript Developers

Welcome! I’m glad you’re here again for some more Dart and Flutter magic.
✨ In the previous episode of this series, we looked at Dart and went from basically zero to hero with all those types, classes and asynchrony. I hope you had enough practice on Dart because today, we’ll move forward to Flutter. Let’s get started!
Quick heads up: the “👉” emoji will compare JS and React with Dart and Flutter language examples as of now. Just like in the previous episode,, the left side will be the JS/React, and the right side will be the Dart/Flutter equivalent, e.g. console.log("hi!"); 👉 print("hello!");
What is Flutter, and why we’ll use it
Flutter and Dart are both made by Google. While Dart is a programming language, Flutter is a UI toolkit that can compile to native Android and iOS code. Flutter has experimental web and desktop app support, and it’s the native framework for building apps for Google’s Fuchsia OS.
This means that you don’t need to worry about the platform, and you can focus on the product itself. The compiled app is always native code as Dart compiles to ARM, hence providing you the best cross-platform performance you can get right now with over 60 fps.
Flutter also helps the fast development cycle with stateful hot reload, which we’ll make use of mostly in the last episode of this series.
Intro to the Flutter CLI
When building apps with Flutter, one of the main tools on your belt is the Flutter CLI. With the CLI, you can create new Flutter projects, run tests on them, build them, and run them on your simulators or emulators. The CLI is available on Windows, Linux, macOS and x64-based ChromeOS systems.
Once you have the CLI installed, you’ll also need either Android Studio, Xcode, or both, depending on your desired target platform(s).
(Flutter is also available on the web and for desktop, but they are still experimental, so this tutorial will only cover the Android and iOS related parts).
If you don’t wish to use Android Studio for development, I recommend VSCode. You can also install the Dart and Flutter plugins for Visual Studio Code.
Once you’re all set with all these new software, you should be able to run flutter doctor. This utility will check if everything is working properly on your machine. At the time of writing, Flutter printed this into the console for me:
[✓] Flutter (Channel stable, v1.17.4, on Mac OS X 10.15.4 19E287, locale en-HU) [✓] Android toolchain - develop for Android devices (Android SDK version 29.0.2) [✓] Xcode - develop for iOS and macOS (Xcode 11.5) [!] Android Studio (version 3.5) ✗ Flutter plugin not installed; this adds Flutter specific functionality. ✗ Dart plugin not installed; this adds Dart specific functionality. [✓] VS Code (version 1.46.1) [!] Connected device ! No devices available
You should get similar results for at least for the Flutter part too. Everything else depends on your desired target platforms and your preferred IDEs like Android Studio or VS Code. If you get an X for something, check again if everything is set up properly.
Only move forward in this tutorial if everything works properly.
To create a new Flutter project, cd into your preferred working directory, and run flutter create <projectname>. The CLI will create a directory and place the project files in there. If you use VS Code on macOS with an iOS target, you can use this little snippet to speed up your development process:
# Create a new project flutter create <projectname> # move there cd projectname # open VS code editor code . # open iOS Simulator - be patient, it may take a while open -a Simulator.app # start running the app flutter run
And boom, you’re all set! 💅
If you don’t wish to use the iOS simulator, you can always spin up your Android Studio emulator. Use Genymotion (or any other Android emulation software), or even connect a real device to your machine. This is a slower and more error-prone solution, so I recommend to only test on real devices when necessary.
Once they have booted, you can run flutter doctor again and see if Flutter sees the connected device. You should get an output something just like this:
... [✓] Connected device (1 available) ...
If you got this output - congratulations! 🎉 You’re all set to move on with this tutorial. If, for some reason Flutter didn’t recognize your device, please go back and check everything again as you won’t be able to follow the instructions from now on.
Hello world! 🌍
If you didn’t run the magic snippet previously, run these commands now:
# Create a new project flutter create <projectname> # move there cd projectname # open VS code editor (optional if you use Studio) code . # start running the app flutter run
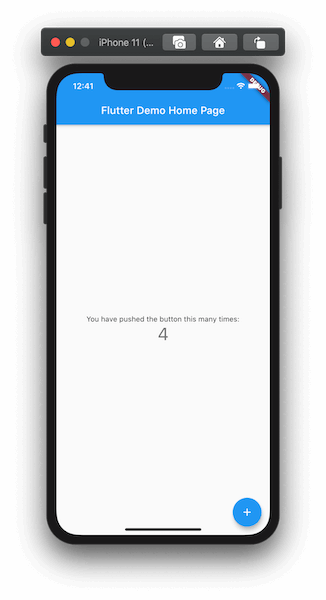
This will spin up the Flutter development server with stateful hot reload and a lot more for you. You’ll see, that by default, Flutter creates a project with a floating action button and a counter:
Once you’re finished with playing around the counter, let’s dig into the code! 👨💻
Flutter project structure
Before we dig right into the code, let’s take a look at the project structure of our Flutter app for a moment:
├── README.md ├── android │ └── ton of stuff going on here... ├── build │ └── ton of stuff going on here... ├── ios │ └── ton of stuff going on here... ├── lib │ └── main.dart ├── pubspec.lock ├── pubspec.yaml └── test └── widget_test.dart
We have a few platform-specific directories: android and ios. These contain the necessary stuff for building, like the AndroidManifest, build.gradle, or your xcodeproj.
At this moment, we don’t need to modify the contents of these directories so we’ll ignore them for now. We’ll also ignore the test directory as we won’t cover testing Flutter in this series (but we may look into it later if there’s interest 👀), so that only leaves us to these:
├── lib │ └── main.dart ├── pubspec.lock ├── pubspec.yaml
And this is where the magic happens. Inside the lib directory, you have the main.dart: that’s where all the code lives right now. We’ll peek into it later, but let’s just have a look at the pubspec.yaml and pubspec.lock.
What are those?

Package management in Flutter - pub.dev
When building a project with JavaScript, we often use third party components, modules, packages, libraries, and frameworks so that we don’t have to reinvent the wheel. The JavaScript ecosystem has npm and yarn to provide you with all those spicy zeroes and ones, and they also handle the dependencies inside your project.
In the Dart ecosystem, this is all handled by pub.dev.
So, just a few quick facts: npm 👉 pub.dev package.json 👉 pubspec.yaml package-lock.json 👉 pubspec.lock
We’ll look into installing packages and importing them into our app in the last episode of this series, in which we’ll create a fun mini-game.
Digging into the Dart code
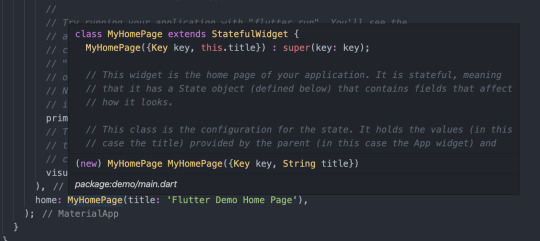
The only thing left from the file tree is main.dart. main is the heart of our app, it’s like the index.js of most JS-based projects. By default, when creating a project with flutter create, you’ll get a very well documented code with a StatelessWidget, a StatefulWidget, and its State.
So instead of observing the demo code line by line together, I encourage you to read the generated code and comments by yourself and come back here later.
In the next part, we’ll look into what are widgets and the build method.
We’ll learn why it is @overrided, and what’s the difference between stateful and stateless widgets. Then we’ll delete all the code from main.dart and create a Hello world app by ourselves so that you can get the hang of writing declarative UI code in Flutter.
Go ahead, read the generated code and the documentation now! 👀
In Flutter, everything is a widget!
As you have been reading the code, you may have noticed a few things. The first thing after importing Flutter is the entry method I have been talking about in the previous episode:
void main() { runApp(MyApp()); }
And then, you could see all those classes and OOP stuff come back with the line class MyApp extends StatelessWidget.
First things first: in Flutter, everything is a widget! Oh, and speaking of widgets. Components 👉 Widgets!
The StatelessWidget is a class from the Flutter framework, and it’s a type of widget. Another kind of widget is StatefulWidget and we’ll look into the difference between those and how to use them later.
We can create our reusable widget by extending the base class StatelessWidget with our own build method. (By the way, render in ReactJS 👉 build in Flutter). We can see that the build returns a Widget because the return type is defined, and we can see an odd keyword in the previous line: @override.
It’s needed because the StatelessWidget class has a definition for build by default, but we want to replace it (or override it) with our own implementation - hence the keyword @override. Before we dig further into the code, let’s have a peek at using widgets in Flutter:
// using a React component <button onClick={() => console.log(‘clicked!’)}>Hi, I’m a button</button>
// using a Flutter widget RawMaterialButton( onPressed: () { print("hi, i'm pressed"); }, child: Text("press me!"), ),
You can see that Flutter has a different approach with declarative UI code.
Instead of wrapping children between ><s and passing props next to the component name (e.g. <button onClick ...), everything is treated as a property. This enables Flutter to create more flexible and well-typed widgets: we’ll always know if a child is supposed to be a standalone widget or if it can accept multiple widgets as a property, for example. This will come in handy later when we’ll build layouts with Rows and Columns.
Now that we know a bit more about widgets in Flutter, let’s take a look at the generated code again:
@override Widget build(BuildContext context) { return MaterialApp( title: 'Flutter Demo', theme: ThemeData( primarySwatch: Colors.blue, ), home: MyHomePage(title: 'Flutter Demo Home Page'), ); }
The build method returns a MaterialApp that has a type of Widget and - unsurprisingly - comes from Flutter. This MaterialApp widget is a skeleton for your Flutter app. It contains all the routes, theme data, metadata, locales, and other app-level black magic you want to have set up. 🧙
You can see the MyHomePage class being referenced as the home screen. It also has a property, title, set up. MyHomePage is also a widget, and we can confirm that by looking at the definition of this class.
Quick tip: if you are using VSCode as your editor, hold Command and hover or click on the class reference and you’ll be directed to the code of the class.
We can see that MyHomePage extends a StatefulWidget. However, the structure of the code itself is a bit squiggly and weird. What’s this MyHomePage({Key key, this.title}) : super(key: key); syntax? Why doesn’t this widget have a build method? What’s a State? What is createState?
To answer these questions, we’ll have to look into one of the more hard-code topics in Flutter: state management.
Local state management in Flutter: StatefulWidgets
I previously talked about the two main types of widgets in Flutter: StatelessWidgets and StatefulWidgets. StatelessWidgets are pretty straightforward: a snippet of code that returns a Widget, maybe some properties are being passed around, but that’s all complexity.
However, we don’t want to write applications that just display stuff! We want to add interactivity! And most interactions come with some state, whether it’s the data stored in an input field or some basic counter somewhere in your app. And once the state is updated, we want to re-render the affected widgets in our app - so that the new data is being displayed for the user.
Think of state management in React: it has the very same purpose with the goal of being as efficient as possible. It’s no different in Flutter: we want to have some very simple widgets (or StatelessWidgets), and some widgets with a bit of complexity and interactivity (or StatefulWidgets).
Let’s dive into the code: a StatefulWidget consists of two main components:
a StatefulWidget (that is called MyHomePage in our case)
a typed State object (that is called _MyHomePageState in this example)
We’ll call these “widget” and “state” (respectively) for the sake of simplicity. The widget itself contains all the props, and a createState overridden method. As you can see, the prop is marked with a final - that’s because you cannot change the prop from within the widget. When you modify a prop of a widget, Flutter throws the current instance away and creates a brand new StatefulWidget.
Note that changing either the prop or the state will trigger a rebuild in Flutter - the key difference between the two is that changing the state can be initiated from within the widget while changing a prop is initiated by the parent widget.
Props help you pass data from parent to children. State helps you handle data change inside the children.
Now, let’s look into changing the state: inside the widget, we have a createState method that only returns the state, _MyHomePageState(). When modifying the state with the setState method, this createState method gets called and returns a new instance of your state. The old instance gets thrown away, and a new instance of your widget will be inserted into the widget tree.
(Sidenote: the widget tree is only a blueprint of your app, the element tree is the one that gets rendered for the user. It’s a bit more advanced, under-the-hood topic, so it won’t be covered in this series - however, I’ll link some video resources later on that will help you understand how Flutter works and what’s the deal with the widget tree and the element tree.)
The _MyHomePageState class has a type of State, typed with MyHomePage.
This is needed so that you can access the properties set in the MyHomePage instance with the widget keyword - for example, to access the title prop, write widget.title. Inside the state, you have an overridden build method, just like you’d see in a typical StatelessWidget. This method returns a widget that renders some nice data, both from props (widget.title) and from the state (_counter).
Notice that you don’t need to type in anything before the _counter. No this.state._counter, no State.of(context)._counter, just a plain old _counter. That’s because from the perspective of the code, this variable is declared just like any other would be:
int _counter = 0;
However, when modifying this variable, we need to wrap our code in setState, like this:
setState(() { _counter++; });
This will tell Flutter that “Hey! It’s time to re-render me!”.
The framework will call the previously discussed createState method; a new instance of your state gets created; built; rendered; and boom! 💥 The new data is now on-screen.
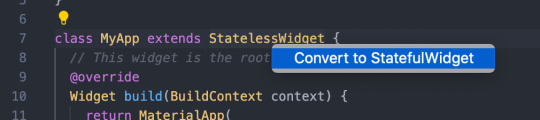
It may seem a bit complicated or seem like you have to write a lot of boilerplate code to get this running. But don’t worry! With VS Code, you can refactor any StatelessWidget into a stateful one with just one click:
And that’s it for managing your widget’s state! It may be a lot at first, but you’ll get used to it after building a few widgets.
A few notes about global state management in Flutter
Right now, we only looked at working with local state in Flutter - handling app-level, or global state is a bit more complex. There are, just like in JS, tons of solutions, ranging from the built-in InheritedWidget to a number of third-party state management libraries. Some of those may already be familiar, for example, there is RxDart and Redux, just to name a few. To learn more about the most popular solutions, and which one to choose for your project, I suggest you watch this awesome video about global state management in Flutter by Fireship.
Widgets, widgets, and widgets
I already talked about how everything is a widget in Flutter - however, I didn’t really introduce you to some of the most useful and popular widgets in Flutter, so let’s have a look at them before we move on!
Flutter has widgets for displaying texts, buttons, native controls like switches and sliders (cupertino for iOS and material for Android style widgets), layout widgets like Stack, Row, Column and more. There are literally hundreds of widgets that are available for you out of the box, and the list keeps growing.
The whole widget library can be found here in the Widget Catalog, and the Flutter team is also working on a very nice video series with new episodes being released weekly. This series is called Flutter Widget of the Week, and they introduce you to a Flutter widget, it’s use cases, show you code examples and more, in just about one minute! It’s really binge-worthy if you want to get to know some useful Flutter widgets, tips, and tricks.
Here a link for the whole series playlist, and here is the intro episode.
Some useful widgets in Flutter
As you’ll work with Flutter, you’ll explore more and more widgets, but there are some basic Flutter widgets you’ll absolutely need to build your first application. (We’ll probably use most of them in the next and last episode of this series, so stay tuned!)
First and foremost: Text.
The Text widget delivers what its name promises: you can display strings with it. You can also style or format your text and even make multiline texts. (There’s are a lot of line of text-related widgets available, covering your needs from displaying rich text fields to creating selectable texts.)
An example Text widget in Flutter:
Text('hello world!'),
Adding buttons to your Flutter app is also easy as one two three. There are numerous button-related widgets available for you ranging from RawMaterialButton to FlatButton, IconButton, and RaisedButton, and there are also specific widgets for creating FloatingActionButtons and OutlineButtons. I randomly picked 🎲 the RaisedButton for us so that we can have a peek at how easy it is to add a nice, stylish button into our app:
RaisedButton( onPressed: () { print( "hi! it's me, the button, speaking via the console. over.", ); }, child: Text("press meeeeeee"), ),
Building layouts in Flutter
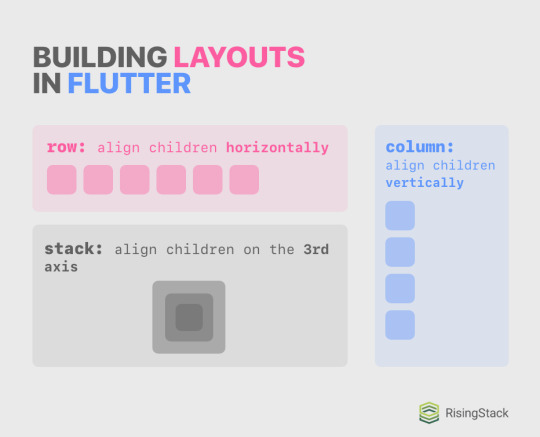
When building flexible and complex layouts on the web and in React-Native, the most important tool you used was flexbox. While Flutter isn’t a web-based UI library and hence lacks flexbox, the main concept of using flexible containers with directions and whatnot is implemented and preferred in Flutter. It can be achieved by using Rows and Columns, and you can stack widgets on each other by using Stacks.
Consider the following cheatsheet I made:
Remember how I previously praised typing the props of a widget and how it’s one of the best tools in Flutter’s declarative UI pattern? The Row, Column and Stack widgets all have a children property that want an array of widgets, or [Widget]. Lucky for you, the VS Code automatically completes the code for you once you start working with these widgets:
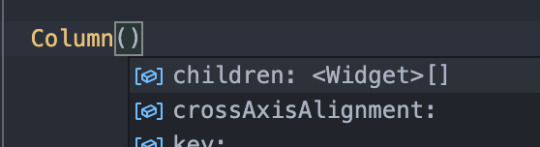
Just hit tab to let Code complete the code for you! Maybe in the future, you won’t need to write code at all, Flutter will just suck out the app idea out of your brain and compile that - but until then, get used to hitting tab.
Let’s look at an example where we display some names underneath each other:
Column( children: <Widget>[ Text("Mark"), Text("Imola"), Text("Martin"), Text("Zoe"), ], ),
You can see that you create a typed list with the <Widget>[] syntax, you pass it as a prop for the Column, create some amazing widgets inside the list, and boom! The children will be displayed underneath each other. Don’t believe me? Believe this amazing screenshot. 📸

Alignment
The real power of Columns and Rows isn’t just placing stuff next to each other, just like flexbox isn’t only about flex-direction either. In Flutter, you can align the children of a Column and Row on two axes, mainAxis and crossAxis.
These two properties are contextual: whilst in a Row, the main axis would be horizontal, and the crossing axis would be vertical, it would be switched in a Column. To help you better understand this axis concept, I created a handy cheat sheet with code examples and more.
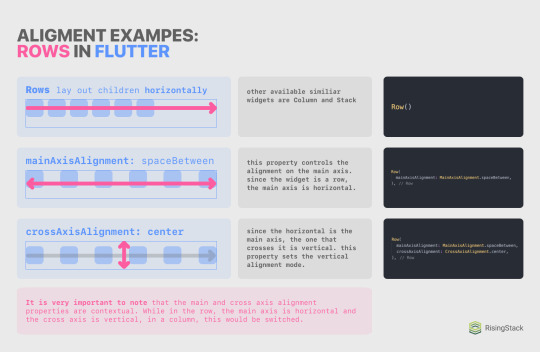
So, for example, if you want to perfectly center something, you’d want to use either the Center widget; or a Row or Column with both mainAxisAlignment and crossAxisAlignment set to .center; or a Row and Column with their mainAxisAlignments set to .center. The possibilities are basically endless with these widgets! ✨
Rendering lists (FlatLists 👉 ListViews)
Whilst thinking about possible use cases for columns, you may have wondered about creating scrollable, dynamic, reorderable, or endless lists.
While these features could be achieved by using Columns, it would take a lot of effort to do so, not even mentioning updating your list data or lazy rendering widgets when there’s a crapton of data. Lucky you, Flutter has a class for rendering lists of data, and it’s called a ListView!
There are several ways to use a ListView, but the most important ones are the ListView(...) widget and the ListView.builder method. Both of them achieve the very same functionality from the perspective of the user, but programmatically, they differ big time.
First, let’s look into the ListView(..) widget. Syntactically, they are very similar to a Column except that they lack the main and cross-axis alignment properties. To continue on with our previous example for columns when we placed names under each other, I’ll display the very same column converted into a ListView:
ListView( children: <Widget>[ Text("Mark"), Text("Imola"), Text("Martin"), Text("Zoe"), ], ),
Tada! 🎉 Your first ListView in Flutter! When refreshing or rebuilding the app (by either pressing a small or capital R in the Flutter CLI), you’ll see the very same thing you saw previously.
However, if you try to drag it, you are now able to scroll inside the container! Note that when a Column has bigger children than its bounds, it will overflow, but a ListView will be scrollable.
ListView builder
While the ListView widget is cool and good, it may not be suitable for every use case. For example, when displaying a list of tasks in a todo app, you won’t exactly know the number of items in your list while writing the code, and it may even change over time. Sure, you are able to run .map on the data source, return widgets as results, and then spread it with the ... operator, but that obviously wouldn’t be performant, nor is it a good practice for long lists. Instead, Flutter provides us a really nice ListView builder.
Sidenote: while working with Flutter, you’ll see the word “builder” a lot. For example, in places like FutureBuilder, StreamBuilder, AnimatedBuilder, the build method, the ListView builder, and more. It’s just a fancy word for methods that return a Widget or [Widget], don’t let this word intimidate or confuse you!
So how do we work with this awesome method? First, you should have an array or list that the builder can iterate over. I’ll quickly define an array with some names in it:
final List<String> source = ["Sarah", "Mac", "Jane", "Daniel"];
And then, somewhere in your widget tree, you should be able to call the ListView.builder method, provide some properties, and you’ll be good to go:
ListView.builder( itemCount: source.length, itemBuilder: (BuildContext context, int i) => Text(source[i]), ),
Oh, and notice how I was able to use an arrow function, just like in JavaScript!
The itemCount parameter is not required, but it’s recommended. Flutter will be able to optimize your app better if you provide this parameter. You can also limit the maximum number of rendered items by providing a number smaller than the length of your data source.
When in doubt, you can always have a peek at the documentation of a class, method, or widget by hovering over its name in your editor:

And that sums up the layout and list-related part of this episode. We’ll look into providing “stylesheets” (or theme data) for your app, look at some basic routing (or navigation) methods, and fetch some data from the interwebs with HTTP requests.
Theming in Flutter
While building larger applications with custom UI components, you may want to create stylesheets. In Flutter, they are called Themes, and they can be used in a lot of places. For example, you can set a default app color, and then the selected texts, buttons, ripple animations, and more will follow this color. You can also set up text styles (like headings and more), and you’ll be able to access these styles across the app.
To do so, you should provide a theme property for your MaterialApp at the root level of the application. Here’s an example:
return MaterialApp( title: 'RisingStack Flutter Demo', theme: ThemeData( // Define the default brightness and colors. brightness: Brightness.light, primaryColor: Colors.green[300], accentColor: Colors.green, // Define button theme buttonTheme: ButtonThemeData( buttonColor: Colors.green, shape: CircleBorder(), ), // Define the default font family // (this won’t work as we won’t have this font asset yet) fontFamily: 'Montserrat', // Define the default TextTheme. Use this to specify the default // text styling for headlines, titles, bodies of text, and more. textTheme: TextTheme( headline1: TextStyle(fontSize: 72.0, fontWeight: FontWeight.bold), headline6: TextStyle(fontSize: 36.0, fontStyle: FontStyle.italic), bodyText2: TextStyle(fontSize: 14.0, fontFamily: 'Muli'), ), ), home: Scaffold(...), );
These colors will be used throughout our app, and accessing the text themes is also simple as a pickle! I added a RaisedButton on top of the app so that we can see the new ButtonThemeData being applied to it:

It’s ugly and all, but it’s ours! 🍋 Applying the text style won’t be automatic, though. As we previously discussed, Flutter can’t really read your mind, so you explicitly need to tag Text widgets as a headline1 or bodyText2, for example.
To do so, you’ll use the Theme.of(context) method. This will look up the widget tree for the nearest Theme providing widget (and note that you can create custom or local themes for subparts of your app with the Theme widget!) and return that theme. Let’s look at an example:
Text( "cool names", style: Theme.of(context).textTheme.headline6, ),
You can see that we are accessing the theme with the Theme.of(context) method, and then we are just accessing properties like it’s an object. This is all you need to know about theming a Flutter app as it really isn’t a complex topic!
Designing mobile navigation experiences
On the web, when managing different screens of the app, we used paths (e.g. fancysite.com/registration) and routing (e.g., react-router) to handle navigating back and forth the app. In a mobile app, it works a bit differently, so I’ll first introduce you to navigation on mobile, and then we’ll look into implementing it in Flutter.
Mobile navigation differs from the web in a lot of ways. Gestures and animations play a very heavy role in structuring out the hierarchy of the app for your user. For example, when a user navigates to a new screen, and it slides in from the right side of the screen, the user will expect to be able to move back with a slide from the left. Users also don’t expect flashy loadings and empty screens when navigating - and even though there are advancements on the web in this segment (e.g. PWAs), it’s by far not the default experience when using websites.
There are also different hierarchies when designing mobile apps. The three main groups are:
Hierarchical Navigation (e.g. the Settings app on iOS)
New screens slide in from left to right. The expected behavior for navigating back is with a back button on the upper left corner and by swiping from the left edge of the screen to the right.
Flat Navigation (e.g. the Apple Music app)
The default behavior for this hierarchy is a tab bar on the bottom.
Tabs should always preserve location (e.g. if you navigate to a subscreen inside on tab one, switch to tab two and switch back to tab one, you’d expect to be on the subscreen, not on the root level screen.)
Swiping between tabs is optional. It isn’t the default behavior and it may conflict with other gestures on the screen itself - be cautious and think twice before implementing swipeable tab bars.
Custom, content-driven, or experimental navigation (Games, books and other content)
When making experimental navigation, always try to be sane with the navigation. The user should always be able to navigate back and undo stuff.
I created a handy cheat sheet for you that will remind you of the most important things when in doubt:
Also, all of these can be mixed together, and other screens like modals can be added to the stack. Always try to KISS and make sure that the user can always navigate back and undo things. Don’t try to reinvent the wheel with navigation (e.g., reverse the direction of opening up a new screen) as it will just confuse the user.
Also, always indicate where the user is in the hierarchy (e.g., with labeling buttons, app title bar, coloring the bottom bar icons, showing little dots, etc.). If you want to know more about designing mobile navigation experiences and implementing them in a way that feels natural to the user, check out Apple’s Human Interface Guideline’s related articles.

Navigation in Flutter
When routing on the web with React or React-Native, you had to depend on third-party libraries to get the dirty work done for you (e.g. react-router). Luckily, Flutter has native navigation capabilities out of the box, and they cover every need of most of the apps, and they are provided to you via the Navigator API.
The applications of this API and the possibilities to play around with navigation are endless. You can, for example, animate a widget between screens; build a bottom navigation bar or a hamburger menu; pass arguments; or send data back and forth. You can explore every navigation-related Flutter cookbook here. In this series, we’ll only look into initializing two screens, navigating between them, and sharing some widgets between them.
To get started with navigation, let’s create two widgets that we’ll use as screens and pass the first into a MaterialApp as the home property:
import 'package:flutter/material.dart'; void main() { runApp(MyApp()); } class MyApp extends StatelessWidget { @override Widget build(BuildContext context) { return MaterialApp( title: 'Flutter Demo', home: ScreenOne(), ); } } class ScreenOne extends StatelessWidget { @override Widget build(BuildContext context) { return Scaffold( body: Center( child: Text("hey! 👋"), ), ); } } class ScreenTwo extends StatelessWidget { @override Widget build(BuildContext context) { return Scaffold( body: Center( child: Text("hi! 👋👋"), ), ); } }
This was easy as a breeze. If you run this app in a simulator, you’ll see “hey! 👋” on the center of the screen. Now, inside the MaterialApp, we can define our routes:
return MaterialApp( title: 'Flutter Demo', home: ScreenOne(), routes: <String, WidgetBuilder>{ '/hey': (BuildContext context) => ScreenOne(), '/hi': (BuildContext context) => ScreenTwo(), }, );
Then, we’ll need something that will trigger the navigation. I’ll add a RaisedButton to the ScreenOne:
return Scaffold( body: Column( mainAxisAlignment: MainAxisAlignment.center, crossAxisAlignment: CrossAxisAlignment.center, children: <Widget>[ Text("hey! 👋"), RaisedButton( child: Text("take me there"), onPressed: () { print("hi!"); }, ), ], ), );
And now, we can navigate the user to the next screen when the button is pressed. Notice that I replaced the Center with a Column with both its main and cross axises centered. This was required because I wanted to have two children underneath each other: a Text and a RaisedButton. Inside the RaisedButton, we only have to push the route to the stack and let Flutter handle the routing and animation:
Navigator.pushNamed(context, '/hi');
By default, we can navigate back to the previous screen by swiping from the left edge of the screen. This is the expected behavior, and we don’t intend to change it, so we’ll leave it as it is. If you want to add a button on the second screen to navigate back to the first screen, you can use Navigator.pop(); method.
Don’t ever push to the same screen the user is on, nor the previous screen. Always use pop when navigating backward.
This will be just enough to cover your basic navigation needs. Don’t forget, if you want to check out more advanced navigation features such as animating widgets between screens or passing data back and forth, check out the related Flutter cookbooks.
Networking, HTTP requests
Now that you can build widgets, layouts, display lists, and you can navigate between screens with Flutter, there’s only one thing left: communicating with your backend API. One of the most popular BaaS providers for mobile and Flutter is Firebase by Google. It allows you to use real-time databases, push notifications, crash reporting, app analytics, and a lot more out of the box. You can find the Flutter Firebase packages on pub.dev or you can follow this step-by-step tutorial.
If you are a more experienced developer and you have a complex project with a custom backend in mind, or if you are just genuinely looking forward to using your own selection of backend APIs - Firebase just won’t suit your needs.
That’s where the http package comes in handy.
Just add it into your dependency list inside the pubspec.yaml, wait until flutter pub get finishes (VSCode automatically runs it for you if it detects changes in the pubspec.yaml), and then continue reading:
dependencies: flutter: sdk: flutter http: any
http is a Future-based library for making HTTP requests. To get started with it, just import it:
import 'package:http/http.dart' as http;
And then, you can start making requests with top-level methods like http.post or http.get. To help you experiment with making HTTP requests in Flutter, I have made a demo API that you can GET on. It will return some names and ages. You can access it here (https://demo-flutter-api.herokuapp.com/people).
Parsing JSON data in Flutter and Dart
After making your GET request on the API, you’ll be able to get data out of it by accessing properties like this:
void request() async { final response = await http.get("https://demo-flutter-api.herokuapp.com/people"); print(response.body); // => [{"name":"Leo","age":17},{"name":"Isabella","age":30},{"name":"Michael","age":23},{"name":"Sarah","age":12}] print(json.decode(response.body)[0]["name"]); // => Leo }
However, this solution should not be used in production. Not only it lacks automatic code completion and developer tooling, but it’s very error-prone and not really well documented. It’s just straight-up crap coding. 💩
Instead, you should always create a Dart class with the desired data structure for your response object and then process the raw body into a native Dart object. Since we are receiving an array of objects, in Dart, we’ll create a typed List with a custom class. I’ll name the class Person, and it will have two properties: a name (with a type of String) and age (int). I’ll also want to define a .fromJson constructor on it so that we can set up our class to be able to construct itself from a raw JSON string.
First, you’ll want to import dart:convert to access native JSON-related methods like a JSON encoder and decoder:
import 'dart:convert';
Create our very basic class:
class Person { String name; int age; }
Extend it with a simple constructor:
Person({this.name, this.age});
And add in the .fromJson method, tagged with the factory keyword. This keyword informs the compiler that this isn’t a method on the class instance itself. Instead, it will return a new instance of our class:
factory Person.fromJson(String str) => Person.fromMap(json.decode(str)); factory Person.fromMap(Map<String, dynamic> json) => new Person( name: json["name"], age: json["age"], );
Notice that I created two separate methods: a fromMap and a fromJson. The fromMap method itself does the dirty work by deconstructing the received Map. The fromJson just parses our JSON string and passes it into the fromMap factory method.
Now, we should just map over our raw response, use the .fromMap factory method, and expect everything to go just fine:
List<Person> listOfPeople = json .decode(response.body) .map<Person>((i) => Person.fromMap(i)) .toList(); print(listOfPeople[0].name); // => Leo
Sidenote: I didn’t use the .fromJson method because we already parsed the body before mapping over it, hence it’s unneeded right now.
There is a lot to unwrap in these few lines! First, we define a typed list and decode the response.body. Then, we map over it, and we throw in the return type <Person> to the map so that Dart will know that we expect to see a Person as a result of the map function. Then, we convert it to a List as otherwise it would be an MappedListIterable.
Rendering the parsed JSON: FutureBuilder and ListView.builder
Now that we have our app up and running with our basic backend, it’s time to render our data. We already discussed the ListView.builder API, so we’ll just work with that.
But before we get into rendering the list itself, we want to handle some state changes: the response may be undefined at the moment of rendering (because it is still loading), and we may get an error as a response. There are several great approaches to wrap your head around handling these states, but we’ll use FutureBuilder now for the sake of practicing using new Flutter widgets.
FutureBuilder is a Flutter widget that takes a Future and a builder as a property. This builder will return the widget we want to render on the different states as the Future progresses.
Note that FutureBuilder handles state changes inside the widget itself, so you can still use it in a StatelessWidget! Since the http package is Future-based, we can just use the http.get method as the Future for our FutureBuilder:
@override Widget build(BuildContext context) { return Scaffold( body: FutureBuilder( future: http.get("https://demo-flutter-api.herokuapp.com/people"), ), ); }
And we should also pass a builder. This builder should be able to respond to three states: loading, done and error. At first, I’ll just throw in a centered CircularProgressIndicator() to see that our app renders something:
return Scaffold( body: FutureBuilder( future: http.get("https://demo-flutter-api.herokuapp.com/people"), builder: (BuildContext context, AsyncSnapshot<http.Response> response) { return Center( child: CircularProgressIndicator(), ); }, ), );
If you run this app, you’ll see a progress indicator in the center of the screen running indefinitely. We can get the state of the response by the response.hasData property:
builder: (BuildContext context, AsyncSnapshot<http.Response> response) { if (response.hasData) { // loaded! } else if (response.hasError) { // error! return Center( child: Text("error!"), ); } else { // loading... return Center( child: CircularProgressIndicator(), ); } },
And now, we can be sure that nothing comes between us and processing, then rendering the data, so inside the response.hasData block, we’ll process the raw response with previously discussed parsing and mapping method, then return a ListView.builder:
// loaded! List<Person> listOfPeople = json .decode(response.data.body) .map<Person>((i) => Person.fromMap(i)) .toList(); return ListView.builder( itemCount: listOfPeople.length, itemBuilder: (BuildContext context, int i) => Text( "${listOfPeople[i].name} (${listOfPeople[i].age})", ), );
And that’s it! 🎉 If you run this snippet right now, it will render four names and their corresponding ages next to them. Isn’t this amazing? It may have seemed like a lot of work for a simple list like this, but don’t forget that we created a whole-blown class, parsed JSON, and converted it into class instances, and we even handled loading and error states.
Summing it all up
Congratulations on making it this far into the course! You have learned a lot and came along a long way since we started in the previous episode.
You went from zero to hero both with Dart (types, control flow statements, data structures, OOP, and asynchrony) and Flutter (CLI, widgets, alignment, lists, themes, navigation and networking).
This really has been a lot of work, and you’ll still have to learn a lot until you get fluent in Flutter, but in the end, the only thing that will matter is the result of your hard work. And that’s what we’re going to harvest in the next and last episode of this Flutter series: we’ll build a fun mini-game with Flutter! 🎲
I’m really looking forward to seeing you here next week. Until then, stay tuned, and happy Fluttering! ✌️
All the bests, 🍻 Daniel from RisingStack
Flutter Crash Course for JavaScript Developers published first on https://koresolpage.tumblr.com/
0 notes
Photo

The Simplest Android App: Hello World
Learning to code Android apps is a great decision. It's fun and it's an in-demand skill for the tech industry. In this tutorial, you'll learn how to build the simplest Android App: Hello World. It's a great place to start making Android apps.
Prerequisites for Creating a Hello World App
Before you get started with this tutorial, you should have:
A basic understanding of object-oriented programming and the Java programming language.
A computer running Windows or Linux, or a Mac running macOS.
Install Android Studio
Android Studio is the official integrated development environment for native Android app development. It comes with all the tools necessary for developing apps such as a powerful code editor, debugger, testing support, and performance tools . It also comes with a Gradle-based build system, fast emulators, code templates, and much more.
Android Studio is available for Windows, macOS, and Linux platforms, and you can download it from here.
Proceed to download the appropriate Android Studio distribution file and install it according to your operating system.
Windows
For a .exe file (recommended), double-click to launch it.
For a .zip file, unpack the ZIP and copy the android-studio folder into your Program Files folder. Open the android-studio/bin folder and launch the .exe file.
Follow the setup wizard guide to complete the installation.
Linux
Unpack the .zip file you downloaded to /usr/local for your user profile, or /opt for shared users.
To launch Android Studio, open a terminal, go to the android-studio/bin directory, and run studio.sh.
Choose whether to import previous Android Studio settings or not, and then click OK.
Follow the setup wizard guide to complete the installation.
Android Studio Install for Mac
Launch the Android Studio DMG file.
Drag and drop Android Studio into the Applications folder, and then launch Android Studio.
Select whether to import previous Android Studio settings and then click OK.
Follow the setup wizard guide to complete the installation.
Hello World Android Application
First, a peek at what we'll be building. The completed Android hello world application will look like this:
To create this simplest Android app, just follow along with the steps in this tutorial.
Create the App Project
Launch Android Studio, and you should see a welcome page, as shown below.
In the welcome page above, click Start a new Android Studio project. The next window presents the activities page, as shown below.
Create a Hello World Activity
Android Studio provides activity templates to help you get started. For the Hello World project, choose Empty Activity and click Next.
An activity is a crucial component of any Android app. It provides a screen with which users can interact to perform activities, such as dial the phone, take a photo, or send a message. Each Activity has a window in which to draw its user interface. The window typically fills the screen, but it may be smaller than the screen and float on top of other windows.
You can learn more about Activities and many other topics in Android development in the Android From Scratch series.
Android
Android From Scratch: Activities and Fragments
Paul Trebilcox-Ruiz
Configure the Hello World Project Details
We'll finish creating the project by configuring some details about its name, location and which API version it uses.
Change the name of the application.
Change the default Project location to your preferred directory or just leave it the default location.
On the minimum API level, Ensure that API 15: Android 4.0.3 IceCreamSandwich is set as the Minimum SDK: this ensures that your application runs on almost all devices.
Click Finish.
The Gradle Build System
Each time you create a new application, Android Studio creates a folder for your projects and builds the project with its Gradle system. The Gradle process may take a few moments. Gradle is Android's build system, which is responsible for the compilation, testing, and deployment of code. It makes it possible for the app to run on the device.
Explaining the Files in an Android App Project
Whenever you start a new project, Android Studio creates the necessary folder structure and files for that app. Let's look at the different files involved in an Android app project.
The manifests Folder
The manifests folder contains the AndroidManifest.xml file. The manifest file describes essential information about your application.
The java Folder
This folder contains the Java source code files. As you can see from the editor window above, the MainActivity.java file contains the Java source code for the app's main Activity.
The res Folder
This folder includes all non-code resources, such as:
layouts: Layouts are XML files that define the architecture for the UI in an Activity or a component of a UI. For example, in our application, the activity_main.xml file corresponds to the main Activity.
values: Contains the color, style, and string XML files for the application.
drawable: This is a catch-all for a graphics that can be drawn to the screen, eg. images.
build.gradle: This is an auto-generated file which contains information on details of the app such as the SDK version, build tools version, application ID, and more.
Coding the Hello World App
Now that you have a general view of the project structure let's describe the most critical component files that constitute the hello world application.
The Default Main Activity
The main activity is the first screen that will appear when you launch your app.
Each Activity represents a screen of the Android app's user interface. Each Activity has a Java (or Kotlin) implementation file and a XML layout file.
The Default Main Activity Java Code
Below is the default Java code generated by the application for the main activity.
package com.example.helloworldapplication; import androidx.appcompat.app.AppCompatActivity; import android.os.Bundle; public class MainActivity extends AppCompatActivity { @Override protected void onCreate(Bundle savedInstanceState) { super.onCreate(savedInstanceState); setContentView(R.layout.activity_main); } }
You don't need to understand this code fully. A lot of it is boilerplate and will be the same for any app. The code defines a MainActivity class and with the onCreate method defines what happens when the Activity is created. In this case, it simply initializes the view of the Activity with the layout from the activity_main layout file.
The Default Layout XML File
XML files are used for layouts. The main Activity layout XML file is found in the project's /app/src/main/res/layout directory. Layout files are named after what they represent. For example, the Hello World application has one layout, which is the activity_main.xml named after the main Activity.
Here is the default activity_main.xml layout. It contains one text view element, with the text Hello World!
Activity.xml <?xml version="1.0" encoding="utf-8"?> <androidx.constraintlayout.widget.ConstraintLayout xmlns:android="https://schemas.android.com/apk/res/android" xmlns:app="http://schemas.android.com/apk/res-auto" xmlns:tools="http://schemas.android.com/tools" android:layout_width="match_parent" android:layout_height="match_parent" tools:context=".MainActivity"> <TextView android:layout_width="wrap_content" android:layout_height="wrap_content" android:text="Hello World!" app:layout_constraintBottom_toBottomOf="parent" app:layout_constraintLeft_toLeftOf="parent" app:layout_constraintRight_toRightOf="parent" app:layout_constraintTop_toTopOf="parent" /> </androidx.constraintlayout.widget.ConstraintLayout>
Changing the Activity Layout
As you can see, we don't need to change much to complete our Hello World app, but we'll make a small change so that the text stands out better—we'll change the text colour and font size.
<TextView android:layout_width="wrap_content" android:layout_height="wrap_content" android:text="Hello World!" android:textSize="50dp" android:textColor="#800000" app:layout_constraintBottom_toBottomOf="parent" app:layout_constraintLeft_toLeftOf="parent" app:layout_constraintRight_toRightOf="parent" app:layout_constraintTop_toTopOf="parent" />
The Strings File
The strings.xml file provides text strings for your application. For example, a default strings file looks like this:
STRINGS <resources> <string name="app_name">Hello World Application</string> </resources>
If you want to change your app name, you can do it here.
Running the Application
Connect your Android device to your computer with a USB cable. The right connection type should show up as connected as a media device.
You'll also need developer options enabled on your device. If this is not already enabled, follow these steps (this will work on most Android devices:
Open up the Settings menu on your Android phone and scroll to the bottom.
Tap About phone and scroll down again until you see the Build number option
Tap the Build number multiple times. Soon you should see a pop-up that reads something similar to You are five taps away from being a developer.
Keep tapping until the pop-up says you're a developer.
Go back to the main Settings > System > Advanced. Developer options should be the second-last option. Turn the Developer options on.
In Android Studio's navigate to the top menu, select Run 'app'. Android Studio will show a dialog where you can choose what device to run your Android app. Choose your connected device and click the OK button.
The Hello World application should now be running on your phone. From here, you can make modify your app to whatever you want and add more features.
Conclusion
In this tutorial, I showed you how to install Android Studio and create your first app: Hello World, the simplest Android app. After following this tutorial to create your first Android app, you are on your way to a promising career in developing apps!
To learn more about Android programming, check out some of our other Android tuorials here on Envato Tuts+.
Android From Scratch: Exploring Android Sample Apps
One of the most daunting tasks when developing for Android, for both beginners and experts, is figuring out where to start when using a new feature. Luckily,...
Paul Trebilcox-Ruiz
04 Apr 2016
Android
How to Learn Android App Development: Start With These Courses and Tutorials
Aiming to build apps for Android? This article walks you through some of the best courses and tutorials on Android app development that we have to offer.
Kyle Sloka-Frey
25 Apr 2020
App Development
How to Get Started Making Android Apps
In this tutorial, you'll learn how to install Android Studio and various Android SDK components. You'll also learn to create an Android emulator that can be...
Ashraff Hathibelagal
28 Dec 2019
Android SDK
Understanding the Android App Development Kit
Android software development is the process of creating new applications running on the Android operating system. These apps are mainly written in Java, C++,...
Esther Vaati
27 Feb 2020
Android
The Best Free To-Do List Apps for Android and How to Make One Yourself
Keeping track of your tasks can be overwhelming if you don't have them organized. That's where a to-do list helps. In this post, I'll show you some of the...
Esther Vaati
26 May 2020
Android
Build a 360-Degree Video Player App With an Android App Template
There's no doubt that we are living in the age of virtual reality. VR videos and 360 videos have been popular for the last few years, and there are tons of...
Esther Vaati
27 Mar 2020
Android
by Esther Vaati via Envato Tuts+ Code https://ift.tt/3ePjHpz
0 notes
Text
Tutorial How To Create Custom Android Code Templates
Mobile App Development: Tutorial How To Create Custom Android Code Templates
(No Ratings Yet) Loading...
Introduction
This tutorial will show you how to create custom Android code templates of your own. Most Android developers would have used Android code templates at least once to start projects. But have you tried creating your own Android code templates? In this tutorial, we will show you how to create a template that can be used to generate a Android project from Android Studio IDE that contains Google Analytics configuration. (Google Analytics v4 for Android)
Tung Dao Xuan, [email protected], is the author of this article and he contributes to RobustTechHouse Blog
Video & Source Code
Source Code
You can download the source code at GoogleAnalyticApplication-2015-05-31.
Step by Step Video
[vc_video title=”Video Tutorial How To Create Custom Android Code Template” link=”https://www.youtube.com/watch?v=rhsBrBcgMkQ”]
High Level View of Code Generation Process
If you are not familiar with the code generation process, please also check out the documentation of the full process here.
Steps To Create Custom Android Code Templates For Google Analytics
To build your own template, please ensure that:
You understand the code generation process described above at a high level.
You have some knowledge about FreeMarker
You have some knowledge about Android IDE Template Format and you can see the documentation here.
Step 1: Create Google Analytic Application Folder
This is for the template directory you need. On Windows, place it in: path-to-your-installation-android-studio-folder\plugins\android\lib\templates\activities. Please change your path appropriately on Linux, Mac OS etc.
Then, create the root folder and other files inside your GoogleAnalyticApplication folder.
Step 2: Create template.xml file
Each template directory must contain a template.xml file. This XML file contains the metadata about the template, including the name, description, category and user-visible parameters that the IDE will present as options to the user. The XML file also indicates the name of the recipe XML file which gets processed by FreeMarker, and the global variables XML file if there are global variables besides the template parameter values that should be visible to all FreeMarker-processed files (.ftl files).
<?xml version="1.0"?> <template format="3" revision="4" name="Google Analytics Application" minApi="7" minBuildApi="14" description="Creates a new application that has already Google Analytics configuration."> <category value="Activity" /> <formfactor value="Mobile" /> <parameter id="activityClass" name="Activity Name" type="string" constraints="class|unique|nonempty" suggest="${layoutToActivity(layoutName)}" default="MainActivity" help="The name of the activity class to create" /> <parameter id="layoutName" name="Layout Name" type="string" constraints="layout|unique|nonempty" suggest="${activityToLayout(activityClass)}" default="activity_main" help="The name of the layout to create for the activity" /> <parameter id="classApplication" name="Class extends Application" type="string" constraints="nonempty|class" help="The name of class that extends from Application" /> <parameter constraints="nonempty|string" id="googleAnalyticID" name="Google Analytic ID" type="string" help="Id of Google Analytic" /> <parameter id="dispatchPeriod" name="Dispatch Period" help="Frequency of automatic dispatch in seconds. Defaults to 30 minutes (1800 seconds)." type="string" default="1800"/> <parameter id="autoActivityTracking" name="Auto Activity Tracking" help="If true, views (Activities) will be tracked automatically. false by default." type="boolean" default="false"/> <!-- 128x128 thumbnails relative to template.xml --> <thumbs> <!-- default thumbnail is required --> <thumb>template_google_analytics.png</thumb> </thumbs> <globals file="globals.xml.ftl" /> <execute file="recipe.xml.ftl" /> </template>
There are parameters: activityClass, layoutName, classApplication, googleAnalyticID, dispatchPeriod, autoActivityTracking which will be shown in popups when you create a project.
Step 3: Create globals.xml.ftl file
The optional globals XML file contains global variable definitions, for use in all FreeMarker processing jobs for this template.
<?xml version="1.0"?> <globals> <global id="manifestOut" value="${manifestDir}" /> <global id="srcOut" value="${srcDir}/${slashedPackageName(packageName)}" /> <global id="resOut" value="${resDir}" /> </globals>
Step 4: Create folder & files inside root folder
The root folder contains template source code & template resource to generate.
4a. Create AndroidManifest.xml.ftl
<?xml version="1.0" encoding="utf-8"?> <manifest xmlns:android="http://schemas.android.com/apk/res/android" package="${packageName}"> <application android:name="${packageName}.${classApplication}" android:allowBackup="true" android:icon="@drawable/ic_launcher" android:label="@string/app_name" android:theme="@style/AppTheme"> <meta-data android:name="com.google.android.gms.version" android:value="@integer/google_play_services_version" /> <meta-data android:name="com.google.android.gms.analytics.globalConfigResource" android:resource="@xml/analytics_global_config" /> <activity android:name=".activities.MainActivity" android:label="@string/app_name"> <intent-filter> <action android:name="android.intent.action.MAIN" /> <category android:name="android.intent.category.LAUNCHER" /> </intent-filter> </activity> </application> </manifest>
There are parameters: packageName & classApplication that are declared in template.xml file above.
4b. Create Application.java.ftl
package ${packageName}; import android.app.Application; import com.google.android.gms.analytics.GoogleAnalytics; import com.google.android.gms.analytics.Tracker; /** * Created by TungDX on 5/29/2015. */ public class ${classApplication} extends Application { private static GoogleAnalytics analytics; private static Tracker tracker; @Override public void onCreate() { analytics = GoogleAnalytics.getInstance(this); tracker = analytics.newTracker("${googleAnalyticID}"); } public static GoogleAnalytics getGoogleAnalytics() { return analytics; } public static Tracker getTracker() { return tracker; } }
There are parameters: packageName & googleAnalyticID which are parameters declared in template.xml file above.
4c. Create MainActivity.java.ftl
package ${packageName}.activities; import android.os.Bundle; import android.support.v7.app.ActionBarActivity; import ${packageName}.${classApplication}; import ${packageName}.R; public class MainActivity extends ActionBarActivity { @Override protected void onCreate(Bundle savedInstanceState) { super.onCreate(savedInstanceState); setContentView(R.layout.activity_main); } @Override protected void onStart() { super.onStart(); ${classApplication}.getGoogleAnalytics().reportActivityStart(this); } @Override protected void onStop() { super.onStop(); ${classApplication}.getGoogleAnalytics().reportActivityStop(this); } }
There are parameters: packageName & classApplication which are parameters declared in template.xml file above.
4d. Create activity_main.xml.ftl
<RelativeLayout xmlns:android="http://schemas.android.com/apk/res/android" xmlns:tools="http://schemas.android.com/tools" android:layout_width="match_parent" android:layout_height="match_parent" android:paddingLeft="@dimen/activity_horizontal_margin" android:paddingRight="@dimen/activity_horizontal_margin" android:paddingTop="@dimen/activity_vertical_margin" android:paddingBottom="@dimen/activity_vertical_margin"> <TextView android:text="@string/ready" android:layout_width="wrap_content" android:layout_height="wrap_content" /> </RelativeLayout>
4e. Create strings.xml.ftl
<resources> <#if !isNewProject> <string name="title_${activityToLayout(activityClass)}">${escapeXmlString(activityTitle)}</string> </#if> <string name="ready">Google Analytic is ready!</string> </resources>
4f. Create dimens.xml
<resources> <!-- Default screen margins, per the Android Design guidelines. --> <dimen name="activity_horizontal_margin">16dp</dimen> <dimen name="activity_vertical_margin">16dp</dimen> </resources>
4g. Create recipe.xml.ftl file
The recipe XML file contains the individual instructions that should be executed when generating code from this template. For example, you can copy certain files or directories (the copy instruction), optionally run the source files through FreeMarker (the instantiate instruction), and ask the IDE to open a file after the code has been generated (the open instruction).
<?xml version="1.0"?> <recipe> <dependency mavenUrl="com.android.support:support-v4:${targetApi}.+" /> <dependency mavenUrl="com.android.support:appcompat-v7:${targetApi}.+"/> <dependency mavenUrl="com.google.android.gms:play-services:6+" /> <instantiate from="AndroidManifest.xml.ftl" to="${escapeXmlAttribute(manifestOut)}/AndroidManifest.xml" /> <instantiate from="src/app_package/Application.java.ftl" to="${escapeXmlAttribute(srcOut)}/${classApplication}.java"/> <instantiate from="src/app_package/activities/MainActivity.java.ftl" to="${escapeXmlAttribute(srcOut)}/activities/${activityClass}.java"/> <instantiate from="res/xml/analytics_global_config.xml.ftl" to="${escapeXmlAttribute(resOut)}/xml/analytics_global_config.xml"/> <instantiate from="res/layout/activity_main.xml.ftl" to="${escapeXmlAttribute(resOut)}/layout/${layoutName}.xml"/> <copy from="res/values/dimens.xml" to="${escapeXmlAttribute(resOut)}/values/dimens.xml"/> <merge from="res/values/strings.xml.ftl" to="${escapeXmlAttribute(resOut)}/values/strings.xml" /> <open file="${escapeXmlAttribute(srcOut)}/activities/${activityClass}.java" /> <open file="${escapeXmlAttribute(resOut)}/layout/${layoutName}.xml" /> </recipe>
4h. Check Dependencies
4i. Check AndroidManifest.xml.ftl
<instantiate from="AndroidManifest.xml.ftl" to="${escapeXmlAttribute(manifestOut)}/AndroidManifest.xml" />
4j. Check Application.java.ftl
<instantiate from="src/app_package/Application.java.ftl" to="${escapeXmlAttribute(srcOut)}/${classApplication}.java"/>https://robusttechhouse.com/wp-admin/post.php?post=6937&action=edit&message=10#
4k. Check MainActivity.java.ftl
<instantiate from="src/app_package/activities/MainActivity.java.ftl" to="${escapeXmlAttribute(srcOut)}/activities/${activityClass}.java"/>
4l. Check analytics_global_config.xml.ftl
<instantiate from="res/xml/analytics_global_config.xml.ftl" to="${escapeXmlAttribute(resOut)}/xml/analytics_global_config.xml"/>
4m. Generate files: activity_main.xml, dimens.xml, strings.xml from template to project.
<instantiate from="res/layout/activity_main.xml.ftl" to="${escapeXmlAttribute(resOut)}/layout/${layoutName}.xml"/> <copy from="res/values/dimens.xml" to="${escapeXmlAttribute(resOut)}/values/dimens.xml"/> <merge from="res/values/strings.xml.ftl" to="${escapeXmlAttribute(resOut)}/values/strings.xml" />
4n. Open files after the project is generated.
<open file="${escapeXmlAttribute(srcOut)}/activities/${activityClass}.java" /> <open file="${escapeXmlAttribute(resOut)}/layout/${layoutName}.xml" />
Try Generating A Project For Your Own Template
If your Android Studio IDE is running, please restart it to see your own template as shown in following image.
If you encounter this error when you are generating a project from the template:
AssertionError: Wrong line separators: ‘…plication;\r\n\r\nimport…’ at offset 29:
Please check your line separators in all your files in the template. Please ensure that you use the correct line separators for your computer’s OS. Eg Window uses LF, Linux or MAC OS use CRLF.
Conclusion
And that’s it. It isn’t that difficult to create custom Android code templates and you will benefit from it in the long-term because you would adhere to the DRY (Don’t Repeat Yourself) principle and save yourself some time. Have fun coding!
RobustTechHouse is a leading tech company focusing on mobile app development, ECommerce, Mobile-Commerce and Financial Technology (FinTech) in Singapore. If you are interested to engage RobustTechHouse on your projects in Singapore, you can contact us here.
References
Video showing the steps
Source code can be downloaded at GoogleAnalyticApplication-2015-05-31
Custom Android Code Templates Slides
GoogleSource Templates
ADT Template Format Documentation by Roman Nurik
Tutorial How To Create Custom Android Code Templates was originally published on RobustTechHouse - Mobile App Development Singapore
0 notes
Text
Progression of M.A.R.S - Weeks 15-20 + Extra Research
M.A.R.S was a very interesting term. There might be another post after this, but for now I’ll give you the full process of what I did so far this term (using screenshots from previous posts).
Note, this may contain extracts from my previous posts because I either forgot the process or couldn’t word it any differently.
Cinema 4D - Captain’s Chair
For our first project, we were taught how to make a Captain’s Chair similar to the one in Star Trek, which if you don’t know, looks like this:

Because of the immense effort I have to take in order to re-create every detail on this chair, I chose to go simple by using basic shapes and sizes.

For this, I started out with a flat cylindrical base. Then, I added a cone in the middle of it to give it that base-y feel. A few more shapes are used within the cone to give the chair a spinning mechanic, which involved me making cubes, cylinders and spheres (I have no screenshots of the underside so imagine it for now). Finally, to give it a seat, I just used cubes and resized them accordingly. Now THAT is a lot of cubes in one model. If I did it practically with clay or super-sculpie instead of digitally, I would have done the same, only with a tougher base.

Then I had to transform the shapes into polygons to have a bigger base, tilted walls and sloped surfaces. This was done by making the object editable, selecting the Polygons selection tool and dragging the faces accordingly. This was tough to figure out at first, but now I think I’ve got the hang of it.
Mudbox - Alien-like Creature
Then we took to Autodesk Mudbox to make an alien. This required us to download a full human figure and adjust it with tools to level out spots, lumps and deformed body parts.
We then had to take THAT to Cinema 4D and make a little animation with the character rig (which also had to be downloaded and applied).
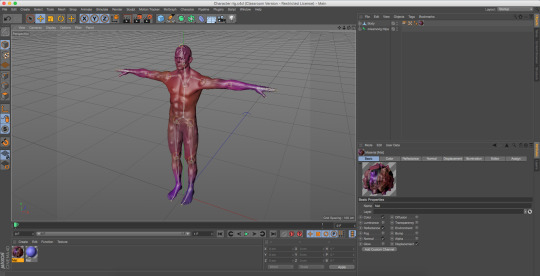
In the animation I made, the figure puts it’s arms into an “L” shape, shakes it’s head, and then kicks the viewer. Afterward, it thinks about what it did and then puts it’s hand on it’s head in shock that it hurt someone.
Nobody was actually hurt in the process, don’t worry.
This was VERY hard to do as the export process was absolutely horrendous and I can’t even begin to tell you how to do it properly because of how problematic it can be.
What I did first was selecting UVs and maps. Then I had to select the options I needed for my character to look good. I enabled paint map saving as well as two other essentials, and added filenames to the bottom of all but the paint map save.
After a lot of trial and error, that was done.
Unity - Gaming Time!
After all that stuff was done, it was time to move into Unity, a games engine! Personally, this was my favourite part of the entire project as I like to game/make games.
First I had to make Terrain by using GameObject > Terrain, and then scale up certain parts of it using Brush tools to lift it up. The textures on it come from Google Images, which have then been imported into Unity to be used there. The cubes, however, are stone cubes (also stock images). They are added by simply clicking on GameObject > 3D Object > Cube. After that, we had to import a Unity package that comes WITH Unity when you install it, which creates a character. A move-able character that you can control.

Then I chose to add a lot of floating cubes and make a parkour-like game as it was very basic and the gravity in-game can be altered to make it look like they’re on another planet. Some of those cubes move up and down continuously by code, which is what you see in the image above.
For the code, we originally used Adobe Dreamweaver as that was what we had in our selection of coding programs. We then switched to Visual Studio 2018 as that is apparently easier to handle your code with (sometimes it gets on your nerve with the auto-completion mechanic).
If you want to know, the game is written in C#. If you know Java, you can use that too. I currently know most of C#, so I chose to use that. If you’re curious, I know a little bit of C++ and Java. Anyway, moving on.

There were a lot of changes I chose to make with the game to both make it work properly and be good. This included having a lot of problems with code, movement and placement, and since this was a game that I played a lot, it was very easy to get distracted.
RESEARCH TIME
Kerbal Space Program
youtube
Kerbal Space Program is a game made in the Unity engine that appears to be a game where you have to stock up resources and upgrade your vehicle to fly it into space. While in space, you can visit other planets (and even land on them to explore!). Personally, I have never played this game. It does look interesting though because it requires strategy and good thinking in order to complete it, so I might consider getting it.
Escape From Tarkov
youtube
Escape From Tarkov is another game made in the Unity engine that appears to be a game similar to Half-Life 2 (which is a game I have played), which requires you to run around with weapons and kill off people who try and capture you or leave you for dead. Just like Kerbal Space Program, you can modify your accessories/weapons to make them look better or insanely overpowered.
Hearthstone
youtube
Hearthstone is yet another game made in the Unity engine that appears to be a trading card game similar to Yu-Gi-Oh (which is another game that I have played). The objective of the game appears to be to wipe out your opponent’s main card to win (which has a set amount of hitpoints, which is the amount of hits it can take before it gets wiped out).
BACK TO UNITY

The final part of this project involved me having to make a timer, a menu and give the planet a sense of darkness. The first thing I added was a timer, and a fail counter.
During the development of levels 3 and 4, I came across a cheat, where you can just jump up the very end of the landscape and skip levels 1 and 2, going straight to level 3. However, that is now impossible to do without hacking the game.
I have written a check in the game’s code to check if the player is far enough to the side, near the edge of the terrain. If they are, and they haven’t completed level 2 yet, they will be stopped in their tracks, and “YOU! SHALL NOT!! CHEAT!!!” will pop up in the interface.
I put the text there for humorous purposes, as it calls out the cheater directly. I might change this text however, or just remove it entirely, seeing as it isn’t really needed. The text is also, you guessed it, a reference to “You shall not pass” from Lord of the Rings (I haven’t seen the movie but I know of the memes associated with it).

Another feature I have added in is Fog. Fog is directly implemented into Unity, so I just have to check a box within the “skybox” that says “Fog”, and this is the result. I’ve added it because it adds a dark feeling to the world and also makes invisible objects visible again (cubes that blend with terrain behind them, making them very difficult to see).

I have built the menu outside of the map, VERY far away, so that even if fog wasn’t enabled, nobody would be able to see it from the planet map.
The menu was made with triggers, or invisible objects that make the game do things when the player interacts with them. Say for example, if you want to walk into a cube and get teleported to another map, you can set it to do that via triggers and… ahem, code.

If you cannot understand this, don’t worry. First of all, the game checks to see if the player is colliding with a mesh (which is what the trigger is made of, mainly). It will then check the TAG of that object, whether it’d be Mode 1, Mode 2, Void or whatever.
If one of the tags matches it’s respective tag in the list of statements, then it will either teleport the player or make the game do things, such as increasing the fall counter by 1 or setting the level count to 3.
Now the game is fully built and is ready to play on Windows, Mac and Linux.
What was your initial plan with this? What did you focus on and WHY?
I chose to focus on game design as that is my main comfort zone within the three, plus it is the easiest for me to get the hang of. Plus, I have about 8 years experience in game design (although 7 of them were spent in the Scratch engine, then I moved to Game Maker and Unity).
I chose to do it because I couldn’t see myself making a standout sculpt or very wacky spaceship with interior design. Maybe I could’ve done one of the other two I had more time.
What is your story?
The story is that the first people who went to the moon for the first time in 1969 found a mysterious object on the way back to Earth. This was thought to be a planet, so they sent somebody else there (who is you, the player). They are now trapped on the planet with no way out but to get to the top of the cliffs and hope.
Inspiration?
Apart from the moon landing and my game design experience, none.
Review?
I... have just explained that in the rest of the post beforehand. I went over all three aspects.
Final Evaluation?
Personally, I think my game turned out very good. The only thing I would do to improve it is learn more of Unity to add more fonts and even a glitch-like effect with night vision, along with maybe a few more levels or even some enemies that try and stop you from progressing. However, I couldn’t do so due to the fact I had to test it over and over again for about four hours, which didn’t really allow me to stick to my original plan, which was to have a boss-like level in the game where the platforms get destroyed as soon as you step on them, making it a very difficult Level 5. In all seriousness, this was a very fun project for me as I enjoyed every single step of it. I have learned a lot about the digital industry and 3D game design. The only hard steps I had was near the end when I compiled the game and found out my interface had to be re-aligned, along with a menu issue, which instead of using a proper buttoned menu I used hotkeys instead (cheating). Again, if I had more time, I would’ve made a proper menu, made the boss level and even more elements. But now we’re here at the end, with a game that is good enough... and difficult as well, for everyone else. Because I have experience in C# coding, that part wasn’t hard at all. All I had to learn was the proper elements of Unity as there are a LOT of code tidbits that Unity adds to make things easier.
Final Research about Cinema 4D - 5 Examples of what was made in it

1 - This picture was made in Cinema4D using lighting, shapes and fog. From the looks of it, it looks like the car in front of the driver is going to pull out of the fuel station, or is just going to sit there forever. I like it because it looks so realistic, which is very tedious in 3D software.

2 - Another realistic picture, but this time with a building in the middle of a forest. This looks like it wasn’t even made in Cinema4D at all, and that is why I like it.

3 - A semi-realistic picture of a giant vehicle puffing out red smoke before (what looks like it will be) driving off, crushing about 400 people. This reminds me of Cars 2 for some reason. Deserted village, car-... oh wait, the car is a TOASTER? Well then... Anyway, I like this picture without reason. I just like it.

4 - A realistic picture of a sink with some utilities beside it. This was done with transparent shapes to give the water it’s reflective effect, hence the mirror (which is probably just a plain copy of the scenery from this side). Again, I like it because it is a realistic picture, plus the detail.

5 - Another realistic picture that doesn’t look like it was made with Cinema4D at all. It looks like an abandoned fuel station with what looks like a giant ball near it. Do I have to say I like it? Well yes, because of the detail it has to make it realistic.
These five images are directly pulled from the Cinema4D website, the gallery: https://www.maxon.net/en-gb/gallery/
Phew, that was a lot of research and reflection. Again, there may be another post after this, but if not, then I’ll see you in my FINAL MAJOR PROJECT!
0 notes
Link
So I got many comments on my previous article, many by Windows 10 users who are ignorant to modern Linux. I still see people claiming that Ubuntu is terrible... and throw 16.04 LTS into the argument. I have seen this happen so often, and people who do not understand Linux or what it has now always try to throw the claim "Linux is not as good as Windows 10", and that argument is void of any real arguments. I always hear the same several arguments thrown around, and I have to say that they are about as easily debunkable as flat-earth science.
"Linux doesn't have as much software"
While partially true, in sense of high-end enterprise software from Adobe, you could argue that. However, as you can replace everything to do with Google, you can replace the entire Adobe suite with something on Linux. To focus on the main ones: Photoshop, Illustrator, Premiere. Four Linux apps can easily replace them: Kdenlive (video editing), Inkscape (vector graphics), GIMP (image editing and manipulation), Krita (drawing and art). For game developers, I mean you probably heard of these two but Unity Engine supports Linux and Godot supports Linux. GameMaker: Studio (1 and 2) can be easily supported by Proton and Wine, while not losing out on speed. Adobe itself can theoretically run over Wine. Wine being the compatibility layer (not emulator) of Windows programs.
Heck in that same field, gaming. While some companies idiotically ban Linux users for no reason, many others don't. Games like CS:GO, Team Fortress 2, Minecraft, and more fairly large games support Linux out of the box, not to mention so do thousands of games. Some games also work fairly well with Proton, with games like the Sims 3 only needing a slight amount of work (by renaming a couple of files). Games like GTA 5 also work fairly well, and other communities all over the world work their butts off so others can enjoy the games smoothly on Linux.
One last thing for software and that is that Adobe might start supporting Linux one day, and when it does, the survival of Windows 10 is gone.
"Linux is hard to use/install"
Here is the deal. False. Even Arch Linux, a distribution known for being hard is just simply a long process you need to be slightly accurate with. Most distributions not only come with a GUI but also an easy GUI installer. Ubiquity, Calamares, and others all have easier installations than normal Windows 10. Yes, Windows 10 is harder to install than Linux. Not only that, but Linux also has many hardware manufacturers. Companies like HP, Lenovo, Dell, and more support both Linux and Windows 10 to come pre-installed. There are also even manufacturers who are Linux only. System76 is one of the largest of these.
Let's get into using Linux. Well, I can't see how it is harder if you don't pick a distribution that is intentionally difficult like Arch or Gentoo. Most distributions have tools where you can ignore the command line, like the app stores, something Linux has had for a while, even before Apple. To install software, it is harder to do on Windows 10. Let's see the steps to install an app on Windows.
Google the app name/go to the website
Make sure you download the right thing
Go through the install wizard
Restart your computer (might not be required for all apps)
Now on Linux, there are three ways to do it. Let's go through the CLI method first, the GUI method, and the app store method.
CLI:
Google what the package is called on your package manager
Run the package manager. (Optional: Update repos)
GUI:
Google the app name/go to the website
Download the proper edition (.deb, .rpm, .AppImage)
Install it and run it
App Store:
Open the app store on your distribution (if one is supported)
Search for the app
Install the app and run it.
So Linux does it faster, and easier. With three methods to do it, and much more possibly supported. Even Flatpak and Snap can centralize the process, so if you use a smaller distribution it won't be as much of an issue on the supported repos. And for the CLI method, on Ubuntu, that command would be sudo apt install some-package, Arch Linux it is sudo pacman -S some-package, Fedora it would be sudo dnf install some-package and I think you get the point.
Many Windows 10 stans always claim that "Linux is worse because you need the CLI, which is difficult." Which is false. Nano is easy to write files as you would in notepad, HTop is like Task Manager on Windows, and other tools on the CLI have the same goal. Efficiency. You can 100% ignore the CLI, but the reason it exists to do things faster. You don't have to use it.
"Linux is toxic"
While true sometimes, any community has the toxic parts. Same thing in Windows 10. However, the easiest way to avoid it is to stick with something based on Ubuntu. While you might still see it sometimes, most of the Ubuntu users (including myself) are 100% willing to answer the stupid questions and will enjoy doing it without bullying you. Arch Linux also has it's nicer parts, with people willing to help out, and even Manjaro has a decent community for helping with Arch.
So even the most toxic of Linux isn't that hard to avoid, and it isn't most of these communities. Communities will sometime even learn a little bit for you so you can have an easier time.
Well what about Windows?
Well, there is a lot wrong with Windows. You can't make it your OS. It is filled with adware, bloatware, lagware, and spyware. Also for a US$100 price tag, well that isn't worth it now is it. A lot of Windows only specific apps only need mild work to get running on Linux, those who are more of an issue plan to support Linux (some at least), and major corporations see Linux as a valuable thing to support, including Valve (the people behind CS:GO and Steam) who contributes to Wine and even has a setup of their fork of Wine called Proton, which is built into Steam. What Windows 10 support compared to Linux is the life support of a couple of games who ban Linux users for no reason and Adobe, but if Adobe supports Linux, Windows 10 will no doubt fall. Even now Windows 10 is slowly bleeding users
0 notes
Text
How to print “HELLO WORLD” with empty main() in C, C++, and Java?
Follow
Follow
Follow
C Language
1) One way of doing this is to apply GCC constructor attribute to a function so that it executes before main()
#include /* Apply the constructor attribute to myStartupFun() so that it is executed before main() */ void myStartupFun(void) __attribute__((constructor)); /* implementation of myStartupFun */ void myStartupFun(void) { printf(“HELLO WORLD”); } int main() { }
2) In linux, just override the default definition of _start() function so that it would work as a custom startup code.
#include #include int main(void) { } // _start() function void _start(void) { printf(“HELLO WORLD”); // Call main() function int var = main(); exit(var); } Now compile this by following command gcc -nostartfiles -o file file.c
C++ Language
1) The idea is to create a class, have a cout statement in constructor and create a global object of the class. When the object is created, constructor is called and “HELLO WORLD” is printed.
#include class MyClass { public: MyClass() { std::cout << "HELLO WORLD"; } } m; int main() { }
2) The idea is to create a struct and use the same logic which is discussed above. The reason is that struct and class in C++ are exactly the same data structure except struct default to public visibility while class defaults to private visibility
#include struct Mystruct { Mystruct() { std::cout << "HELLO WORLD"; } } obj; int main() {}
3) By using a global variable, idea is to initialize printf() function to a global variable, but it will work only in C++ language as in C language we can’t initialize variable or expression like this to global variable.
#include int var = printf(“HELLO WORLD”); int main() { }
JAVA LANGUAGE
The idea is to use static block for printing, actually, any static blocks declared outside the main() method in java is executed before the main method. class Myjava { static { System.out.println(“HELLO WORLD”); } public static void main(String args[]) { } }
What is the difference between margin and padding?
by Akansha Rai | February 2, 2020 | The Coding Bus | 0 Comments
This blog here tells you the difference between padding and margin. An easy tutorial on most common mistakes programmers make.
Read More
How to print “HELLO WORLD” with empty main() in C, C++, and Java?
by Akansha Rai | February 2, 2020 | Download Code, Programming questions | 0 Comments
Different ways to write the program without having anything in main using C, C++ and JAVA.
Read More
How to design Contact form 7 in WordPress
by The Coding Bus | January 30, 2020 | Wordpress | 0 Comments
Contact Form 7 is one of the most popular contact form plugins for WordPress. This is the tutorial to how to design Contact form 7 in WordPress.
Read More
Programmers
by The Coding Bus | January 27, 2020 | Memes | 0 Comments
Read More
You cant programming
by The Coding Bus | January 27, 2020 | Memes | 0 Comments
Read More
The first step in learning programming
by The Coding Bus | January 27, 2020 | Memes | 0 Comments
Read More
NPM command not found
by Akansha Rai | January 24, 2020 | Solution to basic errors, The Coding Bus | 0 Comments
The most basic errors of all time npm command not found. While everything works fine with local project its dependencies, there might be the problem with global installation of some packages which are not installed or sometimes are not accessed via terminal bash command.
Read More
How to make voice translator app in MIT app inventor
by The Coding Bus | December 28, 2019 | The Coding Bus | 0 Comments
Here is the simplest tutorial on how to build a MIT translator app. Just groove into it and start learning.
Read More
Simple HTML Website Template Download
by The Coding Bus | December 16, 2019 | Uncategorized | 0 Comments
Free HTML5 Website Templates All of these basic web design templates are released as ‘open source’ designs which means that you are FREE to download and use them for anything you want (including modifying and amending them). These are beautiful yet simple html5...
Read More
Hello World! Program in HTML
by The Coding Bus | December 16, 2019 | Uncategorized | 0 Comments
In this tutorial, you will learn how to create a simple hello world page with HTML. Firstly, let explains some of the HTML basics. HTML is stands for Hyper Text Markup Language HTML is a text file which consists a set of markup tags like...
Read More
The post What is the difference between margin and padding? appeared first on The Coding Bus.
from WordPress https://ift.tt/2GJl5L0 via IFTTT
0 notes