#how to use a multimeter for beginners
Explore tagged Tumblr posts
Visit Tumblr Blog
Explore Tumblr blogs with no restrictions, modern design and the best experience.
Last Seen Tumblr Blogs


Fun Fact
Tumblr was attacked by a cross-site scripting worm deployed by the Internet troll group GNAA on Dec 3, 2012.
Text
From Circuits to Solutions: Practical Projects to Elevate Your EE Skills
From Breadboards to Breakthroughs” encapsulates the journey of an aspiring electrical engineer as they evolve from basic circuit experiments to advanced, real-world engineering projects. Hands-on projects are essential for building practical skills, reinforcing theoretical knowledge, and preparing for professional challenges. Below is a guide to project-based learning that can help you improve your electrical engineering (EE) skills at every stage.
Beginner Projects: Building Foundations
Simple LED Circuit
What you learn: Basic circuit design, current and voltage concepts, use of resistors and LEDs.
Tools: Breadboard, jumper wires, resistors, LEDs, battery.
Battery Tester
What you learn: Measuring voltage and current, basic instrumentation, and safety practices.
Water Level Indicator
What you learn: Sensor integration, simple logic circuits, and practical applications.
Logic Gates and Digital Circuits
What you learn: Boolean logic, digital circuit fundamentals, and troubleshooting.
DIY Switch Circuits
What you learn: Circuit switching, input/output devices, and practical wiring.
Intermediate Projects: Expanding Your Skills
Infrared Security System
What you learn: Sensor-based security, signal processing, and system integration.
Digital Voltmeter
What you learn: Instrumentation, analog-to-digital conversion, and measurement accuracy.
Solar Charger
What you learn: Renewable energy concepts, power management, and circuit protection.
Motor Control Circuits
What you learn: Driving motors, pulse-width modulation (PWM), and power electronics.
Heart Rate Monitor
What you learn: Biomedical instrumentation, sensor interfacing, and signal filtering.
Advanced Projects: Real-World Breakthroughs
Smart Home Automation System
What you learn: IoT, wireless communication (Bluetooth, Wi-Fi), and system integration.
Wireless Power Transfer System
What you learn: Inductive coupling, resonant circuits, and energy efficiency.
Dual Axis Solar Power Tracker
What you learn: Mechatronics, sensor feedback, and renewable energy optimization.
Smart Energy Meter
What you learn: Real-time data monitoring, wireless communication, and energy management.
DIY Quadcopter or Drone
What you learn: Embedded systems, motor control, wireless communication, and robotics.
Why Hands-On Projects Matter
Resume Building: Practical projects demonstrate your skills to potential employers and can help you land internships or jobs
Theory Application: Projects bridge the gap between classroom learning and real-world engineering challenges.
Skill Discovery: Experimenting with different projects helps you identify your interests and strengths.
How to Get Started
Gather Basic Tools: Invest in a quality breadboard, jumper wires, resistors, capacitors, LEDs, and a multimeter.
Start Simple: Begin with basic circuits and gradually tackle more complex projects as your confidence grows.
Use Online Resources: Take advantage of tutorials, simulation tools, and open-source project guides.
Join Maker Communities: Engage with online forums, local maker spaces, and engineering clubs for support and inspiration.
Document Your Work: Keep a project journal, take photos, and share your progress on platforms like GitHub or LinkedIn.
Conclusion
Arya College of Engineering & I.T. is one of the best colleges of Jaipur, which is progressing from breadboard experiments to advanced engineering projects is a transformative process that builds both technical expertise and problem-solving confidence. By systematically advancing through beginner, intermediate, and advanced projects, you will develop a robust skill set that prepares you for the challenges and opportunities of a career in electrical engineering.
2 notes
·
View notes
Text

📦 All India FREE Delivery 📞 Contact Number: +91 88726-46155 💸 Now Only: ₹1,299 (20% Discount) 🔖 MRP: ₹1,650 ✅ Order Now option is available
---
🎁 You get 25+ Free Training Videos – very helpful for learning through practical examples.
✅ Total 28 Chapters – each chapter covers important and practical topics ✅ Colorful Photos + Easy Diagrams – to help you understand concepts easily ✅ Available in Hindi, Punjabi, and English – no language barrier!
-🔧 What Will You Learn?
🔹 Sensors, Relays & Voltages– What they are and how to test them, explained in complete detail 🔹 Multimeter Usage – All functions and correct usage of a multimeter are explained simply 🔹 Diagnostic Tools – Learn about tools used for fault detection in vehicles 🔹 Car and Truck ECM Repair – A perfect guide for both beginners and advanced learners
Hi-Tech Automotive Skills Development Academy
#MechatronicsBasics#ECMRepair#AutomobileTraining#CarRepairSkills#TruckMechanic#VehicleDiagnostics#MultimeterTraining#SensorTesting#AutoElectrical#GarageLife#MadeInIndia#IndianMechanics#BharatSkills#IndiaLearning#FreeDeliveryIndia#HindiMeSikhe
0 notes
Text
From Breadboards to Breakthroughs: Hands-On Projects to Improve Your EE Skills

From Breadboards to Breakthroughs” encapsulates the journey of an aspiring electrical engineer as they evolve from basic circuit experiments to advanced, real-world engineering projects. Hands-on projects are essential for building practical skills, reinforcing theoretical knowledge, and preparing for professional challenges. Below is a guide to project-based learning that can help you improve your electrical engineering (EE) skills at every stage.
Beginner Projects: Building Foundations
Simple LED Circuit
What you learn: Basic circuit design, current and voltage concepts, use of resistors and LEDs.
Tools: Breadboard, jumper wires, resistors, LEDs, battery.
Battery Tester:
· What you learn: Measuring voltage and current, basic instrumentation, and safety practices.
Water Level Indicator
What you learn: Sensor integration, simple logic circuits, and practical applications.
Logic Gates and Digital Circuits: What you learn: Boolean logic, digital circuit fundamentals, and troubleshooting.
DIY Switch Circuits: What you learn: Circuit switching, input/output devices, and practical wiring.
Intermediate Projects: Expanding Your Skills
Infrared Security System: What you learn: Sensor-based security, signal processing, and system integration.
Digital Voltmeter: What you learn: Instrumentation, analog-to-digital conversion, and measurement accuracy.
Solar Charger: What you learn: Renewable energy concepts, power management, and circuit protection.
Motor Control Circuits
What you learn: Driving motors, pulse-width modulation (PWM), and power electronics.
Heart Rate Monitor: What you learn: Biomedical instrumentation, sensor interfacing, and signal filtering.
Advanced Projects: Real-World Breakthroughs
Smart Home Automation System: What you learn: IoT, wireless communication (Bluetooth, Wi-Fi), and system integration.
Wireless Power Transfer System: What you learn: Inductive coupling, resonant circuits, and energy efficiency.
Dual Axis Solar Power Tracker: What you learn: Mechatronics, sensor feedback, and renewable energy optimization.
Smart Energy Meter: What you learn: Real-time data monitoring, wireless communication, and energy management.
DIY Quadcopter or Drone: What you learn: Embedded systems, motor control, wireless communication, and robotics.
Why Hands-On Projects Matter
Resume Building: Practical projects demonstrate your skills to potential employers and can help you land internships or jobs
Theory Application: Projects bridge the gap between classroom learning and real-world engineering challenges.
Skill Discovery: Experimenting with different projects helps you identify your interests and strengths.
How to Get Started
Gather Basic Tools: Invest in a quality breadboard, jumper wires, resistors, capacitors, LEDs, and a multimeter.
Start Simple: Begin with basic circuits and gradually tackle more complex projects as your confidence grows.
Use Online Resources: Take advantage of tutorials, simulation tools, and open-source project guides.
Join Maker Communities: Engage with online forums, local maker spaces, and engineering clubs for support and inspiration.
Document Your Work: Keep a project journal, take photos, and share your progress on platforms like GitHub or LinkedIn.
Conclusion
Arya College of Engineering & I.T. is one of the best engineeering college in Jaipur, which is progressing from breadboard experiments to advanced engineering projects is a transformative process that builds both technical expertise and problem-solving confidence. By systematically advancing through beginner, intermediate, and advanced projects, you will develop a robust skill set that prepares you for the challenges and opportunities of a career in electrical engineering.
Source: Click Here
#best btech college in jaipur#top engineering college in jaipur#best private engineering college in jaipur#best engineering college in rajasthan#best btech college in rajasthan#best engineering college in jaipur
0 notes
Text
Top Mobile Repair Mistakes Technicians Make – And How to Avoid Them
Mobile repair is a highly technical and hands-on profession. Whether you're a beginner or an experienced technician, avoiding common repair mistakes is key to your success and customer satisfaction. At Mobile Guru Advance Tech, we’ve trained thousands of students across India and Nepal on how to repair devices the right way — and more importantly, how to avoid costly errors.
🔧 Here Are the Most Common Mistakes in Mobile Repair:
1. Skipping Diagnosis and Rushing the Repair
Many beginners start fixing without understanding the core issue. Always diagnose the fault thoroughly using tools like multimeters, schematic diagrams, and software diagnostics.
2. Using the Wrong Tools
Using low-quality or incorrect tools can damage components. Invest in professional-grade tools for chip-level work, soldering, and jumper repairs.
3. Neglecting ESD Protection
Electrostatic discharge (ESD) can silently damage circuits. Always use anti-static mats, gloves, and wrist straps when working on PCBs.
4. Overheating Components
Heat guns and soldering irons must be used with precision. Overheating ICs or nearby components can lead to permanent failure.
5. Not Following Schematics
Modern smartphones are complex. Not following the correct schematic diagrams can lead to missed connections and misdiagnosed faults — especially in power lines, audio circuits, and charging ICs.
6. Poor Jumper Work
Jumpering without understanding the trace path can short components or cause further board damage. Follow a structured approach with verified jumper solutions.
✅ How to Avoid These Mistakes?
Get Certified: Learn from industry experts at Mobile Guru Advance Tech.
Practice on Dead Boards: Never experiment on working devices during training.
Join Structured Courses: We offer modules on Schematic Reading, Chip-Level Repair, Audio Engineering, and more.
Follow Industry Best Practices: Regularly update your knowledge with new tools, techniques, and case studies.
📈 Become a Professional Mobile Technician
Mobile repair is not just about fixing phones — it’s about building a career with skill, confidence, and precision. Avoiding these common mistakes is the first step toward becoming a certified mobile technician in 2025.
💡 Want to level up your mobile repair skills? 📚 Check out this blog: 👉 Common Mistakes in Mobile Repair and How to Avoid Them
0 notes
Text
How Long Does It Take to Learn Mobile Repair?
Ever cracked your phone screen and thought, “I wish I knew how to fix this myself”? You’re not alone! These days, everyone’s glued to their phones, and when something goes wrong, there’s always a need for someone who can fix it fast. That’s where mobile repair skills come in—and guess what? You don’t need to be a tech genius or spend years in college to learn it. In fact, you can pick up mobile repair skills way faster than you might think. So, if you're curious, love gadgets, or want to start earning by fixing phones, you might be asking: “How long does it take to learn mobile repair?” Let’s break it down together.
1. Understanding the Basics – 2 to 4 Weeks
If you're just starting out, the first step is to understand the basic components of mobile phones and how they function. This includes learning about:
Types of mobile phones (smartphones vs feature phones)
Mobile phone hardware components (battery, screen, motherboard, etc.)
Mobile phone software and operating systems (Android, iOS)
Common tools used in mobile repair (screwdrivers, multimeter, soldering iron, etc.)
Most foundation-level courses take about 2 to 4 weeks to cover these basics. These short-term courses are ideal for beginners and can be completed part-time or full-time depending on your schedule.
2. Intermediate Repair Skills – 1 to 2 Months
After mastering the basics, the next level involves learning how to troubleshoot and repair common mobile phone issues, such as:
Screen replacement
Battery issues
Charging problems
Speaker/mic faults
Software errors and formatting
Mobile unlocking
These skills usually take around 1 to 2 months to learn thoroughly. During this time, students work on practical hands-on training, which is crucial in the mobile repair field. Institutes typically provide real-time practice with faulty devices to improve diagnostic and repair skills.
3. Advanced & Chip-Level Repair – 2 to 3 Months
If you aim to become a professional technician or open your own repair business, learning chip-level repair is highly recommended. This includes:
Soldering and de-soldering techniques
Working with ICs and circuit boards
Using advanced tools like SMD rework stations, hot air guns, and microscopes
Understanding schematics and diagrams
BIOS and firmware flashing
Chip-level training can take 2 to 3 months, depending on the complexity of the course and the student's grasp of electronics. Some courses also include basic electronics theory and diagnostics to help understand how circuits function.
4. Total Time to Learn Mobile Repair
So, how long does it really take to learn mobile repair?
Level
Duration
Basic Level
2–4 weeks
Intermediate Level
1–2 months
Advanced/Chip-Level
2–3 months
On average, a complete mobile repair training program can be completed within 3 to 6 months. However, with intensive or fast-track programs, it is possible to become job-ready in as little as 2 to 3 months.
5. Factors That Affect Learning Time
Several factors can affect how quickly you learn mobile repair:
Learning Method: Classroom training, online classes, or self-study
Practical Experience: Hands-on practice accelerates learning
Trainer Expertise: A skilled trainer can simplify complex topics
Student's Background: Those with prior electronics knowledge may learn faster
Course Duration & Frequency: Full-time students progress faster than part-time learners
6. Career Opportunities After Training
Once you finish your training, a lot of exciting opportunities open up for you. You can:
Work as a mobile repair technician at a service center
Start your own mobile repair shop or home-based business
Take up freelance work or offer doorstep repair services
Specialize in advanced areas like chip-level repair or data recovery
The best part? The mobile repair industry is growing fast, which means there’s always demand for skilled people. Whether you want a steady job or dream of being your own boss, this field offers great income potential and long-term career growth.
Learning mobile repair doesn’t take years of study. With the right training and consistent practice, you can become a skilled technician in just a few months. Whether you're looking for a job, planning to start your own business, or want to add a valuable skill, mobile repair training is a smart, career-focused choice.
If you're ready to take the next step, join a certified mobile repair training institute near you and start your journey toward a successful and hands-on career!
1 note
·
View note
Text
Understanding Calibration Services: Beginner’s Guide
In a world where precision and accuracy matter more than ever, calibration services play a crucial role in ensuring the reliability of measurements across industries. Whether you're running a laboratory, a manufacturing plant, or a research facility, having your instruments properly calibrated can make all the difference. If you're new to this concept, don’t worry — this guide is here to help you understand the basics of calibration services, especially if you're looking for Calibration Services in Jaipur.

What Are Calibration Services?
Calibration is the process of comparing the measurements of an instrument to a known standard and making adjustments if necessary. Think of it like tuning a guitar. Over time, strings can get out of tune, and you need to adjust them so they sound just right. Similarly, measuring instruments can drift from their original accuracy, and calibration helps bring them back to their correct values.
Calibration services ensure that tools and instruments — whether they're weighing scales, pressure gauges, temperature sensors, or lab equipment — give precise and consistent results.
Why Is Calibration Important?
You might wonder why calibration is such a big deal. Here are a few key reasons:
Accuracy: Regular calibration ensures your equipment provides accurate readings, which is especially important in fields like pharmaceuticals, electronics, and research.
Safety: Incorrect readings in sensitive environments, such as chemical labs or medical settings, can be dangerous. Calibration minimizes that risk.
Compliance: Many industries must meet strict regulatory standards. Calibration ensures your instruments stay compliant with ISO, NABL, or other quality frameworks.
Cost Efficiency: Uncalibrated instruments can lead to product defects or process errors, costing time and money. Calibration helps reduce these costly mistakes.
Types of Calibration Services
When we talk about Calibration Services in Jaipur, it's important to know the different kinds available:
1. Instrument Calibration Services in Jaipur
This involves checking and adjusting tools like multimeters, pressure gauges, and torque wrenches used in industries ranging from automotive to aerospace. These services help businesses maintain accurate results and high-quality output.
2. Laboratory Instrument Calibration in Jaipur
Labs require extremely precise instruments. This type of service focuses on devices like spectrophotometers, pipettes, balances, and temperature chambers. Proper calibration ensures these instruments give trustworthy data — which is critical in research and development and Laboratory Instrument Calibration in Jaipur is Important for work and precise data.
How Calibration Services Work
The process typically involves a few essential steps:
Initial Assessment: The instrument is evaluated to see if it functions within acceptable limits.
Comparison with Standards: The instrument is tested against certified reference standards, often traceable to national or international bodies.
Adjustment (if required): If the device is not accurate, technicians adjust it.
Documentation: A calibration certificate is issued, showing the test results and confirming compliance.
In Jaipur, many certified labs offer these services using advanced tools and experienced professionals. Look for NABL-accredited providers for the most reliable outcomes.
When Should You Calibrate Your Instruments?
There’s no one-size-fits-all answer. However, regular intervals such as every 6 to 12 months are common in most industries. Other signs that you may need calibration include:
Sudden changes in readings
After a repair or mechanical shock
Post-installation of new equipment
Before critical measurements
Choosing the Right Calibration Partner in Jaipur
When searching for Calibration Services in Jaipur, it’s essential to pick a provider that understands your industry needs and follows international standards. Ask about:
NABL or ISO certification
Turnaround time
On-site vs. in-lab calibration
Calibration scope and documentation provided
A reliable partner not only performs the service but also guides you on how to maintain your instruments in optimal condition.
Final Thoughts
Calibration might sound technical, but it’s simply about ensuring your instruments work correctly and reliably. Whether you’re managing a research lab or running a factory, investing in Instrument Calibration Services in Jaipur helps you achieve better accuracy, efficiency, and safety.
And if you’re in the scientific or industrial field, regular Laboratory Instrument Calibration in Jaipur isn’t just good practice — it’s essential. With trusted calibration service providers available locally, maintaining precision has never been more accessible.
Ready to get started? Ensure your equipment is in top shape by choosing expert Calibration Services in Jaipur that you can rely on. Your data, processes, and results depend on it
Also Read: NABL Calibration Services: Ensuring Accuracy and Compliance in Testing
#Laboratory Instrument Calibration in Jaipur#Instrument Calibration Services in jaipur#Calibration Services in jaipur
0 notes
Text
Understanding Smartphone Chiplevel Engineering: A Beginner's Guide
With smartphones becoming more advanced and compact, the demand for chiplevel engineers is skyrocketing. Whether you’re exploring a career in electronics or already pursuing a mobile repairing course, understanding the fundamentals of smartphone chiplevel engineering is a game-changer.
In this blog, we’ll break down the essentials of chiplevel repair and explain how you can become a skilled mobile technician through expert-led training at Magnus Institute – the premier mobile phone repair training institute in Kerala.
What is Smartphone Chiplevel Engineering?
Chiplevel engineering refers to the in-depth repair of internal circuits and components of smartphones. This includes:
Micro-soldering
Circuit tracing
IC (Integrated Circuit) replacement
Diagnosing power supply issues
Working with motherboards and logic boards
At Magnus Innovative, our chip level repairing course covers all of these aspects using hands-on training techniques designed for both beginners and experienced learners.
Why Choose Chiplevel Engineering as a Career?
High Demand for Skilled Technicians
With every smartphone embedded with complex micro-components, trained professionals are needed for detailed repairs—especially in high-end devices like iPhones.
Start Your Own Service Business
After completing our mobile chip level service course, many students launch their own successful repair shops.
Lucrative Earning Potential
Whether as a freelancer, technician, or entrepreneur, chiplevel experts command competitive rates.
What You'll Learn at Magnus Institute
As Kerala's trusted institute of mobile repairing, we offer a complete mobile repairing training institute experience including:
Smartphone repairing course (including Android & iPhone)
Mobile hardware course
Mobile software troubleshooting
iPhone repairing course
Laptop repair training with practical exposure
Tools and equipment handling
Hands-on diagnostics using latest tools like soldering stations, BGA machines, and multimeters
Bonus: Laptop Repair Training Also Included!
In addition to mobile repair, our course includes a laptop repairing course that trains students on:
Laptop motherboard diagnostics
Screen, keyboard, and power issue repairs
Chip replacement and BIOS programming
Looking for a laptop repairing institute near me? Magnus is your one-stop solution for both mobile and laptop repairing courses in Kerala.
Course Options at Magnus
Mobile Technician Course in Kerala
Mobile Laptop Repairing Course – a dual advantage program
Career Support After Training
Magnus offers placement support, business setup guidance, and industry certifications, helping you transition into the workforce with confidence.
Why Choose Magnus Innovative?
Government-registered certification
Real-time lab access
100% practical-oriented approach
Trainers with 10+ years of industry experience
Recognized as one of the best mobile repairing institutes in Kerala
Whether you're searching for mobile repair training or a laptop repair training near me, Magnus offers the best of both worlds.
Enroll Today with Magnus – Kerala's Premier Mobile Repair Training Institute
Ready to launch your career in the booming electronics industry? Join Magnus’s smartphone repairing course and gain the skills to excel in the field of mobile chiplevel engineering.
Visit magnusinnovative.com or contact us for free counselling and demo classes.
#chip level repairing course#institute of mobile repairing#iphone repairing course#laptop repair training near me#laptop repairing course#mobile and laptop repairing course#laptop repairing institute near me#laptop repair training#mobile chip level service
0 notes
Text

How to Check Your Car Battery with a Digital Multimeter (Without Feeling Like an Auto Electrician)
Let’s face it, most of us don’t think much about our car battery until the dreaded day it decides not to cooperate. You’re ready to head out, turn the key (or press the button), and instead of that familiar engine hum, you’re met with a disappointing click—or worse, silence.
Before you panic or call for roadside assistance, there’s a simple check you can do at home, even if you’re not particularly handy: testing your car battery with a digital multimeter. It sounds technical, but trust me—it’s not. All you need is the right multimeter (and a bit of confidence).
Here’s how to do it, step by step.
First Things First: What’s a Digital Multimeter?
A digital multimeter is a small, handheld device that measures electrical values like voltage, current, and resistance. It’s a staple in any DIY toolbox and incredibly useful when it comes to car maintenance. The best multimeter isn’t necessarily the most expensive one—it’s the one that’s accurate, easy to read, and doesn’t overwhelm you with unnecessary settings.
If you haven’t got one yet, ULTRICS offers a great value digital multimeter that’s ideal for beginners and casual users. It’s compact, user-friendly, and perfect for checking your car battery without the fuss.
Step 1: Safety First
Before diving in, make sure your car is off—completely. Take the key out of the ignition, turn off the lights, and don’t touch any buttons.
You’ll also want to pop the bonnet and locate the battery. It’ll usually be a rectangular box with two terminals—one marked + (positive) and one – (negative).
If the terminals are dirty or corroded, give them a quick clean with a wire brush or a bit of baking soda and water. Just be careful not to short anything out in the process.
Step 2: Set Up Your Multimeter
This is where most people freeze—but don’t. Here’s what to do:
Turn the dial on your digital multimeter to DC voltage (usually marked as V with a straight line and a dashed line underneath).
Make sure it’s set to 20V or the closest higher setting. Most car batteries are 12V, so this gives you a clear reading.
Step 3: Connect the Probes
Now for the fun part:
Take the black probe and touch it to the negative (-) terminal of the battery.
Take the red probe and touch it to the positive (+) terminal.
It doesn’t matter which one you touch first—just make sure both are making good contact.
Once connected, it'll will display a voltage reading.
Step 4: Read the Results
Here’s how to interpret what you see:
12.6V or above: Your battery is fully charged and in good health.
12.4V–12.6V: Still fine, but it could do with a bit of charging.
12.2V–12.4V: Slightly discharged. Keep an eye on it.
Below 12.2V: Your battery is undercharged. It might need a top-up—or replacement if it won’t hold a charge.
Below 11.8V: Uh-oh. That’s dangerously low. Time to get it checked properly.
Step 5: Go the Extra Mile (Optional but Useful)
If you want to be thorough, test the battery again after starting the engine. This will tell you how well your alternator is working.
With the engine running, the voltage should jump up to 13.7V–14.7V.
If it doesn’t rise or goes above 15V, there may be an issue with the charging system.
Why Use a Multimeter Instead of Just Guessing?
Because your car battery is a silent operator—it won’t always show signs of failing until it’s too late. A quick test with a multimeter takes less than a minute and can save you the stress of a surprise breakdown.
Plus, owning one means you can check household electronics, fuses, and even your home’s sockets. These are a small investment that pays for itself again and again.
Final Thoughts
Checking your car battery with a digital multimeter isn’t just for mechanics—it’s for anyone who wants a bit more control over their car’s health.
With the right tools and a little know-how, you can avoid the guesswork and keep your car running smoothly all year round. No lab coat required.
So next time your car seems sluggish or refuses to start, grab your multimeter before you call for help. You might just impress yourself.
0 notes
Text
AC PCB Repairing Course for Beginners
AC PCB Repairing Course for Beginners: Build a Technical Career from Scratch
With the rapid growth in air conditioner utilization in homes, offices, and industrial spaces, the demand for professional AC PCB restore technicians is developing step by step. AC PCB Repairing Course for Beginners If you are interested by electronics and searching out a profession that mixes technical talents with real-world process opportunities, an AC PCB repairing direction for novices is a fantastic area to start.

This newbie-friendly route offers fingers-on training and the fundamental information needed to paintings expectantly inside the discipline of AC PCB restore and protection.
What is an AC PCB and Why is it Important?
The AC PCB (Printed Circuit Board) is the most essential component in an air con unit. AC PCB Repairing Course for BeginnersIt controls critical features together with temperature law, fan velocity, compressor overall performance, and common unit operation. Any failure within the PCB can lead to the AC system malfunctioning or shutting down completely.
Learning how to repair AC PCBs equips you with in-call for talents which are important for maintaining and servicing present day air conditioners.
What Will You Learn inside the Course?
An AC PCB repairing course for beginners is designed to be realistic, easy to understand, and process-orientated. Key subjects commonly covered include:
Basics of digital components and their features
Identification and testing of AC PCB components
Understanding circuit diagrams and connections
Common PCB faults and diagnostic strategies
Use of multimeters and checking out gadget
Soldering and desoldering techniques
Replacing defective additives
Practical troubleshooting on actual AC units
The course combines idea with arms-on exercise to put together college students for actual-world provider environments.
Who Can Join This Course?
This direction is suitable for:
Students who have handed 10th or twelfth grade
Diploma or ITI holders in electric or electronics
Beginners interested in technical or restore jobs
Existing electricians or technicians trying to upgrade their competencies
No prior enjoy is required. It is designed specially for novices who want to start from scratch.
Certification and Job-Oriented Training
Upon a success of completion, students acquire a certificate's crowning glory, which provides cost to their resume and improves employability. AC PCB Repairing Course for Beginners Many education centers additionally offer job placement assistance, internships, and sensible publicity in the subject.
With these qualifications, students are prepared for entry-stage roles together with:
AC PCB Repair Technician
AC Maintenance Technician
PCB Service Engineer
Appliance Repair Staff
Technical Support Executive
Graduates also can discover freelance paintings or start their own carrier business in the equipment restore enterprise.
Career Scope and Staffing Demand
There is a excessive staffing call for for professional AC PCB technicians, especially all through peak summer seasons. Service facilities, electronics shops, and HVAC agencies are continuously hiring skilled specialists for technical help roles. This course prepares you to meet that demand with self assurance.
Some capacity career paths after the route encompass:
Working in AC service corporations or electronics repair stores
Joining HVAC preservation departments
Becoming a field technician for home service platforms
Starting your own AC repair carrier
The possibilities are various and provide properly income ability with regular career increase.
Choosing the Right Institute
When choosing a training institute, search for those capabilities:
Experienced school and running shoes
Practical lab classes and real-international equipment
Industry-recognized certification
Placement assistance and profession support
Updated course curriculum with modern system
Some institutes also provide on-line classes with recorded motion pictures, permitting students to study at their very own pace from everywhere.
Conclusion
If you are looking for a sensible, short-term path that leads at once to job opportunities, the AC PCB repairing route for beginners is a clever and less costly choice. AC PCB Repairing Course for Beginners It gives important abilties, palms-on education, and activity readiness—all without requiring a high-level academic background.
Start your adventure into the technical international nowadays and emerge as a part of a fast-developing enterprise that values professional specialists. Whether you intention to sign up for a agency or begin your personal carrier business, this path lays the foundation for a a hit and sustainable career.
0 notes
Text
Top 8 Electrical Tools That Every Beginner and Pro Electrician Needs
In the framework of the choice of tools, it is helpful to know what a professional electrician should use for their work. Regardless of your level in the field – from a beginner to an experienced professional, there are some electrical tools that are compulsory to perform fundamental jobs, as well as those complex tasks. Here’s a guide to the top 8 electrical tools every electrician—beginner or professional—should have in their toolbox.
1. Multimeter
A multimeter is, without doubt, one of the most useful electrical tools handheld devices that anyone can have. It enables electricians to measure output voltage and input current, output current and input voltage and resistance which are essential when undertaking electrical problems. For simple circuit problems as well as when fixing a device which is working to order, an original multimeter is out of question.
2. Wire Strippers
Wire stripers are basically tools that can be used to thread a wire without uncovering electric copper beneath. As cleaner cutting tools these strip precisely to assist electricians on preparing wires for joints and ends. They are available in different sizes and types, but must accordingly match the wire gauges that will of course be used in the given range.
3. Cordless Drill
A cordless drill is essential for an electrician because it helps to make quick work of installing electrical outlets, light switches, and other parts. Design features such as voltages and modes, as well as the speed control, make a variation of a drill efficient and strong for every task.

4. Fish Tape
Fish tape is useful when pulling wires through walls, conduits or any ceiling. It relieves you from being forced to use conduits to guide the wires through narrow regions. There are short and long fish tapes of various material varieties and the tile cutter blade is essential for use by all electrical contractors in residential and commercial construction.
5. Voltage Tester
Common types of safety gears include: Voltage testers which enable one to establish whether a wire or an electrical outlet is charging or not. This must be used to check for safety before engaging in any electrical work in the house. Specifically, non-contact voltage testers are quite valuable because they enable the electrician to check voltage on the wire without actually coming into contact with it.
6. Plier Set
Every electrician needs a good set of pliers. Pliers are applicable in instances where one has to cut, grasp or bend; twist wires and other tiny characteristics. The basic recommended pliers types are the needle nose, lineman’s and cutting pliers since you will require them in different electrical projects.
7. Tile Cutter Blade
Although tile cutter blades are not a tool often identified with electrical work they come in handy when electricians require cutting tiles for use in installations such as electrical outlets or light switches. A suitable blade for cutting tiles will provide clean and sharp cuttings which are very important especially when working in areas such as kitchen and bath areas to remove portions that have been corroded by electricity.
8. Tool Belt or Toolbox
Finally, a durable tool belt or toolbox is necessary for keeping all your tools organized and accessible while working. A tool belt lets you keep essential tools at your side, while a toolbox is ideal for storing larger tools and equipment safely. Both are essential for ensuring that your work environment stays efficient and organized.
Conclusion
These are the top 8 electrical tools any electrician cannot afford to work without in their practice. Sometimes as an artist drawing can be a tedious task but only when you have the right equipment, so for that reason investing in good equipment is important no matter how small a business you may be. Combined with other related products such as tile cutter blades and other tools and equipment it provides an all round coverage of the various tasks and projects that might be required.
When well equipped it is a joy and a privilege to tackle any electrical assignment knowing that it will be done perfectly and like a professional.
#electrical tools#tools and equipments#industrial electrical tools#best electrical tools#industrial tools supplies#industrial tools
0 notes
Text
How to Install XCF32PFS48C: A Step-by-Step Guide
The XCF32PFS48C is a versatile and essential component in the field of programmable logic devices. Whether you're a seasoned engineer or a beginner, installing this chip correctly is crucial to ensure your project runs smoothly. In this guide, we'll walk you through the installation process step by step, making it easy to follow and understand.
Introduction
Installing the XCF32PFS48C can seem daunting, but with the right guidance, it becomes a straightforward process. This guide will help you install the chip correctly, ensuring optimal performance for your electronic projects.
1. Overview of XCF32PFS48C
The XCF32PFS48C is a complex programmable logic device (CPLD) known for its flexibility and high performance. It's used in various applications, including digital signal processing, communications, and embedded systems. Understanding its features and specifications is the first step in ensuring a successful installation.
2. Tools and Materials Needed
Before starting the installation, gather the necessary tools and materials:
Soldering iron and solder
Antistatic wrist strap
Magnifying glass or microscope
Flux
Desoldering braid or pump
Multimeter
XCF32PFS48C chip
Clean, well-lit workspace
Having these items ready will make the process smoother and more efficient.
3. Preparing for Installation
Work Area Preparation
Ensure your workspace is clean and well-lit. An organized workspace reduces the risk of errors and makes the process more efficient.
Antistatic Precautions
Wear an antistatic wrist strap to prevent static electricity from damaging the chip. Ground yourself and your tools to eliminate any static charge.
4. Step-by-Step Installation
Step 1: Inspect the Chip and Board
Carefully inspect the XCF32PFS48C chip and the circuit board. Ensure there are no visible defects or contaminants that could affect the installation.
Step 2: Apply Flux
Apply a small amount of flux to the pads on the circuit board where the chip will be placed. Flux helps in making better solder joints.
Step 3: Position the Chip
Using tweezers, carefully position the XCF32PFS48C chip on the pads. Make sure all the pins are correctly aligned with the corresponding pads.
Step 4: Solder the Pins
Begin by soldering one pin to secure the chip in place. Then, proceed to solder the remaining pins, ensuring each connection is clean and solid. Use a magnifying glass to inspect the joints.
Step 5: Clean the Board
Once all the pins are soldered, clean the board with isopropyl alcohol to remove any excess flux and ensure a clean installation.
5. Testing the Installation
Initial Power-Up
Before applying full power, do a continuity check with a multimeter to ensure there are no shorts. Once confirmed, power up the board and check for correct operation.
Functional Testing
Run a functional test to ensure the XCF32PFS48C is operating as expected. This might involve running specific programs or tests relevant to your project.
6. Troubleshooting Tips
Common Issues
Solder Bridges: Use desoldering braid to remove any excess solder causing bridges between pins.
Misalignment: Carefully reheat and adjust any misaligned pins.
Tools for Troubleshooting
Multimeter: For checking continuity and proper connections.
Oscilloscope: To verify signal integrity if needed.
7. Maintenance and Care
Regular Inspections
Regularly inspect the solder joints and connections to ensure they remain solid. This helps in identifying potential issues before they become significant problems.
Proper Storage
Store the board and chip in a clean, dry place. Use antistatic bags to prevent static damage.
8. Common Mistakes to Avoid
Insufficient Solder
Ensure enough solder is used to make a good connection, but not so much that it creates bridges.
Overheating
Avoid applying excessive heat to the chip and board, as this can damage both. Use a temperature-controlled soldering iron.
9. Advanced Tips for Experts
Fine-Tuning Soldering Techniques
For experienced users, practice advanced soldering techniques such as drag soldering for quicker and more efficient installations.
Custom PCB Design
Consider designing custom PCBs that optimize the layout for the XCF32PFS48C, improving performance and ease of installation.
Conclusion
Installing the XCF32PFS48C doesn't have to be a daunting task. By following this step-by-step guide, you can ensure a successful installation, leading to reliable and high-performance operation in your projects. Remember to take your time, be precise, and double-check your work.
0 notes
Text
The Ultimate Guide to Digital Multimeters: Working and Benefits of Use

In the world of electronics and electrical troubleshooting, the digital multimeter stands out as a versatile and indispensable tool. Whether you are a professional electrician, an electronics hobbyist, or a DIY enthusiast, understanding how a digital multimeter works and its benefits can significantly enhance your work. This blog explores the working principles and advantages of using a digital multimeter, with a special focus on popular brands like Fluke and Hioki.
What is a Digital Multimeter? A digital multimeter is an electronic measuring instrument that combines several measurement functions in one unit. Typically, it can measure voltage, current, and resistance. Modern digital multimeters can also measure a variety of other parameters such as capacitance, frequency, and temperature.
How Does a Digital Multimeter Work? Understanding how a digital multimeter works can demystify its operation and improve its utilization in various applications. Here's a detailed breakdown: Selection of Measurement Mode: The first step in using a digital multimeter is to select the appropriate measurement mode. This is done by turning the rotary switch to the desired function (voltage, current, resistance, etc.).
Connecting the Probes: The multimeter comes with two probes: red (positive) and black (negative). These probes are connected to the circuit or component being tested.
Measurement Process:
Voltage Measurement: To measure voltage, the probes are placed across the component or section of the circuit. The digital multimeter measures the potential difference between the probes.
Current Measurement: For current, the circuit must be opened, and the multimeter probes are placed in series with the circuit. The device measures the flow of electric charge.
Resistance Measurement: When measuring resistance, the probes are placed across the component. The multimeter sends a small current through the component and measures the voltage drop, which is then used to calculate resistance.
Displaying the Results: The measured value is displayed on the digital screen of the multimeter, making it easy to read and interpret the results. Benefits of Using a Digital Multimeter Investing in a digital multimeter comes with numerous benefits, enhancing both accuracy and efficiency in electrical measurements:
High Precision and Accuracy: Digital multimeters provide highly accurate readings, which are essential for precise measurements in electronics and electrical work. Brands like Fluke digital multimeters and Hioki digital multimeters are renowned for their reliability and precision.
Versatility: A digital multimeter combines multiple measurement functions in one device, making it a versatile tool for various applications. It can measure voltage, current, resistance, and more, eliminating the need for multiple instruments.
Ease of Use: Modern digital multimeters are designed with user-friendly interfaces. Clear digital displays and simple controls make them accessible even to beginners.
Safety Features: Quality digital multimeters come with built-in safety features like overload protection and auto-ranging capabilities, ensuring safe and effective use in various conditions.
Portability: These devices are compact and portable, making them convenient to carry around for fieldwork or use in different locations.
Durability: Brands like Fluke and Hioki are known for their durable and robust designs, ensuring that the multimeters can withstand rough handling and harsh environments.
Specifications to Consider When choosing a digital multimeter, consider the following specifications: Display Count: This indicates the maximum number the display can show. Higher display counts mean better resolution. Accuracy: Look for a device with high accuracy for precise measurements. Auto-Ranging: This feature automatically selects the measurement range, simplifying operation. Input Impedance: High input impedance is essential for measuring sensitive electronics to prevent circuit loading. Safety Ratings: Ensure the multimeter complies with relevant safety standards (e.g., CAT ratings) for your specific application. Digital Multimeter Price The price of a digital multimeter varies based on its features and specifications. Basic models suitable for simple tasks can be found at affordable prices, while advanced models with more features and higher accuracy will cost more. It is important to balance your budget with the required specifications to get the best value for your needs. Applications of Digital Multimeters Digital multimeters are used in a wide range of applications due to their versatility and accuracy:
Electronics: Essential for troubleshooting and repairing electronic devices, digital multimeters help in identifying faulty components and ensuring proper operation.
Electrical Work: Electricians use digital multimeters for various tasks, including wiring installations, maintenance, and diagnosing electrical issues.
Automotive: In the automotive industry, these meters are used for testing electrical systems and components in vehicles.
Educational: They serve as valuable teaching tools in educational institutions, helping students learn about electrical measurements and circuit analysis.
DIY Projects: Hobbyists and DIY enthusiasts use digital multimeters for various projects, from building circuits to repairing household appliances. Conclusion A digital multimeter is an essential tool for anyone working with electronics or electrical systems. Its ability to measure multiple parameters accurately and reliably makes it a must-have in any toolkit. Whether you choose a Fluke digital multimeter or a Hioki digital multimeter, understanding how it works and its benefits will enhance your efficiency and accuracy in electrical measurements.
0 notes
Text
Getting Started with Breadboard Electronics for Beginners
Are you fascinated by electronics and eager to dive into the world of DIY projects? One of the first steps for beginners is to learn about breadboard electronics. Breadboard electronics for beginners offer a hands-on way to understand circuitry without the need for soldering or permanent connections. In this guide, we'll explore what breadboard electronics are, how they work, and how you can start your own projects.

What is a Breadboard?
A breadboard is a tool used to prototype electronic circuits without the need for soldering. It consists of a plastic board with many holes, and underneath the board, there are metal clips that connect the holes in specific patterns. These patterns allow you to create circuits by inserting components into the holes and connecting them with jumper wires.
How Does a Breadboard Work?
The metal clips underneath the breadboard are arranged in rows and columns. The rows are labeled from A to J, and the columns are labeled from 1 to 30 (or more, depending on the size of the breadboard). Each row and column is connected internally, allowing you to create circuits by connecting components to these points.
Components Needed for Breadboard Electronics
To get started with breadboard electronics, you'll need a few basic components:
Breadboard: The breadboard itself is the main component you'll need.
Power Supply: You'll need a power supply, such as a battery or a DC power adapter, to provide power to your circuits.
Components: Various electronic components like resistors, capacitors, LEDs, and integrated circuits (ICs) are essential for building circuits.
Jumper Wires: These wires are used to make connections between components on the breadboard.
Building Your First Circuit
Now that you have the basic components, let's build a simple circuit to light up an LED:
Insert the LED into the breadboard. The longer leg (anode) should go into a hole in one row, and the shorter leg (cathode) should go into a hole in a different row.
Connect a resistor from the cathode of the LED to the ground (negative) rail of the breadboard.
Connect a jumper wire from the anode of the LED to the positive rail of the breadboard.
Connect the power supply to the breadboard, ensuring the polarity is correct.
Tips for Beginners
Start with simple circuits and gradually increase complexity as you gain more experience.
Double-check your connections before applying power to avoid damaging components.
Use a multimeter to troubleshoot your circuits if they're not working as expected.
Conclusion
Breadboard electronics offer a fantastic way for beginners to learn about circuitry and electronics without the need for soldering. By following this guide and experimenting with different components and circuits, you can start your journey into the exciting world of DIY electronics. Check out https://technobotics.in/ for more resources and kits to kickstart your breadboard electronics projects.
#robotics courses#robotics courses for kids#robotics for kids#stem education#breadboard electronics for beginners#robotics classes in mumbai#robotics courses in mumbai
0 notes
Text
Fluke 87V Industrial Multimeter in Bangladesh
Fluke 87V Industrial Multimeter in Bangladesh
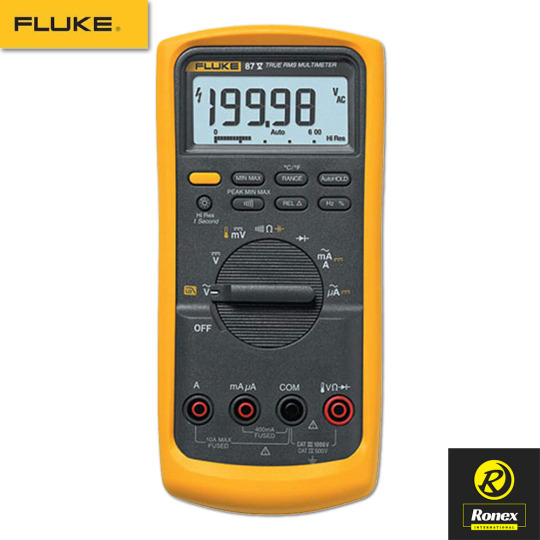
Fluke 87V Industrial Multimeter ৳50,000.00
Model: 87V Brand: Fluke Origin: USA Warranty: No Stock: Available Discount: No Accessories: Available Delivery Charge: BDT 200/-
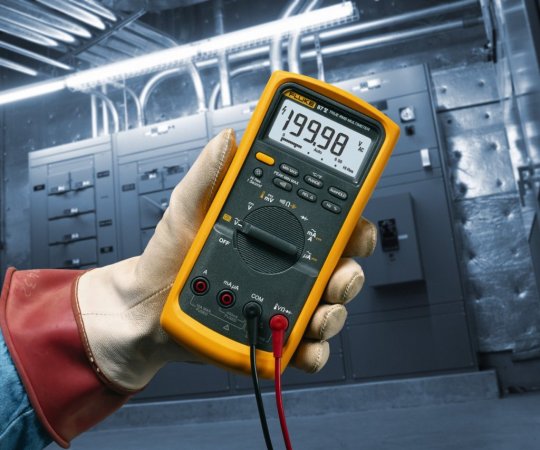


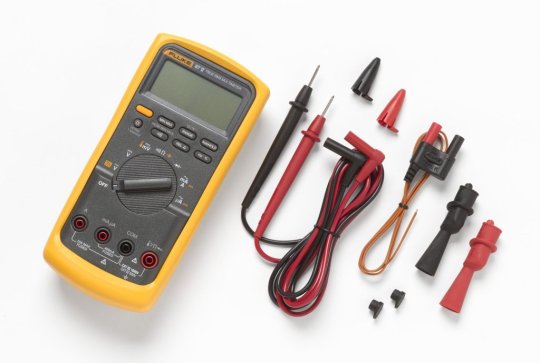
Fluke 87V Industrial Multimeter in Bangladesh
The Fluke 87V Industrial Multimeter provides the resolution and accuracy to efficiently troubleshoot motor drives, plant automation, power distribution, and…
View On WordPress
#best multimeter#best multimeter 2019#digital multimeter#digital multimeter how to use#fluke 87V#fluke 87V industrial multimeter#fluke multimeter#fluke multimeter price in bangladesh#how to use a multimeter for beginners#multi-meter#Multimeter#multimeter analog#multimeter review#multimeters
0 notes
Text
1 note
·
View note
Video
Diy Tutorials to Sew Homemade Masks : Cloth Face Mask for Coronavirus Sa...
Review Zojirushi Rice Cooker review mini kegerator Tankless Electric Water Heaters Wall Mounted Electric Fireplaces Best propane grill Best Keurig Coffee Maker Wonderwash Portable Washing Machine leupold binoculars for hunting Panda Portable Washing Machine Best Portable Charcoal Grill Lasko Digital Ceramic Heater Best Electric Fireplace Wall Mount Big green egg smoked spatchcock chicken A Guide to Manual Coffee Brewing Salter Ultimate Accuracy Scales Wood Fire Stove For your Room Queen 8 inch Memory Cuisinart 360 Griddle best french press stainless steel Sun Joe Snow Blower Rheem Tankless Water Heater Cauldryn Coffee Travel Mug Honeywell Wifi Thermostat Heated Seat Kit Best wood stove Portable Buddy Heater upright vacuum cleaner Gourmia 6 qt digital air fryer Nectar Mattress Mr coffee electric kettle Cuisinart Slow Cooker Brinkmann Gourmet Charcoal Smoker GE Burner Gas Stove AquaTru Water Purification System Review Best Pillow Protector Vegetable Dicer Kerosene Heaters - Gas Heaters Fabric Shaver clothes folder instructions casper king mattress reviews Char Broil Smoker Grill Review Cauldryn Coffee Travel Mug Ezstax Clothing Organization System Best Bidet Toilet Seat Electric Pressure Best Ceiling Speaker How To Vacuum Seal Food Mr Coffee Grinder Metal detector coils Rice Cooker Lifetime Compost Tumbler Remove Urine Stain From Mattress Shark Handheld Vacuum Cleaner Pure Komachi Knife Power Air Fryer Xl Porcelain Enameled Steel Bathtub Automatic Egg Cooker Instructions Wicker Storage Bin The Casper Mattress snowshoe Delonghi Space Heater Snow Joe Snow Blower Yimby Tumbling Composter Review Food Vacuum Sealer Breville Toaster Review Cordless Electric Kettle Cobb Grill Review Best hanging organizer Frameless Sliding Shower Door Best Portable Gas Grill Reverse Osmosis System Reviews Beach Sand Scoops for Metal Detecting? Evo Skis Automatic Bread Maker Baratza Burr Coffee Grinder Review 2020 Gas Air Compressor Camp Stove Toasteri Make Smoked Cheddar Cheese Snowshoe for Beginners Best Cordless Sweeper Heating Knee Pad Smeg Gas Range Best Samsung Microwave Best Sewing Machine Best Motorcycle Chain Breaker Tool Emberlit Stove Review Sand scoop for metal detecting Smeg Dishwasher Nostalgia Hot Dog Toaster Best Digital Alarm Clock Compact Combo Washer Dryer Camp Stove Toaster Best Snowshoe Garrett Edge Digger Zenith Trim Puller Racing Wheel for Playstation 4 Asunflower High Chair Reviews Usb Digital Microscope Reviews Dyson Cinetic Big Ball Animal Review Best Axe For Splitting Wood Breville Electric Kettle 3 Drawer Dresser White Pactool Gecko Gauge Clamps Knife Pouch Philips Avent Fast Baby Bottle Warmer Pulled Pork Shredder Claws Leather Knife Pouch Lightweight Easy Fold Stroller Coffee Travel Mug Fenix Pd35 Flashlight Vs Fenix Pd32 Flashlight Folding Shovel Military Wooden High Chair Lightweight Easy Fold Stroller Best Pulled Pork Shredder Claws How to Use Auto Ranging Digital Multimeter Irwin Locking Pliers Puredown Pillow Review Oxo Tot Sprout High Chair Knife Block Set Stainless Steel Electric Baby Bottle Sterilizer Led Stand Light With Milwaukee Makita Impact Bit Set klein parallel jaw grip SUNAVO Induction Cooktop Camco Eaz-Lift Slide Out Support Camco Water Bandit Dewalt Push Lock Pliers Small Utility Tote of Charcoal Felt Brother MFC-J6935DW Inkjet All-in-One Color Printer Jeep Cherokee Sport Stroller Master Lock M175 Measuring Cups and Spoons Set Weigh Safe 180 Hitch 100% Original Peet Boot Dryer Camco Rv Sewer Hoses Stainless Steel Soap Dispenser Predator 3500 Inverter Generator Polyscience Sous Vide Searzall Torch Attachment Small Stainless Bamboo Cheese Board With Cutlery Set Baby Beach Tent Pop Up How Gravity Works Culinary Blow Torch Review Ski Tuning Vise Reviews Camco 50 Amp Surge Protector Andersen Hitches 3220 Delixike Large Magnifying Lamp With Light Polyscience Sous Vide Professional Creative Series Predator 3500 Inverter Generator Reviews Wheelchair Controller Car Driveway Best Cordless Air Pump Bead Breaker for Tires Titan RV Sewer Hose Kite Harmar Mobility Lift for Car Hamilton Beach 3 in 1 Spiralizer Pond Pump for Waterfall Tribest Sousvant Sv-101 How to Change Outdoor Wall Lights AquaTru Water Filter Kitchenaid Artisan Stand Mixer Usb Postal Scale Searzall Torch Attachment Small Bamboo Cheese Board With Cutlery Set Baby Beach Tent Pop Up Platypus Gravityworks 2.0L Filter Culinary Blow Torch Ski Tuning Vise Camco 50 Amp Surge Protector Andersen Hitches 3220 Delixike Large Magnifying Lamp Polyscience Sous Vide Professional Wasserstein Water Sensor With Alarm DEWALT Tool Box set Tacklife Paint Sprayer review Trimaco Canvas Drop Cloth PHZ Adult Bike Helmet Review Heavy Duty Wagons and Cart Sun Joe Cordless Leaf Blower Firman Generators Review Wheelchair Joystick Gc 2 Bridjit Curb Ramp Set Best Cordless Air Pump for Tires Perfect Tools for All Size Tires Titan RV Sewer Hose Kit Harmar Mobility Lift for Car Hamilton Beach 3 in 1 Spiralizer Pond Pump for Waterfall Sun Joe Cordless Air Compressor Review Camping Shower head 18 Inch Stanley Fatmax Tool Bag Makita Cordless Flood Light Louisville Elite Aluminum Attic Ladder Alpcour Indoor Bike Trainer Stand Pocket Hole Jig Green Elephant Utilitent Best Hot Air Popper for Popcorn Smart Electric Scooter Azio Keyboard Unboxing Instant Water Balloons How to Fill 100 Gold's Gym Vinyl Dumbbell Set 40 Lbs Genuine Epson 125 Black Ink Cartridge Instant Water Balloons Gold's Gym Vinyl Dumbbell Set Genuine Epson 125 Black Ink Cartridge Best Stainless Steel Coffee Maker Oster Bread Maker Honeywell 5 2 Day Programmable Thermostat Yeti Rambler 20 Camco : Rv Sewer Hose Support Sunbeam Electric Heated Throw Blanket Dyson V6 Motorhead Cordless Vacuum Apple ipad Air 2 Best Fiber Optic Tool Kit Akg K612 Pro Headphones Best Indoor Thermometer Best Nose and Ear Hair Trimmer 18-inch Laptop Case Modern Kohler Moxie Rainfall Bluetooth Showerhead Speaker Rocket R58 Espresso Vs Quick Mill Vetrano Best Wireless Portable Bluetooth Speaker Coleman 2 Burner Camping Stove Saeco Talea Giro Plus Automatic Espresso Machine Romeifly Wireless small Spy Camera Hitch Mount Bike Rack Carrier for Truck 3 in 1 T Handle Wrench and Screwdriver Modern Vasagle Vanity Set for Makeup New Learning Shapes and Colors The Best Portable Flashlight for Hiking Best Canister Vacuum Cleaner How to Use Work Sharp Knife Sharpener Stanley Tool Box Brim 12 Cup Programmable Coffee Maker Best Hand Pruners Fiskars power Gear 2 How to Install Water Filter Faucet Gopro Hero3 3 Wheel Kick Scooter for Kids BBQ skewers stainless steel Cave Tools Best Folding Bluetooth Keyboard 18v Shark Cordless Handheld Vacuum Best Smart Charger for AA Batteries Hitch Mount Bike Rack Carrier Romeifly Wireless small Spy Camera Saeco Talea Giro Plus Automatic Espresso Machine The Best Sog Multi Tool With Pliers Best Hunting Knife for Hunters Comparison Test With Gopro Hero 7 Mic Adapter How to Clean Tile Grout Floors Capresso Infinity Burr Grinder Top Burr Stuck Fix Top 10 Best Kitchen Gadgets New Best Electric Chainsaw Sharpener Mini Cordless Drill Driver Review How To use pampered chef mandoline slicer Butterball Electric Turkey Fryer Salav Handheld Garment Steamer Review Kitchen Pull Out Trash Cans America's Test Kitchen Best Immersion Blender The World's mini Electric Skillet for a single person
8 notes
·
View notes