#how to write h1 to h6 tags in html
Explore tagged Tumblr posts
Visit Tumblr Blog
Explore Tumblr blogs with no restrictions, modern design and the best experience.
Last Seen Tumblr Blogs


Fun Fact
28.6 is the average number of monthly visits per US mobile user.
Text
How to Become a Successful On-Page SEO Specialist
In the digital marketing world, SEO is a high-demand skill, and among its various branches, On-Page SEO stands out as a foundation for visibility, engagement, and long-term growth. On-Page SEO focuses on optimizing individual web pages to rank higher and earn more relevant traffic in search engines. As an On Page SEO specialist, your role isn’t just about keywords—it's about understanding user intent, creating optimized structures, and enhancing user experience across every element of a webpage.

Becoming an On-Page SEO expert requires a unique blend of technical knowledge, content strategy, and analytical thinking. From mastering metadata and keyword usage to improving site architecture and content quality, each step plays a critical role in a successful SEO strategy. This guide outlines the key steps and skills required to become a successful On-Page SEO specialist.
Understand the Fundamentals of SEO
Before you dive into On-Page SEO, you need a strong understanding of general SEO principles. Learn how search engines like Google crawl, index, and rank content. Study how algorithms evaluate relevance and quality. Key concepts such as keyword intent, domain authority, ranking factors, and indexing methods are essential. You don’t need to be a technical developer, but knowing how search engines interpret HTML and content structure gives you a significant edge.
Invest time in learning about SEO terminology, updates (like Google’s core updates), and the role of white-hat versus black-hat techniques. Free resources like Google’s Search Essentials (formerly Webmaster Guidelines), Moz, and Ahrefs offer reliable educational content. Grasping the basics ensures that as you grow your on-page skills, you’re aligning them with the broader SEO ecosystem, making your strategies more effective and compliant with best practices.
Master Keyword Research and Intent
Keywords are the building blocks of SEO, and understanding how to choose and apply them is critical. Start by learning how to use tools like Google Keyword Planner, Ahrefs, Semrush, or Ubersuggest to find relevant search terms. Beyond volume, focus on search intent—what the user is actually trying to achieve. Are they looking to buy, learn, or find a service? Aligning content with intent leads to better rankings and conversions.
Once you identify keywords, integrate them naturally into page titles, meta descriptions, headers (H1, H2, etc.), and throughout the content. Avoid keyword stuffing and prioritize readability. Understanding the balance between keyword optimization and user experience is what separates a beginner from a professional. Regularly update your keyword strategy based on search trends, seasonal changes, and performance metrics for long-term success.
Learn HTML Basics and On-Page Elements
While you don’t need to be a coder, understanding basic HTML is vital for On-Page SEO. Elements like title tags, meta descriptions, header tags (H1-H6), image alt attributes, and canonical tags play an important role in how search engines interpret your page. Learning how to view and edit these tags, either through a CMS like WordPress or directly in code, empowers you to optimize pages more effectively.
You should also understand how to properly structure a webpage. This includes organizing content in a logical flow, using proper header hierarchy, and ensuring your pages have a clear and concise topic focus. Implementing schema markup (structured data) is another advanced skill that helps enhance how search engines display your content in rich snippets. Mastery of on-page elements ensures both search engines and users have a clear understanding of your content’s value.
Focus on Content Quality and Optimization
At the heart of On-Page SEO is content. Google prioritizes content that is helpful, relevant, and trustworthy. To excel, you need to develop the ability to write or evaluate content with both humans and search engines in mind. Your goal should be to create valuable pages that answer specific questions, solve problems, and guide the user through a clear journey.
Optimized content should include targeted keywords, but it must also be engaging, well-structured, and rich in relevant information. Break up long paragraphs, use bullet points, and integrate multimedia like images or videos when appropriate. Update content regularly to reflect current trends or information. Great content keeps users on the page longer, reduces bounce rates, and boosts SEO performance—a key metric of success for any On-Page SEO specialist.
Improve Site Structure and Internal Linking
A well-structured website helps users and search engines navigate easily. Learn how to create an effective site architecture where important pages are easily reachable within a few clicks from the homepage. Proper use of categories, tags, and breadcrumbs not only improves usability but also helps Google understand the relationships between your pages.
Internal linking is another powerful yet often overlooked SEO tool. Use descriptive anchor text to link to related articles or service pages, guiding both users and bots to high-value content. This improves crawlability and distributes link equity (ranking power) across your site. As an On-Page SEO specialist, designing a user-friendly and search-friendly structure is one of your most impactful contributions to long-term SEO success.
Analyze Performance and Use SEO Tools
Effective On-Page SEO requires ongoing analysis and refinement. Learn to use tools like Google Analytics, Google Search Console, and third-party platforms such as Screaming Frog, Ahrefs, or Semrush to track your progress. These tools provide insights into keyword rankings, page performance, crawl errors, and user behavior.
Use this data to optimize underperforming pages. Are users bouncing quickly? Is a high-ranking page under-delivering on conversions? Data helps you identify where your efforts are working and where they’re not. A good On-Page SEO specialist doesn't just optimize and forget—they continuously iterate, test, and improve. Understanding analytics and using them to guide your strategy is what makes you indispensable in any SEO team.
Stay Updated and Keep Practicing
SEO is constantly evolving. Algorithm updates, changes in search behavior, and new technologies mean that what works today might not work tomorrow. Follow trusted SEO blogs (like Moz, Search Engine Journal, and Google's official blog), join SEO communities, and consider attending webinars or conferences to stay current.
Beyond consuming content, practice is key. Start your own blog, volunteer for small projects, or freelance to build hands-on experience. As you apply your knowledge, you’ll develop problem-solving skills, spot optimization opportunities faster, and gain confidence. The more you practice, the sharper your instincts become. Staying updated and practicing regularly is the only way to keep your skills relevant in the fast-moving world of digital marketing.
Conclusion: Turning Knowledge into Career Growth
Becoming a successful On-Page SEO specialist doesn’t happen overnight—it’s a blend of learning, applying, and constantly refining your skills. From understanding the core principles and mastering content strategy to analyzing performance and staying ahead of trends, each step builds toward SEO mastery.
youtube
The demand for skilled On-Page SEO professionals continues to grow as businesses invest more in digital visibility. By focusing on what you can control—your page content, structure, and optimization—you position yourself as a key player in any SEO strategy. With dedication, curiosity, and real-world application, you can carve out a rewarding and impactful career in SEO.
0 notes
Text
Mastering On-Page SEO: How to Build a Search-Optimized Website from the Ground Up
Whether you're launching a new website or trying to improve your existing SEO strategy, one thing remains clear: On-Page SEO is your foundation.
Without it, your content won’t reach the right audience—no matter how great it is. In this detailed guide, we’ll walk you through how to structure your content and website architecture so that both users and search engines love it.
🧱 What Is On-Page SEO?
On-Page SEO is the process of optimizing your website’s pages to improve their visibility in search engine results. It covers everything you control on your own website—unlike Off-Page SEO, which focuses on backlinks and external signals.
On-Page SEO includes:
Keyword placement
Page structure
Content quality
Internal linking
UX and mobile performance
Site speed
Accessibility
🧭 The SEO Framework: Three Dimensions of On-Page SEO
To understand On-Page SEO fully, think of it in three dimensions:
1. Content Optimization
Creating valuable content that addresses user intent.
2. HTML Optimization
Using meta tags, header tags, and schema markup to help search engines understand your content.
3. Site Architecture
Designing a structure that enhances crawling, indexing, and user navigation.
Let’s dive into each.
📚 Part 1: Content Optimization
🎯 Targeting the Right Keywords
Start with search intent. Before you write, ask:
What is the user trying to accomplish?
Are they looking for information, a product, a tutorial?
Tips:
Use long-tail keywords to reduce competition.
Use tools like Ubersuggest, SEMrush, or Google Keyword Planner.
✍️ Writing SEO-Friendly Content
Great content does three things:
Informs or solves a problem
Keeps readers engaged
Encourages action or next steps
Best practices:
Use your main keyword within the first 100 words.
Use subheadings (H2/H3) to break content into sections.
Answer related questions users may have (good for featured snippets).
🧠 Semantic SEO: Go Beyond Keywords
Google is smart. It now ranks pages that cover a topic comprehensively, not just those stuffed with exact-match keywords.
Use tools like:
LSIGraph: To find semantically related keywords.
Surfer SEO: To see what top-ranking pages include.
🛠️ Part 2: HTML Optimization
📌 Meta Tags
Title Tag
Include the primary keyword close to the beginning.
Keep it under 60 characters.
Meta Description
Summarize the page with a compelling CTA.
Keep it under 155–160 characters.
🧩 Header Tags (H1 to H6)
Use headers to create a clear hierarchy:
H1: Page title (only once).
H2/H3: Subsections and supporting content.
Pro tip: Include keywords naturally in headers.
🧼 Clean, SEO-Friendly URLs
URLs should be:
Short and descriptive
Include your keyword
Use hyphens for spacing
Bad: yourwebsite.com/page?id=4589§ion=abc
Good: yourwebsite.com/seo/on-page-optimization
📷 Alt Tags for Images
Describe each image using keywords appropriately. This helps:
Search engines understand images.
Improve accessibility for screen readers.
Boost traffic through Google Image Search.
📚 Structured Data / Schema Markup
Add schema to support:
FAQs
Reviews
Products
Recipes
Events
Use Google’s Structured Data Markup Helper to implement it.
🏗️ Part 3: Site Architecture & UX
🗺️ Internal Linking
Link to other relevant pages on your site:
Boosts page authority
Improves crawlability
Encourages longer sessions
Use descriptive anchor text (not “click here”).
📱 Mobile Optimization
Google uses mobile-first indexing.
Ensure:
Responsive design
Touch-friendly navigation
Readable font sizes
Use Google’s Mobile-Friendly Test to evaluate your site.
⚡ Page Speed
A slow site hurts both UX and rankings.
Boost speed by:
Compressing images
Using a CDN
Minifying CSS/JavaScript
Enabling lazy loading
Test your speed with:
Google PageSpeed Insights
GTmetrix
WebPageTest
🔐 HTTPS and Secure Site Structure
Google considers HTTPS a ranking factor. Ensure your site has an SSL certificate.
Also, structure your site logically:
Homepage → Categories → Subcategories → Content
Use breadcrumbs and clear menus
📊 Tools to Supercharge Your On-Page SEO
ToolFunctionYoast SEO / Rank MathSEO analysis, meta tags (WordPress)Ahrefs / SEMrushKeyword and competitor researchSurfer SEOContent editor based on SERP dataScreaming FrogOn-page auditsGoogle Search ConsolePerformance, indexing, crawl errorsHotjarAnalyze user behavior and heatmaps
🚫 Common On-Page SEO Pitfalls
🟥 Duplicate meta tags and content
🟥 Broken internal links
🟥 Ignoring mobile UX
🟥 Not optimizing for featured snippets
🟥 Poor page layout (walls of text, no images)
🟥 Outdated or thin content
📌 On-Page SEO Checklist (Quick Reference)
✅ Keyword in title ✅ Keyword in meta description ✅ One H1 per page ✅ Use H2/H3 for subheadings ✅ Short, readable URL ✅ Internal links to related pages ✅ External links to credible sources ✅ Image alt tags with keywords ✅ Schema markup added ✅ Fast loading time ✅ Mobile-friendly layout ✅ No duplicate content
🧠 Frequently Asked Questions
Q: Does Google still use meta keywords? A: No. They’ve been deprecated for years.
Q: How often should I update on-page content? A: Aim to refresh every 6–12 months for important pages.
Q: Can I rank without backlinks if my On-Page SEO is strong? A: You can rank for low-competition keywords, but backlinks help in competitive spaces.
🚀 Conclusion
On-Page SEO is the heart of your website’s visibility. It’s where your SEO journey begins—and without a strong foundation, no amount of link building or social shares will help you rank long term.
By mastering content optimization, HTML improvements, and site architecture, you position your site to climb the search engine ladder—organically, sustainably, and strategically.
1 note
·
View note
Text
HTML and SEO: How to Structure Web Pages for Better Rankings
A visually appealing website alone isn’t enough in today's digital landscape. To attract organic traffic, web developers must focus on optimising their sites for search engines. A crucial aspect of SEO is properly structuring HTML, which directly impacts a website’s visibility and performance. Mastering the connection between HTML and SEO is essential for developers building high-ranking, efficient websites. Aspiring developers can enhance their skills by enrolling in a full stack developer course in Mumbai, where they can learn best practices for structuring HTML and optimising web applications for search engines.
The Role of HTML in SEO
HTML (HyperText Markup Language) forms the backbone of web pages. It provides structure to content, making it easier for browsers and search engines to interpret. Well-structured HTML improves a website’s visibility, allowing search engines to crawl and index content efficiently. A full stack developer course covers the fundamentals of HTML and its critical role in SEO.
Key HTML Elements for SEO
Title Tags: The title tag sets the webpage title and appears in search results. A well-crafted title tag improves click-through rates and helps search engines understand the page's content.
Meta Descriptions: Meta descriptions briefly summarise the page's content. Although they don't directly impact rankings, compelling meta descriptions encourage users to click on search results.
Heading Tags (H1-H6): Heading tags structure content and highlight section importance, with H1 for titles and H2 and H3 for subheadings.
Alt Attributes: Alt attributes describe images for search engines and visually impaired users. Including relevant alt text improves both accessibility and SEO.
Anchor Text: Descriptive anchor text enhances SEO by providing search engines with clear context about linked content, improving discoverability and user experience.
Best Practices for Structuring HTML for SEO
Use descriptive and unique title tags.
Write concise meta descriptions with target keywords.
Organise content with proper heading hierarchy.
Include relevant keywords naturally within the content.
Optimise images with alt attributes and appropriate file names.
Use semantic HTML elements like , , and to improve content clarity.
How HTML Structure Impacts User Experience
A well-structured HTML layout improves SEO and enhances user experience. Clean, organised code makes websites easier to navigate and faster to load. This positive user experience contributes to lower bounce rates and higher search rankings. A full stack developer course in Mumbai emphasises balancing SEO optimisation with user-centric design.
Common HTML Mistakes That Harm SEO
Using duplicate title tags and meta descriptions.
Ignoring heading hierarchy.
Missing alt attributes for images.
Overloading pages with irrelevant keywords.
Failing to use semantic elements.
HTML is fundamental to SEO, as it structures content in a way that search engines can efficiently interpret. Developers who excel in HTML and best practices can boost SEO and usability. Aspiring developers can gain these essential skills by enrolling in a full stack developer course, which provides in-depth training on building SEO-friendly web applications. With hands-on experience and expert mentorship, learners can confidently create well-structured, high-performing websites that meet technical requirements and user expectations.
HTML and SEO: How to Structure Web Pages for Better Rankings
A visually appealing website alone isn’t enough in today's digital landscape. To attract organic traffic, web developers must focus on optimising their sites for search engines. A crucial aspect of SEO is properly structuring HTML, which directly impacts a website’s visibility and performance. Mastering the connection between HTML and SEO is essential for developers building high-ranking, efficient websites. Aspiring developers can enhance their skills by enrolling in a full stack developer course in Mumbai, where they can learn best practices for structuring HTML and optimising web applications for search engines.
The Role of HTML in SEO
HTML (HyperText Markup Language) forms the backbone of web pages. It provides structure to content, making it easier for browsers and search engines to interpret. Well-structured HTML improves a website’s visibility, allowing search engines to crawl and index content efficiently. A full stack developer course covers the fundamentals of HTML and its critical role in SEO.
Key HTML Elements for SEO
Title Tags: The title tag sets the webpage title and appears in search results. A well-crafted title tag improves click-through rates and helps search engines understand the page's content.
Meta Descriptions: Meta descriptions briefly summarise the page's content. Although they don't directly impact rankings, compelling meta descriptions encourage users to click on search results.
Heading Tags (H1-H6): Heading tags structure content and highlight section importance, with H1 for titles and H2 and H3 for subheadings.
Alt Attributes: Alt attributes describe images for search engines and visually impaired users. Including relevant alt text improves both accessibility and SEO.
Anchor Text: Descriptive anchor text enhances SEO by providing search engines with clear context about linked content, improving discoverability and user experience.
Best Practices for Structuring HTML for SEO
Use descriptive and unique title tags.
Write concise meta descriptions with target keywords.
Organise content with proper heading hierarchy.
Include relevant keywords naturally within the content.
Optimise images with alt attributes and appropriate file names.
Use semantic HTML elements like , , and to improve content clarity.
How HTML Structure Impacts User Experience
A well-structured HTML layout improves SEO and enhances user experience. Clean, organised code makes websites easier to navigate and faster to load. This positive user experience contributes to lower bounce rates and higher search rankings. A full stack developer course in Mumbai emphasises balancing SEO optimisation with user-centric design.
Common HTML Mistakes That Harm SEO
Using duplicate title tags and meta descriptions.
Ignoring heading hierarchy.
Missing alt attributes for images.
Overloading pages with irrelevant keywords.
Failing to use semantic elements.
HTML is fundamental to SEO, as it structures content in a way that search engines can efficiently interpret. Developers who excel in HTML and best practices can boost SEO and usability. Aspiring developers can gain these essential skills by enrolling in a full stack developer classes, which provides in-depth training on building SEO-friendly web applications. With hands-on experience and expert mentorship, learners can confidently create well-structured, high-performing websites that meet technical requirements and user expectations.
Business Name: Full Stack Developer Course In Mumbai Address: Tulasi Chambers, 601, Lal Bahadur Shastri Marg, near by Three Petrol Pump, opp. to Manas Tower, Panch Pakhdi, Thane West, Mumbai, Thane, Maharashtra 400602, Phone: 09513262822
0 notes
Text
Crafting Strong DX With Astro Components and TypeScript
New Post has been published on https://thedigitalinsider.com/crafting-strong-dx-with-astro-components-and-typescript/
Crafting Strong DX With Astro Components and TypeScript
I’m a big fan of Astro’s focus on developer experience (DX) and the onboarding of new developers. While the basic DX is strong, I can easily make a convoluted system that is hard to onboard my own developers to. I don’t want that to happen.
If I have multiple developers working on a project, I want them to know exactly what to expect from every component that they have at their disposal. This goes double for myself in the future when I’ve forgotten how to work with my own system!
To do that, a developer could go read each component and get a strong grasp of it before using one, but that feels like the onboarding would be incredibly slow. A better way would be to set up the interface so that as the developer is using the component, they have the right knowledge immediately available. Beyond that, it would bake in some defaults that don’t allow developers to make costly mistakes and alerts them to what those mistakes are before pushing code!
Enter, of course, TypeScript. Astro comes with TypeScript set up out of the box. You don’t have to use it, but since it’s there, let’s talk about how to use it to craft a stronger DX for our development teams.
Watch
I’ve also recorded a video version of this article that you can watch if that’s your jam. Check it out on YouTube for chapters and closed captioning.
Setup
In this demo, we’re going to use a basic Astro project. To get this started, run the following command in your terminal and choose the “Minimal” template.
npm create astro@latest
This will create a project with an index route and a very simple “Welcome” component. For clarity, I recommend removing the <Welcome /> component from the route to have a clean starting point for your project.
To add a bit of design, I’d recommend setting up Tailwind for Astro (though, you’re welcome to style your component however you would like including a style block in the component).
npx astro add tailwind
Once this is complete, you’re ready to write your first component.
Creating the basic Heading component
Let’s start by defining exactly what options we want to provide in our developer experience.
For this component, we want to let developers choose from any HTML heading level (H1-H6). We also want them to be able to choose a specific font size and font weight — it may seem obvious now, but we don’t want people choosing a specific heading level for the weight and font size, so we separate those concerns.
Finally, we want to make sure that any additional HTML attributes can be passed through to our component. There are few things worse than having a component and then not being able to do basic functionality later.
Using Dynamic tags to create the HTML element
Let’s start by creating a simple component that allows the user to dynamically choose the HTML element they want to use. Create a new component at ./src/components/Heading.astro.
--- // ./src/component/Heading.astro const as = Astro.props; const As = as; --- <As> <slot /> </As>
To use a prop as a dynamic element name, we need the variable to start with a capital letter. We can define this as part of our naming convention and make the developer always capitalize this prop in their use, but that feels inconsistent with how most naming works within props. Instead, let’s keep our focus on the DX, and take that burden on for ourselves.
In order to dynamically register an HTML element in our component, the variable must start with a capital letter. We can convert that in the frontmatter of our component. We then wrap all the children of our component in the <As> component by using Astro’s built-in <slot /> component.
Now, we can use this component in our index route and render any HTML element we want. Import the component at the top of the file, and then add <h1> and <h2> elements to the route.
--- // ./src/pages/index.astro import Layout from '../layouts/Layout.astro'; import Heading from '../components/Heading.astro'; --- <Layout> <Heading as="h1">Hello!</Heading> <Heading as="h2">Hello world</Heading> </Layout>
This will render them correctly on the page and is a great start.
Adding more custom props as a developer interface
Let’s clean up the element choosing by bringing it inline to our props destructuring, and then add in additional props for weight, size, and any additional HTML attributes.
To start, let’s bring the custom element selector into the destructuring of the Astro.props object. At the same time, let’s set a sensible default so that if a developer forgets to pass this prop, they still will get a heading.
--- // ./src/component/Heading.astro const as: As="h2" = Astro.props; --- <As> <slot /> </As>
Next, we’ll get weight and size. Here’s our next design choice for our component system: do we make our developers know the class names they need to use or do we provide a generic set of sizes and do the mapping ourselves? Since we’re building a system, I think it’s important to move away from class names and into a more declarative setup. This will also future-proof our system by allowing us to change out the underlying styling and class system without affecting the DX.
Not only do we future proof it, but we also are able to get around a limitation of Tailwind by doing this. Tailwind, as it turns out can’t handle dynamically-created class strings, so by mapping them, we solve an immediate issue as well.
In this case, our sizes will go from small (sm) to six times the size (6xl) and our weights will go from “light” to “bold”.
Let’s start by adjusting our frontmatter. We need to get these props off the Astro.props object and create a couple objects that we can use to map our interface to the proper class structure.
--- // ./src/component/Heading.astro const weights = "bold": "font-bold", "semibold": "font-semibold", "medium": "font-medium", "light": "font-light" const sizes= "6xl": "text-6xl", "5xl": "text-5xl", "4xl": "text-4xl", "3xl": "text-3xl", "2xl": "text-2xl", "xl": "text-xl", "lg": "text-lg", "md": "text-md", "sm": "text-sm" const as: As="h2", weight="medium", size="2xl" = Astro.props; ---
Depending on your use case, this amount of sizes and weights might be overkill. The great thing about crafting your own component system is that you get to choose and the only limitations are the ones you set for yourself.
From here, we can then set the classes on our component. While we could add them in a standard class attribute, I find using Astro’s built-in class:list directive to be the cleaner way to programmatically set classes in a component like this. The directive takes an array of classes that can be strings, arrays themselves, objects, or variables. In this case, we’ll select the correct size and weight from our map objects in the frontmatter.
--- // ./src/component/Heading.astro const weights = bold: "font-bold", semibold: "font-semibold", medium: "font-medium", light: "font-light", ; const sizes = "6xl": "text-6xl", "5xl": "text-5xl", "4xl": "text-4xl", "3xl": "text-3xl", "2xl": "text-2xl", xl: "text-xl", lg: "text-lg", md: "text-md", sm: "text-sm", ; const as: As = "h2", weight = "medium", size = "2xl" = Astro.props; --- <As class:list=[ sizes[size], weights[weight] ] > <slot /> </As>
Your front-end should automatically shift a little in this update. Now your font weight will be slightly thicker and the classes should be applied in your developer tools.
From here, add the props to your index route, and find the right configuration for your app.
--- // ./src/pages/index.astro import Layout from '../layouts/Layout.astro'; import Heading from '../components/Heading.astro'; --- <Layout> <Heading as="h1" size="6xl" weight="light">Hello!</Heading> <Heading as="h3" size="xl" weight="bold">Hello world</Heading> </Layout>
Our custom props are finished, but currently, we can’t use any default HTML attributes, so let’s fix that.
Adding HTML attributes to the component
We don’t know what sorts of attributes our developers will want to add, so let’s make sure they can add any additional ones they need.
To do that, we can spread any other prop being passed to our component, and then add them to the rendered component.
--- // ./src/component/Heading.astro const weights = // etc. ; const sizes = // etc. ; const as: As = "h2", weight = "medium", size = "md", ...attrs = Astro.props; --- <As class:list=[ sizes[size], weights[weight] ] ...attrs > <slot /> </As>
From here, we can add any arbitrary attributes to our element.
--- // ./src/pages/index.astro import Layout from '../layouts/Layout.astro'; import Heading from '../components/Heading.astro'; --- <Layout> <Heading id="my-id" as="h1" size="6xl" weight="light">Hello!</Heading> <Heading class="text-blue-500" as="h3" size="xl" weight="bold">Hello world</Heading> </Layout>
I’d like to take a moment to truly appreciate one aspect of this code. Our <h1>, we add an id attribute. No big deal. Our <h3>, though, we’re adding an additional class. My original assumption when creating this was that this would conflict with the class:list set in our component. Astro takes that worry away. When the class is passed and added to the component, Astro knows to merge the class prop with the class:list directive and automatically makes it work. One less line of code!
In many ways, I like to consider these additional attributes as “escape hatches” in our component library. Sure, we want our developers to use our tools exactly as intended, but sometimes, it’s important to add new attributes or push our design system’s boundaries. For this, we allow them to add their own attributes, and it can create a powerful mix.
It looks done, but are we?
At this point, if you’re following along, it might feel like we’re done, but we have two issues with our code right now: (1) our component has “red squiggles” in our code editor and (2) our developers can make a BIG mistake if they choose.
The red squiggles come from type errors in our component. Astro gives us TypeScript and linting by default, and sizes and weights can’t be of type: any. Not a big deal, but concerning depending on your deployment settings.
The other issue is that our developers don’t have to choose a heading element for their heading. I’m all for escape hatches, but only if they don’t break the accessibility and SEO of my site.
Imagine, if a developer used this with a div instead of an h1 on the page. What would happen?We don’t have to imagine, make the change and see.
It looks identical, but now there’s no <h1> element on the page. Our semantic structure is broken, and that’s bad news for many reasons. Let’s use typing to help our developers make the best decisions and know what options are available for each prop.
Adding types to the component
To set up our types, first we want to make sure we handle any HTML attributes that come through. Astro, again, has our backs and has the typing we need to make this work. We can import the right HTML attribute types from Astro’s typing package. Import the type and then we can extend that type for our own props. In our example, we’ll select the h1 types, since that should cover most anything we need for our headings.
Inside the Props interface, we’ll also add our first custom type. We’ll specify that the as prop must be one of a set of strings, instead of just a basic string type. In this case, we want it to be h1–h6 and nothing else.
--- // ./src/component/Heading.astro import type HTMLAttributes from 'astro/types'; interface Props extends HTMLAttributes<'h1'> "h4" //... The rest of the file ---
After adding this, you’ll note that in your index route, the <h1> component should now have a red underline for the as="div" property. When you hover over it, it will let you know that the as type does not allow for div and it will show you a list of acceptable strings.
If you delete the div, you should also now have the ability to see a list of what’s available as you try to add the string.
While it’s not a big deal for the element selection, knowing what’s available is a much bigger deal to the rest of the props, since those are much more custom.
Let’s extend the custom typing to show all the available options. We also denote these items as optional by using the ?:before defining the type.
While we could define each of these with the same type functionality as our as type, that doesn’t keep this future proofed. If we add a new size or weight, we’d have to make sure to update our type. To solve this, we can use a fun trick in TypeScript: keyof typeof.
There are two helper functions in TypeScript that will help us convert our weights and sizes object maps into string literal types:
typeof: This helper takes an object and converts it to a type. For instance typeof weights would return type bold: string, semibold: string, ...etc
keyof: This helper function takes a type and returns a list of string literals from that type’s keys. For instance keyof type bold: string, semibold: string, ...etc would return "bold" | "semibold" | ...etc which is exactly what we want for both weights and sizes.
--- // ./src/component/Heading.astro import type HTMLAttributes from 'astro/types'; interface Props extends HTMLAttributes<'h1'> "h3" // ... The rest of the file
Now, when we want to add a size or weight, we get a dropdown list in our code editor showing exactly what’s available on the type. If something is selected, outside the list, it will show an error in the code editor helping the developer know what they missed.
While none of this is necessary in the creation of Astro components, the fact that it’s built in and there’s no additional tooling to set up means that using it is very easy to opt into.
I’m by no means a TypeScript expert, but getting this set up for each component takes only a few additional minutes and can save a lot of time for developers down the line (not to mention, it makes onboarding developers to your system much easier).
#Accessibility#ADD#alerts#app#Arrays#Article#Articles#astro#attributes#Blue#box#Building#change#Children#classes#code#Code Editor#coding#command#Conflict#convention#course#craft#deal#delete#deployment#Design#Developer#developers#development
0 notes
Text
Website Development Interview Questions.....
Website development interview questions:
In such a situation, it is critical to be ready for interviews, especially when entering the web development field. Irrespective of your plan of working with a leading organization such as SkyWeb Design Technologies, an organization that deals in web and mobile applications, or with any organization of your preference, it is important to learn the basics.
1. What is HTML, what is it used for?
Answer: HTML stands for Hyper Text Markup Language it’s most commonly used markup language in the creation of Web documents or anything related to the Web environment. It determines the layout of the material posted on the World Wide Web and includes such components as headings, paragraphs, hyperlinks, images, and others.
2. What makes HTML5 different from the prior version of HTML?
Answer: HTML5 is the version of HTML that is currently in use. It adds new elements and attributes and enhanced support for multimedia that are <article>, <section>, <header>, <footer>, <audio>, <video> and new APIs such as Canvas, Web Storage and Geolocation.
3. Here are some of the frequently used HTML tags and what they are used for:
Answer:
<p>: Defines a paragraph.
<h1> to <h6>:
<a>: Defines a hyperlink.
<img>: Embeds an image.
<ul> and <ol>: is unordered list, and ordered list.
<div>: division. So it defines a division or section.
<span>: Sets a block of text, mainly used for applying a style on.
4. What is CSS and why should one bother with it?
Answer: HTML is used to create a structure of a web page while CSS (Cascading Style Sheets) is used for appears of web pLAST EDITED: pages. It enables you to use aspects like colors font, space and position to your html elements which in turn creates aesthetically pleasing and more functional website to the users.
5. Please also provide me with a definition of what the box model in CSS .
Answer: The CSS box model describes the rectangular boxes generated for elements in the document tree and consists of:The CSS box model describes the rectangular boxes generated for elements in the document tree and consists of:
Content: The inner content area referred to as Knowledge Creation is:
Padding: Margin between the stuff and its visual frame.
Border: These are the line on the right and at the bottom of the padding and content.
Margin: (h) Space referring to the area beyond the border surrounding an element and other elements.
6. JavaScript is a programming language and web development tool, but how is it defined and what does it do?
Answer: JavaScript is also a language used in the designing of web sites to provide flexibility and impressive features on any web page. It lets you to work with HTML and CSS, manage events, verify data in forms, use animations, and work with servers.
7. What are variables in JavaScript and how can one declare them?
Answer: In JavaScript, variables refer to the means of storing data values. You can declare them using the var, let, or const keywords:You can declare them using the var, let, or const keywords:
javascript
var name = "ram";
let age = 25;
const isStudent = true;
8. What is the difference between let, const, and var?
Answer:
var: Any variable declared in a function block is either function-scoped or globally-scoped which even can be redeclared and again updated.
let: Local, write-only, specifically they allow updating the variable but not declaring it in the same block.
const: declared only in block can’t be updated, or redeclared after the declaration.
9. What is an array; Explain how you can define an array in JavaScript?
Answer: An array can be defined as a united variable for storing more than one value. We can create an array using square brackets []:
javascript
let fruits = [‘apple’, ‘banana’,’ cherries’];
10. What is a function and how does one describe or create one using JavaScript?
Answer: Function is a set of statements and instruction used to do a certain job or achieve a specific goal. we can define a function using the function keyword:
javascript
function greet(name) {
return ‘Hello, ‘ + name;
}
11. What is the event handling of JavaScript?
Answer: Javascript as the name suggests is an event driven language; this means that functions can be written that will take actions based on events such as a click, key press or even mouse movements. we can handle events by attaching event listeners to elements:
javascript
document. getElementById("myButton"). addEventListener("click", function() {
alert("Button clicked!");
});
12. What is the Document Object Model (DOM)?
Answer: DOM is a programming interface for the web documents. It depicts a document as a tree structure of nodes; this assist in managing the content and structures of the web pages by applying JavaScript.
13. How do you select an element by its ID in JavaScript?
Answer:
I can select an element by its ID using the getElementById method:
javascript
let element = document.getElementById("myElement");
14. What is responsive web design, and why is it important?
Answer:
Responsive web design ensures that web pages look good and function well on devices of various screen sizes and resolutions. It is important because it improves user experience and accessibility, and it is favored by search engines.
15. What are some basic steps to create a responsive web design?
Answer:
Use flexible grid layouts: Utilize relative units like percentages instead of fixed units like pixels.
Media queries: Apply different styles based on screen size, orientation, and other characteristics.
Flexible images: Ensure images scale appropriately within their containers.
Viewport meta tag: Set the viewport to control layout on mobile browsers.
html
<meta name="viewport" content="width=device-width, initial-scale=1.0">
These questions and answers demystify basic facts which a fresher that wants to join the web development team should know.
Thanks for visit us……
For more Information to visit our website: skyweb design Technologies.
Address: 15th floor, manjeera trinity corporation ,kukkatpally , HYDERABAD.
#app development#website development interview questions#website development services#best website designers#skyweb design technologies#best app developers in hyderabad
0 notes
Text
Ensuring Your Converted PSD Website Meets Accessibility Standards
Many websites begin their life as a PSD (Photoshop Document) file, a visual blueprint for the final design. But the conversion from PSD to a functional website can sometimes overlook accessibility best practices. Here's how to bridge the gap and ensure your website is inclusive from the start.
Planning for Accessibility During Conversion
Semantic Structure: A well-structured website uses semantic HTML tags to define the meaning of content. This goes beyond just bolding text for emphasis; it means using heading tags (H1-H6) to define the hierarchy of information, and using list tags for actual lists. This clear structure is crucial for screen readers to navigate the page and convey the content effectively.
Alternative Text (Alt Text): Images are important for visual appeal, but they can be a barrier for users who can't see them. Adding alt text descriptions to images provides context for screen readers. Don't just stuff keywords here; write concise descriptions that accurately reflect the image content.
Color Contrast: Visual impairments can make it difficult to distinguish between colors with low contrast. Use a color contrast checker to ensure there's enough contrast between text and background colors. This improves readability for everyone, not just those with visual limitations.
Keyboard Navigation: Not everyone uses a mouse. Ensure your website can be fully navigated using just the keyboard. This means menus, buttons, and links should be accessible through the Tab key and have clear keyboard shortcuts.
Testing and Validation
Once your website is converted, it's vital to test its accessibility. Here are some resources:
Web Content Accessibility Guidelines (WCAG): Developed by the World Wide Web Consortium (W3C), WCAG is the international standard for web accessibility. It has three levels of conformance (A, AA, and AAA), with A being the minimum and AAA the most comprehensive. Use WCAG guidelines to check your website's accessibility.
Automated Testing Tools: Several online tools can scan your website for accessibility issues. These tools are a great starting point, but they don't replace manual testing with assistive technologies.
Beyond the Basics
Accessibility is an ongoing process. As your website evolves, consider these additional points:
User Testing: Involve users with disabilities in your testing process. Their feedback is invaluable in identifying and addressing accessibility barriers.
Content Management Systems (CMS): If you're using a CMS, ensure the chosen platform offers built-in accessibility features.
Building an Inclusive Web
By following these steps, you can ensure your website is accessible to a wider audience. This not only benefits users with disabilities, but also improves search engine optimization (SEO) and overall user experience. Remember, a website that's usable by everyone is a website that thrives. Incorporating PSD to WordPress into your development process can further enhance your site's functionality and accessibility.
0 notes
Text
SEO
Types of SEO: –
SEO (Search Engine Optimization)
Types of SEO:
1. On Page SEO
2.Off page SEO
ON Page SEO, it contains an ON-page SEO report which one should manage/optimize.
On Page: ON-page SEO refers to SEO factors and techniques focused on optimizing aspects of your website that are under your control.
Report contains: –
Title: One should set a title of their website, what’s their website in about, there is also a character limit of 50-60 characters. If the title is within 50-60 characters, then the title is optimized otherwise not optimized.
Description:
Description: You should also add a brief description about your website, there is also a character limit of 150-160 characters. Keywords: You should also add keywords to your website so that it helps in ranking of your website.
URL structure:
URL structure: You should also manage the URL structure of your website; it is also called permalinks. It should be short and simple and in lower case. Example: if you open about page of any website its URL structure looks like website name/about.
Image Optimization:
Image Optimization: you should also optimize your image i.e., you must compress the image without failing in quality of that image, use Web P for that.
Java Script optimization:
Java Script optimization: Java Script (JS) should be in external method i.e., when you click on JS link in Source code it should redirect to another page where JS coding is done separately.
Style sheet optimization: It is same as Java script optimization, when you click on CSS link in Source code it should redirect to another page where CSS coding is done separately.
Header Tag
Header Tag: You should also manage the header tags of your webpage; every webpage has a separate header tag. Header tags are H1, H2, H3, H4, H5, H6.
For an optimized header tag there must be only one H1 and 1-2 H2 tag on each web page, H3-H6 can be unlimited. Canonical Issue: It most commonly occurs when a website has more than one URL that displays similar content.
XML site map: You index your webpages on search engine priority wise so that google crawlers can scan this and index on google easily.
Google Search Console: It helps you measure your site’s Search traffic and performance, fix issues, and make your site shine in Google Search results.
Google Analytics Code: It helps in finding traffic on your website, from which location traffic is coming from and from which device it is coming from, it also shows how many users are currently active on your website. Alt Tag Optimization: You should write an alternative text for every image you post on your website.
Website Internal Linking:
Website Internal Linking: An internal link is any link from one page on your website to another page on your website. Your users and search engines use links to find content on your website.HTML sitemap: An HTML sitemap is a file that lists every page on your website.
Content Optimization: Write your own content on your website and add keywords on your website and make your website readable, don’t copy from any other website or AI write it in your own language.
Web responsive Design: It means to make your website responsive according to mobile, desktop and tablets, OG Tag: An OG tag (Open Graph tag) shows an image and description when you send your website URL.
Off Page Optimization: Off-page SEO refers to SEO factors and strategies focused on promoting your site or brand around the web.
Classified and Directory Submission: Classified submission is advertisements that are posted to offer information to new customers whereas, Directory Submission is a process of submitting your website URL to various web directories (websites) with the aim of building backlinks thus increasing business growth.
Image and Info graphic submission: It is a technique for obtaining high domain authority backlinks by hosting or posting your image content on various image-sharing services. Infographics submission involves sharing these informative graphics on various platforms across the internet.
PPT and PDF submission: Power point presentations or PDF files allow you to explain your business in an attractive and concise way to your customers and clients.
You can create impactful Power Point presentations / PDF files and submit them to various submission sites which will help your business garner the right exposure online.
Forum and Q/A submission: This strategy involves responding to the queries that users post on various websites and online discussion forums. Some websites like Quora, Letsdiscuss etc.
Blog and Article Submission: Blog post is the act of sharing your written content, typically in the form of a blog post, on another website that accepts guest contributions.
Article submission is the process of submitting written content to various online platforms, such as article directories, websites, or blogs.
Local Listing: It is an online mention of the name, address, phone number, or website for a local business.

Techniques of SEO
White Hat SEO: Good content, proper title and keywords, ease of navigation, site performance, quality inbound links.
Black Hat SEO: keywords stuffing, cloaking, hidden pages, doorway pages, article spinning, duplicate content.
Gray Hat SEO: SEO squatting, negative S, spun content, paid links, domain grabbing
We also provide SEO services with practical problems, for more information contact us: https://digitalgarv.in/contact
0 notes
Text
HTML for Beginners: An Introduction to Web Development
Are you new to the world of web development and curious about how websites are created? Look no further! This comprehensive guide on HTML (Hypertext Markup Language) is designed specifically for beginners like you. In this blog, we'll take you through the fundamental concepts of HTML and provide you with a solid foundation to start building your own web pages. Let's dive in!
What is HTML?
HTML is the backbone of the internet - it stands for Hypertext Markup Language and is used to create the structure and content of websites. It uses a series of tags, enclosed within angle brackets, to define the elements of a webpage. These elements can be headings, paragraphs, images, links, forms, and more. Web browsers understand these tags and use them to display web content correctly.
Setting Up Your Environment
Before you start coding in HTML, you need a text editor and a web browser. Don't worry; these are readily available and often come pre-installed on your computer. Some popular text editors are Notepad++ (for Windows), Visual Studio Code (for all platforms), and Sublime Text. For web browsers, you can use Google Chrome, Mozilla Firefox, or Microsoft Edge.
Creating Your First HTML Document
To get started, open your preferred text editor and create a new file. Save it with the ".html" extension. Now, let's write our first HTML document:

Understanding the Structure
In the above code snippet, we have a basic HTML structure. Let's break it down:
- <!DOCTYPE html>: This declaration specifies the version of HTML being used, which is HTML5 in this case.
- <html>: The root element of an HTML document. Everything in your document will be contained within this tag.
- <head>: This section contains meta-information about the webpage, such as the title, character encoding, and links to external resources like CSS and JavaScript files.
- <title>: This tag sets the title of the webpage, which appears on the browser's tab or window title bar.
- <body>: The main content of your webpage resides within this tag. Here, you can add headings, paragraphs, images, and other elements.
Working with Text and Headings
HTML provides six levels of headings, ranging from `<h1>` to `<h6>`. `<h1>` is the highest level and represents the main heading of your page, while `<h6>` is the lowest level and represents the least important heading. Use headings to structure your content and provide hierarchy.
Creating Paragraphs and Line Breaks
To create paragraphs, simply use the `<p>` tag:

To insert line breaks within a paragraph, use the `<br>` tag:

Adding Images:
Images are an essential part of most webpages. To include an image in your HTML document, use the `<img>` tag:

In this example, replace "image.jpg" with the actual file path or URL of your image. The `alt` attribute provides a text description of the image for accessibility and SEO purposes.
Creating Links
Links are used to navigate between webpages or resources. To create a hyperlink, use the `<a>` tag:

Replace the URL inside the `href` attribute with the destination URL you want the link to point to.
Adding Lists
HTML supports both ordered (numbered) and unordered (bulleted) lists. For an ordered list, use the `<ol>` tag, and for an unordered list, use the `<ul>` tag. Each list item should be placed inside the `<li>` (list item) tags.

Creating Forms
Forms are essential for collecting user data. The `<form>` tag is used to create a form, and the `<input>` tag is used for input fields. Let's create a simple form with a text input and a submit button:

Conclusion
Congratulations! You've taken your first steps into the world of HTML. With this foundation, you can start creating your own web pages and explore the endless possibilities of web development. Remember that HTML is just one part of web development, and there's a lot more to learn, such as CSS (Cascading Style Sheets) for styling and JavaScript for adding interactivity.
As you continue your web development journey, keep practicing, experimenting, and seeking new challenges. The web is constantly evolving, and there's always something new to learn. Good luck, and happy coding!
I hope this helps. If it did like the post and comment on it
0 notes
Text
HTML H1 to H6 Tag
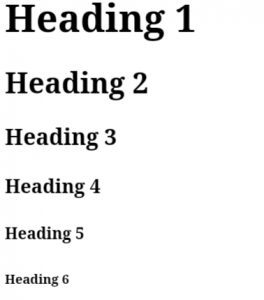
HTML H1 to H6 Tag
The heading tags are used to define HTML headings. There are six levels of headings H1, H2, H3, H4, H5, and H6. The H1 is the highest (or most important heading) and the smallest H6. Syntax <h1>heading</h1> to <h6>heading</h6> Example <h1>Heading 1</h1> <h2>Heading 2</h2> <h3>Heading 3</h3> <h4>Heading 4</h4> <h5>Heading 5</h5> <h6>Heading 6</h6> Try It Now Output: Global Attributes The <h1> to…
View On WordPress
#h1 - h6 tags#h1 to h6#h1 to h6 tags#h1 to h6 tags explained in html#h1 to h6 tags in html#h6#h6 tag#heading tags#heading tags in html#headings tags {h1 to h6}#how to write h1 to h6 tags in html#html h1 h2 h3 h4 h5 h6 tags#html h1 to h6 tag#html h1 to h6 tags#html h6 tag#html heading tags#html heading tags h1 to h6#html headings tags h1 to h6 with practical#html tags#html5#html5 heading tags#introduction to html#use of h1 to h6 tags in html
0 notes
Text
WhatsApp Clone Using HTML and CSS
What does cloning a website means?
To make a copy
Cloning a website means copying or modifying the design or script of an existing website to create a new website. Website cloning allows a designer to create a website without writing scripts from scratch.
Any website can be cloned. You are also free to integrate some additional new features while cloning your website.
Cloning a website is one of the proven methods you can use to learn web development faster. It provides basic to advanced ideas about how websites work and work, and how to integrate them.
Let’s learn how to clone a website just using HTML5 and CSS in a simple way.
Will take an example of WhatsApp Website and will clone it.
WhatsApp is a free cross-platform messaging service. iPhone and Android smartphone, Mac and Windows PC users can call or exchange text, photo, voice and video messages with anyone in the world for free, regardless of the recipient's device. WhatsApp uses Wi-Fi connections to communicate across platforms. This differs from Apple iMessage and Messages by Google, which require a cellular network and Short Message Service (SMS).
Key WhatsApp Terminology
Cross Platform
Messaging apps
End-to-end encryption
Video & Audio Calls
WhatsApp Business
HTML (Hyper Text Markup Language) –
HTML stands for Hyper Text Markup Language that is standard markup language to create web pages and web-based applications
It represents the structure of a web page
It comprises of series of elements which tells the browser how to display the content
Basic Structure of a HTML Document –
<!DOCTYPE html>
<html>
<head>
<title>WhatsApp Clone</title>
</head>
<body>
<h1>let's learn Web Development</h1>
<p>My first project - WhatsApp Cloning</p>
</body>
</html>
Let’s Explain the above code –
- It is used to defines that the document is HTML5 document
- It is the root elements on an HTML Page
- It contains all the meta information about the HTML Page
- This element contains all the visible content of the page, such as paragraph, headlines, tables, list, etc.
- It defines the largest heading for any topic, it ranges from -
- It defines a paragraph in the HTML page
Elements –
It is the collection of start and end tag, and in between content is inserted between them.
It major components are–
Opening Tag – Used to tell the browser where the content starts.
Closing Tag – Used to tell the browser where the content material ends.
Content – Whatever written inside the opening and closing tag is content.
Some Most Commonly used tags are –
– Used to define a document or section, as it contains information related to titles and heading of related content.
– The navigation tag is used to declare navigation sections in HTML documents. Websites typically have a section dedicated to navigation links that allows users to move around the site
– Anchor tag is used for creating hyperlink on the webpage. It is used to link one web page from another.
– It is used to define a paragraph. Content written inside tag always starts from a new line.
– It is used to define heading of a web page. There are 6 different heading h1, h2, h3, h4, h5 and h6. H1 is the main heading and the biggest followed by h2, h3, h4, h5 and h6.
- It is used to group multiple elements together. It helps in applying CSS.
- Image tag is used to embed an image in a web page.
CSS (Cascading Style Sheet) –
CSS stands for Cascading Style Sheets, that describes HTML elements that appear on screen, paper, or other media.
It used for designing web pages, in order to make web pages presentable.
It is standardized across Web Browsers and is one of the core languages of the open web system/technology.
CSS Selector –
CSS Selectors are used to select or target the element that you want to style. Selectors are part of the CSS ruleset. CSS selectors select HTML elements by ID, class, type, attributes, etc.
Types of CSS Selectors –
Element Selector – It selects the HTML elements directly using name
ID Selector – It selects the id attribute of an element. ID is always unique, in the code. So, it is used to target and apply design to a specific or a unique element.
Class Selector - It selects the class attribute of an element. Unlike ID selector class selectors can be same of many elements.
Universal Selector – It selects all the elements of the webpage, and apply changes to it.
Group Selector – It is used when same style is to be applied on many elements. It helps in non-duplication of code.
Different ways of applying CSS -
CSS can be applied in different ways –
Inline CSS –
Styling is done using different attributed inside an element itself. It can be used to apply unique style for a single element.
<h1 style="color:blue;">Let's learn Web Development</h1>
Internal CSS –
It is defined or written within the <style> element, nested instead <head> section of HTML document.
It is mainly used when need to apply CSS on a particular page.
<style type="text/css">
h1 {
color:blue;
}
</style>
External CSS –
It is used to apply CSS on multiple pages. As all the styling is written in a different file with an extension “.css” Example style.css.
<link rel="stylesheet" type="text/css" href="style.css">
It is written instead head tag.
For more detailed guide – Click here
Let’s implement the above learnt concepts –
In this example will clone a static page of WhatsApp using Internal CSS-
<!DOCTYPE html>
<html lang="en">
<head>
<style type="text/css">
:root {
font-size: 15px;
--primaryColor: #075e54;
--secondaryColor: #aaa9a8;
--tertierColor: #25d366;
}
* {
margin: 0;
padding: 0;
font-family: inherit;
font-size: inherit;
}
body {
font-family: Helvetica;
font-weight: 300;
}
img {
object-fit: cover;
width: 100%;
}
.container {
margin: 0 1.2em;
}
header {
background-color: var(--primaryColor);
padding: 1.4em 0;
}
header .container {
display: flex;
justify-content: space-between;
align-items: center;
color: white;
}
header .logo {
font-size: 1.5rem;
font-weight: 300;
}
header .menu {
margin-left: 18px;
}
.nav-bar {
background-color: var(--primaryColor);
margin-bottom: 8px;
display: grid;
grid-template-columns: 16% 28% 28% 28%;
justify-items: space-between;
align-items: center;
text-align: center;
box-shadow: rgba(50, 50, 93, 0.25) 0px 2px 5px -1px,
rgba(0, 0, 0, 0.3) 0px 1px 3px -1px;
}
.nav {
color: var(--secondaryColor);
text-transform: uppercase;
padding: 1em 0;
}
.nav.active {
border-bottom: 3px solid white;
color: white;
}
.chat {
padding: 1em 0;
display: flex;
justify-content: space-between;
}
.chat .info {
display: flex;
}
.chat .username {
font-size: 1.2rem;
margin-bottom: 5px;
font-weight: 300;
}
.chat .recent-chat {
color: gray;
max-width: 200px;
text-overflow: ellipsis;
overflow: hidden;
white-space: nowrap;
}
.chat .recent-chat .read {
color: #34b7f1;
}
.chat .photo {
width: 55px;
height: 55px;
border-radius: 50%;
margin-right: 18px;
}
.chat .recent-chat-time {
font-size: 12px;
color: gray;
}
.contact-button {
padding: 1em;
border: 0;
border-radius: 50%;
color: white;
transform: rotate(0deg);
font-size: 1.3rem;
position: fixed;
bottom: 20px;
right: 1.2em;
background-color: var(--tertierColor);
}
</style>
<title>WhatsApp</title>
<link rel="icon" type="image/x-icon" href="wp.png" />
<link rel="stylesheet" href="https://cdn.jsdelivr.net/npm/[email protected]/font/bootstrap-icons.css" />
</head>
<!-- Body section starte here -->
<body>
<header>
<div class="container">
<h1 class="logo">WhatsApp</h1>
<div>
<a role="button" class="bi bi-search icon"></a>
<a role="button" class="bi bi-three-dots-vertical icon menu"></a>
</div>
</div>
</header>
<nav class="nav-bar">
<span class="bi bi-camera-fill nav"></span>
<a role="button" class="nav active">Chats</a>
<a role="button" class="nav">Status</a>
<a role="button" class="nav">Calls</a>
</nav>
<!-- Chat section starts here -->
<!-- chat 1 -->
<section class="chats">
<div class="container">
<div class="chat">
<div class="info">
<!-- <img class="photo" src="user-2.png" alt="User" /> -->
<img class="photo" src="user-2.png" alt="User" />
<div>
<h6 class="username">Anurag</h6>
<p class="recent-chat">
<i class="bi bi-check2-all"></i> Yes, i remembered that! 😄
</p>
</div>
</div>
<small class="recent-chat-time"> 04:20 PM </small>
</div>
<!-- chat 2 -->
<div class="chat">
<div class="info">
<img class="photo" src="user-2.png" alt="User" />
<div>
<h6 class="username">Cipher</h6>
<p class="recent-chat">Do you wanna hangout?</p>
</div>
</div>
<small class="recent-chat-time"> 10:20 AM </small>
</div>
<!-- chat 3 -->
<div class="chat">
<div class="info">
<img class="photo" src="user-2.png" alt="User" />
<div>
<h6 class="username">CipherSchools</h6>
<p class="recent-chat">
<i class="bi bi-check2-all read"></i> Hey bro, time to band!
🥁🎸
</p>
</div>
</div>
<small class="recent-chat-time"> Yesterday </small>
</div>
<!-- chat 4 -->
<div class="chat">
<div class="info">
<img class="photo" src="user-2.png" alt="User" />
<div>
<h6 class="username">Schools</h6>
<p class="recent-chat">Hey, where are you now? 🙄</p>
</div>
</div>
<small class="recent-chat-time"> 7/22/21 </small>
</div>
<!-- chat 5 -->
<div class="chat">
<div class="info">
<img class="photo" src="user-2.png" alt="User" />
<div>
<h6 class="username">Anurag CS</h6>
<p class="recent-chat">
<i class="bi bi-check2-all read"></i> May i borrow your games
for 2 weeks?
</p>
</div>
</div>
<small class="recent-chat-time"> 7/22/21 </small>
</div>
<!-- Contact button on the whatsapp -->
<button type="button" class="bi bi-chat-right-text-fill contact-button"></button>
</div>
</section>
</body>
</html>
23 notes
·
View notes
Text
8 On-Page SEO Techniques to Boost Your Rank
Introduction
On-page SEO refers to the process of optimizing individual web pages in order to rank higher and earn more relevant traffic in search engines. This involves optimizing the content, HTML code, and other elements of a web page to make it more search engine friendly.

On-page SEO is important because it helps search engines understand the context and relevancy of a webpage. It also helps improve the user experience, as pages that are optimized for specific keywords are likely to be more relevant and useful to users.
In short, on-page SEO is an essential part of any SEO strategy because it helps search engines understand what a webpage is about and how it should rank in search results. By optimizing your web pages for specific keywords and phrases, you can improve your chances of ranking higher in search results and attracting more relevant traffic to your website.
I. Title tags and meta descriptions
Title tags and meta descriptions are important on-page SEO elements that help search engines understand the content of your webpage and provide context for search results. They also help users decide whether or not to click on a search result, so it's important to make them as compelling as possible.
Best practices for writing title tags and meta descriptions:
Keep them concise and to the point (around 50-60 characters for title tags and 150-160 characters for meta descriptions)
Include your target keyword or phrase
Make them unique and relevant to the content of the page
Use action words or phrases to encourage clicks
Avoid spamming or keyword stuffing
To optimize title tags and meta descriptions for CTR (click-through rate), try using modifiers such as "best," "top," "review," etc. to make your listing stand out in search results. You can also use numbers or lists to provide a clear overview of what the page is about and encourage clicks. Finally, make sure to use compelling and descriptive language to entice users to click on your listing.
II. Header tags
Header tags (H1, H2, H3, etc.) are HTML tags used to identify headings and subheadings on a webpage. They help organize and structure content and also provide context for search engines.
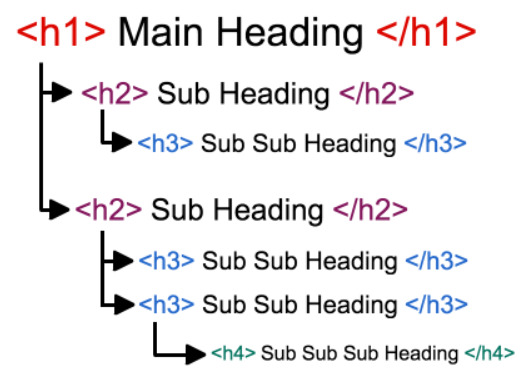
It's important to use header tags correctly in order to maximize their impact on on-page SEO. Here are some best practices for using header tags:
Use H1 tags for main headings and H2-H6 for subheadings
Use only one H1 tag per page (the main heading)
Use relevant and descriptive headings that include your target keywords or phrases
Use headings to break up content and make it easier to read
Avoid using too many heading tags or using them excessively (e.g. using an H3 tag for every paragraph)
By using header tags correctly, you can help search engines understand the content and structure of your web page, which can improve your search rankings and make your page more user-friendly.
III. Content optimization
Optimizing your content is an important aspect of on-page SEO. To optimize your content, you should start by doing keyword research to identify the terms and phrases that your target audience is using to search for information online.

Once you have identified your target keywords, you should incorporate them into your content in a natural and relevant way. This means using them in your headings, subheadings, and throughout the body of your text. However, it's important to avoid keyword stuffing, which is the practice of cramming as many keywords as possible into your content in an attempt to manipulate search rankings. This can actually hurt your SEO efforts and make your content less readable.
In addition to using keywords, it's also important to write for both search engines and users. This means creating content that is informative, useful, and easy to read. To optimize images and videos, you should use descriptive and relevant file names, as well as alt tags to describe the content of the media. This helps search engines understand what the media is about and can improve the accessibility of your site for users.
IV. Internal linking
Internal linking refers to the practice of linking to other pages on your own website from within your content. Internal linking can be an effective way to improve the SEO of your website because it helps search engines understand the structure and hierarchy of your pages. It also helps users navigate your site and discover more of your content.

To use internal linking to boost SEO, you should:
Link to relevant and useful pages on your site
Use descriptive and relevant anchor text (the text that is hyperlinked)
Use a mix of generic and specific anchor text
Use internal linking to organize and structure your content
Best practices for internal linking include:
Linking to pages that are important or relevant to the topic of the page
Using a logical and hierarchical structure for your links
Avoiding broken links (links that lead to pages that no longer exist)
Limiting the number of links on each page to avoid overwhelming users
By following these best practices, you can effectively use internal linking to improve the SEO and user experience of your website.
V. URL structure
The structure of your URLs can impact your on-page SEO. Search engines use URLs to understand the hierarchy and organization of your website, so it's important to create URLs that are easy to understand and reflect the content of your pages.
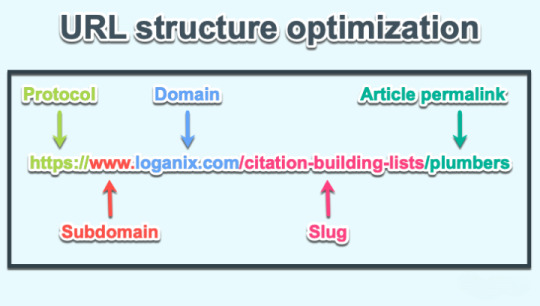
Best practices for creating SEO-friendly URLs include:
Keeping them short and concise (around 50-60 characters)
Using hyphens to separate words
Including your target keywords or phrases
Using a logical and hierarchical structure
Avoiding special characters and unnecessary words
To use keywords in URLs, try to include your target keywords or phrases as close to the beginning of the URL as possible. This helps search engines understand what the page is about and can improve your search rankings. However, it's important to avoid keyword stuffing in your URLs, as this can have a negative impact on your SEO.
By following these best practices, you can create URLs that are both user-friendly and SEO-friendly.
VI. Mobile optimization
Mobile optimization is an important aspect of on-page SEO because more and more users are accessing the internet via mobile devices. In fact, Google now uses mobile-first indexing, which means that it crawls and indexes the mobile version of a website first. This means that if your website is not optimized for mobile devices, it could negatively impact your search rankings.

To ensure that your site is mobile-friendly, you should:
Use responsive design, which means that your website adjusts to fit the screen size of the device it is being accessed on
Use large, easy-to-read fonts
Keep your content organized and easy to navigate on a small screen
Avoid using pop-ups or interstitials (full-screen ads) that can be disruptive to users on mobile devices
Test your website on multiple mobile devices to make sure it is functioning properly
By optimizing your website for mobile devices, you can improve the user experience for mobile users and also improve your search rankings.
VII. Page speed
Page speed is the amount of time it takes for a web page to load. It is an important factor for SEO because search engines take page speed into consideration when ranking websites. In addition, users are less likely to stay on a website if it takes too long to load, which can hurt your search rankings and overall traffic.

To improve your page speed, you should:
Optimize your images by using appropriate file types (such as JPEG or PNG) and compressing them to reduce file size
Minimize the use of plugins and large scripts that can slow down your page
Enable browser caching, which allows a webpage to store certain elements locally in the user's browser so that they don't have to be re-downloaded each time the page is accessed
Use a content delivery network (CDN) to distribute your content across multiple servers, which can improve loading times for users who are further away from your server
Consider using a website accelerator such as Google PageSpeed Insights to identify specific issues and provide recommendations for improvement
By following these tips, you can improve the speed of your website and improve your search rankings and user experience.
VII. Schema markup
Schema markup is a type of structured data that you can add to your website's HTML code to provide additional context and information about your content to search engines. This can help search engines understand your content better and can also improve the way your website appears in search results.

Schema markup is implemented using a specific syntax and vocabulary called "schema.org." There are many different types of schema markup, including product, event, recipe, and article schema.
Here are some examples of schema markup and how to implement them:
Product schema: This type of schema is used to provide information about a product, such as the price, availability, and review ratings. To implement product schema, you would need to add specific tags to the HTML code of your product pages.
Event schema: This type of schema is used to provide information about an event, such as the date, time, location, and ticket availability. To implement event schema, you would need to add specific tags to the HTML code of your event pages.
Recipe schema: This type of schema is used to provide information about a recipe, such as the ingredients, cooking time, and nutrition information. To implement recipe schema, you would need to add specific tags to the HTML code of your recipe pages.
By using schema markup, you can provide additional context and information about your content to search engines, which can improve the way your website appears in search results and attract more relevant traffic.
Conclusion
In conclusion, on-page SEO is an important aspect of SEO that involves optimizing individual web pages in order to rank higher and earn more relevant traffic in search engines. The top on-page SEO techniques include optimizing title tags and meta descriptions, using header tags, optimizing content, using internal linking, creating SEO-friendly URLs, optimizing for mobile devices, improving page speed, using schema markup, and regularly reviewing and optimizing your on-page SEO efforts.

It's important to regularly review and optimize your on-page SEO because search algorithms and user behaviors are constantly changing. By staying up-to-date with the latest best practices and making adjustments as needed, you can ensure that your website is optimized for search engines and provides a good user experience.
By following these on-page SEO techniques and best practices, you can improve your search rankings and drive more relevant traffic to your website.
2 notes
·
View notes
Text
Web Development Interview Questions?
In such a situation, it is critical to be ready for interviews, especially when entering the web development field. Irrespective of your plan of working with a leading organization such as SkyWeb Design Technologies, an organization that deals in web and mobile applications, or with any organization of your preference, it is important to learn the basics.

1. What is HTML, what is it used for?
Answer: HTML stands for Hyper Text Markup Language it’s most commonly used markup language in the creation of Web documents or anything related to the Web environment. It determines the layout of the material posted on the World Wide Web and includes such components as headings, paragraphs, hyperlinks, images, and others.
2. What makes HTML5 different from the prior version of HTML?
Answer: HTML5 is the version of HTML that is currently in use. It adds new elements and attributes and enhanced support for multimedia that are <article>, <section>, <header>, <footer>, <audio>, <video> and new APIs such as Canvas, Web Storage and Geolocation.
3. Here are some of the frequently used HTML tags and what they are used for:
Answer:
<p>: Defines a paragraph.
<h1> to <h6>:
<a>: Defines a hyperlink.
<img>: Embeds an image.
<ul> and <ol>: is unordered list, and ordered list.
<div>: division. So it defines a division or section.
<span>: Sets a block of text, mainly used for applying a style on.
4. What is CSS and why should one bother with it?
Answer: HTML is used to create a structure of a web page while CSS (Cascading Style Sheets) is used for appears of web pLAST EDITED: pages. It enables you to use aspects like colors font, space and position to your html elements which in turn creates aesthetically pleasing and more functional website to the users.
5. Please also provide me with a definition of what the box model in CSS .
Answer: The CSS box model describes the rectangular boxes generated for elements in the document tree and consists of:The CSS box model describes the rectangular boxes generated for elements in the document tree and consists of:
Content: The inner content area referred to as Knowledge Creation is:
Padding: Margin between the stuff and its visual frame.
Border: These are the line on the right and at the bottom of the padding and content.
Margin: (h) Space referring to the area beyond the border surrounding an element and other elements.
6. JavaScript is a programming language and web development tool, but how is it defined and what does it do?
Answer: JavaScript is also a language used in the designing of web sites to provide flexibility and impressive features on any web page. It lets you to work with HTML and CSS, manage events, verify data in forms, use animations, and work with servers.
7. What are variables in JavaScript and how can one declare them?
Answer: In JavaScript, variables refer to the means of storing data values. You can declare them using the var, let, or const keywords:You can declare them using the var, let, or const keywords:
javascript
var name = "ram";
let age = 25;
const isStudent = true;
8. What is the difference between let, const, and var?
Answer:
var: Any variable declared in a function block is either function-scoped or globally-scoped which even can be redeclared and again updated.
let: Local, write-only, specifically they allow updating the variable but not declaring it in the same block.
const: declared only in block can’t be updated, or redeclared after the declaration.
9. What is an array; Explain how you can define an array in JavaScript?
Answer: An array can be defined as a united variable for storing more than one value. We can create an array using square brackets []:
javascript
let fruits = [‘apple’, ‘banana’,’ cherries’];
10. What is a function and how does one describe or create one using JavaScript?
Answer: Function is a set of statements and instruction used to do a certain job or achieve a specific goal. we can define a function using the function keyword:
javascript
function greet(name) {
return ‘Hello, ‘ + name;
}
11. What is the event handling of JavaScript?
Answer: Javascript as the name suggests is an event driven language; this means that functions can be written that will take actions based on events such as a click, key press or even mouse movements. we can handle events by attaching event listeners to elements:
javascript
document. getElementById("myButton"). addEventListener("click", function() {
alert("Button clicked!");
});
12. What is the Document Object Model (DOM)?
Answer: DOM is a programming interface for the web documents. It depicts a document as a tree structure of nodes; this assist in managing the content and structures of the web pages by applying JavaScript.
13. How do you select an element by its ID in JavaScript?
Answer:
I can select an element by its ID using the getElementById method:
javascript
let element = document.getElementById("myElement");
14. What is responsive web design, and why is it important?
Answer:
Responsive web design ensures that web pages look good and function well on devices of various screen sizes and resolutions. It is important because it improves user experience and accessibility, and it is favored by search engines.
15. What are some basic steps to create a responsive web design?
Answer:
Use flexible grid layouts: Utilize relative units like percentages instead of fixed units like pixels.
Media queries: Apply different styles based on screen size, orientation, and other characteristics.
Flexible images: Ensure images scale appropriately within their containers.
Viewport meta tag: Set the viewport to control layout on mobile browsers.
html
<meta name="viewport" content="width=device-width, initial-scale=1.0">
These questions and answers demystify basic facts which a fresher that wants to join the web development team should know.
Thanks for visit us……For more Information to visit our website: skyweb design Technologies.
Adress: 15th floor, Manjeera trinity corporation, kukkatpally, HYDERABAD
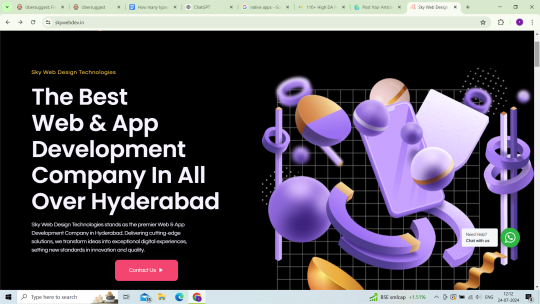
#web development interview questions#skyweb design technologie#top15 interview questions#top 10 interview questions#web dev interview question for freshers
0 notes
Text
SEO (Search Engine Optimization)
SEO (Search Engine Optimization)
Leave a Comment / Uncategorized / By Garv@
Types of SEO: –
SEO (Search Engine Optimization)
Types of SEO:
1. On Page SEO
2.Off page SEO
ON Page SEO, it contains an ON-page SEO report which one should manage/optimize.
On Page: ON-page SEO refers to SEO factors and techniques focused on optimizing aspects of your website that are under your control.
Report contains: –
Title: One should set a title of their website, what’s their website in about, there is also a character limit of 50-60 characters. If the title is within 50-60 characters, then the title is optimized otherwise not optimized.
Description:
Description: You should also add a brief description about your website, there is also a character limit of 150-160 characters. Keywords: You should also add keywords to your website so that it helps in ranking of your website.
URL structure:
URL structure: You should also manage the URL structure of your website; it is also called permalinks. It should be short and simple and in lower case. Example: if you open about page of any website its URL structure looks like website name/about.
Image Optimization:
Image Optimization: you should also optimize your image i.e., you must compress the image without failing in quality of that image, use Web P for that.
Java Script optimization:
Java Script optimization: Java Script (JS) should be in external method i.e., when you click on JS link in Source code it should redirect to another page where JS coding is done separately.
Style sheet optimization: It is same as Java script optimization, when you click on CSS link in Source code it should redirect to another page where CSS coding is done separately.
Header Tag
Header Tag: You should also manage the header tags of your webpage; every webpage has a separate header tag. Header tags are H1, H2, H3, H4, H5, H6.
For an optimized header tag there must be only one H1 and 1-2 H2 tag on each web page, H3-H6 can be unlimited. Canonical Issue: It most commonly occurs when a website has more than one URL that displays similar content.
XML site map: You index your webpages on search engine priority wise so that google crawlers can scan this and index on google easily.
Google Search Console: It helps you measure your site’s Search traffic and performance, fix issues, and make your site shine in Google Search results.
Google Analytics Code: It helps in finding traffic on your website, from which location traffic is coming from and from which device it is coming from, it also shows how many users are currently active on your website. Alt Tag Optimization: You should write an alternative text for every image you post on your website.
Website Internal Linking:
Website Internal Linking: An internal link is any link from one page on your website to another page on your website. Your users and search engines use links to find content on your website.HTML sitemap: An HTML sitemap is a file that lists every page on your website.
Content Optimization: Write your own content on your website and add keywords on your website and make your website readable, don’t copy from any other website or AI write it in your own language.
Web responsive Design: It means to make your website responsive according to mobile, desktop and tablets, OG Tag: An OG tag (Open Graph tag) shows an image and description when you send your website URL.
Off Page Optimization: Off-page SEO refers to SEO factors and strategies focused on promoting your site or brand around the web.
Classified and Directory Submission: Classified submission is advertisements that are posted to offer information to new customers whereas, Directory Submission is a process of submitting your website URL to various web directories (websites) with the aim of building backlinks thus increasing business growth.
Image and Info graphic submission: It is a technique for obtaining high domain authority backlinks by hosting or posting your image content on various image-sharing services. Infographics submission involves sharing these informative graphics on various platforms across the internet.
PPT and PDF submission: Power point presentations or PDF files allow you to explain your business in an attractive and concise way to your customers and clients.
You can create impactful Power Point presentations / PDF files and submit them to various submission sites which will help your business garner the right exposure online.
Forum and Q/A submission: This strategy involves responding to the queries that users post on various websites and online discussion forums. Some websites like Quora, Letsdiscuss etc.
Blog and Article Submission: Blog post is the act of sharing your written content, typically in the form of a blog post, on another website that accepts guest contributions.
Article submission is the process of submitting written content to various online platforms, such as article directories, websites, or blogs.
Local Listing: It is an online mention of the name, address, phone number, or website for a local business.

Techniques of SEO
White Hat SEO: Good content, proper title and keywords, ease of navigation, site performance, quality inbound links.
Black Hat SEO: keywords stuffing, cloaking, hidden pages, doorway pages, article spinning, duplicate content.
Gray Hat SEO: SEO squatting, negative S, spun content, paid links, domain grabbing
We also provide SEO services with practical problems, for more information contact us: https://digitalgarv.in/contact
0 notes
Photo

hydralisk98′s web projects tracker:
Core principles=
Fail faster
‘Learn, Tweak, Make’ loop
This is meant to be a quick reference for tracking progress made over my various projects, organized by their “ultimate target” goal:
(START)
(Website)=
Install Firefox
Install Chrome
Install Microsoft newest browser
Install Lynx
Learn about contemporary web browsers
Install a very basic text editor
Install Notepad++
Install Nano
Install Powershell
Install Bash
Install Git
Learn HTML
Elements and attributes
Commenting (single line comment, multi-line comment)
Head (title, meta, charset, language, link, style, description, keywords, author, viewport, script, base, url-encode, )
Hyperlinks (local, external, link titles, relative filepaths, absolute filepaths)
Headings (h1-h6, horizontal rules)
Paragraphs (pre, line breaks)
Text formatting (bold, italic, deleted, inserted, subscript, superscript, marked)
Quotations (quote, blockquote, abbreviations, address, cite, bidirectional override)
Entities & symbols (&entity_name, &entity_number,  , useful HTML character entities, diacritical marks, mathematical symbols, greek letters, currency symbols, )
Id (bookmarks)
Classes (select elements, multiple classes, different tags can share same class, )
Blocks & Inlines (div, span)
Computercode (kbd, samp, code, var)
Lists (ordered, unordered, description lists, control list counting, nesting)
Tables (colspan, rowspan, caption, colgroup, thead, tbody, tfoot, th)
Images (src, alt, width, height, animated, link, map, area, usenmap, , picture, picture for format support)
old fashioned audio
old fashioned video
Iframes (URL src, name, target)
Forms (input types, action, method, GET, POST, name, fieldset, accept-charset, autocomplete, enctype, novalidate, target, form elements, input attributes)
URL encode (scheme, prefix, domain, port, path, filename, ascii-encodings)
Learn about oldest web browsers onwards
Learn early HTML versions (doctypes & permitted elements for each version)
Make a 90s-like web page compatible with as much early web formats as possible, earliest web browsers’ compatibility is best here
Learn how to teach HTML5 features to most if not all older browsers
Install Adobe XD
Register a account at Figma
Learn Adobe XD basics
Learn Figma basics
Install Microsoft’s VS Code
Install my Microsoft’s VS Code favorite extensions
Learn HTML5
Semantic elements
Layouts
Graphics (SVG, canvas)
Track
Audio
Video
Embed
APIs (geolocation, drag and drop, local storage, application cache, web workers, server-sent events, )
HTMLShiv for teaching older browsers HTML5
HTML5 style guide and coding conventions (doctype, clean tidy well-formed code, lower case element names, close all html elements, close empty html elements, quote attribute values, image attributes, space and equal signs, avoid long code lines, blank lines, indentation, keep html, keep head, keep body, meta data, viewport, comments, stylesheets, loading JS into html, accessing HTML elements with JS, use lowercase file names, file extensions, index/default)
Learn CSS
Selections
Colors
Fonts
Positioning
Box model
Grid
Flexbox
Custom properties
Transitions
Animate
Make a simple modern static site
Learn responsive design
Viewport
Media queries
Fluid widths
rem units over px
Mobile first
Learn SASS
Variables
Nesting
Conditionals
Functions
Learn about CSS frameworks
Learn Bootstrap
Learn Tailwind CSS
Learn JS
Fundamentals
Document Object Model / DOM
JavaScript Object Notation / JSON
Fetch API
Modern JS (ES6+)
Learn Git
Learn Browser Dev Tools
Learn your VS Code extensions
Learn Emmet
Learn NPM
Learn Yarn
Learn Axios
Learn Webpack
Learn Parcel
Learn basic deployment
Domain registration (Namecheap)
Managed hosting (InMotion, Hostgator, Bluehost)
Static hosting (Nertlify, Github Pages)
SSL certificate
FTP
SFTP
SSH
CLI
Make a fancy front end website about
Make a few Tumblr themes
===You are now a basic front end developer!
Learn about XML dialects
Learn XML
Learn about JS frameworks
Learn jQuery
Learn React
Contex API with Hooks
NEXT
Learn Vue.js
Vuex
NUXT
Learn Svelte
NUXT (Vue)
Learn Gatsby
Learn Gridsome
Learn Typescript
Make a epic front end website about
===You are now a front-end wizard!
Learn Node.js
Express
Nest.js
Koa
Learn Python
Django
Flask
Learn GoLang
Revel
Learn PHP
Laravel
Slim
Symfony
Learn Ruby
Ruby on Rails
Sinatra
Learn SQL
PostgreSQL
MySQL
Learn ORM
Learn ODM
Learn NoSQL
MongoDB
RethinkDB
CouchDB
Learn a cloud database
Firebase, Azure Cloud DB, AWS
Learn a lightweight & cache variant
Redis
SQLlite
NeDB
Learn GraphQL
Learn about CMSes
Learn Wordpress
Learn Drupal
Learn Keystone
Learn Enduro
Learn Contentful
Learn Sanity
Learn Jekyll
Learn about DevOps
Learn NGINX
Learn Apache
Learn Linode
Learn Heroku
Learn Azure
Learn Docker
Learn testing
Learn load balancing
===You are now a good full stack developer
Learn about mobile development
Learn Dart
Learn Flutter
Learn React Native
Learn Nativescript
Learn Ionic
Learn progressive web apps
Learn Electron
Learn JAMstack
Learn serverless architecture
Learn API-first design
Learn data science
Learn machine learning
Learn deep learning
Learn speech recognition
Learn web assembly
===You are now a epic full stack developer
Make a web browser
Make a web server
===You are now a legendary full stack developer
[...]
(Computer system)=
Learn to execute and test your code in a command line interface
Learn to use breakpoints and debuggers
Learn Bash
Learn fish
Learn Zsh
Learn Vim
Learn nano
Learn Notepad++
Learn VS Code
Learn Brackets
Learn Atom
Learn Geany
Learn Neovim
Learn Python
Learn Java?
Learn R
Learn Swift?
Learn Go-lang?
Learn Common Lisp
Learn Clojure (& ClojureScript)
Learn Scheme
Learn C++
Learn C
Learn B
Learn Mesa
Learn Brainfuck
Learn Assembly
Learn Machine Code
Learn how to manage I/O
Make a keypad
Make a keyboard
Make a mouse
Make a light pen
Make a small LCD display
Make a small LED display
Make a teleprinter terminal
Make a medium raster CRT display
Make a small vector CRT display
Make larger LED displays
Make a few CRT displays
Learn how to manage computer memory
Make datasettes
Make a datasette deck
Make floppy disks
Make a floppy drive
Learn how to control data
Learn binary base
Learn hexadecimal base
Learn octal base
Learn registers
Learn timing information
Learn assembly common mnemonics
Learn arithmetic operations
Learn logic operations (AND, OR, XOR, NOT, NAND, NOR, NXOR, IMPLY)
Learn masking
Learn assembly language basics
Learn stack construct’s operations
Learn calling conventions
Learn to use Application Binary Interface or ABI
Learn to make your own ABIs
Learn to use memory maps
Learn to make memory maps
Make a clock
Make a front panel
Make a calculator
Learn about existing instruction sets (Intel, ARM, RISC-V, PIC, AVR, SPARC, MIPS, Intersil 6120, Z80...)
Design a instruction set
Compose a assembler
Compose a disassembler
Compose a emulator
Write a B-derivative programming language (somewhat similar to C)
Write a IPL-derivative programming language (somewhat similar to Lisp and Scheme)
Write a general markup language (like GML, SGML, HTML, XML...)
Write a Turing tarpit (like Brainfuck)
Write a scripting language (like Bash)
Write a database system (like VisiCalc or SQL)
Write a CLI shell (basic operating system like Unix or CP/M)
Write a single-user GUI operating system (like Xerox Star’s Pilot)
Write a multi-user GUI operating system (like Linux)
Write various software utilities for my various OSes
Write various games for my various OSes
Write various niche applications for my various OSes
Implement a awesome model in very large scale integration, like the Commodore CBM-II
Implement a epic model in integrated circuits, like the DEC PDP-15
Implement a modest model in transistor-transistor logic, similar to the DEC PDP-12
Implement a simple model in diode-transistor logic, like the original DEC PDP-8
Implement a simpler model in later vacuum tubes, like the IBM 700 series
Implement simplest model in early vacuum tubes, like the EDSAC
[...]
(Conlang)=
Choose sounds
Choose phonotactics
[...]
(Animation ‘movie’)=
[...]
(Exploration top-down ’racing game’)=
[...]
(Video dictionary)=
[...]
(Grand strategy game)=
[...]
(Telex system)=
[...]
(Pen&paper tabletop game)=
[...]
(Search engine)=
[...]
(Microlearning system)=
[...]
(Alternate planet)=
[...]
(END)
4 notes
·
View notes
Text
Web Page Seo
Now that you have an understanding of keywords and how to find them, it is time to use them. But SEO on web pages is more than just schema and Meta tags. Time to get writing and creating awesome content that actually answers users questions.
Keyword Usage
Lets take those keywords you’ve found and want to use and prepare them for use in a page. A general outline to use when setting up keywords is:
Group your keywords into similar groups and intent. This way you can create pages for a section of keywords and not a new page for every keyword.
If you haven’t already, evaluate the SERP data of your keywords. This will help you determine the type of content you need to create. (Are the SERPs image/video heavy? Hows the page formatted? Is it long form or short posts?)
Ask yourself “how could I contribute uniquely to the keyword to make my content stand out among the current ranked content?”
Also avoid keyword stuffing. Some believe that if you use your keyword excessively that it will help your page rank. While this may have been helpful in the past, Google’s algorithms are much more advanced now. When they crawl your page, the robots want to make sure your content doesn’t sound like it is written by a robot. Make sure you use natural phrases and sentences when using keywords to make sure the page flows naturally to the reader.
Avoid Low Value Tactics
Content should not be created to aide your sites ranking alone. The purpose of content is to add value to the reader and answer questions that they’re searching for.
Avoid posting thin content. Thin content is when you have multiple pages that convey similar information about a topic that could be linked together. For example, if you were selling athletic shoes you might be tempted to create a page for each shoe when it would be better to group them. You could have a page for basketball shoes while having another for baseball cleats. By creating individual pages for each shoe you would be creating thinner, less informative content.
Content you create should also be unique. There is no penalty from Google for copying content but they will filter duplicate content from search results giving precedence to the original or higher valued version. This includes making minor changes to someones content and posting as your own.
Auto-generated content is also frowned upon by search engines. It creates low value content and is usually used to try to increase rankings and does not help users. It is common to see auto generated content and seeing that it is hard to read since its written by a program and not a human.
Higher Value Tactics
The purpose of creating content is to inform users of specific information they are searching for. It isn’t enough to just duplicate or use common information. Make it your goal to create better content than is already out there. With better content, not only will Google reward you in ranking, but it will create much more organic traffic than if it were not better.
Make proper use of your Headers. An H1 header is reserved for the title of your content page. It is important to have a great title that not only grabs readers attention, but utilizes your keywords to make it dominate. Other headers range from H2 to H6. These move down in importance in the article. For example, the topics of your page may use H2 headers while the Conclusion section at the bottom would use an H3 or lower.
Using internal links is another important factor in creating great SEO. BY linking your other pages to the current page you help the search engines find all of your web content. Some pages require a navigational menu to pass between pages and may not be as easily accessible to the crawlers. To avoid this make sure to use links directly on the page.
Using too many internal links isn’t always a good idea though. If there are a lot of internal links then they begin competing for SEO equity and can lose value. An easy way to avoid this is to only use links when you mean it and it links to a relevant and important page.
Using Images
Using the right format for images is crucial to image optimization. Image use is the biggest cause of slow web speeds. If your image uses animation it is best to use a GIF format. If you do not need high resolution use a JPG and if you do need high resolution use a PNG format.
Make sure to use Alt text in your images. Alt text uses words to describe an image on your page. Crawlers check your alt text to value to relevance of your image for search results. Still make sure your text reads naturally and isnt spammed with keywords.
Meta Descriptions
Meta descriptions are HTML tags that describe the page. Like Titles they are also nested in the head tag. Your meta tag should be between 150-300 characters long. Google’s search engine will cut off your description on the SERP around 155 characters.
Your meta description should also be relevant to the page. You want to make sure you describe the main goal or purpose of the page without giving away too much information that the searcher doesn’t have to click the page.
Conclusion
Optimizing your web page is crucial to effective SEO but it is still important to maintain relevance. Create awesome content for your readers and establish SEO dominance at the same time. Ahead we will learn about Link Building
The post Web Page Seo appeared first on Google My Business Optimization Specialists | G Map Pros.
From https://gmappros.ai/web-page-seo/
from https://gmappros.wordpress.com/2020/01/16/web-page-seo/
From https://googlemybusinessoptimization.blogspot.com/2020/01/web-page-seo.html
from https://googlemybusinessoptimization.wordpress.com/2020/01/16/web-page-seo/ from https://localseo8.blogspot.com/2020/01/web-page-seo.html
1 note
·
View note
Text
Web Page Seo
Now that you have an understanding of keywords and how to find them, it is time to use them. But SEO on web pages is more than just schema and Meta tags. Time to get writing and creating awesome content that actually answers users questions.
Keyword Usage
Lets take those keywords you’ve found and want to use and prepare them for use in a page. A general outline to use when setting up keywords is:
Group your keywords into similar groups and intent. This way you can create pages for a section of keywords and not a new page for every keyword.
If you haven’t already, evaluate the SERP data of your keywords. This will help you determine the type of content you need to create. (Are the SERPs image/video heavy? Hows the page formatted? Is it long form or short posts?)
Ask yourself “how could I contribute uniquely to the keyword to make my content stand out among the current ranked content?”
Also avoid keyword stuffing. Some believe that if you use your keyword excessively that it will help your page rank. While this may have been helpful in the past, Google’s algorithms are much more advanced now. When they crawl your page, the robots want to make sure your content doesn’t sound like it is written by a robot. Make sure you use natural phrases and sentences when using keywords to make sure the page flows naturally to the reader.
Avoid Low Value Tactics
Content should not be created to aide your sites ranking alone. The purpose of content is to add value to the reader and answer questions that they’re searching for.
Avoid posting thin content. Thin content is when you have multiple pages that convey similar information about a topic that could be linked together. For example, if you were selling athletic shoes you might be tempted to create a page for each shoe when it would be better to group them. You could have a page for basketball shoes while having another for baseball cleats. By creating individual pages for each shoe you would be creating thinner, less informative content.
Content you create should also be unique. There is no penalty from Google for copying content but they will filter duplicate content from search results giving precedence to the original or higher valued version. This includes making minor changes to someones content and posting as your own.
Auto-generated content is also frowned upon by search engines. It creates low value content and is usually used to try to increase rankings and does not help users. It is common to see auto generated content and seeing that it is hard to read since its written by a program and not a human.
Higher Value Tactics
The purpose of creating content is to inform users of specific information they are searching for. It isn’t enough to just duplicate or use common information. Make it your goal to create better content than is already out there. With better content, not only will Google reward you in ranking, but it will create much more organic traffic than if it were not better.
Make proper use of your Headers. An H1 header is reserved for the title of your content page. It is important to have a great title that not only grabs readers attention, but utilizes your keywords to make it dominate. Other headers range from H2 to H6. These move down in importance in the article. For example, the topics of your page may use H2 headers while the Conclusion section at the bottom would use an H3 or lower.
Using internal links is another important factor in creating great SEO. BY linking your other pages to the current page you help the search engines find all of your web content. Some pages require a navigational menu to pass between pages and may not be as easily accessible to the crawlers. To avoid this make sure to use links directly on the page.
Using too many internal links isn’t always a good idea though. If there are a lot of internal links then they begin competing for SEO equity and can lose value. An easy way to avoid this is to only use links when you mean it and it links to a relevant and important page.
Using Images
Using the right format for images is crucial to image optimization. Image use is the biggest cause of slow web speeds. If your image uses animation it is best to use a GIF format. If you do not need high resolution use a JPG and if you do need high resolution use a PNG format.
Make sure to use Alt text in your images. Alt text uses words to describe an image on your page. Crawlers check your alt text to value to relevance of your image for search results. Still make sure your text reads naturally and isnt spammed with keywords.
Meta Descriptions
Meta descriptions are HTML tags that describe the page. Like Titles they are also nested in the head tag. Your meta tag should be between 150-300 characters long. Google’s search engine will cut off your description on the SERP around 155 characters.
Your meta description should also be relevant to the page. You want to make sure you describe the main goal or purpose of the page without giving away too much information that the searcher doesn’t have to click the page.
Conclusion
Optimizing your web page is crucial to effective SEO but it is still important to maintain relevance. Create awesome content for your readers and establish SEO dominance at the same time. Ahead we will learn about Link Building
The post Web Page Seo appeared first on Google My Business Optimization Specialists | G Map Pros.
From https://gmappros.ai/web-page-seo/
from https://gmappros.wordpress.com/2020/01/16/web-page-seo/ from https://gmboptimization0.blogspot.com/2020/01/web-page-seo.html
1 note
·
View note