#Css
Explore tagged Tumblr posts
Visit Tumblr Blog
Explore Tumblr blogs with no restrictions, modern design and the best experience.
Last Seen Tumblr Blogs


Fun Fact
Tumblr was named as a finalist in Lead411’s New York City Hot 125 in Aug 2010.
Text
Day 6 [Forms In HTML]
Introduction To HTML
Day 2 [Multimedia Elements In HTML]
Day 3 [Table in HTML]
Day 4 [Link Tag In HTML]
Day 5 [Lists In HTML]
Forms are basically used for collecting user information. And they are really important to learn. Here's a simple form in HTML:
Code:


Line By Line Explanation:
<form>: Used for creating forms. All the form elements go in this tag. Action: When submitted, data is sent to this file or URL [index.html] Method="post": Sends data
<label> : This describes the input tag for="___": Connects the label to the input with id="name" id : gives a unique identification to the tag <input>: It's used to make the form elements
<input> Type Elements :
type="text" : A simple text box is created.
type="email" : A box to input email.
type="checkbox" : A small square that users can tick. Can select multiple options using this.
type="radio" : A small circle, you can only select one option.
type="submit" : A button that submits the data to the server.
<textarea>: Accepts multiple lines of text. rows="4": It creates 4 lines cols="30": It creates 30 characters
<select> : Creates a drop-down list <option>: Creates an item in the dropdown. value="colorname": This is the data sent to the server if chosen.
Output For The Code:

_______________________
Hope This Helps !!
#code#codeblr#css#html#javascript#python#studyblr#progblr#programming#comp sci#web design#web developers#web development#website design#webdev#website#tech#html css#learn to code#school#study motivation#study aesthetic#study blog#student#high school#studying#study tips#studyspo#website development#coding
44 notes
·
View notes
Text
I love this so much. Now, whenever Minty mentions Dark's name, I'll use the Glitch one. I think that looks pretty cool.
Ich liebe es. Das Glitch-Ding werde ich von nun an benutzen, sobald Minty Darks Namen sagt. Ich finde, dass das so echt cool aussieht.


My recent foray into CSS for the sake of Ao3 site skins wound up not being as complex as expected—largely because it turns out the complicated thing I wanted to do can't be done on Ao3 at all.
(If I'm wrong about that, and you happen to know how to make text animation work with Ao3's limited CSS guidelines, please let me know.)
But! I did make this!
A work skin allowing for typewriter-style font with or without ominous red and gold shadow and glow. Perfect for dialogue spoken by Alastor from Hazbin Hotel, or any other creepy bitch with a transatlantic accent!
Work skin CSS below the cut:
#workskin .radio { font-family: 'American Typewriter', 'Courier', 'Andale Mono', 'Courier New', monospace; } #workskin .glitch { font-family: 'American Typewriter', 'Courier', 'Andale Mono', 'Courier New', monospace; text-shadow: 2px 2px #FF0000, 0 0 3px #DAA520, 0 0 5px #8B0000; }
93 notes
·
View notes
Text

Welcome back, coding enthusiasts! Today we'll talk about Git & Github , the must-know duo for any modern developer. Whether you're just starting out or need a refresher, this guide will walk you through everything from setup to intermediate-level use. Let’s jump in!
What is Git?
Git is a version control system. It helps you as a developer:
Track changes in your codebase, so if anything breaks, you can go back to a previous version. (Trust me, this happens more often than you’d think!)
Collaborate with others : whether you're working on a team project or contributing to an open-source repo, Git helps manage multiple versions of a project.
In short, Git allows you to work smarter, not harder. Developers who aren't familiar with the basics of Git? Let’s just say they’re missing a key tool in their toolkit.
What is Github ?
GitHub is a web-based platform that uses Git for version control and collaboration. It provides an interface to manage your repositories, track bugs, request new features, and much more. Think of it as a place where your Git repositories live, and where real teamwork happens. You can collaborate, share your code, and contribute to other projects, all while keeping everything well-organized.
Git & Github : not the same thing !
Git is the tool you use to create repositories and manage code on your local machine while GitHub is the platform where you host those repositories and collaborate with others. You can also host Git repositories on other platforms like GitLab and BitBucket, but GitHub is the most popular.
Installing Git (Windows, Linux, and macOS Users)
You can go ahead and download Git for your platform from (git-scm.com)
Using Git
You can use Git either through the command line (Terminal) or through a GUI. However, as a developer, it’s highly recommended to learn the terminal approach. Why? Because it’s more efficient, and understanding the commands will give you a better grasp of how Git works under the hood.
GitWorkflow
Git operates in several key areas:
Working directory (on your local machine)
Staging area (where changes are prepared to be committed)
Local repository (stored in the hidden .git directory in your project)
Remote repository (the version of the project stored on GitHub or other hosting platforms)
Let’s look at the basic commands that move code between these areas:
git init: Initializes a Git repository in your project directory, creating the .git folder.
git add: Adds your files to the staging area, where they’re prepared for committing.
git commit: Commits your staged files to your local repository.
git log: Shows the history of commits.
git push: Pushes your changes to the remote repository (like GitHub).
git pull: Pulls changes from the remote repository into your working directory.
git clone: Clones a remote repository to your local machine, maintaining the connection to the remote repo.
Branching and merging
When working in a team, it’s important to never mess up the main branch (often called master or main). This is the core of your project, and it's essential to keep it stable.
To do this, we branch out for new features or bug fixes. This way, you can make changes without affecting the main project until you’re ready to merge. Only merge your work back into the main branch once you're confident that it’s ready to go.
Getting Started: From Installation to Intermediate
Now, let’s go step-by-step through the process of using Git and GitHub from installation to pushing your first project.
Configuring Git
After installing Git, you’ll need to tell Git your name and email. This helps Git keep track of who made each change. To do this, run:

Master vs. Main Branch
By default, Git used to name the default branch master, but GitHub switched it to main for inclusivity reasons. To avoid confusion, check your default branch:

Pushing Changes to GitHub
Let’s go through an example of pushing your changes to GitHub.
First, initialize Git in your project directory:

Then to get the ‘untracked files’ , the files that we haven’t added yet to our staging area , we run the command

Now that you’ve guessed it we’re gonna run the git add command , you can add your files individually by running git add name or all at once like I did here

And finally it's time to commit our file to the local repository

Now, create a new repository on GitHub (it’s easy , just follow these instructions along with me)
Assuming you already created your github account you’ll go to this link and change username by your actual username : https://github.com/username?tab=repositories , then follow these instructions :


You can add a name and choose wether you repo can be public or private for now and forget about everything else for now.

Once your repository created on github , you’ll get this :

As you might’ve noticed, we’ve already run all these commands , all what’s left for us to do is to push our files from our local repository to our remote repository , so let’s go ahead and do that

And just like this we have successfully pushed our files to the remote repository
Here, you can see the default branch main, the total number of branches, your latest commit message along with how long ago it was made, and the number of commits you've made on that branch.

Now what is a Readme file ?
A README file is a markdown file where you can add any relevant information about your code or the specific functionality in a particular branch—since each branch can have its own README.
It also serves as a guide for anyone who clones your repository, showing them exactly how to use it.
You can add a README from this button:

Or, you can create it using a command and push it manually:

But for the sake of demonstrating how to pull content from a remote repository, we’re going with the first option:

Once that’s done, it gets added to the repository just like any other file—with a commit message and timestamp.
However, the README file isn’t on my local machine yet, so I’ll run the git pull command:

Now everything is up to date. And this is just the tiniest example of how you can pull content from your remote repository.
What is .gitignore file ?
Sometimes, you don’t want to push everything to GitHub—especially sensitive files like environment variables or API keys. These shouldn’t be shared publicly. In fact, GitHub might even send you a warning email if you do:

To avoid this, you should create a .gitignore file, like this:

Any file listed in .gitignore will not be pushed to GitHub. So you’re all set!
Cloning
When you want to copy a GitHub repository to your local machine (aka "clone" it), you have two main options:
Clone using HTTPS: This is the most straightforward method. You just copy the HTTPS link from GitHub and run:

It's simple, doesn’t require extra setup, and works well for most users. But each time you push or pull, GitHub may ask for your username and password (or personal access token if you've enabled 2FA).
But if you wanna clone using ssh , you’ll need to know a bit more about ssh keys , so let’s talk about that.
Clone using SSH (Secure Shell): This method uses SSH keys for authentication. Once set up, it’s more secure and doesn't prompt you for credentials every time. Here's how it works:
So what is an SSH key, actually?
Think of SSH keys as a digital handshake between your computer and GitHub.
Your computer generates a key pair:
A private key (stored safely on your machine)
A public key (shared with GitHub)
When you try to access GitHub via SSH, GitHub checks if the public key you've registered matches the private key on your machine.
If they match, you're in — no password prompts needed.
Steps to set up SSH with GitHub:
Generate your SSH key:

2. Start the SSH agent and add your key:

3. Copy your public key:

Then copy the output to your clipboard.
Add it to your GitHub account:
Go to GitHub → Settings → SSH and GPG keys
Click New SSH key
Paste your public key and save.
5. Now you'll be able to clone using SSH like this:

From now on, any interaction with GitHub over SSH will just work — no password typing, just smooth encrypted magic.
And there you have it ! Until next time — happy coding, and may your merges always be conflict-free! ✨👩💻👨💻
#code#codeblr#css#html#javascript#java development company#python#studyblr#progblr#programming#comp sci#web design#web developers#web development#website design#webdev#website#tech#html css#learn to code#github
100 notes
·
View notes
Text
Going to put all this in its own post too by popular request: here's how you make your own website with no understanding of HTML code at all, no software, no backend, absolutely nothing but a text file and image files! First get website server space of your own, like at NEOCITIES. The free version has enough room to host a whole fan page, your art, a simple comic series, whatever! The link I've provided goes to a silly comic that will tell you how to save the page as an html file and make it into a page for your own site. The bare minimum of all you need to do with it is JUST THIS:

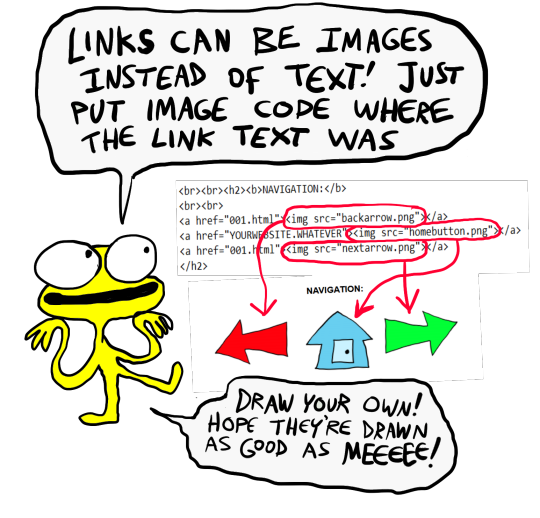
Change the titles, text, and image url's to whatever you want them to be, upload your image files and the html file together to your free website (or the same subfolder in that website), and now you have a webpage with those pictures on it. That's it!!!!! .....But if you want to change some more super basic things about it, here's additional tips from the same terrible little guy:

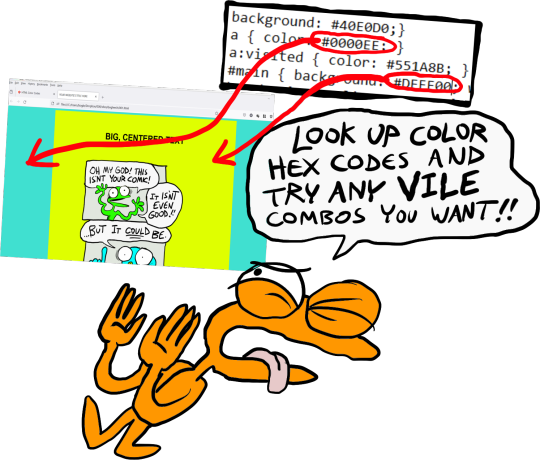
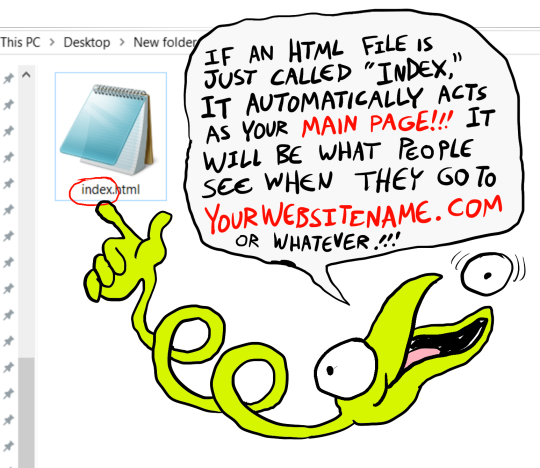

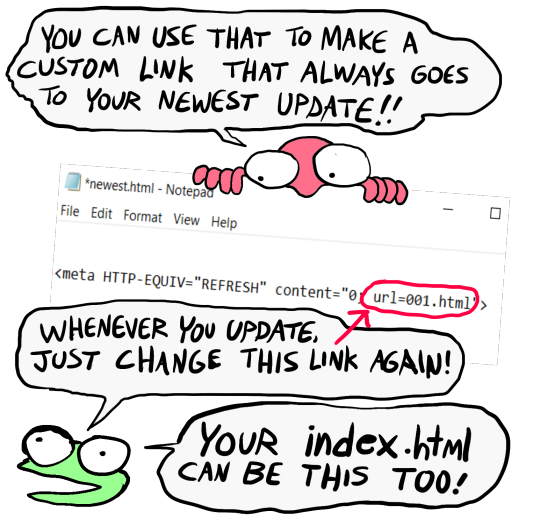
That last code by itself is: <meta HTTP-EQUIV="REFRESH" content="0; url=001.html"> Change "001.html" to wherever you want that link to take people. THIS IS THE REASON WHY when you go to bogleech.com/pokemon/ you are taken instantly to the newest Pokemon review, because the /pokemon/ directory of my website has an "index.html" page with this single line of code. Every pokemon review has its own permanent link, but I change that single line in the index file so it points to the newest page whenever I need it to! While I catered these instructions to updating a webcomic, you can use the same template to make blog type posts, articles or just image galleries. Anything you want! You can delete the navigational links entirely, you can make your site's index.html into a simple list of text links OR fun little image links to your different content, whatever! Your website can be nothing but a big ugly deep fried JPEG of goku with a recipe for potato salad on it, no other content ever, who cares! We did that kind of nonsense all the time in the 1990's and thought it was the pinnacle of comedy!! Maybe it still can be?!?! Or maybe you just want a place to put some artwork and thoughts of yours that doesn't come with the same baggage as big social media? Make a webpage this way and it will look the same in any browser, any operating system for years and years to come, because it's the same kind of basic raw code most of the internet depends upon!
#art#website#websites#resource#resources#webcomics#html#html css#css#neocities#webhosting#old internet#as soon as I drew this shitty scribble guy I uncontrollably interpreted him with Weird Al's voice if you wondered
12K notes
·
View notes
Text

53 — I Promised You - CB
Preview & Download
~~~
ES:
NO quitar los créditos.
Las imágenes se adaptan automático.
Iconos aquí!
Colores en el HTML. PB1: #A67294 / PB2: #8C5463
El ancho de la tablilla es editable.
Si necesitan soporte para cualquier cambio básico, contáctenme.
Like y reblog si llegan a usarlo ♥
EN:
DON´T remove the credits.
Icons
Color at the HTML PB1: #A67294 / PB2: #8C5463
The width of the code is editable.
If you need support for any basic changes, contact me.
Like or reblog if using ♥
71 notes
·
View notes
Text

drawing every day until I stop day 5 (no spoilers in tags pls I'm not done yet!!)
603 notes
·
View notes
Text


Old Web/Windown 98 Style HIGHLY CUSTOMIZABLE Neocities/Nekoweb Template
LIVE PREVIEW DOWNLOAD FOR FREE
FOLLOW ME ON KO-FI!
#old web graphics#css#cybercore#html#html css#htmlcoding#web graphics#web resources#neocities#neocities template#nekoweb#web development#temple os#free template#template#rentry template#blog theme#tumblr theme#themes#theme#neocities theme#neocities themes#neocities website#neopets#old tech#old internet#old web#oldweb#techcore#webcore
582 notes
·
View notes
Text


Theme - Allfire; [preview] [code] [magnusthemes] [buy me a coffee?]
A compact, versatile and responsive header theme.
Features:
Full support for NPF posts
Theme is responsive!
Like/reblog buttons
1, 2 or 3 columns of posts
Custom post size from 250px to 540px
Pagination options: Infinite scroll, manual load or pagination
Background image options: Full-size, repeated, none
Header image options: Full-size, compact, none
Change content opacity from 0 to 1
Optional rainbow accents
Notes:
Built with JSON - thanks to @eggdesign's base code!
To insert links into the menu, simply create a page and check “show a link to this page”.
Please turn off the default mobile theme in Advanced Options if you want to use the mobile version!
Subtitle is optional, and you can add icons if you want!
Updates tab is also optional, and you can also add icons if you want!
Icons cheatsheet: here
Full list of credits: here
Please like and/or reblog this post if you use or plan or using this theme, and consider buying a coffee to support me! Thank you c:
#themes#mythemes#tumblr theme#codingcabin#theme hunter#magnusthemes#html#css#fueled by coldplay bts and 2010s anime osts
262 notes
·
View notes
Text

Move over homework a vision of a css/vannie design was bestowed upon me.
#my art#cassie fnaf#fnaf cassie#vannie#css#csy#vanny!cassie#fnaf au#fnaf#its a little!!! kinda busy!!! but i think it works#i really wanted to tie back to the pizzaplex with the neons and patterns/colors of the animatronics#working on my hw now though ughhhhhhhh
284 notes
·
View notes
Text
CALL ESTROGEN HTML/CSS THE WAY IT DEVELOPS YOUR FRONT END
253 notes
·
View notes
Text


RANDOM / RARE BUTTON BATCH III
200 notes
·
View notes
Text
I might not be a programming language but at least I'm hot as fuck. You ever seen web pages without me? Fucking black and white times new roman? Talk about drab. javascript always gets all the hype but I'm definitely the pretty one in the family.
421 notes
·
View notes
Text

The 100% Good Twine SugarCube Guide!
The 100% Good Twine SugarCube Guide is a coding guide for the SugarCube format of Twine. It is meant as an alternative to the SugarCube documentation, with further explanations, interactive examples, and organised by difficulty. The goal of this guide is to make the learning curve for new SugarCube user less steep, and provide a comprehensive and wide look over the format.
VIEW / DOWNLOAD THE GUIDE!!!!
The Guide is compartmentalised in (currently) four categories:
THE BASICS or the absolute basics to start with SugarCube. No need for extra knowledge. Just the base needed to make something.
THE BASICS + adding interactivity, and creating a fully rounded IF game May require a bit of CSS knowledge (formatting rules)
INTERMEDIATE MODE adding more customisation and complex code Will probably require some CSS knowledge, and maybe some JavaScript
ADVANCE USE the most complex macros and APIs Will surely require some JavaScript/jQuery knowledge
Note: The Advanced Use includes all the APIs, macros, and methods not covered by the previous categories. This includes code requiring very advance knowledge of JavaScript/jQuery to be used properly.
Each category explains many aspects of the format, tailored to a specific level of the user. More simpler explanations and examples are available in earlier chapters, compared to the later ones.
If something is unclear, you found a mistake, you would like more examples in the guide, or would like a feature covered, let me know!
The Guide currently covers all macros (as of SugarCube v.2.37.3), all functions and methods, and APIs. It touches upon the use of HTML, CSS, JavaScript and jQuery, when relevant. It also discusses aspects of accessibility.
The Guides also provides a list of further resources, for the different coding languages.
The Guide is available in a downloadable form for offline view:
HTML file that can be opened in Twine
.tw file that can be opened in Twine
source code, separating the chapters, .js and .css files
GITHUB REPO | RAISE AN ISSUE | TWINE RESOURCES TWEEGO | TEMPLATES | CSCRIPT 2 SG GUIDE
Twine® is an “an open-source tool for telling interactive, non-linear stories” originally created by Chris Klimas maintained in several different repositories (Twinery.org). Twine is also a registered trademark of the Interactive Fiction Technology Foundation.
SugarCube is a free (gratis and libre) coding format for Twine/Twee created and maintained by TME.
VIEW / DOWNLOAD THE GUIDE!!!!
As of this release (v2.0.0), it is up to date with the version 2.37.3. If you are looking for the guide covering SugarCube 2.36.1, you can find it on my GitHub.
Note: the Guide is now complete. There won't be further substantial updates.
#the 100% Good Twine SugarCube Guide#template#templates#guide#coding in twine#twine#coding#HTML#JavaScript#CSS#macros#interactive fiction#sugarcube#interactive games#k thanks. i don't need any more reminders that sugarcube update and that I NEED TO UPDATE MY RESOURCES#i KNOW#manonamora
558 notes
·
View notes
Text
!!! my tag system is below all of this,,, I moved it under a cut because people reblog this post for the links :P
edit: thx for the love on this post. im going to try and continually update this!

⇩ ⠀sites FULL of web graphics ⇩
blinkie maker : make your own blinkies!
DOLLZ REVIVAL : a revival of pixel dolls where you can create and share your own. very cute!
GlowTxt : create glowing transparent text gifs that say whatever u want
HOARDER'S PILE : contains blinkies, buttons, stamps, and teddies
plasticdino.neocities.org : blinkies
Glitter Graphics : contains gifs, blinkies, dividers, and just sooo many web graphics
Cute Kawaii Resources : contains gifs, blinkies, stamps, favicons, dividers, buttons, fonts, literally everything you need. its an insane resource
Adrian's blinkie collection : collection of blinkies, stamps, and buttons
☆ (supplies.ju.mp) : blinkies, stamps, buttons, & favicons
twigbranch.carrd.co : blinkies
lallys.carrd.co : blinkies, stamps, dividers, and other resources
Bugleeblinkie.carrd.co : blinkies, and 3 very special gifs at the end ;)
unshinesblinkies.carrd.co : blinkies
The 88x31 GIF Collection : buttons. there are 5 parts! huge collection!
Bonnibel's Graphic Collection : blinkies
WELCOME TO GIFCITY : blinkies, dividers, favicons, stamps
cass-tastrophe.carrd.co : blinkies, stamps
kotatsuOS : blinkies
Cute web graphics : blinkies, stamps, dividers, and a LOT of other graphics, all very cute
⇩ some html tools! + tags below cut ⇩
MDN (mozilla.org) : if you're just starting out like me this is super helpful HTML Tutorial (w3schools.com): same here! (offers other programming languages as well!) Accessibility Checker(Free Scan) : a site you can use to check accessibility/ADA compliance when making your website! it will point out what needs to be changed. it is free, but they also offer paid services if you need more help imagecolorpicker.com : hex code picker. i use this one because you can upload an image, paste clipboard, OR type in the website and it'll grab a screenshot for you! something simple that was made really well. cssgradient.io : helps you make css gradients for backgrounds or whatever else you need them for smartgb.com : a free guestbook service FC2 Counter! : free "site visits" and "online now" counters. fully customizable Unclosed Tag Checker by Alicia Ramirez : does as it says, checks for unclosed tags (although I recommend using a program that does this as you write anyways. I use Visual Studio Code. Status Cafe : an updateable and embeddable status that you can stick anywhere on your site! it is mostly customizable with CSS but I have noticed a few small quirks with it
my tagging system :))
#graphics
#blinkies
#stamps
#buttons
#dividers
#html/css
#resources
#code
e10's web (neocities.org) <- shameless site plug. show it some love :P
#blinkies#stamps#favicons#gifs#old web graphics#old web aesthetic#old web stamps#old internet#old web#old webcore#2000s web#90s web#html#html css#html5#css#htmlcoding#web design#web resources#early web#early internet#neocities graphics#neocities#geocities#gifcities#web graphics#webcore
636 notes
·
View notes
Text

i have kind of a hate boner for websites rounding all their damn corners so to combat that i installed a browser extension that lets me square all the corners on a given website. so far im not regretting that decision
186 notes
·
View notes