#i also have a tutorial section. lemme know if you need any of my tutorials permanently engraved on my website just in case
Explore tagged Tumblr posts
Visit Tumblr Blog
Explore Tumblr blogs with no restrictions, modern design and the best experience.
Last Seen Tumblr Blogs


Fun Fact
Tumblr is used by 21% of adults online aged 18-29 years.
Text

about time i redid my website
#sq*respace's new editor kinda owns ngl......#i also have a tutorial section. lemme know if you need any of my tutorials permanently engraved on my website just in case
171 notes
·
View notes
Text
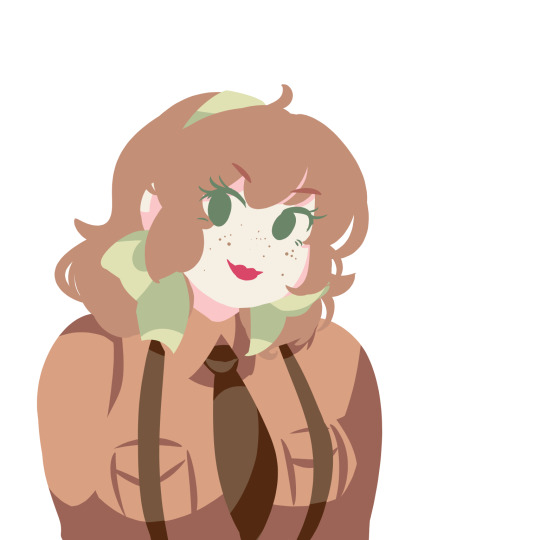
How I Did the Mosaic Effect
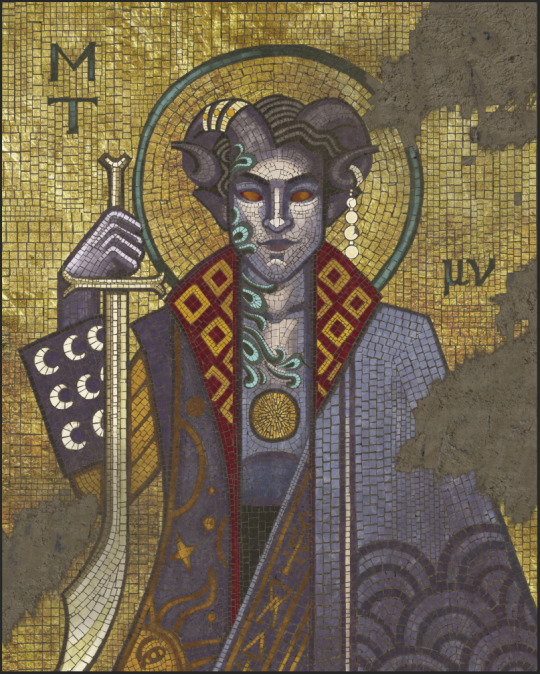
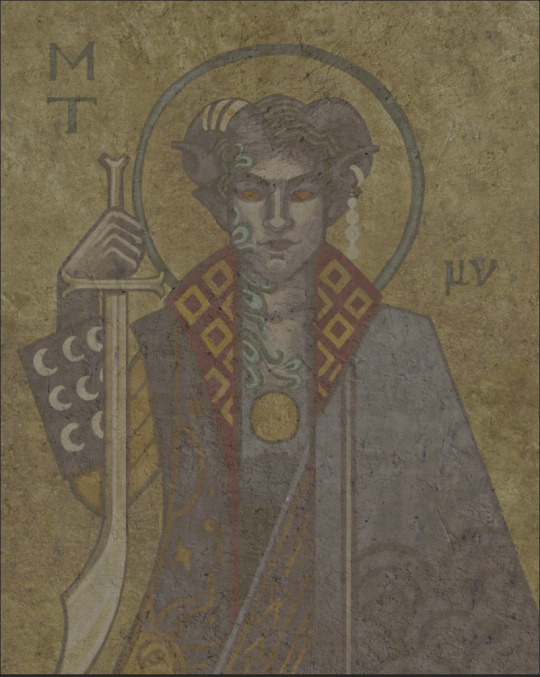
You asked for it, so here it is- a shoddily composed but nonetheless candid and hopefully useful tutorial on the Mosaic Effect I used in the Mollymauk portrait. Those of a stout and courageous spirit, read on.

Start with a sketch. I was heavily referencing the Byzantine mosaics found in Ravenna and Istanbul, so my sketch is boxy and simple. The detail and structure comes from the shape of the tesserae, so there’s no need to put in a lot of fine lines in the sketch. In fact, you probably won’t be able to replicate really small details.
Next lay in the gold textures where you want guilding to be. I used multiple layers of gold textures, piecing things by where I wanted the visual interest. Blend the edges by erasing with a soft brush, but don’t make anything too smooth. Sparkle comes from the difference between dark and light. You can see I placed the highest texture in the halo and in his chest, and darkened the sides by his arms a lot. NOTE- I eventually found this color gold to be too warm, and cooled it down significantly.
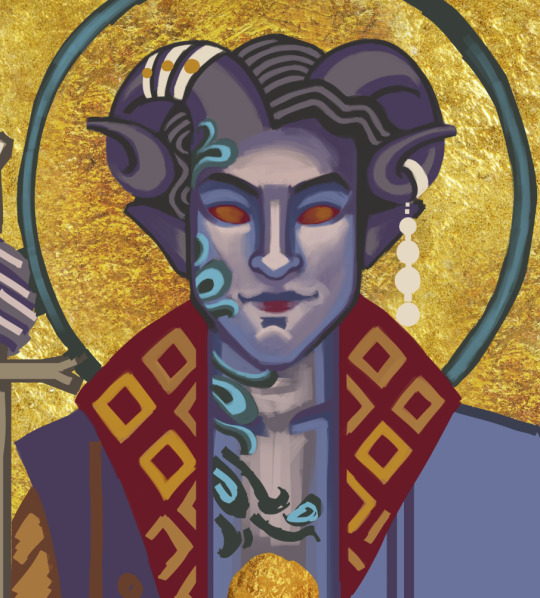
Time to paint! Try really hard to block things in without lines. If you do draw lines, make them bold enough that they can serve as a line of tesserae in the finished piece. Use motifs that echo the style you are going for, and the end texture will do the rest.

For example, I cribbed the diagonal square pattern on Molly’s coat from a famous mosaic in the Hagia Sophia. Also make note of the shifting line patterns of the gold tiles, which create a circular shape in Alexandros’ halo, while building mostly on geometric patterns in the background. That’ll come up later.

Apply a stone texture to the painted section. Once again, it doesn’t have to be perfect or absolutely convincing, it just has to break up the brush marks that inevitably make up the underpainting. I went with a marbled look, but you can go in any direction you like. Most Byzantine mosaics have satin polished stones making up the tesserae, so I wanted a smoother look.

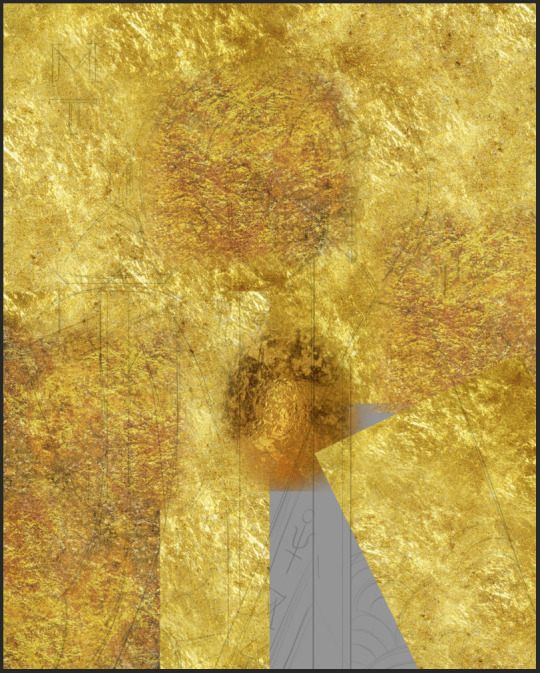
Okay here is the magic part- Place a stone or plaster texture over the whole piece. I used a photo of a plaster wall from textures.com, but I’m fairly confident anything will work.

Now darken the plaster texture to a midtone, something that matches very few areas of your underpainting, in terms of darkness levels.

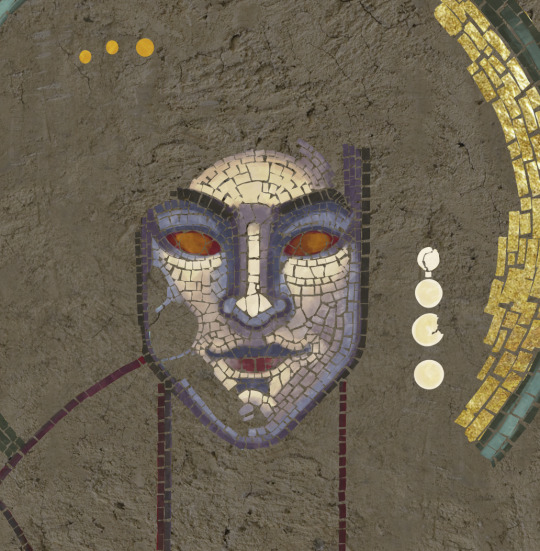
Put the following layer style setting on your plaster texture layer. There’s a purpose here- you are making a very tiny shadow around every tesserae you draw. It makes a huge difference on areas of the finished painting where the tesserae colors are similar to the background color. Lemme give you an example-

This is Molly’s hair without the Inner Glow styling. See how you can hardly see the individual tiles on the lighter sections?

Here’s the same section WITH the layer styling. Big difference.
Now- apply a layer mask to your plaster texture. Set your texture to a lower opacity- say 70%. Get yourself a slightly geometric brush with hard edges. Choose the color absolute black and choose your layer mask to paint on. Set your brush to 100% opacity. Are you ready?

BEGIN TO PAINT OUT THE TESSERAE. This takes practice. You’ll probably have to go back and forth between making the texture layer 30% opaque and 70% opaque. The goal is to be able to track the shapes you are making while still being able to see the underpainting.
This part takes a while to get the hang of and even after you’ve mastered it, it takes forever. Keep turning your background to 100% opacity to check how it’s going.
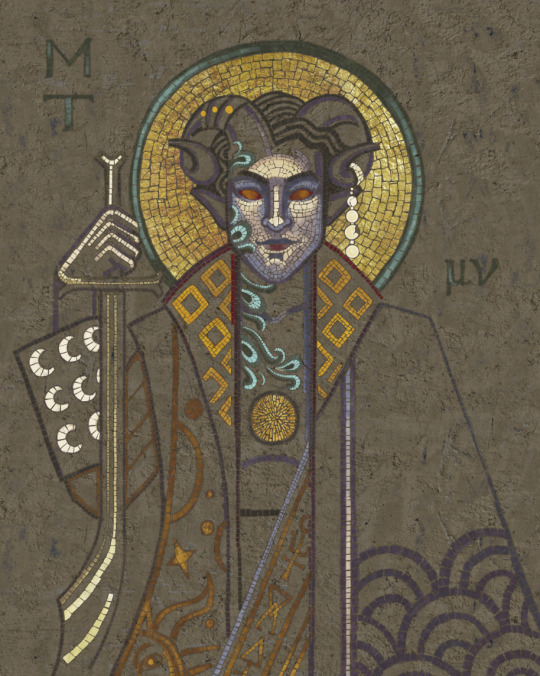
My advice is to start with the outlines of everything. I know I finished the face first, but by the time I was patching up the other interiors I had learned so much that I basically had to do mass parts of the face over again in their entirety.

At some point I decided that Molly’s skin wasn’t purple enough- color choice is one of my weaknesses, so I had sampled colors off of actual Byzantine mosaics. They don’t really include violet as a tone at all, so I eventually had to make the decision to abandon historical accuracy in pursuit of lavender.
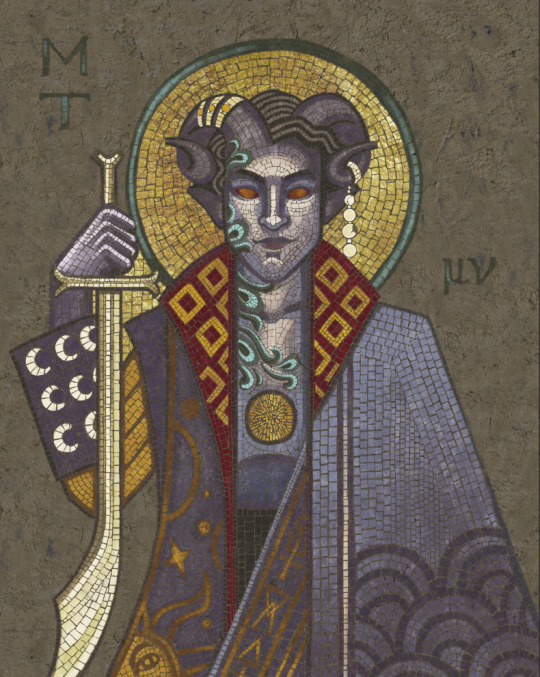
Okay so that’s the interior finished!
For the external background, I made a brush. Well, I took a hard square brush and took away all size jitters and transfers. Then, after a few lines, I added a 1% angle jitter so that it wouldn’t look Too Perfect. Actual Byzantine mosaics have very regularly irregular backgrounds. They try to make as much of it out of square stones as possible, but then they keep the matching ones all in one little patch and then just sort of bang that patch into other patches. So, in an effort to imitate that, you can see my hastily-developed system. I picked a size and plotted out a small area in that size. Then I built lots of other small areas of various sizes until they started to collide. I left the imperfect spaces alone, for a minute....
Then I went back and filled them with my hard brush, by hand. This was an absolute necessity in curved areas, like the edge of the halo, but also looked really slick where tiles didn’t line up quite right. It gave it that imperfect, handmade look.
Okay DAMN ALMOST DONE! I made the damaged bits by taking a cloud brush, setting it to pure white, and going to town on the layer mask. When you feel good about the shapes, take a hard brush and bust up the edges to that it mostly takes out whole tiles instead of just... ghosting them to death.
NOTE- I almost gave myself a heart attack because I forgot to duplicate the texture layer first and ended up having to recover the original finished pic from some Well of Lost Souls in the back of my computer. So learn from that and do elegant damage AFTER DUPLICATING YOUR TEXTURE LAYER.
OKAY THAT’S IT! Go into the world with this knowledge and make me a bunch of mosaic effect drawings. It was tedious but fun, right???
#art tutorial#mosaic effect#okay talking this out wasn't as hard as I thought it might be#but it's still not one of those pretty tutorials#but still useful right?!
7K notes
·
View notes
Text

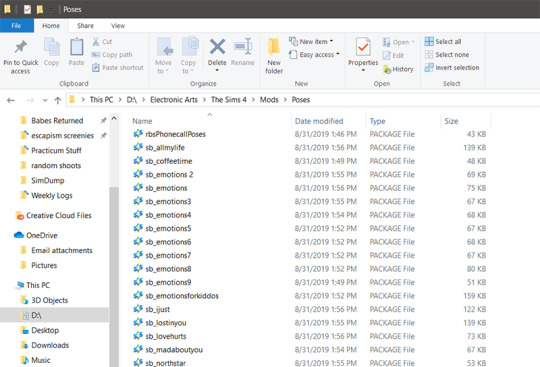
You know how Pose Player just kinda of...sorts poses however it feels and it can be annoying to find a specific one? Well that bugged me. There’s a method to it’s madness though, so you can fix it to suit your needs by renaming the packages in s4studio. Now this could have already been obvious and I’m just an idiot. But I had never seen anyone write about it, so i thought I’d just make a little tutorial to help any one else who might not have realized you can change the way things appear in the Pose Player. Cuz I certainly didn’t for a while.
It’s not difficult, it’s just...a bit tedious. Worth it in the end though, I promise.
You’ll need:
Latest Version Sims 4 Studio [ x ]
Poses, obv. I get all mine from @ts4-poses
Pose Player [ x ]
Patience and a bit of time. If you know where to download those, lemme know, but I kinda just cultivated mine over the years.
(Tagging: @ts4-poses @maxismatchccworld @mmfinds @mmoutfitters to help spread this around!)
And that’s it. So *rosanna pansino voice* let’s get started!
1. GET ALL YOUR POSES INTO YOUR MODS FOLDER
If this is your first time dealing with mods and poses, here’s how it goes: Sims 4 has a Mods folder that all that good stuff goes into. Navigate to your Electronic Arts > Sims 4 > Mods folder and drop all your poses in there. Usually you’ll find it in your main drive folder (C Drive, D Drive, whatever) unless you intentionally put it elsewhere. You can make sub folders in your Mods folder. For organization’s sake, I stick my poses into their own folder just so I can find them easier
2. DOUBLE CLICK A POSE TO OPEN IT IN SIMS4STUDIO
Make sure you’ve downloaded and installed Sims 4 Studio. If you did, then you can double click a pose in your folder (or any package file for that matter. this is basically a package editing tutorial.) and it will pop open in Sims 4 Studio.
It’ll bring you to this screen.
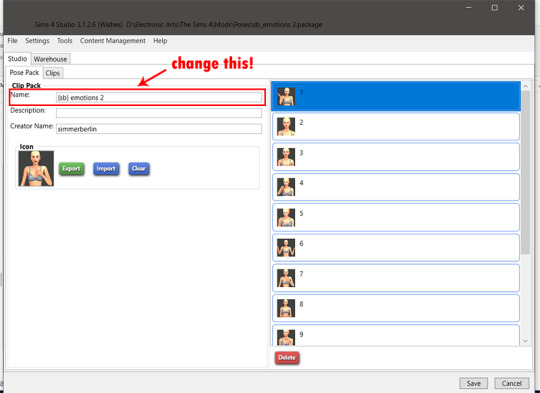
See that section that says ‘name’? That is the name of the package as it appears IN GAME and that is what you want to rename. Renaming the file in the mods folder itself (a.ka. without opening sims4studio) doesn’t do anything other than change the way it appears in the Mods folder. Make sense?
3. RENAME YOUR POSE(S)
This is where the ‘organization’ part comes in.
Pose Player sorts things alphabetically in game, prioritizing poses with with letters in the title first, then poses with symbols. So, for example, if you have poses labeled as followed:
Amazing Posepack
Barely Amazing Posepack
[Amazing Posepack]
[Barely Amazing Posepack]
It’ll sort how it’s listed above. ‘Amazing’ and ‘Barely amazing’ first, then [amazing] and [barely amazing] after it, while still keeping the titles with symbols in it in alphabetical order.
I like to sort my poses by whether they’re story poses or model-type poses. I also further sort them by how many people are in the poses (couple, single, or group). I also opt to put that in Brackets because...idk. Looks more organized to me.
This is where your own creativity and sorting conventions come into play. You can mimic what I do, or come up with your own organization method.
For this pose I’m using by @simmerberlin I personally class it as a Storytelling pose with a single sim. So this is how I label it.
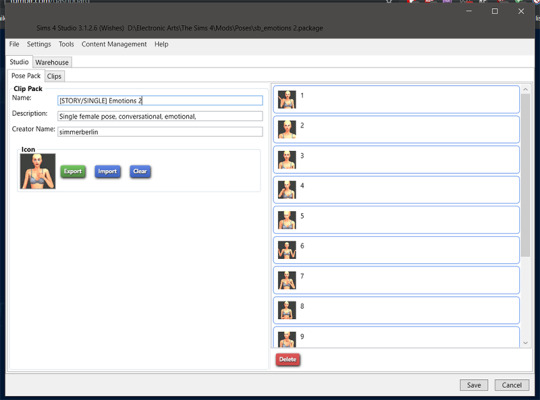
You can also change the Description right below it to help you further identify what you’re looking at. Super nifty when you have A LOT of similar poses. You can differentiate them with the description.
You can ALSO change the icon if you feel inclined to.
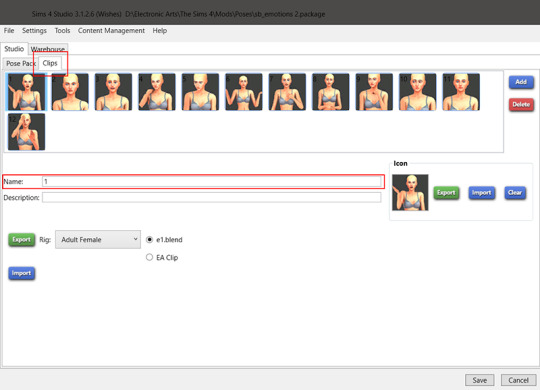
You can ALSO ALSO change the name and description of each pose in the package by clicking the ‘clips’ tab in the top right. This won’t change the order it appears in the pose pack itself, but, again, it allows you to make little descriptions for the pose and help you recognize them better in game.
4. SAVE. SAVE. SAVE. SAVE.
When you are done making your edits, SAVE by clicking the button in the bottom right of the window!
5. CHECK POSE PLAYER IN GAME.
If you’ve done the above properly, all your changes will be reflected in game in the Pose Player when you open it. I only did a few poses for the purposes of this tutorial, and here’s how it looks in game for me!
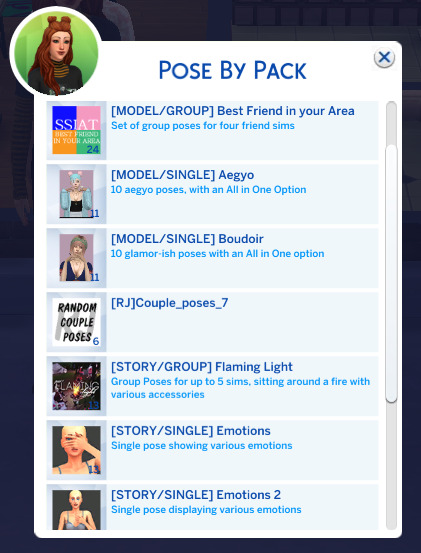
Ignore the random ‘rj couple pose’ in the middle. It’s somewhere else in my mod folder and i can’t find it for the life of me to remove it.
And that’s it! Have fun making you Pose Player super heckin’ organized and easy to look at ~
433 notes
·
View notes
Text
The Complete Copywriting Course : Write To Sell in 2019

WANT TO BE A BETTER COPYWRITER?Are you struggling to make sense of all the information out there? Are you stuck for words? Or just plain don't know where to start?LEMME KNOW IF THIS SOUNDS FAMILIAR:You sit down to write but the words don't come. When they do, they sound floppy, lifeless, flat on the page. Worse, you feel kinda greasy, gloopy -- a little bit 'scuzzy'.And even though you've studied blog post after blog post....Read a few copywriting books....Fallen down endless YouTube rabbit holes....Maybe taken other copywriting courses - eek!!There's still one issue.You're writing isn't working. It's not generating the clicks, shares, downloads and SALES you know you deserve.If that sounds about right, then keep reading...Do you want expert tips to give you a competitive advantage?Do you want access to repeatable formulas and processes? Would you like scientifically-proven techniques to boost your confidence?How about fun, interactive copy missions... to help you lock down the info?And brilliantly handy templates you can overwrite... time and time again?If you want to learn how to write really great copy -- quickly and efficiently -- sign up to The Complete Copywriting Course, today. With 7000+ students, a consistent rating of 4.6 out of 5 and over 1000 glowing 5-star reviews... you'll be good hands.★★★★★ "As an absolute beginner, I found it to be incredibly useful in understanding the fundamentals of an essential part of online business. Thank you for offering such a comprehensive course." Ross Cessna★★★★★ "Short, straight to the point and an excellent course for anyone who is new to copywriting. Tons of useful tips and tools that I know will make a huge difference in my writing from now on. I'm over the moon excited about putting everything I've learned into practice:-)" Marita Marcolongo★★★★★ "This course the best I have taken so far. You get valuable information that makes your copy way better. Thanks for sharing your knowledge!" Mouhamadou Diouf★★★★★ "Absolutely brilliant! Easy to follow, incredibly educational and packed with resources. Thanks Tam - what a wonderful human you are." Nerissa George★★★★★ "This course is a perfect match for me. I like the way the content is presented. Very useful and straight to the point." Sonja Aleksic★★★★★ "Great course! Time and money well spent. Practical and inspiring. I'm really excited to start my career in copywriting." John Selvey★★★★★ "This course actually makes me excited to start marketing using copy and to be more persuasive." Kasey D★★★★★ "I always thought copywriting was complicated until I took this course. I really see myself doing this for a living. I can't wait to complete the next course on portfolio creation. Thanks for the examples and resources that really add credibility to what you teach." Keenya Tynes★★★★★ "I've been down the Youtube rabbit hole trying to learn anything I could about copywriting, and I've already learned more in this class in LESS time. Tamsin is engaging and breaks down copywriting into actionable, replicable steps. My brain is literally buzzing. I feel like I finally GET it. I also love how many opportunities there are to practice what I'm learning, so I know it's going to stick. The confidence this class has given me is priceless. P.S. This is the first training I've taken on copywriting that hasn't bored me to tears. You can tell so much thought, heart, and soul went into making this training. THANK YOU! :)" LindseyNo other course on Udemy gives you all the fundamental tactics you need -- in just three hours. No faff, no nonsense. Just binge-worthy video tutorials, packed with fun, easy-to-remember missions, tools and techniques.Let me emphasise that again....EASY-T0-REMEMBER... That's the key to your success, right?If you’ve taken other copywriting courses and found them to be too long, too drawn out, too theoretical... and you're STILL not seeing results? It's probably because it's impossible to absorb all the information. Which is such a shame. Because learning how to write persuasive copy has the potential to change everything for you. Check out some reviews from my lovely students below. See for yourself how people are already seeing wonderful results after taking The Complete Copywring Course.★★★★★ "I'm only about 35% through the course and have already had so many "WOW" moments! I actually said "Wow" out loud each time Tamsin made an especially eye-opening point. I am amazed at her gift for words and how she can spin such tempting copy! I never knew how powerful and valuable the skill of copywriting could be, and now I'm really excited to know even more about it and to get better at it.Update: I've completed the course and have learned so much from Tamsin. She's been so generous in sharing her tips and expertise. Her warm and engaging manner makes me want to continue watching her videos. Though I'm not so confident in my abilities, I'm excited to put what I've learnt into building a part-time gig in copywriting." Brenda Chung.★★★★★ "Just the fundamentals section covered more than most copy writing books I've read. I'm moving on to the advanced techniques, and I can't wait. Gonna be learning till late tonight. Better than Netflix." A. Jackson★★★★★ "Best copywriting course on Udemy! Practical and easy-to-follow." Carys. S.★★★★★ "Amazing course! I learned so much. The lessons were light and beautifully explained,the visuals also helped a lot. The information is relevant and applicable, I started taking action immediately. I loved Tamsin's personality and her voice was easy to listen to. I liked that certain things were repeated in various sections, it solidified the information in my head. I will certainly be going over the lessons. This course gave FAR more value than it costs. I would highly recommend it and will be on hunt for any other content this instructor has out there. Thank you Tamsin!" Christina F-ThomasWELCOME and great to see you here!My name’s Tam and I’m the copywriter behind some of Udemy’s best-selling courses. My marketing career spans 18 years. For six of those, I've been running a successful copywriting business. The flexibility and freedom to work from anywhere, at any time, is what gets me bouncing out of bed every morning. On top of that, doing something creative that feeds my inner science geek AND pays the bills? Couldn't ask for anything better. I believe copywriting is THE most useful (yet underated) skill ANYONE can have. And I genuinely can’t wait to share what I've learned with you.It doesn't matter what you do, or what your goal is... it's your words that win hearts, minds and pockets. You could be an app developer, a solopreneur, a digital marketer, a VA, a freelance fashion designer, a florist, an IT engineer, a business coach, a high-flying CEO, an artisan baker, an inventor, a tech startup founder, a branding agency, an Instagram wannabe, a fitness instructor, or a kickarse web designer. If you want to achieve your goals, it all comes down to your WORDS. The words on your website, in your emails, newsletters, pitches, proposals and brochures. Yup, your COPY.And when you can write to persuade? Endless possibilities in your life and business open up to you.So whether you’re a complete beginner or looking to refresh your skills, this course is for you. And I'm going to walk you through the exact steps I take to remember complex topics -- and how I implement them to run a profitable copywriting business. And how YOU can too. :)★★★★★ "This course was so informative and has empowered me to get started with my freelance copywriting business right away. The content flowed well and I feel prepared to go it on my own!" J. Smith★★★★★ "SO HELPFUL!!!" Ryan★★★★★ "It’s so obvious now why our copy wasn’t working before. We were making every classic mistake. The tips and tricks I’ve learned on this course have completely changed the way I’m writing. The how to guide make it easy to follow. Now all I need is practice! Add to this the lectures are engaging and get to the point quickly. Thanks Tamsin." Suean Pascoe>>>>>>>>>>>>>>>>>>>>>>>>>>>>>>>>>>>>>>>>>>>>>>>>>>>>>>>IMPORTANT NOTE: I DO NOT use fake reviews. EVER. All my reviews are 100% genuine. Sadly and unfortunately, there are less ethical instructors using underhand strategies to boost their ratings (and diminish the ratings of honest instructors, like me.) Udemy is working hard to combat this, but some continue slip through.So when you choose a course, please, PLEASE, watch some of the videos, and decide for yourself based on quality. And be EXTREMELY wary of courses promising to make you rich without doing any work, or through automation! You cannot automate copywriting! Thank you! Read the full article
1 note
·
View note
Text
unaesthetic asks (anon edition)
i usually use a psd for asks to make them look nice and transparent and number them but tbh it’s just keeping me from answering asks quickly, having to shift layers around and stuff. so this is me literally cutting and pasting the text of some asks into a text post instead, sry.
if i did not answer yr thing here i lost/never got the ask, need a separate post to answer it (community lot anon), or worked myself into an anxious lather when i did not have an immediate response at the ready and fled into the woods to hide inside an old damp log and mutate slowly into a creature composed entirely of moss.

1) hey friend i think i can actually help with this one! slig did my poor lover for momma lisa, and has a few of my other skins linked to different body meshes in this tag here. @asimplevampire also did rehash for androgyny. those are the two i know off the top of my head but if anyone else knows any others pls reply to this post!
i don’t personally make showerproof skintones for body meshes because i a) am lazy and b) don’t usually take pics of my sims in the shower or naked in general so the occasional floating head just gives me a lil chortle when it does happen.

2) yis, it is the second to last one in this post by @magpieplayssims with a bunch of face masks piled on.

3) i use a personal edit of gunmod’s 3.1 A camera which alters the, like, central pivot axis so i can swing the camera underground into any basements i might be using. as a result, whenever i load the lot, it starts me off zoomed inside the floor, you just gotta zoom out with the scroll wheel to get above ground and it works normally from there. i haven’t figured out how to mitigate this while still being able to access underground rooms. which is why my edit never got its own post, but i did share it here.

4) nah, not really. i mean i have an outdated one at the back of my catalogue but my face is boring to me cuz i see it every day n stuff & i’m less and less interested in making human features now that custom sliders have let me go absolutely mad with power.

5) ye sorry i put that on my to-do list and promptly forgot about it cuz my brain seems to think that putting something on a list means it’s done forever now!!!! but now it’s actually done and i’m fixing the other links too.

6) yr phone is a craven liar and i will not stand for this libel. earlier today i was genuinely bewildered by a discussion about channing tatum cuz i thought his name was tatum channing. i sat there for minutes, convinced that there were two guys in hollywood one named channing tatum and the other named tatum channing and wondering if that ever got confusing for them.
7) u would be surprised, friend! my memory is a lawless wasteland but i do not end up chatting back and forth w/ many ppl b/c i am a seething pit of social anxiety. if we talked, like, more than twice, i probs remember u!
8) omg i was about to be like “nah i never made nosemasks for those” but that is a fucking lie of the highest caliber, i totally did make one (1) set and then forgot entirely about it. i will post them with the next batch of bodyshop content which should be Shortly (and if i don’t just yell @ me and i’ll just lazily put them on sfs and link them in a reply).
also thank u anon i am glad u like my content! :D

9) omg thank u so much anon that is so sweet of u to say!! truly i don’t feel like i have accomplished a whole lot beyond managing to snag @resurrection-failed but that is definitely the Best thing i could accomplish so i am 100% fine w/ that

10) oh ts4. i want to play it real bad but i have discovered that playing games that are still being updated and could break at any moment due to a new patch or ep gives me hives. esp when it’s sims games b/c those are held together exclusively w/ wishes and prayers as it is. they’re like the bottom panel of an expanding brain meme on spaghetti coding. at least when the game is Done there nothing else for EA to break (... right?). plus i only have base+pets and no money to throw at the other expansions so i could maybe download 1/10th of the cc available out there ¯\_(ツ)_/¯
but i am excited to be late af to the party. lemme tell u. thank u for saying such nice things, anon!! i hope u have a good day also. like, lots of ‘em.

11) hey anon! it’s built into tumblr’s text editor. u type the text first, highlight it, and click on the fourth button that looks like a slouchy figure 8 to insert yr link. i’m not sure if it’s the same on mobile, tho, cuz the tumblr mobile app is self-elected torture.

12) i do not right now but i can make one. idk if it would interest you but i am also doing a big ol’ blend of the hq eyes and wifezaya’s favorite ephemera mist eyes and will make a default version of those too when they are done.

13) nah i am still using my v3 texture for straight hairs and for waves or natural hair i just use nouk’s originals. i’m old-fashioned and boring. if u need help w/ making yr own, tho, i would suggest checking out @furbyq’s tutorial here!
14) hey friend! i did have plans to do that, in that vague way where i have plans to do many things but most of the time end up taking a five-hour nap under a cat instead or watchin game grumps. luckily, @digitalangels is a doll and did it for me so consider this my official endorsement. i am pooklet and i approve this action.
15) hey anon. when did i call it that?? i think usually i just call it marriage or equal marriage if i need to specify (or gay marriage if i’m feelin Spicy cuz nonbinary-for-nonbinary is pretty gay). if i did say same-sex it was probs w/ implied air-quotes since that was the term du jour when we got married, which was 3+ years before the supreme court mandate, when it was only legal in some places and everyone was still ‘‘‘‘debating’’’’ the ‘‘‘‘issue’’’’ of queers gettin all married.

16) i been gatherin’ links for u anon but lemme look around a lil more. i will either give this its own post or add it as its own section in the resource post that is like .... five years overdue. meanwhile if anyone reading this has anything they either know is made for dark skin or works well universally or knows of a list like this that already exists, i would appreciate links!

17) I KNOW THAT’S YOU, AZAYA
#anonymous#pooklet replies#wcif#pazooka#pooklet irl#sims 2#ts2#also if u got cakebread wcifs plssss ask me on dreamwidth#in the post in question#with a link to the picture
16 notes
·
View notes
Text
Instead of today’s “What the Fuck, Freud?” Segment, I present to you: Life Pro-Tips with Moon
(now you may be thinking, “Moon is an absolute disaster, what pro-tips could she know?” but I have approximate knowledge of a few things, okay)
I’m sure that a lot of you already know all this, and that you have your own methods, but I just wanted to share what I’ve learned by myself.
Do you like Band/Graphic shirts? Do you identify as a Woman? Are you sick and tired of getting the most ridiculously low-quality shirts with the ugliest designs?
I have found The Answer
So where I am, buying official band merch/designed graphics tees from the original artists/designers, is either impossible or will cost me rent for a month. So, we turn to our good ole trusty trendy mega clothing stores (H&M, Cotton On, etc) and there we are met with the greatest quandary (also, make sure that the stores you’re buying from are actually sustainable and trying to stop exploitation,etc): - there are band tee shirts available, they’re expensive and a little ugly, but let’s not look gift horses in the mouth. we can withstand the designs. we can withstand the price (sort-of) BUT what we cannot withstand is the quality. A woman’s graphic tee is made of fairy gossamer. one look at it and it will dissolve. I’ve got lace lingerie that’s more sturdy than a woman’s graphic tee. One wash, and you will have to wear this shameful shirt as pajamas for the rest of its life (which is no longer than a year)
so, what is The Answer? The Answer is the men’s section of these same stupid stores. 1. the designs are simpler, the printing is better 2. the shirts are cheaper. Genuinely. I don’t know why, but a man’s Black Sabbath tee costs less than a Lady’s Black Sabbath tee (the stores just have the license to print the logos on the shirts, I don’t think the actual artists have much say in that matter) 3. The shirts are better quality. The difference is like feeling a single piece of tissue paper vs actual corrugated cardboard. These shirts will actaully last past a season, hell, they’re gonna last more than a few years (i have so many still. from the same stores)
But, “Moon,” you say, “I don’t like the way men’s shirts fit” My answer: learn to sew. like literally. learn how to hemstitch. That’s it (there are hundreds of videos of youtube). get that oversized man shirt, and get a friend to mark off a new hem (you can crop them at any point, I have so many different lengths of cropped shirts. Crop it into a crop top. Crop it so that it’s long enough to tuck into pants. or don’t crop it all, tie a knot with the hem and sew that.) all you need is a needle and black thread, some pins and a friend. Maybe a measuring tape in you’re feeling fancy. But “Moon, I have big ole tiddies, the hem won’t be even.” So do I, and this is where you need a friend. show them where you want your shirt to end, and let them mark along that point, WITH YOU IN THE SHIRT, please. you can’t tailor shit if you aren’t in the shirt. Trust me, I learned this the hard way (there’s a Metallica crop whose hem is as straight as Gojo Satoru. i keep it as a reminder) Lastly, the sleeves of these men’s shirts tend to be longer and restrict movement more than ladies’ shirts. Take the hem of the sleeve, roll the width of the hem twice, and sew into place. Boom. Cute sleeves.
So this is my Answer. I’ve only really done this with shirts I’ve bought from Cotton On (IDK if there’s and American/British/European) equivalent, and with a few thrifted men’s band tees. but I’ve been really happy with how they turned out, and I just thought I’d share, just in case there are other Band-Shirt Deprived Women out there, like me
I’m doing this to a few shirts rn, so if anyone wants progress pics/ a tutorial, lemme know.
#this makes no sense#but I was just starting the project today#and wondered if I should share#because I know there are Band Babies on here whoaren't from places where merch is impossible to find#so maybe this helps?#idk#anyway#sewing tip#life tip#i guess
1 note
·
View note
Note
Whoa I really love your lineless art! How do you do it?
:”ooo thank you so much, it really does mean a lot to hear that— usually bc I don’t go lineless often, it takes me forever lmao
And here’s a lil tutorial- this is just how I do lineless art. It is by no means the correct way, so feel free to mix and match w other artists! Personally, when I do lineless art, I do my best to keep it sweet and simple— i think that’s when it looks best, but if you want to go for a more detailed piece, that is okay too!
1. As always, start off with your sketch. It doesn’t have to be super detailed; as long as you got the basics of your drawing down you’re good. (Eg, I’ll add in the seams of the clothing and hair partitions later on).
2. Set your sketch layer to Multiply. Create a new layer under the sketch layer. This’ll be your first lineless layer. I usually start with the face and work from there. And another thing I do (that I find helps) is just use random colors for each layer to get the shapes of the layers down, and then go back and properly color them later. This helps me see the shapes I’m working with and refine them if I need to (I usually go with various shades of red and pink).
Some tips about layering:
-It’s easier if you divide your hair into 2 layers— a front (where the bangs usually are) and a back layer. The back hair layer is usually under all the other layers.
-Separating the face layer from the other skin layers helps make shading easier as well.
-It might seem like a pain to separate your clothes into different layers (eg for the collars and sleeves and main body), but it’s a huge help when it comes to the final shading (I’ll admit I’m a little guilty of not separating them myself when I’m in a rush :”) ).
This is what your first layer will look like when you hide the sketch layer:

It’s a little messy, but that’s okay— you can refine it if you want, but don’t get too caught up in refining before you actually get your shapes down.
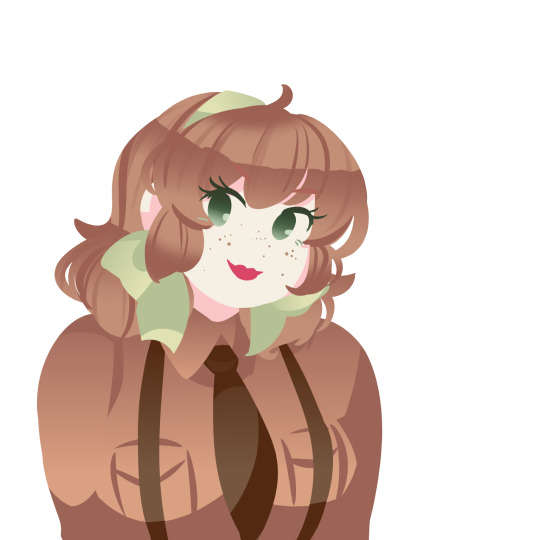
3. Fill in the rest of your lineless layers. The colors look kinda weird, but that’s just to show that each color is a different layer. Note how the hair, clothes and skin are split into different sections. There’s also breast pockets on her uniform, but those’ll be added in later on. Refine your shapes if you need to at this point.
4. Now, go in and recolor everything to the colors you want them to be.
Now, it’s time for the fun part— shading!
So usually lineless art has a combination of gradients and hard shadows, yes? Do the hard shadows first. (At least, it’s what I do.)
There’s some parts that aren’t shaded yet, they’ll be colored w mostly gradients. Also, you don’t need to create a new clipping layer to add the shadows— you can just do it on the same layer after locking the transparency.

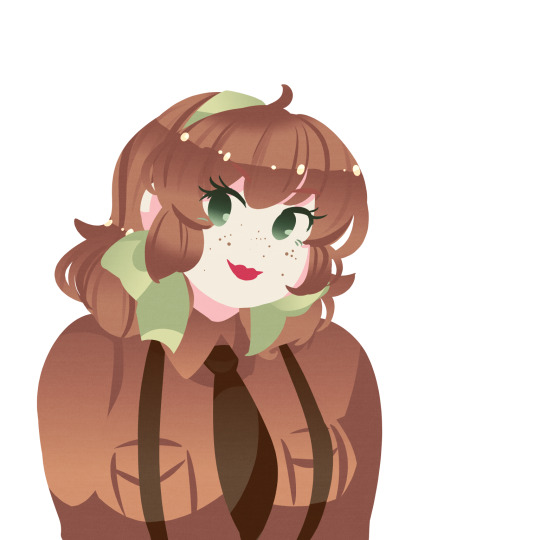
9. Make a new clipping layer over each different layer, and add gradients as you see fit. It’s really up to each different person how they go about adding the gradients. For the eyes, I usually make it graduate from dark to light, and then add a light shine afterwards. I didn’t do the hair yet, bc I have a different technique for it.

10. For the hair, create a new clipping layer over the hair layers. Then, using a default pen at different opacities, draw hair strokes— just enough to not seem overly detailed.
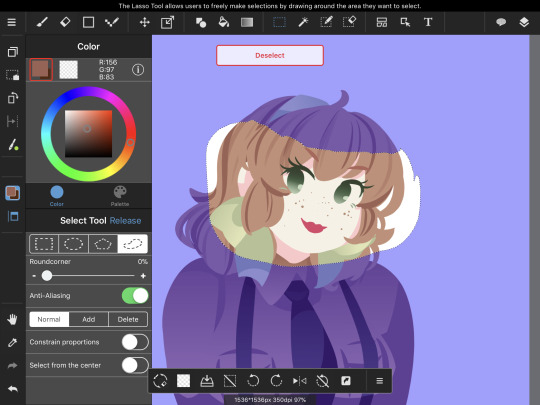
Using the lasso selection tool, create a selection where you want the hair shinies to go. Then, using the Gradient tool, make a gradient with the darkest part on top. After you do so, it should look like this:

Now, repeat the process for the back hair.
Almost done!

11. Now, create a new clipping over the shading layer. This’ll be your highlights layers. Set the blending mode to add, and add a couple spots of shine along the gradient you made.
And you’re done! ❤️
OPTIONAL STEP: Merge all the layers down, and create a new clipping layer over your merged drawing. Find a paper-like texture and overlay it over the drawing. The blending mode should be set to Overlay for best results.
I really hope this helped you a little bit, anon! Lemme know if you have any questions!
209 notes
·
View notes
Text
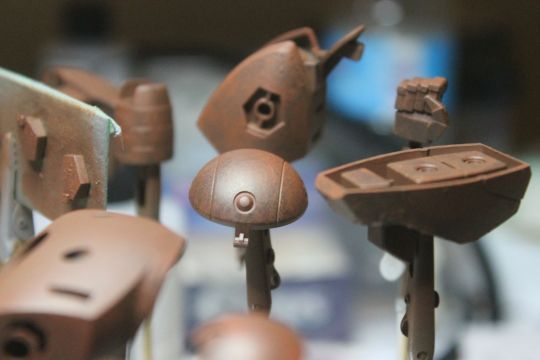
2016 HI MOCK BUILD
I wrote this ages ago to be honest and I finally decided to go back to it and post it now. Here it finally is now. My 1/144 HGBF Hi-Mock. I got this kit along with the Mock Army Set and Ez-ARMS at a decent price from a local guy off of a Facebook group for Gunpla and Mecha builders in Canada name Mechanada.
So here’s what I did with this kit.
When assembling it, I knew I was going to paint it so I didn’t fully construct the kit. I assembled what was needed for seamline removal and left the rest with nubs removed and a little bit of drilling on some details. Basically fully prepared for painting. To fill seams I used Tamiya Cement and Tamiya Putty White with a bit of lacquer thinner so I had more working time with it. After I had gotten everything prepped for painting I had to decide what I wanted to do with the kit. I always liked the look of beat down machines so I figured I would make it look like a rusted out junker that looks like it’s been left alone for decades in a warehouse or something. I got to looking up some rust tutorials for scale model car, tank, and gundam models and had finally decided on one by Scale War Machines on youtube.
youtube
I pretty much had everything ready to paint but as usual i was just kinda slacking on it and ended up leaving it for a couple days. In those couple of days, I saw ZakuAurelius’s youtube video about his Hi-Mock and how he textured it and decided I wanted to do something similar.
So my breakdown of steps was
Texture the parts
Prime with dark grey
Coat with a rust colour
Clear coat
Paint with the top colour
Clear coat again
Add rust washes
Paint the sensors
1. TEXTURING
So after referring back to Zaku’s video, I decided to take the putty technique he used and modify it a bit. In his video, he used thinned down Tamiya Putty and applied it to the parts with a sponge. When I added texture to my kit, I used Mr. Surfacer 1000 and applied with with my finger (while wearing gloves of course). I went through with it this way basically cause I didn’t want my parts to have that slightly stucco looking texture but rather more of a chipped and bubbly look like you would see with rust on cars.
When using my finger to apply the texture, I only used a little bit of Mr. Surfacer at a time and just kinda kept going at it sometimes letting it pool VERY slightly in some spots. Once those little pools were somewhat dried, I tried dabbing it again to get it to peel up and off a bit and have a chipped look. Allowing some semi dried Surfacer to build up on my finger also provided some texture. I don’t have any pictures of it before paint over it but you can kinda see what I mean on the chest armor.
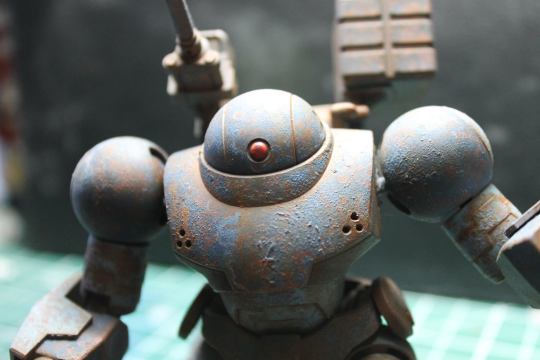
During this step I also tried to cover up the seamlines I was a bit lazy with a little bit more or the Surfacer so keep that in mind too if you want to try this out. just make sure it doesn’t look intentional as if you’re trying to “hide your crimes.” Another thing to note is to not put any Surfacer on joints or sections of parts that might be in contact with joints.
2. PRIMING
I used an airbrush to prime all the parts after texturing. I mainly use acrylics cause I don’t have a spray booth yet so I ended up making a dark grey using Vallejo’s Black and Grey Polyurethane Primers thinned with water and their thinner. Light even coats as always should be done.
3. COAT WITH RUST COLOUR
So i didn’t have any dark orange colours at all which meant I had to mix one myself. I can’t possibly remember the ratios but I do remember the paints I used. All of the paints used for the rust were Citadel paints, specifically Bestial Brown, Red Gore, Blazing Orange, and Sunburst Yellow. I tried to achieve a good middle ground between brown, orange, and red for the base colour of my rust because i would be apply other “detailing layers” with a brush afterwards. After that initial colour was dried, i drybrushed a darker shade that was pretty much just Bestial Brown and then used a sponge to apply a thinned out Blazing Orange and a small amount of Bestial Brown. Didn’t apply it in any specific way, just worked on it until it was good.
4. CLEAR COAT
for clear coating, I used some Vallejo Polyurethane Matte Varnish. I really couldn’t find any info at the time on how to apply it with an airbrush so I just kinda went for it? I ended up making everything too wet and it didn’t really turn out that matte as you can see in the picture above. I guess next time I’m just gonna try doing moderate coats and see what happens. If anyone’s used this lemme know how it works.
5. TOP COLOUR
Ended up wanting to do a colour scheme similar to the Gouf Custom so I just used some Tamiya acrylics for the colours cause I didnt have enough of my citadel paints that I’m trying to use up to cover all the parts. The dark blue used Black X1 and Blue X4, and for the lighter blue I used Blue X4 and White X2. I pretty much followed the steps in that salt chipping video above for each part.
This is where I started having my issues.
When I used this technique to achieve rust, I put WAY too much water on the part to adhere the salt and grinded some grains of the salt itself too small. What ended up happening is that some of the salt started dissolving which lead to white marks and crystals that stuck to the part and weren’t coming off with a toothbrush afterwards without ruining the paint itself. I corrected this later when I did the light blue parts, making sure the parts were only damp enough for the salt to stick but not dissolve and not using the regular sized or almost powdery salt. the light blue would be more forgiving to the white spots but I saw almost none on there.

After the paint was dried, I used some paper towel and some water with a bit of thinner on it and started rubbing a very small amount of the top colour off. I tried to take paint from just the edges and details to show more definition in the few details this kit has. This is where I learned that my clear coat wasn’t really that durable cause a lot of it was just eaten through even when I used just water. Kind of upsetting but I gotta mess with it for sure.
6. CLEAR COAT AGAIN
Tried doing it super light this time. Came out slightly better i guess? I didn’t really need or want to test it’s durability again again.
7. RUST WASHES
Made from the same Citadel paints as before but thinned with water and with a couple drops of drying retarder and flow-aid added. Made the wash more orange-coloured and just started having it pool up around the details of the model. Because it was something I made on my own, I over-thinned it by accident and had to do this multiple times for it to be noticeable. I tried to do some streaking too when the paint got a bit thicker. It didn’t show up too well on the dark blue but came out really fantastic on the light blue. Was interesting to do as I’ve never done anything with custom washes before. When the orange wash was dried, I mixed the remaining wash into some Vallejo Sepia Shade 73.200 and applied it in crevices where the orange wash was too bright (like the details on the head)
8. PAINT THE SENSORS
The sensors were really simple. Along with the mono-eye, there are 2 sensors on each shoulder and 2 on each “disc” on the hips. Painted the mono-eye with a darker red for the base, bright red around the border, deeper red dot in the middle, and painted the top quarter of the border with a reddish orange.

Almost exactly like this.
The sensors on the hips and shoulders were done the same without the center dot.
And that’s pretty much it. I don’t know why it took me forever I pretty much had it all written up after I finished it two years ago.
4 notes
·
View notes
Text
my spoilery thoughts on the last of us part ii
i apologize in advance for this super long post that you have to scroll past because i don’t know how to do the “keep reading” option thing
the only reason i’m writing this out is because i’m literally going insane from not being able to talk about my feelings for this game to anyone since no one i know actually cares lmao so this is mainly just for myself and anyone who wants to read this
the intro:
as i played through this game, i also watched a few playthroughs up until the point where i stopped to take a break. this was a game i couldn’t binge just because it’s so heavy and intense and sometimes you just gotta step away and take a breather
one of the playthroughs i followed along with was jacksepticeye’s and at the end he gave his review of the game like he normally does. i didn’t completely agree with everything he said, but for the most part i thought what he said lined up pretty well with my own opinion.
in particular, one thing that stood out to me was when he said that the introduction to this game shouldn’t have been Joel talking to Tommy about what he did at the end of the first game, but rather the whole flashback of Ellie’s birthday at the museum. then at “one” during the countdown to liftoff, the screen should’ve went black and fast forwarded to four-years-older Ellie opening her eyes in her home in Jackson (idk if i’m explaining this well, but Jack’s editor, Robin, edits this together and really sold it to me. if you wanna see it, go to the last part of Jack’s playthrough and look for it towards the last 30 minutes). i think this would have given us the time i think we all needed with Joel before he died and all the following flashbacks would be more focused on how/why Joel and Ellie’s relationship turned so distant - or hostile on Ellie’s part - and could’ve helped the pacing a bit.
Joel’s death:
potentially an unpopular opinion? but i actually like how Joel died. or uh lemme rephrase, i like the way they wrote his death. in this world of violence, hate, and brutality (actually doesn’t sound too off from our world but ahem moving on), i think the way he died was realistic, especially since he doomed all of humanity by saving Ellie in Part I. it just makes a lot of sense that someone would go after him and hunt him down
from the moment Abby and Owen stood over Jackson from the cliff, i was thinking: well theyre gonna kill Joel and since we’re gonna probably be playing as this girl for some (emphasis on some) of the game, they’re gonna go hard on the grey area of perspective in terms of revenge. which i was super on board with, but we’ll get back to that
when this game was first advertised, i didn’t know how i felt about a revenge story. it’s been told so many times and i’m never as hell-bent on revenge as much as the character is because it never feels warranted enough. that is, until i saw Joel die. watching Ellie pinned to the floor with a perfect view of his body, his face, beat to shit as she screams and begs for Abby to stop? haha that’s fucked Naughty Dog, thanks. but i do appreciate that they were able to make me just as mad as Ellie because of just how brutal his death was and how much i care, cared, about that character. no story has ever made me so incredibly enraged to the point i was with the main character full-stop to just destroy the perpetrator and take revenge. that’s why i think the way Joel dies is perfectly done. the fact that that cutscene is so horrible to watch for so many reasons just proves that it does it’s job.
Ellie’s half:
i actually don’t have too much to say about Ellie’s half of the story. this was what i both expected and wanted from the game, the whole game. while i can’t say i was having “fun”, because this isn’t really a fun game to play, you know what i mean when i say that this part was fun to play and follow.
side note: Naughty Dog’s improvement of your NPC buddy is so good, Dina and Jesse were both actually helpful, still not perfect, but also they’re not supposed to do all the work for you. i think the added layer that they could also get caught/seen and alert the enemy was completely unexpected and such a good addition to the gameplay (ofc this goes for Lev as well).
throughout the whole story, there’s kinda a problem with the pacing, and i know i’m not the first person to say that. however, i think the only big pacing issue i had with Ellie’s perspective was that kinda weird attempt of an open world map that they did with the gates. it felt a little unnecessary since i, and most other people, are playing for the story, not an open world with various side quest-like things. i missed the guitar cutscene with Ellie playing the guitar and singing to Dina (which kinda sucks, but i obviously just watched it after) because i just wanted to get back to the story rather than explore a large area. it was an attempt at something different so i won’t fault the game for that too much, but also stay in your lane lol so that section was a bit of a miss for me personally. i really liked the rest of it though, it had me engaged the whole time
Abby’s half:
ok. i have a lot to say about this half of the game since this is where most the problems occur.
first, let me preface this by saying that i don’t hate Abby. as i said, from the very beginning i knew she was going to have a, not justifiable, but an understandable reason for murdering Joel and that the game was going to be about seeing two sides to the same story. except, at the same time, i came here for Ellie, so why am i playing as this heterosexual? im mostly kidding. but fr i didn’t need the entire half of the game trying to get me to sympathize with Abby. i really didn’t need the message to be so spelt out for me, i got it from the moment i realized she was going to kill a favorite character.
i think my main gripe with the way they told this story is the way they formatted it. this story has all the elements to be amazing, but the execution just lacked the...finesse? idk if that’s the right word.
rather than splitting up the game into two halves, they could/should have integrated Abby’s story into Ellie’s so that when we cut from Abby holding the gun at Ellie in the theater to suddenly Abby as a young girl, it won’t feel so jarring when we have to start all over again with the upgrades and the timeline.
i really liked how we switched between them in the very beginning so why couldn’t that have just continued? in a book with multiple povs, the author often switches back and forth between every or every few chapters. you never see a book that starts with one perspective, then at the climax you have to start all over again from the other. at least, i’ve never seen this in any books i’ve read and i’ve read a lot ngl
maybe they forced us to stick with Abby for so long because if we’re forced to play as her, then we’re forced to get invested into her story. while this makes sense, it also really degraded at my enthusiasm for the game. it took me so long to just give up on the idea that we would be going back to Ellie relatively soon and when i did actually realize that was what was happening i was really disappointed.
instead of separating their stories, i would’ve liked to have Abby maybe one step behind Ellie the whole time so that while we play we’re just anticipating when Abby will finally catch up and it builds to this whole thing. instead, when we actually got to the point where everything was supposed to go down, we’re hit with whiplash and back to the very beginning with tutorials?? like did they just expect us to forget how to play since we switched characters?
i’m thinking, after Ellie and Dina jump over the barbed wire that explodes and Ellie’s knocked out, we could have switched over to Abby waking up in the WLF stadium. after Abby sneaks out of the stadium and you have that interaction with Jordan where he mentions Leah at the tv station, then we go back to Ellie waking up and tied to the table and we see Ellie kill Jordan.
after this i think Abby should have met Lev and Yara way sooner because i barely even remember what happened before Abby was caught by the seraphites it was so boring. so she gets caught by the seraphites AFTER we meet them through Ellie being shot through the shoulder (i still want to get all the first impressions of new stuff with Ellie because then it still makes her feel like the main character) and we meet the siblings and blahblahblah.
as a follow up, after Ellie kills Nora, which by the way, Ellie’s facial expressions are just so good with the red light while she’s just beating Nora to death? wow that entire interaction was so well done. anyway, after Ellie kills Nora, and Ellie gets back to the theater and the scene ends with her and Dina hugging, then we would switch to that whole section with Abby and Lev traveling to the hospital to get the meds and it would be cool if on her way in, Nora helps Abby and then on her way out, we run into a door we have trouble opening so we push and when it opens, Nora’s beaten up body is right there.
you get the gist. Abby’s story was barely intertwined with Ellie’s until the very end where she finds Owen and Mel dead. she doesn’t know that literally everyone else, except Leah, is dead too. i feel like that would’ve made the impact of Abby and Ellie’s fight at the theater more effective. affective? whatever i’m not an english nerd
i also think we should have gotten the flashback with Abby’s dad a little later when we’re expected to understand her character a bit more.
overall, i’m not mad about getting Abby’s side of the story, but i am mad that the way it was told felt so disconnected from Ellie. we could still get that whole arc of Abby going to the island to get Lev, she can still get her own story apart from Ellie, but she needed to have more of a interaction with Ellie’s actions.
Abby vs. Ellie, Abby’s pov:
i absolutely hate this fight. i really hate the way it was written and the way it happened. i get that the game is trying to give us Abby’s perspective and to show that in her point of view, Ellie is the villain in this story.
except, AGAIN, i don’t need this spoon fed to me!!! i KNOW that the world isn’t black and white and that people’s perspectives are different, but also? i don’t really care. both characters have gone through shit and both have done shitty things. neither of them are innocent, no one in this world is innocent (hence why i really dislike Mel, but that’s not really relevant), so it really comes down to which character you value more. in my - and most other people’s - case, it’s Ellie. i know the whole point of this fight is to make the player uncomfortable, but i wasn’t just uncomfortable, it made me legitimately start to dislike this game (spoiler for the end of this stupid-long review: i don’t completely dislike it)
the game really emphasizes that this is Abby’s story as much as it is Ellie’s and i get that, but this fight did not need to happen the way it did and the game didn’t need to be even longer after this. a lot of people say that we played from Abby’s perspective because Ellie would have killed Abby and that would be that (and she did, by the way, i relished watching Ellie get her revenge because while i don’t hate Abby, it was still so satisfying even if that wasn’t how the game wanted me to play). however however however, Abby wouldn’t have showed mercy either. she was absolutely going to kill Ellie if Dina hadn’t intervened then she was going to kill Dina if Lev hadn’t intervened.
here’s how i wouldve wanted it to go: we go back to Ellie’s perspective once Abby has the gun pointed at Ellie in the lobby and during their fight, Ellie would get the upper hand because she has weapons and shit (let’s be honest, Ellie would not win in hand-to-hand combat with fully-healthy Abby, we saw that first hand). Lev would try to jump in, but then Dina would disarm him and prevent him from escaping her grasp. then eventually Ellie would have the barrel of the shotgun pointed at Abby’s face and she would hear Lev tell her to please stop don’t kill her and Ellie would listen because the same exact thing happened to her (we could get a short flashback or something for more emotions, idk). so instead of killing Abby, Ellie would knock her out and her and Dina would leave and Lev would run to Abby’s unconscious body. this would end that cycle of revenge and because Abby has something more important to her than revenge (Lev), they would move on.
the ending:
if the game went how i just imagined, we probably wouldn’t get an ending that’s as depressing and open ended as it is, but i’m sure Neil and his team could figure something out, such as Ellie still has to deal with PTSD and Tommy’s really pissed at them and Ellie still looses her two fingers. so we get that little domestic sequence and the PTSD flashback and Tommy coming with his eye missing and showing the map. he leaves and when Ellie is about to leave in the middle of the night, Dina convinces her this time to stay and the next day Ellie tries to play the guitar one last time before giving up since she doesn’t have her fingers (i still want that last heartbreaking flashback, that one fucked me up i love it) and she goes out to leave it somewhere in the woods with it all ending with her walking away from the guitar that Joel gave her to symbolize her letting him go. idk man something like that, still not that open ended, but i’m just talking out of my ass rn
anyway that’s not how it went so we’ll stick to reality.
an open ending isn’t supposed to be unsatisfying, because that’s what this ending was. Part I does an open ending perfectly as we still get closure even though we don’t know exactly how things go afterwards (until now obviously).
after playing from Abby’s perspective for so goddamn long, it was weird to play as Ellie again, even while it was also a relief, and that makes me really sad. in the end, i did feel bad for Abby when she was literally left to starve and “hang” (but again i didn’t need 15+ hours in order to feel basic sympathy).
from the way they wrote the story, i knew Ellie wasn’t going to let it go and she was going to leave Dina and JJ. it made sense and i don’t think it was out of character for her, but the fact they did that in the first place and that Abby was the one to let go first? Abby got her revenge, she killed Joel, but Ellie never got that closure so of course she was going to go after Abby.
in the very end, Ellie is left with no one and Abby still has Lev and a group of fireflies to run to. Ellie’s biggest fear was being alone as she said in the first game, but that’s exactly what she’s left with. yeah life is unfair and i do like that the consequences feel real in this story, but i don’t think Ellie deserved to be done so damn dirty while Abby is living her best life. sure all of Abby’s friends were murdered because of Ellie and Dina leaving is Ellie’s own fault and i don’t blame Dina, but i mean we have no idea what happens to Ellie after this, where she goes. it at least feels like she’s on the road to eventually being relatively okay, as okay as you can be in this world.
i can’t completely articulate how i feel about this ending, even after three days having finished playing. all i do know is that while it’s realistic how Ellie’s story ended, i would’ve liked for Abby to get the same treatment. for her to not actually find the fireflies through the radio and escape from the Rattlers only to have no where to go so that, just like Ellie, revenge cost her everything and we don’t know where she went after.
maybe because Abby’s story was pretty much wrapped up and Ellie’s wasn’t, they’re planning for a trilogy, but i guess we’ll see.
the tldr;
this game has all the elements it needed to be amazing overall imo, i just wish they were all utilized Better. the reason it’s so hard to figure out how i feel about this game is because it has so much potential that just never came through and i’m really jealous of all the people who were blown away by this story. it’s still a good game though, but a 7/10 seems too high and 6/10 seems to low. ig it’s a 6.5/10 for me.
thanks for reading if you made it this far
#tlou2#tlouii#the last of us#the last of us part ii#the last of us part 2#i just love ellie a lot#i dont think abby is better than ellie for letting go because everyones an asshole#im scared of them making a part three because they would end up killing ellie somehow#this game fucked me up and im sorry if you actually read all my rambling but i appreciate you#also joel is not a bad person he’s just traumatized from losing his daughter leave him ALONE he’s HUMAN#the last of us part ii spoilers#tlou2 spoilers
0 notes
Text
Introduction To Hacking A 3DS For The Complete Noob
How To Hack When You Have No Idea Wtf You’re Doing
Before We Start:
Hi guys, some of you might have known me before as fireemblemhax and read some of my old tutorials but I’m here with a new blog now.
I realized a bunch of my previous tutorials were honestly a bit too “advanced” for someone who’s completely new to 3DS hacking so this time around, I’m gonna try to cater my tutorials for complete newbies in mind. I’ll try to make hacking as accessible and unscary for you guys as I can.
With that said, some of the most frequently asked questions I’d get on hacking a 3DS were: Is it safe to do this? Can I break my 3DS by trying to hack it?
And to those questions, the short answer to both is: Depends
Now lemme explain why.
Is it safe to hack your 3DS? Depends on what method you choose to use.
Can you accidentally brick your 3DS through this? Yup but once more, depends on what methods you use. In this tutorial, I’ll be teaching you the safest, virtually-impossible-to-screw-up way I know of.
Still, always try to read all possible information you can on hacking AND as a disclaimer, remember that I am not responsible if you happen to somehow brick your 3DS. It’s extremely unlikely this will happen as it’d honestly require almost willfully screwing things up but if it does somehow happen, I am not responsible for it.
I can still try to help you if you think you broke it though, cus sometimes something MIGHT look scary and broken but it’s in fact actually completely ok and unbroken (this happened to me when I first started hacking, I was 99% sure I’d broken my 3DS only to find out a few days later that everything was fine lol).
Also, always remember: Do NOT automatically upgrade your 3DS if you plan on hacking it! This guide was written with firmware 11.3 in mind, anything that might come after this might render all of the hacking methods described here completely useless. Always remember to check first online if it’s ok to upgrade your firmware before doing so.
OK, with all of the above out of the way, let’s get on with the guide. Everything under the cut:
So You Wanna Hack Your 3DS But Have No Idea Where To Start:
That’s ok, I gotcha. I was once a total noob too and though hacking your 3DS might seem scary at first, I promise you it’s not that hard. Just a kinda long and sometimes tedious process but otherwise, anyone can do it with just the right info and tools.
This tutorial might get long but I’ll try to cover as much info as I can for you to be able to fearlessly begin your hacking journey.
What Does Hacking Your 3DS Mean And Why Would You Want To Do It?
Hacking your 3DS basically means modding your 3DS and 3DS games by using various tools and exploits. Think of it as a Powersave but completely integrated into your 3DS.
You can get everything you’d get from a Powersave for free on almost any game by hacking your 3DS but that’s just the tip of the iceberg. A hacked 3DS can give you access to even cooler stuff when used alongside the right tools. This is where it goes way beyond what a Powersave could provide for you.
Like for example, let’s say you’re annoyed that games like Fire Emblem Awakening and Fire Emblem Fates have mostly nothing but Hetero romance options for your characters. With a hacked 3DS, you can easily fix this by using UV’s famous Same-Sex Marriage Hack for instance, which would then give you a ton of support options with no gender restrictions as well as a bunch of new, custom support conversation.
Or maybe you’re playing Animal Crossing but are having a frustrating time getting your Dreamies to move into your town or hate having to wait around for villagers to suggest Public Works? In that case, you can just get yourself ACNL’s Save Editor and get to editing any part of the game you want to make building your dream town a less tedious process.
Maybe you play pokemon and would love to edit your pokemon’s models and textures to look cuter/cooler/prettier/whatever? Then getting Ohana3DS would help you.
So I think you can see the various reasons one might want to get to hacking their 3DS and 3DS games.
Getting Started: A Brief Summary Of Homebrew.
In order to get started though, you need to understand a few things first.
To be able to mod your games and get access to hacks, you need to get Homebrew.
What is Homebrew? Homebrew is unofficial software made by amateur developers for closed systems such as the 3DS and PSVita. Homebrew is the software necessary for practically all sort of hacking to work so you need to be able to run it on your 3DS.
To be able to access homebrew on your console, you need what is known as an entrypoint. An entrypoint is a modded game or app that will act as a “door” between your 3DS and Homebrew. Some examples are:
Pressing A on a modded Ocarina of Time save will take you directly to the Homebrew Channel.
Putting a certain modded sound file in your 3DS’s SD card gives you access to Homebrew through the 3DS’s stock sound application.
Putting a modded file in your your 3DS’s SD card gives you access to Homebrew through the game Freakyforms Deluxe.
A bunch of other entrypoints are listed on the official 3DS Homebrew Launcher website
Before You Choose An Entrypoint:
Before trying to get Homebrew, you need to know three very important things: whether you have an Old or New 3DS, your region and what firmware your system is currently on. These 3 things will determine which Homebrew entrypoints you can use as not all of them work on all system versions.
To check whether your 3DS is Old or New: Easy enough, just compare your 3DS to the ones on this pic and you should know whether yours is Old or New.
Note that 2DS’s are automatically placed in the “Old” category.
To check your firmware version and region: You can see which version of the system software you have by accessing the System Settings and looking on the bottom right of the top screen. The number is your version with the letter at the end of it is your region.
Letter E means: Europe and other PAL regions aka Australia, New Zealand and any other countries with PAL software. Letter J means: Japanese region, also known as NTSC J. Letter U means: Region used in USA, Canada, Central America and South America.
Letter K means: Korean region.
Now that you know which 3DS you have and what firmware version you’re on, you can check which entrypoints are available to you here. Compare the “Supported firmwares” section of each entrypoint/exploit to see if it could work on your own system.
BUT I’m assuming you are a complete noob to this, which means you’re very probably on firmware 11.3 and you would rather go for the easiest to use entrypoint that’d work on the latest firmware.
Nothing to worry about, I gotchu.
Launching Homebrew Through Soundhax:
SO, the easiest and safest method that I know of for the current firmware (11.3) is Soundhax.
Soundhax is an entrypoint that uses the stock Sound application that comes with every 3DS ever so it honestly doesn’t get any easier and cheaper than this.
To get started, follow the steps listed below (links to everything you need included):
Turn off your 3DS. Now take your 3DS’s SD card out and plug it into your computer. If you have a New 3DS, you’ll probably have to take off your console’s back cover and use a usb plug for microSD cards. Follow the instructions Nintendo gives on this page.
Once your SD or microSD card is plugged to your computer, download the Homebrew Starter Kit from here. The download link is in the “Preparing your SD card” section of the page. When it says “Extract it at the root of your SD card”, this just means “Don’t put it inside any folders inside the SD card”. Just put the files and folders you just downloaded directly in the “open” space of your SD card and ignore any other folders you might find already in it.
Next up, download the right sound file over at nedwill’s soundhax website. Choose the region that matches your 3DS’s and then just choose between Old and New. Then click on “Download MP4” and you should now have a MP4 file downloaded to your computer. Now, just drag this file on to the root of your SD card.
Now go back to Homebrew’s website and scroll down to the “Otherapp/ropbin payloads” section. Here, you need to download the right “otherapp” file for your console by choosing wheter you have an Old or New 3DS, choosing the exact firmware numbers you see when you go into system settings and then choose your region’s letter. Just go back to system settings, check the bottom right of the top screen and input the numbers and letter in exactly as they are on your 3DS (zeros and all). After you do this, click on “Download otherapp”.
Drag the file you just downloaded to the root of your SD card. It has a super long name that you’ll want to change so rename the file to “otherapp”. Note: Normally, just renaming the file to otherapp should work but there’s been people who reported this sometimes doesn’t work. If when you try to launch homebrew nothing happens, try renaming this file “otherapp.bin” instead.
Eject your SD card from your computer and put it in your 3DS now. Turn on your 3DS now.
Now go to the Nintendo 3DS Sound application. This one:
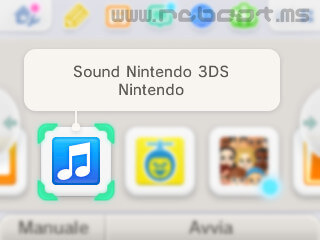
Once inside the app, use your stylus and choose your SD card folder and you will then see a sound file named “<3 nedwill” aka probably the only file you’ll see. Play this file and ta da!
You should get a scary black screen with random words and numbers that will then flash colors but don’t worry, this means everything worked and you can now access homebrew!
If nothing happens or your screen freezes for a long time, don’t panic cus this is normal (soundhax sometimes glitches out), just reboot your 3DS and try opening the sound file again.
After the black screen and flashing colors, your 3DS screens should now look like this:
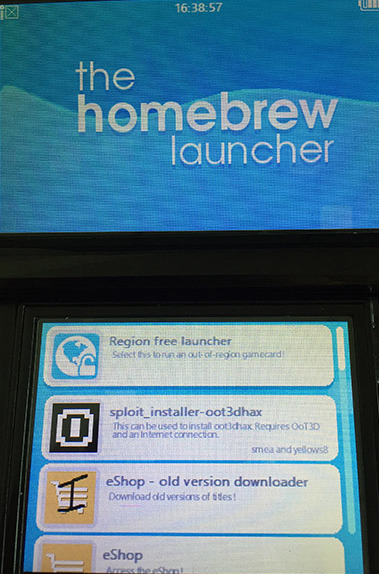
Congratulations, you now have access to Homebrew!
Ok, I Have Hombrew But Now What?
Now you can use any hacks you want for any game you want :) I happen to only know hacks for 3DS Fire Emblem games and ACNL but you can always go on gbatemp and search for other hacks for other games.
To hack Fire Emblem, I recommend for you to watch this video. It’s pretty outdate but most of the steps in it still work.
To hack ACNL, I recommend you go watch this video. Very up to date.
Have fun and if you have questions or comments, just shoot me an ask.
#3ds hack#tutorial#hacking tutorial#fire emblem fates#fire emblem awakening#ACNL#animal crosing new leaf#my tutorials#hacks#soundhax#homebrew#fire emblem hacking#acnl hacking#fe14#gay hack#3ds hacking
75 notes
·
View notes
Text
A’ight so I’m reposting this comment I made on a YT video bc it’s very useful info
That whole thing about trying to figure out what to eat never leaves- I've assisting/been grocery shopping for my household(s) for arguable amounts of time (the safest bet being around 14-15ish) and lemme tell you buddy meal planning is the absolute worst. So, for this one area of which I actually have years of experience and for the benefit of anyone who happens upon this comment (unlikely) here's my advice:
(I will provide an actual list under all the advice that I am marking with a *** because sometimes having an actual list is vital in order to do A Thing)
This is all assuming you have at LEAST a microwave and maybe a stove, as I and most of the people I have lived with have been non-to-semi functional mentally ill people who do NOT have the energy to make complicated recipes, basically all of these are low energy makes. I DO recommend two other appliances other than those, and those are a toaster and a rice maker (depending on how much you like rice, or at least what you are willing to do to rice in order to make it palatable).
Also a coffee maker, depending on whether or not you drink coffee and the volume you drink it at. We have a Keurig, which is one cup at a time, and that's good for moderation and convenience and it let's you make just hot water for tea and hot chocolate. So your biggest savior is staple foods, bread, eggs, butter, milk(chocky or otherwise), peanut butter, jelly, sandwich materials of your preferred choosing like, turkey, ham, Bologna, etc. and cheese slices like the orange ones you see at the store all the time but they usually have a selection that'll include swiss, cheddar, provolone, etc. The biggest struggle of grocery shopping is trying to predict what you want to eat, so having a bunch of basic things that you can mix and match is a life saver.
(Note that half the battle for shopping is finding what you're looking for, with the added bonus that different stores carry different brands namely their own; Market Pantry for Target, Great Value for Walmart, etc. My renowned strategy is to keep your eyes glued to the ceiling, particularly at the signs they hang at the entrance of each aisle, those with get you where you need to go most of, notably not all, of the time. )
If you've made it this far, you're going to notice there's a lot of decisions you personally are still going to have to make, and that is because you are the one whose going to be making the food here, so it has to be edible for you to eat, and I do not know what exactly you find edible. What do you like to eat personally? What's your favorite food? Can you get that at your grocery store?
***Okay so now for the actual list. These are all things you should have on hand at all times no matter what. if you don't what brands or which sandwich ingredients to just ask yourself what your Mom/Dad/Parental Figure used to make for you and give them a call if you can/bother to.
Bread; Any kind, White, wheat, whatever. You probably have a preferred type of bread and if you don't just get wheat
Butter/Margarine: this is mostly for if you have a toaster, so for like... toast, but it's good to have around for a bunch of stuff
Eggs: If you have a stove and a singular pan you can make eggs, there's tons of tutorials on how to make them without burning you're house down
Milk: Depending on your tolerance, get lactose-free or lactose-full, or go to the pharmacy section and get Lactaid Tablets, preferably whatever the non-name brand they have there. I also recommend getting what you'll drink before it spoils, but do note that it usually good to have at least a quart or so on hand to use to make other things like scrambled eggs.
Sandwich materials: See your childhood for advice here. Like with a lot of these, literally follow your gut. My recommendations are Peanut butter, jelly of your choice(Grape, you heathens), turkey, and cheese slices (swiss or american, swiss didn't work out as well as thought it would but still edible I'm going to try cheddar next time, thus revealing another big part for grocery shopping: trial and error)
Potatoes: Get sandwich bags and the potato fix-in's of your choice, stab potato with fork many times, put potato in sandwich bag, put /that/ in the microwave for 8 minutes, be very careful taking it out of microwave and out of the bag. Cut in half, mash up the insides, add fix-ins like butter and salt. Boom. Baked Potato.
When all else fails, get microwave dinners. They have a whole section in the very Cold aisles.
They also have boxed Dinners, which require a few things that they tell you on the boxes, but largely can also be made using only a microwave. Note that you will also definitely need measuring cups. You can probably find those in the baking aisle. Try to keep prices and your budget in mind, use the calculator on your phone to keep track and stop within 3 to 20 dollars of your budget depending on how many things your buying. This isn't even everything I planned to say but it's been like an hour and I have work tomorrow so if the zero people who see this want more feel free to comment
0 notes
Text
Frost Is An Update
Alright alright. This is a little bit of a test recording, not entirely sure if I'll be uploading this one or not. I'm... trying out a little bit of an extra style of commentary which I normally don't do because most of my clips are extremely live stream based, so at most you'll hear me speaking to people, but not really just in general. Unless I'm going off on a tangent trying to think of a story, but considering most of my styling is just 'Hey, FC a song'... I never really get to do stuff like this. So, I get to speak a little bit. Play a cool song as well. This is an overchart I made back in 2016 for GuitarHeroPhenom's cover of Soothsayer, one of my favourite covers of the song. And a cool song in general, definitely love this song. I really wish more people would make overcharts as well. There's a stigma in the community recently that says 'Hey, all charts need to be accurate'. And while that is true to an extent, I think that sometimes it's fun to venture outside of the realm of accuracy for the sake of fun. And while it might just be fun for me alone, considering you know... patterns and stuff like that, it's still really cool to play songs like this. There's some sort of mental thing with it, and I definitely wasn't ever going to FC this song anyway. It's way too long for that. The main reason I haven't been uploading any Soulless 5 content recently is because I don't really have a good guitar, like as you saw earlier, this whammy bar doesn't work, the strum bar I have is really bad, hence why there's tape and stuff in it. That is something you can do with your strum bars by the way. If you feel like they're a little bit too... you know, overstrummy, you can slide some paper between the top and the bottom of them, tape it in place and it'll help with certain things. Like, I believe that the upstrum on this can still bounceback overstrum if I do it too much, but for the most part, it's much better. The only issue is that it makes an entirely different feel for the strum bar. In other words, it'll feel entirely different, so if you're entirely used to your current strumbar, don't do this, but if you don't really care, I'd say give it a shot. I know a lot of people like having strum bars that overstrum and I don't really, personally. Like, to be fair, that's how I got the Patterns 2++ FC, but I could have done it with a non-overstrumming guitar as well, it just has to be consistent. Like, if it overstrums sometimes but not other times, then it would suck. I think non-overstrumming guitars in general are better because they're good for getting FCs. Like, you'll never accidentally overstrum because of the guitar if it doesn't overstrum. Which, I mean, I guess if that's the case then I should just get a Les Paul... but wireless guitars? I don't wanna even try getting into that. I have some new series' coming up soon that I'm planning on uploading. Some stuff like, uh... I know for one that Idiotic CH Comments is coming back, eventually. And let me tell you, my comment section recently has been exploding with them. And I'm not talking about the people who are saying stuff like 'This guy has no personality' or whatever, that's cool, you know. You don't have to like me. I'm talking about the people who are like 'Play a real guitar, nerd' because those people are so easy to make fun of. Good for comedy. I'm also planning on doing some form of tutorial series in the future. You know, showing people how to play the game and certain things, because I know that unless you're someone like Randy or Alec, you know, who already know how to play the game extremely well, it's hard to figure out what's happening with patterns. And stuff like that, you know, like how to do rake tapping and stuff. It's a bit challenging, which is why I'm willing to explain it. I've already started on one episode, because I've heard a lot of people have issues with strumming, so I was explaining how to do that. My editor, m00tie, and I are gonna be working on that soon. Also, I have literally no idea how to hit this section, so I apologise for being a LeafGreen. Almost got that. Alright. This is shaping up to be a 7 star run but probably not a PB. I like this chart, even if I did make it. It's fun. Another thing that I kinda wanna mention that I saw a few people saying in my Jordan video. They're saying stuff like 'Man, you only did this to snipe Alec, what a scumbag' which I mean, I guess from face value that could be seen as that, but I was wanting to go for Jordan 175% like a full year ago before that I knew, you know, I was capable of doing the bridge, because back then I had, like, less physical speed than I do now, I say as I miss that lol So now that I'm capable of doing that, Alec's video more or less reminded me that I wanted to go for it than anything. I didn't just do it just to be mean to Alec, and the cool thing about Alec and who he is, considering he's very consistent with, like, Stepping B and stuff, he could easily get 185% if he went for it. I don't think I would personally go for 185% because I'm not consistent enough at the bridge, but he could do that. That would be cool. At the end of the day, like, I'm not enemies with Alec or anything. Same with George, I was friends with him when I made the Cry for Eternity video. I talked to him about it before making the video just to make sure he wasn't gonna be mad about it, you know? I think the main reason why I don't think people should be mad about that is because it took me, at max, 30 minutes of grinding with a guitar that actually worked. So it shouldn't have taken Alec any longer than that considering he's better at those type of patterns than I am. I almost hit that, wow. I've only hit that twice before, once in practice. Another thing that I want to get done eventually is some form of proper overchart for Soulless 5. Mainly just because the song is long enough to where it'd be cool to have. Like, Hexci made me one a little while ago but it-it was the style of overchart that's not playable and I want a playable, like, tech FCable overchart of it done. And I don't know if that means I'm gonna have to do or someone else is gonna have to do it, I just wanna see it happen, it'd be fun. Oh, uhh... That reminds me. The whole people saying that I have 'no personality' thing. I get that a lot, but I don't understand it because most of the time... Like, they're not talking to me or in streams with me or anything. They're just commenting on the little snippets of the stream where I'm usually focusing on FCs and stuff, so I don't know if that's really fair judgement, but at the same time, I could you just be a scumbag you know, who knows. Lemme get a screenshot of this real quick. Apologies for this being an extremely impromptu video. I just felt like making some sort of commentary thing because I've drifted away from that a little bit considering, you know, I used to have a YouTube channel where I did this sort of thing all the time and it didn't really go anywhere because I was young at the time, and I kinda have that sort of, ingrained in my brain like 'Hey, you are not allowed to do this' but it's fine. I'm gonna be getting those videos that I was talking about in this one uploaded some time in the near future. I'm sure, uh, that the Idiotic CH Comments one will come out first, uhhh... And then either a channel trailer which I was working on with Cactus_Salad or the other thing, the tutorial series, I don't know. All of it's a lot of editing work that I'm not usually used to considering most of this is clip the stream, you know, add your outro, add a caption here or there and it's normally fine. So it's not something I'm used to but I'm definitely trying to put a lot more effort into my stuff considering I have a lot more people to entertain, and that's the main goal. I wanna give somebody something to watch, and if that annoys people, which, I mean I've seen it in the comments a lot, that I annoy people. I mean, that's cool, watch Alec, you know. If you don't like me, that's not my problem. Constructive criticism is one thing, just being a dick is another. But I'm gonna go for now, and enjoy my outro, peace.
0 notes