#idevblogaday
Explore tagged Tumblr posts
Visit Tumblr Blog
Explore Tumblr blogs with no restrictions, modern design and the best experience.
Last Seen Tumblr Blogs


Fun Fact
69% of Tumblr users are millennials.
Text
The development of iBots Launch
I've spent the last 10 years as a web developer. My partner in crime (actually graphic design) is a lawyer. What the hell were we doing creating an iPad game!?
I'd wanted to make games since I played King's Quest when I was 12. My first "game" was a double dragon remake for the commodore 64 with ascii graphics. My older brothers thought it was hilarious. When I got a 486 pc it was all about plasma fires, spinning cubes, starfields and the mandelbrot set all lovingly coded in Turbo Pascal 6.
A taste of real game development came during University. We had a PS2 running linux and a fat manual on how the chips worked. It took me a week to get a 10 line assembly program running that wouldn't crash the system. It took 2 minutes for the system to restart. I loved it.
The days and nights of Uni game dev ended alas and I was thrown into the real world, where the only offers of professional game dev positions I received seemed to consist of 80 hour weeks and a janitor's salary. At the same time there were all these companies offering comfy positions with good pay, all you had to do was code .net!
Whoops.
Fast forward 10 years
I'd been making good money as a .net consultant for a while now and I was at the end of a contract. I had cash in the bank, a buddy I grew up playing video games with who had an eye for design and an iPhone in my pocket. It was time.
Day 1 was exhilarating
We knew the game we wanted to make. It was a remake of an old arcade game we'd sunk a lot of coins into. We were going to make it exclusively for the iPad. In 4 hours I had a running prototype:

This was going to be totally awesome.
Andy started rushing to get graphics in. Years of design projects on the side had given him wizard like photoshop skills. We also knew where we needed help.
The theme: super cool futuristic action space game. With robots. We needed 3d models. Luckily you can buy them fairly cheaply from turbo squid. We found an animator who we worked with remotely to rig up the characters and create all the animations we needed.
The next 6 months
Given that I had a working prototype in 4 hours, I didn't expect it to take six months to get the game out the door.
The first problem I had to tackle was learning Xcode, objective-c and cocos2d. Luckily I like learning new languages. I had a pretty thorough understanding of c, c#, javascript and ruby plus I was casually familiar with a lot more languages and language patterns. It took me some time to get up to speed with manual memory management but I'd used smart pointers before in c++ so I understood the concept. Xcode itself wasn't too bad, but I did miss a lot of things from visual studio.
Cocos2d turned out to be a fantastic choice. It's put together really well with an intuitive API. The community is large and active too. I strongly recommend looking at it for 2d games.
The Tortoise and the Hare
We rushed our prototype to a visually polished game in a few months. We had the menus done, full graphics and animations for all the characters, the sounds and the soundtrack all in place.
There was a problem though. The game wasn't fun.
> The controls are too hard!
We reworked the controls three times. Each time we created new graphics and recoded the control code.
> We need powerups!
We did the powerups twice. The first time we had them activate as soon as you picked them up. But this didn't work well because we wanted to have offensive and defensive powerups and the defensive powerups you wanted to wait to use at the right moment.
> We need a single player mode!
This was a pretty late addition and some of the most difficult code I wrote for the game. I tried to make my life easier by embedding Lua to write the AI so I could iterate faster. This turned out good and bad. I was able to get the AI up and running a lot faster than if I'd coded it in objective-c but now I had some tough memory leaks to track down.
Instruments in Xcode gives you some pretty amazing tools for tracking memory leaks and performance issues, but with the Lua VM it was a black box. After a lot of trial and error I did get the memory issues sorted out but I spent a lot more time on that than I would have liked.
The release date kept getting pushed back. Like the fabled hare we'd rushed too fast to the finish line when we should have been iterating the game design much earlier. This was much longer than we intended to be in development for and we sorely wanted real market feedback to justify further development. We had to make some tough decisions, cut out a lot of things that we wanted to ship with and just get the game out the door.

Show me the money!
So we released! I announced it on twitter, facebook, my blog, forums I used and told as many people as I could. The spike up was fun. Thanks to App Figures I was able to obsessively watch the game rise through the rankings.
We got a very thorough and positive review on Touch Reviews. Also the app store reviews from around the world were fantastic:
> LOVE LOVE!!! > Just got my iPad, one of first games I've downloaded & I'm totally addicted!
> Fast fun and furious.... This is what iPad was made for ! > I think this game ROCKS. I've bee looking for a good fast pace multiplayer game to play against my kids and whoop my wife at too :-). The game is great even the AI is very challenging. Make sure you play in ARCADE mode cause that where it's at !!! Great action very polished and balanced gameplay and the perfect balance of power ups. Well done developer, this is what the iPads touch screen is perfectly suited for.
> Très bon surprise ! > Simple mais diablement efficace ! Jouabiliter au top, et très tactique. Possédant le jeu de hockey (le très connu), et étant fan de ce genre de jeu "2 joueur 1 iPad" je ne peu que sucomber a cette approche plus tactique et plus maniable de ce jeu.
Unfortunately this didn't translate into great sales numbers:


We made it to #45 in Games in Australia which is where I live and I was pretty happy with that. And then we crashed! Unfortunately we didn't make much of a dent in the US rankings.
We did get the feedback we were looking for though: The game has potential. People liked it despite its flaws, and for a few days there it sold OK. If it had climbed as high in the US as it did in Australia and the sales were maintained I would be a happy man and wouldn't have to go straight back to building web apps to pay the bills!
What needs to be done
I think there's a pretty good game hiding in here. Here are a few things I know would improve the game:
More content. Levels, characters, in game variations
A more interesting single player game. Tournament style, rewards/achievements
Internet multiplay. Challenge a friend or stranger, have a worldwide leaderboard.
More reviews and ratings and press wouldn't hurt either.
What I learned
While the game hasn't bought me an island in the Caribbean, staffed with robot servants, it has provided me with one piece of knowledge:
> Transitioning from a freelance web developer to a self supported indie game developer is not a pipe dream.
I've had a taste of the app store market and I want more! There's a lot more work to be done, on this game, on the next one and the one after that. But I'm not giving up.

29 notes
·
View notes
Text
Tutorial: Cool UIScrollView Effects
While I was working on the "Cardflow" interface mode for CardSwitcher I had to work out get custom page widths and custom effects as you scroll through the cards, this is actually quite simple but I haven't seen many posts on customising a UIScrollView. Most of the tips are spread across lots of different stackoverflow questions.
Problems with custom scrollview's
To start with (actually while I was working on the first version of CardSwitcher) I looked into iCarousel, which has quite a lot of cool effects and a tableView style data source and delegate protocols. However as the first version of CardSwitcher was actually just a standard WebOS, or Safari tab's style, linear layout that highlighted a problem with iCarousel (which joehewitt also noticed with iScroll), caused by the fact it doesn't customize a UIScrollView but instead uses UIGestureRecognizers to do the scrolling itself (like UIScrollView itself).
However because of this the scrolling just feel wrong, the physics are off by a little bit. The bounce as you scroll of the edge, flicking and then how many pages it scrolls past before stopping and the paging effect all just feels off slightly.
When using iCarousel for the purpose it was designed for, the coverflow or other custom modes, and you might not notice. However as CardSwitcher would have used the linear mode only, at least for the initial release, that would annoy me. For instance Multifl0w's 'cards' style has a custom scrolling too, it feels very smooth but isn't quite right still.
So after explaining why I didn't like using a custom methods I'll now point out why people feel a need to develop these custom methods rather then using a UIScrollView.
The most obvious problem is "paging". To activate paging on a UIScrollView you just set it's pagingEnabled property to YES. However it defaults to each page being the same width as the scrollview itself, meaning if you want to achieve a preview effect like in Safari (screenshot below) you can't do it by simply specifing a custom page width.
Also the custom scrollview's all have built in ways to create custom effects whereas UIScrollView provides no built in way to achieve cool effects, so you'll have to work it out yourself.
Despite the need to subclass and customize the UIScrollView yourself it's is a very refined and very well built UIKit class and over all I think it's best to just deal with the one or 2 limitations then throw it all away and start again from scratch or use a custom scrollview library. The difficulty of matching the refinement of a UIScrollView is highlighted well by the numerous JavaScript libraries which try to mimic it for web apps and the native attempts at making custom scrollviews (none of which get the physics quite right).
Customizing UIScrollView & Adding Effects
So now to the fun bit (the code). Customizing the page width of a UIScrollView is actually quite simple, set the width to whatever you want and then set the 'clipsToBounds' property to NO, very simple. Except it's not quite that simple as there's a little problem with that (how big a problem depends on how small you want to the page widths to be). The problem is that touches will only be received inside the view's bounds. So if your use for this is a scrolling menu (like a UITableView) that's page width is the width of one cell only the center one will receive touches. To fix that you need to subclass UIScrollView and override the -(BOOL)pointInside: withEvent: method.
@interface CustomScrollView : UIScrollView @property (nonatomic, assign) UIEdgeInsets responseInsets; @end @implementation CustomScrollView - (BOOL)pointInside:(CGPoint)point withEvent:(UIEvent *)event { CGPoint parentLocation = [self convertPoint:point toView:self.superview]; CGRect responseRect = self.frame; responseRect.origin.x -= self.responseInsets.left; responseRect.origin.y -= self.responseInsets.top; responseRect.size.width += (self.responseInsets.left + self.responseInsets.right); responseRect.size.height += (self.responseInsets.top + self.responseInsets.bottom); return CGRectContainsPoint(responseRect, parentLocation); } @end
Though for CardSwitcher I use a less flexible implementation because it does what I want.
@implementation CustomScrollView - (BOOL)pointInside:(CGPoint)point withEvent:(UIEvent *)event { CGPoint parentLocation = [self convertPoint:point toView:self.superview]; return [self.superview pointInside:parentLocation withEvent:event]; } @end
This now means that no matter how small the scrollview (in Cardflow mode it's only 30px wide) you'll still be able to scroll by dragging anywhere on it's parent view.
Cool Effects
Now we're going to go through and create a few cool scrolling effects.
Now I actually have each card keep track of it's offset and set it's own transform but you can easily do this in a for loop in the scrollViewDidScroll delegate method if you want. Note though that you'll need a way to track the index of each card (hopefully besides just using it's position in the UIView's subviews).
// Method that get's called every time the scrollView scrolls. -(void)setTransform{ /// setting up zoom effect!!!!!! UIScrollView *scrollView = //get the scrollView (most likely either self.scrollView or self.superView); // Set the layers transform back to normal so it's frame wouldn't be effected while we do the calculations self.layer.transform = CATransform3DIdentity; // Easier reference to these CGFloat scrollViewWidth = scrollView.bounds.size.width; CGFloat offset = scrollView.contentOffset.x; // Do some initial calculations to see how far off it is from being the center card CGFloat pageIndex = ([/* an array (hopefully not self.superviews.subviews)*/ indexOfObject:self]); CGFloat currentPage = (offset/scrollViewWidth); CGFloat pageDifference = (pageIndex-currentPage); // And the default values CGFloat scale = 1.0f; CGFloat alpha = 1.0f; /*** NOW FOR THE EFFECTS ***/ // Scale it based on how far it is from being centered scale += (pageDifference*0.2); // If it's meant to have faded into the screen fade it out if (pageDifference > 0.0f) { alpha = 1 - pageDifference; } // Don't let it get below nothing (like reversed is -1) if (scale < 0.0f) { scale = 0.0f; } // If you can't see it disable userInteraction so as to stop it preventing touches on the one bellow. if (alpha <= 0.0f) { alpha = 0.0f; self.userInteractionEnabled = NO; } else{ self.userInteractionEnabled = YES; } /*** Set our effects ***/ self.alpha = alpha; // We could do just self.transform = but it comes by default with an animation. [CATransaction begin]; [CATransaction setValue:(id)kCFBooleanTrue forKey:kCATransactionDisableActions]; self.layer.transform = CATransform3DMakeScale(scale, scale, 1.0f); [CATransaction commit]; }
This will create the same effect as the 'Cardflow' mode in CardSwitcher. However the important bit's are those initial variables and then the end bit where you set it's transform. In between you can fiddle with those values to create the cool effects.
If you want some examples of cool scrollView effects have a look at the iCarousel Demo project, which includes these effects: Linear, Rotary, Inverted Rotary, Cylinder, Inverted Cylinder, CoverFlow, CoverFlow2 and a Custom one similar to this one.
If you have any questions or comments please post them below.
11 notes
·
View notes
Text
Image Manipulation: Retrieving And Updating Pixel Values For A UIImage
[caption id="attachment_1371" align="alignright" width="400" caption="Grayscale Jobs"][/caption]
With the recent success of cool photo manipulation apps such as Camera+ and Instagram, it got me wondering. How do these photo apps modify the pixel data of the image.
After doing a bit of research on the subject, I found countless posts on Stack Overflow and the Developer forums about various methods to get and set the pixel values of a UIImage. Most of them unanswered or partially answered. I tested out many solutions and banged my head on my computer into the whee hours of the morning with no success. Every solution I tried seemed to completely destroy the image.
It wasn't until this morning, I had an "aha" moment, changed one line of code and was able to produce a grayscale version of a UIImage.
Having the ability to get and set pixel values of a UIImage is super important if you want to create a photo related app that has "Filters". Once you know the basics, you can apply your ninja math skillz to implement cool filter algorithms on the pixels. Below, I will show you onc such algorithm for converting an image to grayscale (it's not that clever).
I should note, that a good majority of my code comes from Olie's solution on this Stack Overflow post. His example simply returns and array of UIColor objects for a given image. Mine will modify those colors and write them back to a UIImage.
Converting A UIImage Into A Pixel Array
Here is the first part of our grayscale method. It is creating a char array from a global UIImage property named workingImage.
- (IBAction) grayscale:(id) sender { CGContextRef ctx; CGImageRef imageRef = [self.workingImage CGImage]; NSUInteger width = CGImageGetWidth(imageRef); NSUInteger height = CGImageGetHeight(imageRef); CGColorSpaceRef colorSpace = CGColorSpaceCreateDeviceRGB(); unsigned char *rawData = malloc(height * width * 4); NSUInteger bytesPerPixel = 4; NSUInteger bytesPerRow = bytesPerPixel * width; NSUInteger bitsPerComponent = 8; CGContextRef context = CGBitmapContextCreate(rawData, width, height, bitsPerComponent, bytesPerRow, colorSpace, kCGImageAlphaPremultipliedLast | kCGBitmapByteOrder32Big); CGColorSpaceRelease(colorSpace); CGContextDrawImage(context, CGRectMake(0, 0, width, height), imageRef); CGContextRelease(context); . . .
This is a lot of Core Graphics fanciness that isn't super important to understand. It's just getting the RGBA values from the image and writing them into the rawData char array. There are 4 bytes per pixel (red, green, blue, alpha), so this array contains 4 * height * width elements.
Modifying The Pixels of a UIImage
Here is where the magic happens. You can replace this code with the logic necessary to apply the filter you are making. Another clever way to approach this would be to pass this code in as a block into the method (I'll leave that as an exercise for the reader :)).
. . . int byteIndex = 0; for (int ii = 0 ; ii < width * height ; ++ii) { int outputColor = (rawData[byteIndex] + rawData[byteIndex+1] + rawData[byteIndex+2]) / 3; rawData[byteIndex] = (char) (outputColor); rawData[byteIndex+1] = (char) (outputColor); rawData[byteIndex+2] = (char) (outputColor); byteIndex += 4; } . . .
The first part is pretty straight forward, we have a for loop that goes from 0 to width * height. We index into the rawData array using a counter that we increment by 4 each time (remember 4 bytes per pixel). As you can imagine, the first pixel (rawData[byteIndex]) represents the red pixel, then green for +1, blue for +2, and finally alpha for +3. Note that the alpha byte is last because kCGImageAlphaPremultipliedLast flag above.
In order to do grayscale, we simple set all of the color values to the average color value. So, for example the color [218,232,244] (which is the light blue color of the Wordpress editor's toolbar) would be converted to [231,231,231] which is a fairly light gray color.
The most important step that everyone in the forums seemed to miss was casting the new value to a char. Remember we are using a char array, setting ints as values will generally screw up your image. (This was my "aha" moment that I mentioned above)
Writing The Pixels Back To a UIImage
The final step is to write the pixel data back to a UIImage. Again, I borrowed some of this code from somewhere else and unfortunately lost the link. If I find it, I will update the post.
. . . ctx = CGBitmapContextCreate(rawData, CGImageGetWidth( imageRef ), CGImageGetHeight( imageRef ), 8, CGImageGetBytesPerRow( imageRef ), CGImageGetColorSpace( imageRef ), kCGImageAlphaPremultipliedLast ); imageRef = CGBitmapContextCreateImage (ctx); UIImage* rawImage = [UIImage imageWithCGImage:imageRef]; CGContextRelease(ctx); self.workingImage = rawImage; free(rawData); }
All we are doing here is creating a new Bitmap Context, writing it to our CGImageRef and constructing a new UIImage from that CGImageRef. Finally, we just update our workingImage with the modified one. Fancy, I know...
Now, much of this code is to work with my example (download below), but it could easily be tweaked to fit within your super awesome photo app. If you have any questions or comments PLEASE leave them here or send them to me on Twitter (but probably leave them here ;) ).
Download The Sample Source Project
* Note on the sample code: Before you give me crap about doing this in the main thread, I know. Don't do these operation on the main thread. The example is meant to be quick and dirty and by no means is ready for production. Enjoy!
This post is part of iDevBlogADay, a group of indie iOS development blogs featuring two posts per day. You can keep up with iDevBlogADay through the web site, RSS feed, or Twitter.
Original Article
2 notes
·
View notes
Text
Designing an icon for a word game

Making cool icons is an artform unto itself. Making an icon for a word game is even harder without it looking like every other word game icon out there.
For Word Wall, we really wanted to NOT do the typial showing of 2 offset tiles or just the simple name of the game. Initially, we were thinking about contracting out the icon but decided that I would do it because we're cheap and wanted save a few bucks and be lean.
So starting out, here's the gameplay screen I had already finished. I really wanted the icon to have the same feel.

I guess we have to use the name of the game. There really isn't any other way since our game doesn't really have fancy gameplay and graphics.
v1: Original idea. "Word wall" as bricks. I really wanted something that represented the gameplay. Not bad.
v2: Made the blue brighter. It just seemed washed out.
v3: Slightly changed the colors of the blue bricks to help give it some depth. Also added in some surrounding words since there was just a lot of white space.
v4. The white words look awful. Changed font color to grey.
v5. Experimented with lower case fonts. Made the surrounding words darker.
v6. Back to uppercase. Lowercase words just looked too "kiddy".
v7. Even darker font.
v8. Still looks washed out. Even darker font. Added blue border. Now this is something that looks somewhat presentable.
v9. Back to different color of blue bricks.
v10. The spacing of the blue tiles in relation to the whole icon looked a bit off, so I scaled the words and bricks down. It still should be readable on a retina device. Made the blue the same color again. The blue isn't overpowering the icon anymore.
v11. Experimented with different font.
v12. Another font experiment
v13. Back to original font. Decided to scale "WORD WALL" up slightly to help it pop off the icon.
v14. Its still looking flat, so I added an extruded border plus some drop shadowing. Looking good!
v15. Tweaked the drop shadow.
v16. Final tweak of the drop shadow. Darkened it slightly, and made it so that it looks like its lit from the top.
DONE!
And all the iterations as one image.

Hope that was useful! =)
If you want to check out Word Wall, it's available for free on iOS.
https://itunes.apple.com/app/id569351141?mt=8
1 note
·
View note
Text
Jailbroken Development : Starter Pack
For me first blog post on iDevBlogADay, I thought I'd talk about a part of iOS development that rarely gets mentioned on blogs, Tweak development (or mobilesubstrate development).
To start you'll need:
A Jailbroken iOS device
OSX 10.6+ (or iOS 3.x+)
Theos
A good knowledge of Objective-C
Getting Theos
You can get Theos from DHowett's official Github profile, although rpetrich has a fork which includes a set of private headers and is kept quite up to date (however the headers are from 3.x). Theos also needs ldid THEOS/bin/ldid
You can find a more complete guide here. If you need to install Theos on your device rather then on OSX you can find a guide on the iPhoneDevWiki.
On Your Device
On your device you should install a few tools first:
BigBoss Recommended Tools
syslogd (saves NSLog statements to file)
MobileSubstrate (obviously)
Cycript Javascript/Objc mix, install yourself (useful for testing the output of SpringBoard methods)
gdb (if something goes wrong we can't use xcodes debugger)
Mobileterminal, allows you to run commands from the device itself (same as cycript)
Class-dump-z (gets the method names & classes from an iOS binary file)
Using Theos
Theos comes with a group of tools, the most obvious of which is Logos. Theos itself is a build system (make files and build scripts) which can build you code straight to a .deb file (the format cydia installs).
Logos is a preprocessor-based library to make developing with mobilesubstrate easier by providing an ObjectiveC style syntax.
MobileSubstrate Example (from iFans)
static void __$ExampleHook_AppIcon_Launch(SBApplicationIcon *_SBApplicationIcon) { UIAlertView* __launchView = [[UIAlertView alloc] init]; __launchView.title = @"No way muchacho"; __launchView.message = @"You can't touch dis!"; [__launchView addButtonWithTitle:@"Dismiss"]; [__launchView show]; // If at any point we wanted to have it actually launch we should do: // [_SBApplicationIcon __OriginalMethodPrefix_launch]; } extern "C" void ExampleHookInitialize() { NSAutoreleasePool* pool = [[NSAutoreleasePool alloc] init]; // Get the SBApplicationIcon class Class _$SBAppIcon = objc_getClass("SBApplicationIcon"); // MSHookMessage is what we use to redirect the methods to our own MSHookMessage(_$SBAppIcon, @selector(launch), (IMP) &__$ExampleHook_AppIcon_Launch, "__OriginalMethodPrefix_"); // We just redirected SBApplicationIcon's "launch" to our custom method, and now we are done. [pool release]; }
Theos/Logos Example
%hook SBApplicationIcon -(void)launch{ UIAlertView* __launchView = [[[UIAlertView alloc] init] autorelease]; __launchView.title = @"No way muchacho"; __launchView.message = @"You can't touch dis!"; [__launchView addButtonWithTitle:@"Dismiss"]; [__launchView show]; } %end
Much less code, much simpler and much easier to understand!
Useful Stuff
This is a collection of useful links & info to help you get started:
iPhoneDevWiki
StackOverflow is the most useful site for iOS development and for jailbroken development the iPhoneDevWiki is by far the most useful sites for a developer.
irc.saurik.com
If you have a problem you can't solve while making your AppStore app you ask on StackOverflow for a solution. If while making your tweak you can't fix a certain bug/problem you ask on the #theos or #iphonedev channels on Saurik's (creator of cydia) IRC.
TweakWeek
Lots of simple example tweaks from top Cydia developers. It's now finished but there are still over 60 example tweaks to study.
That's it hopefully that's enough to get you started developing tweaks. Enjoy!
5 notes
·
View notes
Text
Automate your iOS projects with rake
Rake is make for ruby, but it's so damn good I use it on every project no matter what language i'm in. Ruby is the perfect glue language for getting stuff done and Rake makes it easy to write a set of tasks for each project. It's also convenient because it's already installed on Mac OS X!
Today I'm going to show how we can create tasks to build spritesheets from images, build the app and publish it to TestFlight for beta testers.
Building spritesheets
I like to build my spritesheets based on directory structures. This makes things easy to manage, just group sprite files into directories and they get combined into spritesheets. Something like this:
├── spritesheets │ ├── charlie_walk │ │ ├── charlie_walk.00.png │ │ ├── charlie_walk.01.png │ │ ├── charlie_walk.02.png │ │ ├── charlie_walk.03.png │ │ ├── charlie_walk.04.png │ │ └── charlie_walk.05.png │ ├── charlie_run │ │ ├── charlie_run.00.png │ │ ├── charlie_run.01.png │ │ ├── charlie_run.02.png │ │ ├── charlie_run.03.png │ │ ├── charlie_run.04.png │ │ └── charlie_run.05.png
In this example I'm combining animation frames into spritesheets. I use TexturePacker to create spritesheets. Using command line tools like this is great, it keeps things flexible and easy to change.
So here's a Rake task which extracts path information and uses that to build the spritesheets:
This will create cocos2d specific spritesheets but can be modified for other formats. It also creates the retina spritesheet at full resolution and a half scaled one for older devices. Now first lets see how we can list out the available tasks:
⚡ rake -T rake spritesheets:update # Recreates spritesheets that are out of date
Cool, so it tells us that we have a spritesheets:update task, let's try it out!
⚡ rake spritesheets:update Writing sprite sheet to assets/spritesheets/charlie_walk-hd.png Writing data for cocos2d to assets/spritesheets/charlie_walk-hd.plist Resulting sprite sheet is 256x1024. Writing sprite sheet to assets/spritesheets/charlie_run-hd.png Writing data for cocos2d to assets/spritesheets/charlie_run-hd.plist Resulting sprite sheet is 256x1024.
Alright! Now if we want to change the spritesheets, it's just a matter of regrouping the sprite files into directories and running that task.k.
Auto build and publish to TestFlight
Another great aspect of using Ruby is you get access to thousands of gem packages which are really easy to install and use. We're going to use wox to help us out now. First you need to install the gem. This is as simple as:
⚡ gem install wox Successfully installed wox-0.0.8 1 gem installed
Now we can require this gem from our Rakefile and use it to configure the build:
# Rakefile require 'wox' # make sure the info_plist argument points to the right file! Wox::Tasks.create :info_plist => 'assets/Info.plist' do end
This will create a few tasks for us, let's have a look:
⚡ rake -T rake info:configurations # List available configurations rake info:sdks # List available sdks rake info:targets # List project targets rake spritesheets:update # Recreates spritesheets that are out of date
There's a few info tasks there, let's see what they tell us:
⚡ rake info:configurations Debug Release ⚡ rake info:sdks macosx10.6 iphoneos4.3 iphonesimulator3.2 iphonesimulator4.0 iphonesimulator4.1 iphonesimulator4.2 iphonesimulator4.3 ⚡ rake info:targets chickenpox cocos2d tests
Ok, so lets create a task which will build the chickenpox target in Release mode with iphoneos4.3 sdk. Wox makes this fairly simple:
Wox::Tasks.create :info_plist => 'assets/Info.plist' do build :release, :configuration => 'Release', :sdk => 'iphoneos4.3', :target => 'chickenpox' end ⚡ rake build:release Building chickenpox 0.2 configuration:Release Success. Results in build/build-Release.log
Great! Now we have a build we can run from the command line which we could easily call from a Continuous Integration service like Jenkins.
The last step is to create the ipa file and have it publish to TestFlight. In order to do this we'll need a couple of things. For the ipa we need to know which developer certificate and provisioning profile we want to use to sign the app bundle.
For the TestFlight publish you need your API token and Team token. Grab the API token from the Account page. The Team token you can get from clicking edit next to the team on the top left.
Now change the wox section of your Rakefile to this:
Now we have some extra tasks:
⚡ rake -T rake build:release # Build chickenpox 0.2 with Release configuration rake ipa:adhoc # Creates build/chickenpox-0.2-Release-adhoc.ipa rake testflight:publish # Publishes build/chickenpox-0.2-Release-adhoc.ipa to testflight
Let's try it out!
⚡ rake testflight:publish Building chickenpox 0.2 configuration:Release Success. Results in build/build-Release.log Creating build/chickenpox-0.2-Release-adhoc.ipa Success. Results in build/ipa.log Publishing to TestFlight File: build/chickenpox-0.2-Release-adhoc.ipa (1.0 megabyte) Accessible To: Internal After publish will notify team members ######################################################################## 100.0% Success. Results in build/testflight.log
This one command line now builds the app, creates an ipa file, uploads it and sends emails to all of your beta testers with a link to install the new version. TestFlight is an amazing service, if you're not signed up you're missing out!
That's it for now, feel free to share any more automation tips in the comments.
5 notes
·
View notes
Text
From LUA to JSON
I was planning on writing an article about how to integrate LUA into a game using iPhone Wax. This is how I wrote the AI for iBots Launch and how I wrote the first prototype of Chicken Pox. There were a few advantages to this strategy but I think in the end there were a lot more disadvantages. So this is an article on why I'm not using wax or LUA any more.
Why use LUA anyway?
I'm used to coding in ruby and javascript which are much more concise languages with a lot more runtime flexibility than objective-c. Also I really like using closures and I was targeting iOS 3.2 so no blocks.
The other main reason is I wanted a run-time interpreter. I'm a firm believer that shorter development cycles have a massive productivity boost. My goal is to get the time it takes to make a change and see it running live down to zero. In iBots I could telnet into the game and execute arbitrary code which helped a lot during development (Thanks Miguel!).
So what where the problems??
Instruments
Compared to the visibility that Xcode's Instruments gives you over your objective-c code, LUA is a black box. Wax does some really clever object mapping between the two languages and releases and retains objects as necessary. Unfortunately you can run into situations where LUA is holding objects alive and it's hard to see why or where it's happening. I ended up spending a fair amount of time debugging LUA code in iBots Launch looking for retained variables.
Speed
This was fine for the AI code in iBots, but I wrote 99% of the Chicken Pox prototype in LUA and it was sloooooooow. It's hard to say whether the speed issues where in the LUA VM or the iPhone Wax bridge but it was clear that it wasn't the correct approach.
So where to now?
Right now i've rewritten Chicken Pox in objective-c and it's back to 60Hz and plays much nicer.
I'm also trying to tackle the live updating with a different approach. Instead of running arbitrary LUA code at runtime I'm limiting myself to live updating data. My scene graphs are defined in json files which look something like this:
{ "GameScene": { "children": [{ "name": "hud", "type": "layer", "children": [{ "type": "sprite", "frame": "pause_menu_bg.png", "position": [291,142], "visible":false }] }] } }
I then have the game start a zeromq server when it launches, I start a local filewatcher to watch the json files, and anytime I edit and save a file I transfer it to the device which parses it and updates the scene graph. This also works for arbitrary data which when used with KVO makes live changes possible.
Stay tuned to see some more detail on how this stuff works because it's really fun!
4 notes
·
View notes
Text
Free as in Ads
This is my second post in the idevblogaday series and it's going to be a short one because I'm at WWDC and I'm writing this post at the NGMOCO night of meat!
For those who caught my last post in the series you'll know that our iPad game iBots Launch has been getting less than stellar sales. After a decent initial peak the number has fallen to roughly 10 sales a day.
So as an experiment I decided to make the game free for a weekend and see what difference it made. Well I can tell you it made quite a difference:
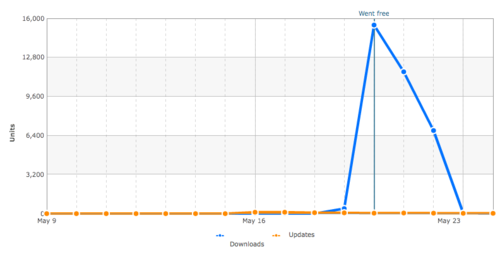
In just two days I had received around 30,000 downloads. Interestingly most of these were from China. I'm not sure exactly why, maybe there was a Chinese blog feature, maybe they just love robots!
It was a crazy two days, I got to watch the game cruise up through the charts again. I was especially fascinated this time because I had done zero marketing beyond making the game free. I did notice that there were a lot of twitter robots that announced that it had gone free but beyond that I can't account for the rise in ranking.
Anyhoo obviously I haven't been monetizing this game correctly!
So I've decided to try providing the game for free with iAds. The last few days have been spent adding ad support to various parts of the game and analytics to help me understand how people play it. As of today I'm ready to submit an update to the app store.
Stay tuned to see if I can turn my financial situation around with the new strategy!
Ps. I have a few technical posts up my sleeve, one exciting piece to look forward to is a system that live updates the game while it's running on the device. I have been using this system a lot in the development of our upcoming game.
3 notes
·
View notes
Text
Farewell (For Now) iDevBlogADay
Hey guys,
I wanted to thank everyone for letting me be a part of the iDevBlogADay community. You guys have been super supportive and I really appreciate all of the commenting, retweeting, and upvoting of my iDevBlogADay articles.
I have found myself in a position with life (work + family) where I may no longer be able to consistently write a post per week. So, after 2 months of writing, it is time for me to pass the torch to the next blogger on the list.
I will still continue to blog (and continue my Twitter For Mac Series), so I really encourage you to subscribe to my RSS feed (or Twitter feed).
Thanks again and Happy Coding!
Original Article
1 note
·
View note
Text
AppBlogger: A Tool For iOS App Developers And Bloggers
Imagine that you have just found the coolest app in the world and just can't wait to tell all of your followers about it. So, you head to the admin panel of your blogging engine (hopefully Wordpress) and begin to write your review. Now, you want to insert some screenshots, icons, descriptions, app store links, etc... So, what do you do? You head on over to Bing and type in google.com. Next, you search your app name and hopefully find the iTunes URL so that you can slowly grab some information about the app. #Fail
Dum duh dum duh (trumpet noises)!
Enter AppBlogger. AppBlogger is a little tool that I have been working on that uses "Instant Search" technology (jquery fanciness) to allow you to instantly search the app store and quickly get the information you need.
How Does It Work? (you say)
As you start typing, AppBlogger makes an asynchronous request to the iTunes web service and pulls a list of applications that match your search terms. This list is presented as a bunch of icons. You will then click on one of these icons to pull of the details page of that application.
The details page (see above screenshot) then contains everything you need to write a stellar blog post about that application. It provides text fields (for easy copy and paste) with icon URLs, download URL, and screenshot URLs.
I have some plans to integrate this in the near future with my Link Share tool to auto generate shortened URLs that contain your affiliate code (so you can make $). If you have any other suggestions for it, I would love to hear them.
I know many of you are heartbroken and were expecting the next iteration of my Twitter Client For Mac series. I want you to know, you are not forgotten and I will continue the series next Thursday. So Stay Tuned!
Check out AppBlogger!
This post is part of iDevBlogADay, a group of indie iOS development blogs featuring two posts per day. You can keep up with iDevBlogADay through the web site, RSS feed, or Twitter.
Original Article
0 notes