#install.php
Explore tagged Tumblr posts
Visit Tumblr Blog
Explore Tumblr blogs with no restrictions, modern design and the best experience.
Last Seen Tumblr Blogs


Fun Fact
1,644 Tumblr posts in 1 second.
Text
Quick Guide to Check TYPO3 Version, Composer Use and Site Root
Every TYPO3 developer knows that moment: you're diving into an existing project and need to quickly understand what you're working with. Is it running TYPO3 v11, v12 or v13? Is it using Composer mode? Where exactly is the site root? These fundamental questions need answers before you can check your TYPO3 version and start productive work.
1. Check TYPO3 Version from Backend
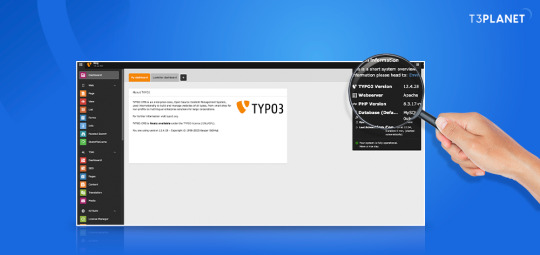
One of the quickest ways to find the TYPO3 version is by logging into the backend. Once logged in as an administrator, go to the "System" section and click on "About". This screen will display the installed TYPO3 version, system information, and basic environment details.
2. Use the Install Tool for Deeper Details
TYPO3 also includes a powerful tool called the Install Tool, located at /typo3/install.php. After logging in, go to the "Environment" section. It shows not only the TYPO3 version but also details about the PHP version, file paths, database setup, and whether the system uses Composer. If the system uses Composer, the tool may mention it explicitly or show related directory structures.
3. Inspect the PackageStates.php File
Another way to identify how your TYPO3 instance is configured is by checking the PackageStates.php file in the typo3conf directory. This file contains a list of all registered TYPO3 extensions. If the structure or naming suggests extensions are managed through Composer, it's a good sign that the project is running in Composer mode.
4. Look for composer.json and composer.lock
If your project uses Composer, you will find a composer.json file in the root directory. This file includes all required dependencies, including TYPO3 core packages and third party extensions. You can also look at the composer.lock file for exact versions of packages in use. These files help determine not just if Composer is being used, but also what version of TYPO3 is installed.
5. Find the Site Root in TYPO3 Backend
The site root is the starting point of your TYPO3 page structure. In the backend page tree, the site root is marked with a globe icon. You can confirm this by accessing the "Sites" module. This module lists all the site configurations and their corresponding root pages. Each configuration includes the base URL, language settings, and other related properties.
Summary
Before starting any TYPO3 project work, make sure you:
Confirm the TYPO3 version through the backend or Install Tool
Check if Composer is used by reviewing system files
Locate the site root for proper configuration management
Knowing these three pieces of information helps you build, manage, and maintain TYPO3 projects more effectively. It avoids confusion, saves time, and prepares you for version upgrades or extension handling.
0 notes
Link
#Automation#cloud#configuration#containerization#deploy#DevOps#Docker#feedaggregator#FreshRSS#Linux#Monitoring#news#open-source#Performance#Privacy#RSSreader#self-hosted#Server#systemadministration#updates#webapplication
0 notes
Text
SMF Nedir ve Ne İşe Yarar?Simple Machines Forum (SMF), web sitesi sahiplerine online topluluklar oluşturmak için kullanılan ücretsiz forum yazılımıdır. SMF, kullanıcıların tartışabilecekleri, bilgi paylaşabilecekleri ve birbirleriyle etkileşime geçebilecekleri bir platform sunar. İhtiyaç duyabileceğiniz tüm özelliklere sahip olan SMF, web sitenize kolayca entegre edilebilir ve kullanıcı dostu bir arayüze sahiptir.SMF, forum sitesi oluşturmak isteyen kişiler için mükemmel bir seçenektir. Kullanıcıların rahatlıkla üye olabileceği, konulara katkıda bulunabileceği ve iletişim halinde olabileceği bir ortam sunar. Ayrıca, moderatörlerin ve yöneticilerin forumu yönetmesini ve istenmeyen içerikleri engellemesini sağlayan bir dizi güvenlik özelliği de sunar.SMF ayrıca, kişiselleştirilebilir tema ve eklenti seçenekleri sunar. Bu sayede, forumunuzun görünümünü istediğiniz gibi ayarlayabilir ve istediğiniz ek özellikleri ekleyebilirsiniz. Böylelikle, forumunuzu web sitenizin genel tasarımıyla uyumlu hale getirebilirsiniz.Tüm bu özellikleriyle SMF, web sitesi sahiplerinin online topluluklar oluşturmasına ve yönetmesine yardımcı olan güçlü bir forum yazılımıdır.SMF İle Web Sitesi Nasıl Oluşturulur? SMF (Simple Machines Forum), web sitesi oluşturmak isteyenlerin tercih ettiği bir forum sistemidir. SMF ile web sitesi oluşturmak oldukça kolaydır ve herhangi bir kodlama bilgisi gerektirmez. İlk adım olarak, SMF resmi web sitesinden en son sürümü indirerek kurulum dosyalarını bilgisayarınıza kaydedin. Daha sonra, bir web hosting sağlayıcısı üzerinden bir web sitesi barındırma hizmeti satın almanız gerekmektedir. Ardından, web hosting panelinize giriş yaparak veritabanı oluşturun ve SMF dosyalarını sunucunuza yükleyin. Eğer SMF kurulumu konusunda bir teknik bilginiz yoksa, bu adımları takip etmek zor olabilir. Bu durumda, web hosting sağlayıcınızdan destek alabilir veya SMF topluluğunun forumunda yardım isteyebilirsiniz. Kurulum tamamlandığında, web sitesi için temalar ve eklentiler seçebilirsiniz. Birçok ücretsiz SMF teması ve eklentisi mevcut olduğundan, istediğiniz tarzda bir web sitesi oluşturabilirsiniz. SMF ile web sitesi oluştururken dikkat etmeniz gereken en önemli noktalardan biri güvenliktir. Güvenlik önlemleri almadan bir web sitesi yayınlamak, hassas bilgilerinizi tehlikeye atabilir ve site ziyaretçilerinizin güvenliği tehlikeye girebilir. Bu nedenle, SMF forumunun güvenlik önerilerini dikkatlice inceleyerek uygulamanız önemlidir. Son olarak, web sitesi yayına alındıktan sonra moderatörlük nasıl yapılır konusunda bilgi sahibi olmanız gerekebilir. SMF forumunun moderasyon özelliklerini detaylı bir şekilde inceleyerek, site yönetiminin nasıl yapılacağını öğrenebilir ve web sitesi ziyaretçileri ile etkili bir iletişim kurabilirsiniz.SMF Kurulumu Nasıl Yapılır? SMF kurulumu yapmak oldukça kolay bir işlemdir. İlk olarak, resmi SMF web sitesinden en son sürümü indirmeniz gerekmektedir. İndirdiğiniz dosyayı zipten çıkarttıktan sonra, sunucunuzdaki FTP istemcisine dosyaları yüklemeniz gerekmektedir. Bu adımdan sonra, domaininiz ile ilişkilendirdiğiniz sunucuda yüklediğiniz dosyaları bulun ve domain.com/install.php adresine gidin. Bu sayfada, size kurulum sihirbazı rehberlik edecektir. Bu sihirbaz size, veritabanı bilgilerinizi girmeniz gerektiği gibi, forumunuzun adını ve diğer ayarlamaları yapmanızı sağlayacaktır. Veritabanı için gerekli bilgileri girerek, adımları takip edin ve kurulumu tamamlayın. Bu adımlardan sonra artık SMF forumunuzu kullanmaya başlayabilirsiniz. Eğer herhangi bir sıkıntı veya hata ile karşılaşırsanız, SMF topluluğu ve belgeleri size yardımcı olacaktır. Kurulum sonrası gelen ekranların talimatlarını dikkatle takip etmeniz, sorunsuz bir kurulum için oldukça önemlidir. Artık SMF forumunuzu kurma konusunda bilgi sahibisiniz. Herhangi bir sorunla karşılaşırsanız, yazılımın resmi web sitesi ve topluluk sizin için vardır. SMF Tema ve Eklenti SeçimiSMF Tema ve Eklenti Seçimi SMF (Simple Machines Forum), kullanıcı dostu arayüzü
ve kullanışlı eklentileri sayesinde web sitesi sahipleri tarafından sıklıkla tercih edilen bir forum sistemidir. SMF kullanıcıları, forumlarını kişiselleştirmek ve kullanıcı deneyimini artırmak için geniş tema ve eklenti seçeneklerine sahiptir. SMF'de tema seçimi yaparken dikkat edilmesi gereken en önemli nokta, site ziyaretçilerinin konforunu ve görsel olarak hoşnutluğunu sağlamaktır. Kullanıcı dostu bir tasarımın yanı sıra, seo uyumlu ve hızlı yüklenen temalar tercih edilmelidir. Ayrıca, responsive (duyarlı) temaların seçilmesi, mobil cihazlardan erişim sağlayan ziyaretçilerin memnuniyetini artırır. Eklenti seçimi yaparken de, sitede sunulan hizmetlere ve kullanıcı ihtiyaçlarına uygun eklentiler tercih edilmelidir. SEO, güvenlik, sosyal medya entegrasyonu gibi farklı kategorilerdeki eklentiler, sitenin performansını artırmak ve kullanıcı deneyimini zenginleştirmek adına önemlidir. SMF kullanıcıları, forumlarını istedikleri gibi kişiselleştirebilmek adına geniş tema ve eklenti seçeneklerine sahip olmaları sayesinde, kullanıcılarının beklentilerini karşılayan zengin içerikli forumlar oluşturabilirler.SMF Forumunda Moderatörlük Nasıl Yapılır?SMF forumunda moderatörlük yapmak,forumda düzeni sağlamak ve kullanıcıların kurallara uymasını sağlamak için oldukça önemlidir.Bunun için öncelikle forum yöneticisinin moderatör olmanızı onaylaması gerekmektedir.Bu onayı aldıktan sonra moderatör panelinden giriş yapabilir ve moderatörün yetkilerini kullanabilirsiniz.Moderatör olarak forumdaki mesajları kontrol edebilir, kullanıcıların tartışmalarını yönetebilir ve istenmeyen içerikleri silme yetkisine sahip olabilirsiniz.SMF Güvenlik Önlemleri ve İpuçları SMF Güvenlik Önlemleri ve İpuçları kapsamında, SMF forumunun güvenliğini artırmak için bazı adımlar atmak çok önemlidir. İlk olarak, forum yazılımınızı ve eklentilerinizi düzenli olarak güncellemelisiniz. Güncellenmemiş yazılım ve eklentiler, forumunuzun güvenliğini tehlikeye atabilir. Ayrıca, güçlü bir şifre politikası belirleyerek kullanıcıların güçlü şifreler oluşturmalarını sağlayabilir ve düzenli aralıklarla şifre değişimini zorunlu kılabilirsiniz. Bu, forumunuzun genel güvenliğini artıracaktır. Diğer bir güvenlik önlemi ise, gereksiz eklentilerden ve temalardan kaçınmaktır. Her eklenti veya tema, forumunuzun güvenliğini tehlikeye atabilir. Yalnızca güvendiğiniz kaynaklardan eklenti ve tema indirmeli ve düzenli olarak güncellemelisiniz. Ayrıca, forumunuzu sürekli olarak izleyerek ve düzenli olarak logları kontrol ederek potansiyel güvenlik ihlallerini tespit edebilirsiniz. Bu şekilde, erken aşamada güvenlik sorunlarına müdahale edebilirsiniz. SMF forumunuzun güvenliğini artırmak için önemli adımlardan biri de yedekleme işlemidir. Düzenli olarak forum veritabanını yedekleyerek, olası bir veri kaybı durumunda verilerinizi koruyabilirsiniz. Son olarak, güvenlik duvarı ve güvenlik eklentileri kullanarak forumunuzu kötü niyetli saldırılara karşı koruyabilirsiniz. Bu önlemleri alarak, SMF forumunuzun güvenliğini artırabilir ve kullanıcılarınızın güvenliğini sağlayabilirsiniz. SMF forumunun güvenliği konusunda dikkat edilmesi gereken önemli noktaları ele aldığımız bu yazımızda, forumunuzun güvenliğini artırmak için alabileceğiniz önlemleri bulabilirsiniz. Güvenli bir forum deneyimi için bu önlemlerin düzenli olarak uygulanması büyük önem taşımaktadır. Kullanıcılarınızın ve forumunuzun verilerinin güvenliği için bu önlemleri göz ardı etmemenizi öneririz.
0 notes
Text
[solved] Wordpress keeps redirecting to install-php after migration
[solved] Wordpress keeps redirecting to install-php after migration
When you migrate a WordPress website from one server to another, it’s common to encounter issues such as redirects to install.php after the migration. This can occur due to a variety of reasons, such as incorrect database connection settings, mismatched site URLs, or corrupted WordPress core files. In order to fix this issue, you’ll need to troubleshoot and resolve the underlying causes of the…
View On WordPress
0 notes
Text
Nginx client intended to send too large body
The other day I’ve saw these error in my ngix log: 2023/09/22 08:15:29 [error] 141156#141156: *15 client intended to send too large body: 9921114 bytes, client: 127.0.0.1, server: two.one.mooo.com, request: "POST /wp-admin/update.php?action=upload-theme HTTP/1.1", host: "crushedge.comel.mooo.com", referrer: "http://two.one.mooo.com/wp-admin/theme-install.php?browse=popular" It turns out I need…
View On WordPress
1 note
·
View note
Text
Instalar GLPI en un servidor Ubuntu 18.04 LTS

Instalar GLPI en un servidor Ubuntu 18.04 LTS. GLPI es un paquete de gestión TI especifico para los departamentos de tecnología de cualquier empresa u organización, también está recomendado para comercios al por menor relacionados con la informática (permite el seguimiento de las reparaciones). El software se desarrolla en PHP, MySQL/MariaDB y Apache. Ofrece una gran cantidad de funciones, entre las que destacamos el inventario de hardware (computadores, monitores, software, impresoras, etc...), y las entradas / salidas de maquinas, junto con el seguimiento de las reparaciones. GLPI facilita el trabajo diario de los administradores, por ejemplo: en el seguimiento de trabajos genera notificaciones por correo electrónico, también permite crear una base de datos con toda la información de la topología de la red. A continuación vemos las principales características de GLPI (son muchas más): Inventario de computadoras, periféricos, impresoras de red y componentes asociados a través de una interfaz con OCS Inventory o FusionInventory. Gestión de problemas en diversos entornos a través de tickets, gestión de tickets, asignación, programación de tickets, etc... Gestión de licencias (compatible con ITIL). Asignación de equipos por área geográfica a usuarios y grupos. Información comercial y financiera (compras, garantía, etc...) Gestión del estado del equipo. Gestionar las solicitudes de asistencia de cualquier maquina del inventario. Interfaz de usuario para los tickets de soporte. Gestión comercial, de contratos y documentación de los artículos del inventario. Reserva de equipos. Gestión de preguntas frecuentes (FAQ). Excelente generador de informes: hardware, red e intervenciones técnicas (soporte). Soporte multilingüe para más de 70 idiomas. Puedes ampliar la información en este articulo anterior. En este instalaremos nuestro propio servidor GLPI sobre Ubuntu 18.04 LTS server.
Instalar GLPI en un servidor Ubuntu 18.04 LTS
Comenzamos instalando LAMP en nuestro servidor, para ello primero actualizamos el sistema e instalamos Apache. sudo apt update sudo apt install apache2 Una vez concluya la instalación de Apache, comprobamos el estado del firewall de Ubuntu (por defecto UFW). sudo ufw app list Ejemplo de salida valido... Available applications: Apache Apache Full Apache Secure OpenSSH Nos aseguramos que Apache Full habilita el tráfico en los puertos 80 y443. sudo ufw app info "Apache Full" En el caso de que no veas los puertos abiertos, ejecuta lo siguiente. sudo ufw allow in "Apache Full" Ahora instalamos el servidor MySQL. sudo apt install mysql-server Aseguramos la instalación. sudo mysql_secure_installation Lo que vamos a hacer es: Configurar la contraseña de root. Eliminar usuarios anónimos. Deshabilitar el inicio de sesión remoto para el usuario root. Borrar la base de datos demo y los accesos. Puedes configurar una password especifica o no, es tu decisión (normalmente como root, pulsa "Y"). En el resto de preguntas responde siempre "Y", esto eliminará los usuarios anónimos y la base de datos de prueba, deshabilitará los inicios de sesión remotos, y cargará las nuevas reglas para que MySQL aplique inmediatamente los cambios que hemos realizado. La base de datos ya esta configurada y lista para ser usada. Nos falta iniciarla (normalmente ya debería estar iniciada), y hacer que arranque con el sistema. systemctl start mysql systemctl enable mysql Creamos una base de datos para GLPI. #Nombre de la base de datos mysql> create database glpi; #Usuario y password mysql> grant all privileges on glpi.* to 'usuario'@'localhost' identified by 'tu_password'; mysql> flush privileges; mysql> exit Reiniciamos MySQL. systemctl restart mysql Para poder instalar nuestro servidor GLPI, solo nos falta PHP (por defecto se instala php 7.2 en su ultima versión). Realmente GLPI necesita pocos módulos. sudo apt install php libapache2-mod-php php-mysql php-gd Si el servidor es exclusivo para GLPI con el comando anterior es suficiente, si te planteas alojar otras aplicaciones o sitios web... instalamos php con más módulos. sudo apt install -y php libapache2-mod-phpsudo php-xml php-zip php-mysql php-curl php-mbstring php-json php-gd php-intl php-mcrypt php-xsl php-soap php-common php-readline php-cli php-opcache php-iconv php-sqlite3 Una vez instalado, reiniciamos Apache. systemctl restart apache2 Como punto final, actualizamos y reiniciamos el sistema. sudo apt update sudo apt upgrade reboot Instalamos GLPI en el servidor Debes asegurarte de instalar la ultima versión estable, hoy la "9.4.3". Antes de descargar el código fuente del software, revisa que versión está disponible en ese momento, pagina de descargas. wget https://github.com/glpi-project/glpi/archive/9.4.3.tar.gz Descomprimimos el archivo en /var/www, y accedemos al directorio. tar -xvzf glpi-9.4.3.tar.gz -C /var/www/ cd /var/www/glpi/ Concedemos los permisos necesarios. chmod -R 777 config/ chmod -R 777 files/ Ya estamos listos... Desde tu navegador web favorito accedemos a la instalación gráfica de GLPI. http://IP-del-Servidor/glpi Vemos como concluir la instalación de GLPI de forma gráfica (con imágenes de ejemplo reales). Al acceder por primera vez al servidor, te indica que selecciones tu lenguaje predeterminado.

Seleccionar el idioma en GLPI Quieres instalar o actualizar GLPI?, en nuestro caso instalar.

Instalar o actualizar GLPI Antes de comenzar la instalación se verifica que el sistema es compatible.

Verificar la compatibilidad de GLPI con el sistema Al pulsar en continuar nos solicita ingresar los datos de la base de datos, son los siguientes: Servidor SQL: Normalmente "localhost" o "localhost:3306". Usuario SQL: Nombre de usuario de la base de datos. Contraseña SQL: La password que insertamos al crear la base de datos.

Configurar la base de datos de GLPI Seleccionamos o creamos una base de datos para GLPI. Nosotros ya la generamos anteriormente, así que la seleccionamos.

Seleccionar o crear una base de datos para GLPI Solicita permiso para recopilar estadísticas de uso, el SI o el NO... es tu decisión. Ten cuidado, por defecto esta marcada la opción "Si enviar".

Recopilar estadísticas de uso Llegado este punto la instalación a concluido, en pantalla nos imprime los usuarios y passwords predeterminados de la aplicación. No olvides modificar estos datos inmediatamente. Administrador: glpi / glpi Técnico: tech / tech Usuario normal: normal / normal Solo lectura: post-only / postonly Usuarios y contraseñas predeterminados en GLPI Al intentar acceder a GLPI nos aparece la pantalla de login, inserta los datos predeterminados que vimos en la pantalla anterior.

Pantalla de acceso a GLPI Al acceder a GLPI por primera vez podrás observar dos advertencias, una te indica que modifiques las contraseñas por defecto, y la otra que por motivos de seguridad borres el archivo "install.php" contenido en la carpeta "install". Por ejemplo: rm glpi/install/install.php

Acceder por primera vez a GLPI Por ultimo, y para concluir este articulo, vemos una imagen con datos ya rellenados en GLPI.

Demo de GLPI Espero que este articulo sea de utilidad, puedes ayudarnos a mantener el servidor con una donación (paypal), o también colaborar con el simple gesto de compartir nuestros artículos en tu sitio web, blog, foro o redes sociales. Read the full article
#/var/www/#accederaGLPI#actualizarGLPI#Apache#apachefull#característicasdeGLPI#GLPI#hardware#InstalarGLPI#install.php#lamp#lts#mysql#navegadorweb#php#php7.2#servidorGLPI#servidorMySQL#ubuntu#Ubuntu18.04#Ubuntu18.04LTSserver
0 notes
Text
Simply install WordPress Offline Locally!
From the standard installation on a hosting, through a fully automated installation via the modules provided by your hosts, to the installation of WordPress locally, you will find in this tutorial, simple solutions to install WordPress Offline.
This article will detail one by one, these 3 installation procedures, you can click on the links in the list above to access the installation that interests you.
Install WordPress on Server
WordPress prides itself on being famous for its installation in 5 minutes! Beforehand, you must have to host with database and PHP, here are the minimum requirements:
PHP in a version greater than or equal to 4.3;
MySQL in version greater than or equal to 4.1.2;
Apache with the mod_rewrite module.
Go to www.wordpress.org and download the latest version of WordPress and unzip it to your hard drive, then create a database for WordPress on your server, so that MySQL has full access privileges and in modification. Upload WordPress files via FTP ( Filezilla ) to the desired location on the server:
If you want to place WordPress at the root of your domain (for example www. monsite. com/), move all the content of the unzipped WordPress directory (excluding the directory itself) to the root of your server ( usually www or web)
If you want to place your WordPress installation in a subdirectory of your website (for example: /monsite. com/blog/), rename the WordPress directory with the name you have chosen for the subdirectory and move to your server
From your web browser, launch the WordPress installation script:
If you installed WordPress on the root: /monsite,com/wp-admin/install.php
in the case of a sub-directory called blog: /monsite,com/blog/wp-admin/install.php
The installation itself:
The installation begins with the creation of the configuration file (wp_config.php). It is essential because it contains the various information that will allow PHP scripts to connect to the database to save and retrieve blog content (articles, pages, comments, etc.).
A prior warning indicates the procedure to follow in the event of problems related to permissions. It is precisely to avoid this kind of unfortunate situation that we must be vigilant in this area. In fact, sometimes the rights are not good. It is, therefore, necessary to go through the FTP and modify the rights in 755 or 777 during the installation, then go back to 644.
All information relating to the database is provided by the host. The table prefix proposed wp_ is generally kept, it is advisable to change it (according to your convenience) for security reasons.
Once this information is validated, WordPress confirms that it was able to create the configuration file and that the installation will be able to start.
An e-mail containing the address of the blog is automatically sent to the address indicated in the installation form, it is then possible to connect to the administration area accessible by the URL http: // mysite. com / wp-login.php
1 note
·
View note
Text
Wordpress localhost ampps alternative

#Wordpress localhost ampps alternative how to#
#Wordpress localhost ampps alternative install#
#Wordpress localhost ampps alternative update#
I had mega problems getting the XAMPP Server working locally, so I decided to try the WAMP. In “Step 5”, you say “With your browser go to Should this be: Thanks so much for your assistance! In “Step 4”, you say “…… the username is root, enter nothing between the ‘.’, and host……” What is the “enter nothing between the ‘…’ referring to? The password?ģ. In “Step 3″, you say ” Go to wamp / www”… This directory does not exist. (get “IE cannot display this webpage” error on this one. No luck on either front, as constant “The requested URL was not found on this server” errors.
#Wordpress localhost ampps alternative install#
Having endless problems with the install and have tried both Nicks and your directions. If you’re having a problem getting your WAMP or XAMPP server online, that’s a whole ‘nother issue, but check to make sure you’re not using IIS infact disable IIS if possible. Step5.)With your browser go to Hope that helps! New file structure will be wamp / Step4.)Unless you’ve changed the db username, password or host name then the db_name is whatever you created in Step 2, the username is root, enter nothing between the ‘.’, and host is localhost. Step 3.) Go to wamp / to a folder ( mysite) with only the content of the wordpress folder dumped directly into ( mysite). With WAMP installed (or XAMPP) your Step 3, 4 and 5 will look different then, our gracious host has suggested, with a MAMP install.
#Wordpress localhost ampps alternative how to#
In the next chapter, I’m going to show you how to create a custom WordPress theme in designer way (no PHP skill is required).įor anyone using WAMP (and possibly XAMPP, have not tested) who has any issues related to Step 3-5, here is your solution: With your browser, go to and follow the instructions to install WordPress.
#Wordpress localhost ampps alternative update#
Open wp-config.php and update the database details (db_name, user, password, host) according to your local server. In the folder, rename the wp-config-sample.php to wp-config.php. Go to the htdocs folder (where you installed the MAMP), extract the wordpress.zip to a new folder (eg. Go to and download the latest build of WordPress. In the phpMyAdmin page, create a new database (eg. Create a New DatabaseĪfter you’ve installed MAMP, run it and it should take you to the start page. I’m using Mac here, so I’m going to install MAMP. In order to run any PHP/database application on a local computer, you need a local host (ie. Run wp-admin/install.php and follow the instructions to install WordPress.īefore you start, let’s look at the requirements to run WordPress: Rename the wp-config-sample.php file to wp-config.php and update the database details according to your local server. Install a local server ( Mac: MAMP, PC: XAMPP or WAMP).ĭownload WordPress from and extract the files to a new folder under the htdocs folder. Here are the simplified steps on how to install WordPress on a local computer: If you have some technical background, you can skip the detailed steps in this tutorial. This tutorial is intended for beginners who want to learn how to run WordPress locally. You can also use the local version to test new plugins, themes, and upgrades. By doing so, it will save you time from updating and previewing files (so, you don’t have to frequently upload files on every change). In this chapter, you will learn how to install WordPress on a local computer. This is the first chapter of the Complete WordPress Theme Guide series.
0 notes
Text
404 not found nginx 1.4 6 ubuntu

I enabled the developer debug settings in config.php. When I click to continue, I'm taken to the /user/editadvanced.php?id=2 page, which fails to load styles and scripts. Next screen installs lots of things and appears to be successful. Install indicates all required and recommended PHP modules are installed successfully. Moodle and moodledata dir owned by same user that the php7-fpm process runs as. Notice: Undefined offset: 1 in /var/on line 62 PHP Notice: Undefined offset: 1 in /var/on line 62 Notice: Undefined index: SERVER_PORT in /var/on line 58
PHP Notice: Undefined index: SERVER_PORT in /var/on line 58 Notice: Undefined index: SERVER_PORT in /var/on line 57 PHP Notice: Undefined index: SERVER_PORT in /var/on line 57 Notice: Undefined index: HTTP_HOST in /var/on line 55 PHP Notice: Undefined index: HTTP_HOST in /var/on line 55 I won't post that HTML but here are the install.php errors: The command line install displayed these errors, then dumped the HTML of an install web page where one chooses the language. When I checked in firebug for their location to see them directly, the link resulted in an error. On the admin page, none of the icons appeared including the pencil icon. So, I can't seem to get beyond this point either. I tried variations of removing the contents of the localcache/mustache/ epoch time stamped directories (there are two), but the admin setup page continues to not allow the entering of passwords. I have moodle installed in /var/www/html/ domain-name/moodle and moodledata installed at /var/moodledata with the correct permissions. There also seems to be a css issue, to, because neither the styles nor css graphics (e.g. I have the same javascript errors reported above. Switching to the browser install, however, was straightforward until the page to create the master admin account. I am using nginx rather than apache because I have some Meteor development on this server.Ĭommand line installation did not work (php install.php dumped a set of errors then aborted).
Today, I installed 3.2.1 downloaded from the moodle site onto one of our Ubuntu 14 servers with php 7.1. I am having the exact same installation problem.
0 notes
Text
Easy TYPO3 installation: Manual & Composer methods!
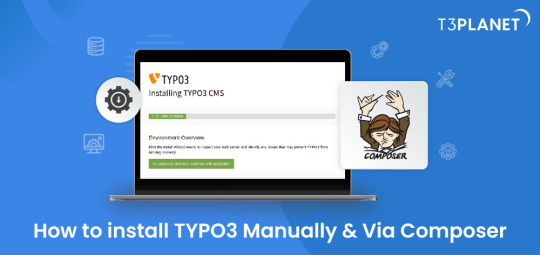
TYPO3 is the most secure, fast and robust CMS that is powered by easy installation which makes it easy for anyone to create a website. Leading TYPO3 web hosting providers facilitate quick and straightforward TYPO3 installations, typically requiring less than five minutes to set up.
In this Step by step Tutorial We are looking into how to install TYPO3 Manually and Via Composer .
Let's Look How?
System Requirement for installing TYPO3
It's essential to ensure the proper prerequisites for CMS installation are in place.
This process primarily necessitates two key components: a web server and a database server.
Operating System : Linux, Windows or Mac, or cloud infrastructure
Web Server : Apache httpd, Nginx, Microsoft IIS, Caddy Server ,
Supported Browser : Chrome (latest) , Edge (latest) , Firefox (latest) , Safari (latest)
Composer Requirement : Composer >= 2.1
Database : MariaDB >= 10.2.7 <= 10.5.99 Microsoft SQL Server MySQL >= 5.7.9 <= 8.0.99 PostgreSQL SQLite
Hardware Requirement RAM >= 256 MB
PHP Version Support PHP >= 7.4.1 <= 8.1.99
How to Install Via Composer
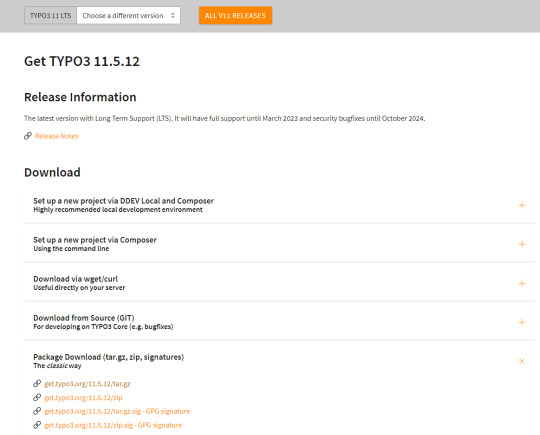
Step 1 Download TYPO3 From Website
The first step involves obtaining TYPO3 from its official website. You can acquire your preferred TYPO3 version from there.
2. Configure the Installation Files
Following Steps can be followed to setup the installation file of TYPO3.Begin by extracting the TYPO3 Zip file that you downloaded from TYPO3's official website. This will create a folder on your system containing all the necessary files for TYPO3.
Next, transfer these items to the server's designated folder Further , it is critical to decide the installation location for TYPO3. If you intend to Access it through main domains , this means you will need to Upload TYPO3 Files directly to public_html/ directory of your account..
However, if you have a different setup in mind, the location may vary accordingly.
there two different ways to transfer your records first is Utilising an FTP or second way of directly through cpanel account.
3.Initiate the Installation Process
To begin the installation process, generate a file named 'FIRST_INSTALL' within the same directory where you've uploaded your TYPO3 files.
This serves as a security checkpoint that grants permission to proceed with the installation. You can create this file using FTP or utilise the File Manager in your cPanel account.
4.Verification of System Requirements
To access the TYPO3 installation wizard, visit
“ https://www.MY_INSTALL.com/typo3/install.php." This tool is designed to facilitate the TYPO3 installation process, which consists of five phases.
In the initial phase, the tool conducts a thorough examination of your system environment. If any issues arise as a result of system settings, you can utilize the troubleshooting function to address them. If no problems are detected, you can continue with the installation process.
5.Configuring TYPO3 Setup
For Configuring TYPO3 Setup You can follow this steps :
You'll integrate the MySQL database. Log in using the username 'root,' and note that no password is necessary when using the XAMPP installer.
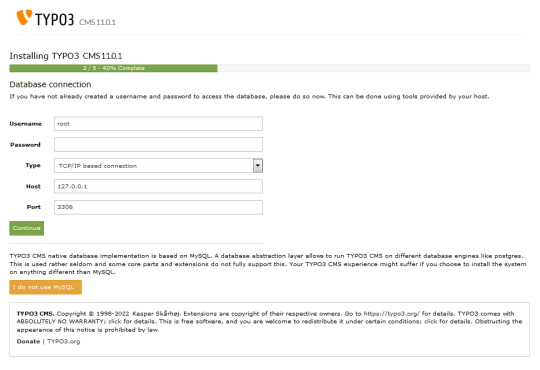
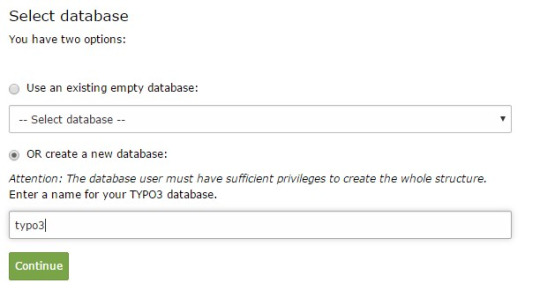
Next, you can either select an existing database or create a new one It's worth noting that you now have the option to use a different database implementation other than MySQL.
Next, you'll create an admin user for the TYPO3 backend. The password you set for this user will also be utilised for the install tool.
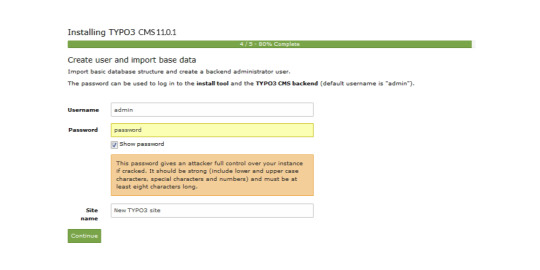
Now the installation itself is completed.
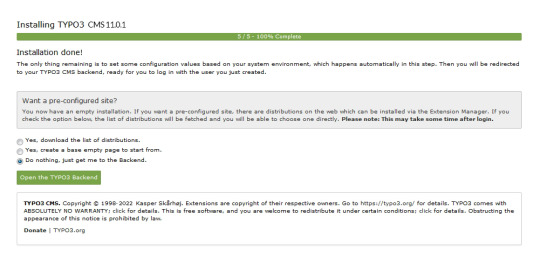
Lastly , the installation wizard finalises by automatically adjusting certain configurations to match your system environment.
However , You still have the option to choose whether TYPO3 will create an empty website or remain inactive temporarily.
By selecting 'Open the TYPO3 Backend,' you'll access the admin area, where you can log in using the account you just created.
Congratulations ! You have Completed and installed TYPO3 manually .
Install TYPO3 Via Composer Mode
For detailed instructions on installing TYPO3 using Composer, you can find a comprehensive step-by-step guide here: How to install TYPO3 - Manually & Via Composer
0 notes
Text
phpBB'nin tanımı nedir?phpBB, PHP ile yazılmış açık kaynaklı bir forum yazılımıdır. Bu yazılım, forum toplulukları oluşturmak ve yönetmek için kullanılır. Kullanıcıların iletişim kurmasını sağlar ve farklı konular hakkında tartışmalar yapmalarına olanak tanır.phpBB, PHP programlama dili ile yazılmış olduğu için web sitesi barındırma hizmeti veren herhangi bir sunucuda çalıştırılabilir ve MySQL, PostgreSQL veya MS SQL Server gibi veritabanlarıyla uyumludur.phpBB forum yazılımı, genişletilebilir özelliklere sahiptir ve kullanıcı dostu bir arayüze sahiptir. Ayrıca, kullanıcıların mesajları yönetmelerini, forumlar oluşturmalarını ve moderatörlerin forumu yönetmelerini sağlayan bir yönetim paneline sahiptir.Açık kaynak kodlu olması nedeniyle, phpBB forum yazılımı, topluluk geliştiricileri tarafından sürekli olarak geliştirilmekte ve güncellenmektedir. Bu da forum sahiplerinin ihtiyaçlarına uygun şekilde özelleştirilebilir olmasını sağlar.phpBB'nin özellikleri nelerdir? phpBB, web tabanlı bir forum yazılımıdır ve birçok özelliği bulunmaktadır. Bunlardan ilki, kullanıcı dostu arayüze sahip olmasıdır. Kullanıcılar forumu rahatlıkla kullanabilir ve istedikleri konular hakkında kolayca bilgi alabilirler. Ayrıca phpBB, genişletilebilir bir yapıya sahiptir. Bu da forumu istenildiği gibi özelleştirmek için geniş bir alan sunar. Ayrıca phpBB, güvenlik konusunda oldukça hassastır. Yapılan güncellemelerle sürekli olarak güvenlik açıkları kapatılmakta ve kullanıcı bilgilerinin güvenliği sağlanmaktadır. Arama motoru dostu bir yapıya sahip olan phpBB, SEO çalışmaları için de oldukça elverişlidir. phpBB'nin en büyük özelliklerinden biri ise ücretsiz bir yazılım olmasıdır. Kullanıcılar herhangi bir ücret ödemeden bu forum yazılımını kullanabilir ve istedikleri gibi özelleştirebilirler. Ayrıca, geniş kullanıcı topluluğu sayesinde destek ve yardım almak oldukça kolaydır. Son olarak, phpBB, mobil cihazlara uyumlu bir yapıya sahiptir. Bu sayede kullanıcılar istedikleri her yerden forumu takip edebilir ve görüşlerini paylaşabilirler. Tüm bu özellikler phpBB'yi diğer forum yazılımlarından ayıran özelliklerdir. phpBB kurulumu nasıl yapılır?phpBB, kullanıcı dostu bir forum yazılımıdır ve kurulumu oldukça kolaydır. İlk adım olarak, phpBB web sitesinden son sürümü indirin ve sıkıştırılmış dosyayı bilgisayarınıza kaydedin. Daha sonra, sunucunuza veya barındırma hizmetinize FTP istemcisi kullanarak dosyaları yükleyin. Dosyaları yükledikten sonra, sunucunuzdaki install klasörüne gidin ve install.php dosyasını tarayıcıda açın.phpBB'nin web tabanlı kurulum sihirbazı başlayacak ve size yönergeler sunacaktır. İşte burada, veritabanı ayrıntılarını girmeniz gerekecek. Veritabanı adı, kullanıcı adı, şifre ve veritabanı sunucusu gibi bilgileri girdikten sonra, kurulum sihirbazı veritabanı tablolarını oluşturacak ve config.php dosyasını oluşturmanızı isteyecektir.Config dosyasını oluşturup, tüm ayrıntıları doğru bir şekilde doldurduktan sonra, kurulum sihirbazı size forumunuzun adını ve yönetici hesabını oluşturmanızı isteyecektir. Bu bilgileri girdikten sonra, phpBB'nin kurulumu tamamlanmış olacaktır ve forumunuzu kullanmaya başlayabilirsiniz.phpBB'nin kurulumu oldukça basittir ve adımları takip ettiğiniz sürece herhangi bir sorunla karşılaşmazsınız. phpBB'nin resmi web sitesinde daha ayrıntılı kurulum rehberi bulunmaktadır ve bu rehberi incelemeniz, kurulum sürecindeki herhangi bir sorunu çözmenize yardımcı olacaktır.phpBB'nin tema ve stil seçenekleri phpBB, birçok özelleştirilebilir tema ve stil seçeneği sunan ücretsiz bir forum yazılımıdır. Bu seçenekler sayesinde forumunuzu istediğiniz gibi kişiselleştirebilir ve kullanıcı deneyimini artırabilirsiniz. Tema seçenekleri arasında genellikle renk, düzen ve font seçeneklerini değiştirebileceğiniz birçok farklı seçenek bulunmaktadır. Kullanıcılar, forumlarını istedikleri konsepte uygun hale getirebilmek için birçok farklı temayı ücretsiz olarak indirebilir veya satın alabilirler. Stil seçenekleri ise genellikle forumun görünümünü değiştirme seçeneklerini içerir.
Bu seçenekler arasında forumun logosunu, gönderi düzenini, kullanıcı profillerini ve diğer birçok öğeyi özelleştirebilirsiniz. phpBB'nin tema ve stil seçenekleri sayesinde forumunuzun benzersiz ve kullanıcı dostu bir görünüme sahip olmasını sağlayabilirsiniz. Bu seçenekleri kullanarak forumunuzun markalaşmasını güçlendirebilir ve kullanıcıların forumu çok daha etkileyici bulmasını sağlayabilirsiniz. phpBB'nin yönetim paneliphpBB'nin yönetim paneli, bu platformda bir forumun nasıl yönetileceğini kontrol etmek için kullanılan bir araçtır. Kullanıcılar, forumun görünümünü, izinlerini, moderasyonunu ve diğer pek çok özelliğini yönetim paneli üzerinden ayarlayabilirler.Yönetim paneli, phpBB forum yazılımının en güçlü ve esnek özelliklerinden biridir. Kullanıcılar, forumlarını istedikleri şekilde yapılandırabilir ve yönetebilirler. Bu da onlara tam kontrol sağlar.phpBB'nin yönetim paneli, kullanıcı deneyimini geliştirmeye yönelik birçok seçenek sunar. Örneğin, kullanıcılar forumlarında spam'ı azaltmak için CAPTCHA'yı etkinleştirebilir veya tarayıcı bildirimlerini kullanarak kullanıcıları etkinlikler hakkında bilgilendirebilirler.Sonuç olarak, phpBB'nin yönetim paneli kullanıcıların forumlarını kolayca yönetebilmeleri için güçlü bir araç sağlar ve istedikleri şekilde özelleştirebilme imkanı sunar.phpBB'nin popüler eklentileri phpBB'nin popüler eklentileri dünyanın en popüler açık kaynaklı forum yazılımı olan phpBB'nin işlevselliğini arttıran ve kullanıcı deneyimini geliştiren eklentilerden oluşmaktadır. Bu eklentiler genellikle ücretsiz olarak sunulmakta ve forum sahiplerinin ihtiyaçlarına göre özelleştirilebilmektedir. Son Mesaj Gösterimi eklentisi, forum ana sayfasında en son gönderilen mesajları göstermek için kullanılır. Bu sayede kullanıcılar son etkinliği hemen görebilir ve ilgi çekici konulara hızlıca erişebilirler. Reklam Yönetimi eklentisi, forum sahiplerine reklamları kolayca yönetme imkanı sunar. Bu eklenti sayesinde farklı reklam türleri eklenip düzenlenebilir ve istenmeyen reklam içeriği engellenebilir. Avatar Galerisi eklentisi, forum üyelerinin profil resimleri için geniş bir avatar seçeneği sunar. Kullanıcılar, kendi zevklerine ve kişiliklerine uygun bir avatar seçerek forumda daha kişisel bir deneyim yaşayabilirler.
0 notes
Text
百度网盘解析源码,PanDownload,网页版源码
支持账号在线监测是否正常! 上传源码至服务器绑定域名(和其他网站搭建差不多)然后输入:域名/install.php安装并填写一些基础信息这些可以数值可以看GitHub里的获取教程“BDUSS” “STOKEN” (这些非常重要)后台:域名/settings.php 单个资��可直接支付即可下载 如需要下载多个资源开通会员更划算 可享受全站资源免费下载 会员权益介绍
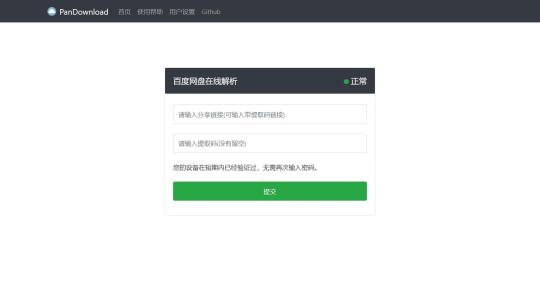
View On WordPress
0 notes
Text
خطوات تصميم موقع الكتروني متكامل

ليس من غير المألوف أن يختار معظم الناس WordPress لأنه أسهل منصة لجميع لغات وأدوات البرمجة ،وهو أرخص. ومن المفيد أيضًا ألا يحتاج المستخدم إلى معرفة البرمجة و HTML وغيرها ،بالإضافة إلى سهولة استخدامه.
كيفية تصميم موقع
المرحلة: تطوير هيكل واضح لموقعك. حدد الصفحات التي تريدها ،وقم بتطوير هيكل لموقعك. يجب أن يشمل ذلك الصفحات الرئيسية وصفحات الفئات والصفحات الفرعية. الإجراء: حدد الصفحات التي تريد إنشاءها: 1. صفحة الفئة. أو 2. صفحات للمنتجات الجديدة.
الاشتراك في خدمة
الخطوة الأولى اللازمة لتصميم موقع على شبكة الإنترنت هي تسجيل اسمه ،والاشتراك في خدمة تربط الموقع بالإنترنت ،ومن خلال خوادمه يتم حفظ جميع محتويات الموقع من صور وفيديوهات ونصوص وغيرها. .
التسجيل في خدمة ما ليس مجانيًا ،وعليك البحث عما يناسبك من حيث السعر والعوض. تقدم Bluehost خدماتها بتكلفة 2.75 دولار شهريًا.
بعد التسجيل يجب عليك تحديد اسم للموقع ،ويمكنك القيام بذلك بناءً على ما تريد ،وما تشعر به يعكس الغرض من الموقع. كذلك ،تجنب النهايات الغريبة مثل الشبكة. org. أو com. لأن هذه هي النهايات الأكثر اختيارًا.
أخيرًا سيُطلب منك إدخال اسمك وبيانات عنك ،ومستوى التكاليف الأخرى للموقع ،والخطوة الأخيرة هي تعيين كلمة مرور لحسابك والتحقق منها عبر البريد الإلكتروني ،ثم تسجيل الدخول إلى حسابك الجديد في الخدمة التي اخترتها.
تجهيز الموقع
الآن ،يجب عليك تثبيت WordPress أو المنشئ الذي تختاره على موقعك ،وهذه الخطوة سهلة للغاية ،في لوحة تحكم حسابك داخل الخدمة ،ستجد نقرة زر لتثبيت الأداة التي تختارها ،و بالطبع لا بد من تحديد اسم الموقع بعد اختيار الأداة المناسبة.
يعتقد بعض الخبراء أن تنزيل الأداة على موقع الخدمة كان اختصارًا ،ولكن على أي حال ،يمكنك تنزيل الأداة يدويًا عن طريق تنزيلها من الموقع ،ثم البحث عن ملف باسم
wp-config-sample.php أو شيء من هذا القبيل ،وأدخل معلومات الموقع فيه ،فأنت بحاجة إلى برنامج
حدد ~ 1 1/2 "~ 2" فروع وأوراق قطرها. اختر أغصانًا ذات حواف مستديرة وناعمة وليست خشنة أو مدببة. اختر الأوراق التي يبلغ حجمها 2 بوصة
yourdomain.com/wp-admin/install.php
(بالطبع استبدل yourdomain باسم موقعك)
تصميم الموقع
حدد أوراق صغيرة ونابضة بالحياة. ابحث عن الأوراق التي تكون مشرقة في اللون، ولكنها ليست كبيرة للغاية. الأوراق يمكن أن تكون أي حجم، طالما أنها ليست كبيرة جدا أو مشوهة.
هنا سيتم تحديد شكل وألوان وتصميم موقعك ،ومن الجيد أن تكون جميعها مصممة مسبقًا من قبل خبراء التصميم ،ويمكنك الحصول عليها مجانًا ،والأمر متروك لك إذا كنت ترغب في شراء تصميم خاص لموقعك من خدمات أخرى ،وعلى أي حال ،فإن تثبيت السمة سهل للغاية بضغطة زر (يمكنك تغيير السمة لاحقًا دون فقد محتوى الموقع).
https://wuzzuf.net/a/Web-Design-Jobs
0 notes
Text
Dokuwiki でサイドバーにインデックスメニューを表示するまで
Dokuwiki を使ってプラグイン「indexmenu」をインストールし、サイドバーに全体の構成を表示するまで Dokuwiki のサイトからダウンロード。 ※ ダウンロードする際、Janguagesを日本語だけにし、左下の「start download」をクリック。 解凍したフォルダを例えば、「CakePHP4 のセットアップからlocalhostでのMySQLへのデータベース接続まで」でセットアップしたwebrootに移動し、フォルダ名を例えば「doc」とする。 初期セットアップのために http://localhost:8765/doc/install.php へアクセスする。 スーパーユーザーを作成してログイン。 管理>検索とインストールで「indexmenu」と入れて 作者Samuele Togniniの IndexMenu Plugin をインストール URLに…
View On WordPress
0 notes
Link

Install #Ludo League App & play game with real players and win cash.
#playludogame #onlineludogame #realcashludogame #realmoneygame
0 notes