#it contained 1/2 cup of soy and 1/3 cup of Brown sugar
Explore tagged Tumblr posts
Visit Tumblr Blog
Explore Tumblr blogs with no restrictions, modern design and the best experience.
Last Seen Tumblr Blogs


Fun Fact
Tumblr has been providing a Korean-language service since 2013.
Text
i am slow cooking the most delicious of concoctions in the kitchen rn
(my tags are so long lol whole half ass recipe down there)
#idk its some bastardized recipe for something called mongolian beef#well can it really be called bastardized when i actually fuckin improved it#like all there was originally was fucking soy sauce garlic brown sugar and onion#LITERALLY NO SEASONING#so i took my earned skills and actuallly made it good#the sauce is now flavorful and doesnt taste like garlic soywater#(the meat gets slow cooked in the sauce thats how i know how the sauce tastes)#added a teeny bit of mustard powder and cumin(half TBsp) added some ginger and onion powder(TBsp) and upgraded garlic to black garlic(TB)#it contained 1/2 cup of soy and 1/3 cup of Brown sugar#also replaced the water with beef broth(half cup)#theres also some oil(i did reg Veggie oil cause i dont like Sesame/ 1TB)#you serve ontop some seasoned/fried rice and mixed peppers/veggies thatve been lightly seasoned and fried in a skillet#the meat(1 1/4 Lb.) gets cleaned and sliced into strips#you leave the strips in a heavy salt solution to leach it/tenderize it(you can use other methods but this was what i had on hand) then rins#(you leave it in the solution for ATLEAST 30 minutes)#pat the strips down dry and using a 1/4 cup of Corn starch you coat the strips entirely#you then put the meat into your sauce and stir it around until the meat is entirely covered in it#then slow cook for however long you want(im doing 8 hours for some REAL tender shit)#alot of these measurements were eyed balled (except starch and liquids)[im skilled at this]#i will update yall once ive tasted the finished product#i went a little light on the seasoning but i dont have certain ingredients i want/can obtain so i had to make do(plus my parents cant shiit#DO NOT ADD EXTRA SALT TO THE DISH#leaching the meat and the soy sauce already has enough salt content#THE STARCH IS NECESSARY PART OF THE DISH#you can achieve black garlic by slow cooking regular garlic FOR WEEKS#longer = better#also i recommend using minced Ginger instead of powder for better flavour
5 notes
·
View notes
Text
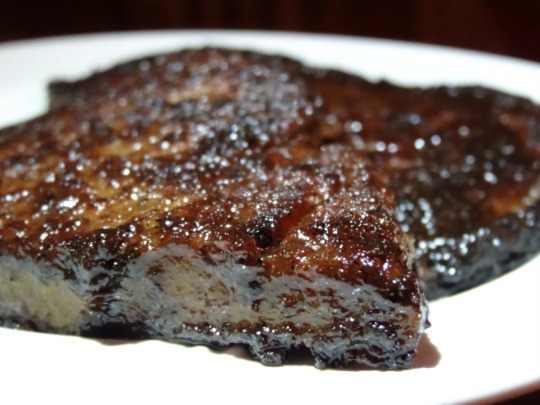

[ID: First image is of two dark brown glazed lamb chops. Second image is a close-up; one of the chops has been cup open to show a pink interior. End ID]
Seitan lamb chops
This vegan meat can be used as a substitute for lamb chops or rack of lamb. Like well-cooked lamb, it is fine-grained, moist, subtly sweet, and meltingly tender. Once simmered it is ready to be seared, breaded, fried, or sliced, and included in your favorite recipes.
The seitan is made using the washed flour method, which kneads dough in water to separate the gluten from the starch: this allows you to control how much starch you leave alongside the gluten in the dough, and thus how tender versus chewy your final cut of meat will be. This recipe makes a dough that leaves more starch in than most seitan recipes do, and then kneads the dough again to distribute that starch into an even, fine grain. A simmer in a spiced, aromatic broth leaves the final product tender, moist, and flavorful all the way through; the broth is then cooked down to a glaze.
The spices called for in this recipe are geared towards replacing lamb in Palestinian recipes, but they can easily be swapped out to complement the flavor profiles of other dishes.
Recipe under the cut!
Patreon | Tip jar
Makes 4 large lamb chops.
Ingredients:
For the dough:
720g bread flour (or any white wheat flour with at least 12% gluten)
About 2 1/4 cups water
For the dry flavoring mix (scaled to 455g dough yield):
2 tsp (7.5g) ground sumac
1 3/4 tsp (5.25g) onion powder
1 tsp (4g) kosher salt (1/2 tsp table salt)
1 tsp (5.5g) vegetarian granulated sugar
1 tsp (2.5g) black peppercorns, toasted and ground
3/4 tsp (2g) caraway seeds, toasted and ground
3/4 tsp (3g) garlic powder
3/4 tsp (2.5g) ground turmeric
3/4 tsp (2g) cumin seeds, toasted and ground
3/4 tsp (1.5g) aniseed, toasted and ground
1/2 tsp beet powder; or 5 drops red + 1 drop green food coloring
1/2 tsp (2.5g) MSG (optional)
To fry:
4 tsp vegan margarine or ghee (سمنة), divided
4 tsp olive oil, divided
For the simmering broth:
2 Tbsp soy sauce (I used Chinese aged soy sauce)
1 Tbsp red tahina
2 tsp miso paste (preferably red)
2 tsp pomegranate molasses
2 tsp vegetarian 'beef' stock concentrate (optional)
1 small yellow onion, quartered
2 cloves garlic, crushed
1 bay laurel leaf
1 stick cinnamon bark
5 allspice berries
5 green cardamom pods, crushed
2 cloves
1/2 tsp black peppercorns
1 tsp vegetarian granulated sugar
Several cups water
Instructions:
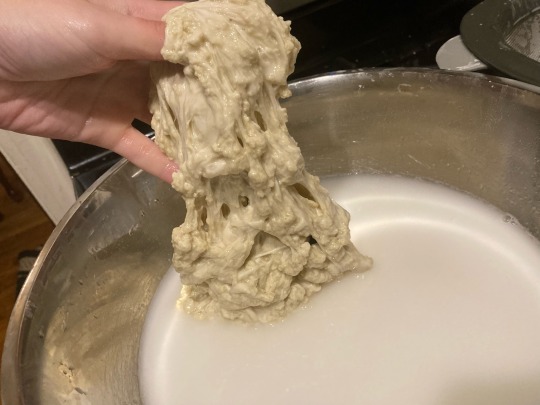
To wash the flour:
To make seitan using the washed flour method, a dough is first made out of flour and water; then, the dough is washed in water multiple times. The water carries off the starch, leaving the gluten behind.
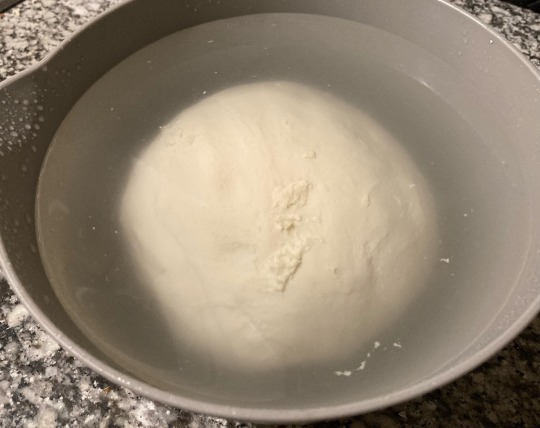
1. Make the dough. Mix flour and water in a large mixing bowl until dough comes together. Knead for several minutes, and then cover the dough and allow it to rest for another 10-15 minutes to develop gluten. After resting, the dough should be very smooth, elastic, and stretchy.

2. Soak the dough. Fill the bowl with enough cool water to cover the dough, and let it soak for about an hour. This allows gluten to continue developing.
3. First wash. Leave the soaking water in the bowl, and begin to knead the dough with your hands under the water. Repeatedly pull, stretch, fold, and press the dough for several minutes to knead, occasionally using your fingertips to break through and shred or mangle the dough as you pull. Soon, the water should be a thick, opaque white.
4. Drain the dough. Set up a colander over a very large container, and pour the contents of your mixing bowl through. You can also just pour the starchy water down the sink if you don't have plans to use it (to make liangpi noodles, or dumpling wrappers, or any of the recipes out there for vegan bacon using wheat starch...).
At this point, you will see two distinct substances in the dough: the gluten, which is thin and stringy and feels rubbery when pinched, and the starch, which is thick and 'globby' and feels soft when pinched, offering no resistance. We want to wash the flour a few times until most of the starch has been removed, and there are only some small globules interspersed throughout the stringy gluten.
5. Second wash. Return the dough to your mixing bowl and fill it with fresh cool water. Knead and pull the dough for another few minutes, until the water once more turns opaque. There should be fewer large areas of starch in the dough, and more development of the gluten strands. Drain the dough again (just like in step 4).
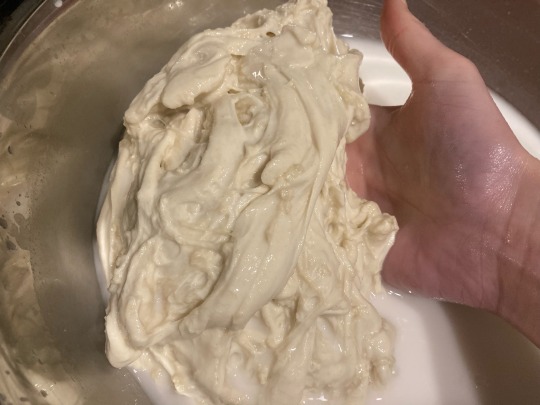
6. Third and fourth wash. Repeat this process another time or two, until the starch globules are about 20% of what you see, and the gluten is around 80%. For the last wash, the water should be a bit less opaque with starch than it was for the first one, but it should be more than a bit cloudy. You should see your fingers when you cup some of the water in your hand, but not the bottom of the bowl.

After the third wash
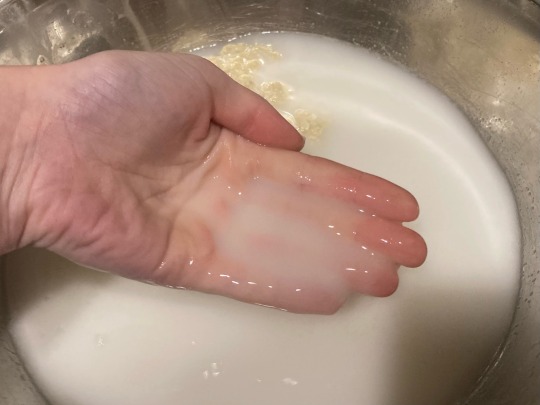
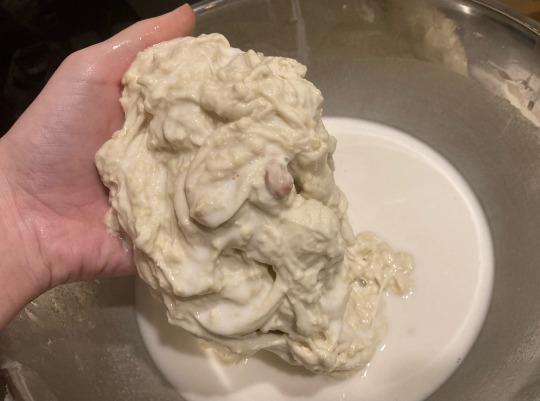
After the fourth wash
7. Drain the dough. Drain the seitan again and allow it to continue draining, flipping over once, until it is noticeably less wet. Squeeze the dough to remove any extra water or starch on the surface.
You now have your washed flour! This will be the base for the rest of the recipe. I had 455g of dough at this point.
To finish the dough:
1. Add all dry ingredients to the dough and knead again to distribute evenly; or use a blender for about 30 seconds until everything is well-incorporated and the gluten strands are visible.
2. Pull the dough into a single long, thick strand, and then tie it into a couple knots. Do this a few times to build structure.
To cook:
The dough will first be seared to develop a crust, then simmered to infuse it with more flavor. After a rest in the simmering liquid, it is seared again to re-crisp, then tossed in the thickened liquid to form a glaze.
1. Divide dough into four pieces. In a large skillet, heat 2 tsp of margarine and 2 tsp of olive oil (or use all olive oil). Add dough pieces and push flat with a spatula. Fry, turning as needed and intermittently pressing flat with the spatula, until the surface is browned and crispy.
2. Mix liquid simmering ingredients together and whisk to combine. Pour over browned chops and add whole spices and aromatics. If necessary, add more water to cover.
3. Slowly bring simmering liquid up to a bare simmer. Don't let it come to a rolling boil, which could produce a spongey texture.
4. Cook at a very low simmer, uncovered, for 20 minutes, stirring occasionally. Remove from heat and allow to soak in the simmering liquid (including spices and aromatics) for at least an hour in the fridge, or overnight.
This is a good place to stop for the night if you want to make these ahead of time.
5. Remove lamb chops from liquid. In a large pot or deep skillet, bring simmering liquid (including spices and aromatics) to a boil, uncovered, until considerably reduced.
6. Strain to remove whole spices and aromatics. Return to pan and continue to reduce until thickened to a glaze-like consistency.
7. In a clean skillet, fry lamb chops again in remaining margarine and oil until browned and crispy. Add glaze and cook, flipping and agitating occasionally, for a couple minutes until coated.
Serve immediately over rice or frika (فريكة / freekeh), topped with fried pine nuts, alongside plain cultured soy yoghurt, pickles, olives, and a side salad, etc.
153 notes
·
View notes
Text
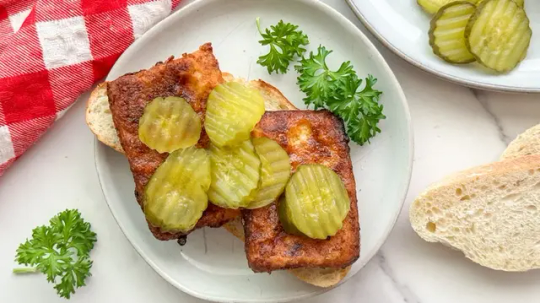
Crispy Nashville Hot Tofu
Ingredients 1 (16-ounce) package extra firm tofu 3 tablespoons brown sugar 1 teaspoon cayenne pepper 1 teaspoon garlic powder 1 teaspoon smoked paprika ½ teaspoon pepper ½ teaspoon salt ½ cup dill pickle juice 2 tablespoons nutritional yeast ½ teaspoon liquid smoke ¾ cup soy milk 2 tablespoons hot sauce ¾ cup all-purpose flour 1 teaspoon baking powder ½ cup vegetable oil 4 slices white bread ½ cup sliced dill pickles
Directions Press the tofu either by using a tofu press or by placing it into a shallow bowl and putting a flat plate on top, then stacking something heavy on top of the plate.
Let it sit for 20 minutes, then discard the water that has collected on the plate. Make the Nashville hot seasoning by combining the brown sugar, cayenne pepper, garlic powder, smoked paprika, pepper, and salt.
Make the tofu marinade by combining the pickle juice, nutritional yeast, liquid smoke, ¼ cup water, and 1 ½ tablespoons of the Nashville hot seasoning.
Slice the tofu into 8 slices (crosswise) and place into a container with a lid. Pour the marinade into the container and marinate for 1 hour, shaking a few times.
In a shallow bowl, combine the milk with the hot sauce.
In another shallow bowl combine the flour, 2 teaspoons of Nashville hot seasoning, and baking powder.
Dredge the tofu slices in the milk mixture then in the breading mixture, setting each dredged slice onto a parchment-lined baking sheet.
Add the oil to a skillet over medium-high heat. Place the tofu slices in the skillet and cook for 4 minutes on each side. Work in batches if necessary.
Add the leftover cooking oil to a glass bowl along with the remaining hot seasoning and stir to form a paste. Spread the seasoned paste over the tofu.
Serve the Nashville hot tofu with white bread and pickles.
#honestly i would like to try this for chicken as well but#i am rarely enthusiastic about buying/cooking meat#would love to have someone else make it for me though!!!!!#anyway#recipes to try#tofu#brown sugar#cayenne#garlic#smoked paprika#dill pickle juice...................#that's a valuable commodity#nooch#liquid smoke#soy milk#hot sauce#bread#pickles
23 notes
·
View notes
Text
juls's super easy sweet coconut curry for when you're sick
note: this is super easy because i have curry paste and an instapot and a rice cooker. if you don't have these things on hand. well like, you can still make it, but it may not be super easy sick food for you
1lb chicken (approx)
1/3 cup of sugar
1 tbsp red curry paste
2 tbsp fish sauce
1 can coconut cream (trader joe's recommended)
cashews, unsalted
separately, rice
(there's a version of this where you brown the chicken first. the super easy version is not that version.)
okay so get your instapot. you can make this in a big one or a small one. i just started a double batch in my baby instapot.
Put in the can of coconut cream. (Tj's is recommended because it is just coconut and water, no thickeners. if you don't have ibd or some shit and thickeners don't bother you, use whatever.) Note: you can also use coconut milk if you and thicken it with like a teaspoon or two of cornstarch, but due to the nature of pressure cookers you can't add the cornstarch until after you cook, or the instapot won't reach pressure.
Add the sugar. Other people who may have originated this recipe kept dicking with the amount because "oh it's too sweet" they ended up working in eighths of a cup who even has eighths of a cup. Fuck that, I like it sweet, I'm sick, it's comfort food, 1/3 cup measure is easy to find.
Add the red curry paste and fish sauce. Note: the original amounts on this were 2tsp red curry paste and 1.5tbsp fish sauce. This was changed because using a tablespoon measure for both is easier and also stronger flavors are better when you're congested. If you think this might be too spicy for you, go easy on the red curry paste. If for some ungodly reason you are trying to recreate this from scratch, red curry paste contains: red chilis, lemongrass, galangal, garlic, coriander, cumin, shallots, lime zest, and usually shrimp paste but mine's kosher. Fish sauce is a mixture of soy sauce and fish so you can use like a tablespoon of soy if you don't have fish sauce, and maybe like a dash of worcestershire (the closest western equivalent to fish sauce, though it is considerably more gussied up).
Give the mix a good stir. This is not strictly necessary but I'm always paranoid about chunk of curry paste won't separate. I also turn the instapot on saute mode at this point because heat gets things moving.
Cube the chicken and add it to the pot. Or if you bought pre-diced, good on you. I prefer breasts to thighs because I think they're easier to chop up. Also I've discovered that if you're pulling chicken out of the freezer, you do not have to thaw it 100% it is actually easier to cube if it's half-frozen.
Add cashews. I will be honest, I've never measured this. Somewhere between half a cup and a whole cup? You do not want there to be more cashews than chicken but otherwise go wild. If you only have salted cashews, wash them in a strainer first. They will get soft. That's fine, they'll get super soft in the curry. If you wanted a crunch instead, try peanuts, they hold their form better.
Close the instapot and set it to meat/stew.
Make some rice. Maybe like a cup and a half before cooking? Tbh I've never totally figured out how to match the rice to the curry to make them run out at the same time. The curry makes 4-5 servings if that helps.
In like an hour you will have food.
34 notes
·
View notes
Text
Cooked: 03/21/2025
Note: I rarely don't eyeball measurements when I'm cooking, so I'm sorry for some lack of exact measurements here
Asian-American Comfort Fusion Trio (Gluten Free)


Chinese BBQ Roasted Porkchops This twist on an American classic, smothered pork chops, is just as comforting and tasty, while sporting flavors akin to a combination of Chinese honey barbecue pork/char siu and Peking duck.
Special Equipment Required:
meat thermometer
large baking dish with raised sides
pastry/basting brush (can also use a spoon, it'll just be more difficult)
Ingredients:
3 thick-cut, bone-in pork chops
Dry Brine: one part coarse kosher salt, one part Chinese five spice powder
Wet Brine: one part Michiu rice wine, one part Taiwanese black vinegar, crushed ginger, crushed garlic
Dry Rub: Old Bay seasoning
Barbecue Sauce: ~ 3 tbsp (dark) brown sugar ~ 1 tbsp thick black bean soy sauce 1/4 cup soy sauce 1 tbsp brown Dijon mustard (smooth) 2 tsp smoked paprika 2 tsp five spice powder 3 tbsp Michiu rice wine (after deglazing*)
Process:
pat pork chops dry and tenderize evenly by pricking with a fork on both sides
apply and pat in enough Dry Brine to lightly coat the meat; add to a sealable container and add Brine, again enough to cover the meat, and rest in the fridge for about 8 hours or overnight
after brining, pat dry and lightly dust with Old Bay seasoning
pre-heat a lightly oiled pan to medium-high and sear pork until a light crust has formed; remove from the pan and place in a lined baking dish with raised sides (I prefer doing a layer of foil then a layer of baking parchment for easy cleanup; I also make sure that I line the sides of the dish as well)
remove the pan from heat and *deglaze with the Michiu set aside for the Barbecue Sauce; once you've deglazed you can add the cooking wine to the Barbecue Sauce and combine
preheat the oven to 350*F/177*C and slather pork chops in Barbecue Sauce (there should be enough to cover the chops and have a thin layer pooling in the dish); let the pork chops roast for 20 minutes on the middle rack before starting the basting process.
for the basting process, every 5 to 7 minutes, flip the pork chops and baste with the slowly reducing sauce using a brush or spoon; continue roasting and basting until the pork chops hit 145*F/63*C near the bone, using a meat thermometer
once done, remove from the oven and allow it to rest in the baking dish, covered with foil, for at least 20 minutes before sprinkling with sesame seeds and serving


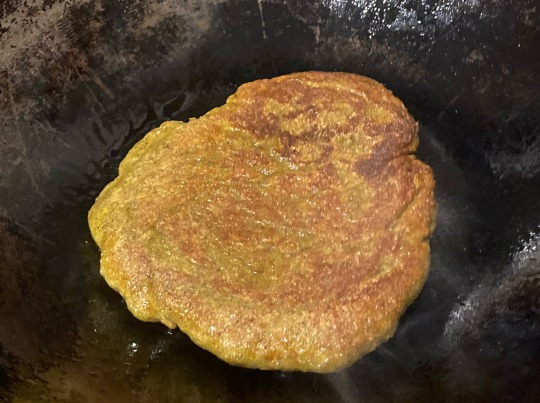
Korean Corn Cheese-Inspired Cornbread It's cheese, and it's cornbread...I think it's pretty easy to explain why it's tasty. Special Equipment Required:
large mixing bowl
9x9 inch baking dish, greased and lined with parchment
silicone spatula (for mixing and scraping)
Ingredients:
one package of Bob's Red Mill Gluten Free Cornbread Mix (or your preferred cornbread mix) prepared according to the package's instructions, and enough for a 9x9 inch baking dish batch (for the choice of oil-or-butter for the fats component, I chose a neutral oil)
1 can of sweet corn kernels (drained; this is mostly for convenience, but I think there's a benefit to the corn having more moisture; I haven't tried this with fresh or frozen corn but if you've already got good experience with using either of those in your cornbread, feel free to add the equivalent)
~1/3 shredded low-moisture mozzarella
1 tsp granulated garlic
1 tsp salt
1 tsp ground black pepper
1/2 brick of cream cheese (soften by microwaving in short ~15 second increments until runny like a glaze or frosting, then mix in ~1/2 tsp granulated garlic, ~1/2 tsp ground black pepper)
1 scallion (thinly sliced, on the bias if you wanna be fancy)
Process:
preheat the oven according to the package instructions
incorporate low-moisture mozzarella, granulated garlic, salt, and pepper
transfer the batter to the greased, lined baking dish
drizzle and swirl the cream cheese mixture on top of the batter (use a toothpick or chopstick to swirl things about) and top with scallions before baking (try to keep the swirls shallow so that the bread itself doesn't get soggy)
bake as instructed*, turning halfway through for even baking and browning, and allow to cool before slicing and serving *if you'd like, broil for about a minute towards the end to crisp the top

Japanese Miso Nabe-Inspired Collard Greens (with Bacon and Shallots) Savory, gently bitter greens make for a perfect contrast with the richer components of the meal. Also great over rice as its own dish.
Special Equipment Required:
a large pot or wok with a lid
plate lined with paper towels (for draining grease)
Ingredients:
2 bundles of collard greens (washed and stripped of their stems)
3 strips of bacon (cut into bite-size pieces)
1 shallot (thinly sliced)
2 scallions (thinly sliced)
~5 cloves of garlic (minced)
Michiu rice wine (to eye; a splash for steam)
1 tbsp white miso (more or less to taste)
sesame oil (to taste)
sesame seeds
Process:
in the pot/wok, without adding oil, render bacon til fully cooked, but not crispy, and remove from the pan; set on paper towels to drain but do not drain the fat from the pan (an easy way to render bacon without it going crispy or burnt is to add enough water to simmer the bacon; you'll essentially boil out the fat and then cook off the water, leaving you with the bacon grease)
lightly fry the shallots in the bacon fat until golden brown, then transfer to the paper towels
turn down the heat to about medium-low and add the scallions and garlic; sautee until aromatic then add the collard greens, tossing the leafy greens in the aromatics and bacon fat
add a splash of Michiu before covering to steam
once greens have wilted significantly, reintroduce the shallots and bacon and combine
turn off the heat and incorporate miso and sesame oil to taste
add sesame seeds and serve
Feel free to message me or send an ask if you have any questions!
2 notes
·
View notes
Text
Sunday Family Beef with Broccoli
A journey from treasured treat to weekly tradition
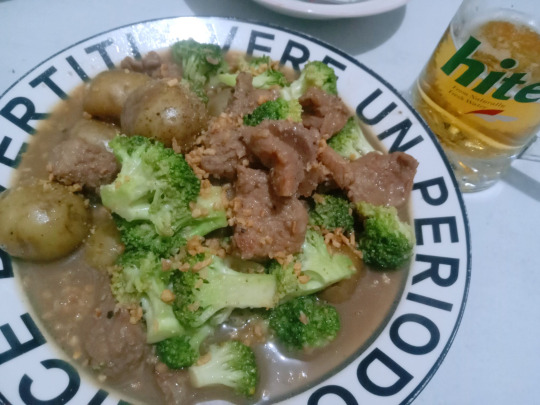
Growing up, beef with broccoli was a rare and special dish in our home. I still remember the first time my mom made it when I was a teenager. The tender slices of beef, the green broccoli, and that rich, savory sauce that brought everything together — it was an instant favorite.
But broccoli was a luxury in those days. Its price often meant we had to adjust our budget elsewhere, making this dish an occasional treat rather than a regular meal. There was always something bittersweet about savoring each bite, knowing it might be weeks or months before we'd have it again.
Years later, with improved circumstances, broccoli no longer strains our weekly grocery budget. What was once a rare indulgence has grown into the centerpiece of our Sunday family meals. Now, I take pride in preparing this dish for my own family, watching their faces light up just as mine did all those years ago. The recipe has remained largely unchanged — some traditions are perfect as they are.
Every Sunday, as the familiar aromas of garlic, ginger, and oyster sauce fill our kitchen, I'm reminded of how far we've come. This dish represents more than just a delicious meal – it's a celebration of family, of progress, and of the simple joys that connect our past to our present.
Ingredients
⅓ cup oyster sauce
2 teaspoons sesame oil
1 teaspoon soy sauce
1 teaspoon white sugar
1 teaspoon cornstarch
¾ pound beef round steak, cut into ⅛-inch thick strips
3 tablespoons vegetable oil, plus more if needed
1 thin slice of fresh ginger root
1 clove garlic, peeled and smashed
1 pound broccoli, cut into florets
Instructions
1. Prepare the Marinade
In a medium bowl, whisk together the oyster sauce, sesame oil, soy sauce, sugar, and cornstarch until well combined.
Add the beef strips to the marinade, tossing to coat each piece thoroughly.
Cover and let marinate for at least 30 minutes at room temperature, or up to 2 hours in the refrigerator.
2. Prepare the Broccoli
Bring a large pot of water to a boil.
Add the broccoli florets and blanch for just 1 minute—they should brighten in color but remain crisp.
Immediately drain and rinse under cold water to stop the cooking process. Set aside.
3. Cook the Dish
Heat a wok or large skillet over high heat until very hot.
Add 2 tablespoons of vegetable oil, then add the ginger and garlic. Stir-fry for about 30 seconds until fragrant.
Add the blanched broccoli to the wok and stir-fry for 2-3 minutes until the edges start to brown slightly. Remove from the wok and set aside.
Add the remaining tablespoon of oil to the wok. When hot, add the marinated beef with all the marinade.
Stir-fry the beef for 2-3 minutes until the meat is no longer pink and the sauce begins to thicken.
Return the broccoli to the wok and toss everything together until well combined and heated through, about 1-2 minutes.
4. Serve
Serve immediately over steamed rice. This recipe makes enough for 4 servings, perfect for a family Sunday dinner.
Chef's Notes
For extra tender beef, slice it against the grain and partially freeze it beforehand for easier cutting.
Don't overcook the broccoli during blanching—it will continue to cook when returned to the wok.
For a spicier version, add a pinch of red pepper flakes when stir-frying the garlic and ginger.
Leftovers can be stored in an airtight container in the refrigerator for up to 3 days. The flavors often deepen overnight!
#food#food recipes#beef#broccoli#homecookedmeals#home cooking#homecookedgoodness#recipe#cooking#recipes
2 notes
·
View notes
Text
my Vegan White Chik’n Tofu Recipe :3
yields: a lot idk. enough to feed 5 people for several days if my household is any indication

Ingredients
14-16oz of super firm or extra firm tofu, thawed for 5 min in the microwave (previously frozen overnight) and then diced into small cubes
2 cans (15oz each) of any kind of white beans. if you don’t have any canned beans, cook up some dry beans beforehand, and use at least 1lb (i usually use 25oz of dry beans)
2 cubes of Not-Chik’n bouillon dissolved in 1 quart of hot water OR 1 carton of your choice of vegan chik’n broth (32oz) OR vegetable broth (32oz)
10-15oz can of diced tomatoes (i like the fire-roasted kind for this or the Rotel brand with chiles or lime juice etc)
4oz can of hatch diced green chiles (mild or hot—up to you)
8oz vegan cream cheese
8oz vegan sour cream, to make it even more indulgent. if you don’t have this, just omit. it’ll still be delicious.
1 tbsp apple cider vinegar
3 cups of plain water (or less—i just like to stretch the chili size-wise by adding more water)
1 whole recipe of vegan ranch dip mix (listed below) OR 1-2 cups of bottled vegan ranch dressing (depending on your taste preference)
1 whole recipe of vegan copycat white chili mix (listed below)
optional: a can of corn, 10oz bag of frozen veggies, a chopped onion, whatever you want
also also optional: a few dashes of liquid smoke
Instructions
1. Open tofu package and drain. Set in an airtight glass or plastic freezer-safe container (or if you need to, just set it on a plate that you can microwave later) and place in freezer for at least 8 hours or preferably overnight.
2. Remove tofu from the freezer. It should look fairly golden brown. Place on microwave safe plate and thaw in the microwave for 5 or more minutes (keep checking it at 1-2 minute increments—you don’t want it screaming hot, but you want it thawed enough to be able to cut through easily).
3. If you have a tofu press, press the tofu for a few minutes. If not, skip this step, it’s not a huge deal.
4. Dice the tofu into tiny cubed pieces. Add to the pot.
5. Add all other ingredients to the pot.
6. If using a traditional stovetop pot, bring all ingredients to a boil on high heat and allow to cook for about 5 minutes minimum, depending on your stove’s heat consistency. Once you’re confident things have reached a solid boil for a few minutes, reduce heat and allow to simmer for at least 15 minutes, ideally 30 minutes or more if you have the time to stick around—or until the chili reaches your desired consistency. If you only have 15 minutes, that’ll still be fine. Taste often and adjust any seasoning as needed.
7. If using an Instant Pot, close the lid and cook on manual, High Pressure, for 20 minutes, and then allow 10 minutes natural release. After 10 minutes, do a manual release and open the lid.
Vegan Ranch Dip Mix
1/3 cup powdered soy milk (or powdered coconut milk) (i did have to order this in but it was worth it to be able to make my own ranch seasoning)
2 tbsp dried parsley
2 tsp dried chives
2 tsp garlic powder
2 tsp onion powder
1 tsp dried onion flakes
1 tsp dried dill
1 tsp black pepper
1 tsp salt
Vegan White Chili Mix
2 teaspoons dried oregano
2 teaspoons onion powder
3 teaspoons cumin
1 teaspoon garlic powder
1 teaspoon chili powder
1 teaspoon chipotle chili powder or ancho chili powder (depending on your taste preference)
1 tsp salt
½ teaspoon pepper
¼ to ½ teaspoon cayenne pepper (adjust to your liking)
1 teaspoon sugar or sugar substitute (use a sweetener with a 1:1 equivalent to sugar)
thickener: ½ teaspoon xanthan gum or 2 teaspoons cornstarch
8 notes
·
View notes
Text
Marinated Tofu Recipe
I'm constantly cooking with tofu after learning this recipe and it's delicious. None of the details are vital. This is quickly written. Please send asks or suggestions if you have any. (WIP)
Put towel, board, chopsticks, sushi rolling mat Take a Firm/xFirm tofu brick rinse, place tofu, small board, ~3 cups water in a container
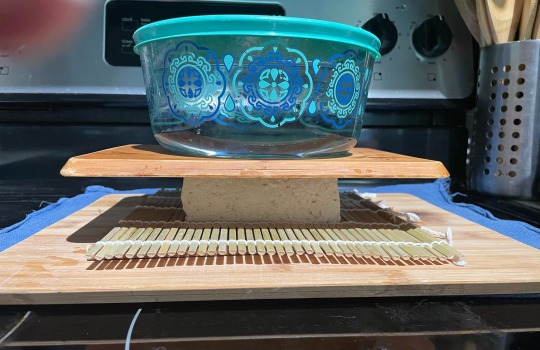
i tend to leave it for a few hours, but I'm guessing less time is okay. I tend to check after the first 5-10 min if the water needs re-centering, it tends to squish one side. Some people use clean kitchen towels or paper towels and weight with no sushi rolling mat (probably faster). You do this so the marinate isn't diluted.
WIP but here is my current marinade.
In a small container mix: 1/4 cup soy sauce or tamari 1 TB vinegar (~rice/wine) 1 TB mushroom seasoning (dashi) or more 1 TB sugar (~turbinado)
Flavor options (all optional to taste) 1/2 tsp. sesame oil 1 tsp. salt (to taste) 1 TB plum extract Minced Garlic (to taste) 1 TB red pepper powder (~Taekyung) 1 TB red chili paste (~Sambal Oelek) 1 TB pickled or minced jalapeno
Dice tofu into 1 in. cubes or smaller. Submerge the tofu in the marinade and space along cuts. Place something on top to keep the tofu submerged, I use a couple plastic Asian-soup-spoons. I tend to let it marinate in the fridge about 24 hours, it seems flexible. I sometimes top it off with a little soy sauce or aminos to cover.
The garlic and jalapeno I add mostly because I use the marinade for cooking after. Maybe using both red and green chili is rare because they have different flavors. Experimenting still with plum extract, but the recipe i borrowed from uses it.
You can cook in oil or as you normally would cook tofu. Below is the method I use.
Preparation instruction for carbon-steel. Preheat oven to ~410 with the pan inside. I drain the marinate to use for cooking later. After the oven is ready clean any residue in the pan with a paper towel. Add ~1/3 cup butter to pan. When the butter is melted add tofu in a single layer and return the pan to the oven.
Turn the tofu quickly every 4-5 min. Repeat until browned to desired texture. For me it's 15-25min depending on planned use. I may under cook in order to recook/reheat with vegetables later.
You can eat raw tofu, I like nibbling on the raw marinated tofu sometimes. The more you eat tofu the less methane is produced from cattle ranching and the less rain forests get burned. Please do that if you enjoy this recipe =).
4 notes
·
View notes
Photo

Recipe for Chef John's Crab Rangoon These deep-fried crab and cream cheese wontons contain just as much crab meat as cream cheese. They're served with a spicy sweet-and-sour dipping sauce. 8 ounces crab meat drained well, 1 clove crushed garlic, 1 tablespoon sriracha hot sauce or to taste, 1/2 teaspoon freshly ground black pepper, 1/4 cup rice vinegar, 1 pinch cayenne pepper, 60 wonton wrappers, 2 tablespoons brown sugar, 1/2 teaspoon Worcestershire sauce, 1 teaspoon soy sauce, Canola oil for frying, 8 ounces cream cheese, 1/3 cup chopped green onions, 1/4 teaspoon sesame oil, 1/2 teaspoon fish sauce, 1/2 teaspoon salt or to taste, 1 cup ketchup
2 notes
·
View notes
Text
Glazed Tofu & Sticky Rice Bowls
with Daikon-String Pea Salad & Hoisin Mayo

700 cals
30 mins
Equal parts tangy, salty and sweet, this tofu will be a total hit on a meatless meal night. All it needs is a quick marinade (say hello to the power trio of soy, hoisin and rice vinegar) followed by a roast in the oven to seal in the flavours. Earn style points for your side salad by thinly slicing daikon, string peas and scallions for elegant crispness. Serve it all with sesame-studded rice and a dollop of hoisin mayo.
Contains:
Eggs, Sesame, Soy, Wheat
Ingredients
Nutrition
Recipe
In the kit:
2 Scallions
100g Snow peas (or sugar snap peas)
225g Daikon
157g Calrose rice
30ml Soy sauce (low sodium)
15ml Rice vinegar
30ml Mayonnaise
3g Black & white sesame seeds
60ml Hoisin sauce
1 Block of tofu (non-GMO)
You will need:
Medium pot
Strainer
Peeler
Sheet pan
Oil
Salt & pepper
Parchment paper

Step 1: Cook the rice
Preheat the oven to 450°F. Place the rice in a strainer and rinse under cold water, agitating the rice with your hands for 1 minute, until the water runs clear. In a medium pot, combine the rice, 1 ¼ cups water (double for 4 portions) and a big pinch of salt; bring to a boil. Reduce the heat, cover and simmer, 18 to 20 minutes, until the rice is tender and the water has been absorbed. Remove from the heat and let sit, covered, for 5 minutes. Fluff the cooked rice with a fork and set aside in a warm spot.

Step 2: Marinate the tofu
While the rice cooks, cut the tofu into medium cubes. In a large bowl, combine the soy sauce, ½ the hoisin and ½ the rice vinegar. Add the tofu and toss to coat evenly. Set aside to marinate while you prepare the next step.
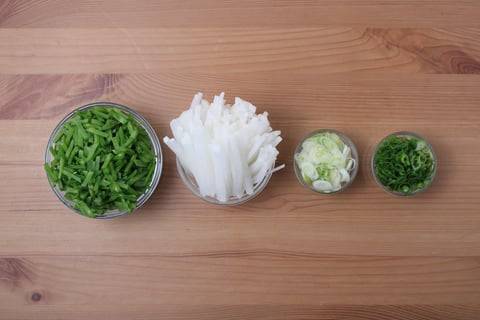
Step 3: Mise en place
While the tofu marinates, peel and julienne the daikon. Snap off and discard the stem ends of the snow peas; pull off and discard the tough string that runs the length of each pod. Thinly slice the snow peas crosswise on an angle. Cut off and discard the root ends of the scallions; thinly slice, separating the white bottoms and green tops.

Step 4: Roast the tofu
On a lined sheet pan, arrange the marinated tofu (letting the excess marinade drip off) in a single, even layer. Reserve the remaining marinade. Transfer the tofu to the oven and roast, 12 to 14 minutes, until browned, stirring and adding the reserved marinade halfway through.

Step 5: Make the salad & hoisin mayo
While the tofu roasts, in a large bowl, combine the daikon, snow peas, up to ½ of the green tops of scallions (to taste), the remaining rice vinegar and a drizzle of oil; season with S&P to taste. In a small bowl, combine the mayonnaise and remaining hoisin sauce; season with S&P to taste.

Step 6: Finish & serve
To the pot of rice, add ½ the sesame seeds and as many white bottoms of scallions as you’d like; stir to combine. Divide the finished rice, tofu and salad between your bowls, side by side. Garnish with a drizzle of the hoisin mayo, the remaining sesame seeds and as many remaining green tops of the scallions as you’d like. Bon appétit!
0 notes
Text
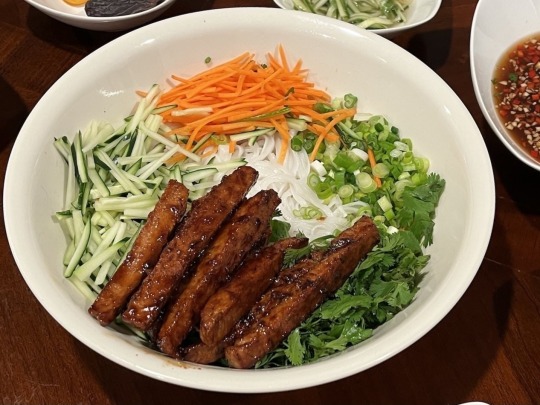
[ID: A large bowl filled with rice noodles, julienned carrot and cucumber, piles of herbs, and grilled 'chicken' strips; a bowl of sauce with minced chili and garlic is to the side. End ID]
Bún sườn nướng chay (Vietnamese rice noodle salad)
This is a vegetarian ("chay") version of bún gà nướng, a Vietnamese rice noodle ("bún") salad with grilled chicken ("gà nướng"). Chewy rice noodles, fresh vegetables and herbs, and a tangy, slightly spicy sauce combine with grilled or pan-seared 'chicken' to create a rich, flavorful, well-rounded dish. A marinade of lemongrass, sugar, garlic, and vegetarian fish sauce caramelizes around the 'chicken' as it sears, creating a sweet-and-savory crispy coating that perfectly complements the bright, herbacious salad. This dish can be made with Vietnamese sườn non chay, or with any meat substitute you have on hand.
Recipe under the cut!
Patreon | Tip jar
Serves 4.
Ingredients:
For the nước chấm (dipping sauce):
1/2 cup water
Juice of 1 lime (2 Tbsp)
2 Tbsp rice vinegar
1/4 cup vegan fish sauce
3 Tbsp sugar
1 red chili (de-seeded and sliced)
3 cloves garlic, minced
Fish sauce doesn’t take “like” fish, merely fermented and intensely salty. You can buy a bottle of ready-made vegan fish sauce from a Southeast Asian brand such as Au Lac, or you can make your own by combining the following ingredients:
For the vegan fish sauce (nước mắm):
3 Tbsp liquid from a jar of fermented bean curd
1 Tbsp white miso paste
1 Tbsp light soy sauce
1/4 tsp salt
For the chicken (gà):
300g vegan chicken substitute (I used Gardein), or 100g sườn non chay
2 cloves garlic
1 stalk lemongrass (or substitute lemon zest or a bit of preserved lemon pulp)
Juice of 1 lime (2 Tbsp)
1 Tbsp vegan fish sauce
1 Tbsp vegetarian oyster sauce
1 Tbsp Vietnamese soy sauce
2 tsp vegetarian 'chicken' broth concentrate, or bột nêm chay (optional)
2 Tbsp brown sugar
1 Tbsp neutral oil
Sườn non chay may be found in bags online or at your local Asian grocery–the bags will be labelled “sườn non chay” as well as “vegan meat slice,” “textured soy bean protein,” “vegetarian food,” or “vegan food.”
Bột nêm is a Vietnamese seasoning sold in powder or granule form. Vegetarian (“chay”) versions of the seasoning may contain shiitake mushroom, lotus seeds, carrots, tomatoes, and kohlrabi, as well as salt and MSG. It can be purchased in pouches or boxes from an Asian grocery store, or you can use any other vegetable stock powder.
For the salad:
300g vermicelli rice noodles
2 cups bean sprouts
1 large carrot (julienned)
1 seedless cucumber (julienned)
6 leaves romaine lettuce (julienned)
1 bunch fresh cilantro
1 bunch fresh rau răm (Vietnamese mint), or mint
2 stalks green onion, sliced
Handful of peanuts
Fresh Vietnamese herbs can be found in the refrigerator section of an Asian grocery store, particularly one that specializes in southeast Asian food. You can also experiment with whatever leafy herbs you have on hand.
Instructions:
For the chicken:
1. (If using sườn non chay:) soak meat slices in cool water until rehydrated. Squeeze out excess water and cut each slice in half along its shortest dimension, to get two blocks of the original height and width.
2. Slice lemongrass. Peel away any tough, dry outer leaves to reveal the yellow-green leaves within. Remove the root end of each stalk, as well as the tough green portion at the top of each stalk (reserve this latter to boil in stocks). Thinly slice the tender yellow portion of each stalk.
3. Mix all marinade ingredients in a large bowl. Marinate chicken for 20-30 minutes while you prepare the nước chấm and vegetables.
4. Remove the chicken from the bowl, leaving any excess marinade behind. Heat a couple teaspoons of oil on medium in a large pan then sear the chicken, turning once, until deeply golden brown on both sides (or use a charcoal grill). (If using a pan) filter marinade to remove lemongrass slices, then pour extra marinade over the chicken and cook, stirring often, until coated.
5. Cut chicken into strips, or as desired.
For the nước chấm:
1. Mix vinegar, lime juice, fish sauce, sugar, and water in a small saucepan. Heat, stirring, until the sugar has dissolved.
2. Remove from heat and add minced garlic and chili. Pour into a bowl and allow to cool.
For the salad:
1. Boil the vermicelli according to package directions. Drain and rinse with cool water to halt cooking. Toss with a little bit of neutral oil to avoid sticking.
2. Roast peanuts in a dry pan on medium-low, stirring often, until golden brown and fragrant.
3. Julienne carrot, cucumber, and lettuce. Roughly chop herbs.
4. Plate vermicelli followed by vegetables, herbs, chicken, and peanuts. Spoon some nước chấm over the salad and set remainder to the side to serve.
#Vietnamese#cooking#vegan cooking#vegan recipe#gluten free#cucumber#carrot#mint#green onion#chicken#lettuce
96 notes
·
View notes
Text
Foods and Drinks That Stain Your Teeth After Whitening
So, you've just had your teeth professionally whitened and you're enjoying your new, bright smile — congratulations! But did you know that the days following your teeth whitening treatment are critical for maintaining those results? Certain foods and drinks can easily stain your freshly whitened teeth, undoing all that effort.
At our clinic for Teeth Whitening in McDonough, we always remind patients that post-whitening care is just as important as the procedure itself. Let’s look at what you should avoid to keep your smile bright.

Top Foods and Drinks to Avoid After Teeth Whitening
1. Coffee and Tea
These beverages are among the biggest culprits when it comes to teeth staining. They contain tannins, which can cause color compounds to stick to your enamel, leaving behind yellow or brown stains.
Tip: If you must have your morning cup, drink through a straw and rinse your mouth afterward.
2. Red Wine
Red wine is acidic and dark in color, making it double trouble for your white teeth. The pigments in wine can seep into porous enamel and dull your results quickly.
3. Cola and Dark Sodas
Cola, root beer, and other dark soft drinks are not only loaded with sugar, but their deep hues can stain enamel, especially when your teeth are more porous right after whitening.
4. Berries and Dark-Colored Fruits
Blueberries, blackberries, cherries, and pomegranates are healthy — but they’re rich in dark pigments that can stain your teeth. This also applies to fruit juices made from these berries.
5. Tomato-Based Sauces
Pasta sauce, chili, and pizza sauce are all deeply pigmented and acidic. The acid temporarily softens enamel, allowing stains to set in more easily.
6. Soy Sauce and Balsamic Vinegar
These flavorful condiments may enhance your meals, but they can also stick to enamel and discolor your teeth. Use them sparingly or opt for lighter alternatives post-whitening.
7. Beets
Beets are notorious for their vibrant color. If they can stain your hands and clothes, imagine what they can do to your teeth — especially within the first 48 hours after whitening.
What You Can Eat Instead
After your whitening treatment, try to stick to a "white diet" for the first few days:
Plain yogurt
White rice and pasta
Bananas and apples (peeled)
Skinless chicken and turkey
Cauliflower and potatoes
Water and clear liquids
These foods are less likely to stain your enamel and can help prolong your whitening results.
Keep That Bright Smile!
To maintain the best results, brush and floss regularly, use a whitening toothpaste (approved by your dentist), and schedule touch-ups as needed. At our clinic for Teeth Whitening in McDonough, we provide personalized care and guidance for keeping your smile stunning long after treatment.
Looking for Teeth Whitening in McDonough?
If you're ready for a brighter, more confident smile, our expert team in McDonough is here to help. We offer safe, effective teeth whitening solutions tailored to your needs. Book your appointment today!
0 notes
Text

🥜 Peanut Butter Bread Recipe
A soft, moist, and delicious peanut butter bread that’s perfect for breakfast or a snack.
📝 Ingredients
1 cup milk
1 cup granulated sugar
1 cup peanut butter
2 eggs, room temperature
1½ cups flour
½ cup old-fashioned oats
1 tablespoon baking powder
½ teaspoon salt
🛠 Substitutions & Additions
Eggs: Use ¼ cup applesauce or ¼ cup pureed bananas as a substitute (flavor will change slightly).
Chocolate Chips: Add as many as you like—try chocolate, butterscotch, or peanut butter chips.
Nuts: Add crushed peanuts for crunch (mix into batter or sprinkle on top).
Milk: Substitute almond, soy, or other nut milks (may need slightly less than 1 cup).
🧑🍳 Instructions
Preparation
Move oven rack to center position.
Preheat oven to 350°F (175°C).
Prepare an 8×4-inch loaf pan:
Lightly spray with nonstick spray and line with parchment paper.
Mixing the Batter
In a heavy-duty blender or food processor, add:
Milk
Sugar
Peanut butter
Eggs
Process for 1 to 2 minutes until smooth.
Add:
Flour
Oats
Baking powder
Salt
Process until smooth (about 1 minute).
If using a lower-wattage blender, add dry ingredients gradually.
Baking
Pour batter into the prepared loaf pan.
Bake for 1 hour and 10 minutes, or until a toothpick inserted comes out clean or with a few crumbs.
Tip: At 50 minutes, check if the top is browning too much. If needed, cover loosely with foil and continue baking.
Cooling
Remove from oven and rest in the pan for 10 minutes on a cooling rack.
Remove from pan and allow to cool completely before slicing.
🍽 Serving Suggestions
Spread with strawberry or raspberry jam for a PB&J twist.
Serve with hot chocolate or a pumpkin spice latte.
Optional toppings: peanut butter, jelly, sliced bananas, etc.
🗂 Storage
Make Ahead: Bake and store at room temp (wrapped tightly) for up to 2 days.
Fridge: Store in an airtight container for up to 1 week.
Freezer: Wrap in plastic wrap and foil; freeze for up to 3 months.
❓ Tips & FAQs
Room-temperature eggs: If needed, place eggs in warm water for 5 min.
Measuring peanut butter: Spray measuring cup with nonstick spray for easy release.
Quick bread: No yeast required; simple batter-based recipe.
Almond butter: Can be used instead of peanut butter.
🔍 Nutrition (Per Serving)
Calories: 341 kcal
Carbs: 44g
Protein: 11g
Fat: 15g
Fiber: 2g
Sugar: 24g
0 notes
Photo

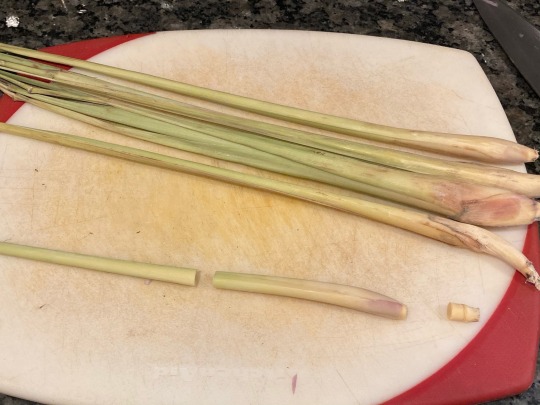
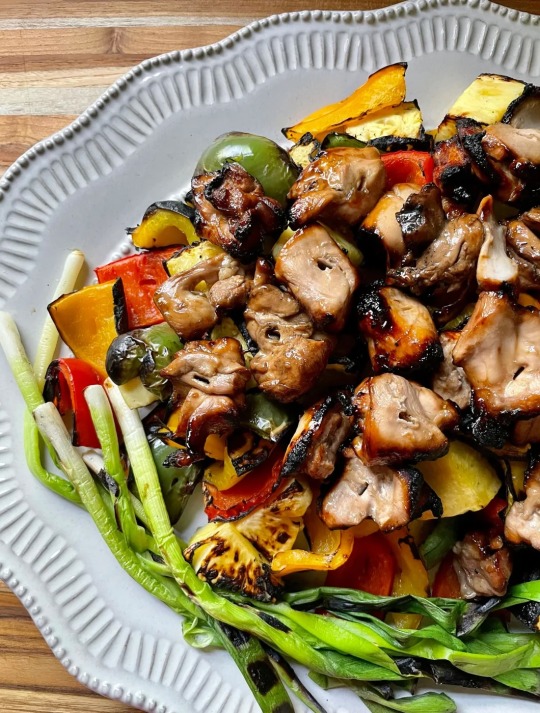
This weekend marks the unofficial start to summer, grilling season, and all the hot weather we can handle. Today, I have a recipe perfect for a Memorial Day cookout and any summer get-together. This is a simple recipe; the homemade teriyaki sauce will be our chicken marinade, and we will use a portion of it to make a glaze for basting the chicken on the grill. Are you ready? Let’s kick off grilling season with Teriyaki Chicken Skewers with Pineapple and Peppers! Teriyaki Chicken Skewers Ingredients and Preparation Step 1: Teriyaki Marinade A few simple ingredients: we have soy sauce, Mirin for sweetness, pineapple juice for a little sweetness and tang, rice vinegar, sesame oil, fresh ginger and garlic. You can substitute orange juice for the pineapple juice if you like, but since we are grilling pineapple to go along with our veggies and chicken, it’s a nice flavor marriage. Whisk together 1 cup soy sauce, 1 cup pineapple juice, 3 tablespoons sesame oil, and 1/4 cup Mirin. If you don’t have Mirin, you can substitute 1/4 cup brown sugar. Add to this 1 tablespoon each of grated ginger and fresh garlic. Give this a taste and add any more of anything you think it needs. We will reserve one-half cup of this marinade in a separate container for the glaze, which we will make a little sweeter. Add the bite-size chicken thigh pieces to the marinade, cover, and refrigerate for at least one hour, or up to overnight. Step 2: Teriyaki Glaze Take the reserved 1/2 cup of the marinade and add it to a small saucepan, and add 2 tablespoons of brown sugar. Whisk together and bring to a simmer. Make a cornstarch slurry with 1/2 tablespoon of cornstarch and 1/4 cup of water. Add the cornstarch slurry to the simmering sauce and whisk until the sauce is thickened a bit and will coat the back of a spoon. Remove from the heat and give it a taste. Add more sugar if you like. Transfer the glaze to a bowl and set aside until we’re ready to grill. Step 3: Veggies Since this whole meal is going on the grill, peppers are a natural choice; their colors are gorgeous, they hold up so well to the hot coals, and their flavor gets smoky and sweet. And pineapple, because grilled pineapple is amazingly good. I like to keep the veggies on their own skewers, separate from the chicken, because they cook at a different rate than the chicken. We are just chopping everything into large chunks so they will stay on the skewers. I also have a bunch of whole scallions to throw on the grill. Step 4: Chicken Skewers After at least an hour in the marinade, thread the chicken pieces on skewers and discard the marinade. We are using skinless, boneless chicken thighs, but you can use breasts if you prefer. Our skewers are long enough to span the width of our PK (Portable Kitchen) charcoal grill, so we are going grill grate-less, with the skewers right over the coals. You can put the skewers right on your grill grates. Charcoal grilling imparts the most flavor when grilling, but these will still be amazing over a gas grill, too. Step 5: Grilling Set the skewers on the grill and keep them moving; turn them every one to three minutes to get an even charring on all sides. Once the chicken skewers have made a complete turn, begin glazing them with the teriyaki glaze. We want to build up the layers of glaze so that each layer has time to caramelize for the most teriyaki flavor. Turn chicken skewers every 1-2 minutes. Glaze the chicken after every turn. Pull the veggie skewers off and set them on a rimmed sheet tray when the peppers have softened and gained a lot of great char and browning. Once you have pulled off a few of the veggies skewers, lay the scallions directly on the grill grates and use tongs to turn them as they begin to char. They will only take a minute or two. The chicken is ready when it’s firm to the touch, and an instant-read thermometer reads 165 degrees. Teriyaki Chicken Skewers with Pineapple & Peppers Even though we cooked the veggies separately from the chicken, we will serve them all together, on a platter. Pull all of the veggies off the skewers and pile them up on a platter. Lay the scallions along one side. Then pull all the chicken off the skewers and pile the chicken pieces on top of the veggies. If there’s any remaining glaze, drizzle it over the top of the platter. A beautiful, colorful presentation. The presentation is so tempting; the red, yellow, green, and orange peppers, edges tinged with caramelized char; the salty-sweet, umami-rich chicken pieces – so tender and juicy. And that gilled, caramelized pineapple! This is a winning combination for any cookout or summer get-together. Serve with a big bowl of rice or lay out this platter alongside other cookout sides like Esquites (Mexican Street Corn Salad). Take care and be well, xo Kelly Key Equipment Marinade1 cup Soy Sauce1 cup Pineapple Juice3 tbsp. Sesame Oil1/4 cup Mirin you can substitute 1/4 cup brown sugar1 tbsp. Fresh Ginger grated1 tbsp. Fresh Garlic grated2 lbs. Boneless Skinless Chicken Thighs, sliced into 2-inch piecesTeriyaki Glaze1/2 cup Reserved Marinade2 tbsp. Brown Sugar1/2 tbsp. Cornstarch1/4 cup WaterSkewers1 Large Red Bell Pepper sliced into 2-inch pieces1 Large Yellow Bell Pepper sliced into 2-inch pieces1 Large Orange Bell Pepper sliced into 2-inch pieces1 Large Green Bell Pepper sliced into 2-inch pieces1 Small Pineapple skinned and sliced into 2-inch pieces1 Bunch Scallions washed and trimmed MarinadeWhisk together the soy sauce, pineapple juice, sesame oil, Mirin, ginger, and garlic. Pour off 1/2 cup to reserve for glaze and set aside. Add cut chicken pieces to the remaining marinade, cover and refrigerate for at least one hour, or overnight.Teriyaki GlazePour the reserved 1/2 cup of the marinade into a small saucepan and add 2 tablespoons of brown sugar. Whisk together and bring to a simmer.Make a cornstarch slurry with 1/2 tablespoon of cornstarch and 1/4 cup of water. Add the cornstarch slurry to the simmering sauce and whisk until the sauce is thickened and will coat the back of a spoon.Remove from the heat and give it a taste. Add more sugar if you like. Transfer the glaze to a bowl and set aside until ready to grill.SkewersThread cut pepper pieces and pineapple pieces onto skewers, alternating peppers and pineapple.Thread marinated chicken pieces onto skewers. Discard marinade.Place skewers on a hot grill and turn skewers every 1-2 minutes. Brush the chicken skewers with the glaze after every turn.Remove veggie skewers from the grill when the peppers are softened and develop some browning.Lay scallions directly on grill grates and turn every minute, with tongs, until browned.Remove chicken skewers from the grill when chicken is firm to the touch and reaches an internal temperature of 165 degrees.Pull veggies and pineapple off skewers and pile onto a large platter.Remove chicken pieces from skewers and lay pieces on top of veggies and pineapple. Drizzle with any remaining glaze. About The Author Kelly Djalali Kelly is our 40s+ fashion & food contributor. She posts a Daily Look on Tuesdays, writes about Fashion on Thursdays, joins Beth for Fridays with Oscar and shares a new recipe on Sunday. She’s 48, 5’0, and a petite 0/XS. Kelly also has a food blog called Djalali Cooks, which you can find by clicking the world icon below. Source link
0 notes
Photo
This weekend marks the unofficial start to summer, grilling season, and all the hot weather we can handle. Today, I have a recipe perfect for a Memorial Day cookout and any summer get-together. This is a simple recipe; the homemade teriyaki sauce will be our chicken marinade, and we will use a portion of it to make a glaze for basting the chicken on the grill. Are you ready? Let’s kick off grilling season with Teriyaki Chicken Skewers with Pineapple and Peppers! Teriyaki Chicken Skewers Ingredients and Preparation Step 1: Teriyaki Marinade A few simple ingredients: we have soy sauce, Mirin for sweetness, pineapple juice for a little sweetness and tang, rice vinegar, sesame oil, fresh ginger and garlic. You can substitute orange juice for the pineapple juice if you like, but since we are grilling pineapple to go along with our veggies and chicken, it’s a nice flavor marriage. Whisk together 1 cup soy sauce, 1 cup pineapple juice, 3 tablespoons sesame oil, and 1/4 cup Mirin. If you don’t have Mirin, you can substitute 1/4 cup brown sugar. Add to this 1 tablespoon each of grated ginger and fresh garlic. Give this a taste and add any more of anything you think it needs. We will reserve one-half cup of this marinade in a separate container for the glaze, which we will make a little sweeter. Add the bite-size chicken thigh pieces to the marinade, cover, and refrigerate for at least one hour, or up to overnight. Step 2: Teriyaki Glaze Take the reserved 1/2 cup of the marinade and add it to a small saucepan, and add 2 tablespoons of brown sugar. Whisk together and bring to a simmer. Make a cornstarch slurry with 1/2 tablespoon of cornstarch and 1/4 cup of water. Add the cornstarch slurry to the simmering sauce and whisk until the sauce is thickened a bit and will coat the back of a spoon. Remove from the heat and give it a taste. Add more sugar if you like. Transfer the glaze to a bowl and set aside until we’re ready to grill. Step 3: Veggies Since this whole meal is going on the grill, peppers are a natural choice; their colors are gorgeous, they hold up so well to the hot coals, and their flavor gets smoky and sweet. And pineapple, because grilled pineapple is amazingly good. I like to keep the veggies on their own skewers, separate from the chicken, because they cook at a different rate than the chicken. We are just chopping everything into large chunks so they will stay on the skewers. I also have a bunch of whole scallions to throw on the grill. Step 4: Chicken Skewers After at least an hour in the marinade, thread the chicken pieces on skewers and discard the marinade. We are using skinless, boneless chicken thighs, but you can use breasts if you prefer. Our skewers are long enough to span the width of our PK (Portable Kitchen) charcoal grill, so we are going grill grate-less, with the skewers right over the coals. You can put the skewers right on your grill grates. Charcoal grilling imparts the most flavor when grilling, but these will still be amazing over a gas grill, too. Step 5: Grilling Set the skewers on the grill and keep them moving; turn them every one to three minutes to get an even charring on all sides. Once the chicken skewers have made a complete turn, begin glazing them with the teriyaki glaze. We want to build up the layers of glaze so that each layer has time to caramelize for the most teriyaki flavor. Turn chicken skewers every 1-2 minutes. Glaze the chicken after every turn. Pull the veggie skewers off and set them on a rimmed sheet tray when the peppers have softened and gained a lot of great char and browning. Once you have pulled off a few of the veggies skewers, lay the scallions directly on the grill grates and use tongs to turn them as they begin to char. They will only take a minute or two. The chicken is ready when it’s firm to the touch, and an instant-read thermometer reads 165 degrees. Teriyaki Chicken Skewers with Pineapple & Peppers Even though we cooked the veggies separately from the chicken, we will serve them all together, on a platter. Pull all of the veggies off the skewers and pile them up on a platter. Lay the scallions along one side. Then pull all the chicken off the skewers and pile the chicken pieces on top of the veggies. If there’s any remaining glaze, drizzle it over the top of the platter. A beautiful, colorful presentation. The presentation is so tempting; the red, yellow, green, and orange peppers, edges tinged with caramelized char; the salty-sweet, umami-rich chicken pieces – so tender and juicy. And that gilled, caramelized pineapple! This is a winning combination for any cookout or summer get-together. Serve with a big bowl of rice or lay out this platter alongside other cookout sides like Esquites (Mexican Street Corn Salad). Take care and be well, xo Kelly Key Equipment Marinade1 cup Soy Sauce1 cup Pineapple Juice3 tbsp. Sesame Oil1/4 cup Mirin you can substitute 1/4 cup brown sugar1 tbsp. Fresh Ginger grated1 tbsp. Fresh Garlic grated2 lbs. Boneless Skinless Chicken Thighs, sliced into 2-inch piecesTeriyaki Glaze1/2 cup Reserved Marinade2 tbsp. Brown Sugar1/2 tbsp. Cornstarch1/4 cup WaterSkewers1 Large Red Bell Pepper sliced into 2-inch pieces1 Large Yellow Bell Pepper sliced into 2-inch pieces1 Large Orange Bell Pepper sliced into 2-inch pieces1 Large Green Bell Pepper sliced into 2-inch pieces1 Small Pineapple skinned and sliced into 2-inch pieces1 Bunch Scallions washed and trimmed MarinadeWhisk together the soy sauce, pineapple juice, sesame oil, Mirin, ginger, and garlic. Pour off 1/2 cup to reserve for glaze and set aside. Add cut chicken pieces to the remaining marinade, cover and refrigerate for at least one hour, or overnight.Teriyaki GlazePour the reserved 1/2 cup of the marinade into a small saucepan and add 2 tablespoons of brown sugar. Whisk together and bring to a simmer.Make a cornstarch slurry with 1/2 tablespoon of cornstarch and 1/4 cup of water. Add the cornstarch slurry to the simmering sauce and whisk until the sauce is thickened and will coat the back of a spoon.Remove from the heat and give it a taste. Add more sugar if you like. Transfer the glaze to a bowl and set aside until ready to grill.SkewersThread cut pepper pieces and pineapple pieces onto skewers, alternating peppers and pineapple.Thread marinated chicken pieces onto skewers. Discard marinade.Place skewers on a hot grill and turn skewers every 1-2 minutes. Brush the chicken skewers with the glaze after every turn.Remove veggie skewers from the grill when the peppers are softened and develop some browning.Lay scallions directly on grill grates and turn every minute, with tongs, until browned.Remove chicken skewers from the grill when chicken is firm to the touch and reaches an internal temperature of 165 degrees.Pull veggies and pineapple off skewers and pile onto a large platter.Remove chicken pieces from skewers and lay pieces on top of veggies and pineapple. Drizzle with any remaining glaze. About The Author Kelly Djalali Kelly is our 40s+ fashion & food contributor. She posts a Daily Look on Tuesdays, writes about Fashion on Thursdays, joins Beth for Fridays with Oscar and shares a new recipe on Sunday. She’s 48, 5’0, and a petite 0/XS. Kelly also has a food blog called Djalali Cooks, which you can find by clicking the world icon below. Source link
0 notes
Link
0 notes