#the meat(1 1/4 Lb.) gets cleaned and sliced into strips
Explore tagged Tumblr posts
Visit Tumblr Blog
Explore Tumblr blogs with no restrictions, modern design and the best experience.
Last Seen Tumblr Blogs


Fun Fact
China blocked Tumblr because of pornography and censorship problems in 2013.
Text
i am slow cooking the most delicious of concoctions in the kitchen rn
(my tags are so long lol whole half ass recipe down there)
#idk its some bastardized recipe for something called mongolian beef#well can it really be called bastardized when i actually fuckin improved it#like all there was originally was fucking soy sauce garlic brown sugar and onion#LITERALLY NO SEASONING#so i took my earned skills and actuallly made it good#the sauce is now flavorful and doesnt taste like garlic soywater#(the meat gets slow cooked in the sauce thats how i know how the sauce tastes)#added a teeny bit of mustard powder and cumin(half TBsp) added some ginger and onion powder(TBsp) and upgraded garlic to black garlic(TB)#it contained 1/2 cup of soy and 1/3 cup of Brown sugar#also replaced the water with beef broth(half cup)#theres also some oil(i did reg Veggie oil cause i dont like Sesame/ 1TB)#you serve ontop some seasoned/fried rice and mixed peppers/veggies thatve been lightly seasoned and fried in a skillet#the meat(1 1/4 Lb.) gets cleaned and sliced into strips#you leave the strips in a heavy salt solution to leach it/tenderize it(you can use other methods but this was what i had on hand) then rins#(you leave it in the solution for ATLEAST 30 minutes)#pat the strips down dry and using a 1/4 cup of Corn starch you coat the strips entirely#you then put the meat into your sauce and stir it around until the meat is entirely covered in it#then slow cook for however long you want(im doing 8 hours for some REAL tender shit)#alot of these measurements were eyed balled (except starch and liquids)[im skilled at this]#i will update yall once ive tasted the finished product#i went a little light on the seasoning but i dont have certain ingredients i want/can obtain so i had to make do(plus my parents cant shiit#DO NOT ADD EXTRA SALT TO THE DISH#leaching the meat and the soy sauce already has enough salt content#THE STARCH IS NECESSARY PART OF THE DISH#you can achieve black garlic by slow cooking regular garlic FOR WEEKS#longer = better#also i recommend using minced Ginger instead of powder for better flavour
5 notes
·
View notes
Photo
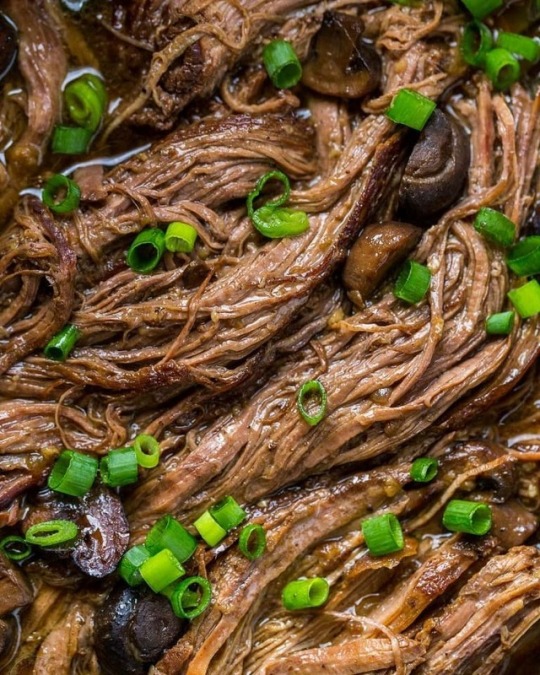
Slow Cooker Beef Brisket Recipe This slow cooker beef brisket is fall-apart tender, so juicy and flavorful. Slow Cooked beef brisket is easy and gets rave reviews every time! Perfect with mashed potatoes or as beef brisket sandwiches. Ingredients: 3 Tbsp Olive oil to sauté divided 4 lb beef brisket 2 tsp sea salt or to taste 1 tsp black pepper freshly ground 1 lb yellow onions (2 medium) sliced into thick strips 1 lb mushrooms thickly sliced 6 garlic cloves peeled and chopped (not pressed)* 2 cups low sodium chicken stock or beef broth 2 1/2 Tbsp Worcestershire sauce Instructions: Generously season brisket with about 2 tsp salt and 1 tsp black pepper. Heat large heavy skillet or cast iron pan over high heat. Add 1 Tbsp oil and when hot, add brisket (fat side down). Sear 4-5 min per side or until browned on both sides. Transfer to slow cooker, fat side facing up. In the same pan, add 1 Tbsp oil and sliced onions. Sautee 5-7 min or until onions are caramelized. Place onions over brisket. In the same pan, add more oil as needed and saute mushrooms until soft (5 min). Place mushrooms into the slow cooker and sprinkle chopped garlic over the top. Combine 2 cups chicken broth with 2 1/2 Tbsp Worcestershire sauce and pour mixture over meat. Cover and cook on low 7 to 8 hrs or until cooked through and easy to pull apart with forks. Turn off slow cooker and rest 15 min with the lid on. Remove and discard excess fat from the top** then pull the beef apart with forks and keep it in the slow cooker to soak up the juices which will add amazing flavor and keep meat tender. Serve beef brisket and mushrooms, spooning slow cooker juices over the top. Recipe Notes: *Garlic Tip: it is easiest to mince this quantity of garlic in a food processor. Do not use a garlic press for this recipe. **If you prefer really clean and lean meat; transfer the meat to a platter to make sure all of the fat is removed then return the shredded meat to the slow cooker. Note on Nutrition: the nutrition label will vary greatly based on how much you trim the fat from your meat. Also, keep in mind some of the salt and liquid may get discarded at the bottom of the pot.
1 note
·
View note
Text
Summertime classic: Pan Fried Burger with Caramelized Onions
Nothing screams summer like a juicy burger on a hot day. Growing up I never liked the way burgers tasted coming off a grill so my dad would always cook them in frying pan. I love how crispy the edges of the burger get and the way it can really soak up flavors.
The search for this recipe was inspired by my dad and by one of my favorite food blogs the FoodFreakk. The blog features a video of an onion burger and it looked too delicious for me to not recreate!
This is a relatively simple recipe to make since it’s only a few steps. If you’re unsure of how to properly caramelize onions this article from Delish features the step by step process on how to get the perfect onions.
Serves: 4
Time: 15 minutes
- 1 Lb. of ground chuck (80% lean 20% fat)
- ½ White Onion
- 2 Tablespoons of butter
- Salt & pepper to taste
- Burger buns of choice (I used brioche)
- Sharp Cheddar (optional)
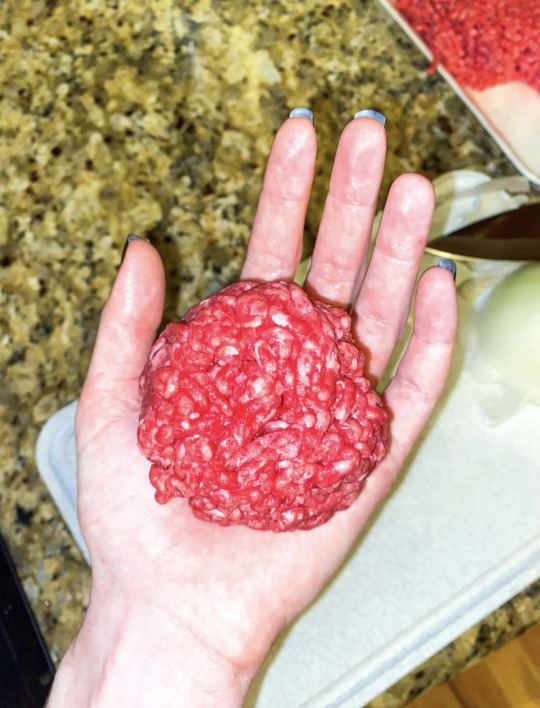
This shows the relative size the ball of ground beef should be in reference to the palm of a hand. Photo taken by Jillian Dowden.
Let’s prepare to make some juicy onion burgers! Heat a frying pan to medium-high heat while peeling the onion. Place the flat side of the onion on the cutting board after cutting it in half, then slice the onion into thin strips.
Next, separate the ground beef into four equal parts. Roll each section into a loose ball about the size of the palm of your hand.
Now that the food is prepped, melt the butter in the frying pan and add the onions. Gently move them around for 3-4 minutes while they brown and become soft. Place the caramelized onions on a plate for later. Don’t clean off the pan, you’ll want to save those yummy juices to cook the burgers in!

This shows what the burger should look like once the onions are on top and the burger has been pressed down. Photo taken by Jillian Dowden.
Using the same frying pan, place your burger on the pan and sprinkle some of your caramelized onions on top. Then, smash down the burger until it becomes flat and the onions are embedded into the meat. Sprinkle salt and pepper on top.
Let each side cook for about 2-4 minutes depending on how you like your burgers done. Repeat until all burgers are cooked!

The finished burger with toasted buns and cheddar cheese. Delicious! Photo taken by Jillian Dowden.
If you want your buns to have a buttery, toasted flavor to elevate the dish a little more, just spread some butter on the inside of each bun. Then, place face them down on the frying pan you cooked the burgers on. They should take about 20 seconds to toast.
I added a sharp cheddar cheese to top off my burger, but this is a personal choice. My mom added blue cheese, while my dad opted for the classic ketchup and mayo option. However you spin it, it will be delicious and juicy!
Some helpful tools for this recipe:
This onion slicer from Amazon Prime is $9.97 and is extremely helpful for getting the perfectly sliced onion. It hold the onion in place and makes the process go by faster, which helps prevent your eyes from watering!
This flat grill spatula from Amazon Prime is $9.99 and is great for pressing down your burgers. Its smooth edge will allow for it to easily slide underneath the burger for a clean flip, its also great for pancakes!
0 notes
Link

easy dinner recipes for a family
Looking for Easy Dinner Recipes for a Family?
Here are all our best 14 easy dinner recipes for a family to make everyone around the table happy! Plus, they’ve got a healthy spin. It's elusive recipes that please the entire family! We get it. Initially, there are distinctive eating regimen inclinations. At that point, kids particularly have tastes that change continuously! (That's right, our child does as well.) But never dread: there easy dinner recipes for a family will adore. Here we've assembled a rundown of family dinner recipes that are quick and easy to make and on the sound side. There are heaps of brilliant vegetables, yet enhances that are straightforward and swarm satisfying. A large number of these recipes can be utilized as formats! Tail them correctly, or go through them as thoughts for eating extras or altering for your family's preferences. For recipes that require over 30 minutes of planning time, we've offered a few recommendations for making them ahead. And practically the entirety of the recipes underneath have been kid tried and offered the go-ahead by our baby, Larson!

easy dinner recipes for a family
1. Sausage Green Bean Potato Casserole
Sausage Green Bean Potato Casserole easy dinner recipes for a family - A hearty side dish loaded with sausage kielbasa, baby potatoes, green beans, seasoning and baked until tender. Delish!

easy dinner recipes for a family
INGREDIENTS
1 1/2 lbs sausage kielbasa or smoke sausage, sliced 1/4" thick
2 lbs baby creamer potatoes, washed, sliced in half
2 15 oz cans green beans, drained
1/8 cup vegetable oil
1/4 cup butter
1 cup onions, chopped
3 cloves garlic, minced
1 tsp Slap Ya Mama® seasoning
1 tsp garlic powder
1 tsp pepper
1/2 tsp red pepper flakes
1/4 cup water
INSTRUCTIONS
Preheat oven to 400° and spray a 9x13 baking dish with a non stick spray.
Wash creamer potatoes, cut in half and add to a sealable gallon size baggie.
Add oil, seasonings, pepper and red pepper flakes to baggie. Shake to coat.
In a large frying pan, add sausage and water and cook over medium high heat until sausages have browned and most of water has evaporated.
Remove sausage from pan and when cool enough add to baggie.
Melt butter in frying pan and add onions and garlic, cook until onions are translucent.
Let cool for a few minutes and then when cool enough, add to baggie and shake to mix.
Lastly, add green beans to baggie, shake to mix and then empty contents into prepared baking dish.
Cover with foil and place in the oven. Bake for 40 minutes or until potatoes are tender.
Carefully remove from oven and enjoy!
NOTES
Also try this Quick and Easy Dinner Recipes
Don’t forget to pin and save for later! 🙂

easy dinner recipes for a family
2. Skillet Chicken and Mushroom Wine Sauce
Tender and flavorful, this Skillet Chicken and Mushroom Wine Sauce is easy dinner recipes for a family.

easy dinner recipes for a family
INGREDIENTS
3 boneless, skinless chicken breasts, cut diagonally into cutlets
½ cup all-purpose flour
1/2 teaspoon salt
1 teaspoon pepper
1/2 teaspoon garlic powder
12 ounces mushrooms, cleaned and thick sliced
4 tablespoons unsalted butter, divided
1 tablespoons olive oil
2 garlic cloves, minced
2 large shallots, sliced thin
1 ½ cups chicken broth, low sodium
½ cup dry white wine
½ cup heavy cream
2 large springs of fresh thyme
1 teaspoon Dijon mustard
2 teaspoons cornstarch dissolved in 2 tablespoons water or broth
INSTRUCTIONS
Pat the chicken breasts dry with paper towels. Cut each breast in half diagonally into 2 thinner cutlets. Alternately, place the chicken breasts between two sheets of plastic wrap and pound to an even thickeness.
In a shallow bowl combine the flour, salt, pepper and garlic powder. Set aside.
Add 2 tablespoons butter and 1 tablespoon olive oil to a large skillet. Heat over medium until the butter is melted. Dredge 3 chicken cutlets in the flour mixture, coating both sides, shaking off the excess flour. Add the coated chicken to the skillet and cook until lightly browned, about 5 minutes. Turn and cook another 3-5 minutes. Remove the cooked chicken to a plate and cover to keep warm. Repeat until all chicken is browned.
Add remaining 2 tablespoons butter to the pan and heat until melted. Add the sliced mushrooms and cook, undistrubed, until the mushrooms are well browned on one side. Stir and turn the mushrooms and continue cooking until the moisture is released and evaporated, and the mushrooms are all well browned.
Add the sliced shallots to the pan and cook until softened. Add the minced garlic and sauté for 30 seconds or until fragrant. Pour the wine into the pan and scrape the bottom to deglaze. Add the thyme sprigs, chicken broth, mustard and cream. Bring to a boil and cook for 5 minutes. Stir in the dissolved cornstarch. Bring the sauce back to a light simmer and add the chicken. Heat and simmer for 5 minutes or until the sauce is thickened and the chicken warmed through. Remove the thyme sprigs, and season the dish with salt and pepper to taste.
Garnish with parsley or additional thyme and serve with rice, potatoes or noodles.
NOTES
Any dry white wine will do for this sauce. For this recipe I typically use a Chardonnay. If you don't drink wine, substitute white grape juice or additional chicken broth in this recipe.
If you prefer more sauce / gravy, double the ingredients starting with 2 extra tablespoons of butter in Step 4. Then double the amount of mushrooms, shallots, garlic, wine, thyme, chicken broth, mustard and cream.
Enjoy!
Don’t forget to pin and save for later! 🙂

easy dinner recipes for a family
3. Mashed Potato Casserole with Crispy Chicken
This mouth-watering mashed potato casserole is topped with Corn, Cheddar Cheese, Crispy Chicken Strips, and a drizzle of brown gravy! It’s easy to make ahead of time and bake later for a easy dinner recipes for a family.

easy dinner recipes for a family
INGREDIENTS
5-6 cups mashed potatoes
1 cup corn
1 cup cheddar cheese, freshly grated
6 Frozen Chicken Strips
.87 oz. packet Brown Gravy Mix
INSTRUCTIONS
Preheat the oven to 400 degrees Fahrenheit.
Take out your chicken strips and let them sit at room temp for about 5 minutes if you prefer to slice them first.
Spread the potatoes on the bottom of a 9 x 13 casserole dish.
Note: If your mashed potatoes are cold, warm them first.
Top with corn and cheese.
Carefully slice the chicken strips into pieces of desired size and top the casserole dish with them.
Bake for 20 minutes, until the chicken is crisp.
Prepare the gravy on the stove top according to package instructions while the casserole finishes baking.
Drizzle desired amount of gravy over the casserole dish and serve!
NOTES
Milk may be used instead of half and half. You can also use cream for ultimate decadence.
If you prefer a creamier consistency, additional milk or half and half may be added to the mashed potatoes until your desired consistency is reached.
For quicker mashed potatoes, you can peel them and slice them into thirds of equal size so that they finish boiling more quickly.
Don’t forget to pin and save for later! 🙂

easy dinner recipes for a family
4. Honey Mustard Chicken
Honey Mustard Chicken baked with potatoes and green beans in ONE PAN for a flavor bursting meal-in-one OR just bake the chicken super easy dinner recipes for a family!

easy dinner recipes for a family
INGREDIENTS
Chicken
4 boneless, skinless chicken fillets (large chicken breasts sliced through the equator)
1/4 cup kosher salt
4 cups warm water
olive oil
1 tsp EACH garlic powder, onion powder, paprika, dried parsley, salt
1/2 teaspoon pepper
Pinch-1/8 teaspoon cayenne pepper
Honey Mustard Sauce
1/3 cup honey
2 tablespoons Dijon mustard
2 tablespoons stone ground mustard
2 tablespoons yellow mustard
Vegetables (optional)*
2 tablespoon olive oil divided
salt and pepper
2 lbs. red potatoes cut into 1/2” cubes
1 lb. green beans ends trimmed
INSTRUCTIONS
Combine warm water and kosher salt together in a glass dish. Stir until the salt dissolves. Add chicken and let sit at room temperature for 15-30 minutes while you prep the rest of your ingredients. Remove chicken from the brine, rinse in cold water and pat dry.
Meanwhile, whisk together honey mustard sauce ingredients in a small bowl. Remove 1/4 cup (to coat chicken before it bakes). Set aside.
Add potatoes to a microwave safe dish. Add enough water to fill 1/4” up the sides. Cover, and microwave for 6 minutes. Drain water and add potatoes to a lightly greased 9x13 baking dish. Add one tablespoon olive oil, 3/4 teaspoon salt and 1/4 teaspoon pepper. Toss to evenly coat then divide potatoes in half and push to the sides of the pan, making room for the green beans down the middle (see photos in post).
While the green beans are on the cutting board, toss with 1 tablespoon olive oil, 1/4 teaspoon salt and 1/8 teaspoon pepper. Line green beans down the center of the pan in between the potatoes (they will not be in a single layer but slightly overlapping).
Add 1 tablespoon olive oil and all “chicken seasonings” to a large bowl; stir together to make a wet rub. Add chicken and massage spices into the chicken with hands. Using the 1/4 cup reserved Honey Mustard Sauce, coat both sides of the chicken evenly in sauce. Transfer chicken to baking dish, and spoon over any remaining sauce/spices from the bowl.
Cover pan with foil and bake at 400 degrees for 25 minutes. Uncover and check for doneness with a meat thermometer. If needed, continue to bake, uncovered, an additional 10-20 minutes OR until chicken is cooked through (an instant read thermometer should register 165 degrees F, cooking time may be more or less depending on thickness of chicken). Let chicken rest 5-10 minutes before slicing chicken. Serve with remaining Honey Mustard Sauce.
NOTES
Also try this Keto Dinner Recipes
Don’t forget to pin and save for later! 🙂

easy dinner recipes for a family
5. Mongolian Beef
Delicious Mongolian Beef Recipe is made with juicy beef strips, sauteed bell peppers and onion all coated in a delicious savory sauce. It's best served over hot steamed rice.

easy dinner recipes for a family
INGREDIENTS
Mongolian Beef Ingredients
2 lb beef stew tips, flank steak, New York strip steak (extra fat trimmed), cut against the grain into thin strips
1/2 cup cornstarch
1/2 cup neutral oil
4 stalks green onion, green part only, cut into 2 inch pieces
3 bell peppers, cut into strips
1 large onion cut into 1/4 rings
Mongolian Beef Sauce Ingredients
2 tsp ginger powder (or double the amount if using fresh grated ginger)
4-5 garlic cloves , minced
1/2 cup low sodium soy sauce
1/2 cup water
1/2 cup brown sugar
1 tsp Sriracha sauce (add more or less for desired spiciness)
INSTRUCTIONS
In a ziplock bag combine the 1/2 cup cornstarch and 2 lb of cut into strips, close it and shake for the beef strips to be fully and evenly coated in cornstarch.
Preheat a large skillet over high heat, then add enough oil to coat the bottom of the skillet. Next, add 3 cut up bell peppers and quickly cook them for about 3-4 minutes, stirring often. As soon as the bell peppers are browned slightly, remove them to a separate bowl.
Do not overcook them, they should still have a bit of a bite to them.
Lastly, tilt the skillet to the side and remove the bell peppers to a separate bowl, leaving the oil behind.
Add the onions to the skillet and sear for about 3-4 minutes, just trying to char up the sides. Add more oil if needed. Tilt the skillet and remove the onion to the bowl with peppers, leaving the oil behind.
Next, add the rest of the oil and add the beef strips, shaking off the excess of cornstarch and cook in a single layer in batches for about 1 minute per side. Transfer the cooked beef to a separate bowl.
Do not overcrowd the pan. Beef needs to be seared, not cooked in its own juices.
Keep adding the oil as needed after cooking each batch.
Mongolian Beef Sauce
Drain off the remaining oil from the skillet leaving the stuck on beef bits.
Next add 1/2 cup of soy sauce, 1/2 cup water and 1/2 cup brown sugar, 2 tsp of ginger powder and the 4 cloves of minced garlic to the pan and let it come to a boil, scraping off the bits off the bottom of the skillet.
Boil for about 1-2 minutes to reduce the sauce.
Then, add Sriracha sauce if desired.
Bring everything together
Add the beef back into the sauce and stir to coat it in the sauce.
Allow to come to a boil, which should thicken the sauce.
Next add the bell peppers, cooked onion, and the green onion stalks and stir to heat through.
NOTES
Also try this 14 Healthy Recipes to Lose Weight
Don’t forget to pin and save for later! 🙂

easy dinner recipes for a family
6. Sun-Dried Tomato Pasta with Chicken and Creamy Mozzarella Sauce
This easy dinner recipes for a family - Italian-inspired Chicken Mozzarella Pasta features sun-dried tomatoes, garlic, basil, red pepper flakes, and paprika. The sun-dried tomato sauce is the star of this recipe!

easy dinner recipes for a family
INGREDIENTS
3 garlic cloves , minced
4 oz sun-dried tomatoes
2 tablespoons olive oil
1 lb chicken breast tenderloins , sliced
1/4 teaspoon salt
1/4 teaspoon paprika
1 cup half and half (or use 1/2 cup heavy cream + 1/2 cup milk)
1 cup mozzarella cheese , shredded (do not use fresh Mozzarella, use pre-shredded Mozzarella)
8 oz penne pasta (for gluten free, use gluten free brown rice pasta)
1 tablespoon basil
1/4 teaspoon red pepper flakes
1/2 cup reserved cooked pasta water or more
1/4 teaspoon salt to taste
INSTRUCTIONS
In a large skillet, sauté garlic and sun-dried tomatoes (drained from oil) in 2 tablespoons of olive oil (reserved from the sun-dried tomatoes jar) for 1 minute on medium heat until the garlic is fragrant.
Remove the sun-dried tomatoes from the skillet, leaving the olive oil.
Add sliced chicken (salted and lightly covered in paprika for color) and cook on high heat for 1 minute on each side. Remove from heat.
Cook pasta according to package instructions. Reserve some cooked pasta water. Drain the pasta.
Slice sun-dried tomatoes into smaller pieces and add them back to the skillet with chicken.
To make creamy pasta sauce, add half-and-half (see substitution for half-and-half in the Recipe Notes section below) and Mozzarella cheese to the skillet, and bring to a gentle boil.
Immediately reduce to simmer and cook, constantly stirring, until all cheese melts and creamy sauce forms.
Add cooked and drained pasta to the skillet with the cream sauce, and stir to combine.
Add 1 tablespoon of basil, and at least 1/4 teaspoon of red pepper flakes. Stir to combine.
If the creamy sauce is too thick: Add about 1/2 cup of reserved cooked pasta water to the skillet to thin it out. Do not add all of pasta water at once - you might need less or more of it.
Season the chicken pasta with salt and more red pepper flakes, to taste, if needed. Let it simmer for a couple of minutes for flavors to combine.
Note: Make sure to salt the dish just enough to bring out of the flavors of basil and sun-dried tomatoes.
NOTES
What is half-and-half? Substitute 1/2 cup of milk + 1/2 cup of heavy cream for 1 cup of half-and-half.
If using sun-dried tomatoes in olive oil (in a jar), make sure to drain sun-dried tomatoes from oil, before using them. Reserve 2 tablespoons of this drained olive oil.
Do not use fresh Mozzarella.
Fresh Mozzarella is usually sold as a large ball or small balls in a brine or water solution.
Do not shred fresh Mozzarella.
Use pre-shredded Mozzarella cheese sold in bags.
Don’t forget to pin and save for later! 🙂

easy dinner recipes for a family
7. Crack Chicken
Quick and easy crack chicken recipe is made in the Crockpot! Tender, chicken with cream cheese, bacon, cheese and Ranch seasoning!

easy dinner recipes for a family
INGREDIENTS
2 lbs boneless skinless chicken breasts
1 oz packet ranch seasoning mix
2 packages cream cheese 8 oz each, cubed
2.8 oz bacon bits
1 c. shredded cheddar cheese
INSTRUCTIONS
Spray crock pot with non stick spray. Place the chicken breasts on the bottom of the crock pot. Top with ranch seasoning and cubed cream cheese.
Cook on low 6-8 hours or on High for 4 hours.
When cooking time is done shred the chicken with two forks. Then add the cheese and bacon. Stir to combine and cook on low for about 10-15 minutes or until cheese is melted.
Serve on buns or how ever you would like to enjoy it!
NOTES
Also try this 14 Simple Meal Plan to Lose Weight
Don’t forget to pin and save for later! 🙂

easy dinner recipes for a family
8. Chicken Fajita Casserole
Skillet Chicken Fajitas Bake (Low Carb and Keto) is a super delicious and easy dinner recipes for a family! Make in one pan from stovetop to oven. Full of all your favorite fajitas flavors, but in a tasty casserole.

easy dinner recipes for a family
INGREDIENTS
1 tbsp olive oil
6 boneless skinless chicken thighs, cut into 1" to 2" pieces
4 bell peppers, sliced (vary the colors to make it pretty!)
1 small onion, sliced
1 pkg taco seasoning mix, or easy homemade recipe: Copycat Taco Seasoning Mix
1 cup sour cream
4 oz of cream cheese, softened
2 cups cheddar cheese, grated
INSTRUCTIONS
Preheat oven to 350 degrees F. Over medium heat, saute the chicken in olive oil until chicken is done. Remove from skillet and set aside.
Add onions and peppers and saute until tender. Add chicken back to pan and stir in taco seasoning, sour cream, and cream cheese. Mix well.
Sprinkle with cheese and bake in oven for 20 minutes or until cheese is bubbly.
NOTES
Serve and enjoy!
This is really good topped with avocado, guacamole, sour cream, or salsa. Yum.
Don’t forget to pin and save for later! 🙂

easy dinner recipes for a family
9. Easy Chicken Fried Rice
This easy chicken fried rice recipe is loaded with veggies. Better than takeout, this version of chicken fried rice is easy to make, tastes great and perfect for meal prep.

easy dinner recipes for a family
INGREDIENTS
2 cups cooked white rice Jasmine or Basmati
3 tablespoons plus 1 teaspoon canola or vegetable oil divided
1 boneless skinless chicken breast
1 small yellow onion diced
1 medium carrot peeled & diced
3 scallions thinly sliced diagonally
2 medium cloves garlic minced
3 teaspoons low sodium soy sauce
2 teaspoons toasted sesame oil
kosher salt & freshly ground black pepper to taste
1 tablespoon mirin
1 cup frozen baby peas
2 large eggs lightly beaten
INSTRUCTIONS
Cook the rice according to package directions – after cooking, pour it on a plate and set aside to cool completely. Once the rice has cooled completely, break it up with your hands into individual grains.
Heat 1-tablespoon oil in a 12-inch nonstick skillet (or wok), over high heat, until smoking. Add the rice, cook and stir 3-4 minutes or until the rice just begins to turn a little darker. Transfer the rice to a small bowl and set aside.
Turn heat to medium, heat 1-tablespoon of oil and place the chicken breast in the skillet. Cook 3 minutes on each side. Transfer the chicken to a cutting board, cut into very thin slices and then cut the slices into thirds.
Heat 1-tablespoon oil in the skillet and add the diced onion, carrot, scallions and garlic. Cook, stirring continuously, 2-3 minutes or until carrots are just lightly tender and onions are translucent.
Add the rice and peas and stir to combine.
Add the cooked chicken, soy sauce, sesame oil and mirin, stir and cook another 2 minutes.
Season to taste with kosher salt and freshly ground black pepper.
Push the chicken rice mixture to the sides of the skillet and add 1-teaspoon oil to the middle of the skillet.
Add the lightly beaten eggs and season with salt & pepper. Scramble the eggs and stir to combine with the chicken/rice mixture.
Cook, stirring continuously, 3-4 minutes, to give time for the flavors to meld.
Serve immediately and…
Enjoy!
Don’t forget to pin and save for later! 🙂

easy dinner recipes for a family
10. Granny's Classic Beef and Noodles
Beef and Noodles using Granny's classic easy 5-ingredient recipe made even quicker in the Instant Pot, but can be made using the crockpot or stove top too.

easy dinner recipes for a family
INGREDIENTS
1 tbsp olive oil
1 pound beef stew meat (cut into one inch pieces)
22 ounces cream of mushroom soup (two 11-ounce boxes from Trader Joe's recommended)
2 tbsp onion dip mix
1 cup beef broth
8 ounces egg noodles
INSTRUCTIONS
Add olive oil to pressure cooker pot and set to saute function. Divide meat in half and brown the first half, turning only once. Remove from pot and set on plate. Brown second half of meat.
Add first batch of meat back to the pressure cooker along with any juices that may have accumulated on the plate. Add cream of mushroom soup, onion dip mix, and beef broth. Stir to mix.
Close lid and set to high pressure for 15 minutes. When done, allow to release naturally.
When meat is cooking, cook egg noodles in salted boiling water to al dente doneness, drain, and set aside.
To serve, top egg noodles with beef and mushroom mixture.
NOTES
To cook on stove:
Brown meat in heavy bottom pot over medium high heat using same procedure. Once all ingredients (not the egg noodles which will need to be cooked separately) have been added to pot, cover and allow to braise at a simmer for at least an hour.
To cook in slow cooker:
Brown meat in heavy bottom pot over medium high heat using same procedure. Transfer to slow cooker with remaining ingredients (not the egg noodles which will need to be cooked separately). Cover and cook on high for 2 hours or low for 6-8 hours.
Don’t forget to pin and save for later! 🙂

easy dinner recipes for a family
11. Poor Man’s Hamburger Steaks
Easy, rich, and creamy, this poor man's steaks recipe is packed with flavor. Ground beef is perfectly seasoned and covered in a simple, delicious gravy.

easy dinner recipes for a family
INGREDIENTS
2 pounds ground beef
1 ½ cups saltine crackers crushed
1 cup whole milk
½ teaspoon Italian seasoning
½ teaspoon garlic powder
½ teaspoon onion powder
½ teaspoon paprika
¼ teaspoon cayenne
Salt and pepper to taste for the patties
1 cup flour for dredging or more if needed
Salt and pepper to taste for the flour dredge
2 tablespoon butter
1 tablespoon olive oil
Gravy Ingredients:
2 cans 10.75 oz condensed cream of mushroom soup
1 ½ cups whole milk
1 ½ tablespoons fresh parsley chopped
INSTRUCTIONS
Preheat oven to 350 degrees and spray a 9x13-inch baking dish with nonstick spray.
In a medium bowl, whisk together the cream of mushroom soups and milk and then stir in the chopped parsley. Set aside.
In a large bowl, combine the ground beef, crushed saltines, milk, Italian seasoning, garlic, onion powder, paprika, and cayenne pepper. Season with salt and pepper to taste.
Using a spoon or your hands, combine the ingredients until mixed. Gently form into even-sized patties.
Place 1 cup of flour in a shallow dish. Season the flour with salt and pepper. Dredge all the patties in the flour.
Heat a large skillet over medium-high heat and melt the butter and add the olive oil. Once hot, sear patties on both sides until golden brown. Work in batches. It will continue cooking in the oven.
Transfer the browned patties to the greased baking dish. Pour the gravy evenly over the top of the patties. Cover the dish with aluminum foil.
Place baking dish in the oven and bake for 30-40 minutes or until cooked through.
Don’t forget to pin and save for later! 🙂

easy dinner recipes for a family
12. Monterey Chicken Bake
Monterey Chicken is not only DELICIOUS, but quick and easy to make with only 6 ingredients and one pan. The combination tangy BBQ sauce, smokey bacon, and rich colby jack cheese makes this a meal the whole family will love!

easy dinner recipes for a family
INGREDIENTS
2 lbs boneless skinless chicken breast thinly cut or pounded
6 tbsp BBQ sauce
4 oz bacon regular or thin sliced
4 oz grape tomatoes quartered
1 cup colby jack cheese shredded
2 green onions sliced
INSTRUCTIONS
Preheat the oven to 425˚F. Place chicken flat in the bottom of a baking dish. Spread 1-2 tbsp BBQ sauce on each chicken breast.
Cut the bacon into slices equal to the size of the chicken breast and lay it over the top of the chicken. Bake uncovered for 20 minutes. If you want crispier edges on your bacon, broil for 2-5 additional minutes.
Remove from oven and sprinkle cheese over the top, then turn oven to 350˚F and cook for 5 additional minutes, or until chicken is cooked through (165˚F internal temp.)
Once done, sprinkle tomatoes and green onions over the top. Serve warm. Enjoy!
NOTES
To make this dish with crispy bacon:
pre-cook the bacon to your desired level of crispiness.
Reduce the cooking heat of the recipe to 350˚F. Bake the chicken covered in BBQ sauce for 20-25 minutes or until it is no longer pink.
Top each chicken breast with the crispy bacon, cover with cheese, and put back into the oven for 3-5 minutes or until the cheese is completely melted.
Remove and continue with recipe as directed.
Don’t forget to pin and save for later! 🙂

easy dinner recipes for a family
13. One Pot Cheesy Chicken Broccoli Rice
One pot cheesy chicken broccoli rice is a quick & easy skillet dinner. Broccoli, rice, chicken chunks, and cheese cook in one pot for a delicious dinner.

easy dinner recipes for a family
INGREDIENTS
2 tablespoons olive oil
3 boneless, skinless chicken breasts (cut into small, bite-sized pieces)
1 teaspoon salt
1/4 teaspoon pepper
1 cup uncooked basmati OR long-grain rice
2 1/2 cups chicken broth
1 bag (12 oz) frozen steamable broccoli (about 2 cups chopped broccoli)
2 cups shredded Colby Jack cheese
INSTRUCTIONS
In a 12-inch skillet pan (make sure it has a lid) heat olive oil over medium-high heat. Add in the chunked, bite-sized chicken, and sprinkle with salt & pepper. Cook 4-6 minutes, stirring frequently, until chicken is mostly non-pink in the middle.
Add rice and chicken broth. Bring to a boil. Once boiling, cover with lid, and reduce heat to medium-low. Simmer for 12-15 minutes or until water is absorbed and rice is cooked.
While rice and chicken is simmering, cook the microwaveable broccoli in the microwave following the instructions on package. Once done, chop up the broccoli into smaller pieces, if wanted.
When rice is done cooking, add broccoli and 1 cup of the cheese into the skillet pan. Stir together. Top with the remaining 1 cup shredded cheese and cover with the lid. Let cook for about 2 more minutes or until cheese is melted.
Serve immediately.
NOTES
You can use long-grain white rice instead of the basmati. I just love basmati rice because it cooks up perfectly and is always no-fail.
If you don't want to use the 12 oz bag of microwaveable broccoli, simply cook fresh broccoli in a pot, and then chop it and add it to the skillet pan. Using the microwaveable broccoli makes it so easy and quick.
I like to drain some of the water/chicken juices that are in the pan after cooking the chicken. You don't have to, but I like to.
If your chicken breasts are big then only use 2.
Don’t forget to pin and save for later! 🙂

easy dinner recipes for a family
14. Baked Honey Mustard Chicken
Baked Honey Mustard Chicken - The classic combination of honey and mustard smothered all over tender chicken breasts and baked to a succulent perfection.

easy dinner recipes for a family
INGREDIENTS
4 (4 ounces each) boneless, skinless chicken breasts
1 teaspoon (or to taste) chicken seasoning blend <-- click here for the recipe
1-1/2 tablespoons olive oil, divided
1/4 cup honey
1 tablespoon dijon mustard
1 tablespoon yellow mustard
1 tablespoon wholegrain mustard
1/2 teaspoon white vinegar
1/8 teaspoon paprika
4 sprigs fresh rosemary, optional but recommended
INSTRUCTIONS
Preheat oven to 375°F.
Lightly grease a 9x13 baking dish with cooking spray and set aside.
Heat 1 tablespoon olive oil in a skillet.
Season chicken breasts all over with the chicken seasoning blend and add chicken breasts to the skillet; cook for 2 minutes on each side, or until browned.
In the meantime, prepare the honey mustard sauce.
Combine 1/2 tablespoon olive oil, honey, mustards, white vinegar, and paprika in a small mixing bowl; whisk until well combined.
Transfer chicken breasts from skillet to previously prepared baking dish.
Pour prepared honey mustard sauce over the chicken breasts, turning chicken over so to cover each chicken breast entirely.
Lay sprigs of rosemary between chicken breasts.
Cover with foil and bake for 20 minutes.
Remove cover and continue to bake for 15 minutes more, or until chicken is cooked through. Cooking time will vary depending on the size/thickness of the chicken.
Remove from oven and let stand 5 minutes.
Serve.
Don’t forget to pin and save for later! 🙂

easy dinner recipes for a family
0 notes
Text
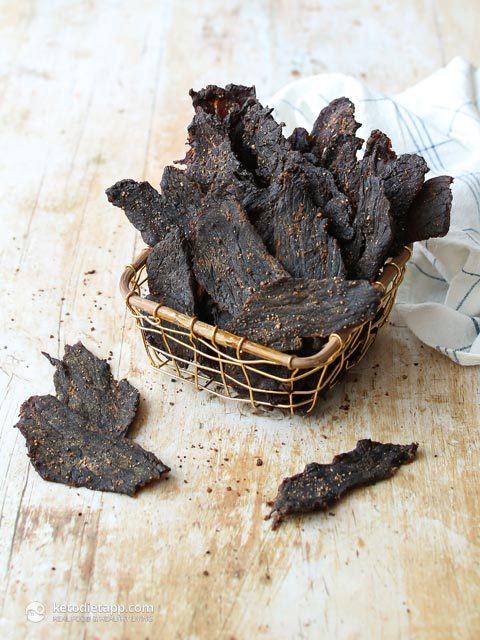
The Best Low-Carb Homemade Beef Jerky
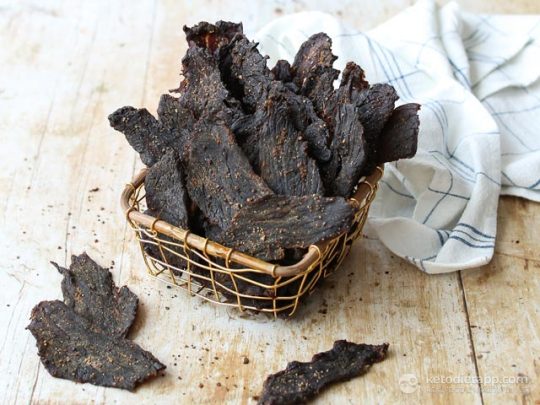
Have you ever tried making your own beef jerky? It's a healthy snack that is high in protein and almost zero-carb. Making jerky at home is really easy and you won't even need a dehydrator. All you need is an oven!
I love making low-carb jerky because it's a fantastic travel-friendly snack — it lasts for months without refrigeration. Dehydration (removing water from food) helps preserve it, and using salt adds another level of protection.
I keep some jerky at hand when I travel, or just in case I get hungry and have no time to cook. It's also ideal for camping and even makes a great edible gift.
Why Make Your Own Jerky?
Most jerky products contain sugar, MSGs, caramel colouring and starches. Although there are a few sugar-free products that are made with simple whole foods and organic meat, they can be really pricey. Homemade jerky is not just delicious, it's a lot less expensive and you have complete control over what's going into it.
How to Make the Best Homemade Jerky
It's really simple — you just need to follow the following steps:
Use lean meat cuts and part-freeze them to make them easy to slice.
Using a sharp knife, slice as thin as you can.
Marinate the sliced meat (ideally overnight).
Dehydrate on oven racks with a tray positioned in the bottom part to collect the juices, and leave the oven door slightly open using a wooden spoon so that the meat dehydrates rather than cooks.
When done, leave at room temperature to cool down and dry out.
Store in a sealed jar at room temperature for months.
Tweaks & Substitutions
This homemade jerky recipe is so versatile! You can skip the sweetener, add herbs or sub any of the spices with your favourites. To make the marinade, I used coconut aminos but feel free to swap it with tamari sauce (fermented gluten-free soy sauce) if you can tolerate it. If you can't eat beef or simply want to try other equally delicious options, try lean pork such as tenderloin, chicken, turkey or duck breasts (without the skin). The options are endless! Just remember to use lean cuts as excess fat would slow down the dehydration process.
Compared to most recipes you'll find online, mine uses less marinade, just enough to add flavour without wasting ingredients. In fact, I found that using less marinade that is more concentrated makes the jerky more flavourful.
If you don't like your jerky too hard or chewy, make sure to cut it against the grain, or try this Soft & Tender Beef Jerky made with ground meat that also includes a quick video tutorial.
Now let's make some jerky — I hope you like it as much as I do!
Preparation time
Hands-on: 20 minutes Overall: 12 hours
Nutritional values (per serving, 57 g/ 2 oz)
Total Carbs 2.8 grams Fiber 0.5 grams Net Carbs 2.4 grams Protein 30.2 grams Fat 7.7 grams of which Saturated 2.8 grams Energy 209 kcal Magnesium 44 mg (11% RDA) Potassium 522 mg (26% EMR)
Macronutrient ratio: Calories from carbs (5%), protein (61%), fat (34%)
Ingredients (makes about 450 g/ 1 lb jerky)
1.1 kg lean beef such as skirt, flank, brisket, top round or sirloin (2.5 lbs) - the leaner the meat, the better
1/2 cup coconut aminos or tamari sauce (120 ml/ 4 fl oz)
2 tbsp fish sauce or more coconut aminos (30 ml)
1 tbsp coconut vinegar or apple cider vinegar (15 ml)
2 tsp onion powder
2 tsp garlic powder
1 tsp smoked paprika
1 tbsp coarse black pepper
1-2 tsp smoked sea salt or plain sea salt (I used 2 tsp)
2 tbsp brown sugar substitute such as Sukrin Gold or just use Erythritol or Swerve (20 g/ 0.7 oz)
Optional: 1 tbsp chile pepper flakes or 1/2 tsp cayenne pepper
Instructions
Before you slice the meat, place it in the freezer for 1 to 2 hours. The aim is to part-freeze it so that it's easy to slice really thin.
Once ready, use a sharp knife and slice the meat into long strips as thin as you can. I slice mine to less than 1/2 cm (1/4 inch). You can also ask you butcher to slice it for you. Note: Slice the jerky to your preference. Slicing the meat against the grain will result in jerky that is easier to chew as it will break more easily as you chew it. If you slice it with the grain, it will be more chewy and harder to break apart.

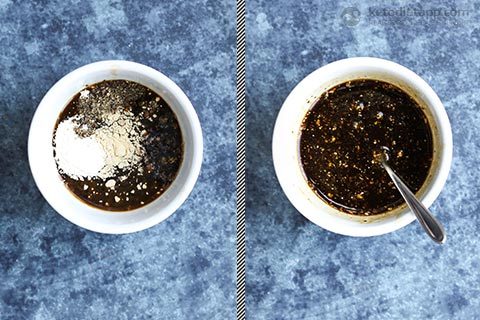
Prepare the marinade by mixing the coconut aminos, fish sauce, coconut vinegar, onion powder, garlic powder, smoked paprika, freshly ground coarse black pepper, smoked salt and brown sugar substitute. Optionally, add chile flakes or cayenne pepper if you want to add some heat.
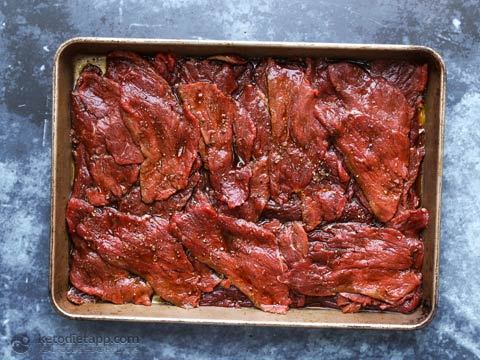
Use a baking tray deep enough to fit all the meat. Brush the bottom of the tray with some marinade. Place the first layer of the meat slices inside the tray and brush the tops with the marinade.
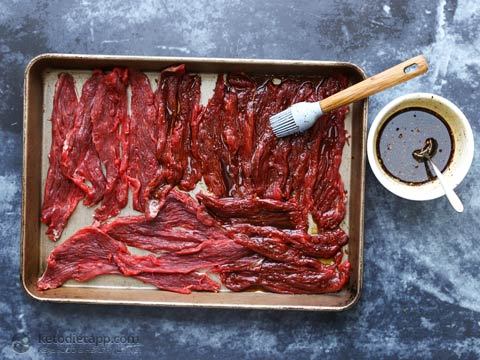
Place another meat layer on top and brush again with more marinade.
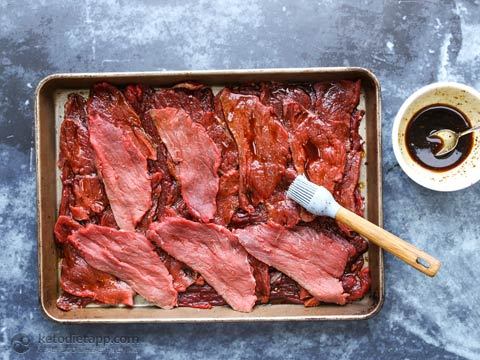
Repeat until all of the slices are in the tray. Cover with a cling film. Place in the fridge for 8 hours to marinate, or ideally overnight.
When the meat is ready, preheat the oven to 70 °C/ 160 °F (fan assisted), or 90 °C/ 195 °F (conventional). Lay the slices on clean racks (or a heatproof wire rack or a mesh net tray) and transfer into the top part of the oven. Note: Keeping the oven door slightly open will help dehydrating the meat without cooking it. A wooden spoon or a crunched can inserted in the top of the door work best. Thanks to The Art of Manliness for this great tip!

Place a baking tray in the bottom section of your oven ready to collect all of the juices dripping from the meat (otherwise your oven will get really messy).
Dehydrate for 3 to 4 hours. The exact time depends on the thickness and position of the racks. The top rack will dehydrate faster than any racks below as the juices will drip down.
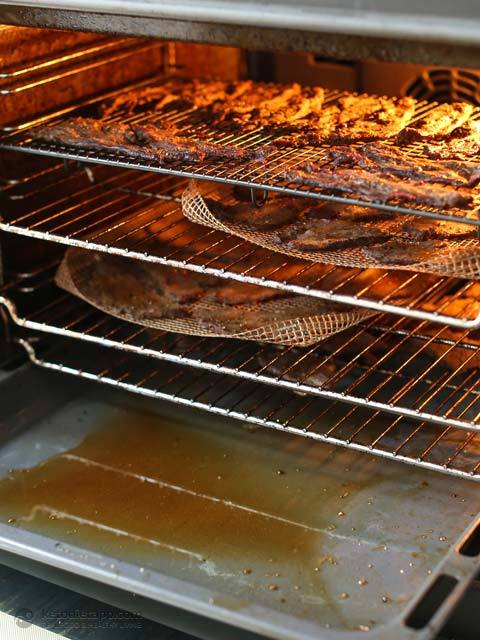
The jerky is done when it’s dry and it snaps when you bend it. Remove the jerky from the oven and let it cool down. You can leave it out for up to 24 hours. The longer you leave it, the drier it will get. Storage: Properly dehydrated jerky is travel-friendly. Keep it in a sealed jar or a Ziploc bag at room temperature for 3-4 months.
https://ift.tt/2HHUXSn
0 notes
Text
Arrachera (Best Mexican Skirt Steak)-Ultimate in Beef Tacos
Do You Know Arrachera is the meat taken from Cow ribs. Arrachera (Skirt Steak) is more delicious if you make very thin Steak. The more you marinate the better flavor you get. One of the most popular cuts is Arrachera from Northern Mexico. It is typically cooked with high heat for a short time. Ingredients 2 lbs. arrachera skirt steak12 corn tortillasSalt1 bunch of spring onions.2 cups of your favorite salsa - ( fresh salsa verde)8 limes

Directions for making Arrachera Preheat a pan to medium hot and place the spring onions in the pan. Soute the onions untill it turns brown. Repeat until the onions are browned on all sides. Set it aside.Slice the meat into 3/4" wide strips and about 3" long. Thinner the strip better. Sprinkle a portion of lime juice, sazon, salt and adobo seasoning(Amount of seasoning used vary to your family's requirement). Top it with onion and stack the strips layer by layer and marinate for 12 hour in refridgerator. You can add beer if you like(Optional).Preheat the grill to medium-high. Discard marinade. Grill steak until lightly charred on the outside but still slightly tender in the center for medium doneness, 6 to 7 minutes per side.Place a 2 or 3 strips of the cooked meat on a warm tortilla and serve with your favorite salsa, charred spring onions and sliced limes. When Buying Arrachera from Mexican Grocery Store ask them to run through the machine to tenderize the meat. Is Arrachera same as Carne Asada? Carne asada means grilled beef in Spanish. The king of cuts for making carne asada is arrachera, or skirt steak. It's the taste that comes to mind when you think carne asada. Skirt steak is now the second most expensive cut of beef, wholesale, with only the tenderloin costing more. How do you cut Arrachera Steaks? https://www.youtube.com/watch?v=-pncWvsLfh0 What kind of meat is Arrachera? Arrachera is the meat taken from cow ribs. But commonly they use Skirt steak also which is the thin muscle of the diaphragm. What is the Best method marinate Arrachery Skirt Steak? First prepare the marinade with (Common options) lemon or lime juice, vinegar, buttermilk or even yogurt can help tenderize tough proteins. Keep it in refridgeration to Marinate for 3 to 4 hours before grilling, but no more than 10 hours. Remove the skirt steak from the marinade and clean away any excess marinade with the back of a knife
Arrachera (Best Mexican Skirt Steak)-Ultimate in Beef Tacos

Arrachera (Skirt Steak) is more delicious when to make the Steak very thin. The more you marinate the better flavour you get. One of the most popular cuts is Arrachera from Northern Mexico. It is typically cooked with high heat for short time.", "2 lbs. arrachera skirt steak""12 corn tortillas""Salt""1 bunch of spring onions.""2 cups of your favorite salsa - (fresh salsa verde",)"8 limes" "Preheat a pan to medium hot and place the spring onions in the pan. Soute the onions untill it turns brown. Repeat until the onions are browned on all sides. Set it aside.","Slice the meat into 3/4" wide strips and about 3" long. Thinner the strip better. Sprinkle a portion of lime juice, sazon, salt and adobo seasoning(Amount of seasoning used vary to your family's requirement). Top it with onion and stack the strips layer by layer and marinate for 12 hour in refridgerator. You can add beer if you like(Optional).","Preheat the grill to medium-high. Discard marinade. Grill steak until lightly charred on the outside but still slightly tender in the center for medium doneness, 6 to 7 minutes per side.","Place a 2 or 3 strips of the cooked meat on a warm tortilla and serve with your favorite salsa, charred spring onions and sliced limes."
Nutritional Facts
Arrachera (Mexican Skirt Steak for Tacos)
Servings Per Recipe: 6 Calories: 174 % Daily Value * total fat: 6.4g 10 % saturated fat: 2.6g cholesterol: 34mg 11 % sodium: 414mg 17 % potassium: 288mg 8 % carbohydrates: 6.2g 2 % fiber: 1.2g 5 % sugar: 1g protein: 18.9g 38 % exchange other carbs: 1 vitamin a iu: 22IU niacin equivalents: 7mg vitamin b6: 0mg vitamin c: 7mg folate: 15mcg calcium: 29mg iron: 2mg magnesium: 23mg thiamin: 0mg *Percent Daily Values are based on a 2,000 calorie diet. Your daily values may be higher or lower depending on your calorie needs. **Nutrient information is not available for all ingredients. Amount is based on available nutrient data. (-)Information is not currently available for this nutrient. If you are following a medically restrictive diet, please consult your doctor or registered dietitian before preparing this recipe for personal consumption. Read the full article
0 notes
Text
Banh Mi Salad Keto, Paleo, Whole30
Banh Mi Salad. This is a delicious take on Vietnamese classic sandwich, the Bánh mì. Keto, paleo, Whole30 and gluten-free, this deconstructed take on one of my favorite sandwiches is loaded with flavor, fresh crunchy vegetables and so much color. I cannot wait for you to try this one.
Alright all my keto, paleo, Whole30 pals, you didn’t think I would leave you hanging on this whole Banh Mi thing, did you? I shared my delicious gluten-free Banh Mi Sandwich a few weeks back, as part of a Sammie Smackdown Contest with Canyon Bakehouse, all for a very good cause, but a lot of you, like me, are generally on that grain-free train. I feel ya, I feel better that way, too! But, there’s no reason we can’t get it on these sammie vibes, in our own way. Enter the Banh Mi Salad, my new favorite thing!
I entered my tasty take on this classic Vietnamese sandwich, the Banh Mi, to try to win $10,000 for my charity, Joyful Heart Foundation. Joyful Heart is a leading national organization with a mission to transform society’s response to sexual assault, domestic violence, and child abuse and support survivors’ healing. Through healing, education, and advocacy, they are paving the way for innovative approaches to treating trauma, igniting shifts in the way the public views and responds to these horrific acts of violence and reforming legislation to ensure justice for survivors – and ultimately working to end this violence, forever!
Voting is still open. It remains open until August 20th and you can vote up to 3 times a day for my sandwich, with extra votes coming in if you share on social media and sign up through email to win a years worth of gluten-free bread! Head over to the Sammie Smackdown contest on Canyon Bakehouse’s website and help me by voting EVERY SINGLE DAY until the contest ends on 8/20. It would mean the world to me to win this money for this incredible, privately funded organization, doing such important work.
In the meantime, if sandwiches and bread aren’t so much your thing, you need to make this epic salad, inspired by that sandwich. All the flavors, tastes and vibes, without the bread. (And yes, I am aware that Banh Mi literally translates to bread, so this becomes an oxymoron of sorts, but I am OK with that.) If you are following a paleo or keto approach to your eating or maybe just doing a Whole30 and looking to have something fun, this salad is for you!!
The quick pickled carrot and daikon are one of my personal favorite parts of this salad, with the amazing fresh crunch, the tang of the vinegar, it’s such a fabulous compliment. The fresh herbs, the cilantro and the mint elevate this to a level that is so unique, it’s fresh and flavorful. For greens, there is no wrong answer, go with what you like. I went with a blend of green leaf lettuce, butter lettuce and watercress, my favorites for salads. You can use romaine, spinach, cabbage, spring mixed baby greens, or whatever you like. Of course the sriracha mayo dressing is a total perfect finishing move and it allows you to control the heat, along with the pepper rings. Finally, don’t skimp on the quality proteins, as always you know I want you getting sustainable, properly raised meats, not only will you taste the difference, but it’s better for you and the earth, too!
Protein Swaps: Here’s the thing, once you have the basic elements of this salad, the various flavors and crunchy veggies, the tasty sriracha dressing – you can switch up your protein easily and swap in chicken, shrimp or even tofu, if that’s your jam! Use the marinade from the pork belly and coat chicken breasts or chicken thighs and give it a bake/roast, till it’s cooked through and caramelized on the outside. You can also opt for pork loin instead of pork belly. Keep the ham, or skip it. Toss shrimp in that marinade and pan fry it on the stove top. Same with tofu. Boom. Lots of options. If you are strict no sweeteners, leave out the honey in the marinade, it’ll still be amazing. I have made it both ways.
Banh Mi Salad
6 cups of organic greens, of your choosing (I opted for butter lettuce, green leaf lettuce and watercress)
4 pieces thick cut roasted pork belly strips (or thick-cut bacon), cut into bite sized pieces - see below
4 slices freshly sliced, high-quality gluten-free deli ham, cut into thin strips
Pickled Carrot and Daikon - MAKE AHEAD see below
thinly sliced red chiles or jalapeño
cucumber, thinly sliced or cut into matchsticks
fresh cilantro
fresh mint
Sriracha Mayo Dressing - see below
To compose each of your salad, arrange your greens into your serving bowls or plates. To each salad add the roasted pork belly, ham, thinly sliced cucumber and the chiles or jalapeño, if using.
Finish with a heaping spoonful of the pickled carrots and daikon, a generous bunch of the fresh cilantro and fresh mint. Drizzle the sriracha mayo on top. Enjoy!
You can also use romaine, baby spinach, baby kale, spring greens or other lettuces / greens of your choice. It's a personal preference.
Check out above for other protein suggestions
3.5.3229
Pickled Carrot and Daikon
4 oz carrots - julienned or cut into thin match-like strips
4 oz daikon radish, cut the same way as carrots
2 cups water, slightly warm enough to dissolve the salt and sugar
1 tablespoon sugar (or other sweetener)
1 tablespoon salt
¼ - ⅓ cup* distilled white vinegar or rice vinegar
NOTE: I suggest you start with ¼ cup of vinegar and taste the mixture. If you want it more tangy/vinegary, add more vinegar to taste
In a large bowl, mix the water, sugar, salt and vinegar. Whisk until the sugar and salt are dissolved.
In a clean, glass jar, add the carrots and daikon. Pour the vinegar mixture over until the veggies are completely covered in the liquid.
Cover the jar and place in the refrigerator, at least overnight. The longer it sits the better the flavor. They’ll last up to a few weeks in the fridge.
You can leave out the sugar or sweetener here, if you'd like. It's up to you. I have made this with a couple drops of pure monkfruit, instead of sugar, just to bring a little balance with the sweet, and it was perfect.
3.5.3229
Roasted Pork Belly
½ lb high-quality properly-raised pork belly, cut into thick-cut bacon like slabs or thick-cut bacon. You want four, approximately 6-inch long strips, around ½-inch thick
1 tablespoon honey
½ teaspoon very finely minced garlic
½ teaspoon very finely minced fresh ginger
1 tablespoon fish sauce
1 tablespoon coconut aminos (GF soy sauce or tamari will also work)
sea salt and freshly ground black pepper, to taste
Preheat oven to 400ºF. Line a baking sheet with foil or parchment paper and set an oven-proof rack over the foil. Arrange the bacon in a single layer on the rack.
In a small bowl, whisk together the remaining ingredients. Brush the mixture over the entire surface area of the pork belly or bacon, flip and do the same on the other side.
Bake, rotating the sheet halfway through, until the bacon is brown and shiny, 30 to 40 minutes. Let cool for about 5 minutes, then loosen the slices from the rack with a metal spatula. Continue to cool for another 5 minutes before serving; the bacon will crisp as it cools.
NOTE: cook time will vary based on the thickness of the pork belly or bacon, so best to start checking around 15 to 20 minutes.
You can easily leave off the honey, if you prefer
3.5.3229
Sriracha Mayo Dressing
¼ cup avocado oil mayonnaise
approx 1 teaspoon sriracha, or to taste (as spicy as you’d like)
1 tablespoon fresh lime or lemon juice
water as needed, to thin to your desired consistency.
Whisk together, until well combined. Set aside. Keep refrigerated until ready to build your sammie.
3.5.3229
Source: http://tasty-yummies.com/banh-mi-salad-keto-paleo-whole30/
0 notes
Text
Need A Great Recipe for That Gobbler? Try Cashew Turkey! With the 2018
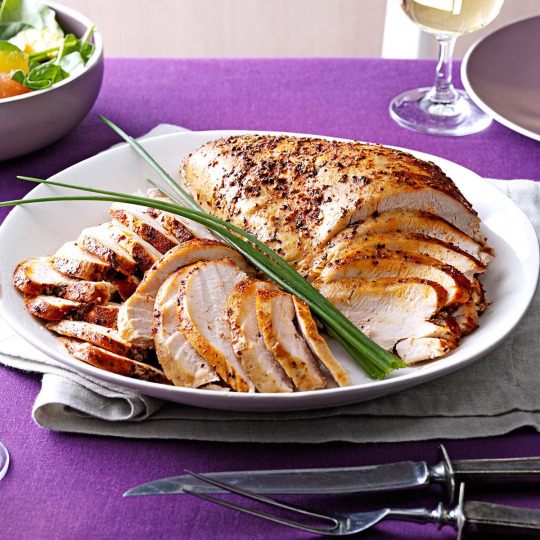
With the 2018 Spring Turkey Season well under way here in North Florida here’s a great recipe for those of you fortunate enough to have harvested a gobbler already.
Like any game, wild turkey is very lean and nutritious.
The biggest problem you face with cooking any wild game meat is overcooking – it’s just easy to end up with meat that’s dry and tough.
Many people have had a bad experience with wild meat because it was poorly cared for and prepared.
Smoking is great, baking is great, but frying is my preference!
Our native Missouri is the home of “Cashew Chicken” (invented in Springfield, MO) and we have yet to find a real cashew chicken place here in North Florida.
My great wife of 37 years has substituted wild turkey for the chicken and for the past twenty years or so we have had many a “Cashew Turkey” meal.
It’s a family favorite and every year we all look forward to a spring time family gathering centered around a large platter fried turkey slathered in cashew sauce ( like we plan to here in a few days:)
Here is our favorite turkey recipe along with a few helpful tips:
CASHEW TURKEY
1 lb. of turkey breast per person
1 egg per pound of turkey
¼ cup milk per egg
Lots of flour, pepper, and salt (easy on the salt if you don’t like salty foods)
Peanut or vegetable oil
Step #1-PREPARE THE MEAT
Remove turkey breast, clean out any feathers and shot you can see
Rinse well, place in a large bowl and soak overnight in water in the fridge
The meat can stay in this condition several days, just make sure you cover the bowl with a lid or clear plastic
When you slice the meat for frying make sure you cut it across the grain (perpendicular to the length of the breast)
Drain and dry the meat before slicing.
Cut the breast into strips first then cut in to cube about ½ -¾ “ square
Examine each cube for shot, feathers, or any dark spots
Cut them out and discard them – nothing worse than biting down on a piece of shot!
Let the cubes set 15 min. or so before moving on
Mix egg, milk, salt, and pepper in a bowl
Dip the meat in the egg mixture then roll in flour, let stand 15 minutes
Dip the meat in the egg mixture again and roll in flour once more – now you are ready to fry!!!
Heat your oil in a large, deep skillet (I use a giant cast iron skillet) or Fry Daddy.
You want it as hot as possible but not smoking or burning
The goal is to cook the meat thoroughly but as quickly as possible without burning or overcooking
When your meat turns a light, golden brown remove it and keep it warm – nothing worse than cold food!
Step #2- PREPARE CASHEW SAUCE (makes at least 4 batches)
3 chicken bouillon cubes
2 cups water
3 tsp. corn starch
2 tsp. sugar
1 tsp. salt (omit salt if you don’t care for salty foods)
1 tsp. soy or oyster sauce
½ cup cashews (unsalted or rinse off the salt)
½ cup green onions
Boil water and dissolve the bouillon cubes
Pre-mix your starch with cold water then pour slowly into the bullion mixture to thicken
Stir and cook for a few minutes over low heat until desired thickens is achieved – not to thick, not to thin
Turn off heat and let sit for 5 or 10 min.
Step #3- SERVE
Arrange 4-6 pieces of turkey on a plate and cover with cashews
Sprinkle with cashew sauce and green onions
I like mine served on a bed of stir fried rice (parboiled rice fried in a lightly oiled skillet with some soy sauce and a scrambled egg or two thrown in) or you can serve fried rice on the side
This is my favorite way to enjoy wild turkey and I have no doubt you will enjoy it as well.
If the season happens to leave you empty handed domestic chicken or turkey will work as well.
A special word of thanks to my wife, Karla, for the THOUSANDS of wild game and domestic meals she has so faithfully prepared over the years – you’re the greatest!!
Jeremiah and I are currently strategizing and preparing for our next turkey hunt coming up this weekend – we’re hoping to get the boys on a tom!
We hope you will soon be enjoying your own steaming hot platter of Cashew Turkey as well!
We wish you a safe and successful hunt!
Click here for more resource about Its Time To Drive Away Pests Using An Electronic Bug Repellent
youtube
0 notes
Text
The secret to delicious Thai curry is using whole coconut milk and plenty of vegetables which gives a nice aromatic flavor to the curry and the nice curry paste. The red creamy curry cooked with lots of vegetables, mildly spicy and hot, is perfect for any day. If you are a lover of Thai food, I am sure you will like this Red Curry. If you get a chance then prefer making curry paste at home otherwise, get a good brand of curry paste from the store.
If you are looking something spicy and mildly hot to eat for your meal and also want to include more and more vegetables then I am sure this recipe is for you. I really feel Thai curries are the best to include all the vegetables in your diet. Feel free to use vegetables of your choice or whatever you need to use up to clean your fridge. 😀 Add your choice of meat to the curry and if you are a vegetarian the replace the meat with tofu and enjoy the flavorful meal.
When cooks in an Instant Pot this is surely an easy-peasy recipe which comes together within half hour. It is a perfect one pot meal that tastes best when served with hot jasmine rice.
Serves 2
Ingredients:
½ Lbs boneless chicken or boneless chicken breast, cut into ½ inch thick strips
1 Can whole coconut milk
2 Tbsp red curry paste or more, as desired
1 Tbsp garlic, finely chopped
1 Tsp ginger, finely chopped
2 Tbsp onion, finely chopped
1 Small green bell pepper, cut into strips
1 Small red bell pepper, cut into strips
1 Small carrot, sliced thin
¼ Cup green beans with ends trimmed
¼ Cup onion, cut into strips
4-6 Broccoli florets
4 Asparagus, end trimmed
3-4 Baby Bok Choy leaves
A handful of basil leaves, chopped
1 Tsp lime zest
1 ½ Tbsp brown sugar, to cut down the bitter taste
2 Tsp lime juice
1 Tbsp coconut oil
Salt as required
For Garnishing
fresh basil leaves
1Tbsp lime juice
Learn Step By Step Recipe With Pictures For Thai Red Curry With Chicken | Instant Pot Recipe- Red Curry With Chicken
Recipe:
Step 1- Turn the IP to saute mode and heat 1tbsp coconut oil. Add the chopped ginger-garlic and saute for 30secs and add finely chopped onions and when they are half fry add the red curry paste and saute for a min
Step 2- Add the chicken and cook for 2min. Keep stirring and deglaze the IP well using the spatula before adding the coconut milk
Step 3- Add the coconut milk with ½ cup of water or as required. Add the required salt and pressure cook for 4mins with the valve on the seal side. Quick release the pressure and open the lid
Step 5- Turn the IP to saute mode (low) Add all the veggies and basil leaves. Let it simmer for 10mins and then add the sugar, lime zest, and bok choy leaves. Adjust salt and let it simmers for 1-2mins more and then turn off the IP. Add the lime juice and give a final stir to the curry
To thicken the curry, dissolve 1tbsp of cornstarch to 2tbsp of water and add to the simmering curry
Garnish with lime juice and fresh basil leaves. Serve with hot jasmine rice and enjoy.
Thai Red Curry With Chicken | Instant Pot Recipe- Red Curry With Chicken The secret to delicious Thai curry is using whole coconut milk and plenty of vegetables which gives a nice aromatic flavor to the curry and the nice curry paste.
#chicken#coconut milk#jasmine rice#one pot meal#Red curry#spicy#thai#Thai Curry#Thai Food#Thai red curry#vegetables
0 notes
Text
Do you love to spiralize veggies, or do you love to spiralize veggies?! Seriously, what’s not to love? It is a fun and fresh way to eat more veggies, and we can totally get on board with that! This sweet potato spaghetti is a nourishing and healthy way to enjoy spaghetti!
What If You Don’t Have A Spiralizer?
Well, first of all you should really just invest in one. They aren’t super expensive like some other kitchen gadgets, but affordable and something you’ll definitely get a fair amount of use out of. Here’s the one we have. I was able to find a 20% off coupon to save a few bucks.
But…if you can’g get one in time to make this tasty sweet potato spaghetti you have at least one other option. There are those julienne peelers that turn veggies into thin strips that somewhat resemble noodles. Here’s one from Amazon. We haven’t used this before, but I have watched some youtube videos, and they appear to work quite well.
Simple Italian Sausage Meat Sauce
We like using Italian sausage for our meat sauce because it adds tons of extra flavor without extra ingredients. We recommend Mulay’s Italian sausage brand, which we are able to find locally at Natural Grocers. You can look for where to purchase it in your area here. We also get Isernio’s brand Italian sausage links at Trader Joe’s sometimes, and then remove the ground meat from the casings. Either way, find a clean brand near you and see how much flavor it adds to your meat sauce.
Add In Some Extra Greens
We are always looking for ways to get more greens into our day! With this sweet potato spaghetti, the perfect opportunity was to add some in right at the end of the sweet potatoes softening in a skillet on the stove. We just toss in a few big handfuls of spinach (or you could use whatever your favorite greens are) and let them wilt a bit. It is the perfect texture and flavor combo with the sweet potatoes, greens and rich meat sauce.
Other Spiralized Veggie Recipes
Like this recipe and want to try out some other spiralized veggie recipes? Go ahead, give these a shot!
#gallery-0-3 { margin: auto; } #gallery-0-3 .gallery-item { float: left; margin-top: 10px; text-align: center; width: 33%; } #gallery-0-3 img { border: 2px solid #cfcfcf; } #gallery-0-3 .gallery-caption { margin-left: 0; } /* see gallery_shortcode() in wp-includes/media.php */
EASY ZUCCHINI CASSEROLE
SPRING ROLL SHRIMP ZOODLE BOWL
CHICKEN WITH CREAMY GARLIC & MUSHROOM SAUCE
Your Turn To Try Our Sweet Potato Spaghetti
Go ahead and plan this for a weeknight. It’s a quick and easy recipe that is clean and full of flavor. Let us know how it goes by leaving a comment below. Also, take a photo and tag us on Instagram @realsimplegood, so we can check it out! Give us a follow, too!
LIKE THIS RECIPE? PIN IT AND TRY IT LATER!
Sweet Potato Spaghetti
This Paleo and Whole30 sweet potato spaghetti is a nourishing and healthy way to enjoy spaghetti, with extra veggies and greens added in!
2 sweet potatoes
2 tbsp avocado oil, divided
2 cloves garlic, minced
1/2 onion, thinly sliced
1 tsp dried basil
1 tsp dried oregano
1 tsp dried parsley
1 lb ground Italian sausage
1 25 oz jar sugar-free marinara sauce
4 cups spinach
pinch of sea salt
Start by spiralizing sweet potatoes to turn them into noodles. Use kitchen scissors or a knife to cut the long strands into more manageable sized pieces. Set aside.
Heat a large skillet over medium heat and add 1 tbsp avocado oil and onion to the pan. Once onion begins to soften (about 4-5 minutes), add dried herbs to pan.
Once herbs become fragrant (about 1-2 minutes), add garlic and ground Italian sausage to pan and cook until sausage begins to brown a bit.
Add marinara sauce to pan and stir to mix everything together. Turn down to low and let simmer while you heat up the noodles.
In another skillet over medium heat, add 1 tbsp avocado oil, the sweet potato noodles and a pinch of salt to the pan. Cook and let the sweet potatoes soften, stirring occasionally for about 5-6 minutes. Add spinach to the pan and continue to cook until spinach wilts.
Turn off all the burners and serve with a bed of the sweet potato noodle mixture and the marinara on top. Enjoy!
Quick & Easy Sweet Potato Spaghetti (Paleo + Whole30) Do you love to spiralize veggies, or do you love to spiralize veggies?! Seriously, what's not to love?
#clean#clean eating#dairy-free#dinner#easy#gluten free#health#paleo#refined sugar free#wellness#whole30
0 notes
Text
It’s that time of year. For weeks we have introduced you to new hot pots from China, Korea, Japan and Malaysia. Here’s what to do with them! It’s time for a traditional Chinese Steamboat – where your guests and diners get to choose from a wide array of raw and marinated ingredients then dip these in tasty simmering stocks. Lightly cooked organic meats and fish are best for Steamboat. Salted Duck Eggs, salted radish and pickled mustard greens are a must – Always available at Tang: The Asian Food Emporium.
Try this recipe from Kylie Kwong as published on the ABC website…
Ingredients
700 g (1 lb 6 oz) small whole squid
300 g (10 oz) organic pork fillet, finely sliced on the diagonal
300 g (10 oz) organic chicken fillet, finely sliced on the diagonal
300 g (10 oz) organic beef fillet, finely sliced on the diagonal
400 g (13 oz) white fish fillets, finely sliced on the diagonal
12 uncooked king prawns (jumbo shrimp), peeled and deveined but with tails intact
Squid marinade
2 large red chillies, halved lengthways, deseeded and roughly sliced
1 teaspoon sea salt
11/2 tablespoons palm sugar
1 tablespoon fish sauce
2 tablespoons ginger julienne
1 tablespoon lime juice
Garlic and ginger paste
10 garlic cloves, crushed
1/2 cup roughly chopped ginger
1 teaspoon sea salt
Pork marinade
2 tablespoons Hoisin sauce
1 tablespoon Shao Hsing wine
1 teaspoon Chinese black vinegar
dash of sesame oil
Chicken marinade
1 tablespoon oyster sauce
1 tablespoon Shao Hsing wine
1 teaspoon light soy sauce
dash of sesame oil
Beef marinade
2 tablespoons Chinese BBQ sauce
1 tablespoon Shao Hsing wine
1 teaspoon Sichuan pepper and salt
dash of sesame oil
Fish marinade
2 tablespoons finely sliced coriander stalks and roots
1 tablespoon peanut oil
2 teaspoons sea salt
1 teaspoon white sugar
Prawn marinade
1 tablespoon finely diced lemongrass
1/4 cup finely sliced spring onions (scallions)
1 1/2 tablespoons ginger julienne
1 tablespoon Shao Hsing wine
1 teaspoon sea salt
dash of sesame oil
1 fresh bamboo shoot — about 750 g (11/2 lb)
18 live mussels — about 350 g (11 oz) in total
12 live sea scallops
1 bunch choy sum
1 bunch green asparagus
1 Chinese white cabbage
2 cups bean sprouts
1/3 bunch mint
1/3 bunch sweet Thai basil
1/3 bunch coriander
1/3 bunch Vietnamese mint
300 g (10 oz) fresh Hokkien noodles
2 salted duck eggs
3/4 cup fresh black cloud ear fungus
75 g (21/2 oz) fresh shiitake mushrooms, stems discarded
6 braised dried Chinese mushrooms
Stock
3 litres (3 quarts) water
4 spring onions (scallions), trimmed and cut in half crossways
10 garlic cloves, crushed
20 slices ginger
60 g (2 oz) galangal, peeled and sliced
3 lemongrass stalks, bruised
2 tablespoons sea salt
Dipping sauces
combine 3 tablespoons oyster sauce with 1 teaspoon sesame oil
combine 2 tablespoons of each of hoisin sauce, Chinese black vinegar and Chinese BBQ sauce
combine equal quantities of finely sliced salted radish and pickled mustard greens
combine 1 teaspoon dark soy sauce with 2 teaspoons light soy sauce, 1 teaspoon diced ginger and a dash of sesame oil
Condiments
light soy sauce
fish sauce
Chinese mixed pickles
finely sliced large red chillies
lemon wedges
Sichuan pepper and salt

Method
Clean squid by gently pulling head and tentacles away from the body. Pull out the clear backbone (quill) from inside the body and discard entrails. Cut tentacles from the head just below the eyes; discard head. Remove side wings and fine membrane from the body. Rinse body, tentacles and wings thoroughly and pat dry with kitchen paper.
Cut the squid down the centre so that it will open out flat. Using a small, sharp knife, score shallow diagonal cuts in a criss-cross pattern on the inside surface. Cut scored squid into 5 x 2.5 cm (2 x 1 in) pieces and place in a bowl.
For the squid marinade, pound chilli and salt into a rough paste with a pestle and mortar. Add palm sugar, pound lightly, then stir in fish sauce, ginger and lime juice. Add marinade to the squid in the bowl.
Place pork, chicken, beef, fish and prawns in separate bowls, then set aside while you prepare the garlic and ginger paste.
Pound garlic, ginger and salt together with a pestle and mortar until you have a rough paste. Divide this paste between the pork, chicken and beef.
Add the five lots of marinade ingredients for the pork, chicken, beef, fish and prawns to their respective bowls. Thoroughly mix the contents of each bowl, then cover and refrigerate for 2 hours.
To prepare the bamboo, cut the horn-shaped shoot in half lengthways, strip off the outer fibrous layers and then trim about 2 cm (1 in) off the base. Cut into 5 mm (1/4 in) wide strips, add to a pan of cold salted water and then boil rapidly for at least 10 minutes. Drain and refresh under cold water. Repeat this process of boiling from a cold-water start, draining and refreshing twice more to remove any bitterness. Set aside. (Any leftover bamboo can be placed in cold water and stored in the refrigerator for up to 3 days — it makes a delicious addition to stir-fries and braises.)
Scrub, debeard, rinse and drain the mussels; set aside.
Clean the scallops, leaving them attached to their shells.
Trim ends from the choy sum, then cut crossways into 3 pieces and wash thoroughly; drain. Wash the asparagus and snap off the woody ends, then peel the lower part of the stem and cut into thirds on the diagonal. Discard outer leaves of cabbage, then slice cabbage in half lengthways, remove core and cut crossways into about 4 pieces and wash thoroughly, pulling pieces apart to separate leaves. Wash bean sprouts and all the herbs thoroughly; drain well. Pick sprigs from the herbs.
Blanch Hokkien noodles in boiling salted water until ‘al dente’ — about 4 minutes. Drain, refresh in cold water, then thoroughly drain again.
Bring a pan of water to the boil, add salted duck eggs and boil for 9 minutes. Drain, refresh in cold water, then peel and cut into quarters.
Arrange bamboo, mussels, scallops, choy sum, asparagus, cabbage, bean sprouts, herbs, noodles, eggs and mushrooms in simple serving bowls. Place these on the table, along with the bowls of marinated meats and seafood.
About an hour before your guests are due to arrive, make the stock. Place the water in a large electric wok — about 35 cm (14 in) in diameter. Add all remaining stock ingredients and bring to the boil, simmer, uncovered, for 20 minutes. Turn off heat, cover and set aside.
Finally, arrange all the dipping sauces and condiments in small bowls on the table, allowing two bowls of each.
When everyone is ready to sit down and eat, place the electric wok in the centre of the table. Reheat stock and invite your guests to choose their own meat, fish and vegetables to cook in the simmering stock, before dipping them in their favourite sauces and condiments. Towards the end of the meal — generally a long and raucous affair — the noodles are added to the rich, full-flavoured stock and slurped.
Enjoy!
Source: abc.net.au
All the ingredients mentioned can be purchased at Tang: The Asian Food Emporium (excluding fresh meat and fish). As well at Tang we offer a wide range of pre-prepared Hot Pot sauces and stocks, ready to heat, eat and enjoy. You can find them in our Chinese, Korean, Japanese and Malaysian selections. Check at our store site map here and drop by to make you selections at 185 Russell St, Melbourne CBD everyday between 10am and 11pm, seven days a week.
Don’t hesitate to ask for advice, our friendly staff will assist you in making the selection that best meets your taste and your needs.
Tang: The Asian Food Emporium – for the taste of Asia
STEAMBOAT – A Chinese feast for friends. It’s that time of year. For weeks we have introduced you to new hot pots from China, Korea, Japan and Malaysia.
0 notes
Text
Turkey Dinner!
Tonight’s dinner was a slam dunkaroo. Gouda Ramsay (that’s me) and Julia Childhands (that’s my old roomie/cooking buddy/best friend in college) made an awesome turkey recipe we made up as we went along.
Under the cut, there’s ingredients and instructions for our Dinner: Bacon-Wrapped Stuffed Turkey, Salad, Garlic Bread, and Caramelized Onions!
Ratings:
Ease: 3/5. Difficulty mostly in cook time for the meat.
Taste: 5/5! Flavor was amazing! Not too heavy, but oh so satisfying.
Healthiness: 3/5. The white meat and the salad are a big health plus. Bacon and garlic bread, not so much.
Cook time: 1 hour + 10 minutes prep for turkey stuffing
Dishes/cleanup: 3/5. Not too much going on in the dishes department (a pan, a couple of knives, cutting boards, and a baking tray, plus plates and silverware), but there are probably a number of produce leftovers that’ll need to be stored.
Baked Turkey
Ingredients:
2 lbs turkey (London Broil)
Zest of 1 lemon
Juice of ½ lemon
3 cloves garlic (pressed)
¾ stick salted butter (softened)
3-4 slices of ¼ inch thick bacon
Small handful white onion (about 1/3 onion, cut into roughly ½ inch squares)
¼ cup fresh af rosemary leaves
(Optional)
Whole Foods garlic lemon poultry seasoning
Fresh ground pepper
(Optional) 1/2 cup Chicken or turkey stock for maximizing gravy yield
Salad:
½ bag fresh spinach
Juice of ½ lemon
Cherry tomatoes or baby bella mushrooms
Generous amount of basil
Salad croutons of choice
Drizzle of Extra Virgin Olive Oil (optional)
Garlic bread:
1 loaf Italian bread
2-3 cloves garlic, pressed or minced
Olive oil, to stop bread from burning in pan (not needed if using a toaster oven)
Butter, to taste
Caramelized onions:
White onion (used the left overs from stuffing the turkey, about 2/3rds)
Butter
Salt and pepper
Directions:
> Preheat the oven to 350 degrees Fahrenheit.
> Take out your beautiful slab of turkey meat. Look at it. Appreciate it. Put it on a nice clean cutting board. Drizzle a bit of olive oil onto it. Rub it all over that turkey.
> Using a long, sharp knife, cut a slit into the center of your turkey meat, being careful not to cut all the way through.
> Open your turkey pocket.
> Lightly season the inside of your turkey pocket with the garlic lemon poultry seasoning, if you have it.
> (Wash your hands.) Using a different cutting board, zest your lemon. Strip the rosemary leaves from their sprigs. Peel and press your garlic. Chop your onions. Tuck those onions into your turkey pocket.
> In a small bowl, combine rosemary leaves, butter, lemon juice, half the lemon zest, and the pressed garlic. Make sure the texture is soft and creamy enough to scoop out from the bowl, but not so melted that it’s runny. This will ensure that the butter will gradually flavor your turkey and keep it moist.
> Close up the turkey pocket by laying the top half of the meat on top of the bottom. If the turkey has trouble sitting comfortably, your pocket may be too small, or you may have used too much onion. We didn’t use any butcher string to hold it together, but you can if you wish. If so, tie it up after you add the bacon.
> Lay your bacon across the turkey longways. The bacon will keep your turkey from drying out as it cooks, and will give the drippings flavor.
> Put your turkey in the oven and bake for 50 minutes.
> While the turkey is cooking, melt a knob of butter in a pan and add your chopped onions to it on low heat. Cover the pan with a lid and let the onions caramelize. Keep an eye on them, stirring occasionally, and stop cooking when the onions get soft throughout, about 10-15 minutes.
> 15-20 minutes before the turkey is done, prepare the bread and salad.
> For the bread: butter and fry (or toast) a few thick slices of bread, and when the bread turns golden brown, take it out and add the garlic.
> For the salad: tear up the basil leaves with your hands. Add them to a bowl with the rest of the ingredients and toss. You’re done with your salad!
When the turkey is done:
> Remove your turkey from the oven. DO NOT cut into it immediately. While it’s hot, the turkey juices are between the meat fibers. Resting your turkey will allow the meat to recollect its juices so they won’t dribble out onto the cutting board when you carve it. Don't worry - it won't get cold. In fact, resting will raise the internal temperature of the meat up to 5 more degrees, depending on size. Using your fingers, give the turkey a poke to see if it's done. For a meat-poking guide, check out our post on tenderness!
> Rest your turkey for 5-6 minutes. Then you may cut into it. Strangely, our turkey looked a shade rosier than we were comfortable with at first, but it actually whitened a bit as the slices cooled. If you can hold your finger against the meat for more than a second and it looks pink, it is probably not cooked through. Optional: put your turkey drippings on the stove on medium heat and thicken them into a gravy by slowly adding small amounts of flour and stirring. Add the half cup of chicken broth to the mixture to yield more gravy. This is best done while the turkey is resting.
> Carve into slices and enjoy your delicious turkey!
0 notes
Text
New Post has been published on Aquaponic Lynx LLC http://yalaha.locallygrown.net/files/product/image/176191/small/Large_Aloe_Leaf.jpg?1435522622 Order now through March 16th for March 18th pickup. Send me a message if you are interested in Getting Channel Catfish. Let me know if you are interested in Shiitake Mushrooms. They should be listed soon but if you let me know, I may be able to fill orders even before the new farm gets...
New Post has been published on http://www.aquaponiclynx.com/order-yalaha-local-produce-now-for-march-18th-pickup
Order Yalaha Local Produce Now for March 18th pickup
Order now through March 16th for March 18th pickup.
Send me a message if you are interested in Getting Channel Catfish.
Let me know if you are interested in Shiitake Mushrooms. They should be listed soon but if you let me know, I may be able to fill orders even before the new farm gets listing.
If you want Living Trays of Sunflower shoots, Pea shoots, or micro greens please let me know as I need time to grow them for you. Currently I can do Pea shoots, sunflower shoots, radish, arugula, and Basil micro greens and wheatgrass in full trays, 1/6th trays or 1/8th trays. I can also do radish in smaller containers. In trials are Beet micro greens. If you have any particular requests, let me know I’m happy to grow to order.
Sign in to order. https://yalaha.locallygrown.net/market
You have to sign in to see the add to cart button. Then click the add to cart button on the items you want to buy. Remember you need to check out before your order will be placed. Remember to let me know when you want to pick up on Sat. (If I don’t send you an e-mail confirmation of your order and pick up time, please make sure you checked out and completed your order.)
Aloe Vera Leaf, Large Grower: Aquaponic Lynx LLC Price: $3.00(Large Leaf) Available (Exact): 6 Description: Large leaf from mature Aloe Vera plants. Gel from the leaves can be applied to skin and burns to facilitate healing. The gel can also be juiced or used in health drinks. Aquaponically grown which means the fish water fertilizes the plants and nothing toxic to fish or bio-filtration can be used on the plants. That means no cheating with toxic pesticides around our farm, everything we use has to be safe enough to dump in a fish tank.
Aloe Vera Plant Grower: Aquaponic Lynx LLC Price: $5.00(4" square pot) Available (Exact): 0 Description: Aloe Vera or medicinal Aloe. Aquaponically grown which means the fish water fertilizes the plants and nothing toxic to fish or bio-filtration can be used on the plants. That means no cheating with toxic pesticides around our farm, everything we use has to be safe enough to dump in a fish tank.
Baby Carrots Grower: Aquaponic Lynx LLC Price: $4.50(4 oz) Available (Exact): 4 Description: Baby Carrots. 4 oz
Cook like a chef with micro veggies. Small Blasts of carrot flavor to decorate your dish or dress up your salad.
No toxic chemical sprays are used on our farm as everything must be safe enough for our fish and my toddler.
Broccoli Grower: Aquaponic Lynx LLC Price: $4.00(One Head) Available (Exact): 5 Description: Broccoli Aquaponically grown which means the fish water fertilizes the plants and nothing toxic to fish or bio-filtration can be used on the plants. That means no cheating with toxic pesticides around our farm, everything we use has to be safe enough to dump in a fish tank.
Carrot Microgreens Grower: Aquaponic Lynx LLC Price: $4.50(4 oz) Available (Exact): 4 Description: Carrot Microgreens. 4 oz
Cook like a chef with micro greens. Small Blasts of carrot flavor to decorate your dish or dress up your salad.
No toxic chemical sprays are used on our farm as everything must be safe enough for our fish and my toddler.
Celery Grower: Aquaponic Lynx LLC Price: $3.00(bunch Aprox 12 ounces) Available (Exact): 20 Description: Celery This is full flavor celery with Leaves attached, great for making soup. No chemicals or growth regulators ever sprayed on my celery crops. (I'm allergic to whatever they spay on the regular industrial celery at the grocery store.) Aquaponically grown which means the fish water fertilizes the plants and nothing toxic to fish or bio-filtration can be used on the plants. That means no cheating with toxic pesticides around our farm, everything we use has to be safe enough to dump in a fish tank.
Celery, Baby Grower: Yalaha, FL Price: $3.00(bunch Aprox 8 ounces) Available (Exact): 1 Description: Baby Celery With Leaves Great for Soup or Stock Aquaponically grown which means the fish water fertilizes the plants and nothing toxic to fish or bio-filtration can be used on the plants. That means no cheating with toxic pesticides around our farm, everything we use has to be safe enough to dump in a fish tank.
Celery, whole Grower: Aquaponic Lynx LLC Price: $4.00(At Least 1 lb) Available (Exact): 8 Description: Celery, whole This is full flavor celery with Leaves attached, great for making soup. No chemicals or growth regulators ever sprayed on my celery crops. (I'm allergic to whatever they spay on the regular industrial celery at the grocery store.) Aquaponically grown which means the fish water fertilizes the plants and nothing toxic to fish or bio-filtration can be used on the plants. That means no cheating with toxic pesticides around our farm, everything we use has to be safe enough to dump in a fish tank.
Celery- Big Bag Grower: Aquaponic Lynx LLC Price: $9.00(3 plus lb Big Bag) Available (Exact): 5 Description: Celery Big Bag, 4 times the amount as a regular celery bunch. This is full flavor celery with Leaves attached, great for making soup. No chemicals or growth regulators ever sprayed on my celery crops. (I'm allergic to whatever they spay on the regular industrial celery at the grocery store.) Aquaponically grown which means the fish water fertilizes the plants and nothing toxic to fish or bio-filtration can be used on the plants. That means no cheating with toxic pesticides around our farm, everything we use has to be safe enough to dump in a fish tank.
Chives-cut Garlic Chives Grower: Aquaponic Lynx LLC Price: $2.00(3 oz cut) Available (Exact): 1 Description: Garlic Chives. Aquaponically grown which means the fish water fertilizes the plants and nothing toxic to fish or bio-filtration can be used on the plants. That means no cheating with toxic pesticides around our farm, everything we use has to be safe enough to dump in a fish tank.
Chives-living Garlic Chives Grower: Aquaponic Lynx LLC Price: $3.00(4 oz with roots attached) Available (Exact): 1 Description: Chives. Aquaponically grown which means the fish water fertilizes the plants and nothing toxic to fish or bio-filtration can be used on the plants. That means no cheating with toxic pesticides around our farm, everything we use has to be safe enough to dump in a fish tank.
Cuban Oregano Grower: Aquaponic Lynx LLC Price: $3.00(2 oz) Available (Estimated): 4 Description: Large, succulent leaves have a strong oregano flavor and can be used in place of Greek oregano, or as a substitute for sage. Use fresh in salads, vegetables, stuffing, meat, fish, and salsas. I have even heard of slicing them in strips for use in sandwiches! This is a tropical herb, and the thick leaves will keep about a week on the kitchen counter in a sealed container at room temperature, but refrigeration causes discoloration.
Aquaponically grown which means the fish water fertilizes the plants and nothing toxic to fish or bio-filtration can be used on the plants. That means no cheating with toxic pesticides around our farm, everything we use has to be safe enough to dump in a fish tank.
Fresh Thai / Galangal Ginger roots Grower: A Natural Farm & Educational Center Price: $5.00(1/2 Lb) Available (Exact): 299 Description: Our Fresh Thai/Galangal ginger roots are grown organically without the use of any chemicals or pesticides. This type of edible Ginger is very spicy and tastes like Wasabi. These roots are harvested and washed within 24 hours of customer pick-up.
Kale – Living Assorted Kale Grower: Aquaponic Lynx LLC Price: $3.00(multiple at least 8 oz) Available (Exact): 2 Description: Assorted Kale. Living, clean root, Not Washed Tender beautiful Kale with roots attached so it keeps a long time. Aquaponically grown which means the fish water fertilizes the plants and nothing toxic to fish or bio-filtration can be used on the plants. That means no cheating with toxic pesticides around our farm, everything we use has to be safe enough to dump in a fish tank.
Kale-Beira Grower: Aquaponic Lynx LLC Price: $3.00(At least 12 ounces) Available (Exact): 2 Description: Beira Kale. Super food Kale is great in salad, cooked, or made into Kale chips. We use lots of our Kale in blended smoothies. Easy way to handle kale for use in smoothies is to wash the kale and then shake off excess moisture then place in a freezer bag in the freezer, then when it is time to use in the smoothie you simply bash the bag on the counter and then scoop out a hand full of the kale to place in the blender. Aquaponically grown which means the fish water fertilizes the plants and nothing toxic to fish or bio-filtration can be used on the plants. That means no cheating with toxic pesticides around our farm, everything we use has to be safe enough to dump in a fish tank.
Kale-Big Bag Crinkly varieties Grower: Aquaponic Lynx LLC Price: $9.00(2 plus lb Big Bag) Available (Exact): 1 Description: Kale. Big Bag, think 5 gallon bucket (equivalent of 4+ regular orders) for those smoothie, chip and juicing enthusiasts. Green and Red Crinkly varieties. Generally as much as I can stuff in the bag. Super food Kale is great in salad, cooked, or made into Kale chips. We use lots of our Kale in blended smoothies. Easy way to handle kale for use in smoothies is to wash the kale and then shake off excess moisture then place in a freezer bag in the freezer, then when it is time to use in the smoothie you simply bash the bag on the counter and then scoop out a hand full of the kale to place in the blender. Aquaponically grown which means the fish water fertilizes the plants and nothing toxic to fish or bio-filtration can be used on the plants. That means no cheating with toxic pesticides around our farm, everything we use has to be safe enough to dump in a fish tank.
Kale-Big Bag Mixed varieties Grower: Aquaponic Lynx LLC Price: $9.00(2 plus lb Big Bag) Available (Exact): 1 Description: Kale. Big Bag, think 5 gallon bucket (equivalent of 4+ regular orders) for those smoothie, chip and juicing enthusiasts. Many different varieties including several crinkly green types, several Russian types, plus Toscano and Beira Kale. Generally as much as I can stuff in the bag. Super food Kale is great in salad, cooked, or made into Kale chips. We use lots of our Kale in blended smoothies. Easy way to handle kale for use in smoothies is to wash the kale and then shake off excess moisture then place in a freezer bag in the freezer, then when it is time to use in the smoothie you simply bash the bag on the counter and then scoop out a hand full of the kale to place in the blender. Aquaponically grown which means the fish water fertilizes the plants and nothing toxic to fish or bio-filtration can be used on the plants. That means no cheating with toxic pesticides around our farm, everything we use has to be safe enough to dump in a fish tank.
Kale-Mixed varieties Grower: Aquaponic Lynx LLC Price: $3.00(bunch At least 8 ounces) Available (Exact): 4 Description: Kale. Many different varieties including several crinkly green types, several Russian types, plus Toscano and Beira Kale. Generally as much as I can stuff in the bag. Super food Kale is great in salad, cooked, or made into Kale chips. We use lots of our Kale in blended smoothies. Easy way to handle kale for use in smoothies is to wash the kale and then shake off excess moisture then place in a freezer bag in the freezer, then when it is time to use in the smoothie you simply bash the bag on the counter and then scoop out a hand full of the kale to place in the blender. Aquaponically grown which means the fish water fertilizes the plants and nothing toxic to fish or bio-filtration can be used on the plants. That means no cheating with toxic pesticides around our farm, everything we use has to be safe enough to dump in a fish tank.
Kale-Toscano Grower: Aquaponic Lynx LLC Price: $3.00(bunch Aprox 8 ounces) Available (Exact): 1 Description: Toscano Kale. Also known as Dinosaur Kale, Lactano Kale, and I've even seen it called Blue Kale. Super food Kale is great in salad, cooked, or made into Kale chips. We use lots of our Kale in blended smoothies. Easy way to handle kale for use in smoothies is to wash the kale and then shake off excess moisture then place in a freezer bag in the freezer, then when it is time to use in the smoothie you simply bash the bag on the counter and then scoop out a hand full of the kale to place in the blender. Aquaponically grown which means the fish water fertilizes the plants and nothing toxic to fish or bio-filtration can be used on the plants. That means no cheating with toxic pesticides around our farm, everything we use has to be safe enough to dump in a fish tank.
Lettuce – Cut Lettuce Mix Grower: Aquaponic Lynx LLC Price: $3.00(8 ounces Bagged) Available (Exact): 10 Description: A mix of all our lettuce varieties (all the lettuce that was too small to sell as heads for the week.) Aquaponically grown which means the fish water fertilizes the plants and nothing toxic to fish or bio-filtration can be used on the plants. That means no cheating with toxic pesticides around our farm, everything we use has to be safe enough to dump in a fish tank.
Lettuce – Cut Premium Mix Grower: Aquaponic Lynx LLC Price: $3.00(8 ounces Bagged) Available (Exact): 10 Description: A mix of small lettuce varieties specially developed to provide perfect size and texture leaves for a satisfying (rather than flat) lettuce mix. Aquaponically grown which means the fish water fertilizes the plants and nothing toxic to fish or bio-filtration can be used on the plants. That means no cheating with toxic pesticides around our farm, everything we use has to be safe enough to dump in a fish tank.
Lettuce – Living Green Summer Crisp Leaf Lettuce Grower: Aquaponic Lynx LLC Price: $3.00(aprox 6 oz, head, one or multiple depending on size) Available (Exact): 4 Description: Green Leaf lettuce. Living, clean root, Not Washed Tender beautiful lettuce with roots attached so it keeps a long time. Aquaponically grown which means the fish water fertilizes the plants and nothing toxic to fish or bio-filtration can be used on the plants. That means no cheating with toxic pesticides around our farm, everything we use has to be safe enough to dump in a fish tank.
Lettuce – Living Heads Assorted Mini Premium Lettuce (clean root) Grower: Aquaponic Lynx LLC Price: $3.00(aprox 6 oz, Mini head, multiple depending on size) Available (Exact): 10 Description: Premium Living lettuce assortment. New Aquaponic Growing Method with clean bare roots. Tender beautiful lettuce with bare clean roots attached so it will keep longer than cut lettuce. Lettuce in red/green/texture combos of heads for your salad 2 or more heads depending on size. Tender beautiful lettuce developed to cut off the heads into uniform leaves for the perfect lettuce mix without all the extra work. Aquaponically grown which means the fish water fertilizes the plants and nothing toxic to fish or bio-filtration can be used on the plants. That means no cheating with toxic pesticides around our farm, everything we use has to be safe enough to dump in a fish tank.
Lettuce – Living Mini Green Butterhead clean root Grower: Aquaponic Lynx LLC Price: $3.00(at least 6 oz, Mini head, one or multiple depending on size) Available (Exact): 6 Description: Living green butterhead lettuce. Tender beautiful lettuce with roots attached so it will keep longer than cut lettuce. Aquaponically grown which means the fish water fertilizes the plants and nothing toxic to fish or bio-filtration can be used on the plants. That means no cheating with toxic pesticides around our farm, everything we use has to be safe enough to dump in a fish tank.
Lettuce – Living Premium Green Sweet CrispLettuce, clean root Grower: Aquaponic Lynx LLC Price: $3.00(aprox 6-8 oz, Mini head, one or multiple depending on size) Available (Exact): 5 Description: Living Green Sweet Crisp lettuce with small uniform leaves that come off in perfect salad mix size. Tender beautiful lettuce with roots attached (clean root no dirt) so it will keep longer than cut lettuce. Aquaponically grown which means the fish water fertilizes the plants and nothing toxic to fish or bio-filtration can be used on the plants. That means no cheating with toxic pesticides around our farm, everything we use has to be safe enough to dump in a fish tank.
Lettuce – Living Red Leaf, Clean Root Grower: Aquaponic Lynx LLC Price: $3.00(one or multiple (at least 6 oz)) Available (Exact): 2 Description: Living Red Leaf lettuce. Tender beautiful lettuce with roots attached so it will keep longer than cut lettuce. Aquaponically grown which means the fish water fertilizes the plants and nothing toxic to fish or bio-filtration can be used on the plants. That means no cheating with toxic pesticides around our farm, everything we use has to be safe enough to dump in a fish tank.
Lettuce – Living Red/Green Summer Crisp Leaf Lettuce Grower: Aquaponic Lynx LLC Price: $3.00(At least 6 oz, multiple depending on size) Available (Exact): 4 Description: Red/Green Leaf lettuce. Living, Not Washed Tender beautiful lettuce with roots attached so it keeps a long time. Aquaponically grown which means the fish water fertilizes the plants and nothing toxic to fish or bio-filtration can be used on the plants. That means no cheating with toxic pesticides around our farm, everything we use has to be safe enough to dump in a fish tank.
Living Microgreens-Arugula Grower: Aquaponic Lynx LLC Price: $4.50(Quart) Available (Exact): 0 Description: Living Arugula Microgreens. One Quart
Cook like a chef with micro greens. Small Blasts of Arugula flavor to decorate your dish or dress up your salad.
To Harvest, Cut above the seed/matting level.
No toxic chemical sprays are used on our farm as everything must be safe enough for our fish and my toddler.
Living Microgreens-Arugula Grower: Aquaponic Lynx LLC Price: $3.50(Pint) Available (Exact): 5 Description: Living Arugula Microgreens. One Pint
Cook like a chef with micro greens. Small Blasts of Arugula flavor to decorate your dish or dress up your salad.
To Harvest, Cut above the seed/matting level.
No toxic chemical sprays are used on our farm as everything must be safe enough for our fish and my toddler.
Living Microgreens-Basil Grower: Aquaponic Lynx LLC Price: $5.00(Pint) Available (Exact): 12 Description: Living Basil Microgreens. One Pint
Cook like a chef with micro greens. Small Blasts of Basil flavor to decorate your dish or dress up your salad.
To Harvest, Cut above the seed/matting level.
No toxic chemical sprays are used on our farm as everything must be safe enough for our fish and my toddler.
Living Microgreens-Basil Grower: Aquaponic Lynx LLC Price: $6.00(Quart) Available (Exact): 4 Description: Living Basil Microgreens. One Quart
Cook like a chef with micro greens. Small Blasts of Basil flavor to decorate your dish or dress up your salad.
To Harvest, Cut above the seed/matting level.
No toxic chemical sprays are used on our farm as everything must be safe enough for our fish and my toddler.
Living Microgreens-Radish Grower: Aquaponic Lynx LLC Price: $3.50(Pint) Available (Exact): 5 Description: Living Radish Microgreens. One Pint
Cook like a chef with micro greens. Small Blasts of radish flavor to decorate your dish or dress up your salad.
To Harvest, Cut above the seed/matting level.
No toxic chemical sprays are used on our farm as everything must be safe enough for our fish and my toddler.
Living Microgreens-Radish Grower: Aquaponic Lynx LLC Price: $5.00(Quart) Available (Exact): 0 Description: Living Radish Microgreens. One Quart
Cook like a chef with micro greens. Small Blasts of radish flavor to decorate your dish or dress up your salad.
To Harvest, Cut above the seed/matting level.
No toxic chemical sprays are used on our farm as everything must be safe enough for our fish and my toddler.
Living Pea Shoots – 5×7 Tray Grower: Aquaponic Lynx LLC Price: $6.00(5×7 tray each) Available (Exact): 4 Description: We grow shoots to order, if interested in this product please let us know at [email protected] so we will start making it available. Small 5×7 inch tray of living pea shoots. They taste like snow peas, great as garnish, salad ingredient, or in summer rolls. Water once or twice daily, keep in a bright location with good ventilation.
To Harvest, Cut above the seed/soil level anytime but they may start to get tough if you let them grow too big.
Plants may re-grow.
Tray could produce up to 8 oz of cut pea shoots from the first cutting.
Growing in potting medium.
Aquaponically grown which means the fish water fertilizes the plants and nothing toxic to fish or bio-filtration can be used on the plants. That means no cheating with toxic pesticides around our farm, everything we use has to be safe enough to dump in a fish tank.
Living Sunflower Shoots – 5×7 Tray Grower: Aquaponic Lynx LLC Price: $6.00(5×7 tray each) Available (Exact): 4 Description: We grow shoots to order, if interested in this product please let us know at [email protected] so we will start making it available. Small 5×7 inch tray of living Sunflower shoots. They taste almost nutty, great as garnish, salad ingredient, or in summer rolls. Water once or twice daily, keep in a bright location with good ventilation.
To Harvest, Cut above the seed/soil level anytime before the second set of leaves start to grow (they tend to be bitter.) Knock or pull any remaining seed hulls off before consuming.
Tray could produce up to 8 oz of cut sunflower shoots from the first cutting.
Growing in potting medium.
Aquaponically grown which means the fish water fertilizes the plants and nothing toxic to fish or bio-filtration can be used on the plants. That means no cheating with toxic pesticides around our farm, everything we use has to be safe enough to dump in a fish tank.
Lufa cleaning sponges Grower: Aquaponic Lynx LLC Price: $3.91(each piece) Available (Exact): 2 Description: These are 5-7 inch pieces of sponges that are "less pretty" than the bath sponges. These are perfect for scrubbing pots and dishes or washing your car or any other cleaning projects around the house. This is what is left over because I do not wish to use bleach in the processing of the sponges but they are still perfectly useful. Grown right here at my home in Florida. Yes grown, Lufa is a vine similar to a cucumber but much bigger. The fruit become quite large and if allowed to mature and dry on the vine,they can be pealed to become the nice plant fiber sponges so great for use in the bath or to wash dishes and scrub pots without worry of scratching the non stick surface. These plants are grown chemical free, some in soil and some in Aquaponics. Sponges are pealed and washed in plain water to remove plant juices and most seeds then dried in the sun. No bleach is used so color will vary. Sponges may contain a few free seeds. If you wish to grow your own, provide a strong trellis, these vines are able to grow to the top of trees in our long hot summers. Small fruits are edible.
Micro Carrots Grower: Aquaponic Lynx LLC Price: $4.50(4 oz) Available (Exact): 4 Description: Micro Carrots. 4 oz
Cook like a chef with micro veggies. Small Blasts of carrot flavor to decorate your dish or dress up your salad.
No toxic chemical sprays are used on our farm as everything must be safe enough for our fish and my toddler.
Mint Grower: Aquaponic Lynx LLC Price: $3.00(2-3 oz) Available (Exact): 3 Description: Mint. Aquaponically grown which means the fish water fertilizes the plants and nothing toxic to fish or bio-filtration can be used on the plants. That means no cheating with toxic pesticides around our farm, everything we use has to be safe enough to dump in a fish tank.
Mosquito Fish (Gambusia) Grower: Aquaponic Lynx LLC Price: $20.00(box with a 1 Gallon breather Bag holding 10 mosqito fish) Available (Exact): 1 Description: Need fish to start up a new aquaponics system? Or perhaps you just need something to control the mosquitoes in your rain barrel or ornamental pond? These are little live bearing native fish that eat mosquito larva and other small aquatic creatures. They don't get very big but they are hardy little fish that can survive all sorts of conditions. I've left a dozen of them in a 5 gallon bucket that had rain water in it, as long as there is a few inches of water for them, they seem to survive fairly well and keep the bucket from breeding swarms of terrible mosquitoes. I use these fish in my aquaponics systems where the bigger fish can't go to make sure I'm not breeding mosquitoes in my systems. I also use them in the kiddie pools under my worm bins (I keep the worm bins in a moat of water to keep the ants out) to keep that water from breeding mosquitoes. The Females are the larger fish, the males are smaller and there are often babies as well. I don't think I've ever seen one much over 2.5". They do jump out of containers so beware what you put them in. Since it is a breather bag full of water you can't simply float the bag in the intended new home to equal out the water temperature, you will need to open the bag and remove some water and add some of the new home water a few times to equal out the temperature before putting the new fish in their new home.
Pea Shoots Grower: Aquaponic Lynx LLC Price: $5.00(bag, aprox 4 oz) Available (Exact): 3 Description: Pea Shoots. Very young pea plants harvested between 7-14 days to eat the leaves and stems. They taste like peas. Can be eaten raw in salads, used as garnish, cooked as greens, or added to stir fry. This is a new product I'm adding to the market since some people have expressed interest in it. Production is just starting to come online. Aquaponically grown which means the fish water fertilizes the plants and nothing toxic to fish or bio-filtration can be used on the plants. That means no cheating with toxic pesticides around our farm, everything we use has to be safe enough to dump in a fish tank.
Plant Papayrus Grower: Aquaponic Lynx LLC Price: $5.00(4" square pot) Available (Exact): 3 Description: Papayrus, Ornamental Water Plant. Aquaponically grown which means the fish water fertilizes the plants and nothing toxic to fish or bio-filtration can be used on the plants. That means no cheating with toxic pesticides around our farm, everything we use has to be safe enough to dump in a fish tank.
Sunflower Shoots Grower: Aquaponic Lynx LLC Price: $6.00(bag, at least 4 oz) Available (Exact): 3 Description: Sunflower Shoots. Very young sunflower plants harvested between 7-10 days to eat the leaves and stems. They taste almost nutty. Can be eaten raw in salads, used as garnish, cooked as greens, or added to stir fry. This is a new product I'm adding to the market since some people have expressed interest. Production is just starting to come online. Aquaponically grown which means the fish water fertilizes the plants and nothing toxic to fish or bio-filtration can be used on the plants. That means no cheating with toxic pesticides around our farm, everything we use has to be safe enough to dump in a fish tank.
Swiss Chard-assorted Colors Grower: Aquaponic Lynx LLC Price: $3.00(bunch Aprox 8-10 ounces) Available (Exact): 2 Description: Swiss Chard-Assorted Colors. Great in salad or cooked. Aquaponically grown which means the fish water fertilizes the plants and nothing toxic to fish or bio-filtration can be used on the plants. That means no cheating with toxic pesticides around our farm, everything we use has to be safe enough to dump in a fish tank.
Swiss Chard-Perpetual Spinach Grower: Aquaponic Lynx LLC Price: $3.00(bunch Aprox 12 ounces) Available (Exact): 2 Description: Swiss Chard-Perpetual Spinach. Great in salad or cooked. Aquaponically grown which means the fish water fertilizes the plants and nothing toxic to fish or bio-filtration can be used on the plants. That means no cheating with toxic pesticides around our farm, everything we use has to be safe enough to dump in a fish tank.
Tomato, assorted small sweet varieties Grower: Aquaponic Lynx LLC Price: $5.00(Pint) Available (Exact): 2 Description: Tomato, assorted small sweet varieties. Sungold, Indigo Cherry Drop, Black Cherry, Supersweet 100, Matt's Wild, and Sunpeach.
Aquaponically grown which means the fish water fertilizes the plants and nothing toxic to fish or bio-filtration can be used on the plants. That means no cheating with toxic pesticides around our farm, everything we use has to be safe enough to dump in a fish tank.
Viola and Violet Edible Flowers and Leaves Grower: Aquaponic Lynx LLC Price: $3.50(18 flowers/leaves) Available (Exact): 1 Description: Wonderful edible flowers to dress up a fancy salad or dish. Viola and Violet Flowers are very mild and slightly sweet in flavor. Aquaponically grown which means the fish water fertilizes the plants and nothing toxic to fish or bio-filtration can be used on the plants. That means no cheating with toxic pesticides around our farm, everything we use has to be safe enough to dump in a fish tank.
Water Chestnut Plants Grower: Aquaponic Lynx LLC Price: $4.00(3 Bare root plants) Available (Exact): 10 Description: Rooted Water chestnut plants. Can be planted in a bin of water or some gravel in a pond or pond plant bed. They grow well in hot weather and fresh water chestnuts are a world of difference compared to the canned variety. The plants will spread and multiply. They die back in cold weather but come back as the weather warms. Water Chestnuts can be harvested and the plants re-planted to continue growing and producing. Aquaponically grown which means the fish water fertilizes the plants and nothing toxic to fish or bio-filtration can be used on the plants. That means no cheating with toxic pesticides around our farm, everything we use has to be safe enough to dump in a fish tank.
Wheatgrass – 5×7 Tray Grower: Aquaponic Lynx LLC Price: $6.00(5×7 tray each) Available (Exact): 0 Description: We grow wheatgrass to order, if interested in this product please let us know at [email protected] so we will start making it available. Small 5×7 inch tray of living wheatgrass.
Water once or twice daily, keep in a bright (but no direct sun) location with good ventilation.
To Harvest, Cut above the seed/soil level anytime but don't let it grow beyond the second blade of grass starting to divide off. If you want too long it gets more bitter.
It will re-grow but there won't be much nutrition left in the second growth so it isn't recommended to juice the re-growth.
Healthy way to get your green, super food so a little goes a long way.
Tray could produce up to 4oz of cut wheatgrass. Each pound of wheatgrass could produce up to 12-14 oz of juice with a good juicer.
This is grown from Organic wheat seed growing in potting medium. No fertilizer, no chemicals or sprays are used on it. Only plain water.
Wheatgrass – Fresh Cut Grower: Aquaponic Lynx LLC Price: $13.00(1 lb) Available (Exact): 0 Description: We grow wheatgrass to order, if interested in this product please let us know at [email protected] so we will start making it available.
Fresh Cut Wheatgrass for Juicing.
Fresh cut, should keep for up to 7-10 days sealed in a bag in the refrigerator.
Healthy way to get your green, super food so a little goes a long way.
This is grown from Organic wheat seed. No fertilizer, no chemicals or sprays are used on it. Only plain water.
Wheatgrass – Fresh Cut 8 oz Grower: Aquaponic Lynx LLC Price: $6.50(8 oz) Available (Estimated): 0 Description: We grow wheatgrass to order, if interested in this product please let us know at [email protected] so we will start making it available.
Fresh Cut Wheatgrass for Juicing.
Fresh cut, should keep for up to 7-10 days sealed in a bag in the refrigerator.
Healthy way to get your green, super food so a little goes a long way.
This is grown from Organic wheat seed. No fertilizer, no chemicals or sprays are used on it. Only plain water.
Wheatgrass – Living in 8" Clamshell Grower: Aquaponic Lynx LLC Price: $6.00(each) Available (Exact): 0 Description: We grow wheatgrass to order, if interested in this product please let us know at [email protected] so we will start making it available. Clamshell of living wheatgrass. This is still in the small yellow stage so it can travel in the closed clamshell. All you need to do is bring it home, open the clamshell and place in a bright location but out of direct sun and water it well once or twice a day. In several days you will have wheatgrass ready to harvest. If you need to wait before letting it grow, you can keep the clamshell closed and place it in the refrigerator to suspend growth for a week or two.
To Harvest, Cut above the seed/soil level anytime but don't let it grow beyond the second blade of grass starting to divide off. If you wait too long it gets more bitter. Cut, it will keep sealed in a bag in the fridge for a week or two.
It will re-grow but there won't be much nutrition left in the second growth so it isn't recommended to juice the re-growth.
Healthy way to get your green, super food so a little goes a long way.
Max harvest possible 5 1/2 oz of dry grass. Max Juice 4 oz with a good wheatgrass juicer.
This is grown from Organic wheat seed. No fertilizer, no chemicals or sprays are used on it. Only plain water.
Wheatgrass – Tray Grower: Aquaponic Lynx LLC Price: $20.00(Tray) Available (Exact): 0 Description: We grow wheatgrass to order, if interested in this product please let us know at [email protected] so we will start making it available. Whole 11×21 inch tray of living wheatgrass.
Water once or twice daily, keep in a bright (but no direct sun) location with good ventilation.
To Harvest, Cut above the seed/soil level anytime but don't let it grow beyond the second blade of grass starting to divide off. If you want too long it gets more bitter.
It will re-grow but there won't be much nutrition left in the second growth so it isn't recommended to juice the re-growth.
Healthy way to get your green, super food so a little goes a long way.
Tray could produce almost 1.5 lb of cut wheatgrass. Each pound of wheatgrass could produce up to 12-14 oz of juice with a good juicer.
This is grown from Organic wheat seed growing in potting medium. No fertilizer, no chemicals or sprays are used on it. Only plain water.
Order now through March 16th for March 18th pickup.
Send me a message if you are interested in Getting Channel Catfish.
Let me know if you are interested in Shiitake Mushrooms. They should be listed soon but if you let me know, I may be able to fill orders even before the new farm gets listing.
If you want Living Trays of Sunflower shoots, Pea shoots, or micro greens please let me know as I need time to grow them for you. Currently I can do Pea shoots, sunflower shoots, radish, arugula, and Basil micro greens and wheatgrass in full trays, 1/6th trays or 1/8th trays. I can also do radish in smaller containers. In trials are Beet micro greens. If you have any particular requests, let me know I’m happy to grow to order.
Sign in to order. https://yalaha.locallygrown.net/market You have to sign in to see the add to cart button. Then click the add to cart button on the items you want to buy. Remember you need to check out before your order will be placed. Remember to let me know when you want to pick up on Sat. (If I don’t send you an e-mail confirmation of your order and pick up time, please make sure you checked out and completed your order.)
0 notes
Text
it was 1/2 Tablespoon of Cumin(hehe CUM) not a whole one
anyways, the only reason im making this food is because i got some the stuff at a reduced price(like i got the meat at 8 dollars, it was past expiration in store, honestly a steal tho, plus i live in farm country so certain things like beef is lil cheaper)
I do not like the price i paid for peppers tho(a dollar per pepper[AND THAT WAS REDUCED TOO] smh they are green tho so they should last a bit, its not as bad as the price of cucumbers and zucchinis now paying 2 dollars a pound which is essentially paying 2 dollars for each one)
i am slow cooking the most delicious of concoctions in the kitchen rn
(my tags are so long lol whole half ass recipe down there)
#idk its some bastardized recipe for something called mongolian beef#well can it really be called bastardized when i actually fuckin improved it#like all there was originally was fucking soy sauce garlic brown sugar and onion#LITERALLY NO SEASONING#so i took my earned skills and actuallly made it good#the sauce is now flavorful and doesnt taste like garlic soywater#(the meat gets slow cooked in the sauce thats how i know how the sauce tastes)#added a teeny bit of mustard powder and cumin(half TBsp) added some ginger and onion powder(TBsp) and upgraded garlic to black garlic(TB)#it contained 1/2 cup of soy and 1/3 cup of Brown sugar#also replaced the water with beef broth(half cup)#theres also some oil(i did reg Veggie oil cause i dont like Sesame/ 1TB)#you serve ontop some seasoned/fried rice and mixed peppers/veggies thatve been lightly seasoned and fried in a skillet#the meat(1 1/4 Lb.) gets cleaned and sliced into strips#you leave the strips in a heavy salt solution to leach it/tenderize it(you can use other methods but this was what i had on hand) then rins#(you leave it in the solution for ATLEAST 30 minutes)#pat the strips down dry and using a 1/4 cup of Corn starch you coat the strips entirely#you then put the meat into your sauce and stir it around until the meat is entirely covered in it#then slow cook for however long you want(im doing 8 hours for some REAL tender shit)#alot of these measurements were eyed balled (except starch and liquids)[im skilled at this]#i will update yall once ive tasted the finished product#i went a little light on the seasoning but i dont have certain ingredients i want/can obtain so i had to make do(plus my parents cant shiit#DO NOT ADD EXTRA SALT TO THE DISH#leaching the meat and the soy sauce already has enough salt content#THE STARCH IS NECESSARY PART OF THE DISH#you can achieve black garlic by slow cooking regular garlic FOR WEEKS#longer = better#also i recommend using minced Ginger instead of powder for better flavour
5 notes
·
View notes