#lzw compression
Explore tagged Tumblr posts
Visit Tumblr Blog
Explore Tumblr blogs with no restrictions, modern design and the best experience.
Last Seen Tumblr Blogs


Fun Fact
The “We are the 99%” Tumblr blog became the slogan for the Occupy Wall Street movement.
Note
i need a coding project that isn't the one i'm currently working on. any ideas?
that's a tricky one because i also don't have many idea for projects! my current project has been learning about and eventually attempting to write a compiler, but it's been quite slow since my brain has been a bit mushy for a few months now, it's interesting though!
uhhhhhhh... i'll just list a few things i've done in the past for like school and stuff that i found interesting i guess?
writing a memory allocator
just like, implementing various data structures is pretty fun sometimes
i started writing a file compressor with huffman and lzw compression once and immediately got distracted and never finished it but it's pretty interesting stuff
learning how to reverse engineer binaries is pretty interesting, i'm still not very good at it
graphics programming can be pretty fun
also network programming
no idea if any of that is helpful but maybe it'll give you an idea for something?
5 notes
·
View notes
Text
CS 1501 Assignment#3 Lzw Solved
Purpose: The purpose of this assignment is to fully understand the LZW compression algorithm, its performance and its implementation. We will improve the performance of the textbook’s LZW implementation when the input files are large. Goal 1: Read the input file as a stream of bytes (i.e., byte by byte) instead of all at once (feel free to use your lab code for this task). Goal 2: Avoid the…
0 notes
Text
does compression really help vpn
🔒🌍✨ Get 3 Months FREE VPN - Secure & Private Internet Access Worldwide! Click Here ✨🌍🔒
does compression really help vpn
Compression algorithms in VPN
Compression algorithms play a crucial role in the efficiency and performance of Virtual Private Networks (VPNs). These algorithms are utilized to reduce the size of data packets transmitted over the network, thereby improving speed and conserving bandwidth.
In the context of VPNs, compression algorithms work by identifying repetitive patterns within data packets and replacing them with shorter representations. This process helps in reducing the overall size of the data being transmitted, which is particularly beneficial for VPNs operating over networks with limited bandwidth or high latency.
One of the most commonly used compression algorithms in VPNs is Lempel-Ziv-Welch (LZW). LZW is known for its effectiveness in compressing data without significant loss of information. It achieves compression by creating a dictionary of frequently occurring patterns and replacing them with shorter codes during transmission.
Another popular compression algorithm used in VPNs is Deflate, which combines the LZ77 algorithm for pattern matching and Huffman coding for data compression. Deflate is widely supported and offers a good balance between compression ratio and computational complexity, making it suitable for various VPN implementations.
However, while compression algorithms can improve the performance of VPNs by reducing bandwidth usage and speeding up data transmission, they may not always be suitable for certain types of data. For example, already compressed files such as multimedia or encrypted data may not benefit much from further compression and could even result in increased overhead.
In conclusion, compression algorithms play a vital role in optimizing the performance of VPNs by reducing data size and conserving bandwidth. By choosing the appropriate compression algorithm based on the specific requirements and characteristics of the data being transmitted, VPN providers can enhance the efficiency and reliability of their services.
Efficacy of data compression in VPN
Data compression plays a crucial role in enhancing the efficiency and performance of Virtual Private Networks (VPNs). By reducing the size of transmitted data packets, compression techniques optimize bandwidth utilization and improve overall network performance.
One of the primary benefits of data compression in VPNs is the reduction of network latency. When data packets are compressed before transmission, they require less time to traverse the network, resulting in faster data transfer speeds. This is particularly beneficial for tasks that involve transferring large files or streaming media over a VPN connection.
Moreover, data compression can lead to significant cost savings, especially in situations where bandwidth usage is metered or limited. By compressing data before it is transmitted over the network, VPN users can effectively reduce their data consumption, leading to lower costs associated with data usage.
Furthermore, data compression enhances the security of VPN connections by minimizing the amount of data that needs to be transmitted. This reduces the exposure of sensitive information to potential threats and helps to mitigate the risk of data breaches.
However, it's essential to consider potential trade-offs when implementing data compression in VPNs. While compression can improve network performance and reduce costs, it may also introduce additional processing overhead on both the client and server sides. Additionally, certain types of data, such as already compressed files or encrypted data, may not benefit significantly from compression techniques.
In conclusion, data compression plays a vital role in optimizing the performance, efficiency, and cost-effectiveness of VPNs. By reducing data packet sizes, compression techniques help to minimize network latency, lower data consumption, and enhance security, ultimately providing users with a more seamless and secure VPN experience.
Impact of compression on VPN performance
When it comes to Virtual Private Networks (VPNs), users often prioritize security and privacy. However, another crucial aspect that significantly influences VPN performance is data compression. Compression techniques aim to reduce the size of data packets transmitted over the network, which can have both positive and negative effects on VPN performance.
One of the primary benefits of compression is the reduction of bandwidth usage. By compressing data before transmitting it through the VPN tunnel, users can conserve bandwidth, leading to faster transfer speeds and lower latency. This is especially beneficial for users with limited bandwidth or those accessing the VPN over a slow internet connection.
Moreover, compression can improve the overall efficiency of data transmission. Smaller data packets require less time to transmit, resulting in quicker response times and smoother browsing experiences. This is particularly advantageous for activities such as streaming, online gaming, and video conferencing, where real-time data transmission is crucial.
However, compression may also introduce some drawbacks to VPN performance. One potential issue is the additional processing overhead required to compress and decompress data packets. This can increase CPU usage on both the client and server sides, potentially impacting overall system performance, especially on devices with limited computational resources.
Furthermore, the effectiveness of compression depends on the type of data being transmitted. While text-based data such as emails and documents can be significantly compressed, multimedia files like videos and images may not experience much compression, limiting the benefits in certain scenarios.
In conclusion, compression plays a crucial role in shaping VPN performance by reducing bandwidth usage and improving data transmission efficiency. However, its impact can vary depending on factors such as network conditions, computational resources, and the type of data being transmitted. Balancing the benefits and drawbacks of compression is essential for optimizing VPN performance according to individual needs and preferences.
Comparison of compressed vs
compressed vs. uncompressed images: Which is Better for Web Performance?
When it comes to optimizing web performance, the choice between compressed and uncompressed images can significantly impact a website's speed and user experience. Let's delve into the comparison between these two image formats to determine which is better for enhancing web performance.
Compressed images are files that have undergone a reduction in file size through various techniques such as lossy or lossless compression algorithms. This reduction in size is achieved by removing unnecessary image data while retaining as much visual quality as possible. Common compressed image formats include JPEG and PNG.
On the other hand, uncompressed images maintain all the original data and quality without any compression applied. Formats like BMP and TIFF are examples of uncompressed image files. While uncompressed images offer the highest quality and fidelity, they come with larger file sizes, which can negatively impact web performance, especially on devices with slower internet connections.
When considering web performance, compressed images have a clear advantage. By reducing file sizes, they decrease the time it takes for a webpage to load, leading to faster load times and improved user satisfaction. Additionally, smaller file sizes result in reduced bandwidth consumption, making websites more accessible across a wider range of devices and network conditions.
However, it's essential to strike a balance between image compression and visual quality. Over-compressing images can result in noticeable artifacts and degradation in image quality, which may compromise the overall user experience. Therefore, it's crucial to optimize images carefully, selecting the appropriate compression level based on the specific requirements of each image and webpage.
In conclusion, while uncompressed images offer superior quality, compressed images are the preferred choice for enhancing web performance due to their smaller file sizes and faster load times. By employing efficient compression techniques, web developers can ensure that their websites deliver a seamless and optimized experience for users across all devices and network conditions.
Optimization techniques for VPN compression
VPN compression plays a crucial role in enhancing network performance and optimizing bandwidth utilization for both personal and professional usage. By implementing effective optimization techniques for VPN compression, users can experience faster speeds, reduced latency, and overall improved connection stability.
One of the key optimization techniques for VPN compression is protocol selection. Choosing the right compression protocol can significantly impact the performance of a VPN connection. Popular options include LZO, LZ4, and Gzip, each with its own strengths and compatibility considerations. It is essential to evaluate the specific requirements of the VPN connection and select the most suitable compression protocol to maximize efficiency.
Additionally, adjusting compression levels can further enhance VPN performance. By fine-tuning compression settings based on network conditions and traffic patterns, users can strike a balance between achieving high compression ratios and minimizing processing overhead. Experimenting with different compression levels and monitoring performance metrics can help optimize VPN compression for peak efficiency.
Furthermore, optimizing packet size can contribute to improved VPN compression. By adjusting MTU (Maximum Transmission Unit) sizes and leveraging techniques like packet fragmentation, users can minimize data overhead and enhance data transfer speeds within the VPN tunnel. Fine-tuning packet size parameters based on network characteristics can lead to more efficient data transmission and reduced latency.
In conclusion, applying optimization techniques for VPN compression is essential for maximizing network performance and bandwidth efficiency. By carefully selecting compression protocols, adjusting compression levels, and optimizing packet sizes, users can experience smoother connectivity, faster data transfer speeds, and overall improved VPN performance.
0 notes
Text
A Comprehensive Guide to Computer Graphics and Rendering Micro Projects

Computer Graphics and Rendering form the backbone of digital visualizations, breathing life into the virtual worlds we interact with daily. For individuals seeking a hands-on exploration of this dynamic field, micro projects provide the ideal avenue. In this comprehensive guide, we'll delve into a myriad of Computer Graphics and Rendering micro project ideas, each offering a unique lens into the expansive universe of digital imagery.
Note: Also read our blog on 49+ Exciting CGR Micro Project Topics: Learning and Innovation
Best CGR Micro Project Ideas
here's a comprehensive list of 50+ micro project ideas covering various domains:
Computer Science Programming
Implement a Basic Interpreter: Create a simple interpreter for a programming language or a mini scripting language.
Build a Chatbot: Develop a conversational AI chatbot using frameworks like Dialogflow or Rasa.
Create a File Compression Tool: Implement algorithms like Huffman coding or LZW to compress and decompress files.
Design a Sudoku Solver: Develop a program that can solve Sudoku puzzles of varying difficulty levels.
Develop a Password Generator: Create a tool that generates secure passwords with specific criteria (length, complexity).
Build a To-Do List App: Develop a task manager application with features for adding, editing, and organizing tasks.
Create a Web Scraper: Build a tool to extract specific information from websites by scraping web pages.
Implement a Simple Blockchain: Develop a basic blockchain system with features like adding blocks and validating chains.
Design a Weather App: Create an application that fetches and displays weather information based on user input.
Develop a Personal Finance Tracker: Build an app to track expenses, income, and visualize financial data.
Data Science Machine Learning
Sentiment Analysis on Social Media Data: Analyze sentiments from Twitter or Reddit data using Natural Language Processing (NLP).
Build a Recommendation System: Create a recommendation engine for movies, books, or products using collaborative filtering.
Predictive Stock Price Analysis: Use historical stock data to predict future stock prices with regression or time series models.
Image Classification: Develop a deep learning model to classify images using Convolutional Neural Networks (CNNs).
Customer Churn Prediction: Analyze customer data to predict customer churn in subscription-based services.
Time Series Forecasting: Forecast future trends in data using techniques like ARIMA or Prophet.
Spam Email Detection: Create a machine learning model to classify emails as spam or non-spam using text classification.
Predictive Maintenance: Develop a model to predict equipment failures in machinery using IoT sensor data.
Credit Card Fraud Detection: Build a fraud detection system to identify fraudulent transactions in credit card data.
Healthcare Analytics: Analyze medical data to predict disease diagnoses or patient outcomes.
Web Development
Create a Personal Portfolio Website: Design and build a professional portfolio showcasing your skills and projects.
Build a Blogging Platform: Develop a content management system (CMS) for creating and managing blog posts.
E-commerce Website: Develop an online store with features for browsing products, adding to cart, and checkout.
Interactive Quiz App: Create an app that allows users to take quizzes and provides instant feedback.
Recipe Sharing Website: Develop a platform for users to share and discover recipes with search and filter options.
Event Booking System: Build a system for users to browse and book tickets for events or workshops.
Social Media Dashboard: Create a dashboard to manage and schedule posts across multiple social media platforms.
Online Learning Platform: Develop a platform for online courses with features for video lectures and quizzes.
Real-time Chat Application: Build a chat app that enables real-time messaging between users.
Weather Forecast Web App: Create a web app to display weather forecasts based on user location.
Mobile App Development
Fitness Tracker App: Develop an app that tracks and monitors users' fitness activities like steps, distance, and calories burned.
Language Learning App: Create an app to help users learn a new language with lessons, quizzes, and interactive features.
Expense Tracker: Build an app for users to track and manage their expenses with categories and budgeting features.
Music Player App: Develop a simple music player app with features for playlists, shuffle, and repeat.
Recipe Organizer App: Create an app to store, organize, and access cooking recipes with search and categorization.
Task Manager: Build a task management app with features for creating, organizing, and prioritizing tasks.
QR Code Scanner: Develop an app that scans QR codes and performs actions based on the encoded information.
Voice Recognition App: Create an app that recognizes and transcribes voice input into text or performs specific tasks.
Location-based Reminder App: Build an app that sets reminders based on user-defined locations or geofences.
AR-based Navigation App: Develop an app that uses augmented reality for indoor or outdoor navigation.
Robotics IoT
Home Automation System: Build a system that controls home appliances remotely using IoT devices.
Line-following Robot: Create a robot that can follow a path or track lines using sensors and motors.
Gesture-controlled Robot: Develop a robot that responds to hand gestures or motions for navigation or actions.
Temperature Monitoring System: Build a system that monitors and logs temperature using IoT sensors.
Smart Plant Watering System: Create a system that automatically waters plants based on soil moisture levels.
Object Detection with Raspberry Pi: Use a Raspberry Pi and a camera module for object detection and tracking.
Drone Programming: Program a drone for autonomous flight or specific tasks using APIs and SDKs.
Voice-controlled Home Assistant: Develop a home assistant using speech recognition for controlling smart devices.
IoT-based Security System: Create a security system with sensors for detecting intrusion or monitoring.
Gesture-controlled Light Switch: Build a system that controls lights based on hand gestures using sensors.
These micro project ideas span various fields, offering a wide range of opportunities to explore and develop skills in computer science, data science, web development, mobile app development, robotics, and IoT. Feel free to choose projects aligned with your interests and skill level to embark on your learning
Note: Also read our blog on 51+ Best Statistics Minitab Project Ideas For Students 2024
Conclusion
In conclusion, Computer Graphics and Rendering micro projects serve as gateways to the captivating world of visual storytelling. Beyond honing technical skills, these projects contribute to the evolving landscape of digital imagery, each exploration adding a brushstroke to the canvas of virtual worlds.
Embark on your micro project with zeal and curiosity. As you navigate the complexities of Computer Graphics and Rendering, you not only enhance your skills but also contribute to the collective effort of shaping digital realities. These micro projects are not just learning experiences; they are journeys into the extraordinary, where pixels transform into art, and imagination knows no bounds.
0 notes
Text
What is Data Reduction ?
Data reduction techniques refer to various methods and approaches used to reduce the size, complexity, and redundancy of data while preserving its essential information. These techniques are applied in diverse fields such as data storage, data analysis, machine learning, and data transmission. The primary goal of data reduction is to optimize storage resources, improve computational efficiency, enhance data processing speed, and facilitate easier data management.
Here are some common data reduction techniques:
1. Data Compression: Data compression involves encoding data in a more compact form to reduce the number of bits required for storage or transmission. Compression can be either lossless or lossy. Lossless compression techniques ensure that the original data can be perfectly reconstructed from the compressed version, while lossy compression sacrifices some details to achieve higher compression ratios. Popular compression algorithms include ZIP, GZIP, and LZW (used in GIF images).
2. Deduplication: Deduplication, also known as data deduplication or duplicate data elimination, involves identifying and removing duplicate or redundant data within a dataset or storage system. By storing only a single instance of each unique piece of data and referencing it elsewhere, deduplication reduces storage space requirements and improves data efficiency. Deduplication is commonly used in backup systems, file storage systems, and cloud storage.
3. Dimensionality Reduction: Dimensionality reduction techniques aim to reduce the number of variables or features in a dataset while preserving the important characteristics and minimizing information loss. This is particularly useful in machine learning and data analysis tasks where high-dimensional datasets can lead to computational inefficiencies and the curse of dimensionality. Techniques like Principal Component Analysis (PCA), Linear Discriminant Analysis (LDA), and t-SNE (t-Distributed Stochastic Neighbor Embedding) are commonly used for dimensionality reduction.
4. Sampling: Sampling involves selecting a subset of data points from a larger dataset for analysis or modeling purposes. Instead of using the entire dataset, a representative sample can provide insights and results that approximate those obtained from the complete dataset. Sampling reduces computational and storage requirements, speeds up analysis, and can be particularly useful when dealing with large datasets.
5. Data Aggregation: Aggregation involves combining multiple data points or records into a single representative value or summary. This is commonly used in data summarization, where large datasets are condensed into smaller, more manageable representations. Aggregation techniques include calculating averages, sums, maximums, minimums, or other statistical measures for groups of data points.
6. Filtering: Filtering involves removing unnecessary or irrelevant data from a dataset based on specific criteria or conditions. This can be done to remove noise, outliers, or data points that do not meet certain requirements. Filtering helps improve data quality, remove unwanted information, and focus on the most relevant data for analysis or processing.
Data reduction techniques play a crucial role in managing and extracting insights from large datasets. By reducing data size, complexity, and redundancy, these techniques enable more efficient storage, faster processing, and improved decision-making capabilities across various domains. By collaborating with professional AWS Managed Service Provider, you can utilize the cloud environment at its best. However, it's important to carefully consider the trade-offs between data reduction and the potential loss of information, as some techniques may result in a partial loss of data fidelity or detail.
0 notes
Text
0x5E1F1E
i released an experimental artwork that allows the viewer to create collaborations with me in realtime and mint the resulting 1/1 artworks on tezos
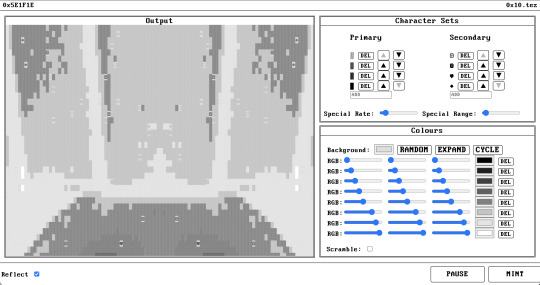
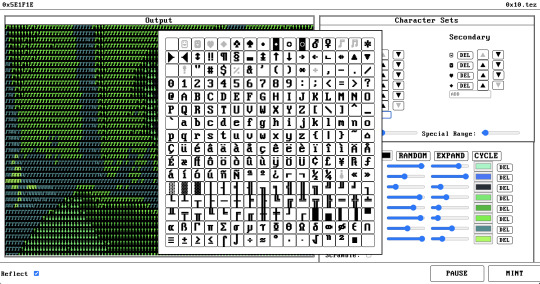
it takes in your camera stream through a DOS/ASCII style filter created by 0x10 and there are some controls where you can configure colours and character sets
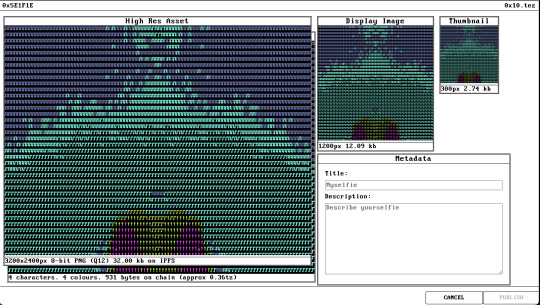
when you're happy with the creation you can press mint and a preview of the final artwork will be displayed. this is where you can add a title and description for the token
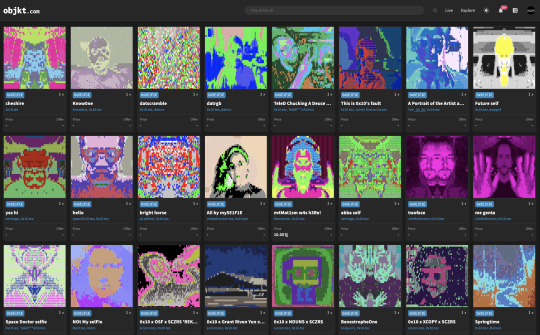
all minted artworks appear in the collection on objktcom and rarible and are marked as collaborations between the minter and 0x10
on-chain artworks and viewer
each artwork has a 100% on-chain ASCII version that is stored alongside the artwork on the blockchain and can be used to reconstruct the artwork without ipfs
for this we pay per byte, so there is an associated storage cost for each selfie that increases depending on the complexity of the final output - the more colours, characters, and overall noise in the scene the higher the on-chain storage costs
i created an accompanying token viewer application which is also 100% on-chain, and this came with a whole heap of problems i had to figure out in order to achieve
it can be installed via a single terminal command available inside the artwork. the same command is minted at typed.art/8280
running the command installs and optionally opens a local viewer app. this app is extremely basic because it was written from scratch, by hand, and optimised to fit inside a single tezos blockchain transaction, which also brought about a lot of limitations i had to get around to achieve this part of the artwork
technical information
the artwork consists of 6 smart contracts. 3 of them are utility contracts that do things like checking signatures, domains, and token balances, and the other 3 are the mintery, the on-chain asset storage, and the tokens themselves
when you access the site for the first time you need to request a "mint access token"
this token is an NFT that will appear in your wallet from the mintery contract, and is your key to minting selfies. it's not possible to call the minting functionality without this special access token in your wallet
you also require a tezos domain linked to the wallet. both the tezos domain and the mint access token are used to create a unique signature that gets signed and attached the each mint request and gets verified on-chain during the mint process as part of a bot-resistant proof-of-concept minting technique
fun facts
the entire artwork is to be considered a self-portrait of 0x10
the artwork is 100% web3 - there are no servers, the primary artwork site is hosted on ipfs with the dns running through the linked tezos domain page (0x5E1F1E.tez.page)
i initially created the entire artwork to use gzip compression for storing the on-chain data and then at the very end when i was writing the on-chain viewer i could not fit my gzip decompression code into a single blockchain transaction, so had to scrap and re-implement the entire engine using a basic LZW implementation instead of gzip to achieve my goal of having a self-contained transparent on-chain viewer application that fits into a single transaction
there is a super-secret glitch mode hidden inside the artwork that can lead to some pretty amazing creations - however, the complexity of the final results can lead to very expensive storage costs for the on-chain versions of glitched creations and they can even deviate slightly from the original (below example would cost over 5tz in on-chain storage alone)

there's on-chain documentation for reconstructing a selfie from the raw on-chain data
the hex representation of the red colour in the access token and logo is #5E1F1E
there is an upper max limit of 0x5E1F1E (6168350) selfies available
you may use outputs from 0x5E1F1E or even 0x5E1F1E itself as an input into new artworks provided attribution of some sort to either 0x5E1F1E or 0x10 is included with the new artwork
my versum genesis is one of my earliest glitch-mode outputs created while i was developing selfie

i had fun making this artwork, i hope you have fun using it, and i look forward to seeing more creations
#tezos#tezosnft#smart contracts#nft#nftart#nftproject#nftumblr#nftcreators#nftcommunity#nftcollection#mintable#artwork#cryptoart#experiment#behind the scenes#interactive art#ascii art#self portrait#collaboration#0x5E1F1E#0x10
27 notes
·
View notes
Text
Did you ever wonder how lossless data compression works? This article from Quanta makes Huffman coding easy to understand.
Major compression algorithms (such as GIF) use an encoding trick called "Lempel-Ziv-Welch" (LZW) which avoids the need to explicitly store a translation table. You can read about LZW at Wikipedia: https://en.wikipedia.org/wiki/Lempel%E2%80%93Ziv%E2%80%93Welch
2 notes
·
View notes
Text
Prof. Abraham Lempel has died (the L in LZW compression)
https://www.ynetnews.com/business/article/hjdfzoa2o Comments
2 notes
·
View notes
Text
Pixels, Blobs, and Bitmaps - A Guide to BMP and PNG

There is a good bit of confusion about the difference between BMP to PN (b) and PNG to BMP (p). In this article, I'll try to clear up some of the technical terminology. While some people still find this confusing, I think it's time that it was.
To begin with, let's have a look at the difference between the BMP format and the PNG format. BMP stands for "Bitmap Image File". The major benefit of the BMP format is that they can be saved on just about any format from disk to floppy and back again. In contrast, only a handful of compressed formats have been designed specifically for use with BMP files.
Another advantage of the BMP format is that they are considerably smaller than PNG files. Since most applications can open both formats, the ability to open more than one file simultaneously is beneficial.
Another major benefit of the BMP format is that they are much easier to manipulate on-screen. Since they are stored as a file, all the transformations that would take place in an image editing program can be applied without having to decompress the file first. This makes them particularly popular for image viewers like most people use when browsing the web.
This leads to a discussion of the difference between PNG and BMP to PNG (p). For these formats, there is a choice between a lossless or lossy option. This means that you can save the file, compress it, and then decompress it in a way that preserves the original quality.
The BMP to PNG (p) method makes it possible to save a lot of files at once. This enables most users to store all of their images in one file, which makes them far more compatible with many common image editors. This also allows for the conversion of an image without losing any quality.
However, the other major disadvantage of the BMP to PNG (p) method is that it cannot open every image format, including JPG, GIF, TIFF, BMP, PCX, and JPEG. This is because they have different compression methods.
As a result, the only files that can be converted to PNG format are JPG, GIF, PCX, and JPEG. If you need to be able to open all of your images from a variety of formats, this method is not right for you.
PNG is, for the most part, the same as BMP, except that it supports additional formats. These include SVG, XPM, PSD, TIFF, BMP, LZW, and HTML, to name a few.
It's important to note that when you work with PNG files, you must convert them to a format that supports PNG optimization. The primary reason for this is that PNG files are designed to be much smaller than BMP files. When you do this, they are extremely small, but also are less flexible.
While there is not a clear winner between BMP to PNG (p) and PNG to BMP (p), the biggest advantage of the BMP to PNG (p) method is that it's easier to manipulate on the screen. If you don't need a lot of files in your application, this might be the right choice for you.
1 note
·
View note
Text
Assignment#3 – Lzw Solved
OVERVIEW Purpose: The purpose of this assignment is to fully understand the LZW compression algorithm, its performance and its implementation. We will improve the performance of the textbook’s LZW implementation when the input files are large. Goal 1: Read the input file as a stream of bytes (i.e., byte by byte) instead of all at once (feel free to use your lab code for this task). Goal 2: Avoid…

View On WordPress
0 notes
Text
WAV To MP3 Converter
Full Audio MP3 Converter converts WV recordsdata to MP3 format simply and shortly. I take advantage of AIMP as my default Audio player and with none equalizing just flat. TO check the sound high quality, 1. I used my Dell 2.1. system first and a pair of. I took a line out from the PC which I linked to Yamaha transistor analog amplifier related to a 3 way Aiwa pair of audio system and subsequent to set of 2 way Creation pair of audio system. plus next to a Pioneer transistor analog amplifier connected to a pair of Diatone 3 method spaekers and subsequent to the 2 way Advent pair. MediaHuman Audio Converter là ứng dụng chạy trên các thiết bị sử dụng hệ điều hành Mac OS X và Home windows, hỗ trợ người dùng chuyển đổi các tập tin âm nhạc hoàn toàn miễn phí sang các định dạng MP3, AAC, WMA, FLAC, WAV, OGG hay AIFF hay Apple Lossless, cùng nhiều định dạng khác. A superb MP3 converter for becoming a member of audio files. works fairly fast, without errors. WV to MP3 Converter helps quick and batch converting WavPackwv to MP3, AAC, M4A, WAV, WMA, FLAC, APE, AU, RA, MP2 and AIFF and so on with very best quality and quick velocity. This manner with right_click>Ship To>Tools> I can convert tracks to DSF and duplicate all tags in WV, if any, but it surely does not work the opposite way, restoring DSF file from VW has no tags. If I find solution for this I will pass if somebody is involved using this. The compressed file format (.wv) incorporates all original header information and the compressed audio data for onewav file. The file can be used by WvUnpack to restore the original file, or thewv file will be played directly by a participant that supports WavPack information like winamp, foobar2000 or Apollo utilizing the provided plug-ins. Also, there are plugins accessible to use WavPack files with Adobe Audition (formerly CoolEdit) and Nero Burning ROM. Once downloaded, open XLD and go to the Preferences > Common part. Below Output Format", set the format to which you wish to convert the WV file. When conversion completes, you would proper-click on on converted file and choose "Play Destination" to play the ALAC file; or select "Browse Destination Folder" to open Windows Explorer to browse the outputted ALAC file. To edit wv waves of fun in video modifying software program Home home windows Film Maker, Sony Vegas, iMovie, Last Reduce, Audacity, changing WV to MP3 with WV Converter is a reasonably good strategy. Half 1. Most interesting 5 FLAC Converter. FLAC, brief for Free Lossless Audio Codec, is a kind of lossless audio format, which suggests it offers the same prime quality as the original audio file. On the main window configure the format" as WV (WavPack)"and preset" as both Lossless (Normal compression)" if you happen to desire higher processing pace however bigger ensuing recordsdata or Lossless (Best compression)" (see below) if you do not thoughts longer processing instances to obtain the smallest attainable files:Start BatchEncoder from the Windows menu (standard install) or double clicking on " (portable installation).The following step is copying " from the folder the primary obtain was extracted to to either the usual installation or transportable folder of BatchEncoder. Multimedia conversion could also be divided into two essential classes, ‘Lossy' and ‘Lossless'. WavPack employs solely effectively-known, public domain strategies (i.e., linear prediction with LMS adaptation, Elias and Golomb codes) in its implementation. Methods and algorithms which have ever been patented (e.g., arithmetic coding, LZW compression) are specifically averted. This ensures that WavPack encoders and decoders will keep open and royalty-free.
The Converter also offers the customers some customizable options, resembling video enhancing capabilities and audio conversion preferences. Swap has the advantage of being devoted to audio conversions and allows you to quickly batch convert audio tracks. It has an enormous number of output formats together with MP3, WMA and AAC. - Online e-ebook tool, convert between varied e-book formats on-line.
This instrument can convert any track or recording into MP3, AAC, AAC HE, AC3, https://judeflagg1759.hatenadiary.com MusePack, Ogg Vorbis, Opus, WMA, DTS, ALAC, FLAC, Monkey Audio, TAK, TTA, WavPack, AIFF, and leroycilley58.hatenadiary.com PCM formats. Supported Output Codecs : MP3, FLAC, M4A, WMA, AIFF, AAC, WAV, WavPack, OGG, AC3, AMR, MP2, AU. Bem instalei foobar2000 versão 9.6.four completa e Lame porém não consigo localizar a opção de conversão já que pretendo converter a extensãoflac paramp3 estar faltando alguma coisa a mais para ser instalado?, alguém poderia me ajudar neste sentido.
1 note
·
View note
Text
CS 1501 Project 2
Goal To understand the innerworkings and implementation of the LZW compression algorithm, and to gain a better understanding of the performance it offers. Background As we discussed in lecture, LZW is a compression algorithm that was created in 1984 by Abraham Lempel, Jacob Ziv, and Terry Welch. In its most basic form, it will output a compressed file as a series of fixed-length…
View On WordPress
0 notes
Text
Data Encoding: How Data Compression and Encryption Keep Your Data Secure

Data encoding is an essential part of keeping our data secure and private. In today’s world, data is constantly being transmitted over the internet and stored in databases. As a result, it’s crucial that we have the right tools and techniques in place to ensure the data is properly encoded to protect it from unauthorized access.
Data encoding is the process of compressing and encrypting data so that it can’t be understood or accessed by someone who doesn’t have the proper security credentials. It’s a critical component of data security, as it prevents data from being stolen or accessed by malicious actors.
Data compression is the process of reducing the size of a file or data set by removing redundant or unnecessary information. This can be done through a variety of algorithms and techniques, such as run-length encoding, Huffman coding, Lempel-Ziv-Welch (LZW), and Burrows-Wheeler Transform (BWT). The goal of data compression is to reduce the amount of data that needs to be transmitted or stored, which can help reduce the cost of transmitting and storing data.
Data encryption is the process of transforming data so that it can only be accessed by someone with the proper security credentials. Encryption algorithms use algorithms to scramble the data so that it can’t be read without the proper key https://data-encoder.com/the-best-miner-2021/. This helps ensure that only authorized people are able to access the data.
Data encoding is an essential part of keeping data secure and private. Compression and encryption help reduce the amount of data that needs to be transmitted or stored, and encryption helps ensure that only authorized users are able to access the data. By utilizing data encoding, businesses can ensure that their data is secure and protected from malicious actors.
0 notes
Text
Best image type for use in after effects research
Originally compiled by Ryan Wieber of ‘Ryan vs Dorkman’ fame:
A major factor that prompted this experiment was the recent discovery that PCs without an editor specifically equipped to handle HVCproHD footage cannot read it. And Nobody seems to be providing it for free. With our new HVX200 purchased for RvD2, this essentially means that we can capture via Final Cut and have nice HD footage to play with, but there is no way to simply take those files onto my PC and work on them in After Effects. Which blows. This means we have to export into some other format that can be read by both platforms, to work with. Well, the question then becomes, what format?
Image sequences are almost always used in “the industry” as opposed to video files, for a variety of reasons that to be honest I’m not fully aware of. One factor is that if there is some corruption or data loss, you don’t loose an entire video file, you loose however many image files were compromised, and you can quickly and easily re-render them back into the sequence. I suspect there are also compatibility benefits to image sequences as well. Plus, if you ever want a screengrab, just copy one of the images. Woo.
Anyway, I conducted two tests.
The first test was to take a 119-frame HD (1920x1080) shot, and export it as a bunch of (allegedly) lossless codecs and compare the filesizes to see which compressed better and worse. Here were my results:
Uncompressed AVI No compression. 705 MB Not an image sequence, but a basis for comparison.
BMP Set to the “Windows” file format, as opposed to OS2. It only allowed export in 24 bit mode. 705 MB I would guess there is no compression happening at all here.
PNG The settings offer the option of interlacing, which I did not do. I didn’t even notice at the time, but by default this format was set to “Trillions of colors” 941 MB I was suprised to find the filesize of the sequence actually jumped up instead of down. A long time ago I had done some experiments with PNGs before and had the impression that they were very good. This puzzled me. Also, exporting as PNGs with these settings took nearly 20 minutes, while all the rest took between one and two.
TIFF 24 bit, with “IBM PC Byte Order” enabled. 706 MB Larger by one meg. I was beginning to wonder if any of these actually compressed.
TIFF 24 bit, with “LZW Compression” enabled. 680 MB Alright, some improvement. At least better than an uncompressed AVI.
TIFF 24 bit, both “LZW Compression” and “IBM PC Byte Order” enabled. 680 No improvement over just using LZW alone.
TGA 24 bit, with RLE (run-length encoding) compression. 707 MB Larger by about 2 megs. A bit disappointing, but then I realized that the bit-depth in my project is 16, and so is the footage. 24 bit may be an excessively vast color space for this (and most kinds of) footage, if that mattered. Well, let’s find out.
TGA 16 bit, with RLE compression. 472 MB Aha! Significantly smaller. Could this be the best image format to use?
It was at this point that I decided to confirm the authenticity of the losslessness. Here’s how. I brought the image sequence into After Effects and laid it on top of the original footage. So we theoretically have 2 frame-for-frame pixel-for-pixel identical layers, just different file formats. I set the top one to “difference” mode, which theoretically will produce a perfectly pure black image, as there should be no difference between the pixels, and thus be represented as a pixel with zero color information. To help accentuate any inconsistencies there may be, I created an adjustment layer above it with a Levels filter on which stretched the image so extremely that a pixel with even the slightest bit of luminance or chrominance pops out and becomes apparent.
For the 16-bit TGA, there was an apparent residual image during this test. In the form of a very apparent noise/grain pattern, I could see the image, meaning that there was a difference between the two. This is not lossless! Bummer. I even compared the images by just looking at them normally and switching the top on and off. There was a visually detectable difference in saturation and the shadows. Please note that the 24 bit TGAs did not have this deterioration.
I decided to try this difference test with the other formats as well. To my surprise, under the extreme scrutiny of my adjustment layer, all of them exhibit an extremely small amount of uniform noise. I then tried duplicating the original layer itself and using it as the difference layer, which is the only one that produced absolutely no difference.
I would hypothesize, though, that the rest of the formats (which exhibited the very small amount of noise) do not actually suffer from inconsistency from the original. Instead, I’m guessing that this is super-tiny differences in how After Effects is rendering each pixel (probably sub-pixel stuff) which is being magnified excessively by my adjustment layer. Please understand that to actually see this noise, I’m blowing out the image so severely that about 1% brightness becomes pure white. I’m working under the assumption that this small bit of noise is unavoidable and will occur even between images that are truly identical, and can therefore be ignored as it is merely a quirk of After Effects. There was a distinctly different (and much more noticeable) difference image created by the 16-bit TGA, indicating that it actually was lossy.
So then I realized there was one more thing I didn’t try:
PNG “Millions of colors” (as opposed to Trillions, which was the default) 363 MB Almost half the size of the original file! I immediately ran it though the difference test to see if it was too good to be true. Success! It exhibited no noise in addition to the base difference noise found in all lossless versions.
PNGs in Millions of colors: Pixel-for-pixel 100% lossless sequence, at half the total diskspace of an uncompressed AVI (and most of the rest of the lossless image sequences). Fantastic!
Now, I said I conducted two tests.
The footage used in the first test(s) was some of the most difficult I could find, from a compression standpoint. It had a lot of out-of focus soft gradients to deal with, and it was extremely grainy, making run-length encoding very difficult (I would assume). For the second test, I wanted to give the codecs something easier to work with. So for this one, I took 50 frames from that footage and shrunk to 50%, and left it sitting inside a bunch of black space. The total dimensions of the video was still 1920x1080. This might approximate some title sequences (which are mostly black space), or an extreme example of what might happen if working with letterboxed video.
Here’s what I found:
Uncompressed AVI No compression. 300 MB Again, a baseline for comparison.
BMP “Windows”, 24 bit. 296 MB No real improvement.
TGA 24 bit, with RLE (run-length encoding) compression. 101 MB Now we’re getting somewhere. While this format and settings produced a slightly larger filesize in the scenario before, the run-length encoding really gets a chance to shine now, producing a filesize about 1/3 as big as the original.
TIFF 24 bit, with “LZW Compression” enabled. 80 MB Even smaller. Much improved compression ratio over it’s results in the last scenario.
PNG “Millions of colors” 43 MB Less than 1/6 the size of the original file! Even more dramatic results than it’s victory in the last scenario.
So, in both cases the clear victor is:
PNG image sequence Set to “Millions of colors”
Which, according to these tests I was playing with, can generally produce filesize savings of roughly 50% and up. Who knows how small you might be able to get the sizes on something like a credit sequence with only 2 colors for it’s compression to handle, especially if you could manually set the colors to less than “millions” and get away with it.
So for all kinds of video, including everyday footage that you just need to save losslessly, this format of image sequence is going to save you the most disk space… in some cases, by far. At least, that’s my findings.
In conclusion PNGs seem to be the best file type to go with.
For more click here.
1 note
·
View note
Text
Types Of Images Files

In a nutshell, an images file format is how you store and represent digital photos. The data of an image is stored to be show on the screen or be printed. This archived through the process of rasterization. Ideally, an photos is a grid of pixels, and all pixel is allocated a value (a bit). The mechanism used to store and raster and photo can vary Ross different standards. This is what makes any photo formats so unique. Mainly, the formats follow compressed or uncompressed (that is, loss or lossless compression) techniques. Through, some photos formats are dedicated to vectors as well. Some commonly used different photos formats are TIFF, PSD, GIF, PNG, BMP and JPEG. Apart from them, there could be numerous other kinds of formats as well.
1. JPEG
JPEG stands for joint photographers Expert Group. It is one of the most popular types of photos formats out there and features 6 major formats: JPEG, JPG, JPE, JIF, JFI, and JFIF. This means that the formats JPEG can compress data while still retaining the photo quality. It consumers lesser storages and can even compress a photo to up to 5% of its real size. The JPG file extensions are universally accepted. It supports high-definition photos. Also, JPG, formats are accepted by printers and other hardware units too. The only pitfall is that JPG does not support photos layers.
2. JPG
JPG file extension is one of the formats promoted by the JPEG compression union. Exact like JPEG, JPG also follows a lossy compression method. This means the real size of the images would be reduced, but some of its data would also be compromised in the process. The JPG/Exif format is mostly used in photographic tools like digital cameras. The JPG/JFIF format is accustomed to store and transfer photo Ross the site. It is a part of the JPEG group and is accepted by all the world’s major normals.
3. JPEG 2000
JPEG 2000 is a highly advanced compression method and part of the JPEG union. Different JPG, it supports both lossy as well as losses compression. It improves the overall quality of the photos Ross different platforms. It is comparatively a newer format, which has been derived from JPEG. It follows a lossy as well as a lossless method. It is used in photo editing and mostly for taking individual movie frames.
4. GIF
It means “graphic interchanged formats.’’ Today’s mostly GIFs are used to represent animations or videos. The format was introduced way back in 1987, but it has gained immense popularity in the last many years because of social media. It follows the LZW lossless compression method. This means the real quality of the data is retained. Though, GIFs only support 8-bit pixels. That is, there are only 256 possible color combinations in the formats. Since GIFs store “moving photos,” the size of the life is mostly large than JPEGs
5. PNG
PNGs are amazing for interactive documents such as website but are suitable for print. While PNGs are “losses,” meaning you can edit them and lot loses quality, they are still low resolution. The reason PHGs are used in most web projected is that you can save your photo with more colors on a transparent background. This creates for much shaper, web-quality photo.
6. PDF
PDFs were invented by adobe with target of capturing and reviewing rich information from any application, on any computer, with everyone. I’d say they’ve been very successful so far. If a designer saves your vector logo in PDF format, you can view it without any design software (as long as you have downloaded the free acrobat reader software), and they have the ability to use this file to make further manipulations. This is by far the better universal tool for sharing graphics.
7. RAW
A RAW photo is the least-processed photo type on this list-it’s often the first format a photos inherits when it’s making. When you snap a images with your camera, it’s saved immediately in a raw file format. Only when you upload your media to a new device and edit it using photo software is it saved using one of the photo extensions explained above. RAW photos are valuable because they capture every element of an image without processing and losing small visual details. Eventually, how’re, you’ll want to package them into a raster or vector file type so they can be transferred and same size for various purpose.
8. PSD
PSDs are files that are makes and saved and in above Photoshop, the most popular graphics editing software ever. This type of file contains “layers” that create modifying the photo much easier to handles. This is also the scheme that generates the raster file types mentioned above. The biggest disadvantage to PDS is that Photoshop works with raster photo as opposed to vectors photos.
9. TIFF
A TIFF is a big raster file that doesn’t lose quality. This file types is knows for using “lossless comparison,” meaning the real photo data is maintained regardless of how often you might copy, re-save, or compress the real file. Despite TIFF images’ ability to recover their quality after manipulation, you should avoid using this file type on the site. Since it can take forever to load, it’ll severely impact websites performance. TIFF files are also normally used when saving photographs for print.
1 note
·
View note
Text
VeryUtils TIFF Toolkit GUI and Command Line
VeryUtils TIFF Toolkit is a powerful application tool which can compress TIFF image files to small size ones, merge many TIFF image files to one combined TIFF image file or split one TIFF image with many pages to single ones. With VeryUtils TIFF Toolkit, the users can preview each TIFF image file added into the application which also allows users to zooming in or out the image. VeryUtils TIFF Toolkit also supports to preview the best fit size of image after zooming in or out.

VeryUtils TIFF Toolkit does compress TIFF images to reduced size. There are five kinds of compression methods in VeryUtils TIFF Toolkit, including LZW, Zip, PackBits, CCITT G3 and CCITT G4. You can use VeryUtils TIFF Toolkit to reduce the size of source TIFF files with anyone of the compression methods, which can help you store or transfer the compressed image files faster.
VeryUtils TIFF Toolkit does merge multiple TIFF images to one. If you don't want to browse, save or transfer many TIFF images one by one, please use VeryUtils TIFF Toolkit to merge these multiple TIFF images to a combined one. Just by some easy clicks, the application can realize this function in a short while.
VeryUtils TIFF Toolkit does split multipage TIFF to separate pages. VeryUtils TIFF Toolkit has the ability to split multipage TIFF image files to separate pages for those who need this function. The application also allows you to storing the separated TIFF images in a newly created folder.
Features of VeryPDF VeryUtils TIFF Toolkit:
Convert scanned PDF to editable Word or RTF documents in batches.
Split multipage TIFF to single page TIFF in batches.
Compress TIFF files with LZW, ZIP, PackBits, G3, G4 compression methods in batches.
Show the page number of a multipage TIFF file.
Able to rename output TIFF image files automatically.
View TIFF thumbnails by a preview window.
Able to rotate the thumbnails when previewing them.
Right click to get the detailed information of TIFF.
Contain some TIFF command line utilities. These command line applications can be called from a script or web application to process TIFF files in batches.
VeryPDF VeryUtils TIFF Toolkit contains a GUI application and some command line tools, these command line tools will help you to split, merge, append, compress and manage your TIFF files easily.
TIFFToolkit.exe: Windows version of VeryUtils TIFF Toolkit GUI application. tiff2bw.exe: Convert input color TIFF images to output gray TIFF images. tiffcmp.exe: Compare the two input TIFF files (file1 and file2). tiffcp.exe: Merge multiple TIFF files to one multipage TIFF file. Use option "-a" to merge an output TIFF file to an existing TIFF file. tiffdump.exe: Display verbatim contents of the TIFF directory in a file, which is useful for debugging bogus TIFF files. tiffinfo.exe: Display information of one or more TIFF files. tiffsplit.exe: Split (multipage TIFF) input.tif to single-page TIFF prefix0001/0002.tif files. tiff2pdf.exe: Convert a TIFF image to a PDF document. tiff2ps.exe: convert a TIFF image to PostScript document.
0 notes