#mix over medium to low to residual heat
Explore tagged Tumblr posts
Visit Tumblr Blog
Explore Tumblr blogs with no restrictions, modern design and the best experience.
Last Seen Tumblr Blogs


Fun Fact
Tumblr’s reach among the 26-to-35-year-olds in the US is 11%.
Text

mac and cheese carbonara,,,,, ft. turkey and arugula,,,,,
#alt version for when tired: make mac and cheese like normal then throw everything into the pot except for the eggs (just ditch those)#recipe:#box of kraft mac and cheese#half a bag of arugula#handful of sandwich turkey (smoked or peppered is best and you’ll chop it up or tear it up)#2 defrosted eggs (can attest to the squishing in a bag w salt and freezing method) (they defrost under running water in a minute or two)#(i froze mine in batches of 2 and 3 per bag with several shakes of salt)#mustard (i use boars head deli mustard but really any will do) (deli mustard just reigns supreme to me)#spices (lemon pepper and pepper pepper and salt and parsley) (now’s the time to fresh grind it if u can) (some smoked paprika would fuck too#)#milk and butter#boil the kraft mac and cheese then drain and set aside (make sure u save some pasta water)#throw your spices in the pot after it’s empty and toast them like that#throw your turkey in to the side of the toasted spices as you’re doing the toasting so it browns#mix all together then add mustard (at least 2 tablespoons) and toast again#throw in some pasta water if it starts to dry or gets too dry#throw in the cheese packet and a pad of butter and a splash of milk#throw in the boiled pasta#throw in the arugula#mix over medium to low to residual heat#mix in egg like you’re making carbonara#done 👍
2 notes
·
View notes
Text
How to Prepare Chinese Chili (Sichuan Style)?
Preparation:
Preparation time: 20
Cooking time: 40 min
Serving: 8
Ingredients:
Chili blend (*Footnote 1)
16 Chinese Facing Heaven chili peppers
16 Chinese Red Lantern chili peppers
1 and 1/2 tablespoons Sichuan peppercorns
2 teaspoons cumin powder
2 teaspoons dried oregano
1/2 teaspoon salt
Chili
1 tablespoon olive oil (or vegetable oil)
1 yellow onion, minced
5 cloves garlic, coarsely chopped
2 lbs (1 kg) ground beef
4 tablespoons Doubanjiang Chinese fermented spicy chili paste
1 can (28 oz) canned diced tomatoes
1 cup canned tomato sauce, about 1/2 can (7 oz. tomato sauce, or 2 tablespoons tomato paste)
2 tablespoons Shaoxing wine
1 tablespoon soy sauce
1 cup beef broth
2 can (14 oz) kidney beans, drained
Serve (Optional)
Finely chopped cilantro
Cubed avocado or sour cream
Steamed rice
Instructions:
Make the chili paste
Toast the Sichuan peppercorns in a small saucepan over medium heat until you can smell the fragrance and the Sichuan peppercorns turn a little darker. Transfer the peppercorns to a small bowl and set aside.
Soak the chili peppers in 2 cups of hot water until softened, 15 minutes or so. Use your fingers to press the air out from the chili peppers so they soak evenly. Once soaked, remove the tough stems of the chili peppers and discard them.
Combine the soaked chili peppers, Sichuan peppercorns, cumin powder, dried oregano, and salt in a blender or in a tall glass and use an immersion blender. Add 1/2 cup of the pepper-soaking water without adding the residue at the bottom. Blend until it forms a fine paste.
Cook
Heat oil in a 5.5 quart dutch oven over medium heat and add the yellow onion. Cook and stir until the onion just starts to soften, 5 minutes or so.
Use your spatula to move the onion to the edge of the pan and add the ground beef in the center. Add the Doubanjiang. Let cook for a minute without moving. Then, stir with a spatula to break the meat into smaller pieces and coat with the Doubanjiang. Cook, stirring frequently, until the meat is cooked and turns into small pieces.
Add the chili paste. Cook and stir for 2 minutes.
Add the diced tomato, tomato sauce, Shaoxing wine, and soy sauce. Cook and stir for 2 minutes.
Add the beef broth. Cook until it brings to a simmer. Turn to medium-low heat. Simmer, covered, until the beef turns soft, 30 minutes.
Add the kidney beans and stir to mix them well. Cook for another 5 minutes. Taste the chili carefully and add more salt if needed.
Serve the chili over steamed rice. Garnish with chopped cilantro and avocado, if using. Serve as a main course.
Store
Store the leftover chili in an airtight container in the fridge for up to 5 days or in the freezer for up to 1 month. Reheat in the microwave or on the stovetop. The beans will continue to absorb liquid during storage, so you can add a splash of broth before reheating to bring back the original texture. For a cozy dining experience similar to enjoying meals by the Lotus Stream Hong Kong, pair your reheated chili with a warm, ambient table setup.
0 notes
Text

Why Food Manufacturers Need High-Quality Chilli Powder
Introduction
For food manufacturers, chilli powder isn’t just a spice – it defines the color, heat, and shelf stability of their products. Low-quality chilli can ruin taste and product appearance, hurt brand reputation, and even lead to regulatory issues. High-quality chilli powder is a smart investment for every food manufacturer.
Visual Appeal Matters
Bright red color is critical for packaged spice mixes, sauces, and snacks. Indian chillies like Teja and Byadgi offer ASTA color ratings between 50 and 80, perfect for vibrant products.
Heat Consistency for Recipe Control
Food companies need uniform pungency across batches. Indian Guntur chilli offers 30,000 to 90,000 SHU (Scoville Heat Units), giving manufacturers precise heat control.
Contaminants Risk in Low-Grade Chilli
Cheap, untested chilli powders often carry pesticide residues, aflatoxins, or artificial colorants. These not only hurt product quality but can block exports to regions like the EU and Japan.
Consumer Preference for Natural
Global consumers are moving towards clean-label products. In a 2024 survey, 63% of buyers preferred natural color and flavor in packaged foods, making clean chilli essential.
Shelf Life and Packaging
High-quality chilli powder processed with controlled drying and hygienic grinding has a shelf life of up to 18 months, maintaining color and aroma for longer.
Why Indian Chilli Leads
India produces over 1.7 million tonnes of chilli annually, accounting for 40% of global trade. Its diverse range of chillies covers mild, medium, and extra hot categories, serving all market needs.

How Prabhu Group Can Lead
Prabhu Group delivers premium chilli powder that meets exact color, heat, and purity requirements for food manufacturers. Our modern processing, strict quality checks, and export-standard packaging ensure spices that enhance product appeal and shelf life. Partnering with Prabhu Group means guaranteed quality, batch consistency, and peace of mind for global buyers.

0 notes
Text
Cookbook: Buddha Bowls
To start off this weird little blog, I'm gonna give y'all one of my most versatile recipes. It's easy and quick to make on a weeknight, and it's pretty healthy depending on how you cook it. I call it a Buddha Bowl because it's adapted from a recipe I saw once that had the same name, but it's more accurate to call it "the bowl of whatever the hell I want."
What you need:
a protein of choice
leafy greens like kale, cabbage, and/or brussel sprouts
rice
a sauce or dressing of choice
Shrimp is great for this if you like seafood, but otherwise chicken and beef are good. I like to use tempeh for a vegetarian option, but tofu or even chickpeas will work.
I prefer cruciferous greens for this bowl because they add a lot of volume to fill you up, and are very good for you. I have trouble getting enough iron in my diet so kale and spinach are a must for me.
Who doesn't like rice? I tend to use a 5:1 mixture of brown rice and wild rice because I like the texture that wild rice introduces. Any kind of base would work for this, though - you could even sub noodles if you prefer.
What's the difference between a dressing and a sauce? I don't know. They're both just flavor goop. I really like Asian sauces for this dish. You can use plain ol' soy sauce if you want, jazz it up with some sesame oil and rice vinegar, but I usually use Lee Kum Kee oyster sauce. Other good options are teriyaki sauce, tamari, or even chunjang if you have the time to prepare it. If you want a lighter/tangier flavor, you could also use a vinaigrette.
Instructions:
Make rice. Plain white rice is great if you want a lighter flavor, or want it to soak up extra sauce. I like to cook my rice in vegetable broth and a drizzle of olive oil to make a quick dirty rice. I highly recommend getting a dedicated rice cooker if you don't already have one - it takes so much work out of the process.
(Optional) Marinate your protein in your sauce while your rice cooks. This is not necessary, but can elevate the flavor of your dish. It makes a big difference and most proteins only need about 20 minutes to soak up some good flavor.
When your rice is about halfway done, start cooking your protein in a large pan or wok over medium heat. Get it about 75% done before adding anything else to the pan. I use a neutral oil like canola or sunflower for this, but if your protein is fatty you might not need to add extra oil.
Turn heat to medium-low and add your veggies. Usually for me this is shredded kale, cabbage, onions, and mushrooms. You can mix and match to make it as simple or complex as you want. Alter your cook times according to what veggies you add - for example, onions will cook slower than kale, so let the onions get semi-translucent before adding softer veggies that will cook faster.
Once the protein and veg mixture is cooked, turn off the heat and drizzle in your sauce. Stir it in just enough to combine and warm the sauce with the residual heat from the pan. If your sauce starts sizzling and burning, your pan is too hot. We want the flavor of the veggies and sauce to stay nice and fresh, which is why we only add in the sauce at the end rather than cooking them all together.
Place rice in the bowl and spoon the protein and veg mixture on top. There you go!
This is one of the most adaptable and delicious recipes in my personal cookbook, and my family loves it. It's a great recipe for those days when you have a bunch of random ingredients in your fridge that are on the cusp of going bad. You can just throw it all in a pan, slap some sauce in there, and put it over rice. It's also very easy to make vegetarian or vegan. It's not the most original or complicated recipe, but it's really good and requires very little effort, which means I absolutely love it.
0 notes
Text
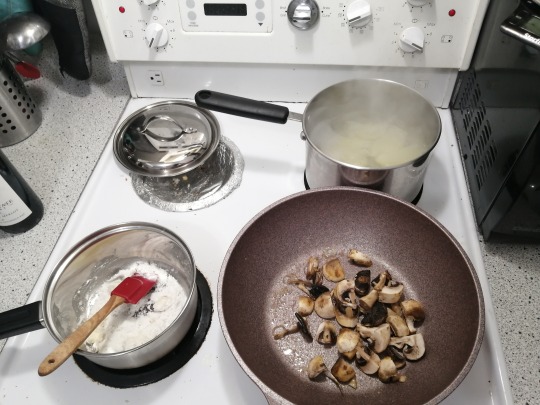
you will notice that any steps that require time sensitive/multiple simultaneous tasks that I haven't documented bc i didn't have an extra hand to hold the phone.
okay so we do all the prep first - halve the brussel sprouts, peel and quarter the potato, chop the mushroom to set aside, mince about 3-4 cloves of garlic.
put a pot of salted water on the boil, preheat the oven to 400-425F.
then the brussel sprouts get seared in some butter for a touch of browning, turn the heat off and toss in the garlic to *just* soften it

mix in some salt, chicken stock, balsamic vinegar, spritz of lemon and throw in the oven in a covered baking dish. I happened to have a round lil crockpot so I did that
Wash the pan.
then we get some stuff started simultaneously. clockwise from the top right:
quartered potato goes into the boiling water
pat of butter and pour of oil go in on medium-high heat with the mushrooms
equal amount of butter and flour in a saucepan on med-low
when the mushrooms are just about done, deglaze 'em with some red wine and shut the heat off.
keep a consistent stir on the roux (butter and flour) so you don't miss when it's toasted brown. In the meantime, season the steak to your choosing (im a fan of montreal steak spice meself) and a mashin' bowl with some milk, butter, salt and pepper.
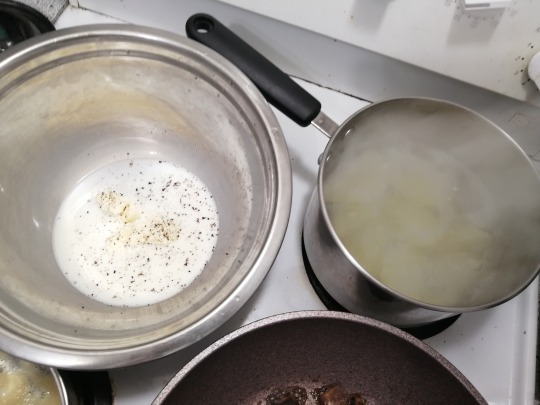
when the roux is browned, pour a little beef stock in and mix smooth, then add more til it's too runny - it will firm up again. mix in the mushrooms as it begins to thicken off, then turn the heat off - the residual heat will do just fine. Taste, salt to taste.
Wash the pan. Turn the oven off. drain the potato and mash it into your milk mix.
Bring the pan to as hot as you can go without the fire alarm going off.
add a tiny pat of oil to the screaming hot pan, get the steak on there. I do a little over two minutes on each side, then bring it out to rest.
Within these 4 minutes of cook time, I usually plate everything else:
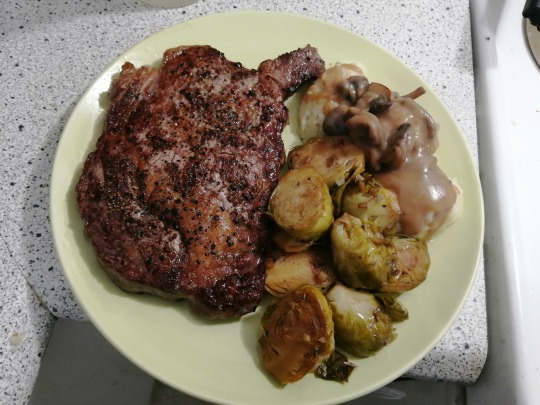
and there ya go
plenty of leftover sprouts, mash, and gravy too!
I've never eaten a meal at this level of effort in a restaurant before (much less ribeye this is a 14 oz steak lmao), so I'm left wondering how much this'd cost me if I went out for it?
i think i am going to make fancy white person dinner tonight
1K notes
·
View notes
Text
Mushroom risotto
Ingredients (serves 3):
2-3 tbsp olive oil
2 tbsp butter
750g mushrooms
2 cloves garlic
1 small onion
1.5 cups long grain rice
2.25 cups water
1 stock cube
1.5 cups sliced scallions/spring onions
Heat 2 tbsp oil in a large pot over high heat, add half the mushrooms and cook for 5 minutes until golden. Season with salt and pepper, then remove and set aside.
Add ½-1 tbsp oil (if pot is dry), and add butter. When melted, add onions and garlic
Cook for 30 seconds, then add remaining mushrooms. Cook for 5 minutes, or until mushrooms are lightly browned, and the base of the pot is brown
Add rice and a splash of stock water, make sure to mix the brown stuff at the bottom of the pot in. Once the bottom is clean, add remaining liquid
Place the lid on, bring to a simmer, then turn down to medium low. Cook for 15 minutes, or until there is no residual liquid
Remove from stove, remove lid, QUICKLY toss in reserved mushrooms and scallions, put the lid back on, and leave for 10 minutes
Fluff rice
0 notes
Text
Salt, Fat, Acid, Heat in under 1500 words
Here's my under-1500-word summary of Salt, Fat, Acid, Heat, a book about the skill of cooking by Samin Nosrat.
There are four basic factors that determine how good your food will taste: salt, which enhances flavor; fat, which amplifies flavor and makes appealing textures possible; acid, which brightens and balances; and heat, which ultimately determines the texture of food.
Salt
Salt amplifies other flavors, except bitterness; it reduces bitterness.
Fine salts can be up to twice as dense as course salts, so measure salt by weight, rather than by volume. Better yet, measure by taste.
It's usually best for food to be salted from within, rather than sprinkled with salt at the end.
In many cases, salt is best added before cooking so it has time to diffuse through the food. For meat (but not fish), salt hours (or days) before cooking. For vegetables (but not mushrooms), salt 15 minutes before cooking.
Taste often while cooking, and add more salt if needed.
Fat
Fat plays three distinct roles in cooking: as a main ingredient (e.g. butter in a pastry or olive oil in pesto), as a cooking medium (butter to sauté vegetables), and as a seasoning (e.g. sour cream in soup, mayonnaise in a sandwich). Knowing which role fat will play will guide you to choose which fat to use for your purpose.
Fat carries flavor. It coats the tongue, allowing aromatic compounds to stay in contact with taste buds for longer periods of time. Take advantage of this by adding aromatics (e.g. garlic) directly into the cooking fat. When baking, add vanilla extract and other flavorings directly into the butter or egg yolks for the same result.
Fat also enhances flavor another way. Cooking fats can withstand temperatures well above the boiling point of water (212°), so they can do what water can't: facilitate browning (which begins around 230°). Browning can introduce entirely new flavors.
An important factor, when choosing a fat, is to match it with the culture of the food you're creating, otherwise it won't taste right. e.g. don't use olive oil in Vietnamese food, or smoky bacon fat in Indian food.
Which fats we use primarily affect flavor, but how we use them determines texture. Depending on how we use fats, we can achieve one of five textures: Crisp (e.g. fried food), Creamy (e.g. chocolate, ice cream), Flaky (pastries), Tender (shortbread), and Light (whipped cream).
Foods that are too dry, or need just a bump of richness, can be corrected with a little olive oil (or other oil), or another creamy ingredient such as sour cream, crème, fraîche, egg yolk, or goat cheese. Use vinaigrette, mayonnaise, a spreadable cheese, or creamy avocado to balance out dryness in a sandwich or atop thick, crusty bread.
Acid
Like salt, acid heightens other flavors. But while the salt threshold is absolute, acid balance is relative. If you add too much salt to a broth, it's unsalvageable, except through dilution. But if you add too much acid to something, you can add sugar, salt, fat, bitterness or starch to change it from unpalatably sour to pleasant. (For example, if you make lemonade from lemon juice, water, and sugar, try tasting it before and after you add sugar, and what was unpleasantly sour becomes good.)
Let geographic tradition guide your choice of acid to use: wine vinegars in Italian, French, Germany, and Spanish cuisine; rice vinegars in Asian cuisine; apple cider vinegar for British and southern American food; lemon and tomatoes in Mediterranean food, lime in tropical climates like Mexico, Cuba, India, Vietnam, and Thailand; dairy can fit in most cuisines.
Acid dulls vibrant greens, so wait until the last possible moment to dress salads or squeeze lemon on cooked green vegetables.
Acid keeps reds and purples vivid, so add acid before cooking purple cabbage, red chard stems, and beets.
Raw fruits and vegetables vulnerable to oxidation, like apples, avocados, and bananas, will retain their natural color if coated with acid or kept in water mixed with a few drops of lemon juice.
Acid keeps vegetables and legumes tougher, longer. Anything containing cellulose or pectin will cook much more slowly in the presence of acid. Fifteen minutes of simmering in water can soften carrots to baby food, but they'll still be somewhat firm after an hour stewing in red wine. If you've ever cooked something with onions and been perplexed at the onions not cooking, it could be that an acidic ingredient - perhaps tomatoes, wine, or vinegar - is interfering.
As in general with cooking, the best way to optimize acidity is to taste during cooking and adjust.
Heat
To determine whether the heat level is correct, the best cooks look at the *food*, not the the heat source. They listen for the changing sounds of a sizzling sausage, watch the way a simmer becomes a boil, and taste a noodle to determine whether it's al dente. Is the food browning, firming, shrinking, crisping, burning, falling apart, swelling, or cooking unevenly?
Food is primarily made up of: water, fat, carbohydrates, and protein.
Water can be a medium in which we cook other foods. At low temperatures, water is particularly gentle. Simmering, braising and poaching provide foods with the sustained low heat they need to develop tenderness. Heat water to 212° at sea level and it boils, giving us one of the quickest and most efficient ways to cook food.
Beyond 212°, water transforms to steam, a valuable visual cue: as long as food is wet and giving off steam, its surface temperature probably isn't hot enough to allow browning to begin. Caramelization and the Maillard reaction don't begin until food reaches higher temperatures.
Make decisions in relationship to steam. Encourage steam to escape if you want temperatures to rise and food to brown. Contain steam with a lid to allow food to cook in a moist environment if you want to prevent or delay browning.
Food piled in a pan can affect steam levels by acting like a makeshift lid; both entrap steam. Trapped steam condenses and drips back down, keeping food moist and maintaining a temperature around 212��.
Control steam in the oven when roasting or toasting food similarly. Spread out zucchini and peppers so steam escapes and browning begins sooner. Protect denser vegetables that take longer to cook, like artichokes, from browning too much before they can cook through by packing them tightly to entrap steam.
At high temperatures, sugar melts. At very high temperatures (340°), sugar darkens and caramelizes, producing hundreds of new compounds with abundant new flavors: acidic, bitter, fruity, caramel, nutty, sherry, and butterscotch.
Cooking fruits, vegetables, dairy, and some grains releases their sugars. As heat penetrates a boiling carrot, for example, its starches break down into simple sugars, and the cell walls enclosing the sugars disintegrate, making a cooked carrot taste sweeter than a raw one.
Heat proteins in the presence of carbohydrates, and the Maillard reaction occurs, heat's most significant contribution to flavor, with notes like floral, onion, meaty, vegetal, chocolatey, starchy, and earthy. It's often accompanied by dehydration and crispness, so the texture is also often improved.
Browning begins around 230°. The temperatures required to achieve this tasty browning will dry out proteins, so beware. Use intense heat to brown the surface of meats and quickly cook tender cuts through. After browning a tougher cut such as brisket, on the other hand, use gentle heat to keep its interior from drying out. Or cook it through with gentle heat first, and brown the surface at the end.
Brown with care; it's easy to burn.
Cooking sometimes continues after removing the food from the heat source, as the residual heat continues cooking. Proteins in particular are susceptible to carryover.
The primary decision is whether to cook slowly over gentle heat, or quickly over intense heat. For some foods, the goal is *creating* tenderness; for others, it's *preserving* tenderness. In general, foods that are already tender (some meats, eggs, delicate vegetables) should be cooked as little as possible to maintain their tenderness. Foods that start out tough or dry and need to be hydrated or transformed to become tender (grains and starches, tough meats, dense vegetables) will benefit from longer, more gentle cooking. Browning, whether for tender or tough foods, will often involve intense heat, so you'll combine cooking methods. For example, brown and then simmer meats in a stew, or simmer and then brown potatoes for hash to ensure browning *and* tenderness in both cases.
Gentle cooking methods (for creating or preserving tenderness)
Simmering, Coddling, and Poaching
Steaming
Stewing and Braising
Confit (poaching in fat)
Sweating
Bain-marie
Low-heat Baking and Dehydrating
Slow-roasting, Grilling, and Smoking
Intense cooking Methods (often for browning)
Blanching, Boiling, and Reducing (an exception to this list - these, of course, don't brown foods)
Sautéing, Pan-frying, and Shallow and Deep-frying
Searing
Grilling and Broiling
High-heat Baking
Toasting
Roasting
368 notes
·
View notes
Note
If you’re still doing breakup requests…
First thought: even though it’s been years and I now have a wonderful, happy loving healthy and wholesome relationship, back in first semester of freshman year of college I was dating this guy. Because this was my first relationship EVER I told him I loved him within a month of dating, right before Thanksgiving break. He nodded, took it well at the time, then we left for break. The night that I returned from break, he made me steak and crème brulée, wanting to show off that he, a junior, had a kitchen and knew how to cook. That night he told me he loved me.
Next night, we hung out again and he showed me the first episode of Game of Thrones because I mentioned that I had never watched it before. Shortly after, while talking about the episode he paused and said, “I don’t think I love you,” and later, “I don’t think I can ever love you.” It was awkward as hell as he drove me back to my dorm that night. Needless to say we broke up.
It’s funny, because even though I’ve since moved on, met the love of my life, graduated college and I’m about to move in with my love - who I’ve dated for years now…I’m still angry that the steak he made for me was so damn good and that I think I’ll never again have a steak and crème brulée like that again - that’s my one regret.
It was an amazing steak.
I am actually maybe the BEST person to ask this too.
As for your song, I picked “Comptine d’un autre été, l’aprés-midi” from the movie ‘Amélie’. This isn’t the song that plays when she eats the creme brûlée but it invokes a nostalgia for things you can’t have anymore.
For the steak you’re going to need
Room temperature butter
Fresh rosemary, removed from the stem and then bruised with your knife. You don’t need to chop it super fine and for this recipe you don’t need a lot of it either.
Two to Three garlic cloves, smashed open but left mostly whole.
Salt and Pepper
Steak, any cut of your choosing but I would recommend something with a decent fat displacement.
When thinking about the doneness of your steak, take the thickness into consideration. If you need your oven, turn it on.
Bring your steak out of the fridge to rest for 30 minutes at room temp before cooking.
While that’s happening, mix together 2 TBS of your softened butter with a bit of black pepper and your rosemary. DO NOT ADD ANY SALT AT THIS POINT.
When you’re ready to start on your steak, preheat your medium/large skillet on a low setting. You don’t want to start with a cold pan, just enough so when you turn the heat up later you’re not starting from zero.
Pat your steak SUPER dry. As dry as you can. Then season with salt and pepper only. It’s always going to be a little bit more salt than you think the first time around.
With your pan now turned up to a medium high heat, add in the butter and garlic. The minute the butter starts to sizzle, add in your steak and DO NOT MOVE IT. Take a spoon and baste the steak with the butter/garlic, waiting at least 3 minutes before flipping over.
Second side, same thing. If you want your steak cooked more to the ‘done’ end of things, extend your time and whack it into your oven.
Now here’s where I might lose you. When you’re not quite at your desired doneness, remove your steaks from the heat and wrap them with aluminum foil with a dollop of that rosemary butter on top.
You want to let the meat rest so that it goes from “tensed” cooking, to “relaxed” so the juices have gone back into the muscle as a whole. Let it hang out for about 5 minutes before serving. The residual heat will continue to cook your meat, so keep that in mind.
Hope that helps!
3 notes
·
View notes
Photo


MONSTER HUNTER: ICEBORNE FEAST
YOU CAN EAT FOOD MADE BY CATS IN MONSTER HUNTER WORLD WHY DID NOBODY TELL ME THIS
As an apology for how long we’ve been on break (we moved to Texas and wow it’s hot here), we’ve put together this Monster Hunter feast featuring not one but three new recipes! As always, you can find them under the cut. Happy hunting!
- MJ & K
Corn and Poblano Chowder
Ingredients:
3 Tbsp butter
3 Tbsp olive oil
1 large onion, chopped
5 cloves garlic, chopped
3 medium red potatoes, chopped into 1/2-inch pieces
2 bay leaves
2 tsp cumin
1 tsp thyme
1 tsp oregano
1 tsp cayenne pepper
5 cups chicken or vegetable stock
5 cups frozen corn
2 poblano peppers, chopped
1 cup heavy cream
Salt and pepper to taste
Combine the butter and olive oil in a large dutch oven over medium-high heat. Add the chopped onion and cook for 3-5 minutes, until translucent. Add the garlic, potatoes, and all of the spices and cook for another 5 minutes, stirring occasionally. Add the stock and lower the heat to medium-low. Let simmer for 10 minutes, or until the potatoes are easy to pierce with a fork. Add the frozen corn and pepper pieces and cook for 5 minutes.
Remove the bay leaves and add the heavy cream, stirring to combine. Remove the pot from heat and allow to cool for at least 10 minutes. Blend until smooth in 3-4 batches using a blender (or in one batch using an immersion blender). Season with salt and pepper to taste and top with cheese or sour cream.
3-Cheese Potato Gratin
Ingredients:
2 pounds Yukon gold potatoes, chopped into 1/8-inch slices
1/2 cup grated Parmesan
1/2 cup shredded cheddar
1/2 cup shredded mozzarella
2 cups heavy cream
2 sprigs fresh thyme
3 cloves garlic, chopped
1/2 tsp ground nutmeg
Salt and pepper
Preheat the oven to 350 degrees F.
Combine the three cheeses. Coat the inside of a casserole dish with nonstick spray and lay down a layer of potato rounds. Top with a layer of mixed cheese and a small amount of salt and pepper. Repeat until the potatoes have all been used, but keep a small amount of cheese reserved for topping with.
In a small saucepan, heat the cream, thyme, garlic, and nutmeg until it just begins to simmer. Pour the cream mixture over the layered potatoes and cheese, topping with the remaining cheese at the end.
Bake uncovered for 1 hour, or until the cheese is browned and the potatoes are tender.
Beef Tajine With Vegetables and Yogurt Sauce
Ingredients:
3 pounds beef top blade roast
2 Tbsp olive oil
1 Tbsp butter
½ butternut squash chopped into 1-inch cubes
1 onion, sliced into rounds
3 carrots, diced
2 c. broccoli
1 Tbsp paprika
1 tsp cinnamon
1 ½ tsp ground ginger
1 tsp salt
½ tsp EACH: cayenne pepper, red pepper flakes, cardamom, coriander, black pepper
8 cloves garlic, chopped
2 c. beef broth
1 14-oz can crushed tomatoes
1 Tbsp tomato paste
½ c unflavored and unsweetened yogurt
Preheat the oven to 350 degrees F.
Mix together the beef broth, garlic, and tomato paste. Set aside.
Add all the spices together and rub over the beef roast, coating the entire piece. Heat the olive oil and butter in a large cast iron skillet on high heat, and sear the roast on all sides. Cook each side for about 2 minutes or until brown and crispy. Once all sides are seared, remove the meat from the pan and set in a dutch oven or tajine. Add the onion rings and beef broth mixture to the pot, then cover and bake for 30 minutes.
In the same skillet where the meat was seared, lightly cook the carrots and squash until they brown a bit from the residual spices over medium heat (about 5 minutes). Set aside.
After the 30 minutes have elapsed add the squash, carrots, and broccoli to the pot/tajine. Cook for 45 minutes to 1 hour, or until the vegetables are tender and the meat registers at least 145°F.
Allow the pot to cool for 5 minutes, then remove ½ cup liquid from the pot and whisk with the yogurt. Add additional paprika, cayenne, and salt and pepper to the yogurt sauce as necessary.
Serve with crispy bread and the yogurt sauce drizzled over.
Additional Items
1 baguette
1 loaf rustic bread
2 types of wedge cheese
1 bunch on-vine tomatoes
2-4 grilled sausages (we used jalapeno and cheddar)
1 large mug of beer (cook’s choice)
#food#recipe#monster hunter#monster hunter world#monster hunter iceborne#iceborne#feast#meat#tajine#tagine#chowder#bread#beef#potatoes#food from video games#video game#video game food
1K notes
·
View notes
Text

Not the most glamorous, but a lifesaver and more than the sum of its parts! Translated recipe & notes behind the cut.
INGREDIENCE (Serves 2) - 3 eggs - 2 heads bok choy - 1 tbsp sake - 1 tbsp cooking oil - 1 tsp sugar - Salt - 1/3 tsp powdered chicken stock - 1 tbsp oyster sauce - Potato starch slurry (1 tsp potato starch + 1/2 tbsp water)
(1) Cut the bok choy as shown in the video—I'm not translating all that.
(2) In a bowl, beat the egg and add the sugar and a pinch of salt.
(3) Heat the oil in a pan on medium heat, then add the egg mixture, mixing in large swirls until halfway solidified (you can watch the video for this too), then transfer to a plate.
(4) Add the remaining oil to the pan and cook the bok choy stems over medium heat, tossing until coated. Add the sake, cover the pan, and let steam about 2 minutes on low.
(5) Add the bok choy leaves, stir-fry briefly, then add the powdered stock, oyster sauce, and 50 ml of water. When it begins to bubble, make the potato starch slurry, then add it to the pan, mixing until the sauce thickens. Return the egg to the pan and mix together.
NOTES/VARIATIONS
I have forgotten the sake and I have substituted mirin, and both times it has still been lovely.
I added onions once, but I'm not sure if I prefer it.
I've also had good results by cooking the bok choy stems on high, then getting distracted by work and letting them sit on the residual heat. That gave them a pretty charred look and nice texture. If you try to recreate this, you shouldn't need to do the steaming part.
I really can't stress enough how easy, quick, dirt cheap, and tasty this is. Love.
This was really, really good! I thought I was having a sad dinner because all I had was bok choy, eggs, and rice, but this was delicious! And low-effort, and low-skill, and pantry ingredients. Definitely make again!
58 notes
·
View notes
Photo

Lemon Aquafaba Bread
At this particular time, when we are going through a world-wide crisis, a terrifying pandemic, it can be therapeutic for many of us to cook and bake.
I am one of those people.
I have plenty of ingredients to cook with because over the years I’ve learned to keep shelf-stable foods on hand in case I can’t shop: ingredients such as canned beans, rice, frozen veggies, dried fruit, canned or packaged milk, and so on.
Equally important for me is — don’t waste food (I’ve talked about that often). I believe that it is important to use all resources — “food forage” as my colleague Susan Barocas calls it. Don’t throw out any ingredient that’s useable, including leftovers.
With all this in mind I offer this lemon bread.
I have lots of lemons in my crisper because of an article I am writing. I’ve developed the recipe for that, so I need to make use of the extra lemons.
I also needed to do something with the liquid leftover from a can of chick peas that I opened for a salad. Chick pea liquid is incredibly useful.
In case you aren’t familiar with this leftover liquid (also from canned beans), it is called aquafaba and it can be used in place of eggs. That makes it an ideal ingredient for vegans and anyone who is allergic to or otherwise can’t eat eggs.
When you beat chick pea liquid with a whisk, it traps air like eggs do, so baked goods have both structure and also a light, tender crumb.
I am trying not to use too many fresh eggs that I might need for meals, so I used the aquafaba instead to make this lemon bread.
Dee-lish!
To get the most out of the liquid in a can of chick peas, be sure to scrape the residue at the bottom of the can. For best results, reduce the liquid slowly over medium-low heat until it becomes the consistency of egg white. Use about 3 tablespoons of the liquid in place of each egg.
For another delicious recipe (carrot bread) using aquafaba, click here.
LEMON AQUAFABA BREAD
6 tablespoons aquafaba
4 tablespoons coconut oil
3/4 cup sugar
1 tablespoon finely grated fresh lemon peel
2 cups all-purpose flour
2-1/2 teaspoons baking powder
3/4 teaspoon salt
1 cup coconut milk
1/4 cup fresh lemon juice
1-1/2 tablespoons sugar
Preheat the oven to 350 degrees. Grease a 9”x5”x3” loaf pan. If the aquafaba seems thin, boil it for a few minutes to thicken slightly to the consistency of egg white. Set aside to cool. In the bowl of an electric mixer, beat the coconut oil and 3/4 cup sugar at medium speed for 1-2 minutes or until well combined. Add the lemon peel and aquafaba and blend them in. Mix the flour, baking powder and salt in a small bowl. Add the dry ingredients to the creamed mixture in thirds, alternating with the coconut milk. Beat to blend the ingredients to a smooth, even batter. Spoon the batter into the prepared pan. Bake for 50-55 minutes or until a cake tester inserted into the center comes out clean. While the bread is baking, combine the lemon juice and 1-1/2 tablespoons sugar in a small saucepan and cook over medium heat for 1-2 minutes or until the sugar has dissolved. When the bread comes out of the oven, pour the lemon juice mixture on top. Cool the bread in the pan for 10 minutes. Invert onto a cake rack to cool completely.
Makes one bread
5 notes
·
View notes
Text
Just for posterity and because I can't stop thinking about how much I enjoyed this meal:
Brussels sprouts done with:
Turmeric
Salt (only a little)
Olive oil (enough to coat and make dry spices stick)
Cinnamon
Cut in half and toss with oil and spices
Lightly oil pan and sauté on medium heat until cooked through and starting to caramelize
Turn off heat and use residual warmth to cook chopped/slivered almonds (any mild nut would do) and toss in dried cherries (craisins, raisins, or dates would absolutely also work) to warm through
Meat:
Ground beef (1lb; i used fairly fatty 73/27, but any balance will work)
Olive oil (mostly for toasting the seasonings in the pan)
Pickles (kosher dill are my pick, but any savory pickle should work)
Tomato
Feta
In a medium-low heat pan warm up paprika, cinnamon, mustard, cumin (I used ground, but seed will work), ginger, rosemary
Once spices start going fragrant add roughly chopped red onion (mine were pearl onions, but an average/midsized red onion should be a good baseline amount)
While the onions are working, mix dill, ginger, cinnamon, cardamom, mustard into meat. Roughly chop half a large tomato (think roughly 1/2c for 1lb) and mix into meat along with spices.
Once onions are starting to get color, toss in meat and work until cooked through and the tomatoes give off some juice.
When meat is cooked through, add in chopped up pickles (can be as rough or fine as you want) and feta.
Mix until incorporated
Obviously I used tortillas to make a taco-y situation, but you can toss it in bread, over rice, a pita, really anything you feel like.
If you do the taco option, I tossed a couple of pickles and some slices from the other half of the tomato in with the meat before topping with tzatziki

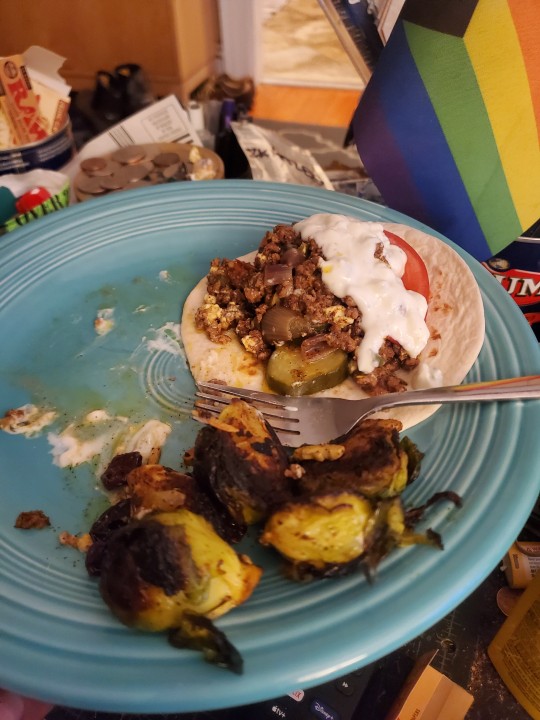
Not the tidiest pictures, but made some Brussels sprouts and 'shawarma' tacos with play friend last night. I guess we've both been craving that shawarma flavor profile, because it hit SO HARD for both of us.
3 notes
·
View notes
Text
Making candy glass
Some of you know I’ve been experimenting with this process.
I thought perhaps you’d like to learn how to do it. So I’m going to tell you. Be sure to do everything precisely as stated, because apparently, there is no room for error.
Tools:
A flat skillet like saucepan made of steel. Avoid non stick.
A candy thermometer (no other type will do)
Wooden spoon
Glass of hot water to set the thermometer in.
Paper towels
Parchment paper
Baking sheet
Food coloring gel is optional. As is the toothpick you need to help you drop it in.
Sterile sewing pin for popping potential air bubbles
Ingredients:
1 c. Water
1 3/4 c.white sugar
1/2 c. Karo’s corn syrup
Pinch cream of tartar
Instructions:
Again, I cannot stress enough how absolutely delicate this is and so all instructions must be obeyed to the letter
Have your baking sheet set aside and already lined with parchment paper.
Mix the ingredients (minus coloring) in a sauce pan and put the sauce pan on low heat. For me this meant exactly on the line between low and medium. The difficulty here is, that if you raise the temperature too swiftly with too high heat, your glass will turn brown. However, if you raise the temperature very slowly over the exact right amount of heat, your glass will remain clear, and so food coloring will behave true to color. It may take you a few times to figure out precisely where on your stove the sweet spot might be.
Stir occasionally, until the product is boiling, careful to scrape the sides. Measure with the candy thermometer, keeping it in the fluid for at least a minute each time. It must be clean every time, with no residual sugar sticking to it. This means that you should keep it in the glass of hot water in between measurements, and wipe it clean each time with a clean paper towel. If any residual sugar is attached to the thermometer, it will impact the sugar in the pan and alter the chemical structure, it will also throw off the reading of the thermometer.
The mixture must reach 300° exactly. Once it hits that point, you must immediately remove it from the heat and pour it out onto the pan. This means that from 275° on, you must sit there and measure continuously. When the mixture gets to 280, put in the food coloring and stir, then continue to measure. Remove from heat immediately upon reaching 300° and pour into your lined sheet pan.
Shake the baking sheet a bit and tilt to allow the cooling sugar to shift and coat evenly. Let it cool one hour before manipulating. Must be refrigerated after this point until use.
As you can see, my glass is uniform in color, and cracks with a snap, as evidenced by the long crack I’ve put into it to test the coolness. Keep in mind that contact with any residual moisture or sugar during the setting process will give the sugar a slimy texture and change the structure. If you want to preserve for a while or create a clouded sea glass or sand blasted effect, toss the shards in powdered sugar or corn starch. If, during the initial setting process, I.e. the first minute or two, you encounter air bubbles, you can pop them with a heated sterile pin.


84 notes
·
View notes
Text
Understanding and Making the Most of the Recipe

Have you ever looked up a recipe online and finished up purchasing $70 worth of ingredients to allow it to be all? It is so popular that these days using the millions of recipes that can be found online today. However some dishes, like a noodle sauce, do have 30 or more ingredients, so this does not always need to be true. If there is a single thing I've learned in my career, it really is that more is not always preferable.
I always tell my students never to take the very first recipe that you find and run with this. With the ease of searching on the internet, you should locate 4-5 recipes to equal dish and then take a second to browse through them in order to locate the usual denominators. If you're on the lookout for a hummus recipe and everyone has chick peas, tahini, garlic and lemon, you then also can guess that you're most likely the primary ingredients you want to be sure to really have. By finding these same base ingredients, so you are going to be able to create your own variation of the recipe without even stepping too far off bottom. Below are 3 different ingredient lists to make hummus with the common ingredients highlighted.
Following comes the cooking process. Perhaps not everyone has a vita mix or perhaps even a Ninja blender, and that is fine! I never fail to try to ensure that I possess the apparatus and a different means to cook up the dish as a way to create a related item. If you're earning a noodle soup along with the recipe maintains to combine the roasted cubes of butternut squash, then take a move . Yes, a butternutsquash will prepare faster if you roast and dice it until you puree in a blender with the liquid.
But slicing it half and roasting the skin side up will help you save you in the long run as the procedure for peeling and dicing a hard skillet such as butternut is laborious and difficult. Once roasting the halved butternut until tender, then you can scoop it with a spoon along with an immersion blender will get the exact same, if better, final product.
Pairing Inch
Melt the butter in a big pot, and cook the onion, celery, lettuce, celery, and skillet 5 minutes, or till lightly browned. Pour enough of the chicken stock to pay for veggies. Bring to a boil. Reduce heat to low, cover pot, and simmer 40 minutes, or until all veggies are tender.
Move the soup into a blender, and mix till smooth. Return to marijuana, also blend at any residual inventory to attain desired consistency. Season with pepper and salt.
Recipe 2
Soften the butter in a soup kettle over medium heat, then add the onion, salt, and pepper, and cook for 10 minutes, then before the onions are still soft.
Insert the roasted butternut squash cubes and cinnamon, and simmer for 2 minutes, then until the cinnamon smells fragrant.
Add the stock, bring the liquid to a boil over high heat, then lower to a simmer. Cook for 2 minutes at a simmer.
Puree the soup, either either using an immersion blender, or by massaging the soup slightly and mixing into a blender (you will probably need to get this done at batches).
youtube
Taste the soup, and see if it needs more seasoning.
Drink is, or with a spoonful of thick cream plus a couple pumpkin seeds, if desired.
Recipe 3
Combine salt and curry powder; set a side.
Rinse lentils; set aside.
Heat butter in a sizable sauce pan over medium heat.
Insert curry mixture; stir fry till fragrant, about 1 second.
Add garlic, onion, and ginger; cook until translucent, about 4 minutes.
Include skillet; prepare until only starting to soften, about five minutes.
Add stock and water. Bring to a boil; reduce to a simmer.
Cook until squash is tender, about 10 minutes.
Stir in legumes; prepare until soft, 10 to 15 minutes.
Today that you have assembled your own simplified recipe and know exactly how you're getting method the ingredients, then next includes the seasoning match. If you know that you simply want 1 teaspoon of salt on your recipe, that does not signify you are likely to hold back until the limit to quantify your own salt and put in it directly before you are eaten. The purpose of salt is to enhance the tastes of your food of course, when used properly, then you can bring out the tastes of each ingredient individually to produce a balance of tastes that are vibrant.
If you are after a recipe, then your own best guideline is to gently season with pepper and salt every time you add a second component into the pot or pan. By doing so you're pulling moisture from just about every fixing and letting the heat to evaporate the water, in turn emphasizing your flavors more and longer. This trick alone will help you to generate a depth of flavor which may shock your pallet. Let us try it inside this farro recipe.
1 note
·
View note
Text
Instructions to Get the Best Cup from an Auto-Drip Coffee Maker

The Best Coffee Maker is disparaged by espresso showoffs (and in light of current circumstances—a lot of different techniques make reliably better espresso), however the auto-trickle's no issue, programmed preparing still settles on it the go-to decision for a great deal of homes and workplaces searching for a brisk caffeine fix. While you will most likely be unable to get the "great" mix from an auto-dribble, you can make it a ton better with a little ability.
An auto-dribble espresso producer is convenient on the grounds that you can set it and overlook it, however the reality you can't control the temperature or the water proportion as it pours over the beans implies you can't modify the blend as a lot to accommodate your loving. The way to great auto-dribble is to do skirt any senseless deceives and keep it as essential as could reasonably be expected, beginning with the correct espresso beans and dish.
Start the Process Right: Whole Beans, a Good Grind, Filtered Water, and the Right Temperature
Since you can't control a ton of the factors that make some espresso great with an auto-dribble it's significant that you start the procedure right. This implies crisp simmered entire beans, getting a decent crush, new water, and attempting to get the temperature as near right as could reasonably be expected.
Pick and Store Your Beans
Since a dribble espresso creator as of now disables the flavor somewhat it's extremely imperative to get new beans. In case you're lucky enough to have a decent nearby roaster close to you it merits getting your espresso from them since it's quite often ensured new. Espresso goes stale rapidly and the procedure goes considerably quicker when the beans are ground, so stay with entire beans. In case you're left with a supermarket brand make certain to search for a simmering date on the bundle so you can get something crisp ish.
On the off chance that you do have a nearby roaster where you can purchase beans legitimately it doesn't damage to inquire as to whether they have any espresso mix proposals for an auto-dribble espresso producer. They'll in any event have the option to control you toward broils that may work better with a little flavor misfortune. My preferred neighborhood bistro suggests a medium meal on the grounds that a light dish can lose an excessive amount of flavor and dim will be excessively solid.
Get the Grind Right to Speed Up Brewing Time
Espresso gets its flavor and smell during a procedure called extraction when the boiling water leaves through the ground behind beans. On the off chance that this happens too rapidly, the espresso will be feeble; in the event that it happens too gradually, it will be severe. The speed of this is chosen by how fine the granulate of the espresso is.
For most auto dribble espresso creators you need a fine or medium granulate contingent upon the sort of channel your espresso producer employments. Here's an estimation of how fine to granulate it:
Level Bottom Filters: Medium (near the surface of sand).
Cone Shaped Filters: Medium/Fine (somewhat better than granulated sugar).
Gold/Plastic Permanent Filters: Medium.
It may take a bit of testing to get the correct granulate. In the event that your espresso is excessively severe, attempt a coarser crush. On the off chance that it's deficient with regards to season, attempt a better pound.
Most auto-trickle espresso producers are additionally programmable, however fight the temptation to crush your espresso the prior night and set it to consequently get you up toward the beginning of the day. It's ideal to begin the espresso preparing following pounding the beans to catch all the flavor. Photograph by Joe King.
Use Filtered Water with the Right Ratio
Since some espresso is for the most part water, the nature of that water is significant. On the off chance that you live in a zone where faucet water isn't awesome, at that point use separated water for your espresso. You may figure the flavor of espresso can overpower the flavor of awful water, however it doesn't.
Furthermore you have to mess about and get your water to espresso proportion right. All in all, you need around 1 or 2 tablespoons of ground espresso per six ounces of water. Your inclinations may shift, so don't hesitate to attempt various sums. When you get a decent proportion, stay with it. At the point when you're doing as such, run a couple of tests on the "cup lines" on your brewer to perceive how they really stack up. Various brewers check the cups diversely and it probably won't be six ounces.
Play out a Trial-Run to Get Your Coffee Maker's Temperature Up
In case you're working with a particularly junky dribble espresso producer like the ones you find in lodgings at that point you're presumably not preparing some espresso anyplace close to the temperature you ought to be. The National Coffee Association suggests that espresso ought to be prepared between 195-205 degrees Fahrenheit. Most less expensive dribble espresso creators can't find a good pace temperature rapidly enough and they wind up delivering a harsh mug of espresso. One stunt to tackle for the low-temperature issue originates from Budget Travel:
Do a "preliminary run" of your espresso producer without espresso to warm up the machine. Empty the warmed water over into the gadget and blend your espresso not surprisingly. While you won't get the water to an ideal degree of hotness, you will get it entirely darned close.
This can help get an under powered espresso producer up to the correct temperature so it appropriately mixes the espresso. In any case, some dribble espresso producers will continue raising the temperature much after it comes to the ideal 195-205 degrees (which can consume your blend), so your mileage may shift here. Get a thermometer and do a few tests. In the event that your machine reliably has issues with a predictable temperature, you will make some extreme memories getting steady outcomes.
Post-Brew: Get the Pot Away from the Heating Element and Clean it Daily
The means to getting a decent mug of espresso from an auto-trickle espresso creator don't stop once the espresso is made. Actually, probably the least demanding approaches to demolish a decent cup is to leave it sitting on the warmth component. When the pot is fermented, remember these two key advances:
Expel the Pot from the Heating Element
Representation for article titled How to Get the Best Cup from an Auto-Drip Coffee Maker
In case you're utilizing an espresso producer with a glass carafe like this one, the most significant advance you can take is to get it off the warming plate. The warming plate is frequently the explanation the espresso consumes and gets harsh. The second the espresso is done blending, dump it into a warm carafe (like any of these) and serve it from that point.
In case you're in the market for another espresso producer it's justified, despite all the trouble to rampage spend on one that empties legitimately into a warm carafe since they don't utilize the warming component that consumes espresso.
Clean the Pot Daily, Deep Clean the Whole System Monthly
The set it and overlook simplicity of a trickle espresso producer is incredible, however one of the symptoms is that it very well may be difficult to make sure to stay aware of the cleaning and support. In case you're making espresso consistently it's imperative to clear and shower out the carafe day by day in light of the fact that else you're simply getting a second taste of yesterday's blend. You ought to likewise clear out the entire framework at any rate once per month, yet in the event that you're an every day consumer, at that point once seven days is prescribed. Fortunately, you can do it with vinegar.
Fill the tank with a 50/50 proportion of vinegar and water.
Run the vinegar and water blend through a mix cycle similarly as you would normally make a pot of espresso (without grounds!).
At the point when it completes, pour the blend from the carafe over into the tank and run the procedure once more.
Dump the blend from the carafe and clean the pot with cleanser and water.
Run one more cycle with customary water to flush out any residual vinegar.
In case you're utilizing one of the metal carafes referenced over it's additionally a smart thought to leave the vinegar and water blend in the carafe medium-term to evacuate any stains within. Cleaning the espresso creator and pot can have a shockingly enormous effect in the nature of a cup so it's acceptable to stay aware of it.
Regardless of what you do you're not going to get a similar full-enhanced mug of espresso from an auto-dribble espresso creator as you do from something like a French Press or AeroPress. Be that as it may, if the straightforwardness and simplicity of the auto-trickle is its greatest intrigue, the above tips will assist you with making the most ideal cup. In the event that you'd prefer to plunge your toe into different sorts of espresso blending, make certain to look at our guide. Have your very own few hints? Offer them in the remarks.
1 note
·
View note