#need it for screencapping and making gifs
Explore tagged Tumblr posts
Visit Tumblr Blog
Explore Tumblr blogs with no restrictions, modern design and the best experience.
Last Seen Tumblr Blogs


Fun Fact
Mobile Tumblr US users spend an average of 4.04 minutes per session on the app.
Text


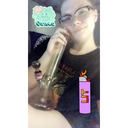
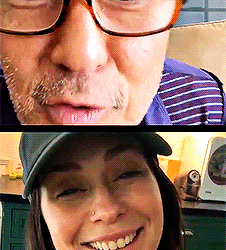
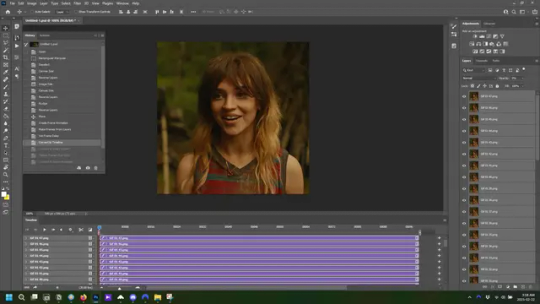
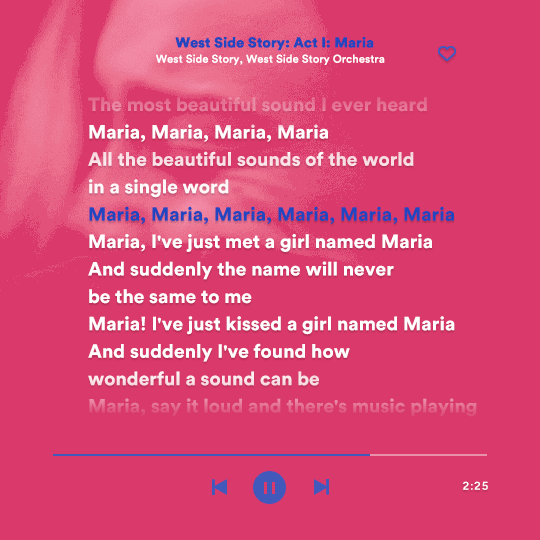
Oh, I... I wish I was with you. Lisa Frankenstein (2024) dir. Zelda Williams.
#userdeetz#userholtz#usertj#filmgifs#moviegifs#tvandfilm#lisafrankensteinedit#lisa frankenstein#lisa frankenstein*#movies#mine#gif#does it look good?#i always have problems with the monitor#and i also suck at coloring movies#aaand i need another program to make screencaps because my computer literally turned off#LMAO#aaaand i also want to tag more people but i don't want to be a bother#(ik ik it's wonderful how my brain works lmao)#so for my next set if anyone wants#they can send a pigeon and tell me or easier send a message lol#sorry i'll shut up now
276 notes
·
View notes
Text

#i love them#i have a bunch of screencaps from the live#i'll have to make some gifsets eventually#add it to the dozens of shows and movies i need to gif this week#haha#madney foreva#911 abc#maddie x chimney#chimney x maddie#chimney han#maddie buckley#love#jennifer love hewitt#kenneth choi#happy wedding day everyone
375 notes
·
View notes
Text
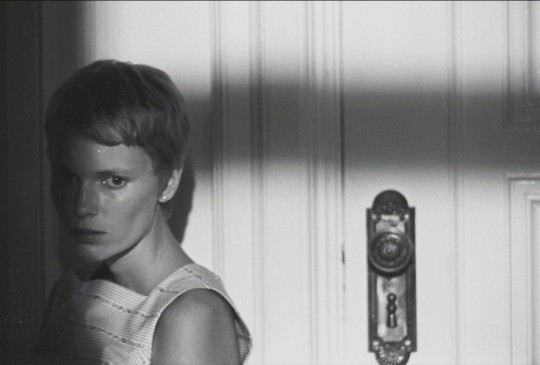

and I'm not happy and I'm not sad
#roman polanski#rosemarys baby#horrorcaps#horror film#horror#mia farrow#repulsion#catherine deneuve#girlblogging#film#coquette#hell is a teenage girl#cinema#lana del rey#femcel#this is what makes us girls#cinema stills#dollette#i need sleep#bed rotting#adult human female#black and white#filmtvdaily#cinemapix#60s film#60s icons#it girl#film screencaps
110 notes
·
View notes
Text

Who wants a gif I've had saved to my phone since 2018... I don't remember who I saved it from but I hope they are well
#supernatural#spn#sam winchester#jared padalecki#hes so pretty#like actually gorgeous and perfect in every way#i need to start taking my own screencaps so i can make the sam content that i want to see in the world
20 notes
·
View notes
Text
...i think he's onto something

thank u @mournfulwatcher for the inspired screenshots 🙏😉
based on:


#emmrich volkarin#dragon age#by way of#John Waters#and MournfulWatcher's wickedly good screencaps#does this need a content warning?#something like 'lewd brow' or 'face card: final thrill' or 'SIR WHAT R U DOIN'#<can a look make u take necrotic damage>
15 notes
·
View notes
Text
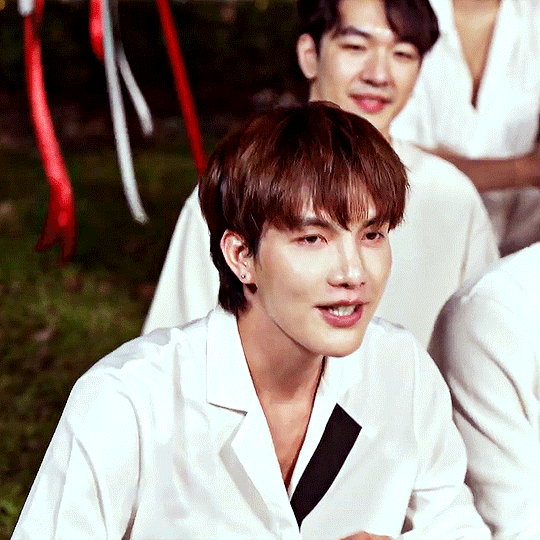
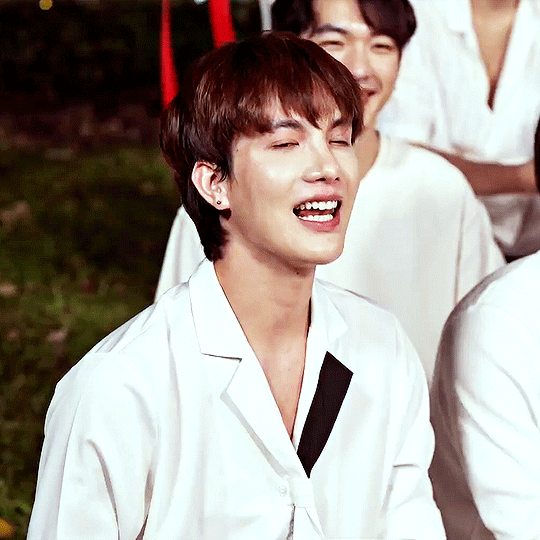
#i'm finally watching all the shows i've been putting off and i wanna gif them when i'm caught up but i've given up on mpv player so i need#to remind myself how to make gifs from video frames instead of screencaps again so i will be making random gifs until i have the steps#memorised again. half of them will probably stay in my drafts but i few cute ones might make it out#tong 💓💖💕💝💗#tong thanayut#kinnporsche#kinnporsche cast#kinnporschesource#dailymenedit#dailymencelebs#mensource#flawlessgentlemen#mancandykings#gif
77 notes
·
View notes
Text


Elfen Lied visual parallels with the works of Edvard Munch
#i was looking at his art earlier and thinking huh some of these make me think of elfen lied#then the autism kicked in and i needed to find as many parallels as i could#elfen lied is very munch coded even though i know they take a lot of inspiration from Klimt#which is what drew me to the show in the first place bc i love Klimt#and i listened to Lilium a lot as a child#well anyways#it actually genuinely surprised me when i saw how well these paired up#elfen lied is totally edvard munch coded!! who woulda thought!!#i cant say for sure if i think the artists were actually using munch as a reference... thatd be kindof a stretch#but the visual parallels are still undeniable#:)#<3#elfen lied#edvard munch#parallels#screencaps#paintings#anticanonhearts
6 notes
·
View notes
Text

— tony gilroy, andor season 2 declassified: time

#keeping up with the skywalkers#andor spoilers#*ominous chanting* NUYA'ARI EXAR KUN SITH'ARI#tony pls. p l e a s e.#show us the place where they carved out the sith wars bas relief. show us where dryden vos's desk piece came from.#(make my 'them carving out that desk piece released exar kun's spirit from confinement in his tomb' headcanon actual canon)#comparing rebels/rogue one screencaps (since they're most recent) to figure out WHERE they were stranded? me??? hahahaha#in relation to where the temple of exar kun would be??? (yes)#(did i need to do this anyway for lene & ari's excellent adventure/sith hunting? yes. because i wanted a 'moon's haunted' moment)
5 notes
·
View notes
Text


#futari wa pretty cure#precure#nagisa misumi#honoka yukishiro#i broke my promise 5 minutes later#i just can't bring myself to do it#anyway i need some advice#how readable is the second gif?#i've been trying to make more gifs of conversations rather than just show them in screencaps because it's more compact#and obviously they portray motion better#but the second one loops so well that i'm afraid someone will start reading it in the middle and get confused#is it confusing?#i'd really like feedback on this
21 notes
·
View notes
Text
the nearly 1000 word Ryang Eum/Jang Hyun fic sitting in my drafts that just keeps getting longer staring at me every time i open it to edit:
#tv: my dearest#my dearest#mbc my dearest#namgoong min#nam goong min#kim yoon woo#kdrama#local gay watches My Dearest (and is subsequently f*cked up).txt#local gay watches k-dramas.txt#local gay writes fanfic.txt#i am. i am trying to keep it to ep 3 and 4 only but i saw RyangHyun screencaps from ep 6 and now my brain is like 'if you don't turn this#into a 20k+ fic you're going to need to make this a series. you know that right'#queer ass brainrot. tragic gay ass brainrot. pray for me pls
16 notes
·
View notes
Note
hi! i was just wondering if you’re getting a piece of this pie. https://www.kickstarter.com/projects/voidrealmminis/rise-of-the-eldertubbies?ref=profile_saved_projects_live
Oh my goodness! Haha thanks for showing me! And no, of course, this guy is still selling my dream while claiming it’s totally nothing to do with me. I hadn’t heard about it so thank you.
For those just joining us, here is the saga of the elder teletubbies:
1. in 2017 I posted a dream I had on Tumblr. In the dream I discovered that the childish teletubbies shown on BBC’s Teletubbies are merely the children of a species that grows up to be forest cryptids as adults. The post contained a detailed character description explaining how the children’s simple antennae become more complex antlers; their coats become thicker hair; their eldritch screens are unknowable; here, look:
The adult Teletubbies have more branching, complex antlers and shaggy coats. They are less brightly coloured. They are terrifyingly large. Their strangely human faces, emerging from the thick fur, are unquestionably adult; remote, serene, reproachful. Their television screens are glitchy, esoteric and unknowable. They are cryptids whose public exploitation has undermined their rarity and their strange, alien dignity.
That’s a pretty clear description.
2. The post quickly gained attention and many people drew art, made sculptures, designed in-depth character concepts, and even made DnD character sheets and entries with detailed notes. It was 2017. The post got over 90k notes. It had an extremely clear description of the cryptid in it. This wasn’t at all obscure.
3. The post and four pieces of the concept art, including the first piece by were screencapped and posted on r/tumblr. The post included this art by the now-deactivated @finoliatav which is, I think, the first piece of art. Most screencaps don’t show that it’s animated! Once you see it you can no longer pretend that any more work needs to be done in designing these characters, really - they’re all variations on a very clear theme.

4. A guy called Jars started drawing the BBC Teletubbies as adult Teletubbies. He noted on Reddit that his inspiration for the first one was the r/tumblr post but after that, he considered it entirely his own creative work. He drew each of the 4 BBC Teletubbies as adults using my character description and wrote a little story about how his character had stumbled upon them in the woods. He’s a good artist and his work went viral on Reddit and instagram. Those places being separate from Tumblr by the walls of the enclosure, they quickly believed the Jars was being highly original and praised him for it.
5. jars got carried away by his fame and started merchandising for all he’s worth. He’s selling elder teletubbies placemats. He got a collaborator to help him make and sell plushies.
6. Plushies of my character design applied to BBC characters. Jars sells them. To people. Who buy them. He sells these.
7. I think this is like… his job.
8. It has been years of this. I don’t think he has actually come up with anything else to sell by himself. But given that he now has millions upon millions of views on platforms I don’t use, let alone dominate (Instagram, YouTube, Reddit, TikTok) he seems to have fully subscribed to the idea that this is his THING.
9. After a while I wrote him a friendly email expressing that since my original dream was very much about discomfort with how the teletubbies were being exploited, I didn’t mind him selling his own art but that I wasn’t happy with him selling plushes based on my writing.
10. He wrote back along the lines of it all being his original intellectual property and absolutely nothing to do with me, etc, so jog on and don’t interfere.
11. I’m not entirely sure where the original intellectual property is when taking BBC characters and drawing them according to someone else’s detailed description of how to “evolve” them (branching antlers, shaggy coats, eldritch screens, serene adult human faces) especially having drawn them after seeing four separate detailed reference photos to base your own drawings on; especially when they’re the existing BBC characters from the show and not even your own. Like, Jars, you were given an entire detailed brief, several sets of references, an entire concept and a television show: the only artistic choices made here were to pick up your own personal pen and do the drawing. You have never deviated from my description, which you did not come up with yourself in any way. But okay Jars. You did some real intellectual heavy lifting here, this is Intellectual Property suddenly, and I guess this is your day job!
12. I myself actually have a day job, am capable of generating lots of other original material just for funsies, have never asked you guys for money, and I’m not generally huge jerk I don’t think. Also, I’m uncomfortable but have never been clear on how to stop him - I don’t think I can. So I don’t do much about this, apart from occasionally scream with hilarity with you guys about it.
13. Like this is the opposite of Goncharov. This is a guy making his wage on a 2017 tumblr collaborative shitpost insisting that this is the beautiful fruit of his only brain. And millions of people believe him.
14. There are now YouTube documentaries with millions of views and TikTok lore about Jars, and his lore, the Elder Teletubbies, which apparently he invented. People are making their wage talking about the history of Jars and his teletubbies lore. These documentaries are, if you can’t tell, not especially well-researched, as it is not difficult to find the original elder teletubbies art on the internet, which is all timestamped. Occasionally hilarious people from Tumblr point this out in the comments (thank you, you guys are hilarious) but the juggernaut is unstoppable!
15. Jars is now, apparently, doing a kickstarter to raise money for some kind of DnD sheets using the grown up BBC teletubbies.
16. I will point out that tumblr made and played with DnD teletubbies in 2017 for free and nobody had to pay $3000, but again. The juggernaut is unstoppable.
I have never, ever known what to do about this guy.
I have always been open to advice but genuinely never been able to articulate how it “damages” me, apart from ethical discomfort about how much I hate my writing being monetised by other people, especially when it was about my discomfort with exploitation. The juggernaut is unstoppable though. He fully intends to get thousands of dollars from this. He almost certainly will!
4K notes
·
View notes
Text

i told my friend i would find him some beginner’s giffing tutorials, but all the one’s i could find were either years out of date, used a method that made me go “huh”, or incorporated ready-made actions. all perfectly fine, but if i’m sending someone a tutorial i’d rather it be one for a method i understand enough to help with.
so, here is a beginner’s guide to giffing, as told by cleo, a neurotic, detailed, and organization happy individual. there will be many pictures.
this tutorial will strictly cover the gif making portion of the process, from getting your screencaps to importing in photoshop, resizing/cropping, and sharpening. i was going to briefly go over colouring, but tumblr only allows 30 images and i ran out of space, so i'll have to do a separate colouring tutorial (which also means i can go into more detail, yay).
downloading the videos, whether direct downloads or t*rrents, is also another tutorial. but make sure you’re using at least 1080p, and the bigger the file the better. a single episode of a ~45 minute show should ideally be 2gb at minimum. a full length movie should ideally be at least 5gb. imo 2160p/4k files are not really necessary; the quality increase is negligible, and it takes a lot longer to screencap them. if you do use 2160p/4k files, try and make sure it is not HDR, as those videos are often washed out and require a different screencapping program to fix.
Programs
I am using a cracked version photoshop 2022, but whichever version you use should be pretty much the same
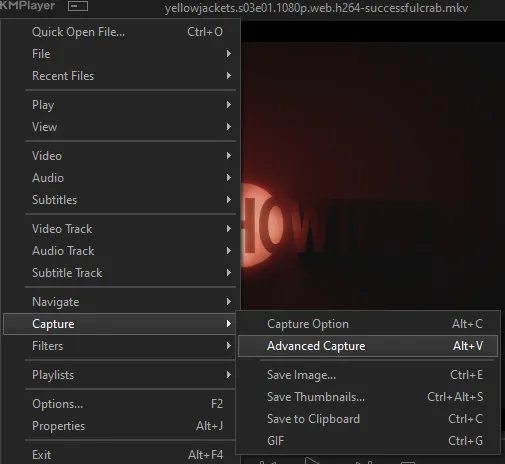
Actions. not a program but a function inside photoshop, where you essentially record a series of steps, and then you can simple play that action when needed and those steps will repeat, which saves considerable time when giffing. I will note which parts of the tutorial are best saved as actions, and explain how to create actions at the end.
For screencapping i use kmplayer it’s free and very simple to use
not at all a necessary program, but i use freecommander instead of the regular windows file explorer as i find the dual panels very helpful when moving the frames around
Screencapping
there are many programs you can use to get the screencaps from a video, a lot are basically the same, some are better suited for particular video file types. kmplayer is a very simple program to use, but afaik the capture function only works on mkv. files (the only other file type i’ve tried is mp4, which plays but does not capture)
once you open your video file in kmplayer, we’re going to open the advanced capture window, found under capture→advanced capture, or alt+v
the window should look like this
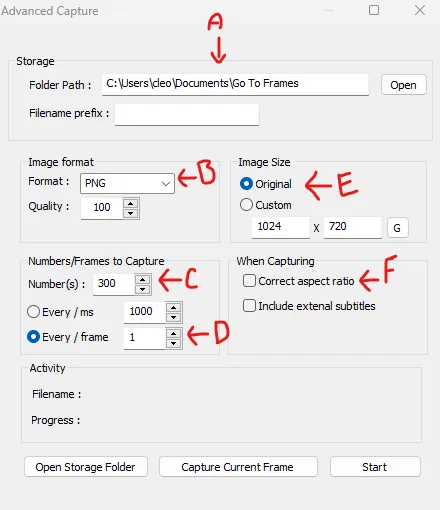
A-this is where all your screencaps will save to. i recommend making a specific folder for all your screencaps
B-make sure this is set to png for best quality
C-this is the number of screencaps you want to take, guesstimate how many you will need, keeping in mind that most videos are approx. 25 frames per second, and you should always cap a bit more than you think just in case
D-make sure “every/frame” is selected and set to 1
E-make sure “original” is selected, resizing will be done in photoshop
F-make sure “correct aspect ratio” is unselected
go to the part of the video you want to gif, and pause it just slightly before that part starts, then select ‘start’. the screencaps will start to save to the file, no need to play the video, and will automatically stop once it has capped the number of frames you have chosen
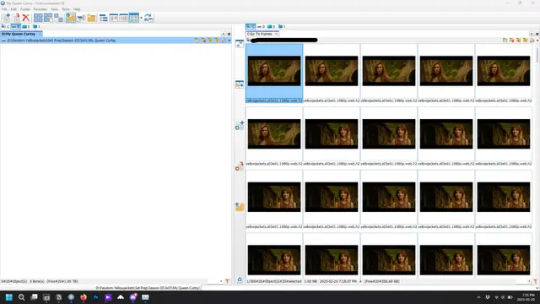
and here is how they look inside freecommander. i have already made a folder for this gifset, which is on the left. now you’re going to make a folder for each individual gif. i’ve decided this one will have four gifs, so create four folders (i just label them gif 01, gif 02, etc) and then move the frames for each gif into their respective folder
while you can always delete frames once the gif is made if it’s too big, i prefer to make sure i have the correct number of frames before i start. the gif limit on tumblr is 10mb, so it’s good to look at the scene/shots you’re giffing and decide approx. what dimensions your gif will be. full size gifs have a width of 540px and your choice of height. if you go for a square gif (540x540) you can usually fit 40-50 frames. if you’re planning for a smaller height (such as 540x400) you can usually fit more around 50-60 frames.
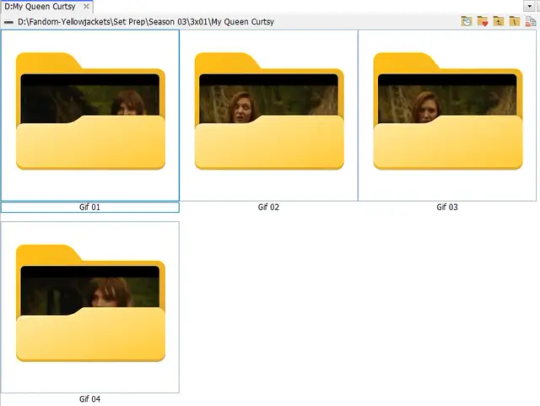
and here are the caps inside the folders. another reason i like freecommander is it’s ability to “multi-rename” files. the default file explorer can do so as well, but you have to do each folder individually and you can’t customize the new names as much. either way, i prefer to rename the files to each gif just to scratch my organization itch.
Introduction to Photoshop
NOTE: i have changed many of my keyboard shortcuts in photoshop to ones i prefer, so any you see listed in the menus of these screenshots are likely not the original shortcuts. you can see and change them yourself under edit→keyboard shortcuts

quick run-down of the photoshop interface. i have adjusted placement of some things from the default so this isn’t exactly how your photoshop will look when you open it, but everything is labelled, either on top or by hovering over the element. once you’re more familiar and have your process down i would recommend adjusting the workspace to suit your process.
A-your main tools and colour selector. almost all the tools have either several tools in one, or have alternate options which can be accessed by right-clicking the tool. you can also hover over each tool to get a pop-up with a quick explanation of the tool
B-additional “windows” such as history, properties, actions etc. can be opened from the window menu at the top and moved around with click-and-drag. history and properties should already be there by default, but probably on the right hand side instead. each window opens and closes with a click
C-the timeline window where the gif is made. the white square is a single frame of a gif, and on the row below is the play controls. this will not be there by default and will need to be opened from the window menu
D-adjustment layers for colouring
E-layers box. this is where the screencaps will show, along with adjustment layers, text layers, etc.
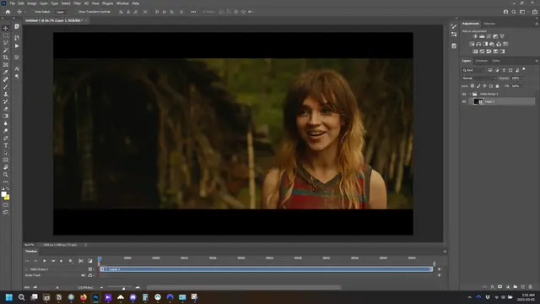
Opening Screencaps in Photoshop
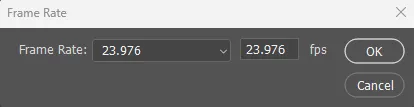
go to file → open navigate to the folder for your first gif, select the first screencap, and check the image sequencing, and click open

a window will open labelled frame rate. set it to 23.976 and select ok
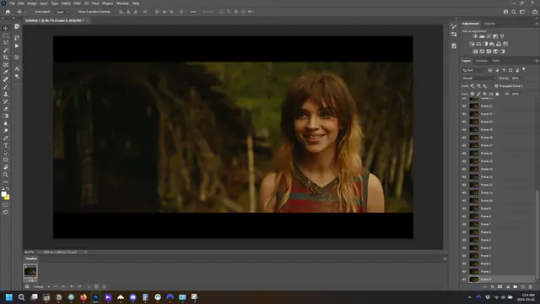
the screencaps will open in the timeline view, seen as the blue panel line at the bottom, and the screencaps are combined into video layer in the layer panel on the right.
Creating Frames
technically, you could go right into your cropping/resizing and sharpening from here, however if you do that directly then you have to keep the screencaps in the folders you have, otherwise if you save and re-open the gif it won’t move.
this next part should be made into an action.
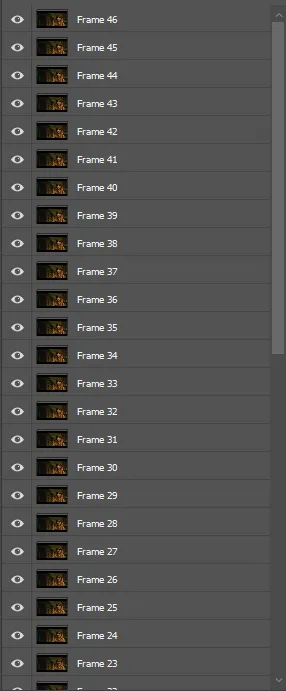
at the top right of the timeline window, click four vertical lines to open the menu and select convert frames → flatten frames into clips. depending on how long the gif is, this can take a minute.

the layers panel should now look like this, each frame of the gif is now its own layer.
the very bottom layer will be the video group. this can be deleted as we’ve made the frames from it
in same timeline menu as before, right under “flatten frames into clips”, select “convert to frame animation” and the screen should now look like this. this will be the end of this action.
Cropping and Resizing
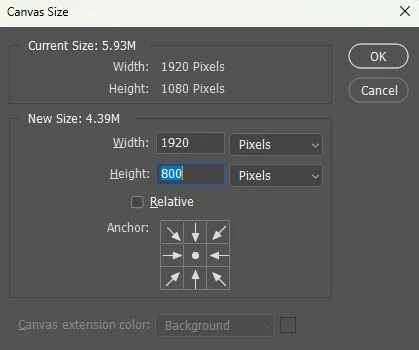
with widescreen footage, sometimes it’s just shorter than 1080p, but most of the time it will have the black bars on the top and bottom, and frustratingly, they’re not always the same size. it’s good to save the most common sizes as actions.
to find the size of the actual screen you turn on the rulers under view→rulers and check the height. then open your canvas size dialogue box under image→canvas size and change the height, making sure pixels are selected in the dropdown. yellowjackets is what i call “xtra wide” which is 800px. “normal” widescreen is 960px.
next we’re going to resize the caps. i also make actions for this, one for each potential gif size. open the image size dialogue box under image→image size and change the height of the image to your desired height plus 4 pixels. these extra pixels are to prevent a line at the top and/or bottom of your completed gif. now re-open the canvas size box, change the width to 540px, and the height to the desired, removing those 4 extra pixels. i have set this one to 540x540. this is where you would end the resizing action.
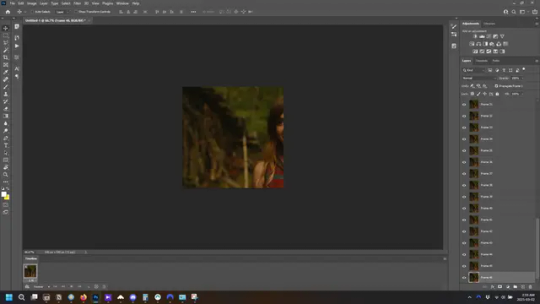
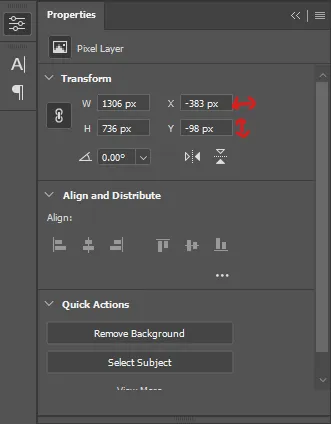
and as you can see she is off-screen. select the top layer, hold down shift and select the bottom layer to select them all, and with the move tool (the very top one) activated, click and drag to move it left to right as needed to centre the figure/s. as you move it a box will appear telling you how far you are moving it in any direction. make sure you are only moving it left or right, not up or down. to be certain of that, open the properties tab.
the y axis is your up/down, x is left/right. for this gif the y needs to stay at -98. you can also manually change the x axis number instead of dragging the image. also helpful for making sure multiple gifs of the same shot are all positioned the same.
the layer are currently ordered with the 1st at the top and the last at the bottom. with all layers still selected, go to layers→arrange→reverse. the last layer will be on top now. if there is movement in your gif, check if you need to alter the position again to make sure the movement properly centred. but once you are satisfied with the position, the layers should be in “reverse” position, of last layer on top. this is to ensure that the gif plays forwards.
Converting Gif
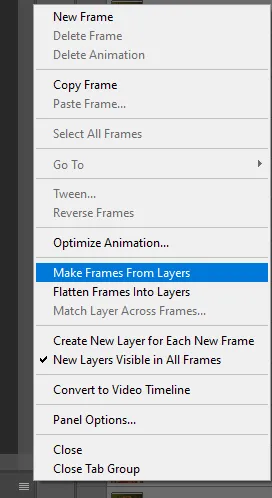
this should also be made into an action, going through sharpening process
in the timeline menu, select “make frames from layers”
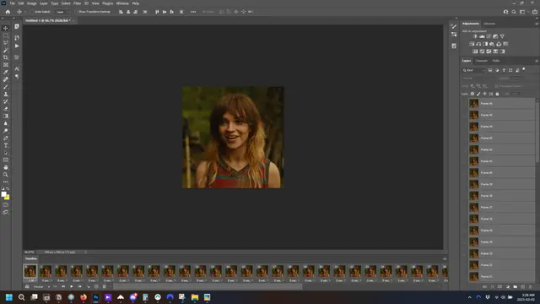
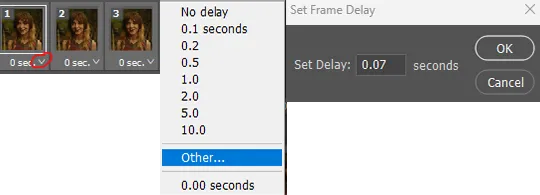
the frames are now populated in animation window. in timeline, click select all frames. go to any of the frames on the bottom and click the little arrow beneath it, select other, and enter 0.07 seconds. this is not a necessary step, as we will have to adjust the frame rate at the end, most likely to 0.05, but if we don’t change the frame rate here, then when we play the gif while working on it to check how it looks, it will play very fast.
in the same menu at the right of the timeline box, select “convert to video timeline”
then, making sure all layers in the panel on the right are selected, go to filter→convert for smart filters. this turns all the layers into a single smart object.
but if you look where i’ve circled, it says the gif is 99 frames long*, when in fact there are only 47. if you are making regular “scene” gifs, basic colouring and maybe a caption, this is fine and does not need to be fixed, it will play at the same speed. if you want to change it to display (approx.**) the correct number of frames, go to the timeline menu on the right, select “set timeline frame rate” and change it from 30 to 15
*if it does not list a frame number by 4 digits but instead says 5f, 10f, 15f, etc. go to the timeline menu on the right, select panel options, and change timeline units to “frame number”
**the reason why this is only approximate is because the actual frame rate is not a a whole number, so when changing the frame rate it isn’t a 1:1, and 47 frames becomes 50 frames. the extra frames are removed at the very end, but if you are not doing any edits that require working frame by frame, there’s no need to change the frame rate here at all
Sharpening
this is, as it sounds, making the gif look sharper. to start go to filter→sharpen→smart sharpen and this window opens. play around with the dials to see what each ones does. the below settings are good for most high quality footage.
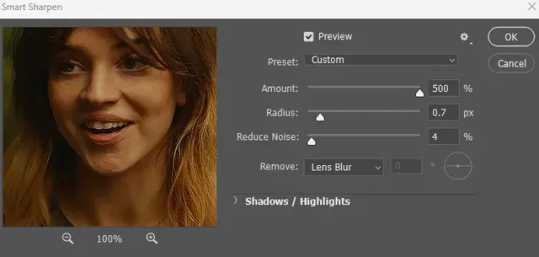
Amount-basically, how sharp do you want it
Radius-hard to explain, but this essentially sets how deep the lines of the sharpness are
Reduce Noise-smooths the pixels
once you click okay your single layer should look like this.
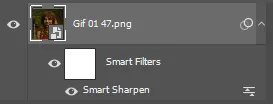
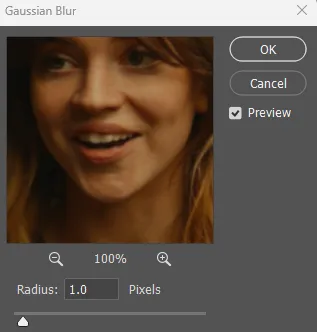
you’re going to then right click the layer and select duplicate layer. with the top layer selected, go to filters→blur→gaussian blur and set the radius to 1.0 pixels.
then change the opacity of the top layer to 10%. this is to essentially soften the sharpening a bit, as if it’s too sharp it can make the colouring wonky. this opacity level can also be changed depending on need.
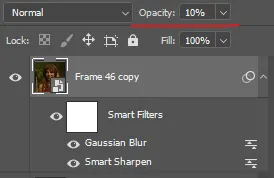
finally, select both layers, right click, and click “group from layers”. your gif is now fully made and sharpened.
Colouring
yeah. ran out of image space. but this is where you would do your colouring and add a caption or any other text.
Converting & Exporting
when all your colouring is done, you’re ready to start saving your gif. you can do it directly from your current file, but that means essentially losing your colouring, as all those layers will be merged together. i am someone who likes to save my psd’s (photoshop files), at least until i’ve posted the gifs, in case i need to fix something in the colouring. if you’d like to keep yours as well, open the history tab and select the first icon at the bottom “create new document from current state”. this will open a copy of the file in a new tab. save the original file and you can close it, continuing all work on the copy file.

select your all your layers, convert them into a smart object from filter->convert for smart filters, then follow the same steps from Creating Frames above. once you're back in frame animation, select Create Frames From Layers, and once again set the frame animation speed.
most people set the speed to 0.05. i personally set it to 0.05 or 0.06 depending on the length of the gif. check how it looks at 0.05, if it seems too fast, try 0.06.
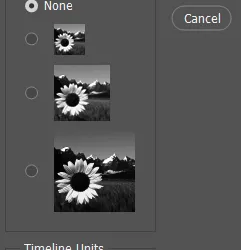
now to save. go to file->export->save for web (legacy). the number is the lower left corner is your gif size, it needs to be under 10mb or else you'll have to delete some frames.

the right panel is your save options. the preset dropdown has some built-in settings, but you won't use them because (at least on my version) the presets only go up to 128 colours, instead of the full 256. the 3 i've highlighted in green are the only one's you'll adjust as needed. the settings below i use for i'd say 90% of my gifs. i'll sometimes change the adaptive dropdown to one of the other options, ocaissionaly the diffusion, and rarely the no transparency dither, but play around with them and see how they change the look of the gif.

when you're satisfied with the look of your gif, click save at the bottom right of the window.
voilà! you now have a gif.
Actions
this is your actions panel. the triangle on the left side is the button to open it. remember, if it's not already there, go to windows->actions to open it.
the buttons on the bottom, left to right, are stop recording, record action, play action, new folder, new action, and delete.

as you can see, i have different folders for my resizing, sharpening, captions, saving, and my 1 step (temporary) actions. to run an action is very simple; click the action, and click play.
to create an action, click the new action button, a box will pop up, give the action a name, and click record. the record button at the bottom of the action window will turn red. now perform all the steps you want it to record, and click stop recording. keep in mind it will record every single thing you do, including in other open files, so if the action you plan to record will have a lot of steps, it might help to write them down first.
to modify an action, select the step in the action above where you'd like the new step to be, hit record, perform the step, stop recording. select the step you'd like to delete, and click the delete button.
steps within the actions can be clicked and dragged, both within that action and moved to other actions. actions can also be moved between folders.
273 notes
·
View notes
Text

hi! someone requested me to do a tutorial based on this gifset!
this tutorial requires an intermediate knowledge of gifmaking. i won’t teach you how to do gifs from scratch, there are other tutorials for that out there.
[tutorial under the cut]
THE BASICS
AN INTRODUCTION
first off, the gifset in question is based on this gifset by @/eddiediaaz and i got permission from them to explain the process. i won’t be sharing the template because it’s a near replica of theirs (that isn’t shared to the public) and i don’t feel comfortable doing so, but you can recreate it by yourself just like i did!
also, ESL, so please pardon any mistakes.
THE FONT
Circular ST (Medium & Black). download it here & here.
CLIPPING MASKS
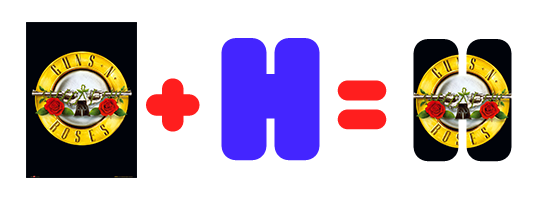
clipping masks are the way i put images and gifs inside of shapes. i used that method in the first and second gif of the Spotify gifset as you can see here. what does a clipping mask do? basically, it links two or more layers together in a way it follows the “shape” of your base layer. ie, everything that is shown follows the “shape” of your main layer and nothing more. your base layer can be anything: a shape, an image, a gif, a text, an adjustment layer, really everything. let’s see an example:
CLIPPING MASKS & SHAPES

the original image (Gun 'n' Roses logo) is intact, as in, it’s not cut like a circle, something that cannot be undone. instead, everything outside the limits of the blue circle is just hidden. if i delete the base layer (the circle layer), the original image will appear as it originally is, as an rectangle. talking about layers, let’s see my layers panel (some things are in Portuguese, but i think you can understand):
notice the little arrow pointing downwards to the “circle” layer. that is the clipping mask symbol. the base layer always needs to be below what is being clipped. if the base layer is deleted, the chain is broken and every layer clipped will now act independently and have its original shape. you can have as many clipped layers as you want. you can also have multiple chains going on in a .psd, each one with its own base layer. to clip a layer, you just need to press ctrl+alt+G or cmd+option+G while having the layer you want to clip selected (NOT your base layer). or, you can go to LAYER > CREATE CLIPPING MASK.
CLIPPING MASKS & TEXT
let’s see the same example, but with text instead:
A TIP
because adjustment layers are clippable, you can completely gif by using clipping masks. this is very useful when you have more than one gif inside a canvas and don’t want an adjustment layer to affect everything besides a certain layer/element.
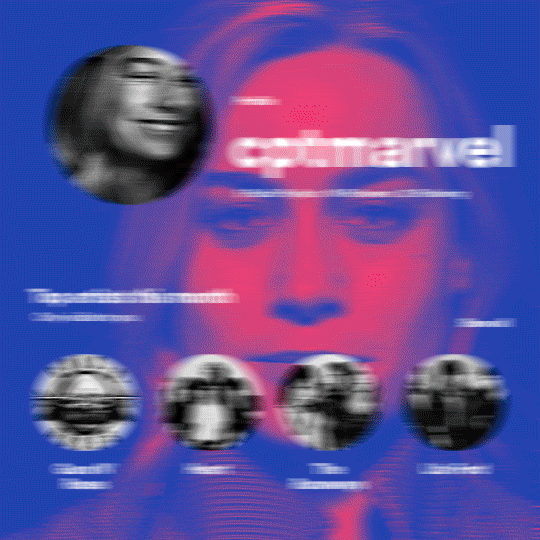
let’s take my first gif of the Spotify gifset as an example.
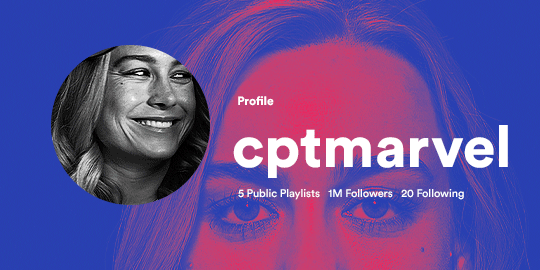
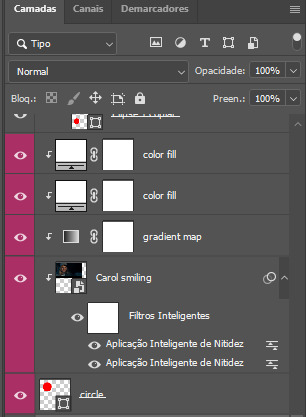
the circle is the base layer. the “Carol smiling” layer is my gif converted to a smart filter. above that “Carol smiling” layer, there is a black and white gradient map and two color fills of white so i can achieve the coloring you see. all those layers are clipping onto the circle layer, making my now b&w gif have the shape of a small circle as well. those layers are in a folder in the .psd of my first gif, so i don’t have multiple files sitting on my PC to assemble just one gif. i could have giffed that small gif separately and pasted it onto my canvas as well, but i like to do this way so i can adjust everything i want in real time instead of redoing a gif over and over every time i want to change something.
HOW TO MAKE EACH GIF
all gifs are 540x540px.
THE FIRST GIF
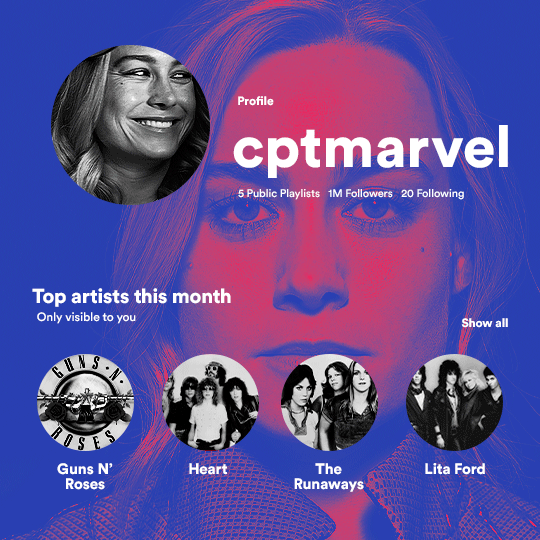
the first gif has 6 elements. the elements are: a big gif serving as a background (a close-up of Carol), a smaller gif inside a circle (a b&w gif of Carol smiling) as a profile picture and four static images for the featured artists. i giffed as i normally do (loaded screencaps, resized the gif, sharpened the gif, etc) for my background gif. to achieve the coloring, i’ve added a gradient map (layer > new adjustment layer > gradient map) purple to pink. to the profile picture, i made a 160x160px circle in the top left corner. the color of it doesn’t matter. the next step is a matter of taste: i giffed the smaller gif in the same .psd thanks to clipping masks that i explained earlier, but you can do it in a separate canvas too. for the featured artists, i made four circles with 98x98px each. for the images, i had to check Spotify for their selected PFPs. after that, i googled “[band/artist] spotify” to find the images. the PFP of bands and artists in the Spotify app are displayed in black and white, so you might have to make them b&w if you happen to find them only in color. to make the artists PFPs pop a bit more, i transformed them into smart filters and added a bit of sharpening to them (intensity 10 x radius 10). you can adjust the colors and the brightness if you want, too. the sizes of the texts in the gif are: 58px (username), 20px (top artists of the month), 15px (name of the artists), 12px (only visible to you + show all + profile) and 11px (following and follower numbers).
SECOND GIF
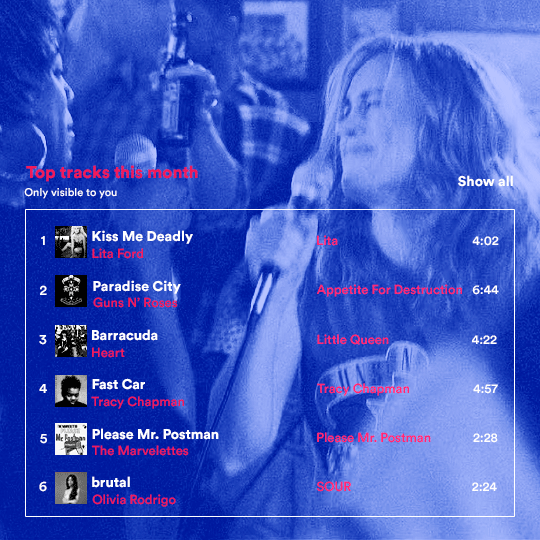
for the chart, i created a black rectangle (490x308px) that i set its blending mode to lighten (thus making it transparent) and i added an internal white stroke. i added the text and the little squares next to the top 6 numbers. the font sizes are: 17px (top tracks this month), 11px (only visible to you), 14px (song title, show all, top 6 numbers), 13px (artist/band, album title, length of the song). i added the album covers — that i made b&w — by clipping images onto 32x32px squares. for the coloring, i added a gradient map (dark purple > light purple).
THIRD GIF
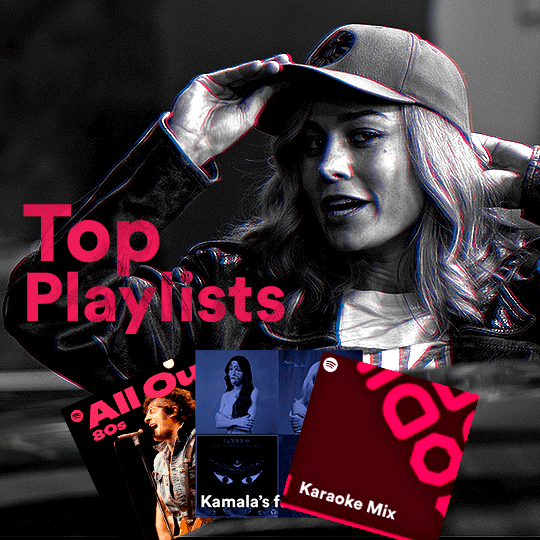
there are three types of playlists in this gif: a Spotify original playlist, a playlist made by a user and a Mix. you don’t have to follow this formula if you don’t want to, but in the case you do, here’s how i did it: browse Spotify for an original playlist of theirs. chances are, if you google the playlist’s name, you can find its cover on Google Images. at least, i found the “All Out 80s” cover that i used in my gifset. you can also create your own. for the user playlist, just pick four songs and find their (album) covers, also on Google. create a square canvas on Photoshop and make four squares, each in one quadrant of the canvas. paste your images onto your canvas and clip the images to each square. then, add a gradient map (black + whatever color you want) to all those images and title your playlist (font size: ). save that collage as a PNG and load to your gif canvas or merge all the layers+transform into a smart filter and drag the smart filter layer onto your gif canvas. now, the trickiest one. while you can invent your own Mix, i wanted to use a real one, but i had no idea on how to find them. thanks to reddit, i discovered that, if you search “made for you” on Spotify, you will find their Mixes! some of them are very whacky and specific! i just picked the Mix that made the most sense for Carol from that (gigantic) list. before doing the next step, i would advise you to google the name of the Mix you picked to see if you are able to find the cover of it with good quality. i wasn’t able to find mine (Karaoke Mix), so i just screenshotted my Spotify app, pasted that screenshot into Photoshop and cut the Mix cover and pasted that onto my canvas. the quality wasn’t great, so i transformed the cover into a smart filter, added a bit of gaussian blur and then sharpened it (intensity 10 x radius 10). the color wasn’t what i wanted either, so i used Hue/Saturation to change the hue. because the original image for the Mix was smaller than i wanted and i stretched it to make it bigger, the quality of the text and the Spotify logo was botched. i painted over the Mix cover and created a text with the font i linked earlier to replace its now pixelated title. i also painted over the little Spotify logo, found a logo in the internet and pasted over the Mix cover about the same size of the original logo. to achieve the “3D effect” of the gif, i made my b&w gif, the base. then, i duplicated all layers and added a gradient map (black > pink) and merged all the layers of that duplicate. i made a second replica of my gif, now with a different gradient map (black > blue). i set both replicas to the ligthen blending mode. you will notice that the replicas will "disappear" and only the original b&w gif will remain. if you move the replicas a bit, that colored border will appear. this doesn't work much in very bright gifs without a lot of dark areas, btw.
FOURTH GIF
this gif used an altered (by me) version of this template. (i changed the fonts to match the rest of the gifset, too.) for the color text effect, you will have to gif with the timeline bar. take your gif’s length and do the math to find how many frames are ⅓ of it. take your lyrics’ layer and cut it into three equal parts or close to it by using the scissors icon in the timeline panel. in each third, change the color of just one line, line by line. when you play your gif, the colors of the lyrics will change like in Karaoke. you can do the same thing with frames iirc, though. i explained the timeline method because that’s the one i used in this gifset and use in general gif making. for the coloring, i added a gradient map. to make the colors pop a bit more, i add two gradient maps: the first one is in black and white, the other is in color. that adds depth to the blacks and darker colors of the gif.
FIFTH GIF
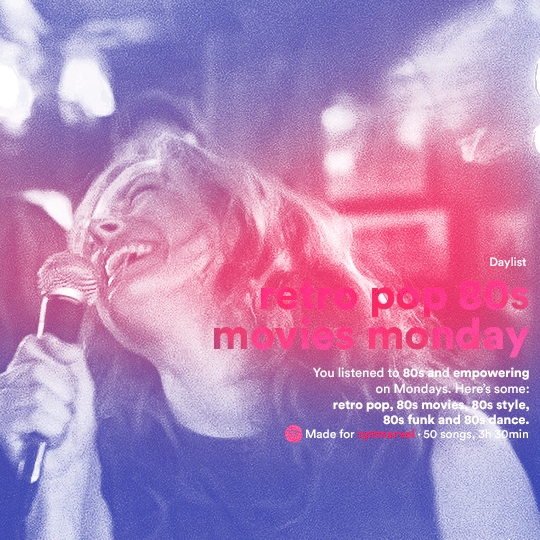
like in the Top Playlists gif, i wanted for my Daylist to be real as well. to achieve that, i listened to my Carol Danvers companion playlist (that you can listen here) for a long time until my Daylist refreshed itself. (Daylists refresh in certain times of the day — don't worry, Spotify will tell you when.) then, i just copied what it told me — the title and the genres i listened to generate such a Daylist, plus the genres i should check it out. you can invent your own Daylist if you want, but because it is generated by AI, i find very difficult to mimic its crazy titles, but you can try! you can also search in the web for other people’s Daylists if you want, but usually people don’t tell you what they listened to to get those playlists and nor what was recommended for them to listen to and i, at least, find that information important for the gifset. be aware that Daylists aren't available for every country yet (like in mine), but i found a way to work around that. the browser Opera GX offers a free "VPN" — not exactly a VPN, but it works close enough — so you can set your location to the US and listen to in-browser Spotify. i recommend not log into Tumblr while using Opera's VPN as there is a myth (that could easily be true!) that Tumblr terminates people's accounts that use a VPN. font sizes: 43px (daylist title), 13px (text), 12px ("daylist" & "made for"). for the flare effect, i searched for flare overlays on YouTube and downloaded one of those videos with 4K Video Downloader, a free software. i loaded the overlay into Photoshop and added a gradient map (purple > pink) over it, thus changing its color. i pasted the overlay onto my b&w gif and set its blending mode to screen. voila!
that's it! i hope you liked it and that i was able to express myself well. if you have any questions, feel free to contact me, i love helping people about their gifmaking questions! 💖
#*#*tutorials#gifmaker tag#dailyresources#usergif#completeresources#alielook#userairi#userhallie#userbess#userrobin#usershreyu#userzaynab#tuserju#tusermalina#tuserheidi#usertina#userabs#userbuckleys#usermagic#userjoeys#antlerqueen#userarrow#flashing gif tw
444 notes
·
View notes
Note
Hi, could you please tell me how to do this slanted layout? the-borgias*tumblr*com/post/695485491217334272/one-chicago-appreciation-week-day-one-favorite
Hi, Anon! I'm sorry this took me a few days to answer but I struggled making this tutorial (not because the process itself is difficult but it is difficult to explain it properly.) Anyway, here's the gifset Anon is asking about. I hope this is easy to understand and I also included a .psd file of the layout :)

PSD FILE OF THE GIF ABOVE & TEMPLATE
What you'll need:
Basic Photoshop knowledge (I use Photoshop 2023)
Basic knowledge on how to make layouts (here are a couple of tutorials: x x)
Basic knowledge about layer masks (tutorial)
STEP 1: Make a basic layout
You can do pretty much any layout you want but for the sake of the tutorial I tried to recreate the same template I used in that gifset. I'm assuming you already know how layouts/templates work so I created a 540x540px canvas and went to View > Guides > New guide layout. I used these settings:

And this is how my canvas looked like:

Now I pressed (M) to use the Rectangular Marquee tool and create the rectangles I wanted. This is my end result:

STEP 2: Tilt the layout
This is actually pretty easy. First we're going to select all our layers. I paired mine in groups so they looked like this:

Once we've selected all of them (groups, layers, whatever you're working with) press Ctrl + T. Your canvas should look like this:

And we're going to tilt it by changing the angle to -2.00 in here:

Now our layout is slanted! But as you can see we have transparent spaces we need to fill. I don't know if this is the easier method to do it but I use the Polygonal Lasso tool (L). I'll use the first orange box as an example:

As you can see I use a ridiculously big zoom so I can be as accurate as possible but it's basically impossible to create a perfect box, so this will work. Once we have selected our desired shape we'll use the Brush tool (B) to paint in the layer of our original orange box:

You have to do this with every box so it's a bit tedious but that's the way I did it 🤷♀️ This is the end result:

STEP 3: Place the gifs (using Layer Masks)
But now, how do I know which size my gif should be? Our initial measures won't work because our final boxes are bigger so here's what I do. I'll select the Polygonal lasso tool again and make sure I select a little bit more of the box I'm measuring, like this:

It's a little hard to see it but the dots are just a little bit bigger than the orange shape. To be more accurate, my original box was 178x87px and the shape I selected is 174x100px. So I'm going to make a 174x100px gif and place it right above the background, like this:

Now we're going to select the layers of our gif (I'm assuming you're working with a Group because it's easier) and click Ctrl + the orange box. You should see this in your canvas:

And now create a layer mask in your gif group (if you don't know how to do it check out the tutorials I liked at the start of the post.)

Now you can delete the orange box. And, once again, you have to do this with every box and write down the measures (and remember that all your gifs must to have the same number of screencaps!)
I hope y'all don't mind that I didn't create 8 different gifs lmao I was too lazy so I just used a big gif as a background and made 4 small gifs. This my end result:

For the background I merged the remaining boxes and used that to create the layer mask. I'm not going to explain it since I believe it's much easier if you check out the psd file.
And that's pretty much it! It's the same as making a standard layout you just have to be careful with your gif measures. Oh and also see how my gifset shows those white marks between the gifs under a dark background?

Well, that can't be avoided since we aren't working with straight lines (you can see the same effect in the 2nd gif of this set, different layout but also not straight lines) so we'll just ignore them.
I hope this was helpful (I lowkey feel like this tutorial is a mess) and if you have any questions feel free to ask :)
#ps tag#tutorial#resources#usershreyu#userelio#userhella#alielook#userabs#useraish#uservivaldi#tuserju#tuseruta#tuserhol#tusermels#userroza#quicklings#userbunneis#userhann#tusermona#usertj#userbuckleys#usertina#useralien#userchibi#userrobin#larlies#tuserheidi
244 notes
·
View notes
Text
Mike was saying "I love you" to Will
Most people see Mike's monologue and think of it as "proof" that he and El are an endgame couple, but it's actually one of the strongest hints of a Byler conclusion.
Because Mike was saying "I love you" to Will.
Sounds crazy? Of course! He was speaking directly to El, after all. What the hell am I talking about?

Some have focused on contradictions and other issues with what Mike says, including listing El's superpowers instead of the full person she wants to be loved for being. Plus he had to do it (and was pushed by Will), or else El and their friends in Hawkins might have died. It does seem like El sensed something off in what he said, which would explain why she hardly talked to him afterward. But I actually disagree about Mike's "I love you" being a total lie. In the official script it's written that it had a positive effect on El (although the way it was ultimately shot and edited made it more ambiguous). (I got this screencap from a TikTok video):
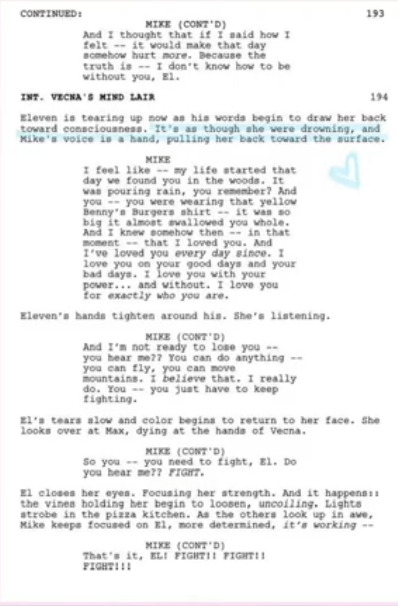
And so, in the van, Will DID make Mike love El. Mike MIGHT have wondered whether Will was talking about himself too, but one thing he was convinced of was that that El loved him because "he's the heart." Feeling like she loved him for who he was made him love her. I think it's more accurate to say that, while Mike's monologue may have had issues, he DID feel something genuine... BUT the logic of events leads more toward a BYLER conclusion than away from one.
The problem for Mike and El is that Mike was saying "I love you" to the idea of El that WILL put in his head:
Will said that El felt like a mistake, and that Mike made her feel like she was better for being different. She was terrified of losing him and so that's why she pushed him away.
So Mike came out of that conversation with new feelings for El: he thought that SHE needed HIM to love her, not because of "dumb luck," but because of his unique qualities. Who HE is helps her be a superhero.
But El's journey in Season 4 was to LEAVE Mike to "be a superhero." When she left a note for Mike, she tellingly signed it "From El." When she realized he couldn't say he loved her, she chose to let go of their romantic relationship. Her journey in Season 4 was about finding who she was independently from others in her life (most importantly her "papa" Dr. Brenner). El went through her own journey that REQUIRED separating from Mike.

By the time they reunite, she has grown. Instead of Mike coming up with the plan (like so many times before), EL came up with the piggyback plan. While she was piggybacking, Mike said "I love you" -- but having her self-image rely on how Mike sees her was something she was moving away from.
She had felt like a monster. What liberated her from feeling that was NOT Mike and not an elusive "normal life" (with a relationship) -- let alone something as token and symbolic as saying "I love you." She had to realize this on her own:

There were clues in Mike's monologue for her to pick up on that he wasn't fully telling the truth, first and foremost him saying that he "knew, in that moment, that I loved you." (He couldn't have, when he was openly scheming in s1 to get her sent away, possibly to a mental hospital, loud enough for her to hear.)
But Mike DID love El when he said "I love you." Mike saw someone who desperately needed him, someone whom MIKE was a hero to and not just the other away around.
That person he was thinking of, of course, was WILL.
It wasn't like it was news to Mike that El needed his love: El confronted him earlier in the season for not saying he loved her. We all saw that El's heartbreak didn't convince Mike that he loved El.
Ironically, it was WILL'S heartbreak, HIS emotions, and HIS words that did. And Mike felt something real this time, because it came from WILL.
Will's words affected Mike deeply. Deep down, Mike wants to be someone's hero. He's the leader; he's "the heart." When dealing with a superhero like El, he can admire and love her, sure... but does it make MIKE feel loved for who HE is? Does a romantic relationship with El COMPLETE him? Mike doesn't want to be a discount Lois Lane. He wants be loved because who HE is makes him THEIR hero, too.
Mike has always been bullied, misunderstood, and angry. He rambled just before Will's speech about being "some random nerd" and feeling like he didn't deserve El. He felt inadequate, and this affected him ("leader Mike" recedes when he's in a relationship with El, and comes forward when someone -- usually Will -- needs him). Will's point "You make them feel better because they're different" doesn't just describe El + Will; this is what Mike is looking for, too.
Being "some random nerd" is part of why Will loves him so much. Will's painting was the perfect gift; Will knows and understands his best friend better than anyone. The D&D theme was a tribute to Mike the nerd -- he sees everything he is, the "good" and the "bad" -- AND he sees the hero and the leader. WILL's love for WHO MIKE IS made him feel like he's a good person.

(Here's an angelwithnightmares video that shows this about Mike exactly)
Mike's journey in s4 was him rediscovering that he is a hero. And this required separating from El and hearing this from Will. Will said that he's the leader of the group: "You keep the party together." And earlier in the season he reminded Mike "you guys saved me" (with a proud "I did, didn't I" reaction from Mike that was super endearing lol).
Will's love gave Mike the strength to be a hero again. Mike pretty much used Will's words in his monologue to El. Two scenes at the end of Season 4 foreshadowed "leader Mike" coming back; his speech to El, and his "We will" shoulder grab with Will. Whatever issues there were in his monologue, this was THE callback to "leader Mike" of s1 and s2. He didn't help El beat Vecna, but he helped them survive. Mike spoke of his genuine platonic love for El, while thinking it was romantic love. And it was WILL's romantic love that helped him be this hero, to say "I love you" to the person he thought made him feel that way, who as it turns out was WILL.
So we'll have a final season where there is this hugest of loose ends when it comes to Byler: Mike will somehow realize that Will in the van was describing himself and not El. Mike will realize that the first time he felt romantic love was because of Will, and that Will more than anyone helps him be the hero he wants to be because he loves that part of him. (It's the perfect formula, writing-wise, to make a closeted boy confused about his romantic feelings!)
AND Mike will learn that Will sacrificed his own happiness for him and El. How does that NOT lead to Mike loving Will even more than he already does?
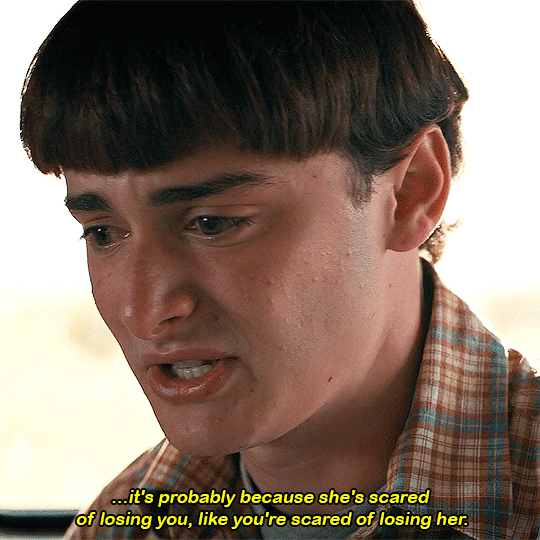
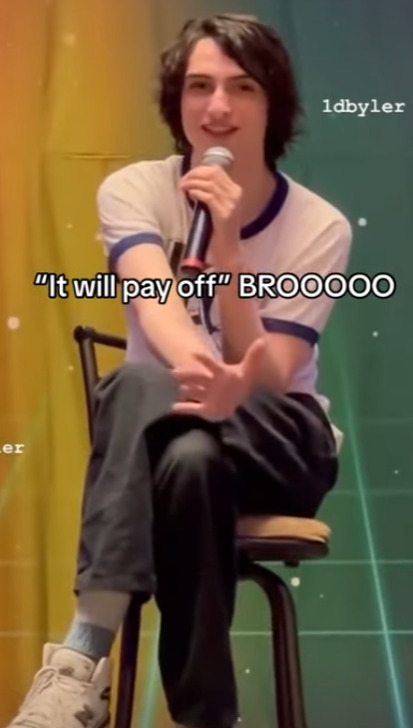
Finn Wolfhard himself said about the van scene:
How is he this clueless right now? What with the Will scene... I remember asking the Duffers, "Why would he not know all this?" And they were like, "Don't worry, kid, it'll pay off in the end."
I think it will.
-teambyler
550 notes
·
View notes
Text
complete beginner's guide to [kpop] giffing, as explained by me!
keep in mind everyone has a different style and process, so there are some things in mine that may not feel intuitive or helpful - if so, don't include it! if you can make the gif, and have fun doing it, that's good enough. this post also assumes interest in specifically kpop giffing, but can for the most part apply to other content as well. i would just recommend different sharpening and coloring for those.
separated by headings (not images, since i need those... for examples) - if you are skipping to a specific section, look for the orange text of what you are looking for!
table of contents: - picking your programs - additional tools and programs (optional) - finding files - importing to photoshop (vapoursynth, screencaps, etc) - photoshop shortcuts and actions - sharpening - coloring - export settings - posting on tumblr
programs:
if you already have photoshop / your giffing program installed and set up, go ahead. if you don't, i would recommend looking here to get photoshop. please make sure you follow instructions carefully and safely! i do know photopea is an alternative people use, and i'm sure there are others. i unfortunately don't know any tutorials to link and probably won't be much help in regards to those programs, but i'm sure there are some floating around on tumblr!
my gif process uses photoshop, so this tutorial assumes that as well. if you use a different one, you might be able to transfer this to what you use, i'm not really sure :(
additional tools and programs: - handbrake: upscaler, found here. i make my own settings and generally only use this on lower quality sources to give vapoursynth a better chance with encoding in higher quality. - davinci resolve: a program i use to make clips appear 60fps when they are choppy or too few frames for the gif to look nice, and occasionally to do pre-photoshop coloring! i use the free version. i do not use this all the time and it is a big program, so definitely don't get it if you think you'd forget to / not want to use it. - yt-dlp: open source, downloads pretty much any file i could want quite well. i use this for most of my downloads and for subtitles as well. does require some knowledge of code, or, at the very least, willingness to troubleshoot set-up. find it here! i can share the command lines i run for: video, audio, vid + sub. - 4k+ downloader: what most people use for youtube-source sets, i believe. you have a limited number of downloads per day on the free version, thus the other downloading programs. - jdownloader2: no limit but sometimes a little slow or will refuse to download because of not being logged into an account, etc. a good download alternative if you plan on downloading a lot and yt-dlp is too much. - vlc: free program, standard on some devices, good for viewing files. - mpv: excellent file viewing, can also deinterlace and screencap (if you do not have / use vapoursynth) - vapoursynth: mac users beware, it's not optimized or set up and is a huge headache. windows users, once you get it set up, it's golden.
finding files, what to look for, and how to use them: how to use is explained here, with a focus on smooth and nice speeds! but finding the file is the first step, so let's head there.
stages: k24hrs (invite only, feel free to private dm or send an ask off anon for a file - i will do my best to get it to you); kpopbuzzhub; sharing korea torrent (requires a torrent app); twitter (shrghkqud (only has recent files) and a few other uploaders, requires much more active searching). there are a few other places you can look, but it is often more trouble than it is worth (or costs $). i am also always willing to help people find materials, so you can ask me to help you look for something or to link a source i used for whatever set.
music videos: also sometimes on k24hrs. i use vimeo a lot (color graders, directors, etc., will upload clearer versions). sharemania.us has some kpop mvs, typically bigger groups (i.e. blackpink). this is a place i check for ggs. and if none of these places or searching for torrents on btdigg, or on google in korean works, i just download the highest quality setting from youtube.
other types: like vlogs and fancams, normally directly downloaded from youtube, instagram, or twitter using yt-dlp or sites specifically for the app (i.e. twittervideodownloader).
what do i look for? 1080i for stages (or 1080p) are often super nice as they're a .ts. 2160p/4k is often ideal, but it also depends on your computer and what you are comfortable working with! generally - not always due to ai upscale - a bigger file size (in the gbs, high mbs like 800) is better and has more detail that will look clear when you work on it. older stages (2nd gen and before, some 3rd gen) and music videos often always are lower quality due to camera quality, and much harder to find. if you have to use the youtube upload for a stage, it is definitely doable, but it may be slightly disappointing in the quality you want to achieve. it depends on what you're comfortable posting and making!
how do i use them? if you use vapoursynth, scenedetect (encode/process whole video) or timestamp (just a small clip) your file - if upscaling, using davinci resolve, or any other pre-processing, do that first. it will pull up a resizer and a program and once you encode, it will give you an output file using the size and settings you put. this will import to photoshop. if using mpv or another screencapping method, take your screencaps (again, all pre-processing first) and prepare to import. there are two ways to do that for screencaps. you can also just watch whatever you downloaded, i'm guilty of downloading concert files just for fun 😅
in the next sections, i will be using four different files of varying quality and sources to explain my steps. hopefully that is helpful!
example file 1 (4k and 60fps, obtained using yt-dlp) example file 2 (1080i, obtained from k24hrs) example file 3 (1080p HD, obtained using yt-dlp) example file 4 (pulled from the gg archive i use, master)
importing to photoshop (vapoursynth and mpv explained): using example file 1, i am processing in vapoursynth - i always do one extra second before and after the clip i actually want so it doesn't cut off any frames i'd like. i adjust my sizes based on what works best for tumblr (540px for wide, 268px for 2 column, and 178 for 3 column). i always use finesharp 1.5 (this setting is up to you! i used to use .7, so totally ok if it changes over time, too!) when you export in vapoursynth, you need the y4m header. i use export to mov preset.
when importing to photoshop using a video (so vapoursynth, video files, not screencaps):


i recommend making your selected range a little bigger than the frames you want so they don't accidentally not get included. delete any extra frames while in the frame animation and then turn it into video timeline. i turn all my layers into a smart object (select them all by clicking the bottom layer and then shift-clicking the top one, or use (on windows) ctrl + alt + a to have it select faster). set timeline framerate (if you want to, i always use 60).


now your smart object is ready to sharpen and color!
using example file 2, i am processing mpv - i hit 'd' until deinterlace is on 'auto'. find the clip you'd like and hit your screencap shortcut (alt+s) for me - your screencaps should be super clear, it depends on how you set up your software (if mpv, what compression you told it). screencaps can take up a ton of storage so i recommend only screencapping what you need and deleting them after. when you hit your shortcut, play the file to the end of the clip you went and hit the screencap shortcut again to stop. your frames should be in the folder you designated as pngs now. delete extra frames now!
you now have two options: import as is, which can be a little slow, or turn them into dicom files. importing as is is done through stack. it will prompt you to select what is being loaded - change Use: to folder, and let it process. it will be slow. hit ok when the file list updates.

when it is done loading: create frame animation -> make frames from layers -> reverse frames. i would crop now using the crop tool for processing speed, and then proceed to do video timeline, smart object, and frame rate. when cropping: on the top, above your document names, the second image should show up on the crop tool - this can set your dimensions. i zoom and crop screencaps using this.


the other option is DICOM files, and what i use. when you have your pngs, do alt + d in the folder (windows), type cmd, and run this command: ren *.* *.dcm. press enter. it will update the files. on macOs, just rename the file type to .dcm.

then, import as so (it will prompt you to select the folder your .dcm are in, and will not work if the files are not actually DICOM). i find it much faster than the stack import. crop when it is done importing for processing time, like the other screencap import style.

create frame animation -> make frames from layers -> video timeline -> smart object from layers -> 60 fps.
photoshop shortcuts and actions: (windows) - ctrl + alt + a: select all layers - ctrl + shift + alt + w: export as image - ctrl + alt + shift + s: save for web (legacy) - this is the gif one!
actions are imported or created, i've shared my sharpening ones before. there are plenty you can find (or make) for a variety of things, such as aligning objects to a fixed position on all docs, doing the screencap reverse and import for you, etc. they are imported using load actions - select the [downloaded] .atn file and it'll pop up.

sharpening: explained here, and has my actions (feel free to use). very important to the quality and clarity of the gif. the better the file, the clearer a gif looks, sharpening can only do so much. play around during this step!
coloring: very much the most personal taste stage of giffing. i explain my process here. in kpop giffing, we tend to focus on unwhitewashing. other giffing tends to be more aesthetic tastes and fun since the source has better colors to work with.
export settings: these are what i use! you need the 256 colors. i do not recommend lossy or interlaced. i think bicubic sharper is the clearest i have tried.

posting on tumblr: use these dimensions FOR GIFS. edits can be different. height is up to you - i would not go over 800, but i think my quality looks weird past 600 range anyways.

example gifs: yeji, from example file #1, imported using vs. uses no. 1 sharpening (altered) from my pack. colored. zhanghao, from example file #2, imported using mpv and the load via stack. uses no. 4 sharpening (altered) from my pack. colored. taeyeon, from example file #3, imported using mpv and the load via dicom. uses no. 1 sharpening from my pack. colored. eunbi, from example file #4, imported using vs. uses no. 2 sharpening from my pack. colored.


if your gifs don't look how you want right away, that's okay! it takes time. my first ones were not great either. i am always improving on and working on my gifs. good luck and have fun hehe ♡
#i do not feel that qualified to answer this so caveat im not the best. and please also take ideas from my lovely moots and their resource#tags and tutorials / shared things. they are all so good#m:tutorial#resources#long post#flashing tw#userdoyeons#awekslook#ninitual#useroro tuserflora#useranusia#userchoi
86 notes
·
View notes