#proxy_pass
Explore tagged Tumblr posts
Visit Tumblr Blog
Explore Tumblr blogs with no restrictions, modern design and the best experience.
Last Seen Tumblr Blogs


Fun Fact
The “We are the 99%” Tumblr blog became the slogan for the Occupy Wall Street movement.
Text

Enhancing ARMxy Performance with Nginx as a Reverse Proxy
Introduction
Nginx is a high-performance web server that also functions as a reverse proxy, load balancer, and caching server. It is widely used in cloud and edge computing environments due to its lightweight architecture and efficient handling of concurrent connections. By deploying Nginx on ARMxy Edge IoT Gateway, users can optimize data flow, enhance security, and efficiently manage industrial network traffic.
Why Use Nginx on ARMxy?
1. Reverse Proxying – Nginx acts as an intermediary, forwarding client requests to backend services running on ARMxy.
2. Load Balancing – Distributes traffic across multiple devices to prevent overload.
3. Security Hardening – Hides backend services and implements SSL encryption for secure communication.
4. Performance Optimization – Caching frequently accessed data reduces latency.
Setting Up Nginx as a Reverse Proxy on ARMxy
1. Install Nginx
On ARMxy’s Linux-based OS, update the package list and install Nginx:
sudo apt update sudo apt install nginx -y
Start and enable Nginx on boot:
sudo systemctl start nginx sudo systemctl enable nginx
2. Configure Nginx as a Reverse Proxy
Modify the default Nginx configuration to route incoming traffic to an internal service, such as a Node-RED dashboard running on port 1880:
sudo nano /etc/nginx/sites-available/default
Replace the default configuration with the following:
server { listen 80; server_name your_armxy_ip;
location / {
proxy_pass http://localhost:1880/;
proxy_set_header Host $host;
proxy_set_header X-Real-IP $remote_addr;
proxy_set_header X-Forwarded-For $proxy_add_x_forwarded_for;
}
}
Save the file and restart Nginx:
sudo systemctl restart nginx
3. Enable SSL for Secure Communication
To secure the reverse proxy with HTTPS, install Certbot and configure SSL:
sudo apt install certbot python3-certbot-nginx -y sudo certbot --nginx -d your_domain
Follow the prompts to automatically configure SSL for your ARMxy gateway.
Use Case: Secure Edge Data Flow
In an industrial IoT setup, ARMxy collects data from field devices via Modbus, MQTT, or OPC UA, processes it locally using Node-RED or Dockerized applications, and sends it to cloud platforms. With Nginx, you can:
· Secure data transmission with HTTPS encryption.
· Optimize API requests by caching responses.
· Balance traffic when multiple ARMxy devices are used in parallel.
Conclusion
Deploying Nginx as a reverse proxy on ARMxy enhances security, optimizes data handling, and ensures efficient communication between edge devices and cloud platforms. This setup is ideal for industrial automation, smart city applications, and IIoT networks requiring low latency, high availability, and secure remote access.
0 notes
Text
Let's EncryptでSSLを無料導入!Nginxと組み合わせてHTTPS化する手順
WebサイトやAPIの運用においてSSL(HTTPS)化は欠かせません。特にフォーム入力やログイン機能がある場合、通信の暗号化はユーザーの信頼を得る上で大きなポイントになります。 今回は無料で利用できるLet's Encryptを使用し、Nginxと組み合わせてSSL証明書を取得・設定する流れを解説します。
1. HTTPS化のメリット
通信内容の暗号化により盗聴や改ざんを防止
SEOに有利(GoogleがHTTPSを推奨)
ブラウザに��保護された通信」と表示されることで安心感を与える
2. Let's Encryptとは?
Let's Encryptは、無料でSSL証明書を発行してくれる認証局(CA)です。ACMEというプロトコルを通じて、自動で証明書を取得・更新できます。
3. 導入前提条件
サーバーにNginxがインストールされている
独自ドメインを保有しており、Nginxのサーバーに向けてDNS設定済み
80番ポート(HTTP)と443番ポート(HTTPS)が開放されている
4. Certbotを使ったSSL証明書の取得
以下はUbuntu系サーバーでの例です。sudo apt update sudo apt install certbot python3-certbot-nginx
証明書の取得とNginx設定の自動化:sudo certbot --nginx -d yourdomain.com -d www.yourdomain.com
インタラクティブな質問に答えていくだけで、自動で証明書取得とNginx設定が完了します。
5. 自動更新設定
Let's Encryptの証明書は90日間有効ですが、自動更新を設定しておけば安心です。sudo crontab -e
以下のような行を追加します(1日1回チェック):0 3 * * * /usr/bin/certbot renew --quiet
6. NginxのSSL設定の例
server { listen 443 ssl; server_name yourdomain.com; ssl_certificate /etc/letsencrypt/live/yourdomain.com/fullchain.pem; ssl_certificate_key /etc/letsencrypt/live/yourdomain.com/privkey.pem; location / { proxy_pass http://localhost:8000; include proxy_params; } }
HTTPからHTTPSへのリダイレクトを設定したい場合は次のように追加します:server { listen 80; server_name yourdomain.com; return 301 https://$host$request_uri; }
まとめ
SSLの導入は以前に比べてはるかに簡単になりました。Let's EncryptとCertbotを使えば、無料かつ自動化された仕組みで、安全な通信環境をすぐに構築できます。 本サイトでも同様の手順でSSL化を行っており、サーバーコストを抑えつつ安全な配信を実現しています。
ブログがお役に立ったら Buy Me a Coffee ☕ で応援いただけたら嬉しいです。
0 notes
Text
蜘蛛池部署教程详细步骤
在互联网技术领域,蜘蛛池(Spider Pool)是一种用于提高网站收录和优化搜索引擎排名的技术手段。通过合理部署蜘蛛池,可以有效地提升网站的流量和权重。本文将详细介绍蜘蛛池的部署步骤,帮助你更好地理解和操作这一技术。
1. 了解蜘蛛池的基本概念
蜘蛛池,顾名思义,是为搜索引擎爬虫(也称为“蜘蛛”或“机器人”)提供一个“池子”,让它们能够更高效地抓取你的网站内容。这有助于提高网站被搜索引擎收录的速度和数量。
2. 准备工作
选择合适的服务器:确保服务器性能稳定,带宽充足。
安装必要的软件:如Nginx、PHP等。
获取域名:最好使用多个域名,以分散风险。
3. 配置Nginx
配置Nginx是部署蜘蛛池的关键步骤之一。你需要设置好Nginx的配置文件,使其能够正确处理来自搜索引擎爬虫的请求。
```nginx
server {
listen 80;
server_name yourdomain.com;
location / {
proxy_pass http://localhost:8080;
proxy_set_header Host $host;
proxy_set_header X-Real-IP $remote_addr;
proxy_set_header X-Forwarded-For $proxy_add_x_forwarded_for;
}
}
```
4. 编写脚本
编写一个简单的PHP脚本来处理爬虫的请求,并返回相应的页面内容。
```php
<?php
header('Content-Type: text/html; charset=utf-8');
echo file_get_contents('https://yourwebsite.com/page.php');
?>
```
5. 测试与优化
测试:使用工具模拟搜索引擎爬虫的请求,检查返回的内容是否正确。
优化:根据测试结果调整配置,确保蜘蛛池运行顺畅。
6. 监控与维护
监控:定期检查服务器状态,确保蜘蛛池正常运行。
维护:及时更新软件版本,修复可能出现的问题。
结语
通过以上步骤,你可以成功部署一个蜘蛛池,从而有效提升网站的SEO效果。不过,请注意,过度依赖蜘蛛池可能会违反搜索引擎的服务条款,因此建议谨慎使用,并结合其他SEO策略共同提升网站的综合表现。
欢迎在评论区分享你的经验和建议!
加飞机@yuantou2048

相关推荐
谷��快排
0 notes
Text
Advanced Ansible Techniques: Variables, Templates, and Handlers
Ansible's simplicity and power come from its ability to handle complex automation tasks with ease. Two key features that contribute to this are the use of variables and templates for dynamic playbooks, and handlers for conditional execution. In this blog post, we'll dive into these advanced Ansible techniques, showing you how to create more flexible and efficient playbooks.
Using Variables in Ansible
Variables in Ansible allow you to store values that can be reused throughout your playbooks. This makes your playbooks more modular and easier to maintain.
Defining VariablesVariables can be defined in several ways:
Directly within a playbook.
In separate variable files.
As extra-vars passed at runtime.
Here’s an example of defining variables within a playbook:
---
- name: Demonstrate Ansible variables
hosts: localhost
vars:
http_port: 80
max_clients: 200
tasks:
- name: Print the HTTP port
debug:
msg: "The HTTP port is {{ http_port }}"
- name: Print the max clients
debug:
msg: "The maximum number of clients is {{ max_clients }}"
2. Using Variables in Playbooks
Variables can be used in playbooks to customize configurations dynamically:
---
- name: Install and configure Nginx
hosts: webservers
vars:
http_port: 8080
tasks:
- name: Install Nginx
apt:
name: nginx
state: present
- name: Configure Nginx
template:
src: nginx.conf.j2
dest: /etc/nginx/nginx.conf
notify:
- Restart Nginx
Using Templates in Ansible
Templates in Ansible are used to generate configuration files dynamically using the Jinja2 templating engine.
Creating TemplatesCreate a template file, for example, nginx.conf.j2:
server {
listen {{ http_port }};
server_name localhost;
location / {
proxy_pass http://localhost:{{ backend_port }};
proxy_set_header Host $host;
proxy_set_header X-Real-IP $remote_addr;
proxy_set_header X-Forwarded-For $proxy_add_x_forwarded_for;
proxy_set_header X-Forwarded-Proto $scheme;
}
}
2. Using Templates in Playbooks
Use the template module to apply the template:
---
- name: Install and configure Nginx with template
hosts: webservers
vars:
http_port: 8080
backend_port: 3000
tasks:
- name: Install Nginx
apt:
name: nginx
state: present
- name: Configure Nginx with template
template:
src: nginx.conf.j2
dest: /etc/nginx/nginx.conf
notify:
- Restart Nginx
Implementing Handlers in Ansible
Handlers in Ansible are used to trigger actions based on the results of tasks. They are typically used for service restarts or reloading configurations.
Defining HandlersHandlers are defined in the playbook and can be notified by tasks:
---
- name: Install and configure Nginx with handlers
hosts: webservers
vars:
http_port: 8080
tasks:
- name: Install Nginx
apt:
name: nginx
state: present
- name: Configure Nginx with template
�� template:
src: nginx.conf.j2
dest: /etc/nginx/nginx.conf
notify:
- Restart Nginx
handlers:
- name: Restart Nginx
service:
name: nginx
state: restarte
2. Conditional Execution with Handlers
Handlers are only executed if they are notified by a task. This ensures that services are only restarted when necessary, optimizing performance and reducing downtime.
Putting It All Together
Combining variables, templates, and handlers allows you to create dynamic and flexible playbooks. Here’s a complete example that demonstrates these techniques:
---
- name: Complete Nginx setup with advanced Ansible techniques
hosts: webservers
vars:
http_port: 8080
backend_port: 3000
tasks:
- name: Install Nginx
apt:
name: nginx
state: present
- name: Configure Nginx with template
template:
src: nginx.conf.j2
dest: /etc/nginx/nginx.conf
notify:
- Restart Nginx
handlers:
- name: Restart Nginx
service:
name: nginx
state: restarted
In this example:
Variables are used to define the HTTP and backend ports.
A template is used to dynamically generate the Nginx configuration.
A handler is used to restart Nginx only when the configuration changes.
Conclusion
By leveraging variables, templates, and handlers, you can create more powerful and flexible Ansible playbooks. These advanced techniques help you automate complex tasks, manage configurations dynamically, and optimize the performance of your infrastructure.
Stay tuned for more tips and best practices on using Ansible to streamline your automation workflows. Happy automating!
For more details click www.hawkstack.com
#redhatcourses#linux#containerorchestration#information technology#container#docker#kubernetes#containersecurity#dockerswarm#aws
0 notes
Text
Nginx 포트 여러 개 사용하기 (2개!)
Nginx는 기본적으로 포트 3000을 쓰는데 (예제 학습 전까진 아마 8080)
나는 9223을 써보고 싶었다.
하지만 완벽하게 실패하였다. (읭)
이유는 기본 설정이 3000만 listen 하도록 되어있기 때문.
(참고 링크: https://velog.io/@dong3789/nginx-%ED%8F%AC%ED%8A%B8%EB%B3%84-%EB%8F%84%EB%A9%94%EC%9D%B8%EC%9D%84-%EB%8B%AC%EC%95%84%EB%B3%B4%EC%9E%90)
sudo nano /opt/homebrew/etc/nginx/nginx.conf
해서 (권한 있으면 걍 고치거나)
아래처럼 하면 된다 ( 포트 추가 )

참고로 M2 Mac 기준.
직접 쓰다가 죽는줄 알았네. 3시라니 흑흑.
그래도 뿌듯하다.
웹 페이지마다 어떤 건 3000만 쓰고, 어떤 건 9223만 쓰도록도 해보고 싶은데 그건 다음에 하고.
보기에 안 좋아도 코드 그대로 붙이면 아래랑 같다.
server { listen 9223; server_name sena.com; #charset koi8-r; #access_log logs/host.access.log main; location / { root html; index index.html index.htm; } #error_page 404 /404.html; #redirect server error pages to the static page /50x.html # error_page 500 502 503 504 /50x.html; location = /50x.html { root html; } # proxy the PHP scripts to Apache listening on 127.0.0.1:9223 # #location ~ \.php$ { # proxy_pass http://127.0.0.1; #} # pass the PHP scripts to FastCGI server listening on 127.0.0.1:9000 # #location ~ \.php$ { # root html; # fastcgi_pass 127.0.0.1:9000; # fastcgi_index index.php; # fastcgi_param SCRIPT_FILENAME /scripts$fastcgi_script_name; # include fastcgi_params; #} # deny access to .htaccess files, if Apache's document root # concurs with nginx's one # #location ~ /\.ht { # deny all; #} }
이게 뭐야
0 notes
Text
§Python - Scalability and Performance Considerations

1. Scaling Strategies:
- Definition: Scalability is the ability of a system to handle increased loads. Strategies include vertical scaling (adding more resources to a single server) and horizontal scaling (adding more servers).
- Practical Example: Setting up a load balancer to distribute incoming traffic to multiple servers for horizontal scaling.
```nginx
upstream backend {
server backend1.example.com;
server backend2.example.com;
}
server {
listen 80;
location / {
proxy_pass http://backend;
}
}
```
2. Caching Techniques:
- Definition: Caching involves storing frequently accessed data to reduce the need to retrieve it from the original source, improving response times.
- Practical Example: Implementing caching in a Python web application using Flask-Caching.
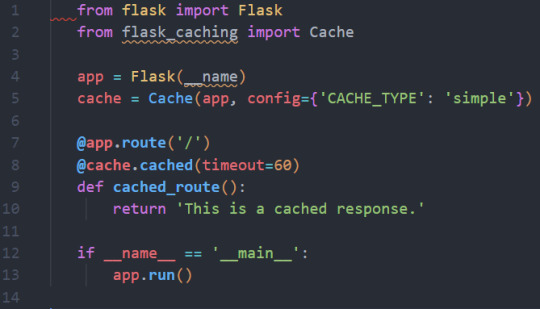
```python
from flask import Flask
from flask_caching import Cache
app = Flask(__name)
cache = Cache(app, config={'CACHE_TYPE': 'simple'})
@app.route('/')
@cache.cached(timeout=60)
def cached_route():
return 'This is a cached response.'
if __name__ == '__main__':
app.run()
```
3. Load Balancing and Clustering:
- Definition: Load balancers distribute incoming requests among multiple servers, while clustering involves a group of servers working together as a single system.
- Practical Example: Implementing load balancing and clustering for a Python application using Nginx and Gunicorn.

```nginx
upstream backend {
server backend1.example.com;
server backend2.example.com;
}
server {
listen 80;
location / {
proxy_pass http://backend;
}
}
```
4. Profiling and Monitoring:
- Definition: Profiling and monitoring tools are essential for identifying performance bottlenecks and monitoring system health.
- Practical Example: Using Python's `cProfile` module for performance profiling in a web application.

```python
import cProfile
def slow_function():
# Simulate a slow function
for _ in range(1000000):
_ = 1 + 1
if __name__ == '__main__':
profiler = cProfile.Profile()
profiler.enable()
slow_function()
profiler.disable()
profiler.print_stats(sort='cumtime')
```
5. Scaling for High Traffic:
- Definition: Preparing your application to handle high levels of traffic efficiently. This may include optimizing database queries, using content delivery networks (CDNs), and reducing unnecessary load.
- Practical Example: Using a CDN like Amazon CloudFront to serve static content for a web application.
These considerations and practical examples are crucial for ensuring your back-end can efficiently handle increased loads, providing a responsive and reliable user experience as your application scales.
#fullstackdeveloper#developer#whatisfullstackdeveloper#fullstackdeveloperjobs#fullstackwebdeveloper#softwaredeveloper#dontbecomeafullstackdeveloper#shreejitjadhav#dinvstr#shouldyoubecomeafullstackdeveloper?#aideveloper#howtobecomeasoftwaredeveloper#whyyoushouldntbecomeafulltackdeveloper#dataanalystvswebdeveloper#webdeveloper#developerjobs#howtobeaideveloper#fullstackdeveloperjob#willaireplacewebdevelopers
0 notes
Text
Docker Nginx con Let's Encrypt
Este es el mejor tutorial que he encontrado de como instalar un certificado Let’s Encrypt en Nginx en Docker. https://pentacent.medium.com/nginx-and-lets-encrypt-with-docker-in-less-than-5-minutes-b4b8a60d3a71 El único cambio que hice fue quitar “proxy_pass http://example.org; #for demo purposes” en la declaración del puerto 443 en la sección server del archivo nginx.conf de la siguiente…

View On WordPress
0 notes
Text
關閉 GitLab 的 nginx,使用自己裝的 nginx
關閉 GitLab 的 nginx,使用自己裝的 nginx
我自己架設的 GitLab 是透過「Install self-managed GitLab」這邊的方法裝進 Ubuntu 系統內的 (我在自己的 wiki 上也有整理:「GitLab」),他會自己下載所有對應的套件,包括了 nginx。
但這樣就直接把 TCP port 80/443 都吃掉了,同一台機器要放其他的 virtual host 就比較麻煩,所以找了些方法讓 GitLab 不要佔用 TCP port 80/443。
首先是找到這篇,資料有點舊,但裡面關掉 nginx 的方法還算是有用:「How to setup gitlab without embedded nginx」。
現在只要把 /etc/gitlab/gitlab.rb 裡面的:
nginx['enable'] 改成 false
web_server['external_users'] 改成 ['www-data']
View On WordPress
0 notes
Text
Configurar NGINX como proxy inverso

Configurar NGINX como proxy inverso en Ubuntu y derivados. El servidor HTTP Nginx es uno de los más populares, y no solo por la velocidad que imprime a los sitios que aloja, sino porque también se puede utilizar para otras muchas funciones. Tal vez la más conocida es como proxy inverso. Se conoce como proxy inverso, cuando un servidor (en este caso, Nginx HTTP) acepta todo el tráfico y lo reenvía a un recurso específico, por ejemplo a un servidor Apache. Los motivos para instalar y usar un servidor proxy son muchos. Por ejemplo, un proxy inverso permite agregar seguridad al servidor principal, también se utiliza para equilibrar la carga, restringir el acceso a rutas definidas, permite evitar ataques, etc... En el articulo de hoy instalaremos un servidor Nginx, y lo configuraremos como proxy inverso. El uso que le des, ya es tu responsabilidad.
Configurar NGINX como proxy inverso
Instalar Nginx es una tarea sencilla, tan solo debes ejecutar lo siguiente: sudo apt-get update sudo apt-get install nginx Iniciamos y habilitamos el servicio para que arranque con el sistema. sudo systemctl start nginx.service sudo systemctl enable nginx.service Para verificar que funciona correctamente, escribe en tu navegador web la ip del servidor, o localhost. Veras algo similar a la siguiente imagen...

Welcome to Nginx Configurar Nginx Normalmente el servidor proxy inverso escucha todo el tráfico del puerto HTTP predeterminado, el "80". Por otro lado, el backend server es el que contiene realmente los archivos del sitio, y deberá escuchar un puerto personalizado, se suele utilizar el "8080". La función proxy_pass es la que proporciona el proxy inverso. En este articulo, configuraremos Nginx para que escuche el puerto 80, y redirigiremos el tráfico al backend server que escuchara el puerto 8080. Lo primero que haremos es crear un archivo proxy VirtualHost, lo llamaremos NginxProxy. sudo nano /etc/nginx/sites-available/NginxProxy Copia y pega lo siguiente (con tus datos reales): server { listen 80; listen :80; server_name ejemplo.com www.ejemplo.com; proxy_redirect off; proxy_set_header X-Real-IP $remote_addr; proxy_set_header X-Forwarded-For $proxy_add_x_forwarded_for; proxy_set_header Host $http_host; location / { proxy_pass http://localhost:8080; } } Guarda el archivo y cierra el editor. Verificamos que todo es correcto con el siguiente comando. sudo nginx -t ejemplo de salida valida... nginx: the configuration file /etc/nginx/sites-available/NginxProxy syntax is ok nginx: configuration file /etc/nginx/sites-available/NginxProxy test is successful Solo nos falta habilitar el sitio proxy, y reiniciar Nginx. sudo ln -s /etc/nginx/sites-available/NginxProxy /etc/nginx/sites-enabled/ sudo systemctl restart nginx.service Ya lo tenemos configurado y funcionando. Espero que este articulo te sea de utilidad, puedes ayudarnos a mantener el servidor con una donación (paypal), o también colaborar con el simple gesto de compartir nuestros artículos en tu sitio web, blog, foro o redes sociales. Read the full article
#backendserver#ConfigurarNginx#InstalarNginx#nginx#NginxHTTP#NginxProxy#proxy#proxyinverso#proxy_pass#servidorApache#servidorHTTPNginx
0 notes
Text

Introduction
Nginx is a high-performance web server that also functions as a reverse proxy, load balancer, and caching server. It is widely used in cloud and edge computing environments due to its lightweight architecture and efficient handling of concurrent connections. By deploying Nginx on ARMxy Edge IoT Gateway, users can optimize data flow, enhance security, and efficiently manage industrial network traffic.
Why Use Nginx on ARMxy?
1. Reverse Proxying – Nginx acts as an intermediary, forwarding client requests to backend services running on ARMxy.
2. Load Balancing – Distributes traffic across multiple devices to prevent overload.
3. Security Hardening – Hides backend services and implements SSL encryption for secure communication.
4. Performance Optimization – Caching frequently accessed data reduces latency.
Setting Up Nginx as a Reverse Proxy on ARMxy
1. Install Nginx
On ARMxy’s Linux-based OS, update the package list and install Nginx:
sudo apt update sudo apt install nginx -y
Start and enable Nginx on boot:
sudo systemctl start nginx sudo systemctl enable nginx
2. Configure Nginx as a Reverse Proxy
Modify the default Nginx configuration to route incoming traffic to an internal service, such as a Node-RED dashboard running on port 1880:
sudo nano /etc/nginx/sites-available/default
Replace the default configuration with the following:
server { listen 80; server_name your_armxy_ip;
location / {
proxy_pass http://localhost:1880/;
proxy_set_header Host $host;
proxy_set_header X-Real-IP $remote_addr;
proxy_set_header X-Forwarded-For $proxy_add_x_forwarded_for;
}
}
Save the file and restart Nginx:
sudo systemctl restart nginx
3. Enable SSL for Secure Communication
To secure the reverse proxy with HTTPS, install Certbot and configure SSL:
sudo apt install certbot python3-certbot-nginx -y sudo certbot --nginx -d your_domain
Follow the prompts to automatically configure SSL for your ARMxy gateway.
Use Case: Secure Edge Data Flow
In an industrial IoT setup, ARMxy collects data from field devices via Modbus, MQTT, or OPC UA, processes it locally using Node-RED or Dockerized applications, and sends it to cloud platforms. With Nginx, you can:
· Secure data transmission with HTTPS encryption.
· Optimize API requests by caching responses.
· Balance traffic when multiple ARMxy devices are used in parallel.
Conclusion
Deploying Nginx as a reverse proxy on ARMxy enhances security, optimizes data handling, and ensures efficient communication between edge devices and cloud platforms. This setup is ideal for industrial automation, smart city applications, and IIoT networks requiring low latency, high availability, and secure remote access.
0 notes
Photo

看看網頁版全文 ⇨ NGINX作為反向代理伺服器的規劃 / Building a Reverse Proxy with NGINX https://blog.pulipuli.info/2023/04/blog-post_238.html 我希望NGNIX不僅是反向代理伺服器,也能夠成為保護其他伺服器的防火牆,還是提高網頁服務效率的加速器。 ---- # 建構規劃 / Planning (圖片來源:Wikipedia) 反向代理伺服器可說是NGINX最主要的功能之一。 但要建構一個好的反向代理伺服器,可不只單純的從後端拉資料的「proxy_pass」這麼簡單。 這邊我只打算簡單地整理一下到目前為止的構思,並附上相關的參考資源。 主要是拓展大家對於NGINX可以負責工作的想象。 大致上整體規劃包含了五個層面: 1. 反向代理 2. 負載平衡 3. 隱藏伺服器資訊 4. 流量限制 5. 提高效率 接下來就讓我們一個一個來看。 ---- # 反向代理 / Reverse proxy。 https://www.programonaut.com/setup-ssl-with-docker-nginx-and-lets-encrypt/。 第一個部分當然就是的反向代理伺服器的職責。 一開始我是參考了「Setup SSL with Docker, NGINX and Lets Encrypt」這篇的做法。 作者對NGINX的要求很簡單,真的只有反向代理伺服器的proxy_pass而已。 http://nginx.org/en/docs/http/request_processing.html。 接著我們要讓反向代理伺服器支援虛擬主機(VirtualHost)的功能。 根據使用者連入的主機名稱,NGINX判斷要連到那個後端伺服器。 這個設定主要是用「server_name」完成。 server_name的形式支援了精確域名、正規表達式、以及星號的通用匹配符號,詳情請看「Nginx的server_name和location配置」的介紹。 除了已經設定好的虛擬主機之外,如果其他人用IP連線,我會直接回傳404。 不過這方法沒辦法阻止用IP連到HTTPS,暫時想不到解決方案。 https://ithelp.ithome.com.tw/articles/10280840?sc=iThelpR。 如果加入了反向代理伺服器,那後端伺服器的所有流量,都會被視為是從反向代理伺服器NGINX連入的結果。 為了讓流量的真實狀況傳遞給後端的伺服器,我們需要加上以下四個設定:。 ---- 繼續閱讀 ⇨ NGINX作為反向代理伺服器的規劃 / Building a Reverse Proxy with NGINX https://blog.pulipuli.info/2023/04/blog-post_238.html
0 notes
Text
YaCy's Docker image behind Nginx as reverse proxy

YaCy is a peer-to-peer search engine. Every peer sets up his own client and is able to crawl and index websites. Searches are carried out by contacting all known peers and cumulating their returns. It is not necessary to have a web server for that. You may well install YaCy on your office computer but of course it only works as long as it is connected to the internet. A long time ago I maintained a YaCy peer on my web server. Later I lost interest because there were (and still are) too less peers online to be a reasonable alternative to Google. Usually only a few hundred concurrently. But to flatter my vanity I now decided to set up my own peer again mainly to introduce several websites I am part of the admin team. Main issue now was that my webserver employs Nginx as reverse proxy and I do not want to expose additional ports to the internet (YaCy's default ports are 8090 and 8443). Good luck, due to the Docker image the install procedure proved fairly easy! Both Nginx and YaCy need the default settings only! In order to use Nginx as reverse proxy its configuration needs to contain some special commands. My default proxy_params file is longer than its pendant in the Nginx GitHub repository: proxy_set_header Host $http_host; proxy_set_header X-Real-IP $remote_addr; proxy_set_header X-Forwarded-For $proxy_add_x_forwarded_for; proxy_set_header X-Forwarded-Proto $scheme; client_max_body_size 100M; client_body_buffer_size 1m; proxy_intercept_errors on; proxy_buffering on; proxy_buffer_size 128k; proxy_buffers 256 16k; proxy_busy_buffers_size 256k; proxy_temp_file_write_size 256k; proxy_max_temp_file_size 0; proxy_read_timeout 300; This proved good enough. Installing YaCy from Docker requires only two comands (head over to this particular site to learn how to backup and update your instance): docker pull yacy/yacy_search_server:latest docker run -d --name yacy_search_server -p 8090:8090 -p 8443:8443 -v yacy_search_server_data:/opt/yacy_search_server/DATA --restart unless-stopped --log-opt max-size=200m --log-opt max-file=2 -e YACY_NETWORK_UNIT_AGENT=mypeername yacy/yacy_search_server:latest We do not need settings for TLS in YaCy since this is done bx Nginx (employing Let's Encrypt in this case). Since YaCy's internal links are all relative, we can proxy the localhost without caring for host name and protocol schemen. The following Nginx server is fully operational: server { listen 443 ssl http2; listen [::]:443 ssl http2; server_name my.host.name; root /var/www/my.host.name; index index.html index.htm default.html default.htm; location / { proxy_pass http://127.0.0.1:8090; include /etc/nginx/proxy_params; } access_log /var/log/nginx/my.host.name_access.log; error_log /var/log/nginx/my.host.name_error.log; ssl_certificate /etc/letsencrypt/live/my.host.name/fullchain.pem; # managed by Certbot ssl_certificate_key /etc/letsencrypt/live/my.host.name/privkey.pem; # managed by Certbot } Head over to my search interface. But attention: there is an extended blacklist excluding pseudo science, extremist politics, conspiracy theories and so on (mainly German sites). Use another YaCy instance to get the same search without my exclusions.

Read the full article
0 notes
Text
Web Servers, Databases, and Server-Side Frameworks

1. Web Servers:
- Definition: Web servers are responsible for handling incoming HTTP requests and serving responses to clients. Popular web servers include Apache, Nginx, and Microsoft Internet Information Services (IIS).
- Practical Example: Using Nginx to serve static files for a Python web application.
```nginx
server {
listen 80;
server_name example.com;
location /static/ {
alias /path/to/static/files;
}
location / {
proxy_pass http://127.0.0.1:8000;
proxy_set_header Host $host;
proxy_set_header X-Real-IP $remote_addr;
}
}
```

2. Databases:
- Definition: Databases are crucial for storing and managing structured data. There are two main categories: relational databases (e.g., MySQL, PostgreSQL) and NoSQL databases (e.g., MongoDB, Redis).
- Practical Example: Using MySQL as a relational database for a Python web application.
```python
import mysql.connector
connection = mysql.connector.connect(
host="localhost",
user="username",
password="password",
database="mydatabase"
)
```

3. Server-Side Frameworks:
- Definition: Server-side frameworks provide tools and libraries for building web applications efficiently. Python offers several popular frameworks, including Django, Flask, and Pyramid.
- Practical Example: Creating a simple web application using the Flask framework.
```python
from flask import Flask
app = Flask(__name)
@app.route('/')
def hello_world():
return 'Hello, World!'
if __name__ == '__main__':
app.run()
```

4. Web Application Deployment:
- Definition: Deploying a web application involves making it available to users. Tools like Docker and cloud platforms (e.g., AWS, Azure) are essential for deployment.
- Practical Example: Deploying a Python web application using Docker.
```Dockerfile
FROM python:3.8
WORKDIR /app
COPY requirements.txt requirements.txt
RUN pip install -r requirements.txt
COPY . .
CMD ["python", "app.py"]
```

5. Load Balancing:
- Definition: Load balancing ensures that incoming traffic is evenly distributed among multiple servers, enhancing performance and fault tolerance.
- Practical Example: Setting up load balancing for a Python web application using Nginx.
```nginx
upstream backend {
server backend1.example.com;
server backend2.example.com;
}
server {
listen 80;
location / {
proxy_pass http://backend;
}
}
```

These components collectively form the core of the back-end technology stack, and selecting the right combination of web servers, databases, frameworks, and deployment strategies depends on the specific requirements of your project. The practical examples provided demonstrate how these components work together to create a functional web application.
#fullstackdeveloper#developer#whatisfullstackdeveloper#fullstackdeveloperjobs#fullstackwebdeveloper#softwaredeveloper#dontbecomeafullstackdeveloper#shreejitjadhav#dinvstr#shouldyoubecomeafullstackdeveloper?#aideveloper#howtobecomeasoftwaredeveloper#whyyoushouldntbecomeafulltackdeveloper#dataanalystvswebdeveloper#webdeveloper#developerjobs#howtobeaideveloper#fullstackdeveloperjob#willaireplacewebdevelopers
0 notes
Text
In our last article, we covered installation of Semaphore Ansible Web UI on Debian/Ubuntu and CentOS Linux distributions. This guide will focus on installing and configuring Nginx as a reverse proxy for Semaphore Ansible Web UI. The only pre-requisite for this setup are: CentOS / RHEL / Ubuntu or Debian Linux distribution. Installed and working Semaphore User account with sudo privileges Step 1: Install Semaphore Ansible Web UI You should have installed Semaphore before proceeding with this setup. Use below guides for reference. Setup Semaphore Ansible Web UI on Ubuntu / Debian Install Semaphore Ansible Web UI on CentOS 7 Step 2: Install Nginx Web Server Install Nginx Web server on your Semaphore server or a difference instance which will be used as proxy server for Semaphore. # Install Nginx on Ubuntu / Debian sudo apt update sudo apt install vim nginx # Install Nginx on CentOS sudo yum -y install epel-release sudo yum -y install vim nginx Once the service is installed, start it and set to be started at system boot. sudo systemctl start nginx sudo systemctl enable nginx Verify that status of nginx service is “running“. $ systemctl status nginx ● nginx.service - A high performance web server and a reverse proxy server Loaded: loaded (/lib/systemd/system/nginx.service; enabled; vendor preset: enabled) Active: active (running) since Tue 2022-04-19 13:34:37 UTC; 6s ago Docs: man:nginx(8) Process: 12190 ExecStart=/usr/sbin/nginx -g daemon on; master_process on; (code=exited, status=0/SUCCESS) Process: 12189 ExecStartPre=/usr/sbin/nginx -t -q -g daemon on; master_process on; (code=exited, status=0/SUCCESS) Main PID: 12193 (nginx) Tasks: 2 (limit: 4915) CGroup: /system.slice/nginx.service ├─12193 nginx: master process /usr/sbin/nginx -g daemon on; master_process on; └─12194 nginx: worker process Apr 19 09:39:45 mydebian systemd[1]: Starting A high performance web server and a reverse proxy server… Apr 19 09:39:45 mydebian systemd[1]: nginx.service: Failed to read PID from file /run/nginx.pid: Invalid argument Apr 19 09:39:45 mydebian systemd[1]: Started A high performance web server and a reverse proxy server. Step 3: Configure Nginx proxy for Semaphore Create semaphore nginx configuration file. sudo vim /etc/nginx/conf.d/semaphore.conf Paste below contents to the file. upstream semaphore server 127.0.0.1:3000; server listen 80; server_name ansible.example.com; client_max_body_size 0; chunked_transfer_encoding on; location / proxy_pass http://semaphore/; proxy_set_header Host $http_host; proxy_set_header X-Real-IP $remote_addr; proxy_set_header X-Forwarded-For $proxy_add_x_forwarded_for; proxy_set_header X-Forwarded-Proto $scheme; proxy_buffering off; proxy_request_buffering off; location /api/ws proxy_pass http://semaphore/api/ws; proxy_http_version 1.1; proxy_set_header Upgrade $http_upgrade; proxy_set_header Connection "upgrade"; proxy_set_header Origin ""; ansible.example.com should be change to match the domain you want to use. Validate file syntax after the change: $ sudo nginx -t nginx: the configuration file /etc/nginx/nginx.conf syntax is ok nginx: configuration file /etc/nginx/nginx.conf test is successful Restart nginx sudo systemctl restart nginx If you don’t have DNS, add a line to your /etc/hosts file with Nginx server IP and host name. $ sudo vim /etc/hosts 192.168.10.15 ansible.example.com You should be able to access semaphore web interface with domain name configured in Nginx http://ansible.example.com. Step 4: Configure https for Nginx Proxy It is recommended to use SSL certificate in your Nginx configuration to secure access to semaphore. Let’s obtain Let’s Encrypt Certificate for this use. Install certbot tool. # Ubuntu / Debian
sudo apt update sudo apt install certbot python-certbot-nginx # Fedora sudo dnf install certbot python2-certbot-nginx sudo dnf install certbot python2-certbot-apache # RHEL 8 based systems sudo yum -y install epel-release sudo yum -y install certbot python3-certbot-nginx # CentOS 7 sudo yum -y install epel-release sudo yum -y install certbot python2-certbot-nginx Stop nginx service. sudo systemctl stop nginx Then request for Let’s Encrypt SSL certificates. sudo certbot --nginx -d ansible.example.com You should get output similar to this: Saving debug log to /var/log/letsencrypt/letsencrypt.log Plugins selected: Authenticator nginx, Installer nginx Enter email address (used for urgent renewal and security notices) (Enter 'c' to cancel): [email protected] Starting new HTTPS connection (1): acme-v02.api.letsencrypt.org - - - - - - - - - - - - - - - - - - - - - - - - - - - - - - - - - - - - - - - - Please read the Terms of Service at https://letsencrypt.org/documents/LE-SA-v1.2-November-15-2017.pdf. You must agree in order to register with the ACME server. Do you agree? - - - - - - - - - - - - - - - - - - - - - - - - - - - - - - - - - - - - - - - - (Y)es/(N)o: Y - - - - - - - - - - - - - - - - - - - - - - - - - - - - - - - - - - - - - - - - Would you be willing, once your first certificate is successfully issued, to share your email address with the Electronic Frontier Foundation, a founding partner of the Let's Encrypt project and the non-profit organization that develops Certbot? We'd like to send you email about our work encrypting the web, EFF news, campaigns, and ways to support digital freedom. - - - - - - - - - - - - - - - - - - - - - - - - - - - - - - - - - - - - - - - - (Y)es/(N)o: Y Account registered. Requesting a certificate for ansible.example.com Performing the following challenges: http-01 challenge for ansible.example.com Waiting for verification... Cleaning up challenges Deploying Certificate to VirtualHost /etc/nginx/conf.d/semaphore.conf Redirecting all traffic on port 80 to ssl in /etc/nginx/conf.d/semaphore.conf - - - - - - - - - - - - - - - - - - - - - - - - - - - - - - - - - - - - - - - - Congratulations! You have successfully enabled https://ansible.example.com - - - - - - - - - - - - - - - - - - - - - - - - - - - - - - - - - - - - - - - - Subscribe to the EFF mailing list (email: [email protected]). Starting new HTTPS connection (1): supporters.eff.org IMPORTANT NOTES: - Congratulations! Your certificate and chain have been saved at: /etc/letsencrypt/live/ansible.example.com/fullchain.pem Your key file has been saved at: /etc/letsencrypt/live/ansible.example.com/privkey.pem Your certificate will expire on 2022-07-18. To obtain a new or tweaked version of this certificate in the future, simply run certbot again with the "certonly" option. To non-interactively renew *all* of your certificates, run "certbot renew" - If you like Certbot, please consider supporting our work by: Donating to ISRG / Let's Encrypt: https://letsencrypt.org/donate Donating to EFF: https://eff.org/donate-le SSL configurations generated after command has been run. upstream semaphore server 127.0.0.1:3000; server server_name ansible.example.com; client_max_body_size 0; chunked_transfer_encoding on; location / proxy_pass http://semaphore/; proxy_set_header Host $http_host; proxy_set_header X-Real-IP $remote_addr; proxy_set_header X-Forwarded-For $proxy_add_x_forwarded_for; proxy_set_header X-Forwarded-Proto $scheme; proxy_buffering off; proxy_request_buffering off; location /api/ws proxy_pass http://semaphore/api/ws; proxy_http_version 1.1; proxy_set_header Upgrade $http_upgrade; proxy_set_header Connection "upgrade"; proxy_set_header Origin ""; listen 443 ssl; # managed by Certbot
ssl_certificate /etc/letsencrypt/live/ansible.example.com/fullchain.pem; # managed by Certbot ssl_certificate_key /etc/letsencrypt/live/ansible.example.com/privkey.pem; # managed by Certbot include /etc/letsencrypt/options-ssl-nginx.conf; # managed by Certbot ssl_dhparam /etc/letsencrypt/ssl-dhparams.pem; # managed by Certbot server if ($host = ansible.example.com) return 301 https://$host$request_uri; # managed by Certbot listen 80; server_name ansible.example.com; return 404; # managed by Certbot Replace example.com with your domain name. Validate Nginx configuration. $ sudo nginx -t nginx: the configuration file /etc/nginx/nginx.conf syntax is ok nginx: configuration file /etc/nginx/nginx.conf test is successful Restart nginx service if configurations are okay. sudo systemctl restart nginx Access Semaphore console via https://example.com: You now have a secure access to Semaphore Ansible Web UI with host name instead of access through an IP address and port 3000.
0 notes
Text
Nike flare 2 hc review

#Nike flare 2 hc review update#
There is a reverse-proxy at your origin that sends the request back through the Cloudflare proxy.
#Nike flare 2 hc review update#
If an A record within your Cloudflare DNS app points to a Cloudflare IP address, update the IP address to your origin web server IP address.A Server Name Indication (SNI) issue or mismatch at the origin.The request includes two X-Forwarded-For headers.The request X-Forwarded-For header is longer than 100 characters.Your Cloudflare DNS A or CNAME record references another reverse proxy (such as an nginx web server that uses the proxy_pass function) that then proxies the request to Cloudflare a second time.An A record within your Cloudflare DNS app points to a Cloudflare IP address, or a Load Balancer Origin points to a proxied record.If you require additional support, explore our plans.Įrror 1000: DNS points to prohibited IP Common causesĬloudflare halted the request for one of the following reasons: Business and Enterprise plan users also have access to chat support. 1XXX errors appear in the HTML body of the response.ĭedicated email support is available for all Pro, Business, and Enterprise Plan users. HTTP 409, 530, 403, 429 errors are the HTTP error codes returned in the HTTP status header for a response. For Cloudflare API or dashboard errors, review our Cloudflare API documentation. The errors described in this document might occur when visiting a website proxied by Cloudflare. Error 1104: A variation of this email address is already taken in our system.Error 1041: Invalid request rewrite (invalid header value).Error 1040: Invalid request rewrite (header modification not allowed).Error 1037: Invalid rewrite rule (failed to evaluate expression).Error 1036: Invalid request rewrite (maximum length exceeded).Error 1035: Invalid request rewrite (invalid URI path).Error 1013: HTTP hostname and TLS SNI hostname mismatch.Error 1011: Access Denied (Hotlinking Denied).Error 1010: The owner of this website has banned your access based on your browser's signature.Errors 1009 Access Denied: Country or region banned.Errors 1006, 1007, 1008 or 1106 Access Denied: Your IP address has been banned.Error 1004: Host Not Configured to Serve Web Traffic.Error 1003 Access Denied: Direct IP Access Not Allowed.Error 1002: DNS points to Prohibited IP.Error 1000: DNS points to prohibited IP.Pulling on the heel. Band of maintenance. For more performance and grip, tighten the crampons. This shoe meets the standards and regulations set by World Rugby.Integrated shoe for a perfect support of the foot.Sprintframe construction. Optimized outsole for greasy terrain. Textile lining.Stem made of textile and synthetic material.Wrap-around support The fitted upper ensures a perfect fit. Stability on greasy terrain The Sprintframe construction provides more stability and speed thanks to a geometric design design that leans on a light and stable chassis. The glory is waiting for you The colors of the Rising Sun pack pay tribute to the host country of the biggest tournament in the world, Japan. The outsole is optimized for explosive play on greasy terrain. The band at the ankle provides superior support. Designed for decisive action, it features a fitted rod ensuring maximum stability during acceleration. Nail your opponents on the spot with this lightweight rugby shoe. COLOUR : ORANGE / HI RES YELLOW / TRUE ORANGE
0 notes
Text
Re-write URL
default.confg
server { listen 8080; server_name localhost;#access_log /var/log/nginx/host.access.log main; location / { root /usr/share/nginx/html; index index.html index.htm; try_files $uri $uri/ /index.html; } #error_page 404 /404.html; # redirect server error pages to the static page /50x.html # error_page 500 502 503 504 /50x.html; location = /50x.html { root /usr/share/nginx/html; } # proxy the PHP scripts to Apache listening on 127.0.0.1:80 # #location ~ \.php$ { # proxy_pass http://127.0.0.1; #} # pass the PHP scripts to FastCGI server listening on 127.0.0.1:9000 # #location ~ \.php$ { # root html; # fastcgi_pass 127.0.0.1:9000; # fastcgi_index index.php; # fastcgi_param SCRIPT_FILENAME /scripts$fastcgi_script_name; # include fastcgi_params; #} # deny access to .htaccess files, if Apache's document root # concurs with nginx's one # #location ~ /\.ht { # deny all; #}
}
docker
stage 1
FROM node:14.17.6 as builder WORKDIR /app COPY . . RUN npm install RUN npm run build --prod
stage 2
FROM nginx:alpine
WORKDIR /usr/share/nginx/html RUN rm -rf ./*
COPY --from=builder /app/dist/frontend-vac . EXPOSE 80
ENTRYPOINT ["nginx", "-g", "daemon off;"]
When the container starts, replace the env.js with values from environment variables
CMD ["/bin/sh", "-c", "envsubst /usr/share/nginx/html/assets/javascript/env.template.js /usr/share/nginx/html/assets/javascript/env.js && exec nginx -g 'daemon off;'"]
env.js
(function (window) { window["env"] = window["env"] || {}; // Environment variables window["env"]["bffSvcApiUrl"] = "https://3232"; // "https://localhost:7101/api/portal"; // window["env"]["sharedSvcApiUrl"] = "https://api-dev/api"; // "https://localhost:7221/api"; // window["env"]["bffSvcApiKeyValue"] = "7aae"; window["env"]["sharedSvcApiKeyValue"] = "7aa"; window["env"]["bffSvcScope"] = "api://1ee8d2ed-/api.scope"; window["env"]["sharedSvcScope"] = "api://e7451fa3-/api.scope"; window["env"]["graphApiUrl"] = "https://graph.microsoft.com"; window["env"]["graphSvcScope"] = "user.read"; window["env"]["clientId"] = ""; window["env"]["authority"] = "https://login.microsoftonline.com/57b68a03-66d0834b1516/."; })(this);
(function(window) { window["env"] = window["env"] || {}; // Environment variables window["env"]["bffSvcApiUrl"] = "${BS_API_URL}"; window["env"]["sharedSvcApiUrl"] = "${SS_API_URL}"; window["env"]["bffSvcApiKeyValue"] = "${BS_API_KEY}"; window["env"]["sharedSvcApiKeyValue"] = "${SS_API_KEY}"; window["env"]["bffSvcScope"] ="${BS_SVC_SCOPE}"; window["env"]["sharedSvcScope"] = "${SS_SVC_SCOPE}"; window["env"]["graphApiUrl"] = "${GRAPH_API_URL}"; window["env"]["graphSvcScope"] = "${GRAPH_SVC_SCOPE}"; window["env"]["clientId"] = "${CLIENT_ID}"; window["env"]["authority"] = "${AUTHORITY}"; })(this);
index
!doctype html html lang="en" head meta charset="utf-8" titleVacPortal/title base href="/" meta name="viewport" content="width=device-width, initial-scale=1" link rel="icon" type="image/x-icon" href="favicon.ico" link rel="preconnect" href="https://fonts.gstatic.com" link href="https://fonts.googleapis.com/css2?family=Roboto:wght@300;400;500&display=swap" rel="stylesheet" link href="https://fonts.googleapis.com/icon?family=Material+Icons" rel="stylesheet" !-- Load environment variables -- script src="assets/javascript/env.js"/script /head body class="mat-typography" app-root/app-root !-- Start MSAL Integration -- app-redirect/app-redirect !-- Ends MSAL Integration -- /body /html
0 notes