#raspberry pi pins
Explore tagged Tumblr posts
Visit Tumblr Blog
Explore Tumblr blogs with no restrictions, modern design and the best experience.
Last Seen Tumblr Blogs


Fun Fact
Women make up for the other 50% of Tumblr’s audience.
Text

Fruit Jam RP2350B credit-card mini computer with all the fixin's 🍓🍇💾
We were catching up on a recent Hackaday hackchat with Eben Upton (https://hackaday.io/event/202122-raspberry-pi-hack-chat-with-eben-upton) and learned some fun facts: such as the DVI hack for the RP2040 was inspired by a device called the IchigoJam (https://www.hackster.io/news/ichigojam-combines-strawberry-and-raspberry-to-deliver-a-raspberry-pi-pico-powered-educational-micro-66aa5d2f6eec). We remember reading about this back when it was an LPC1114, now it uses an RP2040. Well, we're wrapping up the Metro RP2350 (https://www.adafruit.com/product/6003), and lately, we've been joking around that with DVI output and USB Host support via bit-banged PIO, you could sorta build a little stand-alone computer. Well, one pear-green-tea-fueled-afternoon later we tried our hand at designing a 'credit card sized' computer - that's 3.375" x 2.125", about the same size as a business card (https://hackaday.com/2024/05/07/the-2024-business-card-challenge-starts-now/) and turns out there's even a standard named for it: ISO/IEC 7810 ID-1 (https://www.iso.org/standard/70483.html).
Anyhow, with the extra pins of the QFN-80 RP2350B, we're able to jam a ridonkulous amount of hardware into this shape: RP2350B dual 150MHz Cortex M33 w/ PicoProbe debug port, 16 MB Flash + 8 MB PSRAM, USB type C for bootloading/USB client, Micro SD card with SPI or SDIO, DVI output on the HSTX port, I2S stereo headphone + mono speaker via the TLV320DAC3100 (https://www.digikey.com/en/products/detail/texas-instruments/tlv320dac3100irhbt/2353656), 2-port USB type A hub for both keyboard and mouse or game controllers, chunky on-off switch, Stemma QT I2C + Stemma classic JST 3-pin, EYESPI for TFT displays, 5x NeoPixels, 3x tactile switches, and a 16-pin socket header with 10 A/D GPIO + 5V/3V/GND power pins. The PSRAM will help when we want to do things like run emulations that we need to store in fast RAM access, and it will also let us use the main SRAM as the DVI video buffer.
When we get the PCBs back and assembled, what should we try running on this hardware? We're pretty sure it can run DOOM. Should that be first? :) We also need a name. Right now, we're just calling it Fruit Jam since it's inspired by the IchigoJam project.
#fruitjam#rp2350b#raspberrypi#microcomputer#hackaday#diyelectronics#retrocomputing#creditcardpc#hardwarehacking#usbhost#dvioutput#psram#retrogaming#makercommunity#opensourcehardware#homemadecomputer#minipc#embeddeddevelopment#techinnovation#electronicsproject#tinkering#cortexm33#doomport#custompcb#hacktheplanet#hardwaredesign#diytech#retroconsole#handheldgaming#fruitjampc
34 notes
·
View notes
Text
DIY: Making A Pwnagotchi
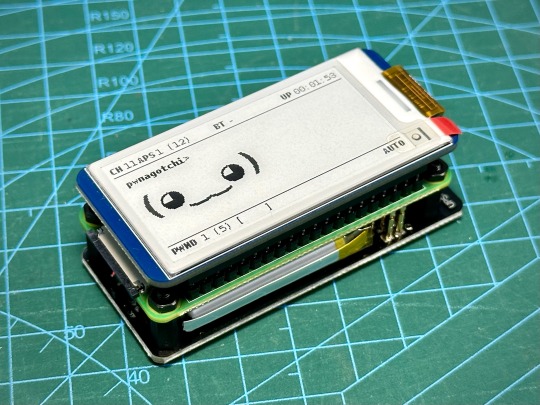

Yes, I know I am very late to the game ... LOL I was meddling with Flipper Zero and war driving, then I came across the Pwnagotchi project. Since I already had the parts to do this lying around in my workshop, I decided to put together my own Pwnagotchi just for fun. Started by hooking up the Waveshare 2.13" Black and White E-Ink Display to a Raspberry Pi running a fresh Raspbian image and downloaded the Waveshare demo code to test the display to make sure it's working properly, since I have not actually used it before. This is a v4 display.

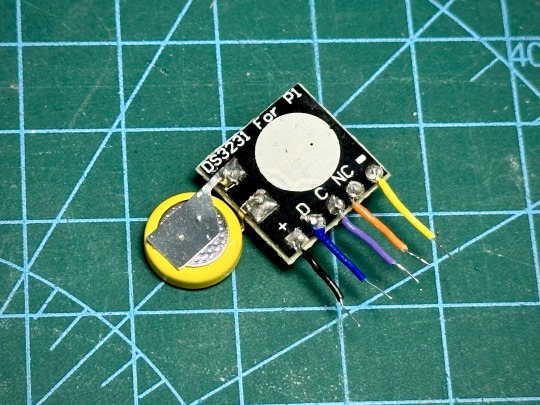
After that, I just followed all the instructions over here to put it all together, including adding a real time clock. I used the DS3231 RTC module designed for Pi, but in order to make it fit into the space between the display and the Pi board, I had to make some modifications. The female header pins on the RTC module was desoldered and short wires were soldered on. The battery also had to be desoldered and resoldered on in a new positionlike below to make the module thin enough. The module was then wrapped in wire tape for insulation. Now, we can just slot the wires into the female header pin holes of the display before we snap it onto the Pi board.
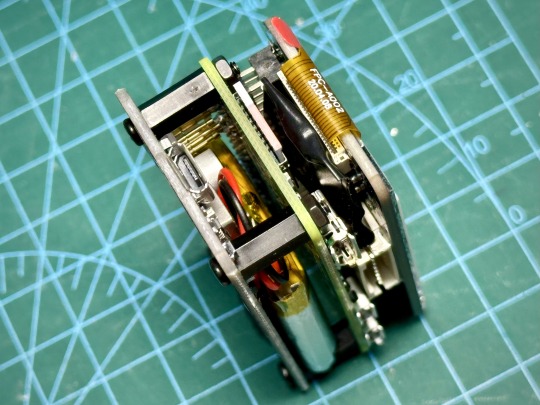
Below, you can see the RTC fits comfortably between the boards. I also attached a UPS Lite v1.2 board. Apparently, the UPS Lite board I had was a clone/knock off. It uses I2C address of 0x32 instead of 0x36 that was used in the original product, so the UPS Lite plugin in Pwnagotchi won't work. Oh well, I will just use it like a normal battery pack.

Now, for the software. The original Pwnagotchi project has not had any new updates for over 2 years, so it's kinda out of date and it doesn't support the newer Waveshare displays. Luckily for us, someone had taken the effort to fork the project and released new versions of Pwnagotchi over here. Note that this requires Raspberry Pi Zero 2 W.
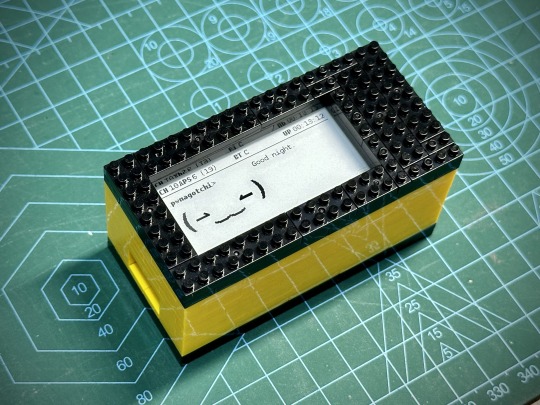
The Waveshare 2.13" E-Ink display that I had was v4, but I found that I had to set the display type to "waveshare_3" in Pwnagotchi settings for it to work properly. Next is to 3D print a case for this, but in the mean time, I used some nano bricks to build a temporary case for it.
That's it for now. Happy hacking!
67 notes
·
View notes
Note
A warmth seeps into your bones, mid-autumn air dispelled by a large fireplace. The flames in the hearth crackled, spitting embers into the air, shooting up the chimney to die off. Sat upon a long-backed chair, you lounge, normally quite content to relax after the craziness of the past. This time, however, you can't help a small fidget, a deep-rooted desire to do something, even if you're not sure what.
Getting up, your gaze sweeps your abode, littered with pieces of furniture and trinkets gifted to you by the deities, mostly Eclipse. Your eyes alight upon the kitchen, and an old pull tugs you forward, searching cabinet contents to see what you still have stocked. Flour, eggs, oats, dried meat, cheese, raspberry-
You pause at the last one, a faint memory surfacing in the back of your mind. Reaching into the container which stores the ripe red berries, an idea comes to mind. Gathering what you need, you start the fire in the oven before reaching up on tiptoe to try and obtain a pie tin, which had been tucked out of the way and forgotten. Not intentionally, of course, but you'd been a bit…distracted, for a long time, and hadn't gotten to moving it to your level again.
Your fingers brush the metal, starting to curl and pull, when your ankle decided that would be a great time to fold out from under you. A gasp slips out, tin jerked forward as you start to fall, pan following after, coming directly towards your face-
Large, bright hands catch both you and the tin. Startled, you look up into a gold and flaxen yellow face, framed by marigold rays. "Careful, sunshine," he admonishes, setting the tray aside while still holding you in an awkward dip. Flushing, you scramble to regain your footing, brushing imaginary dirt off your pants. "Thanks, Sunny," you mumble, embarrassed. The deity smiles, hand flapping back to his side now that he no longer holds you.
"Of course, sunshine. Any time," he promises. It brings an odd, not entirely pleasant, tingle to fuzz your mind, ghosts attempting to haunt you. You dismiss them with a mental flick. "What are you doing?" Sun asks, helping you break from your stupor.
Waving at your ingredients, you shrug. "Thought I might cook, for old time's sake," you inform, moving to do just that. You start with the flour, scooping water from a bucket you'd brought in earlier in the day, beginning to shape the dough. It takes a minute for the proper thickness to set in, caught off guard when Sun's hands enter from your periphery, moving to assist, making sure the tin was clean and prepped before hesitantly hovering his hands over yours. The fact he cools preceding entering your home on instinct nowadays is something to be thankful for, recalling the first time you accidentally burned your hand on him.
Everything about this moment drips with nostalgia, really. You, making raspberries pies, while Sun lingers in the room. This time, however, your hands entwine with his as you flatten and roll the dough, a gentle rhythm that chases away your earlier dis-at-ease. Once fully shaped, run over by a rolling pin, you place the dough in the tin, making sure it fits right, removing excess. You both pour in the raspberries, accompanied by a jam for extra sweet stickiness. Studying your work proudly, you glance up at Sun when he hums, contemplating. Reaching onto the shelves in front of you, he check through jars of spices and herbs, before locating his objective with a small, "Aha!"
You stare at the cinnamon, the memories playing out in a pleasant sense of deja vu. He must be feeling quite sentimental as well, not to mention the fact it was still a bit funny to you, thinking back on it now, how he offered to settle the debt he never had by giving you more of the sharp spice. In the end, he had gotten his wish, kinda, a fact that makes you chuckle.
Sprinkling it in, you fold everything in place, allow Sun to slide it into the oven. Lowered closer to your height, you dart forward to give him a kiss on the cheek. Stunned, he nearly drops the pie, barely managing to collect himself, securing it in place before turning to you with twinkling eyes.
"Sunshine," he nearly sings. You play innocent, smiling. "Yes, Sunny?" you playfully answer back. He quirks a brow, unimpressed, but beaming all the same when he moves forward to plant his lips to yours. A warmth far greater than the one provided by the fireplace earlier seeps into your veins, and you tenderly hold his face, enraptured by bright ivory orbs.
It felt so nice to have this again, after everything, and you wouldn't trade it for the world.
~~~~~~~~~~~
Annnnd part 2!
If you couldn't tell, they're all meant to take place after CSD ends. I know there's no real way for us readers to know how things pan out, but felt it more fun for the open relationship stuff.
Thought about how it might feel for Y/N to go back to the mundane after all the craziness. At least their gods are there for them :)
I LOVE THIS SO DEARLY SOBBINGGGGGGGGand wailing and and and AUGHH THANK YOU SO MUCH <3<3
I hope you'll be satisfied to know that absolutely none of this clashes with the fic canon whatsoever, Y/N would have so many things from Eclipse. And with every hint of something having been a struggle, it's such a delight personally knowing for myself what those struggles were. It's such a lovely glimpse into the future, especially knowing where in the future this would be
I am holding this soooo gently, thank you. KISS KISS KISS KISS ARGRHRGRHRGRGRRGRG
I REALLYYY DO APPRECIATE THIS, IT MAKES ME VERY HAPPY

57 notes
·
View notes
Text
After a hiatus to work on other projects, it's back to servo testing for the biped!
My main problem turned out to be a physical connection pin issue with the servo-hat and Raspberry Pi 5, but easily solved sawing off the base of the port.
Good news, however, is that testing revealed a weakness in the modular lower leg to ankle connectors, which I suspected were a bit weak anyway. Good excuse to do proper re-designs there and for the hips!

#robot#robotics#ai#artificial intelligence#3d printing#getting a leg up#personal projects#lessons in prototyping
2 notes
·
View notes
Note
You probably dont need long arms to tickle my feet and pits cause I'll be curled up in a ball the second you tickle me
Awwwwwee you're gonna make it soooo easy for meeee? Seee I looooove the blushyy ball, and I'm gonna tell you whyyyy~ cutie pies like youuu alwayssss go for the ball because you're adorable and you think that'll do anyyything other than gather alll those spotsss for mee~ you're like a cute raspberry, all bunched up with alll these cute ticklish curvies smushed together so I can strokeee and pokeee riight here along your siiiides and on those little openings on your underarmssss and the back of your neckkkk and your feeeeet! And coochie coooo hereeee and oooh! coochie cooooo thereeee! And it's just sooo sweeeet because you're getting alll blushyy gigglyyy wiggly in your lil cute balllll and you'll either hold your form and get more sensitive sillyyyy or you'll burst open and I can snicker down at youuu and ooh just pin your weakened arms up and teeease those exposed underarms endlesslyyyyy while I get you niceee and ~struggglyyyy~ you lil strugglebug mmhmmm~ and I'm gonna make you burst out of your snicker cocoooon ohh yesss I ammm mmhmm~ ahh and then I get to roll you out and show you anyyyywayy how I can reach all your ticklespotss~!!
13 notes
·
View notes
Text
I have a really fun idea for a project of basically using a Raspberry Pi Pico to make games. I'd use a pico and the gpio pins to output color and sound data and use another raspberry pi to convert them into hdmi and sound output (and input).
Rn, I may buy the Raspberry Pi W so I can connect to it over wifi to more easily interact with it (also im poor and need a bunch of little doodads to interact with it outside of wifi).
I think it would be a fun project, see how much graphics I can get out of the pico. If I can get it to run a ray-caster i'd nut.
26 notes
·
View notes
Text
Data data
So... finding a big datasheet like I am used to is.. very hard for some reason... So all I found was the pin-out diagram. Very prettily made. Bonus for using hardware that is popular with enthusiasts. Found a few guides but nothing like a big datasheet. Oh well, gonna live without. Next up. Finding the email receipt for the RGB LEDs so I can look up the specs.
https://ardustore.dk/produkt/led-diode-rgb-5mm
Ok... have precalculated values for 5V, but not 3.3 like the Raspberry Pie uses. Fine fine. We can do that math ourselves. Forward voltage (How much voltage the LED will eat in order to work) is unique on each color and the pin will supply 3.3 V For blue and green it is 3.2-3.4V Great. No resistor, we just slap it straight on the pin For red, 1.8-2.0V Good good. So the math is: 3.3 - 1.9 = 1.4 So we want to get rid of 1.4 ohms with a resistor so the voltage is correct for the LED. To calculate that we also need the amperage. But this one we can just decide ourselves. We look up the max amperage of the Raspberry Pi pins. 16 mili-amps. We don't want to use max. So let us say half of that. Plug those two into ohms law V * I = R 1.4 / 0.008 = 175 So we need aboutish 175 ohm of resistance. I have...

Eh... 240 ohm will do. Good enough.
4 notes
·
View notes
Text
Anyone know how to make a PCB keyboard dedicated to a Raspberry Pi?
I don't think I worded it the greatest but I intend to make a keyboard from a custom PCB, but I was wondering if there was a way to have it connected to a Raspberry Pi some way other than USB?
I might want to keep the GPIO pins free for a display but I realize I can only have one or the other
15 notes
·
View notes
Text
Relay operated power button

What you need:
a 5V relay module
Raspberry Pi
a bunch of cables
Explanation:
A power button on a computer case lets electricity flow between two power pins upon it being pressed, which is when the motherboard detects the button is pressed and reacts accordingly.

A relay is a specific kind of switch which lets electricity flow conditionally upon the flow of electricity in another circuit. The voltages involved both in motherboard power pins and on Raspberry Pi are generally low to not damage both, but we're taking extra precautions to electrically separate them both.
"5V relay module" here means that 5V is the voltage that is required for the relay module to work, while the controlling voltage can be lower. It being relay module it means it also has a flyback diode we'd otherwise have to provide ourselves.

Raspberry Pi's GPIO pins are programmable and can be controlled through Python code, and operate on 3.3V. Raspberry Pi also provides 5V output, but this one is not controllable.
By
connecting a power button to rPi GPIO pins
connecting the 5V voltage output pin from rPi to the relay module's Vcc input pin
connecting the ground pin from rPi to the relay module's groud pin
connecting programmable GPIO pins as the relay module's input pin
connecting the relay module's outputs (the normally open one and the ground) to the motherboard power pins
running some code on rPi
We can extend the power button functionality so Raspberry Pi can turn on and off our computer, while also still keeping the power button working.
Which is what I use to remotely turn on my computer on, by SSHing to rPi and running a script to turn the PC on while I'm away from home.
Why not Wake-On-LAN?
Wake-On-LAN has restrictions which makes it not as reliable as it could be, for example:
The ability to wake from a hybrid shutdown state (S4) (aka Fast Startup) or a soft powered-off state (S5) is unsupported in Windows 8 and above
The code and explanation for it in Part 2, when I get to writing it.
17 notes
·
View notes
Text
Raspberry Pi Board: Revolutionizing Computing and Education
The Raspberry Pi board is a series of small, affordable single-board computers developed by the Raspberry Pi Foundation, a UK-based charity focused on promoting computer science education and digital literacy. Since its launch in 2012, the Raspberry Pi has transformed from a niche educational tool into a versatile platform used in a wide range of applications, from DIY electronics projects to industrial automation.
A Brief History
The first Raspberry Pi, the Model B, was released in February 2012. Designed to promote basic computer science in schools and developing countries, it featured a 700 MHz ARM11 processor, 256 MB of RAM, and basic connectivity options. The success of the Model B led to a rapid expansion of the Raspberry Pi lineup, with various models offering improved performance, more memory, and enhanced connectivity.
Key Features and Models
Raspberry Pi 1 Model B (2012):
Processor: 700 MHz ARM11
Memory: 256 MB RAM
Ports: 2 USB 2.0 ports, HDMI, Composite video, 3.5mm audio jack, Ethernet
Storage: SD card slot
Raspberry Pi 2 Model B (2015):
Processor: 900 MHz quad-core ARM Cortex-A7
Memory: 1 GB RAM
Ports: 4 USB 2.0 ports, HDMI, Composite video, 3.5mm audio jack, Ethernet
Storage: MicroSD card slot
Raspberry Pi 3 Model B (2016):
Processor: 1.2 GHz quad-core ARM Cortex-A53
Memory: 1 GB RAM
Ports: 4 USB 2.0 ports, HDMI, Composite video, 3.5mm audio jack, Ethernet
Wireless: Wi-Fi and Bluetooth
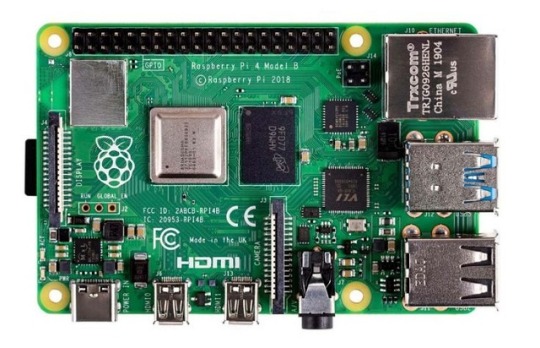
Raspberry Pi 4 Model B (2019):
Processor: 1.5 GHz quad-core ARM Cortex-A72
Memory: Options of 2 GB, 4 GB, and 8 GB RAM
Ports: 2 USB 3.0 ports, 2 USB 2.0 ports, 2 Micro HDMI ports, Ethernet, USB-C for power
Wireless: Wi-Fi and Bluetooth
Raspberry Pi Zero (2015) and Zero W (2017):
Processor: 1 GHz single-core ARM11
Memory: 512 MB RAM
Ports: Mini HDMI, Micro USB OTG, Micro USB for power, GPIO pins
Wireless (Zero W): Wi-Fi and Bluetooth
Applications and Uses
The versatility of the Raspberry Pi has led to its adoption in numerous fields:
Education:
Coding and Programming: Used in schools and educational programs to teach students programming languages such as Python, Scratch, and Java.
Computer Science Concepts: Introduces concepts like hardware, software, and networking.
DIY Projects and Maker Community:
Home Automation: Controls smart home devices, including lights, thermostats, and security systems.
Media Centers: Powers home media centers using software like Kodi.
Retro Gaming: Emulates classic gaming consoles using software like RetroPie.
Industrial and Commercial Applications:
IoT Devices: Serves as a hub for Internet of Things (IoT) devices, enabling data collection and remote control.
Automation and Control Systems: Used in factories and labs for monitoring and controlling equipment.
Research and Development:
Prototyping: Facilitates rapid prototyping of electronic devices and systems.
Data Collection: Gathers data from various sensors in environmental and scientific research.
Community and Ecosystem
The Raspberry Pi has cultivated a vibrant global community of developers, hobbyists, educators, and students. Online forums, tutorials, and community projects provide extensive support and resources for users at all skill levels. The Raspberry Pi Foundation also offers official accessories, including cases, cameras, and expansion boards, further enhancing the functionality of the Raspberry Pi.
Conclusion
The Raspberry Pi board has revolutionized the way people learn about and interact with technology. Its affordability, versatility, and extensive support network have made it an indispensable tool in education, DIY projects, and professional applications. As technology continues to evolve, the Raspberry Pi Foundation remains committed to expanding the capabilities and accessibility of this remarkable platform, ensuring that computing remains within reach for everyone.
3 notes
·
View notes
Text
PSA
If you want to use a Raspberry Pi Pico as a debug probe to program another Raspberry Pi Pico without the annoying BOOTSEL dance, make sure that when you run CMake on the debugprobe firmware (in the picoprobe repository), you pass DEBUG_ON_PICO=ON as option. As in,
cmake -DDEBUG_ON_PICO=ON ..
This flag is described in the Readme of that repository (also note that the repository and tool have been renamed debugprobe from picoprobe), but it's notably missing from Appendix A of the Getting started with Raspberry Pi Pico guide. That guide is probably older, before the firmware was split and renamed like that, and nobody has bothered to update it yet.
If you don't do that, the firmware will expect the SWDIO and SWCLK data on different pins than what the instructions say, and you will find yourself spending hours checking the cable connections because you keep getting "Error: Failed to connect multidrop rp2040.dap0" errors in openocd. Ask me how I know.
(Also, fuck Raspberry Pi for making so much of their otherwise really good documentation PDFs. There are several places where you need to cross-reference things, and if it were HTML, the navigation between the sections would be so much easier.)
Other tip, while we're here: Install ninja (with brew install or apt install), then when doing the cmake generating step, pass "-G Ninja" in addition. Then build by just typing "ninja" instead of "make -j4" or whatever. It's a little extra typing but it is faster and better at utilising many cores on your host computer.
2 notes
·
View notes
Text

Triple Matrix Bonnet Makes Big Bright Displays 🔴🟢🔵✨
With our latest work on getting HUB75 RGB matrices working on the Raspberry Pi 5
we can now create stunning LED displays. But what if we want more pixels? At some point, we max out the bandwidth of the RP1 chip, but we can still squeeze out additional performance by updating the PIO commands to output two or three matrix strings instead of just one.
Thus, the Triple Output RGB Matrix Bonnet you see here! We're using the classic Active-3 pinout
with a switch to select whether the 4th or 8th pin is connected to address E.
Since we expect large matrix grids drawing 10A+ of current, there's no onboard power management—the 5V supply should be connected separately through thick power wires. This board is for data only. If you aren't using port 3, the I2C remains available, so we've added a Stemma QT port for extra flexibility.
#leddisplay#raspberrypi5#rgbmatrix#adafruit#electronics#maker#tech#opensource#diy#hardware#innovation#lighting#embedded#creativecoding#coding#raspberrypi#matrixdisplay#ledmatrix#iot#hardwarehacking#piomatter#blinka#stemmaqt#hackerspace#engineering#prototyping#techgadgets#electronicprojects#powerfuldisplays#makersmovement
47 notes
·
View notes
Text
Raspberry Pi Pico W has been designed to be a low cost yet flexible development platform for RP2040, with a 2.4GHz wireless interface and the following key features:
RP2040 microcontroller with 2MB of flash memory
On-board single-band 2.4GHz wireless interfaces (802.11n)
Micro USB B port for power and data (and for reprogramming the flash)
40 pin 21mmx51mm ‘DIP’ style 1mm thick PCB with 0.1″ through-hole pins also with edge castellations
Exposes 26 multi-function 3.3V general purpose I/O (GPIO)
23 GPIO are digital-only, with three also being ADC capable
Can be surface mounted as a module
3-pin ARM serial wire debug (SWD) port
Simple yet highly flexible power supply architecture
Various options for easily powering the unit from micro USB, external supplies or batteries
High quality, low cost, high availability
Comprehensive SDK, software examples, and documentation
Dual-core Cortex M0+ at up to 133MHz
On-chip PLL allows variable core frequency
264kByte multi-bank high-performance SRAM
2 notes
·
View notes
Text
It's alive!!
I can read out the A and B buttons. It was quite easy to do despite having little experience with electronics. (But C programming experience.)
The board here is an Arduino UNO R4 Wifi. It can act as a USB HID (human interface device) so I could write code to actually use it as a game controller on my computer. Also, it has a fancy little LED display as you can see, and it does 5V digital logic, so I don't need a logic-level converter. (E.g., if you directly connect this controller to a Raspberry Pi, it can destroy the GPIO pins.)
My 3-button controller is not alive, sadly.
5 notes
·
View notes
Text
Megjelent az új Raspberry
youtube
Broadcom BCM2712 2.4GHz quad-core 64-bit Arm Cortex-A76 CPU, with cryptography extensions, 512KB per-core L2 caches and a 2MB shared L3 cache
VideoCore VII GPU, supporting OpenGL ES 3.1, Vulkan 1.2
Dual 4Kp60 HDMI® display output with HDR support
4Kp60 HEVC decoder
LPDDR4X-4267 SDRAM (4GB and 8GB SKUs available at launch)
Dual-band 802.11ac Wi-Fi®
Bluetooth 5.0 / Bluetooth Low Energy (BLE)
microSD card slot, with support for high-speed SDR104 mode
2 × USB 3.0 ports, supporting simultaneous 5Gbps operation
2 × USB 2.0 ports
Gigabit Ethernet, with PoE+ support (requires separate PoE+ HAT)
2 × 4-lane MIPI camera/display transceivers
PCIe 2.0 x1 interface for fast peripherals (requires separate M.2 HAT or other adapter)
5V/5A DC power via USB-C, with Power Delivery support
Raspberry Pi standard 40-pin header
Real-time clock (RTC), powered from external battery
Power button
3 notes
·
View notes