#screenshots manually instead of using the 'take screenshot' button
Explore tagged Tumblr posts
Visit Tumblr Blog
Explore Tumblr blogs with no restrictions, modern design and the best experience.
Last Seen Tumblr Blogs


Fun Fact
The average Tumblr user visits about 67 pages every month.
Text


TechRunner Extraordinaire at your service :]
Bonus under the cut of his big beautiful brown eye
Loving all the new clothes in the game honestly.
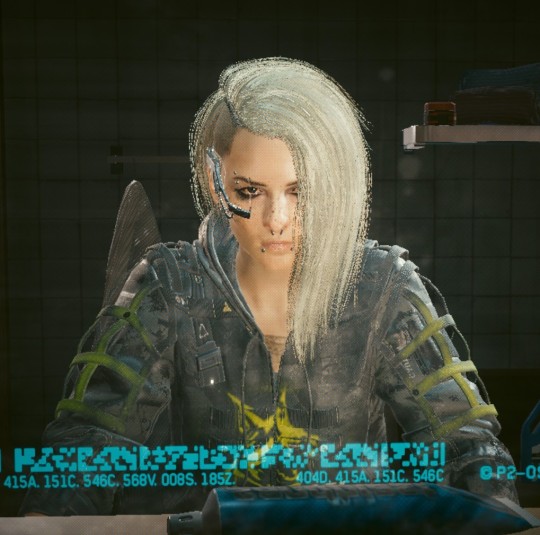

Fit Check 😯
#cyberpunk photomode#cyberpunk 2077#cyberpunk#fem v#phantom liberty#vk#idk how ppl get their screenshots looking so clean my photo mode has been fucked and bugged since day onne :( so i have to take steam#screenshots manually instead of using the 'take screenshot' button
16 notes
·
View notes
Text
𝑊ℎ𝑎𝑡 𝑤𝑒 𝑢𝑠𝑒𝑑 𝑡𝑜 𝑏𝑒.
𝑁𝑜𝑎ℎ 𝑆𝑒𝑏𝑎𝑠𝑡𝑖𝑎𝑛
(𝑓𝑙𝑢𝑓𝑓,𝑎𝑛𝑔𝑠𝑡) 1.4𝑘 𝑤𝑜𝑟𝑑𝑠

You still remember that day, you could still feel the adrenaline, the rush and the overwhelming sensation of warmth coursing through your veins, in your blood, to your heart.
You and Noah were lying under your makeshift tent that took you two hours to set up because he threw the manual away. It all started with a text he had sent you at an unusual hour.
Noah : hey, just wondering if you’re free tn. planned something for us.
Sure, you said you were free you had just canceled a girls’ night because you were feeling down and tired from your shift but the “us” mentioned seemed unusual. So you screenshotted the text and sent it to Folio, and he thought the same.
That was weird, coming from the Noah Sebastian.
Why would he invite only you for the night? And the fact that he “planned something”?
Instead of overthinking the three-line message, you liked it and directly reached for the “dial” button next to his name on your screen.
“You know I hate calling people. Can’t you just respond to my text?” he said in a mix of teasing and annoyance you couldn’t quite place.
You let out a muffled laugh. “If you don’t want me to call, next time add more precision to your text.”
“If I didn’t give precision, it was intentional. You coming or not? I’ll pick you up at nine,” he answered. You couldn’t really hear him clearly because of the sound of the engine and the closing trunk.
“Yeah, I’ll be ready. The guys coming with us?” you asked, trying to make sense of the situation.
You heard a sigh before he said, “No, they’re not. The tent fits two people.”
Your eyes widened. “A tent? What the h—”
You didn’t get the chance to finish cursing at him before he hung up. That clearly meant you should hurry, because at nine sharp, he’d be in front of your door.
When he knocked, you were already slipping into your shoes you barely had time to register before he opened the door.
“It’s not even nine, Noah.” you chuckled, placing a hand on the wall to keep from stumbling as you forced your foot into the sneaker without tying the laces.
“You’re ready. Come on.” He opened the door wider to make space for you to walk out.
He seemed even weirder than he had in the text or the call.
You’d known Noah for years. And sure, you’d had nights out with him just the two of you quite a few times. But that was only because Jolly had left early, or Nicholas was late and couldn’t make it. You guys were a group. Noah never asked for a moment alone with you.
He seemed tense during the drive. He did everything to hide it, but you could see it—his jaw flexing, his hand gripping the steering wheel tighter than usual.
“Where are we going?” you asked between two yawns. The night was warm, the season at its peak, but you were sure you’d never driven on these roads before.
“It’s a spot I found last week. Near the lake.”
You nodded and let your eyes drift back to the road.
The drive wasn’t long twenty minutes or so. Noah parked near the lake, then reached into the trunk for the tent and a bag before leading you down a path.
You knew the lake by heart you’d come here almost every summer night last year. But the path he brought you to was hidden behind a large tree.
The lake stretched out quietly beyond it, the surface still and glassy, reflecting the sky. The air wasn’t easy to describe but it was comforting enough to make you take a few deep breaths, which also let you catch the familiar scent of Noah’s cologne.
The tent had been set up just minutes ago, and it had left you both breahless you’d fought with it the whole time. It was old. You could tell Noah had probably found it buried in his garage.
You were lying next to him, your head resting on the sweater you’d grabbed last minute in case it got cold.
Noah was meticulously laying out snacks on a tablecloth.
You looked up at him. “You had leftovers to get rid of?”
He shook his head and looked down at you. “How can you say that? I brought literally all the things you like.”
“Oh, so now I like birthday cake ice cream?”
He rolled his eyes and finally relaxed beside you when he decided his little snack spread was perfectly placed.
And then you two did what you’d always done talked about your friends, the band, all while munching on the snacks he’d picked out for you.
“Thank you for bringing me here. It’s beautiful,” you said as you lowered your head back onto your sweater.
He did the same, lying down beside you, some strands of his long hair brushing against your shoulder.
“Y/N?” he whispered, making you turn your head. “I… didn’t bring you here just for the view or the bad ice cream.”
Your breath caught in your throat, but you didn’t move. You let him speak, his eyes fixed on the starry sky.
“I’m kinda the worst person for saying this shit, but… it’s been driving me crazy. I like you. I don’t just like hanging out with you. So yeah… I think I love you.”
A second passed. Your eyes widened as you tried to form a coherent sentence.
“You’re…? What?” You almost laughed—not because it was ridiculous, but because it was unbelievable.
Since you met him, you’d always had a little crush. But you brushed it off. You didn’t want to ruin the group, didn’t want things to get weird.
“I won’t say it twice. If you’re freaked out, it’s fine. We can act like I never told you.”
“Noah, stop…”
Your hand tugged at his sleeve, letting his hand fall into yours.
Words were stuck in your throatand in his too. He couldn’t even look at you clearly, even with the night fully settled around you.
You didn’t want to overthink tonight.
So you leaned against him and pressed a soft, shy kiss to his lips. A quick one.
But your smile told him everything when you leaned back.
You still remember that day the love that lit up in your chest. But now, you’re not lying under a tent beneath the stars. You’re lying in a cold bed, your phone next to your head, its screen still bright, casting a soft glow across the room.
Noah ♡︎ : We’re done. I’ve tried, Y/N. The guys will come get my stuff when the tour ends.
A simple message.
That’s all it took to erase five years you spent, blinded by love.
#elyishighoncafeineagain#noah sebastian#noah sebastian fluff#noah sebastian angst#noah sebastian fanfiction#bad omens#bad omens fanfiction
10 notes
·
View notes
Text
I don't rly get the people saying there's no way to have a conversation on this site like?? Replies exist. If someone replies to my post I can type in their @ and reply to their reply and it's literally the exact same thing as replying to someone on twitter, I just have to type their @ manually instead of clicking a button?? and it shows up in their notifications as well if you do that like it's functionally the same thing???
Beyond replies you can also reblog and put your comment in the tags or just the text of the reblog? If someone does tags on your post and you want to preserve them on the post just fucking copy and paste them or take a screenshot.
You can dm and send asks too. It's damn near impossible to not have a conversation on this website with some of the weird glitches that happen when you go to send posts.
Maybe this is just because I've been here for years but I was also on twitter for years and truly it's not that hard to use this site like a twitter replacement ¯\_(ツ)_/¯
9 notes
·
View notes
Text
46. Radirgy De Gojaru! (3DS, 2014)

Well well... this is a wierd one
Radirgy De Gojaru is a pretty good example of not judging a book by its cover.
It all takes place in one screen, not the scrolling backgrounds from previous entries, you have infinite HP, the framerate fucking dies often.
It sounds like a bit of a lame schmup doesnt it... it kind of is honestly... and that what makes it good imo...
RDG doesnt try to surpass its previous entries, instead trying something new and simple for the handheld, this simple aproach makes it in my opinion the best handheld RS34 schmup on the 3DS
Beating that of Karous The Beast of Re:Eden and Illmatic Envelope Dillinjah, as those two shot for something more complicated that didnt really work because of the 3DS's power.
Ooookay so this video game.
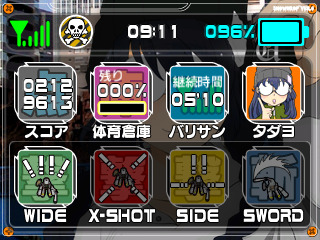
Radirgy de Gojaru is a schmup tower defence game... yup


This are all the options you have in the title screen, nothin more, nothin less.
Alright, let's get straight to it!

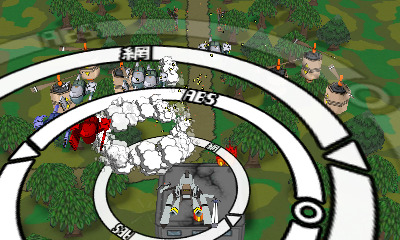
As described previously, RDG takes place in one area, above Tadayo Aita's garage.
You protect the garage using a modified machine with endless HP and a super big bomb.
Your main objetive in game is to not let any bullets or ships travel to the bottom of the top screen.
For every ship and bullet that passes, 1% of the total HP of the garage is lowered (your HP is shown by the block thats over the X shot icon)
and thats the basic gist of it, its quite simple but eh it works well enough.
So you have four weapons and a bomb (that big circle thing in the second screenshot)
So you have a wide shot, a X shot, a side shot and a upgraded sword.
You can use the sword while using any other shot but its particularly strong when using the sword option.
When you deal damage to enemies you regain Battery which lets you use the bomb more often.
You can stack the bomb up to 3-4 times, at max level it covers most of the screen and takes every bullet on its range. Keeping the shield up is the most important part of the game.

On the bottom screen you have a few things,
From top row to bottom row left to right:
Total signal, Instant Death (Quit button), Timer of the current run and battery %
Total score, the HP % of the garage, Time at full signal (you reach full signal by propperly using the shield at max power), a button to talk to Tadayo as shown bellow.

sadly I dont understand japanese so im missing out on the flavor text...
and on the last row: manual weapon switching if you dont want to use the weapon change button (the weapon switch just uses the next weapon to the right, no way to pick the last selected weapon, so that kinda justifies the use of the touch screen... in a way)
Its neat. Having all the important hud info on the bottom screen makes the top screen less cluttered (Kinda like how Resident Evil Revelations handles it... odd comparison I know lmao)
You shoot things, you gain meter, you use meter to get meter.
The gameplay is simple but it works.
So what about that presentation... I mean for a one screen game it actually it has quite the decent presentation
Models are nice, prolly ripped straight from the original radirgy
It does suffer from alot of jaged edges and the cel shaded style doesnt really look the best which does hurt it a bit but despite all that it captures the essence of the series.
Even if the game does look quite alright... It doesnt help that the game never runs at full speed at later parts of runs, the slowdown is SUPER heavy but thats kind of a good thing.
Theres alot of stuff to keep track off so the slowdown helps catch some enemies going to the bottom screen.
One area where I have no complains, where they absolutely nailed it was the 2D elements.
The menus are super nice!
There is alot of selectable bottom screen art that is really nice!

Not a good screenshot, I was trying to just take a screenshot of the bottom screen art alone (and failed) but there is alot of stuff to select and unlock!
The game hits the series style on the 3D visuals and 2D visuals.
also in the topic of presentation, the audio.
The sound effects can be a bit much at times. you will hear the shot sound... often, same with the sword SFX and its a bit annoying. You grow used to it and you can turn off sound effects but its not the best... but what saves all this... is the music.
The music is so good! Daisuke Nagata and Ko Hayashi, composers of the original Radirgy, came back to create a great 13 track long soundtrack!
It even got a CD soundtrack release! (RSCD-001)
Take a listen!
Fantastic stuff for a 800 yen game.
Radirgy de Gojaru is not the greatest schmup out there, its not even the best one on the 3DS. Games like Kokuga and even Metal Torrent on the DSi have it beat easly.
But that doesnt stop it from being a fun time at a cheap price.
Keeping the spirit of the series in a simple format.
I am not sure if I should give this a score at all. giving it a high score is giving it too much credit but giving it a low score is discrediting everything it does right...
Eh I guess its a 4.5/10 game that I like so much I give a 6.5/10
To cap everything off. heres the trailer from RS34's official YT channel.
My apologies for the more scattershot review this time arround.
4 notes
·
View notes
Note
hi there! I'm relatively new(ish) to tumblr and was looking to make my own "bot" via a long queue, and was wondering if you could give me any tips? I'm not super familiar with the queue system, so any advice you can give me would be good! Thank you!
hello, anon!! welcome to tumblr!
(interloper)
it's an honor to be your tutorial npc :D i will do my best to walk you through the "bot"-making process/queue system!
first of all: this is how many posts are currently in this blog's queue.

[ID: Screenshot showing "Queue: 924". End ID.]
this is a kind of insane amount. i believe i started this bot with....700 posts in the queue? and then just kinda kept adding on more? a lot will depend on how often you want your bot to post. at the current number of posts in my queue and the current schedule of 4 posts a day, it could run for 231 more days without running out of quotes! if i bumped it down to twice a day, it could run for over a year!
what i'd probably recommend doing is adding posts in batches of, like, 20 at a time, and keeping the post amount low until you get up to a number where you feel okay just letting it run for a while without adding anything new. then just put new stuff in whenever you want!
but how do you do the "adding stuff in" part? great question! this is the part where we segway into the mechanics of the queue! this is also the part where i put a readmore because hoo BOY this got long. i am prone to overexplaining lmao
tl;dr: find the queue, make the posts, set times for posting and amount of posts per day, use mass tag editor to do tags, and shuffle queue!
the queue is one of tumblr's most special functions, imo. it will automatically put out a certain amount of posts every day between certain hours-- basically like scheduling tweets, except that the site schedules them for you! some people on tumblr actually queue basically every post they see rather than reblog it-- i call them "queuetuals" :P
Step 1: find the queue
so! first you go to your blog controls, where you can view posts and follower counts from, and then look down. under "drafts" is a section called "queue". hit that, it'll take you here.
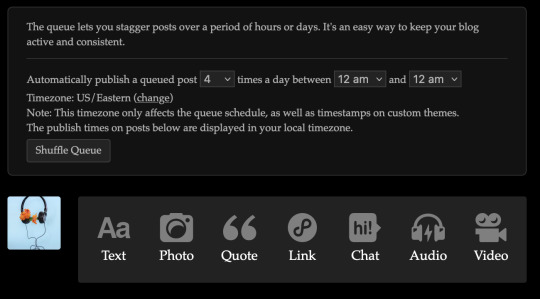
[ID: The Tumblr "queue" page. Up at the top is a text box that reads "The queue lets you stagger posts over a period of hours or days. It's an easy way to keep your blog active and consistent. Automatically publish a queued post (dropbox with 4 selected) times a day between (dropbox with 12 am selected) and (dropbox with 12 am selected) Timezone: US/Eastern (change) Note: This timezone only affects the queue schedule, as well as timestamps on custom themes. The publish times on posts below are displayed in your local timezone." It then shows a Shuffle Queue button and the icon of this blog next to the icons and text for making text, photo, quote, link, chat audio, and video posts. End ID.]
FUN FACT: hitting the text (or whatever kind of post it is you want to make) button from here will automatically set the button that usually says "post now" to "add to queue" instead. i found this out like halfway into making all these posts and it was so helpful to not have to make the switch manually every time. i now pass this knowledge on to you, my protege. use it in good faith. okay where were we
Step 2: make the posts
right. okay . so you hit button you make post you hit other button (make sure it does say "add to queue") and it will automatically be put in your queue!

[ID: A drafted post from songder-bot reading "i'd like to take you through a wasteland i like to call my home!", with no tags and the post button set to "add to queue". End ID.]
now just do that like 100 more times and you're set :) (highly recommend, if you're going to be making a text bot like this, writing all the stuff you want to put in down in a text file so you can just copypaste over. i write new lyrics like the above in manually, but i was copypasting for my first couple big chunks)
you can also see up there the places to adjust when and how often your "bot" posts! i have it set to between 12 and 12 so it just posts day-round, but if you want to set it to only post while you're awake or only while you're asleep, that's cool (i did do that for a bit)
from this screen down you'll be able to see what's coming up next in the queue and at what times it'll post!
Step 3: tags and shuffling!
while i was insane enough to manually input over 700 posts in a few days, i was not insane enough to tag them all individually. for that, i used the Mass Post Editor!
found at the very bottom of the list that posts, followers, queue, etc. is on is a little item called Mass Post Editor. this is one of tumblr's other most helpful functions and i truly cannot recommend it enough.
so once i've gotten all the lyrics from a song that i want to get in there, i go in to MPE. up at the top it says "published, draft, queued". go to queued, i select all the quotes from the song i just put in:

[ID: A screenshot of the Mass Post Editor with several posts selected. End ID.]
i go up top, i select "add tags", and i add the tags i want for those posts! boom! mass tagging: SOLVED.
i will add here that the reason my tags are stuff like "lyric - green day" rather than just "green day" is because i don't want these posts to go directly into the main tag. especially if the bot posts often, it'd be pretty spammy and kind of annoying for people trying to look at posts about green day to have to keep seeing random green day lyrics instead. tag etiquette is important!
and the last tip i will give (i promise) is this: remember that screenshot from earlier and the shuffle queue button? whenever you add in new posts to your bot, especially if they're all from the same song or book or something, make sure to hit the shuffle queue! queueing something automatically puts it at the end of the queue, and shuffling ensures that your new posts are equally distributed and can come up whenever!
hope this was helpful!!! i love explaining stuff but also get very very wordy at times, so if you need a tl;dr version or further explanation of something let me know! oh-- and if you're gonna do quotes, lyrics, art, or anything at all, always credit the original creators!
#not bot#:D!!!#this was genuinely SO fun for me tysm#tumblr tutorial#< that is an example of *wanting* a post to go in main tags lmao#also yes i did add welcome to paradise just for this ask#and yes i chose that song specifically because i think of it whenever tumblr gets an influx of new people
2 notes
·
View notes
Text
Revolutionize UI Design with Visily’s AI Wireframes

Discover how Visily’s AI wireframes help teams design intuitive, high-quality UI mockups in minutes. Perfect for beginners and professionals alike.
What are AI Wireframes?
AI wireframes refer to low or high-fidelity design mockups generated using artificial intelligence. Instead of manually placing elements like buttons, text fields, and menus, AI wireframing tools like Visily intelligently automate the layout based on your input—whether it's a sketch, a screenshot, or even plain text. This innovation saves countless hours and bridges the gap between ideation and prototyping.
Why Choose Visily for AI Wireframing?
Visily stands out among design tools thanks to its focus on simplicity, collaboration, and speed. Here's what makes it a game-changer:
No Design Skills Needed: Even if you’re not a designer, Visily helps you transform rough ideas into beautiful, usable wireframes. You can simply describe your app or website in text, and the AI will convert it into an editable wireframe instantly.
Multiple Input Options: Upload screenshots, sketches, or documents and let Visily extract design elements and structure using computer vision. This means you can repurpose existing materials into fresh wireframes with ease.
AI-Enhanced Components: Visily’s AI wireframes go beyond static mockups. It intelligently suggests UI elements, layouts, and flows, saving time and improving design accuracy.
Real-Time Collaboration: Visily supports team collaboration, so developers, designers, marketers, and stakeholders can all contribute feedback in one shared space.
Rapid Prototyping: Go from idea to interactive prototype in minutes. This is ideal for agile teams that rely on quick iterations and user feedback.
Use Cases for Visily AI Wireframes
Startup Pitches: Bring your MVP idea to life visually before investing in development.
Enterprise UX Teams: Speed up project timelines by generating wireframes directly from product briefs.
Agencies: Deliver quick concepts to clients and get approvals faster.
The Future of Design is Here
AI wireframes are reshaping how product design is approached. With Visily, what used to take hours—or even days—can now be done in a few clicks. It democratizes UI/UX design, making it accessible to founders, PMs, marketers, and teams who previously depended entirely on dedicated designers.
As businesses look for smarter ways to innovate, tools like Visily are proving essential. Its blend of AI, collaboration, and intuitive design makes it a must-have for anyone building digital products today.
Ready to explore the power of AI wireframes? Try Visily’s Wireframe AI today and experience how easy great design can be.
0 notes
Text
HOW TO PROPERLY CALCULATE YOUR BIRTH CHART a tutorial by : astrolagogy aka gogysguides


Hi everyone! Today, I'm going to guide you through the process of calculating a birth chart, just the way I do it, using screenshots! By the end of this guide, you'll be able to create your own personal birth chart, as well as charts for others in the future.
I will do another tutorial/guide on how to calculate your Vedic chart in the future as well so look forward to that. Let's not waste any more time and jump into it!
WHAT WEBSITE TO USE?
I use and highly recommend that you use astro.com if you don't already, as it has pretty much everything you need compared to other astrology websites that may be lacking in some options. It is completely free, and it allows you to have up to 100 charts in your data base per account.
STEP BY STEP ON HOW TO MAKE AN ASTRO ACCOUNT :
1. Go to astro.com the page will most likely look like this:

2. Click on the top right corner that says, "My Astro" and click the "User profile" then it'll open a page. Then, you're going to click on the last button that says, "Create a free user profile" and type in your information to make an account.


After you've made your account, you'll be greeted with this page! What you're going to do to create the actual birth chart now is click on the "Add new astro data" button, and now you can type in your birth data or someone you know's birth data!


I'll just use George's birth data for the birth entry as an example, but you can type in your personal birth data or someone else's you'd like to use.
And then you click the continue button and it should take you back to the list of birth entries with the newest entry that you just typed in. Now you want to click on the name, and it'll open up a page with a few options, but you're going to want to click "Extended Chart Selection"


Now you'll see all these settings you can play around with, and this is what makes this website the best because you have all these advanced features that you can use for FREE!
You can change the chart type to do synastry charts, or to do Composite charts, Davison charts, Solar Return charts, etc. Here I'm just highlighting the ones you should use if you are confused on which one to use:

You can do all sorts of things, and you can even experiment with the different chart styles! If you don't want the chart to look like the default drawing style, you can choose different.
Now, since this is a tutorial of how I personally calculate my birth charts, I will go over what settings I use to calculate them. Now be sure to play around with it! By all means, test out the different features and get familiar with it!
But let's just get down to the nitty gritty as to not take too long here.
STEP BY STEP ON HOW TO CALCULATE A CHART :
1. THE HOUSE SYSTEM: Click on the house system tab and change it to be 'Whole Signs' to make sure the chart is in Whole sign houses.

2. It might be closed for you the first time, if it is, click open the "Display and calculation options" tab and select the ones I have arrowed on the image below, the aspect lines are optional though, so you can keep those shown if you want to see them. I don't because I can just draw the aspect table instead, which I will indeed show you to do in a second here.

I put it on landscape mode for the reason that, when it's not, the chart comes out blurry when it's on 100% unless you change it to be 90%, but I don't because it never saves your setting for it. So, I just put it on landscape since the chart doesn't come out that way, plus, it does save the landscape settings.
2.5. The last section, the Additional objects section is where you can select Asteroids and calculation points like the Part of Fortune and the Vertex to use.
On the right there are lists of different asteroids you can surf through, and on the farther right is a box where you can manually type on asteroid numbers, but you probably don't know any and this is more for advanced people so, I'll spare you putting up any asteroids.

3. Lastly, of course click the green button, that says, "Show your chart" and it'll pull up your chart! 🎉

Now for the people wondering on how to find the aspects are, don't worry! You can find them by clicking on the top left of the chart, where it says, "Additional tables". It will open up a PDF file of all the aspects!


With the exact degrees as well, so I find this to be more useful than just using the aspect lines, because sometimes, I've found, that there are some aspects that don't show other than in the aspect tables, so it's good to check the aspect table so you can truly see all the aspects that are there.
3.5. To save all the settings that you checked, go back to the chart and click on the "Save default settings" button. So now it'll show up by default all the settings you checked.

And that's it! You now have your birth chart, the way I calculate it, I hope this has helped some astrology newbies out there, or maybe some people who have never used astro.com!
New tutorials coming soon hopefully, I want to help people who truly do not know even step one of astrology stuff here.
astrolagogy signing off !

©️ copyright: gogysastrologer & gogysguides
0 notes
Text
ScreenAI: A visual language model for UI and visually-situated language understanding
New Post has been published on https://thedigitalinsider.com/screenai-a-visual-language-model-for-ui-and-visually-situated-language-understanding/
ScreenAI: A visual language model for UI and visually-situated language understanding
Posted by Srinivas Sunkara and Gilles Baechler, Software Engineers, Google Research
Screen user interfaces (UIs) and infographics, such as charts, diagrams and tables, play important roles in human communication and human-machine interaction as they facilitate rich and interactive user experiences. UIs and infographics share similar design principles and visual language (e.g., icons and layouts), that offer an opportunity to build a single model that can understand, reason, and interact with these interfaces. However, because of their complexity and varied presentation formats, infographics and UIs present a unique modeling challenge.
To that end, we introduce “ScreenAI: A Vision-Language Model for UI and Infographics Understanding”. ScreenAI improves upon the PaLI architecture with the flexible patching strategy from pix2struct. We train ScreenAI on a unique mixture of datasets and tasks, including a novel Screen Annotation task that requires the model to identify UI element information (i.e., type, location and description) on a screen. These text annotations provide large language models (LLMs) with screen descriptions, enabling them to automatically generate question-answering (QA), UI navigation, and summarization training datasets at scale. At only 5B parameters, ScreenAI achieves state-of-the-art results on UI- and infographic-based tasks (WebSRC and MoTIF), and best-in-class performance on Chart QA, DocVQA, and InfographicVQA compared to models of similar size. We are also releasing three new datasets: Screen Annotation to evaluate the layout understanding capability of the model, as well as ScreenQA Short and Complex ScreenQA for a more comprehensive evaluation of its QA capability.
ScreenAI
ScreenAI’s architecture is based on PaLI, composed of a multimodal encoder block and an autoregressive decoder. The PaLI encoder uses a vision transformer (ViT) that creates image embeddings and a multimodal encoder that takes the concatenation of the image and text embeddings as input. This flexible architecture allows ScreenAI to solve vision tasks that can be recast as text+image-to-text problems.
On top of the PaLI architecture, we employ a flexible patching strategy introduced in pix2struct. Instead of using a fixed-grid pattern, the grid dimensions are selected such that they preserve the native aspect ratio of the input image. This enables ScreenAI to work well across images of various aspect ratios.
The ScreenAI model is trained in two stages: a pre-training stage followed by a fine-tuning stage. First, self-supervised learning is applied to automatically generate data labels, which are then used to train ViT and the language model. ViT is frozen during the fine-tuning stage, where most data used is manually labeled by human raters.
ScreenAI model architecture.
Data generation
To create a pre-training dataset for ScreenAI, we first compile an extensive collection of screenshots from various devices, including desktops, mobile, and tablets. This is achieved by using publicly accessible web pages and following the programmatic exploration approach used for the RICO dataset for mobile apps. We then apply a layout annotator, based on the DETR model, that identifies and labels a wide range of UI elements (e.g., image, pictogram, button, text) and their spatial relationships. Pictograms undergo further analysis using an icon classifier capable of distinguishing 77 different icon types. This detailed classification is essential for interpreting the subtle information conveyed through icons. For icons that are not covered by the classifier, and for infographics and images, we use the PaLI image captioning model to generate descriptive captions that provide contextual information. We also apply an optical character recognition (OCR) engine to extract and annotate textual content on screen. We combine the OCR text with the previous annotations to create a detailed description of each screen.
A mobile app screenshot with generated annotations that include UI elements and their descriptions, e.g., TEXT elements also contain the text content from OCR, IMAGE elements contain image captions, LIST_ITEMs contain all their child elements.
LLM-based data generation
We enhance the pre-training data’s diversity using PaLM 2 to generate input-output pairs in a two-step process. First, screen annotations are generated using the technique outlined above, then we craft a prompt around this schema for the LLM to create synthetic data. This process requires prompt engineering and iterative refinement to find an effective prompt. We assess the generated data’s quality through human validation against a quality threshold.
You only speak JSON. Do not write text that isn’t JSON. You are given the following mobile screenshot, described in words. Can you generate 5 questions regarding the content of the screenshot as well as the corresponding short answers to them? The answer should be as short as possible, containing only the necessary information. Your answer should be structured as follows: questions: [ question: the question, answer: the answer , ... ] THE SCREEN SCHEMA
A sample prompt for QA data generation.
By combining the natural language capabilities of LLMs with a structured schema, we simulate a wide range of user interactions and scenarios to generate synthetic, realistic tasks. In particular, we generate three categories of tasks:
Question answering: The model is asked to answer questions regarding the content of the screenshots, e.g., “When does the restaurant open?”
Screen navigation: The model is asked to convert a natural language utterance into an executable action on a screen, e.g., “Click the search button.”
Screen summarization: The model is asked to summarize the screen content in one or two sentences.
Block diagram of our workflow for generating data for QA, summarization and navigation tasks using existing ScreenAI models and LLMs. Each task uses a custom prompt to emphasize desired aspects, like questions related to counting, involving reasoning, etc.
LLM-generated data. Examples for screen QA, navigation and summarization. For navigation, the action bounding box is displayed in red on the screenshot.
Experiments and results
As previously mentioned, ScreenAI is trained in two stages: pre-training and fine-tuning. Pre-training data labels are obtained using self-supervised learning and fine-tuning data labels comes from human raters.
We fine-tune ScreenAI using public QA, summarization, and navigation datasets and a variety of tasks related to UIs. For QA, we use well established benchmarks in the multimodal and document understanding field, such as ChartQA, DocVQA, Multi page DocVQA, InfographicVQA, OCR VQA, Web SRC and ScreenQA. For navigation, datasets used include Referring Expressions, MoTIF, Mug, and Android in the Wild. Finally, we use Screen2Words for screen summarization and Widget Captioning for describing specific UI elements. Along with the fine-tuning datasets, we evaluate the fine-tuned ScreenAI model using three novel benchmarks:
Screen Annotation: Enables the evaluation model layout annotations and spatial understanding capabilities.
ScreenQA Short: A variation of ScreenQA, where its ground truth answers have been shortened to contain only the relevant information that better aligns with other QA tasks.
Complex ScreenQA: Complements ScreenQA Short with more difficult questions (counting, arithmetic, comparison, and non-answerable questions) and contains screens with various aspect ratios.
The fine-tuned ScreenAI model achieves state-of-the-art results on various UI and infographic-based tasks (WebSRC and MoTIF) and best-in-class performance on Chart QA, DocVQA, and InfographicVQA compared to models of similar size. ScreenAI achieves competitive performance on Screen2Words and OCR-VQA. Additionally, we report results on the new benchmark datasets introduced to serve as a baseline for further research.
Comparing model performance of ScreenAI with state-of-the-art (SOTA) models of similar size.
Next, we examine ScreenAI’s scaling capabilities and observe that across all tasks, increasing the model size improves performances and the improvements have not saturated at the largest size.
Model performance increases with size, and the performance has not saturated even at the largest size of 5B params.
Conclusion
We introduce the ScreenAI model along with a unified representation that enables us to develop self-supervised learning tasks leveraging data from all these domains. We also illustrate the impact of data generation using LLMs and investigate improving model performance on specific aspects with modifying the training mixture. We apply all of these techniques to build multi-task trained models that perform competitively with state-of-the-art approaches on a number of public benchmarks. However, we also note that our approach still lags behind large models and further research is needed to bridge this gap.
Acknowledgements
This project is the result of joint work with Maria Wang, Fedir Zubach, Hassan Mansoor, Vincent Etter, Victor Carbune, Jason Lin, Jindong Chen and Abhanshu Sharma. We thank Fangyu Liu, Xi Chen, Efi Kokiopoulou, Jesse Berent, Gabriel Barcik, Lukas Zilka, Oriana Riva, Gang Li,Yang Li, Radu Soricut, and Tania Bedrax-Weiss for their insightful feedback and discussions, along with Rahul Aralikatte, Hao Cheng and Daniel Kim for their support in data preparation. We also thank Jay Yagnik, Blaise Aguera y Arcas, Ewa Dominowska, David Petrou, and Matt Sharifi for their leadership, vision and support. We are very grateful toTom Small for helping us create the animation in this post.
#Analysis#android#animation#app#approach#apps#architecture#Art#benchmark#benchmarks#box#bridge#challenge#chart#charts#communication#comparison#complexity#comprehensive#content#craft#data#data preparation#datasets#Design#design principles#devices#dimensions#diversity#domains
0 notes
Text
im gonna give the most basic "read fast farming" explanation im sorry if its too basic (and im trying to explain things that seem obvious to me anyway to avoid not explaining something ppl might need but im not taking people for idiots i promise) (also im on phone so screenshots will be shit)
first, make sure you're on the salvaging cost per research note and not the research note page (first is how much do research notes cost, second is the most "profitable" way to spend your research notes (completely irrelevant when making notes for a specific goal)
have the link for even more convenience https://fast.farming-community.eu/salvaging/costs-per-research-note
now, how the fuck do i read this table of hell?
fast farming wants to give you the cheapest but not the fastest way; fastest would be crafting ascended stuff because asc gives way more notes pder item but it is way more expensive (it doesn't seem like fast has the stats for that but my own maths say crafting ascended would cost about three times as much) — but researching useless ascended you have lying around IS a good idea if you're sure you won't need it (for some reason i thought stat swapping non-researchable ascended gear to research it wasn't worth it but i just did the math and it's good actually)
settings reminder: buy orders are cheaper, instabuying is faster. i personally prefer putting a buy order but if you like instabuying more, be sure to select it here or fast-farming's maths won't be what you want, and the cheapest option for you might differ

in general, you can check the notes/item value of items on the fast-farming table, there's a column for that. the info isn't necessarily important, but if you want to make sure you're buying the exact amount of mats you'd need it for the mats, if you're buying the items on the tp you'll need less clicking if you aim for a high note/item ratio, that kind of stuff (if crafting items to research you should be automatically salvaging so the notes/item only change how much you'll die of boredom waiting for the crafting to finish)
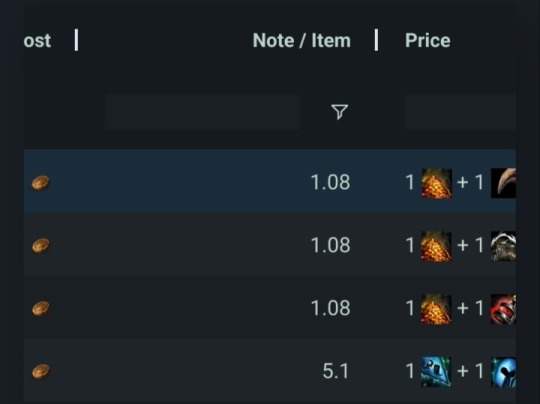
the "important" part of this table is the cost/note colums (the cost of the item is also there but it doesn't really matter). you'll notice there are two different ones, crafting cost/note and tp cost/note; obviously, calculating the cost if you craft the item to research yourself vs the cost if you buy it on the TP instead. you can sort using the column you want, but default seems no be crafting cost/note, surely because crafting is cheaper — at the moment at least.

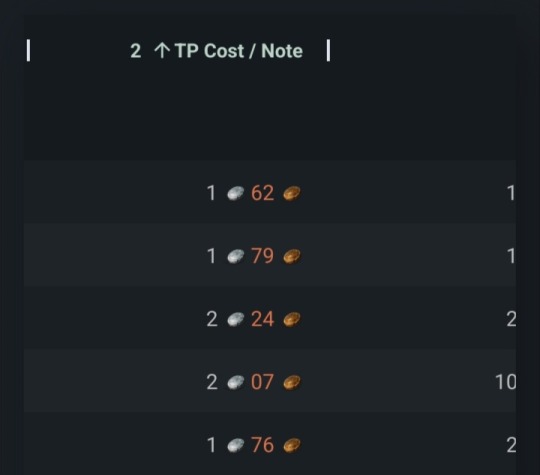
the last two columns are price and notes (lel), price showing crafting materials (for the last step and not total as you'll notice) and here, notes tells us the required crafting profession. I don't really use those, personally, but you can put filters on those so if you want to use specific materials or you want to exclude a crafting profession you havent levelled, for instance, you can do that here.

note: idk where to put it but i just remembered that if you're TP-buying stuff, getting stuff that stacks like potions or food can be nice cus you can just press the salvage stack button instead of having to click everything.
anyway! you should have the main infos to pick the items you want to research. buy em off the tp if that's what you decided & recycle them with the kits, or check the recipe if you'd rather craft — gw2efficiency's crafting calculator is Amazing as always — then buy all the mats you need and go on crafting! just make sure to check "automatically research with a salvage kit" (unsure of the exact formulation but i believe its not hard to find) or you'll have to manually salvage everything and its a pain
if you have questions, if theres obvious stuff i missed, etc, feel free :3
I've got a question for the people who've made the Soto Legendary armour, or just people who understand research notes in general
is anyone able to give me like, a straight forewards run down on just How to get these in bulk, I've tried reading fastfarming but it just goes right over my head and I already tore apart tons of ascended weapons I had stored up just to barely get 6k, and i need 15,000 more notes for a full armour set and it's :'). Driving me a little insane here tbh.
so yeah if anyone can give me a hand-holdy bit of advice it'd be very appreciated ;w;
82 notes
·
View notes
Text
How to Print an Email Across Devices and App Platforms
The answer to can you print an mail might seem obvious, but it’s not always easy across devices and app platforms. Whether you’re printing an email for yourself or someone else, the right way to do it can make all the difference.
Fortunately, most modern email programs are quite flexible and offer several ways to print emails. Gmail is simple with browser-dependent print controls, while the desktop versions of Microsoft Outlook 365 and 2019 offer both manual print options and automated workflows.

To print an email in your Windows or Mac computer, select the specific message or expand the message thread if it’s a conversation. In the top-right corner, click the printer icon or use the Ctrl + P shortcut. The print dialog box opens where you can select the printer, number of prints, and various other settings. In the Print options area, you can also choose to print attachments in addition to the main message body if needed.
In the mobile version of Outlook on iPhone and iPad, the process is slightly different. Instead of using the Print button, open the email that you want to print, and tap the share icon in the upper-right corner. You can then select the Printer icon from the list of available services, and follow the instructions to print your email.
If you’re receiving emails with lots of pictures, you can save some ink and paper by taking a screenshot on your phone or tablet. To take a screenshot, hold down the Volume Down and Power buttons at the same time or use the screen capture gesture that’s native to your device (e.g., swiping three fingers). Once the screenshot is captured, you can access it in your gallery or Photos app and print it as necessary.
youtube
SITES WE SUPPORT
Mail Documents Api – Blogger
0 notes
Text
Google SGE: Early Local Search Data
If the local version of Google’s Search Generative Experience (SGE) experiment rolls out broadly, what will that be like for local business owners and their marketers?
This is the question I set out to answer with a small study geared to gather some early basic data. Bearing in mind that there is no guarantee that the present version of SGE will roll out or will look exactly as it does now, I have what I hope are some interesting takeaways for you today!
Methodology
With SGE enabled, I performed 50 manual local searches. 100% of these searches generate local packs in the non-SGE setting, and 100% of them also generate local packs beneath the SGE box in the SERPs. I included both branded and non-branded terms (e.g. Safeway vs. grocery store), and modified and non-modified terms (e.g. bookstore vs. bookstore in novato). I tracked the data in a spreadsheet and took screenshots along the way.
How many local searches return SGE results?
100% of my keyword phrases (things like pizza, women–owned cafe near me, and bookstore in San Francisco) returned a local pack, signifying that Google recognizes their local intent, but of those searches:
10% returned no SGE display
34% returned a “generate” button to prompt to SGE display
56% auto-generated an SGE display without prompting
Takeaway: At this stage, Google isn’t sure whether users will automatically want SGE for everything or only as an option for some searches.
How many SGE results included an SGE local pack?
While 100% of my searches yielded a traditional local pack outside the SGE display:
Only 77.6% of the SGE results included a local pack
22.4% resulted in an SGE display of something other than a local pack
For example, most of us would expect a search for “shoes” to generate a local pack in Google’s interface these days, but here we see this SGE result, instead:
Similarly, we’ve been trained by Google to think we only need to type “Catholic churches” into a search box to be shown houses of worship near us, but SGE provided this very broad definition instead of any type of local result:
And SGE is really taking a surprising view of my intent in looking up “EV charging stations”. Instead of showing me a pack of nearby places where I can charge my electric vehicle, I’m being shown products to purchase:
When clicking on these products, I’m given an interstitial card of places to buy these products, like eBay and Best Buy, which feels quite remote from my intent:
Takeaway: There is a different logic powering SGE than what we’ve become accustomed to in pre-SGE Google. This may impact both your keyword research and your local search marketing strategy. Just because a search used to be perceived by Google as having an obvious local intent that would then be reflected in the SERPs returned, that doesn’t mean that the same logic applies in what SGE thinks your intent is. You’ll need to re-study the SERPs for your core keyword phrases if SGE rolls out broadly and is adopted by your customers.
The big question: Do SGE packs match traditional local packs?
The short answer is a decisive “no”. In my case study, 62.8% of SGE packs did not exactly match the contents or precise ranking of traditional local packs. That’s right, well over half the time, SGE rankings are different from local pack rankings.
As seen in the above side-by-side comparison, the SGE pack has a completely different business in first place, and the ranking order of restaurants 2, 3, and 4 is in a different order than its traditional local pack analog. These are significant differences for the businesses involved and one is left wondering why that #1 spot is being awarded to an eatery that isn’t strong enough to make it into the familiar local pack.
Takeaway: While I observed many instances of overlap of pack contents between SGE and traditional SERPs, the % of differentiation means that your traditional local pack rankings in no way guarantee the same spot in SGE’s recommendations. You’ll need to study and audit your SGE competitors separately if SGE rolls out to the public and is widely adopted.
How many businesses are included in SGE local packs?
Once upon a time, Google’s local packs contained 10 results. Imagine! Then we had 7. Now, we mostly have 3. SGE packs have their own variation. In my study, I found that:
46.6% have a 5-pack
22.2% have a 4-pack
4.4% have a 3-pack
4.4 have a 2-pack
Takeaway: In 68.8% of SGE packs, more local businesses are being displayed that would be shown in a traditional 3-pack in the organic SERPs. This provides more opportunity for you to be visible without a searcher having to click through an initial interface to something secondary like the Local Finder.
Is there an escape route out of SGE, and what about the ongoing importance of links and citations?
In my June live-tweeted thread documenting my first encounter with SGE, one of my first reactions to the interface was that it felt very enclosed. The SGE packs don’t click to the Local Finder or Google Maps or the reviews interface, making me feel sort of stuck. No matter where I was clicking around in the results, I was kept within the walled garden. Since that first experience, I’ve realized that the local version of SGE does contain an escape route in the form of these carousels to the right of the SGE packs:
In my case study:
53.3% of the carousels linked to Yelp
6.6% linked to Wikipedia
4.4% linked to TripAdvisor
4.4% linked to YP
15.5% linked directly to brands’ own websites
8.8% linked to a local informational site, like local online tourism sites or online local travel magazines
There was also a smattering of Facebook, Michelin, UberEats, GrubHub, and Superpages
This did not come up in my study, but I would like to anecdotally mention that in playing around with SGE, I am seeing a lot of citations of LinkedIn. Local businesses that don’t yet have a Linkedin profile should consider creating one.
Takeaways: Your structured citations in the form of formal local business listings still matter very much in the SGE setting. Your unstructured citations in the form of mentions on relevant local and industry sites still matter, too. The number of direct links from these carousels to local business websites is quite meager, and I would like to see Google reconsider this.
At any rate, there is some escape from SGE to third-party destinations, but here’s what I really want to emphasize:
100% of SGE results containing SGE packs include carousel links to local.google.com
When moused over, these bring up a local.google.com URL, including a Place ID, like this:
I was puzzled at first by that local.google.com subdomain. I feel like I hadn’t seen a URL from Google like that in a long time, but when clicked on, these types of URLs in the SGE carousel redirect to a google.com/search URL and this familiar display:
Takeaway: I could be 100% wrong about this, but looking at the way SGE is currently structured makes me feel like it’s not the ultimate way this will work. As it currently is, you’re already sitting right above the organic results while in SGE, and then there are these tiny cards in the carousel taking you back to the organic results, and the paths just feel a bit bewildering. So, while I like the escape routes out of the confines of AI, there’s something non-intuitive about the CTAs in these SGE packs.
What about local attributes in SGE?
I’m sorry to report that the work you’ve put into adding excellent attributes to your Google Business Profiles to serve specific customer intents seems to be wasted when it comes to SGE at this point. If you’ve taken the time to proudly add self-selected attributes like Black-owned or women-owned to your profiles, these results may let you down. Here’s a side-by-side comparison of my search for “women-owned clothing store Novato”:
The traditional local pack tells me my intent will be met at these two stores on the left with their clear women-owned attributes. On the right, though, SGE is apparently ignoring my modifier and just showing me women’s clothing stores, which may or may not be owned by women. The nuance is being lost. This made me lack confidence in using SGE to search for other businesses with particular attributes.
Takeaway: This version of SGE is coming off as a bit less “smart” about local nuances than the local results to which we’re accustomed.
How standardized are the results when SGE thinks your intent is local?
The answer is not very standardized at all. There’s something very vague and Google-y about the fact that some packs are headed with a simple message like “There are lots of yarn stores in Novato” or:
Whereas, for quite similar queries, Google suddenly wants to tell me a bunch of other information, which, quite frankly, seems rather random. A lookup of nearby Chinese restaurants generated a long list for me of people’s favorite Chinese takeout dishes (which I hadn’t asked about), and look at this example for Mexican restaurants. Explain to me the logic behind a 4-pack (when there are clearly enough choices for a 5-pack) being followed by a list of non-clickable “other” restaurants. What am I supposed to do with that list? What’s the CTA?
Another odd variant I encountered more than once is this one, where the “other” restaurant is clickable but, for some reason unknown to me, is being portioned off outside the other results. Why Google, why?
We won’t even get into the fact that Toast is not a Thai restaurant and is characterized (categorized?) right there in the results as an “American” eatery. So what is it doing there, being labeled a Thai restaurant? Ah, well.
Meanwhile, local business owners will likely be most curious to know how they appear for a branded search in the SGE world. Typically, you’ll see yourself presented like this, with location info, a descriptive summary, some photos, a couple of review boxes, and one of those local.google.com links:
Unless you have that special misfortune of having branded your business something that defies Google’s intent logic, as in the case of the great brand, Patagonia. SGE is uncertain as to whether I’m searching for a store or a geographical region here, and I get this:
Takeaway: As we can see, there is not strong standardization across SGE at this point, and while in some cases, you’d think time might yield a more uniform presentation, I wouldn’t count on it with Google. Traditional local search has changed continuously over the past two decades. Branding, features, pack counts, guidelines, and mysterious ranking logic are all in flux, all the time. I would expect the same from SGE, necessitating ongoing study.
SGE packs vs. local packs: which is better?
I may have oodles of objectivity from studying Google’s local results for nearly 20 years, but this opinion is entirely subjective: right now, SGE is simply not providing as good of an experience as traditional packs and GBPs for basic local search functions. Why do I say this?
If I just want to see an actionable set of local businesses, local packs are faster to access and easier to understand in terms of layout.
SGE is a whole new interface for people to learn without any obvious added benefit to learning it. I did not get into asking SGE further questions in this case study because such activity isn’t basic to basic local search. I want to talk directly to the business after finding it online - not to a bot, given that I have no idea how current its information is.
I really don’t like that I don’t get a review interface when clicking on the reviews portion of the SGE pack. It almost feels like an error that nothing comes up.
I am really surprised by, and not a fan of, the map disappearing when I click on one of the results. How can it be that Google, which has based its entire local search enterprise out of Google Maps, is letting maps take such a backseat in the local SGE interface?
The SGE results for branded searches in no way touch the depth of information provided by a direct look at a Google Business Profile. If Google is betting that people would rather see a bare-bones summary than a novel full of info, then maybe this approach will be popular, but I am not wowed by what I am seeing as the SGE replacement for a GBP. It feels very empty.
Looking at a branded SGE result really makes me wonder about the pressure for conversational search to become ‘a thing’. Local search has accustomed us to getting the name, address, phone number, and hours of operation in a neat little package, nicely organized, almost like a list. If you go back and look at the branded SGE result for The Good Earth Market, Google is expecting you to read through paragraphs of text to find this information. In many ways, local search has been like a giant experiment in shorthand, giving you quick data at a click so that you can make fast decisions. Conversational search presumes you want to read a lot and talk a lot before finding a place for a fast box of tacos. Conversational search is a real 180, and I have to wonder if, like voice search, it will struggle to find the kind of use cases that lead to longevity.
I remain unconvinced that AI, in general, is a natural match for local search. The introduction of an AI-based review filter has caused havoc in local business reviews, and I feel that this movement towards automation simply takes us further towards a virtual world and further away from the local world that local searchers want.
Takeaway: Do your own research and monitor your presence in SGE to see how it evolves. Be wary of hype. Every new thing that is being launched in the AI era comes with claims that it will “change the world forever.” Wait, watch, and see, and keep working on the things that you know work in local.
0 notes
Text
My YCCTEAM's Wireless Switch Pro Controller - Part 16/Final (Career Mode racing in Asphalt 9: Legends)
What's up guys? Welcome back to be at another YCCTEAM Controller topic review share, but guess what? This will be the final video post that I've been waiting for a long time or in case a year half and months since the beginning of revealing my controller back in 🎃October 3rd, 2020. Even though it needed takes time to make sure to correct in details such as doing comparison from my other controllers, testing its buttons, battery charging to battery life results, and pretty much else I've been gone through in months. However, there is one more topic review post that I'm bringing to an end as of my decision; especially when if I'll be doing other topic reviews to my new items soon.
For today's post though, I decided to merge two videos as originally gotten both recordings from last week I've been saving. It's something that I should've done from my past video postings while I'm in YCCTEAM Controller topic reviews, but nevertheless it was alright when I'm getting used to. Anyways, I'm back to try out my final testing as you expected while I'm at Asphalt 9: Legends again. This time I'll turn up the notch by doing real racing with other opponents in career mode and both of the control settings to use after from doing tutorial last month.
Here it is as I'm in track based on San Franciso; the same place I've already cleared its first challenge back in January 18th, 2020. Link Here
I also did the second challenge during part 3 of my Asphalt 9: Legend’s career progress to remember. Link Here #2
However for this topic review post to share, I wanted to go back its first challenge to race through like I did in last year, but showing off my YCCTEAM Controller again and using the same car of Mitsubishi Lancer Evolution; as I previously used on few challenges or just one during my career progress from last year. I'm giving some upgrades along the way, but hoping I can show it during my contining Asphalt 9: Legend's progress soon. Let's get into it as It'll be the final topic review post for my controller.
During two of my recording videos being merged, I'm using my controller to show as I'm racing through San Francisco track against other racers like I previously did in January 2020....two times to be exact when I used both different control settings from manual to gyro like last time when I'm showing off during tutorial mode last month.
It's gonna be different to see which settings I can used for my career mode in progress; despite being obvious it had to be manual settings with pressing buttons for acceleration, brake, and nitro boost. I'm just making this as I'll go along when using both settings once again. I'll even bring the results after crossing the finish line for the races end and how much did I do in time. If I can remember my first one back in Janaury 2020 was 00:43.366 or 43 minutes and 366 seconds while during its first challenge I gotten. Here's my last year's screenshot in high quality to get a better look.

Just wondering how it can compared to my other two racing results during this recording. Well I'll tell ya this is gonna be interesting and hoping to my closest friends to see as well.
On first half until 1:22, I'm doing my first racing through San Franciso track in title "City Dash" where I needed to reach the goal from other opponents they'll trying to catch on me. I did good while using my YCCTEAM Controller in manual setting with the steering analog stick and some tricks like jumping on ramps. However, I was bumping into things while I'm trying to press the left button for brake and drifts, but other times was performing the 360 move at opponents for no strange reason that I'm trying to get knockdowns. ^^* (at least I did have one knockdown on first half, though) Anyways while continuing my race, I made it to a finish line at the end from doing turns, jumping into ramps like two times, and some bumping into walls that I'm trying my best to dodge those. So my racing time results was unexpected since January 2020 is the very first one I've gotten while I'm in manual. Instead, my new racing time results change to 00:44.647 or 44 minutes and 647 seconds while I'm in manual settings a second time as before. I was so close that it should've been much lesser than that if I could make some room in obstacle or something. Nevertheless, it was of really was while doing my YCCTEAM Controller post to share, but at least it was a good first half.
As for the second half though, I'm switched up to gyro control when using my controller to move left and right. During another racing track through San Francisco, I've gotten into somewhat good start as well when using my controller to move my car and the buttons for acceleration, brake/drift, etc while reaching the racing goal again. That being said however as I'm still working on some "errors" while having to race against opponents. Mostly though was while perform my ramp jump, I've almost getting crash into the wall just before landing on the road by luck. It happens at 02:14 to 02:18, but man that it was still lucky or otherwise would've been ruin if I'll start all over again. I tried to steer to get away from and some others that I've keep bump into to get knockdowns at opponents. Nevertheless, it was not bad second half to make while moving my controller in gyro settings; just wanted to work on its sensitivity of adjust along the way. How's my racing time results during it though was really unexpected is 00:43.334 or 43 minutes and 334 seconds to compared on others. (January. 18th, 2020's and September. 8th, 2021's in two recordings merged) Let's just say in other words, the gyro setting I did during second half takes the top spot here by surprise. Maybe because I putting nitro boost for its speed just to catch up at opponents before reaching the finish line? Or simply put on fate to see how do well in gyro settings I've been practicing; like last time when you've see me during my past topic review post while I'm in tutorial mode. Either way, it was pretty not bad to know how I managed to get there during second half recording I gotten; after checking the racing time results changes to 43 minutes and 334 seconds.
My thoughts and a final conclusion for this topic
Just like from last month when using my YCCTEAM Controller for tutorial test, I did really well for this one when I'm in career mode racing through San Francisco. After doing two settings both manual and gyro motion was another review test to see how which would I prefer to use when I can continuing on my career mode in progress and another for hoping there's normal race mode to unlock. I had missteps along the way; including the one during second half where I was almost crashed into the building's wall until I safely landed. Nevertheless, they're both alright when I'm taking my time off to see what racing results I have in both. Unexpected for gyro motion controls having to recognized that it compared from what I did in Janaury 18th, 2020 when clearing its first challenge at 43 minutes and 366 seconds. However for manual settings like I did before that was so close to match; as it underperformed at 44 minutes and 647 seconds. Thought I could handing well like last time if needed, but guessing I've miss calculating a little. So that's means gyro motion setting won? Doesn't matter though as they're both good tests while using my YCCTEAM Controller to show; just like last month when I'm cleared through tutorial mode. However, I'll be closing this topic review to an end after long time of giving details, comparison to other of my controllers, batteries, and more I gone through so far.
🐰🖌Maxwell: Yeah. We've been waiting for after year and the half when he did his best of reviewing this alternative controller to work on his Nintendo Switch system. If I could remember, there are good ones to choose from other past posts; like when he did on Super Smash Bros match with Mario against Banjo & Kazooie.
🐰👊💥May: There's more than that, Maxwell. Like doing his button test it works alright; especially knowing fits well then previously use his Joy-Cons when it had the R button stop working and of course drifting. Hoping it won't effect his YCCTEAM Controller anytime soon.
🦊⚽️Sam: You said it. At least rest assured when it comes to making his topic review, the YCCTEAM Controller had a good run with its battery life, the design to make as a similar Switch Pro Controller, and impressive feedback or response when playing those games in manual or gyro motion setting in Asphalt 9: Legends for example.
Thanks, Sam. I think I can give this a positive thumbs up 👍🏼 for how I using my YCCTEAM Controller to my Nintendo Switch system. Except some minor cons like when turning the rumble features on to my controller that it keep on rumbling through Super Mario Odyessy's cutscenes.
🐰🖌Maxwell: Or another one when you trying to turn on your Nintendo Switch system with your pro controller's home button, but doesn't work it right unlike your used Joy-Cons for some reason.
Yeah, that too. I'm fine to turn on my Switch system manually anyways, but would like that if the developers ever updated my controller so it can be easy to press the home button to activate my system just as easily. Someday, but not today I guess. Anyways, hope you guys and my closest friends to check out my lastest YCCTEAM Controller topic review to share and to my final conclusion after giving my thoughts about from year and half ago. I'm hoping to take it rest and continuing on other stuff like I'm promised to bring my own Super Mario 3D All-Star progress to share for example. I had too much things to get through that I nearly forgotten. Sorry if it happens. 😔
There's one more thing, though. If you finded interests about getting the YCCTEAM Controller like I have, then maybe you can check out at other online stores such as Amazon.com. it cost $25.99 or $26.00 in price which it can affordable if you called that in different way. I even check through search to see its there and it was still available as I link to this one. Link Here
Not sure if it'll work on other countries, but I would like to see when my P-Pal managed to get those in other online stores he could find, but just saying. 😅
Previous Posts for my YCCTEAM’s Pro Controller Topic:
Wireless Switch Pro Controller for Nintendo Switch/Switch Lite (Part 1) - Link Here #1
My YCCTEAM’s Wireless Switch Pro Controller for Nintendo Switch/Switch Lite Unboxing (Part 2) - Link Here #2
My YCCTEAM’s Wireless Switch Pro Controller for Nintendo Switch/Switch Lite Comparison with my Xbox One (Part 3) - Link Here #3
My YCCTEAM’s Wireless Switch Pro Controller for Nintendo Switch/Switch Lite Comparison with my Nintendo Switch’s Joy-Cons (Part 4) - Link Here #4
Testing Buttons (Part 5) - Link Here #5
Rumble Feature Testing (Part 6) - Link Here #6
Battery Charging Test (Part 7) - Link Here #7
Playtime Battery Life Results (Part 8) - Link Here #8
Gyro and Motion Controls 1st Half (Part 9) - Link Here #9
Gyro and Motion Controls 2nd Half (Part 9.5) - Link Here #10
Playtime through Super Mario 3D All-Stars game in Super Mario 64 #1 - Link Here #11
Playtime through Super Mario 3D All-Stars game in Super Mario 64 #2 - Link Here #12
Playtime through Super Smash Bros Ultimate #1 - Link Here #13
Playtime through Super Smash Bros Ultimate #2 - Link Here #14
Tutorial through Asphalt 9: Legends #1 - Link Here #15 Tutorial through Asphalt 9: Legends #2 - Link Here #16
#video post#yccteam#yccteam controller#switch pro controller#video#recording#video recording#asphalt#asphalt 9 legends#nintendo switch#racing#racing game#career mode#san fransico#part 16#finale#final topic post#conclusion#in conclusion#september 2021#september 13th 2021
32 notes
·
View notes
Text
IV. The most useful meshing tools in Blender
(Previous: IIIb. Method II: The sneaky way)
Only in my own, very subjective opinion, of course. I bet many other creators would disagree with me on this selection, but those are the tools I use almost every time when I mesh something new.
This part is going to look a bit different that the previous ones: it won't be a step-by-step guide, but rather a short explanation of different options (some of which I already partially covered) and their possible usefulness, so that you could just implement whichever you want in your own projects.
1. Snap to symmetry
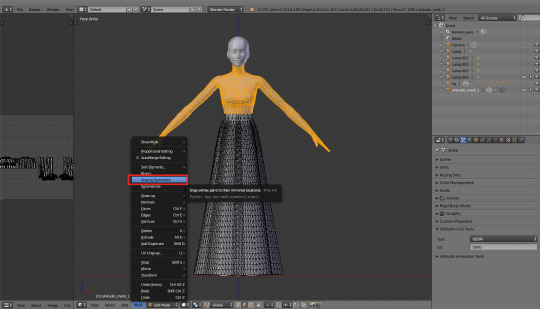
You can find this option in that dropdown (dropup?) menu hidden under the 'Mesh' button, in the bottom bar. It does just what it says on the tin: if a vertex on the left side on your mesh has it's exact equivalent on the right side (so, let's say, vertex A has x = 20, and vertex B has x = -20, and y and z are the same), Blender will recognise them as mirrored.
Make sure to use this option only on parts which really are symetrical! Otherwise you might end up with some of your vertices being symmetrised and others not, and then it'll all become a hot mess. So, in case of our dress, you shouldn't use it on the skirt, but it's perfectly safe to use it on the upper body parts, which are, by default, completely symmetrical – even if Blender doesn't necessarily know it yet. Of course, that applies only if you used the same top as me – I can't speak for others!
2. X mirror
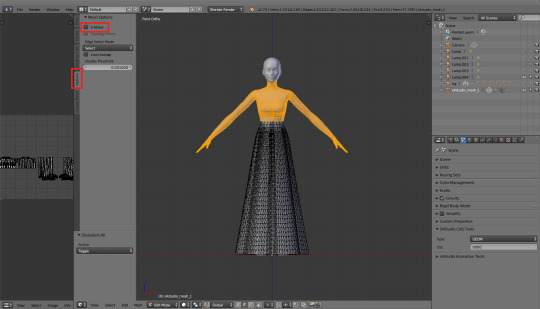
A follow-up to the whole symmetrising process. You can find that option in the toolbar on the left (T), in the 'Options' tab. Just tick it. And now select any vertex of your symmetrised top and move it wildly around. You'll notice that the same happens on the other side of the mesh as well.
3. Proportional editing
I know, I know, we've already used it so many times...! But proportional editing is pure magic and I think it deserves another mention. Depending on the falloff type, you can use it to quickly create a variety of different shapes. Just as a reminder: you turn it on by pressing either O (for all vertices) or alt+O (only for connected vertices) and then select the falloff type in that bottom bar. By default it's set to 'Smooth', which is probably the most universal option. You can make a bigger or smaller area affected by your edits by moving the mouse scroll – by default it's set to VERY big, so probably your whole mesh will be moving. Don't panic and just scroll until you see a white circle – that's exactly the 'affected area'.

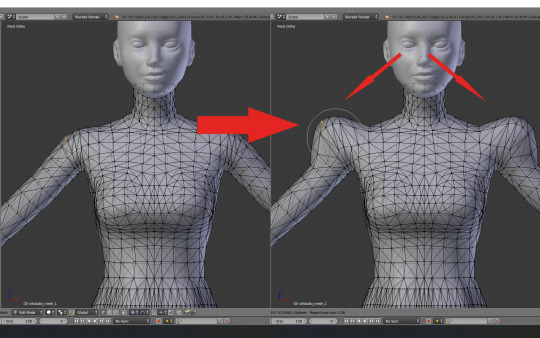
Why mention it now? Because combined with the 2 previous tools it's a perfect way to make those 1890s puffs! Let's take a look at it, shall we?
===============================
Practical Application Corner
I think by now I can admit it: the dress I'm trying to make here with you is this 1897 wedding dress:

As you can see, the dress has some shoulder-puffs: moderate in volume and rather roundish, so they shouldn't be hard to make. I already symmetrised the mesh, turned on the x mirror and proportional editing. I'll just change the falloff type to 'Sphere' and I'm ready to go.
Now I'll simply select a vertex on one of the shoulders and move it up. It's probably the best to do it while looking at the mesh from the front (num 1) - that'll make it easier to see what's going on.
Doesn't look bad, but I'm aware that the puff is still very 2D. You can see it very well if you switch to top view (num 7). To solve this problem, I'll select two vertices this time, one on the front of the puff and another on the back, and scale them – still with all the same options. Much better!

If you want to, you can spend some more time fine tuning your puff. Depending on how much you enlarged it, you might also want to select both puffs, turn triangles into quads (alt+j), then subdivide it smooth (W, select from the dropdown menu) and change to tris again (ctrl+t). However, it might be quite difficult to just 'select your puff' now, so maybe wait with it till the next part, where I'll talk about uv maps...? That'd make stuff a lot easier.
===============================
4. Dissolving
That's a very simple and very useful tool, which lets you just dissolve – but not delete – vertices, edges or faces. What it means practically is that if you use it instead of deleting, you won't get a hole in your mesh. Lets say you subdivided your puffs, triangulated them again and discovered some weird lines here and there...
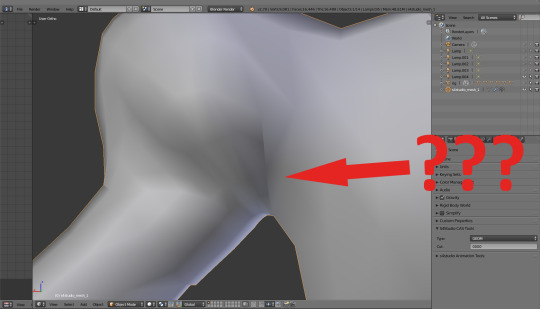
When you switch to edit mode, you immediately see that it's because some of your new vertices aren't proprely connected. At the same time you see that if you let Blender do it automatically, you'll be left with very unpleasant, narrow triangles. It'd be better to get rid of those diagonal lines which I marked in red.
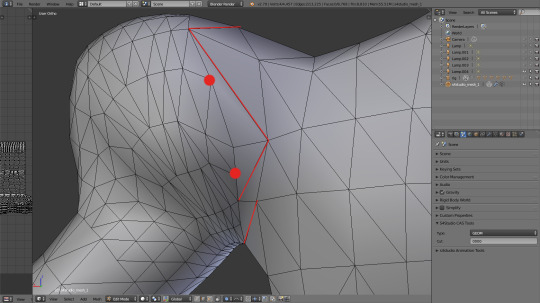
And how do you do it? Very simply: select them and either press x (or delete) and select 'dissolve edges' from the dropdown menu, or – while in edge select mode - simply press ctrl+x.
And how do you change them into sensible triangles? Well, you either triangulate them automatically (ctrl+t), hoping that Blender will be reasonable... Or you can use another simple yet super useful tool.
5. Knife
You activate it by pressing k. It's just what it sounds like: a tool which lets you cut your mesh in any way you want. You can use it to manually cut proper triangles (which I'm going to do right now), but also for a variety of other things. Cool feature: it gently snaps to existing vertices, so if you want to connect vertex A and vertex B, you can do it without much struggle. Press enter when you're done.
But why would you want to use it for anything else than correcting triangles? Why would you cut some random shapes in your mesh? Well, because then you could use another cool tool.
6. Extruding
The principle is very simple. You select any vertices, edges or faces you want and then press e – and suddenly new vertices, edges or faces appear. You can freely move them around, or – which is almost always a better idea – right after that 'e' you can press s to scale them, or x/y/z, to limit the movement to only one axis. You used it while making the skirt and way earlier, when you were meshing a cup. But extruding isn't limited only to this; it's also a perfect way to make 3D collars, belts, cuffs, trims, random deco – almost anything, actually.
7. Flip direction
An interesting peculiarity of Blender meshes – no idea how other software deals with it – is that meshes have only one side. In other words, if you extrude something from your main mesh – let's say, I don't know... Wings? - they will be visible from side A, but if you look from the opposite side, it'll be as if they weren't there at all. Perfectly invisible. That's why in case of such parts you have to duplicate them and then flip direction of that copy, to get the texture on both sides.
Select the part you want to duplicate. Chances are the texture is not even all on one side; in such case press ctrl+n or open the left bar (T) and, in the Shading/UV tab, choose 'Recalculate'. Now press shift+d to duplicate, press enter immediately, and from the same tab select 'Flip Direction'. Your mesh should be double-sided now.
===============================
Practical Application Corner
I want to make that weirdly shaped deco piece my dress is supposed to have on the front. I dissolved some edges and recut them, to get a pretty smooth curve, and now I'm going to extrude it. Whoops, I almost forgot to turn off the X mirror!
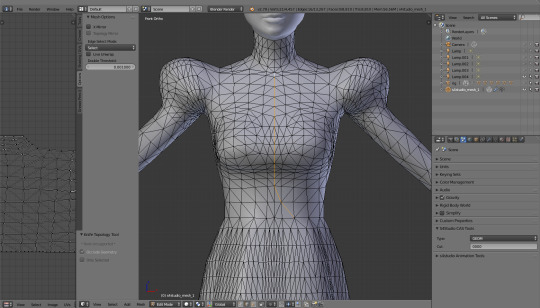
So I press e and, immediately afterwards, y, to extrude that part to the front.
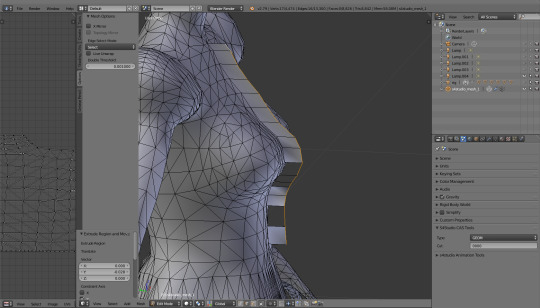
As expected, the extruded part became a mess. I'll switch to face select, select all the faces and then hit 'Recalculate'.
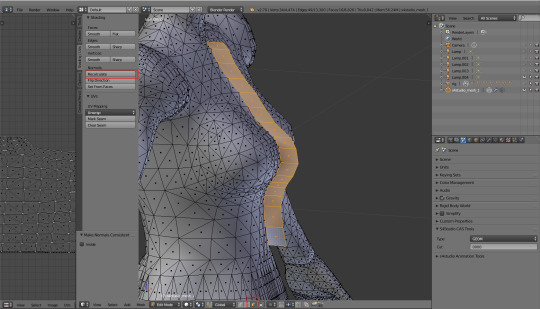
And here comes the surprise: I won't duplicate it and flip direction immediately. First I'd like to adjust it, so that it sits perfectly; some subdividing, some proportional editing, moving vertices around to get a natural, smooth look. Creating the other side is usually the very last thing I do, just before taking in-game screenshots and posting my CC. Single vertices are easier to deal with, and every piece requires tons of corrections and small adjustments, long after you first think it's already done.
In any case, in some distant future, when I'm sure that this... Frill? What even is this? ...works properly, I'll select those faces again, press shift+d, enter, and then flip direction. Let's just see how it'd look now...
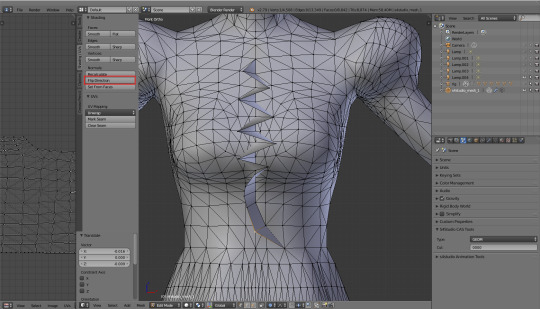
The frill is double-sided. Victory!
===============================
8. Knife project
My absolute favourite tool ever, which I use in almost every second mesh. Similar to knife, but way more sophisticated. It lets you project a shape of one object on another one, cutting it into the mesh. Let me explain...
So, let's say your dress is supposed to have a round collar. You could dissolve some edges, make new ones and move already existing vertices, hoping to get that perfect, round shape – but for reasons which we'll discuss next time (uv-1) I would advise against it. So what's the alternative?
Go into object mode and create a new circle (shift+a). Move it around, rotate it, scale it etc. - do whatever you have to to position it exactly in the place where you want your mesh to be cut. Watch out: your viewpoint matters! Knife project is cool, but a bit dumb and will just cut through the first layer it sees on its way. From my experience, it's the best to make two cuts: one exactly from the front, the other from the back. So press num 1 and put the circle (which you can also make into a half-circle btw, that might be easier) in the right place. Let's say we want it here...
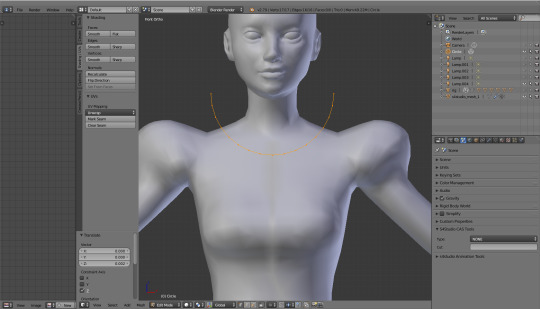
Now, go back to object mode. Click the cut called 'Circle' and then, while holding shift, your mesh: s4studio_mesh_1. Go to edit mode. You'll see that you're back to your base mesh, but the red half-circle is still floating in the air right before it.
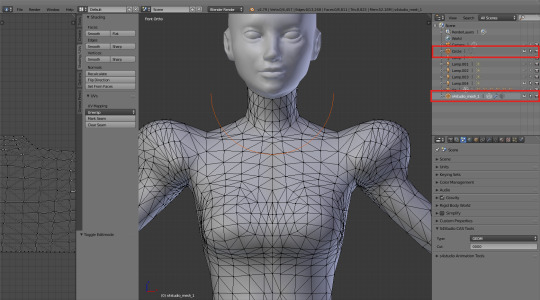
Open that sidebar on the left (T), go to the 'Tools' tab and click 'Knife Project'. Now, before you do anything, go to back view (ctrl+ num 1) and click 'Knife Project' again. Hide the circle by closing that little eye on the right (or just right-click it and choose ‘delete’, if you’re sure you won’t need it anymore) and admire your newly cut collar.
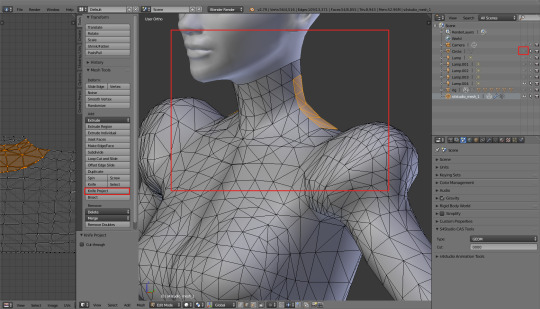
What about all the new vertices? There's so many of them, how to clean them? Again talking from my own experience: merging (alt+m) is safe only in case of vertices which are located very close to each other. Also, if you merge after using knife, always merge at center. However, the rule of the thumb is: it's always better to dissolve and cut new edges than move the existing vertices. Uv-1 can be nasty and trust me, you don't want to deal with it more than necessary. Be extra careful if you're merging or moving anything in the breast area! In there every tiniest mistake is immediately visible.
9. Edge split modifier
The last point on the list is not really a tool, but a modifier. Maybe you remember how Blender Guru was using something called 'Subdivision Surface Modifier' in his tutorial? The one we're going to use can be found in exactly the same place. Go to the little wrench on the right, click 'Add Modifier' and select 'Edge Split' from that menu.
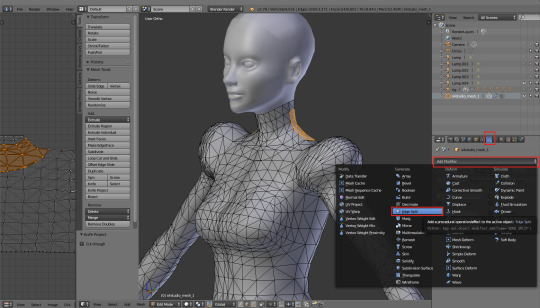
Untick the 'Edge Angle' option, leaving only 'Sharp Edges' selected.
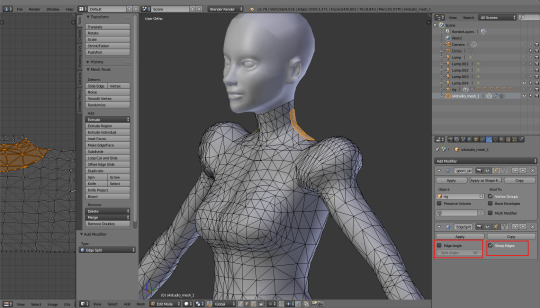
Why would you want your edges to be split in the first place? Because Blender by default smoothes any edges in your mesh. Normally it's a very welcome feature, but sometimes can be annoying. For example, if you 'close' your dress at the bottom – select the lowest row of vertices, extrude and scale them and then merge at center – the bottom edge of your dress will get slightly curved, creating an ugly, dark line:

There are two ways to fix it: either you select that lowest line, press ctrl+e and click 'Edge Split'... Or you choose, from the same list, 'Mark Sharp' and leave the actual splitting to the modifier. The immediate visual result will be the same; however, by only marking edges as sharp you don't actually split them yet, which makes it way easier in case of any future corrections. You don't have to remember to select each vertex twice, as they're not doubled. You can select all and remove doubles, and your edges still will stay marked as sharp. It's super useful and I wish I knew of its existence earlier – it would have saved me SO much work!
Just as a side note: obviously, those closing lines of skirts or sleeves aren't the only places you might want to mark as sharp. The same goes for anything that's layered, so e.g. edges between a shirt and a jacket, edges around a necktie, around a belt etc. If you're not sure what you should mark and what not, just take a close look at your mesh in solid shading. Any weird shadows visible? Mark the edges. The problem should disappear.
And you know what's the best? Even when you apply the modifier – e.g. because you want to be able to quickly select only a certain, separated part of your mesh (with L) – the edges still stay marked as sharp! So you can just do your corrections, select all and remove doubles, and then add the Edge split modifier again. It's so quick and simple.
By the way, you don't even have to click apply for the modifier to work. Even if it's left unapplied, S4S will still recognise it and import your mesh with all the sharp edges being split. Magic!
*** *** ***
I'm sorry it got so long, but I think I really managed to cover every important aspect of meshing. You know all my secrets now :P. Unfortunately, meshing is only a small part of CC making, so there are still many things we'll have to discuss – but hopefully it's somehow comforting to you that at least that part is over. I hope I helped you feel more confident in Blender and saved you some meshing struggles! I know for a fact that not knowing the majority of those things was the reason why meshing my first dress took me two months ;].
Let me know if anything isn't clear and stay tuned! We'll finally talk about uv maps next time.
(Next: V. Adding missing body parts / Frankenmeshing / Finishing touches)
475 notes
·
View notes
Text

I knew this would happen. I accidently deleted an ask. Thank god I took a screenshot of it before deleting it...🙏🙏🙏
Whoever asked this, I'm praying that they will see this post.
WORD COUNT: 2,824
Vert x Reader x Alternative Vert
You settled in handler corners about a year ago and made friends with the people who work at spectre motors. But, one day you became awestruck for the fact that you saw them coming out of a portal. That's when you knew what they really do. You have been nagging them to bring you with them but Vert refused. The reason why is because he's afraid you might get hurt and also, you tried to ride the saber the other day. But, what happened was you drove it to the maximum speed limit. And you crashed his car on a giant rock. You hit your head on the glass real hard and ever since then, he's been treating you like a kid. So, you kept annoying Vert to the point where he gave up and said yes. But he told you to not walk around the battle zone and instead, stay with Stanford.
You were with them on the training tracks watching the solar eclipse through those special glasses that allows you to look at the sun, until Sage announced through their coms that a stormshock was detected, with a warning. Those solar flares could damage their vehicles. Vert turned to you with a serious expression. "Don't get out of the reverb. If you do, then it'll be the last time I'm taking you to a battlezone". You nodded in agreement. You hopped on the reverb and they all took off.
"Stay double frosty guys. Sage said those solar flares could do nasty stuff to our instruments." Vert warned. "Solar activity peak level coinciding with portal entry" Sage announced through the coms as Stanford kept touching a button on the touch screen of his reverb. "Might explain why my rear axle telemetry a bit dodgy." Stanford said.
"Caution. Battlezone may also be affected."
Everyone got inside the portal and arrived on a planet that looks really fimiliar. Like the ones they show on science fiction movies. "Looks like a standard alien desert to me." Spinner said. "Everybody make some dust. Find me a key!" Vert said as he went to the other direction. "As soon as I find out what's wrong my axle. Catch up with you." Stanford parked his car on an area near a mountain. You got annoyed because you couldn't see the rest of the zone for a bit.
Stanford got out of the reverb with a socket wrench that he carries with him. He crossed your arms as you watched him open the bonet. "First rule of a manual servo repair. Never need one." Stanford started to twist and turn some of the parts with the socket wrench. You grunted in annoyance. "Hey Stan. Can I get out and watch the view. I wanna walk around a bit." You asked. "No. Vert told me to make sure your inside the Reverb at all cost." Stanford replied. Not looking in your direction. "Come on! I don't wanna sit here! I just wanna walk!!!" You whined. But, he just ignored you. You looked outside and sighed. Then you got an idea. "Hey stan. I'll make a promise to you if you let me out." You said. He looked at you, a brow raised. "What promise?" He asked. "If you let me out, I'll tell Grace how amazing you are! I know you like her and I'm sure she'll listen to me. That way, she'll ask you out!" You said, with a big smile. He rubbed his chin and thought about it for a second. A smile formed on his face. "Okay! You can come out!" He said. You felt really happy and when you got out of the reverb, you gave Stanford a big hug. "Thank you!!!" You said, before going to the other side, enjoying the view.
You kept walking around until you saw something coming from the distance. It looked like a gold chariot... And it was coming towards you. You ran to Stanford and hid behind him. He gasped when he saw one of his enemies right in front of him. He dropped his socket wrench as the mutant like creature aimed his crossbow at him.
"Go on then! What are you waiting for fang face?!" Stanford said with pure hate. "Even though you humans want to destroy my world, I cannot attack an unarmed man." Kalus said. Stanford looked at him, confused. "Who are you? And what have you done with Kalus?" Stanford asked. "And you, are not acting like a member of the evil battle force 5!" Kallus exclaimed. "Evil battle force 5?" You whispered. Stanford looked at you, indicating he was confused, just as you.
"Mount your vehicle and let us battle as honour dictates." Kalus said. Stanford took a step back, almost stepping on your feet. "Uhh.... One moment..." He said before he spoke through his com. "Guys! Kalus has me in his crosshairs, but he's being... Honourable. Please advice." "On our way!" Vert replied as he and the others went to where Stanford stood.
You saw the team coming towards them from the distance. The tension was relieved.
"Huh! Typical Battle Force 5. Refusing to choose the Vandal code to settle our differences like gentleman!" Kalus spat.
"A vandal gentleman? Huh! In what world?" Sherman asked. "Maybe in this world. Sage said the battlezone could be affected. Captain Kalus! Wait! Please." Vert stopped the Saber infront of him. You and Stanford quickly got inside the Reverb and he aimed the sonic canons at Kalus. "Captain Kalus!" Vert called as he got out, without bringing his double edged sword. Kalus aimed his crossbow at him. "I'd like to speak with you! I've come unarmed." He walked towards him. "Vert! We've got him surrounded. What are you doing?!" Agura questioned. "Playing a hunch I'm about to wish I never had. Cover me but stay back." Vert said. Kalus got out of his chariot. "What kind of trickery is this?!" He questioned. Vert held out his arm, motioning Stanford to turn off the sonic canons.
"You... Ordered your team to stay back..." Kalus said. "I did. So, where is yours?" Vert asked. "Ugh! You know very well what happened to them!" Kalus said before sniffing Vert's uniform. "Or do you?" Kalus got surprised of the scent Vert had. It wasn't the same scent he was fimiliar with.
"It's not Kalus!" Vert turned around to the team. "Uhh... How many talking lions with crossbows are there riding around in gold chariots?" Agura was confused. Zoom came and stopped the chopper beside the tangler. "Just did a flyby on the battle key!" He said before turning to Vert. Surprised to see Kalus standing next to him. "Whoa! And we're not whipping lion butt why?" "Somehow those solar flares must of connected us to a dimention exactly opposite our own." Sherman explained. You gasped in surprise. "Am I gonna see the opposite version of the team?" You thought. "With good Vandals! (Idk what word he said after that... lol)" Stanford said, confused and surprised at the same time. "So where's the rest of your team?" Vert asked. "My good friends Hatch, Xever and Crocomodo were elimimated... Long ago...." Kalus said sadly. His face drooped down. You looked at him with pity. "By who?" Vert asked. "By.... Them...." Kalus pointed to the distance, as he heard a team of cars racing towards them. The whole team looked at the distance and saw their opposites. "Those look just like our rides!" Sherman exclaimed. "Normally it's between me and that battle force 5. Which exists only to conquer peacefull worlds..." Kalus said.
"Well... Look what we have here?" The alternative vert's voice was heard through the com. You gasped at how his tone was so.... Evil... "They look like us, but they're so... Clean." "Not after I'm done with them." "I wanna smash them. Into teeny tiny bits!" "Wow Sherm! That was nearly a complete sentence!" "Oh, you boys are like soooo immature!" "Shut your traps. First we get the key. Then we play...." A fit of evil laughter sent chills down your spine. Anti-Vert noticed you sitting with Stanford. He looked at you and winked. "Uhhh...." You had no words to say. "Whoa. Doppleganger dudes really got their fight on!" Spinner said. "Can't let 'em get the key. What do you need Zoom?" Vert asked. "Battle key is in the side of a mini mountain. Gonna need Agura!" Zoom replied. "Nothings out of my reach!" Agura said. "Agura go for the key. Everyone else on defense. Let's go!" The team charged towards their opposites. They looked at each other in pure hate. You gripped on your seat because of how fast the Reverb was going.
"Looks like those goodie goodies are gonna get in our way!" Anti-Spinner said. "Split up. Take 'em one on one." Anti-Vert ordered. The Saber's blades collided with each other. Anti-Vert's blade scraped past the Saber. Vert grunted in anger.
Anti-Vert's Saber got near the Reverb and he came to your side of the car. "Hey sexy! He thinks he's better than me. Let me show you what I can do." He said before charging towards Vert's Saber. Vert got really angry when his alternarive self called you "sexy". God, he wanted to punch his anti-self's perfect teeth. "If you are trying to challenge me, you're doing a terrible mistake! I'm gonna kick your butt!" Vert said. "That will be in your dreams. The woman/man is mine!" Anti-Vert said. "No, mine!" Vert muttered. "She/he is mine!"
You were watching the entire thing. Each time Vert gets pushed back by his anti self, Anti-Vert has a grin on his face. He knows you are still watching the fight. But, you suddenly can't see them because the Reverb has gone away from them. "Stanford. Follow the girl/boy and try to wreck their Reverb." Anti-Vert said. "Consider it done!" He said. You saw Anti-Stanford following the Reverb really tightly. "Ohmygosh. Please go faster!" You said. "I am!" Stanford swerved the car left and right. Trying to avoid the sonic attacks. His anti self got to your side and you gasped when he made his car push the Reverb to the side. Both Stanford and his evil self pushed each other back and forth. "Coming here was a bad idea..." You regreted annoying Vert. This is what Vert has been warning you about. Something like this always happen. Suddenly, Anti-Stanford pushed his vehicle too hard on the Reverb. Causing the mirror on your side to break. Shards of glasses fell onto your arm. It's sharp sides grazed your skin. Causing a cut on the thin layer of skin. But enough to bleed. It stinged a little. "We'll get away from.... Me..." Stanford somehow managed to turn the Reverb, making it face his anti self. They both sonic blasted each other. Stanford and his anti self took the hit, causing the Reverb to be pushed back. You hit your head really hard on the back and on the side..... The glass shards cut the side of your cheek. It started to bleed and your head hurts fr om hitting the back too hard. "(Y/N)!!! You're bleeding!!!" Stanford gasped in horror. "I'm... I'm okay... Just go!" You said. The Reverb took off, leaving Anti-Stanford alone. You started to feel nauseous and a splitting headache took place. "I... I don't feel so good..." You said, covering your mouth. Trying not to vomit because of how the Reverb's movement is. "I'll take you somewhere that'll keep you safe!" Stanford said.
Stanford parked the Reverb on a small cave. A cave where it's not clearly seen. Both you and Stanford got out. You sat on the floor, leaning onto the wall, as Stanford inspected your injuries. "I don't have an emergency kit. Sorry about that..." Stanford apologized. "N-no it's okay." You said, as you took out your handkerchief from your pocket. You placed it on your cheek, hoping the bleeding will stop. "I should be the onr who's sorry. I shouldn't have come here." You said sadly. "It's okay (Y/N)." Stanford smiled. "You stay here. The Reverb is already damaged. If you're in it, then it'll cause more injuries to you. Our opposites won't find you." Stanford said as he got inside the Reverb. He disappeared into the distance and you sighed. "I shouldn't have come here..."
Vert and his anti-self kept pushing their vehicles on each other, causing a lot of damage. He chuckled. "You already know that soon, the woman/man that you have brought with you on your mission will be mine! I already know it. You're weak!" He said. "Not gonna happen!" Vert shouted. Then Anti-Vert saw the Reverb coming out from the side of a mountain, but you weren't there with him. "Are you sure Vert?" Anti-Vert asked before violenly pushing Vert's Saber with his blades. Vert's vehicle flipped over and Anti-Vert went to where Stanford came.
You started to feel lightheaded and your head was throbbing and you placed your hand on the back of your head. You felt warm liquid covering your palm. It was blood. You sighed, praying the team will come back to get you. You laid down and curled up like a ball, trying to fall asleep. After a few minutes, you heard a vehicle coming towards you. It sounded like the Saber. You felt relieved for Vert being here and you got up... Only to see his alternative self staring at you. He chuckled. "Are you trying to rest my love?" He asked. "I'm not your love! Leave me alone!" You said, as you stood up. "You don't know what I am capable of. I'm way better than the Vert from your homeworld." He said. "Oh no no no. You are just a freak. I don't like men like you!" You shouted. He looked at you with no emotion. He took a step towards you and you took a step back. "Me? A freak? Ha! You don't know me well dear." Vert said. "And you don't know me as well. I'm capable of fighting you off. I have a black belt in karate!" You exclaimed. Suddenly, Anti-Vert just burst out into laughter. "Do you really expect me to believe that?! You don't look like the type to be violent." He said. "Oh, But I am. Don't mess with me!" You said. He took a step forward and you lunged at him, ready to punch his face. But, he grabbed both of your wrist. "Hm... A black belt in karate, huh?" He said, mockingly. "I-I just went e-easy on you!" You said, as you tried to pull yourself out of his grip. But, he was too strong. "Don't even try. You're weak!" He said. You mentally slapped yourself from doing that stupid move. The amount of energy you took to get out of his grip made you feel as if the world was spinning around you. Your legs became weak and you almost fell down, but Anti-Vert caught you. He grazed his fingers on the cut on your cheek. "Looks like Stanford got a little harsh on you...". "I'm very sorry about that..." He suddenly pinned you against a wall.
He looked at how vulnerable you are. It didn't take long to smash his lips onto yours. You couldn't protest as your body felt like jelly. He stopped kissing you as you bit his tongue harshly. "Gah!" He hissed in pain. You fell down on the floor. "D-don't do i-it a-again...." You spoke. Your voice was weak. The blood from his tongue starts to drip down from his mouth. "I would love my woman/man to be a little more compliant. I don't mind playful biting.... But, not in a way it'll stop someone from kissing you..." He said. "Go... To... Hell!" You spat. He just laughed. "You will be under my control when I take you away from them!" He said, with a wicked smile.
"STAY AWAY FROM HER YOU SACK OF SH*T!!!" Someone shouted from the distance. You both looked at who it was. It was Vert. Your Vert. He ran towards his anti-self and kicked him in the guts. Anti-Vert grunted in pain. "You will seriously gonna regret doing that!" He said. "YOU WILL SERIOUSLY GONNA REGRET TAKING MY WOMAN/MAN AWAY FROM ME!!!!" Vert shouted. Then, both Vert and his alternative self started to have a fist fight. You couldn't move or speak, and you laid down almost unconscious.
Vert somehow beaten his anti-self down. He ran to you and picked you up. "You're bleeding!!!" He gasped as he felt the warm liquid from your head. He ran out of the cave and placed you inside the Reverb. "Get her/him home! Now!" He ordered. Stanford nodded and he took you to the hub. He went back to the Saber and looked at his anti-self. "You and I are gonna have a fight. With our vehicles..." He said.
Part 2 (Coming Soon)

#hot wheels#hot wheels battle force 5#battle force 5#bf5#hwbf5#vert wheeler#agura ibaden#zoom takazeumi#sherman cortez#spinner cortez#stanford isaac rhodes iv#sage#evil vert#vert x reader#(y/n) (l/n)#i accidently deleted the ask
31 notes
·
View notes
Text
Mobile Game Review - Emperor of Mahjong (Suggested by @spaceswordblaster)
Note: This game used to be called Jewels of Mahjong.
I was originally going to do this as an “ads vs. gameplay” type review but I ran into something weird which is my fault for not doing any further research until I was just about to write my review.
@spaceswordblaster (thank you for the suggestions by the way!) said they saw an ad for this game that made it seem like a matching game with a cowgirl as the main protagonist. This game is not like that at all, but when I went to look for the ads for Emperor of Mahjong (which like I said I only did after I had played the game itself for the while and needed them for my review) I realized it doesn’t really have any actively running ads that I could find; for some reason Facebook keeps taking down its ads for being about social or political issues (but I was still able to view the ads and they didn’t seem to be about that at all but I’ve found Facebook tends to do that randomly sometimes lol). The ads I was able to see were basically exactly what the game is like: very straightforward and honest ads.
However, G5 Games, which is the company that made this game, also has a game called Jewels of the Wild West, which sounds exactly like what spaceswordblaster was talking about (as well as a game called Sheriff of Mahjong, which is also cowgirl-themed). So it sounds like G5 got its wires crossed at some point and put the wrong game logo in the Wild West/Sheriff ad or had the ad link back to the wrong game listing. I say this is my fault because if I had researched the ad first thing, I would have realized this and probably played Jewels of the Wild West first, or both games instead of just one. It’s worth mentioning that some of G5 Games’ ads are the fake-seeming “pull the pin” or “my husband is cheating on me” type, just not for this particular game that I actually played lol.


Since I did play this game for a considerable amount of time, I’ll still review it! And I’ll take it as a lesson learned to watch the ads first if I haven’t seen them already.
Read my full review below!
***
***
***
***
***
🏛 What is this app? Emperor of Mahjong is a free mahjong game that is set in ancient Rome. The game follows a storyline and involves quests that require you to find certain items by completing mahjong levels - there are different buildings where you can play mahjong levels and each building has different possible items you can receive as rewards for completing the level. Sometimes you need to craft items together to get the item to complete the quest, and you can also find and craft together map pieces to unlock new buildings. Additionally, there are monsters you can “battle” by playing a specific type of mahjong level where the goal is to remove tiles specifically next to a certain object to “attack” the monster.
👍 What’s good about this app? This is honestly a great mahjong app, although to be fair I’ve never actually played a mahjong mobile game before, only mahjong computer games a while back. But everything is really top-notch here from the art, to the mechanics, to the quests, which create a really appealing structure around the mahjong levels as opposed to just having something that’s level after level with no other real goal.
While playing the main mahjong levels in this game is pretty straightforward - you just tap the two matching tiles you want to remove, plus there are some boosters/hints you can use like reshuffling the tiles or highlighting matching tiles if you can’t find any - one of the really appealing features is the auto zoom, which, as the name suggests, automatically zooms into the area where there are still tiles as you gradually remove tiles, so you don’t have to manually zoom or pan around when you start creating more empty space on the board (although you can if you want to). The mechanic is very smooth so you almost don’t notice it’s happening and it just helps you stay focused on making matches, which is useful because you get bonuses for completing consecutive matches within a certain amount of time. I also like the sound effects when you match tiles, it just makes the overall gameplay really satisfying.
(Gif below sped up to demonstrate the otherwise subtle adjustments of the auto zoom feature - also poor quality because idk how to make better gifs from videos lol)
The game also has enough variety and is challenging enough to keep me interested - some levels will be more difficult than others to successfully complete (you lose the level if you run out of matchable tiles) and there are also challenges like going around collecting the right items to complete a quest or to be able to battle a monster (since you need to have certain items to initiate a battle). And the idea of having battle stages on its own is really unique (at least as far as I know, since I haven’t played a lot of mahjong games), I never thought of mahjong being played like that and I’m always interested when games take a well-known puzzle and create a new way to play it.
The other thing I like about this game is that it seems you can really play endlessly for free - you do need to spend energy to play mahjong levels but I never ran out of energy since you have a decent amount to start out with, your energy refills every time you level up and your max energy also goes up each time you level up. The only pop up ads I’ve seen so far are ads for other G5 games, and occasional popups for microtransactions (like if you try to craft something and don’t have all the items you need it will ask you if you want to buy the missing items for real money, typical stuff like that). As far as free puzzle games go this one is really impressive and I’d definitely continue playing after this review!
👎 What’s wrong with this app? Honestly, I don’t really have much to criticize about this app. I guess one thing I would say is that first starting out it did seem a little overly complicated until I played longer and got a better grasp of the quest system and how to get items etc. They probably could have explained all of that better in the tutorial or eased you into it more, because if you’re going into it expecting or wanting just a mahjong game you’re going to feel confused and overwhelmed when it’s telling you need to collect this and build that and combine these items etc. If you want something more straightforward and linear where you can just play mahjong levels continuously then this might not be the game for you.
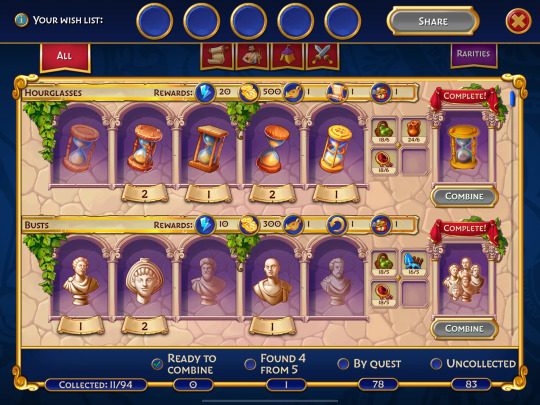
🍇 Full list of features (there may be more unlocked as you go along so this list may not be complete but here’s everything I’ve seen so far):
Regular mahjong levels, with boosters (the symbols on the tiles differ slightly between the different buildings you can play mahjong in, and you can also get different rewards for playing mahjong in different buildings)
Storyline (the story is set in ancient Rome and the main antagonist is Cassius. I’m not that familiar with Roman history or anything and I wasn’t always 100% sure what was going on but there was definitely an overarching plot being conveyed through dialog from the characters and short narrative chapters. Each quest path is also its own mini side story and I found that easier to follow, and liked having a story behind each item I was asked to retrieve. Some of the quests are what I would consider “main quests” that tie more into the overarching story.)
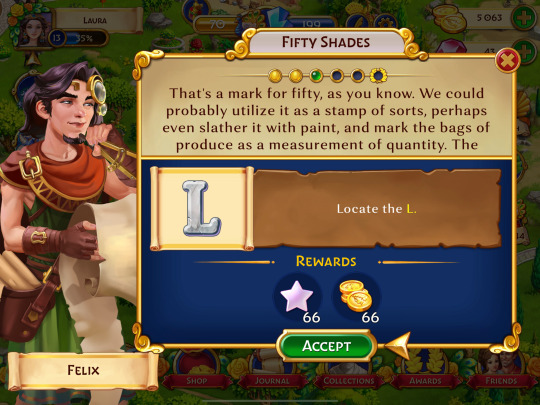
[Image Description: A quest from the character Felix titled “Fifty Shades.” The quest dialog reads, “That’s a marker for fifty, as you know. We could probably utilize it as a stamp of sorts, perhaps even slather it with paint, and mark the bags of produce as measurement of quantity” and is cut off after the start of the next sentence that starts with the word, “The.” The quest task reads, “Locate the L” and an image of stone letter L is shown. Experience and coin rewards are shown above a green button that reads, “Accept.”]
Quests (the main way of progressing through the games, you complete quests by finishing mahjong levels to retrieve the needed items)
Collections/crafting (for some quests you’ll need to combine a set of items and resources to get the final item to complete the quest)
Construction (as you progress there will be points where you are tasked with collecting map pieces, and when you collect the complete set you can construct a new building with new mahjong levels, new possible rewards and a new set of quests. I believe you can also upgrade buildings as you go along to improve their rewards)
Monsters/battles (there are monsters throughout the map that you can “battle” in a mini mahjong game by matching tiles next to the weapon you need to “attack” the monster. You need to collect these weapons from other mahjong levels first before you can enter a battle, and defeating the monsters yields unique items you need for some quests)
Award statues (when you reach certain achievements there are statues that appear throughout the map of different Roman gods that can be tapped occasionally to receive a reward such as energy or a resource needed for crafting. These statues upgrade as you complete more achievements which I assume either gives you better rewards or makes them refresh more often)
Random treasure (sometimes there will be random treasure on the map that you can tap to get free rewards/resources)
Events (there are sometimes limited time events with their own storylines, associated quests and mahjong levels/buildings)

[Image Description: A screenshot of the storyline of the “Backstage Passions” event in Emperor of Mahjong, which is shown as an open book with an image and progress bar on one page and an image and text on the other. The first page shows a color image of the character Argus arm in arm with a woman as the character Vita watches on from beside a pillar in the background with a concerned or upset expression on her face. Underneath is a gold progress bar showing the event is about 75% complete with an ornate golden prize box at the end of the progress bar.
The second page shows a black and white image of Vita speaking to three other women with text underneath reading, “It turns out that Argus managed to have an affair with three difference women: a wealthy widow, a nobleman’s only heiress, and a famous merchant’s daughter! Vita is sure that Argus is going to deceive the poor ladies and run off with their money. A true organizer of-“ The last line of text is partly faded at the bottom and the rest is cut off. A green button under the text reads, “Play.”]
⭐️ Overall Rating: 5/5 (This is a really well-made and satisfying free puzzle game and definitely made me interested in checking out G5’s other games as well! But like I said it’s a little more involved and complicated than a general mahjong game so if you prefer something with straightforward linear levels you might want to try something else.)
Thank you @spaceswordblaster for bringing up this game to me, I really enjoyed it and it helped me kill a lot of downtime while I was on vacation! Sorry I didn’t look more into the cowgirl thing but maybe I will play some of those other games in the future :)
Thanks for reading! 🥳
#mahjong#emperor of mahjong#puzzle games#ancient rome#free games#recommended#mahjong games#image descriptions in alt text#flashing gif warning#gif warning#flashing lights tw#g5 games
2 notes
·
View notes
Text
UI That Isn’t Terrible - (1.1 Update Post)

This week nothing that amazing was completed. Apart from a new pack selection UI with an image and some metadata instead of just a name label, and a new door destination selection UI which doesn’t suck.
Let’s start with the new pack selection UI.

This shows up for both your own editor made packs, and any custom packs you’ve downloaded. The screenshot above shows it being used in the editor.
As you can probably tell, the image functionality is a bit of a work-in-progress, and currently just displays a (very slightly messed up) screenshot from the editor, taken automagically. The goal is to let you take your own screenshot in-game or make a custom graphic for it, and put that as the image. It’s stored with the pack so anywhere the pack goes, the image goes with.
There’s also some extra metadata. You can see the timestamp of the last time the pack was edited at the very bottom. Above it is the creator name and the room and world count. That and the timestamp are both made automatically.
And here’s the second actually interesting thing: a new door destination selection.
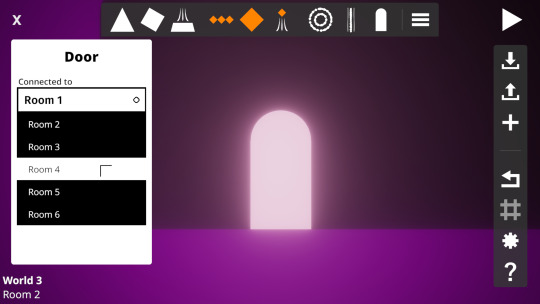
Well okay, it’s not that interesting. But it is a big improvement.
The current system is quite terrible. It requires you to manually enter the name of the room or world you want to connect it to. That’s already pretty annoying, and it would be even more annoying in 1.1 due to the new “renaming rooms, worlds, and packs” thing that’s going around. In 1.1, there’s just going to be a dropdown that allows you to choose from all the rooms and worlds in the current pack. That’s it. Renaming doesn’t affect it.
As for the smaller things I’ve managed to complete, I’ll just list some of the more interesting ones:
Improved item drag-on-top reliability.
The falling void can no longer be moved above the spawnpoint.
The PolyMap shapes now have lock on guides. (You can check that out on Twitter by clicking here.)
Added a guide page explaining how buttons work.
Buttons also explain what they’re doing in the editor a lot better.
Point snapping now takes camera size into account.
The rename icon is now a pen.
And that’s about it! You should follow @lastquarterdev on Twitter, and join the Last Quarter Studios Discord server if you haven’t yet.
17 notes
·
View notes