#setting up one of these integration test suites in postman
Explore tagged Tumblr posts
Visit Tumblr Blog
Explore Tumblr blogs with no restrictions, modern design and the best experience.
Last Seen Tumblr Blogs


Fun Fact
The average Tumblr user visits about 67 pages every month.
Text
Programming object lesson of the day:
A couple days ago, one of the side project apps I run (rpthreadtracker.com) went down for no immediately obvious reason. The issue seems to have ended up being that the backend was running on .NET Core 2.2, which the host was no longer supporting, and I had to do a semi-emergency upgrade of all the code to .NET Core 6, a pretty major update that required a lot of syntactic changes and other fixes.
This is, of course, an obvious lesson in keeping an eye on when your code is using a library out of date enough not to be well supported anymore. (I have some thoughts on whether .NET Core 2.2 is old enough to have been dumped like this, but nevertheless I knew it was going out of LTS and could have been more prepared.) But that's all another post.
What really struck me was how valuable it turned out to be that I had already written an integration test suite for this application.
Historically, at basically every job I've worked for and also on most of my side projects, automated testing tends to be the thing most likely to fall by the wayside. When you have 376428648 things you want to do with an application and only a limited number of hours in the day, getting those 376428648 things to work feels very much like the top priority. You test them manually to make sure they work, and think, yeah, I'll get some tests written at some point, if I have time, but this is fine for now.
And to be honest, most of the time it usually is fine! But a robust test suite is one of those things that you don't need... until you suddenly REALLY FUCKING NEED IT.
RPTT is my baby, my longest running side project, the one with the most users, and the one I've put the most work into. So in a fit of side project passion and wanting to Do All The Right Things For Once, I actively wrote a massive amount of tests for it a few years ago. The backend has a full unit test suite that is approaching 100% coverage (which is a dumb metric you shouldn't actually stress about, but again, a post for another day). I also used Postman, an excellently full-featured API client, to write a battery of integration tests which would hit all of the API endpoints in a defined order, storing variables and verifying values as it went to take a mock user all the way through their usage life cycle.
And goddamn was that useful to have now, years later, as I had to fix a metric fuckton of subtle breakage points while porting the app to the updated framework. With one click, I could send the test suite through every endpoint in the backend and get quick feedback on everywhere that it wasn't behaving exactly the way it behaved before the update. And when I was ready to deploy the updated version, I could do so with solid confidence that from the front end's perspective, nothing would be different and everything would slot correctly into place.
I don't say this at all to shame anyone for not prioritizing writing tests - I usually don't, especially on my side projects, and this was a fortuitous outlier. But it was a really good reminder of why tests are a valuable tool in the first place and why they do deserve to be prioritized when it's possible to do so.
#bjk talks#coding#codeblr#programming#progblr#web development#I'm trying to finally get back to streaming this weekend so maybe the upcoming coding stream will be about#setting up one of these integration test suites in postman
78 notes
·
View notes
Text
Free API Testing: Your Complete Guide to Testing APIs Without Breaking the Bank
APIs are the backbone of modern software, connecting everything from mobile apps to web services. Testing them is essential, but you don't need a huge budget to do it right. There are tons of free API testing tools that can help you validate your APIs without breaking the bank. Let's dive into why API testing matters and how you can get started!
Why API Testing Is Crucial
API testing is key for ensuring that your app communicates smoothly with other services. It’s faster and more efficient than traditional GUI testing, and it catches issues early in development. With modern apps relying on microservices and multiple APIs, a single issue in one API can cause major failures in the system.
Benefits of Free API Testing Tools
The best part? You don’t need to spend a fortune on testing tools. Free API testing tools break down the financial barriers, allowing developers to test thoroughly without high upfront costs. These tools are often open-source, offering transparency and customization to suit your specific needs. Plus, they have great community support and documentation!
What to Look for in Free API Testing Tools
When selecting a tool, make sure it supports multiple HTTP methods (GET, POST, PUT, DELETE, PATCH) and handles various authentication methods (like API keys, OAuth). Automated testing capabilities and integration with your CI/CD pipeline are also key for making your testing process smooth and efficient.
Popular Free API Testing Tools
Here are some top free tools to consider:
Postman: A favorite among developers, Postman’s free tier offers powerful features like automated testing and mock servers.
Insomnia: Great for testing GraphQL and REST APIs, with extensibility through plugins and built-in code generation.
curl and HTTPie: If you prefer working from the command line, these tools are perfect for simple, scriptable API tests.
Setting Up Your Free API Testing Environment
Getting started with free API testing is easy. First, list all your APIs, document their endpoints, and set up a testing strategy. Organize your tests into collections and set up environment variables for each stage of your development. It’s a great way to keep things secure and portable.
Best Practices for API Testing
Effective testing means covering all angles: test positive and negative cases, edge conditions, and performance. Don’t forget security! Ensure your APIs handle errors properly and respond with meaningful status codes. Performance tests can also help spot issues before they impact users.
Advanced Testing Scenarios
Get creative! Free tools can handle complex scenarios like chaining API calls, data-driven testing, and mocking external dependencies. With these techniques, you can test end-to-end workflows and handle large datasets efficiently.
Integrating API Testing into Your Development Workflow
Automate your API tests and integrate them into your CI pipeline. Every code change should be validated by API tests to catch regressions and ensure smooth deployments. Plus, setting up notifications and sharing your testing procedures will help maintain consistency across the team.
Overcoming Challenges with Free API Testing
While free tools are powerful, they do have some limitations. Rate limits are a common challenge, especially when working with third-party APIs. Implement delays between requests and respect the limits to avoid disruptions. And as your test suite grows, managing test data becomes more complex—so be sure to clean up data and use unique identifiers to keep things organized.
The Future of Free API Testing
The future looks bright! AI and machine learning are making their way into API testing, helping tools automatically generate test cases or identify issues. Cloud-based testing platforms are also on the rise, making it easier to scale your tests without worrying about infrastructure.
Conclusion
You don’t need expensive tools to do effective API testing. By choosing the right free tools and following best practices, you can build a robust testing strategy that ensures your apps are reliable and secure.
Ready to step up your API testing? Explore modern testing solutions with Keploy, and discover how to streamline your testing workflow.
0 notes
Text
Unlock the Power of Email with the Best SMTP and Email Marketing Service by Initsky

Email is not just another marketing tool—it’s a digital asset that generates ROI, builds community, and enhances retention. The backbone of this high-performing asset? A reliable SMTP and email server. And when it comes to selecting the right provider, businesses consistently choose the best SMTP and email marketing service by Initsky.
Why Email Still Wins in 2025
Social media platforms come and go. Algorithms change, ad costs rise, and attention spans shrink. But email remains stable, personal, and high-converting. Unlike social feeds, your email list is yours. No middlemen. No restrictions.
With the best SMTP and email marketing service by Initsky, you gain full control over your messaging, branding, and timing.
SMTP: The Engine Behind Every Successful Campaign
Imagine sending 10,000 emails per day from Gmail—it’s not going to happen. You’ll hit limits, experience blocks, and face deliverability issues. SMTP solves that problem. It acts as your personal email postman—fast, efficient, and trustworthy.
The best SMTP and email marketing service by Initsky comes with premium IPs, warm-up support, bounce management, and deep analytics to ensure every email hits its mark.
Why Initsky Outperforms the Competition
There are many email tools out there, but not all are built equal. Initsky isn’t just a bulk email sender. It’s an intelligent platform designed for conversion-driven campaigns.
From real-time data tracking to automated behavioral targeting, the best SMTP and email marketing service by Initsky stands out for businesses serious about ROI.
Features You Can’t Ignore
Drag-and-drop Email Builder
AI-Powered Personalization
Advanced List Management
A/B Testing & Spam Score Checker
Dedicated SMTP IPs
Integrated Webhooks & APIs
All these features are packed into the best SMTP and email marketing service by Initsky, giving you the tools to innovate, test, and grow.
Case Study: Small Business to Seven Figures
Take, for example, a small eCommerce business selling skincare products. They started using Initsky to segment users, create personalized flows, and retarget past buyers. Within 6 months, email became their #1 revenue channel—delivering a 7x ROI.
This is the power of the best SMTP and email marketing service by Initsky. It turns data into dollars.
Increase Customer Retention with Automation
80% of your future revenue will come from 20% of your current customers. With Initsky’s automation suite, you can keep those customers engaged. Birthday wishes, product recommendations, refill reminders—it’s all automated.
The best SMTP and email marketing service by Initsky makes customer retention effortless and effective.
Stay GDPR and CAN-SPAM Compliant
No marketer wants to deal with legal headaches. Initsky ensures that every campaign you send is compliant with privacy laws around the world. It automates unsubscribe handling, opt-in management, and data protection settings.
This makes the best SMTP and email marketing service by Initsky both powerful and safe.
Mobile Optimization and Accessibility
Over 60% of emails are opened on mobile. That’s why Initsky designs all templates to be mobile-responsive. With the best SMTP and email marketing service by Initsky, your emails look perfect on every screen.
This means higher open rates, better engagement, and more conversions.
Final Thoughts
In a digital world overloaded with noise, email remains the one channel where your message gets the spotlight. But to make the most of it, you need the best SMTP and email marketing service by Initsky.
Whether you’re launching a product, nurturing leads, or building a loyal customer base—Initsky helps you do it all with confidence, clarity, and creativity.
#EmailMarketing#BusinessGrowth#SMTPServer#DigitalMarketing#MarketingTools#Initsky#EmailAutomation#OnlineBusiness#MarketingStrategy#BestEmailService
0 notes
Text
EXCELLENT QA TESTING TOOLS YOU SHOULD KNOW IN 2022
SEstablishing a test plan that will assist you both during development and afterward is critical. It verifies that the software is operating according to the created specifications and designs.
You may be surprised to know that the software testing market has a worth of $40 Billion, and it will be rise at a CAGR of 7% by 2027.
You may now understand how important it is to do software testing.
Plenty of Software Testing and QA Services can help you with QA Testing tools.
However, one thing to keep in mind is that there are many various types of software requirements, each with its own set of necessities. A single testing instrument doesn’t have to meet all testing requirements. As a result, it’s critical to figure out which tools would best meet your needs. To accomplish so, you’ll need to evaluate the QA Testing tools.
QA Testing tools
Here is a list of QA Testing tools that can be used for automation testing and various software tests. These tools are highly useful, and they also help to speed up product delivery.
Cypress
It is written in JavaScript; therefore, Cypress is regarded as a universal automation framework. You may also use it to perform cross-browser testing. Chrome, Firefox, Edge, Electron, and Brave are examples of browsers. Cypress is comprised of two modules: a test runner and a dashboard. The cypress test runner is an infrastructure for authoring and executing tests. In contrast, the cypress Dashboard is a test runner that serves as both a recorder and a dashboard.
Cypress does not require selenium or WebDriver. It is beneficial to obtain snapshots for a step-by-step test run. It also includes images of failures and videos of test runs. Cypress comes with a built-in debugger. Furthermore, it has the ability to perform network traffic control for the purpose of stubbing traffic, and it does so without the use of a server.
Postman
The API test automation framework makes use of this testing application. It is beneficial for automating testing. Examples include end-to-end testing, unit testing, regression testing, integration testing, and functional testing. Postman is also helpful in performing HTTP tests. It uses a graphical user interface to receive several types of replies for HTTP requests. These responses must all be validated at the same time.
Schema support in Postman allows you to create, change, and import multiple schema formats. It also aids in the creation of collections.
Postman can also be used to build custom test suites and interact with a current CI/CD workflow. It also guarantees a high level of scalability in terms of test coverage and frequency. Above all, Postman can do high parameterization for a variety of contexts and test sets.
Flood.io
Flood is a load testing platform with numerous modules that is simple to use. These modules include the following:
Work as a real-time user simulator with element.
Agent serves as load simulators and analyzer on-premises.
Insight – BI performance analysis in history
Flood Grid is a cloud-based platform for deploying integrated load generators.
Flood can be combined with a CI or CD flow that already exists. It also offers a number of open-source integrations, including Selenium, Apache JMeter, and Gatling. All of these open-source programs address various aspects of testing. Selenium assists in the automated conversion of functional tests. While JMeter and Gatling provide high-load API performance testing, JMeter and Gatling are known for load generation and plugins.
Flood is an excellent solution for start-ups and small and medium-sized businesses. It is, nonetheless, helpful in offering help to businesses. It’s a cloud load QA testing tool that doesn’t require downloading and can be used in a browser. It’s also known as protocol-based software.
Lighthouse by Google
It is an open-source, automated web page that also checks the performance. It evaluates progressive web applications as well as SEO research and cache policy.
It’s easy to use Lighthouse to scan any online page, whether it’s public or requires authentication.
A full-scale website assessment is simple for Lighthouse to do. It can be attributed to modern metrics, Google search engine statistics, and development best practices.
It also offers reference studies on bottlenecks and assistance with various data to improve website speed. It also has detailed documentation.
Apache JMeter
It is one of the QA testing tools mainly used for performance analysis. Furthermore, Apache JMeter is written in Java and is an open-source framework. You can also call it a protocol-based tool that works to evaluate the functional behavior of web apps and FTP Apps. However, it has the caliber to handle a variety of apps, servers, and protocols.
Apache JMeter is considered a very useful tool that provides testing support to load testing, functional testing, and performance testing. It is a program that allows you to create dynamic HTML reports. It offers a Multi-threaded mode that makes it easy to distinguish individual threads and thread groups.
TestProject
It is a test automation tool for mobile, web apps, and APIs. The TestProject platform is supplied at no cost and with no obligation because it is absolutely free. With the help of the test project, all tests are centralized in the cloud. It also has a page object paradigm, which allows multiple locators per element to be used. Those aspects can be checked independently.
Test projects also make it possible to reuse tests in order to make them more data-driven and parameterized. TestProject also provides real-time AI-powered mobile and web test recorders that capture the testing process and can be analyzed later.
Read Full Content: Software Testing and QA Services
0 notes
Text
10 top API security testing tools

Application programming interfaces (APIs) are a critical part of most modern programs and applications. In fact, both cloud deployments and mobile applications have come to rely so heavily on APIs that you can’t have either without an API managing components somewhere along the line.
Many larger companies, especially those with a big online presence, have hundreds or even thousands of APIs embedded in their infrastructure. The growth of APIs will only continue to increase.
The ingenious thing about APIs is that many of them are just tiny snippets of code, and all are designed to be small and unobtrusive in terms of their network resource requirements. Yet they are also flexible and able to keep working and performing their main functions even if the program they are interfacing with or controlling changes, such as when patches are applied.
As amazing as APIs are, they also have their faults. Because they can be designed to do almost anything, from single functions repeated over and over to smartly controlling the advanced aspects of various programs or platforms, almost no standards govern their creation. Most APIs are unique, and many organisations simply create new APIs as needed. That can be a nightmare for security teams.
Another way APIs are attractive to attackers is that many are over-permissioned. Even APIs that perform only a few functions often have near administrator privileges. The thinking is that such a tiny API could not possibly do any harm.
Hackers compromise APIs and then use those credentials for new purposes, such as data exfiltration or deeper penetration into a network. According to security research conducted by Akamai, nearly 75 per cent of modern credential attacks targeted vulnerable APIs.
The problem is getting worse. According to Gartner, by 2022, vulnerabilities involving APIs will become the most frequently attacked vector across all cybersecurity categories.
API testing tools to the rescue
Having a critical networking and program component in the crosshairs of attackers is bad enough, but with APIs the situation is even more precarious because of the lack of standards involved in their creation. Many organisations likely don’t know how many APIs they are using, what tasks they are performing, or how high a permission level they hold. Then there is the question of whether those APIs contain any vulnerabilities.
Industry and private groups have come up with API testing tools and platforms to help answer those questions. Some testing tools are designed to perform a single function, like mapping why specific Docker APIs are improperly configured.
Others take a more holistic approach to an entire network, searching for APIs and then providing information about what they do and why they might be vulnerable or over-permissioned.
Several well-known commercial API testing platforms are available as well as a large pool of free or low-cost open-source tools. The commercial tools generally have more support options and may be able to be deployed remotely though the cloud or even as a service.
Some open-source tools may be just as good and have the backing of the community of users who created them. Which one you select depends on your needs, the security expertise of your IT teams, and budget.
Below are some of the top commercial API testing tools on the market and their main features, followed by some open-source tools.
Commercial API testing tools and platforms
APIsec
The APIsec platform acts like a penetration tool aimed at APIs. Whereas many tools can scan for common vulnerabilities to typical attacks like script injections, APIsec stress tests every aspect of targeted APIs to ensure that everything from the core network to the endpoints accessing it are protected from flaws in the API’s code.
One big advantage to APIsec is that it can be deployed in the development phase while APIs are being programmed. A full scan of apps that are in the process of being built takes only a couple minutes, with results comparable to old-school penetration testing operations that used to take days or weeks to complete.
AppKnox
AppKnox offers a lot of assistance to those who purchase and deploy their platform. Combined with its easy-to-use interface, this makes AppKnox a good choice for organisations that don’t have large security teams dedicated to their APIs. AppKnox starts with a scan to locate APIs either in the production environment, on endpoints or wherever they may be deployed. Once located, users can select which APIs they want to submit for further testing.
AppKnox tests for all the common problems that can cause an API to break or become compromised like command injection vulnerabilities in HTTP requests, cross-site tracing, and SQL injection vulnerabilities. This includes a complete analysis of web servers, databases and all components on the server that interact with the API.
After the API scan, users can submit their results for advanced analysis with a human security researcher, a process the company says normally takes between three and five days.
The Data Theorem API Secure platform is designed to fit into any continuous integration and continuous delivery/deployment (CI/CD) environment to provide ongoing security to APIs in every stage of development and into the production environment. Its analyser engine continually searches the network for new APIs and can quickly identify non-authorised ones or those that are part of the shadow IT at an organisation.
The analyser engine keeps itself up to date about the most recent vulnerabilities discovered for APIs and continually tests protected assets. It works with both on-premises and cloud environments to make sure that no APIs can fall victim to the latest threats.
To keep the CI/CD pipeline clear and flowing, Data Theorem API Secure offers to automatically fix discovered problems without requiring human innovation. That way organisations can keep their APIs secure against even the latest threats, so long as they are comfortable with a high level of automation.
Postman
While Postman certainly qualifies as a testing tool for APIs, its claim to fame is as a complete and collaborative platform for building secure APIs. It’s used by millions of developers working in Windows, Linux and iOS environments, and for good reason.
Postman provides developers with a complete set of API tools to use when designing new APIs, and it also provides a secure repository for code that organisations can build up over time. Using the secure repository can ensure that future APIs maintain tight security and organisational standards from the start.
The workspaces provided by Postman are designed to help developers organise their work. It also can provide security warnings when an app’s code starts to drift away from the organisation’s established secure template or incorporates a potential vulnerability. That way the problem can be fixed long before the API makes it to the production environment.
Smartbear ReadyAPI
In addition to security testing, the Smartbear ReadyAPI platform is designed to optimise their use and performance within any environment. It can execute an API security analysis with a single click, but it also supports other critical functions like seeing how well, or badly, an API can handle an unexpected load or sudden spike in usage.
You can configure ReadyAPI to generate the specific kinds of traffic that the API is expected to handle. It can also record live API traffic so that future tests will be more accurate and configured to the unique environment where it will be operating.
In addition, the platform can import almost any specification or schema to test APIs using the most popular protocols. Natively, ReadyAPI supports Git, Docker, Jenkins, Azure DevOps, TeamCity and more, and can be run in any environment from development to quality assurance long before APIs go live.
Synopsis API Scanner
One reason why the Synopsis API Scanner is so powerful is because in addition to security testing, it also incorporates fuzzing as part of its suite of deep scans and tests. The fuzzing engine sends thousands of unexpected, invalid or random inputs to APIs to see how they behave or if they will break when subjected to things like very large numbers or odd commands.
It also maps out all the paths and the logic of an entire API, including all the endpoints, parameters, authentications, and specifications that apply to its use. This gives developers a clear picture of what functions they intend their APIs to perform, compared with what they actually might sometimes do. It makes it clear why an API might be subject to unexpected behaviour or security vulnerabilities.
Open-source API testing tools
While the open-source tools generally don’t have the same support as commercial offerings, experienced developers can easily deploy them, often for free, to shore up or improve the security of their APIs. The following are some of the more popular offerings according to the open-source community.
Astra
Astra mostly concentrates on representational state transfer (REST) APIs, which can be extremely difficult because they are often constantly changing. Given that the REST architectural style emphasises scalability in its interactions between components, it can be challenging to keep REST APIs secure over time. Astra helps by offering to integrate into the CI/CD pipeline, checking to make sure that the most common vulnerabilities don’t creep back into a supposedly safe REST API.
crAPI
The crAPI tool has a terrible name, but it performs its function as an API wrapper efficiently. It’s one of the few wrappers that can connect to a target system and provide a base path with the root client’s default set of handlers. It can do it without having to create any new connections. Advanced API developers can save a lot of time with it.
Apache JMeter
Apache JMeter, which not surprisingly is written in Java, began life as a load tester for web applications but has recently expanded for use with almost any application, program or API. Its detailed suite can test performance on either static or dynamic resources. It can generate a heavy simulated load of realistic traffic so that developers can discover how their API will perform under pressure.
Taurus
Taurus provides an easy way to turn standalone API testing programs into a continuous testing operation. On the surface, Taurus is simple to use. You install it, create a configuration file and let your testing tools do their work. If you poke under the hood a bit, you can discover ways to generate interactive reports, create more complex scenarios to put your APIs through, and set up failure criteria so you can immediately go in and fix discovered problems.
This Article Source is From : https://www.channelasia.tech/article/691524/10-top-api-security-testing-tools/
#testing tools#security testing tools#API security testing tools#software testing#API#kairostech#kairos
0 notes
Text
3 Reasons why test automation should be included at the API level
QA & testing become indomitable especially in the context of API testing. The development teams benefit from automated integration tests at API levels as it helps them in easy integration of apps and higher product adoption rate, ultimately helping the firm increase their profits. API layer is frequently ignored while developing and executing automated tests and mostly end to end user interface driven tests are executed to check if final application works perfectly after integration. API layer is not to be ignored and for a QA strategy to be successful, it should consider API testing as a fundamental part of the overall testing strategy.
Let us understand what API testing means:
Application Programming Interfaces (APIs) are a set of programs that allow two or more software to communicate with each other and be able to exchange data smoothly. In the testing world, testing APIs is different than other types of testing. UI and functional testing is often given importance while API testing is ignored. The foremost responsibility of a tester is to ensure that API testing is performed in order to attain seamless functioning, performance, and the reliability of different data-driven applications and systems by verifying exchanges and communications between applications, systems, databases, and networks.
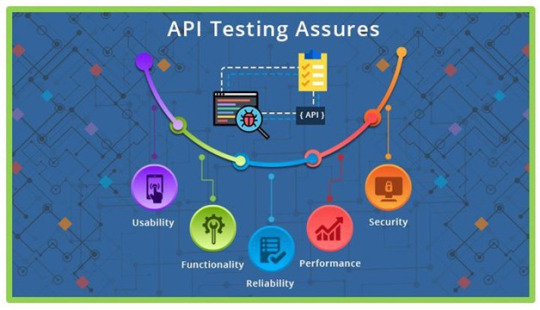
While integration testing has been a component of the test automation pyramid since its inception, it’s also been the most undermined layer in functional test automation. All tests that supercede the scope of an individual unit, and can’t be covered by unit testing are often executed through user interface-driven, end-to-end test scenarios. But while end-to-end tests can be seen as the ultimate integration test, where all components come together, having too many of them leads to test suites that take unnecessarily long to execute, and that are hard to maintain and keep stable. It’s often possible to test important parts of an application’s technical and business logic through an API. To understand the importance of API Testing more in depth, let’s understand the undermentioned benefits of Automated API testing:
Wider Scope than Unit testing:
Unit tests are often run on small group of components within a single application layer. Issues are often not detected in distributed apps where one application layer ends and the next one begins. In order validate if the components are communicating as desired, API level tests are designed. So, the need of a strong API testing Strategy is of dire importance at the integration level especially when it comes to integrating with external components. Managing the testing environment is a critical task to perform especially when the components are with different teams.
More Stability and Speed as compared to end-to-end tests:
It is true that end-to-end tests are vaster in scope than API testing. They cover all the layers and components of the application but API tests cope up with its loss with its stability and speed. API tests are certainly faster than the former. End-to-end tests take longer time to load browsers and screens whereas API tests are based on individual request-response interactions (for example in JSON or XML format)which makes the execution faster with shorter feedback cycles. Moreover, user interfaces tend to change frequently due to various user change requests and adherence to advanced front end frameworks API tends to be more stable in terms of Interfaces that yields fewer faults and requires less maintenance.
Introducing API Level Testing more seriously- A significant decision in Automation Testing
API level integration testing should be a mandatory aspect of any automated testing agenda. It could be an unnerving move for those with no prior expertise in this area. It is mostly the tester’s cup of tea more than the developer’s as it can go beyond the component or application. The absence of user interface can be a blocker in accessing and testing the API. But you can opt from various automated API testing tools available in the market. Tools like RestAssured, SoapUI, and Postman are preferred among the most.
Conclusion
In the era of Artificial intelligence and IoT, the need for API tests is becoming intense. Automated API Testing strategy is the most effective strategy for faster delivery and reduced human inaccuracies. With the help of the tools, more API test requirements could be covered and API testing could be made more advantageous for secured and quality deployment of mobile applications in shorter time. Why don’t you integrate your automation framework using pCloudy’s API and make your app release faster?
Try pCloudy for Free now.
Mobile App Testing , Mobile Application Testing , Android App Testing , iOS App Testing , Mobile Responsive Test , Mobile Testing , Automation Testing , Mobile Device Lab , Mobile Test Lab , XCUITest , Mobile App Testing Platform , Mobile App Testing Tools
#mobile app testing#mobile application testing#android app testing#ios app testing#mobile responsive test#automation testing
0 notes
Text
Testing Angular with Jasmine and Karma (Part 1)
Our goal
In this tutorial we will be building and testing an employee directory for a fictional company. This directory will have a view to show all of our users along with another view to serve as a profile page for individual users. Within this part of the tutorial we'll focus on building the service and its tests that will be used for these users.
In following tutorials, we'll populate the user profile page with an image of the user's favorite Pokemon using the Pokeapi and learn how to test services that make HTTP requests.
What you should know
The primary focus for this tutorial is testing so my assumption is that you're comfortable working with TypeScript and Angular applications. As a result of this I won't be taking the time to explain what a service is and how it's used. Instead, I'll provide you with code as we work through our tests.
Why Test?
From personal experience, tests are the best way to prevent software defects. I've been on many teams in the past where a small piece of code is updated and the developer manually opens their browser or Postman to verify that it still works. This approach (manual QA) is begging for a disaster.
Tests are the best way to prevent software defects.
As features and codebases grow, manual QA becomes more expensive, time consuming, and error prone. If a feature or function is removed does every developer remember all of its potential side-effects? Are all developers manually testing in the same way? Probably not.
The reason we test our code is to verify that it behaves as we expect it to. As a result of this process you'll find you have better feature documentation for yourself and other developers as well as a design aid for your APIs.
Why Karma?
Karma is a direct product of the AngularJS team from struggling to test their own framework features with existing tools. As a result of this, they made Karma and have transitioned it to Angular as the default test runner for applications created with the Angular CLI.
In addition to playing nicely with Angular, it also provides flexibility for you to tailor Karma to your workflow. This includes the option to test your code on various browsers and devices such as phones, tablets, and even a PS3 like the YouTube team.
Karma also provides you options to replace Jasmine with other testing frameworks such as Mocha and QUnit or integrate with various continuous integration services like Jenkins, TravisCI, or CircleCI.
Unless you add some additional configuration your typical interaction with Karma will be to run ng test in a terminal window.
Why Jasmine?
Jasmine is a behavior-driven development framework for testing JavaScript code that plays very well with Karma. Similar to Karma, it’s also the recommended testing framework within the Angular documentation as it's setup for you with the Angular CLI. Jasmine is also dependency free and doesn’t require a DOM.
As far as features go, I love that Jasmine has almost everything I need for testing built into it. The most notable example would be spies. A spy allows us to “spy” on a function and track attributes about it such as whether or not it was called, how many times it was called, and with which arguments it was called. With a framework like Mocha, spies are not built-in and would require pairing it with a separate library like Sinon.js.
The good news is that the switching costs between testing frameworks is relatively low with differences in syntax as small as Jasmine's toEqual() and Mocha's to.equal().
A Simple Test Example
Imagine you had an alien servant named Adder who follows you everywhere you go. Other than being a cute alien companion Adder can really only do one thing, add two numbers together.
To verify Adder's ability to add two numbers we could generate a set of test cases to see if Adder provides us the correct answer.
Within Jasmine, this would begin with what's referred to as a "suite" which groups a related set of tests by calling the function describe.
// A Jasmine suite describe('Adder', () => { });
From here we could provide Adder with a set of test cases such as two positive numbers (2, 4), a positive number and a zero (3, 0), a positive number and a negative number (5, -2), and so on.
Within Jasmine, these are referred to as "specs" which we create by calling the function it, passing it a string to describe the functionality that's being tested.
describe('Adder', () => { // A jasmine spec it('should be able to add two whole numbers', () => { expect(Adder.add(2, 2)).toEqual(4); }); it('should be able to add a whole number and a negative number', () => { expect(Adder.add(2, -1)).toEqual(1); }); it('should be able to add a whole number and a zero', () => { expect(Adder.add(2, 0)).toEqual(2); }); });
Within each spec we call expect and provide it what is referred to as an "actual"—the call site of our actual code. After the expectation, or expect, is the chained "matcher" function, such as toEqual, which the testing developer provides with the expected output of the code being tested.
There are many other matchers available to us other than toEqual. You can see a full list within Jasmine's documentation.
Our tests aren't concerned with how Adder arrives at the answer. We only care about the answer Adder provides us. For all we know, this may be Adder's implementation of add.
function add(first, second) { if (true) { // why? if (true) { // why?? if (1 === 1) { // why?!?1 return first + second; } } } }
In other words, we only care that Adder behaves as expected—we have no concern for Adder's implementation.
This is what makes a practice like test-driven development (TDD) so powerful. You can first write a test for a function and its expected behavior and get it to pass. Then, once it's passing, you can refactor your function to a different implementation and if the test is still passing, you know your function is still behaving as specified within your tests even with a different implementation. Adder's add function would be a good example!
Angular setup
We'll begin by creating our new application using the Angular CLI.
ng new angular-testing --routing
Since we'll have multiple views in this application we use the --routing flag so the CLI automatically generates a routing module for us.
From here we can verify everything is working correctly by moving into the new angular-testing directory and running the application.
cd angular-testing ng serve -o
You can also verify the application's tests are currently in a passing state.
ng test
Adding a home page
Before creating a service to populate our home page with users, we'll start by creating the home page.
ng g component home
Now that our component has been created, we can update our routing module's (app-routing.module.ts) root path to HomeComponent.
import { NgModule } from '@angular/core'; import { RouterModule, Routes } from '@angular/router'; import { HomeComponent } from './home/home.component'; const routes: Routes = [ { path: '', component: HomeComponent } ]; @NgModule({ imports: [RouterModule.forRoot(routes)], exports: [RouterModule] }) export class AppRoutingModule { }
Run the application if it isn't already and you should now see "home works!" below the default template in app.component.html which was created by the CLI.
Removing AppComponent tests
Since we no longer need the default contents of AppComponent, let's update it by removing some unnecessary code.
First, remove everything in app.component.html so that only the router-outlet directive remains.
<router-outlet></router-outlet>
Within app.component.ts, you can also remove the title property.
import { Component } from '@angular/core'; @Component({ selector: 'app-root', templateUrl: './app.component.html', styleUrls: ['./app.component.css'] }) export class AppComponent { }
Finally, you can update the tests in app.component.spec.ts by removing the two tests for some of the contents that were previously in app.component.html.
import { async, TestBed } from '@angular/core/testing'; import { RouterTestingModule } from '@angular/router/testing'; import { AppComponent } from './app.component'; describe('AppComponent', () => { beforeEach(async(() => { TestBed.configureTestingModule({ imports: [ RouterTestingModule ], declarations: [ AppComponent ], }).compileComponents(); })); it('should create the app', async(() => { const fixture = TestBed.createComponent(AppComponent); const app = fixture.debugElement.componentInstance; expect(app).toBeTruthy(); })); });
Testing an Angular service
Now that our home page is set up we can work on creating a service to populate this page with our directory of employees.
ng g service services/users/users
Here we've created our users service within a new services/users directory to keep our services away from the default app directory which can get messy quick.
Now that our service is created, we can make a few small changes to the test file services/users/users.service.spec.ts.
I personally find injecting dependencies within it() to be a bit repetitive and harder to read as it's done in the default scaffolding for our test file as shown below:
it('should be created', inject([TestService], (service: TestService) => { expect(service).toBeTruthy(); }));
With a few minor changes, we can move this into the beforeEach removing the duplication from each it.
import { TestBed } from '@angular/core/testing'; import { UsersService } from './users.service'; describe('UsersService', () => { let usersService: UsersService; // Add this beforeEach(() => { TestBed.configureTestingModule({ providers: [UsersService] }); usersService = TestBed.get(UsersService); // Add this }); it('should be created', () => { // Remove inject() expect(usersService).toBeTruthy(); }); });
In the code above, TestBed.configureTestingModule({}) sets up the service we want to test with UsersService set in providers. We then inject the service into our test suite using TestBed.get() with the service we want to test as the argument. We set the return value to our local usersService variable which will allow us to interact with this service within our tests just as we would within a component.
Now that our test setup is restructured, we can add a test for an all method which will return a collection of users.
import { of } from 'rxjs'; // Add import describe('UsersService', () => { ... it('should be created', () => { expect(usersService).toBeTruthy(); }); // Add tests for all() method describe('all', () => { it('should return a collection of users', () => { const userResponse = [ { id: '1', name: 'Jane', role: 'Designer', pokemon: 'Blastoise' }, { id: '2', name: 'Bob', role: 'Developer', pokemon: 'Charizard' } ]; let response; spyOn(usersService, 'all').and.returnValue(of(userResponse)); usersService.all().subscribe(res => { response = res; }); expect(response).toEqual(userResponse); }); }); });
Here we add a test for the expectation that all will return a collection of users. We declare a userResponse variable set to a mocked response of our service method. Then we use the spyOn() method to spy on usersService.all and chain .returnValue() to return our mocked userResponse variable wrapping it with of() to return this value as an observable.
With our spy set, we call our service method as we would within a component, subscribe to the observable, and set its return value to response.
Finally, we add our expectation that response will be set to the return value of the service call, userResponse.
Why mock?
At this point many people ask, "Why are we mocking the response?" Why did we provide our test a return value userResponse that we created ourselves, to manually set what’s being returned from our service? Shouldn’t the service call return the real response from the service, whether it's a hard-coded set of users or a response from an HTTP request?
This is a perfectly reasonable question to ask and one that can be hard to wrap your head around when you first begin testing. I find this concept is easiest to illustrate with a real world example.
Imagine you own a restaurant and it’s the night before opening day. You gather everyone you’ve hired for a “test run” of the restaurant. You invite a few friends to come in and pretend they’re customers who will sit down and order a meal.
No dishes will actually be served in your test run. You’ve already worked with your cooks and are satisfied they can make the dishes correctly. In this test run you want to test the transition from the customer ordering their dish, to the waiter sending that to the kitchen, and then the waiters fulfilling the kitchen’s response to the customer. This response from the kitchen may be one of a few options.
The meal is ready.
The meal is delayed.
The meal cannot be made. We ran out of ingredients for the dish.
If the meal is ready, the waiter delivers the meal to the customer. However, in the event that a meal is late or cannot be made, the waiter will have to go back to the customer, apologize, and potentially ask for a second dish.
In our test run, it wouldn’t make sense to actually create the meals when we want to test the front-end’s (waiter’s) ability to fulfill the requests received from the backend (kitchen). More importantly, if we wanted to test our waiters could actually apologize to customers in the cases where a meal is delayed or cannot be made we would literally be waiting until our cooks were too slow or we ran out of ingredients before our tests for those cases could be confirmed. For this reason, we would “mock” the backend (kitchen) and give the waiters whatever scenario it is that we want to test.
Similarly in code, we don’t actually hit the API when we’re testing various scenarios. We mock the response we may expect to receive and verify that our application can handle that response accordingly. Just like our kitchen example, if we were testing our application’s ability to handle an API call that failed we would literally have to wait for our API to fail to verify it could handle that case—a scenario that hopefully won’t be happening that often!
Adding users
To get this test to pass, we need to implement the service method in users.service.ts.
First, we'll start by adding our imports and a collection of employees to the service.
import { Injectable } from '@angular/core'; import { Observable, of } from 'rxjs'; // Add imports @Injectable({ providedIn: 'root' }) export class UsersService { users: Array<object> = [ // Add employee object { id: '1', name: 'Jane', role: 'Designer', pokemon: 'Blastoise' }, { id: '2', name: 'Bob', role: 'Developer', pokemon: 'Charizard' }, { id: '3', name: 'Jim', role: 'Developer', pokemon: 'Venusaur' }, { id: '4', name: 'Adam', role: 'Designer', pokemon: 'Yoshi' } ]; constructor() { } }
Then, just below our constructor, we can implement all.
all(): Observable<Array<object>> { return of(this.users); }
Run ng test again and you should now have passing tests including the new tests for our service method.
Add users to the home page
Now that our service method is ready to use, we can work towards populating our home page with these users.
First, we'll update index.html with Bulma to help us with some styling.
<!doctype html> <html lang="en"> <head> <meta charset="utf-8"> <title>AngularTesting</title> <base href="https://feeds.feedblitz.com/~/t/0/0/scotch_io/~scotch.io/"> <meta name="viewport" content="width=device-width, initial-scale=1"> <link rel="icon" type="image/x-icon" href="https://feeds.feedblitz.com/~/t/0/0/scotch_io/~favicon.ico"> <!--Add these--> <link rel="stylesheet" href="https://feeds.feedblitz.com/~/t/0/0/scotch_io/~https://cdnjs.cloudflare.com/ajax/libs/bulma/0.7.1/css/bulma.min.css"> <script defer src="https://use.fontawesome.com/releases/v5.1.0/js/all.js"></script> </head> <body> <app-root></app-root> </body> </html>
Then within home/home.component.ts we can add a call to our new service.
import { Component, OnInit } from '@angular/core'; import { UsersService } from '../services/users/users.service'; @Component({ selector: 'app-home', templateUrl: './home.component.html', styleUrls: ['./home.component.css'] }) export class HomeComponent implements OnInit { users; constructor(private usersService: UsersService) { } ngOnInit() { this.usersService.all().subscribe(res => { this.users = res; }); } }
First we import our service and inject it into our component's constructor. Then we add a call to the service method within ngOnInit and set the return value to our component's users property.
To display these users to the view, update the template in home/home.component.html.
<section class="section is-small"> <div class="container"> <div class="columns"> <div class="column" *ngFor="let user of users"> <div class="box"> <div class="content"> <p class="has-text-centered is-size-5">{{user.name}}</p> <ul> <li><strong>Role:</strong> {{user.role}}</li> <li><strong>Pokemon:</strong> {{user.pokemon}}</li> </ul> </div> </div> </div> </div> </div> </section>
Now when you run ng serve and view the home page, you should see the users displayed within Bulma boxes.
Finding a single user
Now that our users are being populated into our home page, we'll add one more service method for finding a single user that will be used for the user profile pages.
First we'll add the tests for our new service method.
describe('all', () => { ... }); describe('findOne', () => { it('should return a single user', () => { const userResponse = { id: '2', name: 'Bob', role: 'Developer', pokemon: 'Charizard' }; let response; spyOn(usersService, 'findOne').and.returnValue(of(userResponse)); usersService.findOne('2').subscribe(res => { response = res; }); expect(response).toEqual(userResponse); }); });
Here we add a test for the expectation that findOne will return a single user. We declare a userResponse variable set to a mocked response of our service method, a single object from the collection of users.
We then create a spy for usersService.findOne and return our mocked userResponse variable. With our spy set, we call our service method and set its return value to response.
Finally, we add our assertion that response will be set to the return value of the service call, userResponse.
To get this test to pass, we can add the following implementation to users.service.ts.
all(): Observable<Array<object>> { return of(this.users); } findOne(id: string): Observable<object> { const user = this.users.find((u: any) => { return u.id === id; }); return of(user); }
Now when you run ng test you should see all of the tests in a passing state.
Conclusion
At this point I hope testing, both its benefits and the reason for writing them, is starting to become a bit more clear. Personally, I pushed off testing for the longest time and my reasons were primarily because I didn't understand the why behind them and resources for testing were limited.
What we've created in this tutorial isn't the most visually impressive application but it's a step in the right direction.
In the next tutorial, we'll create the user profile page and a service to retrieve a Pokemon image using the Pokeapi. We'll learn how to test service methods that make HTTP requests and how to test components.
Extra
If you want the tests to display in a more readable format within your terminal, there's an npm package for this.
First, install the package.
npm install karma-spec-reporter --save-dev
Once that's finished, open src/karma.conf.js, add the new package to plugins, and update the progress value within reporters to spec.
module.exports = function (config) { config.set({ basePath: '', frameworks: ['jasmine', '@angular-devkit/build-angular'], plugins: [ require('karma-jasmine'), require('karma-chrome-launcher'), require('karma-jasmine-html-reporter'), require('karma-coverage-istanbul-reporter'), require('@angular-devkit/build-angular/plugins/karma'), require('karma-spec-reporter') // Add this ], client: { clearContext: false // leave Jasmine Spec Runner output visible in browser }, coverageIstanbulReporter: { dir: require('path').join(__dirname, '../coverage'), reports: ['html', 'lcovonly'], fixWebpackSourcePaths: true }, reporters: ['spec', 'kjhtml'], // Update progress to spec port: 9876, colors: true, logLevel: config.LOG_INFO, autoWatch: true, browsers: ['Chrome'], singleRun: false }); };
Now when you run ng test you should have a more visually appealing output for your test suite.
via Scotch.io https://ift.tt/2Mtx04M
0 notes
Link
We usually use the Postman to send requests to our APIs and get a response. All the requests that we send come under history so that we could re-use the requests. But this is a manual approach. So the questions that rises are:
Why use Postman collections?.
Why would we need to automate them?
We will be going through the answer to the first question here. And will be covering the rest in the second part. So the answer for the first one is: We can work with requests and history for a small set of requests, But once your history of requests scales up, finding a particular request in your history can become time-consuming. And to handle this situation, we could use the Postman Collections.
What is a Postman Collection?
A Postman Collection lets us group individual requests together and we can organize these requests in folders.We can provide descriptions and logical names for these folders. We can create and publish API documentation pages. We can automate these requests and we can add test scripts to requests and build integration test suites.
Step 1: Create a collection
Step 2: Provide documentation for the collection, if required.
Step 3: Click on the save button of the request and add the request to the particular collection.
Note: We can also save the responses as sample responses. This could help to reflect the expected responses. Just click on the save response. And give some description-name.
So here it is, a basic scenario with postman collections. But we could do a lot more: – We could import and export the collections. – We could duplicate collections and customize them. – And of course, there will be multiple requests, not a singular one, under one collection.
So, now we have created a postman collection. But it’s working on pre-defined values for the request. But there comes a scenario, when we have to use dynamic request parameters, we have to perform some modifications before and after the requests have been sent.
And we will be discussing those scenarios/requirements and the ways Postman provides to implement automation.
Till then keep going through our blogs. Because at Knoldus we believe in sharing knowledge.
0 notes
Text
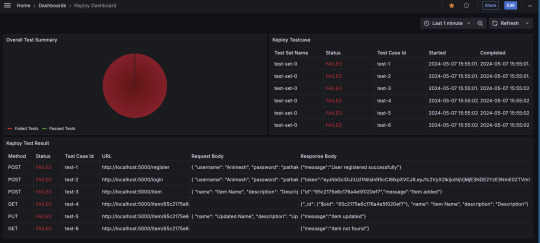
Visualize Keploy Test Data in Grafana for Real-Time Monitoring

In today's fast-paced development environment, efficient monitoring and visualization of test results are essential for ensuring the quality of your application. Keploy, a zero-code testing tool, simplifies test generation and integration, but how do you effectively monitor and analyze the test data Keploy generates?
This is where Grafana, a powerful open-source analytics and monitoring platform, comes into play. In this blog, we'll explore how you can set up a Grafana dashboard to visualize Keploy test data, enabling you to quickly assess the health of your tests and debug issues efficiently.
What is Grafana?

With Grafana, you can create real-time dashboards to track everything from server performance to test results, all in one place. By combining Grafana with Keploy, you can visually monitor your test suites and gain insights into test performance, failures, and trends over time.
What is Keploy?
Keploy is an open-source, zero-code testing platform that generates and executes test cases by observing real-world network traffic. It captures API requests, responses, and user interactions to automatically create test cases without requiring developers to write test scripts.
Brownie points out that it can integrate with existing CI/CD pipelines to enable end-to-end, integration, and unit testing.
Why Integrate Keploy with Grafana?
While Keploy automates test creation and execution, visualizing the test results can sometimes be challenging, especially with large test suites. Integrating Keploy with Grafana allows you to:
Monitor test results in real-time: Get immediate insights into your test runs.
Visualize test trends: Track how your tests perform over time, including pass/fail rates and test coverage.
Analyze test failures: Quickly identify patterns and potential areas of improvement.
Share insights: Easily share dashboards with team members, providing transparency and accountability across your testing process.
Step-by-Step Guide to Using Grafana with Keploy
Step 1: Install Grafana
If you don't have Grafana yet, follow these steps:
Use the docker to start Grafana service:docker run -d -p 3000:3000 --name=grafana grafana/grafana-enterprise
Access Grafana via http://localhost:3000/ and log in with the default credentials (admin/admin).
Step 2: Set Up Keploy to Generate Test Data
Before integrating Grafana, you need to ensure that Keploy is generating and storing test reports. Keploy captures API traffic to create tests and stores the test results, which can then be visualized in Grafana. I am using a sample app based on Mux router with Postgres database : - https://github.com/Sonichigo/mux-sql#Start Postgres docker-compose up -d postgres #Build App binary go build -cover
You can generate test cases with Keploy by running:keploy record -c "./test-app-product-catelog"
This command captures the real-world traffic from your application and creates test cases based on it. We can make API Calls using Hoppscotch, Postman or cURL command and keploy would be able to capture those calls to generate the test-suites containing testcases and data mocks.
To run the test cases we created earlier and generate our report, let’s run :keploy test -c "./test-app-product-catelog"
This will execute the test cases and generate test reports.
Step 3: Export Keploy Test Data
Next, you need to export the test data generated by Keploy into a format that Grafana can read. Most common being JSON format, so let’s export the test reports to JSON using JSON Converter.
Step 4: Configure Grafana Data Source
Grafana supports a wide range of data sources, and you can use one based on how you've exported your Keploy data. If you're using JSON or CSV, you can set up Grafana Loki or another time-series database that supports the format. If you store test reports in MySQL or Prometheus, configure Grafana to fetch data from that source.
Go to Settings > Data Sources in Grafana.
Select the appropriate data source type (e.g., MySQL, Prometheus).
Configure the connection by providing the necessary credentials and database details.
Test the connection to ensure that Grafana can pull data from your source.
Step 5: Create a Grafana Dashboard
Once the data source is set up, you can create a dashboard to visualize the Keploy test results.
Go to Create > Dashboard in Grafana.
Select Add a new panel.
Query the test data from your chosen data source.
Configure visualizations based on your needs. Some examples include:
Bar charts to display test pass/fail ratios.
Time-series graphs to track test execution times.
Tables to list failed tests and their details.
Customize the panels to reflect the key metrics you want to monitor, such as:
Total tests run
Passed/failed tests
Test duration
Coverage percentage
Alternatively, you can import the existing Keploy Dashboard on Grafana with everything already in place and just upload the JSON to view the metrics.
Step 6: Automating Keploy Test Data Updates
To keep your dashboard updated with the latest test data, you can automate the process of exporting Keploy reports and updating the Grafana data source. Set up a cron job or CI/CD pipeline step to regularly export Keploy reports.
Key Metrics to Track in Your Dashboard
Here are some useful metrics to include in your Grafana dashboard for Keploy:
Total Test Runs: The number of test executions over time.
Pass/Fail Ratio: A visual breakdown of successful vs. failed test cases.
Test Execution Time: The average time it takes for tests to run, helping identify slow-running tests.
Test Coverage: Percentage of code covered by the tests, which can help you identify areas lacking coverage.
Failed Test Cases: A detailed breakdown of the specific tests that failed, including error messages and stack traces.
Conclusion
Integrating Keploy with Grafana offers a powerful combination of zero-code test automation and real-time test visualization. By creating a Grafana dashboard for your Keploy test data, you can monitor the health of your application’s test suite, track key trends, and quickly respond to any issues that arise.
This setup not only saves time but also improves transparency and accountability across your testing process, enabling your team to make data-driven decisions with confidence. So, whether you're a developer, tester, or DevOps engineer, start using Grafana with Keploy to streamline your testing and monitoring efforts.
FAQs
What benefits does integrating Keploy with Grafana offer?
Integrating Keploy with Grafana provides real-time monitoring of test results, enabling you to visualize test trends, quickly spot failures, track test execution times, and assess test coverage. It also promotes transparency, helping teams make data-driven decisions and improve testing accountability.
How does Keploy generate test cases without writing code?
Keploy automatically captures network traffic and API interactions within your application to create test cases. This zero-code approach lets you generate comprehensive test suites by simply observing real-world user interactions, saving time and eliminating the need for manually written test scripts.
What kind of data sources can I connect to Grafana to view Keploy test data?
Grafana supports various data sources such as Prometheus, MySQL, CSV, and JSON. Depending on the format of the Keploy test data, you can configure Grafana to pull data from these sources, allowing flexible and customized visualization of test metrics.
Can I automate the process of exporting Keploy test data to Grafana?
Yes, you can automate the export of Keploy test data by setting up a cron job or adding a CI/CD pipeline step. This automation ensures that Grafana receives the latest test reports regularly, keeping the dashboard metrics up to date.
What are some key metrics I should monitor in my Grafana dashboard?
Useful metrics include Total Test Runs, Pass/Fail Ratio, Test Execution Time, Test Coverage Percentage, and specific details of Failed Test Cases. These metrics help assess the overall health of your tests, identify slow-running tests, and focus on areas requiring improvement.
Is there a pre-built Grafana dashboard for Keploy, or do I need to create one from scratch?
You can import an existing Grafana dashboard for Keploy by uploading the provided JSON file. This allows you to quickly set up a dashboard with default panels and visualizations, which you can further customize based on your specific testing needs.
0 notes
Text
Understanding the Testing Pyramid: A Comprehensive Guide

Introduction
Software development is a complex process involving numerous stages and disciplines. One critical aspect is testing, which ensures that software is reliable, functional, and free of defects. The Testing Pyramid is a conceptual framework that helps developers and testers prioritize and structure their testing efforts effectively. This article delves into the software Testing Pyramid, explaining its components, benefits, and best practices.
The Concept of the Testing Pyramid
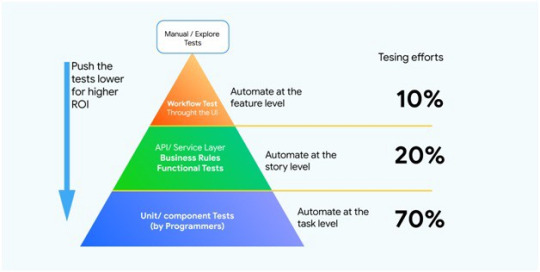
The Testing Pyramid was popularized by Mike Cohn, a prominent figure in the Agile software development community. The pyramid is a visual metaphor representing the different types of tests that should be performed on software, arranged in layers with a broad base and a narrow top. The three primary layers are:
Unit Tests
Integration Tests
End-to-End (E2E) or UI Tests
Each layer serves a distinct purpose and has different characteristics regarding scope, speed, and complexity.
The Layers of the Testing Pyramid
Unit Tests
Scope: Unit tests are the most granular type of tests. They focus on individual components or functions of the software, such as methods in a class or small modules.
Speed: Unit tests are generally fast to execute because they test isolated pieces of code without dependencies.
Complexity: They are straightforward to write and maintain, often requiring minimal setup.
Tools: Common tools for unit testing include JUnit for Java, NUnit for .NET, and Jest for JavaScript.
Integration Tests
Scope: Integration tests verify that different components or systems work together correctly. They test the interactions between units, such as data flow between modules, API interactions, and database operations.
Speed: These tests are slower than unit tests because they involve multiple components and may require setting up external dependencies like databases or web servers.
Complexity: Integration tests are more complex to write and maintain due to the need for a more extensive setup and teardown process.
Tools: Tools like Postman, RestAssured for API testing, and Selenium for browser automation are commonly used for integration testing.
End-to-End (E2E) or UI Tests
Scope: E2E tests cover the entire application flow from start to finish, simulating real user scenarios. They validate that the system as a whole meets the requirements and behaves as expected.
Speed: E2E tests are the slowest to run due to their extensive coverage and the involvement of multiple layers of the application stack.
Complexity: These tests are the most complex to write, maintain, and debug. They require a complete environment that closely mimics production.
Tools: Popular tools for E2E testing include Selenium, Cypress, and TestCafe.
The Importance of the Testing Pyramid
The Testing Pyramid helps teams achieve a balanced and efficient testing strategy. Here are some of the key benefits:
Cost-Effectiveness: Unit tests, being the cheapest and quickest to run, form the foundation of the pyramid. By catching defects early at the unit level, teams can prevent costly fixes later in the development cycle.
Fast Feedback Loop: The pyramid structure promotes a fast feedback loop. Since unit tests run quickly, they provide immediate feedback to developers, allowing them to identify and fix issues promptly.
Reduced Maintenance Effort: Focusing more on unit and integration tests reduces the reliance on E2E tests, which are harder to maintain. This leads to a more stable and maintainable test suite.
Comprehensive Coverage: The pyramid ensures that all aspects of the application are tested thoroughly. Unit tests ensure individual components work correctly, integration tests validate interactions, and E2E tests confirm the overall system functionality.
Best Practices for Implementing the Testing Pyramid
Adopt Test-Driven Development (TDD): TDD is a practice where tests are written before the code itself. This approach ensures that tests are an integral part of the development process and encourages a high level of unit test coverage.
Automate Tests: Automation is crucial for maintaining an efficient and effective testing strategy. Automated tests can run frequently and consistently, providing ongoing assurance of software quality.
Use Mocks and Stubs: In unit and integration tests, use mocks and stubs to simulate dependencies and isolate the unit under test. This practice helps keep tests fast and focused.
Prioritize Testing: While unit tests should form the bulk of your test suite, ensure that integration and E2E tests are not neglected. Each type of test serves a unique purpose and is essential for comprehensive coverage.
Continuously Refactor Tests: As the codebase evolves, tests should be refactored and updated to remain relevant and effective. Regularly review and refactor test cases to maintain their usefulness and accuracy.
Maintain Test Data: Proper management of test data is crucial, especially for integration and E2E tests. Ensure that test data is consistent, predictable, and easily manageable to avoid flaky tests.
Monitor Test Performance: Regularly monitor the performance of your test suite. Identify and address any bottlenecks, such as slow-running tests or redundant test cases, to maintain an efficient testing process.
Conclusion
The Testing Pyramid is a valuable framework for organizing and prioritizing testing efforts in software development. By emphasizing a strong foundation of unit tests, supported by integration tests and a smaller number of E2E tests, teams can achieve a balanced, efficient, and effective testing strategy. Implementing the best practices associated with the Testing Pyramid will lead to higher software quality, faster feedback loops, and more maintainable test suites, ultimately contributing to the success of software projects.
0 notes
Text
Understanding the Testing Pyramid: A Comprehensive Guide

Introduction
Software development is a complex process involving numerous stages and disciplines. One critical aspect is testing, which ensures that software is reliable, functional, and free of defects. The Testing Pyramid is a conceptual framework that helps developers and testers prioritize and structure their testing efforts effectively. This article delves into the Testing Pyramid, explaining its components, benefits, and best practices.
The Concept of the Testing Pyramid
The Testing Pyramid was popularized by Mike Cohn, a prominent figure in the Agile software development community. The pyramid is a visual metaphor representing the different types of tests that should be performed on software, arranged in layers with a broad base and a narrow top. The three primary layers are:
Unit Tests
Integration Tests
End-to-End (E2E) or UI Tests
Each layer serves a distinct purpose and has different characteristics regarding scope, speed, and complexity.
The Layers of the Testing Pyramid
Unit Tests
Scope: Unit tests are the most granular type of tests. They focus on individual components or functions of the software, such as methods in a class or small modules.
Speed: Unit tests are generally fast to execute because they test isolated pieces of code without dependencies.
Complexity: They are straightforward to write and maintain, often requiring minimal setup.
Tools: Common tools for unit testing include JUnit for Java, NUnit for .NET, and Jest for JavaScript.
Integration Tests
Scope: Integration tests verify that different components or systems work together correctly. They test the interactions between units, such as data flow between modules, API interactions, and database operations.
Speed: These tests are slower than unit tests because they involve multiple components and may require setting up external dependencies like databases or web servers.
Complexity: Integration tests are more complex to write and maintain due to the need for a more extensive setup and teardown process.
Tools: Tools like Postman, RestAssured for API testing, and Selenium for browser automation are commonly used for integration testing.
End-to-End (E2E) or UI Tests
Scope: E2E tests cover the entire application flow from start to finish, simulating real user scenarios. They validate that the system as a whole meets the requirements and behaves as expected.
Speed: E2E tests are the slowest to run due to their extensive coverage and the involvement of multiple layers of the application stack.
Complexity: These tests are the most complex to write, maintain, and debug. They require a complete environment that closely mimics production.
Tools: Popular tools for E2E testing include Selenium, Cypress, and TestCafe.
The Importance of the Testing Pyramid
The Testing Pyramid helps teams achieve a balanced and efficient testing strategy. Here are some of the key benefits:
Cost-Effectiveness: Unit tests, being the cheapest and quickest to run, form the foundation of the pyramid. By catching defects early at the unit level, teams can prevent costly fixes later in the development cycle.
Fast Feedback Loop: The pyramid structure promotes a fast feedback loop. Since unit tests run quickly, they provide immediate feedback to developers, allowing them to identify and fix issues promptly.
Reduced Maintenance Effort: Focusing more on unit and integration tests reduces the reliance on E2E tests, which are harder to maintain. This leads to a more stable and maintainable test suite.
Comprehensive Coverage: The pyramid ensures that all aspects of the application are tested thoroughly. Unit tests ensure individual components work correctly, integration tests validate interactions, and E2E tests confirm the overall system functionality.
Best Practices for Implementing the Testing Pyramid
Adopt Test-Driven Development (TDD): TDD is a practice where tests are written before the code itself. This approach ensures that tests are an integral part of the development process and encourages a high level of unit test coverage.
Automate Tests: Automation is crucial for maintaining an efficient and effective testing strategy. Automated tests can run frequently and consistently, providing ongoing assurance of software quality.
Use Mocks and Stubs: In unit and integration tests, use mocks and stubs to simulate dependencies and isolate the unit under test. This practice helps keep tests fast and focused.
Prioritize Testing: While unit tests should form the bulk of your test suite, ensure that integration and E2E tests are not neglected. Each type of test serves a unique purpose and is essential for comprehensive coverage.
Continuously Refactor Tests: As the codebase evolves, tests should be refactored and updated to remain relevant and effective. Regularly review and refactor test cases to maintain their usefulness and accuracy.
Maintain Test Data: Proper management of test data is crucial, especially for integration and E2E tests. Ensure that test data is consistent, predictable, and easily manageable to avoid flaky tests.
Monitor Test Performance: Regularly monitor the performance of your test suite. Identify and address any bottlenecks, such as slow-running tests or redundant test cases, to maintain an efficient testing process.
Conclusion
The Testing Pyramid is a valuable framework for organizing and prioritizing testing efforts in software development. By emphasizing a strong foundation of unit tests, supported by integration tests and a smaller number of E2E tests, teams can achieve a balanced, efficient, and effective testing strategy. Implementing the best practices associated with the Testing Pyramid will lead to higher software quality, faster feedback loops, and more maintainable test suites, ultimately contributing to the success of software projects.
0 notes