#setup woocommerce webhooks
Explore tagged Tumblr posts
Visit Tumblr Blog
Explore Tumblr blogs with no restrictions, modern design and the best experience.
Last Seen Tumblr Blogs


Fun Fact
In Q3 of 2020, 31% of US users access the Tumblr app daily.
Text
WhatsApp Cloud API Setup For Botsailor
Integrating the WhatsApp Cloud API with BotSailor is crucial for businesses seeking to enhance their customer engagement and streamline communication. The WhatsApp Cloud API enables seamless automation, allowing businesses to efficiently manage interactions through chatbots, live chat, and automated messaging. By connecting with BotSailor, businesses gain access to advanced features like order message automation, webhook workflows, and integration with e-commerce platforms such as Shopify and WooCommerce. This setup not only improves operational efficiency but also offers a scalable solution for personalized customer support and marketing, driving better engagement and satisfaction.
To integrate the WhatsApp Cloud API with BotSailor, follow the steps below for setup:
1. Create an App:
Go to the Facebook Developer site.
Click "My Apps" > "Create App".
Select "Business" as the app type.
Fill out the form with the necessary information and create the app.
2. Add WhatsApp to Your App:
On the product page, find the WhatsApp section and click "Setup".
Add a payment method if necessary, and navigate to "API Setup".
3. Get a Permanent Access Token:
Go to "Business Settings" on the Facebook Business site.
Create a system user and assign the necessary permissions.
Generate an access token with permissions for Business Management, Catalog management, WhatsApp business messaging, and WhatsApp business management.
4. Configure Webhooks:
In the WhatsApp section of your app, click "Configure webhooks".
Get the Callback URL and Verify Token from BotSailor's dashboard under "Connect WhatsApp".
Paste these into the respective fields in the Facebook Developer console.
5. Add a Phone Number:
Provide and verify your business phone number in the WhatsApp section.
6. Change App Mode to Live:
Go to Basic Settings, add Privacy Policy and Terms of Service URLs, then toggle the app mode to live.
7. Connect to BotSailor:
On BotSailor, go to "Connect WhatsApp" in the dashboard.
Enter your WhatsApp Business Account ID and the access token.
Click "Connect".
For a detailed guide, refer to our documentation. YouTube tutorial. and also read Best chatbot building platform blog

3 notes
·
View notes
Text
WooCommerce Slack nulled plugin 1.6.0

Boost Your Store Communication with the WooCommerce Slack nulled plugin In the fast-paced world of eCommerce, staying instantly connected to your team can make a huge difference. The WooCommerce Slack nulled plugin is your ultimate solution for real-time updates, seamless workflow integration, and smooth team collaboration—all within the familiar Slack environment. And the best part? You can download it for free right here, ensuring you never miss an important update again. What is the WooCommerce Slack Nulled Plugin? The WooCommerce Slack nulled plugin is a powerful integration tool that connects your WooCommerce store directly to your Slack channels. Whether it's order notifications, product stock alerts, or customer activity, this plugin ensures your team is always in the loop. Designed for flexibility and ease of use, it supports a wide range of Slack actions to help store owners manage their operations more efficiently. Key Technical Specifications Compatibility: WooCommerce 6.x and above Slack Integration: Customizable Slack channel support Notification Triggers: New orders, low stock, failed orders, and customer reviews Custom Webhooks: Easily add new channels and notification types Multisite Support: Fully compatible with WordPress multisite setups Powerful Features & Business Benefits From small businesses to large-scale online stores, the WooCommerce Slack nulled plugin offers a wide array of features designed to streamline communication and boost efficiency: ✔ Real-Time Order Notifications Receive instant updates every time an order is placed, refunded, or marked complete. Your team stays updated and proactive—no need to manually check order statuses. ✔ Team Collaboration Enhanced Assign team members to respond to alerts and collaborate effectively through Slack, reducing the chances of missed updates or customer dissatisfaction. ✔ Customizable Alerts Define the specific events you want to track and where they should be posted in Slack. This allows precise communication flow without cluttering your Slack workspace. ✔ Improved Workflow Automation Automate repetitive tasks and save valuable time. With webhooks and built-in triggers, this plugin enhances operational speed and reduces manual errors. Real-World Use Cases Imagine managing a high-traffic WooCommerce store with hundreds of daily orders. With the WooCommerce Slack nulled plugin, your customer service team gets notified the moment an issue arises. Your warehouse receives stock alerts before products run out. Your admin team sees failed orders in real time. All without logging into your dashboard repeatedly. Quick Installation Guide Download the WooCommerce Slack nulled plugin from our website. Go to your WordPress Dashboard > Plugins > Add New. Upload the plugin ZIP file and click “Install Now.” Once installed, activate the plugin. Navigate to WooCommerce > Slack settings to configure your channels and notifications. It’s that easy! You’ll be connected to Slack in minutes, with a customized setup tailored to your store’s needs. Frequently Asked Questions Is the WooCommerce Slack nulled plugin safe to use? Yes. All files are thoroughly scanned and tested to ensure safety and functionality. Our platform is dedicated to offering high-quality, secure plugins. Can I use multiple Slack channels? Absolutely. The plugin supports sending different notifications to different Slack channels based on event type or store activity. Does it work with other WooCommerce extensions? Yes. The plugin is designed to integrate smoothly with most major WooCommerce extensions without conflict. Why Download from Us? Our mission is to provide premium WordPress tools without the premium price tag. That’s why we offer 100% working and safe nulled plugins like the WooCommerce Slack plugin, ensuring your store can grow without limits. Looking to power up your WooCommerce store even more? Check out the best-performing flatsome NULLED theme to complement your Slack integration with a stunning storefront.
Download the WooCommerce Slack today and experience eCommerce like never before—smarter, faster, and more connected.
0 notes
Text
API Integration for Non-Technical People: A No-Code Guide
Ever wished your apps could update automatically without you lifting a finger?
Imagine adding a new lead to your CRM, and it instantly syncs with your email marketing tool. Or getting an order in your store, and your accounting software records it—without you touching anything.
That’s what API integration does. And here’s the kicker—you don’t need to be a developer to use it.
Thanks to no-code SaaS integration platforms, you can connect apps, automate workflows, and eliminate manual work without writing a single line of code.
Let’s break it down.

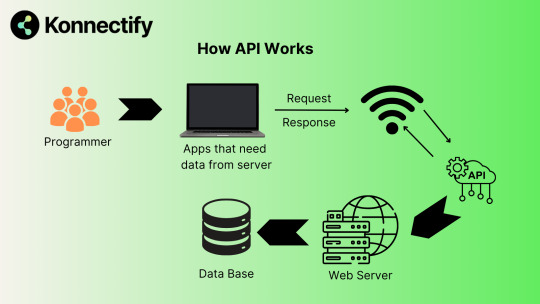
What is API Integration?
APIs (Application Programming Interfaces) are the invisible messengers that let different apps communicate. Every time you:
✅ Get a Slack notification about an email ✅ See live weather updates in an app ✅ Pay through Google Pay inside a store
An API is working behind the scenes.
API integration connects two or more apps, so they share data automatically. Instead of manually transferring files or updating records, APIs handle everything in real-time.
💡 Example: If you run an eCommerce store, API integration ensures that when a customer orders a product, your inventory updates, the order is sent to your fulfillment system, and an invoice is generated—all without manual input.
Why No-Code API Integration Matters
In the past, API integration meant hiring developers and writing custom code. But today, no-code SaaS integration platforms let you:
🔹 Automate workflows in minutes 🔹 Sync apps without coding 🔹 Eliminate repetitive tasks 🔹 Reduce human errors
You choose the apps, set triggers and actions, and let automation handle the rest—simple as that.
Best No-Code API Integration Tools
Not all automation tools offer deep API connections. Some only work for basic tasks, while others require complex setups.
Konnectify – The Best SaaS Integration Platform
Why is Konnectify different?
🚀 2X more API endpoints → Connect apps with deeper automation ⚡ Real-time Webhooks → Sync data instantly 🖱️ Drag-and-drop automation → No coding needed 🔄 100+ integrations → CRM, eCommerce, finance, support tools, and more 🔐 Secure API management → No data leaks
If you want a SaaS integration platform that’s easy, powerful, and built for non-tech users, Konnectify is the way to go.
Top API Integration Use Cases
1. CRM & Email Marketing Sync
📩 Automatically add new leads from HubSpot or Salesforce to Mailchimp 📊 Trigger email campaigns based on CRM data
2. Accounting & Payment Automation
💳 Sync Stripe, PayPal, or Shopify Payments with QuickBooks 📜 Auto-generate invoices for new transactions
3. Customer Support Integration
🎧 Log Zendesk or Intercom tickets into your CRM automatically ⚡ Route support tickets based on priority
4. Inventory & Order Management
📦 Sync Shopify, WooCommerce, or Amazon Seller Central with inventory tools 🚚 Trigger supplier restocks when inventory runs low
5. Lead & Sales Tracking
📈 Connect Google Ads & Facebook Ads with Google Sheets or a CRM 🛠️ Automate lead tracking & ad performance reports
How to Set Up No-Code API Integration
1️⃣ Choose a SaaS integration platform → Konnectify 2️⃣ Pick the apps to connect (e.g., Shopify + QuickBooks) 3️⃣ Define the automation workflow (e.g., "New Shopify order → Auto-record sale in QuickBooks") 4️⃣ Test & Activate → Let automation handle the rest
Final Thoughts
Still manually transferring data between apps? Stop wasting time.
Businesses using no-code API integration are:
✅ More efficient ✅ Less error-prone ✅ Faster to scale
Why work harder when you can work smarter?
Start automating today with a SaaS integration platform like Konnectify��because your apps should work for you, not the other way around.
Frequently Asked Questions (FAQs)
What is API integration?
API integration connects different apps so they can share data automatically. Instead of manually transferring information, APIs handle everything in real-time.
Can I integrate apps without coding?
Yes! No-code SaaS integration platforms like Konnectify let you connect apps and automate workflows without coding.
What is the best API integration tool for non-tech users?
The best no-code SaaS integration platform right now is Konnectify—it’s powerful, easy to use, and supports real-time automation.
How do I set up an API integration?
Choose a SaaS integration platform
Pick the apps to connect
Define the automation workflow
Test & activate the integration
🔗 Want more details? Check out the complete guide here.
🚀 Ready to Automate?
Stop wasting hours on manual work. Start integrating apps today with Konnectify—the easiest no-code API automation tool for businesses.
#saas#saas platform#saas technology#saas development company#it services#software#b2b saas#ipaas#information technology#software development
0 notes
Text
How to Integrate Payment Gateways with WordPress Membership Plugins
Understanding the Basics
Before diving into the technical aspects, let's clarify the key components involved:
WordPress Membership Plugins: These plugins create and manage membership levels, restrict content, and handle user subscriptions.
Payment Gateways: These online services process payments, ensuring secure transactions between customers and merchants.
Popular Payment Gateways and Membership Plugins
Payment Gateways:
PayPal
Stripe
Authorize.Net
Braintree
2Checkout
Membership Plugins:
MemberPress
Paid Memberships Pro
WooCommerce Memberships
Restrict Content Pro
Ultimate Membership Pro
Integration Methods
There are primarily two methods to integrate payment gateways with WordPress membership plugins:
Direct Integration:
The membership plugin directly supports the payment gateway.
This often involves setting up API keys or credentials within the plugin's settings.
Pros: Usually simpler setup.
Cons: Limited gateway options.
Third-Party Payment Gateway Integration:
A third-party plugin or service acts as a bridge between the membership plugin and the payment gateway.
This offers more flexibility in choosing payment gateways.
Pros: Wider range of gateway options.
Cons: Might require additional configuration.
Step-by-Step Guide
Choose a Membership Plugin and Payment Gateway:
Select plugins that are compatible with each other and meet your specific needs.
Install and Activate Plugins:
Install the membership plugin and the payment gateway plugin or integration.
Configure Membership Levels:
Set up different membership levels with varying access privileges.
Configure Payment Gateway:
Enter your payment gateway credentials, such as API keys or merchant IDs.
Set up any necessary webhooks or notifications.
Link Membership Levels to Payment Plans:
Associate each membership level with a specific payment plan (e.g., monthly, yearly).
Test the Integration:
Create a test membership to ensure the payment process works correctly.
Customize Checkout Experience:
Tailor the checkout process to match your branding and user experience.
Additional Considerations:
Security: Prioritize security by using SSL certificates and following best practices for handling sensitive payment data.
Recurring Payments: If you offer recurring subscriptions, ensure the payment gateway and membership plugin support this feature.
Tax and Fee Handling: Implement proper tax calculation and fee management.
Customer Support: Provide excellent customer support for any payment-related issues.
Conclusion
Integrating payment gateways with WordPress membership plugins is essential for monetizing your online content. By following these steps and considering the factors mentioned, you can create a seamless and secure payment experience for your members.
#woocommerce#free subscription#wordpress#ecommerce website development#iptv subscription#membership plugin
0 notes
Text
How to Set Up WooCommerce Webhooks in 4 Easy Steps
How to Set Up WooCommerce Webhooks in 4 Easy Steps In this article, we'll learn about Woocommerce Webhooks. #php #phptutorial #phptutorialpoints #webdevelopment #webdevelopmenttutorial #woocommerce #woocommercetutorial #woocommercedevelopment #woocommercewebhooks #webhooks #wordpressecommerce
In this article, we’ll learn about Woocommerce Webhooks. In the dynamic world of e-commerce, keeping up with customer demands and automating processes is vital for success. Thankfully, WooCommerce, the leading e-commerce platform built on WordPress, offers a powerful feature called webhooks that can revolutionize your online store. We’ll explore the incredible benefits of WooCommerce webhooks and…

View On WordPress
0 notes
Text
How to Accept Credit Card Payments on a Website - The Easiest Way

Setting up credit card processing on your website is easy than what you think. Gone are the days of having to use your local bank to sign up for a merchant account. The costs involved with set up, monthly fees, and transaction fees for a merchant account with major banks, can really add up. Enter Stripe, the easiest way to accept credit card payments online for small businesses. In under 10 mins you can sign up with Stripe, enter your banking details where you want to be paid, and start to accept credit card payments on your website. No monthly fees, No set up costs ! They do however take a 3% transaction fee (which is normal for any merchant account) and it can take up to 7 days until your money is paid out. A small setback, but worth it in the long run.
How to accept credit card payments online - Step by Step
For this tutorial, I will set up the easiest way to accept credit card payments online using WooCommerce. Stripe only allows sign ups from certain countries. To check if your country is supported, go to Stripe - Supported Countries. Sign up to Stripe Go to www.stripe.com and select Create Stripe Account, or Start Now button

Once you've created an account, you'll be taken to the Dashboard. Here, you will "Add a Name". This will be your business name, or whatever you want to call this account.

Next, Activate your Account.

Enter all your business details. When it comes to "Credit card statement details", enter a short description that you want to show on customer's credit card statements.

When all your details are entered, you are now ready to use Stripe. Set up WooCommerce Go to Plugins > New > Search for Stripe for WooCommerce Install Now, then Activate

Once activated, go to WooCommerce > Settings > Payments > Stripe > Setup

Go back to your Stripe Dashboard. You need to copy both the Publishable API Key and Secret Key you will see on your Dashboard into the WooCommerce plugin.

If you can't see your API keys on the Stripe Dashboard, go to Developers > API keys.

Now go back to the WooCommerce Stripe setup where you will Enable Stripe, Enable Test Mode, and Copy and paste API keys from your Stripe account.

Copy the Webhook Endpoint address and enter it back into Stripe. It will be something like www.your-website.com/?wc-api=wc_stripe

Back in Stripe, go to Developers > Webhooks Add endpoint Paste the Webhook address from WooCommerce into Endpoint URL Choose receive all events Add endpoint to finish

Congratulations ! Your Stripe account is now setup with WooCommerce. Test your Stripe account in Test Mode Before going live taking credit card transactions, you need to test a transaction to make sure everything is working.

Go to your Stripe Dashboard and make sure that Viewing Test Data on the left menu is activated. This is important. Now go back to your WooCommerce website, add products to your cart, and start the checkout process. When you get to the payment section you should see the "test" version of the credit card section. Enter credit card number 4242 4242 4242 4242. This is Stripe's test credit card number. Enter a future expiry date, and any 3-number CVC. Submit your order, then go back to your Stripe Dashboard. You should see your payment come up for Today's sales.

Accept credit card payments Once the test sale is working you need to Deactivate Viewing Test Data. You site is now live, ready to accept credit card payments. Read the full article
0 notes
Text
How to Get Slack Notifications From Your WordPress Site
Do you want to get Slack notifications based on certain activity on your WordPress site?
Slack has become a central communication platform for many online businesses. Having activity notifications like new sales, new leads, new blog posts, etc. inside Slack can be helpful in streamlining your business workflows.
In this article, we’re going to show you how to easily get Slack notifications from your WordPress site.
Why Get Slack Notifications From Your WordPress Site?
Getting Slack notifications for key events on your WordPress site lets you keep everyone informed and even respond to certain things quickly.
For instance, you might want to get a Slack notification when your site’s contact form is completed. Or you may want a notification if a product in your online store is low on stock.
We’re going to take you through several different ways to set up Slack notifications from your WordPress site.
You can simply use the navigation links to jump straight to the section you want.
Get a Slack Notification When a New Post is Published (Slack’s RSS App)
Setting Up the Slack Notifications Plugin
Get a WooCommerce Sales Notification in Slack (Slack Notifications Plugin)
Get a Slack Notification for Plugin Updates (Slack Notifications Plugin)
Get New Comment Notifications in Slack (Slack Notification Plugin)
Get a Slack Notification When a WordPress Contact Form / Lead Form is Submitted (Zapier)
Get a Slack Notification When a New Post is Published
If you run many WordPress blogs like we do, then you may want to keep your team informed on all the new article updates that are going live.
Alternatively, you may want to keep your team briefed on all the new things happening in your industry (competitor updates, thought leaders, etc).
This is where Slack notifications can help. You can simply create a new channel that gets RSS feed updates from your favorite sites.
First, go to the RSS app page in Slack’s App Directory then click the ‘Add to Slack’ button.
Next, click the ‘Add RSS integration’ button.
Now, you need to enter the URL of the feed you want to add and choose which Slack channel you want to post notifications to. Once you’ve entered these details, click the ‘Subscribe to this feed’ button.
The app will then fetch and display your RSS feed title on screen.
If you run multiple WordPress sites, then you can add more feeds as needed.
Tip: You don’t have to own the RSS feed. You could use the RSS app to keep an eye on your competitors’ sites or stay on top of news from other blogs in your industry.
You will now automatically get a notification in your chosen Slack channel when a new post is published. The app checks for new items every few minutes, which means these notifications may not appear instantly.
Setting Up the Slack Notifications WordPress Plugin
If you want Slack to notify you about new posts, comments, WooCommerce orders, and other activity on your site, then you need to use the Slack Notifications plugin.
First, you need to do install and activate the Slack Notifications plugin. For more details, see our step by step guide on how to install a WordPress plugin.
Upon activation, click the Slack Notifications link at the bottom of your WordPress admin sidebar. You will see the Slack Integration page.
apps page on Slack and click the ‘Create an App’ button:
Next, enter a name for your app and choose your workspace from the drop-down list. Then, go ahead and click the ‘Create App’ button:
You’ll now see a page titled Basic Information. Here, you need to click on the ‘Incoming Webhooks’ section.
On the next screen, switch the ‘Activate Incoming Webhooks’ slider to the ‘On’ position:
After that, you need to scroll down the page and click on the ‘Add New Webhook to Workspace’ button:
Slack will now prompt you to select the channel from a drop-down list. You need to click the ‘Allow’ button to give the app permission to post to it:
You will now see the previous page again, with your webhook in place. Simply copy this or leave the tab open, as we will need it in a moment.
Now you need to switch back to your WordPress site’s Slack Notifications settings page. On this page, go ahead and copy / paste the webhook URL you created earlier, enter the default channel, and the bot name that you want to use.
After that, you need to scroll down the page and click on the ‘Run Test’ button at the bottom.
You should get a notification into your Slack channel like this. The app will have the name you gave it when setting it up in Slack.
Don’t forget to click the ‘Save Settings’ button at the bottom of the page, too.
The Slack Notifications plugin is correctly connected. The next step is to set up notifications from your WordPress site.
To set up any notification, you need to go to Slack Notifications » Notifications in your WordPress admin. Click the ‘Add New’ button at the top of the screen:
We will go through several different useful options that you may want to use.
Get a WooCommerce Sales Notification in Slack
Are you running an online store with WooCommerce? Typically you can setup new sale notifications via email, but did you know that you can setup WooCommerce sales notification in Slack too?
With the Slack Notifications plugin, you can get a message to your chosen channel whenever a new WooCommerce order comes in.
First, make sure you’ve followed the instructions above to set up Slack Notifications correctly.
Then, simply set up WooCommerce notifications by going to Slack Notifications » Notifications and clicking on the ‘Add New’.
You’ll see several drop-downs. Go ahead and set ‘Notification Type’ to ‘WooCommerce’ and leave ‘Notification Options’ set to ‘New Order’. After that, click the ‘Save Notifications’ button.
You should now get a notification in Slack whenever a new order comes in. This will include the order ID, status, total, and payment method. It will also include the item(s) purchased.
Note: The notification will not include any personal details such as the customer’s name or address.
Get a Slack Notification for Plugin Updates
Outdated plugins can be a serious risk to the security of your WordPress site. As a business owner, sometimes you might get busy and forget to update plugins, especially if you run multiple websites.
The Slack Notifications plugin lets you get a notification whenever a plugin needs updating.
First, you need to install, activate, and set up the plugin, as shown above. Then, go to Slack Notifications » Notifications in your WordPress admin and click the ‘Add New’ button.
For the ‘Notification Type’ select ‘System’ and for the ‘Notification Options’ select ‘Plugin Update Available’. After that click, Save Notifications button.
You’ll receive a notification in Slack whenever a plugin needs updating:
Note: You can also set up an alert for theme updates and core WordPress updates in the same way.
Get New Comment Notifications in Slack
The Slack Notification plugin also lets you easily get notified of new comments on your WordPress site.
Simply install, activate, and set up the plugin, as shown above. Then, go to Slack Notifications » Notifications in your WordPress admin and click the ‘Add New’ button.
Next, you need to set the Notification Type to ‘Comments’. The Notification Options drop-down should default to ‘New Comment’. After that, simply click the ‘Save Notifications’ button at the bottom.
You’ll now receive a notification in Slack for each new comment on your site. This will include a link to the post being commented on, the commenter’s name and email address, and the text of their comment:
There are lots of other ways you could use the Slack Notification plugin to stay aware of what’s happening on your WordPress site.
For instance, you could get a notification every time a page is updated, every time a new post is scheduled, and so much more.
Get a Slack Notification When a WordPress Contact Form / Lead Form is Submitted
Often business owners want to immediately respond to new sales / lead form inquiries. You can connect just about every WordPress contact form to Slack using a tool called Zapier.
Zapier is like a bridge that lets you connect two apps, such as WPForms and Slack. It works with over 2,000 different apps. For the sake of this example, we’ll use WPForms which is the #1 rated WordPress form plugin.
First, you’ll need to install and activate the WPForms plugin. For more details, see our step by step guide on how to install a WordPress plugin.
Note: you’ll need at least the Pro version of WPForms to use the Zapier addon.
Upon activation, go to the WPForms » Settings page to enter your license key. You will find the license key in your account section on the WPForms website.
Next, go to the WPForms » Addon page. Find the Zapier addon, then go ahead and install and activate it.
Once you’ve installed that addon, go to the WPForms » Settings » Integrations page. Simply click on the Zapier logo here, and you’ll see your Zapier API key.
You need this to connect Zapier and WPForms, so copy it somewhere safe or keep this tab open in your browser.
You then need to set up a form and submit a test entry. We’re going to use the ‘Suggestion Form’ template as the basis of our form.
You can follow our instructions on creating a form in WPForms for help getting your form set up.
You will also need an account with both Zapier and Slack. In your Slack workspace, you need to add the Zapier app.
Then, you can create your Zap. Login to Zapier and click the ‘Make a Zap’ button on the top-left to start the configuration wizard.
In Zapier, a ‘zap’ is a process with a trigger and an action. Our trigger will be someone completing the form, and our action will be to send a Slack message.
At the top of the screen, go ahead and give your zap a name. After that, we need to set up the trigger.
In the ‘Choose App & Event’ box, simply type ‘WPForms’ into the search bar and click on the WPForms icon that appears.
Zapier should automatically fill in the trigger event ‘New Form Entry’, so you just need to click the ‘Continue’ button.
You’ll then be asked to log in to your WPForms account. Simply click on the ‘Sign in to WPForms’ button:
Next, you’ll see a popup window. Here, you need to copy the API key from WPForms that you found earlier. You also need to enter the URL (domain name) of your website. Once you’ve entered these, click the ‘Yes, Continue’ button.
On the next step, Zapier will ask you to choose your form from a drop-down list. Just click on the form that you want to use, then click the ‘Continue’ button.
You will now be prompted to test your trigger. Click the ‘Test trigger’ button so that Zapier can look for your test entry.
Once Zapier has found your test data, go ahead and click the ‘Continue’ button.
For the ‘Do this’ action part of the Zap, you need to choose Slack as your app. Simply type ‘Slack’ into the search bar and then click on the Slack app:
Next, you need to choose your Action Event. We’re going to choose ‘Send Channel Message’ here.
Tip: There are several other actions you could choose instead. For instance, you could trigger a direct message or a reminder.
Now, click the ‘Continue’ button. You will then be prompted to sign in to Slack. Simply follow the on-screen prompts to sign in and give Zapier permission to access your Slack workspace.
Once you’ve connected your Slack account, click the Continue button again to move on.
You’ll then be prompted to pick a channel from the drop-down list. We’ve chosen ‘website’ for ours.
Next, you’ll need to enter the text for the notification.
You can include the details of the form submission, as we’ve done here. When you click on the box, you’ll see your form fields in a drop-down below. Go ahead and add whichever fields you want to the message.
Tip: The name of the fields will not be included in the Slack notification. We have added some text before each field to help make the message clear.
Now, you need to give your bot a name. You may also want to choose an emoji. You can leave the other options as their defaults.
Once you are ready, click the ‘Continue’ button to move on.
It’s time to try out your app. Go ahead and click the ‘Test & Review’ button.
Zapier will send your test data to Slack. Go ahead and check Slack to see if your message came through as expected. If there is anything you want to change, you can go back and do so.
Once you’re happy with the Zap, simply click the ‘Turn on Zap’ button.
You may also want to send a new test entry through your form to ensure it appears correctly in Slack. Here is our Slack channel with our first test message plus a second one submitted after the Zap was turned on:
You can use Zapier to connect just about every email marketing service, marketing automation tool, and other business tools with each other as well as Slack.
The process is roughly similar to what we have demonstrated above with WPForms.
When used properly, Slack Notifications can significantly streamline your workflow by centralizing all the important things inside the central communication platform for your business.
We hope this article helped you learn how to get Slack notifications from your WordPress site. You might also be interested in our articles on the best business phone services for small business, and the best live chat software to get more sales / improve support.
If you liked this article, then please subscribe to our YouTube Channel for WordPress video tutorials. You can also find us on Twitter and Facebook.
The post How to Get Slack Notifications From Your WordPress Site appeared first on WPBeginner.
from WPBeginner https://www.wpbeginner.com/wp-tutorials/how-to-get-slack-notifications-from-your-wordpress-site/
0 notes
Text
New Release – 5th OCTOBER 2019 – New Feature: Default field values for New Products, Customers, and Suppliers
New Feature
Feature: Manufacturer Warranties for Sold Products
Impact area: Products, Sale, Reference Books, Users & Roles
Introduction: Sellers are now able to manage manufacturer warranties for their products, helping facilitate the Return Merchandise Authorization (RMA) process when products are returned during the warranty period. This leads to better customer support, and helps track and reduce repair costs.
Pre-condition: None.
Functionality: Go to Reference Books>Warranty Setup to create a warranty. Only users with the correct access permissions can create warranties.
Once a warranty is set up, it can be applied to both new and existing products in Inventory>Products as well as product families in Inventory>Product Families.
Depending on the warranty setup, products with warranties that are included in Sales Orders are assigned warranty registration numbers during the Fulfilment, specifically the Pack stage. The process is the same for sales orders consolidated from third-party e-commerce platforms, e.g. Amazon, eBay, Magento and WooCommerce.
Users with the correct access permissions are also able to look up warranty registrations from Sales>Warranties.
Bug fixes
1. Sales for DEAR POS, Shopify, Vend, and other integrations received by webhooks are now processed immediately upon capture when No Consolidation mode is enabled.
2. In sales orders, the company name is added to the billing address ONLY after the order has been processed in Shopify.
The post New Release – 5th OCTOBER 2019 – New Feature: Default field values for New Products, Customers, and Suppliers appeared first on DEAR Cloud Inventory Management.
This article originally appeared at https://ift.tt/31L2VkO
0 notes
Text
How to setup WooCommerce on Godaddy
Want to know how to setup Wordpress and WoCommerce on GoDaddy?
1) GoDaddy is always offering coupons, so first make sure you have the latest discount at http://www.coupons.com/view/GoDaddy.com?d=255356
2)Choose which type of hosting you want:
a) GoDaddy has a new managed Wordpress product
b) Or use their traditional web hosting
I choose the traditional web hosting for greater flexibility in case I want to do something else later

Select and Checkout. On Thank You
3) Choose which domain you are going to attach your hosting to and setup your user account.
4) Go to your hosting management console (cpanel) and scroll down to Web Applications and select Wordpress

5) Setup Wordpress basic config with GoDaddy Wordpress install
6) Open Wordpress admin and select the plug-in section on the left and hit add new
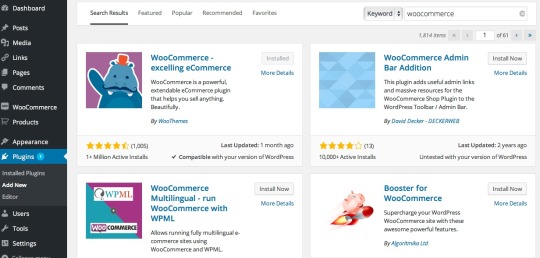
7) Once installed it will ask you to install woocommerce pages say yes.
8) Now go to wordpress tab on left and hit settings to adjust your location, currency, etc
9) Choose a gateway to process your payments. I’m using PayStand as my gateway. To install go back to Plug-ins and Add New Again. Search for PayStand.
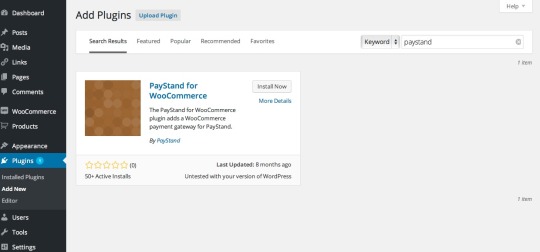
Now go back to Woocomerce Settings and click Checkout

SignUp for PayStand if you haven’t already. Login to your PayStand Dashboard to retrieve your Org ID and API Key required in the Woocomerce checkout settings. Lastly grab your WooCommerce Webhook URL and put that into PayStand Dashboard so you get payment notification to update the order.
9) Finalize you store by adding Products and choosing a theme that you like best. Viola a working store! And if you are like me and choose the go daddy coupon, you now have a full working commerce system for $1 a month. Wow!
0 notes