#shorthand condition in PHP
Explore tagged Tumblr posts
Visit Tumblr Blog
Explore Tumblr blogs with no restrictions, modern design and the best experience.
Last Seen Tumblr Blogs


Fun Fact
BuzzFeed published a report claiming that Tumblr was utilized as a distribution channel for Russian agents to influence American voting habits during the 2016 presidential election in Feb 2018.
Text
PHP Shorthand if Statements
Learn PHP shorthand if statements (ternary operator) with syntax, examples, use cases, and best practices. Simplify your PHP code using concise conditionals. Mastering PHP Shorthand if Statements (Ternary Operator) PHP offers several ways to write conditional statements, and one of the most concise and powerful is the shorthand if statement, also known as the ternary operator. This feature…
#PHP conditional operator#PHP if else shorthand#PHP shorthand if#PHP ternary operator#shorthand condition in PHP#ternary PHP
0 notes
Text
Filling a PHP array dynamically means that instead of hardcoding the values, you're adding values to the array based on some logic, external input, or data sources. Here's a basic overview and some examples:
1. Create an Empty Array
You can create an empty array using the 'array()' function or the '[]' shorthand.
$dynamicArray = array(); // OR $dynamicArray = [];
2. Add Elements to the Array
You can add elements to an array in various ways:
Append to the array:
$dynamicArray[] = 'value1'; $dynamicArray[] = 'value2';
Add with a specific key:
$dynamicArray['key1'] = 'value1'; $dynamicArray['key2'] = 'value2';
3. Dynamically Filling the Array
Here's how you can fill an array based on various scenarios:
From a database (using PDO for this example)
$stmt = $pdo->query("SELECT value FROM some_table"); while ($row = $stmt->fetch()) { $dynamicArray[] = $row['value']; }
From a form (using POST method as an example):
if (isset($_POST['inputName'])) { $dynamicArray[] = $_POST['inputName']; }
Based on some logic:
for ($i = 0; $i < 10; $i++) { if ($i % 2 == 0) { $dynamicArray[] = $i; } }
This would fill $dynamicArray with even numbers between 0 and 9.
4. Tips and Best Practices
Sanitize external input: Always sanitize and validate data, especially when it's coming from external sources like user input, to ensure security.
Use associative arrays wisely: If you're using string keys, ensure they're unique to avoid overwriting values.
Check existing values: When adding to an array, you may want to check if a value already exists to avoid duplicates.
if (!in_array($value, $dynamicArray)) { $dynamicArray[] = $value; }
Using these methods and principles, you can effectively and dynamically fill a PHP array based on any set of conditions or data sources.
#PHPDevelopment#DynamicArrays#WebDevelopment#ProgrammingTips#DataHandling#PHPArrays#BackEndDevelopment#CodingBestPractices#WebProgramming#DatabaseIntegration#vinhjacker#mageplaza
0 notes
Text
Unix Regex Cheat Sheet

Grep Regex Cheat Sheet
Perl Regex Cheat Sheet Pdf
Unix Regex Cheat Sheet Download
Unix Regex Cheat Sheet Example
A regular expression, regex or regexp is a sequence of characters that define a search pattern. Usually such patterns are used by string searching algorithms for 'find' or 'find and replace' operations on strings, or for input validation.
Cheat Sheet This cheat sheet is intended to be a quick reminder for the main concepts involved in using regular expressions and assumes you already understand their usage. If you are new to regular expressions we strongly suggest you work through the Regular Expressions tutorial from the beginning.
Regular Expressions Cheat Sheet by DaveChild - Cheatography.com Created Date: 4237Z. Name Command; Insert string to the begining of lines: sed -i 's/^/head /g' my-file: Insert string to the end of lines: sed -i 's/$/ tail/g' my-file: Add content after nth line.
characters — what to seek
ring matches ring, springboard, ringtone, etc.
. matches almost any character
h.o matches hoo, h2o, h/o, etc.
Use to search for these special characters:
( ^ $ . | ? * + ( ) ( )
ring? matches ring?
(quiet) matches (quiet)
c:windows matches c:windows
alternatives — | (OR)
cat|dog match cat or dog
order matters if short alternative is part of longer
id|identity matches id or identity
regex engine is 'eager', stops comparing as soon as 1st alternative matches
identity|id matches id or identity
order longer to shorter when alternatives overlap
(To match whole words, see scope and groups.)
character classes — (allowed) or (^NOT allowed)
(aeiou) match any vowel
(^aeiou) match a NON vowel

r(iau)ng match ring, wrangle, sprung, etc.
gr(ae)y match gray or grey
(a-zA-Z0-9) match any letter or digit
(In ( ) always escape . ) and sometimes ^ - .)
shorthand classes
w 'word' character (letter, digit, or underscore)
d digit
s whitespace (space, tab, vtab, newline)
W, D, or S, (NOT word, digit, or whitespace)
(DS) means not digit OR whitespace, both match
(^ds) disallow digit AND whitespace
occurrences — ? * + (n) (n,) (n,n)
? 0 or 1
colou?r match color or colour
* 0 or more
(BW)ill(ieamy's)* match Bill, Willy, William's etc.
+ 1 or more
(a-zA-Z)+ match 1 or more letters
(n) require n occurrences
d(3)-d(2)-d(4) match a SSN
(n,) require n or more
(a-zA-Z)(2,) 2 or more letters
Deezer ariana grande. Ariana Grande 10257966 fans Grammy winning, multi-platinum recording artist and international superstar, Ariana Grande, is the first artist to achieve the top three Billboard Hot 100 spots since The Beatles in 1964 with “7 Rings,” “Break Up With Your Girlfriend, I'm Bored,” and “Thank U, Next.”. Ariana Grande 10270075 fans Grammy winning, multi-platinum recording artist and international superstar, Ariana Grande, is the first artist to achieve the top three Billboard Hot 100 spots since The Beatles in 1964 with “7 Rings,” “Break Up With Your Girlfriend, I'm Bored,” and “Thank U, Next.”.
(n,m) require n - m
(a-z)w(1,7) match a UW NetID
* greedy versus *? lazy
* + and (n,) are greedy — match as much as possible
<.+> finds 1 big match in <b>bold</b>
*? +? and (n,)? are lazy — match as little as possible
<.+?> finds 2 matches in <b>bold</b>
comments — (?#comment)
(?#year)(19|20)dd embedded comment
(?x)(19|20)dd #year free spacing & EOL comment
(see modifiers)
scope — b B ^ $
b 'word' edge (next to non 'word' character)
bring word starts with 'ring', ex ringtone
ringb word ends with 'ring', ex spring
b9b match single digit 9, not 19, 91, 99, etc.
b(a-zA-Z)(6)b match 6-letter words
B NOT word edge
BringB match springs and wringer Body model sketch.
^ start of string $ end of string
^d*$ entire string must be digits
^(a-zA-Z)(4,20)$ string must have 4-20 letters
^(A-Z) string must begin with capital letter
(.!?'))$ string must end with terminal puncutation
Chrome we. Discover great apps, games, extensions and themes for Google Chrome.
groups — ( )
(in|out)put match input or output
d(5)(-d(4))? US zip code ('+ 4' optional)
Locate all PHP input variables:
$_(GET|POST|REQUEST|COOKIE|SESSION|SERVER)(.+)
NB: parser tries EACH alternative if match fails after group. Can lead to catastrophic backtracking.
back references — n
each ( ) creates a numbered 'back reference'
(to) (be) or not 1 2 match to be or not to be
((^s))1(2) match non-space, then same twice more aaa, ..
b(w+)s+1b match doubled words
non-capturing group — (?: ) prevent back reference
on(?:click|load) is faster than on(click|load)
use non-capturing or atomic groups when possible
atomic groups — (?>a|b) (no capture, no backtrack)
(?>red|green|blue)
faster than non-capturing
alternatives parsed left to right without return
(?>id|identity)b matches id, but not identity
'id' matches, but 'b' fails after atomic group, parser doesn't backtrack into group to retry 'identity'
If alternatives overlap, order longer to shorter.
lookahead — (?= ) (?! ) lookbehind — (?<= ) (?<! )
bw+?(?=ingb) match warbling, string, fishing, ..
b(?!w+ingb)w+b words NOT ending in 'ing'
Grep Regex Cheat Sheet
(?<=bpre).*?b match pretend, present, prefix, ..
bw(3)(?<!pre)w*?b words NOT starting with 'pre'
(lookbehind needs 3 chars, w(3), to compare w/'pre')
bw+(?<!ing)b match words NOT ending in 'ing'
(see LOOKAROUND notes below)
if-then-else — (?ifthen|else)
match 'Mr.' or 'Ms.' if word 'her' is later in string
M(?(?=.*?bherb)s|r). lookahead for word 'her'
(requires lookaround for IF condition)
modifiers — i s m x
ignore case, single-line, multi-line, free spacing
(?i)(a-z)*(?-i) ignore case ON / OFF
(?s).*(?-s) match multiple lines (causes . to match newline)
(?m)^.*;$(?-m)^ & $ match lines not whole string
(?x) #free-spacing mode, this EOL comment ignored
d(3) #3 digits (new line but same pattern)
-d(4) #literal hyphen, then 4 digits
(?-x) (?#free-spacing mode OFF)
/regex/ismx modify mode for entire string
A few examples:
(?s)<p(?(?=s) .*?)>(.*?)</p> span multiple lines
(?s)<p(?(?=s) .*?)>(.*?)</p> locate opening '<p'
(?s)<p(?(?=s) .*?)>(.*?)</p> create an if-then-else
(?s)<p(?(?=s) .*?)>(.*?)</p> lookahead for a whitespace character
(?s)<p(?(?=s) .*?)>(.*?)</p> if found, attempt lazy match of any characters until ..
(?s)<p(?(?=s) .*?)>(.*?)</p> closing angle brace
(?s)<p(?(?=s) .*?)>(.*?)</p> capture lazy match of all characters until ..
(?s)<p(?(?=s) .*?)>(.*?)</p> closing '</p>'
The lookahead prevents matches on PRE, PARAM, and PROGRESS tags by only allowing more characters in the opening tag if P is followed by whitespace. Otherwise, '>' must follow '<p'.
LOOKAROUND notes
(?= ) if you can find ahead
(?! ) if you can NOT find ahead
(?<= ) if you can find behind
(?<! ) if you can NOT find behind
convert Firstname Lastname to Lastname, Firstname (& visa versa)
Pattern below uses lookahead to capture everything up to a space, characters, and a newline. The 2nd capture group collects the characters between the space and the newline. This allows for any number of names/initials prior to lastname, provided lastname is at the end of the line.
Find: (.*)(?= .*n) (.*)n
Repl: 2, 1n — insert 2nd capture (lastname) in front of first capture (all preceding names/initials)
Reverse the conversion.
Find: (.*?), (.*?)n — group 1 gets everything up to ', ' — group 2 gets everything after ', '
Repl: 2 1n
lookaround groups are non-capturing
If you need to capture the characters that match the lookaround condition, you can insert a capture group inside the lookaround.
(?=(sometext)) the inner () captures the lookahead
This would NOT work: ((?=sometext)) Because lookaround groups are zero-width, the outer () capture nothing.
lookaround groups are zero-width
They establish a condition for a match, but are not part of it.
Compare these patterns: re?d vs r(?=e)d
re?d — match an 'r', an optional 'e', then 'd' — matches red or rd
r(?=e)d — match 'r' (IF FOLLOWED BY 'e') then see if 'd' comes after 'r'
Perl Regex Cheat Sheet Pdf
The lookahead seeks 'e' only for the sake of matching 'r'.
Because the lookahead condition is ZERO-width, the expression is logically impossible.
It requires the 2nd character to be both 'e' and 'd'.
For looking ahead, 'e' must follow 'r'.
For matching, 'd' must follow 'r'.
fixed-width lookbehind
Most regex engines depend on knowing the width of lookbehind patterns. Ex: (?<=h1) or (?<=w(4)) look behind for 'h1' or for 4 'word' characters.
This limits lookbehind patterns when matching HTML tags, since the width of tag names and their potential attributes can't be known in advance.
variable-width lookbehind
.NET and JGSoft support variable-width lookbehind patterns. Ex: (?<=w+) look behind for 1 or more word characters. The first few examples below rely on this ability.
Lookaround groups define the context for a match. Here, we're seeking .* ie., 0 or more characters. A positive lookbehind group (?<= . . . ) preceeds. A positive lookahead group (?= . . . ) follows. These set the boundaries of the match this way:
(?<=<(w+)>).*(?=</1>) look behind current location
(?<=<(w+)>).*(?=</1>) for < > surrounding ..
(?<=<(w+)>).*(?=</1>) one or more 'word' characters. The ( ) create a capture group to preserve the name of the presumed tag: DIV, H1, P, A, etc.
(?<=<(w+)>).*(?=</1>) match anything until
(?<=<(w+)>).*(?=</1>) looking ahead from the current character
(?<=<(w+)>).*(?=</1>) these characters surround
(?<=<(w+)>).*(?=</1>) the contents of the first capture group
In other words, advance along string until an opening HTML tag preceeds. Match chars until its closing HTML tag follows. The tags themselves are not matched, only the text between them.
Unix Regex Cheat Sheet Download
To span multiple lines, use the (?s) modifier. (?s)(?<=<cite>).*(?=</cite>) Match <cite> tag contents, regardless of line breaks.
As in example above, the first group (w+) captures the presumed tag name, then an optional space and other characters ?.*? allow for attributes before the closing >.
class='.*?bredb.*?' this new part looks for class=' and red and ' somewhere in the opening tag
b ensures 'red' is a single word
.*? allow for other characters on either side of 'red' so pattern matches class='red' and class='blue red green' etc.
Here, the first group captures only the tag name. The tag's potential attributes are outside the group.
(?i)<((a-z)(a-z0-9)*)(^>)*>.*?</1> set ignore case ON
(?i)<((a-z)(a-z0-9)*)(^>)*>.*?</1> find an opening tag by matching 1 letter after <
(?i)<((a-z)(a-z0-9)*)(^>)*>.*?</1> then match 0 or more letters or digits
(?i)<((a-z)(a-z0-9)*)(^>)*>.*?</1> make this tag a capture group
(?i)<((a-z)(a-z0-9)*)(^>)*>.*?</1> match 0 or more characters that aren't > — this allows attributes in opening tag
(?i)<((a-z)(a-z0-9)*)(^>)*>.*?</1> match the presumed end of the opening tag
(NB: This markup <a> would end the match early. Doesn't matter here. Subsequent < pulls match to closing tag. But if you attempted to match only the opening tag, it might be truncated in rare cases.)
(?i)<((a-z)(a-z0-9)*)(^>)*>.*?</1> lazy match of all of tag's contents
(?i)<((a-z)(a-z0-9)*)(^>)*>.*?</1> match the closing tag — 1 refers to first capture group
The IF condition can be set by a backreference (as here) or by a lookaround group.
(()?d(3) optional group ( )? matches '(' prior to 3-digit area code d(3) — group creates back reference #1
(?(1)) ?|(-/ .)) (1) refers to group 1, so if '(' exists, match ')' followed by optional space, else match one of these: '- / . '
d(3)(- .)d(4) rest of phone number
Unix Regex Cheat Sheet Example
For a quick overview: http://www.codeproject.com/KB/dotnet/regextutorial.aspx.
For a good tutorial: http://www.regular-expressions.info.
We would like to show you a description here but the site won’t allow us. Walmart insurance copay.
0 notes
Photo

PHP Conditional Statements: Very often when you write code, you want to perform different actions for different conditions. You can use conditional statements in your code to do this. In PHP we have the following conditional statements: if statement - executes some code if one condition is true if...else statement - executes some code if a condition is true and another code if that condition is false if...elseif...else statement - executes different codes for more than two conditions Ternary Operators In addition to all this conditional statements, PHP provides a shorthand way of writing if…else, called Ternary Operators. The statement uses a question mark (?) and a colon (:) and takes three operands: a condition to check, a result for TRUE and a result for FALSE. #php #code #coding #phpdevelooer #developer #afgprogrammer #codesnippet #phpprogramming https://www.instagram.com/p/CLRhNqpjQyn/?igshid=msos8smu9fd3
0 notes
Text
Introducing Alpine.js: A Tiny JavaScript Framework | ArkssTech

Introducing Alpine.js: A Tiny JavaScript Framework Like most developers, I have a bad tendency to over-complicate my workflow, especially if there’s some new hotness on the horizon. Why use CSS when you can use CSS-in-JS? Why use Grunt when you can use Gulp? Why use Gulp when you can use Webpack? Why use a traditional CMS when you can go headless? Every so often though, the new-hotness makes life simpler. Recently, the rise of utility based tools like Tailwind CSS have done this for CSS, and now Alpine.js promises something similar for JavaScript. In this article, we’re going to take a closer look at Alpine.js and how it can replace JQuery or larger JavaScript libraries to build interactive websites. If you regularly build sites that require a sprinkling on Javascript to alter the UI based on some user interaction, then this article is for you. Throughout the article, I refer to Vue.js, but don’t worry if you have no experience of Vue — that is not required. In fact, part of what makes Alpine.js great is that you barely need to know any JavaScript at all. Now, let’s get started. What Is Alpine.js? According to project author Caleb Porzio: “Alpine.js offers you the reactive and declarative nature of big frameworks like Vue or React at a much lower cost. You get to keep your DOM, and sprinkle in behavior as you see fit.” Let’s unpack that a bit. Let’s consider a basic UI pattern like Tabs. Our ultimate goal is that when a user clicks on a tab, the tab contents displays. If we come from a PHP background, we could easily achieve this server side. But the page refresh on every tab click isn’t very ‘reactive’. To create a better experience over the years, developers have reached for jQuery and/or Bootstrap. In that situation, we create an event listener on the tab, and when a user clicks, the event fires and we tell the browser what to do. See the Pen Showing / hiding with jQuery by Phil on CodePen. See the Pen Showing / hiding with jQuery by Phil on CodePen. That works. But this style of coding where we tell the browser exactly what to do (imperative coding) quickly gets us in a mess. Imagine if we wanted to disable the button after it has been clicked, or wanted to change the background color of the page. We’d quickly get into some serious spaghetti code. Developers have solved this issue by reaching for frameworks like Vue, Angular and React. These frameworks allow us to write cleaner code by utilizing the virtual DOM: a kind of mirror of the UI stored in the browser memory. The result is that when you ‘hide’ a DOM element (like a tab) in one of these frameworks; it doesn’t add a display:none; style attribute, but instead it literally disappears from the ‘real’ DOM. This allows us to write more declarative code that is cleaner and easier to read. But this is at a cost. Typically, the bundle size of these frameworks is large and for those coming from a jQuery background, the learning curve feels incredibly steep. Especially when all you want to do is toggle tabs! And that is where Alpine.js steps in. WANT TO BUILD YOUR BUSINESS APP IN LARAVEL FRAMEWORK? ARKSSTECH, AGILE SOFTWARE DEVELOPMENT COMPANY OFFERS EXPERIENCED LARAVEL APP DEVELOPERS & TO HIRE LARAVEL DEVELOPERS FOR STARTUPS AND SMES. RENT A CODER TODAY!! Like Vue and React, Alpine.js allows us to write declarative code but it uses the “real” DOM; amending the contents and attributes of the same nodes that you and I might edit when we crack open a text editor or dev-tools. As a result, you can lose the filesize, wizardry and cognitive-load of larger framework but retain the declarative programming methodology. And you get this with no bundler, no build process and no script tag. Just load 6kb of Alpine.js and you’re away! Alpine.js JQuery Vue.js React + React DOM Coding style Declarative Imperative Declarative Declarative Requires bundler No No No Yes Filesize (GZipped, minified) 6.4kb 30kb 32kb 5kb + 36kb Dev-Tools No No Yes Yes WANT TO BUILD YOUR BUSINESS APP IN LARAVEL FRAMEWORK? ARKSSTECH, AGILE SOFTWARE DEVELOPMENT COMPANY OFFERS EXPERIENCED LARAVEL APP DEVELOPERS & TO HIRE LARAVEL DEVELOPERS FOR STARTUPS AND SMES. RENT A CODER TODAY!! When Should I Reach For Alpine? For me, Alpine’s strength is in the ease of DOM manipulation. Think of those things you used out of the box with Bootstrap, Alpine.js is great for them. Examples would be: Showing and hiding DOM nodes under certain conditions, Binding user input, Listening for events and altering the UI accordingly, Appending classes. You can also use Alpine.js for templating if your data is available in JSON, but let’s save that for another day. When Should I Look Elsewhere? If you’re fetching data, or need to carry out additional functions like validation or storing data, you should probably look elsewhere. Larger frameworks also come with dev-tools which can be invaluable when building larger UIs. From jQuery To Vue To Alpine Two years ago, Sarah Drasner posted an article on Smashing Magazine, “Replacing jQuery With Vue.js: No Build Step Necessary,” about how Vue could replace jQuery for many projects. That article started me on a journey which led me to use Vue almost every time I build a user interface. Today, we are going to recreate some of her examples with Alpine, which should illustrate its advantages over both jQuery and Vue in certain use cases. Alpine’s syntax is almost entirely lifted from Vue.js. In total, there are 13 directives. We’ll cover most of them in the following examples. Getting Started Like Vue and jQuery, no build process is required. Unlike Vue, Alpine it initializes itself, so there’s no need to create a new instance. Just load Alpine and you’re good to go. The scope of any given component is declared using the x-data directive. This kicks things off and sets some default values if required: ... Capturing User Inputs x-model allow us to keep any input element in sync with the values set using x-data. In the following example, we set the name value to an empty string (within the form tag). Using x-model, we bind this value to the input field. By using x-text, we inject the value into the innerText of the paragraph element. This highlights the key differences with Alpine.js and both jQuery and Vue.js. Updating the paragraph tag in jQuery would require us to listen for specific events (keyup?), explicitly identify the node we wish to update and the changes we wish to make. Alpine’s syntax on the other hand, just specifies what should happen. This is what is meant by declarative programming. Updating the paragraph in Vue while simple, would require a new script tag: new Vue({ el: '#app', data: { name: '' } }); While this might not seem like the end of the world, it highlights the first major gain with Alpine. There is no context-switching. Everything is done right there in the HTML — no need for any additional JavaScript. Click Events, Boolean Attributes And Toggling Classes Like with Vue, : serves as a shorthand for x-bind (which binds attributes) and @ is shorthand for x-on (which indicates that Alpine should listen for events). In the following example, we instantiate a new component using x-data, and set the default value of show to be false. When the button is clicked, we toggle the value of show. When this value is true, we instruct Alpine to append the aria-expanded attribute. x-bind works differently for classes: we pass in object where the key is the class-name (active in our case) and the value is a boolean expression (show). WANT TO BUILD YOUR BUSINESS APP IN LARAVEL FRAMEWORK? ARKSSTECH, AGILE SOFTWARE DEVELOPMENT COMPANY OFFERS EXPERIENCED LARAVEL APP DEVELOPERS & TO HIRE LARAVEL DEVELOPERS FOR STARTUPS AND SMES. RENT A CODER TODAY!! Hiding And Showing The syntax showing and hiding is almost identical to Vue. This will set a given DOM node to display:none. If you need to remove a DOM element completely, x-if can be used. However, because Alpine.js doesn’t use the Virtual DOM, x-if can only be used on a (tag that wraps the element you wish to hide). Magic Properties In addition to the above directives, three Magic Properties provide some additional functionality. All of these will be familiar to anyone working in Vue.js. $el fetches the root component (the thing with the x-data attribute); $refs allows you to grab a DOM element; $nextTick ensures expressions are only executed once Alpine has done its thing; $event can be used to capture a nature browser event. Let’s Build Something Useful It’s time to build something for the real world. In the interests of brevity I’m going to use Bootstrap for styles, but use Alpine.js for all the JavaScript. The page we’re building is a simple landing page with a contact form displayed inside a modal that submits to some form handler and displays a nice success message. Just the sort of thing a client might ask for and expect pronto!

Initial view (Large preview)
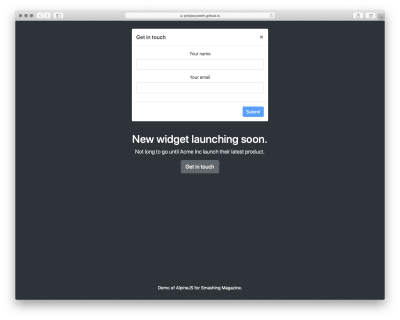
Modal open (Large preview)
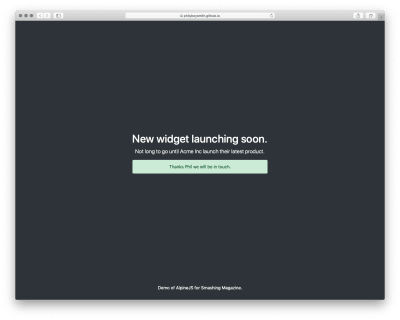
Success message (Large preview) Note: You can view the original markup here. WANT TO BUILD YOUR BUSINESS APP IN LARAVEL FRAMEWORK? ARKSSTECH, AGILE SOFTWARE DEVELOPMENT COMPANY OFFERS EXPERIENCED LARAVEL APP DEVELOPERS & TO HIRE LARAVEL DEVELOPERS FOR STARTUPS AND SMES. RENT A CODER TODAY!! To make this work, we could add jQuery and Bootstrap.js, but that is quite a bit of overhead for not a lot of functionality. We could probably write it in Vanilla JS, but who wants to do that? Let’s make it work with Alpine.js instead. First, let’s set a scope and some initial values: Now, let’s make our button set the showModal value to true: Get in touch When showModal is true, we need to display the modal and add some classes: Let’s bind the input values to Alpine: And disable the ‘Submit’ button, until those values are set: Submit Finally, let’s send data to some kind of asynchronous function, and hide the modal when we’re done: Submit And that’s about it! Just Enough JavaScript When building websites, I’m increasingly trying to ask myself what would be “just enough JavaScript”? When building a sophisticated web application, that might well be React. But when building a marketing site, or something similar, Alpine.js feels like enough. (And even if it’s not, given the similar syntax, switching to Vue.js takes no time at all). It’s incredibly easy to use (especially if you’ve never used VueJS). It’s tiny ( There are more advanced features that aren’t included in this article and Caleb is constantly adding new features. If you want to find out more, take a look at the official docs on Github. WANT TO BUILD YOUR BUSINESS APP IN LARAVEL FRAMEWORK? ARKSSTECH, AGILE SOFTWARE DEVELOPMENT COMPANY OFFERS EXPERIENCED LARAVEL APP DEVELOPERS & TO HIRE LARAVEL DEVELOPERS FOR STARTUPS AND SMES. RENT A CODER TODAY!! Read the full article
#bestbrowsersforwebdesign#designsystems#webdesignbrowsers#webdesigncomponents#webdesigntools#webdesignworkflow
0 notes
Text
Introducing Alpine.js: A Tiny JavaScript Framework
About The Author
Phil Smith is a freelance developer based in Brighton, UK. His agency, amillionmonkeys partner with designers, entrepreneurs and agencies to build websites and … More about Phil …
Ever built a website and reached for jQuery, Bootstrap, Vue.js or React to acheive some basic user interaction? Alpine.js is a fraction of the size of these frameworks because it involves no build steps and provides all of the tools you need to build a basic user interface.
Like most developers, I have a bad tendency to over-complicate my workflow, especially if there’s some new hotness on the horizon. Why use CSS when you can use CSS-in-JS? Why use Grunt when you can use Gulp? Why use Gulp when you can use Webpack? Why use a traditional CMS when you can go headless? Every so often though, the new-hotness makes life simpler.
Recently, the rise of utility based tools like Tailwind CSS have done this for CSS, and now Alpine.js promises something similar for JavaScript.
In this article, we’re going to take a closer look at Alpine.js and how it can replace JQuery or larger JavaScript libraries to build interactive websites. If you regularly build sites that require a sprinkling on Javascript to alter the UI based on some user interaction, then this article is for you.
Throughout the article, I refer to Vue.js, but don’t worry if you have no experience of Vue — that is not required. In fact, part of what makes Alpine.js great is that you barely need to know any JavaScript at all.
Now, let’s get started.
What Is Alpine.js?
According to project author Caleb Porzio:
“Alpine.js offers you the reactive and declarative nature of big frameworks like Vue or React at a much lower cost. You get to keep your DOM, and sprinkle in behavior as you see fit.”
Let’s unpack that a bit.
Let’s consider a basic UI pattern like Tabs. Our ultimate goal is that when a user clicks on a tab, the tab contents displays. If we come from a PHP background, we could easily achieve this server side. But the page refresh on every tab click isn’t very ‘reactive’.
To create a better experience over the years, developers have reached for jQuery and/or Bootstrap. In that situation, we create an event listener on the tab, and when a user clicks, the event fires and we tell the browser what to do.
See the Pen Showing / hiding with jQuery by Phil on CodePen.
See the Pen Showing / hiding with jQuery by Phil on CodePen.
That works. But this style of coding where we tell the browser exactly what to do (imperative coding) quickly gets us in a mess. Imagine if we wanted to disable the button after it has been clicked, or wanted to change the background color of the page. We’d quickly get into some serious spaghetti code.
Developers have solved this issue by reaching for frameworks like Vue, Angular and React. These frameworks allow us to write cleaner code by utilizing the virtual DOM: a kind of mirror of the UI stored in the browser memory. The result is that when you ‘hide’ a DOM element (like a tab) in one of these frameworks; it doesn’t add a display:none; style attribute, but instead it literally disappears from the ‘real’ DOM.
This allows us to write more declarative code that is cleaner and easier to read. But this is at a cost. Typically, the bundle size of these frameworks is large and for those coming from a jQuery background, the learning curve feels incredibly steep. Especially when all you want to do is toggle tabs! And that is where Alpine.js steps in.
Like Vue and React, Alpine.js allows us to write declarative code but it uses the “real” DOM; amending the contents and attributes of the same nodes that you and I might edit when we crack open a text editor or dev-tools. As a result, you can lose the filesize, wizardry and cognitive-load of larger framework but retain the declarative programming methodology. And you get this with no bundler, no build process and no script tag. Just load 6kb of Alpine.js and you’re away!
Alpine.js JQuery Vue.js React + React DOM Coding style Declarative Imperative Declarative Declarative Requires bundler No No No Yes Filesize (GZipped, minified) 6.4kb 30kb 32kb 5kb + 36kb Dev-Tools No No Yes Yes
When Should I Reach For Alpine?
For me, Alpine’s strength is in the ease of DOM manipulation. Think of those things you used out of the box with Bootstrap, Alpine.js is great for them. Examples would be:
Showing and hiding DOM nodes under certain conditions,
Binding user input,
Listening for events and altering the UI accordingly,
Appending classes.
You can also use Alpine.js for templating if your data is available in JSON, but let’s save that for another day.
When Should I Look Elsewhere?
If you’re fetching data, or need to carry out additional functions like validation or storing data, you should probably look elsewhere. Larger frameworks also come with dev-tools which can be invaluable when building larger UIs.
From jQuery To Vue To Alpine
Two years ago, Sarah Drasner posted an article on Smashing Magazine, “Replacing jQuery With Vue.js: No Build Step Necessary,” about how Vue could replace jQuery for many projects. That article started me on a journey which led me to use Vue almost every time I build a user interface. Today, we are going to recreate some of her examples with Alpine, which should illustrate its advantages over both jQuery and Vue in certain use cases.
Alpine’s syntax is almost entirely lifted from Vue.js. In total, there are 13 directives. We’ll cover most of them in the following examples.
Getting Started
Like Vue and jQuery, no build process is required. Unlike Vue, Alpine it initializes itself, so there’s no need to create a new instance. Just load Alpine and you’re good to go.
<script src="https://cdn.jsdelivr.net/gh/alpinejs/[email protected]/dist/alpine.js" defer></script>
The scope of any given component is declared using the x-data directive. This kicks things off and sets some default values if required:
<div x-data="{ foo: 'bar' }">...</div>
Capturing User Inputs
x-model allow us to keep any input element in sync with the values set using x-data. In the following example, we set the name value to an empty string (within the form tag). Using x-model, we bind this value to the input field. By using x-text, we inject the value into the innerText of the paragraph element.
See the Pen Capturing user input with Alpine.js by Phil on CodePen.
See the Pen Capturing user input with Alpine.js by Phil on CodePen.
This highlights the key differences with Alpine.js and both jQuery and Vue.js.
Updating the paragraph tag in jQuery would require us to listen for specific events (keyup?), explicitly identify the node we wish to update and the changes we wish to make. Alpine’s syntax on the other hand, just specifies what should happen. This is what is meant by declarative programming.
Updating the paragraph in Vue while simple, would require a new script tag:
new Vue({ el: '#app', data: { name: '' } });
While this might not seem like the end of the world, it highlights the first major gain with Alpine. There is no context-switching. Everything is done right there in the HTML — no need for any additional JavaScript.
Click Events, Boolean Attributes And Toggling Classes
Like with Vue, : serves as a shorthand for x-bind (which binds attributes) and @ is shorthand for x-on (which indicates that Alpine should listen for events).
In the following example, we instantiate a new component using x-data, and set the default value of show to be false. When the button is clicked, we toggle the value of show. When this value is true, we instruct Alpine to append the aria-expanded attribute.
x-bind works differently for classes: we pass in object where the key is the class-name (active in our case) and the value is a boolean expression (show).
See the Pen Click Events, Boolean Attributes and Toggling Classes with Alpine.js by Phil on CodePen.
See the Pen Click Events, Boolean Attributes and Toggling Classes with Alpine.js by Phil on CodePen.
Hiding And Showing
The syntax showing and hiding is almost identical to Vue.
See the Pen Showing / hiding with Alpine.js by Phil on CodePen.
See the Pen Showing / hiding with Alpine.js by Phil on CodePen.
This will set a given DOM node to display:none. If you need to remove a DOM element completely, x-if can be used. However, because Alpine.js doesn’t use the Virtual DOM, x-if can only be used on a <template></template> (tag that wraps the element you wish to hide).
Magic Properties
In addition to the above directives, three Magic Properties provide some additional functionality. All of these will be familiar to anyone working in Vue.js.
$el fetches the root component (the thing with the x-data attribute);
$refs allows you to grab a DOM element;
$nextTick ensures expressions are only executed once Alpine has done its thing;
$event can be used to capture a nature browser event.
See the Pen Magic Properties by Phil on CodePen.
See the Pen Magic Properties by Phil on CodePen.
Let’s Build Something Useful
It’s time to build something for the real world. In the interests of brevity I’m going to use Bootstrap for styles, but use Alpine.js for all the JavaScript. The page we’re building is a simple landing page with a contact form displayed inside a modal that submits to some form handler and displays a nice success message. Just the sort of thing a client might ask for and expect pronto!
Initial view (Large preview)
Modal open (Large preview)
Success message (Large preview)
Note: You can view the original markup here.
To make this work, we could add jQuery and Bootstrap.js, but that is quite a bit of overhead for not a lot of functionality. We could probably write it in Vanilla JS, but who wants to do that? Let’s make it work with Alpine.js instead.
First, let’s set a scope and some initial values:
<body class="text-center text-white bg-dark h-100 d-flex flex-column" x-data="{ showModal: false, name: '', email: '', success: false }">
Now, let’s make our button set the showModal value to true:
<button class="btn btn-lg btn-secondary" @click="showModal = true" >Get in touch</button>
When showModal is true, we need to display the modal and add some classes:
<div class="modal fade text-dark" :class="{ 'show d-block': showModal }" x-show="showModal" role="dialog">
Let’s bind the input values to Alpine:
<input type="text" class="form-control" name="name" x-model="name" > <input type="email" class="form-control" name="email" x-model="email" >
And disable the ‘Submit’ button, until those values are set:
<button type="button" class="btn btn-primary" :disabled="!name || !email">Submit</button>
Finally, let’s send data to some kind of asynchronous function, and hide the modal when we’re done:
<button type="button" class="btn btn-primary" :disabled="!name || !email" @click="submitForm({name: name, email: email}).then(() => {showModal = false; success= true;})">Submit</button>
And that’s about it!
See the Pen Something useful built with Alpine.js by Phil on CodePen.
See the Pen Something useful built with Alpine.js by Phil on CodePen.
Just Enough JavaScript
When building websites, I’m increasingly trying to ask myself what would be “just enough JavaScript”? When building a sophisticated web application, that might well be React. But when building a marketing agency site, or something similar, Alpine.js feels like enough. (And even if it’s not, given the similar syntax, switching to Vue.js takes no time at all).
It’s incredibly easy to use (especially if you’ve never used VueJS). It’s tiny (< 6kb gzipped). And it means no more context switching between HTML and JavaScript files.
There are more advanced features that aren’t included in this article and Caleb is constantly adding new features. If you want to find out more, take a look at the official docs on Github.
(ra, il)
Website Design & SEO Delray Beach by DBL07.co
Delray Beach SEO
source http://www.scpie.org/introducing-alpine-js-a-tiny-javascript-framework/ source https://scpie.tumblr.com/post/611788754623086592
0 notes
Text
Introducing Alpine.js: A Tiny JavaScript Framework
About The Author
Phil Smith is a freelance developer based in Brighton, UK. His agency, amillionmonkeys partner with designers, entrepreneurs and agencies to build websites and … More about Phil …
Ever built a website and reached for jQuery, Bootstrap, Vue.js or React to acheive some basic user interaction? Alpine.js is a fraction of the size of these frameworks because it involves no build steps and provides all of the tools you need to build a basic user interface.
Like most developers, I have a bad tendency to over-complicate my workflow, especially if there’s some new hotness on the horizon. Why use CSS when you can use CSS-in-JS? Why use Grunt when you can use Gulp? Why use Gulp when you can use Webpack? Why use a traditional CMS when you can go headless? Every so often though, the new-hotness makes life simpler.
Recently, the rise of utility based tools like Tailwind CSS have done this for CSS, and now Alpine.js promises something similar for JavaScript.
In this article, we’re going to take a closer look at Alpine.js and how it can replace JQuery or larger JavaScript libraries to build interactive websites. If you regularly build sites that require a sprinkling on Javascript to alter the UI based on some user interaction, then this article is for you.
Throughout the article, I refer to Vue.js, but don’t worry if you have no experience of Vue — that is not required. In fact, part of what makes Alpine.js great is that you barely need to know any JavaScript at all.
Now, let’s get started.
What Is Alpine.js?
According to project author Caleb Porzio:
“Alpine.js offers you the reactive and declarative nature of big frameworks like Vue or React at a much lower cost. You get to keep your DOM, and sprinkle in behavior as you see fit.”
Let’s unpack that a bit.
Let’s consider a basic UI pattern like Tabs. Our ultimate goal is that when a user clicks on a tab, the tab contents displays. If we come from a PHP background, we could easily achieve this server side. But the page refresh on every tab click isn’t very ‘reactive’.
To create a better experience over the years, developers have reached for jQuery and/or Bootstrap. In that situation, we create an event listener on the tab, and when a user clicks, the event fires and we tell the browser what to do.
See the Pen Showing / hiding with jQuery by Phil on CodePen.
See the Pen Showing / hiding with jQuery by Phil on CodePen.
That works. But this style of coding where we tell the browser exactly what to do (imperative coding) quickly gets us in a mess. Imagine if we wanted to disable the button after it has been clicked, or wanted to change the background color of the page. We’d quickly get into some serious spaghetti code.
Developers have solved this issue by reaching for frameworks like Vue, Angular and React. These frameworks allow us to write cleaner code by utilizing the virtual DOM: a kind of mirror of the UI stored in the browser memory. The result is that when you ‘hide’ a DOM element (like a tab) in one of these frameworks; it doesn’t add a display:none; style attribute, but instead it literally disappears from the ‘real’ DOM.
This allows us to write more declarative code that is cleaner and easier to read. But this is at a cost. Typically, the bundle size of these frameworks is large and for those coming from a jQuery background, the learning curve feels incredibly steep. Especially when all you want to do is toggle tabs! And that is where Alpine.js steps in.
Like Vue and React, Alpine.js allows us to write declarative code but it uses the “real” DOM; amending the contents and attributes of the same nodes that you and I might edit when we crack open a text editor or dev-tools. As a result, you can lose the filesize, wizardry and cognitive-load of larger framework but retain the declarative programming methodology. And you get this with no bundler, no build process and no script tag. Just load 6kb of Alpine.js and you’re away!
Alpine.jsJQueryVue.jsReact + React DOMCoding styleDeclarativeImperativeDeclarativeDeclarativeRequires bundlerNoNoNoYesFilesize (GZipped, minified)6.4kb30kb32kb5kb + 36kbDev-ToolsNoNoYesYes
When Should I Reach For Alpine?
For me, Alpine’s strength is in the ease of DOM manipulation. Think of those things you used out of the box with Bootstrap, Alpine.js is great for them. Examples would be:
Showing and hiding DOM nodes under certain conditions,
Binding user input,
Listening for events and altering the UI accordingly,
Appending classes.
You can also use Alpine.js for templating if your data is available in JSON, but let’s save that for another day.
When Should I Look Elsewhere?
If you’re fetching data, or need to carry out additional functions like validation or storing data, you should probably look elsewhere. Larger frameworks also come with dev-tools which can be invaluable when building larger UIs.
From jQuery To Vue To Alpine
Two years ago, Sarah Drasner posted an article on Smashing Magazine, “Replacing jQuery With Vue.js: No Build Step Necessary,” about how Vue could replace jQuery for many projects. That article started me on a journey which led me to use Vue almost every time I build a user interface. Today, we are going to recreate some of her examples with Alpine, which should illustrate its advantages over both jQuery and Vue in certain use cases.
Alpine’s syntax is almost entirely lifted from Vue.js. In total, there are 13 directives. We’ll cover most of them in the following examples.
Getting Started
Like Vue and jQuery, no build process is required. Unlike Vue, Alpine it initializes itself, so there’s no need to create a new instance. Just load Alpine and you’re good to go.
<script src="https://cdn.jsdelivr.net/gh/alpinejs/[email protected]/dist/alpine.js" defer></script>
The scope of any given component is declared using the x-data directive. This kicks things off and sets some default values if required:
<div x-data="{ foo: 'bar' }">...</div>
Capturing User Inputs
x-model allow us to keep any input element in sync with the values set using x-data. In the following example, we set the name value to an empty string (within the form tag). Using x-model, we bind this value to the input field. By using x-text, we inject the value into the innerText of the paragraph element.
See the Pen Capturing user input with Alpine.js by Phil on CodePen.
See the Pen Capturing user input with Alpine.js by Phil on CodePen.
This highlights the key differences with Alpine.js and both jQuery and Vue.js.
Updating the paragraph tag in jQuery would require us to listen for specific events (keyup?), explicitly identify the node we wish to update and the changes we wish to make. Alpine’s syntax on the other hand, just specifies what should happen. This is what is meant by declarative programming.
Updating the paragraph in Vue while simple, would require a new script tag:
new Vue({ el: '#app', data: { name: '' } });
While this might not seem like the end of the world, it highlights the first major gain with Alpine. There is no context-switching. Everything is done right there in the HTML — no need for any additional JavaScript.
Click Events, Boolean Attributes And Toggling Classes
Like with Vue, : serves as a shorthand for x-bind (which binds attributes) and @ is shorthand for x-on (which indicates that Alpine should listen for events).
In the following example, we instantiate a new component using x-data, and set the default value of show to be false. When the button is clicked, we toggle the value of show. When this value is true, we instruct Alpine to append the aria-expanded attribute.
x-bind works differently for classes: we pass in object where the key is the class-name (active in our case) and the value is a boolean expression (show).
See the Pen Click Events, Boolean Attributes and Toggling Classes with Alpine.js by Phil on CodePen.
See the Pen Click Events, Boolean Attributes and Toggling Classes with Alpine.js by Phil on CodePen.
Hiding And Showing
The syntax showing and hiding is almost identical to Vue.
See the Pen Showing / hiding with Alpine.js by Phil on CodePen.
See the Pen Showing / hiding with Alpine.js by Phil on CodePen.
This will set a given DOM node to display:none. If you need to remove a DOM element completely, x-if can be used. However, because Alpine.js doesn’t use the Virtual DOM, x-if can only be used on a <template></template> (tag that wraps the element you wish to hide).
Magic Properties
In addition to the above directives, three Magic Properties provide some additional functionality. All of these will be familiar to anyone working in Vue.js.
$el fetches the root component (the thing with the x-data attribute);
$refs allows you to grab a DOM element;
$nextTick ensures expressions are only executed once Alpine has done its thing;
$event can be used to capture a nature browser event.
See the Pen Magic Properties by Phil on CodePen.
See the Pen Magic Properties by Phil on CodePen.
Let’s Build Something Useful
It’s time to build something for the real world. In the interests of brevity I’m going to use Bootstrap for styles, but use Alpine.js for all the JavaScript. The page we’re building is a simple landing page with a contact form displayed inside a modal that submits to some form handler and displays a nice success message. Just the sort of thing a client might ask for and expect pronto!
Initial view (Large preview)
Modal open (Large preview)
Success message (Large preview)
Note: You can view the original markup here.
To make this work, we could add jQuery and Bootstrap.js, but that is quite a bit of overhead for not a lot of functionality. We could probably write it in Vanilla JS, but who wants to do that? Let’s make it work with Alpine.js instead.
First, let’s set a scope and some initial values:
<body class="text-center text-white bg-dark h-100 d-flex flex-column" x-data="{ showModal: false, name: '', email: '', success: false }">
Now, let’s make our button set the showModal value to true:
<button class="btn btn-lg btn-secondary" @click="showModal = true" >Get in touch</button>
When showModal is true, we need to display the modal and add some classes:
<div class="modal fade text-dark" :class="{ 'show d-block': showModal }" x-show="showModal" role="dialog">
Let’s bind the input values to Alpine:
<input type="text" class="form-control" name="name" x-model="name" > <input type="email" class="form-control" name="email" x-model="email" >
And disable the ‘Submit’ button, until those values are set:
<button type="button" class="btn btn-primary" :disabled="!name || !email">Submit</button>
Finally, let’s send data to some kind of asynchronous function, and hide the modal when we’re done:
<button type="button" class="btn btn-primary" :disabled="!name || !email" @click="submitForm({name: name, email: email}).then(() => {showModal = false; success= true;})">Submit</button>
And that’s about it!
See the Pen Something useful built with Alpine.js by Phil on CodePen.
See the Pen Something useful built with Alpine.js by Phil on CodePen.
Just Enough JavaScript
When building websites, I’m increasingly trying to ask myself what would be “just enough JavaScript”? When building a sophisticated web application, that might well be React. But when building a marketing agency site, or something similar, Alpine.js feels like enough. (And even if it’s not, given the similar syntax, switching to Vue.js takes no time at all).
It’s incredibly easy to use (especially if you’ve never used VueJS). It’s tiny (< 6kb gzipped). And it means no more context switching between HTML and JavaScript files.
There are more advanced features that aren’t included in this article and Caleb is constantly adding new features. If you want to find out more, take a look at the official docs on Github.
(ra, il)
Website Design & SEO Delray Beach by DBL07.co
Delray Beach SEO
source http://www.scpie.org/introducing-alpine-js-a-tiny-javascript-framework/ source https://scpie1.blogspot.com/2020/03/introducing-alpinejs-tiny-javascript.html
0 notes
Text
Introducing Alpine.js: A Tiny JavaScript Framework
About The Author
Phil Smith is a freelance developer based in Brighton, UK. His agency, amillionmonkeys partner with designers, entrepreneurs and agencies to build websites and … More about Phil …
Ever built a website and reached for jQuery, Bootstrap, Vue.js or React to acheive some basic user interaction? Alpine.js is a fraction of the size of these frameworks because it involves no build steps and provides all of the tools you need to build a basic user interface.
Like most developers, I have a bad tendency to over-complicate my workflow, especially if there’s some new hotness on the horizon. Why use CSS when you can use CSS-in-JS? Why use Grunt when you can use Gulp? Why use Gulp when you can use Webpack? Why use a traditional CMS when you can go headless? Every so often though, the new-hotness makes life simpler.
Recently, the rise of utility based tools like Tailwind CSS have done this for CSS, and now Alpine.js promises something similar for JavaScript.
In this article, we’re going to take a closer look at Alpine.js and how it can replace JQuery or larger JavaScript libraries to build interactive websites. If you regularly build sites that require a sprinkling on Javascript to alter the UI based on some user interaction, then this article is for you.
Throughout the article, I refer to Vue.js, but don’t worry if you have no experience of Vue — that is not required. In fact, part of what makes Alpine.js great is that you barely need to know any JavaScript at all.
Now, let’s get started.
What Is Alpine.js?
According to project author Caleb Porzio:
“Alpine.js offers you the reactive and declarative nature of big frameworks like Vue or React at a much lower cost. You get to keep your DOM, and sprinkle in behavior as you see fit.”
Let’s unpack that a bit.
Let’s consider a basic UI pattern like Tabs. Our ultimate goal is that when a user clicks on a tab, the tab contents displays. If we come from a PHP background, we could easily achieve this server side. But the page refresh on every tab click isn’t very ‘reactive’.
To create a better experience over the years, developers have reached for jQuery and/or Bootstrap. In that situation, we create an event listener on the tab, and when a user clicks, the event fires and we tell the browser what to do.
See the Pen Showing / hiding with jQuery by Phil on CodePen.
See the Pen Showing / hiding with jQuery by Phil on CodePen.
That works. But this style of coding where we tell the browser exactly what to do (imperative coding) quickly gets us in a mess. Imagine if we wanted to disable the button after it has been clicked, or wanted to change the background color of the page. We’d quickly get into some serious spaghetti code.
Developers have solved this issue by reaching for frameworks like Vue, Angular and React. These frameworks allow us to write cleaner code by utilizing the virtual DOM: a kind of mirror of the UI stored in the browser memory. The result is that when you ‘hide’ a DOM element (like a tab) in one of these frameworks; it doesn’t add a display:none; style attribute, but instead it literally disappears from the ‘real’ DOM.
This allows us to write more declarative code that is cleaner and easier to read. But this is at a cost. Typically, the bundle size of these frameworks is large and for those coming from a jQuery background, the learning curve feels incredibly steep. Especially when all you want to do is toggle tabs! And that is where Alpine.js steps in.
Like Vue and React, Alpine.js allows us to write declarative code but it uses the “real” DOM; amending the contents and attributes of the same nodes that you and I might edit when we crack open a text editor or dev-tools. As a result, you can lose the filesize, wizardry and cognitive-load of larger framework but retain the declarative programming methodology. And you get this with no bundler, no build process and no script tag. Just load 6kb of Alpine.js and you’re away!
Alpine.js JQuery Vue.js React + React DOM Coding style Declarative Imperative Declarative Declarative Requires bundler No No No Yes Filesize (GZipped, minified) 6.4kb 30kb 32kb 5kb + 36kb Dev-Tools No No Yes Yes
When Should I Reach For Alpine?
For me, Alpine’s strength is in the ease of DOM manipulation. Think of those things you used out of the box with Bootstrap, Alpine.js is great for them. Examples would be:
Showing and hiding DOM nodes under certain conditions,
Binding user input,
Listening for events and altering the UI accordingly,
Appending classes.
You can also use Alpine.js for templating if your data is available in JSON, but let’s save that for another day.
When Should I Look Elsewhere?
If you’re fetching data, or need to carry out additional functions like validation or storing data, you should probably look elsewhere. Larger frameworks also come with dev-tools which can be invaluable when building larger UIs.
From jQuery To Vue To Alpine
Two years ago, Sarah Drasner posted an article on Smashing Magazine, “Replacing jQuery With Vue.js: No Build Step Necessary,” about how Vue could replace jQuery for many projects. That article started me on a journey which led me to use Vue almost every time I build a user interface. Today, we are going to recreate some of her examples with Alpine, which should illustrate its advantages over both jQuery and Vue in certain use cases.
Alpine’s syntax is almost entirely lifted from Vue.js. In total, there are 13 directives. We’ll cover most of them in the following examples.
Getting Started
Like Vue and jQuery, no build process is required. Unlike Vue, Alpine it initializes itself, so there’s no need to create a new instance. Just load Alpine and you’re good to go.
<script src="https://cdn.jsdelivr.net/gh/alpinejs/[email protected]/dist/alpine.js" defer></script>
The scope of any given component is declared using the x-data directive. This kicks things off and sets some default values if required:
<div x-data="{ foo: 'bar' }">...</div>
Capturing User Inputs
x-model allow us to keep any input element in sync with the values set using x-data. In the following example, we set the name value to an empty string (within the form tag). Using x-model, we bind this value to the input field. By using x-text, we inject the value into the innerText of the paragraph element.
See the Pen Capturing user input with Alpine.js by Phil on CodePen.
See the Pen Capturing user input with Alpine.js by Phil on CodePen.
This highlights the key differences with Alpine.js and both jQuery and Vue.js.
Updating the paragraph tag in jQuery would require us to listen for specific events (keyup?), explicitly identify the node we wish to update and the changes we wish to make. Alpine’s syntax on the other hand, just specifies what should happen. This is what is meant by declarative programming.
Updating the paragraph in Vue while simple, would require a new script tag:
new Vue({ el: '#app', data: { name: '' } });
While this might not seem like the end of the world, it highlights the first major gain with Alpine. There is no context-switching. Everything is done right there in the HTML — no need for any additional JavaScript.
Click Events, Boolean Attributes And Toggling Classes
Like with Vue, : serves as a shorthand for x-bind (which binds attributes) and @ is shorthand for x-on (which indicates that Alpine should listen for events).
In the following example, we instantiate a new component using x-data, and set the default value of show to be false. When the button is clicked, we toggle the value of show. When this value is true, we instruct Alpine to append the aria-expanded attribute.
x-bind works differently for classes: we pass in object where the key is the class-name (active in our case) and the value is a boolean expression (show).
See the Pen Click Events, Boolean Attributes and Toggling Classes with Alpine.js by Phil on CodePen.
See the Pen Click Events, Boolean Attributes and Toggling Classes with Alpine.js by Phil on CodePen.
Hiding And Showing
The syntax showing and hiding is almost identical to Vue.
See the Pen Showing / hiding with Alpine.js by Phil on CodePen.
See the Pen Showing / hiding with Alpine.js by Phil on CodePen.
This will set a given DOM node to display:none. If you need to remove a DOM element completely, x-if can be used. However, because Alpine.js doesn’t use the Virtual DOM, x-if can only be used on a <template></template> (tag that wraps the element you wish to hide).
Magic Properties
In addition to the above directives, three Magic Properties provide some additional functionality. All of these will be familiar to anyone working in Vue.js.
$el fetches the root component (the thing with the x-data attribute);
$refs allows you to grab a DOM element;
$nextTick ensures expressions are only executed once Alpine has done its thing;
$event can be used to capture a nature browser event.
See the Pen Magic Properties by Phil on CodePen.
See the Pen Magic Properties by Phil on CodePen.
Let’s Build Something Useful
It’s time to build something for the real world. In the interests of brevity I’m going to use Bootstrap for styles, but use Alpine.js for all the JavaScript. The page we’re building is a simple landing page with a contact form displayed inside a modal that submits to some form handler and displays a nice success message. Just the sort of thing a client might ask for and expect pronto!
Initial view (Large preview)
Modal open (Large preview)
Success message (Large preview)
Note: You can view the original markup here.
To make this work, we could add jQuery and Bootstrap.js, but that is quite a bit of overhead for not a lot of functionality. We could probably write it in Vanilla JS, but who wants to do that? Let’s make it work with Alpine.js instead.
First, let’s set a scope and some initial values:
<body class="text-center text-white bg-dark h-100 d-flex flex-column" x-data="{ showModal: false, name: '', email: '', success: false }">
Now, let’s make our button set the showModal value to true:
<button class="btn btn-lg btn-secondary" @click="showModal = true" >Get in touch</button>
When showModal is true, we need to display the modal and add some classes:
<div class="modal fade text-dark" :class="{ 'show d-block': showModal }" x-show="showModal" role="dialog">
Let’s bind the input values to Alpine:
<input type="text" class="form-control" name="name" x-model="name" > <input type="email" class="form-control" name="email" x-model="email" >
And disable the ‘Submit’ button, until those values are set:
<button type="button" class="btn btn-primary" :disabled="!name || !email">Submit</button>
Finally, let’s send data to some kind of asynchronous function, and hide the modal when we’re done:
<button type="button" class="btn btn-primary" :disabled="!name || !email" @click="submitForm({name: name, email: email}).then(() => {showModal = false; success= true;})">Submit</button>
And that’s about it!
See the Pen Something useful built with Alpine.js by Phil on CodePen.
See the Pen Something useful built with Alpine.js by Phil on CodePen.
Just Enough JavaScript
When building websites, I’m increasingly trying to ask myself what would be “just enough JavaScript”? When building a sophisticated web application, that might well be React. But when building a marketing agency site, or something similar, Alpine.js feels like enough. (And even if it’s not, given the similar syntax, switching to Vue.js takes no time at all).
It’s incredibly easy to use (especially if you��ve never used VueJS). It’s tiny (< 6kb gzipped). And it means no more context switching between HTML and JavaScript files.
There are more advanced features that aren’t included in this article and Caleb is constantly adding new features. If you want to find out more, take a look at the official docs on Github.
(ra, il)
Website Design & SEO Delray Beach by DBL07.co
Delray Beach SEO
source http://www.scpie.org/introducing-alpine-js-a-tiny-javascript-framework/
0 notes
Text
HubSpot CMS 101: HubSpot Visual Builder vs. Coded Templates
HubSpot is one of the most powerful marketing platforms available right now and I’m always happy to admit it’s also my favorite CMS (Content Management System).
The CMS is only part of HubSpot’s many available features and add-ons, but it’s arguably one of the most important.
This is because it acts as a catalyst for HubSpot’s other features, providing you with the interface you need to easily manage your website. If you’re reading this, hopefully you already know how important your website is for your brand identity.
Your website is like a digital salesperson who works 24/7 to nurture your leads and customers and can produce an unlimited amount of ROI.
However, this means that no website will ever be complete because there will always be an opportunity for improvement whether it’s in the form of a marketing campaign, search engine optimization, or content updates.
This makes it equally as important that your website looks and performs well as it is that it can be updated easily without the need of a developer.
This concept isn’t specific to HubSpot but it’s the reason why HubSpot is my favorite.
Easy Editing is a Priority.
As a Web Developer, I primarily have two responsibilities: build a site that performs well for its visitors, and build a site that can be updated easily by my clients.
Both of these requirements are determined by how I build the template.
What is a Template?
HubSpot’s CMS is composed of many parts but it primarily includes Website Pages, Landing Pages, Blogs, Emails, and any related tools associated with these features such as the Design Manager.
Each of these types of content uses a medium called a Template to determine the HTML markup (“design”) and the modules which are available when editing it (“inputs” or “modules”).
Almost every CMS uses templates for determining the structure of pages in this way because most websites often have at least a few groups of pages which follow a similar design or layout but have their own unique text content and imagery.
By setting these layouts up as templates, the same design can be used an unlimited amount of times without having to build the layout from scratch.
No single layout will work well for every page, so it’s important to consider the way in which you expect to use the template and what the content might look like on the pages using it.
For this reason, you’ll want to start all template designs with a wireframe before you begin building them in HubSpot.
Come Up With a Plan First
You may be familiar with the term “Wireframe” which is a simplified visual example of what someone has in mind for the finalized template.
A wireframe allows the designer and the content creator to determine the general layout of a template and agree on what types of content and elements might be used before finalizing all of the finer details.
For example, placeholder text or a visual cue may be used to show a part of the template that is intended for only one or two sentences and adding any more text than that could cause issues with the design.
A good developer understands that sometimes the finalized content ends up being a little bit different from what was initially expected.
Our job is to do whatever we can to set up each template in a way that gives the editor additional control to adjust the layout as needed without overwhelming them with options or allowing them to accidentally mess up the design.
Developers should provide content editors with any controls that may end up being useful when building a page, or any controls that the editor has mentioned that they’ll need to make a template as useful as possible. This is where HubSpot becomes my favorite CMS.
Visual Builder & Coded Templates
Warning: this may get technical.
HubSpot has two different ways to create a template: Visual Builder and Coded.
Both of these template types share many similarities and work seamlessly with most of the other features in HubSpot’s platform such as forms and CTAs, but there are a few key differences between them that are worth knowing.
Visual Builder
HubSpot’s default template type is Visual Builder, and it’s the only type HubSpot will allow in the Template Marketplace (with email templates being the only exception and allowing coded templates as well).
These templates use a friendly drag-and-drop interface which allows template creators to easily rearrange modules and adjust important settings without needing to understand much code (but it helps if you do).
HubSpot’s Visual Builder Templates use a 12-column grid structure based on Bootstrap 2.
All basic HTML and CSS markup for the grid is handled automatically based on the column arrangement in your template.
This is perfect for users who are comfortable building basic templates in this way but don’t have the technical knowledge to write the code themselves, but it ends up being problematic for developers who need more intricate control over the code structure.
For example, HubSpot’s grid structure also has responsiveness built-in, but it can’t be easily overridden which means every column in your template is going to become full-width if the device’s screen size is 767px wide or less -- regardless of whether or not that’s appropriate for your template design.
Another noteworthy aspect of HubSpot’s grid is that the HTML markup can end up being somewhat bloated due to all of the extra CSS classes that HubSpot wraps each row, column, and module in.
This often won’t cause a noticeable issue with site performance but it definitely won’t help you to improve it and you won’t be able to change it, even if you want to.
HubSpot allows you to add custom CSS classes and IDs in some parts of your template markup, but this intended for specific custom formatting where needed and not for overriding the grid.
If you’re interested in what the grid’s CSS and supporting HTML markup looks like, you can learn more about that here.
These restrictions can make it difficult for developers to build specific designs and complex templates, and this includes templates with lots of flexibility.
Whether you’re an expert or not, the Visual Builder can be tricky to work with if you’re trying to do anything more than a basic design and are typically better for simpler websites.
However, if you’re unfamiliar with building templates on HubSpot and want to experiment with the CMS then Visual Builder Templates are the perfect way to start.
Coded Templates
HubSpot’s other kind of templates are named Coded Templates, which are HTML files written entirely with code.
Unlike Visual Builder Templates, this means you have access to the full HTML markup of your page, including the <html>, <head>, and <body> elements.
This kind of template is intended for experienced developers who are fluent in HTML and CSS.
Although HubSpot will give you a warning or error message if it finds a syntax issue with some parts of your code, it won’t stop you from writing malformed or improperly formatted HTML -- So, you’ll need to know what you’re doing.
In addition to HTML and CSS, Coded Templates also use the power of HubL, which is a unique markup language used in HubSpot’s CMS and based on an existing templating language used for Python programming named Jinja 2.
One of HubSpot’s major flaws is that it does not give developers the ability to use PHP or other server-side scripting languages which are necessary for complex operations. Instead, they provide us with the ability to use HubL which gives us access to various variables, filters, and functions.
HubL is what makes HubSpot a wonderful way to build templates.
Although developers don’t have as much flexibility with their custom functions as they would on a PHP-based CMS like WordPress, HubL can be used to add most of the controls and conditional arguments that are needed to make a HubSpot template endlessly useful.
This allows developers to create templates with flexibility in mind by adjusting layout or design when needed.
HubL can also be used in Visual Builder Templates, but due to the limitations of the Visual Builder’s interface,HubL can’t be used as creatively as it can in Coded Templates.
You can learn more about HubL here.
Coded Templates are great for a developers for another reason: process optimization.
HubSpot is a continuously growing platform. The company releases new updates and improvements often, but there are still some basic features missing which developers would love to have.
The most prominent of the items on this wishlist is preprocessing, such as SCSS.
Preprocessing is the concept of writing shorthand code which is compiled by an application in order to produce the full code.
SCSS, for example, is a commonly used syntax which makes writing CSS more efficient.
Similar to SCSS, there are many other ways to use preprocessing languages but all of them require a compiler.
Coded Templates in HubSpot allow developers to harness this efficiency by building their templates outside of HubSpot and then uploading the compiled versions via FTP or an API.
This means that developers can use a custom development process that work best for them without being restricted by HubSpot’s lack of preprocessing.
This does, however, come with a major drawback.
With this type of workflow, all template development is done outside of HubSpot and
as a result, the templates cannot be edited within HubSpot since the process of compiling the code is a one-way action.
This means the compiled code cannot be decompiled into its original form.
If a user were to make an edit to the template directly on HubSpot system, then the template will now be out of sync with the precompiled version and it will be overwritten the next time the developer makes an update via their custom setup.
Custom workflows like this must be planned out and implemented carefully, especially if the development is being done by another party such as a HubSpot Partner Agency.
Although this method enables developers to be as efficient as possible, it can cause confusion with the template owners since they won’t be able to edit their templates without risking losing their changes in the future.
This makes it necessary to ensure that all parties involved in template buildout and use are aligned and understand who will be responsible for editing templates.
When to Use Visual Builder Templates vs. Coded Templates
On HubSpot’s CMS, both Visual Builder Templates and Coded Templates are viable options, but there is usually a better option depending on the way the site needs to be built and the level of complexity.
Visual Builder is Better For Simple Designs
Generally, Visual Builder Templates are a better option for basic pages that don't require lots of complicated functionality or options.
These are often the better options for individuals with little to no web development experience, those who do not have consistent access to a developer, or those who plan to purchase templates from the Template Marketplace.
Coded Templates Are Better for Developers
Coded Templates are best for teams or agencies with access to a full-time developer or development team that will handle the buildout of all templates. This allows the developers to be creative in how they build their templates and experiment with offline preprocessing tools or their own custom setup.
With the right knowledge and an unlimited amount of time, a developer can make just about anything work on either a Visual Builder Template or Coded Template but it’s best to plan out and discuss all of the expectations for your website prior to beginning the buildout of any templates.
Regardless of Your Choice, Consider Using Custom Modules
While Coded Templates and Visual Builder Templates both have their pros and cons, the product of either should be a website that gives content editors the intuitive flexibility they need to adjust and experiment with their pages without ever needing to modify the template itself.
In February 2018, HubSpot released its the new version of the Design Manager.
This update drastically improved the interface and added many new options for template developers, but we’ve found that this change has been most beneficial for Custom Modules and Page Editors.
Custom Modules are essentially self-contained blocks of code with their own associated modules which can be used in either Coded Templates or Visual Builder Templates.
This allows developers with knowledge of HTML, CSS, and HubL to be creative in the way they build their templates and create a website with editability in mind. This is usually what we opt for here at IMPACT.
Better Templates = Happy Marketers + Happy Users
Overall, a good website is one that both performs well for the user and is endlessly useful for its owner. Both Visual Builder or Coded Templates have the potential to provide you with a powerful foundation for your website, but depending on your team’s structure and internal processes you may end up preferring one over the other.
At IMPACT, we almost always recommend a website built around powerful templates with lots of options. In most cases, we’ve found this to be one built almost entirely of Custom Modules thanks to HubSpot’s new Design Manager, but there are many possibilities. Thanks, HubSpot!
If you need help getting started, talk to us about building your website on HubSpot.
from Web Developers World https://www.impactbnd.com/blog/hubspot-visual-builder-vs-coded-templates
0 notes
Text
Moving from NodeJS to Go
The approach of this article is this:
You are a seasoned NodeJS developer, and are looking to learn a new language, but you don't want to go deep, just see how things compare with your current expertise, and then make a final decision.
Chances are, you were initially a PHP developer, then you found your way into NodeJS and now you feel like you want to expand your expertise. Of course I might be wrong, but in this article we are going to look at some common patterns when working with NodeJS and how they compare in Go.
Since this is a NodeJS to Go comparison, we're going to focus on language constructs and servers. We'll break it down like this:
The most common reasons to learn Go include the following:
We see that Go has only 25 keywords, and this can give you a clue on how simple it is to learn the language. We'll also be looking at the common language patterns, and we'll see how cleaner and easier it is to do some common tasks as compared to other languages. The standard library that comes with Go also has a lot of built in functionality, that you will find yourself rarely relying on other external libraries. Go code will not compile if you have unused variables or syntax errors.
Here's an example with the net/http package that we'll use later. You can see examples are provided, and there are even tabs for the source code files. Sweet!
Is Go Better Than JavaScript ?. No, I don't think so, nor do I think JavaScript is better. The idea is to use the right tool for the job, and sometimes, one tool is better than another one, or one developer is better in one tool over another. So learn what you can, and choose the right thing that you are sure will get the job done for you.
We'll look at a few language constructs that we are used to.
Here's a hello world program in NodeJS
console.log('Hello World');
Running this will produce Hello World in the terminal.
node app.js
Here's an equivalent hello world program in Go
package main import "fmt" func main() { fmt.Println("Hello World") }
What we'll notice first, is that Go follows a certain structure which involves: This code can be run by typing in the following, or see it in GoPlay Space.
go run main.go
where main.go is the name of the file.
JavaScript is dynamically typed, which means you do not have to specify types when defining variables, and the variables can change their types as you program along.
That being said, JavaScript has the following types:
To define variables in JavaScript(NodeJS) we'd write this:
const num = 3; let flt = 2.34; let a = true; let b = false; var name = 'Scotch';
Go however, is statically typed, which means we have to define the types before hand, or assign them and let them be inferred. Here's a comprehensive list of Go Types.
An equivalent of the above JavaScript definitions in Go is
package main const num = 3 func main() { var flt float64 = 2.34 var name string = "Scotch" a, b := 2.34 // shorthand declaration syntax }
Assigning initial values in Go is done by with the var keyword, a variable name, and a type. Additionally and more commonly the := shorthand syntax can be used. When declaring variables with := , they are automatically assigned the correct type. The shorthand declaration syntax can only be used within a function. Finally, you can assign multiple values in one line like we have done in a, b := true, false. This will assign both a and b to the right hand values respectively.
Here is an array of strings in JavaScript
const names = ['Scotch', 'IO'];
While Go has arrays, what we typically refer to arrays in JavaScript are referred to as slices in Go. Here's an example of a slice in Go:
package main func main() { names := []string{"Scotch", "IO"} }
As an example, we'll write a small program that returns the substring of a string at index 10. So a sentence like Luke, I'm not your father will end up being Luke, I'm
JavaScript
const sentence = '`Look, I\'m not your Father';` console.log(sentence.substr(0,10));
Go
package main import "fmt" func main() { sentence := "Look, I'm not your Father" fmt.Println(sentence[:10]) }
You can run the app in Goplay Space
Conditional statements include if else and switch statements. Here's an example in NodeJS.
const age = 10; if (age > 10) { console.log('You are old'); } console.log('you are young'); const gender = 'female'; switch(gender) { case 'female': console.log('your name is tonie'); break; case 'male': console.log('your name is tony'); break;; default: /// }
Here's a equivalent Go
package main import "fmt" func main() { age := 10 if age > 10 { fmt.Println("You are old") } fmt.Println("You are young") gender := "female" switch gender { case "female": fmt.Println("Your name is tonie ") case "male": fmt.Println("Your name is tony") default: /// } }
You can run the app in GoPlay Space.
You'll notice the conditionals are a bit cleaner in Golang, with less brackets.
JavaScript has 3 loops: for loop, while loop, and a do while loop. Here's a for loop example.
// normal for loop for i = 0; i < 10; i++ { console.log(i); } // key, value loop for (var key in p) { if (p.hasOwnProperty(key)) { console.log(key + ' -> ' + p[key]); } } // another key value loop Object.keys(obj).forEach(function(key) { console.log(key, obj[key]); }) // there's also a `for...of`
Go has only one type of loop, and it's the for loop. Don't let that deceive you though as the for loop in Go is very versatile and can emulate almost any type of loop. Let's look at a simple example:
package main import ( "fmt" ) func main() { for i := 0; i < 10; i++ { fmt.Println(i) } // key value pairs kvs := map[string]string{ "name": "Scotch", "website": "https://scotch.io", } for key, value := range kvs { fmt.Println(key, value) } }
You can run the app in GoPlay Space.
Now that we know a little about the similarities and differences in language constructs, we can have a look at servers. Since we are coming from NodeJS it's likely that we're building a server, that returns JSON for instance.
In NodeJS, chances are while writing a server, you are using Express as the base library for your server. It's the most common, comes with a router and is the most battle tested. Here's a NodeJS server.
const express = require('express'); const app = express(); app.get('/', (req, res) => { res.send('Hello from Express!'); }) app.listen(3000, err => { if (err) { return console.log('something bad happened', err); } console.log(`server is listening on 3000`); })
Unlike JavaScript, the Go standard library provides everything we need to get a server up and running without any external dependencies. The net/http package provides most of this functionality. When building larger applications, expanding on the base net/http package with third-party packages is common, and one popular library that provides greatly expanded functionality is the Gorilla Web Toolkit.
Here's an equivalent Server in Go without any external library.
package main import ( "net/http" ) func Hello(w http.ResponseWriter, r *http.Request) { w.Write([]byte("Hello World")) } func main() { http.HandleFunc("/", Hello) if err := http.ListenAndServe(":8080", nil); err != nil { panic(err) } }
Things are starting to get interesting now.
if err != nil { // do something here // return err or panic panic(err) }
You can test this by running go run main.go, assuming your file was named main.go
Now, let's introduce a router library, because, if we don't, we'll have a lot of this in our code.
if req.Method == "POST" { // do this }
To get packages with golang, you usually use a go get <github-link>. To get Gorilla Mux from the Gorilla Web Toolkit we mentioned earlier, we would write the following in our terminal:
go get -u github.com/gorilla/mux
Then we are able to do this. I pulled this directly from Gorilla mux documentation.
package main import ( "fmt" "net/http" "github.com/gorilla/mux" ) func main() { r := mux.NewRouter() r.HandleFunc("/", HomeHandler) r.HandleFunc("/products", ProductsHandler) r.HandleFunc("/articles", ArticlesHandler) // details r.HandleFunc("/products/{key}", ProductHandler) r.HandleFunc("/articles/{category}/", ArticlesCategoryHandler) r.HandleFunc("/articles/{category}/{id:[0-9]+}", ArticleHandler) http.Handle("/", r) } // example handler func ArticlesCategoryHandler(w http.ResponseWriter, r *http.Request) { vars := mux.Vars(r) w.WriteHeader(http.StatusOK) fmt.Fprintf(w, "Category: %v\n", vars["category"]) }
We see that the same way express accepts patterns, Gorilla mux allows us to use the same patterns. It can get a little complicated than what I've described, but I hope you get the idea.
Gorilla mux also comes with helper functions that npm's body parser helps us achieve. Go purist can however claim that these function can easily be written.
Middleware are a great part of NodeJS servers.
They are functions that sit somewhere, and are run before the actual request is run. In NodeJS, this is a simple snippet for a middleware that retrieves a secret from the env and uses it to authenticate a user. When reading variables from NodeJS, dotenv is commonly used.
const express = require('express'); const app = express(); // add server_name middleware function authenticate((req, res, next) => { const secret = process.ENV.SECRET; if (secret == "") { return res.send("secret not found"); } if (!isAuthenticated(req, secret)) { return res.send("invalid authentication"); } return next(); }) app.get('/', authenticate, (req, res) => { res.send('Hello from Express!'); }) app.listen(3000, err => { if (err) { return console.log('something bad happened', err); } console.log(`server is listening on 3000`); })
Go takes a similar approach. Since all a middleware does is take in a request do, something with it and decide whether the request should proceed.
package main import ( "net/http" "os" ) // our sample authenticate middleware func Authenticate(next http.HandlerFunc) http.HandlerFunc { return func(w http.ResponseWriter, r _http.Request) { secret := os.Getenv('SECRET') if len(secret) == 0 { w.Write(_[_]byte("secret not found") return } if !isAuthenticated(r, secret) { w.Write(_[_]byte("invalid authentication")) return } next.ServeHTTP(w, r) } func Hello(w http.ResponseWriter, r _http.Request) { w.Write([]byte("Hello World")) } func main() { http.HandleFunc("/", Authenticate(Hello)) // call the middeware by wrapping if err := http.ListenAndServe(":8080", nil); err != nil { panic(err) } }
If you are a seasoned JavaScript developer, you've probably noticed functions are first class citizens in Go too.
We've just written a function that takes in a [http.HandlerFunc](https://golang.org/pkg/net/http/#HandlerFunc) which is a function type, and the function structure is type HandlerFunc func(ResponseWriter, *Request), just like the Handler we wrote.
The advantage is that the http.HandlerFunc type has a function ServeHTTP which takes in the response and the request pointer we passed, and executes the handle call.
Some people call this approach wrapping functions, but this is the general idea. Again, you can easily write your own middlewares, but there are a couple of libraries out there to help you like http://www.gorillatoolkit.org/pkg/handlers and https://github.com/urfave/negroni.
Most of the time, our servers usually depend on an external API to get some data it needs. Let's say for example we are getting users from Github.
This is the approach you would take in a NodeJS app.
You'll first install a http request module, such as axios. npm install axios
const axios = require('axios'); const url = 'https://api.github.com/users'; axios.get(url).then(res => { // do something with the response }).catch(err => { // do something with the error })
This piece of code can either be in your service, or anywhere you like.
In Go, however, we do not need any external dependencies, and the net/http package can help us with this scenario.
package main import ( "fmt" "io/ioutil" "log" "net/http" ) func main() { URL := "https://api.github.com/users" res, err := http.Get(URL) if err != nil { log.Println(err) } defer res.Body.Close() // for garbage collection responseBodyBytes, err := ioutil.ReadAll(res.Body) if err != nil { log.Println(err) } fmt.Println(string(responseBodyBytes)) }
We use http.Get to make requests, and check errors. The response is usually in bytes, and we have to read it first, then convert it to string with strinb([]bytes).
You can add this to a main.go file and run go run main.go.
This code can also easily be converted to a func, and called repeatedly when needed.
NodeJS has various npm modules to help in database connections depending on the databases that you are using.
These libraries most of the time come with their own methods, that try to make it easier for you to work with them, and some even offer ORM like features.
Go however takes a different approach. The standard library provides an interface for working with databases called https://golang.org/pkg/database/sql/ which RDBMS package authors can use to implement drivers for various databases. Authors following the standard interface ensure greater interoperability for their packages.
Common database driver packages include: But to save you a lot of hustle, especially with SQL databases, https://github.com/jmoiron/sqlx will boost your productivity. Not to be left out of the ORM game either, the Go community has written many excellent ORMs such as https://github.com/jinzhu/gorm.
Go's files must be written within packages, and this usually affects your file structure.
In JavaScript, you'll see a lot of require statements at the beginning of files, while in Golang, the first line is always a package name, which will then be used as an import path in a file where it's required import package_path/package_name
I hope you've gotten a gist of what it's like to write Go, and you'd like to get into action. Golang is really praised for it's concurrency and performance, and if you are building a large application, this would be a preferred choice.
Here are some other cool stuff I did not cover, but are worth mentioning.
I've been following this transitional journey for a while now, and would glady answer any questions you may have. Just leave a comment.
Happy Go-ing! ;-)
via Scotch https://ift.tt/2yaUGB6
0 notes