#sims 2 RPC
Explore tagged Tumblr posts
Visit Tumblr Blog
Explore Tumblr blogs with no restrictions, modern design and the best experience.
Last Seen Tumblr Blogs


Fun Fact
There were a total of 171.5 billion posts on Tumblr in 2019.
Text
A Complete Guide on how to Fix & Optimize The Sims 2 on Windows 10/11
I've made a video tutorial and written guide on everything you need to know on how to Fix & Optimize The Sims 2 on Windows 10/11, with Performance, Stability, and Graphics Enhancements.
Watch the Video Tutorial on YouTube:
youtube
Read the Written Guide on my Website
#sims 2#the sims 2#ts2#sims 2 2024#sims 2 windows 11#sims 2 windows 10#fix sims 2#graphics rules maker#sims 2 RPC#sims 2 4gb patch#Empty standby list#empty standby memory#sims 2 shadow fix#sims 2 George#Sims 2 Settings#Sims 2 Ultimate Collection#Sims 2 Resolution Fix#Sims 2 tutorial#Sims 2 help#Sims 2 crash fix#Sims 2 error fix#Sims 2 video#BellaDovah#Youtube
232 notes
·
View notes
Text
Absolutely fucked up and not at all surprising that ea has reactivated sims 2 for a wacky price. Not fixed bugs they said they would. Introduced NEW and HORRIFYING glitches like sims just straight disappearing from existence. And now we're not allowed to download it for free anymore.
#literally what if i need to reinstall. how will i get on without my starter pack and rpc installation#the sims 2#sims 2#vidya gaem#personal post
7 notes
·
View notes
Text
Anyway, everyone is praising the lot impostors option of LD's Launcher and the other features, but no one mentions how great the smooth camera option is????
Really, if you haven't activated it, do it now! Even though I was playing at 60fps and the game was very smooth, moving the camera was often laggy, it seemed like I had to pull the mouse, now it's so smooth that I feel like crying
(The first time I couldn't control the softness of the mouse, the difference in smoothness was immediately evident)
3 notes
·
View notes
Text

i should probably rearrange my sims bar cause this is actually ugly
#not sonic#i think im gonna get rid of the sims 2 rpc shortcuts#maybe ea origin too#and im rearranging them in release order instead of the order i got them in
0 notes
Text
Sims 2: My cc mods list

Here is my cc mods list that i use in my game, i will share the links to the original creators. There are download links for the individual cc and my whole downloads folder.
I will keep updating this post with my mods. These mods help with making the game more beautiful and immersive ^^
Defaults
Food
Omelette
Pancake XXL
Chefs salad
Pizza
Grandmas comfort soup
Hot dog
Grocery shopping bag
Mac n cheese
Smart milk baby bottles
Toy oven food
Toddler mush
Tv dinner
Chinese food delivery
Environment/ Misc
MTS PineappleForest A Bunch Of Defaults
Book covers
Prettier Plumbob
Beddings
Maxis match lighting mod
Road replacement
Grass terrain
Trees
Better nightlife light
CAS
Skin, supernatural skin
Face templates
Eyes
Eyebrows
Makeup
Default database for clothes, hair, skin, makeup
Gameplay mods
Sims ACR (autonomous casual romance, adds risky wooho, teen wooho, birth control pill, booty call)
Pumpkin carving
Candles making
Knitting mod
Laundry
Toddler play tunnel
Tiny kids kitchen set
Faster University education
Spy crafting station (station for making poisons)
Poison mod
Drink poison and sell from inventory
No reagens needed for spells (witches can cast spells without having the ingriedients in their inventory)
Hereditary supernaturalism
Tombstone bio (will show the sim's biography on the tombstone with a new interaction "about")
Sims 3 traits
Helpful mods
Wider cas
Wider change appearance
Wider buy/plan outfits
Better Camera mod
Sims 2 RPC
Sim shadow fix
FFS "Bat box" lot debugger
Hood checker
Hack conflict detection utility (detects mod conflicts)
No corrupt death
Child ghost NPC fix
CAS makeup lag
Date stood up fix (This mod fixes the broken timer behavior for standing dates/outings up. )
Improved family tree
Rug fixes (Enables placement of rugs on Quarter Tile / Snapping off)
OMSP (enables more slots)
Maxis plant fix (all plants are now seasonal, removed excess shine)
Manual lifetime want chooser
Non-default mods
Hood deco
Sky (prettier and realistic clouds and sky)
4t2 build buy database
120+ Grass and flowers
3t2 Old mill wall ivy
3t2 Deliciously indulgent bakery
Japan inspired CC
Chinese inspired CC
Korean inspired CC
My whole Downloads folder
#sims 2#sims 2 cc#the sims 2#ts2#ts2cc#ts2 download#sims 2 custom content#sims 2 default replacement
271 notes
·
View notes
Text
Quick post while I can; full video coming tonight!
Sims 2 Legacy Edition:
1. NO Bodyshop, tried to run the UC version but it crashed | EDIT: some users have reported being able to copy over bodyshop and run it, but the folder paths are not configured correctly.
2. NO IKEA stuff pack, can be downloaded
3. RPC & associated mods NOT currently working | UPDATE: LD has said on X that he would like to eventually make his mods compatible with this version of the game, so hopefully in the future we will see an RPC for Legacy
4. Scriptorium broken / causes game to crash on load | EDIT: Can be installed manually
5. Pink flashing not solved
6. Object Limit still there (lol)
7. Custom Skins buttons in CAS broken
8. Users are reporting a TONNE of new gameplay bugs - broken pets, broken cutscenes, disappearing Sims, BV community lots not working - it's wild. Check out the EA help forums or this thread on MTS for more: https://modthesims.info/showpost.php?p=5987455&postcount=1
Stick with Starter Pack friends!
258 notes
·
View notes
Text

Fully Underwater Lot Tutorial
@creida-sims @kitkat99
UPDATE January 2025
There is now a much, much easier way to do this. This version of SimPE now includes a tool to change terrain geometry. To edit the terrain in SimPE, go to Tools/Neighborhood/Neighborhood Browser and load your neighborhood. In the Resource Tree, select Neighborhood Terrain Geometry (NHTG) and select the only resource in the Resource List. In Plugin View, click Terrain Editor. It's very intuitive, but basically, you can edit the terrain under a lot to make it be underwater. You can also delete the road with the Road Editor.
I'll keep the old tutorial for archival purposes, but unless you can't or don't want to install this version of SimPE, it is pretty much obsolete.


Some warnings and disclaimers
1. This is not a beginner tutorial. I have tried to explain with as much detail as I can, but still, if you just started playing The Sims 2 I recommend trying out other building tutorials first.
2. I have tested it but there's always a possibility that some new problems will come up. Follow at your own risk. Backup your neighborhoods before trying this. Test it first in a new empty neighborhood.
3. These lots are roadless, so they require specific gameplay conditions to avoid breaking immersion (pun intended).
4. They will behave like normal lots in the sense that sims can walk around and do anything as if they were on land. There's one big problem to consider: when sims go fully underwater, their hair and some parts of their clothing might disappear visually.
So this is more useful for structures that sit above the water, shallow water that doesn't reach a sim's head or, with some modifications, small islands surrounded by water. So unless you want bald mermaids, I don't recommend this for sims that live underwater.
5. If you use Voeille's hood water mod, reflections will look glitchy in lot view, because this is technically not a beach lot. The only solution I found is enabling "Lot view ocean reflections" in RPC Launcher. Otherwise you'll have to deal with glitchy reflections.
6. Before following this tutorial, make sure you know the basics of creating, editing, importing and exporting SimCity 4 terrains. Written tutorial by SimEchoes here, video tutorial by loonaplum here.
Software and mods used
The Sims 2 FreeTime expansion pack (required for the modifyNeighborhoodTerrain cheat)
SimCity 4 (required) Hood Replace by Mootilda (required)
Lot Adjuster by Mootilda (required)
Portal revealer by Inge Jones (required)
Voeille's pond and sea water overhaul and RPC Launcher (optional, see disclaimers)
The Sims 2 Apartment Life and Bon Voyage expansion packs (optional, for "walk to lot/work/school" options)
Cheat codes used
moveObjects on/off
modifyNeighborhoodTerrain on/off
1. Creating/editing a terrain in SimCity 4
1.1. You can edit an already existing terrain or create your own from scratch. In both cases, you need to keep two things in mind: If you want the usable area of the lot to be underwater, such as making houses for mermaids or a coral reef, make sure the water is shallow. No more than a few short clicks with the terraforming tools in SimCity 4. This is because The Sims 2 live mode camera won't go underwater, so making the water too deep might make it uncomfortable to build or play the lot.
If you goal is to build a structure mostly above water, like a ship or an oil rig, you can get away with making the water a bit deeper, but not too much. I've noticed that sometimes the lot terrain tools stop working correctly if there a hill that's too steep.
1.2. Once you've created the terrain, you will need to add a small island on the area where your lot will be. I know it seems contradictory, but trust me, it will make sense. Create and name your city. Use the terraforming tools in city mode to make a tiny island of about 6x2 squares.

1.3. On the island, use the road tool to place a straight road that takes up 4 squares. Then, using the street tool (the last option), place two short streets at each end of the road.
Streets will disappear in TS2, only roads translate to roads in ts2, so why do we place them? Well, placing a street at the end of a road will get rid of the rounded end bit in TS2, which can't be used to place lots. This will be important for the placement of the lot and to make sure the edges of the lot are underwater. If this doesn't make sense yet, don't worry, it might make sense later.
1.4. Save the terrain. Don't exit SimCity 4. Copy your new/edited sc4 terrain from your SimCity 4 folder to your SC4Terrains folder in your Sims 2 documents directory. It is usually
"C:\Users\YOURUSERNAME\Documents\EA Games\The Sims 2 Ultimate Collection\SC4Terrains"

1.5. Back in SimCity 4, we're going to make a second version of this terrain. Remove the roads and streets you made before, with the bulldozer tool. With the level terrain tool in Mayor mode, carefully remove the island, so it's on the same level as the bottom of the ocean/lake. Don't change anything else. Save, exit and copy this second terrain to your Sims 2 SC4Terrains folder. Make sure you rename the file to something different from the first one, like adding "no roads" to the filename. You should have two terrains by the end of this step. One with the small island and one without it.
2. Editing the terrain in The Sims 2
2.1. Open The Sims 2 and create a new neighborhood using your new terrain. Something to keep in mind: if you want the terrain to be a subhood of another neighborhood, make it a subhood from the start. You will not be able to move the lot once it's finished, since it will be roadless. I don't recommend decorating the neighborhood for now. Leave it empty until the end of this tutorial.

2.2. Place the smallest empty lot (3x1) on the island.
2.3. In neighborhood view, open the cheat console by pressing Control + Shift + C, and type
modifyNeighborhoodTerrain on
To quote The Sims Wiki:
"This allows you to alter the neighborhood terrain by raising or lowering it. To use this cheat, be in the neighborhood view, then enter the cheat "modifyNeighborhoodTerrain on" (without the quotation marks), and click over the area you would like to change. To select a larger area, click and drag the cursor to highlight the desired area. Press [ or ] to raise or lower the terrain by one click, press \ to level the terrain, and press P to flatten terrain. When you're finished, type “modifyNeighborhoodTerrain off” in the cheat box (again, without the quotations)."
If you use an English keyboard, these instructions will probably be enough for you. If you don't, I recommend first testing the cheat, because the keys for using this cheat are different in other languages. For example, in my spanish keyboard, the question marks are used to raise and lower the terrain and the º/ª key flattens it.
Another aside: When you select an area using this cheat, a green overlay is supposed to show up. Some lighting mods make this green overlay invisible, like the one I use. If that's your case, you kind of have to eyeball it. Remember that one neighborhood grid square in TS2 is equivalent to 10 lot tiles, or the width of a road. I recommend getting a mod that allows you to tilt the neighborhood camera on the Y axis, which will allow you to have a bird eye's view of the terrain.

2.4. Flatten the terrain around the lot so it's at water level. This cheat won't allow you to edit the terrain inside the lot, so you have to edit the terrain around the lot. Make sure there is plenty of flat underwater space around the island. You should end up with something like the picture above. The water will have some holes, but don't worry, those get filled with water the next time you load the neighborhood.
2.5. Enter the lot and place any object on it. Save the lot and exit the game. This is so LotAdjuster recognizes the lot in the next step.
3. Expanding the lot with Lot Adjuster
3.1. Open Lot Adjuster and select your neighborhood and lot.

3.2. Click "Advanced…". Check "Over the road (only enlarge front yard)". Use the arrows to add 20 tiles to the front yard. Click "Finish" and "Restart".

3.3. Select the same lot again. This time, check "Add and remove roads". Uncheck the road checkbox for the front yard. Add 20 Tiles to the back yard, 20 tiles to the left side and 10 tiles to the right side. Check "Place portals manually". You should end up with a 60x60 lot, which is the biggest size. You might want a smaller lot, but unless you know what you are doing, I recommend starting with this size. You can shrink it later. The goal of making the lot this big is making sure the edges of the lot are underwater. Click "Finish" and exit.
4. Moving portals and flattening the lot

4.1. Make sure you have the portal revealer by Inge installed in your Downloads folder before the next step. Open your game and load your neighborhood. The lot should look something like the picture above.

4.2. Load the lot. Delete the object you placed before. Place the portal revealer on the lot near the mailbox/phone booth and trashcan. It looks like a yellow flamingo and you can find it in Build Mode/Doors and Windows/Multi-Story Windows catalogue. You will notice that when you select the object from the catalogue, some yellow cubes appear on the lot, and when you place the object, the cubes disappear. After placing the portal revealer, pick it up and place it again. This will make the yellow boxes visible again.
So what are those yellow boxes? They are portals. They determine where sims and cars arrive and leave the lot. The ones on both ends of the sidewalk are called pedestrian portals, and in the street, one lane has portals for service vehicles (maids, gardeners, etc.) and the opposite is for owned cars and carpools. You can see the portal's names if you pick them up. Make sure not to delete any of them.
Now, since this is going to be a roadless lot, ideally there won't be vehicles in it. This means that the lot would ideally be accessed through walking only. In community lots, this would not be an issue if you have the Bon Voyage expansion pack, which allows sims to walk to lots.
In residential lots, you might run into some problems. Service NPCs always arrive on vehicles, and unless your sim owns a vehicle, the carpool and school bus will always come to pick sims up for work/school. It might break your immersion to have a vehicle show up underwater or on a ship. There are many options to avoid this: having sims work on an owned business instead of a regular job, not having kids on the lot, making the kids homeschooled, avoiding calling service NPCs… it depends on how you want to play the lot. For example, my icebreaker is a residential lot, only adults live there, some sims live in it temporarily and none of them have a regular job.

All of this is relevant because we're going to move the portals. Where you move the portals depends on you. Think about how you're going to use the lot. In my icebreaker, I placed the car portals (which won't be used) underwater, on a corner of the lot. I placed the pedestrian portals on the ship, to pretend that the walkbys are part of the crew or passengers. But for now, just move the portals, mailbox/phone booth and trashcan to a corner of the lot. To be able to pick up the mailbox/phone booth and trashcan, use the cheat moveObjects on. Delete the street and sidewalk tiles using the floor tool (Control + click and hold left mouse button + drag).


4.3. Flatten the island with the level terrain tool. Save the lot. Almost done! Don't mind the hole in the water, this will be fixed. You will notice that in neighborhood view, the island is still there. This is because the neighborhood terrain under the lot hasn't updated. I don't know why this happens, but it does. Normally, moving the lot would fix it, but we can't move this lot using the game's tools. Instead, we are going to fix the terrain with Hood Replace. Don't exit the game yet.
5. Updating the terrain with Hood Replace
5.1. Create a new neighborhood using the new roadless terrain. Make sure it has the same type of terrain (lush, desert, etc.) as the first one. Again, name it "NO ROADS" or something similar. Exit the game.

5.2. Open HoodReplace. On the left column you will select your "NO ROADS" neighborhood. In the right column, select the neighborhood that has the underwater lot. Check these settings: Replace terrain, replace road, and versioned backups. Leave everything else unchecked. Click Copy.

5.3. Open The Sims 2 and load the neighborhood to check if the changes worked. That concludes the tutorial. At this point you can shrink the lot if you don't want it to be so big. Remember to move the portals to their final placement when you're done building the lot. Also keep in mind pedestrians (walkbys) always walk by the mailbox, so keep the mailbox accessible for sims.
If you're going to have multiple underwater lots, I recommend making them first, and decorating the neighborhood after. Doing this in an already existing neighborhood might be more difficult, mainly because, if you made any changes to the terrain using the modifyNeighborhoodTerrain cheat in the past, they might get reset when using Hood Replace.
154 notes
·
View notes
Text
mini psa:
over the summer i will be preparing to rid my life of win10 and bop over to Fedora finally. i do not want to mess w/ win10 after its no longer supported and i absolutely will not be going to win11 - ew!
theres somethings that i need to know first. do we have a collection of "how-to's":
the best and most reliable method to install sims 2 ultimate collection
reshade
simpe
steam
blender
milkshape
sims4studio
RPC launcher
compressorizor
bulk rename utility
all of these things are required to make the jump with me so i MUST find a way to get them installed and be stable - i cannot bend on this.
i am already familiar w/ lutris so is it all done via lutris or are there additional steps i need to be aware of?
i think the hardest part will be the transferring of data from win10 to Fedora. i will prob need to get my hands on an external SSD so i can transfer all the things from win10 to Fedora as smoothly as possible but that'll take some time ofc. the struggle stems from:
i already win10 as my one and only desktop, obvs since im trying to jump over to fedora, ill need to carve out some space in my storage somewhere, somehow so i can bop over to win10 as needed until im done w/ the transfer. once thats done, i can prob safely get rid of win10.
70 notes
·
View notes
Text
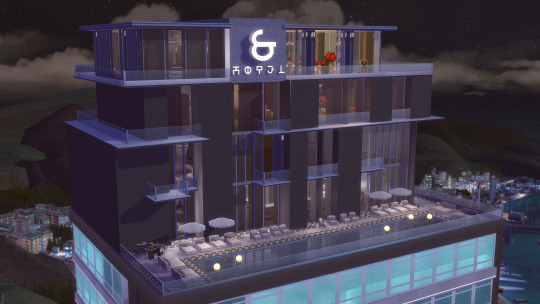

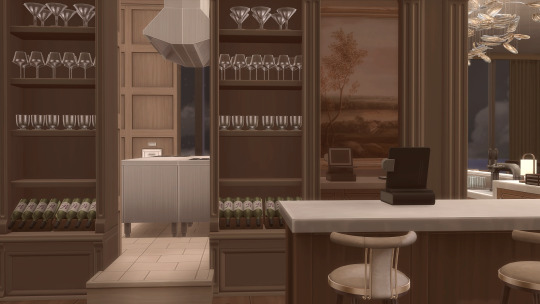


L O T R E V I S I O N - Accommodating the Suite Life Mod by Lot51

The S Hotel @ Uptown
(CC List + Links)
(Disclaimer: I am not affiliated with this hotel by any means. I simply took the 'S' from San Myshuno and slapped 'Hotel' after it. The '@ Uptown' is because I built it within the Uptown neighborhood of said Sims 4 world.)
World Map: San Myshuno
Area: Stargazer Lounge
Lot Size: 40 x 30
Amenities: Bar, Lounge, Nightclub, Pool, Restaurant, Wedding Venue
(These are the venue types that my build meets the requirements of)
Gallery ID: Simstorian-ish
Packs Needed
Expansion Packs
City Living
Eco Lifestyle
For Rent
Get Famous
Get Together
Get To Work
Island Living
Snowy Escape
Game Packs
Dine Out
My Wedding Stories
Parenthood
Spa Day
Vampires
Stuff Packs
Backyard Stuff
Home Chef Hustle
Moschino
Romantic Garden
Recommended Gameplay Mods
(Please read through what each mod has to offer before deciding if it fits your gameplay style or not.)
Dine Out Reloaded
Lock/Unlock Doors for Any Lot
MC Command Center
No Fade On Everything
Spawn Refresh
Build Mode
Harlix
Bafroom (Tall Windows + Tall Doors)
Harrie
Octave Pt. 2 (All Doors)
LittleDica
H&B Store (Lit Letters)
Peacemaker
Old World Wild Plank Flooring
Shaker Paneling
Pierisim
Stefan Kitchen (Tiles)
Syboubou
Lift Elevator (This is NEEDED)
TaurusDesign
Judith Living Room (Walls)
Buy Mode
BlueTeas
Milano Living (Chandelier Medium)
Safford Entertainment Room (Morris Barstool)
Samara Dining (Chandeliers, Sconce)
Felixandre
Chateau Pt. 5 (Tall Bookshelf Pieces)
Grove Pt. 2 (Dining Tables)
Hanraja
S005 Soundbar
Harlix
Baysic Bathroom (Toilet, Toilet Roll, Towel Clutter)
Kichen (All Glasses)
Kichen 2.0 Pt. 2 (All Glasses)
Livin’ Rum (Frame TV)
Orjanic Pt.2 (Chaise, Cushions, Rug, Sectional Sofa)
Tiny Twavellers (Director Chair)
Harrie
Coastal Pt. 5 (Nursery End Table)
Coastal Pt. 6 (Mirror Landscape, Sink Vanity Table)
Coastal Pt. 7 (Bedside Lamp, Leaning Mirror)
KiwiSims4
Blockhouse Kids (Bedroom Lamp)
Max20
Happily Ever After Kit (Bouquet Magnificent, Dining Chair)
No Style x Woodland
Tamasusja Booth Corner
Onyxium
Heilbronn Dining Chair
Pierisim
Domaine Du Clos Pt. 2 (Account Book)
Stefan Living (Curtains + Rod Covers)
PlushPixels
Into Summer (Olive Tree)
Ravasheen
Enjoy the Lentil Things
Shake and Shimmy Dance Floor
Simplistic
RPC x Loloi Rugs II
Sooky88
Oil Paintings
SurelySims
Office Space (Wall Clock Locations)
Syboubou
Bridgerton Wedding (Buffet Table)
Pour Toujours (Petals on the Floor, Tables)
Tuds
IND 02 (Bar, Island Counters, Wine Rack)
IND 03
Valia
Arty Bathroom
Wondymoon
Tiarella Garden Umbrella
DO NOT REUPLOAD MY LOTS.
DO NOT CLAIM THEM AS YOUR OWN.
DO NOT PLACE BEHIND A PAYWALL.
Tray Files: DOWNLOAD
#simstorian#the sims 4#sims 4#ts4#cc#build#sims 4 build#san myshuno#showusyourbuilds#showusyourdecor#sims 4 screenshots#the sims community#blacksimmer
236 notes
·
View notes
Note
im sorry for asking and wasting ur time...how can i get ts2 w ur upload...sorry if im not clear kinda nervous...

edit 3/8/25: one word. magipack. google it and that's way easier than this.
First of all, you're not wasting my time. Treat yourself as kindly as you treat others. /gen /pos
(I'm assuming you are a Windows user. I'm unsure with the state of downloading the game on Linux via Lutris.) With this upload, you will want to download all of them and choose either the x32 or x64 bit Touchup installer. If you have a computer made within the last... 15 years(?) you are using a x64 bit system so just use that.
Pixeldrain has a 6GB download limit daily, which is annoying and I didn't know that until AFTER I uploaded all of it. So you will have to finish downloading it a day later. Yeah It's annoying but the convenient way of doing it was nuked by EA.
Now, navigate to C:\Program Files (x86) and make a folder called The Sims 2 Starter Pack. (This is what I'm used to, so I'll be doing it like this.) You should now have a filepath called [C:\Program Files (x86)\The Sims 2 Starter Pack] and extract all of the expansions in there. You can keep the touchup installer in your downloads. I believe the touchup installer includes RPC, so make sure to play the game through that. Don't forget to run graphics rules maker.
44 notes
·
View notes
Text
How I got my Sims 2 game working on my new Windows 11 laptop, step by step.
OKAY. Gadies and Lentlemen.
I have seen plenty of these around, but I wanted to share my process!
So I bought an MSI creator laptop. The specs are as follows:
CPU: 13th gen Intel i7-13700H
RAM: 16 GB DDR5
GPU: NVIDIA GeForce RTX 4050 laptop GPU
Step One: Fresh install. I used the EA App to install the UC version on my new laptop.
Step Two: Download and install RPC launcher. This will automatically apply the 4gb patch. Run as administrator, but not in any kind of compatibility which renders the 4gb patch useless.
Step Three: Download and install Graphics Rule Maker. I used all of the recommended settings, aside from texture memory which I set at 2048 mb for reasons that will become clear later.
Step Four: Memory allocation fix (empty standby list). Explanation here.
Step Five: Setting virtual memory. I used instructions from this post at MTS - My virtual memory paging file is now minimum of 25000 and maximum of 30000. You'll need to adjust to your system's own specs.
Step Six: In game settings. Shadows Off. Neighbours Off. Lighting Medium. RPC Settings. Apply 4GB patch. Automatically Clean Cache. Lot Imposters Optimized. Sim/Object Shadows Classic. I also have lot view ocean reflections ticked.
If your game works like this with no flashing and crashing, awesome. Mine did not. I firstly tried several different texture memory sizes, but they had 0 impact.
I believe the next step is only for NVIDIA cards, but may be wrong.
Step Seven: DXVK. The most recent version from, here. There are plenty of instructions on how to install out there. But make sure you install the 32bit version. I have these two following lines in my DXVK.conf file (and do make sure it is saved as a conf file, NOT a txt or similar).
d3d9.maxAvailableMemory=2048
d3d9.presentInterval=0
The first line corresponds to the texture memory mentioned earlier. DXVK installs won't recognise more than that and having it higher can cause crashes apparently. The second line... No idea what it does but it was mentioned in several guides and reddit posts.
I don't know if the newer versions of DXVK allow fullscreen mode as the older ones did not, but I play in borderless mode anyway which works.
I also delete my thumbnails folder every so often.
I hope this helps someone, this silly old game can be cantankerous but I was determined to get it running again!
452 notes
·
View notes
Text

here's a mini-mod for medieval sims 2 players!
the sims medieval loading splash music for use with ts2! you can use these with greatcheesecakepersona's loadingrandomizer, pick'n'mix's rpc loading plugin, or choose one to replace your default Splash.package in (latest ep's)\TSData\Res\Sound (make sure you back up the original first, & rename the one you choose to Splash.package)
download: sfs | simblr.cc | mts
#ts2 cc#ts2 mods#ts2 mod#ts2 loading screens#my cc#loadingrandomizer#ts2 loadingrandomizer#ts2 medieval#ts2 mcc#sorry if this was already made#i couldn't find it & it was easy to do!
29 notes
·
View notes
Text
I'm taking a break lol
I'm literally so exhausted with The Sims 2. Like...why am I still crashing at all? I've taken all the necessary steps. Yeah sure I could do the 50/50 method but jeez it's such a tedious process.
I wish there was an easy way to find what is EXACTLY wrong with my game when it randomly crashes, like...why the FUCK are two objects clashing with each other? Like leave me alone, I just want to play my game.
I'm using RPC and yet the 4 GB patch is somehow still not applied if I check the logs. I've gone to Reddit and nobody could help me to point out why the 4 GB patch is not applied.
I'm giving up. I found it to be relaxing to play Old Town but just as I was enjoying myself with shopping for CC to create lots...crashes again.
It's such a fucking exhausting game to play with these issues all the damn time. I can't enjoy myself for just a minute and the sad thing is I was really enjoying it for a while. I just wanted to play my game without my usual worries of accuracy or whatever.
Last time this happened I didn't touch The Sims 2 for MONTHS and somehow...the issue resolved on its own. Like wtf happened? The mods are SETTLING themselves???
Anyway, I might still be posting Bodyshop stuff. At least the crashes there are more bearable. But I swear to god I'm so fucking sick of The Sims 2 as much as Iove it. It really frustrates me cause this is supposed to be my relaxing escape from the world.
35 notes
·
View notes
Text
Tag search:
# Buymode stuff
# Lights
# Plants
# Decor items
# Defaults
# Defaults - TS2 Clothing Tweaks
# Custom TS2 Clothing Tweaks
# Bodyshop stuff
# Tutorials
My SFS Folders :
🪴 Decor 🪑 Furniture 💡 Lights 🎨 Recolours
Other: ⚙️ TS2 Defaults 👚CAS Defaults CAS stuff 👱🏽 Just hair | creator resources
All my old MTS2 uploads (if something's not there, it's on SFS already)
Popular WCIF & FAQ
👾 If you’re curious what other games I’m playing here's this almost empty blog.
❕ I create CC for The Sims 2 only. I don't do requests but I'm ok with receiving CC suggestions / ideas (for TS2).
📣 Updates:
06.02.2025 - Fixed issues with Move In and First Kiss scenes in my 'Less effects in cutscenes' mod. If you still have issues with some cutscenes please let me know.
30.01.2025 - I've added alternative download links to all my last year's posts.
07.01.2025
Photo frame overlay replacement now includes caption UI resources so there's no green. Added Box link.
14.11.2024
Alternative version of my Atomic Fireplace Default is available - I've added emissive map to make the burning logs more realistic - Download (SFS) (Standard Material Shader Edit is required). Corrected fireplace height so it doesn't bleed through the floor above.
04.11.2024
Edited Round Wall Lamp from G&B set, light settings switched from white to yellowish.

01.11.2024 05.11.2024 11.11.2024
Updated my edit of Trait Chemistry Mod, fixed Lua script issues so Alien TO, Facial hair TO work. A few more things fixed in upd. 2 & 3
Download (SFS) , (BOX)
03.10.2024
My ko-fi account's up.
30.06.2024
I've shared updated versions of ceiling lamps from my Lamp Collection - lamp canopies are not hidden in the ceiling anymore /Note to ppl playing on Mac: most of these edits are not mac-compatible.
25.06.2024
Fixed outdoor square shadows for my Wicker Lantern Set . Download (SFS)
21.05.2024
Fixed missing texture in 'TightDressMidiSlit' repo recolor number 10. Download (SFS)
07.05.2024
Finally fixed the Bar Surface OMSP I shared along Wedding Bar Default. Please note it's basically a new object but with the same GUID so if you have old version in the game, the objects placed on that one will disappear Download (SFS)
Updated NonSlip Bar Mat mesh included with Bar Decor Set, now it can be placed on all surfaces. Download (SFS)
08.04.2024 - Bar worktop OMSP was edited and now it doesn't block bar functions, I also added second (1 slot) bar OMSP for the lower shelf.
07.04.2024 - Edited Deco guitar floor stand - now it can be placed on surfaces without moveObjects cheat.
26.03.24 - Updated Toast Flute Default - now glasses are already half-full when Sims toast at the table.
11.03.24 - Fixed EM grey repo recolor 01 for 4t2 Dogsill Amari hair. Here's only the fixed file: (SFS), and here's all of it (SFS)
10.03.24 - Night time Decorative fireflies effect is now available - fireflies only show up at night.
09.03.24 - RDN Sleeping bag edit was made compatible with ACR.
27.02.24 - Another update of Bamboo Sconce (Tropical Lamp add-on). When I fixed the shadow I shared some half-assed version of it ?? Now it has warm light color, correct price and description. Download HERE (SFS)
30.11.23 - Updated LL Billie hair recolors, these are now enabled for all clothing categories
12.11.23 - I've updated witch hat & LL Luanne hair combo recolors so those should be now flagged as hats and disabled for Townies
11.11.23 - Updated Restored Car Paint Colors default, Added Finnish, Norwegian and Portuguese/ Brasilian-Portuguese translations
31.10.23 - Updated Bowling Alley defaults, all files are now separate. Added smoother bowling ball
14.07.23 - corrected shoe sound effects for my Long Dress recolours - changed it from heels to normal shoes
10.08.23 - Fixed blue shadow in Bamboo Sconce (Tropical Lamp add-on.
*If you use RPC you probably haven't experienced the blue shadow flashing but I recommend you update the sconce package anyway.
Old updates list is HERE<<
247 notes
·
View notes
Text
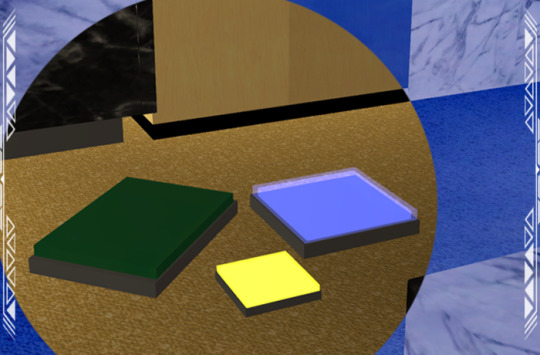
JEWELRY SHOP REMIX

Published: 9-23-2023 | Updated: 9-28-2023 SUMMARY "Master jewelers and dealers of finery. And stuff. And thangs. And stuff! We carry SimCity’s finest jewels, atomized gems, and precious, semi-synthetic metals." This set is a retro-futurist, steam-funkish remix of an older Jewelry Shop (WR/HChangeri/RetailSims, 2007 via the LiquidSims Archive) with several new add-ons. The design is inspired by The Fjord “Chiclettina” counters and ‘marvelous marbles’ walls/floors from Sims 2. All 40+ items range from §50-750 and some assembly is required. Scroll down for more details and download links.

DETAILS Requires all EPs/SPs §50-750 | Buy Mode To streamline files and potential recoloring, everything is repo’d to one of the following objects: Fjord Allshelf 001 (shelving/accents), Fjord Boxed Jewelry Display (boxes), Fjord Necklaces Display (displays/jewelry bands), Fjord Earrings Display (gems), Jewel Case (jewelry cases), Fjord Jewelry Table Glass Display (all glass), Plain Old Fjord Counter (marble surfaces), Fjord Hanging Sign (vertical images; 256x512), Fjord Store Sign (horizontal images; 1024x512) – these items are REQUIRED for textures, etc. to display correctly in-game. *RPC Launcher doesn’t always delete the “Accessories.cache” file, so you may want to MANUALLY delete the file and let the game generate a new one if you remove this set from your game.
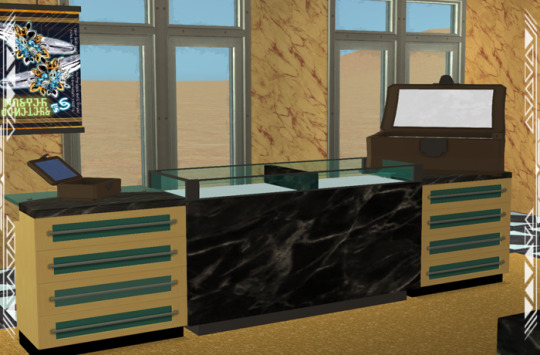

ITEMS Modular Shop Furniture The plain counter has been retextured and has 3 slots (only small deco items can occupy the last 2 slots) while the jewelry table has 1 slot. All other furniture is deco - assemble unique display areas by pairing these and other items with one of three shelving units.
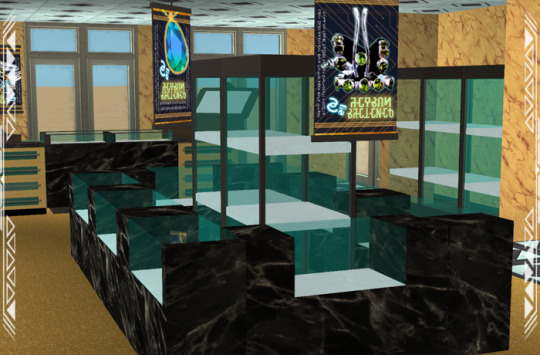

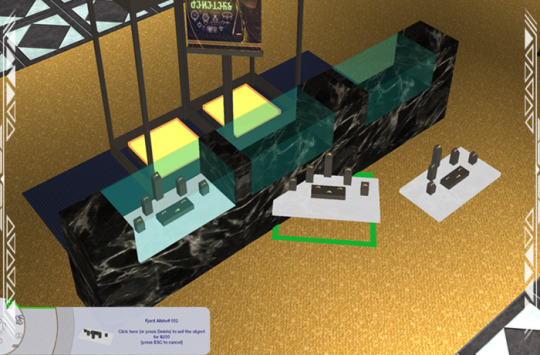
The Fjord Single Item Displays 001-003 (pictured above) get their recolors from the EverGlow Plutonium Rod that came with the Nightlife EP. Find them under Lighting > Standing/Floor Lamps – but they can also be used to gussy up displays (see below). You can get recolors for these lights HERE.
DOWNLOAD (choose one) MESHES from SFS | from MEGA SHELVING from SFS | from MEGA MARBLE RECOLORS from SFS | from MEGA JEWEL CASE RECOLORS from SFS | from MEGA COLLECTION FILE from SFS | from MEGA
*A known game bug may disable some OFB shelf slots. Not all players experience this bug in the same way, but if you do – there is a long-standing fix for it. If you cannot access more than 2 slots on shelves, download ONE of these fixes: MORE_Custom-objects-placeable-on-shelves (Numenor, 2006) MORE_Custom-objects-placeable-on-shelves+LOCKEDTILES (Numenor, 2006) Object Freedom 1.02 (Fway, 2023)) 15 Functional Jewelry Displays §250 each | Buy > Misc > Misc
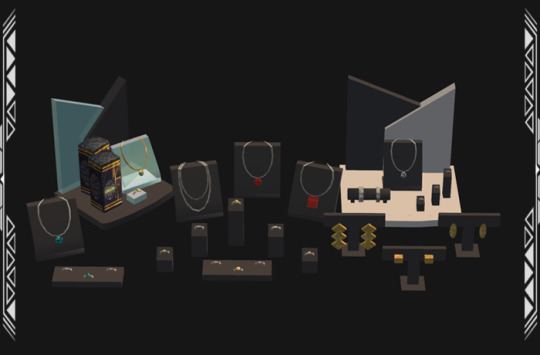
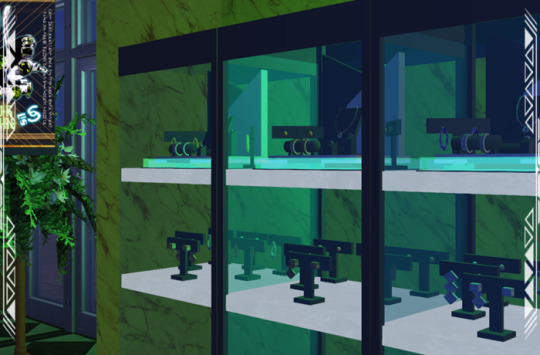
This set includes 6 traditional counter-top displays with empty states.
Fjord Boxed Jewelry Display (1116 poly), Fjord Earrings Display (784 poly), Fjord Jewelry Stand (1212 poly), Fjord Necklace & Rings Display (748 poly), Fjord Necklaces Display (816 poly), Fjord Rings Display (1072 poly). You can’t really place more than 1 or 2 large displays on the shelving, so there are 8 smaller, complementary displays included as well.
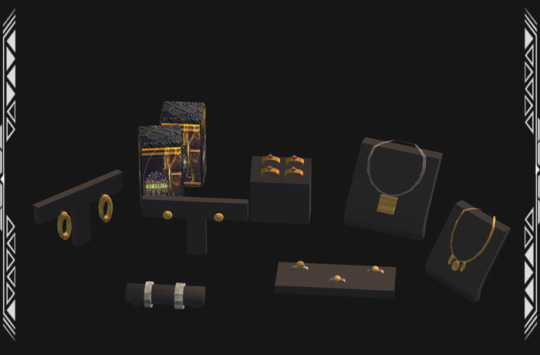
Fjord Boxed Jewelry Display Two (604 poly), Fjord Bracelets Display (392 poly), Fjord Earrings Display Two (276 poly), Fjord Earrings Display Three (356 poly), Fjord Rings Display Two (472 poly), Fjord Rings Display Three (632 poly), Fjord Single Necklace Display (556 poly), Fjord Single Necklace Display Two (258 poly).

Fjord Smart Jewelry Kiosk (2220 poly); Fjord Boxed Jewelry Display Two pictured again above as well. The kiosk functions as a normal jewelry rack with a unique empty state (the glow disappears, and the screens turn all angry and red!). The label at the base of the machine uses textures from the Fjord Hanging Sign. You’ll see two torn pieces of packaging when the Fjord Boxed Jewelry Display Two needs restocking – other items have noticeably empty states as well (i.e. there will be no jewelry on the display). DOWNLOAD JEWELRY RECOLORS:
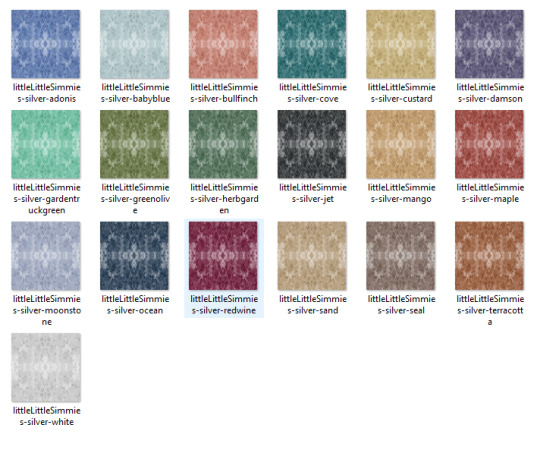

BANDS/CHAINS IN SILVER METALS from SFS | from MEGA GEMSTONES IN CURIOUS-B COLORS from SFS | from MEGA GEMSTONES IN SILVER METALS from SFS | from MEGA
Shop Signage


Show off your merchandise with updated advertisements (originals pictured on top row, remixes pictured on bottom row), as well as several new promotional designs: Fjord Hanging/Standing/Mini Signs (56 poly), Fjord Store Sign (892 poly).
DOWNLOAD (choose one) SIGNAGE from SFS | from MEGA *Since items in the Sims 2 are limited to two recolorable subsets, not all items are recolorable in the same way. For each display, the base and either the gemstones or metal bands/chains are recolorable. Find recolors for this set under the #ts2recolors tag.


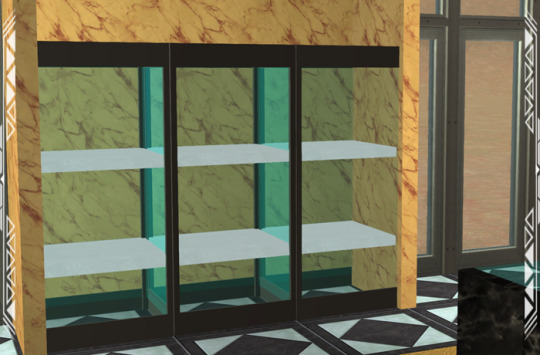
SOME ASSEMBLY REQUIRED 1) Place a counter (or table, display cabinet, large jewel case, etc.): Fjord Accessory Table (156 poly), Fjord Cabinet Metal (88 poly), Fjord Display Cabinets 001-002 (212-250 poly), Fjord Display Pedestal (12 poly), Fjord Glassbox Displays 001-002 (126 poly), Fjord Jewelry Table (22 poly), Fjord Showcase Counter (533 poly), Plain Old Fjord Counter (113 poly).

2) With “snap objects to grid” set to TRUE, assemble items on one of the shelves (3-6 slots each): Fjord Allshelving 001- 002 (12 poly), Fjord Cabinet Glass (Shelf) (28 poly), Fjord Counter Display Cabinet (~400 poly), Fjord Jewel Case Displays Reg/Small (744 poly), Fjord Jewelry Table Glass Display (116 poly), Fjord Jewelry Table Shelf (12 poly).
*For owned businesses, this is a good time to set items for sell. The short display cabinets pictured above are shiftable in case you need to move them and rearrange items on the shelf. You can click through the glass as well.
**Some debug-related items float slightly when placed on Allshelf 001 or 002 – this is something I’ve experienced when cloning BuggyBooz shelves - it’s not terribly noticeable from most angles. If it bothers you, close the gap by shifting another object underneath.
***The jewel cases have 6 slots. This may be awkward for the smaller case but that’s on purpose - to make moving several clutter items at once easier. In my opinion, the larger one looks better when paired with a shelf.
3) With “move objects” ON and “snap objects to grid” set to FALSE, shift/rotate the shelf into place as needed. As you combine different objects, some will look best when they’re all facing the same direction (i.e., the green arrows are pointing in the same direction) and others might not – this depends on what items you’re using. You can shift/combine the Fjord Single Item Displays with select objects to add neon light accents to your displays.

You’ll need “move objects on/off” and “snap objects to grid true/false” cheats to make some combinations work. You may also need fences, OMSPs, or other objects to keep sims from walking through parts of the display.


4) Use the Tile Blocker as needed (especially if you play with Object Freedom by Fway, 2023). All objects have 1-tile footprints – but some cover more space than a single tile. The Tile Blocker is included in this set to help you cover those unused tiles and keep sims from walkin’ where they shouldn’t be walkin (learned this the hard way!). If needed, you can read more about the Tile Blocker using the download link below.
DOWNLOAD (choose one) TILE BLOCKER from SFS | from MEGA Enjoy! Recolors will be available on this site under the #ts2recolors tag.


CREDITS No copyright infringement intended - all imagery/trademark rights belong to their respective owners. Thanks: Crucial testing/input from ChocolateCitySim. All creators, modelers, and modders with open TOUs. Sources: Accessory Table (Triplet 3D, 2018),Any Color You Like (CuriousB, 2010), Beyno (Korn via BBFonts), Circuit Lines (Starline via Freepik), Cubic Dynamics (EA/Maxis), Display cabinet (Feel_funny, 2012), EA/Maxis, Extracted Clutter (Decat, 2014), Gold/Silver Textures (LittleLittleSimmies, 2018), Imagery/Icons (EA/Maxis; Gwenke33 and Simmons, 2011; Shutterstock), Jewelry Shop (WR/HChangeri/RetailSims, 2007 via the LiquidSims Archive), Kitchen Basic (Hafiseazale, 2016; BuggyBooz, 2008), Kitchen Basic Extras (Hafiseazale, 2016; BuggyBooz, 2010), Klevestav (2013; 2010), Low poly jewel case (Morky via Creative Commons Attribution),Necklace Display (DeeDee, 2021; Liana; Nichellerj), Necronomicon in display case (DudleyLong, 2019 via Creative Commons Attribution), New Amerykah Part Two: Return of the Ankh (Universal Motown, 2010), Offuturistic Infographic (Freepik), Quake 4 (Activision, 2005), Realistic Diamond (Boykung via DepositPhotos), Showcases counter (DHK_krm, 2016), Sigla logo DUNHIL (Naidar-InoxArt, 2023 via Creative Commons Attribution), Simlish Merry-Go-Round (BBBunny, 2017), Sunglasses (Versace via Mia Burton), Terminal 02 (ROTFL et al., 2019 via Creative Commons Attribution), The ArchAndroid (Wondaland Arts Society, Bad Boy Records, and Atlantic, 2010), TS2 Maxis Match Lingerie Store Set (SomedayTheSun, 2023).
146 notes
·
View notes
Text
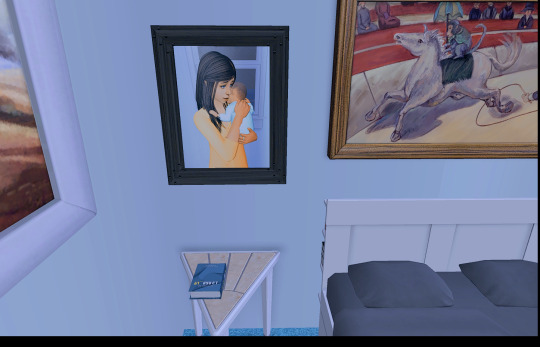
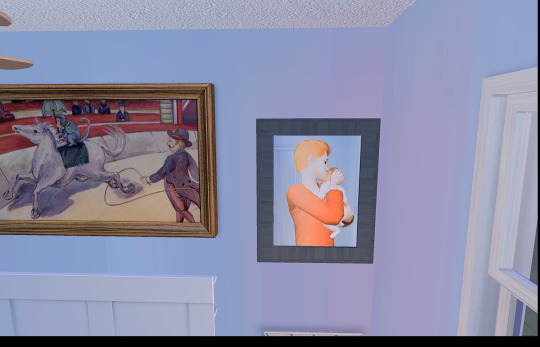

I was today years old when I learned that you could use the antique camera aspiration reward (as well as the instant cameras included in epi's camera mod) to take your own family photos / portraits (or rather... tricking the game into THINKING you took them). I've always loved how Sims 4 has a variety of ways that you can take photographs of your sims / families, especially in Legacies and I'm excited that we have a way to do it in the Sims 2 now. This YouTube video was a big help.
To sum up the video / offer a jist of how to do this: the first step would be posing sims however you want them (you can use poseboxes, omsps, ect) or carrying out an action you'd like to have the photo of. I didn't use anything fancy here, merely had the sim pictured here cuddle her baby. Once you've got your desired photo, you take a screen shot. I use RPC / ReShade, so I can use PrintScreen and my pictures are saved to my Sims 2 Screenshot folder in high quality. Don't use the in-game screen shot tool, as the pictures will be blurry / low quality.
Once you have your photo, you'll need to crop it- either vertically as a portrait picture, or horizontally for a landscape picture. Size doesn't matter, but keep in mind that photos from the camera can either be hung on the wall or placed on a surface in a stand-up frame- so be mindful of the dimensions. Once you've cropped your desired photo, you can edit it further how you please in Photoshop, Gimp, or whatever program you like to use. This picture I edited in Photoshop with a PSD (though it also includes color/lighting from the ReShade I'm using). Jazz it up however you want.
Once you have your photo exactly how you want it, save the photo (place doesn't matter) as Snapshot.bmp. It must be named Snapshot and it must be a bmp file. Photoshop includes some various 'options' when saving a BMP file- I used the default options without any issue. Once you've got your file, direct a/your sim to take a photo with the antique camera (either get it as an aspiration reward or use a mod to be able to buy it from the catalogue at cost/for free- your choice). Epi's cameras can be used as well, but I've not used those yet- you'd want one of the cameras that allows instant pictures. When your sim begins to snap the photo, you're going to get the screen shot box, and it'll tell you to press C to take the picture. At this point, pause your game. Then press C.
After you've pressed C, with your game still paused- you're going to go into your storytelling folder (this is located generally Documents > EA Games > Sims 2 > Storytelling; YMMV (your mileage may vary) depending on your install path, but you're wanting the storytelling folder located in the same folder as your Downloads where you keep your CC). When you go into your Storytelling folder, you will see a myriad of picture files but at the very front should be two files that look like whatever you snapped a shot of in game: one file is named Screenshot.bmp and the other is named Snapshot.bmp. With your game still paused, copy or cut your edited photo and paste it into your Storytelling folder, overwriting the current Snapshot.bmp file. After that, you're done! Unpause your game and let your sim go through the action- they'll take the 'photograph' using the camera and et voilà- out will pop the photo that you took and edited! From there, it can be pulled off of the camera and either hung on the wall or placed on a surface.
My beautiful test subjects pictured in their photographs are Jane and Joe Newbie with their new born twins: Mark and Suzie.
16 notes
·
View notes