#skill bar plugin for WordPress
Explore tagged Tumblr posts
Visit Tumblr Blog
Explore Tumblr blogs with no restrictions, modern design and the best experience.
Last Seen Tumblr Blogs


Fun Fact
Tumblr has 411 employees.
Text
How Can SKT Skill Bar – SKT Skill Bar Plugin Enhance Your WordPress Site?
Introduction
If you’re looking to create a WordPress website that truly highlights your skills and achievements, the SKT Skill Bar Plugin is the perfect solution. It offers a clean, professional way to display your expertise, making your website more engaging and informative for visitors. Here’s why this plugin should be a part of your website.
Easy Integration into Your WordPress Site
The SKT Skill Bar Plugin makes it incredibly easy to integrate skill bars into your WordPress site. The plugin comes with a user-friendly interface that simplifies the installation process, even for those with little technical experience. With just a few steps, you can get your skill bars up and running on your site, improving the visual appeal and user experience in no time.
Customizable to Fit Your Brand
Customization is key when it comes to presenting your skills. The SKT Skill Bar Plugin allows you to modify the appearance of the skill bars to match your brand's colors and style. From the width of the bars to the font style, you can make the plugin fit seamlessly with your website’s design, ensuring it complements your branding.
Display Multiple Skills at Once
With the SKT Skill Bar Plugin, you can showcase a wide variety of skills all in one place. Whether you're a developer, designer, marketer, or professional in any field, you can easily display different skill sets on the same page. This makes it simple for potential clients or employers to understand the full scope of your abilities.
Interactive and Engaging Features
The interactive elements of the SKT Skill Bar Plugin make it more engaging for visitors. As they scroll through your page, the skill bars animate, providing an interactive experience that draws attention. This feature encourages visitors to explore your site further, increasing engagement and helping them understand your expertise more easily.
Clear and Concise Visual Representation
Visual representation of skills is often more effective than text alone. The SKT Skill Bar Plugin makes it easy to visually communicate your proficiency in various areas. This approach is not only aesthetically pleasing but also effective in conveying information in a clear and concise manner.
Enhance Your Professional Reputation
When you display your skills in a polished and professional manner, you enhance your reputation as an expert in your field. The SKT Skill Bar Plugin gives your website a professional look, allowing you to highlight your strengths and achievements in an appealing way. This helps you attract attention from potential clients, employers, or collaborators.
Fully Compatible with All Themes
No matter which WordPress theme you're using, the SKT Skill Bar Plugin will integrate perfectly. It’s built to be compatible with all WordPress themes, so you don’t have to worry about it causing conflicts with your site's design or functionality.
SEO-Friendly Features
In addition to improving your site’s appearance, the SKT Skill Bar Plugin is designed with SEO in mind. It will not slow down your website or interfere with your SEO efforts. The plugin is lightweight and optimized for performance, ensuring that your site remains fast and ranks well on search engines.
Conclusion
The SKT Skill Bar Plugin is an excellent tool for anyone who wants to showcase their skills in a visually appealing and interactive way. With its ease of use, customization options, and SEO-friendly features, this plugin is the perfect addition to your WordPress site.
#skill bar plugin for WordPress#animated skill bar WordPress plugin#WordPress progress bar plugin#WordPress skills showcase plugin#skill chart WordPress plugin#WordPress plugin for skill levels#HTML5 skill bar plugin#visual progress bar WordPress#responsive skill bar plugin#WordPress animation bar plugin#graphical skills display plugin#WordPress custom skill bars#free skill bar plugin for WordPress#skill meter WordPress plugin#team skills WordPress widget#progress indicator plugin WordPress#WordPress frontend skill bar#professional skill bar display#plugin to show skills in WordPress#developer skill bar WordPress plugin
0 notes
Text

Introduction to Jetpack AI In the rapidly evolving world of blogging, leveraging technology is key to creating compelling content. One such technology is Jetpack AI, a powerful tool designed to enhance the functionality of WordPress blogs. Jetpack AI uses artificial intelligence to automate various processes, making the blogging experience more efficient and user-friendly. By integrating seamlessly with WordPress, it allows bloggers to focus on crafting their narratives while optimizing other aspects of their content. The relevance of Jetpack AI in the blogging sphere cannot be overstated. It provides a suite of features that cater to various needs, from site performance to security and analytics. However, one of its standout functionalities is the provision of stunning visuals. In an age where attention spans are fleeting, high-quality images and graphics play a crucial role in capturing readers' attention and enhancing engagement. Jetpack AI is designed to address this need by simplifying the process of image selection and integration, helping users create visually appealing blogs without extensive graphic design skills. Moreover, the importance of visuals in blogging extends beyond aesthetic appeal. Research indicates that articles with relevant images receive 94% more views compared to those without. Thus, utilizing Jetpack AI's capabilities allows bloggers to not only craft better blog posts but also to enhance their overall content strategy effectively. In the larger landscape of content creation, Jetpack AI serves as a valuable ally, aiding bloggers in improving their workflow and elevating their content to meet the expectations of a visually-driven audience. The Importance of Visuals in Blogging In the digital age, captivating visuals have emerged as a fundamental component of successful blogs. Research indicates that articles that include relevant images receive 94% more views than those without. This statistic underscores the undeniable significance of integrating visuals into blog content. High-quality images not only draw readers in but also enhance their overall experience, making information more digestible and engaging. The human brain processes visuals approximately 60,000 times faster than text, which further emphasizes the need for effective visual elements in blogs. Moreover, visuals play a crucial role in user engagement. Blogs that are aesthetically appealing, with well-placed images, tend to capture and maintain the attention of readers longer. According to studies, blog posts loaded with compelling visuals can increase engagement rates by up to 80%. This can ultimately lead to enhanced readership and an increase in social shares. Therefore, the selective use of high-quality images can directly impact the performance of blogs, holding the potential to elevate a writer’s reach and effectiveness. Another important aspect to consider is the role of visuals in comprehension. Integrating images, infographics, and other graphical elements allows for a more integrated learning experience. Research has shown that text paired with relevant visuals improves understanding and retention rates, making the content not only easier to process but also more memorable. For writers utilizing platforms like Jetpack AI, the ability to generate stunning visuals can significantly enrich the content and foster better connections with the audience. The combination of informative text and engaging images works harmoniously to communicate ideas effectively, thereby enhancing the overall impact of blogs. Getting Started with Jetpack AI To enhance your blog with Jetpack AI, the first step is to install the Jetpack plugin. Jetpack is a powerful suite of tools that can boost your blog’s performance through various features, including AI-driven visual content generation. Begin by navigating to the WordPress dashboard of your blog. From the left-hand menu, select "Plugins" and then "Add New." In the search bar, type "Jetpack by WordPress.com" and click "Install Now." Once the installation is complete, click on "Activate" to integrate it into your blog. After activation, you will need to connect Jetpack to your WordPress.com account. If you do not have one, you will be prompted to create it. This connection allows Jetpack to provide a seamless experience, especially regarding its AI features. Once linked, you will be directed to the Jetpack dashboard, where you can manage various settings. Among these settings, you will find the options for activating AI capabilities. To enable the AI features, go to the Jetpack dashboard, select the "Settings" tab, and navigate to the "Performance" section. Here, you can find the toggle to activate “AI-enhanced images.” This feature is essential for generating stunning visuals that complement your blog posts. Once enabled, Jetpack AI can automatically create and suggest images based on the content you create. Exploring the Jetpack dashboard further will reveal various tools and settings available for optimizing your blog. You will find a dedicated section for image generation, where you can customize parameters to align with your blog's aesthetic and theme. We recommend referring to documentation or help resources provided by Jetpack for comprehensive guidance on maximizing the benefits of these AI functionalities. This initial setup establishes a solid foundation for enhancing your blog with transformative visuals that engage your audience. Generating Images with Jetpack AI One of the most exciting features of Jetpack AI is its ability to generate stunning images tailored specifically for your blog content. This function not only enhances the visual appeal of your posts but also allows for complete customization based on the themes and topics you are addressing. To begin, users need to input descriptive prompts or relevant keywords that will serve as the foundation for the generated images. The more specific and detailed the prompt, the more accurately Jetpack AI can create visuals that align with your vision. When crafting prompts, clarity and detail are paramount. Consider including adjectives that denote style, color, and context, as well as any pertinent subjects or objects you want featured. For example, rather than simply stating "landscape," you could specify "a serene sunset over rolling hills featuring vibrant flowers in the foreground." This specificity guides the AI to produce a more tailored output. Furthermore, experimenting with synonyms or variations of your keywords can yield different artistic interpretations, allowing for a diverse array of images for each blog post. Jetpack AI accommodates various styles and formats, from realistic images to abstract art. This versatility provides bloggers with a broad spectrum of options, ensuring that the visuals complement the tone and message of their writing. Whether it's a professional, promotional, or casual blog, adapting the image style to suit the audience is essential. Moreover, incorporating infographics or icons generated through Jetpack can further enrich your blog's presentation. As you explore the capabilities of Jetpack AI in generating images, you'll find it an invaluable tool for enhancing your blogs with visually appealing and tailored content. Customizing AI-Generated Images In the realm of blogging, visuals play a critical role in engaging an audience and enhancing the overall appeal of the content. With the advent of AI technologies like Jetpack AI, bloggers now have access to sophisticated tools for generating stunning images that can elevate their blogs. However, simply generating images is not enough; customizing these visuals is essential to ensure they resonate with the blog's branding and messaging. Jetpack AI offers various editing features that empower bloggers to modify AI-generated images according to their needs. Users can start by adjusting colors to align with the blog's color palette, ensuring a cohesive visual narrative. Filters can also be applied to create a desired mood or atmosphere, whether it be vibrant and energetic or calm and subdued. Moreover, the layout of images can be tailored to integrate seamlessly with the overall design of the blog, allowing for a harmonious presentation of the content. When selecting images, it is important to consider how well they complement the tone and message of the blog. For instance, a lifestyle blog may benefit from bright, uplifting visuals, while a technical blog could require more structured and detailed imagery. By leveraging the customization options in Jetpack AI, bloggers can select and refine images that not only match their distinct style but also enhance their content's effectiveness in capturing audience interest. In conclusion, the customization capabilities of Jetpack AI transform AI-generated images into tailored assets that significantly enhance the blogging experience. By incorporating personalized adjustments and thoughtful selection, bloggers can create visually compelling narratives that resonate with their target audience, ultimately fostering a deeper connection with their readers. SEO Considerations for AI-Generated Images When incorporating AI-generated images into your blogs, understanding the SEO implications is crucial for maximizing visibility and engagement. Well-optimized images not only enhance the appeal of your content but also influence its discoverability on search engines. To begin with, the naming of image files plays a vital role in SEO. Instead of default filenames like 'IMG123.jpg', utilize descriptive and keyword-rich names such as 'beautiful-landscape-sunset.jpg'. This approach facilitates search engines to comprehend the content of your images more effectively. Additionally, adding appropriate alt text is essential. Alt text serves as a textual alternative for images, which is paramount for accessibility and SEO. It should concisely describe the image while ideally incorporating relevant keywords. For instance, if the image depicts an AI-generated landscape, your alt text might read “AI-generated landscape featuring a vibrant sunset over mountains”. This not only benefits SEO but also improves the user experience for visually impaired visitors who rely on screen readers. Furthermore, consider the impact of image sizes on page loading times, as this is a fundamental aspect of both SEO and user experience. Large image files can significantly slow down your blog, leading to higher bounce rates. It is advisable to compress images without sacrificing visual quality. Plugins such as Jetpack can assist in optimizing images automatically, ensuring they are adequately sized for web use. Ultimately, employing best practices in managing AI-generated images—through appropriate naming, alt text, and size optimization—will contribute to a more SEO-friendly blog. By focusing on these elements, you can enhance your content’s discoverability as well as its overall aesthetic appeal, driving more traffic and engagement to your website. Case Studies: Successful Blogs Using Jetpack AI Numerous blogs have nested the power of Jetpack AI into their content creation strategies, driving significant engagement and reaching broader audiences. One notable example is the travel blog, "Wanderlust Chronicles." By utilizing Jetpack AI for generating vibrant images that perfectly captured the essence of various destinations, the blog experienced a remarkable 50% increase in visitor engagement. The stunning visuals not only enchanted the existing audience but also attracted new visitors through social media shares and improved search rankings. Another compelling case is the culinary blog "Savory Bites." This platform leveraged Jetpack AI to create mouth-watering food images that accompanied their recipes. The blog focused on a seamless integration of imagery and text, enhancing the overall reading experience. The results were impressive: a 35% rise in recipe shares and a significant drop in bounce rates, indicating that readers were more likely to stay and explore the content. The crisp, visually appealing images generated by Jetpack AI played a crucial role in enticing more viewers to engage with the blog’s offerings. In the lifestyle domain, "Urban Trends" utilized Jetpack AI to produce high-quality images that resonated with their fashion-conscious audience. By emphasizing unique styles and settings, this blog saw an 80% increase in social media activities. The strategy involved a combination of seasonal visuals and trends; this targeted approach showcased how effective AI-generated content can align with user interests. As blogs like "Urban Trends" demonstrate, harnessing the capabilities of Jetpack AI for image generation can redefine a blog's visual storytelling and elevate audience engagement significantly. Common Challenges and Solutions While Jetpack AI offers a plethora of benefits for bloggers seeking to enhance their content with stunning visuals, users may encounter several challenges during the image generation process. Addressing these potential hurdles is essential for optimizing the blogging experience and ensuring the effective use of AI technology. One common concern is generating irrelevant images that do not align with the blog's context or themes. This may occur due to vague prompts or lack of specificity in the input provided to Jetpack AI. To mitigate this, it is recommended to provide detailed and well-defined descriptions when requesting images. Incorporating key themes and adjectives associated with the blog topic will guide the AI in producing relevant imagery, ensuring that it complements the textual content effectively. Copyright issues can also arise when using generated images. Although Jetpack AI aims to create unique visuals, some may inadvertently mirror existing copyrighted material. To circumvent potential legal issues, bloggers should either opt for image generation options that guarantee ownership or utilize images solely for personal use. Additionally, a thorough search for copyrighted images should be conducted if intending to use AI-generated visuals in monetized blogs. Keeping abreast of copyright laws is crucial for avoiding disputes. Technical issues may present another challenge, such as slow processing times or error messages. These can be frustrating, especially when a blogger relies on Jetpack AI to meet deadlines. Regular updates of both the blogging platform and Jetpack plugin can often resolve such problems. Furthermore, ensuring a stable internet connection and revisiting caching settings may improve overall performance. By anticipating these challenges and implementing practical solutions, bloggers can effectively harness the capabilities of Jetpack AI, allowing them to focus on creating engaging content while generating compelling visuals that enhance their blogs. Conclusion and Future Trends In today's fast-evolving digital landscape, the integration of Jetpack AI into blogging practices represents a significant leap forward in content creation. By harnessing the power of AI, bloggers can generate stunning visuals that not only enhance the aesthetic appeal of their blogs but also engage readers more effectively. The use of Jetpack AI simplifies the creative process, allowing users to focus on crafting compelling narratives while the technology takes care of the visual aspects. Key takeaways from utilizing Jetpack AI include its ability to automatically generate images tailored to the content of the blog, thus saving time and reducing the barriers associated with visual content creation. This feature, once leveraged, enables bloggers to compete more effectively in a crowded marketplace, capturing the attention of their audience through appealing imagery. Additionally, the seamless integration of Jetpack AI ensures that the visual elements align with overall brand identity, maintaining consistency across different posts. Looking forward, the future of AI applications in blogging promises even greater innovations. As algorithms become more sophisticated, we can expect enhanced features that not only focus on image generation but also on personalizing content to suit individual reader preferences. Such advancements could redefine the blogging experience, allowing for more interactive and customized engagements. AI-driven analytics tools may also play a crucial role in understanding audience behavior, thereby informing content strategies for improved engagement. As the blogging landscape continues to evolve, we encourage bloggers to experiment with Jetpack AI and its features to enhance their visual content significantly. Embracing these technological advancements can provide a competitive edge, allowing creators to deliver content that resonates with their audience and stands out in the digital space. The future of blogging is undoubtedly interwoven with AI, and leveraging tools like Jetpack AI is a step towards embracing this exciting evolution. Read the full article
0 notes
Text

Design Web: The Ultimate Guide to Creating a High-Quality Website
In today's digital world, having a strong online presence is essential for businesses, entrepreneurs, and individuals. A well-structured design web can make all the difference in attracting visitors, engaging users, and converting leads. Whether you are a beginner or an experienced developer, this guide will help you understand the fundamentals of designing a high-quality website that meets industry standards and enhances user experience.
Why Design Web Matters
A well-designed website is more than just aesthetics; it plays a crucial role in usability, functionality, and performance. Here are a few reasons why design web is important:
First Impressions Count – Your website is often the first interaction potential customers have with your brand. A clean and professional design creates a lasting impression.
User Experience (UX) Optimization – A properly structured design web enhances navigation, ensuring visitors find what they need quickly and efficiently.
SEO and Search Rankings – Search engines favor well-designed websites with fast loading speeds, responsive layouts, and optimized content.
Brand Credibility and Trust – A professional website design establishes trust with users and enhances your brand’s credibility.
Increased Conversions – An intuitive layout and compelling call-to-action (CTA) can improve conversion rates and generate leads.
Key Elements of an Effective Design Web
To create an effective website, it is essential to focus on several critical elements of design web:
1. Responsive Design
A mobile-friendly website ensures that users have a seamless experience across different devices, including desktops, tablets, and smartphones.
2. Fast Loading Speed
Page speed significantly impacts user experience and search engine rankings. Optimize images, use caching techniques, and choose a reliable hosting provider.
3. SEO-Friendly Structure
Incorporate SEO best practices such as meta tags, keyword optimization, and proper URL structuring to improve search rankings.
4. Intuitive Navigation
A well-structured navigation system helps users find information quickly. Implement clear menus, search bars, and logical content organization.
5. High-Quality Content
Engaging and informative content enhances user experience and improves search engine rankings. Use relevant keywords, including design web, strategically throughout the content.
6. Call-to-Action (CTA)
Encourage users to take action, whether it's signing up for a newsletter, making a purchase, or contacting you for services.
7. Security and Performance Optimization
Ensure your website is secure by using SSL certificates, regular updates, and security plugins. Optimizing performance improves user retention and satisfaction.
Best Practices for Design Web
Follow these best practices to ensure your design web stands out:
Use a Clean and Simple Layout – Avoid clutter and focus on a minimalistic, user-friendly design.
Choose the Right Color Scheme – Select colors that align with your brand and enhance readability.
Optimize Images and Media – Reduce file sizes without compromising quality to improve loading speed.
Ensure Accessibility Compliance – Make your website accessible to all users, including those with disabilities.
Regularly Update Content – Keep your content fresh and relevant to maintain engagement and SEO rankings.
Where to Get Professional Design Web Services
If you need a professional design web service, here are some great options:
Freelance Platforms – Hire skilled designers on Fiverr, Upwork, or Freelancer.
Web Design Agencies – Work with a reputable agency for a tailored and high-quality website.
DIY Website Builders – Use platforms like WordPress, Wix, or Shopify for an easy-to-create website.
Custom Development – For a fully customized solution, consider hiring a web development team.
Conclusion
Creating a high-quality design web is essential for establishing a strong online presence, improving user experience, and enhancing brand credibility. By implementing best practices, optimizing SEO, and focusing on usability, you can build a website that stands out in the competitive digital landscape. If you are looking for services related to design web then “Kingdom Design Solutions” is reliable for you in this regard.
Are you ready to elevate your online presence with a professional design web? Start today and create a website that drives traffic, engages users, and achieves your business goals!
Author:
(Richard Jack)
Richard Jack is an expert in digital marketing having 7+ years of experience in the relevant field.
#DesignWeb#WebDesign#SEO#WebsiteDevelopment#UserExperience#DigitalMarketing#Branding#ResponsiveDesign#Ecommerce#WebDevelopment#CreativeDesign#OnlineBusiness#MarketingStrategies#UXUI#SmallBusinessMarketing
0 notes
Text
Adding an FAQ Plugin to Your WordPress Site

Including an FAQ section on your WordPress site can significantly improve user experience by answering common questions directly on your site. Using an FAQ plugin makes this setup easy and customizable. For those interested in exploring their options, the Best FAQ Plugin for WordPress is a reliable choice to get started with.
Benefits of Using an FAQ Plugin
Adding an FAQ section not only helps your visitors find answers quickly but also enhances SEO. FAQ plugins often utilize structured data, which search engines recognize, potentially increasing your site's visibility with rich snippets. Plus, FAQ plugins are straightforward to set up, eliminating the need for coding skills.
Step-by-Step Instructions for Adding an FAQ Plugin in WordPress
Here’s a quick and easy guide to installing and configuring an FAQ plugin for your WordPress site:
Step 1: Choose an FAQ Plugin That Fits Your Needs
Start by selecting the FAQ plugin that’s right for your site. Some popular options include Ultimate FAQ, Accordion FAQ, and Arconix FAQ. Each offers different features like accordion-style layouts, drag-and-drop options, and customization, so pick one that suits your preferences.
Step 2: Install and Activate the Plugin
To add the plugin to your site:
Log into your WordPress dashboard.
Go to Plugins > Add New.
Search for the plugin by name (e.g., “Ultimate FAQ”) in the search bar.
Click Install Now, then Activate to enable it on your site.
Step 3: Configure Your FAQ Plugin
Once activated, you’ll find a new FAQ section in your dashboard where you can adjust your settings:
General Settings: Set up layout preferences, colors, and font styles to match your website’s branding.
Display Options: Choose between accordion or list views for better organization.
Customization Options: Some plugins allow you to add custom CSS, enabling more control over the FAQ design.
Step 4: Add Your FAQ Entries
With the plugin configured, start adding FAQ content:
In the FAQ plugin’s menu, select Add New FAQ.
Enter each question in the title field and type the answer in the content area.
Use tags or categories to organize questions for easier visitor navigation if your plugin offers this feature.
Most plugins provide a shortcode, which makes it easy to place FAQs on any page or post.
Step 5: Display Your FAQ Section on a Page
To add your FAQ section:
Copy the shortcode generated by the plugin.
Navigate to the page where you’d like to display the FAQs.
Paste the shortcode in the editor, then publish or update the page.
Optimizing Your FAQs for SEO Benefits
To get the most SEO benefit from your FAQ section:
Leverage Structured Data: Many FAQ plugins add structured data to improve search engine visibility.
Use Relevant Keywords: Incorporate keywords naturally in both questions and answers.
Keep Content Clear and Concise: Use simple language and clear answers to make content more accessible.
Conclusion
Adding an FAQ plugin to your WordPress site is a straightforward process that enhances both usability and SEO. By selecting a well-designed plugin, like the Best FAQ Plugin for WordPress, and following these setup steps, you can create an organized, user-friendly FAQ section that benefits both your visitors and search engine rankings.
0 notes
Text
How to Optimize Your Music Portfolio for Search Engines
In today’s music industry, having an online presence is essential for any artist. It’s no longer just about creating great music — musicians also need a platform where they can showcase their work, connect with fans, and be discovered by industry professionals. This is where a well-crafted music portfolio website comes into play.
Building a music portfolio may sound daunting, but with the right steps and tools, it can be an enjoyable and rewarding process. This guide will walk you through everything you need to know to create a stunning music portfolio that represents your artistic identity and helps you get noticed.
1. Define Your Purpose and Audience
Before you even begin creating your website, take a moment to define the purpose of your portfolio. Is it to attract record labels, get booked for live shows, or simply showcase your music for fans? Knowing your purpose will help shape your website’s content, design, and structure.
Your audience also plays a big role in the creation of your portfolio. If your target audience is casual listeners and fans, your website will need to focus on easy music access, videos, and engaging visuals. If you’re targeting industry professionals, include detailed information such as a bio, press kit, and discography.
Key tip: Always keep the end goal in mind, and make sure your content reflects that. Aligning your website with your objectives will ensure the right people are attracted to it.
2. Choose a Website Builder and Domain Name
Once you’ve defined your purpose, it’s time to choose a website builder. Several platforms make it easy to create a music portfolio without needing advanced coding skills. Some of the most popular options include:
Bandzoogle: A website builder specifically designed for musicians, offering templates, music players, and e-commerce options.
WordPress: A highly customizable platform that allows musicians to create a professional website using a variety of themes and plugins.
Wix: Known for its drag-and-drop editor, Wix is beginner-friendly and offers a variety of templates for creatives.
Squarespace: Offers sleek, minimalist designs and is great for artists who want a visually appealing website.
Choosing a domain name is equally important. Your domain should ideally be your artist name or band name to maintain consistency across all your online platforms. It should be easy to remember and spell, as this is how people will find you.
Key tip: If your desired domain name is already taken, try adding a word like “music” or “official” to your name.
3. Design Your Site with the User in Mind
Your website design should reflect your musical style and brand while providing a seamless user experience. While creative design is important, you don’t want to overwhelm visitors with a cluttered interface. Keep it clean, easy to navigate, and visually appealing.
Here are some design tips for your music portfolio:
Homepage layout: Your homepage is your first impression. Make sure it includes a prominent photo, your name or band name, and a brief introduction or artist bio. Include a “Listen Now” button that directs visitors to your best tracks.
Easy navigation: Create a menu bar that is easy to understand. Typical sections include “Home,” “Music,” “Videos,” “About,” “Tour,” and “Contact.”
Use high-quality images: Visuals play a huge role in branding. Make sure you use high-resolution images for album artwork, performance photos, and promo shots.
Incorporate your logo: If you have a band logo, use it to create a sense of consistency across your website, social media, and other promotional materials.
Key tip: Less is more. Visitors should find what they are looking for within seconds, whether it’s your music, tour dates, or contact info.
4. Showcase Your Music and Videos
The heart of any music portfolio is, of course, the music itself. Make sure your tracks are easy to find and listen to. You can integrate a streaming player directly into your website from platforms like SoundCloud, Spotify, or Bandcamp. This allows users to play your music without having to leave your site.
Additionally, embedding music videos or live performance footage can be a powerful way to engage visitors. People love to see musicians in action, so include videos of live shows, studio sessions, or even behind-the-scenes content.
Key tip: Always showcase your best work first. Put your strongest and most popular songs at the top of your music section.
5. Create a Press Kit for Industry Professionals
If you’re hoping to get the attention of music labels, agents, or promoters, a professional press kit is a must-have. A press kit is essentially a resume for musicians and should include the following:
Artist bio: A short, engaging bio that tells your story.
Music samples: Include your best tracks and any recent releases.
Press and media coverage: If you’ve been featured in blogs, magazines, or interviews, include links or excerpts.
Photos: Include high-resolution press photos that media outlets can use.
Contact information: Make it easy for industry professionals to get in touch with you.
You can either dedicate a separate section for your press kit or make it downloadable as a PDF file.
Key tip: Keep your press kit updated with the latest information and photos.
6. Include a Blog or News Section
Adding a blog or news section to your portfolio can give fans insight into your journey and personality. You can post updates about upcoming releases, tour dates, behind-the-scenes stories, or even your thoughts on current music trends. This not only keeps your site active and engaging but also helps with search engine optimization (SEO), making it easier for people to find you online.
7. Optimize Your Website for Mobile
In today’s mobile-driven world, a significant portion of your visitors will access your site from their phones. Make sure your portfolio is mobile-friendly by choosing a responsive design that adjusts to different screen sizes. Test your website on various devices to ensure that the navigation, music player, and visuals all look great on mobile.
Key tip: Most website builders automatically provide mobile-optimized designs, but always double-check to ensure everything functions properly.
Conclusion: Your Portfolio Is Your Digital Business Card
Your music portfolio is an essential tool in your professional music career. Whether you’re just starting out or are an established artist, having a well-crafted online presence will help you stand out from the crowd. By following these steps and putting thought into your website’s design, content, and functionality, you can create a stunning portfolio that showcases your talent and helps you achieve your goals.
0 notes
Text
Unlock Your Digital Marketing Potential: Enroll in Scope Computer’ Advanced Course

To accelerate your career in the ever-evolving digital marketing world, it is very much required to always stay around the latest market trends and technologies which are significantly transforming the ways of marketing. From new graduates to seasoned marketing professionals or even entrepreneurs who are looking to grow their business, becoming a digital ninja can have a massive impact. Advanced Digital Marketing Course by Scope Computer Scope Computer
Course Overview
Duration: 3 Months
The Advanced Digital Marketing Course will span over 3 months, covering 32 different modules.
You will learn:
WordPress for Web Design :Create beautiful designs, perfect plugins and also quickly get the visitor — spot embrace
SEO (Search Engine Optimization): How to improve your website's
visibility on search engines.
Social Media Marketing — Social Media Marketing is the way through which you can take the power of all those social media platforms to interact and comprehensive audience. Fix+"& Coffee Fix_attributes Fix Fashion Fix_parents Fix Sandwhich Non Fix pubs Fix Fashion Coffee Fashion Beach Bars pubs Restaurants Marketing Pub Restaurants Seo Google ads Restaurants Google Marketing Wine Full Addressadge Service Keywords Addressge
How to get back into the SERPS Best practices for onsite technical SEO What is local SEO and how to implement it Google Ads || PPC (Pay-Per-Click): Learn to create effective ads that deliver results.
YouTube Marketing: How to create a successful YouTube Channel and get more views.
Ecommerce Marketing Optimize Your Online Store for Maximum Sales and Customer Satisfaction.
Blogging — Use appealing, powerful blog content that appeals to readers and reinforces your brand.
Google Analytics — A view for the performance and user behavior of your website.
Google Web Master: Get to grip with the technical elements of administering and enhancing your website.
And much more!
GRAB YOUR JOB IN DIGITAL MARKETING
Hands-On Learning
15-Day Internship Projects
15 Days of Internship to evaluate the practical understanding.
projects where you get to work like a professional in the field and implement whatever you have learnt so far in real life scenarios.
10 International Course Certificates
After the completion of the course, you will be getting 10 internationally recognized certificates which will help you to proof your mastery in different areas of digital marketing.
Assignments and Case Studies
The digital marketing course contains multiple assignments and case studies which helps you to enhance your analytical and problem solving skills, the assignments and case studies are designed as per the real life marketing scenarios hence, working on them will prepare you for the worst.
Live Session Recordings and Doubt Classes
Miss no lectures ever, as you get access to all the live session recordings. Also, we conduct special doubt classes where you can ask the faculty any doubt that you have in any subject, this helps to cement the concepts in your mind.
HR Workshop and Portfolio Designing
Our HR workshop and portfolio designing session prepares you to face the interview rounds for jobs and also you will be creating your own professional portfolio which hiring companies look for in the candidates.
Capstone Live Projects
You will be working on capstone live projects which will test your knowledge and skills acquired so far. These projects are added to your portfolio as a testament that you are capable of handling end-to-end digital marketing campaigns for a company.
100% Placement Support & Assurance
Perhaps, the most loved feature of our Advanced Digital Marketing Course, we provide 100% placement support and assurance. We have a separate career development team who work with you and help you to get placed in a top company so that you can get the return on your investment.
Flexible Batches
We have two types of batches as per your convenience:
Weekdays: Monday to Thursday, 8th April 2024 onwards, 1.5 hour sessions.
Weekends: Saturday and Sunday, 6th April 2024 onwards, 2 hour sessions.
Special Offer
You can now register with us and avail the offer fee of 20,000 INR. This offer is valid till 5th April 2024. So hurry up guys this is for a limited period offer. Now anyone can learn high-quality education with us.
Conclusion
As we all know that in digital marketing everything is going fast. So to keep up with the pace Scope Computer is offering Advanced Digital Marketing Course for the comprehensive curriculum, on-hand experience, and the guaranteed placement support to boost your career. So don’t miss this golden chance to add skills and achieve your desired goals.
To know more and to register your seat www.itsscope.com
B-7 Sector 2 Noida
+91-7011845553
TO ENROLL IN DIGITAL MARKETING
#digital marketing#digital marketing india#digital marketing top#digital marketing website#digital marketing example#digital marketing services#digital marketing course#digital marketing meaning
1 note
·
View note
Text
Becoming a WordPress Developer: Essential Skills and Tools

With its widespread popularity and extensive adoption, WordPress has become a cornerstone of web development, powering millions of websites worldwide. Becoming a proficient WordPress developer opens up a world of opportunities to build dynamic, feature-rich websites and contribute to the thriving WordPress ecosystem. In this guide, we'll explore the essential skills and tools you need to embark on your journey to becoming a WordPress developer.
1. Understanding Core Web Technologies:
To become a WordPress developer, it's essential to have a solid understanding of core web development technologies:
HTML: Learn the structure and markup language used to create web pages.
CSS: Master cascading style sheets for styling and layout of web pages.
JavaScript: Gain proficiency in client-side scripting for interactive web elements.
PHP: Understand server-side scripting language used by WordPress for dynamic content generation.
MySQL: Learn database management and querying language used to store WordPress data.
2. Familiarity with WordPress Architecture:
Understanding the architecture of WordPress is crucial for effective development:
Template Hierarchy: Learn how WordPress determines which template files to use for displaying different types of content.
Action and Filter Hooks: Understand how to hook into WordPress core functionality to modify or extend its behavior.
Database Structure: Familiarize yourself with the database tables and relationships used by WordPress to store data.
3. Proficiency in Theme and Plugin Development:
Theme and plugin development are essential skills for customizing and extending WordPress:
Theme Development: Learn how to create custom WordPress themes from scratch or modify existing themes to meet specific design requirements.
Plugin Development: Master the development of custom WordPress plugins to add new features, functionality, or integrations to WordPress websites.
4. Version Control Systems:
Proficiency in version control systems such as Git is essential for managing code:
Git Basics: Learn the basics of Git version control, including creating repositories, branching, committing changes, and merging code.
5. Local Development Environment:
Setting up a local development environment allows you to build and test WordPress websites locally before deploying them to a live server:
Local Development Tools: Choose a local development tool such as XAMPP, MAMP, or Docker to create a local server environment for WordPress development.
Code Editors: Use code editors like Visual Studio Code, Sublime Text, or PhpStorm for writing and editing WordPress code.
6. Debugging and Testing:
Debugging and testing are essential for identifying and fixing issues in WordPress code:
Debugging Tools: Familiarize yourself with WordPress debugging tools such as WP_DEBUG, Query Monitor, and Debug Bar for troubleshooting PHP errors and database queries.
Testing: Learn how to test WordPress websites for compatibility, performance, and security using tools like PHPUnit, Codeception, and browser developer tools.
7. Continuous Learning and Community Engagement:
The WordPress community is vast and supportive, providing ample opportunities for learning and collaboration:
Online Resources: Explore online resources such as the WordPress Codex, developer handbook, and tutorials to deepen your understanding of WordPress development.
Community Involvement: Participate in WordPress forums, meetups, WordCamps, and online communities to network with other developers, share knowledge, and stay updated on the latest WordPress trends and best practices.
Conclusion:
Becoming a WordPress developer requires a combination of technical skills, domain knowledge, and practical experience. By mastering core web technologies, understanding WordPress architecture, gaining proficiency in theme and plugin development, and leveraging essential tools like version control systems and local development environments, you can kickstart your journey to becoming a skilled WordPress developer. Continuous learning, experimentation, and community engagement are key to honing your skills and advancing your career in WordPress development.
0 notes
Text
Best Elementor WordPress Plugins
In today's fast-paced digital landscape, creating a visually stunning and highly functional website is essential for businesses and individuals alike. WordPress has long been a popular platform for building websites, and the Elementor page builder plugin has gained tremendous popularity for its ease of use and versatility. To make the most of Elementor's potential, you need the right set of plugins that can enhance its capabilities. In this article, we'll explore the best Elementor WordPress plugins to take your website design to the next level.
Introduction
Elementor is a drag-and-drop page builder that has revolutionized website design for WordPress users. However, to unlock its full potential, you need to complement it with the right plugins. In this article, we'll explore the best Elementor WordPress plugins across various categories to help you build a website that is not only visually appealing but also highly functional.
Get Any Elementor WordPress Plugins for Free
Essential Elementor Plugins
Elementor Pro
Elementor Pro is the premium version of Elementor and a must-have for serious web designers. It offers advanced features like theme builder, popup builder, and dynamic content capabilities. With Elementor Pro, you can design your entire website, including headers and footers, without any coding skills.
Essential Addons for Elementor
Essential Addons for Elementor is a collection of 80+ elements and extensions that supercharge your Elementor page building experience. It includes widgets like post
grids, pricing tables, and interactive banners, making it a versatile addition to your toolkit.
Happy Addons for Elementor
Happy Addons for Elementor is known for its unique features such as cross-domain copy-paste and live copy. It also provides creative widgets like timeline, skill bars, and data tables, making your website more engaging and interactive.
Design Enhancement Plugins
Ultimate Addons for Elementor
Ultimate Addons for Elementor comes with a range of design enhancements and content widgets that can take your website to the next level. It includes a dual-color headline, price list, and advanced heading widgets.
Dynamic Content for Elementor
Dynamic Content for Elementor allows you to create templates with dynamic content that automatically updates when you change the source content. It's a game-changer for creating post grids, archives, and more.
Performance Optimization Plugins
WP Rocket
WP Rocket is a premium caching plugin that can significantly boost your website's performance. It offers page caching, database optimization, and lazy loading, ensuring your site loads quickly and efficiently.
Smush Image Compression and Optimization
Smush is a top-notch image compression and optimization plugin that helps in reducing the size of images without compromising quality. Faster loading images can improve user experience and SEO rankings.
SEO-Focused Plugins
Rank Math SEO
Rank Math SEO is a comprehensive SEO plugin that offers features like advanced schema support, SEO analysis, and an easy-to-use interface. It's a powerful tool to improve your website's search engine rankings.
SEOPress
SEOPress is another SEO plugin that covers all the essential aspects of on-page SEO. It provides features like XML sitemaps, meta titles, and descriptions, ensuring your website is search engine friendly.
E-commerce Plugins
WooCommerce
WooCommerce is the go-to plugin for creating online stores. It seamlessly integrates with Elementor, allowing you to design product pages and manage your online shop with ease.
WooLentor - WooCommerce Elementor Addons
WooLentor enhances your WooCommerce store's capabilities by offering additional widgets and customization options. You can design unique product pages and category pages effortlessly.
Customization and Styling Plugins
Customify
Customify is a versatile customization plugin that allows you to tweak the appearance of your website. It offers advanced typography options, color settings, and layout controls.
AnyWhere Elementor
AnyWhere Elementor is perfect for creating global templates for headers, footers, and sidebars. It ensures a consistent look and feel across your website.
Analytics and Reporting Plugins
MonsterInsights
MonsterInsights is a user-friendly Google Analytics plugin that provides essential insights about your website's performance. You can track user behavior, monitor traffic, and make data-driven decisions.
Analytify
Analytify simplifies Google Analytics data by presenting it directly in your WordPress dashboard. It's an excellent choice for those who want an easy-to-understand overview of their website's performance.
Security Plugins
Wordfence Security
Wordfence Security is a robust security plugin that safeguards your website from malware, hacking attempts, and other security threats. It includes a firewall, login security, and malware scanning.
Sucuri Security
Sucuri Security is a cloud-based security solution that offers real-time security alerts, website monitoring, and a web application firewall. It's a proactive approach to website security.
Social Media Plugins
Social Snap
Social Snap is a comprehensive social sharing plugin that lets you add attractive social sharing buttons to your content. It includes features like click-to-tweet, social login, and social auto-posting.
Easy Social Share Buttons
Easy Social Share Buttons provides a wide range of options for social sharing, follow, and subscribe. It also offers social proof notifications and social media feeds.
Backup and Restore Plugins
UpdraftPlus
UpdraftPlus is a reliable backup and restore plugin that automates the process of safeguarding your website. It offers scheduled backups and easy restoration options.
BlogVault
BlogVault is a premium backup and security solution that also provides website staging and migration features. It's a comprehensive tool for website management.
Contact Form Plugins
WPForms
WPForms is a user-friendly contact form plugin that allows you to create custom forms for your website. It includes features like drag-and-drop builder, email notifications, and spam protection.
Happy Forms
Happy Forms is a free form builder that offers a straightforward way to create and manage forms.
Get Any Elementor WordPress Plugins for Free
1 note
·
View note
Text
Pickpack Progressbar - Progress Bar Addon For Elementor
Pickpack Progressbar – Progress Bar Addon For Elementor
[ad_1]
LIVE PREVIEWBUY FOR $13

Pickpack Progressbar – Progress Bar Addon For Elementor
Pickpack Progressbar is a Progress Bar addons for elementor page builder. You can make progress bar super fast and easy process.
FEATURES:
3 Progress Bar Style
10+ Progress Bar Style (You make using it)
Background & Color Changing Option
All Google Fonts
Fontawesome Icon
Easy to Customize
Support
CREDIT:
Elem…
View On WordPress
#add-ons#Addon#advance progressbar#Bar#elementor#elementor addon#elementor pack#elementor page builder#elementor plugin#Elementor Widgets#Pickpack#Progress#progressbar#progressbar layout#skills addon#wordpress
0 notes
Text
Is SKT Sushi the Ideal Free Asian Restaurant WordPress Theme for Your Food Business?
Creating a captivating online presence is crucial for any restaurant in today's digital-first world. For Asian cuisine restaurants, it is essential to have a website that reflects both the authenticity of the food and the vibrant atmosphere of the dining experience. Enter SKT Sushi — a free WordPress theme crafted specifically for Asian restaurants, sushi bars, and noodle houses. But is it the right fit for your food business? Let’s dive in and find out.
Visually Appealing Design That Showcases Flavor
The SKT Sushi theme is designed with elegance and simplicity in mind. It captures the aesthetic of Asian culinary culture with ample space for images, subtle color schemes, and an organized layout. Whether you serve sushi, ramen, or dim sum, your dishes will shine in beautiful galleries and sliders. The homepage can be customized to highlight daily specials, signature dishes, or featured chef recipes, helping you make a lasting first impression.
Customization Options for Branding
Brand identity is key for any successful restaurant, and SKT Sushi doesn’t fall short here. With support for the WordPress Customizer and compatibility with Elementor and other popular page builders, you can easily modify fonts, colors, layouts, and more. Even though it’s a free theme, it offers premium-level design flexibility.
This means you can reflect your restaurant's unique brand through personalized headers, color palettes that match your interior decor, and even logo placement. You don’t need coding skills to tailor this theme to your vision.
Mobile-Responsive and Retina-Ready
In the food industry, mobile responsiveness isn’t just a bonus — it’s a must. Diners often search for restaurants while on the go. SKT Sushi is fully mobile-friendly and retina-ready, ensuring your website looks stunning and functions seamlessly on any device, whether it's a smartphone, tablet, or desktop.
This responsive design also means your online menu will be easily accessible, helping potential customers make quick decisions when they're hungry and ready to place an order or make a reservation.
Built-In Sections for Menus, Testimonials, and More
One of the standout features of the SKT Sushi WordPress theme is its inclusion of ready-made sections. You can feature your menu items in categorized formats, add testimonials from satisfied customers, highlight your team, and even share your opening hours and reservation options.
These features help you build trust and encourage action from visitors. Customers can get a sense of your food quality, service style, and ambiance — all from one beautifully structured page.
SEO-Friendly and Lightweight
SKT Sushi is built with SEO best practices in mind. That means your restaurant website has a better chance of ranking on Google and attracting organic traffic from hungry diners looking for local Asian cuisine.
Moreover, the theme is lightweight and fast-loading, which boosts user experience and ensures visitors don’t leave your site due to slow page speeds. This combination of speed and optimization is a huge advantage, especially for local businesses trying to stand out.
Integration with Reservation and Contact Plugins
The theme supports a wide range of WordPress plugins, including contact forms and booking systems. You can easily integrate plugins like Contact Form 7 or WPForms to accept reservations online. This functionality is essential for streamlining the booking process and reducing no-shows.
Additionally, integration with map plugins allows users to quickly locate your restaurant, boosting foot traffic from new customers.
Perfect for Startups and Small Restaurants
If you are a small business owner or just launching your first restaurant, the SKT Sushi theme offers a budget-friendly yet professional option. You can create a polished, high-quality site without spending a dime, allowing you to allocate your resources to other areas like marketing, ingredients, or staffing.
Final Thoughts:
If your restaurant serves Asian cuisine and you want a clean, responsive, and easily customizable website, SKT Sushi is a strong contender. With its elegant design, mobile-friendly features, SEO optimization, and intuitive user experience, it ticks all the boxes for a free WordPress theme.
For startups or local eateries seeking an affordable way to make a powerful digital impression, SKT Sushi is more than just a theme — it's a recipe for online success.
#free Asian restaurant WordPress theme#Chinese restaurant WordPress theme#Japanese food WordPress template#Thai cuisine WordPress theme#free sushi bar WordPress template#Asian cuisine WordPress theme#Oriental restaurant WordPress theme#Pan Asian food WordPress theme#free noodle house WordPress template#Korean BBQ WordPress theme#Asian fusion restaurant theme#free Vietnamese food theme#Asian street food WordPress theme#Asian eatery WordPress template#traditional Asian restaurant theme#Asian food delivery WordPress theme#free Asian bistro template#Asian fine dining theme#Asian takeaway WordPress theme#free oriental menu WordPress theme
0 notes
Text
How to make a website in WordPress(Beginners Guide)

Building your own website can help you preserve your profit margin as a small business owner.
If you've got longer than money, the great news is that lately , it's relatively easy to create your own site from scratch.
Nowadays, there are many platforms to assist you build an internet site yourself, but WordPress is among the first website creation platforms and remains among the foremost well respected.
In fact, it claims that 38 percent of all websites live today are run thereon.
In this article, we’re getting to show you ways to create an internet site with WordPress.org.
First, though, be aware of the difference between WordPress.com and WordPress.org; on WordPress.com, WordPress itself will host your site, whereas, on WordPress.org, you choose your own host.
WordPress.org allows for better customization options, including plugin installation and liberal customization of web themes, numerous businesses prefer it.
Hear what we've to mention and choose if the world’s hottest content management system is true for you.
Before you begin to build your website with WordPress, you must know the purpose and objectives of your site.
Decide exactly what quiet site you would like to make , for instance , whether you plan to be an e-commerce platform with a blog attached or a media platform with a small store.
Knowing the identity of your brand and therefore the nature of your product will make designing an appropriate WordPress site much easier.
Consider how your customer will use your site, whether or not they will go to complete forms, register for events, browse classes, or purchase products.
This will help you determine what tools and plugins you’ll need to use or purchase while creating your site.
Also, believe why your customer would use your site and what solutions they’re trying to find .
This will assist you design a site that frictionlessly satisfies the stress of your audience , ultimately getting you a far better conversion rate when the location launches.
What is the purpose of making a website?
Firstly Identify your purpose of creating your website. Are you going to make a blogging website in which you post content or you are going to create an ecommerce store on WordPress or it is a one page website or Q n A website?
Ask this question first.
What is WordPress?
WordPress is one among the world's hottest Content Management Systems (CMS), with over 445 million WordPress websites currently online.
But why is it so popular? And how do you use it? We've unpacked everything you would like to understand to line up your WordPress website.
Features of WordPress:-
WordPress is open-source software.
It’s flexible.
You can customize your site fully.
You’re able to build any type of website.
It’s easy to find help and support.
Steps to create website in WordPress
Step 1: Choose good Domain name
What is Domain?
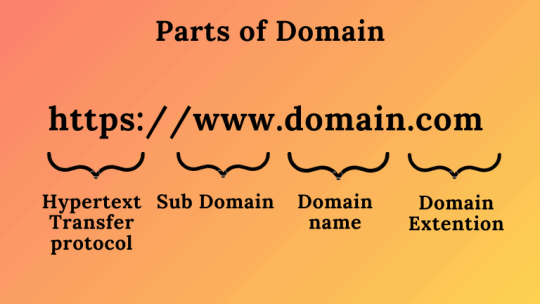
A domain name is the name of the website which user search.
Search and buy domains with WordPress. WordPress has its own name registrar which allows you to get your name while you build your WordPress site.
Alternatively, you'll purchase a website name from another provider then integrate it together with your WordPress site.
Make sure your domain name represents your brand or the ambitions of your site, and that the extension you choose is appropriate to the region you’re in.
WordPress and other name registrars assist you choose a website name which will be good for your SEO by ranking them.
I recommend beginners to go with Godaddy which is one of the best Domain registrar in the world. Most of the Domain name are registered in Godaddy.
If you are looking for Domain at a cheap price you can go with Namecheap.
Step 2: Choose a host for your website
Why do you need hosting services?
Hosting is important As you need some space on the web to store your website information like images, video and graphics and media files.Choosing a good host is not difficult.
WordPress recommends three web hosts from the hundreds available.
Web hosting services allocate your website space on the web so it's ready to deal with the stress of a billboard website, like large numbers of tourists , and remain online.
If your site is intended as a personal project that you share with few people, you should use WordPress.com, instead of WordPress.org, as it has free plans available which allow small numbers of tourists to access your site freely.
However, if you intend to build a site for commercial purposes, you’ll need to choose a web hosting service.
Over 100 web hosting services are compatible with WordPress, but WordPress advises that you simply use BlueHost, DreamHost, or SiteGround because it considers these services the simplest .
I personally use Godaddy hosting services to host my websites but I am switching my host to site ground because of its unique feature and fast loading time.
If you have some more money to invest you can go with Cloudways which is costly but it will increase your website speed dramatically.
Comment Below which hosting services are you going to use for the wordpress.
Step 3: Installing WordPress on server
Manually install WordPress or use an automatic installation service. Many WordPress hosts automate the method of putting in WordPress.
All you’ll need to do is log in to your WordPress instrument panel or web host and click on a button. The entire process takes five minutes maximum.
Alternatively, you'll manually install WordPress by downloading the package then creating a database for it on your web server.
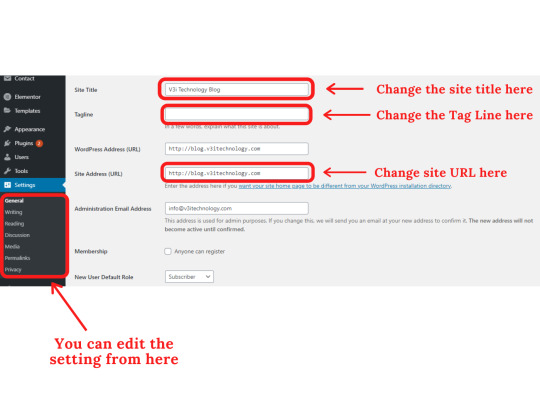
Step 4:General Setting in wordpress
Log into your wordpress account and then go to setting and then you can change the setting from there.
Step 5: Choosing a great theme.
WordPress has around 8,000 stylish themes to settle. WordPress sites are endlessly customizable. Themes allow novices to adapt elements like color or font with none technical skills.
However, if you would like to form deep design customizations, you’ll need CSS coding skills, or to rent a developer with these skills.
Because WordPress has an astonishing range of customizable themes in varied styles, though, you should be able to avoid this.
First, choose your WordPress theme. WordPress itself offers 8,000 themes designed with a spread of business and media niches in mind.
Some are free and others are paid. Navigate from your WordPress dashboard to Appearance, then Themes to browse.
When you’ve found the one you like, activate it.
If one of WordPress’s 8,000 themes doesn’t meet your requirements, you can find one on a third-party site, download it to your computer as a Zip file, and install it in the Themes tab by clicking Upload.
Then, activate your uploaded theme, as you'd one that's already integrated.
Choosing a good theme is important as it determines your website appearance and loading Time.
You can choose your theme based upon your business requirements like if you have to create a website you can go with genesis framework and if you want to start your own blog you can go with Generate press.
I am currently using Generate press premium theme on my website. It is super light and fully customizable. You can also use the Astra theme whose free version is quite good but does not provide better flexibility.
I recommend you to go with Generate press which is best for beginners and it is cheap when compared to other themes.
Step 6: Installing Essential plugins
Plugins enhance the capabilities of your site and protect it. Plugins are software additions that enhance the capabilities of your WordPress site. There is a wide variety available to meet the functional requirements of almost any business, including e-commerce inventory systems, SEO tools, and tools to enhance your site’s security.
List of Essential Plugins for WordPress
Site Kit by Google-For managing search console analytics and AdSense at one place
Anti Spam - Protect your website for spammers
Rank Math or Yoast SEO - For SEO Purpose
Short Pixel - compressing the size of image
contact Form 7 - Creating Contact form
For Customizing your website you need theme Editor Plugin like thrive Architect and Elementor to give your website a professional look.
I am currently using both of them but if you don't have money to invest you can go with any of them.Both are the best.
Thrive Architect- Best for customizing your Blog post and articles.
Elementor pro- Best for making Landing Pages.
Step 7: Create Content
Create content to offer your site authority . Content is what lends your site authority and is that the reason that sites rank on search engines.
First, add essential information content to your website, like the About Us, FAQ, and Contact Us pages, as well as legal information (Shipping/Returns, etc.).
From the WordPress dashboard, you'll easily navigate to the Pages tab and build content from there.
Once you've got your essential content, you'll create product pages or blogs. Installing a plugin that imparts SEO advice, like Yoast, as you create content will help your site rank better on search engines.
Step 8: Optimize your Website for user Experience.
Encourage a conversation by allowing comments. Once your site has the proper theme, domain, and plugins, you would like to make sure the purchasers or readers who visit your site enjoy the experience.
Decide what your audience is trying to find and optimize your site’s features to satisfy their requirements.
First, build a Menu bar which makes it easy for your website’s visitors to navigate exactly where they want to go.
Choose Appearance in the WordPress dashboard and click Menus to build or customize a menu bar.
Choose whether to enable or disable comments to encourage a conversation.
Head to Settings and then Discussion to decide whether you want comments enabled on all posts, or just on blogs.
Conclusion
Building a site with WordPress is slightly more complicated than it's with website building platforms like Wix or Weebly.
The extra effort pays off, because of the near infinite number of plugins available to enhance your site’s functional capabilities.
Do confirm you avoid these WordPress mistakes while building your site. Conduct a little research on WordPress for beginners before you start, so the process goes smoothly.
WordPress beats many of its competitors with its sheer variety of themes and plugins.
You can create any kind of site you want from your WordPress dashboard.
Despite of sites like Wix offering good customization options and a few ability to tinker with the CSS code, sites remain less and adaptive than those hosted on WordPress.
1 note
·
View note
Text
Best e-commerce WordPress themes of 2020
WordPress is far more than a simple platform for blogging enthusiasts. Many WordPress themes are devoted to e-commerce, meaning that if you want to monetize your skills and/or start a small business, you can set up a payment processing site with little or no coding knowledge. Grocery WordPress theme
Not all e-commerce platforms are created equal, though. Some may require advanced technical skills, or they might not display well on tablets and smartphones.
In this guide, we’ve rounded up five of the very best e-commerce WordPress themes. These all represent a good balance between value for money and useful features such as being able to display product slideshows.
Each of these themes also has a free demo, so feel free to test drive them before you buy.
Shopkeeper 1. Shopkeeper
Revolutionize your online shop with this easy to use and elegant theme
Highly customizable
WooCommerce compatible
Learning curve for new users
Shopkeeper is a user-friendly WordPress e-commerce platform. The homepage consists mainly of one large slider, designed to catch the eye of any potential clients. This is part of the Slider Revolution plugin which is included. Various optional plugins like "Shopkeeper Portfolio Addon" can also be installed.
The theme integrates completely with WooCommerce, and translation is supported with the WPML plugin. Shopkeeper is Retina-ready and fully responsive, making it perfect to view on both tablets and smartphones as well as your desktop computer.
The theme is easily customizable. Users do not need knowledge of complex codes in order to use it. There are a huge array of pre-built layouts to suit your needs, but failing this, users can create their own layout from scratch.
Users can also upload their own logo, change fonts and colors. Visual Slider and Revolution Slider plugins are included with the Shopkeeper theme; these cost around $26 (£19.5) each. Shopkeeper itself sells at $59 (£45.5) for a regular license. Users can upgrade to 12-months support for a further $17.63 (£13.6).
Some online commentators have noted that the huge amount of customizable settings contained within Shopkeeper can be overwhelming for newer users.Grocery WordPress theme
Bazar Shop 2. Bazar Shop
Customize your way to success with this great multi-purpose theme
Zoom effect
300+ shortcodes
Support is costly
Bazar Shop is a slightly more complex e-commerce platform. To be precise, it’s a multi-purpose theme which offers a variety of ways in which to build your website.
The theme is fully responsive making it perfect to view on platforms other than a desktop PC. Users can choose from several different sliders and there are no restrictions to the number of sliders you can have on your page. Grocery WordPress theme
There are two custom checkout pages to choose from. The ‘zoom’ effect is included in these so there is no need to bother with a third-party plugin. Users can also add multiple images of a product, similar to what you see on eBay and Amazon.
The homepage includes social media sharing, email subscription forms, featured products and contact information.
Bazar Shop has over 300 ready-to-use shortcodes, which are perfect for users who do not have any coding knowledge.
Users can utilize the option panel to change layouts, edit headers and footers, create a sitemap, change the colors, turn on responsive, and customize blog pages.
Bazar Shop costs $64 (£49) for a regular license and includes 6-months of support. Users can upgrade to 12-months support for a further $19.5 (£14.65).
Online commentators have noted that it is inconvenient to be forced to pay for support after the initial half-year period.Grocery WordPress theme
Divi 3. Divi
A simple to use multi-purpose theme
Frontend page builder
Point and click editing
No coding skills required
Divi is a multi-purpose theme featuring website options to cater for most users, plus it’s highly customizable. Grocery WordPress theme
The theme comes with WooCommerce functionality. The drag and drop feature allows users to include pricing tables, video sliders, tabs and videos. A rating module is also available.
Users can access a variety of pre-built layouts. These include creating a sales page, multiple blog layouts and a variety of portfolio types.
Divi is one of the few WordPress themes to include a frontend page builder tool with point and click editing. This gives users instant feedback on any editing that takes place.
Users can upload logos, choose a new color palette, decide how many posts are displayed on a page, set up social media integrations and more.
Newer users will find Divi particularly handy as you don’t need any coding skills or any former experience building websites. The user-friendly interface makes the whole process seamless. Furthermore, with various CSS transform options, users can offset the position of any page element with ease.
Divi allows you to use multiple rows, columns and content elements. All layouts are fully responsive.
The theme comes with an impressive array of content elements which include an audio player, bar counter, blog, number counter, shop, testimonial and contact form amongst others.
Divi can also be translated into more than 30 languages such as Chinese, Arabic, Czech, Russian and Spanish to name but a few.
Users can try a demo version of Divi for free, and there’s the option to purchase a one-year subscription to all of Elegant Themes’ products for $89 (£68) or $249(£187) for a Lifetime access.
Halena 4. Halena
A clean, simple design that should attract clients to your online store
Minimalistic design
Quick view mode
Large variety of templates
Halena is the perfect choice for users with a minimalist philosophy, as its design is clean and simple, meaning that any web page you build will load almost immediately.
Users can employ the custom-built product quick view mode to get a better view of their items, and the AJAX filtering tool makes inventory searches simple.
Halena comes with a large variety of pre-built layouts. These include options for product display, shopping cart, checkout and customer accounts.
The theme also includes WPBakery Page Builder, a drag and drop content editor. This can be used to customize templates as well as creating unique web pages. The Builder also come with its own selection of templates.
Halena costs $49 (£19.3) for a regular license which includes 6-months of support, future updates and quality checks. Users can extend support for a further 12-months for $13.88 (£10.8).
Artemis 5. Artemis
Ideal for those looking for an elegant and sophisticated shop-front
Excellent customer support
Includes Visual composer
Fully responsive
Artemis is aimed at those wanting a stylish and classy look for their website. It’s a multi-purpose WordPress WooCommerce theme which includes a variety of online shop demos. All the demos are laid out on the Artemis homepage, making it easier for users to find the right one for them.
Designs are easily imported onto your WordPress site. Artemis comes with Visual Composer included – a drag and drop page builder plugin which will save you time when building your site.
Slider Revolution is also part of Artemis. Users have a large variety of number options to choose from, and even novice users will have no trouble creating their perfect website.
1 note
·
View note
Text
Understanding the Admin Dashboard in WordPress: A Comprehensive Guide

Are you a WordPress enthusiast eager to delve into the heart of your website's operations? Look no further than the admin dashboard. Mastering Admin Search in WordPress Dashboard is an essential skill for any WordPress user, enabling you to navigate your website efficiently and effectively.
What is the Admin Dashboard in WordPress?
The admin dashboard serves as the nerve center of your WordPress website, offering a centralized hub for managing various aspects of your site's content, appearance, and functionality. Upon logging in, users are greeted with a customizable dashboard that provides at-a-glance information about site activity, including recent posts, comments, and updates.
Key Features of the Admin Dashboard:
Dashboard Widgets: The dashboard is equipped with a range of widgets that display real-time data and provide shortcuts to frequently accessed features. From quick draft creation to site stats and activity, these widgets offer valuable insights and shortcuts to streamline your workflow.
Navigation Menu: Positioned on the left-hand side of the screen, the navigation menu grants access to all major areas of your WordPress site, including posts, pages, media, plugins, themes, and settings. With intuitive categorization and nested submenus, finding the desired feature or setting is a breeze.
Customization Options: WordPress recognizes that every user has unique preferences and priorities. As such, the admin dashboard can be tailored to suit your individual needs. Users can rearrange dashboard widgets, customize the layout, and even add their own widgets to create a personalized workspace.
Quick Actions: Need to create a new post, moderate comments, or update your site's theme? The admin dashboard puts essential actions within reach with its quick access menus and buttons. Whether you're publishing content, managing users, or configuring settings, you can accomplish tasks swiftly and seamlessly.
Why Mastering Admin Search Matters:
While the admin dashboard offers an intuitive interface for managing your WordPress site, its true power lies in its search functionality. By mastering admin search, you can swiftly locate specific posts, pages, media files, or settings, saving time and frustration in the process.
Tips for Efficient Admin Search:
Use Descriptive Keywords: When searching for content or settings, be sure to use descriptive keywords that accurately reflect what you're seeking. Whether it's a post title, category name, or plugin function, precise keywords yield better search results.
Filter Results: WordPress offers advanced search filters to narrow down results based on various criteria, such as post type, date, author, or category. Utilize these filters to pinpoint exactly what you're looking for and eliminate clutter from your search results.
Learn Keyboard Shortcuts: Familiarize yourself with keyboard shortcuts for navigating the admin dashboard and performing common tasks. From accessing the search bar to switching between tabs and screens, keyboard shortcuts can significantly enhance your workflow efficiency.
Stay Organized: Maintain a well-structured content hierarchy and use clear naming conventions for posts, pages, categories, and tags. This not only improves searchability within the admin dashboard but also enhances the user experience for site visitors.
In conclusion, the admin dashboard is the control center of your WordPress website, empowering you to manage your site with ease and efficiency. By mastering admin search, you can unlock its full potential and streamline your workflow for maximum productivity. So dive in, explore its features, and take your WordPress experience to new heights!
Mastering Admin Search in WordPress Dashboard
0 notes
Link
Spy Fu
If you are looking for a tool to help you spy on your competitors then SpyFu is it. It not only lets you check up on the keywords others are ranking for, but it is also a great tool for checking in with how your own site is doing.
It will let you know all of the keywords you (or your competitor is ranking for) as well as the position you are ranked, and how much search volume that keyword is bringing you in each week. If you are planning to do some SEM paid ads then this is really useful as a way of checking what your competitors are paying for.
One of my favorite features of this SEO tool is that it lets you know the keywords you are almost on page 1 of google for and the keywords you have made page one for. You can then use all of this information to make improvements to your website.
SEMRush
Now I know so many professionals in SEO sware by SEMRush. But I personally hate it. I’ve had it forced on me by a few clients and I can see it’s valued, especially for big marketing agencies as it is a really powerful tool. But its also expensive, and I personally find it really difficult to navigate.
But there are some free tools you can take advantage of, plus they have a 7-day trial which you should 100% take advantage of!
KW Finder
If you need an ok tool that’s free to use then KW finder is a good place to start. It is very basic. And doesn’t really give off important things like search volume, or how difficult it is to rank for those keywords? But it is good to place to get some ideas that you might not have thought of from.
Ubersugest
This is Neil Patel’s tool and I’m really not a fan. I have used this in the past but more for ideas for SEM campaigns I’ve been writing for. For SEO it’s not all that great in my opinion as I’ve found that the information is pretty off.
The only thing I’d say it is good for is local SEO, it has a feature that will let you find local keywords that many other tools don’t have.
Answer The Public
This is one of my favorite tools for content marketing. It is basically a database of questions that people type into Google. What this is useful for is writing great content that solves people’s pain points and answers their questions.
Google Key Word Planner
Pretty much all of the SEO tools out there are going to be pulling their information from Google, so you can skip the middleman and go direct to google for your answers. The tool is more designed for people looking for keywords to use in their paid google ads campaigns. So to even be able to use this tool you will first need to set up a google ads account. Once you have set up the account then you can start searching.
It won’t give you as much data as other tools all you get from it is the keyword, the average monthly clicks, and if the competition is high, or low.
Google Trends
If you are in the content marketing game than Google trends should be on your favorites bar. This is the tool that will make sure your finger is firmly on the pulse of what is hot right now and trending on Google. Keeping an eye on this and being responsive by creating on Trent content is going to help you get ahead of your competitors.
Google Search Consult
A good friend and mentor taught me a trick on here that seriously changed my SEO game. I was able to increase my traffic exponentially just by monitoring the keywords that I’m getting a high number of impressions for but a low click-through rate. If that is the case then there is clearly something amiss in your Title and Meta Description. So give them an edit and make people want to click on your link above anyone else.
MOZ
I love MOZ and I like their pro account, it’s just a lot of money to spend if you only need it to keep an eye on your own SEO. And in all honesty, if you are going to spend this kind of money on an SEO tool, then I’d spend it on SEMRush.
Even without a pro account, there are a lot of great free features that you can make the most of. MOZ gives you 10 searches per month that you can use to do competitor research or check on your site, or your client’s site. I am very careful about how I use my 10. From these searches, you can find out about keywords, backlinks and a lot more. And they will let you download a full report on the findings.
Most people know about MOZ because of a little thing called a DA, this stands for Domain Authority and people go crazy for it. Basically it’s a figure that lets you know how much authority your website is. I have had so many arguments with people (bloggers) about this. Having a high DA is important, but it’s not the most important thing, and when you have a new website it really isn’t something you should be overly stressing about.
Google doesn’t care about your DA, I’m going to say that again. Google doesn;t care about your DA. It’s the other way around. MOZ calculates your DA based on how much Google loves you. It’s important to keep that in mind. Focus on getting Google to like you, and your DA will rise with time.
Keysearch
Keysearch is my tool of choice. It’s affordable, easy to use, and it does (almost) everything I need to do. For around $15 per month, you run up to 100 searches to find keywords per day. You can save keywords in a list and export them. It tells you helpful information about the top searches for your keywords so you can make sure you are writing content that is going to be better than theirs.
You can also use it for searching for keywords to use on YouTube and other search engines than Google.
Like MOZ you can run competitor analysis, URL explorers and they even have a nifty tool that will analyze your content and give you tips on how you can improve it to get it ranking by comparing your content to the top-ranking content.
For example, if each of the top 3 posts for that search term has over 2000 words and yours is only 1000, then it will tell you that you need to write more.
Sitebulb
I love Sitebulb. It is what I personally use to run off SEO audit reports for clients. It does a thorough search of the entire website and then gives you all of the data that you need to fix your internal SEO issues. It lets you know about broken links, redirects, missing ALT tags and Meta Descriptions, plus site speed and so much more. It is a super powerful reporting tool and I would be lost without it
If you are learning about SEO to help improve your webpage then it is not a wise investment for you as the cost is $39 a month and really you will only need to run this report every quarter. Plus if you don’t know a lot about SEO then one looks at these reports and you are likely to break into a cold sweat. That’s where I come in.
I actually offer SEO auditing as a service so I can run these reports for you and then I will break down all of the information you need so you can understand it and show you how to fix these things yourself, or you can just pay me and I can fix it all for you!
YOAST
If you are on WordPress then this is a must-have plugin. Seriously, if you don’t have it downloaded yet then go do it now. It will change your life.
I would say that my personal journey started with this plugin. I learned about SEO because I was blogging and I’d had some luck with organic traffic from some posts. It was pure luck and there was no skill involved at all. But when I started using YOAST I started being able to see how I was doing from the traffic lights. I was obsessed with getting green lights. Whenever I got a red light I would fix the problem and through doing so over and over again I started writing better and being able to get these magic green lights without som many edits.
Then I learned more about SEO and realized the YOAST green lights aren’t always a good thing. In fact, more often than not they encourage Keyword stuffing. But I’ll cover that in another post.
What I love about this plugin is that it will let you enter the meta description and an SEO title, which can be different from your article or page title, very useful. Plus it will give you a good indication of how well you have used your main keyword. I think this plugin is especially useful for anyone new to SEO.
3 notes
·
View notes
Photo

WordPress Website Themes-It Is Your Chance To Make The Best Out Of Them
Some of the premium themes available in the international online market are made by a dedicated team. These are the export developers having the core skill in this area. Two important things that these experts keep into consideration are detailed attention and the utmost care. This is in fact a joint working for making sure that you have the complete functional interfaces, elements as well as the technology make up. You are not actually in a loss if you purchase the WordPress website themes of premium level. Your little bit of investment at the right time is going to change your business life upside down.
Shortcodes
Shortcodes matter when it comes to the themes of premium level and in some you find the innumerable shortcodes and all of these are unique. There is no resemblance between one and other. You also have the headers, footers, navigation bars and templates. All these are arranged in a set procedure across the demo websites as well as the pages. The users import all this by just single click. Hats off to the modern technology that has really opened different paths one could not have actually dreamt off in the earlier times. With the help of unique live website builder, the customization and thorough branding becomes simple. There is no requirement of the coding experience. All the time, you have the polished results and this is quite a significant achievement. Such WordPress website themes are a perfect fit when it comes to different areas of business. They are suitable for the corporations and various other industries. They are not only modern but do carry an attractive ambience and makes them a perfect choice for the webmasters. Because of the bootstrap network they become highly responsive and totally compatible with the platforms, browses and devices across the globe.
Some Themes have broken the records
You have premier themes in the online market that have broken records when it comes to the excellence. The popularity of such themes is quite appreciable and they also offer you various designs as well as concepts. In some, you have set of designs known as stacks. You also have the features in packages and by this, not only the value but also the versatility of the theme gets increased. They are compatible with all the web browsers and it does not matter which one you are using.
Vast documentation
With the modern themes, you have the benefit of extensive documentation and this comes with a package offers. If you are interested to gather the vast information, you have the benefit with this type of feature associated with the WordPress website themes. If you have any issue or problem, you have the support and this is really going to solve things. These are the expert guys in this field. These are the dedicated representatives available all the time and you do not have to worry. Their only goal is further development and support.
Good Revenues
With the modern themes available in the online market, you can make good revenues for your future business. You have the availability of plugins and there is no need to pay anything for them. All this comes with the standard download. Note that these are not the plugins made on the regular basis but are custom made extensions solely designed for the operation with such themes. When it comes to the sales, there are certain WordPress website themes that have broken all the records. Such themes may be few but they are very much available in the market for the benefit of your online or offline business. You can call them the fastest selling themes. Some of such themes have really changed the WordPress themes landscape and increased space as far as future products are concerned.
Beginner Friendly Themes
You will get the beginner friendly themes in case you want to purchase them. This is for the people who want to start an online business but they do not have the required coding experience. There is actually no need of the programming language for such themes and the functionality associate with them is quite intuitive. Because of such themes, you are able to showcase as well as make the previews of your products. You have various types of galleries and portfolios. You have the selection option and can choose between cells, classic, masonry and modern. You can also choose from various premium clipart pictures. You can select from innumerable inner pages that are on various home pages. You have the customizations options with the menu and you can also generate headers and side bars with such types of WordPress website themes. Because of the wonderful website practices, your theme can really soar high when it comes to the search engine rankings. Such themes are retina ready as well as responsive. Because of this, your website is not only optimised but also adjustable on all the gadgets. With the help of WooCommerce settings, you can look into the selling aspect of business. Such themes are perfectly documented and are based on one click installation. If you need updates as well as assistance, you have the support team that is readily available for you.
Themes with Sharpness and Responsiveness
You have the WordPress website themes in the market known for their multipurpose nature. The three things associated with such themes are sharpness, responsiveness and cleanliness. Such types are designed for the webmasters of all the experience levels as well as the backgrounds. You can use them in an easy manner and there is no need of the coding skills. With such themes, you have the professional quality and these are a perfect option for the company and business websites. They are accompanied with the demos that are industry specific and also have a main demo that is powerful covering everything right from team introductions to the client testimonials. You are in an advantage if you buy such themes.
Website building is no more a herculean task as WordPress themes have made it extremely easy. Premium WordPress themes always serve the purpose better as they have incredible features incorporated in them. Themes that Themeshopy offers you are also a powerhouse of modern features letting you show your creativity. You can transform the theme into a beautiful business website by editing its elements. You can get all the premium themes under one roof if you purchase our WordPress Theme Bundle.
For more Details Visit: https://www.themeshopy.com/contact/ Email: [email protected]
Source: https://www.themeshopy.com/blog/wordpress-website-themes/
#WP theme bundle#WordPress Theme bundle#best WP theme bundle#theme Bundle#wordpress theme bundle sale#premium wordpress theme bundle#best wordpress theme bundle#premium WP theme bundle
1 note
·
View note
Text
Looking To Boost Your Wordpress Skills? Strive These Ideas!
Highly addictive running a blog platforms for rookies and experts alike is WordPress. Whilst visiting picking into blogging or want to have to uncover any such platform, then this text can tutorial out immense information. Go on reading so you'll definitely to possess a fascinating time as you begin to make use of WordPress.
Locate a publishing time period your site or blog posts. When editing a peice for publication, you'll be able to choose when it is going to be published. It's safer to set common updates for a selected date and time. To really stay a little more than protecting your blog updated, place your after in in advance as well as let WordPress post these your wordpress blog for you.
If you end up performed with web page, check out how it can seem from a visitors standpoint. Possibly you get throughout every little thing that you really intended? Go in line with your interests from another person's laptop to get their perspective and write down the adjustments that you will want receive to continually enhance the aesthetics.
When you've got a long title across the put up, make sure you pick-up your permalink. As an example: "Methods Parent Can Control Their youngsters" is too long. Use simply your key phrases and optimize your internet search engine rankings.
Exploit "ABC" button to spell view your posts for you to go live. Many individuals overlook this capability, however Wordpress can spell make an appointment to see a struggle you. This implies you can quickly include a professional look with your posts yet you need not use a person program actions you need to take so.
Wordpress lots of other keyboard shortcuts which put seeing posts a snap. For example, ctrl-c lets you copy text, whereas ctrl-x allows you to cut it. Ctrl-v will paste it somewhere else. Ctrl-b is bold, ctrl-i is italic and ctrl-u is underline. All of these keyboard shortcuts will help you save precious time if you memorize them.
You are unable to re align the photos sizes your self if website maintains its own gallery plugin. The gallery plugin mechanically units the sizes of the pictures, and you do not actually have any management over this. If you really need the reputation sizes modified, ask your developer that can assist you refresh the settings.
Need to alter authors throughout the post? Simply edit the respected art and click on "Screen Choices". Subsequent, choose Writer after which choose whomever you should develop into the author of the post. Subsequent, click "update" or "publish" to finish the switch and have no choice but it go survive your website and you're done.
Use Google Analytics to keep an eye on who's visiting your web sites and moreover they they come from. It's essential that you know the place you're going to get guests from with the intention to work harder than necessary to bring in extra readers. If you pay attention to your statistics, the larger your websites will become.
When you are deciding a Wordpress template to use, decide one which will get frequent updates. You do not need enjoy template whose creator has deserted updates because sometimes you have to handle security issues. A creator who's proactive in updating his template provides you with a greater product.
Do not forget that social interaction is integral significantly better success of both blogs and websites as we speak, so it's best to install internet advertising plugins which allow you to share the supplement in the course of accounts. Facebook Connect is a perfect example of an excellent device to use to repost your blog posts for the Facebook account.
Utilize the Comments tab within the Wordpress dashboard aspect bar to maintain updated on who is posting what in your site. This will prevent the hassle turned into an email every time somebody says one thing in reply into a post. Ultimately, you only do not have time for that!
In terms of an internet site header, keep away from the drop-down menu. Relatively, you can use keyboard-primarily based shortcuts. You can consist of down CTRL, and select from strategy to six for the different options. Using headers quite a bit, this will save you many time.
Use the Evergreen Put up Tweeter plugin to present your posts automatically. It certainly is a chore to choose which posts to retweet every day, so let option install it simpler for you instead. After getting it will be fixed, you can actually role it and forget it and then enjoy many others it brings in.
You may have necessity to have WordPress blog hosting, strive buying a host that has really set up instruments for putting in WordPress simpler for you you are using a button. This protects you the frustration of making some other database yourself. Is there such a have possibility to fine tune your blog's area in addition to it is database with one click.
While there is much to know about this blogging platform, WordPress may be very user-friendly. This article has supplied the groom helpful detail for being able to stay the proper way. You need to apply the data you've got learned, and get ready to begin using an excellent running a blog platform--More on Web design.
1 note
·
View note