#so my copy of ts2 is a mess...
Explore tagged Tumblr posts
Visit Tumblr Blog
Explore Tumblr blogs with no restrictions, modern design and the best experience.
Last Seen Tumblr Blogs


Fun Fact
In February 2021, Tumblr had 518.6 million blog accounts.
Text


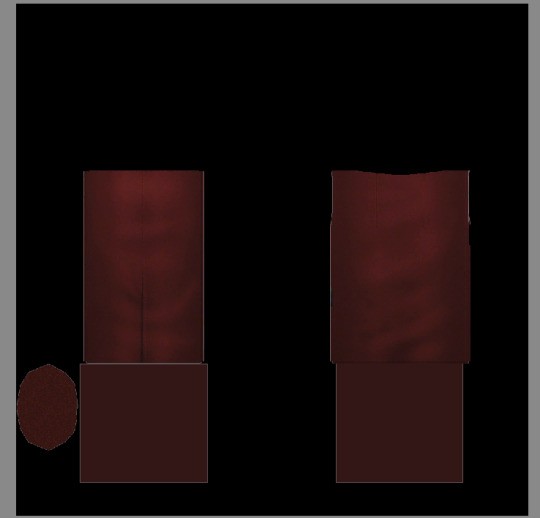
more of me struggling to edit textures to fit another mesh. i thought that using the same denim textures might feel a bit repetitive so i used textures by io and misomoso to introduce more variety. the results are unsatisfactory. oh well... :(
#i'm sporadically poking at my wips#haven't finished anything yet... i don't think#also. FT textures are still missing despite me replacing the objects.package (thank you for your help)#so my copy of ts2 is a mess...#wip
8 notes
·
View notes
Note
Do you have a tutorial of where you convert objects after and make them function?
Hi! Yes and no, LOL. 😅
☽✶•.¸(✶•.¸★¸.•✶´)¸.•✶´☾ ☆«´¨`•°°•´¨`»☆ ☽.¸.•✶(¸.•✶´★`✶•.¸)`✶•.☾
Welcome to Murf’s School of Crap and Crap-Making!
School Motto: Prepare to be tortured! For Science!
Lesson #28: FUNCTIONALITY (I love the way you move~! 🎶)
☽✶•.¸(✶•.¸★¸.•✶´)¸.•✶´☾ ☆«´¨`•°°•´¨`»☆ ☽.¸.•✶(¸.•✶´★`✶•.¸)`✶•.☾
Quick Tid-Bits about Buy Mode CC Functionality
At its most basic level, object conversion follows the same basic steps from this tutorial I made here (for TS2 to TS3 converting). Once you have an .obj mesh and your .png/.dds textures, it's really just a matter of Exporting the mesh from a 3d modelling program (Blender or Milkshape), plus the textures into an image program (Gimp, Photoshop, etc), and Importing all of them into whichever TS3-compatible program you wanna work with (I always use TSRW cuz I can't stand Blender).
But when it comes to FUNCTIONAL CC, it really does depend on what the specific function is. Anything that's not Decor is Functional (anything sims can actually use/interact with; or that you can toggle specific options on). But the Buy Mode object types were NOT created equally--some are WAY more complex than others. Some functional objects are static--they don't move around much or do anything fancy (a table, a lamp, etc), and if they do move, it's very limited and doesn't require a bunch of finagling to make them work right. But some of these turds have pieces that are mobile/etc. 😰 When a sim interacts with the object, there's animations & bits moving all over the place & lights flashing & noises beeping & all kinds of crap happening. So objects tend to get more complicated to make as their functionality increases and there are a lot more moving parts.
LEVEL 1: SCRIPTED (Decor) Objects
Scripted objects are fun(ny), cuz that's when you're changing the base function of an object, by giving it a new Script in TSRW/S3PE (The Transmogrifier mod at MTS basically does this for you in-game). For ME, I'm usually turning a decor object into a functional one. Sometimes that's as simple as taking Wall Decor and giving it a script that makes it ACT like a functional wall tv/mirror/etc instead). Other times I'm making my Edible foodstuffs & Drinkable beverages. These often REQUIRE Arsil's Beverages Mod or something, cuz the script is from a 3rd party mod not built in the game itself. So it depends, but most of the time it's super easy & simple (which is why I tend to make these a lot 😅); just a matter of copy/pasting one script into another.
LEVEL 2: VERY simple functional static objects
There's some basic functional CC that follow the exact same steps as the 2t3 tutorial I already linked above--just swap the meshes & textures, adjusting the mesh sizes/positions as needed, and you're DONE (barring any finagling with Shaders (if you want the mesh to be see-thru or have a neon glow or whatever)):
Surfaces & Comfort (tables & chairs/sofas ONLY*)
Lighting (all lighting categories)
Electronics (Radios, Alarms, Clocks ONLY*)
Hobbies & Skills: LN pianos/keyboards
Toys (SN 8-ball, basegame/AMB crafted toys)
Plumbing (toilets, sinks, & SOME tubs)
Appliances (firepits)
Party (the dance rugs, SN fairy houses, FX Machines from LN/SHT ONLY*)
Debug/Transportation: Teleporter, IP Jet-skis
Plumbing (toilets, sinks, & SOME tubs)
* there's likely exceptions I'm forgetting about, but for the most part these are the "Only" super-reliably simple functional objects sims can use AFAIK
LEVEL 3: More involved functional objects
But then there's garbage that either require you to mess with their Joints/Bones (cuz the objects move / have animations when sims use them); or Geostates (the object changes shape/state when sims interact/use them & move them around). Or worse: you have to edit BOTH. 💀
More Involved (but not bad once you get the hang of it)
Electronics (TV screen meshes need careful positioning, computers have joints/bones on the mouse)
Appliances (stoves--the oven doors have joints/bones)
Storage (toy/treasure chests -- the lid has a joint/bone IIRC)
Sports (WA training dummies have joints/bones IIRC)
Debug (WA incense has geostates)
Hobbies & Skills (SN wands have geostates)
Transportation (ITF hover boards & SN magic brooms have geostates)
Toys (teddy bears have a lot more joints, that pretty much use similar steps as CAS CC--the Mesh Toolkit is your friend!)
None of these are really complicated, once you get the basics of how joints/bones & geostates work.
IMO, other than the teddy bear, you can easily & quickly assign joints/bones to meshes manually, without needing the Mesh Toolkit to do it for you at all. But be careful when manually assigning them! If you mess up assigning the joint/bones, the object mesh will move around in effed up ways during the animations.
OR, it might not move at all--which NGL is sometimes a blessing in disguise! 😅 Sometimes--not always!--it really doesn't matter if an object doesn't have bones/joints, esp. when converting super busy meshes that don't really "FIT" within TS3--like medieval/fantasy/sci-fi meshes with all kinds of fancy bits. In those cases, it's easier to say EFF the animations and just make it a static mesh instead--the dresser/chest/oven/etc doors/lids don't open, the car/bike wheels don't turn, but the object still FUNCTIONS properly--the sim can still USE it as intended, which is all that REALLY matters. 😌
Geostates though? That's a bit different. Cuz making geostates mean you have to make multiple different version of the mesh, cuz the object has different States that show up: full/empty, broken/fixed, up/down, messy/neat, finished/incomplete, on/off, open/closed states. Wands & guitars & brooms & beds & boats etc. NEED geostates in order to act right. They're either supposed to move around with the sim a certain way; or change depending what state they're in when interacted with versus left alone/idle. And those states can be freaking annoying to work with, esp. in TSRW. 🤦 Ofttimes it's easiest to break the mesh into multiple individual groups, Import them all into TSRW separately, and then manually assign the geostates group-by-group, not vertices-by-vertices--(guitars & rowboats, I'm looking at YOU).
LEVEL 4: Harder / More Complex (frikkin irritating)
Hobbies & Skills (guitars--too many effing geostates)
Toys (dollhouses, sandcastles, etc have geostates)
Storage (bookcases have geostates) dressers & armoire/wardrobes have annoying joints/bones for opening the drawers/doors/etc)
Pets (basegame fishbowls have a lot of geostates IIRC)
Transportation (IP rowboats have TOO MANY frikkin geostates & joints--I always say never again! and then I make another one, LOL 🤡🤥)
This is where my patience gets frikkin tested.
LEVEL 5: Too Effing Intimidating / Annoying / Hard For ME*
Appliances (pretty much everything else, I don't go here)
Comfort (beds, cribs, etc. have geostates I'm too lazy for)
Plumbing (showers/tubs with moving doors/screens)
Entertainment, Hobbies & Skills (I don't go here)
Transportation (bikes, cars--absolutely not)
Pets (my rabbit mod--never again and I mean it)
* I am notoriously LAZY--once there's one too many steps or things start acting funny or going wrong, I give up HELLA quick, cuz chile, I HATE making CC. Simming is a hobby that helps me relax; not a job I'm required to do for my livelihood--I'm not tryna be stressed over frikkin pixels. There's objects I've never made before; or only made ONCE and swore to NEVER make again cuz I love myself; or I've tried to make and completely failed at and don't care enough to figure out. So I'm not saying these objects are impossible, I'M just not messing with them. 🤣
TL;DR: Your Mileage May Vary!
So yeah, your question is actually harder to answer than it seems, cuz it really depends on what functional object you wanna convert. There's objects I have no idea how to make--I see way too many moving parts, and I run in the opposite direction.

25 notes
·
View notes
Text


I didn't get a good screenshot of it happening, so consider this a second pop post! And that's where we'll leave Noemi for now. She's the final household, so the season summary's up next!
But first, a novel-length confession. Under the cut because it's not super important to read, just kinda funny if you like hearing about the process of playing this old-ass game, but: most of these screenshots are actually from the second time I played Noemi's round.
I lost my first playthrough to corruption—actual corruption, with sims turning invisible, family trees getting messed up, certain lots throwing nonstop errors. It was 100% my fault for duplicating a bunch of character files while messing around in SimPE.
The funny thing is, the first time around, Noemi also ended up pregnant under very unexpected circumstances, but the father was a random townie. When I realized I needed to replay the round from a backup, I planned to redo everything as closely as possible and just have Noemi hook up with that townie again at her party.
But on my second playthrough, that townie didn't show up to the party, even though he did on the first. Nothing really happened at that first party, just some dancing and questionable conversations, but him flaking on Noemi the second time had a butterfly effect on ACR, I guess, and led to the disaster I've ended up with instead :')
I don't love that I've played two different versions of this round—it feels like cheating! Despite the drama being interesting, it definitely dampened my enthusiasm for playing for a while, because I struggled to view the current version as being canon, if that makes sense? It shattered the illusion of my sims being consistent tbh.
I've gotten over it now, but this (along with other discussions around the TS2 community in recent months) has also encouraged me to rely less on ACR and wants-based gameplay in the future, because I've realized I like certain events/choices in my game to be more deterministic lol and it's wild that one rando making alternate plans for his day could literally change the fate of two playable families.
Anyway! Moral of the story, back up your neighbourhoods, don't copy and paste character files if you don't know what you're doing, and brace yourself before letting a romance sim throw a party even (or especially) if you think you know what's going to happen.
See ya'll next season! 🫡
#sims 2 gameplay#emerald pines#emerald pines: season 5#season 5: arias#emerald pines: family portraits
27 notes
·
View notes
Text

☀️ It's SUMMER everyone! ☀️
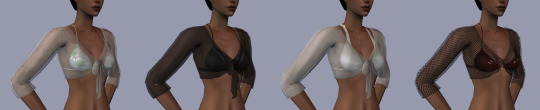
And if your summer has been anything like mine, it's been HOT. Almost too hot to wear anything at all!
I was pursuing some old T$R finds and THIS mesh caught my eye.
Ever since TS2 came out, I've found alpha-editable clothing parts to be so interesting (cut to my obsession with afbodyslip, lol).
HOWEVER, this Sims2Sisters mesh was full body, which I did not need. And it came with these weird, gummy-looking shoes, which I did not want! I wanted to make this into a top! So, this is a *new* mesh.
If you have never messed with alpha-editable clothing meshing before, this Alpha Skirt Tutorial by CatOfEvilGenius is essential. It's not has hard as I thought it would be!
As for the textures - the little translucent beach shrug is just the top from this NL outfit.

The bikini tops are a collection of stuff I have had around - AAS of course, but also MelissaSims and Ekinege and Xandher.
For creators - I have included the shrug textures, as well as the alphas I have used in the DL. If you want to put a new bikini on this mesh yourself, it's as simple as copy and paste!
Categorized for Everyday and Swimwear.

Also; I've made 5 bikini bottoms too. In case you did not have any!
The textures are all Ekinege. Categorized as Swimwear.
Stay cool! 😎
Download - AF Beach Top 8 RC's+ 5 Bikini Bottoms
249 notes
·
View notes
Note
Just wanted to say, you have inspired me to make a ts2 tracker in my notion! I may have gone a little overboard setting it up in like 1 day but im impatient. However, im so excited for maybe a possible shared template from you?
Believe me, it's really a pleasure for me to have inspired someone! 😭 I am very happy that you liked the idea! (although I copied it from other people too! 😅)
The English template is currently in progress, it will take a while because I'm still finishing the Italian one! (I'll use my Italian template as a base and put the English options in the English one)
When I proposed to make the English template I thought of making a simple template without too many options but then I exaggerated by adding more and more things to the Italian one 😅
For example the screenshots I posted on my blog aren't even half the mess my template is now...
3 notes
·
View notes
Text
How to Make Maxis Rebuilds/Remodels Permanent
Have you ever remodeled a Downtown Lot - made everything perfect for you simmies to enjoy - and then lost your hood somehow? Now you have to start over... and try to remember every detail you added to that Eaxis Downtown Lot to make it enjoyable for your sims. *sigh* ...and then your HD dies, and you have to do it ALL over again! OMG!
Well - this is how to keep that perfect made-over lot, so the next time you have to restart your hood, it is already there, ready and waiting, for your sims to come play.
WARNING - Doing this modifies the original installation files of your game. So, make back-ups of your installation files first! Also - if you ever re-install the game (Or have Origin "fix" your installation,) these files will be wiped out. So, make another a back up of your changes when you are done. Note: I use Origin's UC (Ultimate Collection,) if you use a disk install or some other game installation, your folder paths will be a bit different ;)
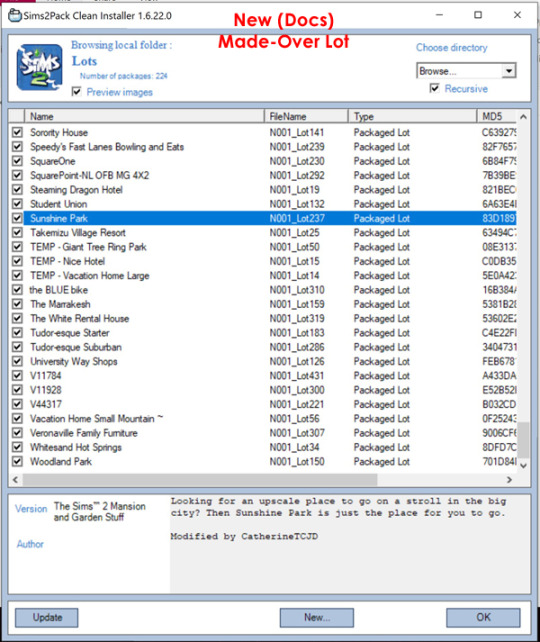
As an example lot - I'm going to fix up Downtown's Sunshine Park: 1 - Use the Clean Installer to find the original EAxis lot in the ProgFiles. Browse to C:\Program Files (x86)\Origin Games\The Sims 2 Ultimate Collection\Double Deluxe\EP2\TSData\Res\NeighborhoodTemplate\D001\Lots - Get the FileName/Lot# - like for our example, Downtown's Sunshine Park is lot number D001_Lot19

2 - Go into the game and fix up the Sunshine Park exactly to your simmies specifications. (Hint - I wouldn't use CC because if you do, and remove that CC down the road, then this lot will crash when you restart your hood.)
3 - Use the Clean Installer again to find your made-over lot in your Docs folder. Browse to Documents\EA Games\The Sims™ 2 Ultimate Collection\Neighborhoods\N001\Lots (I have Downtown assosciated with PleasantView - YMMV) It will have the same name, but a different Lot number. - Make a note of the new lot number (In my example it is: N001_Lot237)
4 - Go to the Documents Folder that has your new lot... Mine is Documents\EA Games\The Sims™ 2 Ultimate Collection\Neighborhoods\N001\Lots - Make a copy of the lot, stick it on your desktop. - Rename it to the original name: D001_Lot19

5 - Go to the ProgFile original lot's location C:\Program Files (x86)\Origin Games\The Sims 2 Ultimate Collection\Double Deluxe\EP2\TSData\Res\NeighborhoodTemplate\D001\Lots - rename the original file's extension (I change .package to .packageORIG) so the game won't try to read the file. - Move your new lot file into the folder. Done!

6 - Next time you generate a new game - your "new" rebuilt lot will be used in place of the original EAxis lot.
This works for all the Eaxis lots that came with the game. If a lot has an original ProgramFiles/installation.package, then it can be rebuilt and saved. Vacation Lots, I'm lookin' at you! Oh, yeah! ...this also works for the pre-made sim's houses (occupied lots.) When you start a "fresh" game/new save - their house will already be made-over. I've even done Olive Specter's place this way, and upon re-starting the game her lot and all of it's ghosts were good to go!
If you are new to messing around with the ProgramFiles and aren't sure where to find certain EA lots - there are many different tutorials that explain where to find each of them. Look for tutorials about installing Stealth Hoods and/or Fixed Hoods. Good Luck! :luff:
Please click through to MTS to for the original tutorial. :D
Please visit my MTS Profile for more TS2 downloads.
#sims 2#Sims 2 tutorial#TS2#TS2 tutorial#How to make EAxis Rebuilds Permanent#Maxis makeover tutorial#Permanent Maxis Makeovers#CatherineTCJD
87 notes
·
View notes
Photo

First of all, you need to know that TS2 was one of my favorite games when I was in college, and I would KILL for the ability to upload stories to the gallery like they used to let you. I didn’t play on a computer that had internet access so I never got to, but I would spend hours reading other peoples’ Legacies and Uglacies in the school library and dreaming of the day I could tell my own sims’ stories and it never happened.
Second of all...for some reason I cannot explain, I was obsessed with the aliens in the game, and I was obsessed with Strangetown. That was MY town, yall. I got the entire town two or three generations expanded, more than once, do to reinstalls. The Curious family were particular favorites of mine. I’m sure all of this is gibberish to most of you so let me just say it was three nerdy brothers: Vidcund, Lazlo, and Pascal, all obsessed with aliens. On day one of your play in the house, if you followed the prompts, one of them, Vidcund, would get abducted and impregnated with an alien baby, guaranteed. This was otherwise a very rare and difficult thing to have happen without cheating. Because he was not a very nice guy, and he was a scientist, I would always do this creepy set up where the baby’s room had a cell door and an observation window, and he had a desk and computer on the other side for his research.
ANYWAY. While many of the old townie families have made their returns in the following games, my beloved Curious brothers did not. I wanted to recreate them, but there was not a way to make them the way I wanted, so I settled instead for a “cousin.” Hence Melvin P. Curious Was born.
I was just starting to pick the game up again...I think this was in 2020. Which makes sense. I just wanted to recapture some of the feelings I had in TS2 playing the Curious Bros, and didn’t intend this to be a Legacy, but I loved the family so much I’ve just continued to play them and now I’m 5 generations in and hooked. So I haven’t done the things I normally would have done. I didn’t start on a huge empty lot. I don’t even have Melvin’s tombstone. I had to put a copy of him back in the neighborhood just to get a photo of him for the family to keep. But I haven’t used money cheats that I can remember, or any others aside from buildmode cheats and a few to complete aspirations that were bugging. Oh. I did cheat to add someone to the household once, recently, but it was an emergency. The only adult in the house was dying and it was my only option to avoid losing the kids/family. But I’ll get to that.
I played 1 as a kid/teen, and played 2 on launch. I didn’t play more than a few hours of TS3 because I didn’t like it. I know that’s sacrilege but the sims look like playdough and kind of “feel” like it too. I didn’t really enjoy the open world, either. Having the town age around me stressed me out, too. (I’ve gotten used to it in 4 and now I’m glad I don’t have to go in and play every family individually but sometimes I do miss having the entire town under my thumb and yes I know you can turn it off but also what is the point if I can’t really edit the town anyway? I was really into building the towns out too.) I didn’t really play 4 when it first came out, either, because it was a MESS when it came out. I was FURIOUS about the things everyone was furious about. No toddlers???
There are still things I miss. I still think, overall, TS2 had some better mechanics. 4 has more fun stuff to do. Uni is better in 2. Aside from the ability to edit neighborhoods and having a way to share stories on the Gallery, I miss Aspirations mattering. I miss personality points. I miss fears and aspiration failure. There are some crazy things you can get up to in 4 but it does require a bit more work and imagination to get the Sims’ individual personalities to shine through. I’m a little controlling with mine, so sitting back and letting things unfold, using a randomizer, letting them be a little more autonomous has helped with that. Still - if you played TS2 you know you could choose a Romance aspiration and have a completely different experience based on what the randomly generated Lifetime Want ended up being. I miss that. I miss Sims wanting specific careers. I miss zombies and werewolves and the Smustle and university being fun...but! There is a lot of fun stuff in TS4 that I’ve been enjoying exploring. The trend in the wider Gaming community of complaining about Every Little Thing really annoys me. (Yes. Wedding Stories is broken af. Yes. It’s also fucking hilarious. As I will demonstrate if I keep talking.)
Consider this post 1 of ???
7 notes
·
View notes
Text
TS2 Tattoo Tutorial!
I thought I’d make a tutorial on creating a tattooed skin! I believe you can use any editing program for this since it’s fairly simple. I’ve never done a tutorial so please bear with me! It’s text & picture heavy so under the cut it all goes! I learned the basics years ago from this video and another one my friend had made but has since been deleted. I had to learn about tricky placement of tattoos on my own and hopefully I’ll be able to show a teeny bit more of that as well soon if you’d like! I know my writing is not the best and it can come off confusing, if there’s something that‘s difficult to get please send me an ask or message!
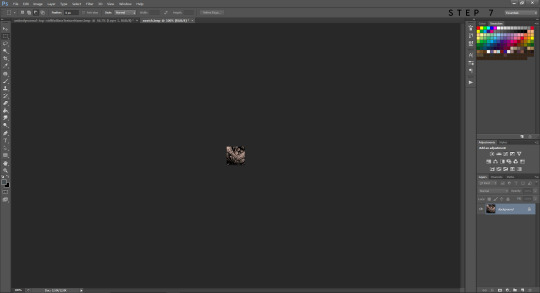
Step One: Open body-shop and create a new project. Select the skin you'll be using. Pick a name that will make it easy to find. I named mine "Tutorial-Tattoo".
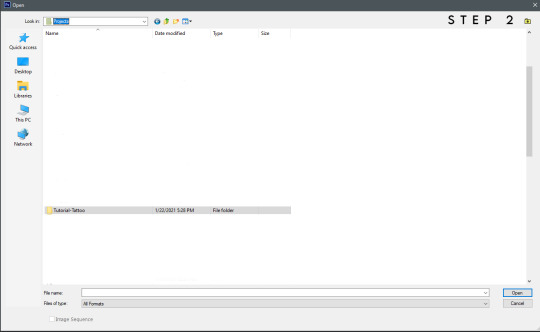
Step Two: Open your editing program (I’m using Photoshop), find your projects folder within the EA folder, and open the folder of your skin.
Step Three/Guide: You'll find all the skin's textures in that folder. It might be a little confusing but it isn't once you know the names! In the case you're new to body-shop, I'll break down what these files are (if I'm mistaken or anyone has a link to a better explanation, please lmk).
Teen through elder have three body textures, "cut" is when your sim is fit, "normal" is their default body, and "soft" is when your sim is fat. (I'll show how to give the different body-types the same tattoo later on!) For adding a tattoo we won't be focusing on the face or hair textures. (You can create face tattoo's though, maybe I'll get to that in the future!)
I've boxed out the groups, the red is adult female (AF), the blue is adult male (AM), the gray is infant (BFM), the black is child (CFM), the yellow is elder female (EF), the pink is elder male (EM), the orange is toddler (PFM), the purple is teen female (TF), and the green is teen male (TM).
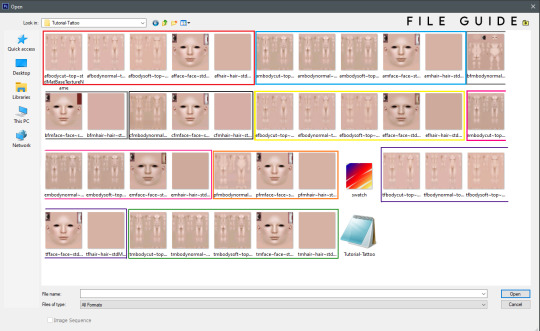
Now you can pick whichever you'd like! I'll be using the adult male skin, so open it up in your editor.
Step Four: Place the image you'd like as your tattoo onto your opened skin texture. Find the blending mode option and change it to multiply instead of normal. This will remove your white background.
Tip: The easiest images to use have white or transparent backgrounds. If there's texture (like it's straight from paper) you can edit the image to erase some of it or make the background brighter, then the multiply option will remove most/all of the background for you.
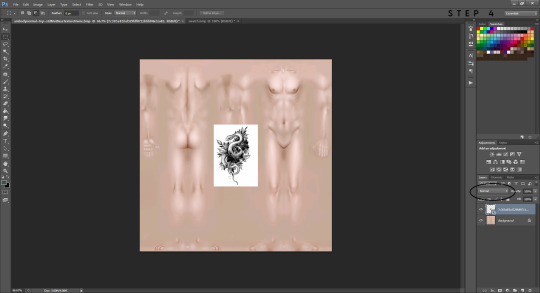
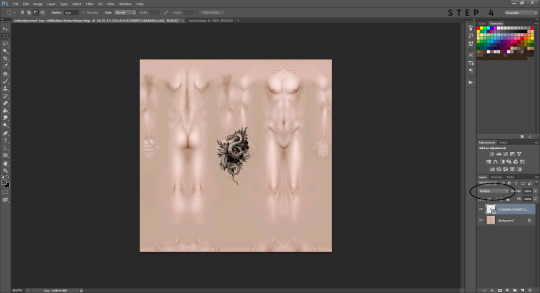
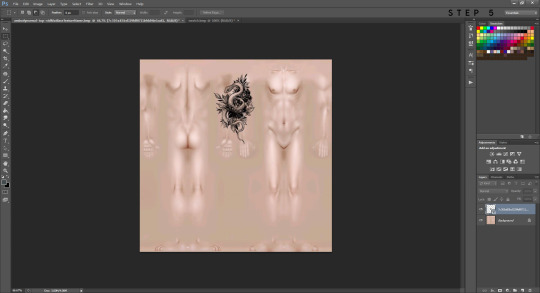
Step Five: Now you can mess around with the tattoo image and find a place you'd like it. Have fun with it, resize it, warp it, etc. do whatever suits your fancy!
Placement can be tricky and you may need to try multiple times until you're happy with it. If you want a tattoo to wrap around their arm or leg it will take a little bit more effort. For this tutorial I placed the tattoo over both sides of his right arm and this will make it wrap around it! If you want more tips on how to do tricky placements like this let me know! You can message me or I could try to make another tutorial. I’m not super great at them but I can do my best to help!
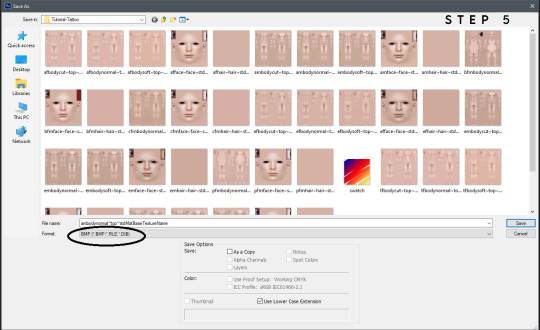
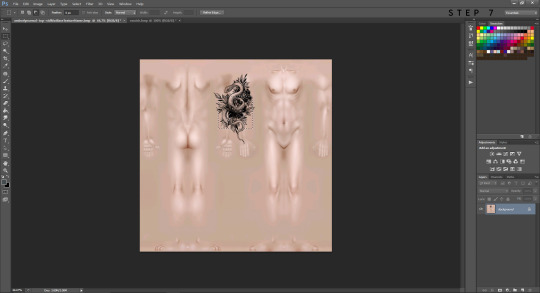
Now you can save it in order to see it in body-shop. This part is crucial, you need to save as a bmp file, or it will not work. It should ask if you'd like to replace the current file so click yes (all this is doing is overwriting the blank texture it was before). Go back to body-shop and refresh, your new skin should show up! If you aren't happy with how it looks, you can go back to your editor and mess around with it until you are! Once you're satisfied move on to the next step, or step seven.
Step Six (Optional): If you want your tattoo to be on another age, gender, or body type this is what you'll do. I chose to add it onto the elder male, so you'll open a new file and choose that texture. Switch back to your adult male texture, right click the tattoo and copy that layer. You'll then want to right click the copied image and duplicate it to send to your elder male texture. It may need a slight tweak depending on the placement if the body is smaller/bigger, but nothing major! This way it will appear in the same exact place for the different ages, genders, and body types and you'll only have to save it instead of start from scratch.
Step Seven: If your skin is ready to go then you can give it a custom swatch. Open a new file and choose the swatch texture. Flatten your tattoo with the skin layer, select a portion you'd like to see as the thumbnail, and make a copy of it. Duplicate that copied selection and send it to your swatch texture. You can move it around until it fills up the space, save it as a bmp and done! Refresh your body-shop once more and your custom thumbnail should appear. You can give your skin a name and import it into your game. All done!

I hope this was helpful and not the most confusing thing on Earth! Thank you for reading!
#ts2 tutorial#ts2 tattoo#ts2 tattoo tutorial#ts2 skin#the sims 2#ts2#simblr#sims 2 tutorial#the sims 2 tutorial
49 notes
·
View notes
Text
So, my dad took my laptop apart and we noticed there were parts missing. They were likely stolen when my ex sent the laptop's screen to be fixed, it's actually pretty common occurrence. Also the battery is all swollen which means it's pretty much a danger hazard 😬
Anyway, the good news is my dad is giving his gaming PC to me! 😭❤ So, I'll finally have a proper gaming set-up again and enough space for all my files, not to mention I can finally play other games too! I'm so gonna install TS2 and TS3 again! I'm so excited and grateful beyond words. I'm currently copying my files to an external hard-drive I've had for a long time. Hopefully it won't corrupt the files because my old photographs were corrupted when I copied them to the laptop a while ago. Tho dad said it might've been because the power cable was the wrong kind or something. He's a professional thankfully, unlike me 😂 I know a thing or two obviously but only in an amateur way lmao.
Here's hoping everything goes well now and I'll be able to have good energy again. My mum really messed me up yesterday which is why I had several panic attacks and cried for hours. I even got really angry and it was upsetting because I've worked hard on my anger issues since I was a teenager. My mum's the only person who can trigger me badly tbh, it's complicated and I won't go into it. But yeah, yesterday was so exhausting I'm in a lot more pain today, my body is too sick to handle extra stress tbh. But I digress. No more of that. We're going to set up the PC today if everything goes right 😊
12 notes
·
View notes
Text
Vintage Champs Les Sims - V2
Like many of you, I downloaded Tedhi’s new version of her town, Vintage Champs Les Sims, earlier today. And immediately removed the old version, and installed this one. Then I spent the rest of the day, taking my brother to see his cardiologist (he had an event monitor placed last week) and trying to convince my Devil Dog that playing outside is a good thing. (She’s still unconvinced).
Anyway, I finally had some free time this evening to open the game. So I did, and immediately set about adding buildings to the town.


One of the first, is the fishing hole, Tedhi shared with us – L’Etang Dudot. The 2nd picture shows one of the new trails she added to the world.


From there, I hopped over to the old village area, where she has a village garden. There’s a little lot right next to it - 15x9 - so I decided to build a small house for my town witch. She lives up there with her cat, and is none too happy with those newcomers

the Tricous, who’ve moved up the road from her. (They are based on the family from TS2 and own the elixir shop in this town).

Since I was sort of in the area. I plunked down my new mayor’s house. He inherited it from his mother, and has moved here to take care of his two younger siblings. Unfortunately for him, the village unanimously elected him as their new mayor. (And no, he wasn’t running for the office). Since moving here, he understands why no one else wanted the job.

Right next door, is the nectary – which he also inherited from his mother. It was a rundown mess, but he’s working on improving the place. Sadly, it’s taken most of his savings, but he’s hoping to recoup that, thanks in large part, to all the drunks in this village.


From there, I bounced down to the basecamp lot in this village. In the previous version, it was just a regular lot, and I had made a small park there, But since this lot shows up as a basecamp on the zoning, I decided to go with it, and made this little lot. Nothing fancy, but my dead-beat tourists now have a semi-cheap place to stay.

Then – because I forgot to save a copy of the church I made for this town, when I removed the original version, so I could play-test this version – I had to build a new one. So I did. It’s nothing special, but then, this is a small village and they can’t really afford one of those fancy cathedrals. (Well, they can’t!)

And next door, is their town cemetery – complete with non-generic ghosts. Because I did remember to save that lot.
I also placed a bunch of other lots, but since I posted pictures of them before, I didn’t bother taking new pictures.
20 notes
·
View notes
Text
How can you make you game much faster! And other tips. (TS2)
I Have added links and tutorials!
1. Rename any CC in your game so they dont have spaces and symbols like %&[] in them by Using the Bulk Rename Utility.
Here is my list with unwanted symbols.
é ”, ; . : ~ ! > £ ’ < ^ # $ + % ½ & { / [ ( _ * ? \ - ] ) } € @ æ ß ü ğ ı ç ö ¨²¦
2. Organize your downloads by putting them in categories
(for example eyes,models,furnitures...)
3. Make sure you don’t have double, same CC files. To check and delete them, Download the Duplicate File Finder. (A MUST HAVE PROGRAM)
4. For us that have the Ultimate Collection, WHO needs origin?? PLAY TS2 WITHOUT IT! Follow this tutorial.
5. Make sure your game recognizes your graphics card.
If you have Intel PC make sure to follow this tutorial to set the best graphics for you.
6. Download the 4GB patch to avoid crashes.
7. Be extremely careful when you download cc (from where it is, how old they are, are they legit?) do you REALLY need them?
8. DON’T mess with the NPC! you can make your own look-alike sims.. just don’t mess with them..
9. The default sims 2 camera is awful.. How about you can see everything in full details?? Download a camera mod! I use the Gun Mods Camera Mod but there are many more.
10. Make sure to have as much backup you can by everything!
Personally i have 2 USB that each have copies of EVERYTHING.
(CC Downloads, The entire game, programs that i use if i re-install the game..)
11. Don’t play your game for hours. Reload after like 2-3 hours.
12. The Sims 2 has many mod/fixes by programers that play the game. For example the famous simNopke‘s Sim Shadow and SkyFix Mod. Search them.
13. Want a Sims 2 open world feel?? You can! Follow this tutorial and install this camera mod.
14. When you download a lot with CC, there is a chance, the lot to have unecessary hacks or CC recolours. That happens because the game doesn't separate the recolours you used on the specific CC you placed on your lot with the rest of the recolours the user had in their downloads and it included all of them anyway. What you can do about it, is to click on the objects, click on the recolour tool and delete the unwanted recolours that came with it. (YOU CAN'T IMAGINE how many unwanted cc i had to remove because of this) someone need to fix that. Maybe the 30% of your CC are unwanted recolours that came with a custom lot...
15. Its 2021 (right now). Luckily there are simmers that are amazing moders too and they making fix patches and programs for the sims 2. One of the best program/fix patch is Lazy duchess's RPC program. Search about it and install it. Its amazing and it fixes many thinking for the game.
16. Hood checker program by Mootilda is a life saving program that checks and fixes corrupted neighborhoods. IT'S A MUST HAVE program.
#ts2#sims#sims 2#the sims#the sims 2#ts2tutorials#ts2programs#ts2 tips#sims 2 tips#the sims 2 tips#faster sims#faster sims 2#faster the sims 2#the sims 2 faster#ts2 fix#the sims 2 fix#sims 2 fix
223 notes
·
View notes
Text
2020 Simming goals!
@vegan-kaktus tagged me for this, so here we go:
Get back into playing TS2. :) (Burn-out, whatcha gonna do?)
Finish building and share Mustang Valley. I’m still hoping to share by Valentine's Day, but it might take me a little longer than that. Doing much of anything Simmy for the past 2 weeks or so was pretty much a lost cause. :( Plus, I have another project due in January to do. Yikes!
Close out and delete my old Livejournal and repost the CC that's on it to Pillowfort.
Finish the hair defaults project. I mean, I've only got about 10 left, for heaven's sake!
Start to tackle BHAV modding. There are so many things I'd like to tweak, if only for my own purposes, but I can't.
Figure out what to do in my own copy of Mustang Valley. Since it’ll be all pre-built, I'm thinking maybe a proper Legacy, but also filling some of the houses with "townie families" that I don't play but that do have homes and then going into them and advancing ages and generating kids along with the playable family and pairing off "townie" kids as they grow up, etc. Make it sort of like TS3's story progression only all done manually. (Unfortunately *sigh*) I have to put in some thought as to how that’s going to work.
Get going and active on Pillowfort. (I'll still be here, but going forward, I'll be posting CC there with just links to the Pillowfort posts here on Tumblr. This is because Pillowfort posts can have multiple cuts, which makes it easier to present and organize info. I'm also going to be doing more personal and non-sims posts over there, in addition to Sim-related stuff, which I'm looking forward to being able to do.)
Start playing some of my other TS2 neighborhoods again. A while back, I decided to overhaul my CC and in the process moved all the hoods on my main user account and a copy of all my CC at the time into backup so they didn't get messed up by removing stuff and all that. I need to start up a new user account (with all the old CC, alas) and start playing them again. Especially Insulo de Fiero, the "queer hood," which I miss and which is probably the thing that will help me to get over my burn-out.
I don't really know who's done this because I'm catching up from the Week of Hell that was Christmas. :) But I'll randomly tag: @anachronisims, @marvelann, @freezerbunny-sims, @moocha-muses, and @taylors-simblr. (Of course feel free to ignore if you've done this or if you're just not interested!)
28 notes
·
View notes
Text
Got Sims 2 Ultimate Collection via Origin? Never update without backing up your game files.
I had an experience today where an Origin client update completely wrecked my Sims 2 game (or so I thought), and I don’t want this happening to anyone else. And before you ask, an EA rep walked me through clearing the cache on my computer. That didn’t work.
The Issue I Had
I updated Origin because it was touted as “mandatory” (cue eyeroll that gives me a migraine). When I went to open TS2UC after the update...The game wouldn’t open! Running the program as an administrator didn’t work, compatibility mode did nothing. I would click on TS2UC and instead of launching it would open the Sims 2 copy in my Game Library. Clicking ‘Play Game’ would make the Origin window disappear for a second or two (as if the game was about to load) only for nothing to happen. The game was not launching in the computer Task Manager either.
After much of the day trying to figure things out (with the “help” of EA/Origin Games support representatives), warning fellow Simmers on Reddit, and thinking my game was wrecked, I have a solution.
Backup Your Game Files Before All Origin Updates*
Backup your Sims 2 Ultimate Collection Folder (or specific folders like Downloads, Lot Catalog, Neighborhoods, and SC4Terrains).
Place the copy somewhere else in your computer that is not the Documents > EA Games folder.
For more information on backing up files, read about it via ModtheSims.
*The Sims 2 is a “legacy game” (read: old, geriatric, and unsupported), so support is not really available outside of the Simmer community, and Origin is not accounting for the game whatsoever when new client updates are published. Because of this, you need to back up all your game before allowing updates. Even if you have no had this happen to you and you believe it never will, backup your files anyway. If you have your Origin client set to auto-update, I recommend turning that feature off so you have time to backup TS2. In fact, putting Origin in Offline Mode may be in your best interest (read more under the Misc. section).
Please only follow this solution if clearing your Origin cache didn’t work, or you are not comfortable messing with program data and such.
The Solution
After backing up the files you want saved, uninstall the Origin client from your computer. It is not necessary to uninstall Sims 2. You can leave that alone. (In fact, don’t touch TS2 in your Uninstall Program manager unless this tutorial doesn’t work!)
Reinstall Origin.
After logging back in, go to your Game Library, and right-click on the TS2UC thumbnail.
Click ‘Repair Game’. Let it repair.
Launch TS2 and let it load.
Check if your game was switched back to the default settings (no custom content, no saved games, no custom neighborhoods, etc.).
If you find anything like this changed, that is where the backed up files come in handy! Close your game.
Go to the Documents > EA Games folder. Delete any and all files within. Place your backed up game files in that same folder. Launch. Voila!
Or are you like me and you already updated the game before you found this tutorial and backed up your files, so you “lost” everything?
Fear not!
Check your Documents > EA Games folder. Are there two files (one saying ‘The Sims 2′, the other saying ‘The Sims™ 2 Ultimate Collection’)?
Delete the folder that doesn’t have your Downloads folder (or it is not filled with your finds), has no custom neighborhood(s) in the Neighborhood folder, and/or no custom neighborhood(s) in the SC4Terrains folder. This will most likely be the most recently created folder, usually with only a few folders/files inside (instead of 16-20 total items), and/or it may be entitled simply ‘The Sims 2′.
After deleting the appropriate folder, please make sure it is named The Sims™ 2 Ultimate Collection exactly, or TS2 will create another file (more than likely named The Sims 2 only).
Misc.
You may notice that the resolution has switched to the default. You will have to re-edit the Graphics Rule information, including using the Graphics Rule Maker program from Sims Network.
For those of you who only use Origin to play Sims 2, it would be better to avoid all Origin updates by using Offline Mode. Read this thread on ModtheSims for more info.
I am not programmer extraordinaire by any means, but if you need help, please feel free to contact me and I will try my best to help. If you have a better solution, do the same - let me know! Happy Simming!
#the sims 2 ultimate collection#the sims 2#thesims2#ts2#ultimate collection#ts2uc#origin#origin games#update#won't open#back up files#tutorial#fix#fixed#custom content#cc#ts2cc#ts2 cc
17 notes
·
View notes
Photo

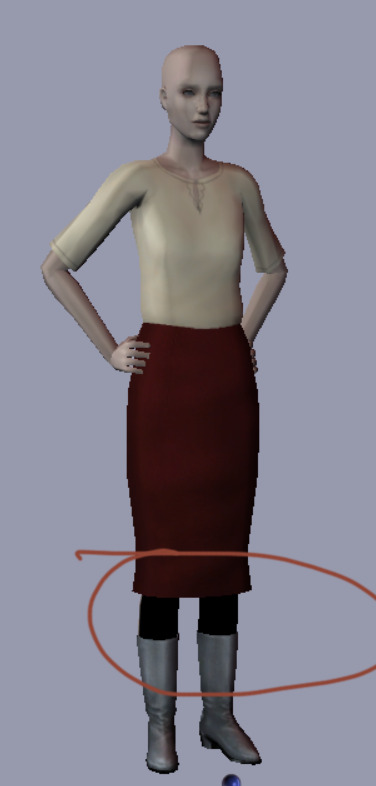
Some time ago, @namelesslibertad asked me how one would add tights to an outfit.
And truly, it is not difficult at all to do, so I’ve made a little tutorial!

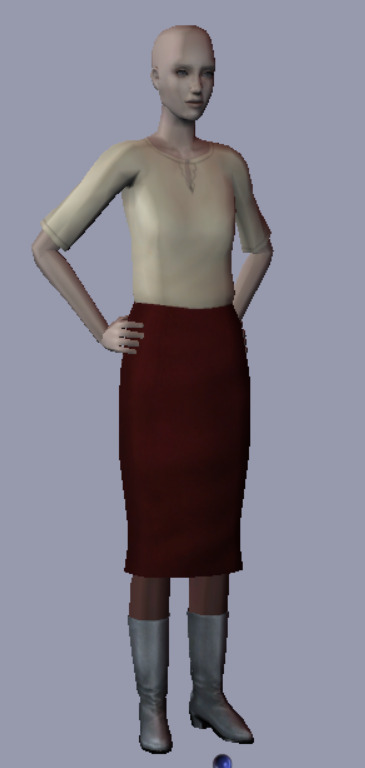
First, we will need a mesh to work with. I am using Bloom’s quite ancient elder skirt, separated from this seasons outfit.
It’s a nice little mesh! However, if it were going to truly be a part of an Outerwear outfit, we should have some leg coverage, no?
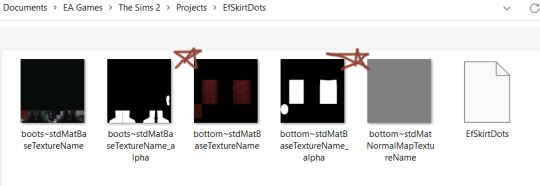
Once you have your clothing item in question in Bodyshop, and you have opened it in your Projects folder, we need to pay attention to the images files we have in front of us.
1 and 2 we don’t need to look at. This mesh is separated into groups, and the very first group is the boots. It’s the boots only and not the legs, so we do not need to mess with it.
If you want to know more about mesh groups aka subsets, @whattheskell‘s tutorial HERE is essential.
3 and 4 are what we want to look at. They are the TEXTURE of the legs and also the ALPHA of the legs. I’ll be saying the word ‘alpha’ a lot here, so if you do not know what that means: as mentioned in my tutorial about retexturing clay hair, the ‘alpha’ texture indicates where the texture should exist.
White means, “yes, texture”
Black means “no texture exists here”
Grey is in-between. Grey is what we want to work with; it’s how you can make sheer and semi-sheer tights.

Now you might be saying, “How did you know that the image file with the skirt texture would also have the legs available, you know, the place where tights go?”.
Well, totally optional step; you can go ahead and export the UV map (with a program like UVMapper) to find this out. The lower half of the texture contains the legs. @digisims2 explains this a little more right here.
Please know that even TS3 and TS4 conversions, while being mapped very differently from TS2 meshes, will still have a base ‘body’ map in one of the images files.
ALSO! When you open a clothing texture, you’re going to be limited to 1-4ish texture files to work with. So, you can just guess which one has the legs and undo undo if you are not correct. One of them has to have the legs texture!

Moving on!
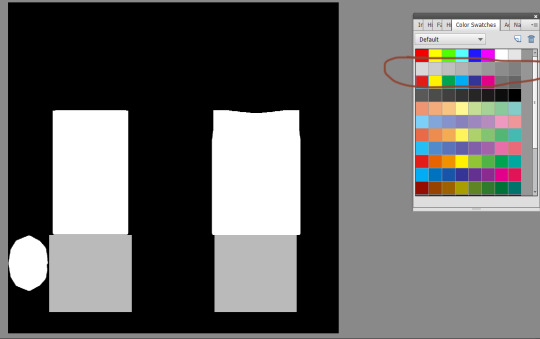
The skirt texture: that’s where the tights texture has to go.
If you are putting tights on an outfit, you can really just fill in with one color and it looks fine! Most tights are just one color. You can get fancy if you want.

Now for the alpha - you’re going to fill in 2 rectangles of white, grey or black here. The whiter, the more opaque. The blacker, the less opaque.
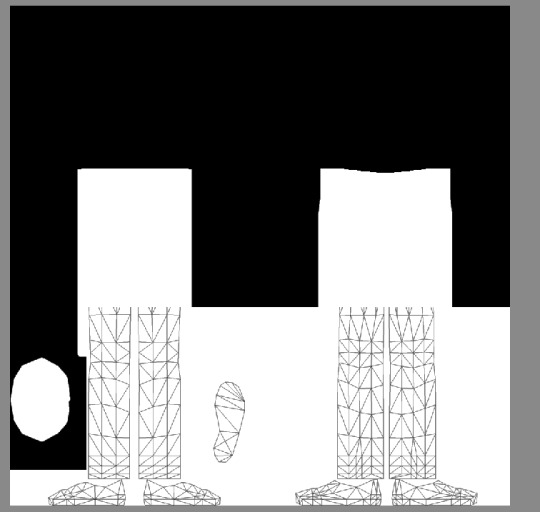
If you’re totally lost - grab a UV map. You can see pretty clearly what is legs and what is feet.

Clean it up, if you like! ‘
Fully remove the feet even, if you’re worried that the tights will end up somewhere they should not.

For the purposes of demonstration, let’s fill that all in with the brightest white you got.
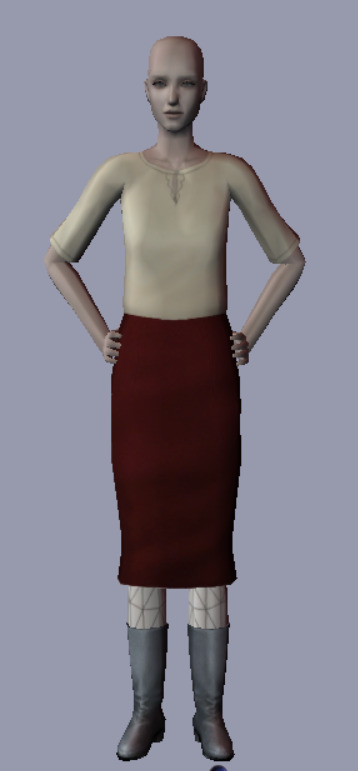
See? Tights! But very dark, very floodfill tights.
If you were going for leggings and if you had a nice texture, that all white alpha would be great! But, we are talking about hose, here.
Also - we haven’t quite gotten all that we need covered. That white bit there is the sim’s skin. Not fashion.
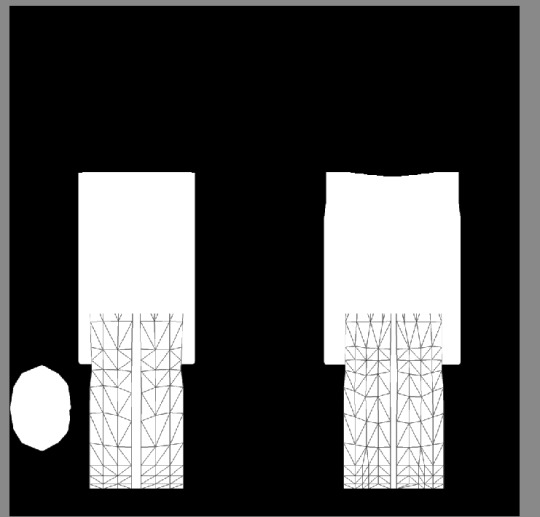
Let’s try a bigger section of alpha and a light grey this time.

You may have to play around with the grey scale to get the right result.
Also, I’d highly recommend you test your project on skintones S1-S4 to make sure that the alpha you choose works for light and dark tones. It also helps to catch mistakes.

This is a little better! The full leg is covered, and they are more sheer.

You can go ahead and copy and save this UV map if you like, if you don’t want to mess around with SimPE or UVMapper or any of that jazz. Really does help if you’re lost about what goes where.

See?

Sinfully ugly texture though, haha.
Not grandma’s best look - but helpful for explaining.
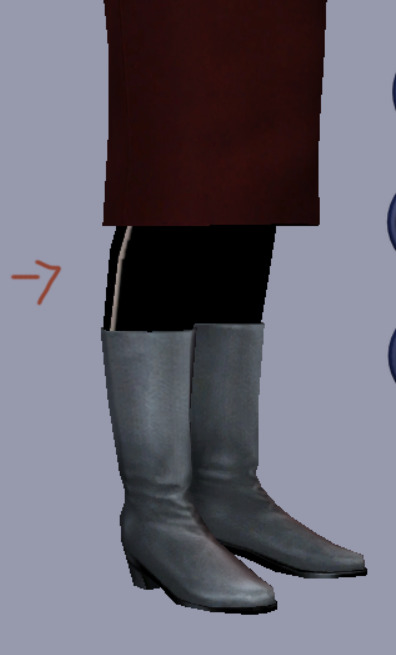
Alright, let’s fill in that texture with something nice, a deep burgundy.
Oh, lovely! A little sheer but not too much.
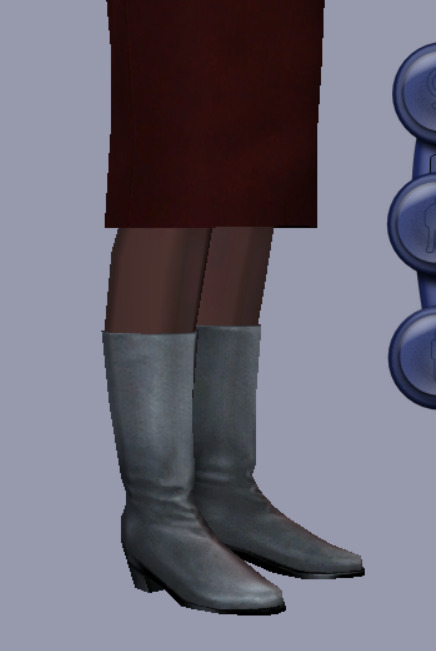
Hooray!
Let me know if you have any questions!
103 notes
·
View notes
Photo
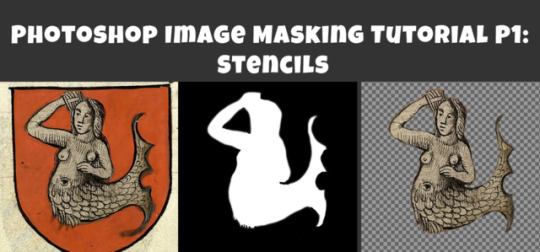
Photoshop Image Masking Tutorial Part 1: Simple Layer Masking to Image with Alpha, for Stencils and Overlays
As promised to a few people now, here is a (probably overly long) tutorial on masking in photoshop. Masking is where you use another image to show what parts of the main image you want to be visible and which parts invisible (or transparent). White = visible. Black = invisibile. Gray = various degrees of transparency. Alpha layers in DDS images do this for the entire image. Masks of individual layers do this for individual layers. This is a really really helpful skill for making textures.
This is all aimed at people who enjoy using Photoshop but are primarily beginners at it. I think I can safely say that masking is a “hump” skill for people who are otherwise pretty handy at Photoshop. I’m told it is a tricky thing to learn and an easy thing to forget, and it doesn’t help that there are several ways to approach it. This is the way I learned that actually stuck for me, so maybe it will make sense for you, too.
Part 1 (below) walks you through how I do overlays/stencils with transparency, from an image that is NOT neatly clipped.
Part 2 will cover RGB masks.
Part 3 will be masking of paint layers and other things in Create A World.
Part 4 will be masking in World Machine.
Part 5 will venture away from masking to cover novel uses of CAW, World Machine, and Crazy Bump for making textures, primarily normal maps, for CC objects and CAS (yes really!).
This is written for TS3 modders, but TS4 and TS2 modders might find it useful as well.
Skills covered:
Select --> Color Range, Inverse
Edit --> fill
Image --> adjustment --> Hue/Saturation(/Lightness), Brightness/Contrast
Filter --> Blur --> Gaussian Blur
Layers: New Layer, Merge Layers, Delete Layers, Mask Layer, Apply Mask
Channels: Edit Mask of Layer, Create Alpha Channel, Edit Alpha Channel
Save as DDS with transparency, Save as PNG for opening in Gimp with transparency
Importing into TSRW stencil OR package file via S3PE
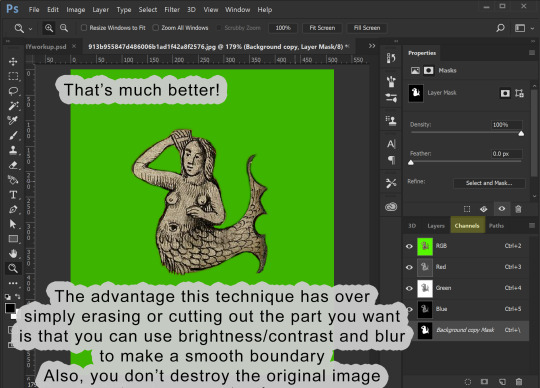
If you already use photoshop, you probably have done some form of creating layers with transparency. You may have selected a portion of your image and copied it, or erased everything but the parts of your image you want. That is all VALID, but working with masks instead has two advantages: first, it is non-destructive. Your image remains intact in case you delete something you might want later. Second, you can make softer transitions with greater detail than is ever possible from hand selecting or using the magic wand tool.
To begin, you can open your image directly in photoshop and just start working with it as is, or if you prefer you can copy it over to a document of the right size for your final texture (ie. 1024x1024 at 72 px per inch ARGB). You might want to do that if you already have other elements of your texture going on, but if you edit this image separately you don’t risk accidentally messing up your existing work. So:
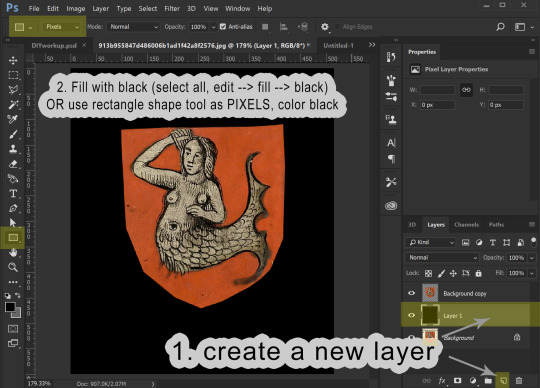
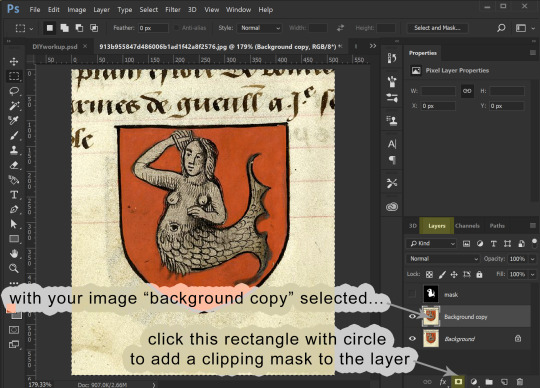
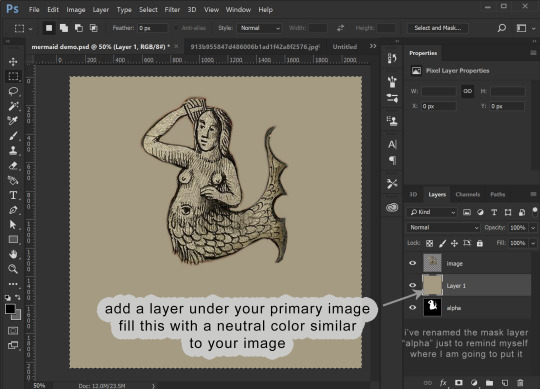
1. Open your image. In Layers, right click your background to create a copy. Please leave the background layer there for now, or make a second copy to save for later. You need TWO layers with your image in, because the layer we are working with is going to be transformed into a masking layer.

2. I’m aiming to isolate the mermaid. I definitely don’t need any of the beige background and I don’t care about the shape of the shield, so I’m just going to use the marquee tool to select the areas I don’t want and delete the. I select the area I want to keep, then go to select --> inverse selection to select the surrounding areas. I can then hit delete and place a black layer underneath to merge down on OR I can go to the edit menu --> fill --> black. The goal here is to gradually make the areas we don’t want BLACK and the areas we do want WHITE.


3. We now have our mermaid on the red shield sitting surrounded by black. This is a pretty good image to work with because what I want to isolate is a different color than the part I don’t want to keep. I’m going to now use the select --> color range tool to select red, and then the hue/saturation adjustment to make all of the red go black:


If you haven’t already merged your image with a black background, you can do that now.
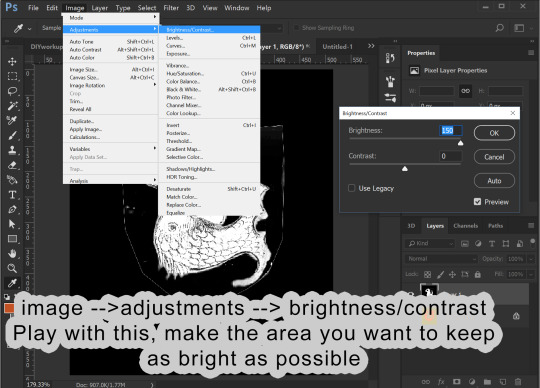
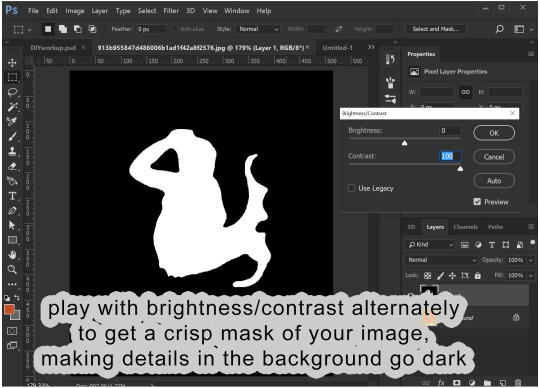
4. Before proceeding, make sure your image is entirely desturated (in grayscale). If you haven’t already, go to image --> adjustments --> hue/saturation, and drag the saturation levels all the way down. Now we go into the Image menu --> Adjustments --> Brightness/Contrast and start playing with these to make the area inside the mermaid as white as possible and the areas surrounding the mermaid as dark as possible. I find it helps to adjust brightness first to bring the areas I want to go to white above a 50% gray and then use the contrast to drive those values apart. This might sound weird, but just play around, and you will get the idea.
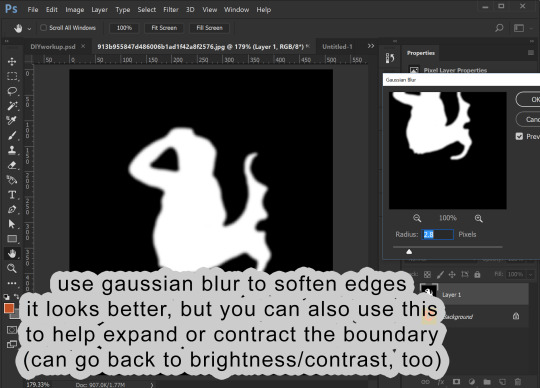
You likely will find that the image has too much detail. The scales on the mermaid I don’t want to be transparent. I want those dark details on my image to show! So, I go into Filter --> Blur --> gaussian blur to help make those details more light gray. This also make the white outline leftover from the shield shape darker by blurring the surrounding black into it.

I can then go back into brightness/contrast. You can jump back and forth between the two tools until you get a nice, crisp mask.
You can then go back into gaussian blur one more time to make the edges a little smoother.
5. I now am going to copy this black and white image and add it as a masking layer of my original image. You need to be working with a copy layer of your original image. This will not work with the background layer (unless you want the mask to be the alpha of the entire image).

You have your black and white “mask” layer copied. Now you select the layer with your original colored image and add a masking layer to it. From within the Layers panel (really important to be in the Layers panel, NOT channels) click the rectangle with the circle in it. This will add a masking image to your layer.

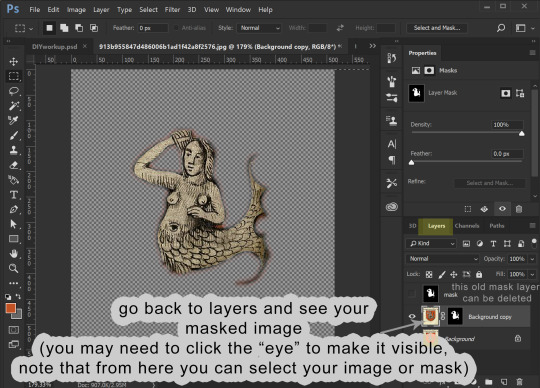
For that layer, click the channels panel, then click the “eye” visibility to the left of each channel to turn off the visibility of the RGB channels and turn on the visibility of the Mask channel. Select the mask channel and paste your mask image into it. Click back on the “eyes” to make everything visible, then go back to the Layers panel to see your image, now transparent because of the added mask. Note that from within the layers panel you can select either the image or the mask (the little “link” symbol in between can be turned on and off to link them or not, but you can ignore that for our purposes.)
6. Now we are going to edit the mask. I like to make a layer of a contrasting color to my image and place it underneath, so I can better see what the mask leaves and keeps.

Making sure your layer with your masked image is selected in the layers panel, go back to the channels panel, and select the mask channel to work with. You can leave the RGB/red/green/blue channels enabled and edit the mask directly, using either brightness/contrast OR a paint brush with black or white color. As you paint black on the mask you will see this “erases” the image (but it isn’t actually erasing the image, just adjusting the mask).


Playing with brightness will push the boundaries of your mask in and out, and contrast will make the boundary crisper. You can always adjust the layer with blur, too.
7. OK, cool! The mask is how I want it. Now I can prepare it for use. At this point you only need the layers with your image and its mask.
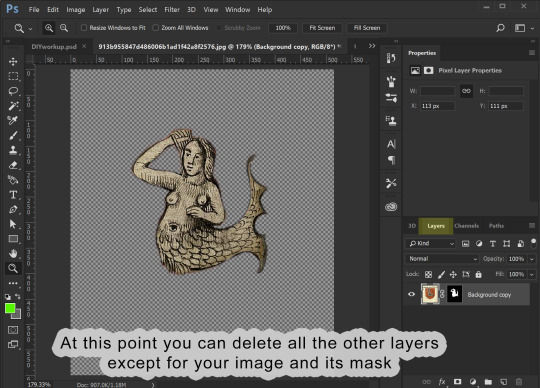
Assuming that you now want to transfer this image elsewhere and perhaps edit its shape to fit something else, you can then right-click the mask and select “apply mask”. This will delete the parts of your image that are masked out. Now you can copy your image and past it wherever you want it to go.

8. I’m making an overlay for a banner deco object. I already have a template made showing me where the banner is. I past the image into it and adjust its shape to look how I want.

9. Once you have it looking how you want, the final step is to prep it for saving as a DDS file. Assuming your image is the correct size (ie 1024x1024), we are once again going to use our image to make a mask. Only, this time, it already is at the correct opacity and transparency. So, duplicate your image. You can also at this point create a solid black background layer underneath it (new layer, fill it with edit/fill or with a the rectangle (pixel) tool). Choose one of your two image layers to make the new mask from. Select that layer, and go to image --> adjustments --> hue saturation. Drag the lightness ALL the way up (+100). You will see all of your image turn white. Click ok, then merge your all-white image down onto the black layer! Presto! This is your image mask again, only adjusted to fit your final image. In fact, this is what is going to become the mask of the entire image, the Alpha channel.


In my example below I’ve renamed that layer “alpha”. This does NOT make it the alpha channel, it is just to remind myself this layer will become the alpha channel. Now I make a layer behind my primary image filled with a color that matches the overall hue of my primary image. The point of this is so that any transparency created by the alpha layer will catch this color instead of filling it with white. You can then merge your primary image down onto this color layer, making it a solid image with no transparency.
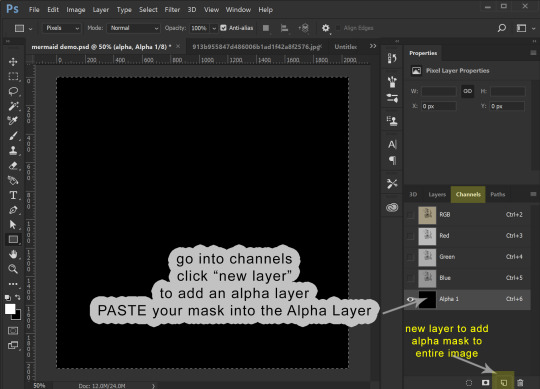
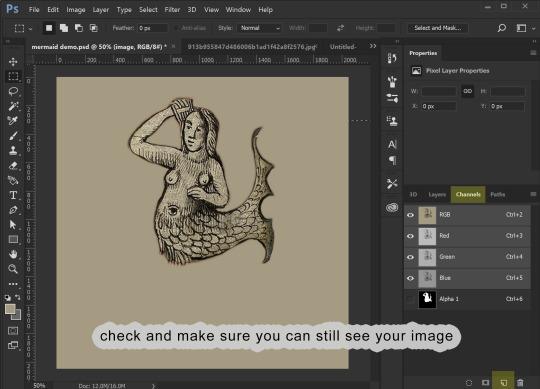
Now we COPY your “alpha” layer in its entirety, and go back into Channels panel. At the bottom of the channels panel, click the “new channel” (same image as “new layer” in the layers panel. This now creates the ALPHA channel for the ENTIRE IMAGE (not just whatever layer). Make sure that just the Alpha channel is selected and paste your copied “alpha” layer into it. Make sure that your entire image is still visible when the RGB channels are all visible.
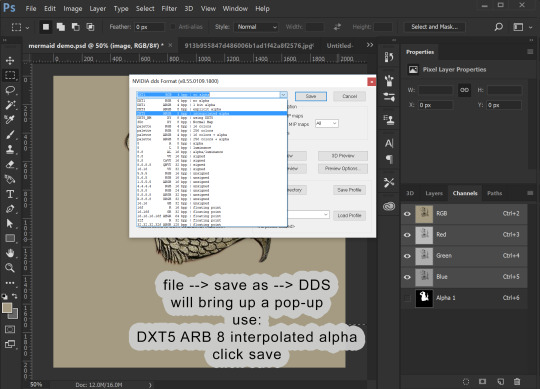
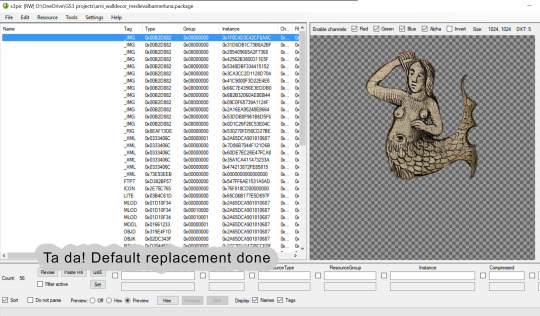
10. We can now save this image. (If you don’t have the NVIDIA plug in or it doesn’t work for you, you can use this plugin: https://software.intel.com/en-us/articles/intel-texture-works-plugin OR you can save the image as a PNG with transparency and open it in GIMP to save it as a DDS. JPEG formating does NOT carry the Alpha channel transparency!). The correct format is DXT5 ARB 8 with interpolated alpha. You can name it whatever you want.
11. To use this stencil in TSRW, simply open up your project, go to the texture variation you want, go to stencil, and import the DDS image. You could also import it as an overlay.

To import it is a default override of an image for an object you have as a package, open the package in S3PE (clone it first with S3OC if you want to make a NEW non-default object) and then right-click the _IMG you want to replace, select replace, and then navigate to your saved image. S3PE will automatically change to file name to whatever the name of the image you are replacing is. And that is it!
Alternately, you can use Texture Tweaker to create new texture variations and add new stencils. But, I’m not going to explain that here.


That is all I’ve got for now!
29 notes
·
View notes
Text
Replies
Oooooh I love this! Veronaville was my first hood so it'll always have a special place in my heart <3
Same here! Perhaps not my first hood, but definitely the one I loved and played the most! tyrellsimsoficeandfire replied to your photoset “Excuse the low graphic settings - and excuse my project-hopping of...”
Capp manor!!! I loved it back in sims 2. But totally Messed it up... Had Consort Capp start an affair with Isabella Monti, Titania Summerdream with everyone and in the end there were Lots of Monit-Capp marriages and Babys 😂 looking forward to your version 😁
Ahaha, some of my Veronaville saves ended up in a similar way :D I’m such a talent at losing or corrupting my ts2 saves, I had to start over countless times. My main mistake probably was to end the feud too smoothly, so all the suspense was gone and everyone a Monty-Capp like in your game! I’m really not sure if I want to give any original twist of my own to the story. I mean to recreate the inhabitants mostly as they appear on start-off in ts2. (Although starting a generation earlier would also be highly interesting!). But when it comes to how the story played out and what became of everyone, I just can’t clear my mind of In Verona, which is my number one favourite historical Veronaville Sims story on the web - with a few Jane Austen characters thrown in. http://winterinverona.blogspot.de/ Sorry, I still can’t link properly in reply posts :/ kevinvoncrastenburg replied to your photoset “Excuse the low graphic settings - and excuse my project-hopping of...”
I always loved the Capp Manor and you did a very very good job! It looks 1:1
Aww, Thank you! The outside pretty much is a direct copy. I got to get more creative with the interior, since ts3 has different furniture, but much more space for creativity with Create a Style. stormflame replied to your photoset “Excuse the low graphic settings - and excuse my project-hopping of...”
So cool :)
Thank You!
8 notes
·
View notes