#softbox LED
Explore tagged Tumblr posts
Visit Tumblr Blog
Explore Tumblr blogs with no restrictions, modern design and the best experience.
Last Seen Tumblr Blogs


Fun Fact
In Q3 of 2020, 31% of US users access the Tumblr app daily.
Text
Éclairage de studio Elgato Key Light - Mac, PC, iOS et Android
Profitez d'une remise de 27 % sur l'Elgato Key Light, l'éclairage de studio professionnel conçu pour le streaming et les visioconférences ! Son intensité de 2 800 lumens et ses réglages précis vous garantissent un éclairage optimal.
Éclairage de studio Elgato Key Light - Mac, PC, iOS et Android - LaRevueGeek.com
#bon plan éclairage#deal Elgato Key Light#panneau LED streaming#lumière de bureau#softbox LED#température de couleur réglable#éclairage visioconférence#diffuseur opale#accessoire gaming#lampe studio#éclairage connecté#promotion éclairage
0 notes
Text
exploring essential camera accessories for stunning photography lighting
In the world of photography, having the right accessories can make all the difference in capturing breathtaking images. One brand that stands out in the camera accessories industry is Ulanzi, known for its innovative and high-quality products.
Ulanzi offers a range of photography lighting solutions that can enhance your shooting experience, whether you're a professional photographer or a hobbyist. Their LED lights are not only portable but also provide adjustable brightness and color temperature, allowing you to create the perfect ambiance for your photos.
Additionally, Ulanzi's accessories are designed to be user-friendly, making it easy for anyone to elevate their photography game. From light stands to softboxes, their products are crafted with the needs of photographers in mind, ensuring that you have the best tools at your disposal.
Explore the world of Ulanzi and discover how their camera accessories can transform your photography lighting and help you capture stunning visuals!
#color temperature#Ulanzi#photography#LED lights#softboxes#hobbyist#user-friendly#camera accessories
0 notes
Text
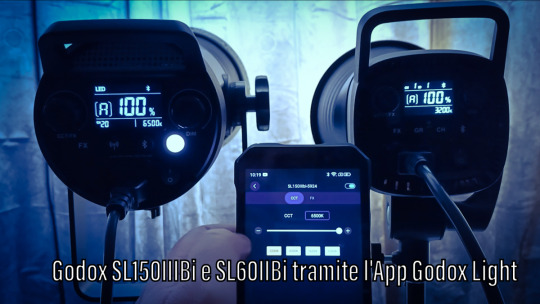
Godox Light: Utilizzare le Luci LED Godox SL150IIIBi e SL60IIBi tramite l'App Godox Light
Le luci sono fondamentali per la creazione di video di alta qualità e la fotografia professionale. Con l’avvento delle tecnologie LED, la precisione e la versatilità nell’illuminazione sono diventate più accessibili che mai. In questo articolo, esploreremo come sfruttare appieno le potenzialità delle luci video Godox SL150IIIBi e SL60IIBi, utilizzando l’app Godox Light disponibile per dispositivi…
View On WordPress
#Lighting#godox#godox continuous light and flash#godox continuous light for video#godox lighting for product photography#godox lights for product photography#godox sl-60w#Godox SL150IIIBi#Godox SL60-II#godox sl60ii continuous led light#godox sl60w#godox sl60w photography#godox sl60w setup#godox sl60w softbox setup#godox sl60w vs amaran 60d#photography lighting#video lighting
0 notes
Text

Master the art of light sculpting with Digitek's DBDS-65S, 85S & 105S Beauty Dish Softbox. Shape your narrative with every beam. Explore the endless possibilities of light manipulation and sculpt your story like never before.
0 notes
Text

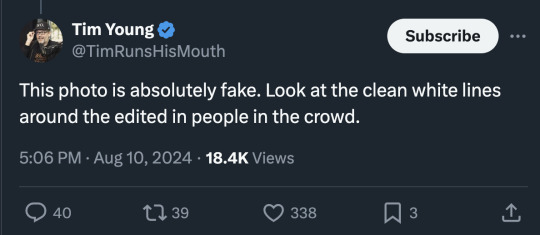

I think in this new age of A.I. the general public is going to need to increase their photography and lighting literacy. The response to this photo has just been a shit show.
There are people pointing out perfectly normal edge lighting and misunderstanding how reflections work.
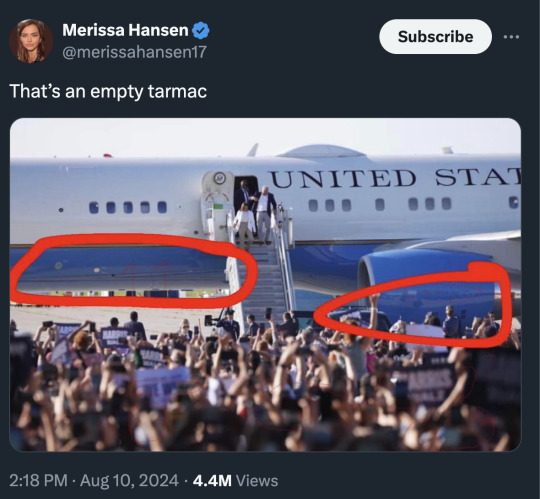

First the plane is parked at an angle. The tail is farther back than the nose. But also that is a curved surface and it tapers. It's reflecting the area to the right of the photo.
And the bottom of the plane is reflecting what is directly underneath. Which is the tarmac, not the crowd.
It should also be noted that photo was shot with a very telephoto lens and everything is super compressed. The crowd appears much closer to the airplane than they actually are.
But then someone who should have good understanding of lighting said this...
And now I'm worried for her clients. Because that's very... wrong.
Well, wrong-ish.
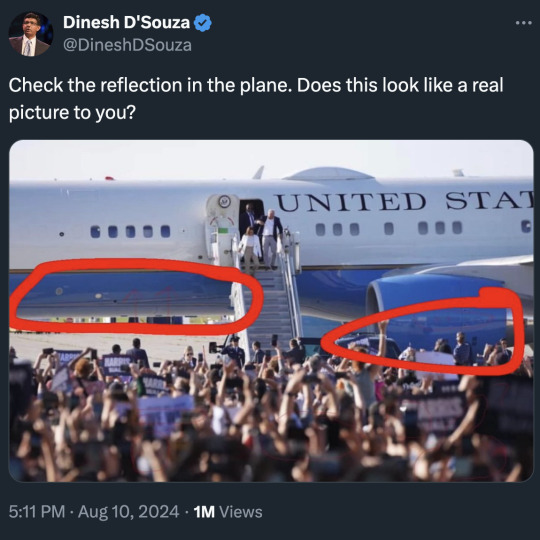
First, let's try to understand why this photo is setting off some alarm bells.

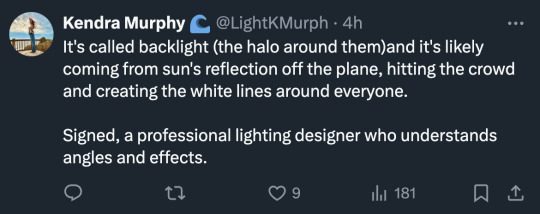
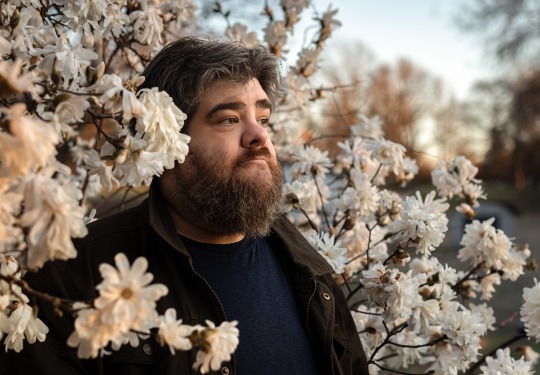
The crowd toward the rear is in shadow, but they are still very well exposed. But then there is also a bright light source creating a strong edge light on them. Looking at this photo with just the context of what is in it, there are some things that seem uncanny.
The information we do not have is the people in the shadow area are inside a very brightly lit airplane hangar.

So they have artificial light blasting them from the top.
But that light is still much dimmer than the sunlit areas outside so they appear in shade. But we are used to shade being much darker than areas in direct sun. So the balance seems off in our brain. We expect the people to be darker because we don't have the context of the bright hangar lights above them.
But the other issue is that the photo was post processed. It wasn't manipulated. The pixels weren't changed. But the exposure balance was altered.
If I were to guess, the original photo looked more like this...
But newer digital cameras can have 13 to 15 stops of dynamic range. And if you shoot in RAW, you can easily lift shadows and bring down highlights. You can balance the exposure so the dark parts aren't as dark and the bright parts aren't as bright. This photographer might have overdone it a bit in this case, but this is a fairly standard edit used to bring balance to photos.
And lastly, where does the edge light come from?
Edge lighting or backlighting or rim lighting (all the same) should probably be called wrap-around lighting if you want to be more accurate.
It comes from a homogenous light source that is larger than the subject being lit. So with my knife photo, I placed it on a large LED panel light.
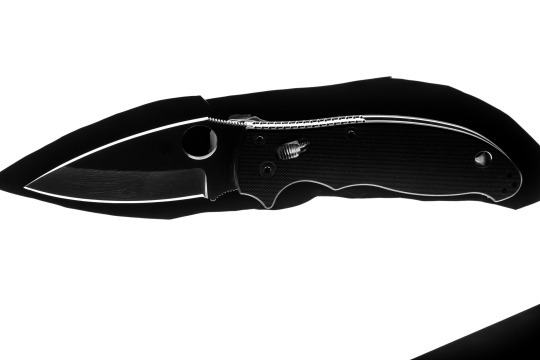
The light source was bigger than the subject so it wrapped around the edges.
And I'm afraid the airplane is not nearly large enough to create a light source to wrap around everyone in the crowd. It isn't even reflecting direct sunlight. So I'm sorry to say that lighting designer was mostly mistaken despite the confidence.
The light source is... everything.
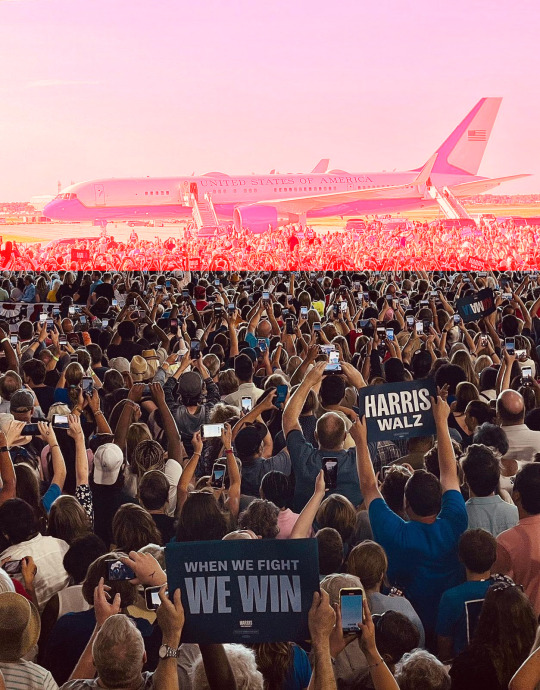
That entire red area I highlighted is the light source.
As well as everything above and everything to the sides.
And the biggest aspect of that light source would be the sky above. I think people always forget the sky is a light source. If you are seeing blue, you are seeing light. And I guess the plane is included in that, but that entire highlighted red area is so bright, and so filled with sunlight bouncing around, that it creates basically a giant softbox. It becomes a huge single light source for the people in the hangar.
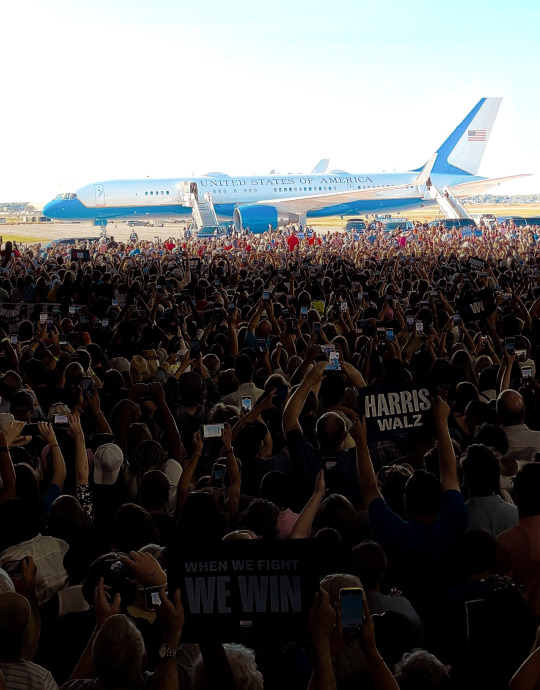
If you look at footage taken from way inside the hangar, you can see the camera adjusting exposure for the crowd inside, but look at what happens to the sunlit area outside.
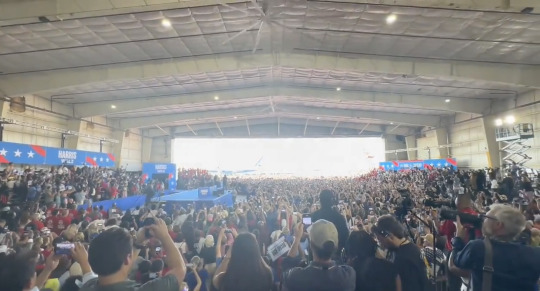
What does that look like?
A giant softbox.
A single homogenous light source blasting light inside the hangar.
The sun is so incredibly bright that even when it is not directly lighting something, the light just bouncing around outside is enough to overpower the very bright hangar lights.
So, what have we learned from this?
Perhaps people should hire me to be their lighting designer.
Though I'm sure she is actually very talented. She seems to work with stage lights and this is more physics and photography.
Phystography.
4K notes
·
View notes
Text

title: rafe's personal playboy bunny
warnings: 18+, smut
background: before moving to obx with your best friend, you were featured in a small playboy spread. when rafe found out about your past gig, he decided he needed to take some photos of his own.
the first purchase was a camera. top of the line, mirrorless, sleek in his hands like it belonged there. he spent too long in the store testing lenses, zooming in and out, asking questions he already knew the answers to. but it wasn’t just about the camera—it was about the setup, the lighting, the fucking vision he had in his head of you spread out and glistening under a spotlight, looking like something out of a magazine, but better. raw. real.
then came the tripods, the softboxes, the LED panels. he wanted precision, control over every shadow and highlight. you weren’t just a girl in front of his camera. you were a masterpiece he was going to create, frame by fucking frame. he tested angles in his room before even bringing you into it, adjusting the height, the placement, imagining the way the light would kiss your skin, the way the shadows would carve out every perfect line of you.
by the time he called you in, the room was transformed. not just a bedroom anymore, but a set. the walls lined with blackout curtains, the bed pushed to the center like a stage, soft sheets rumpled just enough to look inviting. and then, there was the table—laid out with more than just camera equipment. a collection of toys, sleek and glistening under the studio lights, each one carefully chosen. he wanted to see you use them, wanted to capture everything.
“strip,” he said, adjusting the focus, not even looking at you yet. the camera clicked as you peeled away your clothes, the sound sending a jolt of heat straight through you. his voice was low, measured, but you could hear the edge to it, the hunger buried beneath control. “slow. take your time.”
he guided you, not with touch, but with words. told you where to sit, how to arch, where to let your hands wander. the camera clicked with every motion, freezing you in time, making you immortal in pixels. and then, his voice dipped lower, dark amusement curling around each word. “pick one.”
your eyes flicked to the table. so many choices. some familiar, some new. you hesitated, and he caught it, a smirk tugging at his lips as he zoomed in, the lens capturing every little flicker of anticipation across your face. “don’t be shy now. you posed for strangers before, didn’t you? this is just for me.”
heat coiled in your stomach as you reached out, fingers grazing over the cool surface of a toy before wrapping around it. the moment you held it up, the camera clicked again, a satisfied hum escaping him. “good girl,” he murmured, stepping closer, adjusting the angle. “now show me how you use it.”
his voice guided you, steady, unwavering, the authority in it making your breath hitch. “start slow,” he instructed, eyes never leaving the viewfinder. “press it to your skin first. tease yourself.”
you obeyed, trailing it over your thighs, over the soft dip of your stomach, your lips parting when you felt the first shiver of pleasure. the camera clicked. “yeah, just like that. drag it lower.”
his breath was audible, heavy through the silence, the sound of the camera shutter filling the space between you. “spread your legs wider. let me see everything.”
your pulse pounded as you followed his orders, your fingers trembling slightly as you brought the toy exactly where he wanted it. the moment it pressed against you, a sharp inhale echoed from behind the lens. “fuck, that’s beautiful. turn it on.”
the vibration jolted through you, and the camera caught the exact second your mouth fell open, your eyes fluttering shut. “keep them open,” he reminded you. “look right at me. let me see what it does to you.”
his commands were precise. “circle it. slower. now press it in—yeah, just like that, princess.” the camera clicked with every change in your expression, capturing the way your brows knitted, the way your lips trembled. “use your other hand,” he murmured. “play with your tits. make it pretty for me.”
heat coiled tight in your stomach as you did exactly as he said, teasing and touching as he dictated, the pleasure intensifying with each passing second. the room was nothing but the sounds of the toy, your own soft gasps, and the rhythmic snap of the shutter as he immortalized every filthy moment.
“push it deeper,” he ordered, voice thick. “fuck yourself on it.”
you whimpered at the words, legs shaking as you moved the toy in and out, every motion perfectly timed to his direction. “yeah, just like that,” he praised, the camera still clicking. “God, you’re gorgeous honey.”
he didn’t stop until he had everything he wanted. until you were spent, trembling, and completely undone beneath the heat of his lens, captured forever in a way only he would ever see.
tags: @rafesbabygirlx @namelesslosers @drewsephrry @maybanksangel @averyoceanblvd @iknowdatsrightbih @rafesheaven @anamiad00msday @ivysprophecy @wearemadeofstardust0 @rafesangelita @rafedaddy01 @bakugouswaif @skywalker0809 @vanessa-rafesgirl @evermorx89 @outerhills @ditzyzombiesblog @slavicangelmuah @alivinggirl @rafesgreasycurtainbangs @lil-sparklqueen @rafessweetgirl
#rafey ᘚ#littlelamyposts༄࿔#dividers from plum98#rafe cameron#rafe obx#rafe imagine#outerbanks rafe#rafe x reader#rafe outer banks#rafe x you#rafe fic#rafe#rafe cameron x reader
746 notes
·
View notes
Text
Un equipo de cámara profesional: El pilar de tu podcast exitoso

Si estás pensando en lanzar un podcast en Sevilla o deseas llevar tu proyecto al siguiente nivel, ya habrás descubierto que el contenido de calidad no es suficiente. Hoy en día, la presentación visual es un componente fundamental para captar y fidelizar audiencia. En este contexto, contar con un equipo de cámara profesional no solo mejora la estética, sino que puede ser el verdadero pilar que sustente el éxito de tu podcast. Si quieres más información sobre los video podcast, este es el lugar ideal.
En este artículo sabrás por qué invertir en un equipo de grabación adecuado o contratar a un operador de cámara en Sevilla es una decisión clave si deseas destacar entre los cientos de podcasts que compiten por la atención del público.
¿Por qué el vídeo ha revolucionado el mundo del podcast?
Durante mucho tiempo, el podcast fue sinónimo de contenido sonoro. Sin embargo, en la actualidad, los videopodcasts dominan las plataformas como YouTube, Spotify Video o incluso Instagram y TikTok. Si no te adaptas a este nuevo formato, corres el riesgo de perder visibilidad frente a otros creadores que sí lo hacen.
Un contenido de audio puede ser excelente, pero un contenido audiovisual tiene el potencial de conectar emocionalmente, mostrar tu imagen de marca y generar engagement visual, algo imprescindible en un mundo donde el 80 % del tráfico en línea es vídeo.
Los beneficios de utilizar un equipo de cámara profesional
Si deseas que tu podcast en Sevilla sobresalga, no basta con una webcam o la cámara de tu móvil. Necesitas un equipo que garantice calidad, estabilidad y versatilidad. Estos son algunos beneficios concretos:
1. Calidad de imagen superior
Una cámara profesional te ofrece resolución en 4K, enfoque automático y una profundidad de campo adecuada, logrando una imagen clara y cinematográfica que capta la atención desde el primer segundo.
2. Control de iluminación y encuadre
Podrás trabajar con distintas fuentes de luz, controlar sombras, reflejos y ambientación. Además, el encuadre será más preciso, realzando los elementos importantes de tu set.
3. Mejora de la percepción profesional
Un podcast bien grabado transmite confianza. Si tu objetivo es atraer a patrocinadores, monetizar tu canal o colaborar con expertos, una imagen pulida es tu carta de presentación.
¿Necesitas comprar el equipo o puedes delegar?
Adquirir tu propio equipo puede ser una opción si estás decidido a profesionalizarte por completo. No obstante, en muchos casos es más recomendable contratar a un operador de cámara profesional en Sevilla, sobre todo si:
Estás empezando y no quieres asumir una inversión elevada.
Necesitas apoyo técnico con experiencia en videopodcasts.
Buscas grabaciones en estudio o exteriores sin complicaciones.
Un operador no solo aporta el equipo técnico, sino también el conocimiento necesario para aprovechar al máximo las herramientas, resolver problemas de luz o sonido, y adaptar la grabación a tus necesidades específicas.
¿Qué equipos debe incluir una producción de podcast profesional?
Tanto si decides hacerlo por tu cuenta como si delegas en un profesional, es importante que el equipo audiovisual incluya:
Cámara principal:
De preferencia DSLR o mirrorless, con capacidad para grabar en alta definición (1080p o 4K), entrada de audio externa y buena respuesta en condiciones de poca luz.
Micrófonos:
El sonido sigue siendo el corazón del podcast. Debes utilizar micrófonos de condensador, Lavalier o boom, según el tipo de grabación.
Iluminación:
Un set bien iluminado marca una gran diferencia. Utiliza luces LED regulables, con difusores o softbox, para lograr un resultado cálido y profesional.
Trípodes y estabilizadores:
Para mantener la imagen fija, libre de vibraciones o movimientos no deseados, un trípode o gimbal es indispensable.
La importancia del operador de cámara en el contexto local
Contar con un operador de cámara en Sevilla tiene ventajas únicas. No se trata solo de grabar, sino de entender el entorno. Profesionales locales conocen los mejores espacios, la iluminación natural según la hora del día, y cómo lidiar con factores técnicos específicos de la ciudad.
Además, muchos operadores sevillanos trabajan con estudios adaptados para podcasting, con condiciones óptimas de sonido, imagen y fondo, lo que te permite grabar sin preocuparte por el entorno técnico.
SEO, redes sociales y videopodcast: la fórmula del éxito
Un contenido audiovisual de calidad no solo se aprecia, también se posiciona mejor. Los motores de búsqueda valoran los vídeos con buena retención de audiencia, y plataformas como YouTube priorizan los contenidos bien grabados y editados.
Cuando inviertes en imagen:
Mejora tu posicionamiento en Google y YouTube.
Aumenta la tasa de visualización y retención.
Generas contenido que se comparte con mayor frecuencia.
Incrementas la profesionalidad percibida por posibles clientes o aliados.
En definitiva, el vídeo aumenta tu autoridad en el nicho de los podcasts en Sevilla.
¿Y qué pasa con la edición?
Tan importante como grabar con un buen equipo, es editar de forma profesional. El operador de cámara puede ayudarte también en esta fase, aplicando corrección de color, transiciones suaves, intros, cortes dinámicos y subtítulos.
Una buena edición marca la diferencia entre un contenido amateur y un producto audiovisual de alta calidad, listo para competir con los mejores.
Destacar y mantenerse: La calidad como pilar
En el universo creciente de los podcasts en Sevilla, destacar requiere algo más que una buena idea. La calidad visual es un componente esencial para construir una marca sólida, llegar a más audiencia y competir en igualdad de condiciones con otros creadores.
Un equipo de cámara profesional no es solo un complemento: es el pilar técnico de un proyecto exitoso. Tanto si decides invertir en tus propios equipos como si prefieres delegar en un operador de cámara con experiencia, dar este paso es fundamental para asegurar la calidad, la coherencia y el impacto de tu podcast.
¿Estás listo para grabar tu podcast con una imagen que refleje tu talento y profesionalismo? Sevilla te ofrece todo lo que necesitas para lograrlo. Solo falta que tomes la decisión correcta.
2 notes
·
View notes
Text
Yvette Heiser - How Mastering Photography Fundamentals Can Improve Your Night-Time Food Shots
Night-time food photography presents both challenges and opportunities for photographers looking to capture the delicious allure of culinary creations. With low light conditions and the need for effective composition, mastering the fundamentals of photography becomes essential. Yvette Heiser - Mastering Night-time Food Photography provides valuable tips and techniques for overcoming these challenges and capturing stunning food shots even in the darkest settings.

Understanding the Importance of Photography Fundamentals
Photography fundamentals encompass essential concepts such as exposure, composition, lighting, and focus. By mastering these foundational elements, photographers can effectively capture the essence of their subjects—especially in challenging conditions like nighttime settings. Yvette Heiser - Click with Confidence: Mastering Photography Fundamentals offers valuable insights into these core principles, helping photographers build a solid foundation for capturing stunning images in any environment.
1. Exposure: Balancing Light and Darkness
Exposure refers to the amount of light that reaches your camera sensor, affecting how bright or dark your image appears. In night-time food photography, achieving the right exposure is crucial to highlight details while avoiding overly dark or washed-out images.
Key Tips for Managing Exposure:
Use a Wide Aperture: A wide aperture (e.g., f/2.8 or f/4) allows more light to enter the camera, making it easier to shoot in low-light conditions. This also creates a beautiful background blur (bokeh) that emphasizes your subject.
Adjust ISO Settings: Increasing your ISO sensitivity can help capture images in low light. However, be cautious—higher ISO settings can introduce noise. Aim for the lowest ISO that allows you to achieve a properly exposed image.
Utilize Longer Shutter Speeds: Slowing down your shutter speed allows more light to hit the sensor. Use a tripod to stabilize your camera during longer exposures, preventing motion blur.
2. Lighting: Creating Atmosphere and Mood
Effective lighting is crucial in night-time photography, as it sets the mood and enhances the visual appeal of your food shots. Natural light may be limited, so understanding how to manipulate artificial light sources is essential.
Lighting Techniques for Night-Time Food Photography:
Use Soft Light: Soft, diffused lighting is ideal for food photography. Consider using softboxes or LED lights with diffusers to create even lighting without harsh shadows.
Incorporate Ambient Light: Utilize available ambient light sources—such as candles, string lights, or lamps—to create a warm and inviting atmosphere. Experiment with different angles to see how the light interacts with your subject.
Control Shadows: Be mindful of shadows in your composition. Use reflectors (like white foam boards) to bounce light onto darker areas, ensuring your food remains enticing and well-lit.
3. Composition: Framing Your Subject
Composition is the art of positioning elements within your frame to craft a visually engaging and harmonious photograph. Effective composition can draw attention to the food while providing context about the setting.
Tips for Strong Composition in Night-Time Food Photography:
Rule of Thirds: Use the rule of thirds by dividing your frame into a 3x3 grid. Place your main subject along these lines or at their intersections to create balance and interest.
Frames Within Frames: Use elements in your environment (like plates or utensils) to create frames within your composition. This technique adds depth and guides the viewer’s eye toward the main subject.
Negative Space: Incorporate negative space around your food subject to emphasize it further. This technique helps prevent clutter and allows viewers to focus on the dish itself.
4. Focus: Sharpening Your Subject
Achieving sharp focus on your culinary subject is vital in food photography. In low-light conditions, it can be challenging to maintain focus, but mastering this skill will elevate your night-time shots.
Focus Techniques for Crisp Images:
Manual Focus: In low-light situations, autofocus may struggle. Switch to manual focus to ensure precise control over which elements are sharp in your image.
Use a Tripod: A tripod stabilizes your camera and helps achieve sharper images, especially when using slower shutter speeds. This is particularly useful for night-time photography where motion blur can easily occur.
Focus on Key Details: Highlight specific features of the dish—such as texture or garnishes—by focusing closely on those areas. This adds visual interest and draws attention to the quality of the food.
Mastering photography fundamentals is essential for anyone looking to improve their night-time food shots. By understanding exposure, lighting, composition, and focus, photographers can create stunning images that showcase their culinary creations in the best possible light. With practice and experimentation, you’ll find that these fundamental skills not only enhance your night-time photography but also enrich your overall photographic journey. So grab your camera, experiment with these techniques, and watch as your night-time food photography transforms into mouthwatering works of art!
#wedding#pictures#camera#moments#photographytips#photographer#photography#childphotography#yvette heiser#events
6 notes
·
View notes
Text
Technical Challenges and Solutions in Professional Photography
Photography is an art form that demands creativity and technical skill in equal measure. As a professional photographer, navigating the technical challenges that arise during a shoot is part of the journey. These challenges can disrupt your workflow, but with experience and preparation, they can be effectively managed.
One common technical issue is poor lighting conditions. Natural light isn't always available, and artificial lighting can cast harsh shadows or unwanted color tones. To tackle this, investing in high-quality lighting equipment like softboxes, reflectors, and portable LED lights can make a world of difference. Additionally, understanding how to adjust your camera's ISO, aperture, and shutter speed allows you to adapt to changing light conditions quickly.
Another challenge is achieving accurate color balance. Colors can appear different on various screens and prints, leading to discrepancies between what you see and what your client receives. To maintain consistency, calibrating your monitor regularly and shooting in RAW format are essential. RAW files retain maximum data, giving you greater flexibility in post-processing to correct colors without losing quality.
Technical malfunctions also happen—memory card failures, dead batteries, or unexpected equipment damage. The solution? Always carry backups. Extra batteries, memory cards, and even a secondary camera body can save a shoot from disaster. Additionally, regular maintenance and firmware updates for your equipment help minimize the risk of technical issues.
Finally, mastering post-processing software is crucial. Programs like Adobe Lightroom and Photoshop are powerful tools, but they require learning. Taking the time to understand these applications ensures that your editing enhances your work rather than masking flaws.
Every technical challenge has a solution. With preparation, knowledge, and adaptability, you can overcome these obstacles and create stunning work that captures your artistic vision.
2 notes
·
View notes
Text
Can You Use a Personal Loan for Creating a YouTube Studio?
In today’s digital era, content creation has become one of the most lucrative career choices. With platforms like YouTube offering opportunities to earn revenue through ads, sponsorships, and memberships, many aspiring creators are looking to invest in a professional YouTube studio. However, setting up a high-quality studio requires a significant financial investment. This raises an important question: Can you use a personal loan to create a YouTube studio?
Understanding a Personal Loan
A personal loan is an unsecured loan that you can use for various purposes, including debt consolidation, medical expenses, home improvement, and even business-related investments. Unlike business loans, a personal loan does not require collateral, making it an attractive financing option for individuals who need quick funds.
Lenders approve personal loans based on your credit score, income, employment status, and repayment capacity. Since it is a multipurpose loan, you can use it to finance your YouTube studio without any restrictions from the lender.
Costs Involved in Creating a YouTube Studio
Before taking out a personal loan, it’s essential to understand the costs involved in setting up a YouTube studio. Here’s a breakdown of key expenses:
1. Camera and Equipment
A high-quality camera is the heart of any YouTube studio. Depending on the content type, you may need DSLR cameras, mirrorless cameras, or even 4K camcorders. Additionally, essential accessories like tripods, gimbals, and lenses can add to the costs.
2. Lighting Setup
Proper lighting enhances video quality, making it more professional. Ring lights, softbox lights, and LED panels are necessary investments for a well-lit studio.
3. Microphones and Audio Equipment
Audio quality is just as crucial as video quality. A shotgun microphone, lavalier mic, or condenser mic, along with an audio interface and soundproofing materials, can improve the overall production quality.
4. Computer and Editing Software
Video editing is an integral part of content creation. A powerful computer with sufficient RAM, storage, and a high-quality graphics card is necessary for smooth video editing. Premium editing software such as Adobe Premiere Pro, Final Cut Pro, or DaVinci Resolve can enhance post-production quality.
5. Studio Setup and Backdrop
A well-designed backdrop adds to the aesthetics of a YouTube studio. Depending on the theme, you may need a green screen, customized backgrounds, or decorative items.
6. Internet and Streaming Equipment
A high-speed internet connection and streaming gear like capture cards and encoders are essential for live streaming and uploading high-resolution videos.
7. Marketing and Promotion
Investing in SEO, social media ads, and branding materials can help grow your YouTube channel quickly.
How a Personal Loan Can Help You Set Up a YouTube Studio
Using a personal loan for your YouTube studio can be beneficial in multiple ways. Here’s how:
1. Immediate Access to Funds
A personal loan allows you to access funds instantly, helping you purchase essential equipment without delay.
2. No Collateral Required
Unlike business loans, a personal loan does not require collateral, making it a risk-free borrowing option.
3. Flexible Usage
Since personal loans are multipurpose, you can use them for any studio-related expenses without lender restrictions.
4. Structured Repayment Plans
Most personal loans come with fixed monthly installments, making it easier to manage finances and plan repayment effectively.
5. Lower Interest Rates Compared to Credit Cards
Personal loans often have lower interest rates than credit cards, making them a more affordable financing option.
Things to Consider Before Taking a Personal Loan for Your YouTube Studio
While a personal loan can be an excellent financing option, there are certain factors you should consider:
1. Loan Amount and Interest Rate
Compare loan offers from different lenders to get the best interest rates and loan terms.
2. Repayment Terms
Choose a repayment plan that aligns with your earning potential from YouTube to avoid financial strain.
3. Credit Score Requirements
A good credit score can help you secure a loan at lower interest rates. Check your credit score before applying.
4. Alternative Financing Options
Consider alternatives like crowdfunding, grants, or business loans before opting for a personal loan.
Steps to Get a Personal Loan for Your YouTube Studio
If you’ve decided to take out a personal loan for your YouTube studio, follow these steps:
Step 1: Assess Your Financial Needs
Calculate the total amount required for your studio setup.
Step 2: Check Your Credit Score
A higher credit score increases your chances of loan approval at favorable interest rates.
Step 3: Compare Lenders
Research various lenders and compare interest rates, repayment terms, and processing fees.
Step 4: Apply for the Loan
Submit an online or offline application with the required documents, including proof of income and identification.
Step 5: Receive Funds and Start Your Studio Setup
Once approved, the loan amount will be disbursed to your account, allowing you to purchase the necessary equipment.
Conclusion
Yes, you can use a personal loan to create a YouTube studio. It provides an excellent financing option for aspiring content creators who need immediate funds to invest in high-quality production equipment. However, it’s crucial to evaluate your repayment ability and explore different loan options before making a decision. By using the loan wisely, you can build a professional YouTube studio and turn your content creation passion into a sustainable career.
If you’re considering applying for a personal loan for your YouTube studio, compare different loan providers and choose the one that best suits your financial needs. With proper planning and investment, your YouTube journey can be both financially rewarding and creatively fulfilling.
#nbfc personal loan#fincrif#bank#personal loan online#personal loans#loan apps#loan services#personal loan#personal laon#finance#Personal loan#YouTube studio#Personal loan for YouTube studio#Financing a YouTube studio#Loan for content creators#Personal loan for equipment#YouTube studio setup cost#Funding for YouTube channel#Personal loan for business#Best loan for YouTubers#How to finance a YouTube studio#YouTube studio investment#Personal loan for video production#Small business loan vs personal loan#Studio loan for content creation#Loan for vloggers#Best personal loan for YouTubers#Borrow money for YouTube channel#Loan for creative projects#Personal loan benefits for YouTubers
1 note
·
View note
Video
youtube
Ghost Cult caught up with Bruce Lamont of the long-running Chicago-based avant-guard Doom Metal band Yakuza! Their new album "Sutra" was recently released via @SvartRecords and we chatted with Bruce all about the album, the current lineup's contributions as a team, Bruce's evolving approach to saxophone and vocals, his lucrative other gig in the @ledzeppelin tribute band Led Zeppelin 2, vinyl releases, and much more! Stream the track "Alice" here: https://youtu.be/X0Obw8-VvlM Purchase the album here: https://ift.tt/l5PeE2V Yakuza is: James Staffel-Drums and percussion Matt McClelland -guitar/ backing vocals Jerome Marshall- bass Bruce Lamont- vocals and saxophone Interview by Keefy https://ift.tt/rR1eTFS Produced & edited by Ojaay https://www.instagram.com/ojcpics Theme music by Salted Wounds https://ift.tt/M43aWQ7 ▵ PODCAST ▵ (Listen on Spotify, Apple Podcast, Anchor) "Ghost Cult MagazinePODCAST" ▷https://ift.tt/5oEQbu2 ▵ GEAR WE USE ▵ (These are affiliate links) Set up A: Sony A7 III - https://amzn.to/3tQm422 Tamron 17-28 - https://amzn.to/3ePrlTd Tamron 28-75 - https://amzn.to/3fqCjgY Desview Mavo-P5 Monitor- https://amzn.to/33LlTub Manfrotto Befree Travel Tripod - https://amzn.to/3hxbL0e Set up B: Feelworld T7 Monitor - https://amzn.to/2Re9hta Audio: Sound Devices MixPre-3 - https://amzn.to/3tKkJd2 Gearlux XLR Mic Cable - 3 Pack - https://amzn.to/3w3zN6Y Deity D3 Microphone - https://amzn.to/3tRa6W2 Fifine Usb Mic - https://amzn.to/3w8JHEG Lighting: YONGNUO YN600L - https://amzn.to/2QkNrn5 YONGNUO YN300 Air - https://amzn.to/2QjN5gu Dfuse Softbox - https://amzn.to/3uQq4AN Aputure MC - https://amzn.to/3oirFgx NanLite PavoTube II 6C - http://bit.ly/NanLitePavoTubeII Lightstands - https://amzn.to/3uSBl3x 5 in 1 Reflector - https://amzn.to/33KHdjo And our iconic Rope Light https://amzn.to/3ycdmyz For the full list of Ghost Cult gear: http://bit.ly/OJCPicsKit This video contains a shoutout to the band Fallen Shadows https://ift.tt/PuzI2i7 Get your DIY band, record label, or shop mentioned in our videos on YouTube, by visiting our pinned post on Twitter for instructions! https://twitter.com/GhostCultMag/status/1142861626590355456
2 notes
·
View notes
Text
ما هي الأدوات التي يستخدمها مصور فوتوغرافي ال��ياض؟
يعتمد مصور فوتوغرافي الرياض على مجموعة أساسية من الأدوات والمعدات لالتقاط صور عالية الجودة وتنفيذ مهامهم بكفاءة. ومع ذلك، قد تختلف بعض التفضيلات أو الحاجات بناءً على نوع التصوير الذي يركز عليه المصور والظروف البيئية في الرياض (مثل الإضاءة القوية والشمس الساطعة). ويمكن توضيح قائمة بالأدوات الأساسية التي يستخدمها مصور فوتوغرافي الرياض:
1. الكاميرا (Camera):
كاميرات DSLR (Digital Single-Lens Reflex): لا تزال خيارًا شائعًا للمحترفين بفضل جودة الصورة العالية، إمكانيات التحكم اليدوي الشاملة، وتوفر مجموعة واسعة من العدسات.
كاميرات Mirrorless (بدون مرآة): أصبحت شائعة بشكل متزايد بفضل حجمها الأصغر، وزنها الأخف، وميزاتها المتقدمة مثل التركيز التلقائي السريع ومحدد المنظر الإلكتروني. علامات تجارية مثل سوني (Sony Alpha series)، كانون (Canon EOS R series)، ونيكون (Nikon Z series) شائعة في السوق السعودي.
كاميرات متوسطة التنسيق (Medium Format): لبعض التخصصات التي تتطلب أعلى جودة ممكنة للصورة، مثل تصوير الأزياء أو المنتجات الفاخرة، قد يستخدم المصورون كاميرات متوسطة التنسيق.
2. العدسات (Lenses): تُعد العدسات بنفس أهمية الكاميرا ضمن أدوات مصور فوتوغرافي الرياض وتُختار بناءً على نوع التصوير:
العدسات القياسية (Standard Lenses): مثل 50mm f/1.8 أو f/1.4، مثالية للبورتريه والتصوير اليومي بفضل فتحتها الواسعة التي تسمح بإضاءة جيدة وعزل خلفية جميل (بوكيه).
العدسات واسعة الزاوية (Wide-Angle Lenses): لتصوير المناظر الطبيعية، العمارة، أو المجموعات الكبيرة، خاصة في الرياض حيث توجد مبانٍ حديثة ومناظر صحراوية.
العدسات المقربة (Telephoto Lenses): لتصوير الأهداف البعيدة، مثل الفعاليات الرياضية، الحياة البرية، أو تفاصيل العمارة من مسافة.
عدسات الماكرو (Macro Lenses): لتصوير التفاصيل الدقيقة والقريبة جدًا، مثل المجوهرات، المنتجات الصغيرة، أو الزهور.
عدسات الزوم المتعددة الاستخدامات (Versatile Zoom Lenses): مثل 24-70mm f/2.8 أو 70-200mm f/2.8، توفر مرونة كبيرة في المواقف المختلفة.
3. معدات الإضاءة (Lighting Equipment): تعتبر الإضاءة عاملًا حاسمًا في ال��صوير الفوتوغرافي، وتُستخدم لتعويض الإضاءة الطبيعية أو التحكم فيها:
الفلاش الخارجي (External Flash / Speedlite): يوفر إضاءة إضافية وقابلة للتحكم، ويمكن توجيهه أو استخدامه بشكل لاسلكي.
فلاشات الاستوديو (Studio Strobes / Monolights): لإضاءة احترافية في الاستوديو أو في المواقع التي تتطلب إضاءة قوية ومتحكم بها.
المعدّلات الضوئية (Light Modifiers):
السوفت بوكس (Softboxes): لتوزيع الضوء بشكل ناعم ومتساوٍ، مثالي للبورتريه وتصوير المنتجات.
المظلات (Umbrellas): لتشتيت الضوء وتنعيمه.
العواكس (Reflectors): لعكس الضوء الطبيعي أو الصناعي لملء الظلال أو إضافة إضاءة إلى الهدف.
المشتتات (Diffusers): لتنعيم الضوء القاسي، خاصة في ضوء الشمس المباشر في الرياض.
الإضاءة المستمرة (Continuous Lights / LED Panels): يستخدم مصور فوتوغرافي الرياض لتصوير الفيديو غالبًا، ولكنها مفيدة أيضًا في التصوير الفوتوغرافي لبعض الاستخدامات، خاصة في الاستوديوهات.
4. الحوامل والثبات (Stabilization):
الحامل الثلاثي (Tripod): ضروري للحصول على صور حادة في الإضاءة المنخفضة، أو لتصوير المناظر الطبيعية، أو لصور المنتجات التي تتطلب ثباتًا مطلقًا.
الحامل الأحادي (Monopod): يوفر دعمًا إضافيًا للكاميرا والعدسة، وهو أكثر مرونة وسرعة في الإعداد من الحامل الثلاثي.
المثبتات (Gimbals / Stabilizers): لتصوير الفيديو الخالي من الاهتزاز، وأيضًا لالتقاط صور ثابتة في ظروف معينة.
بينما يعد سعود العون أبرز مصور فوتوغرافي متخصص بالرياض، فإنه مصور ومونتير محترف يقدم تصوير فوتوغرافي وفيديو وموشن جرافيك لعلامات تجارية كبر بالرياض، بالإضافة إلى تقديم خدمات الفيديو، المونتاج، والموشن جرافيك. خبرة واسعة مع علامات تجارية كبرى مثل بنتلي، نايكي، STC، والهلال.
5. البطاريات وبطاقات الذاكرة (Batteries & Memory Cards):
بطاريات إضافية: لأن التصوير قد يستغرق ساعات طويلة، وتوفر البطاريات الإضافية استمرارية العمل.
بطاقات ذاكرة سريعة وذات سعة عالية (SD/CFExpress cards): لتخزين الصور عالية الدقة والفيديوهات بجودة 4K أو أعلى. السرعة مهمة لضمان عدم تباطؤ الكاميرا أثناء التصوير المتتابع.
6. ملحقات أخرى ضرورية:
حقيبة الكاميرا (Camera Bag): لحماية المعدات الثمينة أثناء النقل والتنقل في الرياض وخارجها.
أدوات التنظيف (Cleaning Kit): مثل منفاخ الهواء، قطعة قماش مايكروفايبر، سائل تنظيف العدسات للحفاظ على نظافة العدسات والمستشعر من الغبار (الذي قد يكون شائعًا في بيئة الرياض الصحراوية).
الفلاتر (Filters):
فلتر الاستقطاب (Polarizer Filter): لتقليل الانعكاسات من الأسطح غير المعدنية (مثل الماء أو الزجاج) وزيادة تشبع الألوان في السماء.
فلتر الكثافة المحايدة (ND Filter): لتقليل كمية الضوء التي تدخل العدسة، مما يسمح باستخدام سرعات غالق أبطأ في الإضاءة الساطعة للحصول على تأثيرات مثل ضبابية حركة الماء أو السحب.
جهاز تحكم عن بعد (Remote Shutter Release): لتجنب اهتزاز الكاميرا عند الضغط على زر الغالق، مفيد في التصوير الليلي أو عند استخدام الحامل الثلاثي.
7. برامج المعالجة والتحرير (Software for Post-Processing): بعد التقاط الصور، تأتي مرحلة المعالجة الرقمية:
Adobe Lightroom: لمعالجة وتصنيف وتنظيم الصور بكميات كبيرة.
Adobe Photoshop: لتحرير الصور بشكل متقدم، مثل دمج الصور، إزالة الكائنات، وتعديلات الريتوش الدقيقة.
برامج أخرى: مثل Capture One، Luminar Neo، أو GIMP (مفتوح المصدر) حسب تفضيل المصور.
يعتمد مصور فوتوغرافي الرياض مثل غيره من المصورين في العالم، على هذه الأدوات لخلق صور فوتوغرافية احترافية تعكس رؤيتهم الإبداعية وتلبي احتياجات عملائهم.
0 notes
Text
Recensione della Luce LED COB Studio SL150IIIBi
Godox SL150IIIBi Studio LED Video Light 160W High Power Photography Light 2800K-6500K per Home Studio Live Nel vasto mondo della produzione multimediale, l’illuminazione gioca un ruolo fondamentale nel determinare la qualità e l’aspetto finale di qualsiasi lavoro. La luce LED COB Studio SL150IIIBi offre una soluzione versatile e potente per le esigenze di illuminazione in ambienti studio, con…

View On WordPress
#Lighting#godox#godox continuous light and flash#godox continuous light for video#godox lighting for product photography#godox lights for product photography#godox sl-150w#Godox SL150-III#godox sl150iii continuous led light#Godox SL150IIIBi#godox sl150IIIbi vs amaran 60d#godox sl150w photography#godox sl150w setup#godox sl60w softbox setup#photography lighting#video lighting
0 notes
Text
The Art of Product Photography: Capturing Images That Sell

A Picture is Worth a Thousand Sales
In today’s digital-first world, product photography is your online storefront. It’s often the first impression customers have, and it can make or break a sale. Whether you’re showcasing artisanal soaps, tech gadgets, or baked treats, eye-catching images are essential for turning browsers into buyers.
One of the most common questions we hear is: “How can I take good product photos for my website?”
Not a very high budget? No problem. Even without a big budget, smart techniques and a creative eye can turn everyday setups into stunning product shots.
In this guide, we’ll cover everything from basic equipment to styling tips, editing, and even how to increase sales with better product images. Let’s dive in.
Why Great Product Photography Matters?
The Impact of Powerful Product Photos:
Build trust with your audience
Reduce returns through clear representation
Increase conversions with visually persuasive images
What You Need: Basic Product Photography Equipment

Creating scroll-stopping photos doesn’t require a professional studio. A few smart investments (and some DIY hacks) can take you far.
Cameras
DSLR or Mirrorless (e.g., Canon EOS R, Nikon Z5): High quality, full control
Smartphones: Flagship models like the iPhone 15 or Pixel 8 deliver stunning clarity
Tripods
Keeps your images consistent and blur-free
Phone tripod + Bluetooth remote = game-changer
Lighting Tools
Softboxes, LED lights, or natural daylight for smooth, even lighting
Bounce cards or reflectors help reduce harsh shadows
Backgrounds
Seamless white paper for clean e-Commerce shots
DIY backdrops for a textured, custom look
Lighting 101: The Secret Sauce of Great Product Shots
Lighting can elevate even the most basic setup. Get this right, & your product will pop.
Natural vs. Artificial Light
Natural light is great for lifestyle shots and softer shadows
Artificial light gives you full control, great for consistency across product lines
Tools that Help
Softboxes for diffused lighting
LED ring lights for portable brightness
Lightboxes for small objects like jewelry or cosmetics
Backgrounds & Styling: Set the Scene to Sell
Your background isn’t just the backdrop, it’s part of your story.
Creative Background Ideas
Plain white for Amazon, Shopify, and other Ecommerce platforms
Textured surfaces like wood, tile, or fabric for lifestyle branding
Colourful themes that align with your brand identity
Camera Settings that work Every Time
Even if you’re new to photography, learning a few basics can transform your results.
Recommended Settings
Aperture: f/8–f/11 for sharp focus
ISO: 100–200 to keep things clean and crisp
Shutter Speed: 1/125 or faster to avoid blur
White Balance: Match your lighting source to avoid color shifts
Mobile Product Photography Tips (that actually work)

Phones are powerful! With a few adjustments, they can rival DSLRs, seriously.
Quick Tips
Use the back camera (it’s higher quality)
Tap to focus and lock exposure before clicking
Shoot in daylight to avoid grainy shots
Use grid lines to align and frame better
Handy Tools
Tripod with phone mount
Mini LED ring light
Snapseed or Light room Mobile for fast edits
Editing: Polish without overdoing it
Editing helps enhance your photo, not change your product. Keep it clean, consistent, and true-to-life.
Go-To Tools
Lightroom: For color correction and brightness
Remove.bg: Instantly deletes backgrounds
Canva: Great for quick touch-ups and social media formatting
Key Edits
Fix lighting and color
Remove dust or flaws
Crop tightly around the product
Keep aspect ratios consistent
Platform-Specific Tips: E-Commerce Ready
Every platform has different requirements. Here’s how to tailor your images accordingly:
Shopify
Consistent sizing
Minimal background distractions
Amazon
White background
No logos, watermarks, or props
Etsy
Lifestyle shots encouraged
Warm, handmade feel
Final Thoughts: Let Your Photos do the Selling
If you’re still wondering “How to take product photos that sell?”, the answer lies in strategy, not gear. Good lighting, consistent styling, and a clear brand voice will help you create photos that not only look great, but also build trust and drive conversions.
Read Our Latest Blogs
Looking to sharpen your creative edge and stay ahead in the visual content game? Check out some of our latest reads from the Creative Splash Blog:
1. Learn how to emotionally connect with your audience, boost brand recall, and drive deeper engagement using strategic storytelling techniques.
The Power of Digital Storytelling
2. Explore how unconventional storytelling is changing the world of animation and what it means for your brand.
Ever Thought Animation Could Rebel? A Deep Dive into Experimental Animation
3. Understand how AI is reshaping animation workflows and what creatives need to know today.
AI in Animation: Game-Changer or Job-Taker?
Ready to Transform Your Product Photography
At Creative Splash, we specialize in commercial product photography that turns casual scrollers into loyal customers. Whether you’re building your brand, boosting sales, or levelling up your Instagram, we’re here to bring your products to life.
#photography#video marketing#product photography#photoart#photooftheday#minimalism#videoproduction#production#creativesplash
0 notes
Text
Hard & Soft: An Explanation of Light
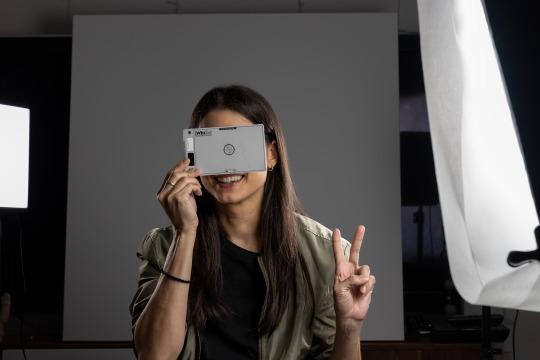
I was watching a video from one of my favorite tech YouTubers, Mr. Whose the Boss. He was showing off some of his favorite tech and pulled out this tiny LED light.

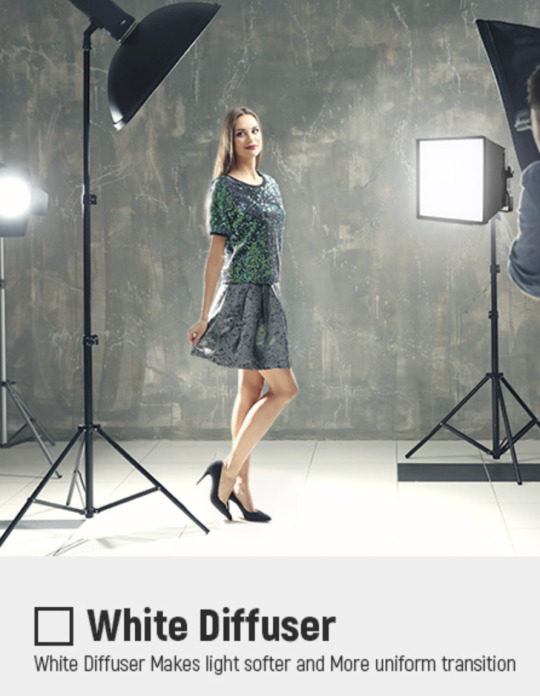
And then he placed a diffuser on the front and said this...

"You can equip a softbox on the front which *massively* softens the light on your face."
Sorry, Arun.
No it doesn't.
I sometimes wish I could get a job as a YouTube lighting advisor. So many creators have to set up and use professional lighting but very few actually have an understanding of how their lighting works. And with just a little knowledge they could up their lighting game big time.
If nothing else, I could stop the plague of ring lights.
Ring lights are my nemesis.
*shakes fist at ring lights*
Arun repeated a classic myth. Diffusing a light does *not* make it softer. And despite the name, a softbox is fully capable of producing hard light. Especially if it is only the size of your granddad's wallet.
I'm afraid softboxes are a bit misnamed—much like how the tremolo system on a guitar is technically a vibrato mechanism. Tremolo is a fluctuation of volume, not pitch. Personally, I just stick to calling it a whammy bar because that is more fun anyway. And, like, what does "whammy" even mean in the context of a guitar? I'd rather call something by a nonsensical name than an inaccurate one, ya know?
What the hell was I saying?
SOFTBOXES!
They should probably be called "light homogenizers." Which is a mouthful, but more accurate.
Or, hear me out... WHAMMY BOXES.
Froggie Note: I am trying a color coding technique to help make the most important information stand out. Red means PAY ATTENTION and blue means "do your best to remember this." Let me know if this is helpful or annoying or if a different color combo is preferred.
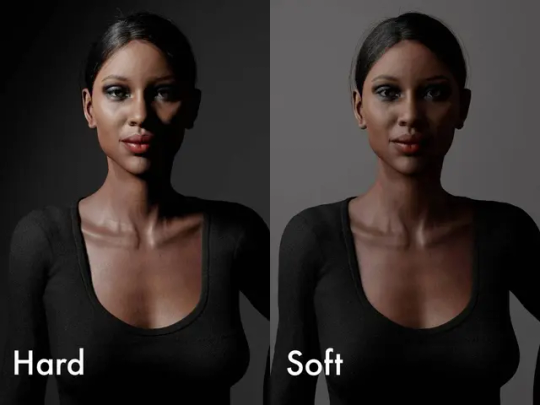
Hard Light vs. Soft Light
Hard light is a less flattering light source that creates high contrast, sharp shadows, and accentuates texture.
Soft light is a more flattering light source that creates soft shadows and reduces texture like pores, blemishes, and wrinkles.
You can *only* get hard or soft light by changing the apparent size of a light source from the subject's point of view.
If you remember only three things about light, they should be...
Bright light = sharp photos, less noise Hard light = small light source Soft light = large light source
Now, it's important to remember that hard light is not *bad* and soft light is not *good*. In photography, the oft-used parlance "flattering" just refers to the rendering of facial features and blemishes. So you might use a more flattering lens to make sure faces do not distort or a more flattering light modifier to reduce wrinkles.
But there are situations where soft light can be very boring and hard light can be much more dynamic and interesting. But if you have someone who is insecure about their skin or has a lot of blemishes, you can mitigate that by making the light softer. But if you have someone with great skin and a lot of angular facial features, you might use a hard light to show that off.
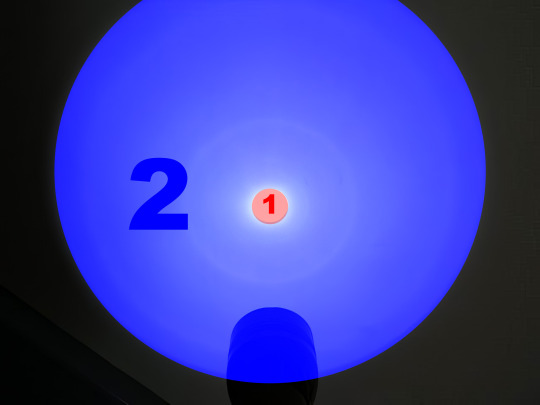
Which of these do you prefer?
The one on the left was taken with a 7 foot diameter light source and is *very* soft. But the other had a 1 foot diameter and I think it is more dynamic and interesting.
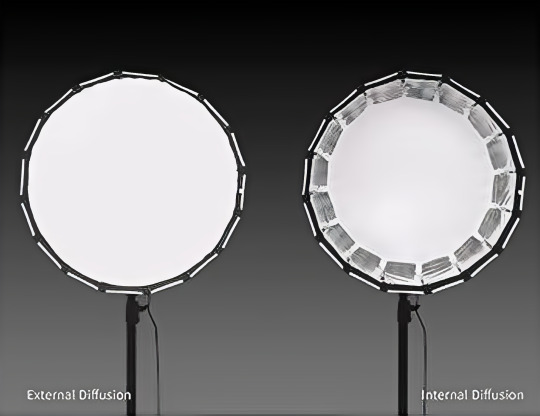
You can also mix hard and soft light. And with something like a parabolic reflector or a beauty dish, you can even modify a light source to be hard and soft at the same time.

This technological terror of a light modifier is sort of like having 24 individual small lights around the edges but the entire surface of the reflector also acts as a single large light source.
And when it isn't atomizing Alderaan, it is taking photos like this...
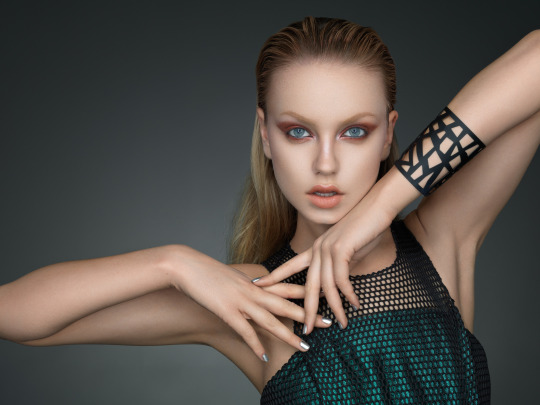
This creates a falloff of light around the edges of her face, nose, and arms while also reducing the intensity of the shadows. Lenses with longer focal lengths prevent distortion of facial features but also flatten our faces. So a modifier like this can bring back dimensionality.
Neat!
Now I just need $8,000 to buy the Death Star light.
There are a ton of possibilities when it comes to modifying light sources, but most people typically want the main light on the subject to be in the realm of soft and use hard light sources as edge lights.

Also, everything is a spectrum and light is no different. There is a giant space in between hard and soft to play with. In fact, the hardest light possible would be cast on a subject floating in space.
And the softest light possible would be on a planet that has 100% cloud coverage that still allows sunlight to scatter through.
So, I have determined the surface of Venus to be the most flattering light in the universe.
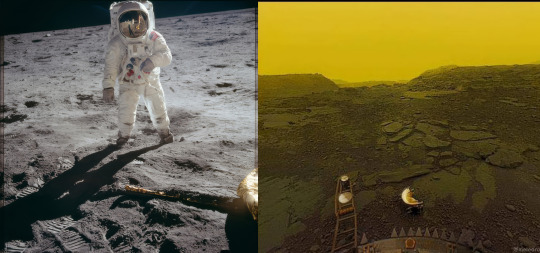
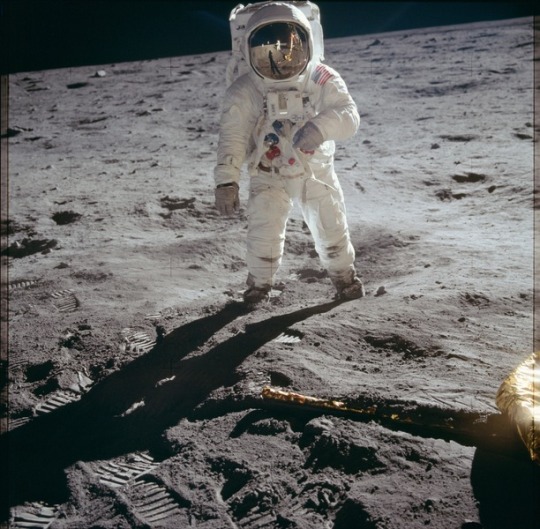
Look at how dark and sharp that astronaut shadow is! And I'm sure Venusian photography would be quite popular if you wouldn't burst into flames.
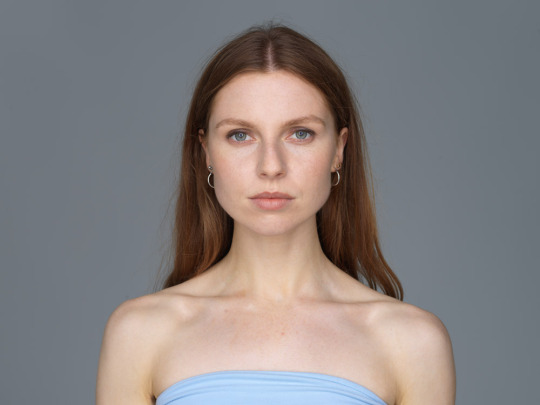
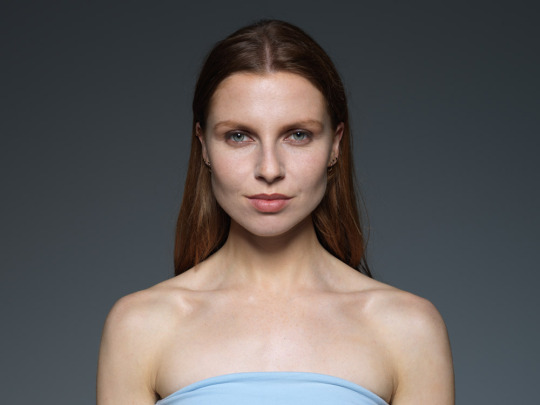
On planet Earth, noon on a clear day would be the hardest light and a very overcast day would be the softest light.

How can the sun be both hard and soft light?
Well, the sun is quite large, but it is very small in the sky and very far away. It is the only thing humans can observe that is close to a "point" light source—the smallest light source possible that shines light equally in all directions.
But on an overcast day, sunlight scatters through all of the clouds and becomes a HUGE homogenous light source. The clouds become a singular giant light above us. And as you can see, the light is so soft the woman does not have a hint of shadow on her face. And shadows can draw attention to pores, wrinkles, blemishes, and other textures.
But wouldn't the smallest light source be a laser or something?
When photographers refer to a small light source we mean from the perspective of the subject being lit. This is referred to as apparent or angular size.
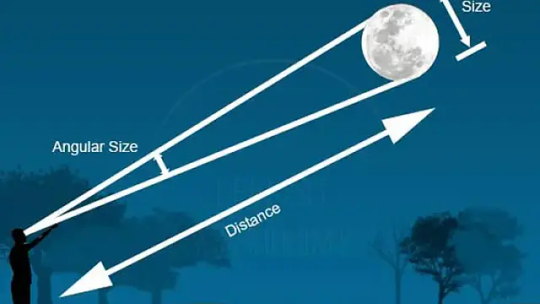
But you also have to account for the size of the area the light source can illuminate.
This is the area a laser can light up.
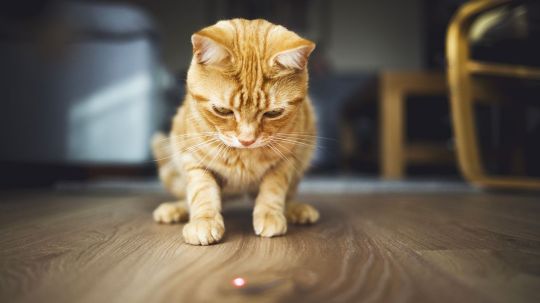
And this is the area the sun is able to cats cast light upon.

It doesn't matter if a laser is close or far away, it focuses light onto a very small area. But the sun lights up half the planet. So look at imagine the apparent size of the sun in the sky and compare its size to half of the Earth. In that relative circumstance, the sun is a super tiny light source.
And the sun becomes an even tinier light source on the moon because there is no atmosphere or clouds to scatter and enlarge it.
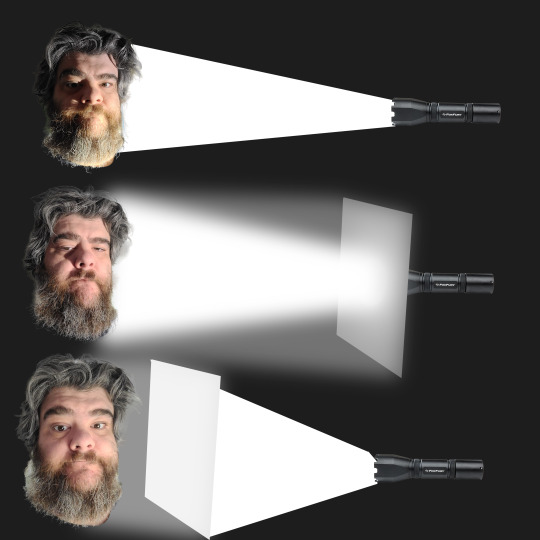
You can change the apparent size of a light source in two ways...
The physical dimensions of the light and the distance from the subject.
A light with small dimensions can be a large light source if it is close enough and if the subject is small enough. So a flashlight could be a large light source for an ant if that flashlight is directly next to said ant. But a flashlight could never be a large light source to a human.
However, we can enlarge small light sources with modifiers.
A modifier can be a softbox. It can be a piece of paper. A large poster board. A wall or a ceiling. Anything that changes the nature of a light source can be a modifier. But not all modifiers increase the size of a light source.
So, you can take that flashlight, shine it on a wall, and reflect the light to make a giant light source capable of producing softer light.
But what you cannot do is put diffusion material directly in front of a flashlight and make the light it produces softer.
When Arun put that diffuser on the front of that tiny light, he was not making the light any bigger. He was only making the light more diffused.
What does diffusion *actually* do?
Diffusion scatters light. It makes light bounce in all directions and keeps it from being focused. And while this is an important aspect to making a light source larger, it does not change the apparent size of a light source on its own.
Diffused light is homogenous.
A homogenous light source has the same intensity across its entire surface area. And that homogenization is the key to creating a better soft light source. It can *assist* in making a light source larger, but only if you know how to wield that diffusion properly.
When you shine a flashlight toward a wall, you increase the apparent size of the light source.
Fantastic! You now have a softer light. Mission accomplished.
But if you do not diffuse it, you will create a hotspot.
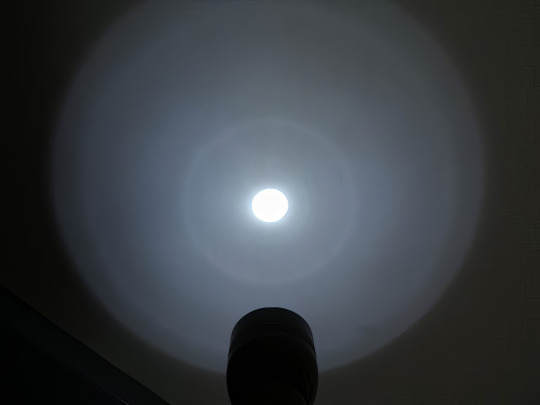
That bright hotspot will reflect more light than all of the other light reflecting off the wall. That reflected light has different intensities across its surface area and you end up creating TWO distinct light sources—one hard and one soft.
This can sometimes be desired if you want to create graduated light that falls off like I showed earlier. But if it is not controlled well with a specialized modifier a hotspot can cause more problems than benefits.
This can reveal unwanted texture, double shadows, cause harsh glare, and it may not achieve the desired amount of soft, flattering light you were hoping for.
However, if you diffuse the light from the flashlight before it hits the wall, the light will scatter and reflect off the wall more evenly. You will create a more *homogenous* light source that acts as a single entity of light.
Diffusion does reduce the overall intensity of the light, but that is usually a worthy trade off for the increased homogeny.
These pesky hotspots are actually a big problem with those cheap softboxes you can buy off Amazon.

Many of them do not have enough diffusion to create a single homogenous light source. So they end up with a hotspot that gives you that double light source effect.
I was able to fix this with my friend Katrina's softbox by adding a layer of tracing paper in front.
You can see the chip clip holding the tracing paper in place on the right side.
Photography is just problem solving all the way down.
A higher quality softbox will have a second layer of diffusion already built in to prevent this, so make sure the softbox has this feature before buying.
Or invest in a roll of tracing paper and some chip clips.
Softboxes are an ingenious light modifier when built properly. They take a small light, diffuse it, enlarge it, and then focus it toward your subject. It's essentially a paradox of scattered & focused light. And since all of the scattering only happens *inside* the softbox, it gives you great control over how that light hits your subject. And you can focus it even more by putting a grid on the front.

This keeps light from "spilling" off to the sides though it can reduce intensity a bit and create unusual looking catchlights in the eyes.
Whereas a cheap shoot-through umbrella kinda "shoots" scattered light all over the place and causes a ton of extra reflections off the walls and ceilings. That may end up giving you unwanted second, third, and fourth light sources contributing to your exposure.
You can see light hitting the left and right walls and the ceiling—those pesky photons are going everywhere! And while it is giving a soft, flattering result due to that umbrella being so freaking big, you have almost no control over the light and how it affects your background.
So, yes, a softbox can make a small light source bigger, but that doesn't always mean you will get "soft" light.
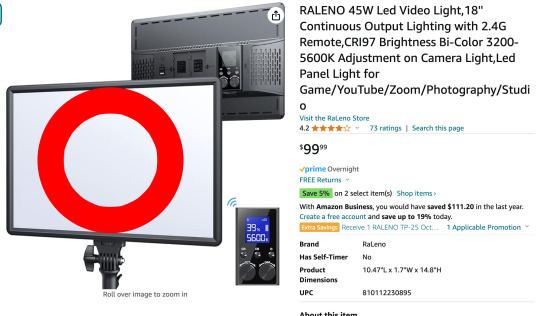
This softbox takes a 10 inch LED panel and creates a 12 inch light source. This is mostly a scam product.

The marketing says it makes the light softer.
And while that is *technically* true, I'm afraid people are going to be disappointed if they think this thing is going to dramatically soften their light. A small increase in surface area like that would only be dramatically different if you were lighting a little toy car or the hypothetical ant friend I mentioned earlier. Something the size of a person is not going to see a difference in softness. Not to mention you are going to decrease the power of your light by adding diffusion and have no softening benefits.
Photography gear companies love taking advantage of new photographers because the desire to buy more gear to improve the quality of photos is quite strong. This is jokingly referred to as G.A.S. or "Gear Acquisition Syndrome." And while there is absolutely gear you can buy to improve your photos (lights, lenses, tripods), knowledge trumps any piece of gear at any time.
So, no, this scam softbox will not make the light appreciably softer. The only way to make this light softer is to find a softbox that enlarges it more than 2 friggin' inches, bounce it off something larger, or bring it closer to the subject. Move your light as close as possible and you will enlarge its apparent size.
Or, conversely, you can move your light farther away to make it hard.
Meaning you can technically make a softbox a hardbox.
Seriously, can we just do the whammy box thing?
So, what have we learned?
Soft light is more flattering to skin and reduces texture and harsh shadows.
Hard light increases contrast, sharpens shadows, and highlights texture.
Neither is good or bad. Soft light can be boring. Hard light can be interesting. A mixture of the two often produces the best result.
The only way to make light softer is to enlarge the light source.
You can enlarge a light source by...
Increasing the physical dimensions with a modifier.
Moving the light closer.
Reflecting the light off a larger surface.
Diffusion alone does not make a light softer.
Diffusion makes a light source more homogenous by mitigating hotspots.
Softboxes create homogenous light that you can direct and focus.
A softbox can still produce hard light if it is really small or really far away.
We should call it a whammy box.
How can you use this knowledge?
Well, the first thing you can do is...
DON'T BUY A RING LIGHT.
YES, I AM RANTING ABOUT RING LIGHTS AGAIN!
That giant hole in the middle of your light is a great spot for extra light.
And as we just learned, a larger light source is softer. So unless you specifically need a ring light and know how to use it (facial close-ups, camera goes in the hole), you are better off getting the biggest light you can fit in your space.
Look at how much bigger this light is than if it were a ring light.
It's like all of these influencers are throwing perfectly good light into the garbage.
Sorry, let's try this again.
Once you avoid ring lights, how can you use this knowledge?
I know a lot of you reading this are not influencers or YouTubers or photographers. And you may be thinking all of this knowledge I just shoved in your dome is useless.
But here's the thing...
We all take photos.
And I think we all want our photos to look their best.
If you start thinking more about light when you take photos, I promise you will be able to improve their quality.
If you are taking a selfie, think about where you can go that has a larger light source. Perhaps you have a large window. Or you have a big overhead light or floor lamp that shines up into the ceiling.
I actually had this idea to create a mega light that could blend in with a house's decor, but secretly be a photography light for taking pictures of people and pets indoors at night.
Secret Photography Light Ingredients Cheap Floorlamp Dual Light Socket Adapter 9000 Lumen LED Bulbs
(Seriously, if you put that together, stick it in a corner, and turn it on when your kids or pets are playing, you will never have another blurry photo from inside your house unless they are going full zoomies.)
If you are outside on a sunny day, don't stand in direct sunlight.
Remember, THE SUN IS ACTUALLY SMALL, angularly speaking. Find a shady spot under a tree. Or put the sun behind you and face a big white wall so the reflected light smacks you in the face.
Walls are light sources!
The ground is a light source!
Remember that moon photo?
You were looking at the sharp shadow earlier because I drew your attention to the sun being a small light source.
But the surface of the moon... HUGE LIGHT SOURCE.
How do you think the front of that space suit is lit when the sun is behind him? Either Stanley Kubrick has a big reflector offscreen or the ground is a soft second light source.
If you can't make it to the moon, just wait to take that selfie on a cloudy day. I think overcast light is a little boring, but your skin will look buttery smooth without using those stupid Facetune apps.
You can also wait for good light. Sometimes sunset has some nice, soft directional light because it has more atmosphere to scatter, diffuse, and enlarge it.
If you are indoors, don't use direct flash on your phone. Never ever use direct flash if you can avoid it. But perhaps you are with friends and they all have phones too. Use one or more phones to bounce the flashlight off a nearby wall. Or open up a paper napkin and hold it just out of frame and shine light through it and diffuse it.
A piece of paper can even work!
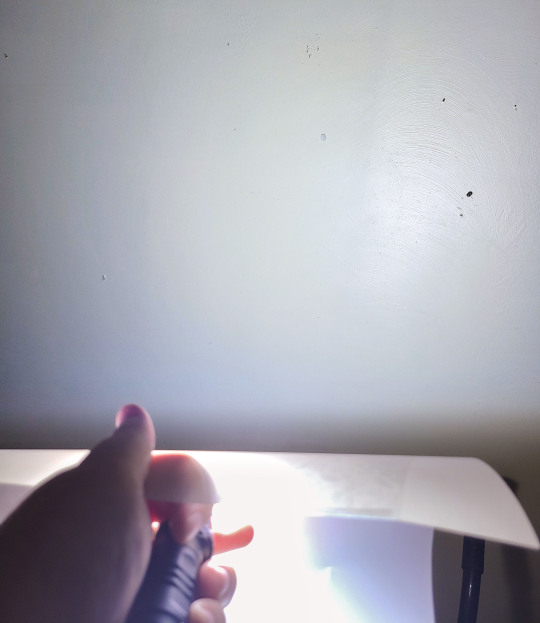
Flashlight 3 feet away shining directly onto my face...

Flashlight shining through a piece of paper a few inches in front of it...

Flashlight shining through a piece of paper 2 feet away that is just out of frame...

I started with a small light source.
I then made the light source a little bigger with the paper, but the diffusion was too close and it created the dreaded hotspot of doom.
And then I made the light source as big as I could by moving the paper as close to my face as possible without being in the shot. This also gave the light more room to scatter and diffuse making it homogenous.
Froggie Tip: I was using a pretty powerful flashlight, so with a phone you might get better results *bouncing* the light off the paper rather than shining the light through the paper.
So, before you take a photo, just think about how you can make your light source bigger, brighter, and more homogenous and you might be surprised how much better you look.
ANYONE CAN DO THIS!
792 notes
·
View notes
Text
Price: [price_with_discount] (as of [price_update_date] - Details) [ad_1] From the brand Set-up Your Own Studio With HIFFIN HIFFIN Passionate team dedicated to innovative photographic equipment. We prioritize quality, fine details, and practicality in our products, supporting every creation. Adapting to social media trends, we offer cost-effective video and audio enhancement tools. Founded in 2010, HIFFIN, a vibrant multinational company, introduces high-cost performance products, from set-top flashes to widely used LED on-camera lights. HIFFIN New Release HIFFIN Continuous Lighting HIFFIN Camera & Selfie Light HIFFIN SoftBox Lighting Kit Camera & Mobile Tripods HIFFIN Umbrella Light Setup HIFFIN Background Support Kit HIFFIN Photo Light Box HIFFIN Studio Setup Kit HIFFIN Extendable Selfie Stick
HIFFIN Octagonal Softboxs HIFFIN Camera Accessories HIFFIN ActionCamera Accessorie HIFFIN Flash Accessorie Kit Features: Magnet magnetic separation system, free to combine superimposed accessories. Role: the effect of the beam, soften the light. Components: universal mount, honeycomb kit, color kit, 2 soft light, 4 color patches It plays the role of beam light, feathers the soft edges of the light, the color film renders the atmosphere, increases the visual strength of the photo, and improves the attractiveness of the portrait work. The famagnetic card slot, which is used with 4 fachips, can select the correct fafilter corresponding to the motif of the recording theme to achieve a good famotive effect. It includes high quality honeycomb grid reflector, diffuser ball and 4 pieces color gel filters. [ad_2]
0 notes