#started sketching on Drawing Desk before I exported it to finish in Photoshop
Explore tagged Tumblr posts
Visit Tumblr Blog
Explore Tumblr blogs with no restrictions, modern design and the best experience.
Last Seen Tumblr Blogs


Fun Fact
Mobile Tumblr US users spend an average of 4.04 minutes per session on the app.
Text

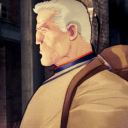
Someone please tell me the author of Those Little Things Called ‘Right Turns’ (Sherb42) is on here cause I think dadswap au is wonderful
#cars pixar#cars fandom#humanized cars#lightning mcqueen#pixar cars#chick hicks#started sketching on Drawing Desk before I exported it to finish in Photoshop#because Drawing Desk crashed 3x on me. I think it’s not that good#but I was experimenting#cars fanfiction#cars fanart#fanfic fanart
80 notes
·
View notes
Text
Making a menu scene
Now I am at the stage where I can go ahead and start developing a menu for my game. I know this isn't the most important thing I could be working on currently but it is something which I know I can get done and out of the way ready for when the game is finished being made. I first through about drawing out my menu screen however felt that it wouldn't fit in with the theme of my game. Instead I decided to go ahead and get some assets from my game and put them into Maya in order to make a menu screen from my assets. I feel like this will make it fit with the game better and suit more. Here are the assets put together inside of Maya. From there I then rendered out the image and place it inside of photo shop.

From here I then went and got a screen shot from the game and put it in the background of the image. However I feel like adding in the menu will make it look weird just because everything is at an angle as well as I feel like it would be too crowded with stuff.

In order to fix this I tried to straighten up the assets however don't feel like this is going to work either as I wanted the menu buttons to go down the cover of the book at the same sort of angle in order to make it fit in. I tried to do this however I couldn't figure out a way to make it happen.

From there I tried just to do a face down look but then when looking at this I thought of a really nice idea to change the closed book on the desk to be an open book.

To do that I took away the book asset and re rendered the scene and as you can see the scenes always render out really bright.

So from there I then went ahead and made the scene a bit darker As well as put in a picture of an open book I got from the internet. I think this really fits well.

From there I thought about how this scene would be really good for telling the intro of the story for my game. Similar to how it is done inside of saints row gat out of hell where the intro is being told through a book. Here I decided to make a few intro pages which will be shown at the beginning of the game.
Here is the adaptation of the first page where I wanted to go ahead and add in some Easter eggs such as forest gump due to me thinking it would be funny and would fit well. Here is the page I had where I did a rough basic sketch of forest gump and the main character sat on a bench together.

However it was only until I was drawing out the second scene that I can to realize that I didn't really like the first page. I decided to scrap that page and make the current page I was drawing the first page.

Then from there I took a render of the voodoos doll model and make that the second page of the book which is where the intro ends.

Coding the menu:
Now I have the graphic design of the menu done I now can go ahead and set it up so that the menu is all coded and animated. Firstly I went ahead and exported all of the menu scenes out of photoshop as pngs .From there I put the images inside of a widget and set the render opacity of them down to 0 except from the blank main menu page where I went ahead and added in some text blocks which I wrapped with a button. I made the actual button transparent so you only see the text. From there I made the text black and used a medieval font which was free to use on Dafont.

Here is the outliner list as to what is inside of the menu widget. In the end I ended up separating the text and photos in each screens to there own images just so it is easier for me to do the transitioning between them.

Now we need to go ahead and do the coding side of the menu. Firstly I am just focusing on the Play button and will do the other 2 buttons towards the end of the project when I have more time. SO the first bit of code I have set up is that when the player clicks the play button it sets the variable “fade” to true.

From there I then have it set up to a branch that is the Boolean variable “Fade” is true then it will go into a second branch where it will check whether the text opacity is >= than 0. I put this so later on when I go an incrementally decrease the value of the text opacity the value will never go below 0. If I didn't put this in then it would go down in value for ever. This not only makes it harder later on if we ever want to get the text back but it might also effect the frame rate of the game. Once past that branch it will then every tick set the render opacity of the play, credits and exit test to text opacity - 0.005. This means the value will go down slowly and be more of a fade instead of a sudden change. I then have it set so if the branch is false it will set the variable “Fade 1″ to true. Meaning that the first set of fading is complete.

From there I then have it set up so once it has faded out that text it is going to go ahead and fade in the image and text used for page one of the book. To do this I have it set up so it goes through the first branch which checks whether the variable “Fade 1″ is true. If it is true it will then go into a second branch which checks whether image opacity 1 is <= 1 And Delay is false. If both these variables are true then it will set the image opacity variable to image opacity +0.005 incrementally until the value is <=1. This float is them put into the set render opacity of the scene 1 text and scene 1 image. This means they will slowly fade in. Once the image opacity does reach <= 1 then it will go ahead and go into a delay before setting a variable called “Delay” to true.

Then from there it goes into the next part where it checks whether the “delay” variable is true. If it is true it will then start to set the image opacity 1 to image opacity 1 - 0.005. This will then be plugged into the set render opacity of the scene 1 image and text. This fires off every tick so will slowly fade out. Then at the end it sets a variable called ”Fade 2″ to true once the delay is finished.

Here the branch checks whether image opacity 2 is <= 1, “Fade 2″ is True AND if “end” is NOT true. If all these variables are correct then it will start to fade in the scene 2 text and image using the same way I have used for the others. At the end it goes to a delay where it sets the variable “End” to True.

This is the final part where it goes into a branch and checks whether the variable “End “ is true. If it is then it will go ahead and incrementally fade the render opacity of the scene 2 text, image and the background image so it goes to black. Once the image 2 opacity reaches 0 it will then go ahead and open the next map which takes you to the next level.

Here is a video showing off how the menu looks and works:
youtube
1 note
·
View note