#targeted layoffs to make the numbers go up are like. again preferable to being BURNED ALIVE
Explore tagged Tumblr posts
Visit Tumblr Blog
Explore Tumblr blogs with no restrictions, modern design and the best experience.
Last Seen Tumblr Blogs


Fun Fact
Women make up for the other 50% of Tumblr’s audience.
Text
maybe paige’s god’s name should be vaughan, since one could make the argument that vaughan was the seed of the wound tree
#or maybe more like paige’s losing vaughan Like That#was the seed#the silt verses spoilers#silt verses spoilers#i have a lot of feelings about vaughan#do you ever think about the fact that they were so important to both paige and carpenter#but they’ve never talked about them like as far as we know never even spoken their name since they died#vaughan who was so kind so invested in the people around them#so SMART like they got the fuck out of that hogie stand and left the damn country#and then the foreshadowed jaws snapped shut#i’m sure it was all in the contract#i say through clenched teeth#it’s definitely not the same as being fucking burned alive at a work function but i do live in a right to work state#and i used to work at a law firm this so i yeah i read my contract#and if you do you know there could in fact come a day when they decide to make use of you#targeted layoffs to make the numbers go up are like. again preferable to being BURNED ALIVE#but given the choice i would prefer to not face the threat of either of these things actually
4 notes
·
View notes
Video
youtube
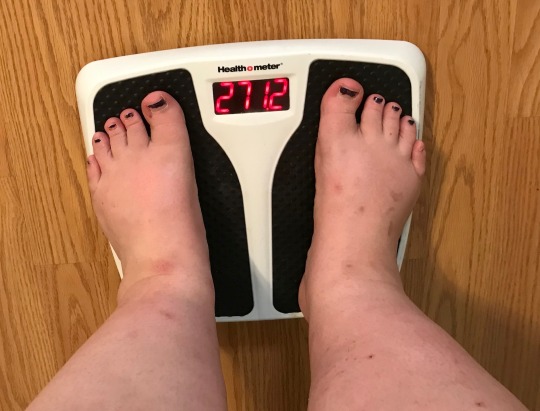
Welcome to day 19!
And today is a weigh in day, so let’s see how that is going:
Okay, so today is going to be a little different. So far when talking about exercising I’ve been pretty focused on cardio. But today I’m going to dip a toe into the waters of strength training.
Now, there are a lot of exercises, and honestly the choice is a little overwhelming. Thinking back to PE, what comes to mind for me is things like push ups, which I could never do, jumping jacks, which hurt my knees, and doing circuits of the gym machines, which I had no idea how to use and never put weights on. Because, again, I was intimidated!
But there are a lot of home exercises that you can do with no equipment. All you need is your own body weight, and sometimes a chair. You can also add something simple, like dumbbells or ankle weights to these. And, as I mentioned before, you can get alternative dumbbells in the form of cans from your pantry, so literally no equipment needed.
There are, of course, a few other simple home equipment pieces, like resistance bands or a medicine ball, but I’ll get to those in the future. Today is just body weight, chair, and adding dumbbells if you want.
So, with that out of the way, before we talk about what to do, let’s talk about how to do it.
So, VeryWellFit has this to say about beginning strength training. “Beginners who start to work out can expect to enjoy a wide range of benefits. If you are completely new to exercise, low-intensity activity sessions will help you burn more calories. And if you don't compensate by eating more, the pounds will start to fall off. But these workouts have a more important function, as well.”
So, you may have heard of things like high intensity interval training. We don’t need to do that yet. It doesn’t have to be high intensity to help. Low-intensity is just fine for now. And VWF lists these benefits to starting this training:
“Boost self-confidence
Establish a healthy daily routine
Develop strong, tight muscles
Improve your sleep
Decrease your stress level
Burn more calories and lose weight”
Well I’m sold! Let’s do it!
Now, there are many ways to exercise at home, including a lot of cardio, like dancing, but we’re going to start with body weight and chair strength training.
Okay, but from what I remember in PE you had to do sets and circuits and reps. How do you even know where to start and how much to do?
First off, we turn to Dummies for a refresher on those terms.
“Rep (repetition) is one complete motion of an exercise. A set is a group of consecutive repetitions. For example, you can say, “I did two sets of ten reps on the chest press.” This means that you did ten consecutive chest presses, rested, and then did another ten chest presses.”
They recommend 8-12 reps per set, though 10-12 seems to be the real sweet spot. This also comes with a warning: “Doing dozens of reps with ultralight weights (weights you can barely even feel) doesn’t bring good results of any kind, because you’re not stressing your muscles enough.”
Which sounds like what I did in PE in high school.
So, how do you know how much weight to use? Especially if you are using body weight or something like that?
Well, again they explain, “No matter how many repetitions you do, always use a heavy enough weight so that the last rep is a struggle, but not such a struggle that you compromise good form. After about a month of strength training, you may want to go to muscular failure (that is, your last repetition is so difficult that you can’t squeeze out one more).”
You’ll probably want to spend your first exercise session figuring out those amounts for yourself. How many reps at what level should I do to get the right “burn”? Write this down so you know what to do the next time, and you’ll quickly streamline your process. They also say that you can mix this up, with light days and heavy days, and note that people vary from day to day, so be flexible. Plus, different body parts and even different moves on the same part can require different weights.
That’s why, when it is time to get a set of dumbbells, I recommend getting more than one pair. Amazon offers this great set of three to get you started.

They are 2 pounds, 3 pounds, and 5 pounds each. In the long run, there are also larger sets, and you can order individual weights as you need more numbers. Hopefully you’ll get stronger and stronger and need heavier weights!
Now, Dummies also covers sets, explaining: “Several studies show that doing one set per muscle builds just as much strength as doing three sets per muscle, at least for the first three or four months of training. If you’re a novice or if you’re starting again after a layoff, begin with one set of 10 to 12 repetitions, and make sure your last rep feels challenging. You should feel like you have control of the weight but if you did one more rep, you may not be able to make it all the way.”
As you improve, you can bump up to two or three sets. That’s all most people need, though hardcore body builders will do, like, 10 or 12 sets!
Now, that said, what do you do for those reps and sets?
Well, Livestrong asked experts to list beginner exercises, and there was quite a bit of overlap. More importantly, looking at the different plans can give you a feel for the layout you should follow.
Most of these followed a circuit pattern, where you do one group of exercises, then another, and flip or circle between circuits.
For example, you might do a circuit of four exercises, then a minute of jumping jacks, then those four exercises again. Or you might switch between two circuits of three exercises. That kind of thing. Others just give you a list of things to work down. If you find yourself struggling to keep track of a circuit, maybe just try going down a list.
On the other hand, if doing the same thing over and over again is boring, maybe break it into smaller chunks and circuit them, so you’re mixing it up.
Now, there are all kinds of articles about how to focus on different areas of the body, and all kinds of workouts that target a specific area, like arms, or even a specific muscle group. But, for the beginner, it is totally fine to just be like, “I’m going to get a general workout with exercises that target different areas of my body” or a whole body workout type thing. You don’t need to know every glute exercise in existence.
So, that all established, let’s look at some of these exercises.
I want to start with push ups, because that is my arch nemesis, and the one that I think everyone dreads. Now, during the brief time that I had a personal trainer, they gave me a super helpful piece of advice, which I am now seeing in more and more places, but which was mind blowing to me when I first heard it several years ago.
And, small detour to say, if nowhere else, this is a good place to splurge. If you can book just one appointment with a personal trainer, get them to give you a customized workout list. And have them help show you proper form for these things - which I can guarantee I won’t always get in these videos. You can always refresh yourself online, but there are literally thousands of exercises you can do, and they’ll have a better idea of what you can do with your specific weight distribution and limitations and goals and such.
Okay, tangent over.
So, this mind blowing advice was to not go all the way to the floor. These are called incline pushups! So, kitchen counters are great for this, or stair railings or banisters if they’re across a flat piece of floor. You don’t want to be on the uneven stairs.
In a pinch, a chair will do, though it is lower than I like, or a wall, though you are more upright than I like. So I’ll demo with the chair.
Instead of needing your entire body weight to be supported on your hands like you would be on the floor, by being more upright, more of your weight is on your feet, and you don’t have to lift as much with your hands.
As you get stronger, you can get further and further down, until you’re flat on the floor!
Now, you have to watch your posture, just like with a regular push up, because you don’t want to be arching your back or sticking your bum up into a v. But I found this is a great way for me to do push ups. See what you have around your house and test different heights to find the best one for you.
In their article on incline pushups, VeryWellFit notes that the most common mistake is putting your hands too far apart. They should be just slightly wider than shoulder width.
Now, a special note, if you are using something that moves, like a chair, make sure that it is pushed against the wall and can’t slide out from under you.
Closely associated with push ups are planks. Now I don’t know about you, but these always hurt my forearms and elbows. But, it turns out that you don’t just have to do forearm planks. There are also “high” planks, which are basically the highest point of a push up.
Self has a great article, with gifs, of different plank variations.
I found this a little intimidating, but it is great for once you get the hang of the basic one. And some of them are easier if you are in a high plank instead of a forearm plank. So if you find that your wrists are stronger than your forearms and elbows, you might think about swapping out a high plank for a forearm one.
Okay, the next one I want to talk about is lunges. There are literally dozens of ways to lunge, I have discovered, and you can really mix and match. The only thing with lunging is that, ideally, you want to be creating 90 degree angles with those knees, and you don’t want to be skewing your hips. And again don’t arch you back funky.
So the one I really like is a lunge circle. With each leg in turn, you do a forward lunge, and then go in a circle, clockwise or counterclockwise, whichever you prefer. Go diagonal, to the side, other diagonal, back, diagonal, now for the crossover I like going in front and behind, just to mix it up. Last diagonal, and then forward again.
Then switch legs! And of course you can do any of these lunges as its own set, or just pick two that are opposite of each other and switch between them. But it doesn’t just have to be lunging forward over and over again, or walking lunges. You can mix it up!
Greatist actually has a short list of 32 ways to exercise with lunges, so there are lots of ideas!
Next is something I dread almost as push ups, and that is squats. But again, a chair can come to your rescue! VeryWellFit has a great article on alternative squats, and the first one is the chair squat!
So you put your feet shoulder length apart, and slowly sink down until you’re sitting in the chair. Then get back up. When you’ve got that down, then squat until you’re just above the chair - but don’t sit down! Just hover and hold before going back up!
Now, the do have an important note on form here: “Send the hips back while keeping the head up and the torso straight. You can extend the arms if that helps with balance.”
So don’t arch or curl your back when doing this. Try to keep it straight and your head up.
If you’re down for laying on the ground, a side leg raise is recommended by Livestrong’s trainers. You lie on one side, put your hand on your hip, and lift your top leg up, then bring it down to just over the other one, then up again. If you need to, you can actually touch down between lifts.
This is one, though, that I’ve noticed with myself, where I can tend to speed up and get sloppy. This is like when they talked about having too light weights and it not working as well. If you’re relying on momentum instead of muscles to do the movements then you’re not helping. And you can be hurting.
One more move from the Livestrong lists is a glute bridge. This one was actually the one that intimidated me the most from these lists, but Shape has a great article - with gifs - on how to do it right!
First you lay on your back, and bring your knees up, with your feet at hip-width. Then you push off and basically thrust your pelvis up. I always was afraid that I was hurting my neck, shoving it into the ground, so I really appreciated Shape’s advice.
“Root down into feet, keeping them stacked below knees. Lift hips up. Draw ribs down and in toward mat (if you can see ribs jutting out when you look down, draw upper back further into the mat until they disappear). Shoulder blades remain on mat, relaxing shoulders away from ears. Lower hips down to ground slowly, maintaining control until seat touches floor. Then use seat muscles to lift back up to starting position, making sure upper back stays in contact with the mat as you lift.”
The important part is that your shoulder blades are still on the ground, so you are using more of your abs and legs to move you, instead of popping up on your shoulders. This also takes pressure away from your neck, which made me feel better.
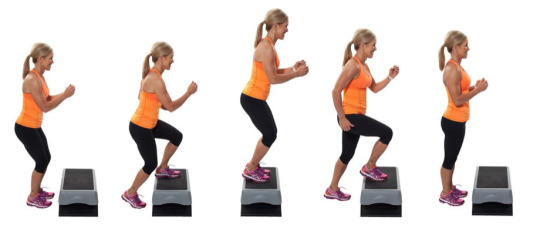
Finally, I want to mention step ups. This is literally just stepping up onto something, like a low crate, or even an actual stair step. The curb outside can be great for this too. Now, this one can have more impact, but you can control how hard you are hitting the step. You can also put a little bounce to it if you’ve got music going or something.
Now, you can use these exercises to build your own starter routine for weight training. You can also check out the livestrong article for more ideas for circuiting them.
Alright, so that was a little longer than usual, I know, but I wanted to cover a few basic exercises!
This has been Roly Poly Weight loss. As always, I am your host, Roly Poly. Please share your simple body weight exercises with the hashtag #StrengthTraining.
And please join me next time!
#RolyPoly#StrengthTraining#Fitness#Exercise#WeightLoss#losing weight#weight loss#Weigh In#Health#Workout
0 notes