#the binary text in the alt version translates to:
Explore tagged Tumblr posts
Visit Tumblr Blog
Explore Tumblr blogs with no restrictions, modern design and the best experience.
Last Seen Tumblr Blogs


Fun Fact
Tumblr has a 66 index score for customer satisfaction in the US.
Text

noth1ng crazy has happ3ned
[alt version under the cut]

ended up liking the blank background more buuut this is also cool
#.png#qsmp#juanaflippa#codeflippa#qsmp slime#charlie slimecicle#fanart#the binary text in the alt version translates to:#‘everything is normal everything is fine. i worry about nothing because nothing’s on my mind.’#it’s from m.arble hornets i just like that quote#also tried to make it more clear this time that the black and green scales are just what juana normally looks like#not a product of the code
2K notes
·
View notes
Text
UIUCTF 2020: Cricket32
This writeup will be an example in using angr to “automatically” solve this problem. But along the way, we’ll find two deficiencies in angr, and show how to fix them! Beyond being a writeup of this problem -- there is very little information specific to this challenge -- this can serve as an angr use and development tutorial.
Challenge:
We are given a file cricket32.S, which contains 32-bit x86 assembly and instructions for assembling:
// gcc -m32 cricket32.S -o cricket32 .text str_usage: .string "Usage: ./cricket32 flag\nFlag is ascii with form uiuctf{...}\n" str_yes: .string "Flag is correct! Good job!\n" str_nope: .string "Flag is not correct.\n" .global main main: mov $str_usage, %ebx xor %esi, %esi SNIP jmp printf
Note that the -m32 flag will force gcc to compile a 32-bit executable. The assembly is pretty short, but has a few hard-to-interpret instructions, such as aaa (ASCII Adjust After Addition), sahf (Store AH into Flags), and so on. It's possible these are filler meant to distract; it's also possible that they're being used as part of some bizarre check, or as data (if the program is reading its own code).
Approach
Instead of trying to reverse engineer this ourselves, we'll be using angr to solve for the input. For background, angr is a tool that turns the problem of "get this program into this particular state" into a constraint problem. We interact with angr mostly through the functions explore(), which tells to seek out various states (such as printing "Success!"), and add_constraints(), which let us tell angr rules about the input or states of the program. Let's dive in!
After compiling cricket32, we open it up in IDA to see what addresses we might care about:
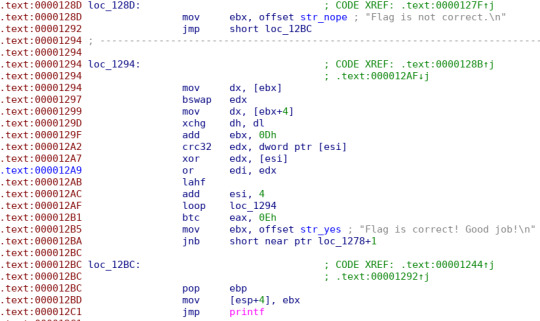
We see that if the code reaches 0x12BD, it will load str_nope, and then proceed straight to loc_12BC and printf. This is our failure condition. We'll load the binary in angr and tell to find an input that allows us to avoid that address, 0x12BD.
import angr import claripy project = angr.Project("./cricket32", auto_load_libs=True) flag_len = 32 arg1 = claripy.BVS('arg1', flag_len*8) initial_state = project.factory.entry_state(args=["./cricket32", arg1])
Here arg1 is our symbolic representation of the argument to the binary. We've allocated 32 bytes to (flag_len), hoping this is enough. Since arg1 can have zero-bytes, effectively being shorter than 32, this will work as long as the flag is at most 32 bytes long.
Running the above code produces the output:
WARNING | 2020-07-19 20:08:15,647 | cle.loader | The main binary is a position-independent executable. It is being loaded with a base address of 0x400000.
so the address that we wanted to avoid, 0x12bd, will actually be 0x4012bd. Let's now explore for that address:
sm = project.factory.simulation_manager(initial_state) sm.explore(avoid=[0x40128D])
Unfortunately, we are left with the result <SimulationManager with 26 avoid (7 errored)>. When angr explores paths, it has a few different "stashes" that paths can be in. There are:
active: paths that have not been fully explored yet
deadended: which is paths that terminated the program
avoid: paths that reached somewhere we didn't want it to
found: paths that found an explicit destination request (we gave no such destination here)
errored: indicating that angr was unable to continue with a path.
Ideally we would have had a deadended path here, meaning that a program successfully terminated without reaching the avoided point of 0x4012bd. Since we didn't, let's take a look at the errors.
sm.errored[0] will get the first state in the errored stash, and on the console we get:
<State errored with "IR decoding error at 0x4012a2. You can hook this instruction with a python replacement using project.hook(0x4012a2, your_function, length=length_of_instruction).">
What's 0x4012a2? Looking in IDA again, we see the crc32 edx, dword ptr [esi] instruction. The crc32 instruction is used to compute a cyclic redundancy check. This is a somewhat complicated operation, and generally rare, so it's not terribly surprising that angr doesn't know how to translate it into constraints. As suggested, we can implement a hook to emulate this.
Angr Hooks
A hook in angr is used to modify or replace a piece of code. A syscall instruction may, for instance, invoke some complicated kernel behavior, and hooking it could allow us to substitute our own behavior; or a simple call might be hooked to modify the execution. When writing a hook, it is important to remember we are working with symbolic values, not actual integers, so that we ultimately return a mathematical expression representing the modified state.
Our hook will intercept the crc32 instruction, emulate it, and then return control flow at the end of the instruction. The crc32 instruction is 5 bytes long, so our hook starts:
def crc32_hook(state): pass project.hook(0x4012a2, crc32_hook, length=5)
Next we need to implement the correct behavior. Since all computations must be symbolic, we can't just use a library implementation of CRC32. Additionally, most CRC32 implementation use the "CRC-32" specification, with the 0x04C11DB7 polynomial (essentially a magic number). The x86 crc32 instruction instead uses the "CRC-32C", or "Castagnoli", specification, with the 0x1EDC6F41 polynomial. Some googling turns up this implementation of CRC-32C we can adapt.
CRC_TABLE = ( 0x00000000, 0xf26b8303, 0xe13b70f7, 0x1350f3f4, # ... SNIP ... 0xbe2da0a5, 0x4c4623a6, 0x5f16d052, 0xad7d5351, ) table_dict = {i: claripy.ast.bv.BVV(CRC_TABLE[i],32) for i in range(256)} def get_crc32_table_BVV(i): i = i.to_claripy() return claripy.ast.bool.ite_dict(i, table_dict, 0xFFFFFFFF) def crc32c(dst,src): b32 = src crc = dst for i in [3,2,1,0]: b = b32.get_byte(i) shift = (crc >> 8) & 0x00FFFFFF onebyte = crc.get_byte(3) crc = get_crc32_table_BVV(onebyte ^ b) ^ shift return crc
Here we need to do a symbolic table lookup, which we can implement with ite_dict. ite_dict(i, table_dict, 0xFFFFFFFF) means that we use the key-value pairs in table_dict to look up i; the default value will be 0xFFFFFFFF is not in the dict (but in our case it always will be). Then our crc32c method computes the update to running CRC32 dst using the four bytes in src. Our hook is then:
def crc32_hook(state): crc = state.regs.edx addr = state.regs.esi b32 = state.memory.load(addr).reversed print('CRC32 accessing ',b32) state.regs.edx = crc32c(crc, b32)
This clearly not a drop-in replacement for any crc32 instruction: we've hard-coded that the source operand is dword ptr [esi] and our destination is edx. But that will work for our purposes here. After adding our hook, we reload the initial state and explore as before. The search continues for a few seconds, until we get a very long stack trace that eventually ends:
RecursionError: maximum recursion depth exceeded while calling a Python object
Urk.
Removing recursion
This turns out to stem from a shortcoming of how ite_dict is implemented. It passes the dictionary to ite_cases, which loops a claripy.If expression -- essentially a ternary operator. In our case, this produces an expression like
claripy.If(i == 0, 0x00000000, claripy.If(i == 1, 0xf26b8303, claripy.If(i == 2, 0xe13b70f7, claripy.If(i == 3, 0x1350f3f4, ... <255 levels like this> ))))
and when Z3 (the backend constraint solver) tries to analyze this, it balks at the depth of the expression. There are two options now: (1) implement a better version of ite_dict, or (2) use a table-free imeplemtation of CRC-32C. In the competition, we used option (2). Googling some more for how to generate the table leads us to this page on generating the table. Instead of generating a table and storing it, we can just "recompute" (symbolically) the value each our crc32 instruction is hit. This leads to the code,
def get_crc32_calc_BVV(i): crc = i.zero_extend(32 - i.size()); if isinstance(crc, angr.state_plugins.sim_action_object.SimActionObject): crc = crc.to_claripy() for j in range(8): shift = ((crc >> 1) & 0x7FFFFFFF) cond = crc & 1 > 0 crc = claripy.If(cond, shift ^ 0x82f63b78, shift); return crc
The crc.to_claripy() here is necessary in case angr passes us a SimActionObject instead of an actual symbolic value. Then the rest of the operations work just like the C code in the link above, with the claripy.If replacing C's ternary operator. Then we replace the appropriate line in our crc32c function to use get_crc32_calc_BVV instead of get_crc32_table_BVV. Looking at our code so far:
import angr import claripy #copy implementation from https://medium.com/@chenfelix/crc32c-algorithm-79e0a7e33f61 def get_crc32_calc_BVV(i): crc = i.zero_extend(32 - i.size()); if isinstance(crc, angr.state_plugins.sim_action_object.SimActionObject): crc = crc.to_claripy() for j in range(8): shift = ((crc >> 1) & 0x7FFFFFFF) cond = crc & 1 > 0 crc = claripy.If(cond, shift ^ 0x82f63b78, shift); return crc def crc32c(dst,src): b32 = src crc = dst for i in [3,2,1,0]: b = b32.get_byte(i) shift = (crc >> 8) & 0x00FFFFFF onebyte = crc.get_byte(3) crc = get_crc32_calc_BVV(onebyte ^ b) ^ shift return crc def crc32_hook(state): crc = state.regs.edx addr = state.regs.esi b32 = state.memory.load(addr).reversed print('CRC32 accessing ',b32) state.regs.edx = crc32c(crc, b32) project = angr.Project("./cricket32", auto_load_libs=True) flag_len = 32 arg1 = claripy.BVS('arg1', flag_len*8) initial_state = project.factory.entry_state(args=["./cricket32", arg1]) sm = project.factory.simulation_manager(initial_state) project.hook(0x4012a2, crc32_hook, length=5) sm.explore(avoid=[0x40128D])
At the end we are left with: <SimulationManager with 6 deadended, 33 avoid>. Fantastic! That means 6 paths successfully terminated without hitting 0x4012bd. Each of these SimStates are listed in sm.deadended. To get the input, we can call state.make_concrete_int(arg1), which will return arg1 as a big integer; then .to_bytes(32,"big") to turn it into a string:
>>> for state in sm.deadended: ... state.make_concrete_int(arg1).to_bytes(32,"big") ... b'uiuc\xdbK\xdf\x9d\xf0N\xd6\x95cket_a_c\xddL\xc7\x97it}\x00\x00\x00\x00\x00' b'\xdaD\xd1\x9ftf{a_cricket_a_c\xddL\xc7\x97\xc6Y\xd9\xfc\x00\x00\x00\x00' b'uiuctf{a\xf0N\xd6\x95\xccF\xc1\x88_a_crack\xc6Y\xd9\xfc\x02\x00\x00\x00' b'\xdaD\xd1\x9f\xdbK\xdf\x9d\xf0N\xd6\x95cket_a_c\xddL\xc7\x97\xc6Y\xd9\xfc\x10\x10\x00\x00' b'\xdaD\xd1\x9ftf{a_cri\xccF\xc1\x88\xf0L\xfb\x9frack\xc6Y\xd9\xfc \x01\x00' b'uiuctf{a\xf0N\xd6\x95\xccF\xc1\x88_a_c\xddL\xc7\x97\xc6Y\xd9\xfc\x01\x04\x01\x08'
We see that angr has found 6 solutions that technically would work as input to the program, and indeed several start with uiuctf{ -- a sign we're on the right track! But they're filled with non-printable characters. The astute eye might piece together the flag from the above malformed fragments, but the "right" thing to do is to do tell angr that each byte of input will be printable ASCII (or zero).
Cleanup
for b in arg1.chop(8): initial_state.add_constraints((b == 0) | ((b > 31) & (b < 127))) for i in range(len("uiuctf{")): b = arg1.chop(8)[i] initial_state.add_constraints(b == ord("uiuctf{"[i]))
It's important to note that -- perhaps a bit surprisingly -- compound constraints are formed using | and &, not Python's or and and keywords. arg1.chop(8) breaks the 256-bit vector arg1 into a list of 8-bit bytes, and we add a constraint for each byte. The second loop actually forces that the flag starts with uiuctf{. Probably not strictly necessary, but will definitely accelerate solving. This code gets inserted right before initial_state = project.factory.... The evaluation now takes less than a minute, and ends with
<SimulationManager with 1 deadended, 26 avoid> >>> >>> for sol in sm.deadended: ... print(sol.posix.dumps(1)) ... sol.make_concrete_int(arg1).to_bytes(32,"big") ... b'Flag is correct! Good job!\n' b'uiuctf{a_cricket_a_crackit}\x00 @@\x00'
Flag get!
A reality check
In practice, progress wasn't quite this linear. Some gotchas I encountered were:
Needing to use .to_claripy() in the hook -- if you don't, the hook runs fine, and then you get weird and inscrutable errors later.
Figuring out what the recursion error was coming from. Was determined by shrinking the dictionary size and watching the problem go away (although of course no solution was found).
Lots of byte-ordering issues. angr will often store the bytes the opposite order you expect, so e.g. forcing the string to start with uiuctf{ was something initally done backwards.
LOTS more byte-ordering issues in implementing the CRC. And sign-bit madness. If you think translating bit-fiddly C code to Python is bad, try translating bit-fiddly C code to symbolic Python with unusual endianness.
This program is small enough that it might have been very routine to solve with angr in just a few lines of code, or that IDA might have decompiled it into something very readable. angr was thwarted by the crc32 instruction. It is worth noting that, had the binary been 64-bit, angr would have known how to do a CRC32; 32-bit executables are less supported. And IDA refused to parse the main code chunk as a function, because it couldn't handle the jump-to-the-middle-of-an-instruction we see at 0x12ba. IDA already parsed an instruction at 0x1278, so a jump to 0x1279 broke it. Finally, the ASCII-Adjust operations (aaa) are pretty rare, and I was surprised that angr supported them. I doubt many decompilers would.
Postscript: A better ite_dict
During the competition, I use a loop implementation of CRC-32 that didn't use a table. In practice, there's little reason why a table couldn't be used, if the if-then-else statement went in a binary tree instead. So I wanted to try that too! Code:
#Improved version of ite_dict that uses a binary search tree instead of a "linear" search tree. #This improves Z3 search capability (eliminating branches) and decreases recursion depth: #linear search trees make Z3 error out on tables larger than a couple hundred elements.) # Compare with https://github.com/angr/claripy/blob/f2c1998731efca4838a4edb9dec77e0424c5f691/claripy/ast/bool.py#L164 def ite_dict(i, d, default): i = i.ast if type(i) is claripy.ast.base.ASTCacheKey else i #for small dicts fall back to the old implementation if len(d) < 4: return claripy.ast.bool.ite_cases([ (i == c, v) for c,v in d.items() ], default) #otherwise, binary search. #Find the median: keys = list(d.keys()) keys.sort() split_val = keys[len(keys)//2] #split the dictionary dictLow = {c:v for c,v in d.items() if c <= split_val} dictHigh = {c:v for c,v in d.items() if c > split_val} valLow = ite_dict(i, dictLow, default) valHigh = ite_dict(i, dictHigh, default) return claripy.If(i <= split_val, valLow, valHigh) def get_crc32_table_BVV(i): i = i.to_claripy() return ite_dict(i, table_dict, 0xFFFFFFFF)
With this modified version of get_crc32_table_BVV, the table-based code ran fine. Interestingly, it took several minutes to solve -- quite a bit slower than the "slow" and "complicated" loop-based implementation. In general though, I expect the binary tree would be faster for Z3 to analyze than a linear expression. I've created a pull request to get this improvement into angr, hopefully. :)
EDIT: It got merged -- hooray for CTFs leading to productive behavior!
0 notes
Text
Original Post from Talos Security Author:
By Andrea Marcelli
Executive Summary
Cisco Talos is releasing two new tools for IDA Pro: GhIDA and Ghidraaas.
GhIDA is an IDA Pro plugin that integrates the Ghidra decompiler in the IDA workflow, giving users the ability to rename and highlight symbols and improved navigation and comments. GhIDA assists the reverse-engineering process by decompiling x86 and x64 PE and ELF binary functions, using either a local installation of Ghidra, or Ghidraaas ( Ghidra as a Service) — a simple docker container that exposes the Ghidra decompiler through REST APIs.
Here is a quick video walking users through this new tool:
Features
This new IDA plugin provides the following features:
Synchronization of the disassembler view with the decompiler view: In the default configuration, the disassembler view is synchronized with the decompiler view. By clicking on different functions, both in the IDA Graph view or Text View, the decompiler view is updated accordingly. When a function is decompiled, the result is cached, making the transition between functions quicker.
Decompiled code syntax highlight: The decompiled code is syntax-highlighted as C code using the pygments Python library.
Code navigation by double-clicking on symbol name: A double click (or right-click -> Goto) over the name of a function in the decompiler view, automatically opens the selected function in the decompiler and disassembler view. The same behaviour happens if the functions is selected through the disassembler view and the synchronization between the two views is active.
Adding comments in the decompiler view: GhIDA allows users to insert and update comments in the decompiler view using the default IDA shortcut (or right-click -> Add comment). Each comment will be displayed at the end of the selected line, separated by a double slash. Comments are not added in the disassembler view, too, but they are cached and displayed in the decompiler view, even if the same function is decompiled multiple times.
Symbols renaming: When a symbol is selected in the decompiler view, it is possible to rename it by pressing N (or right-click -> Rename) and then insert the new name in the dialog. The symbol name will be updated in the decompiler and disassembler view. Due to the different syntax used by the Ghidra decompiler and IDA, only a subset of the symbols can be renamed. If a symbol is renamed in the disassembler view, the function must be removed from cache and decompiled again to update the symbols name in the decompiler view, .
Symbols highlight: When clicking on a symbol in the decompiler view, all the other occurrences of the same symbol are highlighted too. The plugin also highlights the corresponding symbols in the disassembler view, but as mentioned above, this is limited to subset of the available symbols.
Storage of decompiled code and comments: If the corresponding option is selected in the configuration, GhIDA stores in two JSON files the decompiled code and comments when IDA is closed. They will be automatically restored the next time the IDB is opened.
Installation
GhIDA requires IDA Pro 7.x.
Install the following two Python2 libraries:
pip2 install requests
pip2 install pygments
Clone or download the GhIDA repository from GitHub and copy ghida.py and the ghida_plugin folder in the plugins folder of your IDA Pro installation.
The first time GhIDA is launched (Ctrl+Alt+D or Edit -> Plugins -> GhIDA Decompiler) choose between a local Ghidra installation or the Ghidraaas server. If you want to use GhIDA with a local installation of Ghidra:
Install Ghidra
Add the path of the ghidra folder in the installation path
Otherwise, launch a local instance of the server using the Ghidraaas docker container.
Quick start
Select a function in IDA’s Graph or Text view. Then, press CTRL+ALT+D or (Edit -> Plugins -> GhIDA Decompiler). Wait a few seconds and a new window will open showing the decompiled code of the function.
For the best user experience, we suggest to open the decompiler view side-to-side with the disassembler view and keep active the synchronization between the two views. It is best to rename a symbol in the decompiler view since it will automatically update in the disassembler view.
Technical Details
GhIDA exports the IDA project using idaxml.py, a Python library shipped with Ghidra, and then invokes Ghidra in headless mode to obtain the decompiled code, either directly using the local installation, or through the Ghidraaas server, without requiring any additional analysis.
When GhIDA is called the first time, the idaxml library is used to create two files: an XML file that embeds a program description according to the IDA analysis (including functions, data, symbols, comments, etc.) and a bytes file that contains the binary code of the program under analysis. While the binary file does not change during the time, the XML file is recreated each time the user flushes the GhIDA cache, in order to take into account updates the user did in the program analysis. To obtain the decompiled code, GhIDA uses FunctionDecompile.py, a Ghidra plugin in Python that exports to a JSON file the decompiled code of a selected function.
Ghidra decompiler under the hood
The Ghidra decompiler is a standalone C++ project. Ghidra communicates with the decompiler over stdin and stout using a binary protocol specified in the DecompileProcess class, while the DecompInterface Java class implements the logic of the communication.
The decompilation process requires the following steps:
Decompiler initialization (requires the specification of the processor, etc.).
The Java client ask to decompile a function.
The decompiler asks the PCodePacked for each instruction of the function.
The decompiler asks for symbols and comments.
The decompiler returns an XML with the decompiled info.
This article runs down an initial attempt to directly communicate with the Ghidra decompiler. However, sending PCodePacked, symbols and comments to the decompiler, and finally translating the output to C code, requires a complicated process that goes beyond the scope of this project.
Ghidra allows users to import a binary as either an XML or bytes file, a procedure that allows to import in Ghidra projects exported from IDA. Ghidra also provides an IDA plugin with a Python library to ease the exporting process. More importantly, Ghidra can execute Python scripts (using the command-line-based version Analyze Headless) directly on IDA exported XML and bytes files.
By exporting the IDA IDB and calling the Ghidra decompiler through the Headless Analyzer, add a small overhead to the decompilation process, but it saves a huge amount of work by abstracting the low-level communication with the Ghidra decompiler.
#gallery-0-5 { margin: auto; } #gallery-0-5 .gallery-item { float: left; margin-top: 10px; text-align: center; width: 33%; } #gallery-0-5 img { border: 2px solid #cfcfcf; } #gallery-0-5 .gallery-caption { margin-left: 0; } /* see gallery_shortcode() in wp-includes/media.php */
Go to Source Author: GhIDA: Ghidra decompiler for IDA Pro Original Post from Talos Security Author: By Andrea Marcelli Executive Summary Cisco Talos is releasing two new tools for IDA Pro: …
0 notes