#tools crimp guide
Explore tagged Tumblr posts
Visit Tumblr Blog
Explore Tumblr blogs with no restrictions, modern design and the best experience.
Last Seen Tumblr Blogs


Fun Fact
There are dozens of funny blogs to kill time on Tumblr.
Text
https://www.futureelectronics.com/p/interconnect--connectors-rectangular-plastic-industrial/dt04-3p-ce04-te-connectivity-3108700
Cable accessories, Crimping Tool, electrical connectors plug, Contact Crimp Tool
DT Series Contact Size 16 3 Way Gray Receptacle Housing
#Connectors#Tooling and Accessories#DT04-3P-CE04#TE Connectivity#Cable accessories#Crimping Tool#electrical connectors plug#Contact Crimp Tool#push-in wire connector#wire#tools crimp guide#Nickel Plated Crimp Socket#battery terminal
1 note
·
View note
Text
Working on building a cutie a new body.
Walking them through the configuration process of their new skeleton, taking measurements like a tailor, fine tuning offsets and sizes via VR motion tests.
Either ship of theseus conversion of their brain or taking a scan while holding their hand.
Helping them build the skills to control peripherals from limbs to sensors.
Starting the print for their brand new skeleton, nerves, and the tooling for molding their soft features.
Watching their body slowly coalesce from different lentil-like plastic pellets used artfully and intentionally.
Installing and sealing their brain into their skeleton, so they can feel and enjoy the process of being freed from their soluble support structure.
Manually washing them down with solvents to melt away all the support scaffolding, freeing up their joints for the very first time and testing their range of motion before they even have their motors installed.
Taking them out of the spray down station and dutifully bolting each of their motors in place, crimping ferrules onto the leads, and connecting their motors and encoders for the very first time.
Giving them a few moments to amble around on their own, doing the pre-overmolding checklist to ensure they can hold the right position as their soft features are molded on.
Finally, you lead them gently by the hand to the molding machine, they stand in place, and a suit of armor specifically tailored to them assembles around them to have the spaces filled with their soft artificial skin.
Indecent for the first time in their new life, you kiss them on the cheek and dress them in the standard hospital gown and guide them to the auto-tailor that has already sewn their new outfits of choice to perfectly match their new form.
For the first time in their life, everything fits. Perfectly. Not a single hitch or tear, everything just as tight or loose as they want it. They fill out their outfit perfectly and you stand there in awe even though this is your 6,735th time. It really never gets old.
This time is special though, because you'll be spending the rest of your unnatural lives together. This is the last hour of your last day, and you walk out for the last time. For the first time hand in hand with your gorgeous handsome beautiful cute adorable pretty breathtaking perfect partner.
It's time to enjoy eternity, together, no need to worry about 'in sickness or in health', and death will never do us part.
#decided to keep this one gender neutral for everyone.#i do hope you all enjoy this#especially the robots#and the robot fuckers
540 notes
·
View notes
Text
My bookbinding tools and stuff
I started binding in July 2023, so I'm certainly no expert, but in case you're interested in what I use to create my binds…
I use Adobe InDesign to typeset and Illustrator for graphics
I print on an old Canon laser printer for black and white and an Epson ET-3830 inkjet for color
I purchase my shortgrain paper from Church Paper (for folios) and the long grain paper I use for quartos is just whatever (nothing special)
I love my punching cradle and guide that I got off etsy.
I use this thread (that I wax with beeswax) for sewing signatures
I love this cardstock for endpapers (Craft Consortium ink drops) but I collect pads of 12x12 cardstock in various designs from craft stores.
I like this bookboard (in black specifically)
ETA: I recently ordered precut boards from Hollander's. I cannot recommend this enough. I got the .10 thick board.
I use these tools for spacing and squaring when creating covers
Everything gets stuck together with this glue. (GET THE POINTY TOP!)
I have an old Silhouette Cameo for cutting vinyl and applying foil to bookcloth (with this pen)
I use this foil quill for freehanding
I apply laser toner foil with this Scotch laminator
I have a thermal binding machine from Amazon and I use these glue strips with it
I have this guillotine (but I don't recommend black for visibility reasons)
I have purchased bookcloth from Hollander's, Colophon, and Amazon. I don't recommend the Allure line if you are decorating with HTV or paint.
Get this heat and bond if you want to make your own bookcloth
I make ribbon bookmarks with charms like these and these crimps.
I get positive feedback and help and kindness from @renegadeguild
Caveat: These are just the tools and supplies I use. I am not an expert. I'm a hobbyist who is relatively new to it. Some of the things I use might be "wrong" but every book I've made works, so who cares?
If you want to see what it looks like when I bind something, here's a short video.
344 notes
·
View notes
Text

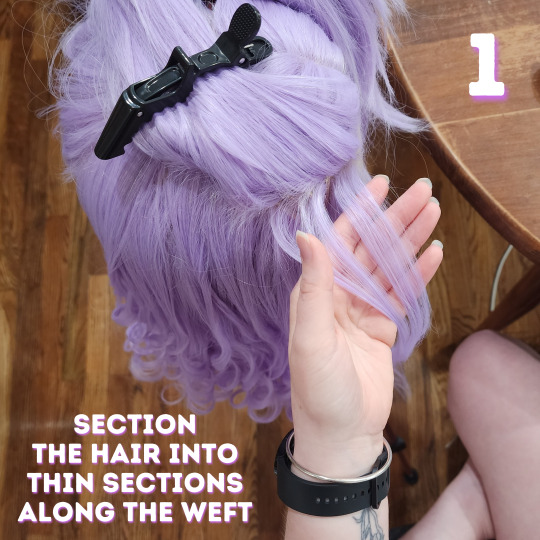


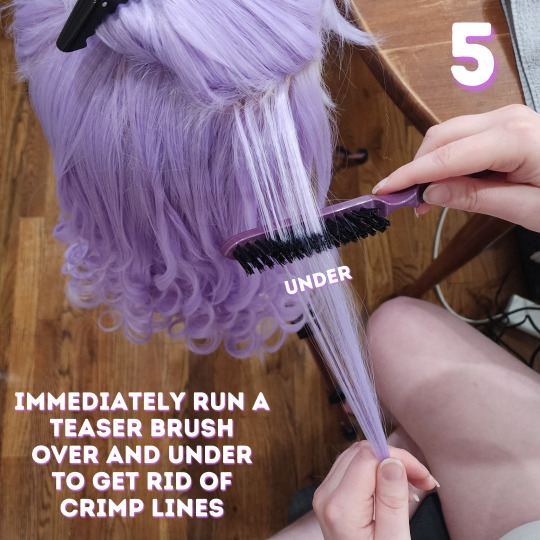


Here is our complete guide to curling a heat safe wig!
We specifically figured out this method worked best when styling this wig for my level 3 Imogen Temult cosplay. She's from campaign 3 of Critical Role. There are many other methods to curl wigs, but this is the one that got the best hold and our desired look on this particular wig! Of course, then I decided to cosplay Imogen at level 13 first and her hair is totally different so this wig is going in storage but at least we got to make a useful tutorial first.
We already have a video version of this tutorial up on our Tiktok and Youtube that we will move over to Tumblr, but honestly I struggle The Most with learning from video tutorials. I prefer things written out so we wanted to make this sort of tutorial as well for accessibility!
Additional tips & all of the products we use are under the cut. Feel free to shoot us a message if you have any questions or want more tutorials on wigs!
What We Use:
Wig: Pastel Purple Wavy Lace Front Synthetic Wig LF5110 from Wig Is Fashion. It technically comes with a curl but we straightened and recurled it differently. Whatever wig you get, just make sure you check that it's heat safe before attempting this!
Silicone Spray: Mane 'n Tail Detangler. Yes, this is technically for horses, but listen, it works SO WELL on synthetic wigs. It keeps it from getting all static-y and tangled. We've only ever used this brand but it works really well so we're def sticking with it.
Setting Spray: Schwarzkopf Got2b Glued Blasting Freeze Spray. This makes sure the curls you spent hours making actually hold!
Crimper: SixRiver Ceramic Waver Hair Tool with 4-in-1 Flat Crimping Iron Plates. This comes with four ceramic crimping plates and Nic uses the one with the "most wiggles" on the lowest setting (320). You can probably use any crimper that goes low enough. Crimp it fast, you aren't holding it like with curls.
Curling Iron: Conair 1 Inch Curling Iron. We use this on "19", whatever that means because it doesn't actually have temperatures. Any curling iron with low enough heat settings will do, you might need to play with settings to make sure you don't melt the hair. Test it on the bottom of the lowest layer of hair where you could cut it off if you melt it. As with curls on human hair, different barrel widths will give you wildly different curl looks.
Teaser Brush & Large Tooth Comb: Honestly these probably came with one of our first hair cutting or wig styling kits so ¯\_(ツ)_/¯ Apparently the teaser brush is Revlon branded.
We aren't sponsored by anyone, this is just what we use! Feel free to substitute in anything that you have / know works well with wigs. We hope this helps! Please let us know what other cosplay or crafting tutorials you'd like to see <3
#wigs#wig styling#cosplay#cosplay wigs#critical role#imogen temult#imogen temult cosplay#bells hells#cr3#imogen temult cosplay level 3#nic crafts#work in progress#crafting#craftblr#cosplay wip#buy list#crafting guide#tutorial#how to#cosplay guide#cosplayer#wig#polycraftory
77 notes
·
View notes
Text
How to Connect a BNC Connector to a Coaxial Cable (Step-by-Step Guide)
Connecting a BNC connector to a coaxial cable assembly involves stripping the cable, attaching the connector, and crimping or soldering the parts for a secure connection. Here’s a detailed guide for crimp-type BNC connectors, which are commonly used. Tools and Materials Needed: BNC connector (crimp-type or solder-type) Coaxial cable (e.g., RG58, RG59, or RG6) Cable stripper (for coaxial…
8 notes
·
View notes
Note
hello! i bought my first ever fleece today and i was wondering if you have any good resources on how to process it? its a jacobs sheep if that factors into anything :-)
Hey congrats on your first fleece ! I don't have a ton of resources to point you towards unfortunately--in terms of fleece prep I'm entirely self taught. The good news is its pretty intuitive and the hard part is mostly getting the tools and having the time to actually do it. I'm happy to walk you through my usual process, which hopefully should help :)
Step 1: assess your fleece. This is an important step. Try to lay out your fleece--some will be rolled neatly and some will be a jumble--and start looking at it. Does it need to be washed ? Even fleeces that are sold as already washed still need another round if they are greasy, brittle, or sticky to the touch, or have lots of dirt, dust, dung, etc. Check your fleece over and determine if it needs to be washed, and start skirting it if necessary; skirting is pulling out the grossest bits--anything covered in dung tags, shot through with vegetable matter, or otherwise way too messy to be processed as is. This can be cleaned later and with special attention to removing all the muck, if you want to.
Step 2: wash your fleece, if necessary. This is grabbed from my comprehensive guide to drop spindling, near the end:
"To wash a fleece, you need a dedicated wool pot (as in, don’t cook in it again), a bit of dish soap, and some time. Put the fleece in--don’t crowd it, just work in batches if your pot can’t easily fit all of the fleece--add cold water and a squirt of dish soap, and let it cook on the stove for about 45 minutes, without a lid. Don’t let it boil--ideally it should be steaming but not quite simmering. You can use a dedicated wool spoon/tongs to gently and infrequently stir the wool. The water should get pretty gross. After 45 minutes, start the tap running (you need to rinse the wool in very hot water--if you let temperature shock happen, it could felt), drain the water, and rinse the fleece. Then repeat--filling up the pot with hot water now--until the water stops looking dirty at the end of the 45 minute cooking time. Rinse it one more time, and then let your wool dry, ideally on a clothesline but over a vent/spread out flat on a towel is fine too.
Yes, it really is that easy. If you’re worried about felting or otherwise ruining the entire fleece, you can always start by washing just a handful, so that way if you ruin it there’s not much waste. But I’ve washed at least a couple dozen fleeces that exact way, and I’ve never ruined one."
Step 3: grading or equalizing. Once it's cleaned and dry, this is a good time to grade your fleece--that is, separate it into the really nice soft wool, the medium wool, the coarser wool, etc. Just work slowly and methodically, and keep an eye out particularly for differences in crimp in the fleece--your finest bits of wool will be much crimpier and typically have shorter locks, whereas your coarse wool will have less crimp than the rest, and is often longer than the rest of the fleece. But if in doubt, just trust your hands and grade by softness.
You may also wish to separate the different colors--Jacob in particular, being a piebald breed, should be sorted by color unless you want a fully random marled effected in your finished yarn. With Jacob I usually sort into black, white, and gray/mixed (for when the color changes mid-lock, or is already somewhat jumbled up), although the specific colors depend of course on your particular fleece.
If you'd rather process the entire fleece into a single batch of yarn, and don't want noticeable grades in your yarn, you will want to equalize your fleece--that is, separate any pieces that are already tearing and make sure the different grades are well distributed in your wool basket. If you plan to comb your wool you'll likely want to avoid doing anything that destroys any lock structure or makes the fleece particularly messy--combing is quickest and most effective if youve got clean locks to start with--but if processing using any other method, feel free to go crazy tearing your wool into handfuls. It's important to note that even if you skip this step, it's unlikely that you'll end up with super noticeable differences inbetween sections of yarn (though it depends on the fleece and how not-equalized it is). But this step doesn't take long and prevents any coarse areas in your finished piece. I would still recommend sorting by color even if you intend to equalize the grades of wool.
Step 3: picking your tools. So, fiber prep tools are expensive, and most people don't have all of them.
Back when I only had hand cards, everything was processed on hand cards. If it was particularly VM-y, I used the No Fleece Left Behind (NFLB) method to individually clean the locks before carding them into rolags. It wasnt ideal for every fleece, but it did work. So, always use what you have.
But here's the possible options (I may be missing a few really esoteric ones like bowing, sorry), and what they do:
~~~Hand Carding: This produces rolags--fluffy rolls of wool that are a woolen prep and will want to turn into a woolen yarn. Hand cards are very fast and versatile--they can handle any staple length under 5 or 6 inches (15 cm) but past that they don't work very well. They also don't usually remove much vm, grit, second cuts, nepps, noils, etc. So if your fleece is very gross, hand cards won't clean it very much, unless you do the NFLB method.
~~~Hand Combing: This can be done on actual hand combs or on palm combs (literally just a cheap plastic hair comb--I have made a tutorial for how to process fiber on a palm comb here). Hand combing is usually much slower than hand carding, which is important to take into account. It also produces a very different prep--hand combed top--which spins into a worsted yarn. It is much more effective at removing vm and whatever else--this is the only way I clean gross fleeces now. It also works particularly well with longer stapled fleeces, but can be used on a fleece of any staple length (just with diminishing returns the shorter it gets).
~~~Flick Carding: These are the cheapest standard fleece prep tool--just a handle with a small tined cloth at the end, for flicking open single locks (or small handfuls of locks). This is a pretty effective way to remove VM and open up the fleece, and results in combed locks. However, combed locks can be tricky to spin evenly--I certainly always process them further into rolags or top--but it's absolutely doable. The speed of flick carding depends heavily on the individual fleece; particularly the amount of VM/second cuts/other debris and the strength of the structure of the lock.
~~~Drum Carding: I'm not speaking from experience here--if anyone who processes fleece on a drum carder wants to chime in, please feel free--but from what I've read this is a very fast method for processing fleece. In most cases you will want to open up the locks a little, and perhaps align them. You'll then feed them through the carder (multiple times, resulting in a more even prep each time) until you have a uniform batt. From there you can pull it into roving or spin strips off the batt. One additional advantage to drum carding is that because it processes much more fleece per batch than any of the methods above, it will also equalize the grades of your fleece--that way, you will have fewer coarse spots.
~~~Willowing: This is a very old and low tech way to open up a fleece and remove VM. I just tried it for this ask, and can confirm that it's pretty good at both of those, and also at least mildly amusing, if not outright fun. (Here's a short video I made demonstrating it, if you want to see !) You lay down a sheet or towel and put your fleece on it. Most fleeces will probably benefit from you pulling it apart with your hands somewhat, and breaking it into small chunks before starting. Then, using one or two willow sticks (or other bendy sticks), hit the wool repeatedly and quickly. This will cause it to fly up in the air, so you need to gather it back up every minute or so. This results in a bundle of fibers that are open and much cleaner, but not at all organized--so not really spinnable. You could refine it by hand picking or layer it and load it onto a distaff. Your next step in processing will determine whether you get a more woolen or worsted yarn--but as it is without further processing, willowing lends itself to irregular woolen yarns. That said, it does also equalize the grades of your fleece, if by no other method than jumbling it all up.
~~~Hand Picking: The no tools approach. This is a pretty good written guide to hand picking. Just open the locks sideways, pick the VM out by hand or manipulate the lock so that it falls out. Make sure to disrupt and smooth out any lock structure for a neater result. This too benefits from an additional step of processing afterwards--even if it's still by hand. I prefer to pull the wool in between my hands until I have a fistful of wool all facing the same general direction, then pre-draft it into a sliver. The pre-drafting cuts down a lot on irregularities, since you encounter those before you start spinning.
Step 4: processing the fiber. As discussed above, there's lots of different methods to process a fleece, and if you have a choice between a few of them, it's good to consider the following two points: 1) how time consuming each method is 2) the preparation that each method results in and how this will work with your fleece. With Jacob fleeces in particular, pretty much any method will result in a usable and attractive yarn, but only a few of them will remove the second cuts that seem endemic to Jacob fleeces (combing and maybe hand picking, if you're attentive), so other methods will result in a lumpy--albeit charming, in my opinion--yarn. Of course you can also pull second cuts off as you see them come up in hand cards or whatever else--but you'll never see all of them, and it's very slow work.
Whatever your method, have fun with it ! If it feels like a slow slog, try breaking it up into shorter sessions (I typically only comb wool for an hour or two at most, and usually under an hour when carding), or doing it with friends. Fleece processing by hand is slow work, much slower than spinning, but also requires a lot less attention than spinning does, so if you can't spin while reading or watching a movie, you may still be able to process fleece.
One thing to keep in mind is that it's also very messy--depending on how much VM is in your fleece, you may want to do it outside to avoid having to clean up your area later. Usually a woven blanket that's smooth and easy to clean is good enough though--just drape it over your lap, and whenever it gets covered in VM, go shake it off outside or into the trash. I would not recommend preparing fleece on your bed or any furniture that's hard to clean. I speak from experience here.
I also highly recommend The Fleece & Fiber Sourcebook (your library may have a copy--if not you can request that they buy one), it's a really good resource to have for anyone who works with fleeces. It has pictures of samples, info on many different breeds of sheep and other fiber animals, and tips on how to process or spin each breed. It's also just a great catalogue for finding what breeds I want to spin next.
Lastly, a few notes about what you can do with fleece that you can't do with already prepared wool.
From multicolored fleeces you can get different colors of yarn without needing to dye anything--great for colorwork, or adding details or edging. In this case it's important to sort your wool by color. Failure to sort a multicolored fleece by color can lead to yarns that all look pretty different from each other, and that don't work together particularly well.
You can also dye in the wool (e.g. dye as fleece) and get several different levels of saturation from one dyejob. This happens naturally without you needing to do anything--different parts of the fleece will accept dye in slightly different amounts, so you end up with a decent range of saturations. You can of course also dye one fleece many different colors with small batch dyeing, and mix them to expand your palette even further.
You can dip or kettle dye either the fleece or picked locks from the fleece, which leads to some great colors as well.
Hope this was helpful ! If you're trying out some new tools for the first time I'd recommend hitting up youtube for demonstrations, and remember that if one method doesn't work, just keep looking. Have fun with your Jacob fleece--they're a great starter breed but also just so fun because of the piebald aspect. One of my favorite breeds for sure.
93 notes
·
View notes
Text
Efficient Hydraulic Solutions in Dubai: Your Guide to Fittings, Repairs & Mobile Hose Services
Hydraulics is the lifeblood of heavy machinery, industrial systems, and many day-to-day commercial operations. From construction equipment to manufacturing lines, the smooth operation of hydraulics is crucial. In a fast-paced city like Dubai, where downtime can cost businesses thousands, having quick and reliable hydraulic solutions is essential.
Whether it's hydraulic pipe compression fitting, hose repair in Dubai, or custom hose solution in Dubai, staying connected with the right service provider can make all the difference. This blog takes a closer look at the evolving world of hydraulic services, especially the rise of mobile hose vans in Dubai and professional hydraulics repair service offerings.
The Importance of Hydraulic Pipe Compression Fittings
Hydraulic pipe compression fitting are key components used to join hydraulic pipes and tubes. These fittings are designed to create a secure, leak-proof seal without the need for welding or other heat treatments. They’re used extensively in high-pressure systems where durability and performance are non-negotiable.
Benefits of Hydraulic Pipe Compression Fittings:
Leak-proof Connections: Ensures smooth operation of machinery.
Easy Installation: No welding or brazing needed.
Durability: Withstands high pressure and harsh conditions.
Versatility: Compatible with a wide range of pipe sizes and materials.
Businesses in Dubai rely on these fittings for construction, logistics, marine services, and industrial operations. Choosing high-quality compression fittings can drastically reduce the risk of hydraulic failure.
Mobile Hose Van in Dubai: Hydraulic Help On-the-Go
In a city where time is money, mobile hose van in Dubai offer the perfect solution for on-site repairs and installations. These vans are equipped with hydraulic crimping machines, hose reels, fittings, and everything needed to assemble or repair a hose line on the spot.
Advantages of Mobile Hose Vans:
On-Site Support: No need to transport machinery to a workshop.
Faster Turnaround Time: Issues are fixed immediately.
24/7 Availability: Emergency repairs without long waiting hours.
Expert Technicians: Trained professionals with diagnostic tools.
From construction sites to industrial parks, mobile hose vans ensure that your work doesn't stop due to a ruptured hose or a faulty fitting.
Custom Hose Solution in Dubai: Tailored to Your Needs
Not all hydraulic systems are built the same. Off-the-shelf hoses might not always be the best fit, especially in industries with unique pressure requirements or operating environments. That’s where custom hose solution in Dubai come into play.
Top hydraulic service providers in Dubai offer custom-built hoses to match your specific needs in terms of:
Length and Diameter
Material and Pressure Rating
Chemical and Temperature Resistance
End Fittings and Coupling Types
Whether you're working in construction, oil & gas, marine, or agriculture, custom solutions help enhance performance and reduce wear-and-tear.
Hose Repair in Dubai: Minimizing Downtime
Hydraulic hoses are prone to damage over time due to wear, temperature fluctuations, and mechanical stress. Instead of full replacements, hose repair in Dubai allows businesses to quickly restore functionality and avoid costly downtime.
Signs Your Hose Needs Repair:
Visible cracks or bulges
Fluid leaks around connections
Pressure drops in the hydraulic system
Unusual noises or vibrations
Professional hose repair technicians in Dubai can diagnose the issue, cut the damaged section, re-crimp fittings, and test the repaired hose all in one visit. This not only extends the life of your equipment but also ensures continued productivity.
Hydraulics Repair Service: A Must-Have for Industrial Success
Hydraulic systems are complex and require ongoing maintenance and occasional repairs. A reliable hydraulics repair service is critical for reducing operational risks and avoiding complete breakdowns.
Services Offered:
Pump and motor repair
Valve inspection and replacement
Cylinder rebuilding
System diagnostics and pressure testing
Preventive maintenance programs
Leading hydraulic service companies in Dubai offer both in-house and on-site repair solutions backed by experienced engineers, certified parts, and advanced diagnostic tools.
Choosing the Right Hydraulic Service Provider in Dubai
Here’s what to consider when selecting a hydraulic service partner:
Experience: Years of hands-on expertise in handling diverse hydraulic issues.
Certifications: Compliance with international quality and safety standards.
24/7 Emergency Services: Especially critical in construction and industrial operations.
Range of Services: From fittings and custom hoses to full-system repairs.
Client Testimonials: Reliable feedback on service quality and responsiveness.
Why It Matters: Real-World Impact
Imagine a construction site in the middle of a major project. A broken hydraulic hose halts operations. Without immediate repair, not only is the project delayed, but also expenses mount. With a mobile hose van in Dubai, the issue is resolved within hours, saving money and ensuring deadlines are met.
This real-world example showcases how crucial efficient hydraulic services are—not just for repairs but for sustaining business performance.
Dubai’s fast-paced, industrially dynamic environment demands top-tier hydraulic solutions. From hydraulic pipe compression fitting to custom hose solution in Dubai, investing in reliable services can save your business time, money, and stress. Whether it’s an urgent hose repair in Dubai, routine maintenance, or a full-fledged hydraulics repair service, having expert help just a call away ensures uninterrupted operations.
With innovative services like mobile hose vans in Dubai, the city is transforming the way businesses approach hydraulic system issues making downtime a thing of the past.
0 notes
Text
How to Install Modern Plumbing in a Vintage Camper

Installing modern plumbing in a vintage camper isn’t just about convenience—it’s about bringing new life to a classic design. Most vintage campers, built decades ago, weren’t designed with today’s plumbing expectations in mind. Whether you're restoring a Shasta, Airstream, or another retro trailer, updating the plumbing system ensures a safe, reliable, and comfortable travel experience. Modern plumbing can support running water, showers, flushing toilets, and even hot water, which transforms your vintage camper into a fully functional home on wheels.
Many DIYers and restoration enthusiasts shy away from plumbing upgrades because of the perceived complexity. However, with the right tools, planning, and patience, you can install a modern system that respects the camper’s vintage integrity. This guide will walk you through the key steps, from assessment to installation, and highlight essential tips learned from hands-on experience in Vintage Camper Repair Michigan projects.
Assessing the Camper and Planning the Plumbing Layout:
Before you touch a pipe or valve, inspect your camper’s structure, floor plan, and water system access points. Most vintage campers won’t have existing plumbing lines that meet today’s standards, and any old pipes may be corroded or brittle. Start by deciding where you want the kitchen sink, toilet, and shower. Take precise measurements and sketch a floor plan including fresh water input, grey water output, and waste holding tank locations.
Next, determine whether you'll use PEX, PVC, or flexible hose for your water lines. PEX tubing is highly recommended for vintage restorations due to its ease of installation and resistance to freezing and cracking. You’ll also need to choose between a gravity-fed system and a pressurized system with a water pump. For most modern builds, a 12V demand pump paired with an accumulator tank provides strong and consistent pressure.
Another consideration is the water heater. Options include propane tankless heaters, electric immersion heaters, or combination units. Choose a heater that matches your electrical load capacity and usage habits. Many professionals working in Vintage Camper Repair Michigan recommend compact, low-wattage water heaters that fit snugly under cabinets or beds.
Running the Water Lines and Installing the Freshwater Tank:
After planning, you’ll run water lines throughout the camper using color-coded PEX tubing—red for hot and blue for cold. Start from the freshwater tank, which should be mounted low and securely in the frame or under a bench seat. Use stainless steel brackets to avoid vibration damage during travel. Connect the tank to your 12V water pump, and then to a manifold that splits the flow toward your fixtures.
Route the PEX lines cleanly and securely along the floor joists or within cabinets. Use PEX crimp or clamp rings with appropriate fittings at all connections. Test each connection for leaks using a pressure gauge and pump water through the system before closing any walls or floor panels.
For hot water lines, insulate the PEX tubing to preserve temperature and improve efficiency. If you’re running lines to a shower or external spigot, install shut-off valves at the source in case of emergency repairs or freezing temperatures. This step is crucial for reliability during cold weather trips through Michigan and is often a key element in certified Vintage Camper Repair Michigan upgrades.
Installing Wastewater and Ventilation Systems:
Now that the freshwater system is in place, focus on the grey and black water setup. Grey water includes used water from sinks and showers, while black water comes from the toilet. Depending on your camper’s size and state laws, you may need a combined or separate holding tank system. Tanks should be vented properly to avoid backflow and odors.
Install the grey water tank under the camper floor using galvanized brackets. Attach sink and shower drains using flexible PVC pipe and ensure all joints are glued securely. Slope the drain lines downward at a minimum of ¼ inch per foot to ensure smooth flow. If space is limited, a compact grey tank inside the camper can work with a portable outlet hose.
For black water, if you’re adding a flush toilet, install a black tank with a wide flange at the base and a sealed connection. Include a vent stack through the roof or sidewall to prevent pressure buildup. Alternatively, composting or cassette toilets reduce complexity but offer fewer home-like comforts.
Ventilation is often overlooked but critically important. All tanks need vent lines that exit above roof level. Without this, you’ll experience poor drainage and foul smells inside the camper. Use ABS pipe for vent stacks and secure them with rubber grommets at exit points. Professionals specializing in Vintage Camper Repair Michigan often upgrade old campers with odor-trapping charcoal filters on these vents for improved air quality.
Final System Checks and Preventative Maintenance:
With all plumbing in place, conduct a final pressure test. Fill the freshwater tank, run all fixtures, and check each joint for leaks. Use a pressure regulator when connecting to city water lines at campsites. Label all shutoff valves and keep a wrench kit on hand for emergencies.
Seal all pipe exits through walls or floors with waterproof silicone to prevent road spray and moisture intrusion. Insulate exposed pipes with foam wrap to protect against freezing, especially for those camping through harsh Midwest winters.
Maintenance is straightforward but critical. Flush tanks monthly, clean filters regularly, and inspect hoses for wear. Drain the system completely if storing the camper in freezing conditions. A small leak can lead to significant damage if ignored.
Modern plumbing installation can seem like a daunting task, especially when retrofitting it into a vintage shell. But with methodical planning, quality materials, and tested practices from hands-on projects like those in Vintage Camper Repair Michigan, you can enjoy reliable plumbing that enhances the value and comfort of your camper for years to come.
Conclusion:
Installing modern plumbing in a vintage camper requires more than just technical know-how—it demands a balance between respecting the original build and integrating reliable, up-to-date systems. From the first planning sketches to the final leak tests, each stage plays a crucial role in the overall success of your restoration. By using durable materials like PEX tubing, reliable 12V pumps, and space-saving water heaters, you ensure that your camper not only functions better but is also safer and more enjoyable. Attention to detail with waste systems, proper ventilation, and thoughtful insulation prevents common issues like odors, leaks, or freezing. Regular maintenance will keep everything running smoothly and extend the life of your system.
Whether you're traveling across the country or camping in your backyard, a well-plumbed vintage camper offers the comfort of home and the pride of craftsmanship. Relying on proven methods from Vintage Camper Repair Michigan projects can help guide your journey to a successful, high-quality result.
0 notes
Text
Common Pitfalls in DIY LED Wall Installations
As more event organizers, businesses, and content creators seek to reduce costs, the allure of DIY LED video wall installations is growing. A major driving factor behind this trend is the desire to cut down on LED video wall cost, which can be significant when outsourcing to professionals.
However, in trying to save money, many DIY enthusiasts run into unexpected technical and operational problems. From electrical failures to poor image quality, the hidden challenges in a DIY LED wall setup can quickly turn cost-saving ambitions into costly mistakes. This guide highlights the most common pitfalls in DIY LED video wall installations and provides technical solutions to help you avoid them.

Why People Attempt DIY LED Wall Installations
There are several reasons why individuals and organizations take the DIY route:
Cost Reduction: Avoiding professional installation fees seems like an immediate win.
False Simplicity: Marketing often portrays LED walls as "plug-and-play."
Customization: DIY allows for more creative freedom in layout and configuration.
Hands-on Learning: Tech-savvy users may enjoy the challenge.
However, this approach comes with significant risks if the installer lacks technical expertise.
DIY vs. Professional Installation Comparison Table

Pitfall #1: Underestimating Structural Support and Mounting Requirements
Many DIYers fail to assess the structural integrity of walls, frames, or trusses that hold LED panels. This can lead to:
Panels sagging or falling
Uneven panel alignment
Damage to LED modules due to flexing
Technical Advice:
Use precision mounting brackets and alignment tools.
Consider load distribution—calculate weight per square meter.
Ground stacks and trusses should follow manufacturer load ratings.
Avoid wooden mounts unless reinforced with steel supports.
Pitfall #2: Poor Electrical Planning and Power Distribution
Electrical errors are a leading cause of LED wall malfunctions. DIYers often:
Overload circuits
Use mismatched connectors
Forget surge protectors or fuses
Power Considerations:
Check the rated power draw of each panel (e.g., 200W/panel).
Use proper PDUs with breakers.
Use 12/14-gauge wires for load handling.
Maintain voltage consistency to prevent flickering.
Case Example: A DIY user connected 10 panels to a single household circuit and experienced power trips during operation. A professional would have distributed the load across multiple PDUs.
Pitfall #3: Inadequate Signal Management and Connectivity Issues
Signal degradation leads to visual glitches, dead pixels, and latency. Common mistakes include:
Exceeding cable length limits (e.g., CAT5 > 100ft)
Using low-quality or unshielded cables
Poor connector crimps
Recommendations:
Use CAT6 or fiber for long-distance signal transmission.
Install signal boosters/repeaters every 100ft.
Test continuity and bandwidth using network testers.
Pitfall #4: Ignoring Pixel Pitch and Viewing Distance
Choosing the wrong pixel pitch leads to blurry or overly detailed images, which either cost more or look poor.
Pixel Pitch Quick Guide:

Example: Using P6 for a 2-meter viewing distance results in visible pixel separation.
Pitfall #5: No Heat Management or Ventilation Setup
LED walls generate heat, especially in enclosed spaces or during long events. Heat buildup causes:
Reduced lifespan of components
Module discoloration
Shutdown due to thermal protection
Cooling Strategies:
Allow 6–8 inches of clearance behind panels
Install exhaust fans in enclosures
Use aluminum back panels for heat dissipation
Note: Passive cooling works for small walls; larger walls need active cooling.
Pitfall #6: Skipping Calibration and Configuration
Even if your panels are mounted and powered correctly, failing to calibrate:
Causes color inconsistencies
Leads to brightness mismatches
Results in flicker in video capture
Calibration Steps:
Use manufacturer software (e.g., NovaStar/NovaLCT).
Set brightness to match ambient light.
Adjust RGB color profiles for uniformity.
Set refresh rate to 3840Hz+ for camera-friendly output.
Pitfall #7: Ignoring Safety and Compliance Standards
DIY projects often overlook building codes, which could lead to:
Electrical fires
Insurance claim denial
Legal liability
Must-Have Safety Features:
Grounding and bonding
Overcurrent protection
Fire-rated cables
UL-certified panels and components
Compliance Standards:
OSHA event safety
NEC electrical code
Local building permits (for permanent installs)
Professional Advice: When DIY Isn’t Worth the Risk
Situations That Require Experts:
Large venue screens (>5m width)
Curved or 3D configurations
Outdoor installs with environmental exposure
Multi-input signal synchronization (e.g., concerts)
Professional Benefits:
Warranty-backed setup
Optimized brightness and viewing angles
Integration with AV systems
Cost Breakdown: What DIY Actually Costs vs Professional

Tips to Avoid These Common Pitfalls
Plan electrical load before buying panels
Choose correct pixel pitch for your venue
Use high-quality CAT6 or fiber optics
Ground all connections and panels
Allow ventilation space
Always calibrate with official tools
Cross-check mounting structure alignment
Test signal and power before full assembly
Read the manual for LED processors
Hire help for curved or large-scale setups
Conclusion: Smarter DIY Begins with Planning
DIY LED wall installations aren’t inherently flawed—but they require serious preparation, technical understanding, and error-proof planning. Before chasing a reduced LED video wall cost, evaluate your technical capabilities and risk appetite. With the right precautions, you can execute a successful DIY setup—but for mission-critical events, professional installation ensures peace of mind.
FAQs
Q1: What’s the average LED video wall cost for DIY setup? A: It ranges from $5,000–$10,000 depending on panel size, pixel pitch, and accessories.
Q2: How long does it take to install an LED wall yourself? A: On average, 80–120 hours for planning, mounting, wiring, and calibration.
Q3: What tools do I need for a DIY LED wall installation? A: Multimeter, alignment laser, network tester, mounting gear, software dongles, and screwdrivers.
Q4: Can I connect LED walls to any media server or PC? A: Only if the video processor is compatible and signal format is supported (HDMI, DVI, SDI).
Q5: Do I need software to calibrate LED video walls? A: Yes. Use vendor-provided tools like NovaLCT, Colorlight iSet, or similar.
0 notes
Text
Understanding Hydraulic Hose Fittings: Types, Applications, and Selection Guide

Hydraulic hose fittings are essential components in fluid power systems, ensuring secure connections between hoses, tubes, and hydraulic machinery. These fittings play a crucial role in maintaining system integrity, preventing leaks, and ensuring efficient power transmission in various industrial, agricultural, and construction applications.
Choosing the right hydraulic hose fittings is critical for system performance, safety, and longevity. This guide explores the different types of fittings, their applications, materials, and key factors to consider when selecting the best option for your hydraulic system.
Types of Hydraulic Hose Fittings
1. Permanent vs. Reusable Fittings
Permanent (Crimped) Fittings: These are crimped onto the hose using specialized tools, providing a strong, leak-proof connection. They are ideal for high-pressure applications.
Reusable Fittings: These can be disassembled and reused, making them cost-effective for maintenance and repairs. However, they may not withstand extreme pressures as well as permanent fittings.
2. Thread Types in Hydraulic Hose Fittings
Different thread standards ensure compatibility with global hydraulic systems:
NPT (National Pipe Tapered): Common in North America, these tapered threads create a seal through thread deformation.
BSP (British Standard Pipe): Used in Europe and Asia, available in parallel (BSPP) and tapered (BSPT) versions.
Metric Threads: Standard in many international systems, measured in millimeters.
SAE (Society of Automotive Engineers): Common in automotive and industrial applications.
3. Common Hydraulic Hose Fitting Styles
JIC (Joint Industry Council): 37-degree flared fittings for high-pressure applications.
ORFS (O-Ring Face Seal): Uses an O-ring for a leak-proof seal, ideal for high-vibration environments.
NPTF (National Pipe Tapered Fuel): Dry-seal threads for fuel and hydraulic systems.
DIN (Deutsches Institut für Normung): German standard fittings with precise dimensions.
Push-to-Connect Fittings: Allow quick connections without tools, suitable for low-pressure systems.
Materials Used in Hydraulic Hose Fittings
The material of hydraulic hose fittings affects durability, corrosion resistance, and compatibility with fluids:
Carbon Steel: Strong and cost-effective but prone to rust without coatings.
Stainless Steel: Highly corrosion-resistant, ideal for harsh environments.
Brass: Resistant to corrosion and suitable for low-pressure applications.
Aluminum: Lightweight and corrosion-resistant but less durable than steel.
Applications of Hydraulic Hose Fittings
Hydraulic hose fittings are used across multiple industries:
Construction & Mining: Excavators, loaders, and bulldozers rely on durable fittings for heavy-duty operations.
Agriculture: Tractors and irrigation systems use hydraulic fittings for fluid transfer.
Manufacturing: Hydraulic presses and assembly lines depend on leak-free connections.
Aerospace & Defense: High-pressure hydraulic systems in aircraft require precision fittings.
Marine: Saltwater-resistant fittings prevent corrosion in ship hydraulic systems.
How to Choose the Right Hydraulic Hose Fittings
Selecting the correct hydraulic hose fittings involves several considerations:
1. Pressure Rating
Ensure the fitting can handle the system’s maximum pressure to avoid failures.
2. Temperature Compatibility
Some materials degrade under extreme heat or cold, affecting performance.
3. Fluid Compatibility
Hydraulic fluids, oils, and chemicals may react with certain metals or seals.
4. Size & Thread Type
Incorrect sizing leads to leaks or fitting failures—always match thread standards.
5. Environmental Conditions
Corrosive or high-vibration environments require specialized fittings like stainless steel or ORFS types.
Installation and Maintenance Tips
Proper installation ensures longevity and safety:
Use the Right Tools: Crimping machines for permanent fittings, wrenches for threaded types.
Inspect for Damage: Check for cracks, corrosion, or wear before installation.
Follow Torque Specifications: Over-tightening can damage threads, while under-tightening causes leaks.
Regular Maintenance: Replace worn fittings and inspect hoses periodically.
1 note
·
View note
Text
Why Choose a Crimp Terminal Kit? A Complete Guide for DIYers and Professionals

Understanding Crimp Terminal Kits
A crimp terminal kit is an essential toolkit for professionals and hobbyists working with electrical systems, electronic assemblies, and hardware projects. These kits contain a variety of crimp connectors designed to ensure strong, reliable, and safe wire connections. Whether you're repairing cables in a laptop or wiring microcontrollers in a new build, a crimp terminal kit simplifies your work by providing all necessary terminals and tools in one convenient package.
What Makes a Crimp Terminal Kit So Valuable?
Crimp terminal kits are ideal for managing diverse wiring needs, offering everything from ring terminals to spade and butt connectors. These kits are especially useful in environments where durable and vibration-resistant connections are required, such as in controllers, microprocessors, and even industrial contactors. With everything organized in one kit, you reduce downtime, boost productivity, and improve safety on the job.
Key Components in a Typical Crimp Terminal Kit
A high-quality crimp terminal kit usually includes:
A range of terminals including ring, fork, spade, butt, and bullet types
Color-coded insulation for easy wire size identification
Heat-shrink or vinyl insulation for added protection
A crimping tool with interchangeable jaws or multi-functional features

Features That Make These Kits Essential
When it comes to selecting a crimp terminal kit, several standout features enhance its usability:
Pre-insulated terminals compatible with various wire gauges
Durable crimping tool designed for long-term use
Organised compartments that simplify selection and storage
Easy compatibility with standard cables, thermal wires, and LED leads
Ready-to-use design, suitable for on-site repairs and installations
Advantages of Using a Crimp Terminal Kit
Switching from soldering to crimping offers multiple benefits. Here’s why crimp terminal kits are a smart investment:
Speeds up wiring tasks by eliminating the need for heat or solder
Reduces the risk of overheating delicate sensors or capacitors
Provides a consistent connection quality for repeat jobs
Ensures safer terminations by reducing loose wire hazards
Enhances professionalism in electronics and automotive projects
Where Can You Use Crimp Terminal Kits?
Crimp terminal kits have versatile applications across various domains. Here are some key areas where they prove invaluable:
Electronics: Ideal for connecting LEDs, capacitors, microcontrollers, and sensors in circuit boards
Automotive repairs: Reliable connections for lights, switches, and fuses
Home improvement: Installing lighting fixtures, sockets, and safety alarms
Industrial equipment: Wiring machines, contactors, and control systems
Laptop repair: Rewiring broken cables, fan connections, and power jacks
DIY projects: Creating custom electronics, robotics, or smart home setups
Tips for Using Crimp Terminals Properly
To ensure optimal performance and long-term reliability of your crimped connections:
Strip the correct amount of insulation from the wire
Match the wire gauge to the correct terminal size
Use the appropriate crimping tool for the terminal type
Test the strength of the connection before installation
Add thermal pads or protective sleeves when working in high-heat zones

Crimping vs. Soldering: Which Is Better?
Although soldering has its place in electronics, crimping offers faster, cleaner, and more vibration-resistant connections. Crimp terminals are easier to handle, especially when you're working in tight spaces like electrical panels, under dashboards, or inside laptop housings. Moreover, crimped joints are widely accepted in professional industries because of their consistent quality and reduced need for post-installation inspection.
Choosing the Right Kit for Your Needs
When selecting a crimp terminal kit, it's essential to consider the following:
Connector variety: Does the kit include connectors for your specific projects involving controllers or sensors?
Wire range compatibility: Can it handle standard sizes used in electronics and thermal setups?
Tool durability: Is the crimping tool ergonomic and suited for repeated use with cables and grips?
Kit size: Does it include enough pieces for large projects without constant repurchasing?
Final Thoughts: Why Every Workshop Needs a Crimp Terminal Kit
In summary, a crimp terminal kit is a smart, convenient, and safety-driven investment for anyone working with electronics, wiring, or repairs. It enhances workflow, provides secure and long-lasting connections, and supports a broad range of applications, whether you're fixing microcontrollers, setting up switches, or managing sensors in an industrial setting. With benefits that span across tools, cables, oils, connectors, and more, there's no reason to delay adding one to your workspace.
0 notes
Text
Step-by-Step Guide to Proper Transformer Installation for Substation Success
Transformer installation is a critical phase in the lifecycle of any electrical substation. The quality of this installation not only dictates the immediate performance of the transformer but also has long-term implications for safety, reliability, and lifespan. Poorly executed transformer installations can lead to insulation failures, oil leaks, and catastrophic breakdowns that compromise the entire substation. At Manikaran Enterprises, we understand that precision and adherence to best practices are non-negotiable when it comes to transformer setup.

Ensuring Safety Through Precision Installation
Safety is paramount in any substation environment. Transformers handle high voltages and currents; any misalignment, loose connections, or improper grounding can create hazardous conditions. By following industry standards—such as correct torque settings for bolted connections, precise alignment of bushings, and proper cable terminations—technicians can mitigate risks of arcing, short circuits, and electrical fires. In addition, a well-installed transformer minimizes the risk of oil leaks, which not only damage assets but also pose environmental and fire hazards.
Impact on Transformer Longevity
A transformer that is installed correctly from the outset can offer decades of reliable service. Key longevity factors include ensuring level and vibration-free mounting, using the right insulation materials, and adequately protecting against moisture ingress. Vibration dampening mounts and proper thermal management help maintain internal components in optimal condition, reducing mechanical stress and preventing premature aging. As a result, the total cost of ownership decreases due to fewer maintenance interventions and extended replacement cycles.
Role of Professional Expertise
Engaging a specialist with proven expertise in transformer setup can make all the difference. Expert teams perform detailed pre-installation surveys, conduct site-specific risk assessments, and prepare customized installation plans that address local environmental conditions, load requirements, and regulatory obligations. For those seeking reliable support in this domain, partnering with a Top Electrical Solution Company in Rajasthan ensures access to certified technicians, advanced testing equipment, and a track record of successful project delivery.
Key Installation Best Practices
Site Preparation: Level grading, compacted foundations, and adequate drainage prevent flood-related damage and uneven settling.
Proper Lifting and Handling: Using certified lifting equipment and following manufacturer guidelines reduces mechanical stress on transformer windings and core.
Accurate Alignment and Anchoring: Ensuring the transformer is level and securely anchored prevents vibration-induced wear and potential seismic damage.
Quality Cable Terminations: Employing precise crimping tools and heat-shrink sleeves guarantees electrical continuity and insulation integrity.
Grounding and Earthing: A robust earthing system protects against fault currents and lightning strikes, safeguarding personnel and equipment.
Testing and Commissioning for Reliability
After physical installation, rigorous testing and commissioning confirm that the transformer operates within its design parameters. Insulation resistance tests, turns ratio checks, oil dielectric strength measurements, and partial discharge analysis are standard procedures. Any anomalies are addressed before energization, ensuring that the transformer integrates seamlessly into the substation network. Companies offering comprehensive Transformer Installation and Commissioning Services in India bring both the technical know-how and the calibrated instruments required for this crucial phase.
Maintenance Strategies Post-Installation
A high-quality installation lays the foundation for effective maintenance. Establishing a preventive maintenance schedule—comprising periodic oil sampling, thermal imaging surveys, and mechanical inspections—helps detect issues early. Routine checks on gasketing, breather performance, and cooling systems further contribute to uninterrupted service. Well-documented installation records also aid in troubleshooting, as technicians can reference exact configurations and component specifications.
Cost-Benefit Analysis of Quality Installation
Investing in top-tier installation practices may entail higher initial costs, but the long-term savings are substantial. Fewer unscheduled outages translate to reduced downtime and regulatory penalties. Lower frequency of repairs and replacements drives down lifecycle expenses, while enhanced safety protocols minimize liability and insurance premiums. In essence, high-quality installation is a strategic investment in operational excellence.
Conclusion
The quality of transformer installation has a profound impact on both the safety and longevity of substation assets. From meticulous site preparation to comprehensive commissioning tests, every step must be executed with precision. By aligning with industry leaders such as Manikaran Enterprises, utilities and project developers can ensure that their substations operate safely, efficiently, and reliably for years to come. Investing in professional installation and rigorous maintenance not only protects assets but also delivers peace of mind in an increasingly demanding electrical landscape.
0 notes
Text
Hydraulic Hose Crimping Machine: A Comprehensive Guide

A hydraulic hose crimping machine is an essential tool in industries that rely on hydraulic systems for power transmission. This machine ensures secure and leak-proof connections between hydraulic hoses and fittings, which is critical for maintaining system efficiency and safety. Whether in construction, agriculture, or manufacturing, a reliable hydraulic hose crimping machine enhances productivity and reduces downtime.
This guide explores the working principles, types, benefits, and maintenance of hydraulic hose crimping machines, helping you make an informed decision when selecting one for your operations.
How a Hydraulic Hose Crimping Machine Works
A hydraulic hose crimping machine uses hydraulic pressure to compress a metal sleeve (ferrule) onto a hose and fitting, creating a tight, permanent connection. The process involves:
Preparing the Hose – Cutting the hose to the required length and ensuring a clean, square cut.
Inserting the Fitting – Pushing the fitting into the hose end.
Positioning the Assembly – Placing the hose and fitting into the crimping machine’s dies.
Applying Pressure – The machine exerts hydraulic force to compress the ferrule, securing the connection.
Quality Check – Verifying the crimp diameter and pull strength to ensure a proper seal.
This process ensures a durable connection that can withstand high-pressure hydraulic applications.
Types of Hydraulic Hose Crimping Machines
Different industries require varying levels of crimping precision and power. Here are the main types of hydraulic hose crimping machines:
1. Manual Hydraulic Crimpers
Operated by hand pumps or levers.
Suitable for low-volume applications and field repairs.
Portable and cost-effective but requires manual effort.
2. Electric Hydraulic Crimping Machines
Powered by electric motors for consistent crimping force.
Ideal for medium to high production environments.
Reduces operator fatigue compared to manual models.
3. Pneumatic Hydraulic Crimpers
Uses compressed air to generate crimping force.
Faster than manual machines and suitable for industrial settings.
Requires an air compressor for operation.
4. Fully Automatic Crimping Machines
Programmable for precise crimping specifications.
Used in high-volume manufacturing with minimal human intervention.
Ensures uniformity and reduces errors.
Choosing the right type depends on your workload, budget, and required precision.
Key Benefits of Using a Hydraulic Hose Crimping Machine
Investing in a hydraulic hose crimping machine offers several advantages:
1. Strong and Reliable Connections
Prevents leaks and hose failures under high pressure.
Ensures long-lasting hydraulic system performance.
2. Cost Savings
Reduces the need for outsourcing hose assembly.
Minimizes downtime by enabling in-house repairs.
3. Versatility
Compatible with various hose sizes and fitting types.
Adjustable dies allow customization for different applications.
4. Improved Safety
Eliminates weak connections that could lead to bursts.
Reduces the risk of hydraulic fluid leaks and accidents.
5. Efficiency
Speeds up hose assembly compared to manual methods.
Enhances workflow in repair shops and manufacturing plants.
How to Choose the Right Hydraulic Hose Crimping Machine
Selecting the best hydraulic hose crimping machine depends on several factors:
1. Hose Size Compatibility
Ensure the machine supports the inner and outer diameters of your hoses.
Check die availability for different crimping requirements.
2. Crimping Force
Higher force is needed for larger hoses and high-pressure applications.
Match the machine’s tonnage with your workload.
3. Portability
For field repairs, choose a lightweight, portable model.
Stationary machines are better for workshops with high production demands.
4. Automation Level
Manual crimpers are budget-friendly but slower.
Automatic machines improve efficiency for large-scale operations.
5. Brand and Support
Opt for reputable manufacturers with good after-sales service.
Check warranty and spare parts availability.
Maintenance Tips for Hydraulic Hose Crimping Machines
To ensure longevity and optimal performance, follow these maintenance practices:
1. Regular Cleaning
Remove dirt and hydraulic fluid residue from dies and moving parts.
Prevent debris from affecting crimping accuracy.
2. Lubrication
Apply hydraulic oil as recommended to maintain smooth operation.
Check seals and O-rings for wear and replace if necessary.
3. Die Inspection
Examine dies for wear or damage that could affect crimp quality.
Replace worn-out dies to maintain precision.
4. Pressure Calibration
Periodically check hydraulic pressure settings.
Recalibrate if crimps are too loose or tight.
5. Storage Conditions
Keep the machine in a dry, dust-free environment.
Cover it when not in use to prevent corrosion.
1 note
·
View note
Text
Hair Styling Tools to Match Your Makeup Game
In today’s beauty-obsessed world, achieving a flawless look isn't just about the right foundation or lipstick. It's about perfect harmony—from head to toe. While makeup enhances your facial features, hair styling tools help shape your entire vibe. Whether you're creating a sleek, professional look for work or soft curls for a night out, your hair can either elevate or disrupt your makeup game.
Let’s explore how choosing the right hair styling tools can complement your makeup routine—and elevate your entire beauty look. From hair styling tools for women to options tailored for men, this guide helps you align your style, one strand at a time.

The Art of Matching Hair with Makeup
Before diving into the world of professional hair styling tools, let’s understand one core principle: balance. The right hairstyle can accentuate your jawline, frame your eyes, or highlight your cheekbones. Similarly, certain hair textures and shapes can either blend seamlessly with your makeup or clash with it.
For instance:
A bold smoky eye pairs well with sleek straight hair to avoid overpowering the look.
Soft curls beautifully complement a dewy, natural makeup style.
High ponytails and top buns allow your bold lip colors or dramatic lashes to take center stage.
Whether you're using natural cosmetic products or high-impact makeup from a brand cosmetic product, styling your hair right creates that finished, put-together look.
Must-Have Hair Styling Tools for Every Makeup Mood
1. Hair Dryers – For the Perfect Blowout
A quality hair dryer is more than a quick-fix tool—it’s the foundation of most hairstyles. For a smooth, voluminous finish, opt for a professional hair styling tool with multiple heat settings and ionic technology to reduce frizz.
Tip: Pair a bouncy blowout with subtle makeup and peach-toned blush for a radiant day look.
2. Hair Straighteners – Sleek, Sharp & Modern
Perfect for those who love structure, hair straighteners create a polished look. Ideal for formal events or power dressing, straight hair aligns beautifully with contoured makeup and a matte finish foundation.
Best suited for: Oval or round faces
Works well with: Neutral eyeshadow palettes and bold eyeliner
Look for ceramic plates and adjustable temperature settings when browsing hair styling tools in India to protect your hair and ensure lasting results.
3. Curling Wands & Tongs – Soft Glam, Always in Style
Loose waves or tight curls can change your entire aesthetic. Whether you’re heading for brunch or a romantic dinner, curls bring femininity and softness. They pair wonderfully with bronzed cheeks, highlighter, and glossy lips.
Hair styling tools for women should include at least one curling tool with barrel options to suit various curl types.
Pro Tip: For a “no-makeup makeup look,” use a thin-barrel curler and let your curls do the talking.
4. Hair Crimpers – Retro with a Modern Twist
Crimped hair is making a comeback! Paired with minimal makeup and nude tones, it makes a bold, textured statement. Crimpers add instant volume and dimension to thin or flat hair.
Ideal for parties, editorial looks, or retro-themed days
Complements: Winged eyeliner and metallic eye shadow
When buying hair styling tools in India, choose a lightweight crimper with heat protection features to reduce hair damage.
5. Hot Brushes & Stylers – Effortless Everyday Glam
Combining the ease of a brush with the power of heat, hot air brushes are great for daily styling. These tools allow you to dry, detangle, and style your hair in one go. Match with a fresh-faced makeup style using natural cosmetic products for an effortless finish.
Ideal for: Working professionals, busy moms, and students who want to look good with minimal effort.
Hair Styling Tools for Men: Grooming Meets Style
Gone are the days when hair styling tools for men were limited to combs and gel. Modern men are investing in tools to shape their hairstyle just as meticulously as their grooming routine.
Popular Hair Styling Tools for Men:
Beard straighteners for a neat, groomed look
Mini hair dryers for quick drying without frizz
Trimmers with precision blades for clean hairlines
Straighteners to manage thick or wavy hair for a clean-cut appearance
Pair these tools with beauty cosmetic products like matte moisturizers and subtle concealers to refine the look without overdoing it.
Natural Looks? Use Natural Cosmetic Products & Styling Tools Together
If your go-to aesthetic is all about clean beauty and minimalism, use natural cosmetic products with tools that don’t require extreme heat. Think low-temp hot brushes, air-drying tools, and curling tools with moisture-locking tech.
Brands are increasingly developing eco-conscious beauty cosmetic products that go hand-in-hand with low-damage tools. This pairing supports not only a gentler approach to beauty but also keeps your hair and skin healthier in the long run.
Best Practices to Maintain Hair Health While Styling
Even the best hair styling tools for women and men can damage hair if used incorrectly. Follow these practices to keep your hair healthy and your makeup pop:
Always use a heat protectant before styling
Avoid using maximum heat daily
Clean your styling tools regularly
Allow hair to cool down before brushing or setting
Pair your look with hydrating, brand cosmetic products to balance the overall glam
Final Thoughts: Style Smarter, Not Harder
Your makeup might define your face, but your hair sets the tone for your entire presence. By investing in quality hair styling tools—matched to your beauty style, hair type, and daily needs—you ensure every look feels cohesive and complete.
Whether you're drawn to classic, professional looks or you prefer experimental fashion moments, there’s a perfect tool (and cosmetic combo) out there for you. Explore the complete range of hair styling tools in India at GlamPlus Store and step up your beauty game—one fabulous hair flip at a time.
#hair styling tools#hair styling tools for women#hair styling tools for men#professional hair styling tools#hair styling tools india##beauty cosmetic products#brand cosmetic product#natural cosmetic products
0 notes
Text
Hanging Pictures from the Ceiling with Wire: A Stylish Display Technique
When it comes to displaying artwork or photos, most people default to hanging frames on the wall. But if you're looking for a more dynamic, gallery-style, or unconventional look—hanging pictures from the ceiling with wire is a creative and modern alternative.
Whether you're aiming for a floating art display, have concrete walls, or want to avoid damage to painted surfaces, ceiling-mounted picture hanging is both functional and aesthetic.
Why Hang Pictures from the Ceiling?
There are several reasons to choose ceiling wire hanging over traditional wall mounts:
Flexibility: Rearranging or rotating artwork becomes simple without patching or repainting walls.
Modern Aesthetics: The floating appearance can give your space a gallery-like or minimalist vibe.
Great for Rentals: Ideal for renters who want stylish interiors without damaging walls.
Creative Layouts: It allows multi-layered, suspended, or staggered arrangements not possible with fixed hooks.
What You'll Need
To hang pictures from the ceiling using wire, gather the following materials:
Ceiling hooks or anchors (toggle bolts for drywall ceilings)
Steel wire or nylon cord (depending on weight)
Picture hooks or adjustable cable grippers
Measuring tape
Level
Pliers and scissors
Optional: Decorative chains, curtain tracks, or ceiling-mounted rail systems for an even cleaner finish.
Step-by-Step Guide
1. Plan Your Layout
Before installing anything, plan where you want each picture to hang. Measure the ceiling height and the distance you want each frame to drop. Mark your hook points on the ceiling accordingly.
2. Install Ceiling Hooks
Drill holes and insert ceiling anchors suitable for your ceiling type (drywall, plaster, or concrete). Secure hooks or mounting hardware.
3. Cut and Attach the Wire
Cut the wire to your desired length, allowing extra inches for knots or adjustments. Use wire clamps or crimping sleeves for security. Attach one end to the ceiling hook and the other to your picture frame.
4. Adjust and Align
Hang the picture and check alignment. Adjust the length or tension of the wire to ensure it’s level. If you’re using two wires for better balance, ensure equal length on both sides.
5. Secure the Frame
Make sure the frame is properly supported and doesn’t tilt. Some systems allow vertical sliding adjustment even after installation—perfect for fine-tuning.
Pro Tips for a Clean Look
Use transparent or coated wire for a minimal appearance.
Group frames vertically for a cascading effect.
Use a gallery hanging system with a rail and sliding cables for professional results.
Balance weight distribution if using heavier frames—double-wire supports can prevent tilting.
Safety First
Always check the weight capacity of your ceiling and hooks. For heavy frames, consider using ceiling joists or stud finders to anchor into solid support.
Final Thoughts
Hanging pictures from the ceiling with wire is an innovative solution that adds a modern, artistic feel to any room. Whether you're enhancing a gallery wall or creating a unique photo display, this method opens up endless possibilities for creative interior design. With the right tools and planning, you can transform your space without ever touching the walls.
0 notes
Text
youtube
Plumber Tricks You Need To See! The video shows a step-by-step process of installing copper pipes for a doggy shower system, using a blending valve and crimping tool . It includes cutting, fitting, sealing, and connecting pipes using various plumbing tools and techniques. Please visit our website to get more information: https://ift.tt/fz8kDeu 🔔𝐃𝐨𝐧'𝐭 𝐟𝐨𝐫𝐠𝐞𝐭 𝐭𝐨 𝐬𝐮𝐛𝐬𝐜𝐫𝐢𝐛𝐞 𝐭𝐨 𝐨𝐮𝐫 𝐜𝐡𝐚𝐧𝐧𝐞𝐥 𝐟𝐨𝐫 𝐦𝐨𝐫𝐞 𝐮𝐩𝐝𝐚𝐭𝐞𝐬. https://www.youtube.com/@Pro-plumbing/?sub_confirmation=1 🔗 Stay Connected With Us. Tiktok: https://ift.tt/DAYvp0C Website: https://ift.tt/fz8kDeu 📩 For business inquiries: [email protected] ============================= 🎬Suggested videos for you: ▶️ https://youtu.be/959ubmF6UdM ▶️ https://youtu.be/ibKmz9uC6JI ▶️ https://youtu.be/aJUvfNdkBBU ▶️ https://youtu.be/x5BFmVvSjDk ▶️ https://youtu.be/KNS55x9gftU ▶️ https://youtu.be/6tu7uPySHKc ▶️ https://youtu.be/4-1EG8DKdYY ▶️ https://youtu.be/FX_rGZvlNd0 ▶️ https://youtu.be/3PgOkuxqSTQ ▶️ https://youtu.be/iBGig1ItZ5Q ================================= ✅ About Pro Plumbing. Welcome to Pro Plumbing! Whether you're a beginner or taking a professional plumbing course, we’re here to make learning plumbing straightforward, accessible, and engaging. Our channel offers practical videos for everyday plumbing tasks and a comprehensive study course featuring slideshows, interactive knowledge checks, and graded exams—everything you need to learn and revise right at your fingertips. Say goodbye to costly plumbing books and revision guides; with Pro Plumbing, you’ll have all your learning resources in one convenient place. Connect with fellow learners and gain real-world knowledge. Let's take your plumbing skills to the next level! For Collaboration and Business inquiries, please use the contact information below: 📩 Email: [email protected] 🔔 Looking to master plumbing skills? Subscribe for cost-free plumbing education, practical tutorials, interactive courses, and real-world plumbing knowledge! https://www.youtube.com/@Pro-plumbing/?sub_confirmation=1 ================================= 🔎 Related Phrases: Hashtags via Pro Plumbing https://www.youtube.com/channel/UCVxEsi03FiuqZZ5u5LSrR8Q June 12, 2025 at 04:50PM
#plumbing#plumbingproblems#plumbingservices#plumbingtools#plumbingandheating#plumbingtips#plumbingsolutions#plumbingissues#Youtube
0 notes