#toremove
Explore tagged Tumblr posts
Visit Tumblr Blog
Explore Tumblr blogs with no restrictions, modern design and the best experience.
Last Seen Tumblr Blogs


Fun Fact
The Tumblr office adopted Tommy, an 11-year-old Pomeranian.
Note
the eu keeps gaining Ws with their protections. I wanna live there so bad 🥲
lmao tbh that's one of the few W of Europe
The rest of the time they're okay'ing US lobbyist who try to pass laws to enable importing poisonous US food and toxic pharmaticals..
The few things we have better (food, data protection, education system, healthcare, etc.) they are slowly trying toremove from us by passing reforms that will destroy our social model...
1 note
·
View note
Text
Perkins 2806F Engine Inlet and Exhaust Valve Springs - Remove and Install
This article introduces Perkins 2806F Engine Inlet and Exhaust Valve Springs - Remove and Install Removal Procedure Start By: a. Remove the electronic unit injectors. Refer to Disassembly and Assembly, "Electronic Unit Injector -Remove"for the correct procedure. NOTICE: Keep all parts clean from contaminants. Contaminants may cause rapid wear and shortened component life. Perkins EST Diagnostic Adapter- High Quality NOTICE: Note: Valve springs must be replaced in pairs for the inlet valves or the exhaust valves of each cylinder. If all valve springs require replacement the procedure can be carried out on two cylinders at the same time. The procedure can be carried out on the following pairs of cylinders. 1 with 6, 2 with 5 and 3 with 4. Ensure that all the valve springs are installed beforechanging from one pair of cylinders to another pair of cylinders Personal injury can result from being struck by parts propelled by a released spring force. Make sure to wear all necessary protective equipment. Follow the recommended procedure and use all recommended tooling to release the spring force. 2023A& 2022A Perkins EST Electronic Service Tool Diagnostic Software Full Provide Installation Service 2. Install Tooling (B) into the electronic unit injector sleeve. Secure Tooling (B) with unit injector clamp (1) (not shown). 3. Tighten the nut of Tooling (B) until valve keepers (3) are released from valve rotators (4). Note: Ensure that valve stem seals (7) are not damaged. 4. Remove valve keepers (3) from valve rotators (4). 5. Loosen the nut to release the pressure on Tooling (B). Remove unit injector clamp (1) (not shown). Carefully remove Tooling (B). 6. Remove valve rotators (4) from valves (2). 7. Remove outer valve springs (6) and inner valve springs (5). 8. Remove washers (8) from the valve guide. 9. If necessary, repeat Step 1 through Step 8 toremove remaining the inlet and the exhaust valve springs.
Perkins Engine ECM ECU Flash Files Collection Download
0 notes
Text
thank god for reddit, my laptop updated and it installed copilot onto my laptop and thanks to a reddit thread i was able toremove it
0 notes
Text
Astroai Tire Pressure Gauge Digital 0 150psi (Accurate In 0.1 Increments), 4 Units For Car Truck Bicycle With Backlight Articles
How to Change a Flat Tire
Few things are as inconvenient as getting a flat tire. Itcan make you late for an appointment, and when you doarrive, you are either frazzled or filthy from theexperience. If you don't know how to change a tire, theexperience is made much worse by having to wait forsomeone to come to your assistance.
Most women couldn't care less about the workings of amotor vehicle and how to change a tire. Unfortunately mostmodern men are as helpless in this respect as most women.I refer to men who can't change their own flat tire as,pardon the expression, "girly-boys".
In this article I will provide simple instructions toprepare you for the inevitable inconvenience of getting aflat tire. Anyone can easily change a tire, even a womanor a girly-boy. But first lets talk about how to avoidgetting a flat tire in the first place.
One way to get a flat tire is when a nail or other sharpobject penetrates your tire. In the old days this wouldcause your tire to go flat within seconds. Today's modernsteel belted radial tires usually just develop a slow leakwhen penetrated. Even if not penetrated by a sharp object,a tire will gradually lose its air pressure. The way toavoid the inconvenience of getting a flat tire is to checkall your tires air pressure regularly.
Today's modern steel-belted radial tires bulge out at theside a little even when they have proper pressure, so youcan't tell by just looking at them if they have properpressure. You need to use a tire pressure gauge. Gaugescome in two main types. One type has a rod that comesjetting out at the end. The other type has a dial. Ineither case you use the gauge by removing the littleplastic cap from the tire's air valve and quickly pushingthe valve end of the gauge onto the tire valve.
You will get a little "hiss" when you do this. If you didit correctly, the gauge will give an accurate indicationof the tires air pressure. Sometimes it takes a littlepractice to get an accurate reading. Compare the readingyou get with the maximum psi (pounds per square inch)written on the sidewall of the tire. Car tires usuallyhave a maximum of 32 psi. Full size light truck tires canhave a maximum of 80 psi.
If the air pressure is too low, there is a risk of thetire breaking lose from the wheel. This would causedangerous rapid deflation of the tire. When a car tire'spressure gets below about 24 psi you risk rapid deflation.If the pressure is too high, there is a risk of the treadseparating from the steal belt. This can also cause rapiddeflation, but usually it just gives you a very bumpyride.
The way to avoid getting a flat tire is to check the airpressure in all your tires regularly. By "regularly" Imean at least once each month. By "all your tires" I meanincluding the spare. It is very common for a person toremove a flat from their vehicle just to learn that theirspare is also flat.
If you find one of your tires has low pressure, you needto pump it up to the proper value. Air pumps come in twomain types. One type has a cord with a plug that goes intoyour cars cigarette lighter. The other type has a cordthat plugs into an AC outlet.
The cigarette lighter type has the advantage that you cancarry it in your car and possibly re-inflate a flat tireat the side of the road, saving the messy job of changingthe tire for later. The disadvantage is that they workvery slowly and can draw down a cars battery. The AC powercord type has the advantage that it can fill tires morequickly, but it‘s rare to find an AC outlet at the side ofthe road.
Possibly the most important thing to know about tires, iswhat to do if you get a flat while speeding down theexpressway. The most important thing NOT to do is slamon the breaks! This is a common cause of roll-overs. Justlet your foot off the gas and look for a level area at theside of the road to pull off.
People that don't know how to change a tire frequentlykeep driving on the flat tire, in search of a servicestation, until the tire is totally shredded. Then insteadof paying ten dollars to fix a flat, they have to pay ahundred dollars for a new tire. Fortunately after you usethe information in this article, you won't get caught inthat situation.
To fix a flat tire you have to jack up the car and replacethe flat tire with your spare tire. Unfortunately manypeople don't even know where the jack is, and some don'teven know how to get the spare out. Don't wait untilyou're stranded by the side of the road to start lookingfor your jack and figuring how to get the spare out.
In the old days, the spare tire and jack where always inthe trunk of the car. Now with mini-vans and SUVs, vehiclemanufacturers have become very creative with hiding thespare tire and jack. Below is a list of places where youmight find the jack.
- in the trunk - under or behind the seat - hidden behind a panel - under the hood Below is a list of places where you might find the spare tire. - in the trunk - under the vehicle - hanging on the back of the vehicle - hidden behind a panel
Go out to your car right now and locate your jack andspare tire. You may need to locate your owners manualfirst to learn how to locate and use your specific jackto change a flat tire. It's better to figure it out nowrather than waiting until you're stranded by the side ofthe road.
If you have never jacked up your car, now is the time topractice. As mentioned earlier, the vehicle should be onlevel ground. The jack usually needs to be positioned ata "peg" or "slot" under the chassis near the tire to beremoved. At first don't jack the car up so high that thetire leaves the ground. Just jack it up to take most ofthe weight of the car off the tire.
Then use the lug wrench to "break" the lug nuts lose. Tobreak them lose you have to turn them counter-clockwise.Breaking the lug nuts lose might take a little muscle. Ifyou left the bottom of the tire on the ground, this willhelp by preventing the tire from spinning or the vehiclefrom rocking. "Breaking" the nut lose means loosening itenough so you can get it off easy, kind of like a jarwith a stuck lid. Just break them lose at this point,don't remove them.
If you're not strong enough to get the lug nuts loose,now is the time to find that out. It is also not uncommonfor a tire mechanic to over-torque lug nuts, or striptreads so the lug nut can't be removed. To get the lugnuts off you may have to use "leverage". That is, make thehandle of the wrench longer, for example by putting a pipeover it. In any case now is the time to learn aboutproblems with getting the lug nuts off - not when yourstranded at the side of the road.
After you have broken the lug nuts lose, jack the vehicleup higher. Jack it up just high enough so that the tireleaves the ground. Then remove the lug nuts and the tire.
There are two types of spare tires. You are lucky if youhave a full-sized spare. Most cars today have a "space-saver" spare. A space-saver is thinner than a regulartire. The space-saver works like a regular tire, but thereare two things to be aware of. First, space-savers arerated for only 50 mph. They are intended just to get youto the service station. Second, the air pressurerequirement for a space-saver is usually much higher thanthe regular tires for your car. Make sure you keep itfilled to the proper pressure.
Next put the spare tire over the lug studs and put the lugnuts back on. Start the lug nuts with your fingers to makesure you don‘t cross treads. After you have the lug nutsstarted, use the wrench to turn them on all the way. Afterthe lug nuts are all the way on, jack the vehicle backdown until the tire touches the ground. Now you can torquethe nuts down tight.
There is always the question; how tight do I make the lugnuts? There is actually a specification (which tireservice personnel usually ignore). For example; 95 ft. lbs. as indicated on a torque wrench. But for the averageperson without a torque wrench, it's a matter of feel.
You want to tighten the lug nuts tight enough so that youare confident they won't come lose while you are driving,yet not so tight that you can never get them off again.Don't be a super man and tighten them until you strip thethreads or break the stud. Just make them tight enough sothat you are confident they won't come lose while you aredriving. It's a matter of feel. After you have tightenedthe lug nuts, remove the jack.
Fix or replace the flat tire ASAP. Murphy's law number 66states that if you don't have a good spare tire you willimmediately get a flat tire. Fix or replace the flat tireon the next weekend if you can't do it sooner.
If you don't know how to locate the jack, access thespare, and replace a tire on your vehicle, I suggest yougo do it right now for practice. If you are prepared andconfident, getting a flat tire will be a minorinconvenience, rather than a bad experience that screws upyour entire day.
How Important Is The Car Tire Pressure?
Discover the importance of having the right tire pressure in your car tires.
Tires are a vital part of our vehicle, directly affecting driving safety, as they are the only parts that bring the car into contact with the road surface.
Don't neglect the pressure of the car's wheels.
When tires are not correctly inflated, they get hotter and therefore lose a lot of load capacity.
Also, being hotter causes more friction, and the car consumes more fuel. Overheating the tire causes it to start deforming rapidly, affecting the whole architecture of the tire and creating the risk of a blowout.
Another negative consequence of insufficient tire pressure is reduced driver control of the vehicle, and proper tire condition and correct inflation pressure are strictly related factors.
Not having adequate pressure can lead to tire deformation and premature wear. For this reason, we must control every month's pressure on the tires of the car, including the spare tire.
What is the recommended pressure that my tires should have?
The manufacturer's tire pressure should be recommended in the car's instruction book, as the tire pressure can vary considerably depending on the tire brand and size.
The most commonly used unit of measurement for tire pressure is the psi (pound per square inch). Generally, light cars have a recommended pressure of between 28 and 36 psi.
The tire pressure gauge is the appropriate tool to measure car tire pressure, also called "pressure gauge." You can purchase it or go to your nearest service station at the time. Usually, all service stations have a designated area for water and air. Tires often lose pressure over time. You should check your tire pressure when you think your tires might lose air, sometimes because of a bad valve, a damaged metal wheel, or a puncture (nail in tire). On the other hand, excessive tire pressure reduces the tire's life, decreases ground adherence, and makes it difficult for any car driver to control the vehicle. Are you now convinced of how important it is to checking tire pressure? Here are the steps to follow. How to measure the tire pressure correctly?
Tyre pressure is measured cold. Make sure your tires are cold, so you haven't traveled many miles before measuring the pressure.
Stop the engine, apply the handbrake, and get out of the car.
Remove the cap from each wheel, not forgetting the spare. They are usually dark and are on the inside of the rims. Be sure to save all the caps well, so you don't lose them.
Take the hose from the air machine and hook it to the spout of the tire. Do this gently, but make sure that the hose reaches the end of the spout.
Look at the air machine for the pressure in each tire.
Compare these figures with the tire pressure table recommended by your car manufacturer.
If the figures are below, you must put them in the air. If they are above, you must remove it.
As you can see, measuring tire pressure is a straightforward task. Still, it is of vital importance for road safety, the life of the tires, and other parts of the vehicle, as well as another way of avoiding excessive fuel consumption.
We love for you to visit this website if you want to know more about car tires. Tires are one of the topmost crucial parts of the auto. Therefore we should take care of them.
#Driving_safety
#Accurate_tire_pressure
#TravelSafety
#tire_pressure_gauge
#car_maintenance_tool
#Saving_fuel
#digital_technology
#Safe_driving
#Ready_for_the_trip
#Digital_tire_pressure_meter
0 notes
Photo

Hi guys sonick here I wonder last time you guys hit like more of it now can you guys do it again ;). . Of you want see more stay tune on my ig . Created by Sonickthecat Inspiration by Jsab . #digitaldrawing #digitalart #art #drawing #draw #fanart #jsabbarracuda #jsab #justshapesandbeats #challenge #toremove https://www.instagram.com/p/B_YpeWdgaoX/?igshid=1u3poy8jrlk4g
#digitaldrawing#digitalart#art#drawing#draw#fanart#jsabbarracuda#jsab#justshapesandbeats#challenge#toremove
1 note
·
View note
Photo

Shivudu ha roju chesina tyagam ipatiki cheppukuntunaru, sivudu ante mrutyuvu, devathalu rakshasulu kalisi amartvam kosam ksheera dagara madanam antha chilikesaru ayina andulo visham vachindi kani amrutam raledhu, ha vishani sivudu teesukoni tanu chanipoyi rakshasulu devathalanu bratiki istadu.., antha goppa tyaganiki prati rupamga, sivudu kosam gundu mokku chelinchadam asalu goppa yemi kadhu, prati adavaru temples ki velli chakaga gundu mokku teerchali apude mana ahankarani sivudi padhala vadha pettinattu.., #puravida #nostr #bitcoin #cryptocurrency #mundan #mundanam #gundu #juttuteeseyandi #singlelaser #toremove #entirebodyhair (at Isha Foundation, Coimbatore India) https://www.instagram.com/p/CpNoQJrgZKf/?igshid=NGJjMDIxMWI=
#puravida#nostr#bitcoin#cryptocurrency#mundan#mundanam#gundu#juttuteeseyandi#singlelaser#toremove#entirebodyhair
1 note
·
View note
Photo
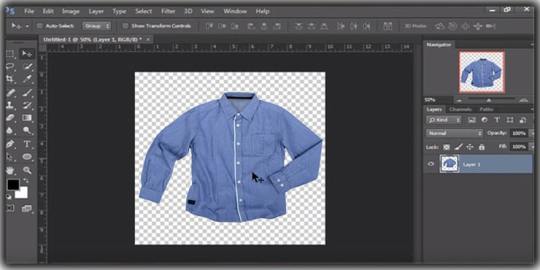
Remove Background from an Image:
Many times we capture some perfect shots. Then we notice that some unnecessary stuff in the background is ruining its quality. At that point, we find the need to remove the background to make it look perfect.
Graphic designers, bloggers, digital product marketers, and content creators are people who understand the importance of removing background images. The main reason for removing image backgrounds or changing them is to clear all distracting objects. Which helps in improving the quality and attractiveness of the images.
Many find it difficult to do. Again most photographers find this to be the most challenging task in photography. The good news, GEI presents a step-by-step tutorial, which can teach you the appearance of background removal. So without delay let's get started.
Contact Info:
Web.- www.graphicexpertsindia.com
Email: [email protected]
#whitebackgroundremoval#magicwandtool#removewhitebackground#removethewhite#thewhitebackground#inphotoshop#thebackground#removewhite#whitebackground#removethe#pentool#thewhite#toremove
0 notes
Photo
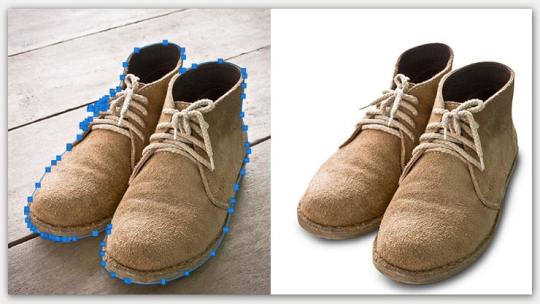
Create Clipping Path in Photoshop to Use in eCommerce Images;
Learn how to create a clipping path in Photoshop for use in eCommerce images. Here's a simple and step-by-step guide complete in 5 minutes.
Our Other Services: clipping path service Background Removing service Image Masking service Image Retouching service Shadow Making service Color Adjustment service Image Manipulation service Raster To Vector service Web-Shop Image Editing service e-commerce Image Editing service
#inecommerceimages#thepentool#creatingclippingpath#pathinphotoshop#aclippingpath#toremove#inecommerce#pentool#pathin#clippingpath#create#tool#image#Photoshop#clippingpathservice#path
0 notes
Text
Update on the tape situation;
It hurt toremove, and when I did remove it there were multiple red marks on my boobs. The biggest areas where under my arms and some skin peeled off on my right boob. I used a crap ton of baby powder and needless to say I will not be binding with Ktape ever again
3 notes
·
View notes
Text
Gmail Account Creator Javascript


Gmail Javascript Issue
Gmail Account Creator Javascript W3schools
Make A Gmail Account
Javascript Code Creator
Gmail Account Creator Javascript Default
Price 25.00$ Create phone verified account automatically. Auto phone verification feature. Auto proxy ip to create unlimited accounts. Saving the registered successful accounts, and the saved format of it is: Email account, Password, An alternate mail, Registered phone number, FirstName, LastName. PLEASE NOTE: This script violates Google(Gmail)'s account creation policies, so I will no longer be supporting it.
Gmail Javascript Issue
Complete the steps described in the rest of this page to create a simple Javacommand-line application that makes requests to the Gmail API.
Prerequisites
To run this quickstart, you need the following prerequisites:
Java 1.8 or greater
Gradle 2.3 or greater.
A Google account with Gmail enabled
Step 1: Turn on the Gmail API
Click this button to create a new Cloud Platform project and automaticallyenable the Gmail API:

In resulting dialog click DOWNLOAD CLIENT CONFIGURATION and save the file

credentials.json to your working directory.
Step 2: Prepare the project

Gmail Account Creator Javascript W3schools
In your working directory, run the following commands to create a newproject structure:
Copy the credentials.json file you downloaded in Step 1 into thesrc/main/resources/ directory you just created.
Open the default build.gradle file and replace its contents with thefollowing code:
Step 3: Set up the sample
Create a file in the src/main/java/ folder with the following filename andcode:
gmail/quickstart/src/main/java/GmailQuickstart.java
Step 4: Run the sample
Build and run the quickstart with the command:
The first time you run the sample, it will prompt you to authorize access:
The sample will attempt to open a new window or tab in your defaultbrowser. If this fails, copy the URL from the console and manually open it inyour browser.
If you are not already logged into your Google account, you will beprompted to log in. If you are logged into multiple Google accounts, you willbe asked to select one account to use for the authorization.
Click the Accept button.
The sample will proceed automatically, and you may close the window/tab.
Make A Gmail Account
Great! Check out the further reading section below to learn more.
Bummer, let us know what went wrong. Check out our troubleshooting section below for some common errors and solutions. If you have found a bug in the code, report the issue on GitHub or submit a pull request.
Notes
Authorization information is stored on the file system, so subsequentexecutions will not prompt for authorization.
The authorization flow in this example is designed for a command-lineapplication. For information on how to perform authorization in a webapplication, seeUsing OAuth 2.0 for Web Server Applications.
Troubleshooting

This section describes some common issues that you may encounter whileattempting to run this quickstart and suggests possible solutions.
Javascript Code Creator
This app isn't verified.
The OAuth consent screen that is presented to the user may show the warning'This app isn't verified' if it is requesting scopes that provide access tosensitive user data. These applications must eventually go through theverification process toremove that warning and other limitations. During the development phase you cancontinue past this warning by clickingAdvanced > Go to (Project Name) (unsafe).
Gmail Account Creator Javascript Default
Further reading
1 note
·
View note
Note
"Please. Don't wait for me at your place fully naked with your legs spread either... If that's a Mondstadt thing." He's saying damn it all and opening the wine bottle he just stole (or is it really stealing if you were in such a situation), drinking directly from it before passing it to Huffman―he needs to focus on something else, someone else. "If you wish to do any sort of undressing, wait for me fully clothed. I prefer to remove them myself. It's half the fun. Unless you're really into those kind of things..?"
What had happened at the tavern, well, let's just say that they'll both never be able to see THEM ( a certain someone ) the same way again.
Lord Barbatos. Huffman pinched the bridge of his nose and tried to get rid of that mental image. How lewd. How vile. It was rather disgusting. If anything at least Viktor was able to swipe some wine to make up for such a traumatizing event.
Huffman just gently took the bottle, not even paying attention too much until...well...as he brought the bottle to his lips, the knight stopped as his face completely dropped.
If you wish to do any sort of undressing, wait for me... (what?) ...toremove them myself... (What?) ...Unless you're really into those kind of things... (WHAT?!)
❝ V I K T O R ?! ❞

Oh and his accent was truly showing at this point. That guttural tone in the back of his throat as he just just set down the bottle, not even having taken a sip of it. He was...flabbergasted, appalled, disgusted.
❝ Verpiss dich, Arschloch!! ❞
He straight up shoved the bottle back into the Fatui's chest as he gave a good fucking SLAP!!! to Viktor's cheek before walking away. Screw having a drink, he's going to go to the church and garden or something. First the thing that happened at the bar. Now Viktor was thinking he'd do something like that AND if that wasn't bad enough, Viktor was going further to telling him HOW to...how to...as if Huffman wanted...disgusting.
But let it be known that Huffman...made a mental note.
#otverzhennyy#.: requests for the knight :.#//you wanted a slap#//here's a slap#//enjoy your wine by yourself viktor#//didn't even touch huffman's lips#//he gonna go garden and be cute without you now
2 notes
·
View notes
Photo

Grown #bicepworkout #littlefat #toremove
0 notes
Text
canigetinfos? @iaeaorg .@iaeaorg @nnsa @lhnnsa @iterorg @iterwomen .@iterwomen isit a goodidea toremove the mox or mandatory do hi ghflux moderators splinter break or explode or only stay intact wit hthe effects more than the reactorfuel andor processed fissionmatter
canigetinfos? @iaeaorg .@iaeaorg @nnsa @lhnnsa @iterorg @iterwomen .@iterwomen isit a goodidea toremove the mox or mandatory do highflux moderators splinter break or explode or only stay intact withthe effects more than the reactorfuel andor processed fissionmatter I am Christian KISS BabyAWACS – Raw Independent Sophistication #THINKTANK + #INTEL #HELLHOLE…
View On WordPress
0 notes
Text
How Do I Get rid of Malware? I'll Present You How to Detect
Has your laptop been contaminated? If you need to question, how do I take away malware - I can help. But website malware removal should suggest you toremove malware rapidly, as it can simply spread through your method and corrupt your personal computer. It transpired to me prior to and I misplaced all the data on my hard generate. I advocate getting motion proper absent. Malware is a malicious type of application put in on your computer with out the your consent. It can arrive in numerous various types this kind of as viruses, worms, trojan horses, adware, and most dangerously - spy ware. I say spyware is the most harmful type of malware since whilst the other folks can mess up your personal computer and sluggish it down, spyware does that AND steals non-public details this kind of as credit history card numbers and passwords. The initial thing you need to do is scan your laptop for malware. I have provided a hyperlink at the base exactly where you can speedily get a cost-free scan to do this for you. If you find out your computer is infested you are possibly questioning "How do I eliminate malware?" The subsequent are a pair choices obtainable to you. You can manually take away malware through the handle panel feature "Add or Take away Packages". However, I don't recommend getting rid of malware by your self. Malware can mask by itself rather properly and simply because it can just take on so a lot of various forms, until you are an absolute specialist it is nearly extremely hard to eradicate all of it. You could also unintentionally take away a necessary technique file which can mess your personal computer up even even worse! I recommend obtaining a system that detects and gets rid of all varieties of malware such as spyware, adware, and other hazardous viruses. You can go to my website for testimonials of the greatest malware removal resources. Following careful investigation see what program I consider the #1 rated malware remover on the net. Arrive have a look and never have to inquire the question, how do I remove malware ever yet again.
1 note
·
View note
Text
How to Save Money on Upholstery Cleaning in Winston Hills
For many people, it's hard to believe that you can get upholstery cleaning done in Winston Hills without having to spend a lot of money. Luckily, there are a few ways you can save money on a professional cleaning service. One of these ways is to do your own cleaning and restoration. This will help you save time while still preserving the appearance of your home. Read on for more information! And, don't forget to check out our special offers!
The best way to avoid spending more than you can afford is to opt for upholstery cleaning Winston Hills. This service will take care of your furniture by removing all stains, mould, and yeast. The results will make your home look and feel cleaner than ever. And, with a cleaner upholstery, you will feel better about the quality of the space in your home. If you haven't had your upholstery cleaned in a while, it may be time to invest in a professional service.
Fresh Upholstery Cleaning is another great way to save money on upholstery cleaning in Winston Hills. We offer our services all over New South Wales. And, our couch cleaning service starts at $27 per seat! And, we specialize in cleaning leather upholstery, so you'll be sure to receive top-notch service. And, we're local! That means that you can get your couch or sofa cleaned for the lowest possible price. With our affordable prices, you'll save money on your upholstery cleaning in Winston
Hills.
Whether you're planning a special event or a holiday with lots of family and friends, the last thing you should do is forget about the upholstery in your home. After all, the upholstery is one of the most important rooms in your home. It can attract allergens and dirt faster than any other surface. Therefore, you should not risk the health of your guests by ignoring your upholstery. So, when in doubt, get a professional upholstery cleaning service today!
The best way to get your upholstery looking its best again is to hire an upholstery cleaning service Winston Hills. Professionals from a reputed company are wellequipped to handle all kinds of upholstery cleaning jobs. From delicate to hard-toremove stains, these cleaning experts are more than capable of handling any type of upholstered item. They will leave your home fresh and smelling better after they finish the job. Moreover, you will feel much healthier afterward, thanks to clean upholstery.
There are many companies in Winston Hills that offer upholstery cleaning services. Fresh Upholstery Cleaning Winston Hills offers the best prices in Winston Hills. Prices for sofa cleaning begin at $27 per seat. They also specialize in leather upholstery cleaning, so you can rest assured that your couch is in good hands. You can easily contact these companies for an upholstery cleaning in Winston Hills. And if you are thinking about the quality of work they provide, you can rest assured that you're in the hands of highly experienced, certified, and licensed local professionals.
For upholstery cleaning in Winston Hills, you can choose between steam and dry cleaning. First, the upholstery cleaning technician inspects the furniture and note its fabric type. Then, chemical-free products are applied to the stains. This will help reduce the amount of dust and allergens that are present in the upholstery. Then, he or she will carefully vacuum all solid debris. If there are stains, they'll be treated using a gentle cleaner.
0 notes
Text
Push the feed tray into position under the lower film web currently lying on top of the lower roll of film.
Push the feed tray into position under the lower film web currently lying on top of the lower roll of film.The card is now properly positioned to guide the film rolls into therollers. Carefully monitor thethreading card to ensure the leading edge is properly taken into thelaminating machine. Find what is left of the top and bottom film webs (by looking betweenthe heated rollers and the supply rolls) and cut them.Using a school laminator is pretty simple, butloading the film so you can use the laminator can be somewhat tricky. When the threading card comes out the back of thelaminating machine, press STOP. Working from the right, slide the shaft of the film into thetube and the core adapter. Put the retaining collar back where it goes andtighten the screw.
If adhesive gets onthe rollers, the machine will not work until the film residue iscleaned off. Pull the cylinder outa bit then slide it in to loosen the left core. 13)After lowering the shield, press RUN. 7)Check to be sure the film is properly positioned to unroll the rightway, then slide one of the core adapters into the right side of a newfilm roll. You can do this by running themachine slowly backward. Service calls can be costly, so learning to load film correctlyis important. Pay attention as you do this so that you don'taccidentally touch the adhesive to the rollers and make a mess. 5)Take the film out of the laminator. Put the remaining core adapter onto the leftside's core adapter. Reposition the feed table,positioning the lower film on the tray. If your machine is already hot, turn it off and let it cool before continuing. Lay thelaminating film over Shrink Film Manufacturers the bottom of the roll.
Look at both rolls of laminate that are mounted on the laminator by removing the feed table. 9)Repeat steps 6-7 after removing the upper film supply roll. Check tomake sure the film unrolls from the bottom after you have loaded itonto the laminator.) *One roll of film runs out while the other one continues to run. 8)Lower the bottom idle bar, then get ready by unrolling two feet oflaminating film and pushing the idle bar into position. Incorrectly loaded film can deposits film on the rollersand if you are not careful can ruin your machine.com. Pay attention sothat you don't accidentally cut the rollers, as this can damage them. 1)Turn the main power switch on. Put the lower roll oflaminating film back in the round hole on the frame and put the leftside into the hexagonal brake hub. Be sure toremove the feed table when you're finished removing film.
Replace both rolls of laminating film at once using the following steps. Pull the cylinder outof the tube entirely to remove the core adapter.The most popular reason for laminator repair calls is improperly loadedfilm. 10)Unroll about two feet of laminating film and lay it over the upper idle bar and over both of the rollers. Four common ways to end up with glue on your rollersinclude: *Laminating when only one roll has been loaded on the laminator .Trying to use two mismatched widths of film together Loading film upside down so that the adhesive faces the roller (Keepin mind that the shiny side of the laminating film faces the rollers,and the adhesive side faces out. 12)Between the laminating film and the feed tray, slide the threadingcard into place by gently pushing it into the heat roller's nip area. 6)Slide the bottom roll of laminating film to the right to release itfrom the hexagonal brake hub. To dothis, you may have to put the feed table back in place. Look on the left side of the film supplycylinder and loosen the screw on the left collar. 4)Lift the shield into an upright position and pull down the top piece of film
0 notes