#ts3 tips
Explore tagged Tumblr posts
Visit Tumblr Blog
Explore Tumblr blogs with no restrictions, modern design and the best experience.
Last Seen Tumblr Blogs


Fun Fact
Tumblr is used by 21% of adults online aged 18-29 years.
Text
tips for 4t3 converters/CAS clothing creators
3 main things:
non-recolorable presets
DDS. settings
Adult to Teen conversions
disclaimer: i'm not a CC expert, but these are things i've noticed and learned these last couple months converting cc. special thanks to thornowl and the other converters in the TS3 Creators Cave discord.
Non-recolorable presets:
we obviously know that ts4 lacks a CASt tool, so ts4 creators rely on recolors. In my conversions, I do include a couple of the item's recolors. these usually are patterns that CASt does not have.
one thing I've noticed more and more converters doing is putting such item recolors in the 'Overlay' tab in TSRW.
let me show you what that looks like for a non-recolorable preset:
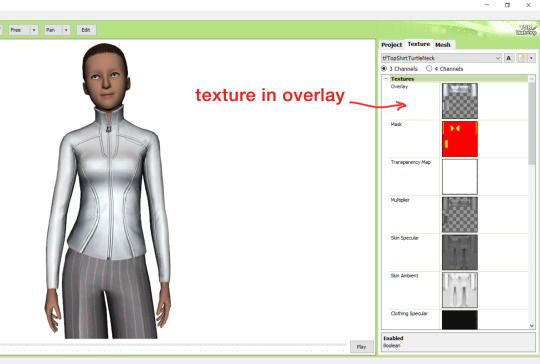
it looks over-saturated, and almost crunchy. but there's another place you can import the recolor into: stencils.
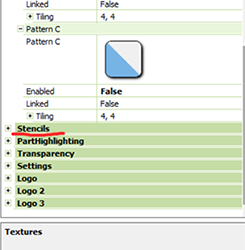
stencils will be found at the bottom, under patterns. hit the plus sign next to stencils to open it.
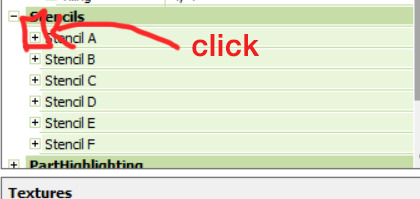
opening it will show you this:
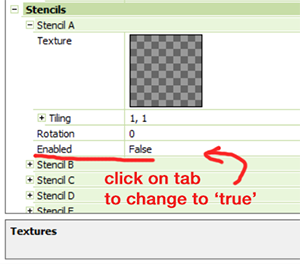
by default, it will be enabled as false. import your recolor into the texture tab as you would do for any other texture tab. make sure you tick the 'false' to 'true.' stencils override overlays, so if you want to use an overlay, enable stencils back to 'false.'
here's what the recolor imported into stencils looks like:

here's the two side by side:
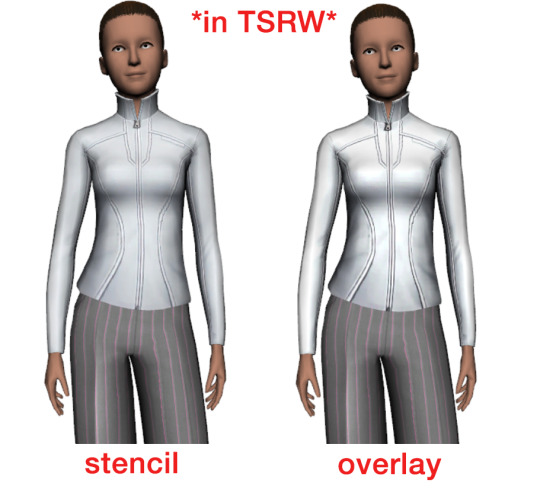
see how different they are? let's see how they are in game:
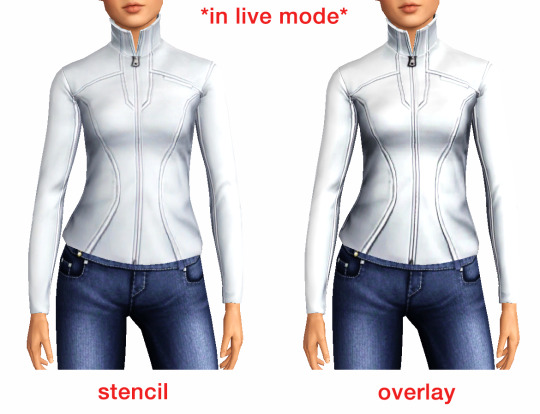
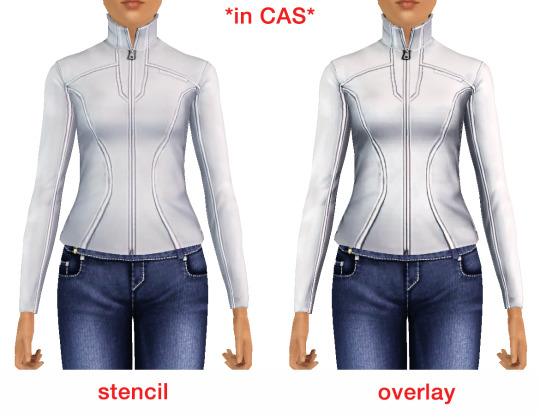
click on the pictures to really see the difference in quality. since TS3 uses DDS. format, it compresses the texture, which results in the crunchy texture. importing the recolor into the overlay tab makes the DDS. compression more noticeable. it ultimately is up to you and whichever one you prefer, but do keep it in mind.
the overlay tab is good for small details that you want to maintain on all recolorable presets, like zippers, buttons, tags, etc. just look at EA clothes for reference, especially their shoes and male clothes.
another thing you can see from the images are the bumps on the mesh. doing normal maps can help you keep those same details on the recolorable presets without importing the recolors.
-----------------
DDS. settings:
something I also see and used to do myself is bloat package files with large file sizes, specifically normal and specular maps, as well as masks. the Sims 3 Tutorial Hub provides a link to plain maps, but the file sizes are unnecessarily big.
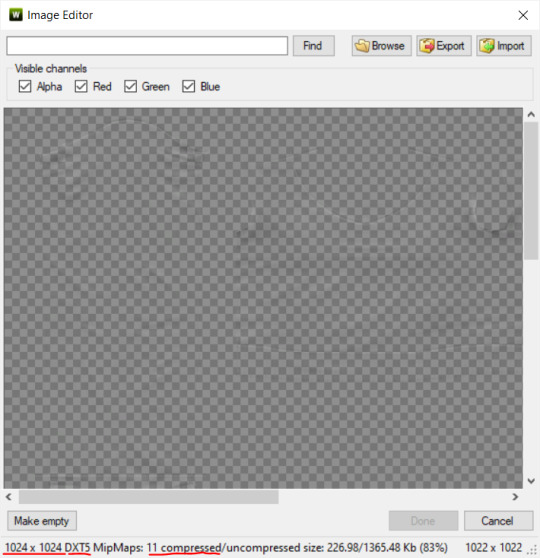
let's look at some of EA's maps in TSRW:
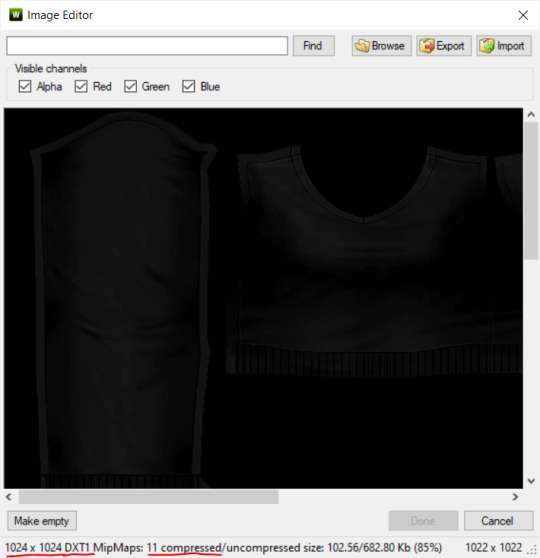
here's the specular from one of the basegame sweaters. notice the image size, DXT format, and compression size.
a lot of converters don't want the shine on regular clothes, so we use a plain, black specular map. but ask yourself, why do you need a 1024 x 1024 purely black specular map with no details?
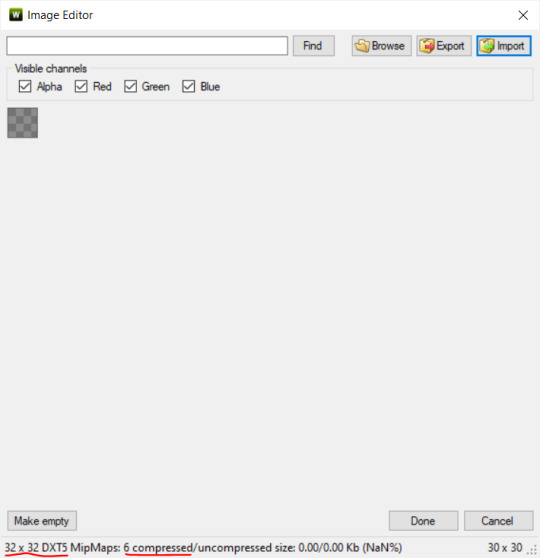
let's try sizing it down:
notice the difference between the image and compression size. instead of bloating the package file, we can keep it down by using a 32x32 plain black specular map instead, since there aren't details we want from the specular map.
same goes for normal maps:
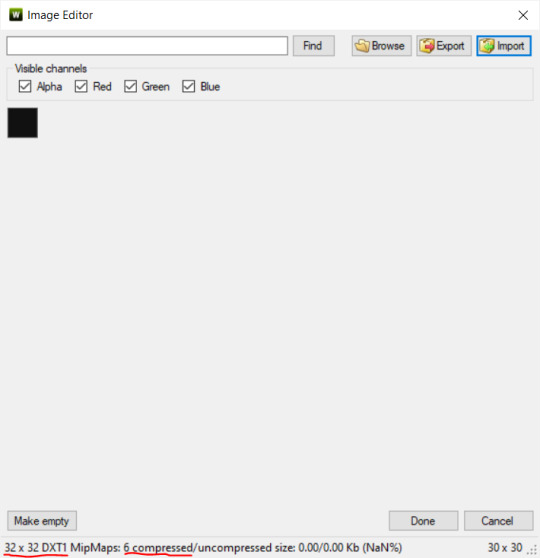
and masks (meant for 1 channel only):

now, notice how I underlined the info about DXT MipMaps. see how the normal map has a different number there compared to the specular map and mask.
the reason these textures use different DXT is because of the colors and alpha channel.
here's how my DDS. settings appear when saving:
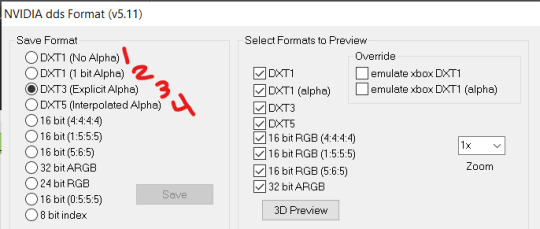
DXT1 (no alpha): this keeps only the 3 color channels and has the strongest compression. it results in half the file size as DXT3/5. 3 channel masks should be saved with this, as they don't need an alpha channel.
DXT1 (1 bit alpha): this includes an alpha, but only black or white. it also results in half the file size as DXT3/5.
DXT3: this one is rarely used for TS3 textures. it really is only used for overlays. it compresses the same as DXT5, but may not be the best for images with smooth-blended alpha regions (Neely).
DXT5: multipliers and normal (bump) maps should only EVER be saved with this. it's best for colors but has a larger file size. this is why it's important to reduce the multiplier and normal map image size, especially if you don't make a normal map.
if you DO decide to do a specular and normal map, they should be regular image size, 1024x1024, and saved in the right format.
here is more information on which textures should use which compression.
-----------------
Adult to Teen Conversions:
the default for converters is obviously AF and AM. a lot of people want the items for teens too. I've seen several converters just enable it in TSRW:
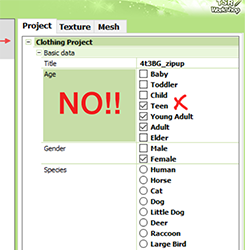
please don't do this. it's honestly the lazy route. you can hardly ever get away this, specifically because of the body differences between adult and teen.
some major issues with this include gaps, seams, and unnatural body characteristics:
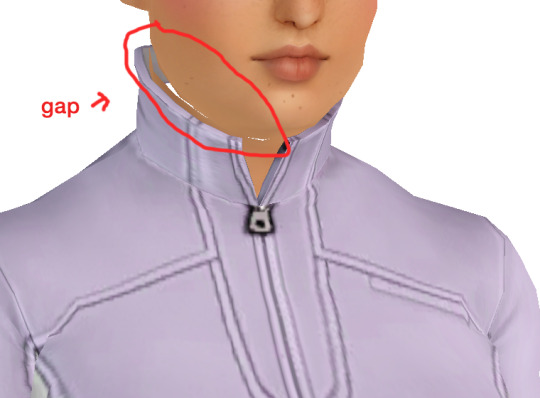
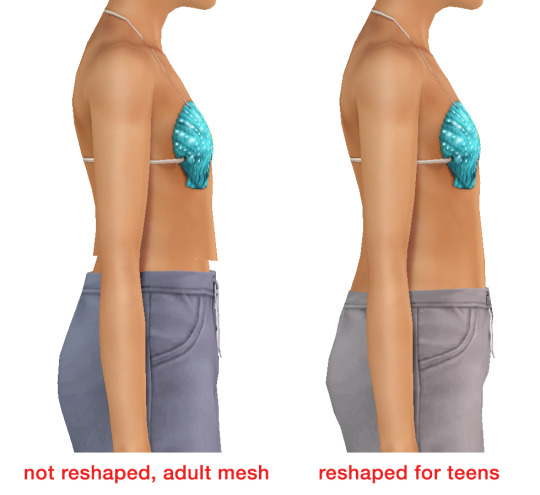
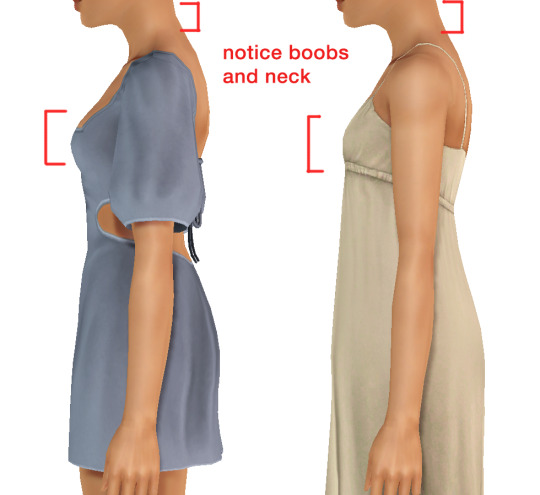
so please, either skip the teen mesh entirely or spend the time reshaping the mesh. @/sweetdevil-sims has a great tutorial on converting meshes from AF to TF here. the inevitable seams on TF meshes are also now fixed, thanks to @/thornowl with their new version of mesh toolkit.
@pis3update
---------------
here are reduced file sizes and corrected settings of the plain mask, specular, and normal:
download
Sources:
Neely, G. ‘Buckaroo’. Working with DDS/DXT Files. Available at: https://www.buckarooshangar.com/flightgear/tut_dds.html (Accessed: 28 May 2024).
212 notes
·
View notes
Text


A lot has changed in Praaven.
Sir Rowan is now the Jarl's chief of Military Police. He gets to work with strapping, strong soldiers every day. A job that suits Rowan well.
Who knows how he got that role?
Dr George has been summoned to a meeting party with the soon to be new King of Praaven, the time and location seemed a little ominous so the family are praying for his safe return.
Young Mabel has painted a picture of the old King being de-throned, to take as a token of family's loyalty to the Prince.
Aunt Morgan has come to stay (George's sister), because Lucinda is up the duff again and is needing some help around the house.
(I added her to the Servant Pool then hired her, next I used MC to add family with George as her sibling. It's literally Aunt Morg as the Butler!)

Previous
Next
12 notes
·
View notes
Text
Thanks to @plumbobgothica for compiling this list. Building on her work, I calculated the average polycounts for vehicles, including those from packs and the store.
Vehicles are large, detailed objects, which is why they tend to have high polycounts. For example, the vehicle with the highest polycount is the fire engine from Ambitions at 9.6k. It's a massive object with a footprint of 30 tiles. In comparison, a small object that only covers part of a tile should have a much lower polycount. However, it's not uncommon for small CC objects to also have thousands of polygons.

Many custom car creators use models from racing games, but be aware that the polycounts can often reach tens of thousands.
Vehicles
Bicycles:
Average polycount: 1436
Minimum polycount: 1272
Median polycount: 1422
Maximum polycount: 1566
Boats:
Average polycount: 3990
Minimum polycount: 2152
Median polycount: 2997
Maximum polycount: 8821
Cars (Base game only):
Average polycount: 4646
Minimum polycount: 3717
Median polycount: 4783
Maximum polycount: 5392
Cars (All):
Average polycount: 5418
Minimum polycount: 3691
Median polycount: 5032
Maximum polycount: 9622
Hover cars:
Average polycount: 5020
Minimum polycount: 3438
Median polycount: 5150
Maximum polycount: 6254
Motorcycles:
Average polycount: 2605
Minimum polycount: 2080
Median polycount: 2856
Maximum polycount: 2878
Scooters:
Average polycount: 2087
Minimum polycount: 1308
Median polycount: 1713
Maximum polycount: 3614
Average Polycount of EA Items in TS3: A Reference Sheet
I initially started this list as a personal “cheat sheet” that I could reference to ensure the custom content I'm downloading is appropriate for gameplay when it comes to polycount (and because I intend(ed) to learn how to make my own cc). I decided to share in case others find it useful.
I��m not a Maxis Match purist or anything like that, but purging high-poly CAS items from my cc folder eliminated in-game stuttering for me entirely. For some reason, this is rarely mentioned in discussions about gameplay optimization. Polycount does matter.
There’s a lot of absolutely gorgeous but incredibly high-poly cc out there that is simply not gameplay friendly for the average player. As we see an influx of first-time or rusty players migrating over from TS4, I think it’s important people are aware of this (both players and creators alike).
This might be a nonissue for those whose focus is on CAS and pretty screenshots, or maybe for those who have beastly gaming pcs/graphics cards etc.
But for players whose focus is on actual gameplay, high-poly cc can be detrimental.
With that said, below the cut you can find a list of average polycounts for some EA clothing/objects to use as a reference.
My method
I recorded the polycount of 10 items from each category below so that I could get a decent representation from each one to calculate the average. Since there is a wide range in some of the categories, I’ve opted to also include the minimum, median, and maximum for a clearer picture.
This list is not exhaustive; I feel like after a while, you kind of get the point. Also, this has been sitting on my computer for ages, and I don’t know if/when I will continue collecting data for it, so I figured I would just share what I have for now.
CAS
Tops:
Average polycount: 3538.4
Minimum polycount: 2868
Median polycount: 3443
Maximum polycount: 4872
Outfits:
Average polycount: 4281.8
Minimum polycount: 3865
Median polycount: 4205.5
Maximum polycount: 4932
Bottoms:
Average polycount: 1094.2
Minimum polycount: 770
Median polycount: 1016
Maximum polycount: 1768
Hair:
Average polycount: 4343.2
Minimum polycount: 2298
Median polycount: 4691
Maximum polycount: 6840
Shoes:
Average polycount: 621.6
Minimum polycount: 456
Median polycount: 594
Maximum polycount: 968
Accessories
Average polycount: 520.8
Minimum polycount: 118
Median polycount: 433
Maximum polycount: 1098
Objects
Dining Chairs
Average polycount: 806.3
Minimum polycount: 362
Median polycount: 799
Maximum polycount: 1054
Sofas and Loveseats
Average polycount: 1699.4
Minimum polycount: 958
Median polycount: 1414
Maximum polycount: 2920
Livingroom Chairs
Average polycount: 791.0
Minimum polycount: 290
Median polycount: 920
Maximum polycount: 1006
Beds
Average polycount: 3529.4
Minimum polycount: 1974
Median polycount: 3316
Maximum polycount: 5668
Plants
Average polycount: 746.3
Minimum polycount: 104
Median polycount: 801
Maximum polycount: 1998
Sculptures
Average polycount: 1659.3
Min polycount: 440
Median polycount: 1417.5
Max polycount: 5263
Misc
Average polycount: 914.4
Min polycount: 380
Median polycount: 988
Max polycount: 1926
Curtains
Average polycount: 762.4
Min polycount: 262
Median polycount: 802
Max polycount: 1438
Wall Art
Average polycount: 524.1
Min polycount: 62
Median polycount: 171
Max polycount: 2403
Dining Tables
Average polycount: 754.8
Min polycount: 468
Median polycount: 685
Max: 1262
(To be continued, maybe? If anyone wants to help me add more categories, feel free to get in touch, happy to credit you for any data you send over).
Further reading from people who are way smarter than me:
Polygon counts and Sims CC by @simlicious, plus their tutorial on how to check polycounts using TSRW. Edited to add: check out their newest essay about polycount vs vertices!
Let’s Talk Polygons by @mispoodle1, plus their tutorial on how to use S3pe to check polycounts.
A warning about high polycount custom content - for downloaders and creators by @tommeraas-cc (this post is for TS4 but still relevant for TS3 as well).
Maybe no one cares about cc polycounts anymore, but I sure do. 😅
Happy simming! I'm on a bit of a break from TS3 right now but I always come back. 🖤
396 notes
·
View notes
Text
Useful TS3 shortcuts you might not know about - quickly copy and recolor! (GIF)
• Hold Shift while dragging a palette to recolor the entire floor or wall


• Ever get frustrated copying objects with an eyedropper? Hold Shift and place the selected object to copy it without loading it! Works in both Build or Buy modes, can copy Debug objects with no codes ;)

• Hold Shift and drag fence or wall tool to create a room; hold Ctrl to remove the wall or fence
These shortcuts have saved me lots of time! I rarely use both sledgehammer and eyedropper :) By the way, the support team has said that my tumblr is finally unbanned! Whew, let's see!
939 notes
·
View notes
Text
Some tips for The Sims 3 Buy/Build
Install LazyDuchess’ Smooth Patch to alleviate lag, esp in Buy/Build and CAS.
Keep your CC merged and organized, esp your patterns, this will also alleviate a lotta lag across all modes.
When building on community lots, or any lot rlly, avoid going to the edit world menu, and just put testingcheats enabled into the cheat window, then shift+click the ground of the lot to enter Buy/Build mode. This makes leaving it to save a lot easier, with less “preparing” screens to possibly get hung up in.
Lower your settings, you don’t need any adjacent lots loaded, and you certainly don’t need super water on either. You can always switch these back on when you’re done.
While you’re at it, remove your HQ mod, and turn off your Reshade/Gshade preset, or at least turn off your depth shaders. I only ever turn on my depth shaders when I’m taking screenshots for better fps while playing. The DoF shader esp requires a lotta resources your game could be using to simulate all those 78 townie sims instead.
Save as… vs Save, I Save as… at least every third save. It’s also just good habit to keep backups.
When using the CASt tool, set down everything you plan to CASt first, then switch to a category like the wall tool to avoid eventual lag and drag when using it a lot. Love yourself. You don’t have to suffer using CASt tool in an overpopulated category like misc deco.
Utilize the clone option through testing cheats to duplicate already CASted objects, it’ll keep your design just like the dropper tool, but it’s a lot less time consuming, I promise.
Don’t be afraid to use the swatch save tool for objects you use often, esp community lot objects, as it helps to keep your aesthetic consistent. I also keep all of my favorite streetlamps, benches, and public trash bins etc in a convenient custom collection folder to speed up the process of doing multiple lots in one sitting. These handy tools are there, use them.
The issue with custom counters. They mess up sometimes, if you can’t recolor it suddenly, here’s how to fix that. Now if you can’t place down a cupboard suddenly, even though nothing’s in the way, and you’ve got moveobjects on activated, try putting it on the wall a tile over, and then try adding it to your desired spot again. Lastly if you set down counters or cupboards at a corner, and it messes up the textures, but you can still recolor it, you could do what the video I linked above does, or you could simply pull out the CASt tool, and switch it back to any of its original swatches and click the check, then feel free to recolor it as you want.
Railings will also do the “can’t recolor” trick too, but this is a simple fix, just delete it, and replace it, and you’re good.
“Oh no, I switched between buy and build mode, and now my catalogue won’t load, and I can’t click on anything at all!” Don’t panic, hit F2 and/or F3 on your keyboard, these are shortcuts for switching between them, and if you’re lucky it’ll load properly again. Should you get the bug where you load a category and it’s somehow empty, don’t fret, just click on a different category and this should fix it. Then if you get the bug where all the objects you put down disappear suddenly, sorry your game is haunted. Call an exorcist, or just reload, they might reappear if you do.
Tbh, if you run into any kind of major bugs, it’s likely a sign to either save immediately or just restart your game. These only ever show up when you’ve been at it a while ( at least for me ), therefore starting fresh wouldn’t hurt. Probably also wouldn’t hurt to check whether you might’ve installed something the game didn’t agree with by running Dashboard, or put it through the ol’ Save Cleaner.
Honorable Mention: Keep an eye on the texture sizes and poly counts of objects. I know it’s tempting to build these ultra hyperrealistic lots with clutter at every inch, but unless you’re just doing it for screenshots, or for your story, or using it very sparingly, it is not by any means recommended purely for gameplay. This is just the truth when it comes to any Sims game. You don’t want lag, or max memory crashes, or save errors? The Sims 3 is a 32bit game, that’s almost old enough to drive, be easy on it.
485 notes
·
View notes
Text
Not-a-tutorial - Lighting (Basics)
I really loved @nocturnalazure Storytelling tips, and figured I'd add one more chapter that I, personally, feel can be helpful to add the mood or maybe a bit more 🌶 to your pictures! (with or without reshade ;))
But first, go check out these tips by Nocturnalazure!
Camera Shots
Dialogues Part I
Dialogues Part II
Things to note before beginning:
This technique can be used with and without reshade/gshade/sweetfx or even editing images. (but I would recommend it!)
Make sure you're playing with at least "Lighting and Shadows" to highest settings. Otherwise this won't work.
All of the images in this post have been taken without being edited/haven't used reshade/gshade for them. (So, just the good ol' C button 😉)
A lighting mod can already go a long way! So, if you haven't yet, go find one before reading!
All Base Game compatible! No EPs/SPs needed
I'm in no way a colourist! But it may be cool to check the science behind it if you want to go more advanced on this :)
And with that said... let's get to it!
What do we need?
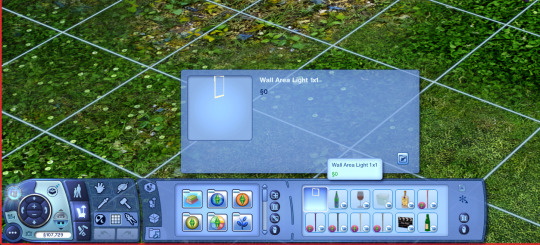
1. "Wall Area Light 1x1", (since it's simpler for sims)
You can find it under BuyDebug on (But first make sure you have Testingcheatsenabled true on!).
Pssst! I would recommend adding it to a catalogue! I made a "story" catalogue and added it so it's much easier to find it!
How to use lighting, the very basics:
Here we have Lolita Goth, outside with no lighting except for the world's.

Not to bad, eh? Well. there are a few reasons why we want to add lights to this scene.
Lolita's face is quite dark.
The reader will be very focused on the background AND the sim. (I personally keep looking at the bench, and less at Lolita right now.)
It's interesting, partially because of the lighting mod installed, but we can make it even more appealing.
NOTE: These techniques will work no matter if your sim is facing the sun or facing away from the sun! The results will always be the same with the lights.

Setup:
The basic setup is simple! You'll need 3 lights. One behind your sim(s), one sideways and one in front.
Back light = used for darker colours (blue, red, green, purple, orange)
Sub light = Used as helper colour for Back light. Can remove if not necessary. (helper in the sense of: Backlight is blue, adding purple can help being more interesting).
Front light = always white, flame, orange.

An example with the 3 lights used.
Setup:
Backlight = Red
Sub-light = Orange
Front Light = White
Why can't I just use the front light?
While it's not a bad approach in certain scenes, often the result is a bit too... tense:

(Left is with backlighting, right is with only front-light).
Personally I find the left image much more appealing, and more interesting to look at. But if trhe right picture is more your cup of tea, the feel free to use it!
Here's an example with the same principle but at night:


(Left is with backlighting, right is with only front-light).
Here, I think it shows it even more, how nice backlights can make something more captivating!
Now that we know about the basics of setting up our scenes... Let's get into the details a bit more!
How to use lighting for nighttime (Outdoors):
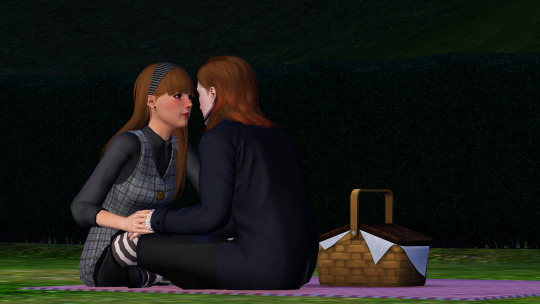
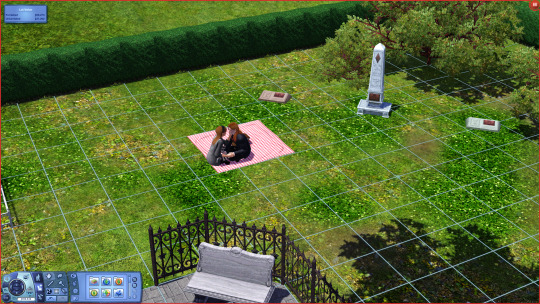
Here we got a scene with Lolita and Gunther Goth in a dark spooky graveyard, having a gothic-y picnick. In-game, this is the lighting setup as of right now:

It's lit up enough, right? While in regular gameplay this is definetly true, in a story setup we can actually make this much more interesting! But before that, here's our scene image:

The thing though is... while there is light, currently the eyes aren't drawn to Lolita's face at all:
So... how do we fix this?
There are a few ways. But all require our Wall Area Light!
Setup 1:

One light can go a long way! In this instance, I added only one light, and used "Dimmed" so it still shows as if they're in the dark. (To select different light settings, use Shift + Click to see them ;))
There are scenes where this would be enough (though, having 2 facing from different directions would work better), it dosn't really in this instance.
The problem, however, is that it almost feels like there's a spotlight that is facing them. The scene may have got a bit more interesting (as we are more focused on Lolita's face), but just isn't there yet.
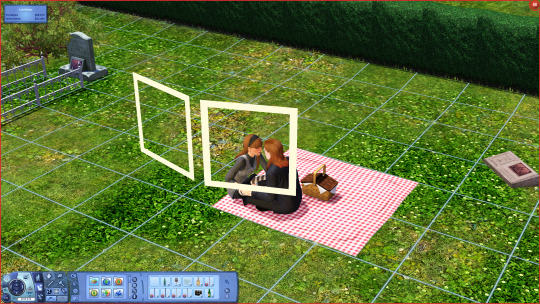
Setup 2:


By adding in a blue colour, facing the back and a little bit the front of our subject(s) we get a much more "fake" nightlight representation.
Though, a few thoughts here:
While in this scene I personally liked making the back colours blue, we can always experiment a little and change one of the blue into purple!
Now, the part of Lolita's face that isn't blue, we do want a non-blue colour. For this, I like to cycle through the following colours:
White
Flame
Orange
(Rarely! But sometimes red).
See result here:


This all depends on your preference, and if you want a deeper colour. Or maybe, to even set a certain dramatic effect! (this is where red may be nicer).
Make sure to also play around with the intensity settings of each light! This can really change things up!
Currently, I've set up the intensities like so:
Blue 1 = Bright
Blue 2 = Bright
Orange/white/flame/red = Dim
Though, if Blue 2 is purple for you, I'd recommend setting this one to normal or even dim.
How to use lighting for Daylight (Outdoors):
This one is much easier, and more straightforward! While backlighting is important here as well, it's less of a necessity in this setting.
Okay! So you've posed all the characters, set up objects, etc... and now we're ready for the lighting! Here's what I currently have:

Not bad, not bad at all without any lights... but what if we add them!


Here I added a White-dimmed light.
Better! In fact, if this is the kind of lighting you want in your scene, then feel free to leave it here!
What about a little more complicated lighting... sort of what we did with our night scene?

Here the left light is a white-dimmed light, and on the right we got a orange dimmed light.
it's not much, but it definitely added a nice shade to the scene! :)
Let's get to how we do this same thing, but indoors!
#the sims 3#ts3#sims 3#the sims#sims#sims 3 story#sims 3 storytelling tips#storytelling tips#ts3 screenshots#ts3 simblr#ts3 gameplay#thesims3#sims 3 blog#sims 3 gameplay#sims 3 screenshots#sims 3 simblr#sims3
249 notes
·
View notes
Text

I haven't opened my game in a while so it was high past time for another cutie.
Bonus:

Look how cute his little smile is. 🤭
#sims 3#ts3#sims 3 gameplay#mine#adventures in cas#sims 3 cas#red is such a hard color to do for hair#i want it to look realistic and not like screaming fire engine red#but maybe it looks too orange now?#anyone have any tips?
29 notes
·
View notes
Text

These questions were asked by @memoirsofasim -- Thanks for asking me these questions/giving me these suggestions.
Originally I asked about what kind of videos I could maybe make on my Sims YouTube Channel, but I couldn't really wrap my mind around it in a way that the video wouldn't become confusing or drag on. So I decided to make a post about it instead. Anyway, here goes...
----------
Note: I just wanted to mention these two things below for anyone who might worry about starting to write/story-tell, before I answered the questions. And also, this goes for any Sims Game not just the Sims 4.
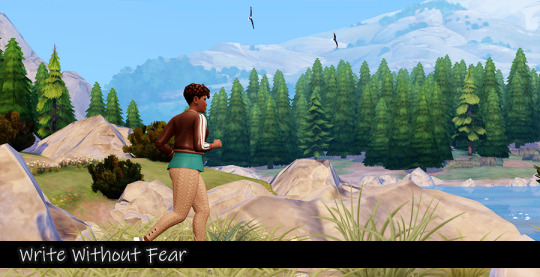
Write Without Fear
Remember to "Write Without Fear". What I mean by that is to develop a story based off of an idea that is your own. You can for sure look for inspiration (more on what will follow in this post), but the point is to not feel as if you have to tell a story someone else is already telling or you have to tell the story in the same way someone else is telling -- or that you must modify what you're writing in order to please someone else in fear of judgement.
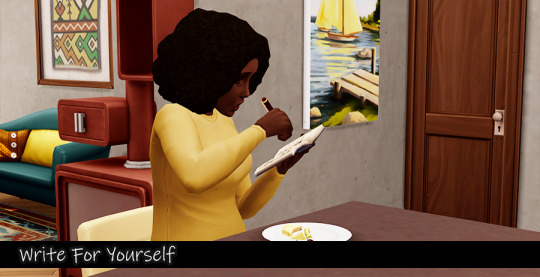
Write For Yourself
Remember to always "Write For Yourself" because at the end of the day, even if someone isn't reading along to your story, you're creating something that is satisfying some part of you. It could easily be something that you wish to read yourself, but can not find it in any medium (even outside of the Sims community) and so there's no where else to turn… except to yourself.
----------
Question: How do I find plots for my stories?
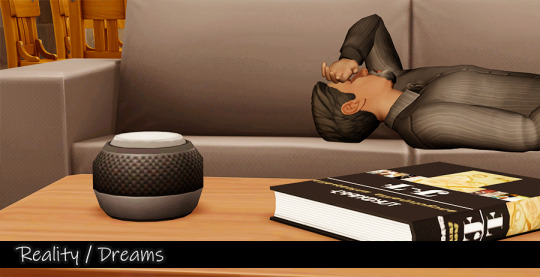
Reality / Dreams
Reality: Everyone has access to this. Whether it's lively, depressing, or somewhere between -- reality is reality.
Dreams: Sometimes you just remember your dreams and even if you can't remember the entire thing, there's something that sticks out to you that makes you remember it long after the dream. It could be something about their physical features, something you might have remembered they said, or even the colors within your dreams.
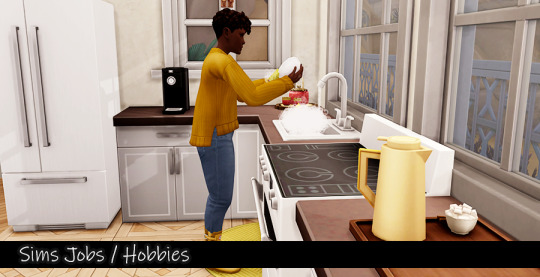
Sims Jobs / Hobbies
Are your sims working a job that aligns with their greatest passions/hobbies or are they just working to pay their bills? It doesn't matter either way, but sometimes just knowing this small thing is enough to get you to think of what they would do in their spare time and who they would do them with. Would they become members in a club? Would they share their hobbies with their family members? Would they have any enemies that could possibly lead to competition?
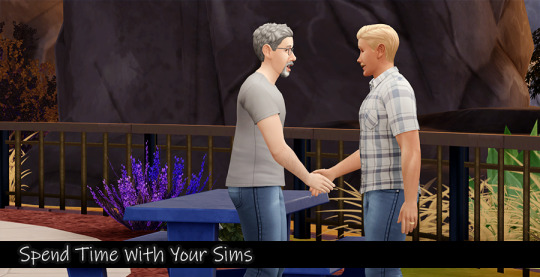
Spend Time With Your Sims
I don't mean in CAS. I mean literally turn your game on and put them on Free Will -- and watch them. See what object they interact with first or which Sim in their household they interact with first. See how they respond to Sims that randomly knock on their door (welcome wagon and all that jazz). Notice their experiences -- what makes them happy, what bothers them, what makes them angry. Also take notice to their speech bubbles.
Send them out into the world. Have them interact with other Sims or just place them on a public/community lot and see who they start talking to first. From there -- take notice to the speech bubbles from both your Sim and the Sim they're talking to. Take notice to your Sims mood while in conversation (or even while they're alone).

Movies and TV -- Or Books
This one hits extremely close to my longest and on-going story because that's exactly where the main character came from -- a movie.
So much of my stories stem from some favorite character of mine or some favorite actor/actress of mine that play such and such a character in something from a million years ago or to the present day -- and everything literally in-between.
My thought when leaving them behind at the movies or after watching them in a movie at home is… how can I flesh this character out? How can I give them a better personality or extend their personality? How can I imagine what their lives are like outside of the worlds they were created in?
And there is how the story builds. One thing literally leads to another.
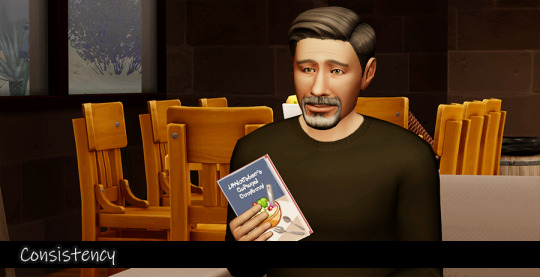
Consistency
If you write somewhere in a chapter that your Sim is crazy about grilled cheese sandwiches -- then that Sim is crazy about grilled cheese sandwiches. The only way they'll stop being in love with grilled cheese sandwiches is if they suddenly had something happen in their lives to make them change their opinions about it. Like they've aged up and gained the lactose intolerant trait. Now -- dairy will make your Sim terribly sick.
Remembering these little things makes your Sims differ from one another, but also allows you to flesh out their personalities and with doing that will open more opportunities.
This Sim may have loved cheese and not all dairy, but guess what? They can't have any dairy anymore. How are they going to survive? Well -- they'll have to change their lifestyle as far as what they choose to eat and with that will come the mental torment that they can't just go and eat cheese like they once used to be able to so now they're in a bad mood and they're terribly jealous of every Sim that can freely eat cheese as well as all the dairy they want…
And so they begin writing in their free time, to get all of their angry and saddened emotions down -- because it helps them with all of the mental stress.
And then they decide to publish their writings and suddenly -- the grill cheese loving Sim who wanted to open a Grill Cheese Shop is now an Award Winning Novelist instead.
Who will they meet along the way? Well -- they may very well fall in love with another Sim that may or may not be lactose intolerant. If they are they have a common ground and if they don't… there's going to be a lot of differences in food options between the two which will turn into food outings needing to be a place where there's both non-dairy and dairy items on the menu.
Make it make sense -- you know what I mean?
Consider Occult Plotlines/Characters
When it's occult stories the themes usually deal with magic and fantasy and what not so I literally just make up things out of nowhere and make them make sense because it's so easy to explain something in the name of magic or fantasy. I can add whatever I want to their lives and their houses and come up with reasons for it which then lead into storylines.
That witch down the street decided she didn't want to work a real job, so she used magic to make her dream house.
Seems like a quick-telling story, but if you start to think on it more you'll think about how she's maintaining her dream home. Clearly -- she's probably an entitled personality type and even lazy, but is she someone who wants to live alone in her dream house? Will she marry? Will she have caretakers to do the gardening and the cleaning… or will she just use magic to handle all of that because she rather be left all alone?
----------
Question: How do you screencap for your story?
I usually know the plot before I take the screencaps, but sometimes I don't. Usually when I don't I end up taking a lot of screencaps that end up going nowhere but being deleted or they end up just as quick edits that I randomly post on my blog because the moment where I had a storyline or a new chapter I let completely pass me by (or it came out of nowhere because I turned my game on to just gameplay and suddenly everything started unfolding whether a Sim prompted me to create more chapters or because I just had something rush to me out of a moment of total imagination).
Still -- I try to remember that I have the ability to use words to continue the story just because I may not have a screencap available -- and that's okay, too.
----------
Mods:
This will help if you start paying more attention to the speech bubbles I mentioned above and would like more of a variety.
Diverse Speech/Thought Bubbles: here (CurseForge | modder: Sims 4 Me/bienchen)
#sims 4 storytelling#sims 4#ts4#the sims 4#sims 4 tips#sims 4 story#the sims 1#the sims 2#sims 1#sims 2#sims 3#ts1#ts2#ts3#simblr
68 notes
·
View notes
Text
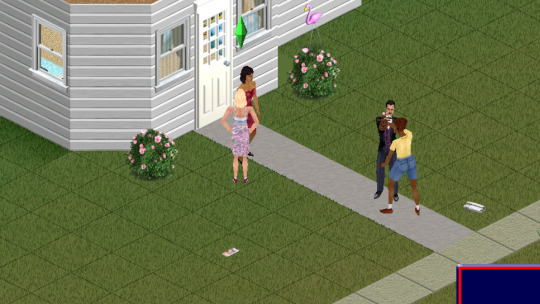
How to Play The Sims 1 on Windows 11
Recently, I've been rebuilding my collections of The Sims 2 and The Sims 3. I used to have the discs when I was a kid, but I lost them, and now I don’t have a computer that can read DVDs. After acquiring The Sims 2 Complete Collection and gradually adding to my Sims 3 collection through Steam, I started thinking about The Sims 1.
The last time I played The Sims 1 was when I was 6 years old. When I tried to download the game again to relive my childhood nostalgia, I was using a Windows 10 machine. Unfortunately, that experience was a complete disaster, as the game wouldn't even let me select a household! It was bugged and unplayable. Now that I'm trying it again on a Windows 11 computer, I approached it with low expectations—until I stumbled upon something magical.
I discovered a GitHub repository that provides an all-in-one installation of The Sims 1, eliminating the need to install patches or edit graphics files. With that in mind, let me guide you through the process of installing The Sims 1 on a Windows 11 computer. To install The Sims 1 on a Windows machine in 2024, simply follow these straightforward steps. You won’t need to enter any keys, edit scripts, or perform any manual tasks.

Please know that this is how I installed The Sims 1 on my computer. I've gotten no crashes or bugs from this method, and my game runs smoothly. My computer specs are:
System Model: ASUS TUF Gaming A15 Laptop
Processor: AMD Ryzen 7 4800H with Radeon Graphics, 2900 MHz, 8 Cores, 16 Logical Processors
RAM: 32 GB
GPU: NVIDIA GeForce RTX 2060
Step 1: Download Installer
Download the The Sims 1 Starter Pack Web Installer. Alternative link can be found here.
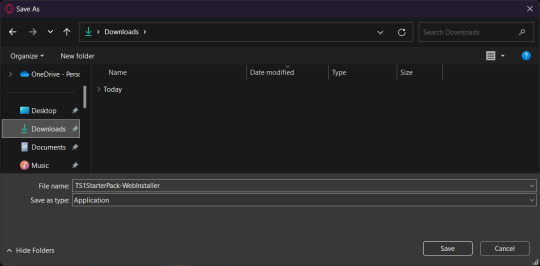
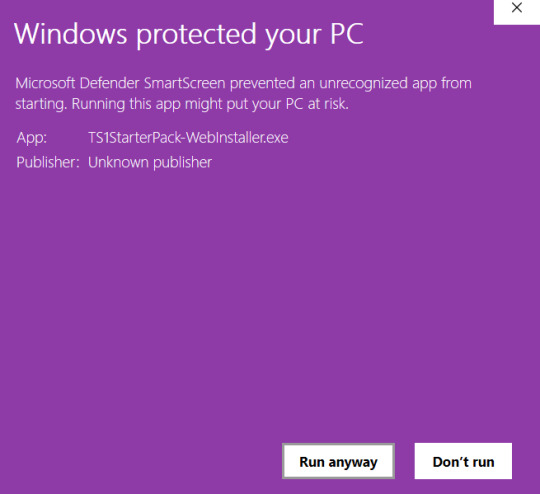
Step 2: Run Installation
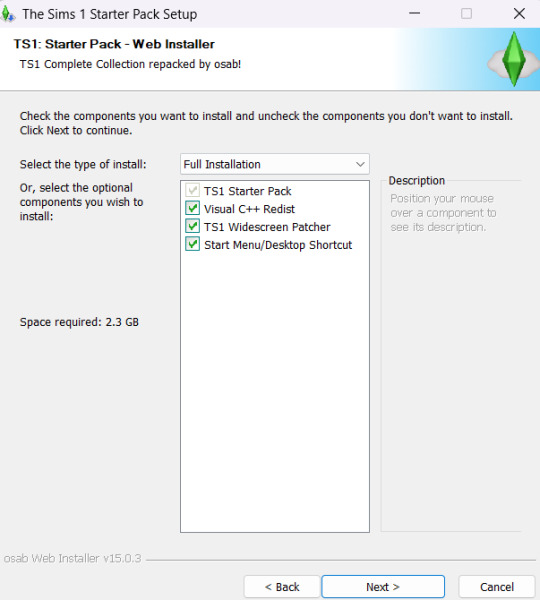
Run the TS1StarterPack-WebInstaller.exe and follow the instructions. If you get a Windows protection notification, select the option to "Run Anyway". Windows does this to protect us from unknown executables, but this one is fine.
Enable all of the components. This includes all the patches you will need to make your game full-screen and compatible with your system.
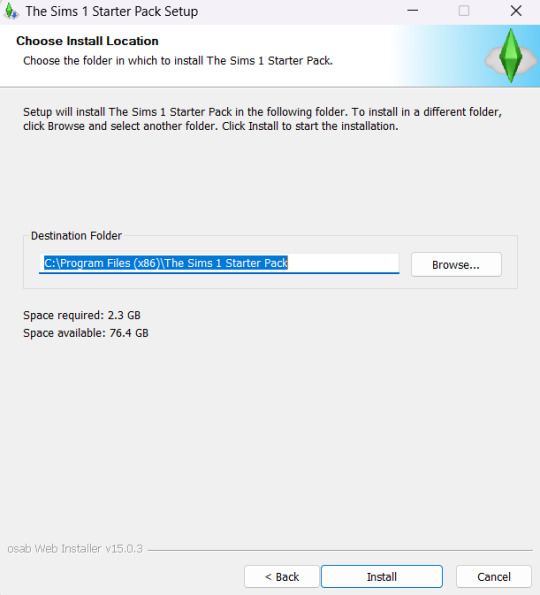
Select the folder you want to install it in.
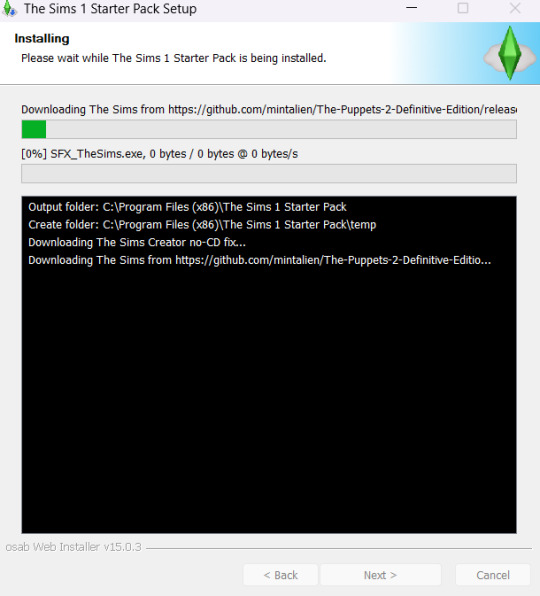
Wait for the installation to finish.
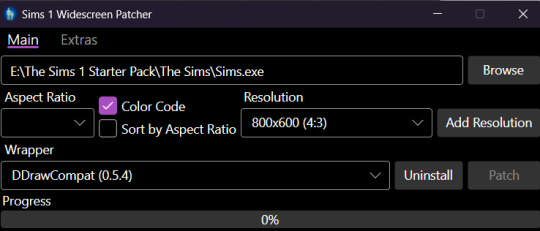
Step 3: Run The WideScreen Patch
During your installation, a popup will display asking you to choose your resolution. If this popup hasn't shown, you can find it in your E:\The Sims 1 Starter Pack directory as Sims1WidescreenPatcher.exe.
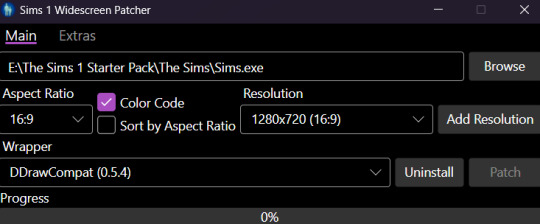
From this, choose your screen's aspect ratio and resolution, and set the “Wrapper” dropdown to DDrawCompat.
Click “Patch.”
If asked to enable “Borderless Fullscreen” mode, click Yes.
Close the patcher once it has finished patching the game.
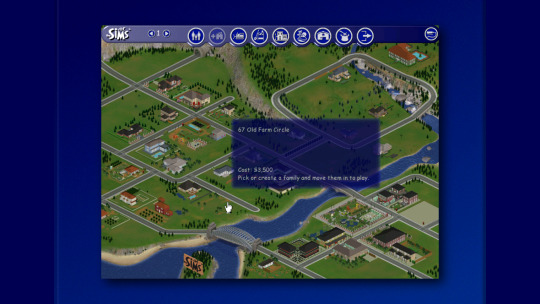
Step 4: Run The Game & Have Fun!
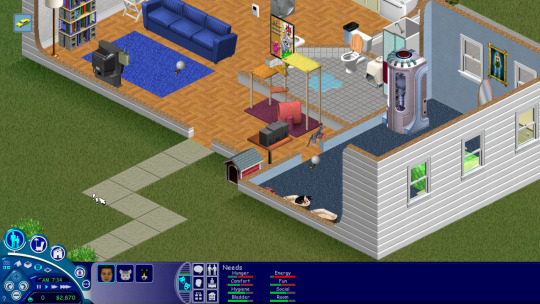
And that is IT. Now you can run the Sims.exe program and the game should run.
If your screen size is weird, just run the patcher again.
Now you can start playing the game and rediscover that old-school nostalgia of having fun!


Conclusion
I hope this guide has been helpful! If it has, feel free to let me know in the comments below. Additionally, I have a blog where I detail the mods I use for The Sims, including instructions on where to place them. If you're interested, you can check that out here.
38 notes
·
View notes
Text
if anyone knows any good ts3 cc creators (preferably not tsr!) please let me know bc i am SUFFERING
#my sims need pizazz#also gshade presets?#or tips on how to take actually nice screenshots?#help#ts3#ts3 gameplay#thesims3#the sims community#sims 3#the sims 3#sims 3 blog
39 notes
·
View notes
Text

It's really difficult for me to switch attention between twins for the sake of this blog but I got this one cute picture :)
#ts3#ts3 gameplay#strange lepacy#strange 2#if you guys have any tips and tricks on how to play with big families id appreciate#also how to be confident with your heir choices when you have multiple strong options >.<
70 notes
·
View notes
Text
Let's show that TS3 core feature called Create-a-Style some love 💜
The CaSt feature is one of the most unique and defining features of the Sims 3. Let's use it to our advantage!
As a pattern creator, I am counting on the ability to recolor CC so that my patterns can be widely used. Making patterns is a pretty lonely road these days (it's more of an overgrown path, hardly anyone travels it anymore). While most likely not the only culprit, the rise of non-recolorable CC (read: patterns cannot be applied or look terrible) definitely plays a role in this development. I admit that I sometimes worry about my place among fellow creators, should this trend continue to gain momentum. Patterns are at the heart of the Sims 3 and there are only a few pattern creators left. It would be sad to see the numbers dwindle even more. It would mean that a lot of creative potential in our games will vanish. Inside the Sims 3, patterns are an important asset to make our creative visions come true, as they can completely transform the look of most objects (and clothes, accessories, walls, you name it). As part of a community, creators have the opportunity to lift each other up, and object/clothing creators can help fellow pattern creators feel valued by including a recolorable swatch (and tidying up that UV mask so they will look good, too 🤪). Furthermore, creators have the opportunity to work hand in hand to enhance the value/usability of their CC for all fellow simmers. So let's do this! If you are a CC creator and have not made your creations recolorable, but are interested in doing so, or in improving your skills, why don't we have a conversation about it? Let's get behind the mystery of recolorable CC. We can put our heads together as a community and share resources, tips, tutorials, and workflows to teach each other how to make RGB masks, edit multipliers, bake AO maps, and straighten those UVs. If you are an experienced creator and are open to sharing your process on how to make CC recolorable, or simply know some great tutorials, please feel free to share in the comments or reblog with info! Feel free to post your questions or concerns too so we may find common ground and appreciate each other's efforts.
Let's make a positive change together 🙏
#ts3#show patterns some love#recolorable CC - let's do it#simblr community spirit#Sims 3 CC Creation#S3CC tips
110 notes
·
View notes
Text
How to mute Rabbit Hole Sounds
There is one thing that has always bugged me about Simynthos: The lots in town are so close together, that the rabbit hole sounds from the movie theater or the stadium are extremely loud on the neighboring lots. I've been wishing there were a way to mute rabbit hole sounds! Thanks to this video by @declaration-of-dramas I learned:
There actually IS A WAY!!! Yay!!!
youtube
You will need Nraas Debug Enabler Mod for this to work. You can either watch the video or follow the instructions in the screenshots below:


A big thank you to @declaration-of-dramas for the video! 🤗
#simynthos#how to mute rabbit hole sounds in the sims 3#declaration-of-dramas#ts3 gameplay tips#sims 3 tutorial
13 notes
·
View notes
Note
hi!! would you consider sharing or doing a mini-tutorial on how you made manual morphs? i would LOVE to just make the morphs myself
Hi!
Well, actually I'm only doing morphs by hand when it's necklaces (and that last madlen boots I converted) because it was possible to fiddle with it without messing things up since no EA body seams are involved.
For clothing, my process is quite chaotic. (it's what I ended up doing on my madlen numia conversion)
I use Mesh Toolkit to convert from .obj to .wso and assign bones and make morphs.
Then I convert the morphed .wso to .obj again so I can adjust the fat morph on blender (because it's always the fat morph that gets distorted af).
Then I re-convert the resulting .obj and use it as reference to re-morph it with Mesh Toolkit (because I then can fix the EA seams in the raw mesh before making the morphs with the Toolkit).
Oh, and I use the Sculpt mode on Blender for that! In my opinion, is more intuitive to fiddle with that, than with proportional editing.
As and example, here I'm fiddling with a choker. Note that in this case I have to better adjust the spikes, but you can see how easy it is to adjust the whole thing to the neck.
The tools I use the most are Grab and Elastic Deform.

(i'm also planning on doing a tutorial of converting necklaces without using milkshape, but then I'll have to overcome my shyness about not only speaking in a video, but maybe speaking in another language? oh well)
22 notes
·
View notes
Text
Fun trick using EA's Alien Eyes Modifier Slider, located in Eyes/Global. You can adjust the wing tip on eyeliners. This will also minimize the upper eyelid depending on how much you use it, but there's a slider to adjust that as well ( EA's Eye Socket Slider I believe it's called ).
While you're at it, download my all time favorite eyeliner set.
242 notes
·
View notes
Text
Finally figured out how to make the transparency show up correctly in game. I followed this tutorial, except instead of using phong alpha for the transparent object, I just use phong instead. That way I didn't need to alter anything else. I guess so long as the part you want transparent is empty in your textures (diffuse and multiplier) it'll show up transparent. Now that I've got it done, I realize how simple it actually is😅 Welp, I've learned something new, so that's nice!
3 notes
·
View notes