#the sims 3 tutorial
Explore tagged Tumblr posts
Visit Tumblr Blog
Explore Tumblr blogs with no restrictions, modern design and the best experience.
Last Seen Tumblr Blogs


Fun Fact
Tumblr is used by 21% of adults online aged 18-29 years.
Text
tips for 4t3 converters/CAS clothing creators
3 main things:
non-recolorable presets
DDS. settings
Adult to Teen conversions
disclaimer: i'm not a CC expert, but these are things i've noticed and learned these last couple months converting cc. special thanks to thornowl and the other converters in the TS3 Creators Cave discord.
Non-recolorable presets:
we obviously know that ts4 lacks a CASt tool, so ts4 creators rely on recolors. In my conversions, I do include a couple of the item's recolors. these usually are patterns that CASt does not have.
one thing I've noticed more and more converters doing is putting such item recolors in the 'Overlay' tab in TSRW.
let me show you what that looks like for a non-recolorable preset:
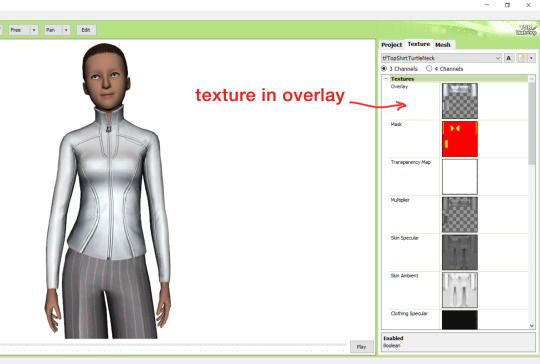
it looks over-saturated, and almost crunchy. but there's another place you can import the recolor into: stencils.
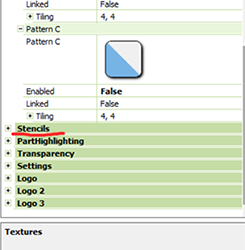
stencils will be found at the bottom, under patterns. hit the plus sign next to stencils to open it.
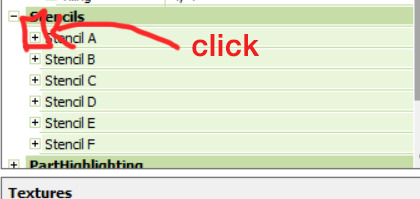
opening it will show you this:
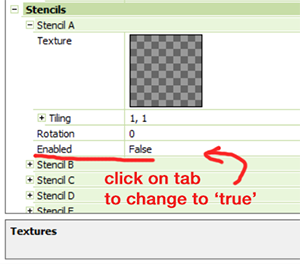
by default, it will be enabled as false. import your recolor into the texture tab as you would do for any other texture tab. make sure you tick the 'false' to 'true.' stencils override overlays, so if you want to use an overlay, enable stencils back to 'false.'
here's what the recolor imported into stencils looks like:

here's the two side by side:
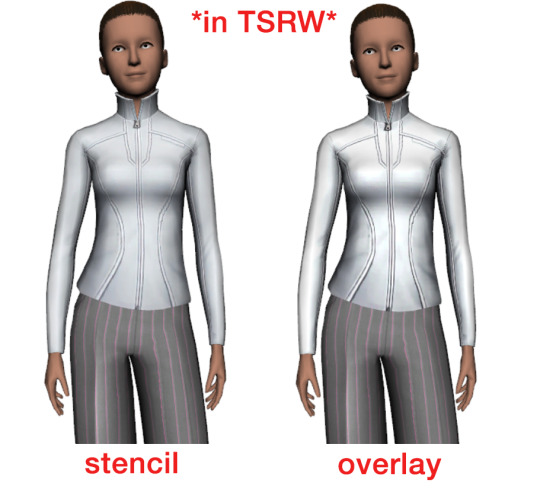
see how different they are? let's see how they are in game:
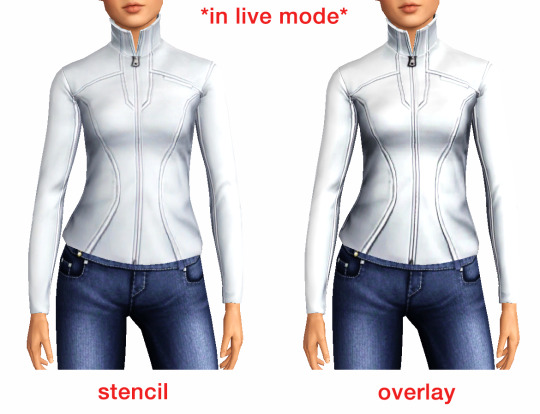
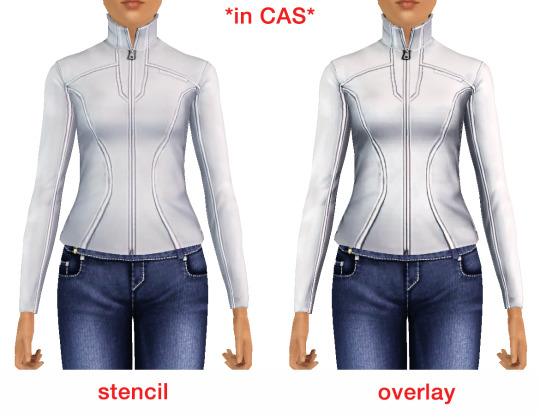
click on the pictures to really see the difference in quality. since TS3 uses DDS. format, it compresses the texture, which results in the crunchy texture. importing the recolor into the overlay tab makes the DDS. compression more noticeable. it ultimately is up to you and whichever one you prefer, but do keep it in mind.
the overlay tab is good for small details that you want to maintain on all recolorable presets, like zippers, buttons, tags, etc. just look at EA clothes for reference, especially their shoes and male clothes.
another thing you can see from the images are the bumps on the mesh. doing normal maps can help you keep those same details on the recolorable presets without importing the recolors.
-----------------
DDS. settings:
something I also see and used to do myself is bloat package files with large file sizes, specifically normal and specular maps, as well as masks. the Sims 3 Tutorial Hub provides a link to plain maps, but the file sizes are unnecessarily big.
let's look at some of EA's maps in TSRW:
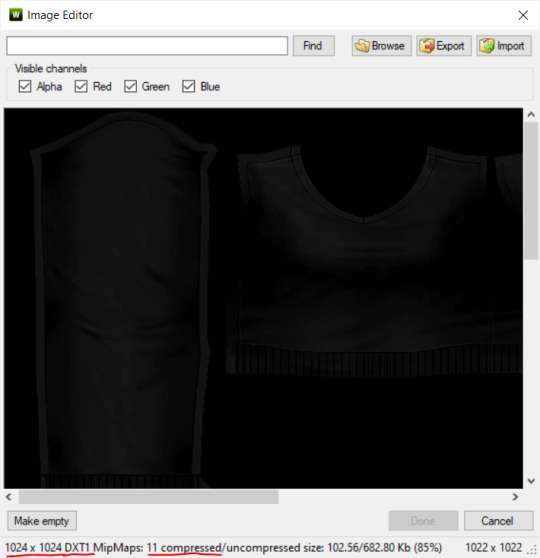
here's the specular from one of the basegame sweaters. notice the image size, DXT format, and compression size.
a lot of converters don't want the shine on regular clothes, so we use a plain, black specular map. but ask yourself, why do you need a 1024 x 1024 purely black specular map with no details?
let's try sizing it down:
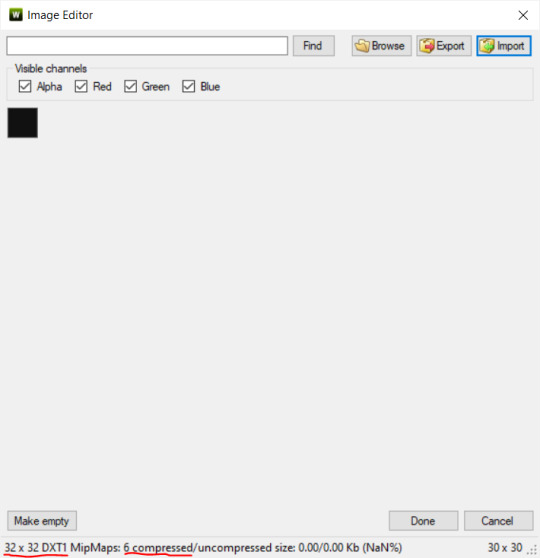
notice the difference between the image and compression size. instead of bloating the package file, we can keep it down by using a 32x32 plain black specular map instead, since there aren't details we want from the specular map.
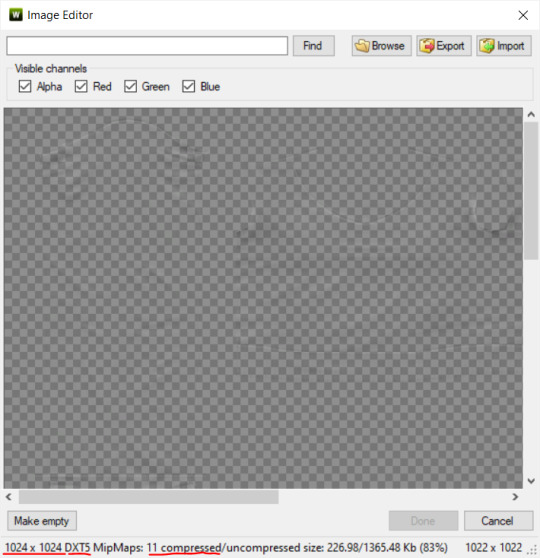
same goes for normal maps:
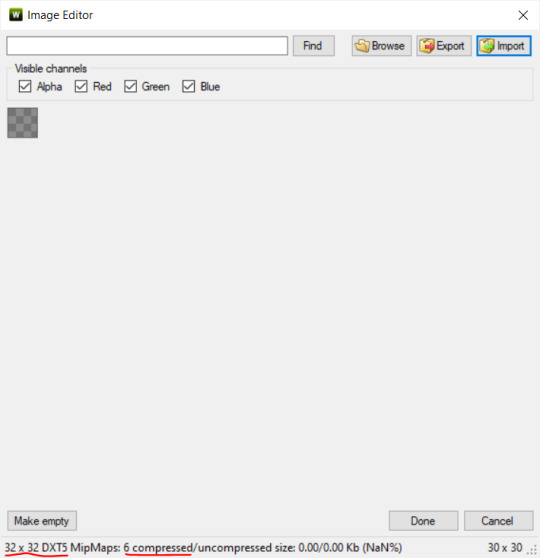
and masks (meant for 1 channel only):

now, notice how I underlined the info about DXT MipMaps. see how the normal map has a different number there compared to the specular map and mask.
the reason these textures use different DXT is because of the colors and alpha channel.
here's how my DDS. settings appear when saving:
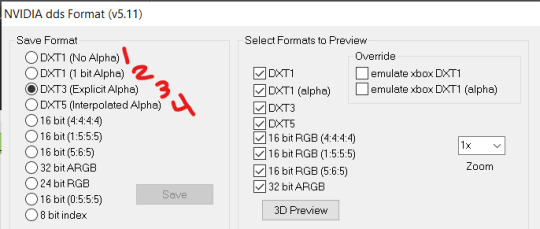
DXT1 (no alpha): this keeps only the 3 color channels and has the strongest compression. it results in half the file size as DXT3/5. 3 channel masks should be saved with this, as they don't need an alpha channel.
DXT1 (1 bit alpha): this includes an alpha, but only black or white. it also results in half the file size as DXT3/5.
DXT3: this one is rarely used for TS3 textures. it really is only used for overlays. it compresses the same as DXT5, but may not be the best for images with smooth-blended alpha regions (Neely).
DXT5: multipliers and normal (bump) maps should only EVER be saved with this. it's best for colors but has a larger file size. this is why it's important to reduce the multiplier and normal map image size, especially if you don't make a normal map.
if you DO decide to do a specular and normal map, they should be regular image size, 1024x1024, and saved in the right format.
here is more information on which textures should use which compression.
-----------------
Adult to Teen Conversions:
the default for converters is obviously AF and AM. a lot of people want the items for teens too. I've seen several converters just enable it in TSRW:
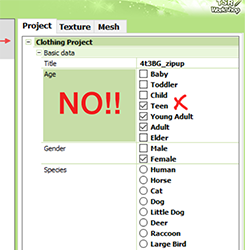
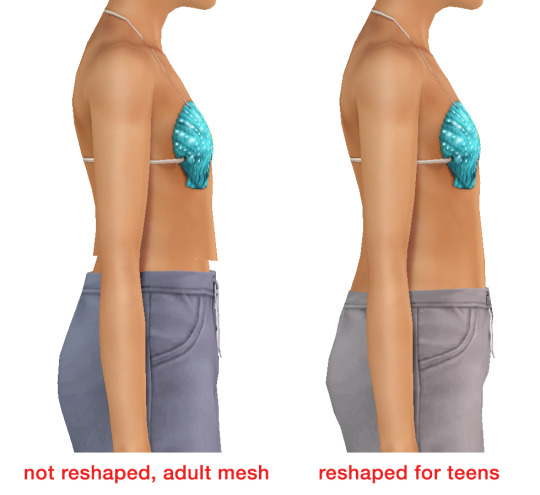
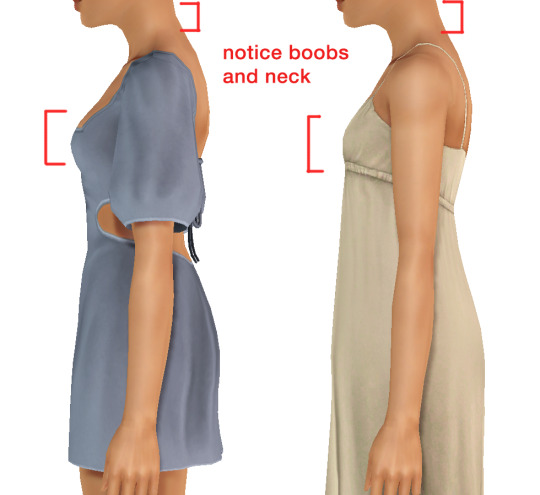
please don't do this. it's honestly the lazy route. you can hardly ever get away this, specifically because of the body differences between adult and teen.
some major issues with this include gaps, seams, and unnatural body characteristics:
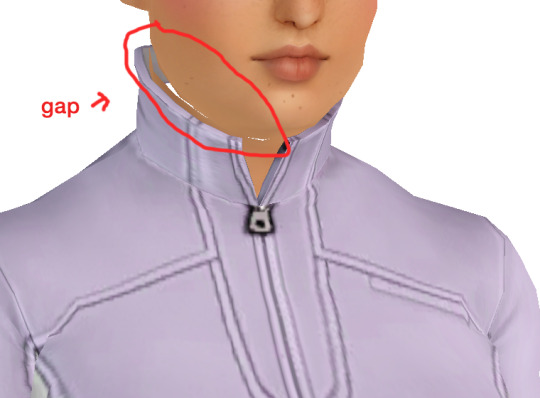
so please, either skip the teen mesh entirely or spend the time reshaping the mesh. @/sweetdevil-sims has a great tutorial on converting meshes from AF to TF here. the inevitable seams on TF meshes are also now fixed, thanks to @/thornowl with their new version of mesh toolkit.
@pis3update
---------------
here are reduced file sizes and corrected settings of the plain mask, specular, and normal:
download
Sources:
Neely, G. ‘Buckaroo’. Working with DDS/DXT Files. Available at: https://www.buckarooshangar.com/flightgear/tut_dds.html (Accessed: 28 May 2024).
210 notes
·
View notes
Text
[sims 3 tutorial] how to make lazy previews of objects with TSRW & GIMP 2.0
bordered, borderless, and borderless with transparency
You can download this tutorial in .docx form here or read it under the cut -->

-->
P.S for all of these, i made the drop shadow invisible in the mesh tab before starting.
Standard borderless previews for objects without special effects

this circle option is the bump map

this option turns the background white, which we need
Take two pictures of your object, one with the bump map on, and one without.


use the 'magic wand' tool to select the black parts of the bump map version 'copy' the entire regular image, and 'paste' 'into selection in place' on the bump map version. copy while the selection is still active, and paste as a new image.

[black to show no background]

How to make a bordered preview of a standard object with no special effects
this option turns the background white, which we need
Take a picture of your object in TSRW at your desired angle.

Open this image in your desired photo editing program. I am using GIMP 2.0.
Use the magic wand tool at threshold level 1.0 to select the white part of the image. you may need to shift select more parts of the image if they are closed off like the area between the prongs.

go to 'select' and 'invert selection' depending on the image, you may need to use the 'remove holes' tool. in the 'select' tab 'grow' the selection to your desired thickness. i like anywhere from 5-10. 'copy' your image while the selection is active, and 'paste' as a new image.

All done!
How to make a borderless preview of an object with transperency…

i have this fruit parfait that has 3 groups [drop shadow, glass cup, and the parfait itself. these groups can be hidden in the mash tab by toggling 'true' or 'false'. im gonna mark these true or false depending on what i want to take a picture of.
this circle option is the bump map
this option turns the background white, which we need
I need a photo of the parfait only, one regular, one with the bump map on. a photo of the glass only, one regular, one with the bump map on. I do this using "windowed mode" with the snipping tool so that my pictures are in the same location.


Open all of these images in your editing program of choice, however i am using GIMP 2.0 so things might be a bit different.
Open a new transparent image 1000x1000
'select' the black bump map image with the magic wand tool, until it is completely outlined

Then copy the entire regular version and 'paste' into 'selection' 'in place'
copy this while the selection is active and paste it in place to your transparent image.
Now for the transparent part, do what we just did and paste it as a new layer on the transparent image. erase parts of the image that do not appear, for me i erased the top part since its actually behind the parfait.


Much better. now lower the opacity and merge this layer with the one below it

All done!
96 notes
·
View notes
Text

THE SIMS 3 TUTORIAL
HOW TO CREATE DEFAULT REPLACEMENT MOD USING CUSTOM MESH & TEXTURE FOR SIMPLE OBJECT
⚠️ Tumblr has 30 pictures limit, so I cannot include too many pictures. If you want to zoom in the pictures, click the pictures to enlarge, or save the pictures into your PC, zoom the pictures on picture viewer or zoom in the pictures on your mobile phone. ⚠️
----------------------------------------------------
I create this tutorial to make easier to follow because there are older tutorials available before but scattered on internet and usually only say "Export to replace s3asc" without explaining how to export the edited object properly.
My method is using TSR Workshop instead of exporting the object using Sims 3 Object Export/Import plug in because exporting to replace the s3asc using that plug in always giving error notification "ERR: Model has 1 groups; original had 0" and cannot be exported.
For beginners who are very new using s3pe and haven't created default replacement mod before, better start from simple object first.
Simple objects I mean in-game object that has single MODL and single texture with no morphs, no GeoStates, no presets, no CAS colour channels, and easily cloned from OBJD on catalogue. Usually as utensils that Sims holding in their hand, not buy/build objects. For example: Pencil, pan, fork, spoon.
----------------------------------------------------
Tools to prepare:
s3oc
s3pe
Milkshape 3D for bone assignment (Version I use 1.8.5 beta, discontinued by its developer, therefore feel free to download the full version with its license key provided).
Sims 3 Object Export/Import 1.01 by Wesley Howe (Milkshape plug-in. Download msS3ObjPluginsV101.rar )
TSR Workshop (Older version for TS3 only version 2.0.88)
TSR Workshop plug-ins for export.import TSRW Object.
3D Program (Blender/Maya/3dsMax)
Editing images software (Photoshop, make sure you have to install .dds plugin by Nvidia. For free software alternative, you can use GIMP with its .dds plugin)
This tutorial will not teach you how to:
Meshing object ❌
Create alpha texture ❌
Change thumbnails in-game ❌
Install programs and plug-ins ❌
This is how I created Chinese chopsticks replacement mod using custom mesh and texture.
In summary, this tutorial has 10 steps:
Step 1. Clone the Object using s3oc
Step 2. Open S3PE to Copy the Original Resource Code and Export the Files
Step 3. Export the Original Mesh as Base Mesh to .obj format
Step 4. Create Your Custom Mesh
Step 5. Bone Assignment & Create Group
Step 6. Create custom Texture
Step 7. Import the .wso of Edited Mesh on TSR Workshop & Export the package
Step 8. Export MODL file from Package saved from TSR Workshop
Step 9. Finalizing in s3pe & Replacing the Original file with Edited File & Correcting the Code As Same As Default Code
Step 10. Test the CC in your game.
-----------------------------------
✳️ Step 1. Clone the Object using s3oc
Before cloning the object, check the Game Folder for in-game object file location. Settings > Game Folders...
Take a look if the Base Game or Expansion Pack for object file you want to clone is in the right folder. For example, my The Sims 3 game are all bought from Steam, so the location is D:\SteamLibrary\steamapps\common\The Sims 3
If you want to clone object from Expansion Pack, make sure input the folder location. For example, the location for World Adventures EP is D:\SteamLibrary\steamapps\common\The Sims 3\EP1

If you are done, close the pop-up box. You can continue click Cloning then choose Normal Object...
Wait until you get the whole catalogue. Click Search...

For example, I clone object from World Adventures Expansion Pack. You can clone object from Base Game or other Expansion Packs as long it is considered as "utensil" that Sim holding on hand. For example: "Pencil" or "Pan"
Search for text: chopsticks
or if you want to clone object from Base Game, search: utensil
Tick check marks for Resource Name, Object Name, Object Desc then click "Search button"
Search result gives you results with name "chopsticks". Here is the object we are looking for: UtensilChopsticks
We need the OBJD file to clone. OBJD = Object Data.

Click "Clone or Fix" at the right bottom. Then you see the next page to determine if you want to clone with renumber or not. If you want to make default replacement, then do not check the Renumber box. Keep it blank.
Tick check box means the s3oc will generate new resource code for new item. Not tick the check means the s3oc will overwrite the same resource code, it is to replace object you cloned in-game.
I am personally a detailed person, so I usually tick as many as I want: tick "Deep clone" "Missing String Tables" and "Include Thumbnail" to include more details. Then click "Start" to proceed.

It will give you file name [CreatorName]_ObjectName_Number
Then save your package file in "DBPF Package" format in your project folder. Always make folder for any file to make everything organized.
✳️ Step 2. Open S3PE to Copy the Original Resource Code and Export the Files
Open S3pe, locate your package file you cloned from s3oc. Find the MODL of Utensil Chopsticks, Right-Click, "Details..."

On Resource Details, click "Copy TGI" to copy the Resource Code. Type, Group, and Instance will automatically be copied on clipboard. Then open Notepad, Right-Click to "Paste".
Click GRID on bottom of the s3pe (I mark it red on picture), it will give you pop-up box with Data Grid. Click "Resources", it will be highlight blue and there's 3 dots button appeared on the right side. Click the 3 dots button. It will give you TGI Block List Editor.
Inside MODL's TGI Block List Editor only has IMG. You may wondering why, but that's how the game coded. Type, Group, Instance of _IMG inside TGI Block List Editor should be the same as _IMG on the package.
Copy the TGI, Group, Instance to your Notepad.

After you copied code of MODL, do the same for the texture image (_IMG), but only copy the code from Resource Details. You cannot edit TGI Block List Editor for _IMG as the Grid button for _IMG is greyed out.
The main task is the code of your edited mesh and texture should be the same as the code you copied now from original package you cloned with s3oc.
Keep the code on notepad. You will need this code later.
Export the MODL file. Right-Click, "Export to s3asc". The file appears in long string such with name for example: S3_01661233_08000001_B619DB2238C3430B%%+MODL_filebase
Do not rename the file. Save.

Export the texture file. Right-Click "Export > To File..." The file will be saved in .dds format. Do not rename the file. Save.

✳️ Step 3. Export the Original Mesh as Base Mesh to .obj format
Open Milkshape. Import the s3asc file you saved before.
More steps click spoiler tag "Read More / Keep Reading" below
File > Import > Sims 3 Object Import v 1.01 by Wesley Howe

Locate the s3asc file, then the original chopsticks mesh appears.
Click the "Joints" tab. It has 4 codes. Check box "Draw vertices with bone colors" It will show Bone Assignment colors on the original mesh. Yellow on top chopstick and light blue on bottom chopstick. The colours are to make the object has rig and movement following the Sim's interaction.

Take a look at the 4 codes on Joints Tab. You can play around to see which colour of the code will appear, after that copy paste the code to Notepad to make it easier to comprehend.
Click Select from Tools menu, Select Options: Face. On "Right/Left/Top/Bottom 2D View", Left-click make selection of one part of chopsticks. While the part of object being selected (Red), click Joints then Choose "Assign".
0x96239247 --> Yellow 0xFEAE6981 --> Purple 0xCD68F001 --> Light Blue 0xD0DECA8E --> Red
Your edited mesh must have the exact same Bone Assignment colour later. Check again if the code and colour are correct.

You can save object mesh as .obj to other 3D software such as Blender or any other 3D software.
✳️ Step 4. Create Your Custom Mesh
Use the original .obj as base model. While you can create longer mesh or any edited version as you wish.
Make sure the scale and position of the edited mesh is same as base original mesh, because the edited mesh will be used on Sim's hand.

If you are done editing the mesh, export the UVmap.
You can export the uvmap in higher resolution, as long as it is Power of 2. 64x64, 128x128, 256x256, 512x512, 1024x1024, 2048x2048, 4096x4096. I export in 1024x1024 pixels to make the size of texture larger and have more details.
Then export the mesh object in .obj format.
✳️ Step 5. Bone Assignment & Create Group
Open Milkshape. Import the original mesh.
Check the Groups Tab. Original mesh has 1 group, "group 00". Group 00 means it is the main mesh. There is no shadow beneath the object.

Import the edited mesh as .obj file.

My edited mesh has one single name "default" name on the Group Tab. While edited mesh may have a lot of file name scattered on Group Tab. Regroup the file name to simplify your edited mesh into one single name. Select > Regroup.
The main task is replacing the EA's original mesh with your edited mesh.
Before you delete anything, you must do Bone Assignment first to the edited mesh you created.
Your edited mesh does not have Bone Assignment, so it appears white.
Remember the 4 codes you copied earlier in Notepad.

Copy Bone Assignment from original mesh to your edited mesh.
This case, your want to Bone Assign Yellow colour.
Select > Face to select one part of chopsticks of your edited mesh. On Joints Tab, double click the appropriate code 0x96239247 in blue highlight then the code box on the right side of "Rename" will appear 0x96239247. Make sure the code is correct. Then you can click "Assign".

Your edited mesh will appear in Yellow colour. Then do the same for another part of chopsticks.
Select another part of chopsticks of your edited mesh. On Joints Tab, double click the appropriate code 0xCD68F001 in blue highlight then the code box on the right side of "Rename" will appear 0xCD68F001. Click "Assign".

Your edited mesh will appear in Light Blue colour.
Then what's the other code for? With colour purple and red?
Leave them. Let the codes have the same exact codes as appear in original mesh and let the colours only assigned Yellow and Light Blue. The colours are to determine rig for interaction in-game, which only use Yellow as upper part of chopstick and Light Blue as bottom part of chopstick.
You can safely delete the original mesh with name group00 until it remains your only your edited mesh.

Rename your edited mesh to group00. Type group00 on the box then click "Rename" on the left side.

Export to TSRW Object in .wso format. .wso is format with bone assignment on object attached.

Save your .wso in your project folder.
✳️ Step 6. Create custom Texture
Import original texture you exported from s3pe to your editing image software.
Look at the original texture made by EA. 32x64 pixels. It is very low resolution, blurry and stretched, because the texture should be compressed as low as possible by game designer. As player you want it has higher detail to look realistic as possible and your PC of course can handle high resolution content, sure you can make the resolution much higher than EA's.

Import the UVMap you saved from 3D software. For example, UVmap I imported has 1024x1024 resolution. Add your custom texture. Then save it to .dds format in the same name as original texture. Save in separate folder, name it "Edited Texture" to keep it separated from original texture.
✳️ Step 7. Import the .wso of Edited Mesh on TSR Workshop & Export the package
Open your TSR Workshop.
Create New Project > New Import >Next...

Then Browse original mesh by EA in package format in your project folder.
On Open file box, you cannot see .package file because the filter is .wrk (TSR Workshop Project). Choose the .package dropdown.

Then you can see .package file.
Open the .package. After the file is located, then Next. On Project Details I usually skip without giving name of Project Name and Title. Next.
You must have seen green land with white blank sky.
Where's the mesh? It is actually there... just being zoomed in too close. You need to zoom out by scrolling down mouse.
You can see the original chopsticks mesh by EA. You can save the project file in .wrk format. After you save the file, import the .wso of your edited mesh. Mesh tab > High Level detail. Click green arrow folder icon to import. Then your edited mesh will appear replacing the original EA mesh.

As you see, the texture is messed up because the texture is still using original EA's texture. But then you check Textures tab and it has blank dropdown...
I cannot change the texture on this TSR Workshop!
Don't worry, we can replace the texture on s3pe later.
No need to change anything other than importing mesh. Click Edit > Project Contents to save as package.
You will see pop up box with number or files DDS, FTPT, LITE, MODL, OBJD, OBJK, etc. Export > To. package. Give name such as "EditedChopsticks_TSRW"

✳️ Step 8. Export MODL file from Package saved from TSR Workshop
Open S3PE, File > Open package "EditedChopticks_TSRW" that you saved from TSR Workshop.
Export MODL. Right-Click, export. It gives you file name with [StringOfNumber] .model .
Save it on project folder. Keep it organized and separated from original MODL. Name the folder "Edited MODL". Do not rename the file.
✳️ Step 9. Finalizing in s3pe & Replacing the Original file with Edited File & Correcting the Code As Same As Default Code
Open s3pe, File > Open original package that you cloned from s3oc. [CreatorName]_ObjectName_Number
Find the MODL. Right-Click > Replace...
Locate to your edited MODL with filename .model .
Then click Open.
The original MODL of the package should be replaced with your edited mesh.
Do the same for the texture.
Locate to your edited texture with filename .dds
Then click Open.
The original texture of the package should be replaced with your edited texture.
Take a look at MODL's Type, Group, Instance. It has the same code as original MODL in the original package cloned with s3oc (because it has been replaced)
Don't forget to see the code inside TGI Block List Editor.
Repeat step 2 how to check the code. Right-Click on MODL/IMG > Details... and click GRID > Resources > TGI Block List Editor.
The Type, Group, Instance of the _IMG are different compared from IMG from original package clone, which means that is the evidence of edited mesh replaced the original.
Rename the Instance with default/original Instance you copied on notepad from Step 2. Type, Group, Instance should be the same as default/original Type, Group, Instance.

Open notepad with resource code you copied from Step 2. Make sure the Type, Group, and Instance are all the same.
If the codes are the same, then your edited mesh and texture will overwrite the default mesh and texture with the same code in the game. Save, Commit, Save the package.
Check again if the texture is replaced properly. Right-Click on _IMG > ViewDDS.
ALTERNATIVES!
Yes, you can delete unwanted files in your edited package, to keep the package clean. Simply Right-Click>Deleted.
The only files needed in package are: MODL, _IMG, _KEY
They are the only files with your edited mesh/texture including codes to overwrite the default codes.
You can Start new fresh blank s3pe. Right-Click>Import from file...
Locate your edited MODL and _IMG (texture) file.
On Resource Details box, tick mark "Use resource name" > OK.
Make sure all the Type, Group, and Instance of MODL and _IMG including in the TGI Block List Editor are all the same as the code in original package.

Save the package.
✳️ Step 10. Test the CC in your game.
Put the package to your CC folder in your The Sims 3 document folder to see if the CC is working or not.
If the CC is working as your intended, with your custom mesh and texture, then test the animation. Are the chopsticks animation working as the same as original EA's? If the animation are working well too, then congratulations!

Your default replacement are working. Give applause to yourself. 👏
-------------------------------------
QUESTIONS!
Q:
Can I use this tutorial for making default replacement for buy/build object?
A: This tutorial covers basic method of using TSR Workshop and replacing the default codes (Type, Group, Instance), so you will understand the basic principle of doing default replacement mod.
Keep in mind that different object has different case. Buy / build object has MLOD (not just MODL) more than one, texture images more than one, has presets, and CAStable colour channels.
The TGI Block List Editor for buy/build object has a lot of codes, so have to spend a lot of time to do trial-and-error to make the default replacement working properly, because a lot of times the texture doesn't work (still using default EA's texture), or when the object appears right with your edited mesh and texture, after you choose the presets, the object reverts back to your edited mesh with default EA's texture.
Q:
Help! The texture is black! / still using same EA's texture when tested in the game!
A: The texture codes must be not the same. Check the Type, Group, Instance of _IMG. Do the codes are the same like codes in original package? Check the TGI Block List Editor for MODL, is the _IMG inside has the same Type, Group, Instance as in original package.
Q:
Help! The object disappears when tested in the game!
A: You must be replacing OBJD in your package. Do not replace OBJD. Just MODL and texture only.
#tutorial#the sims 3#the sims 3 tutorial#thebleedingwoodland#the sims 3 default replacement mod#modding#s3pe#s30c#TSR Workshop
122 notes
·
View notes
Photo
OMG YOU ARE A LIFE SAVER


First method to cleaning MERGED PACKAGES s3 cc, package files, only works for hairs, clothes, acc and shoes! By @crazysim-mary
THIS IS FOR MERGED PACKAGES
Keep in mind this is one of MANY ways I clean my cc, this method is the one I like the most but I don’t know if it is safe for all computers or easier, it is for me :)
If you want other tutorials on how I clean obj, makeup, body hair and how I cleaned my mods folder so it won’t have conflicted files, please send me a message :3 Because on how many people this helps I will make others
You need: Master controller
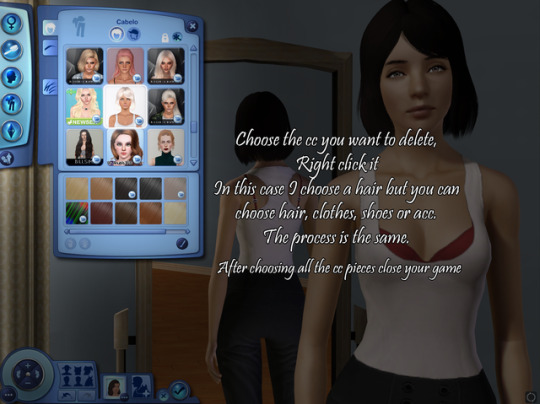
Open a sim in cas, choose the cc you want to uninstall and right click it. (do this with all the cc you want to uninstall but be sure to move the txt files once you have 11 to another folder because if you don’t they will be overwritten by the newest files)
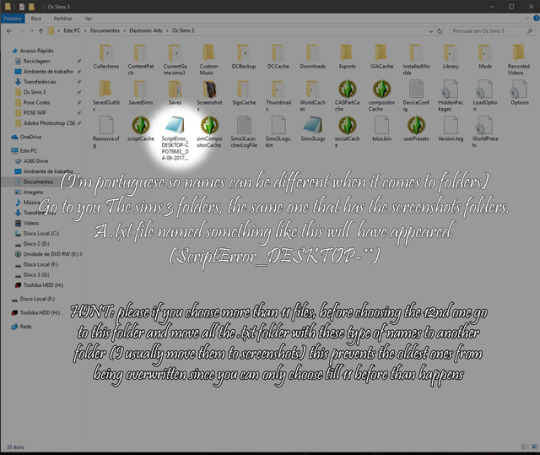
Close your game and a .txt folder named something like “ScriptError_DESKTOP-**” will have appeared (once you right clicked the cc) in your the sims 3 folder.
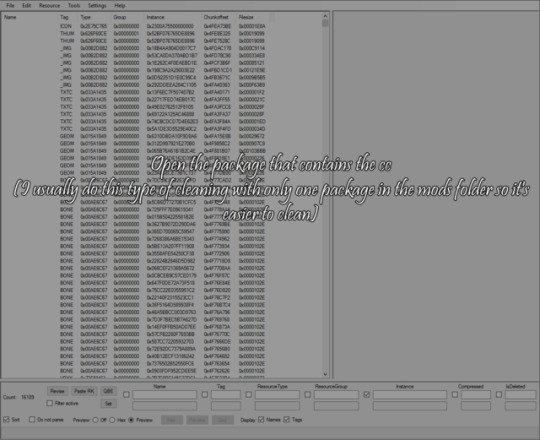
Open it and copy the numbers after ‘’instance’’.
Open the package that contains in this case the hairs (in your case it can be cloths or anything like that)
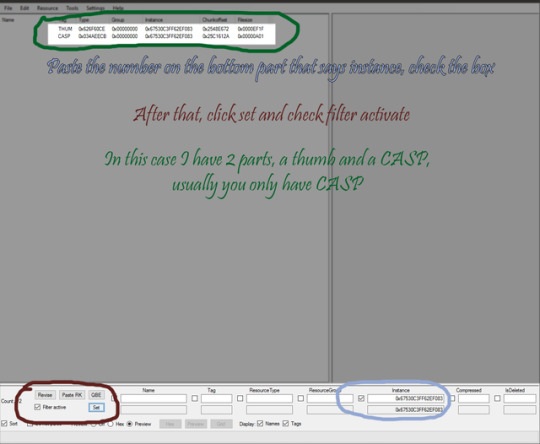
Click once in ‘’chunkoffset”
Paste the number on the bottom part that says instance, check the box
Than click set and check filter activate (In this case I have 2 parts, a thumb and a casp, usually you only have CASP)
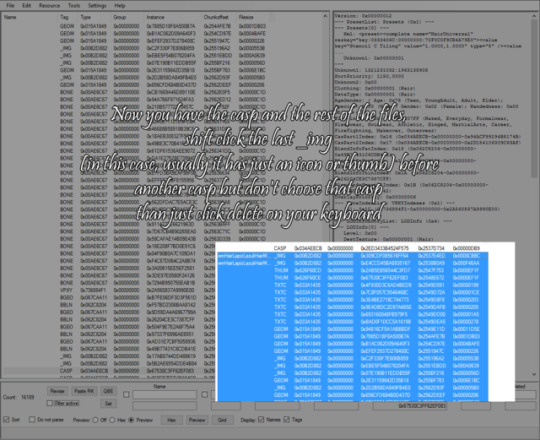
Select CASP and uncheck filter activate.
Now you have the casp and the rest of the folders, shift click the last _img (in this case, usually it has just an icon or thumb) before another casp but don’t choose that casp than just click delete on your keyboard.
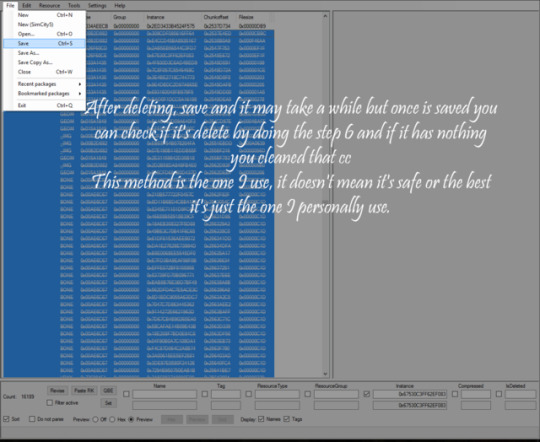
After deleting you will save and it may take a while but once is saved you can check if it’s delete by doing step 6 and 7 again
This method is the one I use, it doesn’t mean it’s safe or the best it’s just the one I personally use :) You can delete the .txt folder it won’t be needed again :)
HOPE THIS HELPED, KISSES AND COOKIES

466 notes
·
View notes
Text
Because you can't save progress on them, I feel like someone should write timeloop horror for Tutorial Joe and Tutorial Jane.


#tutorial joe#tutorial jane#ts2#the sims 2#sims#idk what this is okay <3#once in a lifetime#tw glitch#flashing tw#flashing gif tw#tw flashing gif#tw flashing#tw flickering#undescribed
1K notes
·
View notes
Text
How to throw a fancy dinner party in The Sims 3
You will need @flotheory's new dinner mod, download it here. Depending on what you want, choose either
Version 1: limited to 8 sims having dinner and sims will finish what they are doing before going to dinner -> best for family gameplay when you only want your active family to have dinner together
or Version 2: more than 8 sims can have dinner and sims will stop what they are doing and proceed to their chair once you direct them to do so -> best if you also want inactive sims as guests at your dinner party
Step 1: Assign each sim a chair
Click on the chair
Select "Join dinner…"
Select the sim you want to sit in this chair
Repeat for all chairs/sims.
Sims will now proceed to their respective chairs and sit down at the dinner table:

Step 2: Get them to eat dinner together
If you're doing this with more than one table, pause your game!
You will have to repeat these steps for each table! Do not switch to a different table before you have done them all!
Place the group meal in the middle of the table
Click on the group meal
Select "Serve for dinner…"
Click on the table
Select "Eat dinner together…"
Select the sims sitting at this table
Click OK
Without un-pausing the game proceed to the next table and repeat for every table.


Once all tables have been served their dinner and the sims have been directed to dine:

Press play and watch them all eat at the same time!

Additional tips:
I found it is best to place the group meals on the table after all sims have been seated. If you place them before, you run the risk of a hungry sim grabbing a plate and blocking one of the chairs.
Once all sims are seated at the dinner table you can leave them sitting and just chatting for a little bit, but don't wait too long or they will get up again.
If you want more than 8 sims to dine together, you will need either a custom table seating more than 8 sims (don't know if they even exist…?) or you will need to place several tables. If you want to push them together to make a bigger table, use the cheat "moveobjects on". Take care not to push the tables into each other, or sims may not have enough room to sit down. It's best to leave a small gap.
If you want several tables to eat the same food, either prepare the same group meal for each table or use icarus_allsorts mod "Cook with any ingredient" in order to make a group meal with up to 16 servings. When serving several tables from the same group meal you will have to move the group meal to the table you want to serve before repeating step 2!
391 notes
·
View notes
Text
How to run The Sims 3 with DXVK & Reshade (Direct3D 9.0c)

Today I am going to show you guys how to install Reshade and use Direct3D 9.0c (D3D9) instead of Vulkan as rendering API.
This tutorial is based on @nornities and @desiree-uk's awesome guide on "How to use DXVK with The Sims 3", with the goal of increasing compatibility between DXVK and Reshade. For users not interested in using Reshade, you may skip this tutorial.
If you followed nornities and desiree-uk's guide, it is strongly recommended that you start from scratch, meaning you should uninstall DXVK AND Reshade completely. Believe me when I say this: it will save you a lot of time, frustration, and make your life so much easier.
For the purpose of this tutorial, I am on patch 1.69.47 and running EA App on Windows 10, but it should work for version 1.67.2 on Steam and discs, too. This tutorial does not cover GShade.
Before we start
Backup your files, even the entire folder (Program Files\EA Games\The Sims 3\Game\Bin) if you want to be extra safe; you will thank yourself later. If you do not wish to backup the entire folder, at least backup the following:
reshade-presets
reshade-shaders
Reshade.ini
Options.ini (Documents\Electronic Arts\The Sims 3)
Keep them somewhere secure, for your peace of mind (and sanity).

Done? Great stuff, let us begin!
Step 1:
If you installed DXVK following nornite and desiree-uk's guide, go to the bin folder and delete the following files to fully uninstall DXVK, we are starting from scratch:
d3d9.dll
TS3.dxvk-cache
dxvk.conf
TS3_d3d9.log (or TS3W_d3d9.log)
Step 2:
If you already have Reshade on your PC, uninstall it using this: https://reshade.me/downloads/ReShade_Setup_X.X.X.exe (replace X.X.X with version number)
Step 3:
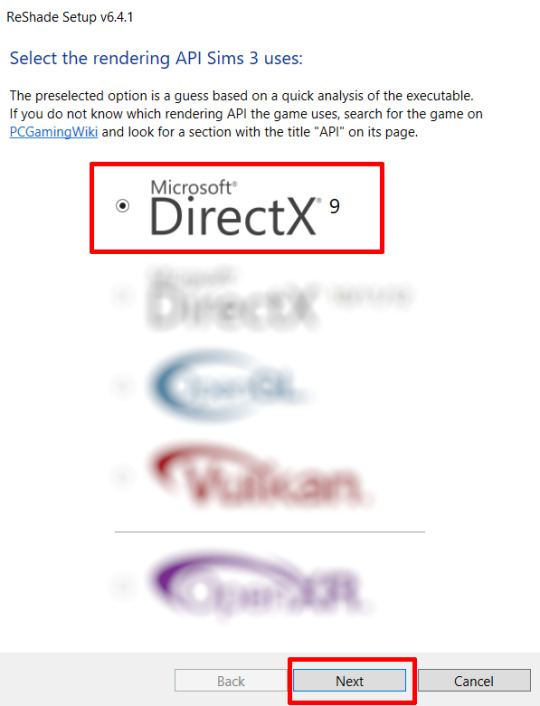
Perform a clean install of Reshade (I am using the latest version - 6.4.1 at the time of writing). Please note that you need a version no older than 4.5.0 or this method will not work. Choose DirectX9, click next.
Once the installation is complete, you should see a "d3d9.dll" file inside The Sims 3's bin folder (Program Files\EA Games\The Sims 3\Game\Bin):
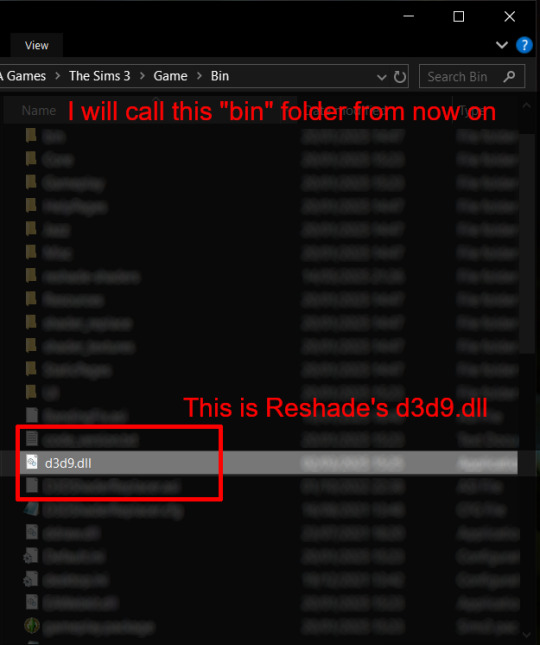
It may all seem familiar thus far. Indeed, this is how we installed Reshade in the past before using DXVK, but here comes the tricky part:
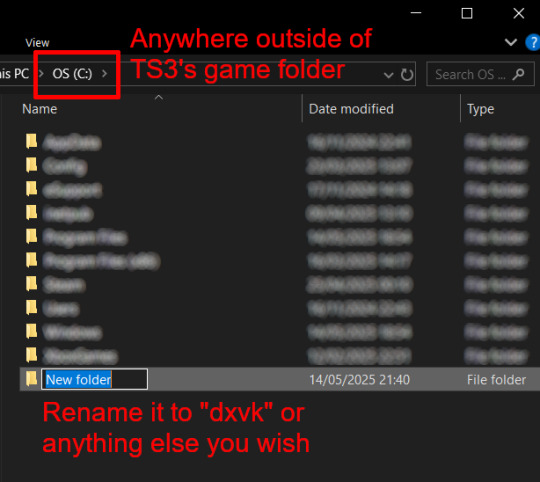
Step 4:
Create a new folder outside of The Sims 3's game folder (I created it on my C drive), name it "dxvk" or whatever else you like. Remember where you saved this folder, we will return to it later.
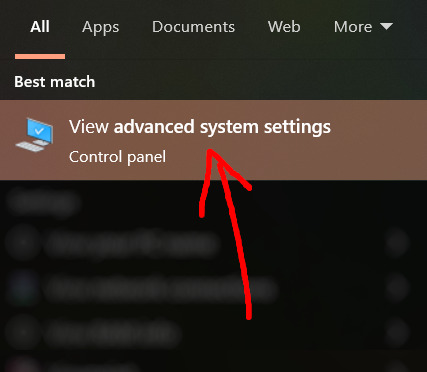
Step 5:
Now we need Reshade to load the next dll in order to chain Reshade with DXVK. Click on the search bar, and type in "View advanced system settings".
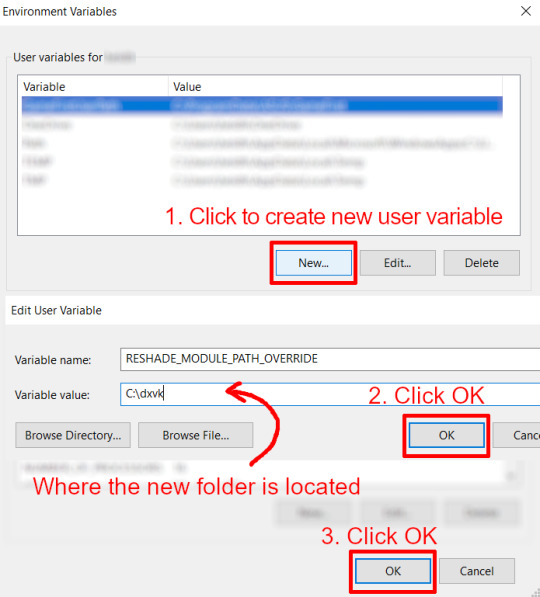
Click on "Environment Variables..."

Under "User variables", click "New..."
In the new pop-up window, find "Variable name:" and type in:
RESHADE_MODULE_PATH_OVERRIDE
for "Variable value:", paste in the directory that leads to the folder we created earlier. Once you are done, hit OK, and then hit OK again to save the changes made.
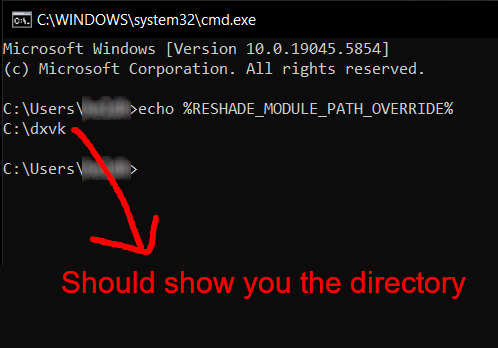
You can use Command Prompt to check if this new environment variable has been registered by entering:
echo %RESHADE_MODULE_PATH_OVERRIDE%
It should return you the folder's location. If not, make sure you have typed in the variable name correctly and confirm the folder's location.
Step 6:
Download DXVK (version 2.3.1) from here: https://github.com/doitsujin/DXVK/releases/tag/v2.3.1 and unzip "dxvk-2.3.1.tar.gz" (I use 7-Zip, but winRAR works, too). Remember to choose x32, and move only "d3d9.dll" to the folder we made earlier.
Now we have two "d3d9.dll" files, one from Reshade (lives in the bin folder), and the other from DXVK (in this new folder, outside of The Sims 3 game folder).

Step 7:
Download "dxvk.conf" here: https://github.com/doitsujin/dxvk/blob/master/dxvk.conf delete everything inside, and enter the following:
d3d9.textureMemory = 1 d3d9.presentInterval = 1 d3d9.maxFrameRate = 60 dxvk.hud = devinfo
Ctrl + S to save the document.
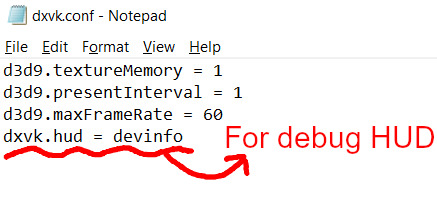
The first 3 lines are taken from @nornities and @desiree-uk's guide.
The last line is only for debugging purposes. Due to the inconvenient location occupied by the HUD (top left corner of your screen), it should be removed once the installation is successful.
Step 8:
Drag "dxvk.conf" into the bin folder, where Reshade's "d3d9.dll", "TS3.exe", and "TS3W.exe" all live.

Step 9:
Now fire up the game and check if both are showing up:

Lastly, check for “TS3.dxvk-cache” in the bin folder:
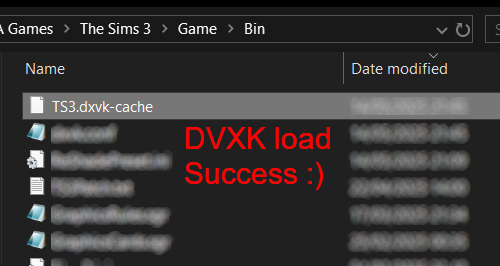
If it is there, congratulations! You have successfully installed DXVK and Reshade utilising D3D9 as API! You can now go to "dxvk.conf" and remove its last line "dxvk.hud = devinfo" and have fun! :)
Hope this tutorial isn't too confusing, the last thing I want is to over-complicate things. If you still need some help, comment down below or send me a DM/ask, I'll try and troubleshoot with you to the best of my ability.
Credits:
@nornities and @desiree-uk for their fantastic guide.
@criisolate for promulgating the usage of DXVK in TS3 community.
reddit user folieadeuxmeharder for helping me troubleshoot and informing me of this workaround.
doitsujin for creating DXVK.
crosire for creating Reshade.
162 notes
·
View notes
Text
Useful TS3 shortcuts you might not know about - quickly copy and recolor! (GIF)
• Hold Shift while dragging a palette to recolor the entire floor or wall


• Ever get frustrated copying objects with an eyedropper? Hold Shift and place the selected object to copy it without loading it! Works in both Build or Buy modes, can copy Debug objects with no codes ;)

• Hold Shift and drag fence or wall tool to create a room; hold Ctrl to remove the wall or fence
These shortcuts have saved me lots of time! I rarely use both sledgehammer and eyedropper :) By the way, the support team has said that my tumblr is finally unbanned! Whew, let's see!
936 notes
·
View notes
Text
How to use DXVK with The Sims 3
Have you seen this post about using DXVK by Criisolate? But felt intimidated by the sheer mass of facts and information?
@desiree-uk and I compiled a guide and the configuration file to make your life easier. It focuses on players not using the EA App, but it might work for those just the same. It’s definitely worth a try.
Adding this to your game installation will result in a better RAM usage. So your game is less likely to give you Error 12 or crash due to RAM issues. It does NOT give a huge performance boost, but more stability and allows for higher graphics settings in game.
The full guide behind the cut. Let me know if you also would like it as PDF.
Happy simming!
Disclaimer and Credits
Desiree and I are no tech experts and just wrote down how we did this. Our ability to help if you run into trouble is limited. So use at your own risk and back up your files!
We both are on Windows 10 and start the game via TS3W.exe, not the EA App. So your experience may differ.
This guide is based on our own experiments and of course criisolate’s post on tumblr: https://www.tumblr.com/criisolate/749374223346286592/ill-explain-what-i-did-below-before-making-any
This guide is brought to you by Desiree-UK and Norn.
Compatibility
Note: This will conflict with other programs that “inject” functionality into your game so they may stop working. Notably
Reshade
GShade
Nvidia Experience/Nvidia Inspector/Nvidia Shaders
RivaTuner Statistics Server
It does work seamlessly with LazyDuchess’ Smooth Patch.
LazyDuchess’ Launcher: unknown
Alder Lake patch: does conflict. One user got it working by starting the game by launching TS3.exe (also with admin rights) instead of TS3W.exe. This seemed to create the cache file for DXVK. After that, the game could be started from TS3W.exe again. That might not work for everyone though.
A word on FPS and V-Sync
With such an old game it’s crucial to cap framerate (FPS). This is done in the DXVK.conf file. Same with V-Sync.
You need
a text editor (easiest to use is Windows Notepad)
to download DXVK, version 2.3.1 from here: https://github.com/doitsujin/DXVK/releases/tag/v2.3.1 Extract the archive, you are going to need the file d3d9.dll from the x32 folder
the configuration file DXVK.conf from here: https://github.com/doitsujin/DXVK/blob/master/DXVK.conf. Optional: download the edited version with the required changes here.
administrator rights on your PC
to know your game’s installation path (bin folder) and where to find the user folder
a tiny bit of patience :)
First Step: Backup
Backup your original Bin folder in your Sims 3 installation path! The DXVK file may overwrite some files! The path should be something like this (for retail): \Program Files (x86)\Electronic Arts\The Sims 3\Game\Bin (This is the folder where also GraphicsRule.sgr and the TS3W.exe and TS3.exe are located.)
Backup your options.ini in your game’s user folder! Making the game use the DXVK file will count as a change in GPU driver, so the options.ini will reset once you start your game after installation. The path should be something like this: \Documents\Electronic Arts\The Sims 3 (This is the folder where your Mods folder is located).
Preparations
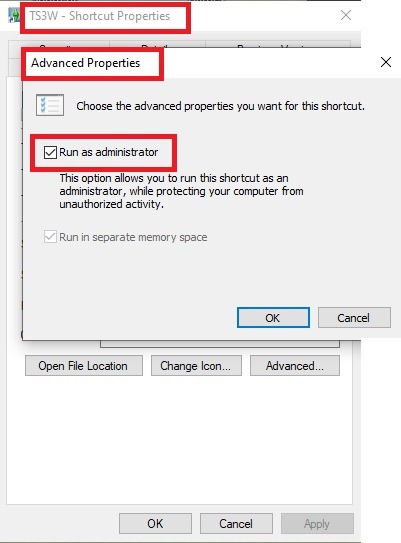
Make sure you run the game as administrator. You can check that by right-clicking on the icon that starts your game. Go to Properties > Advanced and check the box “Run as administrator”. Note: This will result in a prompt each time you start your game, if you want to allow this application to make modifications to your system. Click “Yes” and the game will load.
2. Make sure you have the DEP settings from Windows applied to your game.
Open the Windows Control Panel.
Click System and Security > System > Advanced System Settings.
On the Advanced tab, next to the Performance heading, click Settings.
Click the Data Execution Prevention tab.
Select 'Turn on DEP for all programs and services except these”:
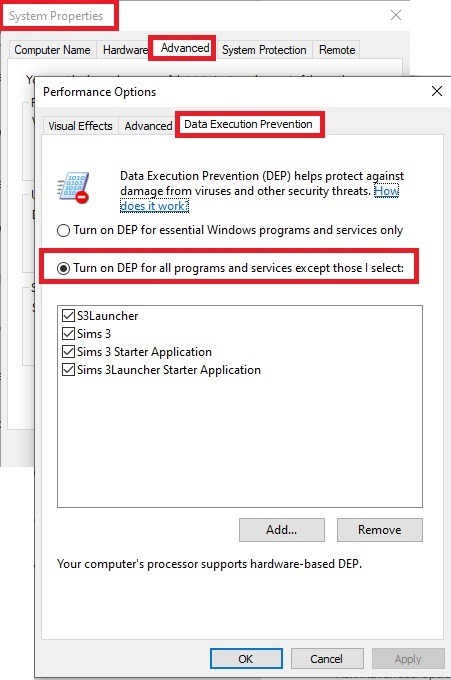
Click the Add button, a window to the file explorer opens. Navigate to your Sims 3 installation folder (the bin folder once again) and add TS3W.exe and TS3.exe.
Click OK. Then you can close all those dialog windows again.
Setting up the DXVK.conf file
Open the file with a text editor and delete everything in it. Then add these values:
d3d9.textureMemory = 1
d3d9.presentInterval = 1
d3d9.maxFrameRate = 60
d3d9.presentInterval enables V-Sync,d3d9.maxFrameRate sets the FrameRate. You can edit those values, but never change the first line (d3d9.textureMemory)!
The original DXVK.conf contains many more options in case you would like to add more settings.

A. no Reshade/GShade
Setting up DXVK
Copy the two files d3d9.dll and DXVK.conf into the Bin folder in your Sims 3 installation path. This is the folder where also GraphicsRule.sgr and the TS3W.exe and TS3.exe are located. If you are prompted to overwrite files, please choose yes (you DID backup your folder, right?)
And that’s basically all that is required to install.
Start your game now and let it run for a short while. Click around, open Buy mode or CAS, move the camera.
Now quit without saving. Once the game is closed fully, open your bin folder again and double check if a file “TS3W.DXVK-cache” was generated. If so – congrats! All done!
Things to note
Heads up, the game options will reset! So it will give you a “vanilla” start screen and options.
Don’t worry if the game seems to be frozen during loading. It may take a few minutes longer to load but it will load eventually.
The TS3W.DXVK-cache file is the actual cache DXVK is using. So don’t delete this! Just ignore it and leave it alone. When someone tells to clear cache files – this is not one of them!
Update Options.ini
Go to your user folder and open the options.ini file with a text editor like Notepad.
Find the line “lastdevice = “. It will have several values, separated by semicolons. Copy the last one, after the last semicolon, the digits only. Close the file.
Now go to your backup version of the Options.ini file, open it and find that line “lastdevice” again. Replace the last value with the one you just copied. Make sure to only replace those digits!
Save and close the file.
Copy this version of the file into your user folder, replacing the one that is there.
Things to note:
If your GPU driver is updated, you might have to do these steps again as it might reset your device ID again. Though it seems that the DXVK ID overrides the GPU ID, so it might not happen.
How do I know it’s working?
Open the task manager and look at RAM usage. Remember the game can only use 4 GB of RAM at maximum and starts crashing when usage goes up to somewhere between 3.2 – 3.8 GB (it’s a bit different for everybody).
So if you see values like 2.1456 for RAM usage in a large world and an ongoing save, it’s working. Generally the lower the value, the better for stability.
Also, DXVK will have generated its cache file called TS3W.DXVK-cache in the bin folder. The file size will grow with time as DXVK is adding stuff to it, e.g. from different worlds or savegames. Initially it might be something like 46 KB or 58 KB, so it’s really small.
Optional: changing MemCacheBudgetValue
MemCacheBudgetValue determines the size of the game's VRAM Cache. You can edit those values but the difference might not be noticeable in game. It also depends on your computer’s hardware how much you can allow here.
The two lines of seti MemCacheBudgetValue correspond to the high RAM level and low RAM level situations. Therefore, theoretically, the first line MemCacheBudgetValue should be set to a larger value, while the second line should be set to a value less than or equal to the first line.
The original values represent 200MB (209715200) and 160MB (167772160) respectively. They are calculated as 200x1024x1024=209175200 and 160x1024x1024=167772160.
Back up your GraphicsRules.sgr file! If you make a mistake here, your game won’t work anymore.
Go to your bin folder and open your GraphicsRules.sgr with a text editor.
Search and find two lines that set the variables for MemCacheBudgetValue.
Modify these two values to larger numbers. Make sure the value in the first line is higher or equals the value in the second line. Examples for values: 1073741824, which means 1GB 2147483648 which means 2 GB. -1 (minus 1) means no limit (but is highly experimental, use at own risk)
Save and close the file. It might prompt you to save the file to a different place and not allow you to save in the Bin folder. Just save it someplace else in this case and copy/paste it to the Bin folder afterwards. If asked to overwrite the existing file, click yes.
Now start your game and see if it makes a difference in smoothness or texture loading. Make sure to check RAM and VRAM usage to see how it works.
You might need to change the values back and forth to find the “sweet spot” for your game. Mine seems to work best with setting the first value to 2147483648 and the second to 1073741824.
Uninstallation
Delete these files from your bin folder (installation path):
d3d9.dll
DXVK.conf
TS3W.DXVK-cache
And if you have it, also TS3W_d3d9.log
if you changed the values in your GraphicsRule.sgr file, too, don’t forget to change them back or to replace the file with your backed up version.
OR
delete the bin folder and add it from your backup again.
B. with Reshade/GShade
Follow the steps from part A. no Reshade/Gshade to set up DXVK.
If you are already using Reshade (RS) or GShade (GS), you will be prompted to overwrite files, so choose YES. RS and GS may stop working, so you will need to reinstall them.
Whatever version you are using, the interface shows similar options of which API you can choose from (these screenshots are from the latest versions of RS and GS).
Please note:
Each time you install and uninstall DXVK, switching the game between Vulkan and d3d9, is essentially changing the graphics card ID again, which results in the settings in your options.ini file being repeatedly reset.
ReShade interface
Choose – Vulcan
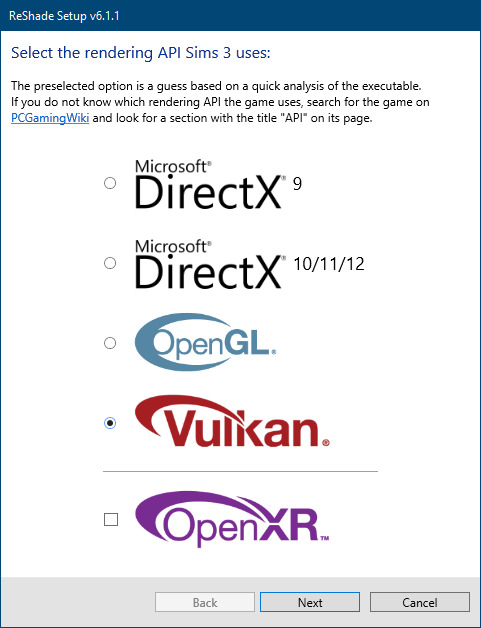
Click next and choose your preferred shaders.
Hopefully this install method works and it won't install its own d3d9.dll file.
If it doesn't work, then choose DirectX9 in RS, but you must make sure to replace the d3d9.dll file with DXVK's d3d9.dll (the one from its 32bit folder, checking its size is 3.86mb.)
GShade interface
Choose –
Executable Architecture: 32bit
Graphics API: DXVK
Hooking: Normal Mode
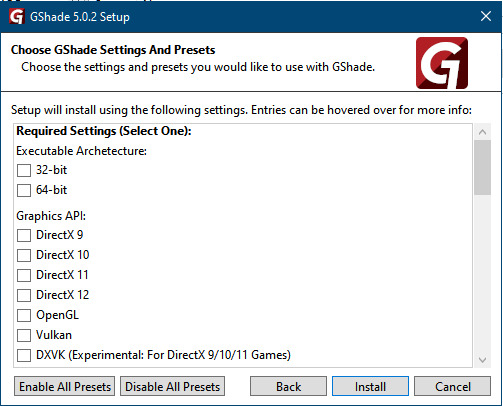
GShade is very problematic, it won't work straight out of the box and the overlay doesn't show up, which defeats the purpose of using it if you can't add or edit the shaders you want to use.
Check the game's bin folder, making sure the d3d9.dll is still there and its size is 3.86mb - that is DXVK's dll file.
If installing using the DXVK method doesn't work, you can choose the DirectX method, but there is no guarantee it works either.
The game will not run with these files in the folder:
d3d10core.dll
d3d11.dll
dxgi.dll
If you delete them, the game will start but you can't access GShade! It might be better to use ReShade.
Some Vulcan and DirectX information, if you’re interested:
Vulcan is for rather high end graphic cards but is backward compatible with some older cards. Try this method with ReShade or GShade first.
DirectX is more stable and works best with older cards and systems. Try this method if Vulcan doesn't work with ReShade/GShade in your game – remember to replace the d3d9.dll with DXVK's d3d9.dll.
For more information on the difference between Vulcan and DirectX, see this article:
https://www.howtogeek.com/884042/vulkan-vs-DirectX-12/
780 notes
·
View notes
Text
how I edit my sims ts3/ts4 screenshots (day-time edition)
A helpful? guide for editing screenshots during the day (this is not so easy for me as i prefer taking screens at night but my sims can't always be in the dark so let us all struggle together ok? ok.) this tut is done in procreate on the iPad.

Before taking screenshots:
Help yourself as much as you can in-game, utilise in-game lighting as shadows/lighting is created for you
Understand good/bad composition and add variety by using different angles to make scenes look interesting
I take LOTS of photos just to end up with 1 or 2 good ones

step 1: i would use liquify to smooth out any sharp edges or paint over them

step 2: create new layer, blending mode "multiply" use the colour picker on the area you want to add shadows to, use the selection tool to draw the shadow. you can either colour fill or just shade into the area with the brush. If you colour fill you can then erase lines that are too harsh or use the smudge tool to soften them.


step 3: do this same step but for the clothing. remember shadows are not usually completly black so i use shades of blue to shade her clothes and then shades of green for the tree.


step 4: create new layer, blending mode: overlay. outline the left side of the sim this is to make the light source more prominant. as natural light is not usually just white, i picked a slight orange tint.

step 5: add more lighting to enhance the effect. *create new layer* blending mode: add, and do the same thing as step 4 but with this layer i'll add more lighting to the parts that will be affected most by the light

step 6: i edit the hair. you can look here for my in depth hair tutorial
step 7: add lighting effects *create new layer* blending mode: add. i used the default procreate brushes 'flare' and 'glimmer' [found in luminace] to immitate light rays

step 8: merge all layers, *duplicate layer* add bloom effect and change opacity and erase parts where bloom is too strong.

step 9: merge again, then go into photshop and colour grade using 'camera raw filter' then 'smart sharpen', use 'topaz labs' effect then done!

if you have any questions feel free to direct them to my inbox & u can check out other tutorials here
207 notes
·
View notes
Text
Tiptorial: manually reducing the poly from hair (if you're crazy enough and have a lot of free time)
First of all, get rid of the undersides and remap the whole mesh to the proper ts3 hair texture size;
Select one strand, revert the selection with ctrl+i and hide it all with H, to isolate the strand we want to work (do not separate it into another object, if you do that you'll mess with the strands order and will have transparency issues!);
We need to convert the tris into quads, for this, press alt+J. This strand had almost no issues converting it, but some might present it, then you'll have to select each square manually and dissolve the faces to turn it into a quad. It's easier to do that in the UV map with sync selection by selecting it like a checkerboard, then dissolve everything, then select one tri and press shift+g and select polygon sides, this will select everything that was not converted and then you can dissolve it.
After everything is in quads, alt+click on a edge to select the whole edge loop, then dissolve the edge. You can also press G twice to slide the edge along the mesh to better adjust it.
When the strand is like you want it, you can select it and assign to a vertex group so you can easily select all the dissolved strands to better work with the whole mesh (remember, do not separate any strand!)
And now you'll repeat the process with all the other strands 🫠
166 notes
·
View notes
Text


Tutorial : How to make roads with car parking space
When I first started using the create a world tool, I immediatly wanted to make roads with car parking space. The only world where I had seen these types of roads were in Boroughsburg by potato-ballad-sims. So, I searched up the internet as one would do when you don't know how to do something and nothing until I found this post by krrank on their forum. I already knew how to make roads at that time. In fact, it was only when I saw her showcase of dirt roads, that I saw how there was a way to make roads larger to then add cars parked on the side. Now, because I haven't found a proper tutorial on how to actually do that, I decided to make my own tutorial and share how I managed to do it. It's not as perfect as Boroughsburg in term of sidewalk intersections (because I'm not the best at texture editing) but enough to have the look of parked cars, which can make a town look so much more lively.
What I'm assuming before this tutorial :
You're familiar with the CAW tool
you know how to place roads
you know how to create roads using textures provided by EA or CC road textures
You know how to add custom content for CAW (only applicable if you don't own the university EP)
The downside
The only downside with these roads is that sims will walk/run through the cars when going somewhere because we're basically using the sidewalk as parking space. To balance that out, I suggest using hybrid roads in your world : normal roads with normal sidewalks and roads with parking space.
On the left we have a road with car parking space
On the right a normal road with sidewalks

Step 1 : Choosing your road textures

Example of what it should look like :

Possible question #1
" Okay but there's no sidewalk now, what do I do ? " : Simple ! Place independent sidewalks on the side. A bit like this (ignore the fact that this is not completly aligned to the grid) :

Step 2 : Placing cars on the road
I highly suggest using cars that are meant for decoration and aren't high poly. If you're using super CAW do not use the drivable cars that can be bought in game. In my case, I used the debug cars from the university EP meant for decoration and lowered them until it hid the parking curb. If you don't have the university EP, the world CC from Boroughsburg includes deco cars used for the purpose of parked deco cars !
Do not put too many cars on the roads (I only do it because I do not care since I'm making my own personal world, but if you intend to share the world you're making, limit the cars that you put on the streets)
How to hide the parking curb (for university cars) :
Lower your car's position (Y axis, green line) to : 15,4 - (Good enough height to hide the concrete curb and only hides a tiny bit of the car's wheels)

Don't forget to rotate (Y axis) the cars to the right direction. In fact, to be 100% accurate in the rotation placement of your cars, you can write the exact degree in the board that appears when you select an object. So, basically : 90 / -90 OR 180 / -180
Possible question #2
"In what direction should I rotate the cars ?" : Here's a reminder of traffic directions in game :

And that's about it. Hope this will be useful to anyone who was wondering how to make larger roads and add cars parked directly on the street :)
#ts3#sims 3#the sims 3#sims 3 tutorial#ts3 tutorial#sims 3 caw tutorial#sims 3 caw roads#sims 3 caw road tutorial#sims 3 parked cars#sims 3 cars#sims 3 how to#ts3 how to#sims 3 blog#sims 3 simblr#simblr#sims caw#ts3 caw#sims 3 create a world#ts3 create a world
310 notes
·
View notes
Text
youtube
in case this can help anyone trying to learn how to decimate when converting sims 4 cc to the sims 3 ❤
140 notes
·
View notes
Text
A Micro Tutorial on Blending Face Presets for Sims 3 CAS by Papermint-Airplane

So I have this Sim here and I'm using this mouth preset. It's nice but it's a little downturned for my liking and I'd prefer more of a Cupid's bow.
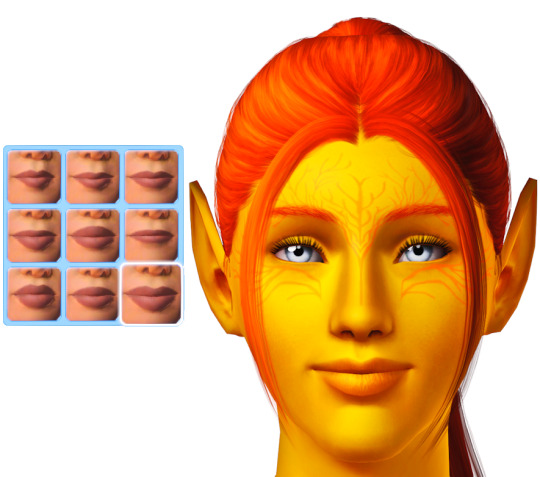
I choose the next preset which is more upturned and has the Cupid's bow I want but it's a little too sharp.
What if I merge the two presets?

I right click the first preset to blend it with the second preset. Now I have everything I want! It's not too downturned, not too upturned, and the Cupid's bow is nice and soft.
You can do this as many times as you want with as many different presets you want to get different effects. Experiment with it!
Happy Simming! 💚
#sims 3#ts3#mine#sims 3 cas#sims 3 tutorial#tutorial#tutorials#sims 3 cas tutorial#resources#sims 3 resources#just simblr things
489 notes
·
View notes
Text
Nucrest Cocoa Hoodie V2 for teenagers
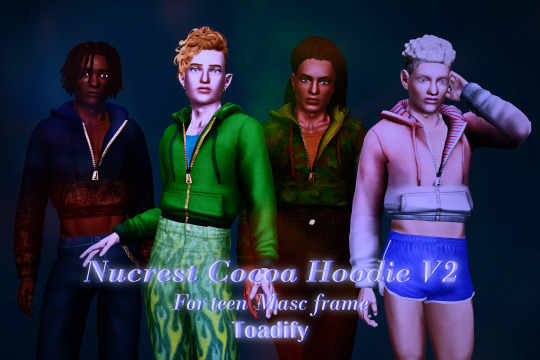
The @nucrests cocoa hoodie version 2 for teenagers, previously made for adults which was recently updated.
It doesn't have any of the original swatches because I made the original as a sort-of collab with @geminipixels , who did the TS4 presets while I did a castable version, and to give it presets I would need to reconvert it from scratch. Though I do have ideas - I would make them hue-recolorable for example.
Download simblr.cc / SFS / Mediafire

About the hoodie
For teen male sims
Sensible specular map (near-black with shiny zipper), blank normal map.
4 presets with 4 combo's of multiplier-mask, 4 channels each.
Enabled for everyday, sleepwear, athletic, outerwear (with accessory tops) and career
Fat, fit, thin morphs
All LODS: 4537 F - 3374 V / 2098 - 1428 / 891 - 698
Custom Thumbnails


Made with
Blender 3.6
Affinity photo
Adobe photoshop
TSRW
S3PE
Meshing tool kit.
I wrote down my whole work progress, right here! Hopefully it can function a bit as a tutorial ♥
@katsujiiccfinds @eternalccfinds @wanderingsimsfinds @pis3update
Edit 21/07: you might need University Life for it to work, I thought i had made it BG compatible but possibly not. Sorry!
#florian pistache#andres bardem#sims 3#ts3cc#downloads: me#downloads: cas#downloads: clothing#ts3#sims 3 cc#s3cc#clothing TM#ts3 cc tutorial#cc tutorial
91 notes
·
View notes
Text
I feel like my brain gained a wrinkle?
Okay, some people might know this already, but I'm sharing for those who don't! Sims 3 players, if you have @omedapixel's Sims 3 decorator Tool, you can select a OSMP (even the resizer and tipsy ones), and move your sims around with it.
Currently, the mod doesn't support moving a sim on it's own, but this is an excellent workaround. Works really good when you're trying to pose a sim and need to move them up or down or tilt and spin them a little.
So just a little psa for you because my brain felt SO unsmooth when I tried it out lol 🫶🏾

#sims 3#simblr#ts3#the sims 3#the sims#If you don't have this mod already#you should#Its a gamechanger#tutorial#tutorials
148 notes
·
View notes