#tutorial review
Explore tagged Tumblr posts
Visit Tumblr Blog
Explore Tumblr blogs with no restrictions, modern design and the best experience.
Last Seen Tumblr Blogs


Fun Fact
Kazakhstan’s Minister of Communications and Informatics has blocked the Tumblr site because it contained 60 sites of terrorism, extremism, and pornography in 2015.
Text

Vidu 2.0 - First Reactions
I am in the Vidu Artist's program, so I've had a chance to play with version 2.0 before the official launch on the 15th. What I'm working with is a pre-launch build, and has improved day-to-day, so this may not reflect the final release.

I haven't yet had a chance to give it the full paces-run-through it deserves, but here's some early samples, and early thoughts. (Converted to GIF because you can only upload one video per post.)
The short version is that everything has been incrementally improved: Better coherence, better prompt responsiveness, better motion, and way, way better speed. Without doing exact time-tests it's say it's at least 25% the time to generate a video of the same dimensions.


While there's still some of the "smudge-blurring" that you got with 1-1.5, it happens less frequently, and is more mitigated with an image/animation that match.


Motion varies gen-by-gen, but impressive results seem to be the norm.

While his sticks are somewhat flexible at full framerate, the cat drummer's cymbal hit struck me as particularly nice.
Control and Coherence


While the roar may not seem particularly impressive, roars, howls, and other emotional outbursts didn't work well in previous versions. Aunt Acid's fumes and drips are are particularly fun, and while it still has problems with her tail, PteroDarla's crest and wings are actually working the way they should (after a number of attempts).

For a long time, I've wanted the last shot of the TMax opener to be Max starting with a zoom-in on the eye going out to a roar and pose. While this isn't quite where I want it, 2.0 is the first time I've gotten him to go through the whole sequence. Which is promising.
Weird Stuff Works
What remains impressive about Vidu is how well it handles concepts and characters that are off-the-beaten-path. Hailuo just released a character consistency feature that only works with humans, but here...

Here's my friend Cole's OC, the Waffler (Intergalactic Bounty-Hunter.) He's one unbalanced breakfast. He's also rather resistant gen AI replication because he's an SD space man with a waffle for head, a very specific waffle for a head turned at a 45 degree angle. Vidu 1.0 wasn't able to work with him, almost always giving him a mouth or rotating his waffle, if not completely glitching out. 2.0 is much better to handle it.
The numerous dino-anthros above are all in the "Tricky for AI" box. If I was into doing what could be gened easily, however, I'd just be pumping out an endless parade of pillowy waifus.


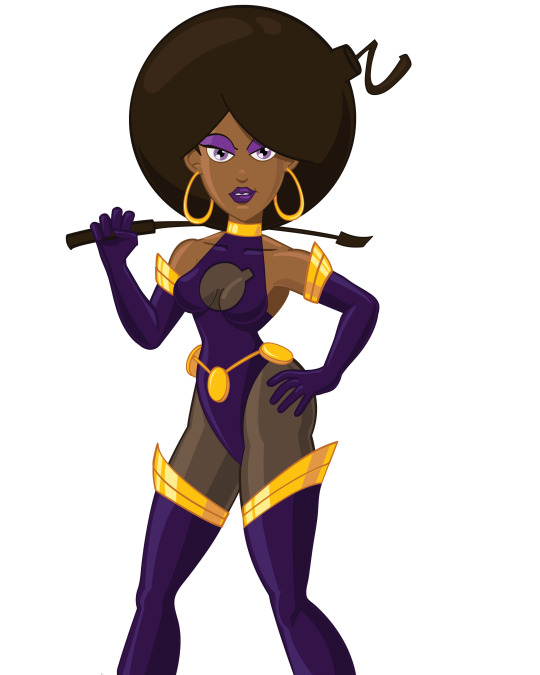
In my defense, I classify SexBomb as more of a 'strifu'. This particular one was an attempt to see if a toony image prompt could be rendered live-action with text prompting. Long story short it can't, but it can produce some interesting effects like the faux-posterized background.
I've had AI gen close to her costume before, but it never adds the fuse or does the boob-window right, and here we are.
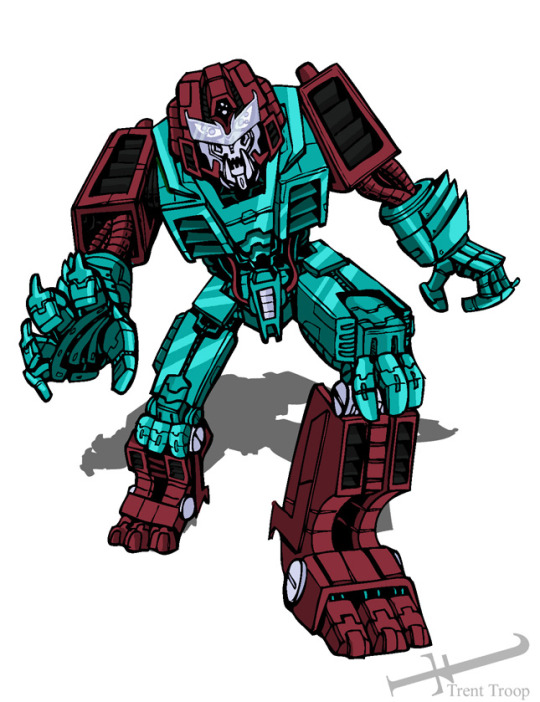
One of my old bits of Transformers fanart of the Pretender Monster Icepick served as the character model for the one on the right.
Fantastical Creatures in general are a lot easier to execute in this version as well.


And... Action!

Motion is a lot more natural this time around.


Weapons fire (though sometimes a bit literal) tends to come out of the barrel semi-consistently now, characters can fight the waves without melting themselves and...

A giant rubber monster can eat your protagonist (if you're lucky.)
Quirks and Flaws
Nothing is perfect, and all AI you see is curated. So lets talk areas to be improved.


A lot of stuff presently generates with multilingual gibberish captions sometimes, which I expect is an early model bug. Versions 2-3 of Midjourney would have similar artifacts, and that sort of thing isn't hard to correct for.
There are still issues with blurring/smudging, especially with things like tail-tips, hands, and any motion the robot doesn't quite get.

Sometimes stuff shapechanges or appears that ought not to, like the knight's floppy second blade.

Or speed gets off requiring being fixed in post.

And stuff just goes dumb sometimes, which one should expect (and in my estimation, desire) from any generative system, artificial or analogue. Should the water go on the fire rather than the firemen? Yes. Do I regret this gen? No.
One quirk of the system is how it resolves incongruous multi-prompts. I've been accustomed to Midjourney, which, when generating an image must blend everything requested. You can put two completely different backgrounds in as image prompts and it will blend them into something new and wacky.

Vidu resolves problems like having two background images at once by taking advantage of the 4th dimension. Confuse the robot too much and it will just cut/fade from one idea to the next.


And then there's stuff that just happens, like, a shot being perfect except a painted (and thus ought to be static) background object animating beautifully (going retro is a path wrought with irony) and the robot deciding it'd rather do CG-style than 2d.
And while it doesn't show up great in the gif of Max at the construction site there, 2.0 is more vulnerable to interpreting bad transparency-clipping as part of the character design, so be careful if you're using transparent PNGs.
Also, if you slap a character and a background together without elaborating on the setting with the text prompt, it will often slap the background back there as a static backdrop and produce a very "greenscreen-y" effect.
Rather than laden this post down with more animated GIFs, I'll be setting up a batch of them as posts for the upcoming days. At least, that's the plan.
#vidu ai#vidu#vidu speed#vidu 2.0#ai video#ai animation#tyrannomax#AI tutorial#AI review#animated gif
74 notes
·
View notes
Text
Lipstick blush jelly / Batom blush em geleia💋💄
• Batom blush em geleia cor:02 / Lipstick blush jelly Color:02 💋💄
- The texture and fragrance are really soft. I recommend it for those who have dry lips and also for those who like a light/soft makeup effect 🍒
Music: Hey now by Ehrdeamon.
#makeup#batom blush#lipstick blush#lipstick#blush#cherry#batom#makeup review#makeup tutorial#beauty#black girl aesthetic#blackgirl#aesthetic#tutorial#maquiagem#soft makeup#red makeup#black girl magic#black girls of tumblr#black girl beauty#black girl fashion#black girls rock#melanin#blondie#blond girl#blond woman#ebony#coquette#black woman appreciation#red
27 notes
·
View notes
Text
youtube
The Ultimate Valentine’s Day Makeup Look: Smokey Eye & Nude Lip
Valentine’s Day is the perfect excuse to go full glam, and I’ve created a look that’s equal parts sultry and sophisticated! This smokey eye with a soft wing is designed to flatter many eye shapes, even subtle hooded eyes, while the nude glossy lip adds the perfect touch of romance.
Whether you’re heading out for a romantic date night or celebrating with friends, tap into your inner artist to recreate this effortlessly chic look.
Let me know in the comments—are you team smokey eye for Valentine’s Day, or do you prefer something softer? 💕
Shonagh x
#makeup#shonagh scott#makeup artist#makeup tutorial#showmemakeup#youtuber#youtube#date night#evening makeup#romantic#Smokey eyes#smokey eye#Smokey makeup#winged#winged eyeshadow#winged liner#makeup tips#makeup help#makeup hacks#beauty makeup#mac makeup#makeup application#makeup beauty#makeup review
29 notes
·
View notes
Text

django
#movies#django#quentin tarantino#cowboys#django unchained#movie review#my artwrok#my art#artists on tumblr#art#artwork#art wip#artworld#digital art#cowboy#sketch#film#lol#drawing#my post#tutorial#idk how to tag this#help#idk
54 notes
·
View notes
Text
a glimpse of noah in chloe’s new tiktok
23/12/2024
#noah schnapp#chloe schnapp#ns update#ns tiktok#i was seriously listening to her tutorial bc i love make up reviews and then he shows up and i was like damn now i have to update my page#lol but thanks chloe for letting us see noah again and keep up w the make up tutorials bc im writing down what to buy next lol#they are in mexico already btw they go every year during this time of the year#hope they have fun during the holidays
24 notes
·
View notes
Text


#markiplier#youtube comments#video games#lets play#white knuckle#hidden inventory arc but markiplier version#don’t skip the tutorial!#powerwash simulator#making a game harder to yourself than it should be#classic markiplier#game developer#steam reviews#you could make a movie out of it#iron lung#a crossover between the two would be fire#adhd things
15 notes
·
View notes
Text
SiliNOT! Testing and Review
Since I run a lot of casting workshops, I've had several people in the costuming/maker community ask me my opinion on SiliNOT!, a relatively new product advertised as a budget- and eco-friendly moldmaking alternative to silicone, urethane, and other single-use materials.
I finally bought a couple of bottles to play with, so I did a test project. My experience and findings are below! (It's not a recipe blog, but if you want to skip the play-by-play and get to the TL;DR, it's under the big "In Summary" header near the bottom.)

First, if you aren't familiar with this material, SiliNOT! is a remeltable, reusable medium for making molds. Though its exact ingredients are not disclosed, it purports to nontoxic, food-safe, and compostable. It melts in a household microwave or double boiler and solidifies at room temperature (or in a refrigerator/freezer for faster results). The website is https://silinot.com/.
(I am not an affiliate, and have no connection to this company apart from having made one retail purchase from them. I just have a lot of casting experience and like trying out new products.)
The Positive Original
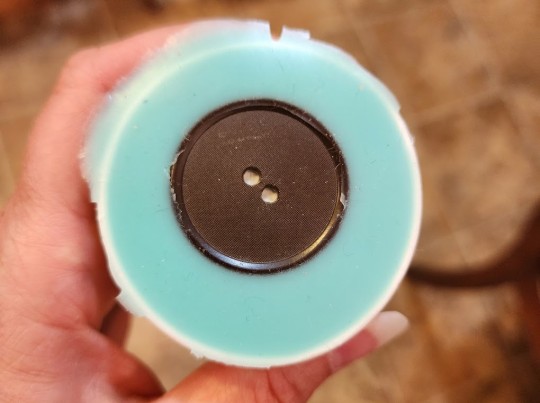
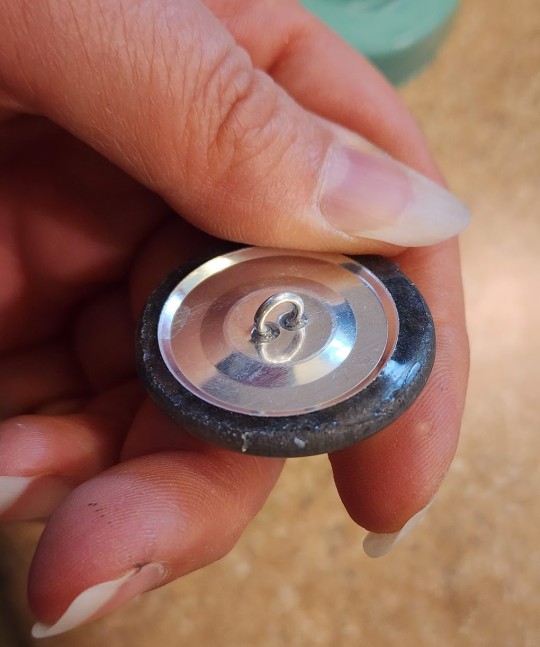
I’m still in the middle of a Vincent Valentine build, so I decided to test the SiliNOT! on his custom buttons. My original is a stack of various nonporous materials: an antique (probably Bakelite) coat button, an epoxy resin dome I cast using a mold I already had in my library, and some engraved Worbla’s Pearly Art for the raised detail. The button shanks won’t be added until the final casting, so the original can be mounted flat for the moldmaking process.
Sample Worbla on the left; completed button stack on the right:

The Mold
I built the mold container the same way I do for silicone pours, with the flat back of the button fixed to a styrene plate and a cylinder (actually a small paper cup with the bottom cut off) surrounding it for the walls. The lip of the cup is sealed all the way around with Monster Clay to prevent leaks.
Heating and Pouring
The SiliNOT! didn’t take long at all to heat up; I did maybe four or five 20-second bursts before it was completely fluid. The bottle does get rather warm, so hand protection isn’t a bad idea. If you have heat-resistant gloves, you can use those; I was working in my kitchen (yay for nontoxic stuff!), so I just grabbed an oven mitt with a silicone grip.
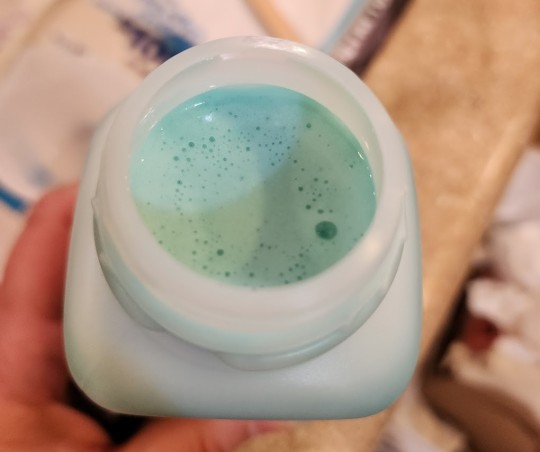
The melted SiliNOT! looks a bit like Luke Skywalker’s blue milk. It’s about the consistency of a yogurt smoothie and likes to pour in a thicker stream compared to silicone. While silicone can be stretched into a thin ribbon for delicate pours or chemically thinned with solvent for really tricky jobs, SiliNOT!'s viscosity is dependent on temperature and never seems to get quite as thin as silicone.
I’d automatically made my mold compact to conserve material (not really a concern with a reusable moldmaking material like SiliNOT!, but after using silicone for more than a decade, I’ve trained myself to be as efficient as possible), so the walls of my mold container were only about half or three quarters of an inch from my object. Because the target was so narrow, I found it difficult to accurately fill from the lowest area of the mold with the SiliNOT! The heavier pour also means more air can get trapped in or under the material.
Bubbles are one of the areas in which SiliNOT! is decidedly inferior to silicone. SiliNOT! has higher viscosity, so bubbles don’t want to rise to the surface without vigorous tapping, which can distort the mold edges or affect leveling depending on your mold container. The bubbles that do make their way to the surface are difficult to pop, even when poked with a sharp implement. Heat gun degassing doesn’t have much effect.
Since the bubble surface cools and skins over quickly, I actually had to use a tool and scoop some large bubbles completely out of the mold to allow the surface to level. Critically, the SiliNOT! is opaque, so you can’t spot bubbles clinging to the surface of your original. (This is why my first mold was a reject, and I had to repour. More on that below.)
Hardening
Once the surface had set, I carefully moved the mold into the refrigerator to cool faster. Here’s another area where some types of silicone can have an advantage: I typically use fast-curing Smooth-On products (because I always have random quantities left to use up after our casting workshops), so I rarely have to wait more than half an hour for a silicone mold to cure, regardless of its size or mass.
The SiliNOT! has to chill completely before handling, though, and discharging that amount of heat requires a fair amount of time even in a cool environment. My mold was pretty small, maybe 2 1/2” wide by 1” deep, and it still took around 40 minutes to cool completely. A larger, deeper mold could hold considerably more energy in the center, and might have to be left in the freezer for a couple of hours before use.
Demolding the Original
When the mold was completely chilled, I removed it from the refrigerator and popped it off the plastic plate I’d used for the base of the mold. The texture was very different from what I’d expected: Unlike other meltable materials (Monster Clay, et al.) that have a firm surface when cool, the SiliNOT! remains tacky, which means it promptly collects any debris that crosses its path. In my case, this meant I had to pick dog hair off the surface throughout the casting process (and I don’t want to think about what would happen if glitter had contaminated the work space).
I’d used a paper cup for my mold walls, which usually works fine with fast-curing silicone. But the SiliNOT! must have a high oil content, because the cup absorbed some of it:
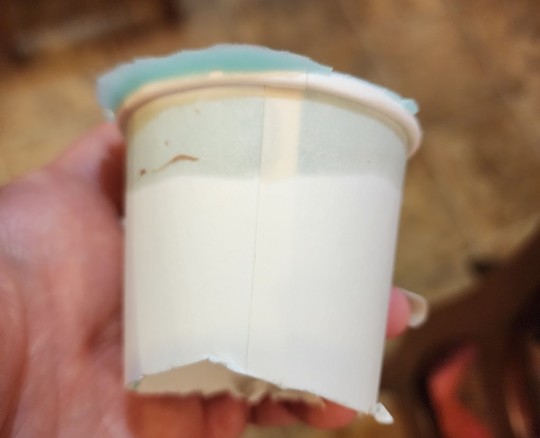
Lesson learned; use only nonporous containers with this stuff.
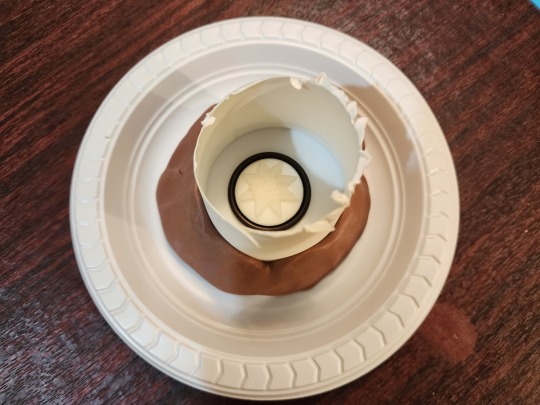
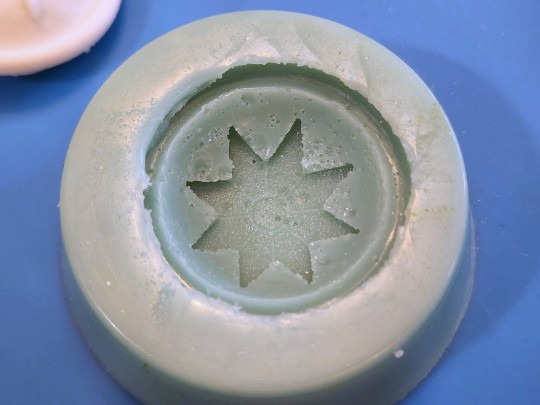
The SiliNOT!! really wanted to cling to the edges of my original, so I had to go slow at first to avoid tearing the thin flanges of the mold off. However, it did demold nicely from the smooth surfaces, and preserved texture very well. You can see the Worbla pebbling and the engraving channels clearly in the mold (as well as some dust and dog hair, because I made the mistake of setting it down briefly):
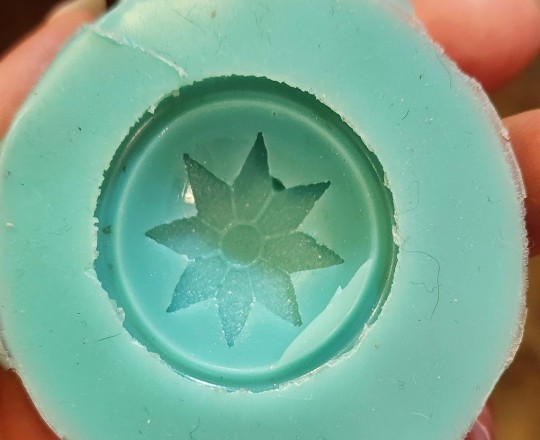
Unfortunately, as you can see, a large bubble had stuck to my original and created a pit in the mold, so I decided to do a second mold pour. I figured I’d tear up the failed mold and put the pieces back in the bottle to remelt… and discovered I couldn’t. The mold would stretch and twist, but not tear. It also seemed to return to its original shape relatively faithfully. Here’s a video of me manhandling the mold:
As you can see, the SiliNOT! has much better stretch and recovery than many silicone products (there are silicones that stretch well -- some of the Dragon Skin products come to mind -- but they’re not typically marketed for moldmaking). This means it’s likely well suited to casting objects with moderate undercuts or oddly-shaped bits that need the mold to stretch during demolding.
You can cut the SiliNOT! easily with scissors, which is the recommended method for getting it back in the bottle when you’re ready to remelt.
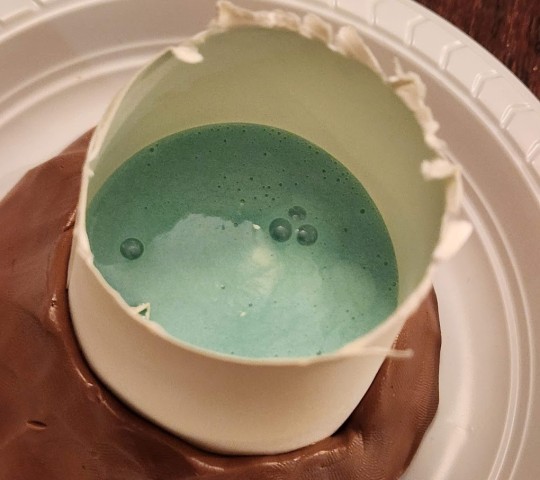
Take Two
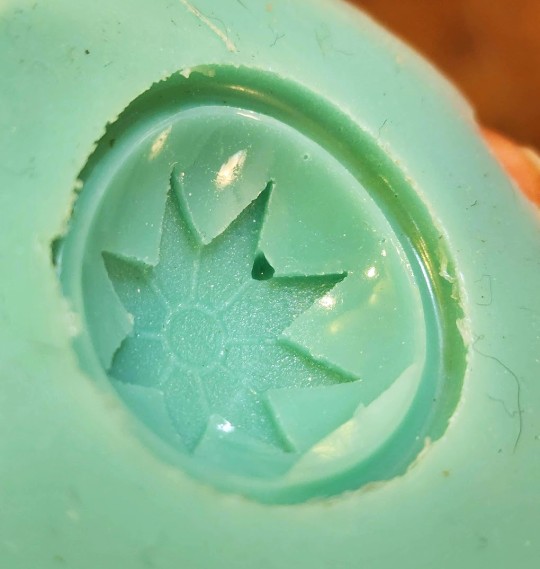
Using what I’d learned from the first pour, I did the second one inside a hard plastic ramekin. This gave me a bit more room to pour into the floor of the mold, reducing the bubble risk, and also eliminated the porous paper cup that had absorbed oil. I still had the issue with bubbles that didn’t want to pop, but there were fewer of them this time.

The ramekin made for a much cleaner mold, buuuuut there was ANOTHER BUBBLE right in the middle of the design. >.<
Take Three
Lather, rinse, repeat. Or in this case, melt, pour, chill.
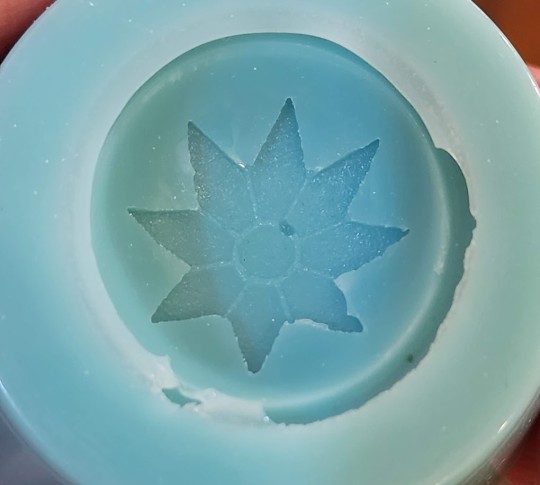
This time I heated the SiliNOT! as much as I dared and did the absolute slowest, narrowest pour I could manage, giving the air extra time to escape as the mold was filled from the bottom. The risk with stringing out the pour like this is that in a thinner stream, the heat escapes faster, leading to uneven viscosity as the liquid fills the mold. I don’t think that’s a major problem for this particular piece, but it’s something to pay attention to as regards leveling and degassing, especially for larger molds that will take longer to fill.
The result of pour three:
/siiiiigh/ Well, at least the bubbles are smaller, this time. They may not show up enough to matter in the final cast. I’ll give it a try.
Casting
I had leftover workshop resin that was getting on toward the end of its shelf life, so I used Smooth-On Smooth-Cast 300 for my initial resin trial. It’s an opaque white resin with about a 10-minute cure time (the fast turnaround is why we use it for workshops).
Before pouring, I had to do a little mold cleanup where the SiliNOT! had managed to sneak under the edge of the Worbla (I think I’d loosened the corner of the star from prying it out of so many molds), but since the SiliNOT! stretches so well, it was pretty easy to invert it to get little scissors down into the bottom of the depression.
For the first cast, I didn’t use anything but the resin in order to get a baseline. Ideally I’d like to cold cast or dye the resin so I don’t have to worry about paint chipping, but since I’m doing a trial here (and need multiple buttons anyway) I figured some plain white extras wouldn’t hurt.
So, my first cast…
…smacked into a big problem, which I probably should have seen coming: The resin I’m using is a fast cure formula, which means it discharges a fair amount of heat as it's going through that rapid chemical reaction -- enough heat to melt the SiliNOT!, as it turned out. When I tried to demold it (after giving it a few extra minutes beyond label time to be sure it was done), the surface of the mold had melted to the resin and even embedded itself in a few places. It’s difficult to see the resin detail in the photos (my camera went into white balance panic mode with all the shades of white and blue), but you can see how pitted the formerly-smooth mold surface is.
In fairness to the SiliNOT!, the bottle does say that you should put the mold in the freezer for half an hour before casting high-temperature materials. But I assumed high-temperature material was something like candle wax or melted chocolate, rather than ordinary resin. (And the mold had just come out of the refrigerator.)
So, on to pour FOUR of the SiliNOT! mold…
Take Four
NGL, this is getting a little old. >.<
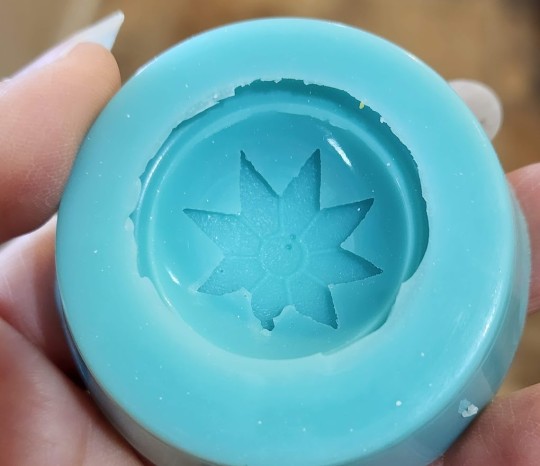
Fourth mold definitely needed some cleanup around the edges, and there are still a couple of tiny bubbles I can’t seem to get rid of, but it’s good enough for a test. (I’m starting to despair of using these for actual production, given how many times I’ve had to redo the molds because of bubbles...)

Deep in the recesses of my basement, I found some transparent epoxy resin with a 24-hour cure time -- much slower and lower-temperature than the Smooth-Cast. Since it cures clear, I went ahead and mixed in some metallic powder pigment on the off chance that I get a usable button out of this one. I had excess resin after mixing, so I poured that into my first mold, which has a bubble in the design but is otherwise fine. Two test pieces are better than one, right?
Results
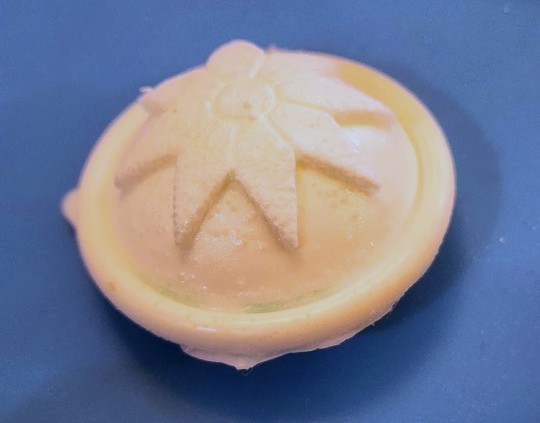
Here are the results of the slow-curing resin out of mold #4:

Finally, a (mostly) clean cast!
As you can see, the detail reproduction is excellent -- certainly on par with the pulls from the silicone mold I ended up making while waiting on this set to cure (purely for time reasons; I couldn’t afford five days to cast the buttons using slow-curing resin, and with a silicone mold and fast-curing resin I could get them all done within a couple of hours).
However, you can also see a few spots where bits of the SiliNOT! embedded themselves in the final cast. Part of that may be due to design flaw in the original; I didn’t want to glue anything permanently to the antique button, and that resulted in a tiny gap between the button and the resin hemisphere. Silicone has enough strength to resist tearing out in that kind of area, but apparently the SiliNOT! doesn’t. The bits of mold around the outer edge seem to have stuck just to be difficult, as there was no structural reason for those to have become embedded in the resin. This means the mold could be damaged by successive casts, reducing its usable life and accuracy.
Still, the mold definitely produced decent results for a first cast, and a different shape might not have had as much of a problem with tearing off mold parts. The slow-curing resin is a bit of a limitation, but not a unique one (I use this same epoxy resin for any glass-clear casts I do, and only use the Smooth-Cast 300 for opaque items or things I need very quickly). I don’t personally use UV resin, but I’d be curious to learn how it performs with the SiliNOT!
IN SUMMARY:
Here’s the TL;DR on SiliNOT!
Pros
Cost effectiveness. This is the most obvious advantage of SiliNOT! over silicone; it’s (theoretically) infinitely reusable, and even with natural attrition/inevitable contamination from use, you can likely get over a hundred pours out of a bottle. That's a lot cheaper per use than silicone.
Non-toxicity. SiliNOT! is touted as food contact-safe, so you don’t have to panic if you get it on your skin or kitchen counters. While platinum-cure silicone is also relatively harmless (some varieties are labeled for food or life casting), other common moldmaking materials such as tin-cure silicone or urethane are not. (NOTE: Since the company is very hush-hush about what actually makes up the SiliNOT! secret formula, I do not know if it might release any vapors or fumes that would be irritating or harmful to pet birds. In general, I advise not doing any kind of casting around birds.)
Eco-friendliness. This is the biggest draw for me personally: Given the number of casting workshops I run and all the things I sell commercially, I have constant guilt about the amount of waste I generate for creative projects. In most areas of life I’m an aggressive reduce/reuse/recycler and try to use organic materials instead of synthetics whenever possible, so a mold that’s reusable and compostable is very appealing.
Ease of use. It’s honestly pretty hard to mess this up -- just microwave according to the directions and pour. No measuring, no A/B mixture, no concerns about chemical contamination from latex or sulfur, etc.
Shelf life. Unlike silicones, which have a shelf life of anywhere from six months to three years depending on storage conditions, the SiliNOT! purports to be shelf-stable. It's compostable, so don’t bury it in your yard, but otherwise it appears that it could be kept on hand for years.
Cons
Bubbles. Honestly the most irritating thing about this stuff for me. I’m used to being able to see bubbles forming as I pour, tap them to the surface, and remove them. The fact that I poured four molds of the same object and never once got one without bubbles is super irritating.
Stickiness. I’m not a big fan of the tacky surface texture, and while I haven’t done any cold casting yet, I can imagine that it would be very difficult to clean out any pigment or mica powder that got where you didn’t want it. I probably wouldn’t use this for any kind of cold casting that required isolated colored areas or changing colors between casts.
Set time. The SiliNOT! may take longer to cool than a fast silicone would to cure when dealing with larger molds, so it’s not ideal for projects with a really tight turnaround. (But cosplayers would never be casting something the night before a con, right? We always plan ahead and never, ever procrastinate!)
Library life. The SiliNOT! may or may not structurally degrade over time the way urethane, latex, and tin cure silicones do, but I noticed even in my very limited casts that it was prone to having tiny bits of the mold (particularly at edges) stick and pull off. While I keep most of my platinum silicone molds for years and reuse them, I don’t feel that the SiliNOT! molds would hold up to repeated casting, and they’re far more sensitive to ambient temperature, so they’re probably best used for short term only. (I also wonder about the possibility of oil leaching out in long-term storage.)
Comparative Ranking
Ranking it against other mold-making materials, I’d place SiliNOT! below platinum-cure silicone in terms of performance, but maybe somewhere in the neighborhood of urethane and tin-cure silicone. It's definitely superior to latex. (Though to be honest, I'd rank Play-Doh above latex. I hate working with that stuff.)
Factoring in cost and environmental impact, it beats out urethane and tin-cure silicone. I'm still not sure if I'd rank it above platinum-cure silicone, though... Silicone costs much more and isn't eco-friendly, but the performance and lifespan is significantly better, so it still makes more sense for some projects.
Alginate is another type of material entirely, but in some ways SiliNOT! is comparable to it -- both are more cost-effective than silicone, both are biodegradable, both are skin safe, and both have long shelf lives. But SiliNOT! is easier to use for beginners than alginate, which has to be mixed to the right consistency and has an extremely short lifespan once poured.
Overall, I would recommend SiliNOT! for:
People who want accurate, non-shrinking molds but don’t have the budget for platinum-cure silicone
People who are committed to eliminating waste from single-use materials, and are willing to trade off a little performance for a more eco-friendly material
Projects with smooth surfaces and no indentations/sharp edges/undercuts where bubbles might stick (e.g. cabochons; simple geometric forms)
Projects where you need only one or two casts of something, rather than many casts from the same mold
Casting oddly-shaped pieces around which the mold needs to stretch in order to demold
Use with slow-curing resins that do not generate much heat
I would NOT recommend SiliNOT! for:
Extremely complex or detailed pieces, or pieces with a lot of surface texture that bubbles might stick to
Two-part molds
Projects requiring many identical casts out of the same mold
Molds that you intend to add to your library for future or repeat casting
Use with fast-curing resins, melted wax, melted Monster Clay, or any other material that emits heat
Cold casting with precise color application
My Overall Opinion
It's... okay? I will almost certainly keep SiliNOT! in my toolkit for certain specific applications. It's MUCH cheaper over the long term, I love the idea of recycling mold material, and there are some projects for which it will likely perform very well (those listed in the above bullet points). I will also admit that three days of working with it does not constitute a comprehensive familiarity with the product, and it might be the sort of thing that you get better at working with after more practice. (Just learning how to eliminate bubbles would go a long way toward making me adopt this for more projects!)
However, I don't quite buy the "better than silicone" tagline. It's definitely more difficult to get a perfect result, and there are some projects for which platinum-cure silicone is always going to be more reliable (e.g. high-temperature casting, mass production, large-scale life casting).
For those looking for a recommendation of whether or not to buy, I'd say look at your project budget and the applications for which you're going to be making molds, and let those factors guide which mold material you go with. People doing some kinds of projects are likely going to find this a godsend, while those doing different projects would probably hate working with it.
39 notes
·
View notes
Text
youtube
Oggi rispondiamo alla domanda "a che gioco stiamo giocando", con the Shadow Theater, board game per due giocatori che ci permetterà di rivivere la leggenda cinese del re scimmia, gioco dalle grafiche e componenti meravigliosi che abbiamo scoperto assieme domenica scorsa e che per tutti questi elementi non potevo lasciare su sugli scaffali delle novità di Hirtemis, ma solo oggi scopriremo effettivamente com'è questo gioco da tavolo.
The Shadow Theatre è un gioco da tavolo che appartiene da una categoria che io apprezzo in maniera particolare quelli che hanno un game design immediato, asciutto ed estremamente chiaro sin dalla prima lettura del manuale, ma nonostante ciò durante le primissime partite, non ho trovato il gioco particolarmente affascinante. Questo giudizio, però, è figlio del consiglio che vi dà il regolamento,m per giocare le prime partite, ovvero eliminare un aspetto fondamentale del gioco: le tessere pergamena.
Il game design di the Shadow Theater prevede un'azione obbligatoria durante il nostro turno da scegliere tra due ed una opzionale da svolgere ad inizio turno; un'azione ci consentirà di ritirare tutte le scimmie da un singolo luogo, l'altra invece ci consentirà di piazzare quelle che abbiamo nella nostra riserva in un luogo ed ottenerne i benefici specifici, con l'azione opzionale potremmo adoperare le carte arma dei drago, se le abbiamo; a seconda dei luoghi le azioni ci consentiranno d avere le risorse che ci consentiranno di fare punti e vincere i round. La partita si conclude al meglio dei tre round! In questa maniera, però, i round risultano abbastanza piatti, ripetitivi, senza particolare mordente, cosa che cambia totalmente con l'uso delle tessere pergamena, elemento di game design che introduce varietà, imprevedibilità: le tessere pergamena cambieranno le regole del gioco durante il round oppure nel calcolo del punteggio e verranno sostitute round dopo round con tessere nuove dando la possibilità ai giocatori di cambiare strategia.
The Shadow Theater è un board game che va giudicato a partire dalla versione completa, non lasciandosi ingannare dalla versione didattica che consiglia il manuale, e che vi conquisterà con le sue due versioni avanzate. Nelle versioni avanzate la vittoria della partita si otterrà sommando il punteggio dei singoli round aggiungendo bonus specifici a seconda del round vinto, se questo cambiamento di game design rende The Shadow Theater un board game diverso, permettendo strategie di lungo termine, è la gestione delle tessere pergamena che ne cambia ancora una volta l'aspetto: nella prima versione a partire dal secondo round potremo scegliere una nuova tessera, che si aggiungerà alla precedente, combinando le due avremo un'evoluzione delle strategie sul tavolo. Nella terza versione invece potremo anche gestire tutto ciò, perché potremo scegliere 3 fra 5 tessere e decidere turno dopo turno quale scoprire per affiancare le altre ottenendo nuove possibilità!
The Shadow Theater è un board Game per due giocatori con una durata stimata di 30 minuti a partita consigliato da 10 anni in su creato da Cédric Lefebvre e Florian Sirieix, con le illustrazioni di Julien Rico edito in Italia da Asmodee Italia!
#Around the table#boardgame#recensioni#recensione#review#giochi da tavolo#giochi in scatola#tutorial giochi da tavolo#tutorial giochi#giochi#giochi di società#board games#boardgamegeek#videorecensione#regole#board game#italiano#gdt#giocatori#board game enthusiasts#Recensione giochi da tavolo#the shadow theater#the shadow theater gioco da tavolo#the shadow theater board game#recensione the shadow theater#the shadow theater tutorial#come si gioca a The Shadow Theater#Youtube
6 notes
·
View notes
Text
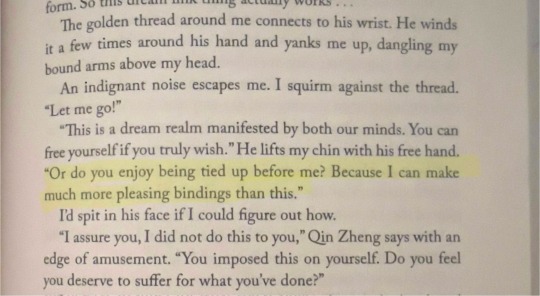

The tension between not trusting a new (male) character and putting the whole car in reverse to make sure you read that right.
#book review#heavenly tyrant#iron widow#I will never see heaven#but that’s fine just will we be getting a tutorial or??
8 notes
·
View notes
Text
After years of wanting one, but not being able to justify the price tag, I finally treated myself to a PS5. It's been an incredibly rewarding weekend getting to play Spiderman 2 for hours upon hours and not have to worry about work for a while. It's been a stressful year, especially these last few weeks, and I still have a ton of stuff to get done before our winter break, so this was a much needed respite to relax and recharge for the next couple weeks.
#between black friday deals and extra discover cashback#i just couldnt resist#i got the console and the 2 games i really wanted#after 3 pretty full days of play#im 80 percent through spiderman 2#probably wont play again till the weekend#need to catch up on shows after work#im hoping once were on break from work i can start ratchet and clank rift apart#ill have 2 weeks off so i can play as much as i want then!#oh and even the preloaded tutorial game is pretty fun!#i can finish that too#and even though i have all the uncharted games for ps4 im considering getting the remaster pack of 4 and lost legacy#mainly cause i really love the ps5 controler and i kinda want to be able to replay them with it#ill have to look up reviews to see if its worth it#ok im rambling too much#if youve made it this far an have any ps5 game recs i would appreciate it!#im a low effort player lol so i like to have easy/super easy modes#no racing or shooting (unless its an uncharted style game)#i just have awful coordination and cant aim or drive for shit lol#also no scary stuff like last of us#i dont care how good the story is i cannot look at something thag dark for that long#(i also adored Stray but fuck if that sewer level didnt almost kill me)
7 notes
·
View notes
Text
Shimmer bomb gloss
•Lip pencil NYX ESPRESSO/EXPRESSO
•SHIMMER bomb gloss MAKEUP REVOLUTION •Berry Lustre + Distortion
Ps.: I have the full video (full makeup) anyone wants to watch it🥰🙏🏽
MUSIC: Quero ver by Ehrdeamon.
#makeup review#makeup#make up tutorial#blackgirl#black girl aesthetic#aesthetic#pink#softcore#soft#soft aesthetic#gloss#coquette#feminine#femininity#divine feminine#blondie#blond girl#blond woman#ebony#black girl magic#black girls of tumblr#black girl beauty#black girls rock#melanin#makeup revolution#nyx#beauty#makeuplover#soft girl
24 notes
·
View notes
Text
Ive been seeing a lot of posts about a "super bowl" and im wondering if it would be good for my soup? has anyone used one to simmer a 10 year long citrus based soup yet and if so have you have any problems? i just want to know before I buy one ^^
#souper bowl#soup#the super boul#bowl of soup help#help me with my bowl of soup#soup making tutorial? help?#how 2 make a ssoup#super bowl soup reviews#get me out of this hell help me help me help me#the soup demons within#i love citrus soup#a clementine for the soup
2 notes
·
View notes
Text

Two of our favorite recent manga from VIZ Media have new issues out today, and we’re here to tell you whether the series—Kagurabachi and You and I Are Polar Opposities—continue to live up to their previous volumes! Plus, we’ve got review of recent releases of Tearmoon Empire, Honey Lemon Soda, and—just in time for MerMay, In the Name of the Mermaid Princess. And much, much more!
-----
Before the Tutorial Starts: A Few Things I Can Do to Keep the Bosses Alive (Vol. 2) • Giant Killing (Vols. 6-9) • Kagurabachi (Vol. 3) • Honey Lemon Soda (Vol. 8) • In the Name of the Mermaid Princess (Vol. 5) • The Person I Loved Asked Me to Die in My Sister’s Stead (Vol. 2) • Tearmoon Empire (Vol. 6) • Villains Are Destined to Die (Vol. 7) • You and I Are Polar Opposites (Vol. 5)
#Manga#Manhwa#Light Novels#Reviews#Before the Tutorial Starts: A Few Things I Can Do to Keep the Bosses Alive#Giant Killing#Kagurabachi#Honey Lemon Soda#In the Name of the Mermaid Princess#The Person I Loved Asked Me to Die in My Sister’s Stead#Tearmoon Empire#Villains Are Destined to Die#You and I Are Polar Opposites#Reader's Corner#Tutorial ga Hajimaru Mae ni: Bosschara-tachi wo Hametsu Sasenai Tame ni Ore ga Dekiru Ikutsu ka no Koto#Mio no Na no Moto ni#Koishita Hito wa Imouto no Kawari ni Shindekure to Itta. Imouto to Kekkonshita Kataomoi Aite ga Naze Imasara Watashi no Moto ni to Omottara#Tearmoon Teikoku Monogatari#Agyeogui Ending-eun Jugeumppun#Seihantai na Kimi to Boku#Manga Article#Manga Blog#Manga Reviews#Articles#Manhwa Article#Manhwa Blog#Manhwa Reviews#Light Novel Article#Light Novel Blog#Light Novel Reviews
2 notes
·
View notes
Text
👉 DIY False Eyelashes Mix 32 Rows High-capacity Natural Eyelash Extension Lashes Cluster Multi Style Fusion Makeup 💔

The DIY False Eyelashes Mix 32 Rows High-Capacity Natural Eyelash Extension Lashes Cluster Multi Style Fusion is a versatile and budget-friendly option for those interested in at-home eyelash enhancements. Here's a comprehensive overview:
✨ Product Overview
Quantity: 32 rows, offering a substantial number of lash clusters for extended use.
Styles Included: A mix of 30D and 40D clusters, providing options for both natural and dramatic looks.
Curl Type: Typically D or C curl, mimicking the natural curvature of lashes.
Lengths: Varies between 8mm to 16mm, allowing for customization based on eye shape and desired effect.
Material: Soft synthetic fibers designed for comfort and a natural appearance.
Click Here And Buy Now >>
💬 Customer Feedback
While specific reviews for this exact product are limited, similar DIY lash kits have garnered positive responses:
Ease of Use: Users appreciate the straightforward application process, especially with included tools like tweezers and bond & seal adhesives.
Versatility: The variety in lengths and styles allows for personalized lash looks, from subtle enhancements to more voluminous effects.
Value for Money: High-capacity kits offer numerous applications, making them cost-effective compared to salon extensions.
However, some users have noted:
Learning Curve: First-time users may require practice to perfect the application technique.
Adhesive Sensitivity: Some adhesives may cause irritation; it's advisable to perform a patch test before full application.
Click Here And Buy Now >>
✅ Pros & Cons
Pros:
High quantity for extended use.
Variety in styles and lengths for customization.
Cost-effective alternative to salon extensions.
Click Here And Buy Now >>
Cons:
Potential for adhesive sensitivity.
May require practice for optimal application.
If you have specific preferences or need recommendations tailored to your desired lash look, feel free to ask!
Click Here And Buy Now >>
#marketing#affiliatemarketing#onlinemarketing#review#reviews#preview#digitalmarketing#usa#false eyelashes#how to apply false eyelashes#apply false eyelashes#false lashes#eyelashes#how to apply false lashes#false lashes for beginners#apply false lashes#false eyelashes review#natural false eyelashes#applying false eyelashes#how to use false eyelashes#false eyelashes tutorial#how to remove false eyelashes#false eyelashes for beginners#how to apply false eyelashes for beginners#kiss eyelashes#natural false lashes#false lashes tutorial
2 notes
·
View notes
Text
Resource: Fiber Spider
First creator highlight of the year! Today I'm going to tell you about Fiber Spider, a crocheter on YouTube. Fiber Spider is actually the first person I learned an actual pattern from. I had made hats before - hats I did not wear and finally brought myself to frog. But his step-by-step tutorial, which he personally narrated with his charmingly soft voice allowed me to create this beautiful waffle stitch hat:
Hat from Tutorial
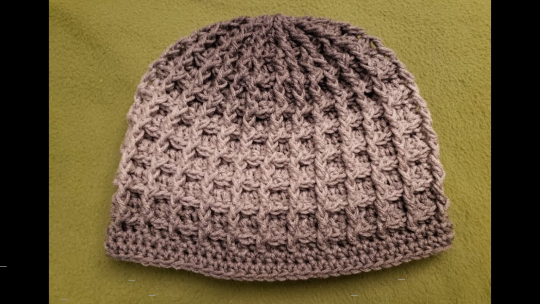
Hat That I Made

(while my hat looks a little off, I take full responsibility, having made it as a novice, and not fully understanding pattern language)
This hat, as of the time this picture was taken, has seen a few winters already, and has been through a washer and dryer a few times still coming out strong.
Fiber Spider showcases and teaches stitches, patterns, and various other crafts, like origami and baking. Mainly his channel includes tutorials for blankets and shawls. He has a Ravelry page as well.
He also narrates books! Currently he's reading the stories of L. Frank Baum (author of The Wizard of Oz).
Beyond all of that, he shares tutorials for boardgames, so if you're an indoors-hobbies person, Fiber Spider might be your guide.
#Crochet#patterns#pattern#yarn#yarnblr#yarn crafts#crafting#helpful#tutorial#amigurumi#shawl#crochet shawl#Hat#Hats#Baking#cooking#Resource#recipe#Narrator#free pattern#Fiber Spider#Book narration#Review
7 notes
·
View notes
Text
theredditblog
Iam paulalice working for theredditblog as PR consultant.With more than 6 year’s experience in PR and Digital Industry,helping teams to achieve goals by streamlining the process.
#technology#web#IT#software#hardware#cybersecurity#artificial intelligence#AI#Internet of Things#IoT#tech trends#how-to guides#tutorials#gadgets#gadget reviews#tech news#innovation#digital marketing#telecommunications#science#tech blog#tech education#freelance writing#guest post#tech community#emerging technology#latest technology#tech insights#tech articles#tech enthusiasts
3 notes
·
View notes