#ue5 tutorial for beginners
Explore tagged Tumblr posts
Visit Tumblr Blog
Explore Tumblr blogs with no restrictions, modern design and the best experience.
Last Seen Tumblr Blogs


Fun Fact
Tumblr’s website traffic is steadily declining.
Text
youtube
Unreal Engine 5 Quest System tutorial for beginners Part 13
This is Last episode of Base Quest System. I'll continue ADVANCED Quest system on Patreon if you want you can join to this adventure too. How to create a quest system in Unreal Engine 5? This question is asked by many game developers who want to make their projects more interactive and fun. You will learn how to create location based quests, add quest object marker. This tutorial is suitable for both beginners who are just getting acquainted with Unreal Engine 5 and experienced developers who want to improve their skills and explore new features of UE5.
#youtube#ue5#ue5 tutorial#ue5 quest system#ue5tutorial#unreal engine 5#ue5 tutorial for beginners#ue5questsystem#unreal engine 5 tutorial#unreal engine blueprint#UE5#UE5GameDevTips#UE5IndieGameCreation#UE5IndieGameDev#UE5IndieGameDevelopmen#UE5Questsystemtutorial#UE5Tutorial#UE5gamedev#UnrealEngine5#UnrealEngine5QuestSys#UnrealEngine5tutorials#unrealengine5#unrealengine5beginner#unrealengine5tutorial
0 notes
Text
UE5 is literally beginning charging for previously free content; I simply can't believe I am the only one taking this badly.
I mean where else do the tutorials direct all the beginners like myself except to download free assets from Quixel? And theres enough stuff in there the average beginner could cobble together 3 or 4 very decent environments. Which is pretty much the only way to learn how to use the engine without having loads of money or having to become hyper skilled at 3d modeling and asset creation first. And now they wanna start charging money upfront?
Can you not simply charge for NEW content and leave the OLD content free? You know the content that everybody is already using for free?
17 notes
·
View notes
Text
UHGA_VR Project
Have some problems controllingthe opacity map in UE5

I did this in one piece (Include things with opacity requirement, and those who don't need), I can keep watching things from outside, at first I thought it's because of the "One Sided" setting, but it doesn't change anything after I tick the box.
youtube
So I refer to this video, where the tutorial splits the parts to make them different materials in the Substance Painter. I didn't do this initially because I don't know how it will work while connecting the map in UNREAL (Beginner problem).
Some more problem-solving.


The opacity performance is so weird in UE5, or I don't know how to make it I'm not sure. I already made the glass super dirty in Substance Painter, but it looks really clean in UE5. I know the map is working because I can see the adjustment at a certain angle.
I'll try a few more times.
0 notes
Text
Bite the bullet, let’s dig into 3D
post 4 - by Chong Lin Wai
As a concept artist, who mainly focuses on 2D visual design and workflows, this was my very first experience working with Unreal Engine. However, as our group only has 4 group members, I had to share the workload in the project to prevent others from becoming overloaded. Given my knowledge of Zbrush, I was responsible for creating the figurative sculpture scene.
The metaphorical meaning of the scene is internal conflict. I wanted to convey the idea of struggling and painful emotions through the human sculptures. Here are some research and reference images:
Rigging in blender
Due to lack of time, instead of creating a human model from scratch, I decided to use the default human models in Zbrush. The T pose function in Zbrush is very limited, so I decided to use the rig feature in Blender for better posing. I first turned the the male and female models into the lowest subdivision level, and exported them into .fbx files for importing to Blender. I followed a beginner tutorial of rigging in Blender to practice rig controlling.
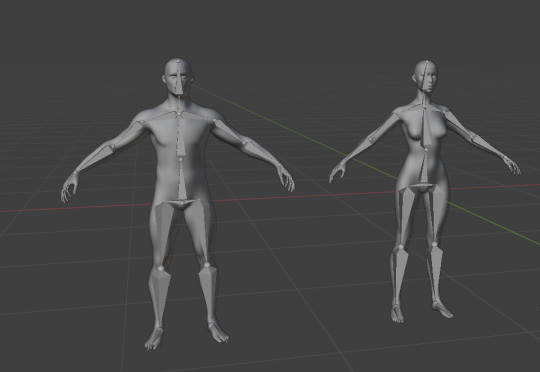
Fig.1 Rigged models

Fig.2 Three designs of the sculpture
I rigged the models and controlled the rigs to pose the figures into a variety of poses. I created several designs to see which one was the best for the sculpture design.

Fig.3 Low poly cave mesh
I also used a cylinder to create a simple low poly mesh for the cavern. I exported the models in .obj files and imported them into Zbrush for further polishing.
Polishing in Zbrush
After importing meshes into Zbrush, I bumped into the issue that there was abnormal behaviour happening on the Zbrush viewport.

Fig.4 Abnormal behavior in Zbrush viewport
The figurative models were facing in the wrong direction whenever the viewport was rotated. I spent some time to figure out that the normal orientations were messed up.

Fig.5 False normal orientation
I opened up Blender again, and fixed all the normal orientations one by one, and then imported the models to Zbrush again. I used a smooth brush to polish the model and sculpted an artistic wall behind it. I also added some detailing textures on the models’ surface using different brushes.

Fig.6 Stone Slate material on the sculpture in UE

Fig.7 Cave texture and imported to UE
I then unwrapped the UV maps and exported all the models in fbx files and used Substance painter for texturing. After I bake the material map of all the models, I assigned a stone slate material for the models and painted some ground sand details on the cave mesh.
Gets started with Unreal Engine
It is impossible for me to create a complicated scenery with intricate blueprints in a very short time. I decided to start with something simple, following the UE beginner tutorial step by step. I followed Neil's suggestion on Unreal Sensei's tutorial to start learning some basic commands.
youtube
Fig.8 Unreal Sensei - UE5 Starter Course
The interface and camera movement were overwhelming at first, however I enjoyed the process of learning new things, and everything came to handy after I spent some time on practicing and recognising certain major features.
Kitbashing
I was very glad that my teammates were aware of my situation as a UE beginner, so one of my teammates, Chuang Xin taught me how to use premade assets, by importing some static meshes and dragging them from the content drawer, to create a simple scenery. I really appreciate her help, she also shared some of the useful assets with me, which are related to the environment I was responsible for. I started to build the cave with simple shapes and then I added all the premade assets to decorate both the exterior and interior of the cavern.
Fig.9 Blocking out with default cubes
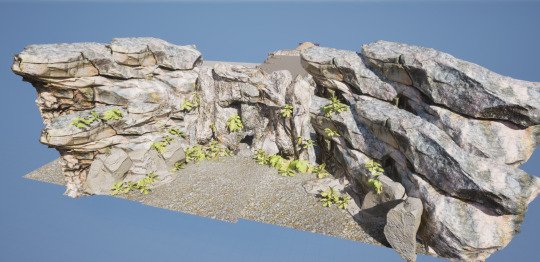
Fig.10 Exterior design of the cave
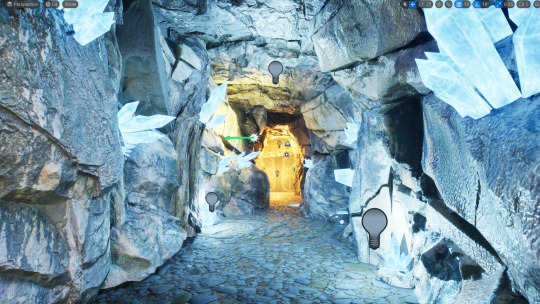
Fig.11 Interior design of the cave

Fig.12 Modified interior design 2 of the cave
Lighting
There was some issue with my lighting. The rendered video appears to be extremely dark, no matter how I cranked up the intensity value. I then noticed that there was a cross out icon on some of my spotlight actors. I searched for a solution and found that this issue is related to the limitation in Unreal Engine. Lighting actors cannot be overlapped, otherwise the distribution of the light map would be messed up, thus, some of the spotlight actors did not take effect. Therefore, I solved the problem by adjusting the area of my spotlights.
1 note
·
View note
Text
Technical research (particles, orbs, lights)
Alexxxxxi (2023). Touchdesigner tutorial 教程 | 点线闪烁实时动画效果. [online] YouTube. Available at: https://www.youtube.com/watch?v=-rmscwDwhmE
Aziel Arts (2023). Easy Glowing Particles with Niagara in Unreal Engine 5 Tutorial. [online] YouTube. Available at: https://www.youtube.com/watch?v=xJK-QO9YH68.
DenTechs (2022). Blender 3.2 Particle Sim Audio Visualizer Tutorial. [online] YouTube. Available at: https://www.youtube.com/watch?v=5J9J03gl0zE
Noto The Talking Ball (2020). How to make spectrum shape audiovisual using feeback in Touchdesigner (터치디자이너 튜토리얼 자막). [online] YouTube. Available at: https://www.youtube.com/watch?v=jf718jbSoTU
plyzitron (2021). Touchdesigner - The Shore Tutorial. [online] YouTube. Available at: https://www.youtube.com/watch?v=bBbyMkzTNpg
PPPANIK (2023). IMAGE / VIDEO TO PARTICLES - TOUCHDESIGNER TUTORIAL. [online] YouTube. Available at: https://www.youtube.com/watch?v=TbM2_Cvygww.
sem schreuder (2020). Let’s build this Unreal Niagara audio visualizer within 10 minutes. [online] YouTube. Available at: https://www.youtube.com/watch?v=UETAS5g-q4M
supermarket sallad (2024a). Dancing Lights - Pointclouds and Chromatic Aberration - TOUCHDESIGNER TUTORIAL. [online] YouTube. Available at: https://www.youtube.com/watch?v=E6yRczNElTk.
supermarket sallad (2024b). Exploding Star - constraining a particle system to a sphere TOUCHDESIGNER TUTORIAL. [online] YouTube. Available at: https://www.youtube.com/watch?v=WS2Ww6zYgJw
The Interactive & Immersive HQ (2024). Exporting in TouchDesigner: Tips & Tricks - TouchDesigner Tutorial 185. [online] YouTube. Available at: https://www.youtube.com/watch?v=4vBu57HaGD8
Unreal Katya Fedak (2024). Create A Mesmerizing Audio Visualizer With Niagara Particles in Unreal Engine 5. [online] YouTube. Available at: https://www.youtube.com/watch?v=OPdy56oNGkA
www.youtube.com. (n.d.). Applying Particle Forces | Niagara [UE4/UE5]. [online] Available at: https://www.youtube.com/watch?v=IOY0yiEvV8s
www.youtube.com. (n.d.). Blender Beginner Particles Tutorial. [online] Available at: https://www.youtube.com/watch?v=CrOboutVHH8.
0 notes
Text
Unreal Engine 5- Lumen and Ray tracing
Blog #7
20th October
I have been following William Faucher for his Unreal Engine lighting tutorials for some time now. Recently I watched his tutorial on lighting in Unreal Engine 5 for beginners. Where he explained the basics of light in Unreal Engine 5. Unreal Engine 5 uses Lumen for Global Illumination.
I learnt about different light actors available in UE5 and how each type of light affects the object and its shadow. Almost all the light sources have settings for intensity, scale, rotation etc. The rectangle light gives softer shadows by default as the size of a light source is related to the sharpness of shadows, the smaller the light source sharper the shadow it casts. When the hardware ray tracing is turned on ray traced shadows give much better output than the virtual shadow maps.
He further explains how the lumen handles indirect lighting in the scene in Unreal Engine 5 and how we can control it. Lumen uses light bounces and calculates indirect lighting depending on the objects hence, with lighter colour objects in the scene we will get more indirect light with a low-intensity light source and vice versa.
he also introduced us to emissive materials which can act as a light source in our scene.
Later in the video the video he takes an environment from the Unreal market and showcases his pipeline to light any environment from the start.
In this tutorial, William explained the basics of lighting and its relationship with objects in the scene very well. I applied what I learned from this tutorial to improve the lighting in my “places of mind” assignment. I better understood the various parameters and settings that can be adjusted to achieve the desired results.

References:
Faucher, W. (2022). Lighting in Unreal Engine 5 for Beginners. [online] www.youtube.com. Available at: https://www.youtube.com/watch?v=fSbBsXbjxPo.
0 notes
Text
LIGHTING AND SHADOWS; Learning Unreal Engine
Blog #2
I wanted to do this project in Unreal Engine so I started watching youtube tutorials.
youtube
I finished watching this youtube tutorial by Unreal Sensei, I tried following it as much as i could but it was hard because the video is a bit dated and I have the newer version on Unreal Engine, but I learned all the basics like the UI and navigation which was enough for me to start working on my project.
YouTube, 2025. [Unreal Engine 5 Beginner Tutorial - UE5 Starter Course]. [online] Available at: https://www.youtube.com/watch?v=k-zMkzmduqI&t=7574s [Accessed 12 January 2025].
0 notes
Text
Project 4: Technical Research
For my project I need to learn how to make a game with driving controls in Unreal Engine.
For the purpose of the game my controls will be relatively simple, so I will find some beginner tutorials to look at first. I need to include features such as accelerating braking, reversing and drifting.
youtube
youtube
youtube
youtube
Since I am currently learning to drive this could make for a fun exercise. I could include basic junctions and add some simple traffic signs. If I have time I could even include crossings and traffic lights.
For the voice of the satnav I will be able to use a text to speech software, which matches the old satnav style and makes it clear that you are being guided by a machine.
The next thing I need to figure out is how to set up timed audio cues, so that the satnav responds to the player's location gives instructions at particular areas in my level.
youtube
youtube
References:
Unreal Engine (2022) Driving Around: Exploring Chaos Vehicles | Feature Highlight | State of Unreal 2022. 22 May. Available at: https://youtu.be/Wc6lUXOhRO0 (Accessed: 20 October 2024).
Math B (2022) 01 - Rig and export vehicles from Blender to the UE5. (UE5 Vehicle Tutorial). 10 Jan. Available at: https://www.youtube.com/watch?v=CXm8Ruu9saA (Accessed: 20 October 2024).
Math B (2022) 02 - Make your imported vehicle drivable! (UE5 Vehicle Tutorial). 28 Jan. Available at: https://youtu.be/VC_9hRRTWdM (Accessed: 21 October 2024).
pinkpocketTV (2021) Unreal Engine 5 Tutorial | Drivable Cars & Chaos Vehicle Physics. 5 Aug. Available at: https://youtu.be/T6vvnLRzjvY (Accessed: 24 October 2024).
unreal magic (2022) Unreal engine 5 everything about sound cue beginner tutorial. 21 Mar. Available at: https://www.youtube.com/watch?v=2XZZ4n-5tBI (Accessed: 24 October 2024).
ITEACH3D (2022) Classroom lecture on UE5 Sound cues, wave files and triggering sounds in level. 17 Nov. Available at: https://www.youtube.com/watch?v=VFlFRFMe1s4 (Accessed: 24 October 2024).
0 notes
Text
Setting Up a Cinematic Camera and Rendering a Post-Apocalyptic Scene in Unreal Engine 5
Creating cinematic renders in Unreal Engine 5 (UE5) can be a powerful way to bring post-apocalyptic scenes to life. Following some tutorials I learned to set up a cinematic camera and render a scene effectively. Here's an overview of the key steps and insights gained:
Tutorial 1:
youtube
Tutorial 2:
Cinematic Camera Setup
Adding the Camera: I began by adding a Cinematic Camera Actor to the scene, which offers more advanced controls compared to the default camera.
Adjusting Camera Settings:
I experimented with the camera's sensor size to affect the depth of field.
Focal length adjustments allowed me to control the field of view and perspective.
Aperture settings were crucial for creating a bokeh effect, enhancing the cinematic feel.
Camera Focus: Learning to use the camera's focus settings was vital for directing the viewer's attention within the post-apocalyptic environment.
Animation and Sequencing
Level Sequence: I created a new Level Sequence to organize my camera movements and scene animations.
Sequencer Panel: This tool became central to animating the camera through the scene.
Keyframe Animation: I set keyframes for the camera's position and rotation, creating smooth movements through the environment.
Interpolation: Adjusting the keyframe interpolation from linear to curved improved the fluidity of camera movements.
Rendering the Scene
Movie Render Queue: I activated this plugin to access high-quality rendering options.
Render Settings:
I configured output settings, including file format and naming conventions.
Resolution and framerate were set to match my project requirements.
Anti-Aliasing: Experimenting with different anti-aliasing settings helped achieve the desired image quality.
Saving Presets: I saved my render settings as a preset for future use, streamlining the workflow.
Challenges and Learnings
While following the tutorial, I encountered some challenges in achieving the perfect camera movements and render settings for my post-apocalyptic scene. It took several iterations to find the right balance between cinematic quality and render time. The process of fine-tuning camera animations was particularly enlightening, as it significantly impacted the mood and storytelling aspect of the scene.
Conclusion
This tutorial provided a comprehensive introduction to creating cinematic renders in UE5. By mastering the Cinematic Camera Actor, Sequencer, and Movie Render Queue, I was able to bring my post-apocalyptic scene to life with professional-looking results. The skills learned here form a solid foundation for more advanced cinematic projects in Unreal Engine 5.
Reference:
PinkPocketTV, 2024. Unreal Engine 5 Beginner Tutorial | Cinematic Renders in UE5. [video] Available at: https://www.youtube.com/watch?v=GHFq4Dj7sVs
vfx world (2022) How to make realistic renders in Unreal Engine 5. https://www.youtube.com/watch?v=XgVOUCvrRW4.
0 notes
Text
Major Study: Digital Media Art
Week-10 ( 21/07/2024 )
This week has been incredibly productive for me. I successfully managed to check off nearly all the key tasks outlined in my meticulously crafted planning folder. In addition to completing these tasks, I have meticulously dedicated time to enhancing the details of my work. I have meticulously added intricate properties to the project, ensuring that every aspect is finely tuned. The details are what truly bring a project to life, so I painstakingly made sure to include elements such as the delicate depiction of dry leaves falling onto the road, adding a touch of realism and depth. Furthermore, I took the initiative to improve the visibility and overall aesthetic of my workspace by installing extra lighting within my garage. By doing so, I aimed to not only make the space more functional but also to elevate the level of detail and intricacy in my work. This attention to detail and dedication to enhancing every aspect of my projects is a testament to my commitment to excellence and continuous improvement.

Magnet VFX (2023a) Unreal Engine 5 Beginner Tutorial - UE5 Starter Course 2023 #unrealengine5 #megascans #unrecord.
youtube
Recently, I've dedicated a significant amount of time to refining my skill in animating my automotive model. This involved an intricate process where I meticulously rigged my model in Unreal Engine. To achieve this, I transformed my static mesh model into a control rig, allowing for precise manipulation and movement. Subsequently, I intricately designed a camerarig rail to be integrated throughout the scene, effectively determining the path along which my model would be driven. Setting key frames at crucial points along the rail was a surprisingly seamless task, offering a level of control and creativity that I had not experienced before. Furthermore, to enhance the visual appeal of the animation, I added a dynamic camera that intelligently tracked and followed my model's movements, ensuring that each frame captured the desired angle and perspective perfectly. The amalgamation of these techniques not only streamlined the animation process but also resulted in a visually stunning and well-executed final product.

0 notes
Text
FMP blog
21/06/2024
As per my last post, I went onto Quixel and found a variety of Megascans. I found a few concrete textures to apply onto various walls, also some actual wall assets, then also plenty of assets to help fill out a scene. These consist of bits of rubble, as well as rusted props and multiple kinds of barrels, gas tanks and more.


Firstly, I re positioned the pipes, making them how I had made them in the Blender project. I then added walls to again mimic the Blender scene and also added the Unreal mannequin to help me scale the scene correctly, where I then realised, I’d scaled the whole scene far too big.

After fixing this I then learned how to add various assets and materials into the content drawer using the built in Quixel menu in Unreal Engine 5.

After this I then added the materials, and quickly re-learned about material tiling to make them look good on the floor and walls.
youtube

I did the same for the ceiling and did final checks on the scene, as well as turning on the fps mode as per Waynes’s recommendation several weeks ago.

I left the lighting for now as it’ll be done later on in production after we’re finished with the modelling stage, but at the moment I’m done with this scene. I added some lights to get some good visuals for the screenshot. Overall, I’m very happy with how the scene turned out, though I do need to re-export both the small and large supports as I made them in the Blander scene at a different scale to the pipes when I made them. I’ll do this after the project is over should I wish to make them available for others online to download.
One criticism I have is that for the next scene I make, I’m going to make sure everything is the same scale before exporting, saving myself a bit of trouble later on. I’m also going to add the Unreal Engine 5 mannequin to future Blender scenes to help me get a better idea of scale. For my next scene I’ll be going to go back to making the front entrance, now I’ve gotten into the swing of things and built up my confidence. Also, I’ll be making another forefront post over the weekend.
References
MikeTheTech, 2021. UE5 Beginner Tutorial 4: Importing Megascan Materials and Assets from Quixel Bridge. [Online] Available at: https://www.youtube.com/watch?v=HgLqf5V9Ci0 [Accessed 21 June 2024].
0 notes
Text
youtube
Unreal Engine 5 Quest System tutorial for beginners Part10
How to create a quest system in Unreal Engine 5? This question is asked by many game developers who want to make their projects more interactive and fun. You will learn how to create location quests and how to complete quest after reach location. This tutorial is suitable for both beginners who are just getting acquainted with Unreal Engine 5 and experienced developers who want to improve their skills and explore new features of UE5.
#youtube#ue5#ue5 tutorial#ue5 tutorial for beginners#ue5tutorial#unreal engine 5#ue5 quest system#ue5questsystem#unreal engine 5 tutorial#unreal engine blueprint
0 notes
Text
Unreal Engine 5 Beginner Tutorial - UE5 Starter Course
youtube
1 note
·
View note
Text
Blog 26 The Portfolio Learning
Today is my last day studying UE5 because I was trying to register for online courses before. I gradually came into contact with the final rendering process of UE5. I should be studying at an entry-level level, thank you for your help, ”UE班的小学生“。 This is the work I submitted under the guidance of my teacher. Although this is not an original work, I think I can improve my work gradually by studying courses, familiarizing myself with case studies. As a beginner UE5, I still need to work harder.


I think this is an entry-level attempt, and the final project will follow. I think it is more necessary to develop a plan and complete the final project on time. Inspiration and sources are essential to ensure that the final project is an original work.I think it's too difficult to ensure that I don't use assets as much as possible to create an environment, but I think I should reflect my ideas in the final project.
Reference :
https://www.artstation.com/artwork/Ar11Z5 tutorial
Plugins:
https://www.unrealengine.com/marketplace/en-US/product/robin Robin
https://www.unrealengine.com/marketplace/en-US/product/realistic-glass-creator Material
https://www.unrealengine.com/marketplace/en-US/product/smart-spline-generator Spine gen
https://forums.unrealengine.com/t/tether-procedural-cable-rope-tool/254197 Tether Cable
0 notes
Text
Blog 31 - FMP
Şefki Ibrahim ( contd. )
For the groom, he used XGen. The entire process of creating the groom in XGen is shown in a YouTube video. It was very insightful to be able to see his process from start to finish as a beginner in XGen. I was intrigued to discover that he had already sculpted the hair and used it as a reference point for the guide creation. While working on the eyebrow guides, I observed that he had the front view open with Pedro Pascal's reference image to ensure the utmost accuracy in replicating his eyebrows. I also noticed something interesting about his workflow, he had separate hair descriptions for different parts of the hair like the top and sides, unlike some other time-lapses and tutorials I saw where the hair on the head would be one collection.

XGen Groom guides

Arnold Render
Before importing the character into UE5, he established a benchmark for it by creating renders in Arnold.
Bibliography
Şefki Ibrahim .(2023) PEDRO PASCAL "JOEL" (UE5), Artstation. Available at: https://www.artstation.com/artwork/elz10X
0 notes
Video
youtube
How to Create a Game in Unreal Engine 5 - UE5 Beginner Tutorial
1 note
·
View note